Transcripts
1. Trailer: Hi, I'm **** CPU and I'm a freelance artist
based in London. In this class, we'll learn the basics of Maya's interface, including modeling
and texturing. Which I know sounds like a lot for your first beginners clause. But you've got me given air out further because
there's quizzes a foot. Let's go.
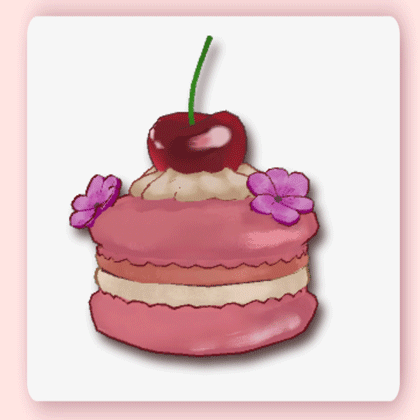
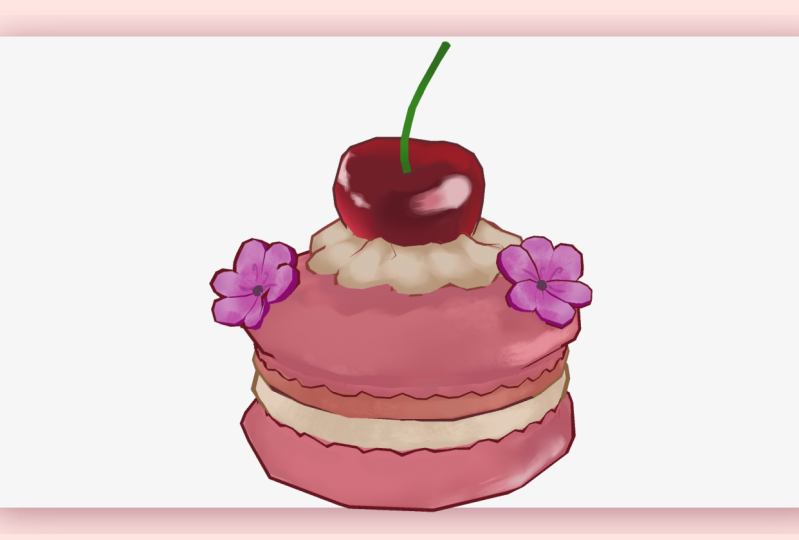
3. Adding a Reference: Now let's add our front image. In the front panel. Go to View image plane,
important image. Before we import our image, let's make it easy for us
to go back to our folder. Find the folder where
you want to go back to and click and drag
it over to the side. Now it's in our favorite bar. But I digress there, find your front image
and add a wonderful. Now let's add the side
image to the side viewport. Go to View, image plane. Important Image. Perfect. In any viewport, click and drag over your objects to
change the scale. Press R or the
button over there. Why does the height
x does the width, does the depth, and the
middle, does it all. Now change the scale to
fit what you'd like? Now let's move it. Press W or the key over there. Click and drag on the arrow of your choice to move the
image in that direction. This line is what we
consider the floor. Let's try to get our macaroons to sit
directly on top of that. Wonderful. Now it's in the right place. Let's move them apart. Click on any image you'd like, and now moves your image backwards so we can have a
bit of space in the middle. Do this to the other side, too. Wonderful. In your outliner you can see all the objects in the scene. Let's rename our objects. Cool them something. Good job.
4. Know your shapes: This brief
intermission will help with everything that
you model from now on. Everything in life is made of three basic geometric shapes. The ones you've
encountered as a baby. So this means we only
have to work on objects basic shape in
order to create it. Okay, here's your test. What are the three basic shapes? Could this possibly be? That's right. It's a square, is just
flattened and elongated. Very nice. Okay. Here's your next one. Which of the three basic
shapes? This one b. Yeah, that's right. This one's just a
cylinder, both parts. The cylinder is
actually alright. Fed. Watch it. Could this possibly be perfect? It is indeed just a
sphere, just a circle. Here you see her. You'll find that a lot of the more complicated
shapes or jest, multiple basic shapes
stuck together. Okay, So let me give
you a true test. Once about this. Let's work out the
first shape first. What shape could the
main part of the body B. What shape is this? What shape is the main
part of the body? That's right. It is a square. It's not circular. It's not rectangular. It's got some good edges on it. Definitely a square. Okay, second shape. What shape is this? That's right. It is a cylinder. The reason why we go for a
cylinder instead of a sphere. A sphere doesn't have any edges. But if we take a look further
into the base of this, we've got some edges. It's kinda hard, kinda goes in with some surrounding edges. It's not really rounded
and it's flats, more importantly at the top. Therefore, this is a square
and a cylinder on top. Nice work.
5. Creating your own shelf: Creating shells is very useful for accessing
tools quickly. You can also customize them
with images. If you want to. Click this icon. New shelf, call it something. How clean? To add tools? First, find one. Let's grab something
you'll be using forever. Edit, delete by type, history, hold Control and Shift and
left mouse button click. Let's add two more. Let's add freeze, transform and center pivot to move
a shortcuts location, middle mouse button and drag
to change text or image. Right mouse button. Go to Edit. Shelves. Change the icon here. Change the name here. How lovely time. A plus.
6. What you need to understand about Turnarounds: Say there's one thing that I
wanted to make you aware of. You'll find that when you make turnarounds or if you
use somebody else's, It's not always
accounting for 3D space. You might find
that the front and the side look the
same in a drawing. But it's impossible in 3D space. They can't both be the same. It just doesn't
work out that way. So eventually, you won't need to put a
turnaround inside of Maya. Take it more as a reference for what it's supposed
to look like. We'll be able to work
with one that we've got, but you'll find that with
the one that we're using. But it's a good way to
help you grow because most of the time drawings
will not match up. So you've got this.
7. Modelling bottom part 1: Let's add a few more things
to your tray before we begin. Head to Edit Mesh
and add extrude. Now had to mesh tools
and add multi cut. And the Insert Edge Loop tool. The offset edge loop tool. And finally, in mesh display, ad soften the edge. Let's identify this shape. It's not square. The circles bottom
is two rounded. So this must be a cylinder. Create Polygon Primitives. Cylinder. Move it into space, change the size with scale, and we've move, pull it
up higher if you want to see through your model so you can see the
reference in the back. Just click the X-ray button
in any panel that you're in, that's this one right here. Attention. Every
object has inputs. They allow you to edit shapes
before you deform them. Let's play around with
here a little bit. Hold right mouse
button and drag. Let's make ours even so the
symmetry, it will be easier. You can tell it's
even because the line goes from the top to the bottom, just like the black line here. Let's take off the cap. Select the caps,
middle mouse and drag. Lovely. Let's select our face, right mouse button. Select face. And with the move, we're just
going to move the top down. Now it almost looks like it's in league with this top bit here. Now, it's time to make this
a little bit more rounded. Let's grab the bottom half of
the macaroons, drag it up. Just before it changes shape. We're going to change our scale. Drag it in just a
little bit to sort of matches the outline perfect. In our tab, in our
Skillshare tray at the top, we're going to select Extrude. Select the blue
box at the bottom. Now we can click and drag
the blue box in the middle, drag it in a little bit, and pull it down. There we go, starting
to match our image. Rinse and repeat two. It's the same size
all the way around. Now, if you've been
working on your shape hasn't come out exactly
how you wanted. That's okay. All we have to do is
right mouse button, select Edge,
double-tap, be edge. Select our scale. A manually drag it out. Let's do the same to the
others. There we go. Much more rounded. Lovely. We shouldn't have
open-ended polygons like this. To solve it. Let's go to our slice tool. And I'll Skillshare tab. Click and drag from
the top to the bottom. Let's make this as
even as possible. We want it to be a
four-sided shape. So it doesn't really
matter how you do it. But try to make it as
symmetrical as possible. That way if we have to cut it, it will be perfect symmetry. The top doesn't fully
seem rounded yet, so let's work on that now. Right? Mouse buttons,
vector n vertices. Let's all of them by clicking
and dragging over the top. We'll select our scale. And we're just going
to pull it in to the most dramatic point. Now what we're going to do is add some edges to fill this out. So let's go back up to
our toolbar at the top. Select our Insert Edge
tool. I'm going to click. Now we have a new line. We're going to double-click
it and scale it out. Rinse and repeat
till you're happy. I'm pulling this
little bit in here because it's in the picture. So we'll make it
in announce to k. Three stars.
8. Modelling bottom part 2 : Before we continue with the top, Let's clean up our workspace. Freeze transforms, center
pivot and history. Now, I know this is dipped and we will make
calls get to later. But for the sake of ease, let's focus on what it's gonna look like
without it being that, I'd like you to select
your face at the top. We're going to extrude it. Click the blue button, then click the next
blue box, drag it in. Drag in a little bit of a ways. And then we're going to do
it again and push it down. This insight bit is
not going to be seen. So we can delete this face inside here. Now it's all hello. This does look a little
bit rough though. So let's click our button. Go to our softened edge that we've added to our Skillshare
tab. Give it a quick. There we go. The next
thing that we have to do is collect some sort of
frilly thing to the top. We can do this multiple ways. But I'm going to show you
this way. First, clean it up. What we're going to do is make another object and just
make that one Details. This can be nice and clean. So it creates polygon cylinder. We're going to make it the same subdivisions
that we have before. Ours was at 12. Just so we can make sure
it's in the right place. Let's make it a
little bit smaller. Let's drag them in a little
bit and we just want to try to get them semi flush. I'm going to do it
in this tab over here because I need to see, or I'd like to see
with a wireframe is let's turn this on
for the wireframe. Let's move this into
position. Okay. Let's take off the caps. I'm just going to make this an isolated layer
by clicking this object. We're gonna get
rid of the bottom here because no one's
going to see it. And let's turn it
back on. There we go. I want this to come down lower. We're going to hold D, hold v. I'm going to drag down to the bottom of our
particular object here. Now our anchors in
a different place. So that means wherever removed from its going to do
it from that anchor. We're going to go
to our scale tool and bring it down
just a little bit. We're pulling it inside
of it just a tiny bit. Because once we add our shader, you won't be able to
tell the difference. Now before, before we
go too far with this, I'm adding on a few
more subdivisions. We're going to extrude
the top and again, select the face at
the top, extrude, Pull it in, repeat,
and pull it down. And delete. There we go. Now we've got a little hoop going around the top.
Let's clean it up. We can clean up both
of them if we so choose select your go-to mesh. Smooth. Because we don't have enough edges currently to make this look as rounded
as these bits right here goes you're sculpting tab. Click this tool, that's
your grabber tool. And we're going to
hold B and drag left, make your selection smaller. Or hold B and drag right to
make your selection bigger. Pick the size that
is best for you. Before you begin.
Got to the top, go to Symmetry, select World x. Now we did one thing to one side, it will
do it to the other. And all we have to do is go ahead and make
something that looks slightly similar
to our turnaround. So we're just
clicking and dragging until we get the sort
of shape that we want. And if you want to make
anything asymmetrical, because obviously this
is gonna be completely symmetrical by the end of this. Or you have to do is turn off the symmetry at the top and then do any
other tweaks you like. But I advise that you do this after you've made
everything symmetrical. Once you make something
asymmetrical, it's very difficult to get
the cemetery working again, so it will make it
easier for ourselves to start, change it later. So just click and drag until
it looks kind of rounded. Very nice. If you want to add your
asymmetrical piece, you can do so. Now, let's say we can
grab one of these, grab a big chunk and just send it into
an other direction. Make it seem like
somebody actually made this rubber computed
it. There we go. Nice time. Yeah.
9. Modelling The Cream Middle: Time to do the centerpiece. The shape seems like a cylinder. So let's grab that. Now we've got three ways to
see our new shape easier. Either select the other shapes and turn the visibility off. All with both selected. Make a layer group. Click here to hide it. T for transparent
wireframe is a reference, but we don't need that. Also let the wireframe
option or X-ray. Let's remove the caps. Make it be in line
with the lower cream. Select vertex and move
the lower section up. Pull the upper part down. Select our split edge tool and our Skillshare
tab at the top. And let's make some lines to help us make
this shape rounder. Major points can
be easier to work from with the line selected. Scale it to fit. I think I'll put one more
above and one below. We'll tap a line
and scale it again. Keep going until you're happy. If double tapping doesn't
work, click and drag. Then hold Control and drag over anything you
need to remove. Erase the top and bottom phases. We won't need that. They worry there's a reason why we're not doing the other part
of the cream yet. Remember, we're working
smarter, not harder. Quiz time. Easy.
10. UV and Completing The Base: We have to UV creation, otherwise we can't
add a texture to it. Select your bottom
mesh into the UV tab. At the UV editor
TO Skillshare tab. Now, planner. Select the UV editor. Here's our objects. Let's make this flat. Modify unfold to add, unfold to a tab, select view, custom shelf, then add it in the same
way we do the others. To select the UVs. Hold right mouse
button and click UVs. You can either double-click
the mesh or click and drag. Sometimes you may need to slice the UV in order to get it flat. If that's the case, had to Tools and
select the Cut tool. When it's selected,
you can click and drag and re unfold to make
it flattened even more. We'll have to do
that to the cherry. All while in the viewport. Select the edges that
you want to cut. Hold shift to select
multiple edges. Had to cut and sew. And select cut. That's a much cleaner
way to cut something. Be sure to add these to your toolbar for
later use, right, let's continue modifying
the size of your UV. Rinse and repeat. We should aim to keep
our work in this square. Let's select both of the other
meshes at the same time. And plan are those together? We can shift select the other mesh so we can
see them all on the screen. Double-tap the mesh you want
to unfold and unfolded. Do the same to all of them. The bigger the UV, the
CRISPR, the texture. So make big what
seemed the moose. Here comes the
working smarter part. Select all of your messages. Control D for duplicate, Control, G for group. Now we have a group. We have Translate enabled, hold D and hold V. And let's snap the anchor to the very top of the cream puff. Now in the channel box in scale, why do minus one? Love? How quick was that? If our texture was
the same all around, we could leave the UVs
on top of each other. But I'll turn around, shows that the texture is
different from top to bottom. So let's move the
duplicated UVs. Hold right mouse
button, select UVs, select all, and
move them slightly. Now, if we select
all of our meshes, we can see every
UV on the screen together with a UV mode
enabled, double-tap a UV. Now we can move it to fit. Fantastic. Let's go back to our outliner. Let's open the group. Select every mesh that's
inside shift and P. Now I can delete the
group and clean it up. Overwrites. Quiz time. Good job.
11. Creampuff Simple Version: As with everything, there's
multiple ways to do this. Here's one way to do this. Select the tourists, create
polygon, then Torres. Ten symmetry on
object X or weld x. Moved the tourists to
the top of the shell. It's okay if half of it is
sticking inside the top shell. In edge mode, select every other vertical
edge and scale it out. You might need to
move it a little too. Once done, remove symmetry mode. In vertex mode,
quickest spot inside, maybe slightly near the top. Hold shift, and double-click
the vertex next to it. Now you select the whole row. If you press B to
enter soft mode, you can hold B and drag your mouse to indicate how
much of it influence you want. I'm going to scale
in the middle. I'm going to continue
to suck in the top while making the
lower half plumper. That will give me that
nice scooped effect. And flatten the top a bit by
holding the green square. While in scale mood, I'm going to drag it down. Keep going until you get
that nice dollar P SKU. Perfect. Great, Looking good. With symmetry back on. You're going to be
flicking between symmetry on and off a lot. Go to Mesh tools,
offset, edge tool, click the center line and drag release to
make your choice. Now, you can select
the rows that you've newly made
and scale them. Owls, pull them out to you. You've noticed it looks a
bit more dollar P. Perfect, That's exactly what we want. We're going to continue this all the way around the cream puff. You may have noticed
that I tend to turn off the symmetry when I
am selecting a row. That's because my
center pivot changes. It's easier to pull everything
in from the center. But if symmetries on, when I tried to
select the whole row, it moves the center, and that's not where I
want to scale in or mu from Azure going and
adding your edits, you can make the
bottom more clumpy. You can pull in the
top a little bit more. You can add dense in the
top as well if you like. Don't worry about trying
to make your cream puff look exactly the same as
the one in the example. It is all about your
creative vision. And your creative vision is something I
can't wait to see. Right now. Rinse and repeat until
you're satisfied. I think I'm okay with this. So we'll leave that
like that for now. Symmetry off. Select face mode. Select the inside ring of faces. That's clicking one square, then double-clicking the square right next to it
while holding Shift. Now I'd like you to hold Shift and the greater key
to increase the row amount. To reduce the row amount, we just click the less than. Remember the parts
of the model that's important are the parts
that can be seen. If it can't be seen,
get rid of it. Now, delete. It's
time to UV or mesh. Don't forget to put
it in an empty space. Doesn't really matter
where it goes. You can always rearrange
your UVs at any point. It doesn't need to
look like mine. If you feel fancy, select the bottom row of
the cream and rotate it slightly devastating to the top in the opposite direction. So we'll do the more
detailed version next. You don't have to do the
more detailed version, but if you want to know
how I will show you that quiz done, That's amazing.
12. Creampuff Detailed Version: As with everything, there's
multiple ways to do this. So this time, let's
do it individually, make a torus and
put it in place. This shall be our reference. Hide the macro room
base, grab a cube, Create Polygon cube, place it over an area of the
path in the template. Select the Insert Edge Tool. Width ways and length wave. I'll include a center line
to select the outer edges. Now, go to Edit Mesh
and bevel or by Val, as I liked the perfect. It's rounded on edges. The vertices are two forward. Now it's no longer flat. I'm molding with the idea
of trying to make it a bit more dollar P. I'm going to go back to the front
of the template to give my dollar a bit more
of a natural feel. If it's not going to be seen, make sure you delete it. Where to duplicate this
and use it for the rest. But we're working
smarter, not harder. So let's prepare the UV first. All the duplicate UVs will
be in the same position. So we'll have to move the
individual UVs while we work. Create NURBS primitive, circle. Move it to fit your
tourists reference. Now it's the fun part. Select your cream, shift, select the curve and
parents by pressing P. Now, anywhere you rotate the
circle, the cream Mofolo. Duplicate the cream and
unpaired enters that shift NP, move the circle, edit
your new selection. Move the UV, duplicate
it, and I'm parented. So now the copy doesn't
move, rinse and repeat. You can duplicate the
current row of paths, parent them to the circle, and move it all around
until it's filled. Then you can tweak as I liked the individual approach is it gives me more control. So I'll go back to doing that. To help speed this along. I'm just going to duplicate the other half rather than
going all the way around. Once we think we've
got the system going, we can absolutely remove our reference as we
don't need it anymore. And we can move on cream puffs up to actually sit on
top of our macaroons. I'm just removing
the duplicated side I just made as I'm
still tweaking it. This way, we can make sure that the dollop actually sits
where it's supposed to sit. I'm going to keep editing
and moving around. From here, we'll be
able to use techniques that we've learned in
the previous lessons. So that includes
the symmetry tool, the soft tool, enlarge, running and moving
certain pieces. Anything to get the
feel of what you need. Don't forget to do the
UVs while you work. I've also decided to combine it. To do that, go to Mesh. Combine. This is going to merge all of the meshes into
one mesh though. So make sure you've
edited your UVs first. Just like in our last one. Let me rotate the top of
this and rotate the bottom. Give it that nice kind
of twisty dollar. Perfect. Perfect. You've done so well. Next we'll make the cherry.
13. Cherry Creation: The basic shape of this
cherry is a circle. So let's grab a
sphere, resize it. In the inputs low
the division a bit. We don't need all that. Fungus is, even it
will be alright. Now let's make it select the center vertices
and two soft mode and pushed downwards will
routinely make the section bigger depicted in the center until it looks the way we want. Now it's got the little dimple
in the middle after Jerry. We can dip the outer edges
to make it look more hot like there we go and
pull up the sides. We could absolutely
turn on symmetry. But I've gotten kind of
old school with this one. And using the scale
tool, drag that out. Let's UV it while we're here. And as always, removing any faces that
aren't going to be seen. It also makes your model
much simpler as a whole. Now, for the stem, the collision shape we
have is a cylinder. So let's grab a cylinder and
resize it to make it fit. We can narrow the
sub-divide if need be, which I think I will. I'm also going to
remove the cap. We don't need that. Let's also remove
this whole tube. Consistency. Then let's pull it to the side. I think I'm going to do this via faces and probably
with a softball again. Okay, here we go. With the face selected. We'll hit the extrude tool
and just pull up and follow along with our reference. All to do with a false
way, we'll just hold, shift and drag
upward on the arrow. This way we're still extruding, but it's a shortcut. Didn't really have time to
keep going all the way up. Clicking a button. Fantastic. Let's go back into
perspective mode and extrude the
top one more time. However, we're going
to drag on square this time just to make it
extrude in on itself. Now let's make
this a even shape. It's good practice to
try to keep things as square as possible or
as even as possible. We're using the splice
tool for this nice work. Now, let's UV this as well, because this doesn't
unfold flat, we have to scrap an edge
and cut it in the UV. You must do the same
to the Cherry as well. Remember, flat is always
correct and select everything. Now we can see where
everything is. It makes it easier for us
to put on new UVs in place. If at any point you feel you need to make the
cherry fit better, by the way, you can adjust the cream to give
it more of a seat. I've just gone into
the layer on the side, connected the cherry to the
layer selected templates. So I can still see the
Cherry as a wireframe, but it helps me to move the cream a little bit easier because now I can
actually see where it is. There we go. Wonderful. Perfect. Cherry done. You sign to get the
hang of this. All you.
14. Flower Creation: We're almost done. You've done so well so far. Now we need to make one
flower will duplicate the one we use as we're
working smarter, not harder. Assessed shape. A petal is similar to a square. So grab your cube a plane. Let's place it over the
front of our template and screens in that basic shape to make the petal fit inside it. Just like this rebel Slice Tool and drag from outside of
the box to the other end. This way it will cut
through the entire box, not just a single phase. Let's do this horizontally too. And as we go routinely pulling the vertices we make to fully
give us the shape we need. Nice. Squeeze the scaling so it's a bit more
flat. Depth wise. Check it from another angle and give it that
curved petal look. When doing things based
off of real objects, look at them in real life, it will help your
designs and creations. If you wanted to, you could totally add a
insert edge loop around this blank part that
we've not filled in and extrude that out if you want it to
be a bit smoother. But you don't have to. While you're doing
this kind of thing, it will be quite therapeutic. You'll find now prepare it
for UV Cutoff bits not seen. Now, important note, if we want the petals to use the
same petal texture, we won't separate, they're UV. But again, I do like the detail, so I'm going to separate
my petals that will allow me to make sure that the one that should
be unique is unique. Let's say you had
three of them that was supposed to look the same
and only to look different. You can totally leave
the three UVs on top of each other and just move away the ones that
need to be separate. Let's duplicate our peace and rotate it to match
the reference. We can move the anchor
of our singular petal by holding down the D key and
just move it to the bottom. It makes it way
easier to rotate, because now we're
going to rotate it a duplicate from the bottom
point rather than the middle. Tweak and edit as you go, you can certainly choose
not to change every petal. That's perfectly fine. I like to do detail though. I really liked detail. So I'm going to change all
the ones on this side. But once we duplicate it, I'll
probably leave them alone. I want to scale in the bottom
of the petals as well. It kind of gives it a better
shape and it hides it better for when we get the
little pollen circular bit in. Right? Now it fits way better. Now, let's make
this look even more dynamic and rotate
certain petals forward. Now this has stopped
it from looking flat all the way around. Then forget we're working in 3D. Three, gotta look at
it from every angle. Consider, everything.
Looks perfect. Now to finish it off, let's make it center. It's clearly a circular shape. So grab a sphere,
put it in place, lower the sub-divide, and remove the half
That's not seen. While we're here. Actually, let me just
turn back on the, let me just turn back on
the rest of our model. Let's group all of
our flower petals to make it easier to move. It's not technically
in place right now, so I'm just going
to move it forward. Try to get it on top or in a nice place to rest
upon the macaroons. There are some things
for you to keep in mind while you're modelling. Some things are going to
have to cheat a little bit. If you're trying to make it look exactly like the picture, which will be impossible because the perspective isn't the same on both of the
reference pieces. You can edit your piece
to make it fit better. So for instance, this flower that's on
the right-hand side for me to make it sit while
still being in the front. I can have it float
off of the macro room. Because obviously
if we tilt it down, it's gonna go halfway through. You can absolutely allow it to go halfway through
the other part of your mesh and just go into your petal
that's peeking in, grab the vertices
and pull it out. But I don't think
I'm gonna do that. I'm going to find
a way to do this. I like it so far. The smarter half, we're
going to duplicate it. So let's grab our
flower group, group. Control D. Don't forget to group
is just control in G. Then minus one in scale x. It's going to flip to the
other side when you're done. Ungroup. Now we can move it, put it wherever you want. I'm happy with this. Nice. And all of their UVs
are in the same place. So actually we could totally do this at the
end, but I didn't. So what I'm gonna do
is probably select all of the flower petals and
just move them together. Yeah, because they're all going to be on top of each other. So the duplicate
is going to have the same UVs as the other ones. Which is cool by me really, as long as we select all of
the flowers, it'll be fine. Otherwise you can just UV. Oh, we forgot to. Hold on. Let me let's make sure we actually UV these before
we get ahead of ourselves. Don't forget to uv your
circular part as well, which I totally forgot to do. I've just done it now because this is just
gonna be one shade. It's not even, it's just one lump of color
is not much happening. We can make it quite small. The petals are
kind of important. I will just to change the scale. Nice. I'm clicking and dragging to make
sure I select both of the UVs because we
did duplicate it before. We did the UVs this time around. Gay, I think they're
overlapping each other. So that'll be okay. Lovely. We've got so much space. We can absolutely make
this bigger if we wanted. If you do want to make it
bigger, you totally can. Now our UV is set, our meshes are set, and we're actually
ready to texture, which is super-duper fun. I'll see you in the next lesson. Quiz time.
15. Texturing The Macaroon: You made it. Now it's
time for fun with color. Firstly, it's time
to combine things. I combine things that
we'll use the same color. It makes it easier
to reuse pains. So head to Mesh, add combined to your bar. The macro ruin will
use the same color. So shift select everything
related to the shell and combine rename as you
go if you'd like. The cherry uses two
different colors. So I won't combine
it for the moment. The flower petals
use the same color, so they're going to be combined. It can bound. The dot in the middle
is a different shade. So I'll combine
both dots together, but I won't combine
them to the flower. If you didn't want
to be super exact, you could paint one flower set and just duplicate it over. The choice is totally yours. The inner cream has different colors so they
don't get connected either. I like to color code
items to identify things. So let's do that. Click and mesh,
Right-click and hold. Assign new material. Lambert is opened our
attribute editor. If it doesn't open onto
the shader, immediately, click through with the arrows till you see a tab
that says lambda two. Lambda one, by the way, is the default gray
shader that's on all objects when you open Maya, renamed the shader to
what it's being used for. This is a cherry, so I'll call it charity shader. Turn the ambient
color all the way up. They'll fuse all the way down. This gives us a flat color. Makes it easier to make
3D objects look to D. On the color line,
click the square, click the Eyedropper
tool and select the part you're working
on in the reference. Now. Let's do the
same with the others. So the perk of doing this is we can see what
objects are easily. It tells us which ones are
sharing the same shader. It and anything that share
the same shader are combined. When we save our work, the textures will be separated into the shaders we've now made. Which means if you want
to or you need to merge the textures together in
a photo editing program. You can do that later, which we will look at
when we get there. It's very useful to have things separated first
just in case you have to do any extra tweaking or
texturing later. Perfect. Now that we're done with that, it's time to get
ourselves ready to paint. Go to the dropdown
box on the far left. Select rendering. Now select the texturing
tab and click these dots, Jess below the word texturing. This will make it pop out. Makes it easy for us to
re-select what we need. Because if we do it once and then we have to
go back into paint, it tends to disappear, and then it's not
very convenient. Lovely. Now, unfortunately, Myers
color picking isn't exact, so we have to tweak it
to get the same colors. So let's first click
our reference image. You can totally duplicate it to have the original somewhere. Or if you download pure ref, you can have it floating like I do in the left
corner right now. The duplicate that you've
made or of your F, Go to your attribute, locate the color space, and select a roar. Perfect, It's changed the color. But this color is actually
what the color is. That's the only way that Maya's going to acknowledge
the real colors. Which is why it's
helpful that you've got a duplicated ref. Now back to our cherry. Go to the 3D paint tool
and click the box. Now head over to
assign edit textures. Pick a size you
want, pick a format, and then assign in flood. Quick for color square. Eye dropper, hover
over the bit you want. Now, you can click the
flood button. There we go. We've got our base. And let's do the same again, but in the color square. And pick another color that we want to start painting with. It could be easier to do
this with a pen tablet. But the choice is yours. You don't necessarily have to. You can use different
blend modes. Change your brushes, hardness, load in and alpha you've made or select one that's pre-existing using the photo on
the right here. If you have something you'd
like to use symmetry on. Scroll to stroke,
select reflection, and pick your axis. Now you're coloring
skills going to come down to how much coloring
you've done before this. But each time you do these, you get better and better. If your model is great, right now, press the number
six to turn the texture on. It just means there is
a texture available, but you're on the wrong tab. Important note, while
we're doing this, maya will only bake our texture
if we save, save often. Trust me, I have
been caught out far too many times where I painted. For a long time. It crashed and there
was no evidence. As we're painting, you might
notice some seam lines. So that's where the color
looks like it's dividing. Which is why it's
really important to choose where you're going
to cut a character. Usually, when you UV something, you try to make the
seam line goes. Some people won't normally look just in case it
should look good anyway, which is why we'll
normally expand our color. I'm bigger than the actual UV. That way, if there's
a bleed in the scene, it will see more of the color rather than whatever
is behind it. The cherry I realize is
actually tilted forward, or at least it is
in the front panel. When I'm doing a 3D
transcription of something, I tend to recreate
the camera angle. And I'll normally just
work in that camera angle. And then after that, because we have to
consider it is 3D, we have to think about what can't be seen in that 2D image. So once I've got, maybe I've done the first half of whatever
we're working on. Let's say the cherry that
we're doing right now. Later on now leave the front camera view and I'll go to the
perspective view, take a look around and make
sure the back looks good too. Yeah, So far, so good. So we've got the cherry rotate it to match
the front view. I'm looking primarily
between the pure ref, reference image
that I've got here. I've got it to a place that
I'm happy enough with. So I'll just move on to
the next bit and it's kind of this until you're done. It's just rinse and repeat. You'll look at your
reference image. You'll do a little bit your
flick between brushes. You'll change between
your opacities. And it continues like
this until you are done. To make this bit easier
for me to see because I'm trying to make this look
like the front view. What I'm going to do is go
to my front view panel, click Panels and go
to tear off copy. So now I've got a separate
version of my front view, which is really
useful for me because now I can see it up big. Just going to reopen
my Texture tool. You'll notice that depending on which camera you
select your item in, is the one where the outline
is going to disappear. I'm not sure why it works
like that, but hey, whoa, I actually need to see it without the
outlines on this one. So I'm going to click
the front view quick my 3D paint again so we
can go straight back in. But this is really handy
because now I can see this up close while being
able to rotate around the back of it and do
what I need to do. Now that the cherries
in the correct shape, I think I'm probably going to edit the mesh a little
bit because it looks way more heart-shaped
than what I have here, especially because
we've rotated it. So while you're going or
while you're painting, you might notice some things
that you didn't notice before because you didn't
have any cornerstones. Sometimes the more
you fill things in, the more cornerstones you have, which makes it a lot easier
to recreate the image better. Now onto the next one. Same again, assign
edit textures, pick the same stuff. The canoe floods, and flood it. And then probably need to zoom in a little bit
to help yourself. Pick a new color. Seems semi the same, so I'm just going to change
my floods of a lighter color. And use the darker
color for the color. Next. Let's do the cream. Let's start by just
going down from the top. So why not? Okay, Before we move on, let's make sure we save it. Save. Good. If you don't save,
it doesn't bake. And if it doesn't bake is like
he didn't nothing at all. We can have that. Okay. And the top half. Nice. Now we can flood fast. You've got the new
color on the top. Now, if this was even, we could probably
turn symmetry on, but I feel like it makes
it a little bit more. It feels a little bit more organic when it's
not symmetry it up. You might not think it, but humans are able to
tell the difference between something
that's man-made and something that's
computer mode. Now, we went for a
little turn on this one. So I'm going to have to eval
look up images of cream. But my cream is going
to look different from the one in the picture. But we know it's the
same sort of thing. There's gonna be a light
where the light hits and gonna grab various palettes. No one's really going to
see that it's indented. I don't think Let's see. Can you see that that's
indented in a bad way? And no, I don't think I
won't be able to tell that. Got nice cream van. It doesn't really
take that long. But the more complicated
the design is, the lumber you're gonna
be sitting there for. Let's move on to the next pie. Next, let's do the top of this cream rental, Assign Edit. You're probably
used to this now. I don't need to see
it from the back yet, so we'll just have a visa. So we know in the main picture there's
a shadow underneath. So let's make our own shadow. Don't forget to change the
size of the brush is just holding B and dragging. Now absolutely get faster
the more you do this. I don't think I can do
it from this angle. That does not seem to
be how shadows work. So let me just pull
this to the side. You got to see it
from the perspective. I'm going to make the
perspective bigger because I don't really need
to see the other stuff. Just this one
because I don't use the side and he really
used the perspective. And the front. Might need to pretend
like that shadows coming from the cherry because that I don't know where
the light's coming from. It was never good at lighting. If the cherries leaning forward, we could totally pretend like there's a gigantic
shadow from this cherry. Cool. Here we go. I have to go rogue because you don't know what it looks
like from the back. This one seems to have
it on every little bit. I'm just going to necessarily do this and then I can just go back with the lighter color k. And there's like a ring. I might turn the
symmetry on for this, because that's
completely the same. You expect it to be good
but isn't the right place. Now because we made the bottom
trim and the top half of the shell separate and didn't
merge them in the end, you can absolutely
choose the merge them after if you'd like. It might be tricky for us
to get the colors to match. So that is something that
you can consider for future. Otherwise you're just
going to have to be really careful when you're
painting those areas. A little bit bigger. It's I don't think Maya has a good way of lessening
how deep the smoothies, You've got a blur intensity. It's kind of like it's
only on when it's on. I don't I'm not too sure. They're all speckles. We can actually
do those battles. The question is, do we want to, after the initial set is done? It's bound to creative
license a little bit. People aren't normally
apart from other artists going to look at an
art of so you can kind of get away if you want
to do some creative license or maybe you're not
going to put in that much effort to go to
look exactly the same. But whatever you make
here will be seen as, oh, this is what it is. I don't normally use other alphas and brushes,
so this is very fun. But this is like Photoshop
and furniture was first made. Everything's on one layer. You have to get comfortable
with doing stuff on one layer and just accepting that if it doesn't come out
the way you wanted it to, you just kinda have to paint
over it and that's okay. It's okay. We're just going to interpret what could possibly
be continuing. What's nice is that
because the artist, the front half, you can kind of guess what should be
happening on the back. And you've got certain shapes or certain tools
that you can use. That'll be similar to what
the artist used on the front. So it will look like it
comes from the same thing, at least already. It's looking good from
basically any angle. Okay, Onto the next bit. Okay, let's move
on to the petals. Why not? I seem to have found an
order to harm doing that. You don't have to do
this in the same order. By the way, however,
you work works. We'll get to outlines if you're interested as a bonus at the
very end of this course. Because that's the
main thing that makes these flowers look so
good in my opinion, it's the outline of them. We do actually need to get
some of those lines on there. Okay, let me grab this. Dive back in. Just going to draw
over the top of that. Even though that doesn't
necessarily make sense. On the other view, it makes
sense when the front. So it kinda depends on which
one you want to prioritize. If you like. We could actually do a
outline on this one, which is just checking
the darkest color. Going to the side of our petal and filling
it in can get messy. You might actually need to have the outline on so you can actually see where
your painting. And sometimes it does go
through the mesh, not sure why. It's useful every once in
a while if you release. Sometimes it does add like this. If we wanted, if we knew exactly what line we want
it to be, dark purple. And let's say it's giving
us this kind of grief. What we could do is simply
go back into our UV, is grabbed by Edge tool, cut along the top of
all of our petals, go into our UV and cast it. There we go. So because we have both petals
on top of each other, it might be tricky
to select them within the UV itself without accidentally
selecting the other one. So now that we've
cut all of these, you can just select
the bottom half, whole control,
right mouse button, go to UV shell and
move it to the side. And because they're all going
to be one color anyway, we could make one a bit bigger, put them all inside
the other one because there wouldn't be
much color change there. Now just got the underside. I'm doing it on one to
give you an example. But if we wanted
it on both sides, we would just do the same thing. And I've got these
edges selected. Are these faces selected? So it's not going to put this on anywhere other than the
places that I want it to go. And now we've got a
social fake outline. I think I'm going to do
that to this one too. I do like how it's
actually turned out. And if we wanted to, instead
of doing this again, we could absolutely
just delete this, duplicate for it to the other side and then move it into
place all over again. So now I've got two of the
flowers done by doing one. Nice. All right, let's move
on to the cream. The more you do them, it ends
up being quite therapeutic. In a way, you'll find
yourself going back-and-forth between getting the
right capacity. So she didn't really need
to worry about the shades. Shades always gonna be right, but the opacity is
what will get you. Sometimes you need
a lighter shade, sometimes you need
a dark shades, sometimes you just need to do
it again or allow it to be really strong and come back
with your darker color after. Once it's made, no one's
going to really know what the reference
actually looked like. Apart from the fellow artists
that love looking at art, looks like the rest. You'll be able to edit your image in your photo
editing software after as well. So no matter what
you've done here, you can add upon it if you so choose in your editing
program of choice laser. So I can make this
look a little bit more varied if I so choose if I were to grab one of these and pull it and change
its shape a little bit because they want and our reference isn't fully straight with us,
completely done to us. It could either be
prim and proper. Oh, perfect. Like or it can have a bit of a very
cheap during the show. Oh, I didn't merge these
together properly, so I can fix that
while we're here. To do that. That's
just modelling, tap into Edit Mesh, merge. You can add that to your
bar as well if you want to. Save it onto the next one. Okay, Next. You really don't have
to be this precious. What you could probably
do is fill in the area with the lighter color
than in your photo editor. App, speckling
afterwards because you'll at least be able
to see where it is. Trying to make sure that
it stays consistent, but not being too
precious at the moment. But it's consistent enough. All right. Nice. Getting faster. Oh, it looks see solid. And lastly, let
us do the bottom. Might have to be pretty careful while we're
painting because we've seen that it's kinda
Chuck's abandon at it. We can isolate the area that
we're working on, however, by selecting our face mode, clicking all the
faces that you want, double-tap the area, then
go into 3D Paint Tool. There we go. Yeah, nice. That way we won't
accidentally paint onto something but we
don't want to paint onto. There we go. That will prevent us from accidentally painting
over the top because we did a good job on the top and we don't
want to mess that up. So the only reason why we didn't copy and flip it upside down is because it's got a
different pattern going on. Normally the trick
is to paint on a surface that looks flat. It starts to bend
in a weird way. It will tell the audience
that it's not 2D. So trying to make sure
that it looks like it hasn't been telling you is key. Alright. We have ourselves a painted
Macarena quiz time.
16. Composing Textures and Clean up: Now that we've got
it to our liking, we can clean up by merging all our texture images
into one file. But before this, we're
going to have to make sure that we can actually see where they're
supposed to go. Let's select all of our models, open up our UV editor, and click the camera icon. Let's make sure that
it's the same size that we picked the texture
images to be earlier. And passive play. Now, a mesh and select attributes,
select selected shader. Click the box next to color. And if we go up,
there's the location. So click on the folder, copy the location string. In our photo editor, open up and paste the
location of the name above. Now grab all of your files. After that is just copying, pasting them into
one file and making the background black or
whatever base color you'd like. And lastly, let's add the
UV that we saved earlier. There now we can see what
it's all supposed to be. Let's magic one tool on the outside of the UV
in select tab, modify. And we're going to
select contract. This is what I was
talking about with having a bit of bleed to allow the image to see
extra image rather than pasting a color that's
not supposed to be there, allowing people to see the same. Basically always make sure
there's a bit of bleed. Now that the highlight
is high lit, we have to do is go
through and delete. Now that the initial
erasing has been done, we're going to go
through each layer and erase the extra bits that
aren't supposed to be there. So for example, on
this particular piece, clearly the only
part that has been textured is this bit right here. So the rest of it isn't needed. So I'm just going to either erase it manually or
use my marquee tool, inverse it and delete it. This layer is blocking the
cream layer underneath, so I'm going to erase that too. After that, it's rinse
and repeat until done. There we go. Nothing's overlapping. What it shouldn't overlap. And I realize I've forgotten the inner
part of the flower. So now that we've gone
back and gotten its UV, all we have to do is select its color with the eyedropper from my sisters
original picture, back onto the texture map. But we're currently making, and we're just going to make a purple Blache where the UV
says it's supposed to be, which is right here. Before we finish, let
me give you an example about the seam and bleed fixing. So I'll cherry had an issue. If we go into our editor and look at the
cherries texture, we can see it fits
perfectly within the UV, but that's not what we want. So I'm just going to go
and make the color expand beyond the UV layer because it's clearly
trying to expand, but it doesn't have the
right thing to expand. So we're just going to repeat
the image that we see, or maybe get the same color. That way when it's
going further, it's going to show
what it should show, not what it currently is. Now, what I'm going
to do as part of a cleanup is select
all of our models, assign a new material, pick a Lambert, and
in the color line, select the checker box. And now just grab the
texture that we made. Unlike before I turn
up the ambient, turned down the diffuse. And you're good to go. As a little bonus or clean up. If we click this blue
button in the top right, it shows all of our shaders. Now let's clean up in file, select optimized Save Scene. Now it's all clean. If you wanted to, you could absolutely combine
all of your meshes together. But I have one more thing
that I want to show you. So I'm going to leave
mine unconnected. You can do this with it
being connected as well. By the way, if you want to, the choice is yours. See you for the bonus round.
17. Creating Outlines: I'm so happy you want
to learn how to do outlines when you
must have them. This will probably be today. It will truly take your
work to a whole new level. To begin, let's do the cherry
in our viewport of choice, select shading, and
turn on back culling. This will allow
us to see through our outline as it will
pair a solid initially. Now in lighting, select two-sided lighting with cherry or mesh selected, duplicate. Now select Extrude
and make it thicker. We can now choose to assign
a new material and use a surface shader for a flat black color or any
color of your choice, or paint our desired outline
color on our texture sheet, like I'm going to do right now, just nipping back into
the photo editor, I dropping on all of the
outlines that I want. I'm probably going
to put them nearby. The other things I could totally labeled these if I wanted to, but I wait because I
know what they mean. And I'm just going to have different random
splotches nearby. They don't really have to
be a comprehensible shape. So as we're doing the latter, I'm just going to add my
new duplicated mesh into our current Texture
Shader and UV it. But put it inside the little
color blob that we've made. Now I've chosen to
double-click while in UV mode. To make sure I select the
outer layer of my shell, there is a way to not have
an extra layer to deal with, but that's on my YouTube
tutorials instead, underneath picks a fight tips. For this. Now that I've made sure that I've
got my outer layer, I'm just going to select the other uv piece that didn't go along with
it with the faces, right mouse button, select
your faces and important, go back out into the
viewport and then delete. Otherwise you just
delete the UV, but you don't delete
the mesh. This way. When we do the magic, we're not going to have too many extra things inside our model. Head to mesh display and
add reverse to your tree. Now click it. We have an outline. Now if we wanted, we can manipulate this
further by simply editing the meshes of
vertices or faces. And if you want even more, we can add edges to give us an even more dynamic outline
that will allow you to make new folds if you overlap them in areas you want the
lines to show up. For example, let's use our Insert Edge tool on
this center part here. Now grabbed the vertices
are a couple of vertices, maybe two or three, and pull them up and pull them down behind the line we've
just made or in front. Now we can see the outline. So you can do this
all over the model. Once done with your
mesh selected. Head to attribute tab, render stats, turn
off double-sided. This will make it
appear the way it looks in the viewport,
in the render. Rendering. This works pretty
well in Maya software. We'll get to that for the
closing of the tutorial. And you've guessed
it, rinse and repeat. At the very end, you can merge everything to keep it nice
and tidy if you so choose. Or you could do the outline on the whole objects instead
of doing it individually. It depends on how
detailed you want to be. So we're still using
all the tricks that we've learned
from beforehand, just using creative ways to make the outline
show how you want it. So for the top of this macro
room bit to make sure that I get that nice wiggled effects. All I've done is made an extra Insert Edge Loop and pulled it up and pulled the other side down to make sure that
it showed a line. Because I chose not to
merge the bottom of the macaron and the
top of the frilly bit. There's a potential for
the outline to show there. So all I did was grab that surrounding area and
use scale to pull it in. I noticed there were some lines in-between
the two bits of cream in the middle. So just like before, made an extra loop, will took one that was
already existing and made it go within the other one. So we could see the outline
kind of gives it more of a unique fill, less mirrored. Then I realized that the center outline is not the
same color as the outside. So in order for me to
get the color I wanted, I just made sure I selected the faces of the bits that
can actually be seen. And our UV them again, because it's split them
from our current uv. If we drag it, it might
create some issues. So just by using, again, it's made a fresh one and I can drag it into the outline
color of my choice. So fundamentally,
when outlining, it's the simple tricks that
you've already learned, but using them in creative ways to get the
result that you want. Nice. Now we've got a outlined
2D styled 3D macaroons. Now we can move on to rendering.
18. Rendering: To render a picture
of our deliciousness. Head to the chalkboard
up here with a cogwheel and pick
your image format. We're also going to
fill my mini loop. So in frames that
animation select name, pound, sign, EXT, and pick
a padding size if you like. Let's change our
frame range to 120. For my render cam, Let's go back to our viewport. Click view and create
camps on view. Rename it a shot cam so we know exactly which
one is the new one. I'm going to show our
original viewport. So let me just click panel and select the original
perspective cam. Now when we zoom out of
our original perspective, can we can actually
see the camera for our shotgun, which
is pretty useful. It can come in handy
for other things, but this isn't the
animation tutorial. So with that shot
camera selected, hold D, hold x, and drag the marker to
the center of the grid. Let's prepare for the
optional loop animation. Make sure we're back in the shotgun window with
all timeline at the start. Press S, go to the end of your timeline
and press S again. Now head somewhere
in the center. And back in our viewport. Now will be rotating the camera, hold Alt and click and drag, just to show a little
bit more of the model. Once you're happy with it, you can press play. I think I'm happy
with this for now. So let's go with this back
in our render settings. Let's first make sure
that we only have one rendering camera enabled. We only need the shot cam. So let's get rid of anything
else that might be in there. Pick a size you like. We can see exactly what
the size will show. If we click this button
on our viewport. There we go. So if we wanted, we could totally move our object to where we want it to be first
and then hit this, which probably what
you would do actually. But I'm happy to go
for this for now. Now let's click the render
preview button so we can see a little snapshot of
what the image looks like. And to make sure that
it's going to render in the right camera,
Let's right-click. Select Render. Select the camera we want. There we go. Nice. Now we can save the image
from here and call it a day. Or if you'd like to render
the mini loop that we made, selects the rendering tab. Then look for render and
select Batch Render. If you're not really sure where it's going to send the files, just take a look in the very
top of your render stats. Also, while it's rendering, it mentions where every
single file will go to. When it's done, we'll
need to hop into a program that can
import sequences, import it as a sequence. And to make sure it doesn't have a background unless you
did want background, render it as an Alpha and REGB. Now you can do
whatever you like. Well, we've done it. I'm sure there's many
more awesome things that you'll do with
this new knowledge. Good luck.
19. Outro: Congratulations on finishing my older this pipeline tutorial. I hope you had fun. I hope
you learned something new if it's not your first
time in Autodesk, Eva. And if you have any questions,
please send them my way. I'll get back to
you soon as I can. Otherwise, I can't wait
to see your macaroons. Fun. Bye.
 Raye Belvedere, Featured on Adobe Live, Asus Presenter