Transcripts
1. Class Intro: When it's the realist,
Rene Magritte painted the treachery
of images is famous. This is not a pipe
was meant to assert that it's just a picture
and not a real pipe. Digital illustration
is meant to do the opposite and have you believe in what
you're looking at, A phone, a character, a world, even a nice pop,
and sell that to you. Hey, I'm Paul, a creator
from South Africa. I worked for 20 years, much of it as a digital
illustrator on global brands. Digital illustration
is a wide field, an exciting career where you can specialize in a single style or work in a new one every day. No, two days are the same. I got my starts in digital illustration about
three years into my career, when I was hired to boost an in house illustration
team at an ad agency. Our team worked on
everything from pre visualization to professional high end
commercial design. What I really cut my teeth on
though, it was ice creams. Working mostly in Photoshop, from a blank canvas meant
I had to learn how to see the final product
before I started the angle, the lighting and think
about how to achieve that. That's what I'm going
to teach you today. Today's project is to
dream up and create your first digitally
illustrated ice pop. To do this, we'll be using a combination of
industry standards, Adobe Illustrator
and Adobe Photoshop. A basic understanding of
both apps is helpful. But if you are an ambitious
beginner, this is for you to. This class is
designed to teach you a number of valuable
skills used by digital illustrators
like spatial planning for three D looking objects
in a two D program. Useful techniques
for illustrating complex effects like smoke, steam or vapors, and
the basics of light, three D semi opaque objects. By the end of the class,
you'll have learned all these and other
valuable approaches in a simple way that
you can apply to the many forms of
digital illustration. I'm passionate about teaching
digital illustration. I believe that
learning the skill is critical because the
demand for unique, original, and
authentic work will only increase as it becomes
more and more automated. Are you ready to start your
digital illustration journey? Let's go.
2. Class Project: Sweet urine. Let's take a look at the class
project video together. Your project today is to illustrate an ice pop
of your own design. Using the provided template. I've built it ready to use for beginners or fully customizable. For the more ambitious
you pick, the colors, the flavor, the angle, and how frozen it looks. The key skill I want
to teach you today is to see your final product
before you illustrate it. This ability is the mark of a successful digital
illustrator. You should think about
a real ice pop you've eaten and how it made you feel when you pulled
it out the wrapper. How did the color
influence your purchase? Could you taste it before
you started eating it? What about the amount
of frozen ice on it? Too little. It's going
to melt too much. It's probably been
refrozen after, that's the quality
you perceived. I've chosen the ice pop
as a way to practice these skills because it
has smooth textures, simple color gradations, and
basic light transmission, making it perfect for
a beginner to grasp. I'll be with you all the
way as we look at how to achieve these principles step
by step over the next hour. But this class is
not a watch me work. We're making a real project today, and I know
you've got this. Some things to look forward to. You will need access
to Adobe Photoshop and Adobe Illustrator to get the full functionality I'm
teaching in this class. You can get a seven
day free trial from Adobe.com to help you know
when and how to launch tools. Keyboard shortcuts will pop
up all throughout the class. I'll also announce the shortcuts for both Mac and Windows. You can interact with me in the discussion tab of the class, and I'll be available to support you on any questions
you may have. Go ahead download
your free Ice Pop, open it an Illustrator,
and let's go.
3. Using The Vector Base: The first step in any kind of digital illustration
is the base. Call it a wire frame,
call it a sketch. This is the foundation on which a successful
illustration is built. Every time we put the file
open in Adobe Illustrator, used to working in Illustrator, you will see that my workspace looks a little bit
different than usual if you are not familiar
with the illustrator. I have done this for the
purposes of teaching this class. I'm only using the properties, panel, appearance, and layers. Artboards does come as
part of a set of this, which is basically
just this big white square in the illustrator, you're looking at all your tools on the left hand side here. These are for drawing,
cutting, joining, punching. Think of this as stationary. This is your pen, your eraser, your scissors at the top. Like any software, you've
got your dropdown menus. These are for modifying,
saving over opening, changing the angle of something, adding in effect your panels on the right hand side
here are for inspecting your work and launching
final edits on the models that you made from the top will look a little bit
different than yours. I do have a special
workspace that I've made just for
Skillshare recording. You can have a fiddle
with any of these. It's usually probably going
to land on essentials. You can add any windows that you'd like from this menu here. You can also tear them out if you need
them somewhere else. If you change your mind, you can put them right back like that. We'll be using this vector
base as the model that will be coloring and lighting
in Adobe Photoshop today. Ever hit control or command
wire on my keyboard? I can see what the L
really looks like, it's actually just this
little bullet shape and this little
cylinder over here. I'll hit command or control
wire to get out of that. Again, you can see I've added some three D and materials effects to both the
ice and the stick. The way I did that is
I selected these ones, went up to effects
three D and materials, and I chose extrude
and bevel originally. This tool was extremely
limited in what it can do. You would essentially
just make cylinders out of little shapes
that you drawn or more basic extrusions with not many lighting options wasn't sully fledged
as it is now. But in recent years there's
been some fantastic updates. This is a nice
thing to play with. We're not going to
do it at this stage, but when we get to
the stick lesson, we will do a deep
dive into that. If I click that Three D
Materials option there, I get my panel for implementing all the effects that I
want to do on something. Select. Over one of these, I can see what I've actually
done of the options there. I did choose extrude, chose a certain depth of 170. I didn't use any of the
things like twist or taper. I did put a cap on it. I did add a bevel. Let me
switch that off to show you. If you look there, it's now this really rock
hard right angle. The bevel with the round chosen gives me
just a little bit more of a tangent on there. I don't want this to actually
be a block of what it is. After all, an ice cream
also have put a repeat on, which means it happens
on the other side in case I wanted to
rotate it or anything. For materials, I
had a fiddle with all the default ones
and you can too. But wax paints actually
look the best for this outside the box. On this one, I do recommend that you use
this texture because it has the right
appearance for ice that looks a little bit
furrowed and scraped, that real deep frozen look. I did make some
minor edits to it. I did fiddle with the color
variation, the intensity, and the roughness
because I don't want to look. Creates
a light like this. I just want that right texture. Most importantly,
obviously, by default it is this teal color.
You'll see that there. And you can double click there and make it any
color that you like. When you click the
lighting in three D, you do get this basic or and you have to start adding light. You can do standard which is
like a hard spotlight on it, diffused which is
Ally how something like this would
receive the light would be absorbed
somewhat into it. Then top left and top right
is just very specific things. If he had like a studio thing in mind for this, a select it, you can see with
the original light, I actually moved it down because that's what's affecting
the side here. If I move it here, you can see
how it changes around the. I did click this plus here
to add a second light. That second light
is my main light. It's got more of a
purpose, shall I say? It's really, really
lighting up that side. This is just a full light. I did want to keep
the bottom dark there because the angle of chosen to move the stick
over more or less in line, you're starting to
get that ice cream. Look again. We will texture the
stick in a later lesson, but for now it's about seeing the product that
we're going to do. We're going to try to imagine what it's
going to look like. Once we get into Photoshop, we will be running this
through the ice cream. We're going to find a
creative way to cut it there. This piece will look like wood, and this piece will look like
it's embedded in the ice. If you do want to
change the angle here, all you have to do is click
that three D and Material. So you get this panel here. You're going to select
over both of them. You can change it
on any of the axes, but look how at some
angles it actually defaults to the separation
of stick and ice. When you do choose your angle, it's worth repositioning
your stick somewhere sensible at the middle
of the ice there. You can also just hit
control command Z. Like any program to undo it, you might have to go
through a few cycles of rendering the
effects and materials. Sweet. That's the first
step of the project. Before you move on
to the next lesson, make sure you've got the angle that you like for
your ice cream. This is important in seeing the final products
before finalizing it.
4. Porting To Adobe Photoshop: In this lesson, we're
going to learn how to port the artwork from Adobe
Illustrator into Adobe Photoshop. And there are two
ways to do this, depending on what you did
in the previous lesson. Let's check it out. First,
let's consider that you're opening the file
directly in Adobe Photoshop. The advantage of opening
in Photoshop is obviously using only one app
and it is quicker. But we get much
less editability. We won't have the
same opportunity as someone it from Illustrator,
let's try that instead. To port it from
Illustrator to Photoshop, we will have to create a new
documents any size will do. I'm going to choose
this nice big one so we can see what we're
doing in the class. I can go back to Illustrator, select both of those, copy
them, and then paste them. I see these options here. It is, set to default pixels. And that's going to
give us the same issue we had when just opening
it directly in Photoshop. We can't edit anything,
we could do layers. That's got a little,
because it's telling you it's going to be a
little bit complicated. We want to aim for a
smart objects creams in. Now the stick and ice
are still joined. But if we go over
to the layers panel and double click the
vector smart object, we're back in Adobe Illustrator where everything is separated. The advantage here is we can
edit the angle if we like. Let's just do something
wacky like that. And if we hit Save to Commit, when we go back in Photoshop, it's going to reflect
those changes. If we hit Undo here, it will undo what
happened in Photoshop, but it won't undo what happens to the Vector smart object. We will have to go back and
it controls there as well. Interestingly enough,
when you've pasted in Illustrator artwork into
Photoshop Vector smart objects, every time you double click to take it back to Illustrator, you're not actually
going back to your original file and
overwriting it. That is quite cool because if we make quite severe edits to this, that template file,
that vector base still says the same as it was. We are going to open that up. Just select the
stick, copy that, clear it, save that file. And it's going to reflect to be just the ice because
we remove the stick. But remember we
copied the stick, we paste it back. It comes, it is trying to
fit the overall heights of, of the canvas. Just play with it a bit there. We can also select both
of those and scale them down so we've got a
better fit in our canvas. The nice thing about these vex smart objects is they're
infinitely scalable. So if you wanted to bump
this up to a massive file, say you just felt inspired to make a billboard of
this, you totally could. Now our ice pop is
in Adobe Photoshop. In the next lesson, we're
going to start adding color. I will teach you to add it in a non destructive way so that you can still
change the angle. If you need to,
I'll see you there.
5. Colour For Flavour: In this lesson, we'll
learn how to add color to our ice cream in such
a way that it's non. Destructive. This
term and illustration refers to doing stuff
in a procedural way. That means we can still have all the editability that
we had when we first started back in Photoshop now and we're going to
start adding color. Now there's a number
of ways to do this. We could select inverse and add a fill layer
on top of this ice. I think the major benefit
of working between Illustrate and Photoshop
is the edibility. If we add a color on top of this and then have it
effect just that ice cream, we can actually change the angle of the ice cream and we don't have to
redo that color. Let me show you
how. First of all, I'll make a new layer above
the ice, incidentally. Let's rename these things. We know that's the
ice, that's the stick, it just helps us know
what we're working with. I'll go to the gradient tool and choose a classic gradient, but I don't want to black
and white ice cream. How do I edit that?
Well, I go over here to my foreground color
and background color. I'm feeling like
I'm going to make a real like wasa melon
colored ice cream. That foreground color,
I'm going to mix a nice pinky red color, go super saturated as well. For that background color, I want it real bluish green. Now this is fairly in human, I don't think I've ever seen an ice cream quite like this. But that's the fun I've illustrated with my
classic gradient selected. I'm going to go here
and it now appears my color selection that my four grounds of
background color. And with this layer selected, I'm going to drag it at roughly the same angle as the ice cream. I can edit this later. This is just a huge
fill layer essentially. I can modify this in
a number of ways, but basically now I'm
building up my ice cream. I do want to just add my color. If I hold option and click, it's going to have that color
effects. Only the ice pop. Of course, the color
is essentially obliterating all the texture that we added before
an illustrator. That's because we haven't
put a blend modes. We haven't told the color how to interact with the layer below. Over here are blend modes. It'll preview as we
cycle through each one. Your first set tends
to burn the color on, the second set tends
to add it as light. Then these ones will start applying it to the lightest or darkest areas
of the ice cream. I'm going to actually
use a combo of both. The first one is a linear
burn because that's getting the most of the color and letting the most
texture through. I can make a copy of this layer by hitting command of control J. I do still need to just
make it effect only that this one I'll
put on soft light. It's something I've used in
a number of classes now. We've got two layers
that we can adjust. If we change the fill of that, how much it's affecting it, basically it does get
a bit washed out. We need that linear burn on the bottom to give
it that depth, but I might back it off
a bit to something like 80% Then in my soft light, if I had to back that off, we get less saturation, right? We're going to have
that right up there. I'd like to change the
saturation of this directly. I'm going to hit command
control on my keyboard. Just boost that up a bit and I can drag the hue
around a little bit. I think something funny is just happening with
the green there. Another thing we can do, we can actually modify
that background color. Say I actually wanted
more of a lime green. I'm going to bring it
up there higher so it's a little bit more boosted. And I'm going to go over to
my classic gradient here with the same effects
applied and drag it again and get my new lime color. Doesn't that look
cool? All right. I'm pretty happy with that. I hope you're
comfortable with that. We've got two different layers
giving that action to it, and if we zoom up, we can see we're still getting
most of the texture through. It's got a lovely feel to
it now, especially here. It's really looking
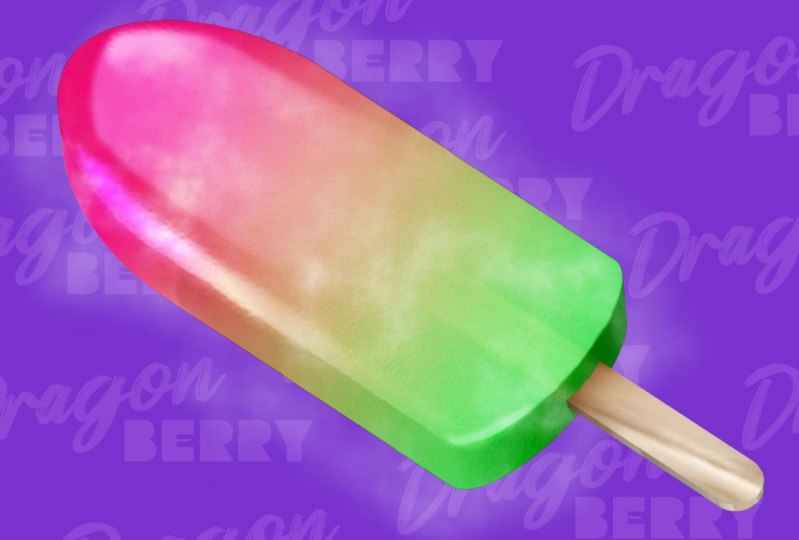
like an ice pop. You have seen how we can edit those colors after the effect. I'm pretty happy with mine. I'm going with like
a watermelon flavor. I'm going to give it
some cool part name like Dragon Berry or
something like that. I do want to sell
this ice pop here. Have fun, play
around with color. Let's see what you come up with. Cool. By this stage
you've got your color in and it's starting to
look like a real ice pop. The next step is to make the wooden stick in
Adobe Illustrator. Join me in the next lesson.
6. Illustrating Wood Texture: In this lesson, we're back
in Adobe Illustrator. And we're going to use the
Three D and Materials tool, the same one that we made
this ice cream basin, to produce an authentic
looking wooden stick. Let me show you how it's time to add a wooden
texture to that stick. There is a cool
way of doing that in Illustrator Access that. We're just going to double click that
smart object that we made. It's open again. In Illustrator, we'll be using the three D
and Materials panel. If you don't have it there, just look in your
appearance panel and double click that and then you'll get it
there on the left. The moment it's just set for the default rotation that we
had to match the ice cream. I wouldn't mess with
that individually like it needs to match
the way the ice is. Otherwise you have to
do the Reice again, you have to redo the ice again. At least we go to
materials and graphics. There's a lot of
wood options here, rest assured we're not
just going to slap it on. But let's think
about that stick. That natural Powwood for me
is the best one I can find. When you think of that
cheap basic stick that you just throw away when
you finish the ice cream, when we pop it on it,
that's not a great start. But to do that by hand would
have taken a long time. If we scroll down, we see many, many more options here we can
deeply customize the wood. The first thing we're going
to do is adjust the rotation, because we want the grain of
the wood to run vertically. Takes a little bit of fiddling. If you do this after you've
already chosen your angle. Because we can't just
go to 90 degrees up, that's actually 284 degrees. It's like halfway to a
skateboard trick or something, but fiddle a bit until it
looks natural. Looks right. If you can get hold of
an ice pop and look at the stick while you're doing
that, that's even better. But this is a fantasy ice cream. It doesn't really exist. You can have a bit
of fun with this. I believe I have a
fairly fast machine, and the more I dig into
the three D properties, the materials, it does take a little time to
render each step. Don't feel bad if you're
experiencing that too. That is pretty natural. It's a more recent
introductions illustrator. It does take time,
but that's looking pretty good. I'm
happy with that now. Now we're going to look at
the lighting a little bit. That's still picking
up its default lighting that we had
when we made it, or at least when I made the
template for the ice cream. We've got that first main
fill in the little edge, one along the side here. But there's not
much contrast here. It looks like one big blow. It's a little bit dark
down there as well. I don't think we need
anything as agro as that. If we go on light one, you can click that
and actually move it and you'll see as you
move it around the stick, either the front face or the side will start
to take that light. You may not even need to. Let's just see, as a renders, we want something
bright somewhere around there because it is a very
brightly lit product. We've got a lot of
light shining on it and a lot of light
coming through. Then that edge, that dark edge, we just don't want
to high contrast, we would fiddle with
that a bit as well. You can just literally click these and move them around
as much as you like. It's a game of
patience as a renders. But again, this is a quick
and efficient way of doing it compared to generating this
texture by handle mapping on a texture as we would
have done in the past. Down in the panel,
you can fiddle with the intensity of the light, how bright the light is shining,
but I'm happy with that. There's a lot of
other options you can do to give your
wood a custom look. If you wanted to
take this further for your illustration work, you might want a
bit more grain or a bit more contrast gnarled wood if it's been outside
for a while. Playing with the
repeats is interesting. You can get different grains
of wood if you look at wood, often a looser or a tighter grain can mean
cheaper or more expensive wood. In this case, it's good to see the final products you've
eaten a pot before, you know that it is a cheap probably pine wood
used for the sticks. That's where we
want to get here. Not too rough. They usually sand these nice and smooth
so the nice to hold. So we're going to dial
that roughness down then. Scale is always important
when you're doing a texture on something,
a digital illustration, that's what helps
it look realistic, the size of it in relation to the object that
you're illustrating. The relief is going to mean
how bumpy the wood is like. If you run your
hand along a piece of wood that's been very sand. It's smooth, almost
like plastic. Whereas if it had
a great relief, that's wood that's
maybe lived outdoors and you can feel those bumps as the softer pieces of wood have changed with
moisture and heat. You also adjust the variation of anything that
you're doing here. That means the number
of unique instances. It doesn't look like one big
texture plopped on there. Play around a bit, you don't
have to follow me exactly. You can see I'm experimenting
and playing with this. I do want to feel
out the options. I want to feel what I'm
seeing in my mind's eye. When you're ready,
you're just going to hit Save and close that. That can be control command or control command to
close the whole program. But W will just close the file. It will render everything we've done and updates in Photoshop. And that looks fantastic.
It is a smart object. Anytime we want to make an edit, if we weren't happy with it, maybe the lighting
was a bit off, we can double click that smart object and play with it again. In Illustrator,
remembering of it is just a plain vector with a bunch of effects
added on top of it. That back and forth is
the real advantage of working in the cross
flow that Adobe offers you between Photoshop and Illustrator pumps
on the lighting. I think that matches the
ice cream fairly well. It's seated nicely
in the center. It's well placed vertically. I like the slight offset there. I like the way the light's
hitting from the right inside. That's a rap on illustrating
a wooden stick. Now our stick is done, much like the vector base. We will be able to
go back and edit it. It's up to you if you're
ready to move on, that's great park the stick. If you feel like you're almost there and you
want to edit it later, we will be able to get back
to that in a later lesson. But for now, the next step is to start lighting our ice cream. I'll see in the next lesson.
7. Lets Light It Up!: We want to create a new
layer above all this. I think at this point we can
start grouping everything. So we'll just select them all and put them in a group
and call that ice pop. Or actually drag berry pop, because that's what I'm
going to call mine. Everything above, that's going
to be our lighting layer. Our colors are still the ones we chose for the ice itself. If we hit D on the keyboard, we're going to get
our default colors X to flip them because
we lights white, right? So that's what we're going
to start painting with. B will give you a brush tool. I'm using 100 pixel size, one at only 10% hardness, it's quite soft like that. I do want to also make
sure the capacity is full. While it will look like I'm painting white stripes
on my ice cream, obviously can
change the capacity in this panel over here. The first place I want to add a highlight is on
this corner here. Even with that round bevel on, it still does look a little
bit like a piece of wood. I am thinking about the lighting that the texture is inheriting where there's a major light on here and a little
fill light over here. Let's start with
that fill light. I'm going to use the bracket
keys on my keyboard to make my brush a little bit
bigger or smaller depending on using open
or closed brackets. Bracket is going to make bigger. In this case, I'm going to
paint just a bit of light coming down there again. If I hit Option on my
keyboard and click there, it should affect just
that dragon berry pop. If we invert this
to have a look, you can see it is just
on the dragon berry pop. You see what inverting
that does for our image. We can actually see the edges,
see the contrast of it. Let's leave that there and we'll set the blend mode to overlay. That's like shining a
bright light on it. That's going to give
us the idea that light shining through
this and into this. Just drop the fill
down a little bit. We don't want it quite
as intense there, pretty much where it's
starting to bloom there. I'm just going to
get my eraser tool, nice soft eraser there. Just brush away a little bit and I can lift
that fill level again as it starts to
come over the edge. There also will use
my brackets to change the brush size down and just try and remove
that edge there. I only want it to be
hitting the side. If I generate a new layer, I can do the next highlights. And I'm going to do
these all separate. We'll group them in
the end as highlights, but we want to have
a lot of control and digital illustration over
the lighting of everything. If we paint all on one layer, you're going to
get yourself into a fix where everything is going to appear at the same levels that
you'd set for that layer. Whereas on my new layer, I'm back to full capacity. Again, let's brack it down. Does help to have a digital tablet when you join this stuff, but as a beginner,
you may not be ready to invest in that
level of gear yet. Something you can do on a tablet is go to
your brush settings. You can choose a brush that
has the pressure added to it, and they go to brush
settings and start setting the dynamics of that. The gentler I press, the smaller it's going to be in. The harder I press, the bigger and more blown
out it's going to be. I'm going to try to do this in one smooth movements and
follow this curve over here. That's cool. Generally, when you
draw, you are going to run out of a
little bit of space. We're going to just click that point there by
holding shift down. Click it here again, and it's going to
complete that arrow. You can also use
my razor just to clean up the uniformity
of that a little bit, but that generally that
little wobble is not too bad. That's giving us
something quite nice and random as it starts to fall off. I do want to get my razor
and as big brush as well, just gently brush away at that. I'll probably dust
drop the saturation. The pass here at least there that I'm not
deleting it quite so much. I can move it into position roughly there on
the edge of my ice. You see if you compare it
to the hard edge there, it's softening it
really nicely there. Now, the same is illustrated
all your mods up here. There's a filter I'd
like to apply to this because it is looking
like a very neat smear. It's looking very smooth and plasticky compared
to the texture here. If I go to filter
distort ripple, it's difficult to preview here, but we can basically choose the size of it and
the amounts of it, K, how intense the ripples are. And add that on,
it's starting to look like it's answering to
some of the texture there. Let's do that and try
a different setting. Again, we'll go back to distort and ripple smaller amounts. That gives you a faker look, we do want to keep at
least the amount up. Maybe we can try
a smaller size of ripple. That's not bad. But I do think on this
particular ice cream, that medium size and
a roundabout there, look the best cool. Start with that as well. Let's try to drop the
fill a little bit. We don't want it so much
that hard edge shows again, but we will get it
up something fierce. Just brush away as it
starts to fall off. Keep your brush
in a low setting, so can get that. This is a great tool
here, smudge tool. You can just wiggle
and wobble the end around a bit and make
it fade out a bit. There, another new layer. Let's make sure
we've got whites and we're going to hit
B for our brush. We want to get that main
edge light with my tablets. You can do this with
a mouse as well. I'm just going to try and
follow that curve there. Keep it going a few times till you get something
that you really like. Then once more there
to get it thicker. And I'm going to use my Or on a smaller setting
to just shape it a bit with our smudge tool. We can also pull that
out a little bit there just so it starts to really like bloom out at the head
of the ice cream. Really get in there as well. We want to just mix that
fall off that it's getting, we are going to actually do a little Gaussian blur on
it because we want it to be, it's on a broader surface. It doesn't have as much
edge to catch there. Nothing too much, probably about there also puts on our ripple. That's great. Let's drop
the fill a little bit cool. That looks good now because
it's on a separate layer, this is our advantage
we already have. We can move these individually
anyway that we like. I did want this to be a little bit closer to the edge here. Can also hit command or
control to rotate it a bit. We want that finite
control of the ice cream. Let's do one for
the bottom as well. We still brush tool and we're
still painting edge manic. Want to get nice
and close there? Just trace out a good edge there using that
pressure sensitivity as well and using the eraser to
just paint out that shape. Another cool trick
is under Noise. There's a setting called median, which aggregates everything it globulizesIguessee how it automatically
fades out that edge. For me, I do like to use
that on a sharp boom like this that we're going
to drop right down. It's just a hint of what's going on down there at the bottom of that ice cream. See how it's starting to take
a bit of shape and form. Now let's go back to that
side highlights and turn the layer mode off and see
what we're looking at there. On that same layer
with our brush, we would actually, let's put the fill back up and we
would actually like to paint, get in again. I think we got rid of a
little too much of it there. You can do this nice
little curve around here. Curves there, snakes there. Let's put it back on
overlay and we'll get our razor on a
really soft setting. Use our hard bracket keys to just just the size
and brush away that. But we do like that
little tangent there. Now let's just pull that fill, do carefully so that
we can see it's light affecting the ice and
not part of the color. Now the next thing is a major ambient light going on this ice. So we're going to make
a new layer again. I'll put it below
all the other ones. I'm going to use my
selection tool to essentially drag a little bit of a shape roughly the
size of the ice cream. It does take a while to get
to do it as fast as this. I'm going to go to
my gradient tool. Again, I'm still on
the classic gradient, but I only want to have
the whites the foreground. And I'm going to drag
that down once more. That looks pretty cool. I'm going to drop it right down from a full point of view, I'm going to use median under noise to aggregate
the wobbliness there. Can you see the effect
it's starting to have? Just smoothing it out a bit
there. That's a lot better. Come on tea again to rotate. But now we're starting to get
a lot of complexity here. We're starting to get
these harder halls and we're starting to get
this extra refracted light. There will be one more trick
I'll show you as well. These ice creams
aren't really as transparent as I'm
going to do it, but it does look super cool. A mark up like that. Let's bring the fill
up a little bit more and then I'm not going
to use ripple this time, I'm going to do a
Gaussian blur again just to make it less specific. Cool pop is really
starting to come together. Now at this point,
if you haven't yet, which I haven't, it's a great
idea to save your works. I'm going to call
the dragon berry pop and save it somewhere in particular on my computer
that I can find it Again, we do have these
all editable now, so we can change the
intensity of any of them. It doesn't hurt to
name your files. Right highlight for
example was left. This is just a bit easier to track if you can't
see what's going on. Right edge. That was the
side light that we had. I call this mean ambience. You might want more or
less than I've got here. But the fact that
they're all separate, I can continue to edit the position and the
intensity of each. Let's use shift click to select
them all and put them in a group and call that lighting.
8. Illustrating An Icy Texture: We've got our base, we've got our colors, we've lit it up. And now it's time to
illustrate an icy texture. That's that frosting
that you see when you pull it right
out of the pack. We want to add some icy
frost When you pull one of these out of a
sample container, for example, or a fridge at a petrol
station or something. It's going to be ice cold. It's going to have instances
of frost all over it, and it's going to have
icy vapor coming off it. To do that, we're going to make a new layer on which to work. We use a filter.
Again, this is in render and it's called clouds. Oh dear Lord. Let's set this screen
and see what we get. Let's look good. Let's also have it affects just
the ice cream layer. That's not so bad. I would
pull the scale down a bit. I only want it to affect the ice and not too
much all around it. This is going to be the
ice that's going all over, or at least the frost
that's on our ice cream. Let's call it frost thing. Actually you can see that by default it's actually
just black and white. We can hit Commando
Control our levels panel and start playing with the contrast
of that to make that general
whiteness disappear. We've got shadows,
highlights, and mid tones. With the mid tones,
we're pulling those out. We can make the highlights more intense and use that to be the contrast That
looks pretty good. We hit command or control to see the full edges
of what we've got. Because we drag it off, you're going to get a hard line there. We don't want to do that. Let's drag it until it
feels like something good. We want little bits
catching all the edges, but we don't want
it to interfere too much with a highlight. Something like that
is pretty good. Let's also drop
the fill of that. It's a bit more vague,
just something subtle. We can set command or
control J to make a copy of that and make it
slightly more intense. Then we're just going to brush away the bits that
we think would interfere with our
main highlights, Just the parts we don't need. But I love this piece down here where it's coming
near the stick. We're going to get
great contrast there of the stick going through
and the ice going onto it. Now we can drag
the base one down further and we've just got these extra hardcore
highlights down there. See where we're going
with this. We want to build everything in layers. We want to have it
super, super editable. Because this is a copy of this. I do want them to
be linked together. I'm going to go down to
the bottom here and hit this little chain link thing. If I have just one selected,
they will move together. What about the icy vapors? For that, we're going to generate a new
layer above there. We'll go to filter and
render clouds again. This time we're going
to move that right behind the whole
dragon Berry pop. That's outside of this. What we're going to do here
is use this to generate a layer mask because it's one big solid layer
of white or black. There's not a lot
we can do that. If we put it on a blend
mode, we will get it. But it's going to depend
on each and every way, which blend mode we use to
make the black pots disappear. If we build a new layer here and fill it with whites by
adding option backspace, we're going to select by
adding commando control, a cop switch that off click over here to generate a
layer mask to get in there. When we click it
and paste it in, we can get rid of that
original clouds layer. We're going to call this vapors spelling or with this
layer mask selected. Let me just show you if
I change the color of this background to
something like blue. See how it's just the white. Now, wherever it's white here, it'll let this layer through. Wherever it's black, it'll block that layer that looks a lot more like the
vapors we wanted. Also in this layer mask, we can non destructively paint out where we want this to
be using our brush tool. And black if I drag
through there, it's basically not
going to do that. These vapors, this
thing is not nitrous. It does need to be fairly
close to ice cream. And I'm basically just going to gently paint all around there. We don't want to too
much by the stick. Just get some soft
vapors coming off there. You paint what feels good. And you're not going
to go as fast as me, but I don't want to keep
you here all day slowly, slowly trying to get
some variants there. I'll click in here
as well to make sure you haven't missed
any spots like that. For example, is getting
quite close to the top. You don't want to have
any outliers here. Now we should almost be done, but can you see
what we've missed? That's right, this stick
needs to go into the ice. Just take a small break and
then in the next lesson, we are going to look at how to get that embedded
beautifully in there with all the right final shading and everything to make this
complete illustration. In this lesson, we learned all about those atmospheric effects. We've put particles all
over our ice cream, and we've got some icy vapors
coming off it as well. And we learned how by setting those up properly
and using the opacity, we can have final control over those depending on where
they're going to be used.
9. Stick in Ice: All right, welcome back.
Since we last saw each other, I decided to just
clean up a little bit. I went over to the vapors
and just dropped the filter about 35% because it
was looking unnatural. I usually keep this
super editable depending on what
we're going to put on. At the beginning of
the class, you saw this Dragon Berry products on top of a big drone
footage of the beach. For that we had to pump
up the capacity of the vapor so that
you could still see them on a light background, on a dark background like this. We could probably even
take them down further. You just want it really subtle, but let's stick with somewhere
in the middle for now. Also took the liberty of
bringing the frosting down into Dragon
Berry pop group. I think just from a file
organization point of view, it makes sense because while it is a separate layer
is the ice cream. The frosting is part
of that as well. It is actually the water of that product frosting together because of the cold
of the fridge. So it makes sense to live
together. That is our pop. The lighting is
something that can move. It's an external
force, essentially. Now we're going to look
at adding the stick. We essentially need
two sticks here. We need one wooden
one that sticks out. We need another one
that's going to be in. The reason we do that is
if we use a layer mode, like overlaid or something, the overlay looks fantastic. It looks like it's
inside the ice, but so does the outside. Let's start by deciding where
that's going to insert. Roughly the halfway mark there and the
halfway mark there. Grab the polygon, the
polygonal lasso tool. You can also ill on your
keyboard, I'll tell you why. If you look at the
structure of the stick, we can't go straight across. We're actually going here. The ice, click, click, click, and then down. It has to join at that point, basically because that
stick is a three D object. Then let's carry on
with a path all around and take it back
to the beginning. Then we're going to hit
a layer mask on that. This is going to be our stick
that's stuck in the ice. Now if we hit command of
control J to make a copy of that layer and click on that
layer mask and invert that. We've got our original
stick that's outside. Let's call that outside stick. Let's call this
one inside stick. It doesn't really matter which
one on top of which one, but we know that overlay
look pretty good for the inside one ready with one blend mode and a
small little shifty on using the same
layer object twice. It does look like it's
inside the ice cream. Soft light takes
it even further. I think that's reasonable. If it's overlay,
it's as if there's a light shining through
it from behind. Soft light as a layer
mode looks a little better then also in
that layer mask. We did learn in fact,
let's go over it again. If we click to get into that layer mask to
reduce that edge there, soften that edge so
we get the fall off. This fades away as it
gets deeper into the ice. We are going to just
get our gradient tool again, our classic gradient. Go to the basics
and make sure it's the one that's only
a foreground color. If yours are like this,
for some reason just hit X and it'll flip that
default back to the front. Then we're just going
to drag our gradient down, something like that. When we go back to
it, see other sticks fading away. This is live. If we disable that effect, the whole stick is still there. In fact, if we double click that it will still go
into illustrated. We can change the
angle if we like, but if we enable the layer mask, it's inside the ice
and it's disappearing. One trick here is you've got to consider that
ice gets more opaque. The more frozen it is, It's not like we're looking
through a pond here. This would start to blur out a little bit as the
ice went around it. Keeping the vector
smart object protected, we are still going to add a Gaussian blur and put it somewhere sensible can see what it looks
like on and off. It's very subtle,
but it does make a huge difference that's actually added that
as a smart filter. It hasn't destroyed this.
I'll prove it to you. If I double click that, it
will land back an illustrator. That's pretty cool.
For the inside stick, we can collapse that. It's nice and neat.
We've got outside stick. All we really want to do on
this is add a little bit of shadow here because we can
see that ice is in shadow. It stands to reason
that the stick would inherit some
shadow as well. Strictly speaking,
there's a large light hitting the ice cream over here. That light is not
going to be able to wrap around that edge. Let's make a new layer
just above there. Let's get our Eye Dropper tool, which will let us sample
any color we want. In fact, you can
even Photoshop's own background color
will reflect there. Absolutely anything
you can reach with this eye dropper
tool, your sample, We're going to go for that darker texture
there and see how it's picked up that dark texture that we had on the stick there. We're going to hit
for our gradient tool again and most likely will just be that four ground to nothing color but
just double check and make sure you've
got that one. It's fairly monstrous option click so it affects
only the stick. Let's set that to multiplier. Now we're starting to
get a real feeling from the exact same stick
that we have in Adobe Illustrator using these live smart filters on Photoshop
and certain overlays. So we have color, that
would be the whole canvas actually land only
on that piece. We are getting that feeling
of a stick going through. I think what I'd like to do here is brush in the same color. Again, I'm going to set the
gradients also to multiply, It's going to put
another instance of the same color over the
one we already did. And I'm just going to
do a short little pull there longer. Now we're talking,
I dragged it out to roughly the same position that this would be out from the thickness of that ice cream. And it's really looking good. That looks fantastic.
Now that that's so dark, we need to drop
this one off a bit. Let's take that fill
down a little bit. We really want it
to be barely there, but it is nice that
it's going in. I do think this layer mask, I think we can brush
that in a bit. When we go on the layer mask, you'll notice the changes
to default colors. It's already on our
classic radiance. We'll just pull that down a bit. That's looking a lot better. If we come in real close, we can see it's going
into the ice cream here, but that it is
tailing off there. And we do have that
gazan blue applied. Put it a little more severe. I think that's great. It's just a hint that that
stick is going into the ice. I think that's
looking pretty good. This is very decent for
an intermediate level. If you're a beginner
and you've done this, consider a gold star from
me because it's not easy. I have done a lot of
these and it still requires quite a bit of
thinking each time you do it. At this stage of the class, you should be wrapping
up the design of your awesome illustration. In the next lesson, we'll
learn how to save that thing professionally and exports it
for different resolutions.
10. Saving & Exporting: Professional saving
and exporting. Yes, we all know control or command S depending on which
platform you're working on. But I'm going to show you the professional digital
illustrators way of cleaning up your file, saving up different versions, and a neat trick for halving the file size of this massive
PSD that you've got, right? Let's look at saving this.
Obviously you can hit command control and it's going to save it wherever you
first saved your file. I do hope you've put that somewhere safe that you can find it again, should
that be the lesson. Well, no, not
quite. Actually, we want to save a few
versions of this. First of all, do yourself a favor and to anyone who might pick up this
file in the future, let's clean up our layers so that when someone opens this and sees all this and might not work in the
same way as you do, there's a little bit of a
trail of breadcrumbs to show them what you did and how
they might edit it or use it. The first step is to
collapse all your layers. Anything that's
sticking out like smart objects and edits. We want to name these,
let's put color fill and then the layer
style that we use, linear burn, I'll select all of that and paste that name there. And we're just going
to change Linear Burn to soft light while we click on this and we
can see what it does, it just helps someone when
they first open the file, see what's going on, they
can see that's a vector. Smart objects, they
know that's the ice. I think that's
totally acceptable. That's the stick. We
can see it's the same. Whichever one they click, it
will take them to the same exact illustrate
a file at least. But we know that's inside
stick and outside stick. And we can see from
that underline as well that that's
got something special happening to it there. This one here, we just
want to put stick shadow, that lovely stick shadow. We should have everything
named there. Frosting copy. I think that's acceptable because we do want to be crystal clear that it's
the same exact thing, vapors we had as well. Background. Let's
look at a cool trick. A cool trick to get a
perfect background color for whatever ice flavor you've tried is go ahead and
select one of your colors. Fill the background
with that color by hitting option backspace. Now go command or control
which will invert it. Now on mine, that's
the perfect opposite on the color wheel to that pink. But because I've got
a similar green here, it doesn't actually
work so well. Let's see what happens if I select maybe that green there, fill the background
color and invert it and it goes to a pink,
which is that one too. If you've got a plain
colored ice cream, you're already done with your
perfect background color. Me, I am going to go back to that blue color because I think it's a near complementary
to either of those colors. They're both stand off. If it went a little
bit more to a purple, we would be getting
somewhere next to secondary color scheme. We file nicely organized. Now let's collapse
all the layers. We've got vapors there,
background there, the dragon berry pop
itself and the lighting. We do want to link
these together like we did before because when we
move it, it all goes together. If we didn't link them and we move just the
dragon berry pop, the highlights are left behind and it's hard to
line them up Again, the vapors I don't think is essential to link
to it because if we move that somewhere there,
it's easy enough to move. The vapors are a general thing. But also remember we do
have the option to go into Illustrator by double clicking this and changing the
angle to whatever we want, see how it moved, but that still retain
all its same color. That was the value in
doing these as overlays. I can undo that
there. But remember I do have to do the same
to the smart objects. I'll save that. Close that. Let's collapse everything. We're going to make
sure we've saved it with a proper file name. That's our master file size. Nice composition and
breathing space around it. We can save another
one for social media. Maybe we want to make the background a
little more exciting. For that, I've come on
you on my keyboard to get to saturation and I might
like to go more purply, play with the saturation
a little bit. We can do a quick export as a PNG and save it in the same space and call
it dragon berry pop. That will give us a P and G
that's the same size as this. It's going to be a
fairly massive file. Another way to have more
control over that is to hit command option shift
and we get to export. As we have a great degree
of control over everything, we can change the scale to maybe 50% get a smaller,
more manageable file. We can switch all transparency,
we don't need that. Check all our settings and
then export the file again. We're going to put it into
the same place as before and maybe call it
social or small, and that's going to be a
smaller version of our file. Now when anyone opens
this project, again, they can see a small
preview of the file. But they've also
got a large export as well as the full
editable file. Now there's one
other trick that I always love to show
in my classes. Bear with me, this is just over 30 megabytes,
which is not terrible. But if you had to transfer
this file to someone, you're going to
wait quite a while. How can we reduce
this file size? Well, one way is to compress it. We're going to go right click on our mouse
and compress it, and we're down to
16.6 megabytes. Let's see if we can
get it even smaller. Back in Photoshop,
let's switch or fall the layers and
hit command S to save. Now let's compress that again. That's 14.9 megabytes. We've actually saved
almost 2 megabytes just by switching
the layers off. If someone were to
unzip that open, that transparent
dragon berry pop, they only have to switch
on the visibility of these layers and
they're right back. We got this original file from more than 30 megabytes down to less than half its size just
by using the simple tricks. So keep that in mind for
all your Photoshop work. By this stage, you've learned
everything you need to know to build the ice
cream from the ground, from that base,
adding all the color, the lighting, the
texture, the vapors. And you even learn how to save your project up like a pro. We've just got one lesson left where we'll think
about everything that we've done so far and
talk a little bit about the career possibilities of digital illustration like this.
11. Final Thoughts: This was a jam. I had a lot
of fun teaching this class. It was great to share a
slightly modern twist on a classic technique
I used for countless, countless, countless ice pop renders that made it out into
the professional markers. As I said at the beginning, this is how I really cut my teeth. As a digital illustrator, I would suggest the
same advice to you. It does take a while
to find your lane, but if you can find a project, hopefully this is one of them where you can do
it over and over again. You can grasp the principles and apply them over and
over without needing to always go back and refer
to where you learned it. So a person or a
sheet or a tutorial, then you know
you're on your way. And it goes from there, you end up getting a wide
repertoire of styles. You get a wide repertoire
of techniques. And you learn how to take
those techniques and apply them proactively to
different kinds of work. For example, the ice
and vapors that we learned could be used for an awesome Halloween
illustration, where you want to make a lot of atmospheric mist, for example. It's exactly the same process, and the way we added color
and applied it just to that layer can be done for a
number of different things. If you want to do
an illustration of a sky or something and change it without having to cut around or put it in the background
or layer it up too much. It's the same process. I thank you for
taking this class. I really appreciate
you sticking around, and I'd really love it if
you could review this class. Reviews mean a lot
to me because I do read every single
one of them and I apply everything you put into that review into
my future classes. Finally, if you
enjoy this class, please consider following me on Skillshare, on my channel. It's the best place to
see all my other classes and stay up to date with
anything new that I've produced. Thanks again. I'll
see you soon. Cheers.
 Paul Oxborrow, Graphic Designer & Illustrator