Transcripts
1. Introduction: [MUSIC] Hi, I'm Auka,
a Dutch designer, engineer, and maker with over 10 years of experience
in designing architecture, such as tiny houses, cabins, products, and interiors. My work is mainly
focused on minimalistic, sustainable, and timeless design made with
natural materials. Together with my wife and kids, we're constantly looking
for new adventures. We love to live a
lifestyle full of creative expression by sharing our ideas and designing
new products. I've produced a series of smart compact homes
in the Netherlands, and besides that, I do a lot of custom-made woodworking
project myself. I love to work out an idea, then quickly draw it out with scaling SketchUp, and
then make it happen. This course is part of
a new series especially designed for interior
designers and home stylists. In this series, I
teach you step-by-step how to become a professional
interior designer. In this course, I
show you how to make a 3D floor
plan in SketchUp. The 3D floor plan is a great
way to impress your clients, friends, and family
with your ideas. It tells you way more than
a sketch or 2D floor plan. You can place furniture, styling objects, and
colors and textures. But at the same
time, you're making a realistic and makeable design with the right dimensions. When you're not
familiar with SketchUp, this is a great place to start, because I tell you
everything you need to know to get started. I try to be clear and focused on the right topics so you exactly learn what
you need to learn. SketchUp has many tools and functionalities,
but in this course, I only tell you the tools you need to know and understand, so it becomes tool you can
use the rest of your life. I use SketchUp in pretty much all my designs and made over a thousand
3D models so far. SketchUp is a great tool because it works
fast and intuitive; it's like making
a digital sketch, but then realistic and precise. I've received many questions
from people who ask me how I can draw this
fast and efficient. In this course,
I'm going to share a bunch of my secrets, tips, and tricks about my workflow
and way of working to create a professional 3D floor plan with the right look and feel. I'm sure this course
is going to inspire you and help you to get
started right away. Let's get started.
2. Setup Sketchup: [MUSIC] Setup SketchUp. We start with setting up Sketch. Go to SketchUp.com. SketchUp is a free program
that you can use online. It is perfect for
interior designers because it's super
intuitive and fun to use. Your clients will love
to functionalities of seeing the end
result of your design, and you will be able
to walk through the design and present it
in a professional way. Click on Plans and Pricing
and go to Personal. Sign up for the free web-based
version of SketchUp. You can also buy a pro version, but it only has a few
extra features that are more useful for
architects and engineers. You can start designing
and drawing right away. First, it's important to
choose the right template, and that depends on
whether you like to work with inches, feet,
or millimeters. Choose the right template. I choose millimeters, and click on Create New. You now enter a 3D world
where everything you draw is displayed
on a one scale. This is very nice because
it allows you to create a realistic design for
your client or yourself, and you can work very precise. SketchUp has a lot of tools, functions, and a lot
of possibilities. I've been working
with SketchUp for over 10 years and I can
say from experience, as you really only use
10 percent of them. In this course, I
will focus exactly on those functions and
it will give you a quick start with
immediate results. Because of this, you will not
drown into possibilities, but we can practically
get started. Each step, I will tell you a little bit about the
tools and functions while you can apply
them immediately in your own 3D floor plan design. I always learn best when I
can apply it right away. On the left side you see
a row of icons with tools mainly intended for navigation
and drawing shapes. If you click on
the little arrow, more options will appear. On the right side are more options about
the 3D model itself, how would you organize
the model with tags and scenes, for example. Before we start, we need to set a few things so we
can start right away. First, we go to Styles and then click on Default Styles, and then click on the style
Shaded with textures. This is the standard
style I always use, is will give us a
more detailed view with a white background
with textures. Then click on Scenes, and then on parallel view
instead of perspective, this makes it easier to draw straight lines and gives it a professional
architectural look. When you've done
that, you can save the model and
you're ready to go. Click "Save" and give
your model a name. Class project. Create a free SketchUp account. Setup the right settings, and save your project. [MUSIC]
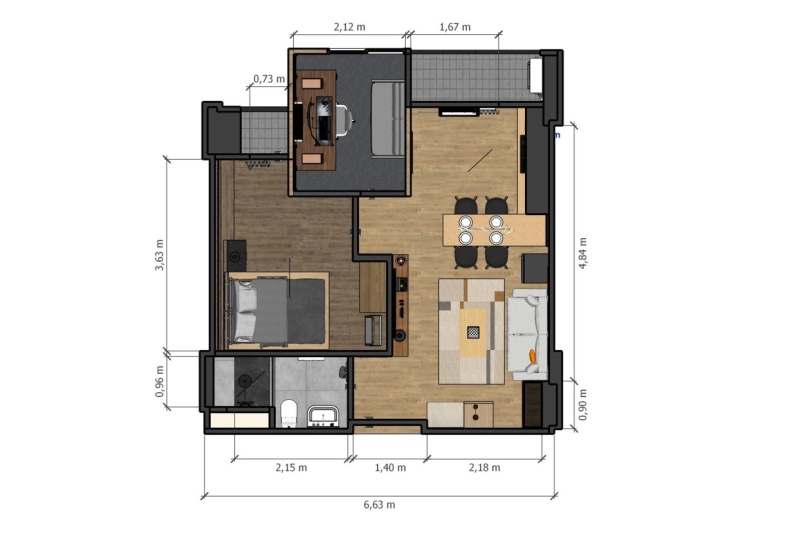
3. Import & Scale: [MUSIC] Import and scale. Imagine you want to create a
3D floor plan for a client. Then you will need
a floor plan of the building you
want to decorate. In most cases, there are
floor plans available in PDF that you can request
from the builder, or you may still be
able to find them on the real estate
agent's website. This doesn't have to be
a complicated floor plan with a lot of measurements
and information. It can be as simple black
and white floor plan with at least one dimension or
information about the scale. In my case, I take a traditional building from the town I live
in as an example. This is the website of the real estate agency
with pictures of the building and a simple
floor plan as you can see. It's helpful to gather as
much information as possible. This way your design will
be detailed and realistic. Make a print screen of the floor plan or
save it as a file. It's important that you include
at least one dimension. Now you can import the
floor plan into SketchUp. In the top left of your screen, go to Insert and locate
the file you just created. Then click ''Insert'' as image. Now you see that the 2D picture is attached to your mouse. Double click with your
mouse or click once to set the starting point of the picture and the second
time to set the size. I like to view the
plan from above. Again, you can do
this by going to Scenes and then
clicking on Top View. There is no shortcuts
for top view, but you can make one by
clicking on the Search bar. Search for top view, and change the shortcut
to Shift plus 1. Now, every time when
I hold Shift plus 1, it shows the top view. Before we start translating the 2D floor plan
into a 3D floor plan, I want to walk you through
a few simple tools that will help you navigate
into 3D world of SketchUp. The first and the
one you will use the most is orbit. Shortcut O. If you click with your
mouse in the middle of the screen and drag it left
and right or up and down, you will see that you can
rotate around an object. By zooming in on the object, you can easily navigate
around the 3D model. Next to orbit, you will use the pen tool or
hands tool a lot. Shortcut H. When you
drag with your mouse, you drag the position
of the object, but it does not rotate
the view of the object. This is very useful
when you want something in focus without
rotating the view. It's helpful for your
own workflow if you can remember these
three shortcuts, O for orbits, H
for the hand tool, and Shift plus 1 for
the top view tool. This way you can
quickly navigate and move around
in your 3D model. If you learn this beforehand, you will see that
you can progress quickly without having to think about navigating
all the time. Now we go back to
the floor plan. You've now imported
a screenshot photo or picture of a
certain floor plan. Only this is probably not the
same skill as a 3D model. If I zoom in on the size, for example here, you see 7.41 meters. But the measurement tool
says 836 millimeters, so it's way too small. Now there is a handy
trick to scale the whole model so the picture will match with the size
that's in the model. Click on the tape
measure tool on the left and zoom
in on any size, preferably one with a
clear start and end point. Click on the beginning of the measurement line
and on the end. Try to do this as
precise as possible. Often images become a
bit blurry when you import them into SketchUp,
but that's okay. When you have clicked
on the end point, type in the correct size. In my case, I see 836, but it should be
7,410 millimeters. So I type in 7410
and press ''Enter''. Now you will see a
pop-up screen that says, do you want to resize the model? Click ''Yes''. You have now resized your entire model to
the correct size. You can test the
other dimensions to check if it went well. If not, you can do it again. If it seems good,
your model is now at a one-to-one scale
with a 3D model. Well done. Now we're ready
to start drawing the walls, doors and windows, and transform your 2D floor plan
into a 3D floor plan. Class project. Import a picture
of a floor plan, practice with the shortcuts, scale your model to
a one-on-one scale.
4. Drawing outer walls: [MUSIC] Drawing the outer walls. Okay, in this step, I'll show you how to
draw 3D volumes easily. You already have a base on
scale that we can build on. We only have to trace the
lines of the 2D picture and transform them into 3D
volumes. Sounds easy, right? I will show you a few handy ways to do this quick and precise. Of course, the best way to
learn this is by doing. The best thing is to first watch the whole class so you
notice steps I take, and then try it yourself by following the class
project assignments. How does this work? Sketch up things in lines and when all
the lines are connected, SketchUp fill them
in automatically. You can quickly draw a square or rectangle
with the rectangle tool, which I will show you later on. But when you need to
trace a floorplan, it can sometimes be more convenient to draw
it line by line. You do this with the line tool. Shortcut L. Make sure you
are in parallel view, like I show you in
the previous lesson. This way you look to the model from above and it makes it a lot easier to draw
straight and proper lines. Make a starting point
and make sure you draw a line straight with
your mouse over the red, green or blue axis. Red is the x-axis and goes left to right when you
view your model from above. Green is the y-axis and
goes from bottom to top. There's also a blue
axis only we don't see it now because we see
the model from above. The blue axis indicates the height we're going
to use later on. Red and green are on the
same 2D plane level. So when you see them while
you're drawing a line, you know your drawing
in the right direction. It's super important
that you follow these directions, red and green. Otherwise, you will get lines with an angle
that are skewed and your model will get messy and out of proportion
very quickly. So if we want to make 3D shapes, we need to make sure that all the lines are
straight and square. When you see the red line, type in the distance
to line needs to become or choose an endpoint. When tracing a 3D floorplan, I always try to use logical dimensions
or rounded numbers, so no numbers after
the decimal point. So for example, 100, 350, etc. But the best thing is to
use the sizes that are mentioned in the floorplan
if there are any. That way you get a
well-defined model where the sizes fit
perfectly together, which will result in a
realistic and detailed design. All right. Start by
drawing the outer lines of the floorplan and make sure you move straight
across the axis. When you've been
all the way around, you will see that SketchUp
automatically turns it into a plane and gives it
a white or gray color. White means above,
and gray means below. When it's gray, you have
to flip the plane by right-clicking on the plane
and press "Reverse Faces". The plane means that
all the lines are on the same level and
connected properly. If SketchUp doesn't
make a plane out of it, you have made a
mistake somewhere, or some lines are not
connected to each other. Double-click on the lines to see which lines are
connected or missing. Now we go to determine the thickness of the outside
wall of the building, or at least the most common
thickness of the wall. In my case, that is
300 millimeters. You can measure this by drawing a line or using a
measurement tool. Then we come to a
very handy tool to turn the large
plane into a wall. So you don't have
to do this by hand. You do this with
the offset tool, shortcut F. Move your mouse over the plane until you see
all the little blue dots, that mean you have
selected the plane. Now click on the outer line of the plane as a starting point and move your mouse inwards towards the
center of the plane. Now type in the thickness of
the wall and press "Enter." So in my case, I type in 300. You will now see that
SketchUp created an extra line inside the
wall with an offset of 300. To keep your model a
little bit organized, I always make each plane a
separate group by default. So here you see two
separate planes, the outer wall and the floor. Double-click on the plane
of the outer wall and make a group by right-clicking
Make Group. All lines and planes that
you've selected now belong to a group which you can edit
by double-clicking it. You can leave the group
with the Escape key. You can also place multiple
groups in a group. I stick to the rule that everything should be a group
when I draw something. When you do this also, you can easily move parts and objects away from each other and you can organize the model by giving names to the shapes. But I will come back to this
later on in the course. First you go back to the outer
wall we've just created. We will delete the floor or
the middle plane for now. This is done by
double-clicking on the plane. If you only delete the square and not
the lines around it. So when you only click once, the outer lines will remain and your model will
eventually become a mess. But when you double-click, you select everything
that is connected to each other and isn't a group. Now the other walls
still remain. This is the base of
the building and you can edit it
here and there by thinning or thickening it and drawing cutouts for
the windows and doors. The best way to do this is to
change your style to X-ray. This will make all the walls transparent and you will be able to see the important floor plan while working on the outer wall. Go to styles, click
on Default Styles, and then to X-ray. We're now going
to indicate where the windows and doors should be. Go to the top view
again and zoom in on the places where there
are windows or doors. Double-click on
the group and draw a line where a window
or door begins and end. Keep an eye on the sizes mentioned in
important floor plan, which might tell you how
wide the openings are. But often you have to
determine these by yourself. I always try to use logical dimensions
or rounded numbers. No numbers after
the decimal point. Go around like this until you've traced all the other walls. Now we're going to fine-tune the exterior wall with
a push/pull tool. This is the magic
trick the SketchUp is well-known for, the
push/pull tool, shortcut P. With this tool, you turn a 2D surface
into a 3D object with a simple push by simply pushing
the 2D face up or down. Now we can give
the wall height by typing in the height
from floor to ceiling. It's often the case that the ceiling height is not
stated in the floor plan. We have to estimate this one. I have a few handy
tricks to do this. To know roughly what
the ceiling height is, you can easily
determine this from a photo by looking at a door. Doors often have
a standard size, depending on the age
of the building. All the doors are
often two meters, slightly newer ones
are 2.15 meters, and the newest are 2.35 meters, not counting the frame. In my case, I estimate the ceiling height
to be 2.9 meters. Because I see a door, I guess is two meters because of the age
of the building, and the door fits a little less than two times
in the wall above the door, which gives me the total
distance from floor to ceiling. Another tip is to
count the bricks, which also often have
a standard size, and when you add them up, you also get a fairly
accurate measure. In this example, you see
a brick wall which has 37 rows of stones and a large
plinth or skirting board. On average, there are 20 rows of stones per meter in a wall. That means dividing 37
by 20 is 1.85 meters. Including a plinth means a
door height of 1.95 meters, which comes pretty close to
the estimate I did before. Above the door, you
see 18 rows of bricks, and 18 divided by
20 is 0.9 meters. Again, the total height
is about 2.9 meters. I think I'm about right. It may sound a lot of work
to count the bricks in every room but of course,
that's not necessary. It's about getting the
general measurements right. The rest of the measurements are based on your
floorplan template. Let's go back to drawing the walls so you can
enter the height. Click on a spot that has to
become a wall and push it up. In my case, I type in 2900
millimeters and hit "Enter." Now I go around the
outer wall and push up all the pieces that
are at ceiling height. To do this quickly, you can activate a
push-pull tool and move your mouse to an endpoint
at another wall. SketchUp will automatically
take the same height. Go around like this until you
have created all the walls. Now you can start to draw
the walls under the windows. Look for a photo
where you can see the size of the space
under the window. In this photo, you can see that the windows extend
quite far down. I estimate the length
at 500 millimeters. I type in 500 millimeters
and push to surface up. Sometimes above a window, there's also a piece of wall. Determine the beginning
point and draw a line. Here again, you can easily use a push/pull tool to fill
the space around a window. See how easy it is
to draw shapes. There are many ways
to draw a shape. You will see that
you quickly get the hang of what
works best for you. Sometimes you don't quite know
what the sizes should be, but try to determine as best you can, and
think logically. The more you draw, the more you learn
about the building. If things got illogical, you've probably made
a wrong assumption about the sizes, but
it's totally okay. Just go back and adjust
it a little bit. Now I showed you how to draw basic 3D volumes and
make an exterior wall. Moving on to the inner walls, I will show you a new drawing technique in the next lesson followed by some important and useful tools
within SketchUp. This way, your floor
plan becomes more and more detailed and realistic. Class project. Draw the other walls. Practice with a line, offset, rectangle,
and push/pull tool.
5. Drawing inner walls: Drawing the inner walls. You can now change the style
again from x-ray to default. The x-ray is
especially useful for seeing the imported
floor plan picture. Go to styles and choose to shade it with
texture style again. If you like it, you can also set a view mode to perspective
once in a while. But this is personal, some people like to draw
in perspective mode. You do this in scenes and
press perspective mode. Now your model gets a more
realistic experience of depth. The objects that are closer are bigger and those that are
further away are smaller. Drawing the inner walls. The inner walls make the spaces
of the building visible. But for this, I will teach you
another drawing technique. Another way of drawing walls is to draw individual wall volumes, with multiple smaller groups. We're going to do this
with the rectangle tool. The rectangle tool is the easiest way to draw
rectangular shapes. The shortcut for this is R. When you've activated
your rectangle tool, you can point with your
mouse to a spot as a starting point and
you choose an endpoint. When you want to make
a precise measurement, you can also enter the dimensions with
a comma in between. For example, when I
want to draw a shower of 1,000 by 1,000 millimeters, then I type in 1,000, 1,000, and press Enter. You can use the rectangular
tool to quickly draw walls and then stretch them
with a push-pull tool. In my case, I estimate
the thickness of this wall is 100 millimeters. I type in 100, 100. Then I pull this up with push-pull tool and extend
it to the endpoint. [inaudible] so 2900. After that, I use the push-pull two to
stretch it to the end of the wall or a point where
I meet a door opening. Again to make the modal logical, choose logical numbers, but also keep an eye on the
import to the floor plan. Make this single wall into
a separate group again, to keep it all organized and
easy to move. Moving things. This brings us to perhaps the most important
tool you'll be using a lot. The move tool, shortcut M.
When you activate this, you will see that our group gets little dots in the corners. When you move your mouse
over a certain point, you can move it from that point. This is why also
draw everything in groups so you can move
them easily and precise. Another great thing about
organizing your model in groups is that you can move objects
according to a set distance. You can do this again
with the move tool. Grab a starting point, for example, on a
corner of a group, and start moving your mouse in a certain direction along an axis and type
in the distance. You can also duplicate
objects with the move tool, which I use very often. You do this by pressing alt at the moment you
move the object. You use this when objects are similar or have the
same thickness, such as interior walls. This way you don't have to
draw a similar shape again, but you just adjust one
you already created. For example here,
it's quicker to duplicate the wall and adjust it than to draw the same wall again because it has the
same thickness and height. After that, I just use the push-pull tool to
shorten or stretch the wall. By duplicating and entering
a size between the objects, you can also work very precise. For example here, I
see a door opening and I estimate the opening
is 900 millimeters wide. First, I click on the
wall I just created. Then I press M for move, and I'll choose a corner. Then I press Alt for duplicating and place the
wall next to the other wall. Then I move it by
900 millimeters, by typing in 900
and press Enter. Without drawing
anything, I've created a new wall and a door
opening with a few clicks. I will show you
some different ways to draw the same thing. But you can also just
use the push pull tool, or draw everything line by line. But you will see that
for some 3D volumes, you sometimes need other tools to draw it easily and precise. That brings me to the
last very handy tool for drawing shapes
of this lesson, the scaling tool, with which you can scale
or stretch things, shortcut S. The advantage of the scale tool
is that you can stretch an object with a
single movement without having to go into the group
by double-clicking, etc. It's a very fast way to
stretch certain objects, especially handy for walls. When you click on a group
and activate the scale tool, you see that the group gets all yellow lines with a lot of green squares
on the corners. These are the anchor
points from which you can scale or stretch
the objects. If you scale from a
corner of the object, the object will scale totally so to hide the length
and width of the object. The proportion of the
object stays the same. But if you grab the
middle green square, you only stretch in that
direction of the objects. Especially handy when you'd just want to stretch an object. This is very useful if
you have a wall that has two clear start and endpoints
that you can designate. Besides that, you
can indicate with a factor how much you want
to increase or decrease. For example, times 2 to make the objects
two times bigger, or by half. Times 0.5. Let's go back to the walls. Sometimes you may have forgotten a door or window in a wall. As I said, there are lots of different ways to draw
or modify a shape. I think that's the
fun thing about drawing and designing
and sketch-up. When you want to draw a whole, you can just draw a plane
on the wall and use the push-pull tool to make
a cut out, as easy as that. You can use guidelines to
set a starting point for the window and use the rectangle tool to
make a precise cutout. It doesn't matter so
much how you draw. There are different ways
to make the same shapes. You often work from a basic shape that you make
more and more detailed. Let's continue drawing all
the intervals with cutouts for the windows and doors and practice with the shortcuts. This is already starting
to look like something. You start to see spaces and
proportions and get a feel of the space because all sizes are now one-to-one
with the reality. Make sure to check if your
measurements are right by looking at the photos of
the house once in a while. Drawing the walls usually
takes the most time. But after that
comes the fun part. Filling in the spaces
with furniture, textures, colors, and making
adjustments to the building. The tools mentioned above, you will use a lot. It's useful if you know them by head or write them down
on a piece of paper. I've added a little
cheat sheet for you with the shortcuts
I use all the time. I place it in the
projects folder. You can find it here. The tools we've discussed so far to draw shapes that you'll be using often are
the Line tool, shortcut, L. The rectangle tool. Shortcut R. The push-pull tool, shortcut P. The Move
tool, shortcut, M. Scale tool, shortcut
S. In the next step, we will draw more details
like the doors and windows. I will teach you how to do it
as easily with components. Class project. Draw the inner walls with
cutouts for windows and doors. Practice using the main
tools for drawing shapes. The line, rectangle, push-pull, move, and scale tool.
6. Doors & Windows: [MUSIC] Doors and windows. In this lesson, I want to
dig a little deeper into groups and a special kind of
groups called components. Where you can very quickly modify multiple objects at once. Let's start by creating a
shortcut for this first. In a web version of SketchUp, the shortcut G is already
taken to create a component. But in my experience, you create a group much more
often than a component. So I suggest you change it to make group instead
of make component. You can do this by
simply looking up group with the search bar and
typing G at the end. If you now draw an object, then select everything by
double-clicking and press the G. You automatically
create a group. I find it very useful myself. In this lesson, we're
going to fill in the windows and
doors to building. I will show you
step-by-step how I do this. I often make a door by drawing a surface with a rectangle tool. Then I offset this
with 67 millimeters, which is a standard frame size, and then delete
the middle plane. Then I use a push-pull
tool to push the frame to 114 millimeters or
a 100 millimeters and make it a separate group. So double-click, and
then the shortcut G. Change the bottom of the
frame to 20 millimeters. I lower it a bit with
a push-pull tool. Then I use the rectangle
tool again to draw a plane using the inner
corners as snap points. I make this into a
separate group again and give it a thickness
of 40 millimeters. Usually the door is a
little deeper into frame, so I use the move tool to
move it back 20 millimeters. Now, I select both groups. The door and the frame
and I place them again in a group by
pressing G again. That takes some work, but windows and doors often
have the same dimensions. Or at least they often look the same, especially interior doors. Of course, you can
use the same door in multiple places by copying
or duplicating it. The only disadvantage of
copying groups is that if I made a mistake afterwards or forgot
to add a door handle, for example, I have to adjust
each group individually. That takes a lot of time, especially with larger
models with several floors. For this situation, you
then use a component. A component is a
special group that has the unique advantage
that when you copy it, it gives all copied
groups the same identity. It sounds complicated,
but I'll show it to you and you will
understand it right away. Here's the door I just drew, which is still a group. When I copy this four times, each group is a separate group and they're not
linked to each other. When I want to make an
adjustment to the group, I have to do it for each door
separately. Very boring. But now I make this
group into a component. I do this with right-click
and then make component. When I copy or duplicate this
component in the same way, nothing seems to have changed. Only when I now make an adjustment in one
of the components. SketchUp automatically adjust it in all other copied components. This is super useful
if I want to add more detail to an object
later on, for example. You can have first work out the main overall drawing and make design decisions
first without having to spend a lot of time
with the details. For example here at
the interior doors, I make a group that we just
drew into a component. Now, I copied this wherever
the same door can be placed. Where there is an opening
of 900 millimeters. I've now placed several doors in the model as you can see. Now I see in the
photo that there are beautiful old
doors with ornaments. By picking up any door, I can apply these details
easily and quickly. Even if I want to add
textures later on, for example, you can give all doors a different
color with one action. Sometimes the door is not
exactly the same size. You can then choose to use
the scale tool to scale the entire component
to the correct size. But you have to realize
one thing if you do that. SketchUp then scales
everything in a component. Also the frame size. The frame size will no longer
be exactly 67 millimeters. But if you want to draw very
precisely to the millimeter, you can also make a
unique component. Press the components
you want to change and click "Make Unique"
by right-clicking it. The component has now become a new component that you can adjust without the other
components all moving along. Windows are also very suitable
for drawing in components. This actually works
the same way. But in this case, I draw
multiple smaller components, but bundled in a group. This way I can use
the same components even though the frames
are not exactly the same. For example, I draw the frame as multiple beams that are stretched here and there
with the scale tool. This is very easy
because I can quickly select snap points because
of the window opening. I have now drawn a frame with
different sizes of themes, but they are still
the same in identity. When I want to add more
detail, for example, a recess or a wood texture, it still makes it
changes to all parts. Of course, you have to take
in account that you only stretch in one direction
with the scale tool. Because the individual parts
are placed in one group, I can use the same components for a completely
different frame, or I can also leave out some components or
add more of them. I can imagine that this will
make your hands spin a bit, but after drawing a few times, you will immediately
discover when it's useful or not useful
to drawing components. In fact, drawing SketchUp
is to a large extent, cleverly reusing things
you've already drawn. Smart copying, duplicating,
and adjusting objects. You will be surprised how
few objects you need to draw and you can use in
many places in your model. Let's go back a little
bit to the groups. In some situations, you want to merge groups together so that you have fewer lines and can delete the lines so you
have a cleaner object. But if you want to merge
certain walls, for example, into one object, you can
best put them in one group. You can easily select specific objects by pressing
"Command" on your keyboard. Hold the command key, and click on "All Objects" you want to merge
into a new group. Then go into group and
explode the two groups. right-click, "Explode". Now they become separate
lines and planes again, but they're still
grouped and you can connect them by
deleting the lines. By exploding things, you
actually ungroup things. This way you can add the walls above the door
posts, for example. When you draw objects
in one group, SketchUp automatically
merges the shapes. This doesn't happen
to separate groups as you may have noticed. You may see me quickly rotating an object
every now and then. You can rotate an object really
easy with the move tool, and move your mouse
over the top of the object and you will see
little red wheels appear. When you click on them, you can rotate the object, rotate it till it's
aligned with the green, red, or blue axis. You can also type 90 for 90
degrees or 45 degrees, etc. Another way of
rotating an object is with the rotate
tool, shortcut Q. The move tool only rotates on
one point around its axis. But with the rotate tool, you can rotate an
object by choosing a starting point and an angle. So far about groups
and components. Now we come to the fun
part of this course, styling the 3D model
with textures, colors, and furniture. Class project. Draw the windows and doors. Practice making groups
and components.
7. Tags & Scenes: [MUSIC]. Tags and scenes. In the previous lessons, you laid the foundation
for your drawing skills. You'll experience
the conveniences of this in the coming steps. The 2D floor plan has
changed to a 3D floor plan. Now, you can fill it in with interior details and
styling accessories. This is where your design
starts to take shape. The more detail you
place into model, the more realistic and
inspiring the 3D model becomes. Before we start, I want to
show you how to organize your 3D model this way you can easily navigate from
place to place in the model. This allows you to easily show specific parts to your client. About selecting objects,
lines, and planes. As your model becomes
fuller and more complex, it becomes more and more difficult to select
specific objects. Here comes a handy
trick for that. If I want to select something
which is selection square, I can do that in two ways. Selecting things from left to right and from right
to left in the screen. This sounds logical
and it sounds the same but there is a big
difference between them. From left to right, means you select everything
that falls exactly in the selection square
so all complete lines, groups, and planes. If something is a
little bit out of place and falls outside
the selection plane, it will not be selected. When I make the same
selection plane but now I click from right
to left in the screen, the plane will select
everything he touches, including half lines and groups. Like this. This way you can quickly select and
eliminate groups and objects. Back to organizing your model. We have processed
all information from the 2D floor plan so
we can delete it. Or if you want to save the floor plan so that you
can check sizes later, it is best to create
a layer or tag. You do this with tags on
the right side of the menu. A tag is label, as you can give two
objects so that you can easily turn them on and off. You make a tag by clicking on the plus icon and
giving the tag a name. I call this first tag all. Then we do this again and name the second tag 2D
floor plan template. You go on and then all the parts that you want to be able
to turn on and off. So I named the doors, the windows, the inner
walls, and the other walls. So now you see a number
of tags in a row. On the left side of the tag, you see an eye which you can
turn objects on and off. Only we haven't designated
any objects that belong to that tag yet so when I click
on it, nothing happens. We have to link the objects
with the tags first. You can do this in several ways. The easiest way is to first disable the tag you
want to assign by clicking on the eye
and then click on the three dots and then
use the Assign Tag button. A tag icon will now appear and everything you
click will be linked to the tag and will
immediately turn off so that you can clearly see what you still need to assign. Do you see how easy it is when everything is placed in a group and how quickly
you can select parts. You can also select
everything first by holding down the Shift key and then
clicking the assign tag. If I now turn a tag on and off, you see that the link
objects react immediately. We do the same with the 2D floor plan
template and turn it off. Sometimes you make mistakes
and a tag has a wrong name. By clicking on entity Info you can find which tagged
object is linked to and you can also change it
there. This is an example. You see a wall that goes out when I click
on the doors tag. So I made a mistake
and I have to change it to inner walls. So I click on entity Info, click on Doors, and then click on Inner Walls. You can name literally
everything with tags and also parts
that are in a group. For example, when I select everything and then
place it in a new group, I can also give this
large group a name. For example, O. When I click O, everything turns off but it can also choose to only show all the doors so that
I can count them, for example, then you turn off everything except
the doors tag. But because the
doors tag falls into the large tag and group named O, you have to turn
on the O tag first because this is the last
and outermost group. Give everything a
name that you find useful to be able
to turn on and off. A handy tip here is to divide
the outer walls into front, back, left, and right. So we're going to create
four more tags here. This will make it
much easier to view the interior layouts
and make it a lot clearer because there
are no walls in the way. But because we have drawn the outer walls as
one large volume, this is not easy to do. That's why I quickly
explain how you can easily place them in
separate groups again. First, I go into
the group and draw lines on top of the wall to
divide the walls into left, right, front, and back. Then I use a push-pull tool to temporarily lower the walls
with the least windows. In this case, the
left and right walls. You will see a plane
will then appear. Make this a separate
group again, and call it right. Now you go into the group
you just created and push the ball back up again and
turn off the tag named right. You also do this
for the left wall. Now, only the front
of the wall remains. Select everything that
belongs to the front of the wall and place it again in a new group and call this front. Now there remains a strange
piece of wall which is a combination of a right
wall and a back wall. Because it has a window, it is difficult to bring it
down with a push-pull tool. In this case, it is better to
close the window first with a push-pull tool then bring the wall down
and make a new group. Then go into the group, raise the wall again and redraw the whole of
the rectangle tool. You call this piece
of wall Right again, and you will see that it
turns off immediately. The rest of the
walls you place in a group and place them
in the back wall tag. Of course, this
seems a bit clumsy. Why didn't we come up
with that in Step 1? Because sometimes you
choose a certain way of drawing in the beginning
that you'll later regret. That's really part of it, so I'll show you how to put
it right as an example. If I now want to
turn the other walls on and off separately
from each other, I see that the
windows still remain. You can also divide this
with the tags Left, Right, Front, and Back. You can then select
all windows and put them in a new group and link
them again to Windows tag. Very nice. Now we can see the living room and
dining room completely in one view without the large right wall
getting in the way. Of course, you can do the
same for the left side. This way you get different optimal viewpoints that you can, later on, share
with your client. By now, you may have noticed that the more tags you create, the more work it is to
keep turning them on and off to get the
optimal viewpoint. That's where scenes
come in handy. To be able to switch very
quickly between these views, you can create a scene. You do this with Scenes on
the right side of the menu. When you click on the plus icon, SketchUp saves the
current viewpoint and all the settings
that you've turned on; all active tags, the
style that you use, but also including
whether you're working in parallel or perspective mode. I choose a nice viewpoint
to show the right side of floor plan and click on the plus icon and
call the scene Right. Then I do the same thing
for the left side. I turn the right tag back
on and the Left tag off. I choose a viewpoint again
and make a new scene. I call this scene Left. When I click on the
scene called Right, it shows the optimal view
from the right side. But when I quickly want to see the left side, I
just click "Left". Easy, right? The top view
is also very useful. I press "Shift+1" and
create a new scene again. This one I call Top. This way, I can switch
very quickly between different viewpoints
so I don't have to switch certain layers
on and off every time. This saves a lot of time. Because we no longer use
the 2D floor plan template, we no longer have a floor. You can simply draw the floor with a rectangle tool
and a push-pull tool. Stretch to floor
here and there so that it's even with the
outside of the walls. When you're done,
move to Group Down. We will then create a
new tag called Floor. Since you are now
creating a new tag, it will automatically be added to all the scenes you
have already created. The Floor tag is turned on in all the scenes
now as you can see. If you don't want that, you can also choose
to update a scene. Go to the scene you
want to update, then turn the tags you
want to be visible on, and then press the spinning
arrows icon under the Scene. The scene has now been updated
to the current settings. As you move from one
scene to another, SketchUp smoothly rotates to model from one point to another. This is called animation and it's of course very nice
during a presentation. But while drawing and designing, I don't find that very
useful because it makes loading a new
scene a lot slower, so I turn it off. You do this at Scenes, then Settings, and then turn off Enable
Scene Transitions. If you now click on A scene, it will go there immediately and you can navigate
much quicker. The possibilities to play
with tags and scenes are truly endless and make navigating super fast and easy. Now your model is
ready to play with. In the next step,
we start designing. We will import furniture, come up with nice layouts, and start styling to model
with textures and colors. Class project. Categorize
two groups by using tags. Create optimal
viewpoints with scenes.
8. Furnishing: [MUSIC] Furnishing. The last lessons were mainly very technical and theoretical. But now we can finally start with the fun part of
the 3D floor plan. With SketchUp, you can
easily download 3D objects, furniture, tables,
chairs, lamps, and so on. You can download pretty
much everything. You can do this very easily
in SketchUps, 3D warehouse. On the right side of the menu, you will see 3D Warehouse. This is a platform where the SketchUp community
shares models that you can download for free. These are all kinds of contributors from
SketchUp geeks to companies that make
their products available to architects
and designers. You can search for products
or models in the search bar. This 3D Warehouse is of
course, growing every day. Sometimes it takes some time to find the right item
with good-quality. Let's start with
the living room. I go shopping for a lunch, a nice chair, a modern lamp, a rock, and a coffee
table, for example. You go search for a part and then easily press
the Download button, and the model appears
in your 3D model. I first place the objects
next to the model. Searching in the 3D Warehouse is quiet an art and often
takes a lot of time. But here are some helpful tips. If you come across an item that you think you will use more often then it may be a good idea to save
them in a folder. Create a folder, for example, and name it Tables. You can also star
them as a favorite. You can find these
safe models under your profile and
then My Content. You can easily find
inspiration in certain topic by clicking
the categories tab. For example, Interior Design. Look here is a nice
mirror that I can use and a nice lamp. Not all models have
the same quality. When I find a maker that I'm fan off with good-quality models, I often check out what
else he has to offer. You can collect everything from large to very small things, such as candles, magazines, a MacBook for a table, or a cup of coffee, for example. I often download a few people here to get a sense of
skill in the model. I then download
simple 2D people. These are special, face me pictures that rotate with you
when you rotate the view. But if you look from above, you can see that they are flat. I use 2D people
because I often find that the 3D people ask too
much attention in a model. For me, the focus is on the
interior, not the people. But you can also
choose to download 3D people and make them
black, for example. Besides that, 3D people make
your model heavy and slow. Also note the file size of the models you
want to download. The bigger the file, the slower your
SketchUp model becomes. You can limit a filter to, for example, 10
megabytes on the left. At this point, it
comes down to how you see and want to present
the floor plan. Of course, I will
share my own style in the course so you can
achieve the same result. Here I download a group
of people in the model. These are of course too many
people for this floor plan. I only need a few, so I delete most of them. I place them on the floor. One in the living room, one in the dining room, one in the hallway, and
one in the kitchen. With the move tool, you can grab people easily
at the bottom of the object and stick them on the floor so they don't
float in the air. That can be difficult sometimes. A handy tip is to duplicate them and then delete
the other figure. Of course, I create a tag called people so that I can easily
turn them on and off later. Do you see how the
model comes to life? People really give the
model scale and space. Collect the objects you need. You don't need much to make a 3D floor plan
lively and stylish. Textures and materials
do most of the work. I go into that in
the next lesson. Some objects you take
out of the warehouse, have the wrong color. We will adjust that
in the next lesson. We now mainly focus on
collecting derived objects. The more 3D objects you place, the more detailed
your model becomes. Of course, it depends
on your end goal, how much items you need. Some interior designers only offer a setup to their client. Then you can keep the
furniture fairly basic. It's all about the layout
and possibly the colors. Other designers may offer
a full styling package, with specific
products and brands. Then I think you will spend some more time in
a 3D Warehouse. You may have already discovered, that the more items to download, the slower your model becomes? That is why it's important
that you place heavy objects, such as plants and decoration in a separate tag so that you can switch them off during
the design process. I am creating a tag called Plans and a tag called Styling. I placed the rest of the furniture under
the Interior tag. When I work on the design and the overview scenes and
turn off the heavy tax. But when I get closer and want to take a look at
a specific room, I turned a heavy tax back on. This is the disadvantage of
the web version of SketchUp, which is a free version. I myself use the pro version, which is a desktop version, so it can handle heavier models. In terms of drawing technique, it does not matter
whether you use the free version or
the pro version. To keep this course accessible, I choose the web
version as an example, but feel free to switch to the pro version if you need to. Then I come to the following. We're now in parallel view mode. But the parallel view
mode is especially useful for overview images. Everything is then
straight and tied. It's easier to see
the proportions. But when you get closer, you will see that it's difficult to get a good
picture of the space. For pictures up close or when you want to view
a space in a room, we switch to perspective mode. The angle of your image now
changes to a perspective. You will notice
that your field of view is still very narrow. In small spaces, you want to
see a wider field of view. You can adjust this at field of view by clicking the
arrow down at scenes. Here you will see a scroll bar, slide it to the left so to one, you get pretty much
a parallel view. The further you
scroll to the right, the wider the viewing angle and the bigger the
perspective becomes. It depends a bit on
the size of the room. But I often use somewhere
between 50 and 65 degrees. Sometimes you have to
make the angle bigger in very small spaces but
you will see that the image then gets an
unrealistic feeling. A bit of a fisheye perspective. We choose a correct spot
as a viewpoint with the orbit tool and position
the image with the hand tool. Another great tool besides the orbit tool and the
hand tool is the eye tool. There's also no
shortcut for this, but you can assign it
to comma, for example. When I activate the eye tool, I can rotate around my axis. This is especially
useful in small spaces because the orbit tool has a
much larger turning radius, so it's much harder to
get the right view. Then play with the field of
view and capture the scene. I call this scene living. This way, I can go directly to the living room or
kitchen or hall, etc., and I have the optimal
viewpoint with one-click. Of course, it is useful
to master the shortcuts, O for the orbit tool, H for the hand tool, and comma for the eye tool. This way you can move
quickly and easily through the model and
set optimal viewpoints. I'm now going to make a
design for the living room. We've collected a
number of parts, a sofa or a chair,
lamp, a table. I use the move tool again to
drag it to the right place. You can also easily rotate the
object with the move tool. Sometimes you want to
mirror or flip the object. Mirroring is done by
right-clicking on the object and then pressing flip along
read for left and right, flip along green
for front and back, then flip along blue
for up and down. Then I move on to the kitchen. Sometimes you find a
complete kitchen in a 3D view of your house
that fits exactly right. But usually, I download separate cabinets or
draw them myself. A kitchen often has
simple shapes and you can easily build it with
the rectangle tool and a push-pull tool. Many cabinets have
standard sizes or have the same elements. You can make these
elements a component again and quickly draw
all the cabinets. I place each cabinet in a separate group so that
I can easily move them. A tap, sink, a stove, and an oven are easier to
download from the warehouse. You can also download
door handles and easily add them to
the door component. This way you can immediately see the direction of the door. Because not every door
has the same direction, you can easily mirror the doors with the
flip along action. By importing furniture
from the 3D warehouse, you see that many new tags
have also been added. You can remove this so that your list of tags remains clear. Simply click on "Delete" and
then assign tag to untagged. Go ahead and fill all the
spaces with interior and styling objects and place
them under the correct tag. Have fun with this. This is the most important
part where you can inspire your client or
your friends with your ideas. In the next step, we will add colors and textures that will make
your model come to life. Class project. Download interior
and styling items from the 3D warehouse. Position the items and
make a beautiful design.
9. Colors, textures & materials: Colors, textures, and materials. This is where you can
make the 3D model shine. In this step, I will show
you how to add textures and colors and also
create textures yourself. This gives your 3D
model a realistic feel. As a designer, I think
it's super important that everything is in harmony
and fits well together. I will show you my
way of working so that you can create
nice, harmonious, and professional 3D
images without having to make a render or have to
use Photoshop afterwards. First I'll show you how
the paint bucket tool and coloring works. On the left side, you see the paint bucket. By the way, it took me
several months to make this course so the web
version of SketchUp has been updated in the meantime so the icons look a bit different than in the
previous lessons. This is a 22 version. When you click on
the paint bucket, the Materials tab will appear, you can also click on the Materials tab
on the right side. Under the House icon, you can see the materials that are now present
in your model. Quite a lot already. That's because of
the 3D objects we've downloaded from
the 3D warehouse. You can also choose
materials from Sketches library itself
by clicking "Browse". You can choose bricks, glass, metals, and wood
textures, for example. Personally, I don't
like these textures a lot and I'd rather
make them myself. But I do use the colors
from the library. By clicking on the color, you can then click on an object so that it
turns into that color. There are a few
things you need to understand about
coloring objects. When you click on a group, the whole groups
gets the same color. If you go into the group and
click on a single surface, you can also give a color
to a specific surface. If you choose to color
a single surface, you have to understand
that this surface no longer changes color if you, later on, give the group
a different color. This may sound a bit
complicated but I'll show you in an
example how it works. Here you'll see a
wall with a door. Everything you see is grouped, and when I give the whole group a color, everything
changes color. Also, the door because
it's in the same group. But now I would like
to make the door gray. For that, I first
go into the group, then choose a color, and then click on the door. Because the elements of the door are also
grouped together, all the elements turn gray. If I then leave the group and want to give the wall
a different color, the door no longer
changes color. This also applies
to a single plane. First, I go into the group of the wall until I
see the blue dots. Then I pick a color and
click on the surface. If I now leave the group again and want to change the
color of the entire wall, the door and the surface
do not change anymore. I usually leave the
walls white and work with surfaces
when I want to give a wall of color because
a wall often borders on two rooms and you may want a different color on the wall in the living room than
in the hallway. I often color objects by giving the group a color because it works faster and more efficient. Now, for this course, I work with the free
version of SketchUp. The downside is that you can't adjust the
colors in the Menu. Now, I've come up with a small workaround
so that you have more choice in choosing colors and don't have
to buy the pro version. You can simply download
colors from the 3D warehouse, for example, using a
RAL color palette. The advantage is also that you can prescribe
to your customer a RAL color so they can
buy the exact paint color. You can see that SketchUp automatically loads
all the colors. Another way is the Eyedropper 2. You activate this by pressing "Command" when you've
opened the Materials step, or you can find it in the Menu. You will see a small
eyedropper appear. If you now hover over a
color and click on it, you will select a color
and you will see that the eyedropper changes
into a paint bucket, so you can color another object without having to search for
it in the materials library. This is super useful
if you're working on the design and later want to apply the exact same color to another object and don't want to scroll through
all the colors. I put all the downloaded
textures and colors in a layer so that I can save
them and use them later on. Then I want to show you how
to use and make textures. You can also download
textures from the warehouse in the same way, such as wood, stone, and metals. I often search for
textures on Google images. For example, I search for
wood planks texture seamless. It is important that it's an infinite or seamless texture. You can then import this
through Import, My Device, then choose the image
you want to import, and then click on "Material". Here's an example
of wooden planks in a herringbone pattern I want to use for the living room floor. Because I made the
texture myself, it doesn't have the
right skill yet. You can adjust this
by going through the surface until you
see the blue dots. Right-click and then click
on "Texture" and "Position". Now you will see a
number of colored icons. The green one allows you to manually rotate and
adjust the size. You can measure the size
with a tape too later on. I'm looking for a plank size
of about 100 millimeters. Similarly, you can
frame a piece of art, a carpet, or a family photo on the wall by
importing a photo. This makes your design even more personal and attractive
for your client. I'm going all over
the house styling and coloring everything. As I mentioned before, this is an important part
of the design process. I tried to bring
as much harmony as possible and not use too
many different textures. I choose a maximum of five types of wood and choose colors that match each other and
do not conflict with each other or ask a
lot of attention. I also do the same with the downloaded objects
from the warehouse. I change the colors and
textures that require too much attention to
the wood tones and colors I already
used in the model. I also never use pitch
black because the lines of the model are also black and the depth of the
shapes will disappear. I then use a dark gray
and a light gray. I like soft, natural,
earthy tones. Again, I try not to use too many different
colors to keep the image calm and in harmony. You can see that
adding the colors to the objects goes quickly if you've drawn everything in groups in a structured manner. The coloring of spaces
and objects is of course an important part of the
design process and takes time. Take the time to get a good
impression of what a color does in a room and therefore
also in the presentation. Use it to create scenes to see the result of a color up close. When you've added
all the colors and have eliminated
unnecessary textures, it is wise to occasionally click on "Purge Unused"
at the bottom-left. Textures make your model heavy
and this function removes all textures that you have not used. All right, well done. Your model starts to
feel more personal, professional, and realistic. Just play with the
colors and textures. Sometimes you have to try a few different textures
to find the right one, but that's really okay and
it's really part of it. In the next lesson, I will show you how to
export your 3D model into high-quality images and make a really nice presentation. Class project. practice using the paint bucket and
eyedropper tool. Make your own textures by downloading or importing images. Color all the walls, floors, and furniture. Harmonize your model by
changing certain colors.
10. 2D floorplans & sections: [MUSIC] 2D floor
plans and sections. Your 3D floor plan is finished. Now it's important that
we present this to your client in a
professional way. I'll show you some
presentation tools within SketchUp that I use often. First, I want to show you how to make a floor plan
with dimensions. We've created a top view scene. When you click on it, you will see an overview
of your design. I blacked out all the tops of the walls to make it look like a cross-section
of the building. Yet we see no windows and doors. To show these, you can
make a section plane. The section plane tool can be found under the tape
measurement icon. A section plane makes a cross-section in a
certain direction. You see a blue, red, and green plane here. Blue means horizontal section, which you can also make
a vertical section to show the ceiling
height for example. If I now click on
the top of the wall, you see that I can
see into the walls. Now I press O for orbit and I see that the plane cuts
through everything it touches. With the move tool I
can drag it up or down. When I do that, this
section plane cuts through everything it
touches at that point. I always choose a
point that tells the most information about
the windows and doors. Let's say about here. The section plane turns on and off by clicking
on the plane. It's easier to click outside
to model to do that. Now we go back to
the top view scene. You can see the section
plane has disappeared. This is because we
saved the scene before creating
the section plane. We have to turn it back on. This can be done at display and then you check
section planes. You would then see a gray
layer appear over your image. You can now activate the section plane by
double-clicking it. Then uncheck the box again
so that the gray layer disappears and you see that the section plane
remains activated. Now we're going to
save this scene as a new 2D floor plan scene, so that you don't have to
do this action every time. We now have an overview
of all windows, doors, and, walls in the house. Then it's of course
important that we can indicate how large these
spaces and parts are. You can easily do this
with the dimension tool. You can also find
the dimension tool under the tape measurement icon. Make sure you are in the floor plan scene
before activating it. You can now assign a start
point and an end point, and then drag the dimension line out with your mouse and click
where you want it to be. You now see the total
size from start to finish in the unit
you are working in, so millimeters or inches. When you click on Model info, we can adjust a number of
things to the dimensions. For example, the format is
millimeter, centimeter, or meters, depending on how exact you want to present
something to your client. It even can show up to several zeros after
the decimal point. I usually round it up to
meters with one decimal. You can also adjust
dimension style. For example, the font, the size, the position of the numbers, and the start and end points. Click on the settings
you want and then update all dimensions. I use the italic font myself. Twelve is big
enough and I choose the numbers on the line
and the open arrow. Now I go around and put dimensions everywhere
it's useful. Not too many, but enough to calculate the sizes
of the rooms. It is important that
you put these in a separate layer so as you
can turn them on and off. We create a tag
called dimensions. You can also choose to change the style
of the floor plan. Go to Styles and find a style that maybe
shows less textures, has thicker lines, or makes the floor plan
black and white. I don't use these
styles a lot myself and I usually stick to the
shaded with texture style. Make sure you update the scene
when you change a style. Well done. Here it is, a nice and professional
2D floor plan. Class project. Create dimensions and put
them under a separate tag. Make a 2D floor plan scene
and choose a nice style.
11. Presentation: [MUSIC] Presentation,
when you're designing, you often come up
with a number of different ideas you want
to present to your client. It would be nice
if, for example, you can show the
original floor plan with what the end result has become with a number of options of different
floor plans setups. You can do this very
easily by putting the whole floor plan
design in a group, make sure all the tags you
want to copy are turned on, then duplicate the
entire group with the move tool and
place one floor plan under the name Option 1 and
the other under Option 2. Now, move Option 2 back to the same position as
Option 1 and turn it off, you can also do this with
the original floor plan, so floor plan without
interior colors and textures, you place this under a
new tag called Original. The big disadvantage
of doing these actions afterwards is that
the created scenes are no longer up to date, for example, when I now go
to the right few scene, you see all options are
mixed up and the dimensions from the previous lesson are also turned
on in this scene, we have to update
all the scenes. A tip is to create a
number of extra scenes in advance that you turned off so that you can
assign them later on, but in practice, you will
see that you have to check all scenes and update them before you export them
to a presentation. You do this by going to a scene, activating and deactivating
the correct tags and then pressing
"Update scene", in addition, we make a
number of extra scenes from the original floor plan and the new floor plan
design options, you could also create some fuse with and without interior. Here you see a number of
scenes I've created for my design with valuable
information for my client, the amount of scenes, et cetera, is up to you as a
designer of course. I created a second floor
plan design option to show to my client, here I've removed a number
of rules in the center of the house to show what the room would look like
without these walls, it's nice to show the difference
between Option 1 and 2, especially in the
scenes up close. This is the original, this is Option 1 and
this is Option 2, without the walls, I will put all these fuse in a separate scene that I can use in my presentation later on. It's sometimes a
puzzle to update the scene with the correct
tags and take some time, but if you've organized
your model well, like I taught you,
it's easy to do. When you've done this, we are ready to make
a presentation, choose a scene that you want
to export, for example, the 2D floor plan Option 1, then click on "Download"
and then PNG in the menu, here you can determine
the dimensions of the image and select the
correct scene again. I always choose the option
transparent background, this allows you to adjust the
colors of the background, which I will show you later on, then click on "Export" as PNG, do this with all the
scenes you want to use. Now I briefly want to show you how to make a presentation
with these files, I use Keynote, but you
can also use PowerPoint, for example, we create a new slide show and I drag
the images into a slide, now I can add extra
information very easily. For example, in the floor plan, additional dimensions such
as the sizes of the rooms, since the image has a
transparent background, it is also very easy to place a colored area behind the image to make the
slide more attractive. Another nice trick is that
you can add a nature picture or photo of the location to
the up-close impressions, wherever there is a
window or a door, you can now see a photo
which gives the image even more depth and becomes more realistic because the
background is transparent. You can see that we can
get a lot of content and value from the 3D model in
a short amount of time, I always have a lot of
fun working in SketchUp, it works fast but precise. All right, we have now come
to the end of this course, I've tried to create
a valuable course, how to make a professional
3D floor plan. Of course, there are many more possibilities within SketchUp, but you'll see that you
only need to master a few basic tools to quickly create something
beautiful and useful. [MUSIC] When you've
reached this lesson, I would like to congratulate
you for coming this far, learning a new
software program takes time and practice makes perfect. I therefore hope
that you will share your process and results with
me in the projects folder, and if you have any questions, you can ask them in the
discussions tab below, good luck and have fun creating beautiful
designs in SketchUp. If you want to stay
updated by new content, you can follow us here, you will be the first
to receive new courses, thank you so much and take care.
 Auke & Jildou, Designer & Maker Architecture & Interior