Transcripts
1. Introduction: Interior design is a
very powerful field, whether you're using it for your own personal projects
such as renovating your home, living rooms, kitchen, et
cetera, or professionally. We're going to be learning
in this current class about very powerful tools and principles within
interior design. We do have the layout plans in which we are going
to learn how to navigate layouts
which could make or break your interior
design project, as well as some
intricate details about furniture layout and
tips about buying, arranging, and placing
your furniture, as well as the power
of mood boards. What are mood boards? What
are the elements placed in a mood board in
order to help you drive your vision to reality? And not just that, I'll
be sharing with you some exclusive tools
and guides and templates that will
surely help you get up and running with your own
interior design projects, helping you transform regular
spaces into masterpieces.
2. Your Project: Your product for
the class revolves around creating
your own moodboard. Feel free to build up your mood board based on
a vision that you have. Take up a room that
you're working on as a sample application project. Build up the mood board, get some inspiration for magazines, images, some textures, fabrics, whatever it is, get creative, get innovative, and pinpoint
them on your moodboard, including the color palette and the color scheme
that you have chosen and share it with the rest of the
community for feedback.
3. Mood Boards as part of Interior Design: And welcome back. Now
in this current lesson, we are going to be addressing a very important tool
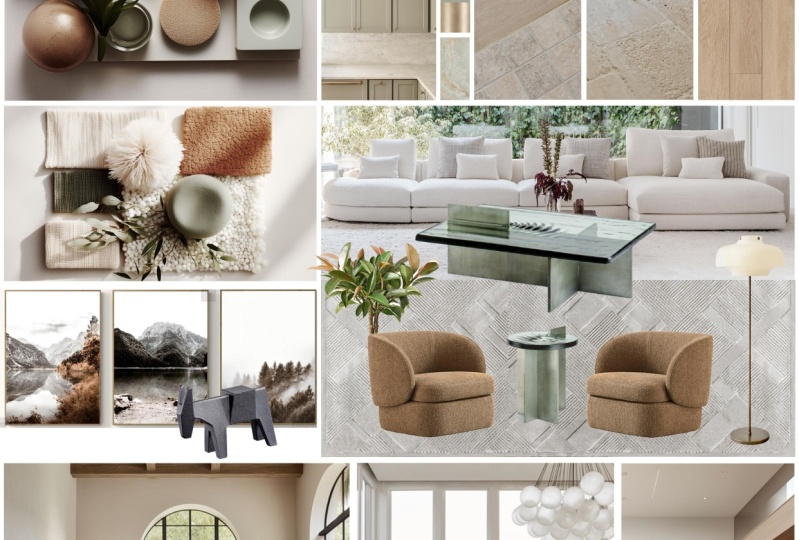
with an interior design, which is the mood board. Now, if you take a look at the representations
and illustrations that we have over here, you notice that a mood board
combines multiple elements. As the name dictates, it's literally a board, like literally a canvas, where you as a creator,
an interior designer. You're going to be collecting pieces of inspiration,
literally. Anything that will help
you develop your vision, you're going to be adding it. For example, if I take a look at the following mood board. Notice what it has. It
has color palettes, certain images of
furniture and paint, different layout from a
different magazine, for example. If you take a look at this
representation over here, you got different images for the accessories,
such as the pillows. You got images for
the color palettes, some accessories as well, the space that you're going to be getting
some inspiration from. It could be a picture that
you have taken somewhere. It could be an
image that you have found on a magazine,
for example, anything that you can use to help you develop
your design concept, bring it, stick it
on that mood board. Even textures, fabrics,
linen, pieces of cloth. If a certain piece of
furniture has a certain color, you'll get an image
of that piece of furniture with an
image of the color, as well as the texture of
the piece of furniture. So think about it as collecting pieces of evidence for
the design concept. That way, you're able to deliver and build
up on your vision. So a mood board, if we're
going to go through various uses of a mood board. First of all, they serve as a valuable tool for
maintaining consistency throughout the staging
and designing process and ensuring the desired emotional connection
is achieved. So you would like to set
up the space, right, to design it, stage it, decorate it, prepare it. So in order to do so, you need to have a vision. What are we trying to
achieve from the space? So in order to make
sure that everyone who's ever working on
the project with you, they follow the same vision, a mood board will help you direct the focus to that
vision that you're having. So it's a very powerful tool
yet it's easy to achieve. So by definition, mood boards, they are visual representations of your color and
design choices. Simply put, whatever tool that you have literally a board, a piece of paper, online, offline, even an application, where you are able to use it as a moodboard, that will do. Creating mood boards will help you present
your color schemes, design ideas to clients or for your own
personal preferences. This is very powerful. Often when you're
dealing with a client, you might notice that the client has no idea what
you're talking about. Url, you could have in
your mind the best idea, the best vision for the
space for that living room, the best decoration, everything
you can see vividly. However your client has no idea what you're talking
about in the first place. How would you bring
a certain piece of your vision to life
through a mood board? Think about it this way. This is where sky is the limit. You can include fabrics, images, anything which is used to
create the intended atmosphere. What are you trying to achieve? From that design. You
can see in your mind, collect pieces of evidence from magazines,
textures, samples. You go visit a furniture store, take a picture of
a couple pieces of furniture to build up that vision and collect it
on a certain physical board. Me personally, I don't like
to use the online version for mood boards because when you're collecting pieces of
information for inspiration, it's very helpful to see
live in front of you. Literally create a
board or a piece of paper or an A three paper and start collecting
that pieces of evidence. However, when you do online, you have to go into the
application and for your brain to start piecing
things together again, it will take you a
lot of on and off. If you have tried this, most probably you agree with me that mood boards are way better when they are
done actually live, physically, you do have a board. You do have a chart, you could pinpoint stuff on, which will help you
develop your image. And finally, and this is the most important part
and point of moodboards, it helps stakeholders visualize the end results and make
informed decisions. This is very critical,
especially if you're an interior designer
working for a client. Sometimes selections
for furniture, fabrics, colors could go wrong in terms of
verbal communication. A vision board helps make
sure that whatever you see, your client sees as well. That way, in case of any
future changes or any issues, you have a clear moodboard. And often in practice, what I would like to do if I'm going to be
dealing with a client, I'm having a
moodboard, let's say, for a project that I'm dealing with make sure that when
you're having your client sit with you for a discussion that both of you are able to see the mood board completely
and you get to sign off. What does that mean?
You as a designer, you confirm that
Moodboard is finalized, and the client will confirm that the moodboard is finalized, such that as stakeholders, individuals involved
in the project, and this is part of the project
management, by the way. This is not the creative
or the design part. This is the expertise from project management that I'm
sharing with you right now. You need to make sure that when you are building the vision, you are going about the process
of creating the design as part of a mood board you don't want to have
issues later on. You could actually go ahead, buy the furniture, get
the colors, paints, flooring, tile, whatever it is, and surprise, surprise, your
client changes their mind. And the simplest
answer would be, we did not agree on this. That's something
very catastrophic to happen at any project. And if you do not have an
actual sound proof that both of the parties agreed
on as stakeholders, this will lead to
delays, wasted efforts, lack of motivation, ruining the whole vision of the project. So I truly hope now at
this current stage, even though it's a
very simple tool, you're able to understand
that mood boards are very, very powerful in terms of helping you bring
your vision to life.
4. Understanding Floor Plans as part of Interior Design: And welcome back. So
when you are diving into the project and you have a clear vision of
what you need to do, you are not going
to start buying things and just simply
placing them out randomly. You need to have a strategy, and your strategy starts
from having what we call as a floor plan. So
what is a floor plan? By definition, it's the
bird's eye view diagram of a home or a property. Larry think about it this way. You're looking from
a top view top down and seeing everything, which includes
representation of the walls, access points or doors or
any pieces of architecture, such as a fireplace, anything which would make up the physical space before
even adding furniture. Here in front of you,
I've had a layout, including the pieces
of furniture, including the representation
of the access points. But with a basic layout, you would expect to have
the framing of the walls, like larly the
dimensions of the walls, the length and the width, and
the total square footage of the space that you're dealing with, including any columns. When I say columns, it could be the circular or square columns which are used to
hold the ceiling. And that's mainly it. This
is the basic floor plan. But as you go about diving into the interior design process and
applying it now, not just simply from
a vision criteria, from a practical live criteria, you need to have a clear
idea about the dimensions, the expected the
length of the space, the width of the space, the total square footage, the doors, how many
doors do you have? Where are they located? Their dimensions, as you
develop this floor plan, it includes metrics, dimensions, inches, centimeters,
meters, whatever it is. Then once you got
this figured out, the next logical step would
be to actually measure your pieces of furniture
and roughly put, as I'm going to be
showing you how to place indicators
of the locations. Notice over here, these are actual sketches for the
pieces of furniture. This is not computer generated. This is an actual sketch of
carpets, armchairs, sofas, different accessories
such as plants here and there, coffee tables. These have been
placed roughly in order for you before
to actually commit to the purchase of
the furniture and the actual vision to figure
out from this stage. Are there any issues
that we might encounter? And let me tell you
something, based on experience, it could be a very, very minor issue, but it could literally put a
stop to your project. Think about it this way.
Imagine you're buying a sofa, and you live in a place where the door is way too
small to get the sofa in. Well, good luck
getting that piece of sofa inside that space. And this happens. Why?
Because at this stage, it has been overlooked. Often, you've tend to find, let's say, decorators
interior design decorators. They dive into the
purchase of the product, the furniture, and then
they shift it to the space. And often they come
across these issues. So that's why it's important to follow these steps
systematically. So now we have a
clear idea about the importance of a floor plan, but we're not done yet. We have to actually take
it one level further and to see how could we fine
tune our floor plan?
5. Variations and Options in Floor Plans: And welcome back. We have seen the basic representation for a floor plan where
we said a floor plan will help us read the
actual dimensions which are necessary to
interpret the layouts and understand the
space and the flow. Then we said that the
layouts main purpose is to illustrate the design of the property and includes the structural and design
details such as walls, windows, doors, and all of these actual basic
components of the space. But when we are
dealing with a design, we need to fine tune it
to a professional level. Here where we dive
into actually using computer based or
generated layouts or maps or what we
call them as drawings. So in this current
case, for example, you're able to see the metrics, the actual dimensions
in feet and inches. You have an idea
about the location of the doors which
are placed over here. Do you have the idea
about the frames, the walls, which make up
the zones or the spaces, as you can see over here? Right. Now, we've added a
more finer representation for the furniture in terms of location wise without
any details, by the way. Just simply going
from a basic sketch, rough sketch to adding now
dimensions of the walls, the lengths, the widths, the square footage, often
with more advanced drawings, every single
location, you'll have a clear representation how many square feet or square meters that
you're dealing with. To actually help you
calculate the area of the piece of furniture to place them in a very strategic way. So once you go from
a basic sketch to further refined drawings,
which include dimensions, you take it one level
further to incorporate some visual representations
of the pieces of furniture. Try what we call as a three D representation
or an isometric. So here we have an
isometric representation which is basically tilted to a certain way to
show you almost as if it's three D. And if
you notice over here, still, this is to
a certain point, quite basic, but
includes colors now. We're adding some
incorporation of the color scheme that you have chosen as part
of your mood boards. From a basic TD sketch, which is black and white
to computer based with dimensions to either,
as we're going to see, computer based or
a rough sketch, including the dimensions
which have been taken based on the
actual drawing or map, and then you add
one level to it, which are the colors and the pieces of furniture
if you have them. If not, this is where
you incorporate some the visual part of the vision that you have
created in the mood boards. These are different variations, by the way, of floor plans. And you don't have to,
let's say, use all of them. I'm sharing with you
the various options. Feel free to apply whatever works best
for your current case. But as you go way more
advanced and more, let's say,
sophisticated projects, you go from two D all the way to three D. And this
is where you have everything quite
clearly laid out before even committing
to the furniture, the colors, the
paints, the tiles. You just simply have your
vision from a mood board. You actually start to shape it virtually as a three D model, which is called as rendering. You are rendering the design. So if you notice
over here, all of these will be to scale in
which you are going to be drawing or let's say
modeling the walls, sizes, the square footage, everything based
on the drawings. So this represents the
real life application. And if you notice
everything even to the finest detail has
been incorporated. Pieces of furniture,
their dimensions, the locations, their
placements, the color palettes. And when you use a
software for rendering, you have the ability to go as if it's a first person view. Like literally, you
land in the design and you're able to
move around to see it. This is very powerful.
This is advanced in terms of three D modeling
as part of interior design. And once everything is ready, Everything is clear.
You got a green light. At this stage, you just
simply go ahead and dive to your own furniture, purchase, and
arrangement and layout. So you have a clear idea
what you're going to buy, how it looks like,
how it's going to be fitting the place. And based on your own
vision as a designer, how it's going to
fit your vision, which is way more powerful than just simply walking
into the space, and assuming that
everything will go well and go about buying things here and there and having no idea if they're going to
work together cohesively. This is the difference
between just simply decorating and interior design. At this current stage,
you have understood the development process of
floor plans and how are they used to help you
shape up your project from being a vision to an
actual real life project.
6. The Role of Furniture Layout as part of Interior Design: And welcome back. So once
you build up your layout, it's time to add
in the furniture, and this is where we come to discuss the furniture layout. Now, if you take a look at the visual representations
over here, your furniture layout could follow the same mechanism that we have discussed in the actual construction
of the layout, in which you just simply
have rough sketches, two D dimensions,
representations as part of drawings or
actual three D modeling. So the whole purpose of the furniture layout is
basically to arrange our furniture in a room to impact its functionality and visual appeal in
interior design. That's the whole purpose. You need to make sure
that the piece of furniture are going to be using to complement your vision. What are you trying to achieve
based on the function of the space and how they
have been selected based on the visual
representation within the space? Here are some key
pointers to keep in mind. First of all, traffic flow. As you go about selecting
your furniture, you need to consider the flow of the movement in the room
to ensure there are clear pathways that
furniture does not obstruct the
when you have doors, don't put a piece of furniture
in front of the doors. If you have access to a terrace, do not block the access to it. So always consider
the traffic flow. As we're going to see, as part of the tips in terms of
picking up the furniture. It's very important always, always consider traffic flow. You could have a magnificent
piece of furniture, but it's not compatible with the space that
you're dealing with. Traffic flow is very important because at
the end of the day, you need to have individuals
engaging with the space, not getting quite annoyed by
the fact they cannot move within the which leads
us to focal points. Always keep this in mind. Furniture is a very
powerful way to direct attention to certain
features or highlights. So arrange the furniture to direct the focal point
towards a certain feature, such as a fireplace, large window, or
architectural feature. Use the furniture
in a strategic way by rotating it in order to naturally push the direction of attention towards
that focal point. These are important tips that will help you fine
tune your design, especially when you're
buying pieces of furnitre. Which leads us to grouping. So grouping pieces of
furniture for conversation or activities to create cozy or functional
zones within the space. So when you are buying
pieces of furniture, put them in a way based on how the people in that
place are going to be engaging with the space. Is this place for
watching, let's say, a fireplace, having
dinner, for discussions. Obviously, if you have a
living room for, let's say, family gatherings,
you're not going to be scattering the
sofas randomly. Take a look at the
image over here. For example, consider
this function of the space to be
for socializing. Obviously, the placement of the three cedar and the
single cerrar is fine, but these are placed
way too far apart. Which does not support
the use of the space. However, in this representation over here, notice
what do we have? We got a large table. We got the arm
chairs on the sides of the table and the three
seater sofa over here. So what have we
done? By default, we have directed the use of the space in terms
of socializing, in that case, where you have people sitting around the table, they're going to be
engaging with each other. So this is part of grouping, where you put
pieces of furniture based on the usage of the space, which leads to a
very important point once you consider
the traffic flow, focal points, grouping,
the scale and proportion. As we have learned about the interior design
principles and elements, there are proportions, harmony, scale, visual weights, all
of these things should be considered as you go about selecting the
pieces of furniture. Once you build up
your knowledge with design principles, interior
design, obviously, we need to make sure
that the pieces of furniture complement
what we're trying to do because the visual part, which is the mood
board, for example, is one half of the equation. We need to actually
get these elements, which are the pieces of
furniture accessories. All of these elements should complement each other in a way to support the
vision that we have. Scale and proportion is very crucial in order to make sure
that we get the job done. Selecting appropriately sized
pieces of furniture which fits the room's proportions
and maintains visual balance. It's very, very important. If you have a small room, do not buy a huge sofa. If you get a really huge room, do not buy a small sofa. Always consider the
visual proportionality. And the visual balance. When you are allocating
the pieces of furniture, try to achieve some balance. Whether you have symmetry or asymmetry that you're trying
to achieve, it's up to you. But these are some important
considerations to keep in mind as you build up
your furniture layout.
7. Tips for Selecting and Arranging Furniture for Optimal Interior Design Application: And welcome back.
So as you go about selecting and arranging
your furniture, we have some key tips and considerations that
we need to follow. That way we make sure
that we're delivering the vision practically in
the best way possible. So let's say we have
the following layout. Let's add some tips
to it to help us fine tune our approach to selecting and arranging
the furniture. First of all, make sure that you actually measure the furniture, not just the space. Let's say you go to
a department store, furniture store, make sure that you have taken
the measurements, get a measuring tape, measure
the space that you have, then go ahead and measure
the pieces of furniture, don't buy it yet. And go back and
add it to layout, and you're able to see on
the spot does it fit or not? Often, this is a
huge mistake where you have individuals,
let's say, decorators, interior designers,
whatever it is, specifically as part of do
yourself home improvements. You would like to change some
aspect of your residence, you drive to a furniture store, buy whatever you see
in front of you, drive back and try to
install it and surprise, surprise, dimensions are wrong, and you have actually moved further away from your
vision not closer to it. So to avoid the hassle, not to waste your time and effort and resources
here and there, make sure that you got
your layout very basic. Even a two d sketch on
a pen and paper will do add the dimensions, then simply go ahead to that store and measure
the pieces of furniture. Come back, or you could
take your design with you, by the way. That's
perfectly doable. Add the dimensions and see, does it work or not. Which leads us to
measure the door. Very important.
Measure the main door before buying the
pieces of furniture. And if you live in an
apartment, you get elevators, measure the elevator's
entrance width and height. Often, when you buy a piece
of furniture for apartments, you notice that
specifically sofas, they do not fit into elevators. And if you're living in a
really high story building, good luck getting
that sofa over there. There have been
practical projects, what I've seen individuals
trying to mobilize a sofa to their 24th
apartment using a crane, literally a crane to
deliver the sofa up to their terrace and into
their living room because it doesn't fit
into the elevator. It doesn't fit
through the doors. So it's a hassle, and
it's quite costly. So always measure these things forefront to make sure that you save yourself
the whole hassle, which leads us to a
very important tactic. Place the big items first. Do not start with the
vase or the vase. Do not start with
the coffee table. Do not start with the wall art get the chunky items
first and place them on the ground and see how they align together,
such as sofas. They take a lot of
space, armchairs, tables, dining tables. Start with these big items and see if you are following
your vision or not, which leads us to
the focal point. So as you place the big items, take a look at the focal point. What are we trying
to achieve? Are we focusing the furniture
around the center table or towards the
fireplace or towards the TV or towards a
certain view outdoors, wherever it is, the
pool, the list goes on. So pick a certain focal
point for that space and use the arrangement of the furniture in order to achieve
that focal point. And then always keep
traffic in mind. As you go about placing
the pieces of furniture, keep an eye on the doors and the natural flow of
occupants, for example, if you've got people sitting over the carpet over
here on the sofas, over the carpet, and then they
would like to move around. How would that
naturally be like? Obviously, someone will stand and
they have the ability to go this way or this way. Not going to be placing
items here and here. Why? Because by default, they block the traffic and they create a
negative experience. Similarly, for doors,
you're not going to put a table in front
of the door, right? Or for individuals leaving
or accessing the space, you're not going to be blocking it by a
piece of furniture. Or if individuals
are moving from one zone within the
space to another zone, let's consider, for example, this is your living area, and this is your dining
area, roughly speaking. So if someone needs to move
from this area to this area, how do they naturally
go about it? They get and either they follow this motion, or this motion. So we need to consider
the traffic flow in general to make
sure that we are not overly occupying
the space with pieces of furniture which
create a negative experience. So make sure that you
consider these crucial points as you go about selecting and arranging your
pieces of furniture.
8. Wrapping Up: So what do you think?
I truly hope that you found the class
helpful if it helped you get some in depth insight in terms of
furniture layouts, layouts, arrangement of the
furniture, mood boards, how to construct them,
and how helpful they are as part of your
interior design efforts, means it's a job well done, and I look forward to receiving your feedback on the
current class and make sure that you follow
my profile for the latest releases and updates, and I'll see you
in the next one.
 Engr. Hussein Attié, Entrepreneur I Engineer I Educator