Transcripts
1. Intro: iMovie Video Editing: Hello and welcome. My name is Rob Montgomery
and I'm coming to you from studio a of the smart film
school in Berlin, Germany. This is a course in iMovie
essentials and it's exclusively recorded for
Skillshare learners, just like you. It's also new for 2022, which means it's going
to feature some of the new updates in
iMovie that only work on some of the newest devices
like the iPhone 13 Pro Max and the I pad M1 Pro, Do not be concerned. I'm not going to focus so
much on those new features. I'm just going to include them because I'm movie
actually works on every iPhone and iPad
since the very beginning, iMovie is the go-to
video editor. I'm going to teach
you some advanced filmmaking that will make this experience just a lot
more than learning the tools. You're going to learn the
techniques of how to put shots together wide shots
were in certain ways, as well as some of the
cool little hacks for using iMovie that I
use when I make films. I think you're really
going to like this the way I'm also going
to be sharing all of the project files with you that I'm gonna be
demonstrating with. Actually in the next
segment as we get started, I'm gonna guide you to getting
those on your iPhone and, or iPad so that when I'm
demonstrating something, you can do the exact same
steps on your device. I think you're
really going to like this course and I hope to
see you inside real soon. Thanks very much.
2. PROJECT FILES: iMovie Video Editing: Let's get you set up. I want to make sure you've
got your iPhone and iPad. And if you've got a Mac, it's going to be maybe
a little easier here. The first thing you're
gonna have to figure out is how to get the project files from the Skillshare course
onto your iPhone or iPad. If you look at the course, you could see the
resources are over there. I have a link to each
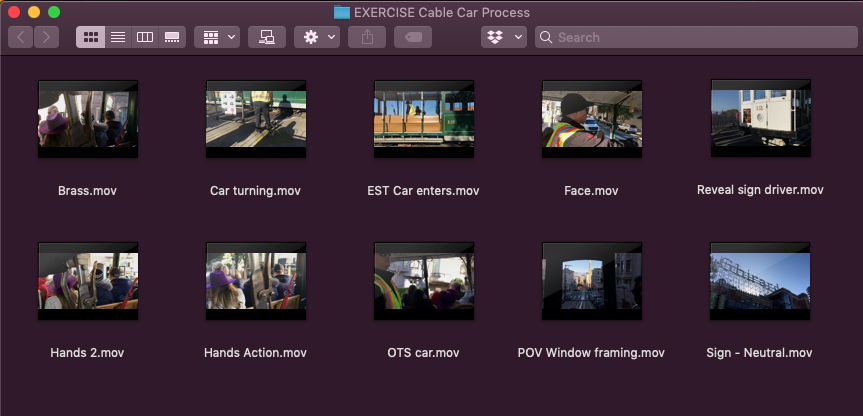
individual movie file, the dot MOV file for hands
and action is the first one listed and then EST
car enters dot MOV. Each of these are
short video clips that we're gonna be
using in the project I'm gonna be demonstrating with. If you option click
or tap on that, you should be able to
download that file and get it into your photos
library or photos app. That's ultimately where we
need to get this material. Now if you scroll down further, you will see that
I have actually a zip file where I've put all of those individual clips
and there's ten of them into an archive. And you can DIY archive that quite easily and expand
it if you'd like to. Your your hard drive. When you do that, you'll get a folder that
says like exercises. In that folder, then you'll see all of the individual files. So that's pretty simple. These are the files,
so we need to get the easiest way to do that is to just drag and
drop and do an airdrop. Now if you don't
know how to do that, you can just open
a separate window like I've done here on my Mac. Go to the AirDrop control that's in the
sidebar on the left. And then you can just
say, I want to drop that to my iPad. Over here on the iPad, it'll just come over and
it will start playing. Of course, we can stop
that from playing. Anytime we want. If you wanted to take all
of the files at once, we can do that as well. Now, let's say I'll take him to my iPhone Pro Max or the
iPhone success plots. Like I said, this will work with all older iPhones and iPads. This is AirDrop. It's been around
for a long time. We just want to get the
project files onto your phone. If you've already
done that, you can skip ahead to the next lesson. I'm just going to
show a couple of other ways how that might work. Here we are on the
overhead cam now, see all of those came
over right to the iPhone. Now all of the clips
are right here. They are in the photos app. You can see them at a glance. That's where we want to be
at the end of this segment. I want you to get them there. But either unzipping
the zip file, air dropping them over. If for example, you
take the folder instead of the individual
files, what happens? Let me just show
you another way. Well, basically they're
going to go into the files app of your iOS
device or your iPad. So if you take the
whole folder and now so we take the whole folder
and we drop it over to iPad. Let's look over here. Now it's going to say, Oh, I've got a folder of stuff. I don't necessarily
know to put that into the photos folder. In fact, it won't even
give you that option. So the best thing to do there is just if you wanted to get
take the whole folder over, just go to the files app and it'll say where do
you want to put it? This folder called exercise. You can just save it
right there on your iPad. That's what I'll do. And now I've got
all the folders, all the clips as well, right here in my files app. And then from here, of course, you can move them with the shear tool into
saving the video. And that will also then just save it into your photos app. If you need to watch
this tutorial again to get the projects files
on your iPhone or iPad. Go ahead and do that. Because when we start
the next segment, I'm gonna be taking
you through building an iMovie project using
those exact files.
3. ALBUMS: iMovie Video Editing: Let's get started
with looking at the clips that we've got
on our iPhone or iPad. Or maybe you're like me. Maybe you say, Hey, I've got all my
clips on my iPhone, but actually I think
I'd rather use iMovie on my iPad because it's
a little bit larger. Since I'm gonna be creating
this course for you, I want you to have the
best experience in seeing all the details and
all the tools and techniques. So I'm also going to
do my project on them, on the iPad and not the phone. So I will select all of the video clips that I just
air dropped onto my phone. Now I'm gonna go an airdrop
them right to my iPad. And what's cool too is like oftentimes I'll actually start a project on iMovie on my phone. Let's say I'm still
in the field doing a documentary or a mobile
journalism report. Then I want to be
able to airdrop the whole project where you can do the same
thing with iMovie. And I'll show you that
later when we get to the end of this course on
sharing and exporting. So depending on your
workflow and your style, you may just prefer to edit
on the larger device net. And that's what
I'm gonna do here. I'm going to just now use
the box with the up arrow, which allows me to AirDrop
it right to the iPad M1 Pro. Now all ten clips are being
sent over wirelessly. And we can see them
here in the imports. We can see the ten clips. Now we're done with
the phone. We can see these ten clips down here. They're just there, but it
would be better to work with them in iMovie if they were
in their own named folder. And you can see that that
is a good habit to get into whenever you start
doing any video projects, you can find all your
original media here. Did you going to use in
iMovie in one handy location? They call them albums. So let's do that. I'm going to now multiple select by tapping on the Select. Now I will just
123455. There it is. Make sure there's
a blue checkmark there that indicates that each of those clips
have been selected. All ten clips are selected. Now I use the box
with the up arrow. And I can either add them
to an existing album. I don't have one yet, or
I can create a new album. Yeah. The way we do that
is we will say add two album and then
go to new album. In this one we call this a cable car adventure. This takes place
in San Francisco. The project files that you have, if you haven't already peeked at them are video clips from a ride honest cable car
in San Francisco that I filmed in December. It was actually a
little bit colder and it's not really ever
warm and San Francisco. And now they all exist here in this album called a
cable car adventure. That makes it really easy
for us to find them. Let's say we shot maybe
more than ten clips of our cable car adventure when we review our raw material
and we decide, okay, what shots are
going to go into the final movie or should
be first considered. Basically you want to
weed out any bad shots, all the shaky ones, the ones that maybe don't
work or are repetitive. And you put your first cut, you're just your best
stuff, your selects, they call them in the film and broadcast world
into this folder. So it's kind of even before you get to your iMovie project, it's good idea.
Review your shots. Yeah, puts the best ones in
a named folder that we can reference in the next step when we start our
iMovie project.
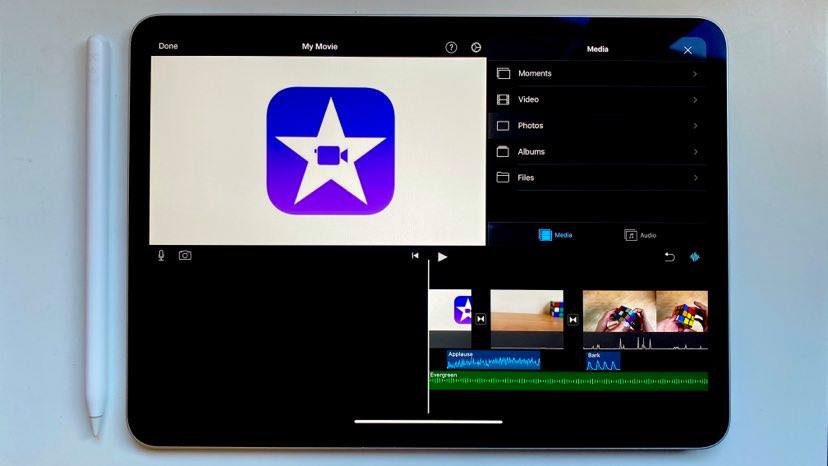
4. START PROJECT: iMovie Video Editing: Okay, so now it's really time to start the eye movie project. Now that we know we have
our clips that will work and they're all put
into their own album. Let's go ahead and
launch the movie app. You see, I like to just focus on having the iMovie app open. No other apps or close
off all other apps. And I like to have ready
access to my photos so I can find media to
put into my projects. In this case, we're gonna
have a iMovie project. We tap the Plus button
and here's the thing. You've got a choice. Do you want to create a trailer or do you want to
create a movie? We want to create a movie. Creating a trailer kind of is like a cookie cutter experience. It's kind of fun. I could show it to you perhaps as a bonus tutorial
to this course. But it's probably, it's, it's
its own separate course. Because you really are doing more kind of following
a script and writing a storyboard
and having to shoot shots that basically
drop into templates. If you've seen one,
you've seen them all. Basically, the
idea with movie is that this can be yours
and yours alone. So let's start with movie and let's go and
create that project. And it's going to
ask us right away, which media, what media do you want to put into this project? You see, that's why I had
you organize all your clips into an album so you
could find them. Basically want to go
then navigate to albums. And we want to find and
scroll until we get to the album that has the
name that we're looking for. The name that we're looking
for is a cable car. Now if you don't see
it here, don't worry. It's probably just
going to be right down here at the bottom. If you don't see it in
alphabetical order, we know that that
cable card venture, hey, there's our ten clips. At this point. I just want you to
take all ten clips. Ten clips is okay. They're short clips there. Between 515 seconds long. They're pretty easy to work with all normally
I say just work with a few clips and then add
the ones you need later on. If you've already got
a paper storyboard, you already know on paper and that's always a
good tip to which goes first, then you can just select them in that order and just build your project in iMovie if you haven't done
that, Don't worry. We're just going to select
all of these clips here. And then I can move
them around, trim them, edit them, modify them, and that's what I'm
gonna show you in the following tutorials. Right now, we're just
going to grab all ten of those clips from
the project files. And then tap down on
the bottom here where it says Create Movie. Once you get there, if you
swipe to the beginning here, you can see that all the clips are there one after the other. Now they're not really in necessarily an order
that makes sense. And that's really the work
that we want to focus on. If you take two fingers and
pinch together or Zoom, you can basically
zoom in or zoom out of your movie project. And you can see basically
a group of pictures here that you will then
be working with. And these are we call clips. And so for each clip, we have tools that we
will use to modify them. We can move one clip at a time. We can work on transitions
between the clips. And we can even
reorder the clips. And I'll show you
how to do some of those things in the
following tutorials. Once you get to the
point where you've created an iMovie project here. You've got all your clips
on the timeline you've pinched to so that you can view basically
thumbnails of each one. Then I want you to stop, then start the next lesson.
5. IN & OUT EDITS: iMovie Video Editing: Let's go into our
iMovie project and start our focus on video clips, things that we can do with each small piece
of video that are gonna be included in our movie
into our final production. So I like to show the overhead view here
because then I can use pencil and then I
can show you in a little more detail exactly
what we're looking at. Again, at a glance, is at word zooming in as
possible with two fingers. On each of these clips, you can see that the audio
waveform is showing. If it's not, you can go into
the wheel up here, the gear. You can also look at some
of your settings here. Do you want to see the
soundtrack from a theme? Do you want to apply a theme? I like to keep things
simple at the beginning here and have no
project filters. Those are things
I definitely want to include right
at the beginning. No special effects,
no overarching theme. We just want to work
on the material here. The material is our Eclipse. If I tap this clip, I have, you noticed what happens is
as soon as I clicked on it, I get to yellow handles, one at the beginning, one
at the end of the clip. The clip appears into
what's called the preview pane, the
preview window. We're looking at our project at a glance here and
then in detail. Now, when we get
into the clip view, we have tools for trimming it, for adjusting the speed. We can adjust the volume level. We could add an
overlay title to that, or we could do color
corrections or filters. Mostly filters. I generally avoid the last
filters thing unless I'm doing something like a music
video and want to have some fun with this clip again, if I go in and now really
expand the clip out, I can see all the sounds there. I can audition the clip. This white line here is
wherever that white line is, that vertical white
line is over your clip. That's basically a playhead. That's what's going
to be showing up here in the preview pane. That makes sense. So as
you go through your movie, whatever is at the white line that cuts through all the clips. That's what's going to show to your viewer as we're
working on this clip. And you see if I tap
on the background, the clip gets de-selected. I tap on the clip,
the tools come up, the yellow handles, these yellow handles, Let's
talk about these. These are trim handles
that can trim the, what's called the endpoint where the first few seconds of video shows and I kind of liked that he's waving
his hand there. And then the out point, I'm just long pressing
and tapping and then readjusting where the out
point is for that clip. So I liked that he's raised
his hand and then he glances. That's usually a good choice
as an editor would tell you. Glance objects, sequences,
then maybe show what he's seeing for that clip. For each clip, I just want you
to adjust the endpoint and the out point just to find the good seconds in
each of these clips. As you start to
put them together. Don't worry about
changing the order yet. I just want you to go
in on each clip and just trim the endpoint
and out point. Moving on to this clip, Let's just audition
that clip by scrubbing. This is scrubbing. See how I'm just dragging
up here in the black. And I'm basically scrubbing that white line across the clip so that I can see
what's happening at the beginning there
and at the end. Basically do that for each clip, set an endpoint
and an out point. And then I'll show you
some more editing tools, such as cropping
and then reordering the clips to start to build our visual sentence something
we call a sequence.
6. SPLIT AND CROP VIDEO CLIPS: iMovie: Let's go in and edit a clip and see what
some of the tools are and how you might use them to improve your video projects. So here we are looking at a clip from our San
Francisco cable car scene. And this is of course
the star of our movies. I'm scrubbing to see the
beginning and end of that clip. Make sure I've got the
timing that I want for it. If I tap on it further, then I can do some
editing with it. If you tap on it. One of the, one of
the things that you find right away that
you might want to do with it is see the
sound file for it. And so that's what this
little icon over here does. Is it toggles the
associated sound track that's with that clip. If you don't want it, you
can also just turn it off. And maybe since we're
just working on the pictures right
here right now, that's what we'll focus on. If you split the clip
that's done down here, that'll just basically make, turn your clip
from one into two. Let me just tap on it and
show you what I mean. Now at that point where
the timeline was, there's a straight
cut indicated by the vertical white bar right
down here between the clips. That just basically to the viewer doesn't
look any different. But if you wanted it to then
modify this clip further, change it, move it around. You can do all that. And basically you use basically
duplicating the clip. But it's trimmed right
to where it was. So that's a really useful thing sometimes to split longer clips. Because maybe we'll use the first few seconds of
this and then we'll use the last few seconds of this and in-between we also
show something else. If we wanted to, we could have, for example, this guy. And I'll just change
that to a straight clip. I'll talk about
transitions later. But just Beispiel,
why would you want to split eclipse
so it's coming in. Then you show something else
and you show it ending. So sometimes it's used as an editing device and narrative
device to compress time. If you don't like
any of those edits, your favorite button in
iMovie is going to be like this, the undo button. It's this loop with the arrow, which will take you back
to our hole on Split Clip. That's how just one little
tool, the split tool, might be used as you
want to start to organize your videos and
the sequence of your shots. And when you want to do
things like compress time or the Shoah Shot in-between
to keep the energy going. Other things you can do
with a clip that are useful at this point are maybe changing the
shot size of it, cropping it if you will. The little icon up here
of the magnifying glass, it says pinch to zoom. Take two fingers, put
them here, pinch to zoom. Now we can basically
re-frame the entire clip. It will not change over time. It's just going to change that, that shot crop for
the entire clip. So again, you could combine those techniques
and say, okay, we want to show the
first part in a wider we'll split that
will keep the framing. And on the second half. Now we want to show
when it gets to here. And I'll just trim the empire
that when it gets to here, I want to be closer up
on the number there. So I'll tap on the clip, tap on the magnifying
glass, pinch to zoom. And now it's just
from that one clip. It's going from here to here. You'll see that it just basically zooms in, but
it's not a zoom in. It's really just a
straight cut too. A new shot size. Just a little bit tighter,
a little bit closer. That's another way to
kind of use the split and the Resize tool or the
cropping tool there to kind of get some energy
into some of your shots. That's an option
for you as well. I'm going to go into some more advanced editing
here in the next segment. And actually we're going
to start to try and find the flow of our, of our scene, of our cable car. Play along with
the project files. You can do no wrong. In this course. I hope you're enjoying
iMovie essentials.
7. TRANSISTIONS: iMovie Video Editing: Okay, Now let's move beyond
basic editing of clips and start to think about editing our story, our visual story. For that, we'd want to definitely
consider that each shot in this sequence
is working much as it does like a noun or
verb in a sentence. In other words, does it
introduce a character, an idea, or is there
some action involved? What's the best way or what's a good way to connect some
of these shots together so that it makes logical sense just like a grammatically
correct sentence. This is called visual
language and that's what we want to look at here. And along the way, or maybe at the beginning, what I like to do
with iMovie is do you see what happened there
from the cable car Turning to the point of
view of looking through the window of the
cable car as it moves down the streets
of San Francisco. There's this little bow
tie thing happening here. I'll zoom in here. You can
see this on the iPad view. You see this little bow tie. What is it doing? It's doing
a cross fade or a dissolve. Here's the thing. This is like a
little pet peeve of mine across Vader dissolve to a filmmaker is used by film directors says to
indicate a passage of time. It's kind of, it's used
a lot here in iMovie. It's the default transition. It's really unnecessary. If you have shots that
are working together as a visual sentence because we don't need a passage of time, we just need to go from
one idea to the next. It connect, it makes sense. You don't need any deciphering
or other cues here. The passage of time is useful if you've got
disparate things, which is often a lot of what, what a lot of people film, Be aware of that, that is
the default transition. It's not necessarily
what pros use. We do something
called straight cuts. Thankfully, there is that
option here in iMovie, just by tapping on
the little bow tie, the dissolve, the crossfade. You can go to none. Now we've got straight cuts. The thing is you'll
have to do that between every clip here. So I'm going to do
that real quick. As you can see, you do have other
options like if you do want to have some
special effects. Other than dissolve
or straight cut, you've got a slide or a WIP or fade or
something called theme. I'll show some of
those later on. As we move towards the
end of the course. They're kind of special purpose. And the point of this
course is not to delve into the every possible
special effect, but it's to show you how to edit very strong visual
sequences using iMovie. So we're gonna stay
disciplined on that and get rid
of some of these, get rid of actually all of
these dissolves here that the program put into the app, if you will, put into
our I'm old school. I still come from a time when there weren't
software engineers, their computer
computer programmers, you know, back when I was
learning computer languages, that's what that's
what you recalled. You're not a developer. You are a programmer. And it's still pretty
much nothing's changed except for
the words around it. Except we have this
really cool apps like iMovie and now it's
doing straight cuts. And now that I've gotten rid of that kind
of special effect fluff, we can really start to focus on what shot should we
open our movie with? Is it them preparing, you know, the the tram
for the turnaround? Do we start with moving down the streets
of San Francisco? Now, you're the director, you're the video editor. We're all working on
the same material. It'll be interesting
to see what shots you choose to open
and close with. Out of these ten shots, do you use all ten shots? Do you use eight of them? Do use five of them. Really, all those creative
options are up to you. I can show you real quickly that what I've
done as a quick sketch. And so I will add it in
here, just a suggestion, of course you can copy
it on your iPads. Look at the shot
order that I've used. And then we'll talk about that. We'll talk a little
bit more about the audio mixing and some
of the things you can do there in terms of or
if you wanted to add music or if you wanted to
add text over transitions, There's a lot you can do
with the project once you figure out what the logical
visual sentences for it. And that's really what
we're going to focus on in this next section. I hope you really enjoy it. My name is Robert Camry. This is i, movie essentials. And I hope that you're
enjoying iMovie.
8. DETACH & MIX AUDIO: iMovie Video Editing: Let's dig in on this
edit and let's look and listen to the sequences the way I've put it together here
in this first draft. Again, you don't have to
put it together this way. But I wanted to explain
to you and show you some of the techniques
I use to do this. First of all, let's rewatch it one more
time. What do you think? It's pretty short. It's like 27 seconds long, but there are ten shots in that. And what's interesting is
maybe you've not heard the sound as it's cut together. It's all natural sound. That's just a sound
that's coming over the mic of the
smartphone, the iPhone. In this case, there are ways you can smooth
that and iMovie, and so we would
definitely want to talk about that going forward. But let's just talk about how aggressively shot opened up. It opens up with real instead
of showing Jira Delhi or showing the slow arrival
of the cable car. It starts right up close
on the operator's hands touching that breath labor
and clicking, ringing, it's really strong opening and you don't really know
what you're seeing at first, but it definitely catches
your attention as a director. That's exactly what I wanted. Let's try it one more time. You can see I'm
looking for shots that take you in a hurry, gets you on that cable car. I'm trying to get you on. I'm trying to get you
right next to the driver. I'm obviously people on the cable car are filming,
whether filming vertically. And they can't really have this type of
experience reproduced because it didn't
shoot the kinds of shots that can be cut together
into a visual sentence. They just shoot what it
looks like from their view. That was just one of my shots. In fact, I was looking at
actually the view from the operator because
it's really, that's one powerful thing
that I can share here is that's one of the
things you want to do is think about shots. Instead of specialists affects. Think about how shots
can connect together like words in a sentence,
nouns and verbs. How you can use characters like the operator to really kind
of focus what you're filming. So then also focuses
what you're editing on. I've got his hands,
I've got his face, I've got his point of view of what he sees going
down the rails. I've also got
establishing shots of the location of the
riders on the car. That's all I have got.
The natural sound. That's all I've got going
on in those ten clips. But those ten clips were edited from a little bit
larger collection, maybe 15 or 20 that I filmed. And that's really
where you want to be when you're
into this program. Oh, by the way, when you're here and you're
reopening a project, everything is called my movie. Well now we can give it a
great San Francisco name, so we can call it San Francisco cable
car adventure. And when we go into Edit, Just remember that the tapping of the button
there of the edit button, we'll get you back into
the flow of your edit. So again, you do not have
a movie at this point, you do not have a video. Basically, you have
all of those ten clips still in your photos library. And if you delete
them off and then you open up your iMovie
again and guess what? It's gonna be missing
media, they won't be there. So you definitely want to
start an editing project. You definitely want to
go all the way through and export it out as a flattened or
finished video movie. So at this point we're still just looking
at the edit here. Let's just look at
those first few shots. It opened. As you can see, there was more to the beginning
of that shot. I focused on this
that peak action when he grabs his hand grabs and then it
makes this noise. He looks at me, he's he's really just wrestling
with that thing. I'm looking for the hand
coming in from the left. And that's gonna be
my endpoint, right? It gives me that great sound. Now if I want that sound to
carry on into the next shot, that's called an L cut. Oh, now we're learning some real advanced video
editing terminology. To do that, I would need
to detach the audio. And again, I like to show the audio frame because then
with the waveform there, because then that enables the tool down here it
says detach audio. Now I can have that audio file
and then I can just extend the audio if I wanted it to go further or if I wanted
it to be be ahead, I can adjust the
length of that audio. Let's say now I want to
change my out point here. I don't want
necessarily see how it dips down into
this neutral dips. I lose because my cameras right up next this thing I
thought he was gonna hit me. And so I think this is
just a natural reaction. I still want that
sound continue, but right there
when he hits that, right there, maybe that I would like to split and then
I'm just going to delete, see what's selected
there in the yellow. If I tap, if I go
back to my edit here, I just tap off and tap back on. Now I can just delete that and have the audio
running underneath. I'm going to tap on
the little trash can icon over on
the bottom right. And that will delete the
second half of that clip. But you see the audio in the blue waveform is going
to carry underneath. Let's audition that the rolling of the car sonically is continuing and it's
from that first clip. And then in the
second clip you'll see the rolling of
the car coming in. Now. Ideally see, well it's
okay. That works for you. Then you can also do that
same thing with this. We can now detach
the audio from this. Now we can start to basically
kind of crossfade and smooth those audio edits out
from each of those clips. So as I'm working,
I usually I'll do the audio editing as kind
of a polishing step. But in this case I'm really focusing on it because
I really being aggressive with the eye-catching and sound catching
the ear catching, if you will, of this clip. Now I'm gonna go from
their car enters, there's another guy who's
watching it as it turns. It goes onto this turntable. Then they take some
time and get it all setup and secure
and then they turn it. So I'm using this as a way
to compress the actual time. This could be a little tighter. So that means I'm going
to move in the end point. I just need bom, bom, bom. And you see it's
moving at a pace. Good. I wanted to
pick up that pace. You see where it starts to turn, says Powell and market, That's the honey
spot right there. It's turning on the turntable. Now. It's still turning. I've just moved to
a new camera Kate location started a new clip. I can match the action. That's what these
two shots are doing. It's matching the action. The action is the car turning
on the turntable cable car. Just doing it with two
different shots sizes, two different shot
locations, same moment. Shooting, repeating action
lets you do it like if it's a cooking or
making coffee or whatever. In this case, I'm just being improvising and I
know what I need in terms of getting shot variety when something's slow like that. And I had the opportunity to film it from a couple
of different locations. I'm going to look for
matching action shots. They always work. And then it also
introduces There he is, he's lifting his leg up. That's our guy. This
shot does two things. It matches the action. It foreshadows the character that will be seen
in the next shots, or it echoes one that you saw but you didn't know because you
only saw his hand. That's how in three shots. Now in this shot, Let's
also detach the audio. The audio goes before. That, creates it looks
like the letter J there. So that's like a J,
that's called the Jacob. And then when the audio
goes after the clip, like here on the first clip with the audio extends over the hill. That's called an outlet. And those are things that you
probably wondered about and maybe now can
consciously observe when you watch television,
news or films. Especially documentaries. Because that just
smooths these cuts. That's how we're getting
the smooth cuts. We're not using a
special effect dissolve, doing it with the audio. That's what really makes this opening sequence.
Let's audition it here. A little more special. Okay, it could use
some further work. Maybe you could even copy
and paste some of these. If you wanted to. You could duplicate them. So if you wanted to have those
sounds repeated elsewhere, you can do that and
you can put them into your audio timeline.
Again to delete. It's the trash can. So maybe it's the
sound here of the car running that you'd like
to hear just a little bit more of while it's turning. Yeah. Let's try that. That's a little better
and then it can get a little quieter there. That's fine. If you wanted
to adjust like that clip, he wanted it to fade out.
You see what I did there? I just went on the
volume of that clip, tapped on Fade and then you
get little triangles there. So you can then now even further smooth each of these
little segments of audio that you've detached from your video clips and really
refine your audio mix. Now you might want to do that. I'm just doing it here
at the beginning to kind of demonstrate
further steps. But basically at this point
you just want to carry on and get the right shots for your edit and see how
I picked up that. Now I don't need that shot. That's the shot I had of the
second half of the carriage. So I can decide to
eliminate that again by tapping on the trash icon. And now I can choose
where do I want to go? Do I want to start
people down the ride? Right? Do I wonder introduce
my character? I think I go back to hands. That's what I probably do. Get us going on this journey. Introduce some of the
other people there. Maybe I used the sign
just as a way to locate. Yes. This is San Francisco
cable car and yes, this is the line
that starts down at Fisherman's wharf right
there, Jira Delhi square. So maybe that's what I go to. That's a neutral shot and
that's usually a good choice to go to after you've established
a sequence like that, because then that allows
for the passage of time. Because after the
gara dolly shot, we can go anywhere on the right. Suddenly we can be
off halfway across San Francisco on this with
the car and the writers. A lot of people think,
well, I need to open with that shot. That should be my first
shot, the Garret Ali. I couldn't think of a more
boring way to open this story, don't you think after the
way I've shown it to you? So try to avoid that
temptation to say, oh, I always needed to show like a sign at the beginning
of my videos. Start with the action,
start with the excitement, start with a little
bit of mystery, a little bit of intrigue, a little bit of beauty,
a little bit of drama. Those are my tips for you. I'm really looking
forward to seeing how your project comes along and finishes up here in the eye
movie essentials course.
9. AUDIO J CUTS & L CUTS: iMovie Video Editing: So at this point we're still just looking
at the edit here. Let's just look at
those first few shots. It opened. As you can see, there was more. The beginning of that shot. I focused on this that peak action when
he grabs his hand, grabs and then it
makes this noise, he lucks and he's he's really just wrestling
with that thing. I'm looking for the hand
coming in from the left. And that's gonna be
my endpoint, right? So it gives me that great sound. Now if I want that sound to
carry on into the next shot, that's called an L cut. Oh, now we're, we're learning some real advanced video
editing terminology. To do that, I would need
to detach the audio. Again. I like to
show the audio frame because then with
the waveform there, because then that enables the tool down here it
says detach audio. Now I can have that audio file
and then I can just extend the audio if I wanted it to go further or if I wanted
it to be be ahead, I can adjust the
length of that audio. Let's say now I want to
change my out point here. See I don't want
necessarily see how it dips down into
this neutral dips. I lose because my cameras right up next this thing I
thought he was gonna hit me. And so I think this is
just a natural reaction. I still want that
sound continue, but right there when he
hits that, right there, maybe that I would like to split and then I'm
just going to delete, see what's selected
there in the yellow, I'm going to tap on
the little trash can icon over on
the bottom right. And that will delete the
second half of that clip. But you see the audio in the blue waveform is going
to carry underneath. Let's audition that the rolling of the car sonically is continuing and it's
from that first clip. And then in the
second clip you'll see the rolling of
the car coming in. Now. Ideally see, well that's
okay. That works for you. Then you can also do that
same thing with this. You can now detach
the audio from this. Now we can start to basically
kind of crossfade and smooth those audio edits out
from each of those clips. As I'm working, I usually
I'll do the audio editing as kind of
a polishing step. But in this case I'm really focusing on it because
I really being aggressive with the eye-catching and sound catching
the ear catching, if you will, of this clip. Now, I'm gonna go from
their car enters, there's another guy who
was watching it as it turns it goes onto
this turntable. Then they take some
time and get it all set up and secure
and then they turn it. So I'm using this as a way
to compress the actual time. This could be a little tighter. So that means I'm going
to move in the end point. I just need boom, boom, boom. And you see it's moving
at a pace. Good. I wanted to pick up that pace. You see where it starts to turn? It says Powell and market, That's the honey
spot right there. It's turning on the turntable. Now. It's still turning. I've just moved to
a new camera Kate location started a new clip. I can match the action. That's what these
two shots are doing. It's matching the action. The action is the car turning
on the turntable cable car. And I'm just doing it with
two different shot sizes, two different shot
locations, same moment. Shooting, repeating action
lets you do it like if it's a cooking or
making coffee or whatever. In this case, I'm just being improvising and I
know what I need in terms of getting shot variety when something's slow like that. And I had the opportunity to film it from a couple
of different locations. I'm going to look for
matching action shots. They always work. Then it also introduces
There he is, he's lifting his leg up. That's our guy. This
shot does two things. It matches the action. It foreshadows the character that will be seen
in the next shots, or it echoes one that you saw but you didn't know because you
only saw his hand. That's how in three shots. Now in this shot, Let's
also detach the audio. The audio goes before. That, creates it looks
like the letter J there. So that's like a J,
that's called the Jacob. And then when the audio
goes after the clip, like here on the first clip with the audio extends over them. That's called an alkyne. And those are things that
you probably wondered about and maybe now can consciously observe when you watch
television, news or films. Especially documentaries. Because that just
smooths these cuts. That's how we're getting
the smooth cuts. We're not using a
special effect, dissolve, doing it
with the audio. And that's what really makes
this opening sequence. Let's audition it here,
a little more special. It could use some further work. Maybe you could even copy
and paste some of these. If you wanted to. You could duplicate them. So if you wanted to have those
sounds repeated elsewhere, you can do that and
you can put them into your audio timeline.
Again to delete. It's the trash can. So maybe it's the
sound here of the car running that you'd like
to hear just a little bit more of wallets turning. Yeah. Let's try that. That's a little better and
then it can get a little quieter there. That's fine. If you wanted to
adjust like that clip, he wanted it to fade out.
You see what I did there? I just went on the
volume of that clip, tapped on Fade, and then you
get little triangles there. So you can then now even further smooth each of these
little segments of audio that you've detached from your video clips and really
refine your audio mix. Now you might want to do that. I'm just doing it here
at the beginning to kind of demonstrate
further steps. But basically at this point
you just want to carry on and get the right
shots for your edit. Let me see how I picked up that. Now I don't need that shot. That's the shot I had of the
second half of the carriage. I can decide to
eliminate that again by tapping on the trash icon. Now I can choose where
do I want to go? Do I want to start
people down the ride? I wonder introduce my character. I think I go back to hands. That's what I probably do. Get us going on this journey. Introduce some of the
other people there. Maybe I used the sign
just as a way to locate. Yes. This is San Francisco
cable car and yes, this is the line
that starts down at Fisherman's wharf right
there at modally square. So maybe that's what I go to. That's a neutral shot and that's usually a good choice
to go to after you've established a sequence like
that because then that allows for the passage of time because after the Garret dolly shot, we can go anywhere on the right. Suddenly we can
be halfway across San Francisco on this with
the car and the writers. A lot of people think,
well, I need to open with that shot. That should be my first
shot, the garish Ali. I couldn't think of a more
boring way to open this story, don't you think after
the way I've shown it to try to avoid that
temptation to say, oh, I always needed to show a sign at the beginning
of my videos. Start with the action,
start with the excitement, start with a little
bit of mystery, a little bit of intrigue, little bit of beauty,
a little bit of drama. Those are my tips for you. I'm really looking
forward to seeing how your project comes along and finishes up here in the eye
movie essentials course.
10. TITLES AND EFFECTS iMovie Video Editing: It's time now to add some titles and look at
some special effects. Not every movie needs
titles and special effects, but let's experiment with it
with our practice projects. Shall we? Returning to the edit, we have now completed the audio detached audio
fading, cross fading section. So we can turn and disabled
basically the showing of those waveforms to kind of clean up our timeline, if you will. Again, that's with that tool. And now we're going to be
looking at our movie and say, Would it make sense to put
any text over video here? Clearly, if you've been here, you know what this
is and there's even a really strong
clue what it is. This movie is about when you read Powell and market
their Powell and market hide and beach
fisherman's wharf. Those are all clearly San
Francisco markings, yeah. And also gear a Delhi
chocolate factory. This is definitely a very
known and very popular place. However, if we wanted
to add some text, Let's look at perhaps
the next shot. The next shot has the POV of what the driver sees
driving along the line. Here, I've split it that
clip into two halves. So I just had it was
that full length there and I just use the split tool like
I showed you before, and I'll show you why. On the first one I'm going
to want to add some texts. So I'm gonna select that
clip and tap on text. The text.com down at the bottom now reveals a number of choices. First of all, the one
that's selected is none. So there's no text right now. Let's just choose, you can audition these
on your own time, but let's just choose one
that I know works pretty well in this instance
and that's focus. What it did was it added a
text overlay right up here. No problem. There's the text overlay. If I tap on the
text, I can edit it. Why don't we just
type San Francisco. Okay, great. So now that's going
to be on that clip. If I just tap off or if
they hit the return button, basically I've got my clip
and it shows that type. Now, let's just audition that and see what's
going to happen. See it's just going to
build into focus, right? And then defocus out. Let's see what some of the
other options are. Focus. Let's say we liked that style, but let's say we don't like
where it is or how big it is. So let's go up to the
magnifying glass and just like with I'm sorry. Actually we just tap on the type and we
can pinch to zoom. We don't have to
say if we did the magnifying glass
is obviously going to re-frame the the
shot underneath. But if we just tap on the
type and pinch to zoom, then it will re-frame
the typography. So now we have San
Francisco building in a nice little elegant way. They're cool. If we like that, we can just
do the same technique on the second thing and use a different piece
of information, let's say maybe the time of day. So again, I'll go from none. I've got the clip
selected, I'll add focus. I will tap up here.
I will edit it. Now say, let's say it's 1130 AM. Finally got that
typed correctly. And then if I want to pinch and zoom on
that, I can do that. Once I get out of the
text editing tool. Now I've 1130 AM. Let's just see how
those line-up. As I scrub back here. The first shot, just play them. 1130 amps just a little bit
bigger than the other one. I can reduce the size of that. What are some of the
other things you can do with your text overlays? Well, there's a lot a lot of the power is now over here
on the left-hand side. Like obviously you can choose
the typeface you want. You can change that. Under these further
arrows, there's variation. So if we choose to Avenir, we can choose everything
from ultra light to heavy italic and many
flavors in-between. It's a really good face if you
want to change the colors, you had different ways
of selecting color. I'm just keeping it in
the classic filmmakers, white and under the dot-dot-dot, here's where you can decide. Do you want to have a
drop shadow on that? Sometimes that's
advisable to get good separation to
the background image. It really depends on what's
in your background image. Do you want it to be all
uppercase, all capitals. By the way, uppercases and an old printing
typesetting term. I could digress, but basically
there's an uppercase and lowercase and
all the metal pieces that were capital letters
were in the uppercase of a typesetters machine and all of those small letters
were in the lowercase. It's more correct. Call
it capital letters unless you're dealing
with printing. Anyhow. Sound effect, it could have
a sound effect as it builds. Let's audition that. Then you have the
choice of whether the text build should be present to the entire clip or should it just run
on its own speed? And that's new in the latest
version, that's up iMovie. I'm gonna keep it. Not full
clip duration because that was always kind
of a pet peeve of mine with the earlier versions. So I'm going to
keep it that way. I'm gonna do the same with the other one that
says San Francisco. Little sound effects. Let's see what that does. Under style. You could also turn it into
what's called a lower third. Now a lower third
graphic is always something that's in the
lower third of the video. Usually down to the left
or down to the riots, usually the person's name and their job or where they're from. It's kind of an
identity or tech. We don't really need that here. I'm just gonna go
with the default, but that is an option
in the lower third. Let's play this. What does that mean? Well, what that might mean is that that's
something that comes along with the special
effects of theme Options. And I'm going to show
you how those things work also with the type, the text overlays
that you might main. So this is nice and clean here with a nice,
clean typography. But if you wanted it to be
a little bit more stylized, we could go into those
clips and the text edits. And instead of non or focus, I'm going to choose one
over here on the right. This says Theme,
location and see up pops would look like stamps and letters than it says San
Francisco, like handwritten. So now it's got a little animation there for 1130. Now where did that theme
graphic come from? And is it changeable? Well, yes. Let me show you where. Up under the gear icon, this is where you can
set project filters. For example, if you wanted
your entire San Francisco to look like a comic or a comic
drawn in black and white. You can do such things and
many other strange filters. You can see. That doesn't really
work for me so much. So I'm gonna go back to none, which is a good place to
be on filters in general. But under Themes here, you can have options for travel, for neon, neon modern. So the modern will put
just a nice little gray would set a tint overlay. So it kinda gives it
a planing effect. Bright will change
that text overlaid, be bright with a
white background. Playful. And so on neon travel. That's the one that
gave us the stamps. And so on. There's something that
looks more like the news. So that's what I had selected. There was travel. Then you can decide
whether you want your entire movie project
to fade up from black or, and, or fade down, fade out to black.
Fade to black. I have enabled on the output. In the last shot it's
going to fade to black and it's also going to
fade down the sound. That's a nice little touch if you've doing a little
vignette scene like this. And as does the speed
change the pitch of a shot? Generally changing speed. I did do that and I'll show you where before I get out of here. But basically I'm going
to keep the travel. And then if I do theme
from soundtrack, themes soundtrack now
it's going to add some music related to travel. Let's hear what
that sounds like. See if it does anything
with the special effects. I'm pretty sure with
the audio waveform on. I can also then adjust
the volume level of that background music in relation to my
natural sounds. So let's audition that
and see what comes up. I have no idea. I've
never actually used that. If maybe it has a bug or something, I'm not really worried about it. I know that if I really want, I'm just going to delete
that, that theme soundtrack. I know that if I really want to add music down there,
I can do that. Or I could do a voice-over. If I wanted to do a voiceover, I would just use the
microphone icon here. I would be ready to record. I would tap the record. I would let the opening
South San Francisco, a real treat. Germans warm chocolate
factory in France. And I just made that up. I was improvising, riffing off of some
of the scenes there. Obviously, if you're
gonna do some voice-over, It's good to have some pauses. Let's Move natural
sounds come up and down. But I started to breath
out some ideas there. If you wanted to redo
it, you can retake it, you could review it or
you could just accept it. You know, there it is,
There's your soundtrack. So let's hear it. San Francisco, right? So if there's another
sound in there, you see that you only have
three tracks of audio, so be aware of
your sound mixing. That means that's a fail. So if you're going
to do a voice-over, you can only have two tracks of other material as
you have to have that third track
free for voice-over. Regarding speed control. Now this shot I
had of the gear a dolly was 1 second long. In my edit I realized 1 second
probably should be two. No big deal. I just went to that clip and I dragged it down to half speed, effectively doubling the length of time that clip
is going to play. It's a pretty neutral shot. It could even be just a picture, but it's video and
have the same effect. It's just, here's
something else nearby. Here's what you see
looking up behind you, by the way, is the Garret Delhi. So that's a good use
of the speed control. If you try and create a slow
motion effect, by the way, using this tool from normally recorded video, it won't work. If you had recorded in the slow motion
mode of your phone. And then try to slow it down. It will work because there's more frames per second and that's just a
whole another course, that's a whole another tutorial and in advanced filmmaking. But that's generally
people try and get slow motion here with
this tool from regularly, regularly shot video,
and it never looks good. It's always gonna be choppy. But in this case it's just a bit of a save to take pretty, pretty much stationary shot. Just doubled the length of it. So that's what we did there. And that's titles and special effects for the San
Francisco cable card venture. I hope you're making
progress with your project. We're getting real
close to the end here.
11. EXPORT & SHARE: PROJECT FILES: iMovie Video Editing: Okay, Hey, we've
come to the end of this course where we
have gone through an edit using some clips of San Francisco cable car
that I shared with you. I've shown you how I've
been starting to edit it and when it's time to export, it might be a little bit tricky. Let me show you some of the
steps there when you're in iMovie and you've
got your project, remember it's not a movie
until you share it, till you export it out
back to the photos album. Right now it's just a
project is just a set of instructions that treats
all these video clips or generates text overlays. And they all have to
be output as a file. What's, what's interesting
is you're like, Hey, where am I
going to do that? How am I going to do that? Okay, I know I can add more
clips to my movie from here. But how do I get my movie out? My gosh, I don't even know. It's not in this screen. That's what's really confusing. You kind of have to go done counterintuitive,
we're not done. We have to go up to the top
and click Done up here. Until it looks like this San Francisco cable
card venture. Down here, the box
with the up arrow. That's how we export it out. Apple, I don't know why
they hit it this way. But anyways, here is where
we can save the video. And that's what we want to do. Just want to export it
out and save it as video. Of course, you could
send it in an e-mail. You could send it
up to social media. But for our practical purposes, the best thing to do is
just export the movie. And that's what's
happening here. It's exporting the
movie and it's putting it into your photo library. I hope you enjoyed this course
in AI movie Essentials. Those are the essentials. Oh, I did promise
you one other thing. And that is, what are you
going to do with some of the cinematic mode that you maybe have filmed with
one of the newer iPhones. The chance for you to edit
them in iMovie is now enabled. What we're talking
about our clips that are enabled within a special camera mode
called cinematic mode. When you, when you choose that, let me just make sure I've
got the overhead camera on. It's called cinematic mode. So it's something
you chose here. And when you're filming a scene, you don't have to
necessarily lock focus and exposure
on people's faces. The AI is doing that. And then when you
input it into iMovie, now you can go in on that clip and you see there's something called
cinematic down here. It's way down here
at the bottom. There's a new tool here. In cinematic mode. Basically, you can
tap up here and lock where you want the focus to
be at that moment in time. And then scrub forward and
say I wanted to now be here, focus on this, these
points down here. You can delete them
and start over. That's pretty much it. And then you can also
determine how much of the scene is in-focus and
out-of-focus overall. In other words, what
f-stop have you done? Clips that had been shot with cinematic mode can also be
further edited in iMovie. So that's another powerful
use case for iMovie. That's a little
bonus tutorial for you for i movie Essentials. It's been my pleasure
to be your instructor. I'm Rob Montgomery. The smart film school in Berlin. I hope to
hear from you soon.
 Robb Montgomery, Video Journalism Professor