Transcripts
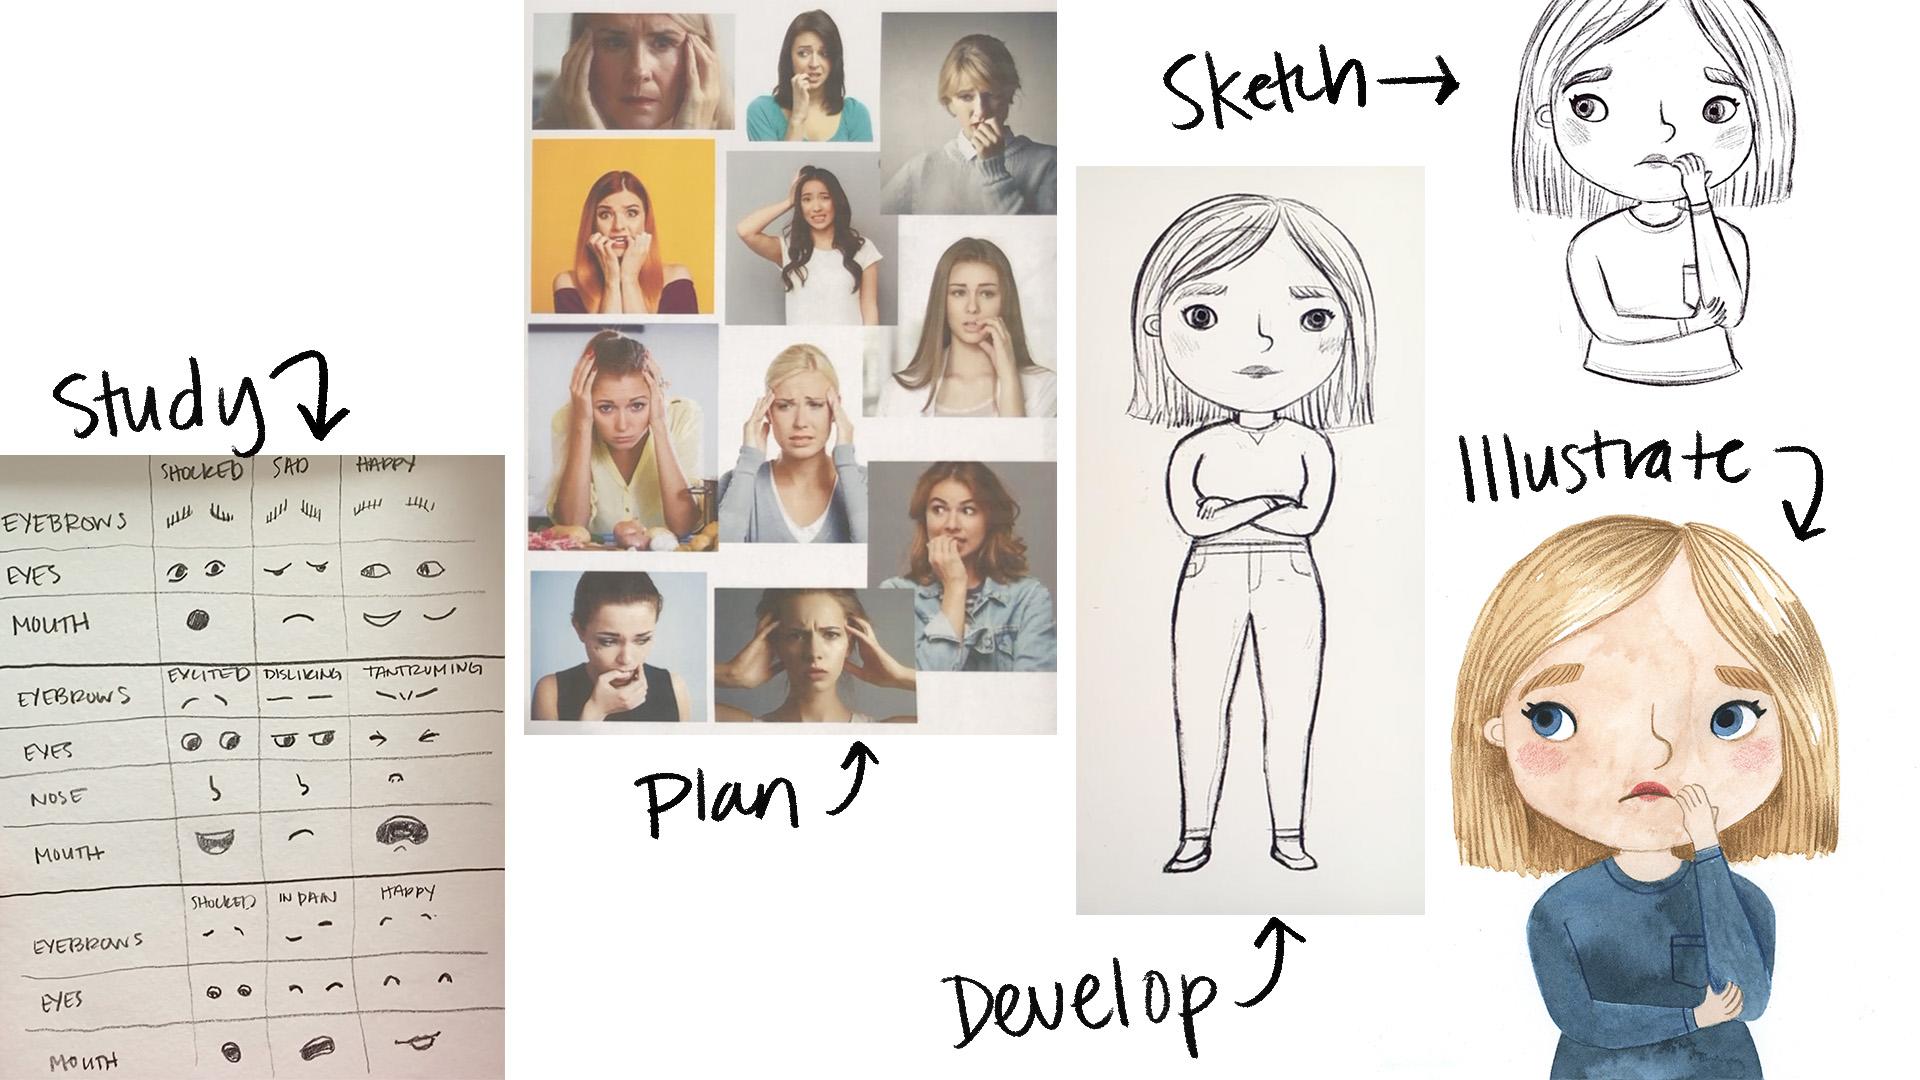
1. Illustrating Emotions Intro: As a kid, I loved to draw lots of characters. These characters were always happy. But now that drawing characters is a part of my job as a children's book illustrator, I need to know how to draw a lot more emotions than just happy. Happy characters are often our default, so it takes practice to learn how to draw other kinds of emotions. In this class, I'll show you the steps that I take to apply an emotion to a character. We'll start by taking a look at how some contemporary picture book illustrators use emotion in their characters, then we will develop a baseline for our own character. Next, we will select an emotion for our character, research that emotion, and gather photographic reference. Finally, you'll learn how to apply the emotion to your character through sketching and illustrating. I hope you'll join me.
2. Illustrator Study: Let's take a look at some contemporary illustrators' work to see how they show emotion in their characters. I've got two little kids at home, so lucky for me, I've got lots of inspiration all around me. If you don't, you can find images of illustrators you admire on Instagram, on their websites, or even better at a bookstore or library. This exercise is meant to help you discover the different ways emotion can be shown. Each illustrator has a unique style, and he's able to apply emotion in their own way. Keep in mind that we don't want to replicate anyone illustrator style of illustrating emotion. The goal is to be inspired, to develop your own style. Let's dive into some of my favorite picture book illustrations for my own kids book shelf. The first book I'm going to look at is called when Charlie Met Emma, written by Amy Webb and illustrated by Merrilee Liddiard. This shocked little boy is the first character that I'd like to really pick apart. I've got my sketchbook here, and I'm going to start by setting up a little chart for myself. The first character trait that Merrilee uses to express emotion is the eyebrows. She also uses the eyes and finally the mouth. Then up here, I'm going to write the emotion which I'm calling shocked. Now I'm just going to start with the eyebrows and sketches she has drawn to show shock. They are curved upward and she uses little dashed lines. Then I'll do the same for the eyes. The eye outlines are separated to show them wide-open with the pupils in the middle. Lastly, the mouth. She's drawn it as a filled-in circle. Let's move on to the next character emotion. Here we have a sad little girl. Let's look at how Merrilee has shown sadness. The eyebrows are slightly curved upward. The eyes are downward curves with little half dots of pupil showing and the mouth is just a simple downward curved line. Next, we have two characters who look happy. The girl's eyebrows are just straight across curves now. The eyes are sideways, almond-shaped, and the boy's mouth is an open smile that looks like a banana shape, and the girls' is a simple upward curve. Now we have three different emotions expressed by the same illustrator. You can look at each character feature and now compare how Merrilee has expressed emotion for each one. The next book we are going to look at is When Grandma Gives You A Lemon Tree by Jamie Deenihan and illustrated by Lorraine Rocha. Here is the first character emotion I'd like to look at. The features I feel like Lorraine uses to show emotion are again, eyebrows, eyes, and this time the nose as well as the mouth. I didn't leave much room for my emotions, but I'll squeeze it in up here. The first one is excited. The next one I'm going to call disliking, and the last one I'll call tantruming. Let's start with excited. The eyebrows are upward curves, the eyes are round, the nose is relaxed looking, and the mouth is the lower half of a circle with the upper teeth and tongue showing. Here's a close-up of the next character emotion that I called disliking. For the eyebrows, Lorraine has used straight across lines. The eyes come down off the eyebrows and our half-circles for a furrowed brow look. The nose is turned up slightly, and the mouth is a simple downward curve. The last emotion we're going to look at in this book I called tantruming. You may have a better term for this one, but I've got two toddlers at home, so tantruming sounds about right to me. For the eyebrows, they're straight but slanting down toward the middle of the face. The eyes are just slightly curved but have extra lines around them showing them scrunched up. The nose is just a little upturn curve this time and the mouth is wide open but shaped like a downward bean to show her unhappiness. Let's move on to another book. This one is, I Promise by LeBron James and illustrated by Nina Mata. First, let's look at the little boy's emotion on the right. I'm going to call this emotion shocked. Then next, we'll do the little girl who's falling and I'll call hers in pain. Finally, the little girl in the lower image who is happy. Nina uses the eyebrows, the eyes, and the mouth to show emotion in her characters. First, we're looking at the shocked little boy. He's got one eyebrow curving up and one curving down. His eyes are pretty circular and his mouth is wide open at an angle. Now let's look at the little girl in pain from falling. Her eyebrows are similar to the boys'. One is curved up and the other one is curved down. Her eyes are closed in a downward curve, and her mouth is an upside-down bean with her teeth showing. Let's look at her happy emotion. Nina has her eyebrows as raised downward curves. The eyes are downward curves as well, but tighter. Her mouth is a straight line with the edges up and lips and teeth as well. Now I've got a full page in my sketchbook of character features and how emotion is expressed using those features. This will be great reference for me to figure out how I can express my own character's emotions. The next book I want to look at is called, Your Name Is A Song written by Jamilah Thompkins-Bigelow and illustrated by Luisa Uribe. First, let's look at the illustration of the little girl and her mother right on the front of the book. Luisa has used eyebrows, eyes, and the mouth to show emotion. I'm calling this first character emotion, happy. The eyebrows are simple, upward curved lines, high above the eyes. The eyes are a little almond-shaped for the girl and curved downward lines for the mother. The mouths are both open in an upward bean shape with lips on each side. Now, let's use this illustration of the little girl who looks mad this time. Her eyebrows are straight lines that are slanted down. Her eyes are still almond-shaped but slightly skinnier or closed. Her mouth is curved downward but a little more sharply this time, almost pointed in the middle. The next emotion is shown in profile view. I'm going to call this one hurt. The eyebrow is curved up at an angle. The eye is wide open with a little line underneath it that shows distress. The mouth is drawn open and angled down slightly to show she's unhappy. The next book I want to look at is called, We Are The Gardeners by Joanna Gaines and illustrated by Julianna Swaney. The first image I want to look at is this one where the girl on the right looks frustrated. Julianna has also used eyebrows, eyes, and the mouth to show emotion in her characters. The eyebrows are angled down in straight lines and the eyes are curved with little dots on one end. The mouth is an angled curved line. Next, let's look at this image with several characters showing different emotions. Now let's start with the boy on the left, who I'm going to say is humored. He doesn't really have visible eyebrows, so I'm going to skip that one. His eyes are downward curved lines and his mouth is an upward curved line. I'm going to add hands as another feature that Julianna has used to express emotion and draw in how the hands are being held by his mouth to show that he's laughing. Next, let's look at this girl here who looks shocked. Her eyes are just simple dots and her mouth is a little circle. Again, her hands have been used to show that she's covering her mouth in shock. The last book I want to look at is called Arno And His Horse, by Jane Godwin and illustrated by Felicita Sala. Let's start with this image of Arno who looks sad. Felicita has used eyes and the mouth to show emotion in this one. Additionally, Arno's body language helps, but for now, let's just focus on facial features. The eyes are almond-shaped but curved in a way that makes them look sad. This eye show irises and pupils. The mouth is a downward curve with lips drawn in as additional lines. The next image of Arno shows him looking happy. We can actually see his eyebrows in this one, so I'm going to add them to the list of features. To show happiness, Felicita has shown his eyebrows as upward curved lines this time and his eyes as downward curves with little straight lines at the edges, and cute little lashes drawn in. His mouth is a simple line curving up this time. Here is my second page of research on illustrators and how they've drawn character features to show emotion. After you've completed the illustrator study, you can spend some time sketching out different features and how they change to show emotion, just to get loosened up and practice showing emotion in your characters. You can start by picking a feature. I'll start with eye shapes. Then, I'm just going to draw some different ways to illustrate eyes. Now I can see if I can come up with ways each of those eye styles change if I'm adding different emotions to them. You don't have to go in any particular order. The thing is to just try different styles of eyes and how they can change when you're applying emotion to them. Next, I'll practice some eyebrows shapes and do the same thing. Finally, I'll do some different mouth shapes and how applying emotion might affect them. You can do this and even combine different eyes, with mouth's and eyebrows to see what style you like. Or maybe you already know what style eyes you like to draw, and you can just practice combining them with eyebrows and mouth to convey emotion. Now that we've warmed up a bit, next, we'll work on developing our own character.
3. Character Development: I don't just jump into drawing a character in a specific mood, like angry, without first knowing what the character normally looks like. I like to start with a neutral or happy version of the character to use as a baseline for other emotions. This is important as a children's book illustrator because you need to show a consistent character across a span of emotions. Something that helps me to create characters I'm happy with is to really think about who my character is before I start sketching them. Start by describing your character. Your character can be a person, an animal, or even an object that's been anthropomorphized. For a person you're going to want to think about things like their gender, their age, their skin color, hair, eye color, personality, occupation, interests, and even clothing style. For an animal you're going to think about these same things, but also species, skin, fur, or scale color, their eye color, what features they have, personality, any clothing or accessories they might wear. Even if your character is an object, you can anthropomorphize him or her by thinking about all these same characteristics. I've decided my character is going to be an adult female, white with blond hair and blue eyes. She's going to be a busy and fun-loving mom. To start, begin sketching your character in a neutral or happy mood, I like to show them full body, facing forward, standing still. I'm using my iPad Pro and the app Procreate to sketch my character but you can sketch in any medium you'd like to. You can use paper and pencil or sketch digitally on your computer, whatever you're most comfortable with. I used a sketch mostly on paper, but I've really started to love sketching on an iPad and Procreate. It's so much easier to erase than in real life. If any of you want to know this here is just an Apple Pencil and I just use the built-in 6B pencil to sketch. That's included with your Procreate app. I like to start by sketching out the rough head shape first and then placing the eyes. My eyes are going to be almost ovals, but with soft corners on each side. I'm drawing in the irises and then the pupils. Remember your eyes can be more or less complex than this. You can have simple dots or even draw every eyelash if you want to. I'm going to give her a sideways, slightly upturned nose and some nice, thick eyebrows. Since this is a neutral drawing, I'm going to keep her mouth pretty straight across and maybe slightly curved up so she doesn't look angry and then I'm adding some lips. Now I'm just refining the shape of her face a bit, adding some ears. She looks quite bald, so I need to add some hair. You'll see that my initial head shape ended up not being tall enough so I'm adding the hair above the line of the top of her original head. I wanted her to have short-cropped hair so I'm just defining where it will stop here and adding some definition to it. Giving her a couple of lines to hint at eyelashes here, and adding some color to her cheeks. I'm going to zoom out to start working on her body. That's one of the other nice things about working on the iPad, you can't zoom in and out on paper like you can in Procreate. I'm going to draw her arms folded, hopefully that doesn't make her look too mean. I just refine my sketch as I go to make her body shape work. I love the ability to just erase and resketch things that aren't working. I'm going to start drawing her lower half now, starting with the hips. Now working on her legs, adding a foot here, and I'll just keep going until I've got a body that I'm happy with. Another great thing about sketching in Procreate is that if the proportions are off, It's so much easier to resize and move things around than having to redraw everything from scratch. I'm going to make her a bit shorter by just squishing her legs. I think her body overall is a bit small for her head. I do tend to do big heads though, but I'm going to just size the whole thing up, larger to look a bit more in proportion, and I'm just adding some final details to this illustration now to make her look like a more finished character, just cleaning it up a bit here and there, adding definition to her pants, giving her shoes, cleaning her up, adding definition to her chest, and finally finishing up her shirt. I think she looks good. Now I've got my neutral sketch of my character to work from. When working with emotions I think it's important to have a neutral character because you want to be able to show that you can have a consistent character across different emotions. It's good to have a neutral to start with so that you can maintain consistency when applying an emotion to that character. Next, let's make a plan by selecting and researching an emotion.
4. Plan: The first step to planning our character's emotion illustration is to decide what feeling you want your character to have. Once you have an emotion you'd like to illustrate for your character, I find it helpful to write a brief story about why the character is feeling that way. This helps me develop the illustration and really convey the feeling that I'm going after. The emotion I'm selecting for my character is worried. The story that I'm telling is that she has two young school-age kids who had been almost completely quarantined for the last year. This has her really worried about many things, including her kid's education, being behind in school, and losing connection to loved ones. Once you have an emotion selected and a story written, it's time to research that emotion. We want to discover the ways people show emotion through their face, body language, movement, and position. What we can do is collect reference images of your emotion. Examine your story, and see if there are other similar emotions you can also search for. For example, using my emotion worried, I could also search for images using the words afraid or stressed, something like that. My emotion is worried. I'm just going to start by googling worried in Google Images. If any images stand out to me as good reference to draw from, I'm going to save them into a folder on my computer. Here's another one that I like, so I'll save that too. Just continue to scroll through and find images that you feel strongly convey your emotion. I encourage you to stay away from looking at illustrations by other artists of the emotion because you don't want your illustration to look like someone else's. You want yours to look like it's in your own unique style. Even if your character is an animal or an object, you should still look for images of people conveying the emotion. Some animals do show signs of emotion, but for character illustration, we are going to want to exaggerate and humanize them as much as we can. A lot of these images I'm picking show emotion not only in the face but also in the body language. Hands are used in a lot of them to show worry. If you run out of good images, you can try searching some of the other terms. I'm going to try scared face to see if anything strong comes up for that. I don't see much, so I'll also try stressed face to see what comes up there. I do like this one, so I'll save it to my folder. Just continue searching under as many terms you can think of that relate to your emotion and try to gather as much reference imagery as you can. Once you are done, print out the images you've saved in a format that is easy for you to reference. With your reference in front of you, write down the common themes you are seeing in the images you've collected. How do the eye tend to look? The eyes, the mouth, the nose, and what kind of body language are you seeing? I'm seeing eyebrows that arch upward, and I'm just drawing some of the shapes I see. I also see frown lines in between the eyebrows. For the eyes, I'm seeing them open wide and sometimes looking off to the side. For the mouth, some are slightly open. None are smiling and some are even downturned. Some have teeth showing. For the hands or body language, I'm seeing hands on the temples or sides of the head. I'm seeing hands or fingers at the mouth. Next, make a plan for how you will convey the emotion in your character using their face and body. For my character, I want to have slightly arched-up eyebrows, wide-open eyes, looking to the side, a downturned mouth, and a nervous hand on the edge of her mouth. Now that I have a plan for how to show my character's emotion, I'm ready to start sketching.
5. Sketch: I'm going to start sketching. I really like this one and the way she looks worried. I think that will be a huge reference point for me. This girl up here as well has a lot of the features that I want to use in my character. I'm just going to start sketching and once again, I start by getting the shape of the head down with the eye placement. I'm referring to my original character sketch to make sure this one looks consistent with her. I'm not doing much with the nose, so I can have the same nose in this one. I'm going to use this girl's eyes for reference since hers are looking off to the side. I'm going to draw in my character's eyes and irises and pupils looking off to one side. I'm also making sure I'm matching the features of my original drawing like these little eyelashes at the edges. Her eyebrows are pretty straight in my original sketch, but this time I'm going to draw them in more of a worried curve up, similar to the girl in this image here. I'm also going to play around with some forehead lines and creases to see how they look. I'm drawing the mouth in an unhappy downward curve, but adding in the lips to make sure I'm staying true to my neutral character. I think I want to try an open mouth to see how that looks. But I think she looks a little too distressed now, so I'm going to undo that and just stick with the downward curved mouth. I also don't love this squiggled eyebrows, so I'm going to redraw them in more of a simple curve up, so she looks more worried and less angry. I'm just resizing and repositioning them. Now I'm adding her little half-moon ears and filling in the lips a bit. You'll see that I tend to draw and erase and redraw again. That's fine, whatever you need to do to get a sketch that you're happy with. I'm just refining the shape of her face here and I can re-add the ears once I have that down. I think I've got the shape of her face down right. Now I'm going to add back in her ears. Next, I'll start drawing in her hair which will define the top part of her head. While I'm sketching, I keep looking back at my original sketch to make sure it still looks true to my character. Now I'm going to add in her little hand at the edge of her mouth. I don't know about you, but I'm the worst at hands. I always have to draw them one million times to make them look natural and not like alien clause. I've learned that keeping them really simple helps me a lot. When I try to get all technical with them and realistic, that's when they start to look really weird for me. Zooming out to see where I'm at. I'm going to add some color to her cheeks. I can see that her hand looks super tiny, so I'm just going to size it up a bit. Let's start to draw in her arm here. But I'm not sure how it will connect to her body, so I'm going to draw in a little bit of her shoulders and neck first. Once I have her shoulders in I can figure out where this arm needs to go. I think that looks okay. I'm just going to erase some of the extra lines here and clean up the sketch where I can. Refining that shoulder. I think I'm going to have this other arm holding onto the elbow here. That seems like a worried pose right? I feel like that girl in the jean jacket in my reference is doing that, but we can't see because it's cut off the picture. Just zooming in to finish up this arm here. Now I'm going to erase this ear because I want her hair on this side to be in front of the ear, just like in my original sketch. Now just finishing up her hair. Now that my sketch is getting close to finish, I'm noticing that I don't really love these frown lines on her. I find that when I add forehead lines, they age people in illustrations more than they do in real life. I think I'm actually going to just get rid of them all together. Now finishing up her shirt by adding some details to it. Her neckline is too high, so I'm going to bring it down. Adding some chest definition and her last sleeve here. For this illustration I'm just doing the bust, so I'm adding a bit of her waist and that's as far as I'm going. I think I'll add a pocket to her shirt and a seam at the collar and I'll add the bottom of the shirt too. All right, she's looking pretty good. I'm just going to touch up a few things here and there and make some refinements. Clean up some lines, give her some more makeup on her eyes. Isn't it great how far you can zoom in and procreate? It makes it a lot easier to tighten up your sketches. Okay, I think she's all set. Now I'm ready to illustrate.
6. Illustrate: As you know, this class is about how to show emotion in your characters. We really learn the bulk of that already in the sketching section, but I also like to show my entire process in my classes. This section I'm going to walk you through how I take my sketch and turn it into an illustration. You do not have to illustrate your character in the same methods or media that I do. But I love to see other illustrators' processes, and we can all learn something from each other, so that's why I'm including this process in the class. I typically like to illustrate my characters using watercolor and color pencil. But if you illustrate in Procreate, Photoshop, Illustrator, or using some other media, like Gouache, that's totally fine. I use a lightboard to transfer my sketch to my painting paper. This one is awesome because it's really flat and doesn't take up a lot of space in my studio. It's called a Daylight Wafer 2. Here you can see how thin it is. I just take my sketch and lay it on to my lightboard. Here's my watercolor paper, which I've cut into a small square. I'm using Arches watercolor paper, and it's hot pressed, which means it has a smooth finish. I'm also using a 6H pencil, which is really hard, and this way I'm able to have really light pencil lines that won't be visible on my final piece. I'm turning my lightboard on and placing my watercolor paper over my sketch. You can tape it down to make sure it stays in place if that helps. I'm just going to lightly trace my sketch onto the watercolor paper. All done with that. I can turn my lightboard off. Let me just turn this light on so you can see how lightly I've sketched it onto the paper here. I've got my painting space all set up here with everything I need. I've got my original sketch, my mixing palette, and my watercolors, which are Winsor and Newton. I even have a little reference sheet so I can see what each of the watercolors look like once painted. I'm going to start by mixing up a few colors to get my character's skin color down. I like to test the color on my sketch paper just to see how it looks. I think it needs a bit more pink tone to it, so I'm adding a little bit of red. That's two reds, so I'm going to add more ocher to it, and a bit of brown. Then I'll water it down a bit and test it out again. I just keep playing with it until I get the perfect mix, and I think this will work. Now I'm just going to start painting in all of her skin tones. I tend to work from light to dark with watercolor, that way you can layer darker colors on lighter colors. Since she's pretty fair, I'm starting by painting her skin. I like to turn my paper around while I paint to get the best brush angle I can, so to get a clean edge on her chin here I've turned the paper upside down. Also adding in her hand. As the paint dries, I see some areas I want to smooth out a bit, so I'm just adding clear water to my brush and blending it. Next I'm going to mix some paint to come up with her hair color, testing it on my sketch to see if I like it, and I do, so I'll start painting her hair. I'm painting in the direction her hair flows and leaving a bit of white so it looks like highlights. For this little spot I'm going to grab a smaller brush. I'm going to darken her hair that falls behind her head and around her neck. Now I'm going to paint her eyebrows in. You can see that I'm painting them right over the skin color. That's why it's good to paint from light to dark. You can layer darker watercolors on over lighter colors, but not the other way around. Now I'm going to mix up some blue for her shirt. I'm just painting in the area in between her arms first. Even though her arms will be the same color, I like to paint separate areas separately, because once this area dries I can go in and paint the arms and the two separate areas of watercolor create a really natural line where it's dried in between. Sometimes I don't even need to draw in any further definition because of it, and then sometimes I still do. I'm mixing some more blue now for her eyes, and using a really tiny brush to paint those in. They're looking a little too bright for me, so I'm adding a bit of a gray-blue color to them. Then because I want them lighter, I'm just going to dab them with paper towel, which you can do as long as the color is still wet. If it's not wet enough to pick up enough color, you can always add water to the area and keep dabbing it until it soaks up some of the pigment. Now I'm thinking I want her shirt to be darker, so I'm just going to add another layer of darker blue right on top of it. I'm done with the watercolor portion of my illustration, and now I'm going to move on to colored pencils. I'm using Faber-Castell Polychromos colored pencils. I've pulled out all the colors I'm going to use for my character here. I'm going to start with this tan color, which I'll use for some of the facial definition. Starting with her nose. Then I'm going to actually grab the black color pencil to work on the upper lids of her eyes. I'll use that same black to draw in her pupils. Doing the same for the other eye. Now for the bottom lids, I'm going to use that tan pencil again. I'll also use it to start the line of the mouth. I'm going to draw some detail in on this hand. I'm grabbing the pink pencil to fill in her lips. Then a darker tan to darken the line of her mouth up a bit, so it's more visible. I'm going to use the same pink to give her some color on her cheeks. Let's start working on her eyebrows and hair. I've still got the white areas for highlights, so I'm going to use this darker ocher color to do some shading and add some strands. We're going to use an even darker color to shade around her chin and neck a bit. Then I'll add some darker strands in other areas as well, just to add some dimension to her hair. I'm grabbing the dark blue pencil to add some definition and detailing to her shirt. I need to add detail to her hand here. Touching up the lips a bit. Her pupil positioning is bothering me, so I'm going to fix this by using some gouache. I use Holbein acrylic wash, and it's pretty opaque, which makes it easy to cover watercolor mistakes. Then once I've covered up the old pupil, I can draw in with the black pencil again right on top of it. Now I'm just grabbing some white gouache and I'm going to use it to adjust the shape of her iris. Then I can go back in with the watercolor and round it out again. I just keep messing around with my various media until I'm happy with the details. I want the pupils to be a bit of a darker black, so I'm painting some black watercolor in over the black colored pencil to really deepen them. I think I'm happy with how my worried lady turned out. I'm all done creating a character with emotion, and now it's your turn to do it. Up next on the project for this class.
7. Project: The project for this class is to illustrate a character conveying an emotion. Start by studying the characters of illustrators you admire and break down the different ways they convey emotion. Next, develop a character for yourself. Write a story about who your character is and sketch them in a neutral emotive state. Then make a plan for your character. Select the emotion you are going to apply to them then collect reference images of real people conveying the emotion. Study and write down what it is about their features that help convey the emotion. Once you have a good list, write down a plan for your character and how you will illustrate the features to convey your emotion. Using your original sketch, your plan, and your reference imagery, sketch your character again. Once you are happy with the sketch, illustrate your character in your preferred medium. In the project area of the class, please share as much of your process as you can. I'd love to at least see your baseline sketch and your final illustration. I can't wait to see what you guys come up with. Thank you so much for taking my class, and be sure to follow me here on Skillshare and on Instagram to stay on top of my latest classes.
 Anne Bollman, Anne Was Here