Transcripts
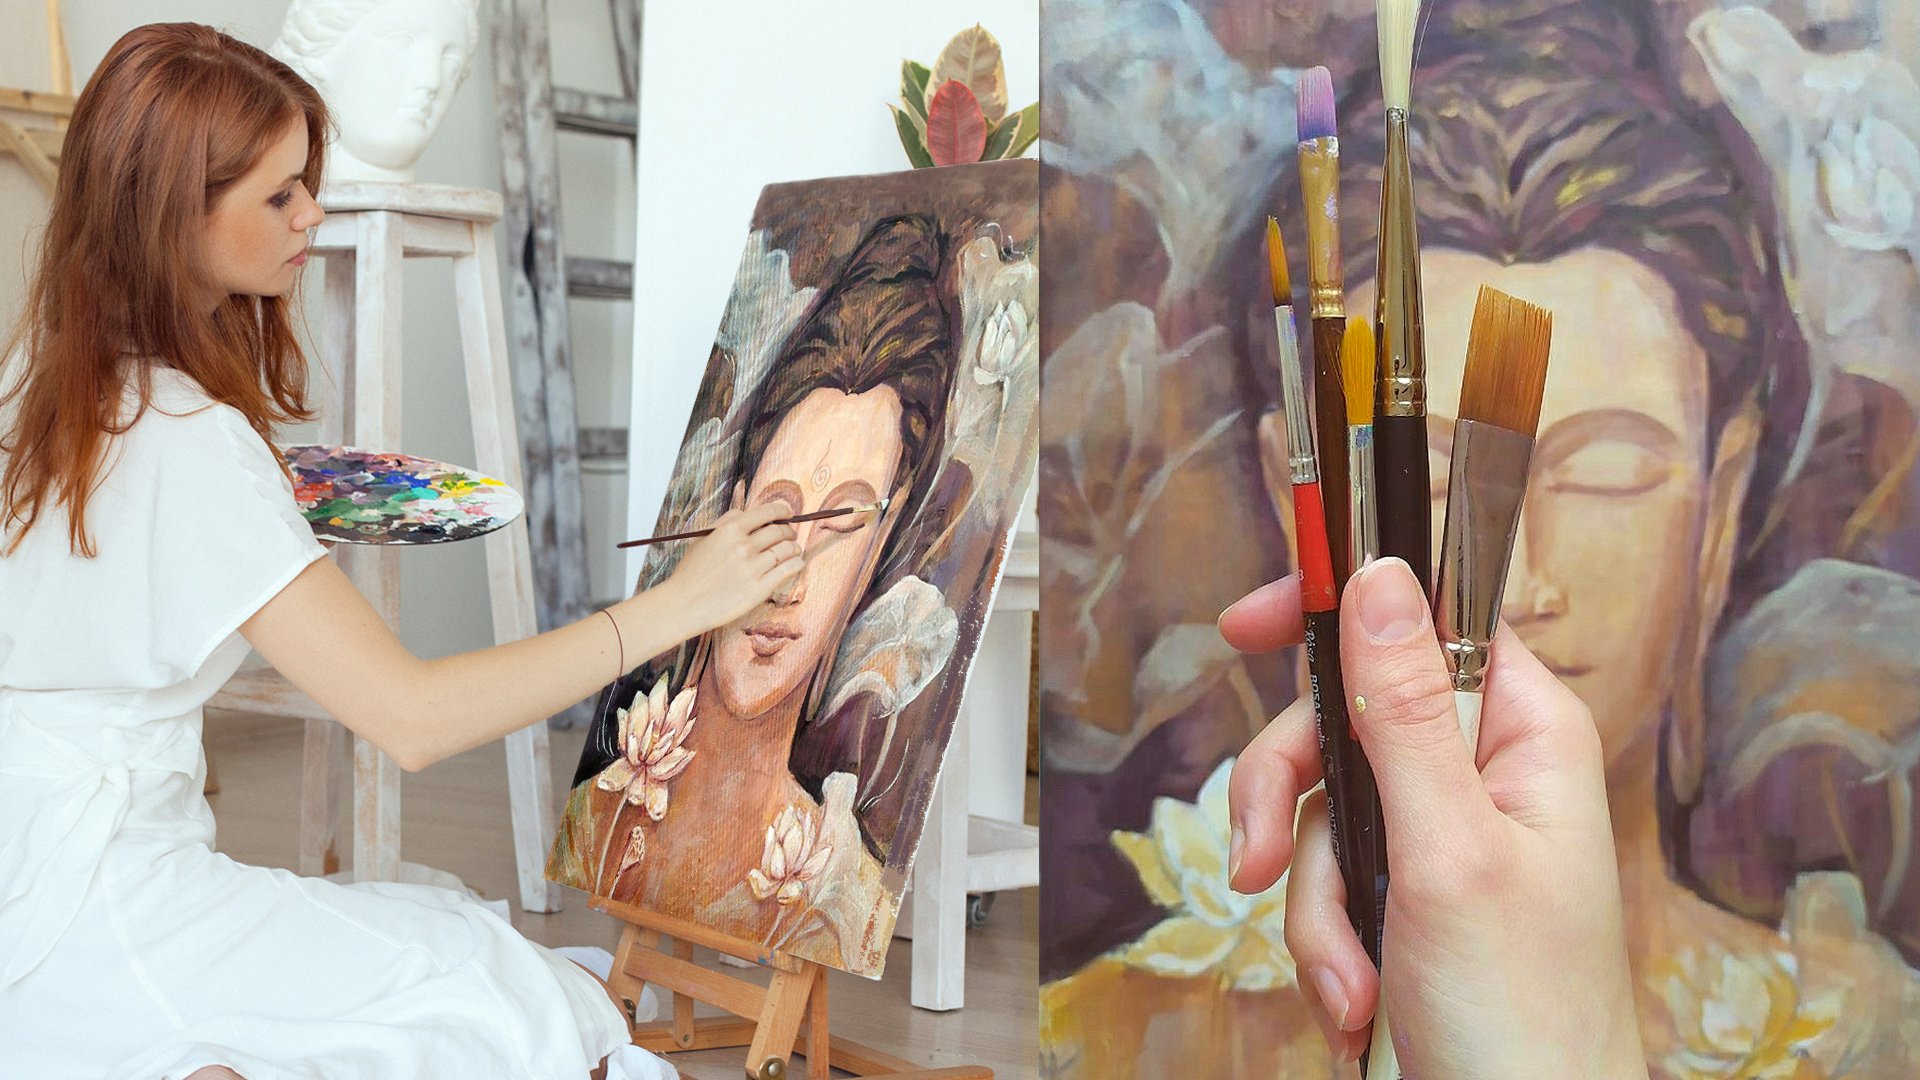
1. Intro: Hi, everyone. My name is Scott in Milan Sky and Illustrator based in Odessa, Ukraine. And I really enjoy making him in prisons for my friends anything. This is the best way to show how you care about person. I often hear from people. It's Christmas coming. It's Burrows Day anniversary. I don't know what to give. So these classes for you, I'm going to show you how to create a romantic and unique eliminated paper crafts. This particular books. I've made its Valentine's Day present for my husband, and I can tell you he was absolutely sentence heaven. Isn't it amazing to make a gift that brings actual emotions and stays a memory for a long time? Feel free to choose any occasion to impress your friends and make happy the one you love In this class, you will learn how to create low budget. Yet the precious gift. I'm sharing the techniques that are accessible to people any level. I'm going to guide you through the whole process from inspiration and sketching, cutting and decorating to the final magical artwork you will be proud of. Are you excited? So let's get started
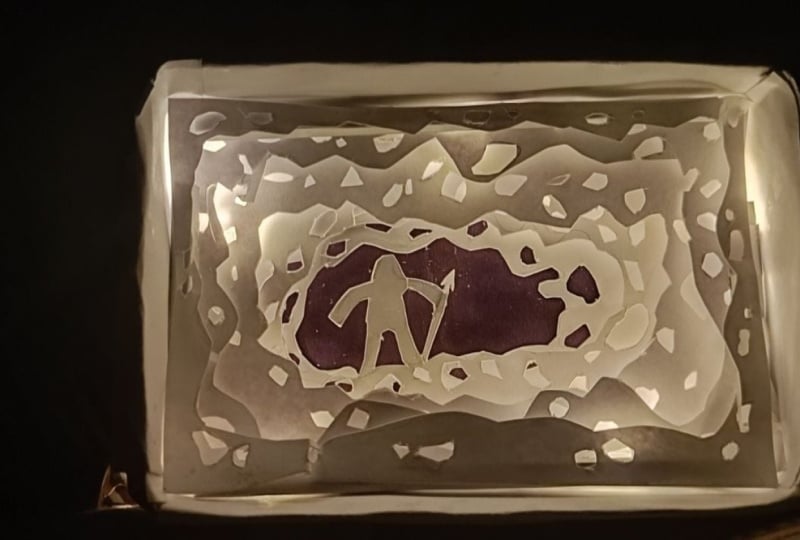
2. Supplies: Welcome back. Thank you for taking this class. So by the art supplies as I'm leaving the place where we don't have a lot of fancy oil supplies. So I have to make do with what they have What is actually fine. Because I want to show you that creativity is about giving new life to the old things. For instance, for this project would be perfect if you could find a part of frame with death like this. I have voted while I was living in Germany, but now I couldn't find anything like this. I saw the drone and I found this box. Found the dates. The size is doesn't really matter. The bottom thing is, there's what is about two inches or 5 to 6 centimeters. Thanks as my book. So naked and I want to make it pretty. Um, wanna use this soft sheets of paper If you have further family, you don't need this. Then I need bake off cutting and thes wonderful background. Then I will need a glue metal. Lola got 10 knife and cutting met. If you don't have any, you can use a cardboard instead. Ben Seal and razor for sketches. and people for sketches, then some. She's a paper you don't really neat is about 200 grams. To make such a cute little supporting elements, I'll explain later. And the last thing this is LGBT Christmas lights so everything is ready. Let's get started.
3. Inspiration: inspiration it the very important part off every art project. For me, the intention to make happy are the person is so powerful that pushes me to work at once only what you can do if you want to make something. But you don't know what exactly in our time information is everywhere. TV, radio, social networks, scrolling news feet, our brain caustically get stones off information, and I find useful to give your brain a little break before the new project. Let's say a five minutes meditation. Just sit in a conflict position. Relax and breathe. A few moments of quiet will organize your mind. Think of your project. What did this you want to create? Is it a gift for your friend? Parents be allowed one or just a self project to improve your skills Or try something you think of the person you love is an inspiration already. Imagine you're happy moments together. Idea comes from pregnant off our experiences, directions, activities and knowledge. What does it you like to do? What is your dream? What are you happiest memories? Think of this project like off a story. Want to tell? What did this place quiz near? you. What are you doing? Maybe you and your second half wanted to take a trip to Europe. And this is a picture off you, too near the Eifel tower or you in love with C. And this is the picture of you on the pounds we need on a tropical beach. Maybe you're just a happy family saying in the yard with a talk, just be open And ideas will come to your mind because inspiration is also things surrounded you in your everyday life. When they closed my eyes, I always imagined myself in the forest. I love nature and fairy tales. So I've had my picture from the beginning. When you open your eyes right down everything he was thinking about doing a little improvised meditation. Of course, you could also collect and seek out some more inspiration for itself. So going Pinterest start grabbing images and that inspired here creating boat. Now, when there's something on your mind already, it will be easier to stay focused on your project. And don't get distracted by thousands of beautiful pictures. Maybe you will see some images of interest. Was this really kind of spark? Something in you then you confess it's through yourself and transform into something you and unique. This step will help to add more distinctness to your idea. So far, it is all tips I wanted to share with you. I use this method every time I'm starting to work. Of course, every person is different and you may have something else that works good for you. Anyway, I'm wishing you tons of inspiration and I can invite dive into our project.
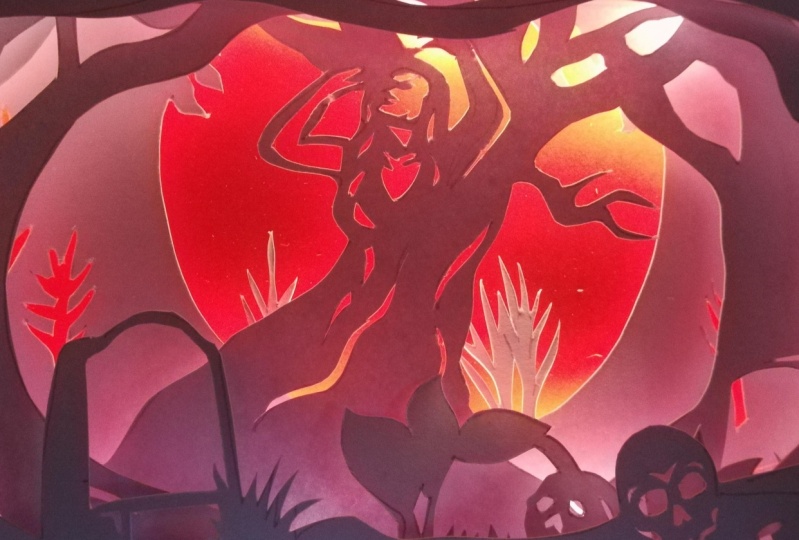
4. Sketching: I start every project by thumbnail my ideas. It's okay to draw such small pieces. At this point, you just want to find out a composition and how you both will looks like in general. I always make several different sketches because often the first catch is not the best one on this. You have something specific and very clear on your mind's already. You don't have to be an express catch artist. We just have to keep in mind what pass you want remain And what parts you want to remove. Make sure that you leave the borders on each side. The design needs this border for assembling. They don't have to be completely straight. For example, I'm growing natural organic lines imitating the forest. By the way, I really like how in fairytales something magical always happened in the forest. So my idea is still our standing in the enchanted hoods. So once you came up with the idea, stopped to do a biggest catch. Once you've got the Beecher sketch separately, every layer add more details. Remember, First, there should be the most detailed one. So the last layer will be the least got out. Yes, you can see My first layer is ready up drawing trees on either sides. And I've kept a lot of blank space in the middle with the same technique. I'll keep drawing more forms toe everywhere. So I've got my card by the size of the box. As you can see, I've made one of them a few centimeters bigger because I think some gaps will left and maybe I could hide them. Or maybe I will eventually got a smaller. We'll see. If you have a photo frame, then you have no such issue and cut all the cards the same size. Now I'm going to transfer my sketches. Two of the paper I will you the window Trusted method. You can also use a light boss or a transparent paper. See you in the next video.
5. Cutting: before we get started, discarding, I want to remind you safety is the most important. So when you're finishing using the knife on, let's play the cap on the blade as's, you're using the better shot blades. Paper cuts could be a really meditative process. Just raise. Relax, follow my tips. Broke away to hold a knife. Similar if you were told. Well, green cards. You'll have the most control when pulling the knife towards yourself. So friend, go slow and cut out the small inside basis First, some a right handed. I'm starting to walk from left to right this way, I don't go with data cut glass. I've caught with my hand elbow on the table that helps to prevent attention. Keep in mind always Scott from paper strongest point out to the weakest point. So friends at the base of the grass is the strong, and these are the weak points way and last but not least, enjoy the process. Even if something goes, not the way you imagine, it's your project and you put heart in it, so it will be amazing way, way
6. Decoration: If you're using a photo frame, then you can skip this step. If you're creating your own books, then I will show you the easiest way to make it pretty way. We're going to rabbit almost like a Christmas gift box. First of all, I'm going to measure all sides of the box. Then I'm drawing the outline for the inside box. I will leave the example off the outline in the project section. The technique our basic you will just have to draw it according to the size off your box. Use their own sharp part off the blade to go over the lines. You don't want to cut the papers roof. We just do it for paper too easily Fold when all unnecessary parts are cut out. Now I'm using the ruler to fall the paper. Okay, The first part is almost ready. You just need to apply glue on the triangles on the inside, borders off the books and carefully place the paper into the box. Pay attention to the corners, particularly smoked out each side. Great. That's more forward. The second part of our little decoration. At first I'm going to find the center of my paper. You may need a ruler to be sure you have enough paper to cover the borders off each side. I'm marking the corners over the pencil, just to be sure the box stays always in the right place and didn't move. Then I'm gently starting to fall this sheet over the borders, make first bottle size, then the other pay attention so the clean edges and corners take a slow first fold out. The short sides holding the long side with the other hand, make a nice triangle folded to border. It was a scandal. - Age is a little bit tricky, but no worries. You can make this. I'm folding paper to the inside one by one, making little triangles near the corners in order to make it in a more needy way. Same thing. Offish side. Then it's glue turn. He used this little help on every layer to stick old paper to the box. - Sometimes the glue come out off lines, so I take a piece of waste paper toe press over to keep my fingers clean. So this it great job
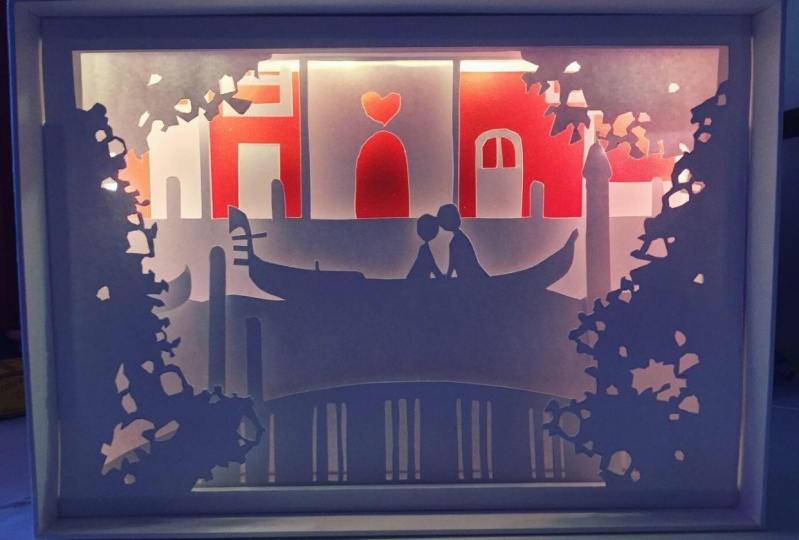
7. Assembling: and here via on the finish line. First of all, we need the separators for all there's to actually create a depths this purpose, we can easily make a paper elements. I'm taking a sheet of paper. Measure off the strip about seven millimeters and lightly touched the paper with the knife . You don't want to call it true. Make five strips. Faves will be the last. So cutting through the legs of my paper cut in half perfectly fits into my box. Then fold the paper by guiding lines and apply that you toe the fifth side. Look, you got a cute little separate GIs. I have six layers. So I'm going to need 12 of these babies and 12 for the short sides. Two of them will be a bit different as there will be the base off the construction. I'm going to threat the led lights, so I'm cutting out small windows for the light to shine. Roger, are the case for this stage are the case for this stage. If you have a forming board, just empty, cut it into strips according to borders off your design, but no less than six millimeters. Yet if you're creating design box. Yet if you are creating design in the books but not in the photo frame, I think you may still have to make paper limits, at least for the base. Dual threat. The lights. Next, I'm gluing on the red background paper, actually the red car as it symbolized love and passion. What is also suits well, toe the Valentine's Day and I'm almost forgot. We also have to make ho for the war for this purpose. I'm carefully using the knife, and I'm also found a screwdriver. It has a perfect diameter full of our I have carefully read the lights through the hole and then through the elements with the windows. Orders follow first the windows element, then short element, then with windows and the short one again. So once operator for the side, be gentle and patient while coining it. My Ellen Delights is one major legs. It's great for the little box. I want all the wire to be inside. It took three rounds by me. I glue on the separators and then don't underlies for a moment just to make sure that everything waas okay, I'm gonna go ahead and blue on the separate tress that applying the glue on each of them and placing in my cards The main thing on this stage is to place they're in the right order . When it came to the last piece of suddenly find out that it's looks pretty good as it ISS. The outstanding borders have created the look off the actual frame. So I decided to leave it like this. - And here's a finished magical books. I'm so happy with the result. It looks so great and even better than the last undone. Wait for it, I will show you.
8. Final magic:
9. Final thoughts: nice. I am so excited of what we did today. This is an amazing job. I hope you enjoyed creating illuminated box. Don't forget to share your project. For the community to see techniques are basic so you can use it to make any cross you like for Christmas, Mother's Day. And even for beloved yourself. If you have any questions, please let me know. I hope you took something away from this class. Make sure you follow me on skill share to be notified about the future classes. And if you like this class police liver, you it's really important. Thank you for watching. Have a great time. See you next videos.
 Kateryna Loreli, Artist and astrologer