Transcripts
1. 00. Introductin To Trello: Hi everyone. Today in
this video training, we will learn what trailer
is and how to use it. Trailer is basically our premium project
management software. It has margins for desktop
computers and devices, and also for Apple devices. Whether you are going to manage our business project or build a website for an
official purpose. Even organized an
upcoming event like a wedding or an
official vacation. Traveler can help you plan and organize everything
in a systematic way.
2. 01. Create a Trello Account: To use the software, you have to create an
account on trailer. Set the link in the
video description. If you click on that link, you will be sent here. Now, here goes the
sign-up button in the top right
corner. Click on it. You can enter your
e-mail address, or you can sign up
with your Google, Microsoft, Apple,
or Slack account. Here is a piece of
information for you. If you sign up with
your e-mail addresses, you can use these to
login to our PUE. Other posit man has
been software like 0 and Confluence as well. So I'm using my e-mail
address here to sign up for Trello upper entering
the email address, I'm going to hit the
Continue button. Then I type my full name
and hit the Sign Up button. Now I paste this
capture talents. I sews those squares and
hit the Next button. And other kept silence. Now I sues this is squares
and hit the verify button. Now I have to name
my first workspace. Let me name this research and development because this is one of the few sections I take care of as the General
Manager in my office. I also like to invite
our PU associates of mine to participate
in this workspace. I'm typing the email addresses. Notice that this time I'm
done typing an email address. I'm hitting the Enter
button on the keyboard. In the case of copy-pasting
e-mail addresses, you don't have to
press the Enter. Now, I have entered all
the email addresses. I'm going to send
invitations tool. I'll click on the
Continue button here. Click on the escape button. Again, click on the Go button. Now here among the
dashboard of my past work, space research and development. Now, I should pay attention to this particular place that wants me to verify my e-mail address as an account holder
here on trailer. I login to my e-mail
address and I click on the email titled verify
your e-mail for Atlassian. I click on the verify
your e-mail button. Once I click on that button, I'm directed here on this page. Now I have to create a password. I entered the password and
hit the Sign Up button. Once again, I'm here on the
dashboard of my workspace. Now, I'll show you how to
accept invitations to. So an artery lowercase space. Assuming remember I have sent
in by additions to James, Henry, and zillion,
three of my associates. Now suppose zooms will
accept the invitation. Let me assume for
a moment depths I am and I have lost
into my email address. I'm going to open a new browser. Now let me log in to
my email account. I'm going to take my inbox and pattern the
email prompt Trello. I'm going to click on that and then click on this big green, join, the Workspace button. Now I have been rejected
here to this page. I can see who are on
this workspace here, but swell means this person hasn't confirmed
the invitation yet. Now, Zoom's one to 0
and this workspace. So he clicks on the blue
zone Workspace button, by the way, assumes hasn't created a Trello or
Atlassian account. Now, here's his turn to do that. Is full name and password
is the sign-up button. He has successfully
learned Oliver's workers plus reserves and development. This is the dashboard for
the workspace on Zooms. And now he can create a board
as he's an admin as well. He can click on the particular
Getting Started link. Now that we have shown
everything about signing up to trailer and creating
and designing our space.
3. 02. Introduction to Trello Workspaces: Hi everyone. Today
in this video, I will introduce the
dashboard of trello, the project management subtract. I hope you have created our Trello account by following
my previous video today, let's talk about the
workspace interface. When I log into Trello, I see the following interface. Let me explain. It's part of this
interface to you. If you click on boards, you will see all boards
under all the workspaces. And the recently built boards. By the way, boards is
selected at the moment. So not only to click on it. Under the work, space
research and development, the bolts or economics book, maths and physics book. If you click on
the template step, you will see all the
available templates per trailer boards. Let me click on that tab. We have arrived on this pace. Here in the left sidebar, we see many template categories. There's our business, design, education, engineering,
marketing, and operations, personal productivity,
product management, project management, Remote Work, sales support, and management. Additionally, I can submit a
new template created by me by clicking on this button
named plus submitted template. As you can see, our pure templates have been pictured in the upper
part of the space. These are new and
notable templates. If I scroll down, I get to see up your templates under
the business category. Another pure under
the design category. The same is applicable for education and other categories. Now, let's get back
to the previous page. If you click on the Home tab, you will be here on this pace. Here you will see a message as a stay one track and up-to-date. In this part, you will see
the recently built items. Here is a link to
create a new board. We'll talk about that
in our next video. Now, let's get back to
the previous scenario. If you click on the plus sign, you will create a new workspace. If you click on the
dropdown arrow tip adjacent to research
and development, you will see all the options
under this workspace. Let me click that. Apu options, EMRs, I have
to explain them as well. However, I'm going to explain only the past three
other options, namely workspace table, members, settings, and Trello premium. We'll discuss in
another section. As we will see, if you
click on getting started, you will see a set list. The list includes
Cato workspace. At a board. To our workspace. Invite your teammates, connect your apps, and
explore automations. To the right of the minimum, it will see existing members. If you click on boards, you will see the existing boards under the current workspace. Next to that, there is our
create new board button. In the peripheral vision. You can't create more than
ten boards under a workspace. If you click on highlights, you will see the space. This is something we
already encountered. They are giving you a sensation to stay on track and up-to-date. You will see the
recently built items and are linked to create a verb. The thing is that you can create a new world at five
different places. Towards the upper wars. The wars, home, the Create
menu and highlights. Now let's get back to the previous scenario by clicking on the
upper boards button. If you click on suits, our category, drop-down
menu will show up. On the menu. You can see APU
categories of templates. If you click here, you will browse the
pool template gallery. This is not required
at this moment. Since we already did that. These are the items you
will recently built. This is the name of your current workspace
where we are working. If you click on this board, you will see all of your boards under your
current workspace. Here they are. If you click on work space
table or this workspace table, you will see our
premium PSL up trailer. If you are on the
pro version and have our workspace containing
honor more boards. Here you will see a
specialized table. However, please save the
playlist to find related videos. If you click on members, you will see all the members
in the current workspace. You can even invite
new members to the workspace by
clicking on this button. You can remove on
or more members. Necessarily. In addition, you can leave
the workspace if you want to. In the periphery version, every member is an
admin by default, you can start up or even day free trial to
unlock exclusive teasers, like numbers, different roles. If you click on settings, you will go to the setting pace. Here, you have a lot of setting
options to sense energy. At the bottom of the space. You can even delete
the workspace. Now, let me go to
the previous space. You'll need to
click on this link. If you want to upgrade
to your Trello account. Now, click View All closed boards to see all
the deleted boards. Up until now only onboard
has been deleted. That's chemistry. If you
click on these cancel sine, you won't see the
template anymore. That's all for today. I hope you guys now know everything about our trill
Workspace dashboard. After watching this video.
4. 03. Create a Trello board: Hi everyone. Today in this video, I'll show you how to
create a board on Trello, the project management software. I hope you watched my
last video where I introduced Trello or caspase
dashboard or interface. Now you know how to
create our keyspace and probably have created
on in your Trello account. The second step is
integrate our board. What is the artery low board, and what purpose does it serve? Let me explain that dedicatedly. Suppose I need to
get up physics book and a maths book published
in the upcoming few days. Here the physics
book is a project, and the maths book is another post-it in trailer market space. These projects are
called boards. Now I'm going to
create a new board in the same market space with these reserves and development. Let me click on the
create new board button. Dialog box shows up. I type the name of the
board as economics book. Now I click here and sues
our keyspace for the board. I keep it as research
and development. Now I click here and sues
the privacy of my board. The default privacy
is work space, which means that all members of the working space can
see and edit this board. The other two privacy settings
are private and public. Private means board
members and worker space admins can see
and edit this bulb. Whereas public means
anyone on the Internet, including Google,
can see this bulb. However, only board members
can edit the board. I keep the default privacy,
which is workspace. As you can see on the right, there are APU
background options. You can choose a
background color or an image for the background
of your trailer board. Alternatively, you can
start with a template. However, for the time being, I like to create the
board from scratch. I like a blue background
for this board, so I select blue. Finally, I click on
the clipboard button. And this is the interface
or dashboard of my newly created Trello board by the name of economics book. Let's have a short tour of
the interface of this board. Here is the name of the board. If we want to sense it, you'll need to click here. Here goes a star sign. If you start a board, you make it important. Start boards shows up at the
top in any list of boards. Here, Gogh's work space. This is the name of the
workspace the board is under. You can click here to since the workspace here
goes visibility. Click over here to
since the visibility of the board currently
is workspace visible, but you can sense it
to private or public. Let's see, mm bars. Moving on the right here goes the avatars or profile images of the members of the board. But admins and normal
members in might. You need to click on
this button to invite new members to the
board automation. You can sit a specific
rules to this board. To me know, this is
a menu which you can use to add description
to your board. Since background color, and emails and sars for
a specific cards. You will also see power of
activated to the board. And recent activities log. Here. Finally, you can go to
more and close the board. Now about the sidebar. If you click here, you can expand or
collapse the sidebar. Next to the sidebar, you can see this board
probe down menu, this menu provirus,
a specialized views for your board and Kurds. However, these PCL is
available on a paid plan. That's all for today. I hope you guys
know how to create a board on Trello after
watching this video.
5. 04. Join a Trello Board: Hi everyone. Today
in this video, I will show you how to do it in an existing board on
a Trello or caspase. So let me show you
how to do that. As you can see, I have designed this workspace named
research and development. There are three boards in it, namely economics book, maths
book, and physics book. There's boards who are created
by an associate of mine. Now I'm going to join
the physics book board. Let me click on the board. Here you can see the
zone board button, which means that I haven't
designed the board it but I can before I Zion, I can see who are already on this board and their
membership status as well, also known as permissions here. I also see with lists and
cards are on this board. These are new terms for you, which I'm going to explain
in the next video. For the time being, I can see up your lists and cards
on this board. There is just one
avatar, which is API. This must represent admin. The creator of the work
is *** and the board. The double arrow
tip on his avatar means that here's the
admin of this board. Let me click on his avatar
and see what happens. Now, although I can't, since permissions
person Peterson, I can surely see his latest
activities on the boards. I click on View members.
Board activity. Here is odd zone, recently did quite
a few activities. Let me now close the menu. So after exploring the board, I have decided to join it. And here I click on the
zine board, may know. Upon joining, you may notice
our senses have taken place. My order has been
added next to admins. Since I'm not an admin yet, I don't have the double
arrow trip in my avatar. However, I can see an invite button right where
the zones board button was. So it seems like I can now even invite a few people
to join this board. Well, I like to invite on
of my asserts name, Daniel. I click on the Invite button
and this menu appears. I type e-mail address because I don't exactly know
his trailer name. Here. I assign him a role on the board since I'm
unnormal member myself, I can't add him either as a normal member or
as an observer. We see something lower
than our normal member. Well, purine permission and observer can view and
comment on the board, but they can't edit the board. They can't invite
new people as well. Whereas a normal member can not only build and
comment the board, but also can edit the board and invite new people to the board. I sues to keep the default we see is a member role for Daniel. Notice that I can invite
people with links. You may be curious as
to how that works. Let me show you. Let's click on Create link. Here is what I can see. I can copy this link to send invitations or alkyne
download these QR code. However, in the case of Daniel, isis, to use neither
of those two. So now let me hit the
Send Invitation button. Since Danielle was already
on the workers face, is instantly edit to this
board after my invitation. He doesn't need any
approval per this. So now you know how to
join our Trello board. If you are on the workspace, on the board is under.
6. 05. Create lists and cards on Trello: Hi everyone. Today in this video, I'll show you how to create
lists and cards on Trello, the project management software. I hope you watched my
last video where I showed how to design an
existing board on trailer. I hope you could create
a board on your account. Now it's time for you to
create a few lists and cards. Let me show you how to do that. Well prints, you might
have a question about what our list and what
purpose it serves on trailer. Simply put, LR stages of task. They represent workflow. When our list
includes a few tasks, it means that those tasks
are under the same estates. Let me show you where to find
list on our Trello board. As you can see, these
keywords, names to do. Doing represents
three default list. When our board is created
on our Trello workspace. Four cards is task on
Trello is called a card. Card can be transformed
from one list to another. Sent. Not depending upon the progress or update of the world work. Now, I wanted to add another list by the
name of planning. I'm going to do
that by clicking on the button named,
add another list. Here I type planning. Then hit at least button. The list has been edit. Now I'm dragging this new
list to the leftmost area. I mean, in the beginning, I'm going to add two
cars to this list. One is collecting books info, and another one is hiring
writers and editors. I click on this plus add a card button and type
collecting book info. Finally click on the
Add Card button. On card has been added. The same way, I'm
adding another card. I'm diving hiring
writers and editors. Then click on Add Card button. Another card has been added
under the list planning. I'm not going to add any
more guards to this list. I'm going to click
on this cross sign. Like I said earlier, our card is more like a task in Trello ion to add a few
cars to the to-do list. They are right contents, type compose the content, proofread the contents,
edit the contents, and finally the contents. Now I'm adding this Kurtz. I'm clicking on the Add Card
button under the to-do list. Here I type the name
of the first task, which is right contents, and then hit at Cart button. The card has been created. Well, guys, as you can
see, the same way, I have added a number of tasks and cards under the list to do. Now you can transfer the
scars to the ADA center or any other list simply
by dragging and dropping. Suppose I have recruited up your writers and they have
started writing the contents. In that case the
cart, right contents. Should we now under
the doing list, now that to-do list, because processing
has already began. So let me drag the curd
right here and then drop. The current hiring writers and editors should be
under the dam list. On my board maids and I have
collected in a book info, this car should be under
the down list as well. So I drag and drop
this task as well. One more thing to note here is that you can
rearrange the water. The card appears
on a list simply by dragging and dropping.
Let me show you. Okay. That's all for today. I hope you guys now know how to cleared list and
cars on trailer. After watching this video.
7. 06. Use labels in Trello: Hi everyone. Today in this video, I'll show you how to
use labels on Trello. I hope you watched
my last video. I showed how to create
lists and cards on Trello and also how
to use them properly. Now, it's time to introduce
the idea of levels. What is a level and what
purpose does it serve? Well, labels are used to
categorize cars and tasks. For example, our
particular project, it can be three types. Present moderately
OR and NOT source. And we can use three labels to have
three categories of task. One Trello levels are of different colors
and you can write sample text on them to remind you what our
particular level is about. Now we have defined levels. How do we apply it on a card? Let me show you that. Suppose we are going to add a label to this particular
card named right contents. To do that, first
click on the curb. Our dialog box shows up. Now click here. Few color options appears. Below the colors. There is a bottom named create
a new level. Click on it. You need to Sue's named for
the level and also a color. The name will help you
remember what the label is. A mode. I sues the name, video present and red color. Then hit this clear button. The level is created, which you can see here. I underclothes the box
and see what I have. As you can see, this
red band indicators that are liberal has been added to the card,
right contents. If I click on the
level, its name APRs. Now you know how to add
a level two occurred. Let us use multiple levels. On this particular board, which is more like a process. There will be two
categories, up cards. In the past category, there will be three levels, barriers and moderately
arson and not so absent. The basic of this
category is present. The basis of second category is who is supervising the curd. In this category will have
two levels, zone and pred. In order to implement the
past category up labels. Let me bring the cards,
collecting book info, and hiring writers and editors
in the planning lists, and other guards
in the to-do list. Let me see the curves in the order they
should every year, I consider both the task in the planning list
as Betty artisan. So let me assign them
the videos and level. The past task, right? Content is already
labeled barriers and I want to label the cards, type, compose the content. Proofread the content
as moderately accent. Let me create this level fast. I click here, then click here, then on the Create New button. I input the name of the level
as moderately are present, and sues the orange color. After that click on
the clear button. The level has been created. Now I close the dialog box
and see the Warren's level on this curve. Let me know. At the same level
to the next car. Now, let me give the third
level by the name not swords. I click on this carbon name, the contents and
create the level. I will have argued in color. After hitting Create and
getting rid of these boxes. As you can see, we have successfully created
another level. Now let me add the same
level to the last card. Is done the same way. I'm going to implement the
second category of levels. As I hinted previously. Let me click on the past task, which is collecting
book in full. Now let me click on this plus button and create a
level called rezone. The cars are to be supervised by zone
will have this level. I'm not going to
show you every step. There's because the process
is called as the same when it comes to creating a level and
assigning a level to occur. Wait a moment, I'll be back. Now. We have the scenario. Few cars are being
supervised by zone, another few by Fred. However, note that
the last task, pineal read, the content, is being supervised by
both John and Fred. So this is all about
the low levels. Lastly, I wanted to
show you how to since level on a certain car
type compost the contents. Currently, it has the
level moderately arson. Assume that my boss
all of a sudden told me to take action
regarding this particular task. In other words, he wants me to, since the Rs and sea level
of the associated card. To do that, I click on
the body of the card. Is detailed form. Show up. Now I click
on levels, right here. The levels may not show up. I click on moderately
ours and level. By doing this, I actually get rid of the
level of the card. Then I assign the videos and
level by clicking anywhere. If I now close the
detailed view of the card, you'll see it now has
the CDRs and level. This is how you can sense the
level on a trailer world.
8. 07. Trello Card Options: Hi everyone. Today
in this video, I'll show you all the options
you have on a Trello card. I hope you watched my last
video where I showed you how to use levels on Trello
project management software. By now, you should
be familiar with Trello cards and how they work. However, you probably don't know what beautiful and significant
options there are. Four is Trello card. Well, let me first show you the interface at the closer
of our previous video. Well, this is it. Suppose we want to explore all the options on
the card, right? Contents past, we
have to click on it. In other words, certain
features or aspects to a card, simply click on it. Pop-up window will show up. Here. You can rename the card and air
description of the card, S2, what it is about. Well, I own to send
the curves name. Let me rename it to
write physics content. Presenting the name, click on somewhere else where
there is no link. And the saints will be done. Once again, you can
rename it anytime. Let's get to the previous name. Now, I want to add a little bit of
description to discard. Let me paste some text here in this box and then
hit the Save button. I can comment here, let me type this task
is very ourself. Then hit the Save button. The comment is now visible to everyone on this orca space. The comment can now be
edited or even delete it. I like to edit the comment. I click here on this Edit Link. I actually wanted to
mention my board mates. So let us see how to mention our teammates using
these rates sign. As soon as I click here, our dropdown mentioned
menu appears. From the menu, I
click on Daniels. He has been mentioned. Now, I click on this
mentioned sign ons again. This time I click
on prayer saboteur. He has been mentioned as well. Before I hit the
save button outlet, draw your attention to a few available options
in the command works. If you click here, you'll be able to
upload or at us a pile. Let me click on this icon. As you can see, you can attach
a file from your computer, Google Drive, dropbox,
Box, and unripe. You can also address any carb
or board from your account. In the case of my project
management software, at a single pile
from Google Drive or Dropbox is a profit cell. However, in the case of trello is available
on the Play version, we have LB us a link events. You can easily add a
link to this comment. Just copy the link
and paste here. Let's copy our YouTube
video link and paste tier. You can name the link. Now, I am done. Click the button. Your file will be addressed. You can see a YouTube video
now edit to this comment. You can add an emoji in your
comment by clicking here. You can even search for
your favorite emoji. If you hover the mouse
cursor on this icon, the tooltip texts is at card. Let me click on this. On Amin way appears. You can add as a car or
a boat in your comment, even an archived card. Now I'm done editing my comment. I'd like to hit the Save button. Now let me click on
this button next to activity and saying showDetails. The lesson. Activities shows up. Now let's talk about
the items on the right. Past two card section. Past option is members. If I click on it, this man shows up. Let me see how to add
members to discard. Here you can see the
board members zone, who is the admin of this board? Daniel and pred are the
general members of the board. Now, I click on the Show, other workers plus
members button. Trello, usernames and profile
images of Henry shows up. Now I click only on Daniel and thread to add both
of them to the card. Upon this action. The sign appears next
to their names and their profile images appears in the member
section of the card. We have a complete
video on Trello levels. Please save the link
in the description. Now, we want to talk
about surrealist. If our guard is considered as a task or set list is a
combination of subtask. Let me now click on
the Set List button. I don't want to, since
the title of the set list now hit the Add button and US
at least has been created. Here is already to mention that while guilting
our new set list, you can copy the items
on an existing cyclist. I need to manually add new items to my newly
created set list. Item is like a
subtask on Trello. The Past item I'm
going to add is make sure you clearly
understand that question. There are options
to assign people on individual items and
also setting due dates. However, these are
professors with means. In order to inside this, you have to use our
paid plan up Trello. Nevertheless, you can still mentioned our
workspace member and use emojis on asset list item
in free version of Trello. I sues to mention Daniel in the item and hit the Add button. The item has been added. The same way. I'm going
to add two more items. The second item is answered
the question to the point. Don't write anything extra. And the third item is approved answering saccule answer
for logical errors. Note appoint here. There is a segue box
next to his item. If you click on a sec box, that particular
subtask or item is considered to be
have been completed. And our percentage sign appears. Meaning that percentage of your set list is
currently complete. There is an option to hire set list and also delete your
set list item. You need to. If you say all the items, it becomes green
and shows a 100%. However, I answered
the last item to make the cyclist
look unfinished. Now, let me explain
the delts option. If I click on that, I
can see the start date. The due date. Start
date is less important. So it's not enabled by default. You will have to manually enable it by clicking the
box if you need to. You can even set a
due date remainder. After setting the depths. Be sure to hit the Save button. And you can anytime removed our due date by clicking
on the remove button. I am clicking on Save button
right now. Appears here. The next option is attachments. Here, you have the
same sources that you had while addressing a file. In the Trello common bugs. The slices are
computer, trailer, Google Drive, dropbox, OneDrive, and addressing our link. The next option on a
Trello card is covered. It's like the background
of the curve. It could be a background image or simply a background color. Let me click on this option. This is what I see. Now let me select a
background color. I select green. Upon doing that, this is the sense I encountered. The background
color of the card. It needs small format and big format has
turned into green. There are two levels for this. Let me sues the second layout. I see senses in the small
version of the card. However, I can even choose
a background emails. Let me choose this image. Then again, I have the
soils to remove the cover. For the time being. I don't
need a cover for the card, so I remove it. Here goes at power-ups. You can add any third-party
add-ons to your car. Per now, I'm adding Dropbox. Let me see. Now you can see Dropbox here. The next option is automation. I'll discuss these
elaborately in another video. You can find that
in the playlist up Trello tutorial
series on my channel. This time being, just know that there are few options
on Trello automations. Here they are. These are
up your button templates, namely MAP card to coffee
cart to add levels, Zion card set due
date or started, Mark due date, removed. And third list. You can even create
our custom button. Below automation,
there are few actions. They are Move, Copy, make, template, was
archive, and share. If I click on the move
action, I see this. Trello is suggesting me to
move the car to the next list, is also prompting me to
select our destination, to move the card. I can sues the board. Then it's least. Also the position number where the card is to be moved to. Next action is copy. If I click on this, this is IC. I can Sue's are titled
per my copied card. I get to choose which
pieces of the previous card will be carried forward
to my copied card. The PSR includes cyclist
levels, members, comments. I also get to Sue's where
the copied card will settle in the location. This location means board
with leaves, with position. Pursuing the title, the
PCRs, and the location. You'll need to click on the kid card button to
have copied cart created. The next option
is make template. If I assume this for
a particular card, I'll make the card our template. Which means that
I'll be able to use the settings and customs that I have applied
on this card. Want to any new card, I'll be getting in the future. The next option is, if
you take this option, you'll basically decided to
follow all the activities and updates that you are taking place on this
particular card. The next option is archive. When you archive occurred, it vanishes from the board, but it is stored a place
in Trello named archive. The key point is you can restore a card once
it is archived. However, you also
have the option to permanently delete
and archived cart. The last option is share. You can share our Trello
card in a number of ways. Let me show you by
clicking this option. As you can see, you can
copy the link to discard. Download QR code. You can embed our Trello
card in your website. Well prints till now, I showed you everything
from zones and you'll have noticed that I have mentioned Daniel and Fred in the
card comment section. So let us see the activities
from Daniels end. Here. I'm at Danielle
and to go to to release, click on write contents. Now here you can see the
activities of the board members. Here Mr. zone commented
and mentioned Donnell and thread. You can see.
9. 08. Change Trello Board visibility: Hi everyone. Today
in this video, I'll explain the visibility of our Trello board
and bolts buttons. I hope you asked my last video. I showed and explained the options you have on
a thriller occurred. Well, parents, let us see how to sense the visibility
of our Trello board. To do that, I need to access the board under research
and development workspace. In your case, the space and
the boards might be defined. Okay, now I'm going to click
on this physics book board. Now here you can see the workspace visibility
tab that click on it. It shows this pop-up where you
can change the visibility. You have the following options. Private, private is selected, as you can see here, it says, only board members can
see an edit this board, the current visibility of
the board is workspace, which means all members of the workspace can see and
edit this board there. So I, anyone who is on the associated
workspace can join a board without the
board admins permission. I showed this in a
previous video of the Trello tutorial
series on my channel. Please set the link
in the description. For your information. Workspace is the
default visibility of artillery board
when it is created. The next visibility
is organization, which is disabled for us because it's a premium
piece or whatever. In the case of
organization visibility, while the members of the
organization can see the board edit to an
enterprise workspace. The next visibility is public, where anyone on the Internet, including the search
engine, can see the board. However, only board members
can edit the board. So there's all for the
visibility of our trailer verb. Now, let me go back to the primary dashboard up trailer by clicking
the trailer logo. You must be familiar with this interface as
I introduce you all to this in a previous video up Trello tutorial
series playlists. I hope you will seek all
the videos in this series. Now the question is, what is the significance
of these boards? These boards and even
these boards, y, three items have the same name, are located at three
different places. Let me explain that. If you click on these boards, which is placed at the top, you will see all the boards
under a new market space. Let me click on this top board. These are two boards, accounting and finance, are under that work
as best marketing. These are three boards. Economics book, maths book, and physics books are under the workspace,
research and development. It will also see the
recently viewed boards. However, if you click
on this second board, here, you can see only a small fraction of
the previous scenario. You will see only the boards
under marketing or caspase. That's because the
second board step is under the
marketing workspace. The same is applicable
for the cardboards. If you click this,
you will see this. Only the boards under research
and development workspace. These are economics book, maths book, and physics book. It will also see a button named view close towards
in this section. Because in the research
and development workspace, there were previously on are more boards which are
closed or archived. Now, let me click
on this button. This is only the closed-book by the name of chemistry
in this work space. Now, there's all
about boards, button.
10. 09. Complete Specialized views of a trello Board: Hi everyone. Today
in this video, I'll introduce you to a few specialized views
of our Trello board. It will have access
to this views. If you are under
article a premium plan, at least 14 day trial. I have started the trial to show you this specialized bills. You need to be on
the interface of any board that has
some data in it, namely least cards, member's date and levels,
assigned two cards. I am on my board, physics book. Parsed. Click on the
board, dropdown middle. This is the men who
I'm talking about. If you want your Trello cards of a particular boat to create
a specialized views for you. This minimum may be very useful. The options available
on dismantle our board, map, timeline,
calendar, dashboard, and work as best table. As you can see currently I have the board view because
board is selected here. Let me click the map view. This is what I get
to see because I previously assigned
locations, 23 cards. You can assign a location to East Trello card while you are viewing the detailed
form of the card, do you see these
three locations? Let me click on East location and CVS
card is assigned 38. Right? Contents is assigned
to Los Angeles, California. Penal read the contents
is assigned to press no. It is the content is
assigned to San Francisco. Now I want to try
the timeline view. Let me click here. This
is the timeline view. Are those three cards I previously
assigned start dates and due dates to the
above mentioned card. That especially true of timeline views is
that you get an idea. S2 is task has how much
duration to complete and whether the due date for a particular card is
immediate or not. Now let me switch to
the calendar view. Is almost like the
timeline view. That calendar
oriented their soul. The timeline view is linear and the calendar view
is kind of spiral. Now, let me show you
that there's would view. This view is divided
into several segments. The past one is cards per list. Currently I have nothing in the planning list PER
cards in their to-do list, one card in the list, and two cards in the down list. The next segment is
Cards part due date. There are four cards without any due date and three
cars are due later. The next segment is card member. Danielle has been
assigned to two cars. Pred has been assigned
to two other cars. The same is applicable for John. There are five cards where
no one has been assigned. So there is our total
of seven cards. The next segment is
cards per label. Per cards have been leveled
zone and four cards pred. It means PER cards are being supervised by zone and
pour cards by pred. These two things have
uncovered in common because one card is supervised by not
only zone, but also Fred. Per cards have been leveled very present on current has been leveled moderately
are present. And two cards have been
leveled, not florescent. The thing is that it is not
possible problem this view to say how many cards are
there totally on the board? It could be anything
between 715. There's all about death
would be wildcard. Last but not least, is the work is
pretty stable view. Since I have started putting the trial period is quite
possible to have this view. So let me click on the open
market space table link. This is a table I get
to see on a new tab. This table is more
like a summary. S2 is card is under Louis
list waste levels they have who are assigned to the card and also the due
date of discard. This table is quite useful in worldview.
Our Trello board.
11. 10. Changing background Color in Trello: Hi everyone. Today in
this video training, I'll show you how to since the background color
of our trailer board. I hope you asked my last
video where I showed and explained our PUE
specialized views of our Trello board. Now, I'm here on the primary dashboard
of my Trello account. As you can see in the research
and development workspace, there are three boards with three different
background color. Economics book has
blue background, mask book has green background. The pigeons book
has red background. If you can remember, you had the option to set
a background color or an e-mail while
getting a board on Trello appropriating a board, you can since the background
color or emails at anytime, you feel like this is exactly what I'm going to show
you today in this video. Let me click on this
board right here. This is the boat where I'm going to show the demonstration. Its background color
is currently red. I wanted to since it
to purple or orange. To do that, let me
pass Greek here on this show middle
bottom menu shows up. Then click on this sense
background option. These are our options. I can set any background color or I can Sue's our
portal from the library. Or even I can upload
my custom portal past. Let me try changing
the background color. Part of this purpose, I click on the
segment named colors. There are nine background
colors to choose from. I click on the purple color. As you can see, the
background color has sense. Now, let me click here and get
back to the previous part. Now let's explore the
photo library and see what nice portals telehealth
in the store for us. So these are the portals. Let me scroll down a bit. This is the portal ISOS. Let me click on it.
And in no time this has been set as the background
image of the board. Well, now I have to click here to get back to the
previous part on. So again, as I must try, our customers has a
background of my board. Let me click on this
custom Plus link and upload our nice emails
from my computer. Great, but a nice
background I have now. However, if I hover
my mouse cursor here, I see our link named options. Let me click on it. Up, up, up. When we appear. Here you can see cover
and light are selected. If a SUS dark instead of light, a sense takes place right here. Let me switch between
light and dark are few times to make the
sense evidence for you. I hope you've realized
what exactly sensed here. Now if you want to remove
these background images, you simply need to click here on the delete
background link. Let me try that. Is the stroke conformation. Let me hit the Delete button. This image seems
to have vanished. From here. Bar the background has not
sense to see the sensory. Let me replace this space. Now. You can see we're back
to the blue background.
12. 11. Trello about Section: Hi everyone. Today in this video, I'm going to show and describe the about this board
section in Trello. I hope you watched my
last video where I showed how to since background
color of our trailer world. So let's get started. Now, I'm on the interface
of our Trello board. I click on the Show me know, the top portion of the menu. Look at the segment
named about this board. This is what I'm
going to explore today. Let me click on it. This is the next interface. Only the board admins
shows up here. In this case, there's
zone Peterson. This is the full
name of the admin, and this is the admins
Trello username. I have the option to edit profile info by
click on this link. However, Trello profile options will be discussed
in the next video. Therefore, I skipped this part. Next, come to the description. To add your description click
here and write your text. After finishing, hit
the save button. As you can see, our description has been added to the board. Now, let's go to the lower
part with his permissions. This portion of the manual is
about who has permission to do what sample permission
is shown here. This says member can
comment on cards. Let me click here on the
sense Permissions link. This particular manner shows up. As you can see, our PUE
options are available here. To sense the workspace. Click here. Now click on this drop-down menu to see the available or caspase. Select our workspace
and click Send button. For example, I sues here
marketing and Qlik Sense. Now, you can see the physics book board automatically goes under
marketing Orca space. Now if I send the workspace, research and development, the physics board is now under
research and development. You can even create a new workspace by
clicking on this link. Now, come to the
card covered option. Clicking here, as you can see, this particular card loses
its cover of green color. Let me click on this segment. This time the tick
mark appears and the cover of the card is
registered in green color. Let's go to the
permissions section. Here are two permissions
that you can change. The upper one is
commenting permissions, which is currently
set to members. This means that only admins and normal members can
comment on this board. Let's click here. Mainly appears. By default, members is selected. If you select disabled, nobody can comment or
react on this board. If you select members
and observers, admins and normal members. And observers can comment
and react on this board. If you select workers
faced members, any member from the
associated work space and the observers can comment
and react on the board. Let me close this mineral. The next permission is
add, remove permissions. This is about who can add or remove whom from the
board. Click on it. By default, all members is selected with means
that while members and admin can add or
remove members from this bulb in Trello board. And admin can remove
our normal member, but our normal member
cannot remove an admin. Also, an admin can
remove another admin regardless of who has
originally created the world. Now about adding members, when an admin as
members to the board, they can assign any
of the role admin, normal member or observer. However, when our normal
member members to the board, there can be assigned a role of either normal member or an
observer, not an admin. Now let us talk about the other air remote
permissions, which is admins. This ellos only admins to add or remove members
on the board. Now, let's close this small
middle and go even lower. This section of the
settings menu has a size saying L0 workspace
members to edit and giant. This size is strict than any
on who is present on the associated to archive space can anytime zone and start
editing the board. If the sources and disabled
workers first members will require permissions from the board admins to Zion
the board and edit. Now that we have talked
about the setting menu, Let's get back to the previous
scenario by clicking here. We are again on the about
this board section. Now click here.
13. 12. Trello Notification Settings: Hi everyone. Today
in this video, I'll show you how to handle notifications on Trello
project management software. To show this, I'll be working on prayers account
throughout this video. So let us get started. If you want to get notifications
about a certain card, even need to subscript to heat. To do that. Click on this body of this card is
detailed form shows up. Now click on this option. As you can see, green tick
has been added next to us, which means from now, pred will be getting
notifications about this curve. If there is any change, print will get notified. Now, click this bell icon to see all the
notifications for pred. This particular window shows
up with all notifications. Let's explore the
notifications with example. Here you can see our notification from
the cart named right content of to-do list under the work space
of physics book. Was on Peter's contact me. Actually Electric
and comment this. If I click on here, that actual activity shows up. Let's get back to the
previous scenario. Here you can see show
previous card activity link. Let me click on it. You can see ARPU
more activities. Here. Zhan Peterson
made a comment and Daniel replied to
heat. This is it. Let me scroll down and get
to the bottom of the window. Here. The past of SHA-1 is
since notification, email and see, it's about how frequently you want to receive notifications
from trailer. Click here, by default
is set to instantly, which means that every time
our card, or at least, or a board is updated, since you'll get notified. Now I click on the
periodically option. The moment I click that, the men are vanishes. So I click on the option
again to see whether or not it is scandalous,
set to periodically? Yes, it is. Now, you may think
if you sous periodically, human loose on or more
notifications in the meantime. However, you have
nothing to worry about. This is because you will
receive notifications on all the latest activities
in a bundle format. No sense to lose
any notification. But if you select never
not email will be sent. The next option is alone
desktop notifications. If you want to
have notifications from Trello on the
browser level, you should activate it. Now I click here, it vanishes. This means desktop
projection system is activated successfully. There's all about
Trello notifications.
14. 13. Delete Workspaces And Boards On Trello: Hi everyone. Today in this video, I'll show you how to
delete workspaces and boards on Trello
project management chapter. I hope you asked my
last video where I showed how to handle
notifications on Trello. This video, I used PATRIC
account to delete a cell and Operations workspace and maths book board with this under research and
development workspace. So let's get started. This is Patrick's
dashboard and I'm going to delete a certain
operation work space right now. To delete a board
or our keyspace, you have to be an admin of the respective board
or orca space. On the free version of trello. Every work space
member is an admin. This means any workspace member
can delete the workspace. Now let me click on
this particular members link and our ASR and operations. Here you can see Petri is an admin of ASR and
Operations workspace. So he can delete this workspace. Now about the
deletion procedure, I need to switch to the
Settings tab and go to bottom where the delete
this workspace link exists. Now click here. You can see this
confirmation message. I'm sure to delete this
orchid space forever. So I click on this red button shortly after undirected to
my Trello dashboard, which is the main interface. So the ASR and
Operations workspace has been delivered
forever like that. Now about the deletion
of our Trello board, I'm going to delete maths book. Under research and
development workspace. Click on a maths book board, which is under the research
and development workspace. This is the interface
of the board. Go to the upper right corner and click on the Show Me no bottom. Now on the middle, there is a more link. Click on it. This particular menu shows up. Now click Close volt. Confirmation. Click
on the Close button. This particular blank
face, a few years. Now two options. Either to reopen the bulb,
permanently, delete it. Reopening our board means
restoring Maths will bode. Well, ISOS, neither
of these two options. Rather, I wanted to show you how to view all closed boards. To do that, expand
the left sidebar, and click on this link. See all orchestras boards. Here. You can see all the boards of the research and
development workspace. Now click View, closed board's, closed ports window, FDR's. You can see here
maths book board, which is under research and
development or his face. You can delete or real
vein this board from here, I click on Delete button. Again, our confirmation
messages has come. Click Delete button. There sit. The board is permanently
delivered now.
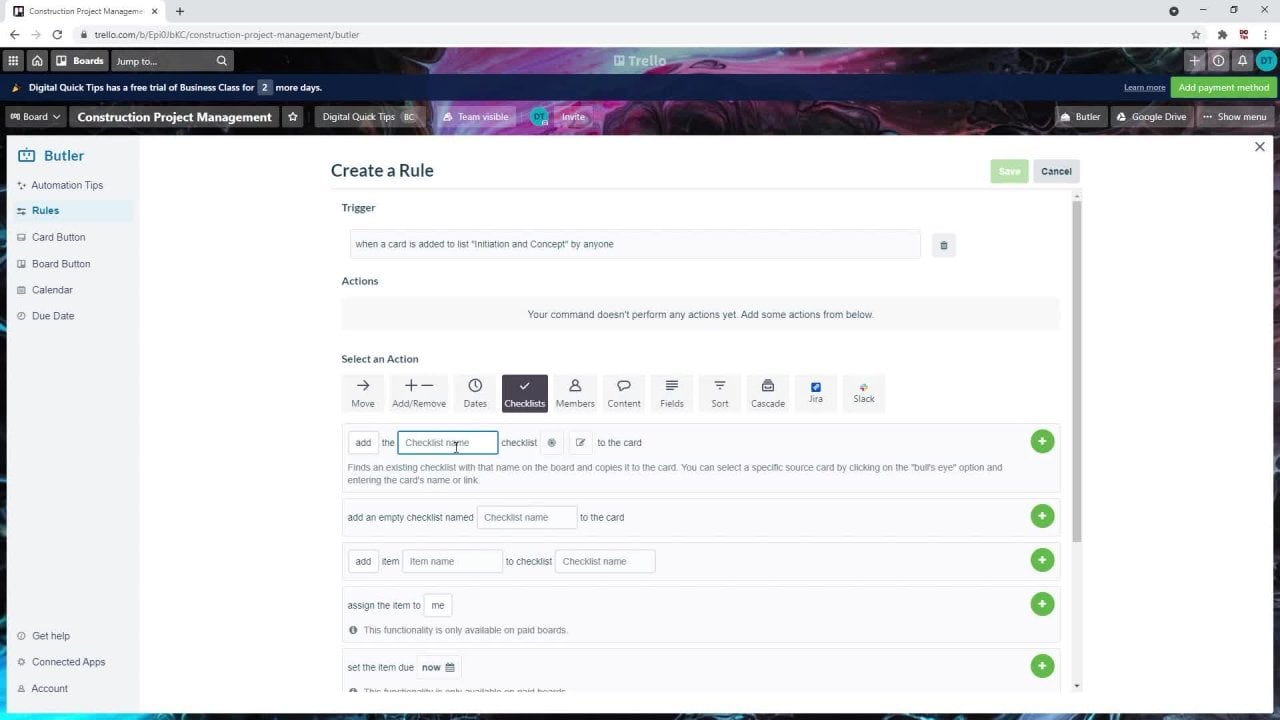
15. 14. Workflow automations on Trello: Hi everyone. Today
in this video, I'll show you how to automate workflows on Trello posit
management software. I hope you asked my last
video where I showed how to delete workspaces
and bores on Trello. In this tutorial, I'm
going to work with maths book board under research and
development work space. So let's get started. This is the zone
Peterson's profile. Zone is the admin up research
and development workspace. Now, click on maths book board under research and
development workspace. This is the interface
of maths book board. Before I continue, I want to demonstrate or
positive concept fast. Here you can see there are
five lists on this board. Planning to do,
doing, Done, review. The planning list will
analyze, whisker, will go to To Do list, zone and Danielle usually
work on the planning list. Takes the responsibility
of to-do list. Task of guards are sent from
to release to doing list. The cars on the doing list
are performed as plant. Volleyball and Robert, take the responsibility
to complete tasks. Completed tasks will be
sent to the down list. The **** cards are sent to the review list after
a certain time. Okay, get back to the initial scenario to
work with the automation. Click on this automation button. This particular manner shows up. There are three options. Rules, buttons and
email reports. Click rules. In this position. Trailer tells you
how the rules works. With example, let us try. Go to the upper-right corner. Here, this bottom, you can transfer your
administrative power. The next button shows
your command libraries. Now click on Create rule. On this pace, you need to clear some actions
according to trigger. Trigger is like a
rule or an event. When the rule applies or
the even takes place. Something else also happens, that something is called action. Okay, let's create
a rule. Passed. Hit the air trigger button. Now, you need to
select our triggered. Before triggering something. Let me tell you what
I wanted to do fast. Let's go to the
math's book board. If I move Chapter
seven card from planning or any other
list to do list, you know, level will show only pred will be l it
except other members, which is not
happening right now. Moreover, our recommended
set list will be generated automatically
in this card. Now, get back to our
previous automation window. Here, Card move is
selected by default. I sues this section to set
our rule for triggering. When a card is moved into list. List name by name. I put the cursor on
Edit and select here, moved into then click list, name and select Todo. Finally, I select by anyone
instead of by me here. Click the plus sign button. Okay? Now our
trigger is created. If says, if any unmoved our card from any
least into to-do list. The third direction we'll walk our Suppose if I drag this
card and drop to two delays, this card to to-do list. Some actions will
occur instantly. Now less steps hmm actions, part of this trigger. Here, movies
selected by default. In this section part, I put the cursor on
the top of the list. Here I select the
bottom of the list. Hit Plus button. See an action has been set. Now click Save. Congratulations. Action has been set. If we want to add more actions, click on edit options here. The last action is shown here. Before setting more
actions aren't like to show you the results
up current action. Let's go to the board. Here. I drag and drop this
car to to-do list at the top. See the card automatically returns to the
bottom of the list. Now send a card to the previous list and said
back to our action center. Here I want to add
another action. Click, Add, Remove. Now I want to add a
label to the card. To do that, this
section will help me. I put the cursor on green
and select yellow here. But no need to since EHR adoption because it
is selected by default. Hit Plus button. Here you can see another
action has been listed. Now I want to click on cyclists. Areas at least. I click here and write the set
list title recommendation. After that, click
this plus button. See this at least
has been created. Now I want to add an item on the recommendations at least part these are
used this section. Here. I keep this adoption
and layman item, question papers or spheres. Then right here, recommendation, which is our newly
edit set list. Now click on this plus button. Here you can see
recommendations. That list has an item named Washington papers
or previous years. In the same way, I add
three more set list items. Here you can see all the
actions I have done so far. Now, I want to add a
specific member for to-do list part doing
this, click on members. With the help of this section, you can add or remove members. To add, our member of shunt
should remain unchanged. Now click the cursor on here. You'll see all the
board members. I select Petrie. And click Plus button. See, Frederick has been
added to match book Barb. If you want adult members
not to be added here, remove the rest of the members
in advanced like this. Now you can see other members have been
removed from to-do list. Now only pred belongs
to maths book board. Okay, let's move on. Content. Here. You can rename your
card name, sir, cards, description, post comment, send, email, and paste URL. In this section, I want to
work with e-mail notification. Here. You can send e-mail to every member on this
card by clicking this, or send email to
everybody member on maths book board
by selecting this. However, I only send
an email to pred. Thus click onto. Now type e-mail
addresses, operate. Types observed on here. And then type messages. After that, click on
this plus button. See email notification
has been sent to see the result of all
that we have done so far. We have to click on
the Save button. Congratulation. All the actions have been saved. Everything I have done
so far is written here. Now, if you want to remove
any rules, click here. The previous settings
are shown again. You can delete your rule or any particular action by
clicking on this button. See, an action has been removed. With this arrow sign, you can take any action upwards, since I don't want to
sense any actions. So I click cancel. This option may allow
you to copy the link. If you want to remove
the entire rules. You may click here. To see command log. Click here. Now you can see modification of commands with date and time. If you think to set these rules to another board, click here. Here, I select Physics book
board and hit Record button. This review automation
settings space shows up. Now, click Add Automation
button, congratulation. This rules are successfully
added to physics book board. Now, let's segue on
physics book board. See the same rules are added
to the physics book board. Now, get back to the
previous settings. Click back to rules. Okay, Now, if you want
to create another rule, click here and add trigger. However, I have no intention
to do that. Again right now. I close this setting and let's set the results of
our automation. First, remember what
rules we have said? Whenever a car move
to the to-do list, it goes on the bottom, there will be a yellow level set list, tidal recommendation.
Recommendations. That list has four items. Question papers or
previous years. Physicians exercise sample
questions and solutions. Only Fred will be the
member of discard. Thread will get an email
to notify his task. Let's drag and drop, subtract seven
from planning list to do list and see what happens. Here. You can see it goes on
the bottom of to-do list. I usually will appears only Fred becomes the member
automatically discard. Now, click on this
car to see set list. You can see the
commendations at least has been added with
those four items. Now, let's have a look
for email notification. This is the inbox of pred. Basically the email has
been sent to zones and with the subject new scepter. So I click here. Now you can see
the message what I have written during automation. Now, get back to the zones and, and close the curves window. Now, I want to work
with button automation. I want to make such
a button that will tense for the card
to the doing list. To do that hit automation.
Click buttons. Here. Card button is selected
automatically. Now click Create button.
This setting pace. I select an icon for the button. From here, name the
button code to doing. And take the closed
card when action is performed, finally,
hit adduction. The action settings appear. By default, movies selected. In this section, I
keep the Move option. But since the position of
the cart top to bottom. Lastly, I select doing list
and click this plus button. See an action has been set. Now I want to define
project due date. To do that, go to dates. In this section D we
selected by default. Now click on here. You can see several options. I choose this option, I sense here this
month, next month. Click this plus button. Finally, click the plus button, see the due date
has been created. Now let's go to the
members option. Here I will add Oliver and Robert and remove everyone else. The process is same. Take a look. Here it is. Volleyball and Robert edit. Rest of all are
removed from the card. Now let's move on
the content option. This time, I said the cards description and
post the requirement. After writing. Click on
Plus buttons separately. See the car's description
and post comments are placed here. I have done for now to see the result of
card button automation. Click the Save button. Congratulation. All the settings have
been saved successfully. And our go-to doing List
button has been created. Let's go to the math book board. Passed, recap. What I have done so far. Every card has a button
named and go to doing list. If you click on this button, the card will be transport
to the doing list automatically and placed at
the bottom of this list. Initially, the cart will have only two members on the list. Oliver and Robert. Due date will be shown. Part that card. Card description and
comment will be seen. Click on Chapter three card. Here you can see go to doing List button at the
right sidebar. Just click on it. See the magic. Chapter three. Functions card has been transport to the Dwayne
list from the to-do list. Now, click on this card. Here we can see Oliver and
Robert are the cart members. There is a due date. You can also see
the description, comment or board admin. After verifying, click
this cross sign. Now I want to work with the
automation of board button. This automation will be such that when the button is clicked, the green level carved in the
doing list will be moved to the down list where
the green level indicators that a given
task is completed and waves to transfer to the down list by the
admin of the board. To do that, click automation. Click on buttons. You can pint. Board button at the left
sidebar, click here. The upper-right corner. Hit the Create button. Here you can change
your button icon. After that, give the
button our name. Finally, click on
Add Action button. Now, action options API, click on move cards. I would like to work
with this section. Here. I keep the Move option. After that click here. By default, basic is selected. This selection says
that from list, I sues to move the card. Keeping in option. I select, they're doing list. Now, click on this plus button. See the action has come. Again. Go to there. Now I sues with green level
and click Plus button. This action has also come. Now, put the cursor on the list and select
the top of the list. After that, click on the text box and select
the Download list. Finally, click this plus button. See the action has been set. Finally, click on Save button
at the upper right corner. Congratulations. Matt book board
button named doing. Two done has been
created successfully. Here you can see the
actions I have said. Now, if you click here, tick mark will show up. It indicates that
this button will enable on boards of research
and development workspace. If you turn on the
struggle option, anyone in this research
and development workspace, we'll see the button. I keep here only the past on. Now is time to verify the
action of this button. Let's close the butler passed. Let's recap what we should expect from these two
into Done button. There will be a button
named doing two done on the maths book board under research and
development workspace. If I click on the button called
the green labeled cards, will be tens part
to the down list. From the following list. The position of the curve will
be at the top of the list. See, there is a doing
to Done button. Beside automation. Doing list has one getting
level card, scepter one. Now click on the button. And here we go. One card has been
moved to the down list successfully and positioned
at the top of the list.
16. 15. How to use card templates on Trello: Hi everyone. Today
in this video, I'll show you how to use
Card templates on Trello, the project man
has been software. I hope you asked my
last video where I showed how to automate
workflows on Trello. As you can see, among
the dashboard of my physics book board under the research and
development workspace. Now this is the car, right contents under to-do list. I want to turn into a template. That's because there would arise certain situations when I would need to have the set list, the members, the levels COVID from discard half on
creating a new one. In addition, it's just not me. I want my associates
to be able to copy freezers from this card
while creating new ones. Firstly, I need to click on it. Then I need to click on
this Make Template button. Now, I see a person
does in their card. Now, let's talk
about the senses. On the lower right
side of the card. You can see that tick
sign next to template. This indicates that
it's the template card. Below there is hide
from list option. The reason is most Trello
users like to hide template cards so that no accidental changes
are made to the card. High does not mean deleting or archiving that God
is still there, standby behind the scene. The following is
the delete option, where previously archive
off from where they're. This button can
delete your template. Now at the top of the
car detailed fall, there is a banner here
saying is a template card. Next to it is the blue
button that you need to click to create a
card from this template. So let's click on it. This particular menu appear. Let's be introduced with the different parts
of this manual. One, this white
background walks. There are the levels. This is the carbon name. They are the members. The existence of cyclists
and description are there. In the clip section. You can get to Sue's with aspects of the template
card you are going to keep. You can also decide in which list the COVID card will appear. From here. Now, I sense the name
of the COVID guard, right, contents per block. Hit the credit card button. Card detail view window appears. You are already familiar
with this view there, so I am closing this
window right now. See right contents for
block is plus two here. Now I want to show you how
to hide the card template. I can do this in two ways. At past, click on the body of
the right content scarred. After that, click this
height from List button, which is something I
hinted out previously. Now I close this without
hiding the card from here. Anyway. Now I'm going to
show you the second option. Just right-click on the body of the card and then hit the
last option, hide from list. Now take a closer
look at the cards. Under the to-do list. The template card does
not show up here anymore. That's because hidden now. You can understand
it's hidden now. At this moment, a couple
of questions may arise. How to create new curves
using template card. Where can you find
the template card? After all, is just hidden,
not deleted, right? Well, I'm going to answer
this questions right now. You can see Create From
Template button next to add a card option
in every single list. Suppose I want to create a new card from the
template in the doing list. So I click here on
this particular icon. Card templates window
appears here you can see the hidden
template card shows up. Now click on this template
card to create our new card. You can discard easily, unsaid that tick mark with options you don't want to keep. Let's answer the set list and rename the card name is
declared card button. Now you can see right the script at the bottom of green list. Now get back to the
previous scenario. Here you can create
a new template. Click on it, name that
template title here. Click on Add button. This is the detailed view of the newly created card template
titled new template card. You can convert this template
back to a normal card. I keep this tick mark
and close the window. You can see new template
card is positioned at the bottom of the
list, as it should be. Now, click on that grid
from template again. You can find all the
card templates here, including the hidden on
click on the Edit Templates. Edit and delete options appears. If you want to
delete our template, you need to click here. However, click on
edit this template. I hit this template. Remember, now I will show you how to return it to
its previous place. To do that, Scroll down
at the bottom right. It will surely
find showing list. This option will help you to
send this template to use XML position to-do list.
Let us click on it. See showing list of Sean's disappears and hide from list comes close this window. Here you can find your template
card in the to-do list.
17. 16. How to use board templates on Trello: Hi everyone. Today in this video, I'll show you how to use
both templates on Trello, the project management software. I hope you asked my last
video where I showed how to use Card templates
on Trello past. I'll show you how to turn
our board into template. Before starting this
tutorial outlet to show you how many boards are
there in every worker space. I am now under zones account. There are two or caspases, business and research
and development. Let us see the boards
of business workspace. You can see there
are three boards, accounting, entrepreneurship
and finance. Okay, Let's set the boards
of research and development. You can see there are
three boards as well. Economics, maths
and physics book. I sues maths book board to
turn into our template. Let's go to the interface
of maths book board. Here we are. Now,
he chose middle. Click on More. There is an option,
make template. This option is only available in the premium
version of trello. Let's click on it. This particular message
shows up to let you know what will happen if you turn this board into our template. Click Make Template button. Congratulation, matchbook
board turns into a template. Now I close it. Let's expand the left sidebar. Here you can see math's book board is
marked as a template. If you want to turn it into a
board again, go to Show me. Back to menu. Click More. Here you can find our new
option, convert to board. Click on it. Thus it match book, become a board again. Well, I'm going to convert
this board to template again to show you the part of that process about
our board template. That's it. Now outlet to close this
about me know, again, there is a message that
says this is a template of members of research and
development to copy. This means only the members
of my current workspace can use this board
template. Whatever. If you want to create a
board from this template, click on Create board
from Template button. Create a bolt from
Template window shows up. With the help of this window, you can create a
brand new board. I give a title of the
new world business math. I changed the work is space from research and development
to business. Now, if you wanted to sense the visibility
setting, click here. It has. Workspace is
selected by default. I don't change it. I keep all the cars as
well as template curve. So don't click on this tick marks or low-k.
Now click the Create button. Congratulations. Businessman board is
created successfully. And the same time you are redirected to the
business workspace. There were three boards
on this workspace before, but now another new
board has been added. And his name is business math. As you can see, the new
world businessman has the same data and interface design of the
template card, including lists, guards, levels, card template, cyclists, descriptions, due
date, Automation button. But in the case of members, only admin zone is here. Other members are not
available on the board. There's why they are not seen. Okay, let us get back to
the math's book template. Let us share the template. Now. Next to create
board from template, you can find shared
template button. Click here. Up above shows up here. Here. You'll find a link of
this board template. You can copy this link by
clicking on this Copy button. You can also share
this on Twitter, Facebook, LinkedIn, and email. Notice that only the members of research and
development work is space. Can see this template. If you wanted to share
this template board for anyone on the internet, you need to change the
workspace visibility setting. Thus click here. Since the visibility from
orchestras to public, confirmation message shows
up, click is button. Now, check on shared template. See the settings
has been sensed. And from now you can share this template to anyone
on the Internet. Finally, it will make
the visibility private. You can't share this template. Share option will be vanished.
18. 17. How to use pre made templates to create a board in trello: Hi everyone. Today
in this video, I will show you how to
use pre-made templates to create a board interlock
posit management software. I hope you asked my
last video where I showed how to use both
templates on Trello. Okay, let's get started. This is the homepage of Trello. Now click templates. Okay, Let me a straight loop for my template of Soyuz past. I take a look at the PCL categories section
and sues marketing. Then I scroll down and find this particular
template by the name of editorial
calendar. Click here. I have entered into the
phase of the template. As you can see, pool details of templates are available here. Sas as template name,
template creator, how many copies are used so far, total views of this template
about these templates. Power Apps support. Note here, these template works best
with Trello premium. You can share this template
by clicking on Share button. Now, if you think you want to view this template
before using it, you have an option at
the bottom right corner, view templates that click on this link and view the template. Here is the pool view
of the template. It looks amazing. It has a total of six
lists and 16 cards. Are few cars have nice
background images. Let me click on this
particular car title, making graphics. Here's the detailed
view shows up. You have already known all
this things like cart levels, description AT assessment, cyclist, action. Close it. This template has up our app called
Calendar. Click on it. You'll see a calendar
click Settings. This option will be enabled
when you use this template. Okay, Let's close all of
this and try this it. In the last video of how to
use Trello tutorial series, I discussed in detail how to create a board
from our template. Please set the description. Now to use this template, click on Create board
from Template button. I keep the title. But since the
workspace marketing, I keep all the cards. Okay, Now click on
this Create button. And here it is. The editorial calendar is positioned under
marketing or caspase. You can see calendar
PowerApps button is enabled and positioned at the left side of the automation.
19. 18. How to add and use power ups on Trello: Hi everyone. Today
in this video, I'll show you how to add an use PowerApps on Trello project
management software. Powerapps are like
a special pieces that are edible
too, trailer boats. If you want to work
with PowerApps, access to a board fast. The upper-right corner. Click here, showing. Here you can find
power of sections. To add up our app. Click on the Add power of tab. Power-up directory shows up. Here. You can see some PSR power up. If you scroll down, you can see Trello integrations, essential power-ups,
and other power-ups. In the left sidebar, there are three options
enabled made by Trello. By default, P3 is selected fast. Now I'm clicking enabled. No power of our
enabled on this board. Okay, now let's talk about
the third one made by Trello. There are 130 power
of classified into several categories in
the mid by Trello section. These are the categories. Alternatively, you
can search for a particular power of in this search box
placed at the top. Now I'm going to show you
how to add our power of. Therefore, I go to
File Management. Here, I click on the body
of show advertisement Power Apps landing page of
show advertisements appears. The detailed view of this
part of is demonstrated here. This power of shows you investment name at the
front of the curd. To add the power of that
click on this Add button. If you click add further, what will happen
is discussed here. I click Add. See the adoption vanishes and Settings
button comes. So congratulations. Show AT assessment is successfully edit to
the power of section. Okay, now I close this power of SQL window to see what
happens to this board. As you can see, the adjustments
in the cars are shown. Let's click on Show
advertisement. From here. Our pop-up window shows up. If you click View power-ups, the lending page of
this power of will appear in the left corner
of their menu bar, which we have already
been familiar with. So I click on the next option, edit power of settings. The settings menu of show
AT assessments, APRs. At the top of the settings, there is a drop-down menu. By default, cherries selected. You can also select private
for the board settings. The following settings
says this option displays show AT
assessments icon like this. The next option allows
showing the attachment name. If you set the following
of Sean tick mark, it will show the number of
attachments in occured. You can send the
background color from this drop-down menu. I select here lime. Also here are a couple of
the ticketing options. If you click this past
filtering option, only the cars assigned to the
current user will be shown. I remove the tick mark. The next option will
display what type of attachments you
want to see on the outer appearance of the curve show
attachment power ofs is not free for
all the authority of our soup 14 days trial. In this section, you are informed about their
subscription plan, okay, I click on Save setting C, The car is sensed. If you want to disable
this power-up, click show AT assessment and
part of that click disabled, see the power of his gun.
 Imran Emu, Graphic & UI/UX Designer