Transcripts
1. Introduction: It started out as a hobby,
but then I got hooked. My passion for
photography and video led me to create a life
I never imagined. Hello, my name is Glenn Graham. I'm a social media consultant
and content creator. I'm in creating content
for over 15 years. I began taking photos
for friends as a hobby. Then other artists started
hiring me for their projects. I spent several years
producing creative projects, directing music
videos, and creating commercials for businesses
and individuals. In today's lesson, I will show you how to add motion at audio to static images to get more
engagement on social media. This class is intended for
small business owners and individuals seeking to create engaging content by
using smartphones. You don't need to
be a professional editor to take this class. I will walk you through
the step-by-step process. So you'll be able to create
similar projects on your own. The skills you acquire by
completing this project will be basic audio and
video editing concepts, such as adding audio to images and using keyframes
to create movement. You'll also be learning
how to add and edit captions on your videos to get
started with this project. Final image you want to use and have it ready on your phone. You'll need audio
editing software, use whatever you have available. I'm gonna be using the
GarageBand software that comes pre-installed
on all Mac computers. There's also a free
software called Audacity for Mac users, I'll provide the link
to all software below. I recommend using an
external microphone, but it's not a requirement
for this project. But as a creator, having a mic or up the
production quality on your future projects to edit and convert
your image to video, you're gonna be using a
free app called Video leap, available for iOS
and Android devices. And lastly, download AutoCad, a free app that
allows you to add captions to your video project. Please share the link to
your completed project in your workspace area for
inspiration for other students, along with any questions you
have about this project, I'm looking forward
to seeing what you guys create. So
let's get started.
2. The Assignment : Okay guys, before
we get started, I wanted to show you what
we're gonna be creating. So I'm on my Instagram page. Glenn grams speaks and I was recently on a podcast
interview call sharp and love. And I wanted it was
an audio podcast, but I wanted a way to promote the event or the
episode that I was on. So I found a photo of myself and I created this
real want to show you. So this is what we are
going to be creating. This is live for my
Instagram right now, so you can actually
see what's happening. So you notice the person that interviewed me is on the front. And as she finishes
speaking, now, the enemy, the photo was a 2D
photo I animated or so it gets a little bigger
as the captions go on. And why I'm showing you
guys this is because I want to show you with just
a little bit of touch-up. You can add some movement
and sound to your, to your own photos and you get some pretty
impressive results. So you'll notice on
this particular post, I got 3,423 views, 111 likes, 22 comments, 55 shares to divide, people have shared this post
and 19 people saved it. So I've reached 3,423 accounts. Now what's important
to mention is I have a relatively low
follower account, right? So it's about 834 followers
I have at the current time. But that will not stop you if you just
add a little pizzazz to your 2D photos as opposed to just putting
up static photos. Put a little motion to it, and I'm gonna be showing
you how to do that, adding some sound and
then later some captions. So without further ado,
let's get started.
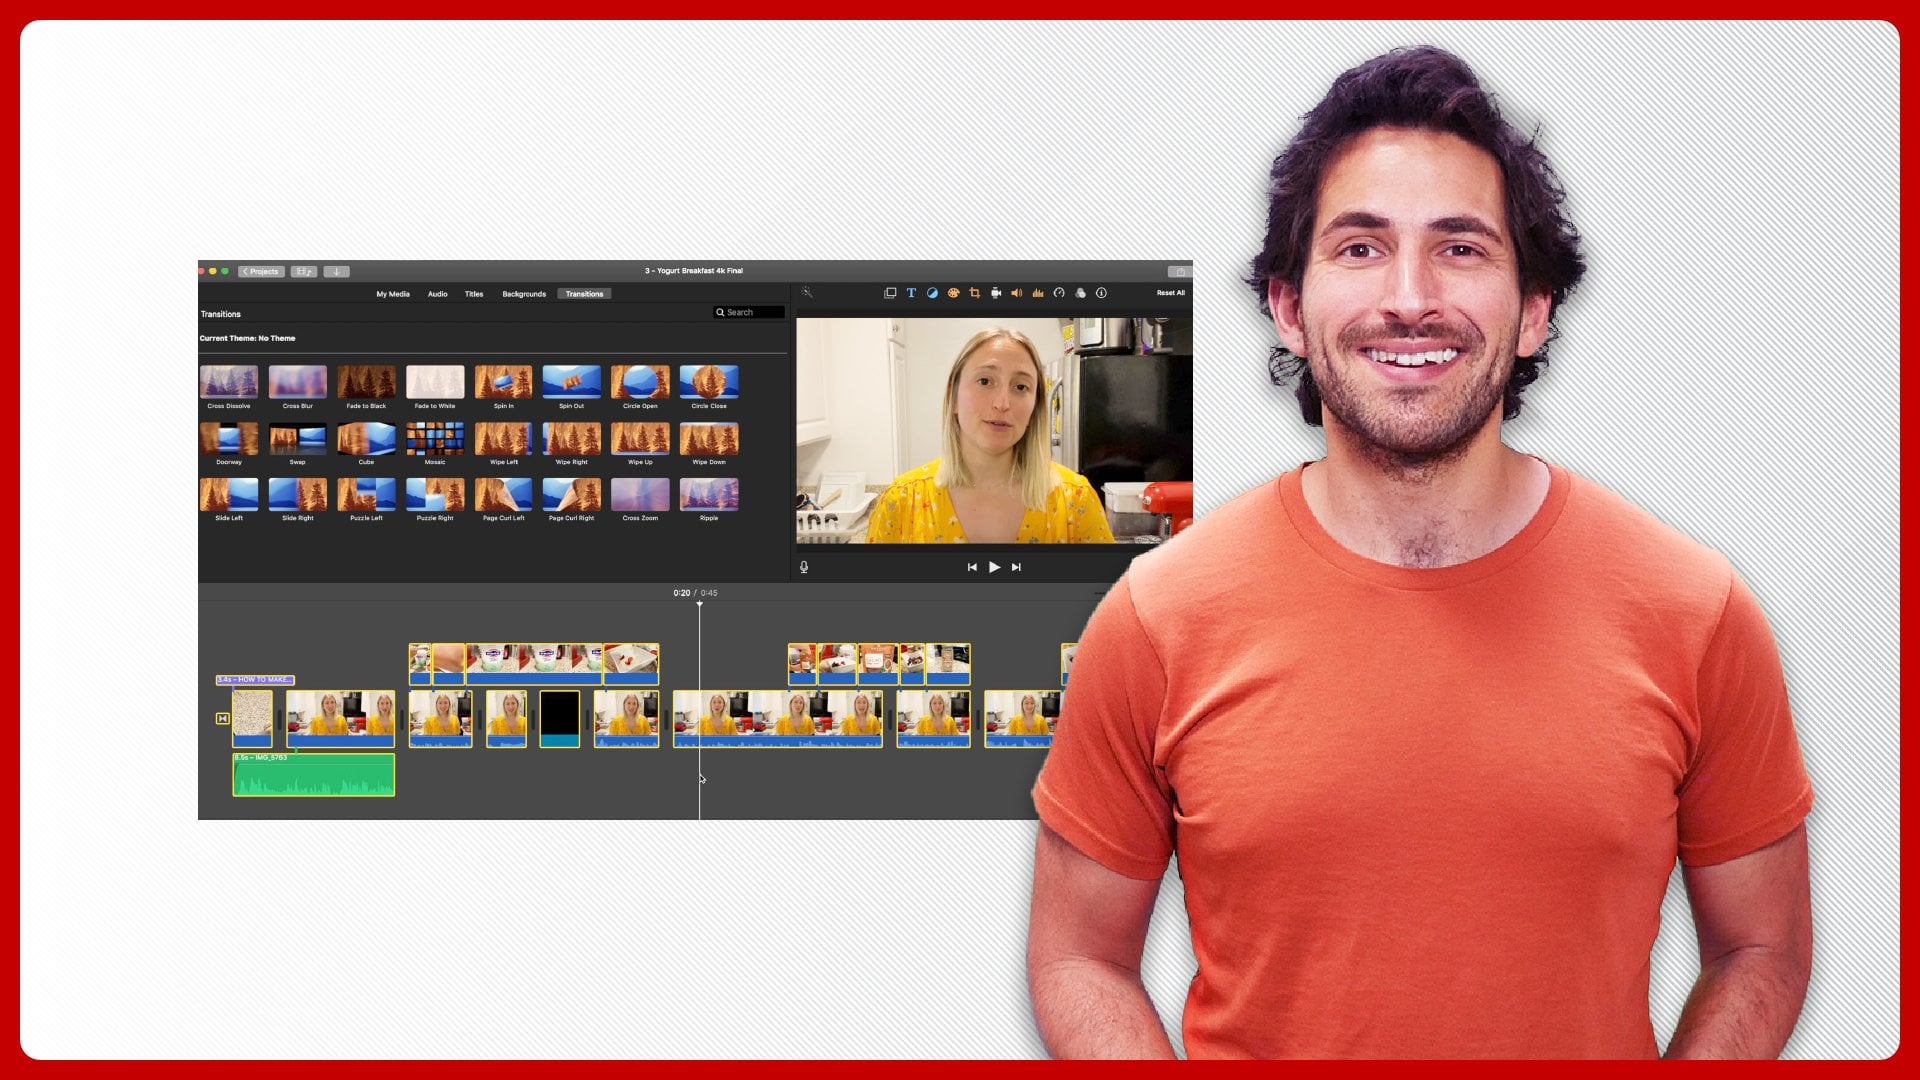
4. Adding Movement & Sound: So we are now in video
and we have imported the audio from GarageBand or whatever audio editing
software you're using. And I just want to make
sure that it's in there. So do you see that
little blue icon? If you tap on that? That is
the audio. Let's play it. Do you know when
to cut people out? Audio Sounds good. Now what
we wanna do is we want to go over here and we
want to tap on Canvas. And what you're gonna do
with that, click on Format. And then you want
it to be 99 by 16. That is a format for Instagram real or if you're
doing YouTube shorts, you want to make sure
you're in the correct format and now you're ready to import
your static image. Tap on the plus sign and click on the image that
you want to bring over. Here it is here I'm
gonna, I'm gonna decrease the size so you see the
real size of the image. It is really a one-by-one
image as good quality. So I want to make
sure that it is the same size as
like Instagram real. So I'm going to just size it
a little bit so that we get a little bit of
action going on here. I great. Now the next step you want to
do is you want to make sure that the image is there the whole time
the audio is playing. So if we go to
scrub a little bit, you see that when the audio, I think each person day
the audio still going, the image has stopped playing. So what you wanna do is
you want to go back to the image, highlight it, and then drag it along the blue line until
you get to the very end. And we're almost there. Okay, great, right here. So now when the
audio stops playing, the image disappears as well. Well, in that way. Great,
So now, that looks good. Now you notice that
the woman talking in the beginning as a woman
at, that interviewed me. Once again, that is
show up in love that's unable to podcasts that she
was n she's on Instagram. And what I wanna do, I want to bring her in so
that when she's speaking, you see the woman speaking
and then she fades out. And then I taught,
I start speaking. So I'm going to
bring her image in. But we're gonna do it
a little different. You're going to tap on mixer. What makes it will
do is it will bring the image of her on top of mine in a different
layer and you can move her image around,
you can size it. So I like how this
looks right here. And so I want to make sure that her image is on the screen
the whole time She's talking. Right? Do you know like when
to cut people out? I think we went
right when she stops talking to image disappears. But what I wanna do before I, At any animation to it, I want to actually make
it look a little cleaner. So what I'm gonna do is I'm
going to tap on her image and I'm going to scroll down on
the bottom and hit Mask. We hit Mask, you have
different options. Linear mirror. I'm going to go for radio. Radio mass puts a nice
circle around her. Just size it a little
bit around her. So make sure she's in there
and you have your circle. Now you can get outside of the mask and now you
can move it around. And I'm going to just decrease the size a little bit because
I want her to be up top, but I don't want it
to cover my face. That looks good. And now we're ready
to add the animation for animation selected image. And you see where it
says the animation tab, you tap on animation
and you go in. And I want this image to go
from the left to the right. So it's going to
slide to the right. So you see, you know, if I want to slow it
down to animation, I can just move the slider
a little bit over here. And now, do you know, it eases in really nice. And then what I'm
gonna do, I'm gonna go all the way to the end. And I'm going to hit out. So I'm going to animate out. It gives me another option
I'm going to do, slide up. So sea slug when
to cut people out. I think in our image slides up. I'm going to, I'm going to bring it up on the big
screen so we can preview it. Play it. Do you know when
to cut people out? I think each person they
have to know what great. Now one last thing I want
to do before we get out of here is I want when
she stopped speaking, I want to make sure
that I start to add some movement to the
static image in mind. So once she goes up, I know that she
stopped speaking. I'm going to tap on my image and I'm going
to add a keyframe. So you see that
little diamond all the way to the right-hand
side of the screen. You're going to tap on
that. That is a keyframe. It will give you it will indicate to the
keyframes selected. Then you're going to
move your play head all the way to the end of the, of the image and you're going
to add another keyframe. But this time you are going
to increase the size. Make sure not to cut
off my nice hat there. Right? Bring it down, bring it up a little bit more. And now that should be good. That looks pretty cool. And now, if we go over here and we play it
from the beginning, do you know like when
to cut people out? I think each person they have to know when is enough
is enough for you. But also I think
that as I'm talking, the image starts to get bigger. And if you let it go
all the way through, it will get very large
and then it will end. So that's, that's
it for this video, what I wanna do one
last step before we go is I want to export this out. So I'm going to hit
the Export button and make sure you
hit Export Settings. Ten ADP is what I prefer. And I hit save. And now it's going to save to my phone and I'm going to import this into auto cap and add our captions. Okay, we're done.
5. Adding Captions / Project Complete: Part of our video, you're going to open up AutoCad. That's the software on
your phone that you downloaded. Tap on that. And then you're going to
select a video that we created from our last video. We're going to select the video. And now we're going to
choose at the bottom-right. Then you're going to tap next. And what auto cap is doing is it's transcribing your video, is going to add some
beautiful captions to your video project. And there it is right there. Just give it a little
bit, a moment right here and then we're
going to play it. Do you know when
to cut people out? You see it has your captions but they're way at the bottom. You can just tap on the
captions and bring it up here. I'm going to bring it right to the bottom of the woman that I was speaking because
I don't want it to go over her will
play it backward. Do you know like when to cut people out?
I think each person. Now you can change the font. So that first tab
that says font, you can tap on font. You can change the font to
different ones as you want. I particularly like
the bigger font, which I believe
is called Austin, is the one that I use. Then the next thing you can do, you can hit the Next button. And that will allow
you to scale. You can scale the
size of your font. I like to keep it a little
bit on the smaller side, away from the edges so
it doesn't get cut off in an Instagram or wherever
you're gonna be putting this. The next thing we're gonna do is go over to the color tab, hit Tab to Color tab. And what you can do here, you can actually change
the color of your, of your font where it says Fill. If you tap on that, you can change it to
whatever color you want. I typically leave it to white, but I do like it to
stand out a bit. So right under that, there's a little tab there. And if you tap on that, it will highlight
as a highlight tab. And my brand colors
have red in it. So what I do is I'll tap red. And now every time I speak, it will highlight certain parts of the tech will be red. Person. They have to know when
is enough, is enough. But also I think that now, so I think that
looks great there. One last thing I do is I add a little background
to my texts. So hit the background
color and I use black. If you tap the
background color again, it will give you a nice shading, which I loved that it
looks perfect to me. And then the next part is, when you're speaking,
you'll notice that you can see the texts
will go with the bottoms. Look at that bottom part. I'm gonna hit play. People sometimes cut
people off prematurely. I means a minute. They have a disability
handy about this feature is if
something is off, like sometimes the
texts may not pick up something you said or am
I spelled it incorrectly, you can just hop on here. Another menu will come up. You see that little
keyboard here. You'd kick on a keyboard. And you can now type in and correct any
misspellings or errors. The other thing that you can
do with that is you can also highlight certain
parts of your hit that little highlight
button right there. I can just highlight, Let's say if I want to highlight people or I want to highlight, sometimes I can
just click on that. Hit Highlight. And now that will be
highlighted in red, or I can unhighlight it. So if there's something
that you don't want to highlight like prematurely, I want to get rid of that. I can just unhighlight it
and then it will no longer. If I go back to it, it will
not be highlighted in red. So now we're going to
hit the Save button. And you see here, let's
go back really quickly. You see that little watermark
there to the bottom right. If you do not pay for the app, that watermark will appear. But if you don't
mind it being, yeah, you can have this app for free. But I'm going to hit
Save and you're gonna get the option to
remove the watermark, tap on remove watermark. And it gives me an option of
499 a month or 2999 a year, and they will remove the
watermark from your videos. But for now, just
leave it there. Try out the Software. I recommend. Save the video first,
see how you like how it plays and if you decide that
you want to purchase it, do so, but I don't see any rush play around
with the software. It's a great thing. Hopefully, you guys found this tutorial helpful and I'll be creating more stuff like this so you can create
better projects in your social media accounts.
More polished stuff. So guys, thank you again. And you guys have a great day.
 Glen Graham, Create the best content possible