Transcripts
1. Introduction: Hello and welcome. My name is Maryanne and I'm a product styling and visual storytelling expert. I've been refining my skills in my job as a visual merchandiser for Switzerland's largest department store chain for the past 10 years. Recently I've started exploring another avenue for my visual storytelling by creating Photoshop composites that I share on my Instagram account and this has taken my storytelling to an entirely new level. I'm excited to share my entire process from the creative aspects to the technical side over everything in-between with you. I'm going to do this by taking you behind the scenes of this image. But first things first, this is a technically intermediate to advanced class but even as a beginner stylist and photographer, you will be able to get some great tips and advice out of this class. This is part 1 of a two-part class. In this class, I will take you all the way from story development, over sketching, over how to make the best out of your light and space to how details and styling can make or break your photo. I'm going to talk about the gear that I'm using and I'll also tell you how I actually shoot my images. But this is it for this class. My entire editing process is something that I will show you in a stand-alone follow up class, more on that at the end of this class. I want this class not only to inspire you but also to leave you with a lot of professional advice and further resources. This is why I have created the creative photography checklist, you can find it as a resource in the project tab of this class. The checklist contains the most important points that I cover in this class and whenever you see this sign pop up, you will find links to further resources in the checklist. I want you to relax and just enjoy the journey because after all, learning should be fun.
2. Class Project: Before we dive in, let's talk about the class project. I want to help you to take your storytelling to the next level, and I hope that you will jump onto this opportunity to get my professional feedback, but also to feedback of all your fellow students. Because let's be realistic, the power of our stories does not come from what we tell, but from how it is received. I want you to upload free photos in which you have nailed your visual storytelling, and also to write us a little bit about why you are sharing these images with us. Also feel free to leave us a link to your social media profiles or your website so that we can look at those images in the context of the entire bigger picture of your brand storytelling. Now, if you're not sure about your visual storytelling style yet, and you feel like you don't have any images to upload, please don't despair. What I want you to do is show us free images that inspire you. Free images to whose storytelling you feel attracted, that speak to you, and then also tell us a little bit about them. If you choose this option, please don't forget to link to the original source and to credit the original creator. I can't wait to see all your images and to get inspired myself.
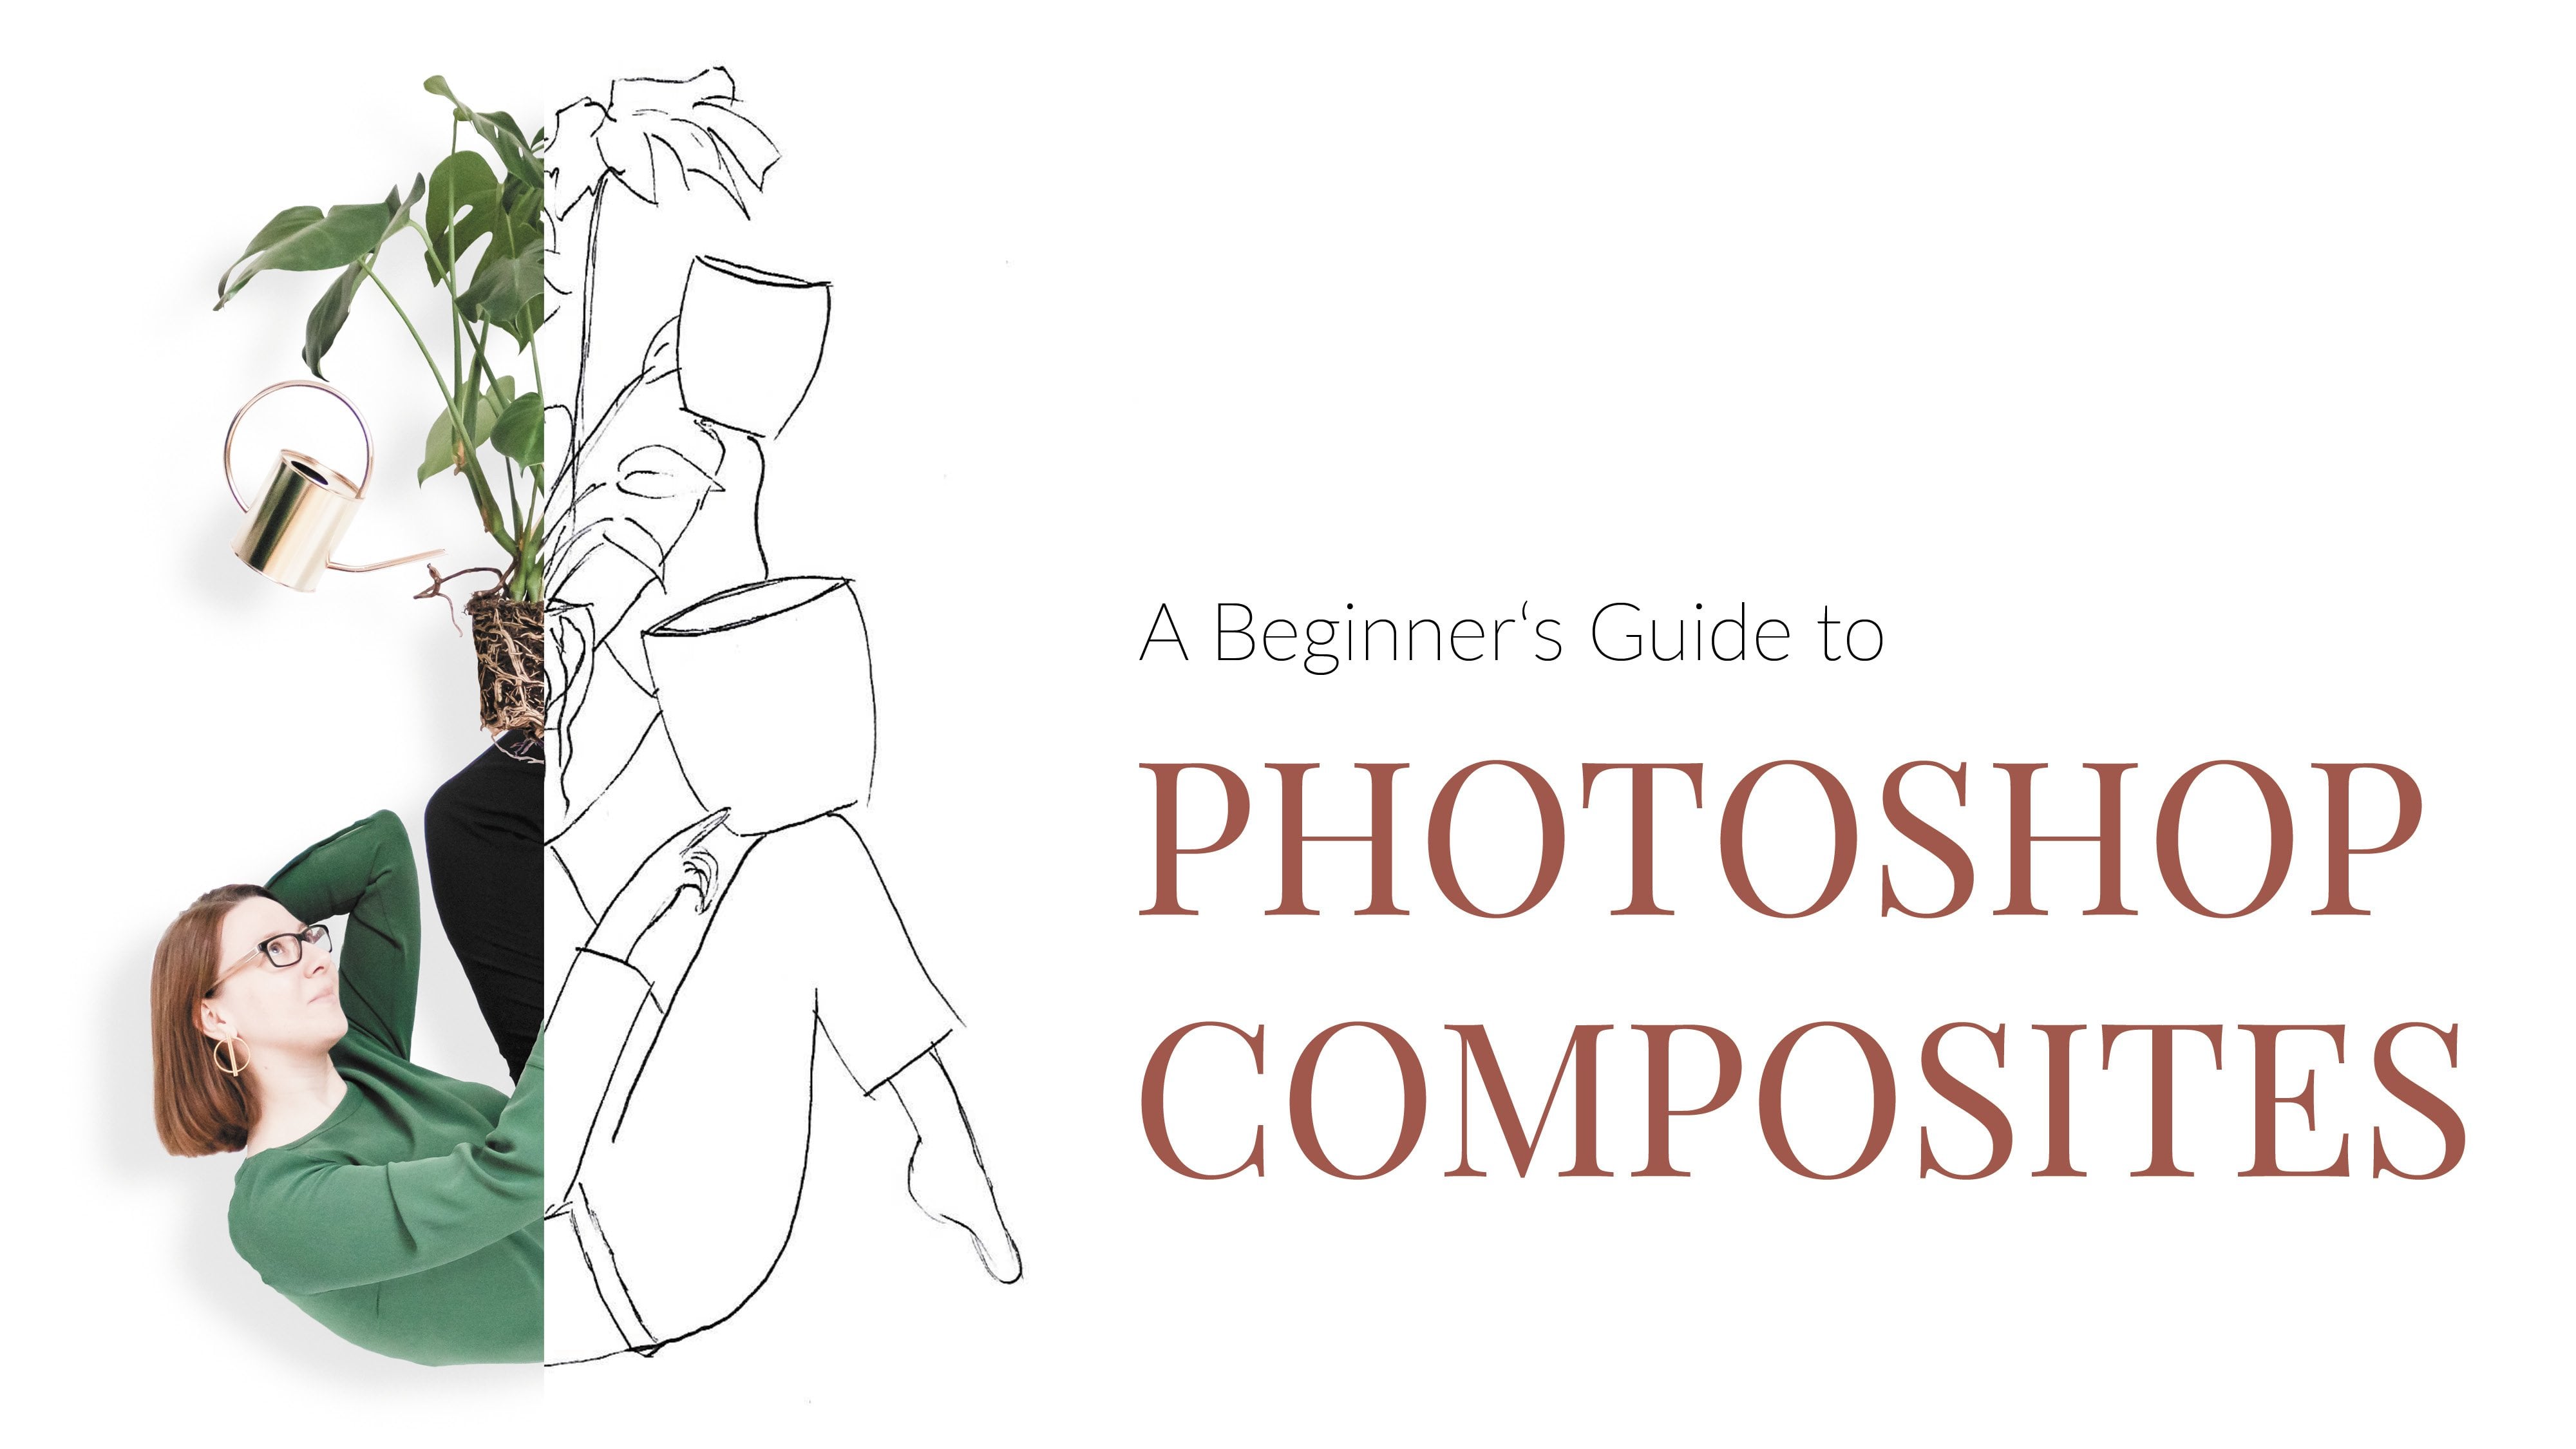
3. Story Telling: Once upon a time, you all know this phrase. Why? I believe is because we human beings are and have always been fascinated by storytelling. Storytelling through words, but also through images. Just think about the cave paintings from the Stone Age. I mean, they're still telling us stories of thousands of years. A picture is worth a thousand words. We know that this is not true for every picture. But think for a moment. What makes those images special? Those images that make you stop scrolling on Instagram, that captured your attention when you are just casually flicking through a magazine. It's the ones that tell a story. The ones that show or hint at an additional layer of meaning, the ones that convey or evoke emotions. How do you develop such a story? I personally like having a prompt. This is why I take part in a lot of creative challenges. Having a prompt gives me a point to start out from, an additional idea and then it also roots me while I explore all the potential possibilities out there. This is my entry for the Instagram Weekend hashtag project community. It prompted us to capture moments of community. For me, Instagram is basically my community. I'm an introvert. I don't like going out and actually meeting people, but I love my community and all my friends on Instagram. In this image, I showed how the community on Instagram is like a hack for me and how it supports me even though I am sometimes very vulnerable on this platform. This is my entry for the hashtag project surrounding New Year's resolutions for the year 2019. Well, I decided not to make any New Year resolutions because they just make me pressure myself and well, feel less unworthy. So I decided to just let go and let myself fall into 2019 and embrace what this year brings with it. The last example, this one was my entry for the Weekend hashtag project movement and instead of depicting actual motion, I decided to take the term movement in its broader sense and actually share something about a movement that I'm passionate about, about raising awareness for mental health issues. What it comes down to for me is first having an idea. At the beginning, this might be a little bit fuzzy, I've become more refined. The second thing is developing a very clear goal and intention behind every image. I need to know what I want to tell, how I want to make people feel, what kind of feeling I want to convey. Then I start refining the idea and I usually do this by taking everyday things and then adding a little bit of magic. Well, what I mean with magic here is introducing something or making something visible that we usually can't see. Let me show you what I mean by telling you how I came up with the idea for this image. This was my entry for creative project on Instagram by creatively squared. It was called by hand and prompted us to celebrate nature by something we create by hand. Now a little backstory, I'm a plant killer and after having laid to rest countless succulents, I bought this monstera on a whim and it actually didn't die. It flourished and by the time this creative challenge came along, it had grown enough that it actually needed a bigger pot. So the idea came to me with in five seconds, I wanted to show how magical that actually felt to me that my monstera was still alive. This was my first attempt. It has a floating watering can in it because well, apart from sparklers, nothing says magic as much as levitation, but this was just not magical enough. So I decided to go bigger. I took all the everyday objects that I would need in the re-potting process like the plants, the watering can the monstera, myself and put them all in there. Then I added this little bit of magic and in this image, it was like true magic of levitation that shows you how it felt to me to be able to actually re-pot my monstera. So I took the everyday objects, added a little bit of magic, in this case the floating and this resulted in an image that shows my excitement and wonder at the fact that I actually got to re-pot my monstera instead of killing it.
4. Sketching: For shots that are as complex as what we're going to create here today, preparation is key, especially preparing and sketching out what type of shots that you will need to make the final composite. Because believe me, there is nothing more frustrating that when you think you've wrapped up the shot, you pack everything away, and then you go into the editing process and you realize that there would've been just one more shot, one different angle that you would have had to take in order to make everything really fit together. This is why I 90 percent of the time do sketching beforehand. Sometimes I like to just dive in, but I've learned that in the long run, sketching saves me a lot of time, a lot of nerves, and spares me a lot of frustration. The idea is to have a levitation shot. I'm going to be in the air. I'm not that good at sketching, you don't need to be either, it's all about getting the idea. I'm going to be in the air. I want to have one of my legs up like this with a pointed foot, because I want to balance the smaller one of the pots on here. Then my front leg, I want to have like this, maybe also with a pointed foot, but these are details that I'm going to figure out later on. Now, I'm thinking about having the second pot, the bigger pot here on my knee. Then what I also want to have in there is a little watering can, that will just float around somewhere, and then of course also the monster. I want it to look like the monster is coming out of this pot, and then with the earth, with all the little brutes is floating here in mid-air in order to be transferred to the bigger pot. Then as I've said, I also want to have the watering cans somewhere. I'm not entirely sure if I want to have it somewhere here, or that maybe somewhere over there, because I'm a bit worried that if I put it on here where I thought I would have it, it would be too cluttered, because my arms have to be somewhere here as well. I'm thinking about doing something like this so that it looks as though I was making everything flowed with my finger. This arm will probably be somewhere up here. Yes, as you can see, I'm very bad at sketching people. Sometimes it works better, sometimes it doesn't work as well, but it's all about visualizing the general idea. I'm actually not entirely sure what I'm going to do with my second arm. It might be somewhere behind here and maybe I can put the watering can in here. But what this is all about, is about seeing what types of shots that I have to take. Now, I'm going to be the biggest part in it. I'm going to have to take a shot of myself lying on the back. I'm going to do this by having lying here so that the main part of me is floating, but I'm basically lying somewhere in the air. Now, this part, I have to recreate this differently, and what I usually do is I do it the different way round. I just kneel on top of this thing and take another shot like this, so I can take this second part out. Then I will have to take shots of the pots, and I have to make sure that I catch them in the angle that are one thumb to have. Later on, this will make it much easier when it comes to all the shadows. This little part, then I will have to make one of the bigger pot because, of course, I'm only going to put them in there afterwards. Then the watering can. I might just take two pictures, one facing in this direction and one facing in the other direction, just to make sure that when I'm editing it afterwards, that I have the choice. Then watering cans are only fun when there's actually water coming out of them. I want to photograph the watering cans plus the water, and then, of course, I also have to take a shot of the monster. That's just put it in here very roughly. Preparation is done, now it's time to do the set up.
5. Space & Light: Talking about setup has different aspects. The first aspect is the space where you shoot in. Now, the first thing I recommend you do is look if you can find a space like this wide wall behind me. This is going to give a frayed background. You can edit out certain things in your background but the more you can fix before you actually take the shot, the less time it will cost you in the end because post-processing and editing all these things out can be time really consuming. Now the second aspect, is something that's crucial to photography is light. If this wall that you find is in a place that has really bad lighting find another space. Now for me, this is a really good situation. I have soft and diffuse light, but only for a short time. In case you say If I move here, can you see this is the bright sunlight coming into one of the windows and this is not what you want because it's going to have too much contrast. You're going to have blown out places in your photos where its just too bright or places where it's just too dark. My favorite shooting days are days when it's overcast a little bit cloudy, but still bright. So you get this really soft look. Odd sometimes that's just not what you get, or sometimes you just have to take the light or the day or the time where you can actually shoot. If this is the case, always look that you are in a shaded area so that you have this soft and diffused look. If you need to gather more light into your situation, your best friends are things like these. Form core boards or just big sheets of white paper, because they can do an incredibly great top up reflecting light and in adding a bit more life to your shade, I will shoot a few photos for you so that you can see what I mean and how much difference just a piece of white paper can make. Position your foam core board or your white paper on the side of your composition that's further away from the light. Just like in this illustration. This way, the light, instead of just gracing your composition, is caught on the far end and reflected back onto it. I've taken two photos to show you the incredible difference. The photo on top was shot without using a whiteboard to reflect the light back.The second photo was shot with exact the same settings and only seconds apart but I propped up a white board. Also, very important is that you only have one source of light. If you shoot in natural light, make really sure that all your other light sources, for example, lambs that you have, that you shut them off because this will give a mix of lights, which just doesn't look nice and is also really tricky to edit out. Here's another example with the setup I've shown you before. The setting is the same in both photos, but on the photo on top, we only have natural light. While on the bottom one, there is an additional artificial light source on the right. In the first photo, we have the same bluish hue of the daylight all over the photo. It just gets dark freyed way daylight sources. The second photo is pretty much split in half. The top part has bluish daylight. The bottom part, a yellow, orangey hue from the artificial light. It can be edited but that will take you a while and most certainly much more time than the five second and it takes you to just switch off the light. Another aspect to live is using a gray card. I've only recently started using it but it's a really helpful tool to make sure that you get well a good light situation, a good lighting, good exposure in your photo every time. You can get these rather cheaply online. I'm not going to dive into how exactly I use this but if you have difficulty metering and getting the correct exposure, I suggest you do a Google search on these little things because they are really helpful and also something that makes sure that you do everything right from the start, rather than ending up spending hours in post-processing and just ending up frustrated because you can't get the result because the lighting was just not good enough to begin with.
6. Gear: Next up would be Gear. I'm shooting with a Canon 80D. I can't show it because I'm filming myself with it. I have two prime lenses, the 35, which I'm filming with at the moment, and a 50 millimeter. I love my 50 millimeter, but because my camera model is a cropped frame, it's only suitable for close ups and more detailed shots. For bigger scenes like the one I'm creating today, I'm using the 35 if I can get my camera wide enough away from the subject. If I can't, I resource to my kid lens which is a zoom lens. The quality is really not good in comparison to my prime lenses but when I'm shooting these type of sceneries from further away than the grain that it's not that tack sharp. It doesn't really matter. Most of all, if I posted on a platform like Instagram where you can't look at it in this detail anyway. I'm going to look what I can make happen. My favorite choice would be the 35, but I probably will have to resort to the zoom lens so that I can get the entire scene into my frame.
7. Styling & Details: Before we actually start shooting, let's make sure that we are prepared really well. One of the final things that I want to look at is the details. One of those things is if you're in the shot, make sure that your outfit is something that you feel comfortable with and something that fits the why of the story that you are going to tell. Now, I have chosen this vibrant green top because I wanted to match my [inaudible] and I'm wearing black pants because they will go really well with the black pots. I have a lot of black in the image, which could turn out to be a problem, but I'm going to risk it because I want this really clean, minimal look. Now, into the details. I'm wearing golden earrings. I'm doing this on purpose because the watering can that is going to be in the picture is also golden. Now, I'm obsessed with details, and I think they are what really sets good storytelling good styling apart. I could be wearing silver earrings, but the old earrings they just add an extra lovely touch. Then you might be wearing a wedding band. Now, think about if you really want to have that in, for example, your product shot, or if it's going to be distracting and if you want to quickly pull it off and lay it to the side while you're taking the shot. Then talking about hands. I have rather dry skin and it's a pain to edit that and make it look good afterwards, I can tell you. I usually have some body lotion or some hand cream and I moisturize my hands, my feet, my arms, basically every body part that I show in the photo because it again saves me so much time in post-processing. Something else that I can't live without is a lint roller. Because you can edit out all these little specs from your clothing, from textile products, but it's just so much easier to get rid of it beforehand. I always have a lint roller close to me. I also always have some window cleaner and some paper just to wipe off smooth surfaces because there could be fingerprints on them. I can edit them out in post-processing, but again, it just takes me a few seconds to do it before. So just everything that you can fix before you take the photo, do it.
8. Shooting: We have completed our set up. All the things that we might need are ready to grab. We're also all fixed up. Now, how do we take this photo? I'm going to tell you how I do it with my DSLR. But just so you know, the first self portrait that I did for my business. I wanted to have myself holding my camera in this image. At that point, I only had one DSLR, so I was left with no other option than to shoot the image with my iPhone. I propped it up somewhere so that it will catch the right angle, I download one of these apps that lets you time your photos and also let's you shoot multiple photos in row, and I worked with that. Just to say it's possible. It absolutely is. The way you could do it with your DSLR is just also set the timer and then run for your life. If you have more complicated positions, that's just not an option. This is where remote shutter release comes into the picture. Some of them are wireless, some of them need to be plugged into your camera. It depends on what kind of model of camera that you own and what is possible to match with that model. If you have a newer camera model, like I have, it will probably have wireless capabilities. This is what I love most. I can tether my camera to my iPhone. Canon has a special app for that, the Canon Connect app, and through that app, I can control all the settings in my camera. It is a bit slow on selecting a new focal point but I'm very happy with it and use it all the time. But even with remotely controlling the shutter of my camera, things can get a bit tricky. When I only have one of my hands in the photo, there is no problem. I can just press the shutter somewhere out of the frame of the picture. What do I do if I have both my hands in the frame? What would I do is I set the timer here on my phone and then I usually let my phone drop away onto a chair or I just plug it into the waist band of my pants, where it's usually out of frame. You will have to figure out what works best for you, for your workflow, for the type of things that you want to shoot. For this shot, I think I'm just going to use single shutter releases and switch my phone around because as I've told you before, I'm going to compose this image out of a lot of different photos. There will be one photo where I focus on the positioning of my right arm, then I can just hold my cam here in the left one and in the one photo, where I will look in detail at the positioning of my left arm, I will just press shutter with my right one. That's it. Now it's time to actually start shooting.
9. What's Next?: As I've said in the introduction video to this class, this is Part 1 of a two-part class and it's a wrap for part Number 1. I will release a second class covering my entire editing process for this Photoshop composite in the next couple of weeks. To make sure that you don't miss it, hit the follow button next to my profile picture. Because this way, SkillShare will notify you as soon as I've uploaded my class. Thank you so much for watching. I can't wait to see your class project. See you very soon. I'm leaving you here with a little sneak peek at the upcoming editing class.