Transcripts
1. Introduction to WordPress Course: Hello, everyone. My name is good us and welcome to my ward. Press scores in the scores. I will teach you how you can easily create your war Press block. If you are a beginner and you don't know how everything works, don't worry because I will explain you everything you need to know. In this step by step course, you'll learn where to get your the main aim. How to set up your hosting, how to use WordPress, how to add content, how to use a war press text editor and much more as well. At the end of the scores, I will share with you some search engine optimization tips for beginners. But that's not all, because I will show you how to use Google Search Console and Google Analytics. These two things are very important. If you want to have a successful block, as you can see right here, this is how our finished product is going to look. I created this block for discourse and by following my lessons, you will be able to create a similar wraps it, of course, the whole customization part will be up to you so that you could great your unique looking blob. Once you have strong foundations, you know how to use teams and plug ins. Yaar customization options will become limitless. If you will face any problems or have any questions, you can join war. Please explain. Group and members of the community will help you. So if you're ready, we can start the course.
2. Domain Names, Hosting, And WordPress Explained: I will start discourse with some basic information, which is more for beginners. I will talk a little bit about the main aims costing and war press itself. So let's get started. All right, So first of all, what will you need? You'll need a domain name. It's basically just the name of your rap set. For example. It can be google dot com, facebook dot com or any other. So it's completely up to you. Next thing you're going to need Webcasting. So basically, just gonna be a place, a server, where we're going to keep all our files. Third thing, you're going to need SSL certificate. Of course, it's not necessary. But if you want to have a professional looking website, are highly recommend you to get one, and in most cases you can get it for free. If you're not sure what it is, maybe you remember in the past it used to be that green padlock next to https nowadays and Google Chrome, there's just great padlock which indicates that connection is secure and the website has SSL certificate and last thing. We're going to need content management system. Since this course is all about WordPress that's exactly what we're going to use. So let's talk a little bit about the main aims. On the right side, you can see the most popular top level domain Knicks T. L. D s are basically just ending off your absent. So, as you can see, the most popular one is dot com, the 2nd 1 that net that go the Thorgan. So there are plenty of them, but these are the most popular ones, and I would like to share with you some tips for choosing at the main aim. So, first of all, if possible, always shoes dot com because it's the most popular one and is the most recognizable one. And if that the main aim is not available, the next best option would be dot net second tip. Make it short. Don't go over the top it along the main aim. There's no need just make it short and simple. The best case scenario would be keep it under 15 characters next to make it easy to pronounce and spell. This one's quite important. Let's say somebody finds your website and that person things that you have an awesome looking website he would like to let his friends know about your Rapson. And if you're the main aim is gonna be difficult to pronounce and spell that person. He's gonna have tough time letting his friends know about your website and last it would be a warrant. Hyphens. Yes, I understand. In most cases, it's gonna be difficult to find a ride, the main aim and because most of them already taken and people tend to go with hyphens between the words if they cannot find a certain remaining Ah, why that Don't do that because you don't want to make your the main aim looks sketchy or spam so a wide hyphens for embarassing. I'll be using hostin ger. And if you will use code WP 10 you'll get 10% discount off annual plans except it doesn't apply for single share hosting plan. And then the next lesson, I will show you how to set up your hosting. So we're going to use war press as out content management system. And actually WordPress is very versatile. So using this content management system, you can easily create blog's e commerce websites. And if you can create e commerce upside, you can even great drop shipping business or print on demand business. And the last thing you can create business websites. Actually, war press, you can create almost any type of website you can imagine. All right, so now you know a little bit about the main aims costing and the WordPress itself. From here, we can go and set up your hosting.
3. Setting Up Hostinger Web Hosting, Installation of WordPress, SSL Certificate: So for discourse, I will be using hosting ER as my hosting provider. And let's start this lesson by selecting our hosting plants. So, first of all, you want to scroll down until you see this section, and I guess several select premium shared hosting plan for discourse because, as you can see, we will get unlimited number off websites and is going to be very useful. If you will decide to host multiple projects. Let's see multiple websites using this Austin. Also, you will get unlimited email accounts and limited ban it and all other parks as well, which will be very useful. So let's add it to the card. And as you can see from here, we can select a different package. So, as you can see, there's like one month package 12 months 24 48 I guess I will select well months package. And from here, as you can see, there are like some other features available. If you want, you can add daily. Backup says you can see it's going to cost you about $1 per month, so it might be a good choice for beginner, but I usually never choose any of these extra features because usually I don't really need them. So let's add a free the main, because with this lasting plan, we will get a freedom in. So just gonna enter a random, the main aim to see if it's available. And like I mentioned you before, I highly recommend you to choose T. L D, which is dot com, because it's the most popular one and it's the most recognizable, So I'm just gonna choose dot com and let's click Search. If this domain name is available, it should be added to my shopping card. All right, Perfect. It's available. And as you can see, it was added to my shopping card, and it's going to cost us just $0 as well. I highly recommend you to choose this option. It will hide your personal information from your domain name. And because you want to keep your personal information, private energy is going to cost you $5 per year. So I highly recommend you to choose this option because I always choose it myself. Let's go to check out section and we can enter discount code by clicking right here. Let's enter it. It's ah WP 10 and let's click. Apply it and that's good. As you can see, we got almost $15 discount. So from here, check out procedure is very simple, and I'm just gonna skip to other part. So once you've finished all check out procedure and you logged into your hostin ger account in the home section, you should be seeing these three things that you have a shared hosting plan. You have a Cecil certificate and the domain. You shouldn't be seeing all these other things. He's all free. And this one, these are other projects of mine. So first things first we should set up. I'm hosting to do this. Click here, so let's click. Start now and you can choose what you want to do. Maybe have a website and you would like to migrate to Ha Stinger. If it's your case, you should click this one. But since we are creating a new blogged, I will click here, build a new website so we have some different platforms available. Let's say if you're planning to create equal Merce website with war press, you should click this one. But since we yeah, creating just ah regular WordPress blogging we can I select WordPress. All right, so here you should add your email, which will be used to log in to award press dashboard and set up your password. And once you finished, just click. Continue. If you will use any of these templates. Depends what type of website you're planning to run. It might be much easier to create your website and you would save some time. But since be a creating WordPress blow from the scratch, I don't want to use any of these templates. I just going to click right here. And from here we have tad of the main aim Chandler hosting. So if you added a freedom main when you were purchasing your hosting, it should be added right here. But if you have another domain, let's say you have the main on Go Daddy, you can click right here, select, and you will add your domain. Since I already have registered the main aim on hostin girl, I'm just gonna choose this option and right here you should add your details. And once you have completed this, just click finish the main registration and from here we can choose on a server location. So if you're wondering which several location you should choose, Actually it's very simple. Let's say majority of your traffic is going to be from United States. So obviously you want to choose several, which is located in the United States, and the same applies for any other location. Let's say majority of traffic is going to be from Europe, so you should choose Europe. So basically, if the user is closer to your several location, the website is going to load a little bit faster for him. So that's the point off choosing several locations. In this case. I'm just gonna leave as it is. I'm gonna choose Europe. Netherlands. Once you have chosen location, just click. Select. If you want, you can fill up this serving. But I'm just gonna skip this part. So it says you're upside will be ready in a few moments. Just wait a couple of minutes. Website should be finished very soon. No, not this again. See says your website is red. So basically about a few clicks we created our website. All right. But just before we log into a WordPress admin panel, we should install SSL certificate, the one which we got for free. So we should go back to control panel. Let's click. Run here and here. Click domains. So before we can install our certificate, we have to complete our domain registration. Just Philip all the information and click set up. And after you have done this, just go back to control panel and you will see this message that the main status waiting for activation. So you should read until this message disappears. It might take up to one hour or maybe a little bit more. And after you refresh the page, it should disappear. So right, Once you don't see any messages anymore, we can install SSL certificate. So to do this scroll to the bottom until you see SSL click right here and you should see this option click install after the all installation is complete, you should see this Rendall and it shows that you have a system certificate. But before we can go to our website first of all, I would like you to go right here, click on WordPress and select dashboard. And if you see the option force https is an active, you should activate it. Once you have done this we can go and check out our website. If you did everything correctly, you should see this great padlock next to our domain name. It indicates that our connection is secure and now absent has SSL certificate.
4. Hostinger Control Panel Walk-through, Important Settings: in this lesson, I would like to walk you through the most important H panel settings. I understand that from the first glance, it might look a little bit confusing because there's like a lot of settings available, but I will show you the most important ones and which you might use in the future. So let's start for the WordPress section. Let's go to the dashboard and right here. Probably one of the most important settings is forced https. If it's an active, you should activate it, because this way we will force our website to load secure connection with https, the next setting flush gas She. Basically, this setting controls the plug in this plug in, which was already pre installed to our WordPress, which controls caches settings. Basically, this Blufgan helps out, perhaps it to load faster, and you can access all these settings in the WordPress panel. Later on, I will show you how it's done, and from here we can move on to plug in section. Also, you will be able to access all plug ins in your WordPress panel, but it's very convenient to have this option right here, because, let's say in the future, and then you install a plug in or let's say you update plug ins. Suddenly your website doesn't load, it starts to crash and you're getting error messages. So probably that means that this issue was caused by a plug in which doesnt work with your WordPress version. Or there could be other reasons. But by going right here in the plague in section, you can easily deactivate that plug in, and you can fix this issue. So let's go back to dashboard in order section. Probably one of the most important settings would be upgrade, so let's click on it. So let's say once you start getting more and more traffic to your website or you have installed so many plug ins that your website doesn't have enough resource is to work properly from here. You can easily upgrade your hosting. You can choose a shared hosting plan, or you can use cloud hosting plan. Of course it. If you want, you can choose VPs, but it's way more complicated than shared hosting plan or cloud hosting plans. So from here, once you click on the view plants, you will be able to choose a more powerful plan so this way you will solve the problem off . A slow loading wraps it, but when you are starting at, you shouldn't face any issues. So let's go back to dashboard and account section. You can check your details. You can change your password. We can move on to email section. So later on in another lesson, I'll show you how to create your business email. So right now we can skip this section in the main section. By clicking this option, you can add more websites to this costing plan, so let's click right here. And as you can see by adding your domain name and selecting password, you can add as many websites as you wish. Basically when we were purchasing our hosting planets, said Unlimited weekend host on limited number of 56 So basically, from here you can add as many of absence as you want. So, for example, added one website for demonstration. So once you added a website, you can switch between map states by going right here and choosing the domain name, which you have added. So as you can see, I have WordPress course and I have this website, Gocha Planet, so Let's go back to dashboard, for example. Once this rich from one domain to other, let's say I'm going to switch from WordPress scores, which is being displayed right here. Let's say I'm going to choose Gocha Planet so as you can see once, ah, switch to other domain. I'm doing changes to this domain, so it's being displayed right here. And if I would decide to install Ah, war press, I would be doing changes to only to this domain. So let's go back to our WordPress scores and let's see other settings. So now you are familiar with domains and with a website section, basically, we can use it install content management system like WordPress. So once you go to auto installer, you will see available content management systems, which you can install to your website. So, as you can see right here, WordPress course has award press and here are some other content management systems. But since the scores is all about WordPress, I will be talking about war powers. But for example, once you add a website once you had another wraps it to your costing, you can switch This website right here is him as I mentioned you before by clicking to another domain. And by using auto installer, we can easily install WordPress to this domain. So we would have to click on the WordPress. And from here we will be able to install WordPress to our wraps it. But since we have already installed war pressed to WordPress scores, we can switch back to WordPress scores and we can go back to the dashboard. So let's scroll down. So you are already familiar with this section? So, as I said, probably one of the most important settings which you might use this order installer and we can go to file section. So basically, you can use this section to access all your files. You can access plug ins, themes, media files or even WordPress files itself. You can do this in two ways by creating FTP account, so you would have to use such program as file zilla to access your files using FTP account . Or you can do the same by clicking right here. Once you click right here, you would have to go to public html and right here you can see all of your files. So basically, these are all files, which great your wraps it. So here you will find plug ins themes word breast files itself. So basically, you can download plug ins. You can upload, you can delete them, or you can basically delete all of your files. And yet this is how you can access your files so we can go back to the dashboard as a felon file section. You can do backups off off all your files, and from here we can move on to databases. So basically your website is created out off two sections. The first section is going to be all your files and your wraps and has a database were like all information. All settings are being kept. You can access such information as users data, Bow's comments and all other information, which is basically a data off your raps. So by clicking on database, you will be able to see your database, which is being displayed right here by clicking here can do a backup off your database and let's go back Teoh Dashboard and let's scroll down and you can access your database by clicking on PHP madman, and you would have to click enter my PHP admin and basically, from here you will be able to access your data. So I usually never used this option. I have used it in the past to export all data when I was moving to other hosting. So to do this you would have to download all your files, and you would have to export your database so you could move your website to other housing . But when you are a beginner, probably you will not use this option very soon. But it's good to know where everything is. So let's go back to the dashboard. And now you are a little bit for Miller with files and databases. So basically, files all files off your wraps It it can be Plagens themes, media files or even war press files. And all data is being stored in your database, which can be access right here by clicking this section and you can export it or you can import it. It's completely up to so we can move on to a different section. And as you probably remember, we used SSL section to install our SSL certificate, and probably one of the more important settings is speech be configuration. So by clicking right here, you will be able to change your PHP version. So if it's not sent to the latest one, I highly recommend you to choose the latest speech. Be version because it's a good practice to keep everything up to date, and it will make your website load a little bit faster. So since you are familiar with this information, we can go back to dashboard and let's scroll down and let's see what other settings might be important and most likely in the section, which is named other. You will not be using any of these settings, so I guess there's no point off talking about it. So, yeah, these are the most important settings which you might use in the future and the understand it. From the first glance, it might look a little bit confusing because there's like a lot of settings, but most likely you're going to use these settings, which Allard explain to you. So, yeah, these are the most important age panel settings
5. How to Create Business Emails: in this lesson, I will show you how you can easily create your business email. So once you have logged into your hostage your account and you are in the home section, we have to access how H panels. So if you not remember how it's done, you should select your housing and click manage. From here, you should go to email account section and right here you can create as many email accounts as you wish, because we have dreams shared hosting plan and we can create as many email accounts as we want. So let's start by selecting the name off our email so we can add like support at the your domain dot com. So just gonna add support and just enter your passport. And once you have done this, just click rate. And as you can see, I just created my email account. It's going to be support at the WP course, Axel Wise set, and as you can see Ryan here in the bottom, we can choose other email hosting plan. But for one business email, it's going to cost us $1 per month. Of course, you're going to have a little better looking email inbox. But, ah, we can go ahead and access our email and see how it's going to look. So let's go right here. Let's click email and this is it. As you can see, this is how your email inbox is going to look. It's quite simple looking email inbox, but it's quite easy to use and you can easily receive and send emails. In most cases, it's more than enough, and if you are using a premium shin housing plan, you can create as many 1,000,000 boxes as you want.
6. How to Point Godaddy Domain to Hostinger (Optional): in this lesson, I will show you how you can point your domain name to Hostin girl. So then we were setting up our hosting. We were installing WordPress. We were asked to name our website and we had two options. We could choose at the main aim which we already had on horse Stinger. Or we could choose. Use an existing the main soon, if you can. An existing the main. Let's say on Go Daddy, you had to choose the Previ assumption. So once it shows that option and all installation is complete, all they have to do is go to your house stinger dashboard to H panel and click on details. And in the very first section you will see name servers. So you want to copy dese to name servers. And once you have done this, you should go to your go dad account. And once you're here, go to your profile and select manage domains. So in this section, just select your domain. Click right here and select managed Dennis. And all we have to do right now is just change name servers, So click change and pays the servers, which we copy. It previously And once you have done this, just click save. So it can take up to 24 hours for these changes to work. In most cases, it doesn't take so long. And just like that, you can easily point your go data domain to hostin ger. But let's say you purchased a premium shared hosting plan. And now you want to host another website on horse singer and you have a domain name which you have on Go Dad, for example, you can add another website to your hosting. Of course, if you have a premium shared hosting plan and to do this you would have to go in domains and click add website from here, all you have to do just enter the main aim and select a password. Once you have done this, just click had. And now we can go back to our dashboard and again from here. We should go to details and we should cover these name servers. Once you have done this, you should go to go, daddy. And just like we did the previous time, you would have to go right here and click managed in this and from here, all you have to do. Just change. Name servers based the name servers which we copied previously and click save. So again, it can take up to 24 hours for these changes to work. But in most cases, it doesn't take so long. So this is how you can point Go, Daddy. The main to ah ha Stinger account.
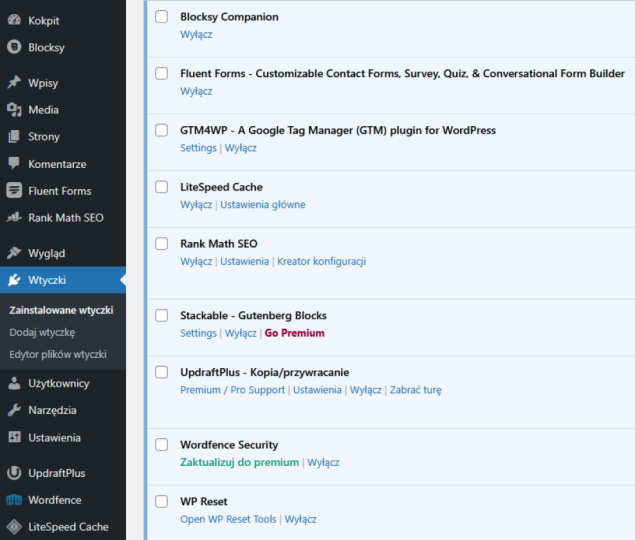
7. Introduction Into WordPress Dashboard: to access your WordPress dashboard. You want to go to your Ural right here and at the end of it, type slash WP dash, admin and hit. Enter from here. Just enter your user name and email address, which we created previously when we were setting up our hosting account and we were installing war pressed. So once you have finished adding your email address and password, you can check. Remember me and click login. All right. So before we start adding themes, blag ins content to our WordPress block, I just wanted to walk you through all the tools which are right here in WordPress dashboard . So let's start with the dashboard and the home section. As you can see in home section, there is not a lot off important settings, just like you can see common sanctity rants which are happening near you. Basically, this section is not were important, but the second section updates is quite important. So right here you will see available updates for your themes, plug ins or even your war pressed. So it's a good practice to keep everything up to date. So once you see available updates, don't ignore them. Just update the plug ins or frames, and yet this is a good practice, so don't ignore de ser commendations. Boast section is meant for block boats so you can check all post. You can add new. You can create categories. You can add tags. So later on, I will show you how to add New Block boasts how to use war press text editor on all other information. So this section is meant for block posts. And this section media section is meant for your media files like images and videos so you can add the new photos. You can check the library, and once you click, you will be able to see all your media files right here. And of course, you can add new files by clicking here or there in pages section. You should keep important information for your users. Like, as you can see right here. This one was created by default privacy policy. Such information as about contact US page. Let's see if you have any calmer store, maybe you could add such pages shipping and delivery, other page like returns and refunds. So all these pages, which might be important to your visitor, should be adding here it's completely different from block boasts. All right, in common section. Basically, you will be able to see all the comments. You can add them to the trash. You can move them to Spam folder. You can edit them. Reply to these comments and right here in offer section, you will see who have this comment. Usually there's like a name, so this should be name, and some people even leave their website address email and under the email address, you should see an I P address. So in this section you can moderate all the comments. So this section WordPress forms this section and that section. These are just plug ins. They came with our hosting. It depends what hosting services you're using. Most of them they have different black in spring stalled by default. So as you can see how Stinger has war press forms all in one war, press, migration tool and lightspeed cash, it like an appearance section, is all about appearance. So from here we will be able to add new themes. We will be able to customize that theme and indigent section. Basically, Ridge. It's like small blocks off information which you can display in various places off your website once we install a certain female going to have even more widgets, which we will be using in a certain places off while website in Menu section, we will be creating menus like Footer Menu, Main Navigation menu and so on. The background section is not very important because it goes together with customization section and we will not be using female editor because if you are just beginning and you're starting out Ah, real adopt. But you will ever need to use this section maybe in the future, but ah, child theme. But not for now and playing in section we will be adding new plug ins. We can check all install plug ins right here. So, as you can see, we have some active and inactive plaguing says you probably saw before in H panel settings . And yet we can use this section tad new plug ins and we will not be using plugged in editor just like we are not going to use Team editor is basically these two things side the same. This one is meant for editing themes, and this one is meant for editing code off plug ins. So instead we will be using customization settings, and we will not be editing and any code ourselves in user section, we can check all users. As you can see, I'm the only one user right here. So I'm administrator. We can add new users. You can fill up the form and choose the roll off a new user. If it's going to be subscriber contributor off or editor or administrator and your profile , we can do some changes to my profile. We can change and man color scheme, but I'm just gonna leave it as it is. A tool section is not very important. You can use it to import and export war press settings and basically export personal data. Check the side health, but I usually never used this option later on. Once you install some plug in surfing's, there might be added new tools, new sections. So you had this section for now is not very important all in one WordPress migration. Like I said before, it's just a plug in this particular play Guinness for migrating your website from one hosting to another. This is the plug in you can use to migrate your website in setting section. Later on, I will talk a little bit more about all these settings which are the most important settings. And this section, like I mentioned you before, is a plug in. We are not going to do any changes. This cash it leg and helps our website to load a little bit faster for our users. And they were not going to do any changes whatsoever because everything is good by default . So since now you know every single tool right here, we can move on to other lessons.
8. Important WordPress Settings: in this lesson, I will show you the most important war press settings. So you want to go right here in setting section and let's start with general settings in this section. We don't really need to change much, but there's like two important fields the site title and tagline. So let's give a title tell Website and our tagline should be relevant to our title. All other settings are good as they are by default. They are not very important if you want it, so it's completely up to you. You can change date, format, time format and all other settings like you can change that. You can even change the side language. So yeah, once you have added your side title and you gave a tagline for your website, just go down and click Save changes and riding section. We don't really need to do any changes. Everything is good as it is by default, and we can want to reading section Reading section as well is not very important. We are not going to do any changes for now. Later on, I will show you different home page display settings. Eso What is the difference between your latest posts option and the static page option. But for now, we can leave it as it is. We don't really need to change anything, and we can move on to discussion section and discussion section is actually everything about Commons. So I know it might look confusing cause there's like a lot of different settings, but actually you can leave it as it is by default. You don't really need to do any changes unless you can check this section so only logged in and registered users will be able to leave comments. And, ah, I would say the most important section is this common block. Eventually, you will start getting spam comments. These comments are going to be shown right here in common section, and you'll have to delete them. But you can add these comments to block with. Usually when user or bought leaves a common. There's always at it such information as name your L email address and I p address. So if you find the any spam a commons just at I P addresses right here one i p address or email address per line and just click save so right here in discussion settings this section block list, I would say, is the most important one. We can go to media settings and in media settings. Everything is good as it is by default, and we can want to Perma link settings. So this section is the most important off all settings, because by default it's set to plain, and it doesn't do any help for our search engine optimization. Basically, the link is like a nonsense, so you want to change it to post names because you'll have better chances to rank higher in Google searches. ALS. So once you have changed to Post Name, just click save changes. And we can want to privacy settings and only have to do in privacy settings just like privacy Policy Page. If it's not selected yet, so later on, I will show you how you can generate your own privacy policy for free, and we will be editing this page, which was created by default. We will add our own privacy policy, So if it's not set, just select the privacy policy and quick use this page in light speed. Cash settings were not going to change anything because everything is good by default and as I mentioned you before this lightspeed cash leg and will help our website to load a little bit faster for our users. So, yeah, these are the most important settings which you should pay attention when you are creating your WordPress website. Basically, there are only two very important settings. The 1st 1 is Ah, a couple of fields in general section and the 2nd 1 is the most important one is Permal ING settings.
9. Themes and Plugins: So before we start installing themes, adding planets, I just want to show you how our finished product is going to look. So I created this WordPress block using a free theme, which is called Bam, and I was quite surprised because this team had so many customization options, even faux. It's free. I was able to create a nice looking foot. Er. It was kind of surprising because most of the free themes they don't even let you to create a footer. As you can see, right here, we have three different sections off information. And let's say once you click on a certain page, we're going to privacy policy page. Later on, I will show you how you can easily generate your own privacy policies. So this is how everything is going to look. This is how contact us Page is going to look, and once you click home, we'll go to home section. So right since now you know how our finished product is going to look. We can start installing themes, and I will show you how everything is done. So all right, this is how our website looks now. These are all the false settings and to add a new theme, we should go to our dashboard and select appearance and click teams. All right, Once you are here, just go click. Add new. And as you can see right here, we have some different themes. And once you click on popular ones, we get about 4000 different teams. So you have, ah, huge variety of themes which you can use. But I must warn you, because when you select the theme, of course these themes are all free, but all of them they have paid versions as well. So once you select a free theme most of the time you will have a very limited customization settings available later, we'll show your place whereby all of my premium themes I will talk a bit more about important factors when you're choosing one, and you will see that you can get a quite good looking themes for a very low price. But for this course, we will be using FEMA, which is called Bam. So just go to search and enter bam and just click install. So once the installation is complete, click Activate and let's go back to our home page and let's see how our website looks now. And as you can see, it doesn't look very good cause that we still have to do some customization settings. And the second thing which I would like to show you, is how to add plug ins. So now we know how to add a theme and they will show you how to add plug ins So we will be adding one particular plug in which we will be used for S U. So you want to go to plug in section and select add new From here. All we have to do is just go to search bar and type s CEO hit enter and you want to install this plug in the very 1st 1 hit install. Once the installation is complete, click activate And here you will see this newly installed plug in and in this section you can see all active and inactive plug ins. So the settings of display gin were added to our WordPress panel. As you can see right here for now, I'm not going to show any settings because I will show you everything in another lesson, which will be about search engine optimization. So the goal of this lesson was to show you how you can install themes and how you can add Blufgan. So next time when you will need to install some plug ins or at new teams, you would know how it's done.
10. Premium WordPress Themes: all right, so in this lesson will show you where you can look for premium themes and where are by most of my themes, myself. So this website is called, as you can see, team forest dot net. So once you hear, if you want, you can look forward, press block themes. And as you can see, we have over 6000 different themes. So, as you can see, you can get a nice looking for him for $19. And there are a couple of very important factors which you should consider before purchasing a premium themes. So, first of all, you should check how many reviews it has doesn't have a good reviews. Usually, if the theme doesn't even have a least four stars, another by these type of themes and it should have at least 10 good reviews. So as you can see, this team doesn't cost much. It just cost $19 it has a five star rating and the 50 good reviews. It has 3.2 K sales. So usually if ah, certain team doesn't even have at least couple of 100 sales on by these teams, and the most important thing is Ah, you should check. When was the last time this film was updated? So this film was updated not so long ago. And this is very important because you don't want Teoh purchase an outdated team because it might not work as expected, You might have some issues with it and so on. So we can click on this female check how it looks. So to do this, you want to click live preview and from here we will be able to see how this team is going to look. So basically, if you're going to use this for him, you will be able to create this type of blog's. As you can see, there are some different styles available. Of course, it doesn't mean that these are the only styles which you will be able to use because you can create your own unique look. But for example, if we would purchase this fame which caused just $19 we would be able to create ah, blogged which would look something like this. So, as you can see, this is quiet. Nice looking blogged. So let's say you like this female. You want to purchase it and have it on your website, so installation process is a little bit different. So let's say once you have purchased this theme, you should go to your profile and select downloads. As you can see right here, I have some teams, some plug ins which are previously purchased, and for example, let's say this is this is going to be your fame and first of all, you want to download it. So to do this, you you would have to click right here and select unstoppable war press fire only just clicked download and the ones who have downloaded this file you should download this license certificate and purchase coat because you will need a code which is going to be inside that pdf file to activate a certain team. So once the download has completely, we can go to our war press website and to install that team, we would have to go right here in a parent section, click teams one more time and click add new. So instead for searching that team in this whole list, we would have to click upload theme and you would have Teoh upload that zip file which we downloaded previously. As you remember it was called Unstoppable Ward Breast File on Lee. So we want to add this file in here. Click install, and once the insulation is complete, you will get a message. If you want to activate this fame, just click activity and one's The activation is complete. You should get somewhere a notification that if you want to use that for him, you have to add your purchase coat. First. Just click on that message and open that pdf file, which we downloaded previously and just entered that coat. That's it. As you can see, it's quite simple, but most off team creators the usually charge for this procedure about $20 or $30 but you can do it yourself.
11. How to Create Pages and Categories: all right, so in this lesson, I will show you how you can create pages and create post categories because we will be using these pages to display in our footer section, and we will be using categories to display them in our navigation menu. So first of all, we can start by creating some pages to create a new page. Quick add New and the pages which we're going to create are going to be about contact us. Also. We will great terms of use, and we are going to edit a page which is called privacy policies. So first of all, we can create a page about So we have to do just add a title, and right here you can add some information about your blood. So I have some text ready, of course, is just a random text. As you can see, we have two different blog's with two different paragraphs one block and the second block. So to add new Block, you would have to click right here paragraph and just entered information. If you want, you can even add the header for a certain section. Let's say you could and history and to make it a header. You would have Teoh click on this block section and change it from paragraph two heading. So this is how the information is added. Let's say you want to add an image to this about page section. All we have to do just click right here, plus, and here you will see all the blocks available. So let's say we can add image. We can add gallery. We can add different columns. So, as you can see, we have lots of different blocks available. Speech break, paragraphs on paragraph. You can add various information as know heading section is for headings just like the one here. You can add list. Let's click on the list. So this way we will add a block off list just like this one. If you want, you can add image to do this. Just click right here. Image and only have to do is just click upload. So, yeah, I just added an image. We can change the placing off this image. You can choose center alignment. You can choose right alignment, or we can go back to center alignment so you can add images. You can add various different blocks and most of the time you're going to use such blocks as paragraph heading, maybe some images, maybe some columns. When you're creating columns, let's say, Let's click on these columns So we have some different variations. Let's say we want to have two columns. One cyclic right here and two columns will be added, and me can add information to these comes. We can add a block. So again, once you click, add a block. We have the same options available so we can again add paragraphs. We can add images. So let's say let's add one paragraph off text. All right, so there's gonna be one paragraph off, Texan. Let's add an image. So to do this, you want to select image and we can choose from Media Library. All right, I'm just gonna choose this image. Click select the And as you can see, this way, you can add different information different blocks into columns. So if you need to add some more information, just go here and select what type off information you want. Ad. So here we have most used blocks. Here. You can choose from common blocks. You can add various other elements so it's completely up to you what type of blocks you want to have to your pages or your block posts. Later on, when I will be creating back posts, I will talk even more about these blocks. But for now, I just wanted to show you what, ah, the most commonly used and how to use them. As I said, it's complete up to you what type off blocks you want to use and just explored yourself. If something doesn't work out, you can always delete and start over. So, yeah, once you have done creating your about page, we can preview of it once you click around here. As you can see, this is how our about page is going to look. So let's go back. And once you have done creating your about page click publish or you can just great pages without any content and later on, we will edit this content. We will do changes to it because you can added these pages. So once you have created your about page, we can go back and create page terms off use so again to create terms of use. Page this quick add new Let's give a title and just that information. I'm just gonna create blank page terms off use and she's gonna click, publish, and right now in the page section, we're not going to need simple page. This one was great. By default, we can delete it. And just like that, I will add the last page, which is going to be contact us. I'm just going to create it without adding any information. Also would like to show you how you can generate your own privacy policy. So to do this you want to go a website privacy policy. Generator that info and I hear just Philip your information. Once you have done this, just click next, and in this section we will have to answer to some questions. So do you use cookies on your website? Maybe in the future you're going to decide that you will use cookies for, Let's say, creating retargeting ads for running ads so you can select the answer. Yes, maybe in the future you are going to use. And the the second question is, Do you show what advertising true Google AdSense on your website? So let's say if you're planning to monetize your blonde with AdSense, you should select yes, and if you are going to use any other advertising platforms to monetize your block, you should select yes as well. So once you have answered these questions this quick next and select Country State and enter your email address. Once you have finished adding information, just click. Generate my privacy policy. And once it's complete, just copy and just click this copy text to clipboard and we can go back to our privacy policy page. So all right, this is our privacy policy page. We can click an edit it. So all we have to do right now is just select all the text, which was created previously because we're not going to use it and click, delete and let's based on the information which we copy it previously. So, as you can see, this is our new privacy policy, which we generated ourselves for our website, and once everything is finished, just click update and we can go back to the list off our pages. So, as you can see right now, we have four different pages, and as I mentioned you before, these pages are basically information for our vistors, as you can see, they will be able to read information about us about our blogged. They will be able to contact us later. I will show you how to add contact form to contact us Page. They will be able to check out privacy policy and terms off use policy. So the goal of this lesson is to show you how to create pages and how to edit pages. So once you have created these pages, later on, we will be adding this pages Joffe footer. But before we do that, we should create some categories. So we are going to use categories for publishing our block posts. So our block pose, they're going to have a certain category. They will belong to a certain category and to create categories, you want to go to both section and click categories by default, we're going to have one category on categorized and we cannot delete it so you can change it to any category which you're going to use. So, for example, this block, which I'm creating right now, is going to be about WordPress courses. So I'm just gonna call this category as war present to do changes this quick, quick edit, and I'm going to change it to Ward Press. The name is going to be displayed once you go to that category and the slag is going to be displayed in our u R l. All right, So once you have finished doing this just quick update category, and right now we can add some new categories. So it's up to you what type of categories you're planning to have. So right now I'm planning to have in total for parent categories, and I'm going to add about four child categories. So first of all, I'm gonna add parent categories to added all we have to do just at name slug, and that's it. And click add new category. So as you can see, right now, we have two different categories, and these are pattern categories. So just like that, I'm gonna add to other category says Well, so as you can see in total, I have four different parent categories, and now let's say I want to add to different child categories for my war press categories. So in WordPress, I would like to have such categories as themes and plug ins. So, like I said before, it's completely up to you. How many parent categories you planning to have or how many child categories you're planning to have? So for this demonstration, I'm just gonna add plug ins as a child category to ma war press category. So to do this, you want to go right here again and just give a title and a slug to that category and this time, instead, clicking at new category, we have to select pattern category. So just click run here and select parent category. So in this case is going to be award. Press and lunch is gonna click. Add new. So just like this, I'm going to add some more child categories. So right, this is how my tree off categories is going to look. So, as you can see, I have four main parent categories and I have a two parent categories which have to child category siege. All right, so since now you know how to create pages and edit them. You also know how to create categories from here. We can go and create menus
12. How to Create Contact Us Page: As you can see, this is how our contact that's page looks right now and our vistors, basically, they don't even have a possibility to contact us, so we should do some changes to it. So first of all, let's go to our dashboard, and we could use WORDPRESS forms to create our contact us form. But instead I would recommend you to go to plug ins and click add new. We will add another plug in for our forms, and all we have to do is search for ninja forms. So just install this plug in and activated. So once you have activated this plug in, we don't need WORDPRESS forms anymore. So we could go here and deactivated, and we can delete it as well. All right, so now we can go to our ninja forms, click on dashboard, and as you can see, we have contact me form already created for us. So all we have to do right now is just do some changes to this form so quick, right here and click head. As you can see, this is how our form is going to look. But first of all, we should do some changes and we should hide this title off our form. So to do this, go round here in a divine section, display settings and disable display form title. So once you have done dishes, click done and hit. Publish. Let's go back to our dashboard and all we have to do right now is just copy this code copy and let's go to our pages. Let's see all pages and right here we should select Contact us and let's click, add it. And once you're here, all we have to do is just face that code, which we copied previously, and we can preview our contact US form. And as you can see, this is how our contact US form is going to look, so our visitors will be able to contact us using the swarm. We're going to receive email messages to our administrators email address, the one which we used when we were installing WordPress. And if you are fine with this form, you are fine with with the way how it looks. We can go back to our page editor and you can click update, but let's say you would like to add your email address as well and the phone number to this form, so you should go here. Click, add and select layout elements, and from here, click on columns. Let's elect two columns and here we can add some text so we could add, Let's say, our email address. And in the second column we could add our phone number. So again, let's click on paragraph and let's enter our phone number. All right, so once you've done, we can go and preview our contact us page again. And as you can see, this is how it's going to look. And if you're fine with the way this form looks, we can go back, and all you have to do is just click update. Just like that, we created our contact US page.
13. How to Create Menus: So once you have created some pages and added some categories, we can go ahead and create our main menu Right now, As you can see, our pages are being displayed in our main menu. But instead of pages, we could display certain categories in our main menu. So to do this, you should go to your dashboard and in appearance section, select menus. From here. We have to create our menus. So let's name it Main navigation menu and click create many. So to this many, we can add pages. So these are all pages which we created previously. As you can see, we have contact as terms of use and about page. But since I mentioned you before, I don't want to use any of these pages and menu. I would like to use category, since that's so to use categories. Let's go right here and click view all so right here. We can see all our categories, so let's add them all to our menu. Click, add, And as you can see, our parent categories are missing child categories because all categories are being displayed as parent categories. So let's say if we want to add the to WordPress our child categories, plug ins and themes, we would have to click on it and move it a little bit to the right. This baby will add this category plug ins as a child, which will be displayed in menu. So let's do the same it teams. And let's do the same with plug ins for woo commerce. And let's do the same for wolf themes for who Commerce as well. So once you have done this, we can select where this menu is going to be disciplined. So we have two different options. Where we can display this menu at the first location is main menu. So is going to be main navigation menu, and we have a tow bar menu, so we don't want to display this many and tall bar. We want to display this menu in our main menu to do this, just click main menu and hit Save, and from here we can go back to our homepage and let's see how it looks now. Yeah, and as you can see, this is how our menu looks. Now we have drop shipping as a parent category. We have print on the man and we have Woo Commerz with other child categories. The same goes for WordPress, and if you don't like the placing off each section, we can go back to menus and do some changes. So let's go back. Select appearance. Let's go to menus. And from here we can move all these categories so we can move commerce to the first place and we can move or press to the second place. So once you have done this, just click save. Let's go back and let's check how it looks now. So as you can see, the placing has changed. So this is how you create your menus.
14. Adding Your First Blog Post: So once we have created some categories and we have added them to our navigation menu, we can start creating some block post for our demo content. Because once a great some de makhan 10 it's much easier to understand how your finished product is going to look. It's much easier to customize your femur and basically customize your whole bug, so let's go ahead and add the our first block post. I just want to show you how WordPress text editor works. So let's go to Post Section and let's click. Add new. So from here you will be able to add the block post. And as you can see right here, you should give a title for your block posts. And right here you will be able to add a content but usually been our right block posts when all right, content for my blog's ah, like to ride them in a text editor like Microsoft Office Ward or like Google docks, because it's much easier to write content in the text editors minutes like riding in WordPress text editor, and once you have finished writing decks, just copy the whole text and face it right here and you shouldn't have any issues whatsoever because the WordPress text editor recognized there's like your paragraphs headings like listings. All these type of content is being recognized by WordPress and it will be added in the content block. So I'm just gonna pay some content and I will walk you through the most important content blocks. So all right is against you have finished adding content and when a adblock posts, I usually use just a couple of content blocks. For example, are you use paragraphs? I use headings and I use images. That's all I use most of the time. Sometimes I use em, but YouTube videos. And as you can see right here, this is how ma block post is going to look. And as you can see, it is Block Post was created using content blocks so they can see this is a block of content and it's called paragraph block, and you can find these blocks right here. But as I mentioned you before, one suitcase your content into War Prospects editor, it automatically recognizes which content Block was based in. And it automatically recognised that it's a paragraph. It was a heading Here we have another paragraph, and all I had to do is just do some layout adjustments, added some spaces and between paragraphs and headings. As you can see right here, I added the space. And to add a space, you would have to go right here and the content blocks, and you would find this space block in the layout elements right here, spacer. And this you can see right here we have lots of different content blocks, and it's completely up to you what type of blocks you're planning to use as I mentioned you before. Most of the time, only use paragraphs, headings, images. Sometimes you remembered videos. And to find these blocks you would have to look all true, these content blocks of which are available right here. For example, If you want to add embed YouTube video, you would have to click right here. And just like that, you can add a YouTube video, Facebook post instagram posts or a tweet from Twitter. So basically we have lots of different content blocks and a highly recommend you to test them out yourself to see which you're planning to use yourself, because otherwise you're not going toe. Learn much if you're not going to practice yourself so highly, recommend you to test everything yourself to see how it works. And if you mess up something, don't worry. You can always start from the beginning. So, like a set for this block post, I use paragraphs. So as you can see right here, I use paragraphs. I use spaces. As you can see, you can also move each block by clicking right here. Or you can move by dragging anywhere you want. And once you add spaces, for example, you can change the size of space. You can public eight blocks once you click right here, you can collect public eight and you will doublet Kate the content block. And you can delete it as well by clicking right here removed block. So, like I said, I use paragraph. I use some spacers. I use some headings. All right. Here you can even choose a different level off heading and right here we have some other paragraphs and added an image so tad an image. You would have to go right here again and select an image block just like that. Added some spaces as well, so as you can see this block is a list block. It's very easy to add it. Just go right here and you will find it. It's going to be called list and I will show you what else are added so, as you can see, added the image just like the previous image added again, some paragraphs added a table with information by clicking right here in formatting section I selected table. So just look around, see what type of content blocks you might use. Like I said, most of the time, I only use paragraphs, headings, images, sometimes somebody YouTube videos, just like the this one right here. So it's very simple. It's very easy to use, and in the past, the war press text editor used to be not so flexible. But nowadays it's extremely flexible, and you can easily great, nice looking block posts. So once you have finished adding content, ve vill go back. Teoh, this is a Seo plaguing. Later on, I will show you how to optimize your block post with keywords because there's like a lot of things to talk about it. So later on we will come back to this section, but for now it's important to know how to use content blocks, how to add content, your blood. And once you have finished adding your content, all we have to do is just go to document section, select your category. So obviously the category for this block post is going to be drop shipping right here, and you should add a featured image for this block post. So all we have to do is just click right here and you should go to your media library. Or you can upload images yourself by selecting from the file or dragging files in this section. So let's go back to Media Library and let's elect our future image. So I guess I'm going to select this image all right, and let's click Select Image. So once you have finished adding content, you can publish or if you want, you can preview how it's going to look. So let's click on preview. And as you can see, this is how Block Post is going to look. So it has our featured image and has our title, so we have some paragraphs. We have spaces in between paragraphs and headings. We have images, so we have what we have a table and we have embassy you to video. So just like that, you can add block post. So, as I said, if you are satisfied, the way this block post look, we can go back to our WordPress text editor and we can click publish. So as you can see just like that, added some demo content as I mentioned you before, because it's going to be much easier to customize our theme. So let's go to our homepage and let's see how our block looks now. So as you can see, this is it how it looks, have a demo content. And from here it is going to be much easier to customize our theme because we will have a better understanding how our finished product is going to look. So basically, this is it. This is how you add block, post your blood. As you can see, it's quite easy. I highly recommend you to go and test block elements because by following this lesson, you will not be able to add a block post. So first of all, we need to know how to use war press text editor and you should get more for Miller with it . So as you can see, this was our first block post, and this is how it's going to look.
15. Customizing Your Theme: to start customizing your block, you would have to go right here in this section and click customize So we will start by customizing our header section and our header section is going to be right here. This is our heather section and later on, we're going to do some changes Style, footer, area. So this is going to be our footer so we can start with side identity. As you can see, there's like, our title and tagline which is being displayed right here in this section. But we can change this title and tagline with our logo so I just gonna add a logo which shot created previously select from the file. And this is going to be my logo. Just click select right here. You have to crop your image. That's exactly what I'm gonna do. All right? It should be good. All right. So this is how it looks now, but we don't need the section anymore, so we can disable it once you click. Right here. Next, we can add signed. I can. So, using these dimensions, I created an image, so I'm just gonna add image which created previously. So just gonna select from the file. This is the one. Once it finished uploading Just click Select So we can go back and we can do some other changes as well. Let's say we can change the colors off our website. So the primary color is this one. You can see it right here. You can see it right here and we can change it. So I would like to change the sculler to the same color as this one. So I already know the code of the sculler and all I have to do. Just click right here and paste that coat. So as you can see now, the color is different. And just like that, you can change any color you want. And like I said, this famous quite amazing because it has so many customization options. So we can go back. If you want, you can add an image to your header. So these are the recommendations right here. So you would add an image right here. But I don't see any reason why I should add one. So just going to go back and background image. You can add image right here as your background, but again it's up to us you want you can add one. But I've been seeing the reason why I should So right In many section, we have locations for menus. So basically we have two locations. Very. We can add our menu. So this is our main menu location, and we have taught by many locations. So let's say we can create another menu for our top bar and we could add it right here. It's up to you, but I'm not going to add one, because I'm going to add the pages Important pages in the Footer. So I'm just gonna disable this stop bar so we can go back about Digits section. There's a little bit more to talk about. So in other lesson, I will talk more about this section. We can go to home page section so you can change the section What type of home page you want to have. If you want, you can have your home page as your latest post, so this is set to late disposes. You can see it's showing our later suppose or we can change it to a static page so we can create some other page for our homepage. We can add some type of content elements, and we can set it as our home pitch as well. We can create other page with the title Blawg, and in this space we would have all our block posts. But for now, I'm just gonna leave as it is Later on, I will show you the difference. So let's go back to other settings In general options, you can change the side layout, you can switch the box and it would look something like this. You can even check and see how your website would look on tablet or smartphone. As you can see, this is how it would look on tablet, and this is how it would look on the smartphone. Let's go back to that stop view, and if you want, you can keep this box. It's up to you. This section is up to you. If you want, you can create your own unique look, and here we have some other options available so you can change the single container to separate containers. So is it considers like a difference when you change content layout from separate containers to a single container. I preferred this look so again it's up to you. Also, you can do some other layout adjustments in this section, for example. As you can see, we can change the size of containers. So this section is completely up to you. You can leave it as it is by default, and we can go back to other settings. So let's go to Heather section and in general settings, we can change Heather style to horizontal style. As you can see, it would look like this, but I'm just going to keep as a default style because I think it looks much better. You can do some other changes as well. So it's completely up to you what changes you want to make. I just wanted to show you what are the possibilities, and we can go back. And as I said, I would like Teoh disabled this stall bar. To do this, I would have to go back and I would have to select Tomba so in general settings and check this Plato bar and it will disappear. So my left that is going to look something like this and yeah, so these settings are completely up to you. I recommend you to explore them test all the settings yourself because it doesn't matter if you going to select any different team, and most of these customization settings are going to be very similar. As you can see, this FEMA has a lot of different settings available in most cases. Free themes. They don't have so many settings. As you see once you click right here. If you want, you can get a pro version off this team. And once you finish doing changes to your award, best blogged. Just click publish. And as you can see, this is how our blawg looks right now.
16. All About Widgets and Social Media Profiles: All right, let's talk about bridges. So basically, ridges are small containers off content. So on the right side bar, we have these ridges. So this search bar is a village in this section of recent posts is a rigid as well. And all these other sections are digits. So basically, we have 123456 villages. So to change them, to edit them, to add some different regions, we should go to our dashboard and we would have to go right here in apparent section and we would have to select ridges. So what phages you should display. Okay, let's go back to our home page and I believe we could add like Social Media Ridge. It's so our misters could find us on social media like Facebook, Pinterest, instagram, Twitter or any other social profile. We could also add a form where our visitors could subscribe to our newsletter as well. We could add some content bridges where we would display our most popular block posts. So to do this, let's go back to our dashboard and we would have to go to fidget section. But first of all, before we start doing some changes to fidget section. I would like to install one plug in once we install a social media leg, and we will be able to use it to add our social media profiles to Bridget Section, and we will be able to add share buttons in our block posts. So let's say our vistors could share certain block post on their Facebook Richard Lincoln or Pinterest so displayed in this cold, sassy social share just centered in the search bar. And this is the blood, and we have to install just quick install once the insulation is complete activated. And as you can see, this plug in was added to our ward breast panel so we can do some changes to display gin. Once you click right here. Sassy social share. All right, we can change how our icons is going to be displayed. You can change it to square. I just want to show you the most important settings. We can disable floating sharing interface cause otherwise we'll have social share buttons on the side off our blogged. So it's up to you. If you want, you can use them. You can desk everything yourself, but I'm just going to show you the most important settings. So I'm just gonna disable this one and then standard interface. We can select what type of social share buttons we want to end. So I just going to keep the most popular ones. So Facebook, Twitter, Clinton interest. I guess I'm gonna keep reading in this section. Check this box because these share buttons will be shown at the top off our content and in the bottom off our content. Next thing which you can do is go to place him in section and uncheck pages because we don't really need to show share buttons in our pages, such as contact US privacy policy, terms of use. It wouldn't look good and it wouldn't do any help for us. So, yeah, these are the most important settings. Once you have finished, just click save. So before we start adding our social profiles two digits, let's go and check how our block boasts. Look now. All right, let's click on the block post. And as you can see, the how share buttons and it's called spread the Love. Of course, you can change this section if you want, by going back to sassy social share settings and right here you should find them. Spread love If you want, you can change it and hit Say, OK, it's time to add our social profiles. Two digits. Let's go to rigid Section. And as you can see, this is our sidebar. So in total, we have six different locations where we can display our bridges. All right, so let's start with sidebar. Let's that our social media icons and these are right here. Sassy social share fall awakens. So this widget was added once we installed, displaying All right, So to add this, just click right here and select very wants added that sided to side bar. All right, we can set a title and give some text before Bridget contents so we can do this way. Next we can change the icon shape. Let's change it to square. And all we have to do is just based your your else off your social media profiles on just gonna add Hashtags to show you how it's going to look. And once you have finished, don't forget to hit save. We can close this visit and we can move it to the top. Alright, so I guess We don't need search because we have a search bar in our heather. We can delete it. Recent boasts. We can delete this one as well, so basically we don't need any of these Vigee. It's which were added by default so we can remove them all. So the next budget, which we can add it, could be subscribed to our newsletter eso. We would have to use this voyage it ninja forms. But before that we have to create ah form, which will be used right here. So we should go to Ninja forms dashboard. So this is the form Vitria using in our contact us page and the the form which we will be using for newsletter should be different. So we have to add new click, add new and select blank form. So you want to add email field and let's set a submit button and all other settings. We can leave as they are and click publish. Let's give a title to our form so we can call it newsletter and let's get published. Let's go back, and now we can go back to appear in section Let's select widgets and we can add ninja form switch So you're going to chat to sidebar. Let's click add and we will select newsletter form Ah newsletter. We can hide the title. You don't really need to show the title and let's get saying All right, So the next budget, which we could add, is this one bam popular recent tax comments so we can add this widget. This one came without FEMA, so yeah, we can add this one as well. Yeah, we can hit. Say so. As you can see right here we have a lot of different midgets and it's completely up to you , which you want to use. Let's say I'm gonna use images. Well, I'll use this widget as some type of ad. I'm just gonna add an image and that will add a link. So that sent a sidebar that's moved the location and let's add an image. So I'm gonna use this image which are created previously. Just done a quick ad, and I can add in your l. So once the wisdom clicks on this image, he will go to this link. So it's up to you what type off link you would like to add in this case, I'm not going to add any links. So once you learn quick sale, let's go back to our home page and let's see how it looks. And as you can see, this is how everything looks. So we have social media, Bridget, we have an image. We have, ah newsletter subscription form, and we have this image with our content. So yeah, this is how you add widgets. So as I mentioned you before today Ah, small blocks of content as well. We can do some changes to pages and block post. Let's say we don't want to display these riches when someone goes to our contact us page. So to do this we would have to go to page a section and we would have to change page layout so we would have to select this option and we would have to click publish. So you had. This is how you add villages also wanted to tell you where the e mails are going to be shown one. So let's say your Mr subscribes to your newsletter. All right, let's add an email and let's click. Submit. Let's go to our WordPress dashboard, and all emails will be displayed right here in danger forms. When you click on submissions, let's select a form newsletter. And as you can see, we have two submissions to email addresses so you can export diesel email addresses and use them for your email marketing.
17. How to Create a Footer: all right. Since now we know how to work with Bridget's, we can start building our footer. So to do this you want to go to dashboard, just like the previous time. Let's go to rigid Section and let's add the first digit for our footer. So the very first visit could be some text about our about our blawg. Again. It's completely up to you what type of content you want to add. But I guess it will add some text about my block. So I want to look for Bridget. We just call text. Let's click right here and let's elect Footer one. That's added and I will add some information, all right. I just added some information and I'm gonna click save. And in the second section we could add links trauma pages, which we created previously so like contact us about privacy policy and terms of use. So to do this, you want to look for rigid ridges called pages right here. So let's click on it that select foot or two and let's click add Vigen. So let's give a title to our region and let's click same. And in the last section we could add social media icons. So we're going to use the same budget, which we use previously sassy social share. And let's select Toe added two footer number free and digit and we can give a title. And right here you have to add your social media profiles. Once you have finished doing this, just scroll to the bottom and hit same. So once we have done adding digits to these footer sections, we can go to our homepage and let's see how it looks now. All right, so let's scroll to the bottom. And as you can see, this is how everything looks. So we have a quiet, nice looking footer section with three different sections. So is against you be created these sections using riches, just like we used them right here. So these are small blocks off content, which you can use in various places off your website. So in this case, we use them in the how footer and then our sidebar
18. Static Homepage vs Latest Blog Posts: in this lesson, I will show you how you can create the static page as your homepage. As you can see, right now, we have a home page which is displaying our latest posts. And this is how our homepage would look if we decided to create a static home page and two great a static home page. You would have to go Teoh your dashboard, and first of all, you would have to create a new page. So go to the pages and click. Add new. Don't add any title to this page and just add elements which you want to be displayed in your home page. So, as you can see, I just finished adding elements, and this is how my home page is going to look. So the first block is a color block. Ah, found it right here. And just like any other block, this section is made out of two columns. So the first column is what image? The second column has Heather Paragraph and a button and added some spacer again. And just like that, I created all other sections. So once you have added information, you shouldn't add title right here. But once you click on this section, you will see that this window pops up. So you want to click edit and the ad home? Once you have finished this, you can click save and we can preview how our home page is going to look once you click right here. As you can see, this is out. It would look. And if you are finally the look, we can go back and publish this page. So if everything is fine, you can quick right here and publish right here. You should see a button which says Publish also, if you want, you can do some layout changes as you remember in customization settings. We turned off the sidebar for our pages, but actually we can turn on a sidebar for each individual page. So right here in this section, we can turn on the sidebar. We can select right sidebar and to see how it would look you and have to click, publish or update. And now we can click preview. So, as you can see, this is how our home page would look. So we have this page and we have to set this page is our homepage. But before we can do that, we should go to dashboard and we need to create another page, which will be named Blog's. So let's go to pages. Let's click and and this time we can add the title and right here you don't need to add anything at all. And once you have finished doing this, just click publish. All right, let's go back. And as you can see, right now, we have two new pages. The one which doesnt have title will be our homepage and the second page blogged will be used to display out block posts. So we have to do some changes in setting section and you have to select reading. You probably already remembered this section from the previous lesson. Here we can change our home beach from the latest post to a static, and for our home page, we will have to select the page with doesn't have any title and for block posts, we would have to select the page which we named Block so we can save changes and let's go to our homepage. As you can see, this is how our homepage is going to look. So instead of displaying the latest posts is going to show us a static page, but actually we have to do some changes in the footer area. As you remember For this section, we used Avijit, which was called pages and by default to discourage it displays all available pages. And right now, as you can see, this is our homepage, and it's being displayed right here. We could leave a blawg, but we should remove this page. So, for example, let's save you gonna click on blood. And as you can see, we have the latest boats in the block section, and we used to have this look as our home page before. And this has said we should remove this page. So to do that, we should go to our dashboard and we should go to appear in section and click on regions. So as you remember, that rigid off pages is in the second section. Off out footer right here, pages and we can exclude pages, but we need a page I d to do this. So how to find a page I d. You should go to pages. Let's click all pages and this is our homepage. It doesn't have any title and you should click on Ed. And once you do this, you'll see this link and this is your I. D. This is the number. It's a supposed equals 20 for so 204 is already and we want to copy it. So let's go back to Visit Section, and now we have to go to the footer to and then pages widget. We have two based, this number once. No page I d. You can exclude as many pages as you want. All we have to do is just and comma and at other I D. So once you have done this, just click save and let's go back to our home page and let's go tell Footer. And as you can see, the page was excluded. It's not being displayed anymore, so yeah, this is how you can create a static pages. Your home page. It's completely up to you if you want to display a static page or you want to show the latest posed to your vistors
19. SEO Plugin and Tips For Beginners: and this lesson I will be talking about S e over and it stands for search engine optimization. So basically, we will be optimizing our block post, so we would have better chances to appear in higher position of Google searches ALS. But before we do that, we should go and do some changes to our s your Blufgan, which reinstalled previously. So let's go right here and click on General Tab. From here we will go to features and let's start by disabling every the bullets announces, because if you don't really need this plug in to keep us bugging but our readability score , in most cases, it doesn't do any help at all. So the next thing would be let's disable textile encounter because otherwise this plug in will keep us bugging that we should include internal links to Arab content. And when you are starting your boggy, you will not have any internal links whatsoever to include so we can disable this option and let's go and disable admin barman because we don't really need this bar menu to be right here in this position, because we will not be using this plug in so often so there's no need to have it. So once you have done doing this, just click save changes. And from here we can go to search appearance because we will not be doing any changes right here. So let's go to search appearance and right here you can add your bog name and you can upload your logo. Once you have done this, just click save changes and let's go to content types. From here, we will be doing some changes in the post section so we can delete this section page, just delete it. And ah, right now just go to page section expanded, and we should add the and meta description. So you want to type exercise s. So to do this, just type as you see on the right side, and it will be added automatically. So once you have done doing this, just click save changes and we can go to Media Section. Actually, Media section, we will not be doing any changes whatsoever, so we can go to another section in category section. In meta description, we will add the same ward, so just type exercise. So basically this function, it will add a short description off our category. It will use the text, which is in the category. Let's go to the tax section and we can disable tags because we want to a wide duplicate content. So just click now and we can go to four months section and let's do the same with the formats because we want to award duplicate content. It's going to harm our S E O. So let's scroll down. And we can remove category specifics because we don't need this world category in our your own. It's not doing any help for us at. Also, once you have bandages, quick save changes and we can go to archives section. So this is the last section to rich. We will be doing any changes. So as you can see her right here, let's disable this all for archives because we want to know what duplicate content, and it will not do any help for our search engine optimization. And let's do the same right here. Let's disable it and ah, once you have done dishes, click save changes two other desu sections. We will not be doing changes that all we can move on to social temp and social section just at your social media profiles. And once you have done dishes, it's a and to all these other sections, people not be doing any changes at all. So once you have finished doing all these changes, we can go ahead and start optimizing our block posts with keywords. And as you can see, I have added some posts some of these posts on demo content. And here you will see the last block post, which are added when I was showing you how to add your first block posts. So I'm just going to click on edit. So as you can see, this is the block post, which I created previously, and the one to optimize this block post for keyword drop shipping. So once someone decides to look something about drop shipping and that person gonna enter a keyword or let's say a key phrase, drop shipping. I want my block post appear in Google searches. Also, that's the point off. Optimizing your content with the keywords basically keywords off raises, which users used to look for information and google. So you have used Google in the past. You know how it works. It's not enough. Just to write the content, you must know how to optimize it with keywords. Otherwise, people will not be able to find your block post. So as you can see, this block post is optimized with the keyboard. Drop shipping. And, as you can see, this cured is mentioned in the title. It's mentioned in the various places off different paragraphs. It's mentioned in headings as well. It's mentioned and in listings. I have mentioned this keyword all over the text because I want Google to know that this block post is all about drop shipping as well. I have done the same with images. So once you adding an image, for example, when you are adding images for this example, I'm just gonna go right here, and I'm going to click on this image so I would access Media Library. So, as you can see, I have added to images in the block post and I have selected one featured image for this block post, and as you can see, all of these images have their title and alternative text. So basically, the title is just the title of that image, and alternative text is being displayed that when the image fails to load for for the user . So in best case scenario, you would like to describe your image an alternative text. But I highly recommend you to use your keyword an alternative text and in the titles because you want your images rank as well in searches. Also, it's going to help drank your block posts and images. So, as you can see in every single photo I have mentioned drop shipping. I didn't use the same phrase. I didn't use the same titles in each image because it's not a good practice. You should do some changes. Just mix it up. You don't want to over use that keyword and you don't want to make your text. Ah, title. So alternative text sound like a nonsense so as you can see alternative text and the title . So from images optimized keyword. So let's go back to our block post. So, like I said, this images optimized with the keyboard drop shipping and this killer is used all over the text. Once you have done this, we will do some changes to our S e o plug in section. So once you scroll down to the bottom, you will see your S e o plug in settings. So right here you will see how your block post is going to look in Google searches, ALS and the mobile results and in the desktop results so you can see it's going to look like this so it has on a title. Our keyword is mentioned in our title, and we should add a description and description should include our main keyword as well. So to add description meta description to this snippet, you would have to quick right here and it's snippet. And let's add meta description. Eso is you can see I just finished adding method description. And as you can see, I have used my key word drop shipping in this description as well. And this green bar shows that you have added a good amount of text. You don't want to have too much text. Otherwise, it's not going to be displayed right here and you don't want and just a little off text because you want use as much space and Google searches. Also, it's possible because it's your moment to stand out from other searches als from other competitors, so try adding as much Texas possible. And don't forget to use your main cured in the meta description as well. So once you have done these steps, we can actually check our content our block post to see how well it's optimized with a cure . Drop shipping. And to do this, you would have to go right here, and you have to enter your focus key phrase or, in other words, your keyword. So in this case, marquee word is going to be drop shipping. And as you can see, we got a green batch. It means that now content is optimized well, and we have good chances to appear in Google. Search results in a higher position. Of course, there are more factors in Waldon in the rankings of Google Searches ALS. But when you are beginner, the most important thing is to learn how to optimize your text with keywords as well. We will do some changes in Social Media section. Let's go right here and let's go to Facebook section. So basically, in Facebook section, all we have to do is just add the same title and the same description as we added right here. As you can see, this is our title and this is our description. So just add the same description and title in these fields and just add the image which will be displayed once somebody's shares your block post on Facebook so you can use the same images to be used for our featured image. And once you have finished doing this, we can go to Twitter section and just do the same at the same title at the same description and add the image. So once you have finished doing this, you can go and publish your block post. So this is how you optimize your block post with yours. And right now I will show you what tools are used and what tools I recommend you to use to do. Ah, simple keyword research. So you will know how well the ski words are performing. You would know how many monthly searches they're getting and if it is very difficult to rank the skewers organically. So the first stool, which I like to use for key, where the research is a free Google Home extension, which is called surfer so you can look it up in the Google. And this is this is how it's called Surfer, and you can add it to your chrome browser. So once you have added, the stool at this stool will show you how many monthly searches a certain keyword is getting. So, for example, our cure drop shipping, as you can see in United States, is getting over 90,000 monthly searches. So it's quite a lot and probably means that this keyword is quite competitive is, and it might be quite difficult to rank this keyword. And on the right side, you can see some other key word suggestions as some similar keywords, which go together with this main keyword drop shipping. And when we are talking about keywords, it doesn't necessarily need to be a cured. Made out off one word. It can be made out off a couple words like Aly Express drop shipping or let's save Luke warmers, drop shipping or any different type of keyword. It doesn't need to be just a single word. It can be multiple words, and it can be your keyword. So basically, it's a key phrase, which is being used in your text so Google could recognize that your block post is all about that key work because the goal of Google is to show the most relevant content to their users. So that's why you want to optimize your block post with keywords so right. This still surfer as well shows you how many words are certain and block post. Let's say your competitors has written and how many times this keyboard has been mentioned in that block post. So these first results are ads. As you can see, it says, add that scroll down. So as you can see, there's a block post, the ultimate guy to drop Shipping, which was published by Shopify. And as you can see here, it says that this block post has our 1000 words and the keyword drop Shipping was mentioned 24 times. By doing this type of research, you can understand how many wars you have to write, and probably how many times you can mention this keyword if you want to rank your block post so it's like a nice to know how many words you should write. So obviously the best case scenario is that you want to write more words and you don't want to go over the top and start using your men. Keyword, drop shipping over and over again. You want to make your block post to sound naturally and you don't want to make it look like a nonsense. All right, So as I said, this surfer tool lets you to check how many monthly searches a certain keyword is getting you as well. You will get some keywords, suggestions and as well right here. It shows the estimated monthly traffic for dead domain in the United States. So the next tool which I'm going to show you is called uber suggests so right here in this this is the uber suggest still which usually use it shows the similar information just like the surfer. As you can see, it shows the same search wall him as a surfer did. So obviously, this keyword is getting over 90,000 monthly searches and as well, it shows what is s yo. Difficulty says it consists. Aecio difficulty is 76 so 76 out of 100. That means it's pretty difficult to rank this keyword Onley, optimizing your content with keywords. And once you scroll down, you will see some keywords suggestions like you would ideas. So of course, this stool is a paid, but with a free version, you can do a very simple keyword research so you would have a better understanding how well this keyword is performing so in cured ideas were getting some nice keyword suggestions. As you can see, a drop shipping keyword is quite competitive, and it's very difficult to rank. But drop shipping suppliers. It's less competitive, and it's easier to rank. But the search walling Miss lower. And just like that, you can get some ideas. The content idea skewered ideas by using these tools also wants to scroll down. You will see some of the best performing block posts, which rang for the skipper. Drop shipping. Basically, by using these tools, you can do a very simple keyword research, so you would know how popular discourse are and how competitive their
20. How to Add Your WordPress Blog to Google Search Console: and this lesson, I will show you how you can add your website to Google Search. Consult So you will be able to see which keywords bring you the most traffic which position they are ranking also, you will be able to check which websites are linking to your blah Gore rap side, and Google will inform you about errors which are happening on your website so you could fix them. And also you will see other settings as well. So to add your website to Google Search console. First of all, you have to look for ruble sirtuins. Also enter and Google and click on the first link. Just set up your account And once you have finished setting up your account, you should see this window. So you have to enter your domain name in this section. Once you have done this, just click continue. And now you have to verify your absent. So we have to add this code. That's all code and our Dennis management off our domain name. So we have to go to hosting er, and once you sign into your horse stinger account, we should go to domain section and just select your domain and click manage. It doesn't matter where you registered your the main aim. The procedure is going to be the same. You have to go to Dennis Zone manager. So in this case, it's called Diana's own Click right here, and we will have to add a text section in this area so we should click at New, Enter Haas Atta and based the Value which we copied previously, and DTL. It's time to load. We can leave it as it is. And once you have done click Save and you should get the message that DNS record was created successfully. It might take some time, usually upto one hour for the settings to propagate. But we can go back to our search console and we can click verifying. So all right, we got this message that ownership verification failed. That means we should wait a little bit more. All right, let's click. Verify one more time, and once you have aided sometime after you click, verify. You should get this message that the ownership was verified, and now once it's done, we can go to our property. If you want, you can check the instructions you can see what each to was meant for. But I will show you everything myself so we can close this window. All right, so first things first. Once we have claimed out property, we have to submit but the site map off our website. So to do this, we have to go right here in site maps and we will have to add our side met. So to find the euro off our site map, we should go back to our war press website. Let's go to dashboard and let's go to our s your plug in and let's click on General Tab. Lets go to feature section and right here in this section XML site maps. Let's click on this question icon and let's click on See, the XML site met and this is our assignment. So all you want to do right now is just copied e u r l of this site map, So just copy it and let's go back Teoh our Google search console and let's based this your l in this section. So once you click on site maps, you will get this window and just base that your l and click submit, So you should get this message that decide Matmos submitted successfully, so just got it. And now I will show you around the Google search console. So let's go to overview. And right here you will see how your website is performing in Google search. So you will get information in this section. You will see how many clicks you're getting. You will be able to see what others you're getting. And if you're going to get any type of Federer, you'll get the message right here with a notification off a certain error. And you will get some kind of guide off tutorial. How you can fix this issue and performance section right here. You will be able to track the clicks, the keywords which bring you the most traffic to your website as well. You will be able to see the impressions, how many impressions you are getting the average position off a certain keywords. So here you will see all the data and right here you will see keywords and all other information so you can check the pages. Which pages are bringing you the most traffic countries and Weiss's on all other information as well and covered section you will see all the errors which Google found on your website, so you will be able to fix them. So on site maps we submitted our site map and this section is not very important. And in Speed tab you will see the speed recommendations. Which pages are performing better than others which needs some kind off attention needs to be improved and mobile usability. You will see as well some errors. If your website block posts pages, some mobile friendly and in cycling search box, it's not very important. And then links section. You will be able to check the websites which are linking to your website. So basically you will be able to see back links and how many of them you're getting and you will be able to see which pages are being linked the most and so on. So if you want to have a successful blogger, you should use Google search console so you could see what errors you're getting. You could track the keywords. You will see how well they are performing. So this is how you add your website to Google search console and if you have a registered your domain somewhere else the procedure is basically the same. All we have to do is just at text element in your DNS management settings.
21. How to Use Google Analytics: in this lesson of you will be adding our laps it to Google Analytics so we could track all the visits coming from the various places we will be able to see. A very traffic is coming from Fitz coming from Facebook, Instagram, Twitter or any other source. We will be able to see how much time people are spending on our website on the certain pages. What is the bounce rate as well? We will be able to see how many live users we have on our website at the moment and all other information which disassociated to traffic which is coming to your wraps it. So if you want to have a successful BAP set, it doesn't matter if it's going to be blogged, e commerce store or any other type of upset, you must have Google analytics. Otherwise, you will not be able to track the traffic which is coming to your website, and you will not be able to make some kind of conclusions which pages are performing well or which are performing worse. So to install Google Analytics, you want to look for Google analytics soon. Once you have found this, just click on it so you will be asked to create an account. So once you have created your account, you have added information. You should be seeing similar window to this. Of course, you might not be seeing anything like that because you have not added any properties yet. So you should go to Admin section right here. And you should see something like this. So once you are here, you should click, create an account and just add account name so you can add the name off your website. Once you have done this, just scroll to the bottom and quick. Next select web click next and enter your website name Just pays the Ural off your website , Select your industry and choose time zone, so choose your time zone. Once you have done this, just click create. So you have to accept east arms and conditions like a set. And it's quick here and right here you will get your goat. So you're tracking code is right here and you want to copy this code, so just copy this code and now we should go back to our wordpress website. Let's go to dashboard. And from here we will have to install one. Plug it. So let's go to plug ins. God knew. And in the search bar type analytics. As you can see, there are plenty off plug ins available which can help you track visits your website. And but I'm going to show you one plug in which I use myself. So you want to install this plug in G A Google analytics, So just install it and activated. So right, once you have installed this Blufgan and he should go to setting section and right here, you should see Google Analytics click on it. And all we have to do is just click, like in settings. And in this section, we have two based on tracking a D, which we compete previously. Just based it and select global site attack. Right? Once you have done this, just click save changes. And before we go back to Google Analytics, you can purchase the cashier once you have a right here. Just quick. Poor John. And let's go back to Google Analytics. All right, so this is where we left. And now we can go to home page off Google Analytics once you click right here. As soon as you can see we are getting live data. We have one active user so that one active user is me. Of course, we can do some changes and disabled tracking for ourselves. But before we do this, I just want to walk you through some of the most important sections in this section. You will see the live users, so as you can see, all right, now, we have one live user and you can check more data in real time once a quick right here and you Quick overview. So we're getting more information and we can see which page has active users. You can see very they are coming from. So as you can see, it's being displayed in the map. You can check the locations. So an audience section you will be able to see your users, The traffic, How many sessions you had? What is the average time spent on your website? And as you can see, you will see language the country, the city where your businesses are coming from. When you're starting out, you should explore analytics yourself to see how it works. When I use Google analytics that are a lot of different data elements which are used myself . Since I run a newcomer stored, there are more information which is relevant to me. But if you are running a blogged and let's say you can check the pages, which are bringing you the most traffic, and to do this you would have to go to acquisition, click all traffic click channels and once you're here, you will be able to see where the traffic is coming from. In this section is going to show you organic traffic, social media, traffic reference, traffic, direct traffic. So once you click on, let's say on the social media traffic, it's going to show you more information in depth so you will be able to see for this. Traffic is coming from Facebook if it's coming from Pinterest, instagram, Twitter, reddit or any other source, so you'll be able to check where the traffic is coming from as well. You will see how many users you got, how much time they spent on your website, and by selecting the secondary dimensions, you will be able to see more information. For example, in commonly used, you can click on the landing page and you'll be able to see which pages bringing you the most? Traffic from a certain source If it's organic, if it's a social media and the if it's a social media, you'll be able to check which social platform is bringing you the most traffic. So you will be able to see all these settings right here and once a click right here, you can go to users and let's say you can select age, browser, country, city or any other secondary dimension, and you will be able to see traffic, which is coming to your website by the country by the age or any other secondary dimension . And once you are in the home section, as I said before, right here you'll be able to see live users in this section. You will get the summary off the last seven days. You can change to any other time frame in this section. You will be able to see how much traffic you are getting by today, so it's going to be displayed right here and where this traffic is coming from. If it's coming from organic sources, if it's coming from social media on direct visits, if you're getting direct visits or any other in this section, you will see which countries bringing you the most traffic in this section. You will see users by the time of the day. So at what time of the day you are getting the most traffic. So right now we don't see any information because it's a new website. But once you will start getting traffic, you will be able to check old information. And don't be afraid. Explore everything yourself and just check what information is the most relevant to you. So, like I said, we can also disable tracking for ourselves. So to do this we would have to go back to our dashboard. Then let's go to setting section and let's go Google analytics. So Blufgan settings. And if you don't want to be tracked but analytics, you would have to go down to the bottom and you would have to click disabled, tracking off admin level users. So click right here and just click say, from now on, your visits will not be tracked on Google analytics, and it's good because you will know the real traffic which is coming to your website. So this is how you add your website to Google analytics. And if you would like to learn more about Google analytics, I highly recommend you to go Google Analytics Academy, where you will be able to learn way more about analytics in depth by taking free courses. As you can see, there's a lot of information about analytics, which you can learn for free. So if you want, if you are interested in, ah, highly recommend you to go to Google Analytics Academy to learn more about it.
 Gvidas Maskoliunas, Digital Marketer | WordPress Enthusiast