Transcripts
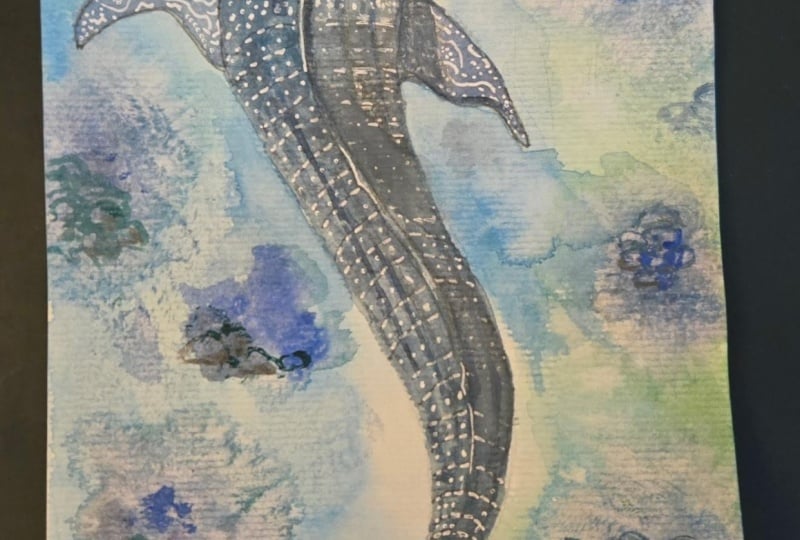
1. Introduction: The whale shark is an
ancient species of shark and is currently the largest living fish
in the ocean today. In fact, its beautiful markings, which resemble glowing stars have given it the
status of being sacred and even regarded as protectors and deities
in certain cultures. My name is Alicia, and
I'm a watercolrist who is obsessed with the ocean
and all its inhabitants, and I would absolutely love to teach you how to
sketch and paint one of my all time
favorite creatures on this planet, the whale shark. In this class, I will cover
each step of the process, starting with simplifying
the sketching process from a reference picture
that I have provided. I will then teach you how to create a unique
tropical background, using a varied wash and salt to create
texture and patterns. We will then define
certain rock shapes in the background to create a
unique and realistic backdrop. Next, we will color
in our whale shark before using a white gel
pen to add those distinct, beautiful markings the whale
shark is so famous for. This class is suitable for intermediate to advanced
watercolor students. However, if you are
a beginner and you are interested in
watching this class, you are more than
welcome to join in, as I will be explaining and demonstrating each
step of the process. So if you are ready to create
a beautiful painting of a whale shark cruising through tropical waters in
watercolors, let's begin.
2. Materials: Hi, everyone, and welcome to the material section
of this class where I will be listing all the materials that you
need to do this project. Starting with the
paper, I will be using an A three size pad of watercolor paper
by the brand Canson. You don't have to
use an A three size if you prefer to work
with something smaller. Just make sure that you use
paper that is artist quality, which has a weight of at
least 300 grams/meter square or 140 pounds to get
the best results. Now let me list the drawing
materials I'll be using. I'll be using this lead holder
by a brand called staler, and it says you're
mass technical. It holds lead, which
is two MM thick. I'll be also using this mechanical eraser by the same brand
Sler mass plastic. If you don't have a
mechanical eraser, it's fine to use any soft
eraser that you have. Now let's list all the painting
materials I'll be using. I always use two jars
of clean water so I don't have to keep changing
water when I'm working. I like using a
ceramic palette for my paints just because
ceramics don't stain. I'll also be using musking tape to create a
border around my painting. This is about 1 "
thick and you can get any usking tape that you
want from a hardware store. You can also use paper
towels or a rag to just wipe off the excess water from your brushes every
time you rinse them. Now I'll be listing the
paint that I'll be using. I'll be using the
colors turquoise blue. This one is called
Emerald Green Nova, and this one is called indigo. And paint's gray. Now, all these colors are
artist quality colors. You don't have to use the
same brands that I use, but please use
artist quality paint to get the best results. If you don't want to use the same colors as me,
that's absolutely fine. A good substitute for turquoise blue, if
you don't have it, it would be cerulean
blue and you can always mix a bit of green
in it to make turquoise. If you don't have this
exact color by this brand, VidianGreen is a
pretty close shade. Next, I'm going to be listing the paintbrushes I'll be using. For the background, I'll be
using a 1.5 inch flat brush. I'll also be using a three quarter inch flat
brush to put the paint on. Here are the brands,
Artist First Choice Taklon and Princeton Neptune. I will also be using a
synthetic size ten mop brush. And I'll be using
three round brushes of the sizes 48 and 12 by brand
called Silver Black Velvet. If you can't get these brands,
that's absolutely fine, but please try and use artist
quality brushes as well. Finally, to create some unique patterns
in the background, I will be using
two types of salt. This is just natural
sea salt rock salt, and this is iodized table salt, which is a little bit finer. Both will create some patterns. And very, very, finally, I'll be using a white gel pen. This is by a brand
called UIBL Signal. And this is to add those really beautiful
white patterns that you see on the whale shack. So those are all the materials that you need to do this class. So I can't wait. So
why don't we begin?
3. Sketching: Hi, everyone, and welcome
to our whale shot class. And I am super excited about
this class because this is actually the first class that
I'm filming now in 2026, and I couldn't think
of an animal that I love more or that
I find so magical. Uh, yeah, I just really, really can't wait to get
this class going and for us to sketch our
beautiful whale shark. And if you're
wondering about this cool backdrop that I have here, it's actually a beach towel. It's a beach towel that
I actually purchased. Yeah, on my way to Byron Bay, I think, on a holiday
a long time ago. But I love this beach
towel and I just thought, what better backdrop to have to inspire us
all for this class. So if you followed a
few of my classes, you know that I
tend to talk a lot. I tend to explain things a lot, but then also I might go off
in a tangent talking about some stories about the animals that I choose to do classes on. So why don't I just
get started right now? So what we're going to
need to start sketching is I'm using A three
sized watercolor paper by Brand called Kanson. But if you want to do this first drawing
that we're going to do on a smaller piece of paper like A four size,
that's absolutely fine. The reason that I
like to go big is because I personally just
draw big in general, and I like to have a big picture just so I don't feel
very restrained by, you know, the
confines of my page. So let's get going. So our first sketch
is going to be, um a whale shark in
a very classic pose, imagine you were flying a drone above a whale
shark that's swimming. It's like, yeah, you
see this a lot at that on social media, photographs of a whale
shark from above. The reason that
I'm starting with this particular orientation and view of the whale shark is because this is probably
the easiest view, the easiest sketch to
do, of the whale shark. If you look at the projects and resources section of this class, you will see that I included a few different sketches
that I personally did. Of the whale shark
from different angles, just so you get a good idea of what this beautiful
creature really looks like, you know, in different poses
and from different angles. So you get a really good
idea of its anatomy, which is quite unique. So before I talk a lot again, I'm going to use lately, I just love when I'm
sketching something big. I love getting the shape
with a lead holder. But if you don't
have a lead holder, if you just prefer mechanical pencil, that's absolutely fine. So I've included one of my, um, photographs that I actually took myself
of a whale shark. And what I want to do is I'm going to start
with a curvy line. I love starting with
a curvy line just so I get the flow of
this beautiful animal. This animal is big and beautiful there's this
lovely flow to the body. It's a very fluid way that it swims if you're lucky enough to see
this in real life. When I start with
this beautiful curve, it gives me as well a guideline to the
way it moves as well. Hence, I can now start
sketching the body. What I'm going to
do now is I want to start with the
head and the head, we're just going to start with a curve line that
looks like that. If you feel if you want, you can turn your hand
the way I'm doing, I'm turning my whole arm. So we're just going to
start with a line that's just slightly curved, okay? Now, the head of this beautiful whale
shark is think of it as a rectangle with round
corners, if that makes sense. So we've got a
roundish corner here. So that's why I love using this, um, this method of sketching because it
helps me be more loose. So you see these
round corners that I'm using instead
of just using a, you know, a very a
bricky looking shape. But the thing about it is it
has this rectangular head, and that's why this creatures
so unique and beautiful. So once you've done that line and then you have
these curved corners, you're going to
basically kind of follow that flow of your, um, of that nice little
curve that you drew. I'm just going to go down here now with it and with
this line here, I'm not going to curve
this one as much, but it will still taper
towards the very end. That's how we can
refine the shape later. But right now, I just want
to get the curves going. Okay. And now this is going
to follow that line, right? That we drew earlier. That's why I love to sketch
that line because it just really helps with the flow of our
beautiful creature. I can always refine this later. I can make certain parts
bigger or smaller later. Okay. But, I think this should just be at
a little bit bigger, but see, I'm just
doing that right now. I'm now going to
start curving it. And it's going to taper
right over here. Okay? So what we've drawn is a body, a very curvy body. In fact, I think I
have to fatten up my whale shark a little
bit, and that's fine. And right here is where
our tail is going to go. So I'm using the
reference photograph that I got, but right now, I'm going to start making
this a little bit more, add a little bit
more realism to it. So we've got that general
shape that is really, really important
to start off with. Let's round these
corners where the very edge of where the
eyes are going to sit. This is such a unique creature
that the eyes are going to sit right at the very
sides of its head. Mind you, it has very small eyes in proportion to its whole body. It's almost as if I don't know whether it really uses its eyes much because they can
descend to very deep depths. Okay, now I'm just going to maybe I think this part looks a little bit
straight for me, so I'm going to just
round it up a little bit. Okay. Yeah. But you see
how we've already sketched the whole
shape of the body. How easy is that for, you know, drawing a whale shot which looks like
a complex animal. Okay, now I'm also going to
start doing little things. I want to just get
those cubs right? Okay. So that's looking
really good already. I'm still going to
leave that central line because we do need it
to just place our tail. But then after that,
we can remove it. Whoops. Okay. So it's still
looking really, really great. Okay. I'm just
wondering if I should just curve this out
a little bit here. Yeah, just a little bit. Yeah, just to follow that curve. We have this very fluid
shape that we've just drawn, and believe it or
not, we've done almost all the work on
our wheel shark already. Now, I'm just going to start positioning the pectoral fins. I'm going to put one over here. Whoops. Let's go down. Roughly here is where I'm
going to put the fin, and the fin has a really
cool shape as well. So it comes out like this. I mean, the pectoral
fins are pretty big. They're going to go down
to this pointed tip, and then they're now going
to just go up like that. Oops like that, and then
they're going to attach to the body in I think I prefer to just
draw this curve like that. So that is the shape that I have in my reference photograph. Then it's going to
attach like that. Here I'm just going
to draw a line like that to just show
where it attaches, on the opposite side, pretty much at the
same distance, it might start a
little bit higher because just of the way
the body is turned. This is not math, you don't have to do this really accurately. But we're going now
it's going to come out just a little bit higher. But it's probably going to
come out at the same distance. So we're doing that pointy N, and I'm going to attach
it with a little bit of a shape like that. Okay. So look at that. Our whale shark is looking very, very slick, looking,
almost complete. Now, I'm just wondering, should we start doing okay, so our whale shark actually has a dorsal fin that
is quite far back. It's going to be
somewhere over here, past the pectoral fins. It's a little bit
different from when you see sharks and, you know, those type of sharks, like a
great white or even whales. Whales their dorsal fins tend to be quite at the
front of the body. But in this case,
the dorsal fin, and it has two dorsal
fins, mind you. Another word for it has
two dorsal fins and one is over here and it's actually much bigger than the second one. I'm just going to draw remember, we're looking from the top view. So this is going to be
quite skinny, right? We will see maybe just
the very top of that fin. So it's going to look something like that from this angle. Over here, we're also
going to have another one. So I'm just going to
give it a little bit of a shape like that. Okay. Sorry, that's a bit
hard to describe the shape. But you're basically
just seeing a very, very like top angle. So you might only
see a little bit of the sides and bottom of this back dorsal fin. And now we've got the tail. I love the way the tail looks in the photograph
that I've provided. So I want to try and copy that. I'm just going to talk you
through what I'm doing. I'm just going to follow
this line down here. So what I'm doing
now is I'm drawing the top part of the tail or what they
call the caudal fin, if you want to be
really scientific. So it's going to look a
little bit like a triangle. When we come out here,
we're going to do a bit of a curve like that. And then we've got this that line didn't look
really good. Sorry. We got a bit of a curve here and we can refine
this again some more. Let's just try and get
the general shape. I'm now doing the very
top part of the tail, and I don't want it
to look too straight. The whale sharks actually do
have a very powerful tail. That's very beautiful
and looks very strong. I guess it's a very big animal, it does need a big tail to help it glide through
the water, I'm guessing. If you've ever swam
with a whale shark, if you've ever been lucky enough to do that in the open ocean, which I've been blessed
to do, they are fast. I could not keep up with one. They swim very effortlessly. And so now I'm drawing
the very bottom tail. Okay. So this looks a bit. I want to actually deviate slightly from the photograph
and kind of give it. I've just decided to do
this now, by the way. I want to give it a
little bit more of a curve rather than a very
straight looking tail, even though, that was what
I saw on the photograph. But I love doing this. So this is art. So we're allowed to change things
where we want to. That's the best part about art. Okay, so look at
that. So that is actually what we're
seeing is the top fin. It may look a bit strange now, but when we paint it, it's going to make a lot more sense. So what you have here is the
tail just kind of turning, and we're going to
see a little bit of that lighter some
highlights here. That's why I'm just
drawing this little tiny line here that is lighter. And then it goes down here. Let's just clean that up
a bit. To a little tip. Okay. I hope that makes sense. Okay. But so far, this
is looking beautiful. So let's just clean
this up a bit. So the lines here
before we start drawing some very rough guidelines for our I'm just flattening this up a bit before it kind of
comes to a tip there. It's just such a beautiful
animal. Gorgeous. Okay. Look at that. So I'm just stepping up
and having a good look. So we have a gorgeous gorgeous,
gorgeous whale shark. I might have drawn my
whale shark a little bit longer and more slender
than the photograph, but I actually love this look. I don't feel like I
want to fatten it up. I think my photograph
that I provided for you was taken in an aquarium. And like I just feel that yeah, the lighting isn't
great, as well. So I'm just going to thicken this part up because
now that I stood up, I had a bit of a look, and
I think it was a little bit too narrow, but don't worry. We don't have to move
that fin or change it. Okay, 'cause I think
it looks good. Okay, so there, we've got
the overall shape anyway. Okay? All right. I'm just wondering if I need to make this fin just maybe a little bit bigger since I did
take it out a little bit. I guess I could just
extend this just slightly. This is the part of the drawing process where
we're now making little, you know, refinements
because we've already got the main shape down. So all the hard work is done now and now we can
just take our time to just make work on the
aesthetics a little. Okay. Taking one last look up here. I think it looks really
great. Beautiful. Let's now start just putting down a few lines
because I just want to put down a few lines like so the whale shark has
a few ridges on its body. It's not going to have
anything up here, so we can start erasing away
a little bit of that line, the central line that
we drew earlier. Okay, so let's do that. A now that I'm
looking at it a bit, I think I want to just this
photograph is a bit tricky because I've got
some fish swimming in the front on the
top of the picture. So I just want to extend this to the back a
little bit more. Okay, but no big deal. We've already got
the main shape done. I'm just going to
make the dorsal fin just slightly longer. I have drawn a
curvier whale shark or more like it's really turning as it's
swimming, which I love. I love the way this is looking, but I am still looking a
little bit at the photographs. So what we want to do now,
you don't have to do this, but I feel like I just want to mark the shadows
from the photograph. You can see a very
defined shadow over here. Okay. I just want
to mark it because all these little things
are going to make it look more realistic later. I also see a bit of a shadow coming down
here that's being cast from the lighting
above by the dorsal fin, the large dorsal fin. Maybe we can just put this down. You don't have to do this. I just want to do this so
that later on, I don't know. I have a bit of a guideline, but you can easily
do this later, but I just want to do this now because I'm just like that. I also want to there
is some shadow here that we're going
to just cast over here. Because of the tail. The lighting for this seems to be coming from this side above, but it's also coming a
little bit from the left. Hence, it's casting a
shadow on the right. So the whale shark actually has, let's see, my notes. How many ridges does it have? It has Three prominent ridges. So we clearly can't see
all of them right now, but we have a very
obvious ridge over here. And how much detail
you want to put down really depends
on you later. Because my whale shark
is curvy, this ridge, it runs all along the whale shark's body on both sides and it's
quite beautiful. And you also see the top part
here that's also a ridge. But I feel like I
want to just move this slightly because I have widened my whale
shark over there a little towards the left. So there is this ridge here
that we can paint later. Okay. I might just erase some of these lines just to clean up
my work before I paint it. Those are the prominent
ridges that I see. Okay. Now, before we paint
our beautiful whale shark, I just want to we're not
going to put every spot on right now because we'll be
painting over it anyway later. But what I want to do is I
really want to do a few of these lines to illustrate the contours of this whale shark so it doesn't just look flat. This will also help provide
a guideline for when we do add those beautiful dots
that it has, that pattern. And just a little bit of trivia, do you know that
the patterns that each whale shark has is very
unique to the individual. So they are really fingerprints the way
they are to people. So that's how scientists can identify an
individual whale shark. So let me talk you
through what I'm doing. I'm trying to make this
look like it has contour. So rather than doing
straight lines, I'm kind of following the contour of the
whale shark's body. So as you can see, what we're
going to do is these rings, not rings, sorry, these circles, these dots, whatever you
want to call them later on, they are going to be
inside each of these, um, each of these little
segments that we're drawing. So remember, no straight lines. We're doing curves. All right? Just little curves. And, we can't see all of them, all these curves clearly. And also, it's fine
for us to deviate slightly from the drawing
because this is art. So we're not looking to exactly
replicate these patterns, we're just going
to suggest them. Okay. Sorry. I'm just getting my I was just
looking for another eraser, but I couldn't quite find
it, but that's okay. Once we finish
doing these lines, try and think about the
quantas of the body. It might curve down more at certain parts because I've chosen to draw a very curvy guy. But then as we go, these are so I'm just
going to draw this side, you can't really
see it right now. I'm just going to keep
going on this side. What's going to happen
is they're going to start becoming straighter as we go along, these lines are becoming wider, obviously, we don't have to
do it all the way to the end. Then the pattern of
the whale sharks. Let me just continue down here. I might as well just do this. These are just guidelines that we're going to paint over later. And as we get towards the head, we're going to see
a few dots here, but as we get wider wider, we're going to see more dots in each segment, if
that makes sense. It will make a lot more
sense when I actually draw this later when we actually paint this
and we keep going. Now, I don't want to
do too much over here, but I do the whale
sharks patterns are such that there are a
few little curves as well. There are it's not just dots, it's also lines and the the contours of the dots kind of change,
if that makes sense. So we're not aiming to copy
the photograph exactly, okay? And everyone will be able to tell that you've drawn a whale shot by the
time we're finished. Okay? So I'm just going
to to leave it at that now because I feel
like we've already put down everything that we really need to do for this photograph. I think maybe I might just even though I don't see it very
clearly in the photograph, I want to just put down
another ridge over here about equidistant from this one is from the very
midline that we drew earlier. So this ridge is supposed
to go all the way here. So how much how much
detail we want to put later really depends
on you. Okay. I guess we could
follow this ridge too. So a whale shark has three prominent ridges on
the sides of its body. It is a very, very
unique animal. So I think all these little details later,
we can do it later. The only thing that I
want to do now before we stop sketching is I'm
just looking to see that, this is almost flat, but that's just a little
bit of a curve, right? It's almost flat, the head. And I think I just want to make that just a
little bit bigger. So I'm still refining it. You know, you can refine it as much as you want
before you paint it. Okay. And we can't really see the
eyes from this view as they are literally right at the corners here and
they're kind of, you know, out of our view. They're below. So we
don't have to put that, and I think it looks
better just like that. So here's the completed
whale shark sketch. I apologize if you
couldn't see the very, very tip of the
whale shark's tail just now during the
sketching as I'm working with a very
large A three size paper in portrait format. I might have inadvertently moved the paper downwards ever so slightly when
I was sketching. But I love how my sketch turned out and
I hope you love yours too because I cannot wait to start building up a
gorgeous background for a whale shark to cruise in the next part of this class. So please join me then.
4. Painting the background Part 1 : Hello, everyone. I hope everyone is really
pumped up about this next step, which is we are going to paint our background
for our whale shark. And before I actually
start executing our plan, let me just talk you through
what we're going to do. So we already have our beautiful whale
shark sketched out, and it's an above view. So I was thinking because whale sharks tend
to be, you know, on the grayish side and they
tend to look kind of dark, I thought for our background, we could do something that
looks very tropical like think Maldives water where it's kind of like
turquoise waters, where they will be quite
the waters are quite light, and that would really
help our whale shark to stand out against
that light background. And the great thing about
this method too is, what's great is we can just paint all over our whale shark. So we don't have to worry about painting around it and
being very careful. So this is a great idea to also make your whale shark just pop against
a lighter color. And what I want to
do besides put down a turquoise background is
I'm also thinking I want to use a synthetic mop
brush to kind of add a bit of a speckly sort of look to the water with a
darker color like think, a teal color, maybe some indigo or pains gray to give
the impression that, you know, it's also something
interesting to look at there might be rocks below
or a bit of corals below. So these are all
some ideas I have, and to give that
rocky look as well, I want to use a little bit of
rock salt that we're going to sprinkle in like we're
marinating something to eat. We're going to sprinkle
that in because that's also going to produce
some lovely texture, which is going to add to this, you know, the illusion of
rocks in shallow water. Now, this is going to look great whether we choose
to do that or not, but every time I like to do something a bit different
for the background. So I think this is a cool idea, and we'll also be, you know, trying out a few different
new techniques that we haven't done before to create an
interesting background. Once again, you are more
than welcome to choose whatever colors you want
with any of my art classes. I never ever restrict you with the colors
that you want to use. So that's my plan. If you don't want
to do turquoise, you are fine to use
a lighter blue, another light blue color,
like a cerulean blue. You can even go
dark if you want, but the reason I chose these colors is because
I want the whale shark, which has a general
darkish gray body to really stand out
with the light colors. Now, before I start, I also want to just
talk very briefly about something because we're not
going to do the spots now. We're not actually going
to paint our whale shark. We're only going to paint
a base color over this. That includes the whale shark. We're just going to be painting
the turquoise over it. So long story short, you could use muskin
fluid to preserve the white spots of
the whale shark, but I'm choosing not to do that, which is why I'm just going
to paint right over it. Before I talk a lot again, I've decided to use
some usking tape, so not muskin fluid to create
a little border around a just I'd like the look of a neat
border here because I feel like the color that we use, the turquoise is going
to just look lovely. And I just want to frame
frame that nicely. So I may just move
this out of the way. So we're going to create a nice clean border around
our painting. So I've showed you how to use masking tape before
in past videos. The very important thing
is when you apply it, just make sure that
you smooth it out, that it's really stuck
to the paper because you don't want any air
bubbles underneath there. Otherwise, it won't create
that nice neat border, and paint will get underneath. So I've said that before in
the past in previous videos. So yeah, sorry if that's
a bit repetitive, but I just feel
like that's a very, very important step if you want the masking tape
to actually work. Okay. I've got one more to do, and then I can't wait to start
putting some colors down, and I'm sure you all are. This is going to be fun. This is not going to be
stressful, I promise. Okay? Because at
the end of the day, it's a background, and it's just going to
complement our whale shark. Very carefully,
just checking right now before I lay any
more paint down, flattening it as much as I can. Okay. So I can't wait.
Let's get going. I might just sorry, just maybe zoom in
a little bit here, just so you can see
what I'm doing. G to put the masking
tape away now. And let's get our colors going. So you see my lovely
palette here, and I'm just going
to use my colors. So this is a beautiful
turquoise blue. As you can see, that color alone by itself is so gorgeous. Beautiful. And I also want to use a little bit of this color which is called emerald green Nova, and it's in this set by
a brand called Hobein. But a color that's very similar
to this is VidianGreen. It's has a bit of a emerald
sort of look to it. It's a cool green. And later on, I will also be using some of this
color indigos. I'll be using that later on. Okay. And I don't think I'm going to use
gray just yet, okay? Because gray is pretty dark, but you know what? I guess we could just
have it in case we want to mix a little bit
in. So here we go. So gray is really dark. We will be using it for our
whale shot later anyway. So if you're ready, let's take a deep breath. This is going to be fun.
Nothing to be nervous about. I've got my flat brush, which is 1.5 ", okay? And I've used this
in the past before. So I'm just dipping it into my nice clean water
jar over here. And all we're going to do
is we're going to apply a nice even layer of water.
That's all we're doing. You don't have to worry so much about making
this background a perfect base layer
that's all even because we actually are going to apply texture to
this with the salt and also using the mop brush to add some dry brushing on later and also a little bit while
the paper is wet. But then we're going to build up the intensity in
some areas later. So that we have that
nice look of, you know, our lovely whale shark just cruising on top of rocks
in tropical water. So if you have to stand up, just stand up to
make sure you've got a nice even sheen of water. It shouldn't be wet. You shouldn't be seeing
pools of water on it. You should just see a
nice even glaze of water. And I think that means
I'm ready to go. So what I'm going to do now is I'm just going to use a smaller flat brush
and I'm going to apply some of this
beautiful gorgeous color. And I'm going to go
over the whale shark. That's completely fine with me because the whale shark is dark. So we're going to be building up some color on its body later. If you find the pain is a
little bit too too thick, even it up with water. I'm doing an almost flat
wash, but don't worry. We're going to just vary a
bit of this color later. So as you can see, a beautiful
blue base to work with. I'm really excited. Let's just I'm just going to continue
with this turquoise base. It's okay if this part
looks a little bit darker, that's absolutely
fine because I want to create some variation. See this part looks a
little bit lighter and that's fine because we
want a bit of variation. Now, I'm just going to dip my brush into this beautiful
green and I'm just going to maybe add a little bit
of green here and just let it blend because we want the waters to
look a little bit varied, this is the ocean. It's not going to
be a uniform color. I'm just adding this in. Totelluth, I might switch to a round brush
because I just like the way a round brush looks like when I
apply the paint on. And just blend the
color if you want. You see it is naturally
blending as well. Maybe I could put a little
bit in the corner up here. This is all while
it's still wet, okay. Maybe some green
near the tail here, just varying it a little bit because the whole
point is we want to create a beautiful
tropical warm water look. Like it's going to do some here. My pain is all still
very, very wet now. I might drop in a little bit
more turquoise over here. My paper is now still really
nice and wet, it's fine. As you can see, I'm going near the whale shark and
that's totally fine. Maybe the top here, I might just just darken it
a little bit there. Okay. You can even mix a little bit of
these colors together, the turquoise and the green. Maybe I can put a little bit more green maybe around here. It's all good. Okay. This part looks a little like it could
use a little bit of green. Okay. Now, before my
paper starts to dry, I'm going to mix a color which is I'm going to need a little
bit more turquoise. I might just put a bit
of turquoise down here. I'm going to mix a
color of turquoise. I might use a
smaller brush to mix this turquoise and a little bit, let's mix it over here,
a little bit of indigo. So this is making I'm going
to have to dilute this down. It's very thick. It's
like a telyt color. That's what I want
to try and do. Okay, see, you can
see that color. Maybe I might mix just a little
bit more indigo into it. And while this is wet, we are going to I might mix just a little bit
more indigo. All right. So I've just mixed
the teal color with the turquoise
and some indigo. And now I'm going to
use my mop brush. The synthetic brush I
talked about at the start. Now, all we can do is
it, wet your mob brush, but you're going to
need to use a rag or a paper towel to just I don't want too
much moisture on this. This step is very important.
Test it out first. This is too much water. What I want to do is I'm just going to get rid of some of this
water by just dabbing it on. I want a consistency like this. As you can see, I'm
now going to start just dabbing this on. I might have to use a little
bit more indigo in this. What this is doing is, I'm making some little shapes of rockiness just the
mixture can be too wet, though, test it out on
a spare piece of paper. This is a little bit too wet. I'm just going to
try and use a little bit more of it on
the piece of paper. This will all make sense later. So we can do a corner here, but I want to try and make
this look a bit varied. But at the same
time, I'm not going to touch the whale shark because I really want the whale shark
to stand out on its own. And we can also vary the size and the shape
of these patterns. So I can go near
the whale shark, and this is just a
matter of preference, but I don't want
to go too near it. And maybe we can
have some over here. So my mop brush, if you don't have a
mop brush like this, you can even use an old
round brush that you, you know, you don't really care that you're
not too precious about an old watercolor
round brush is fine, too. Now, before my mixture
completely dries, though, I need to
put some salt down. It's a bit of a race against
time here a little bit. This color looks a bit dark,
but that's okay with me. We got a little bit
of a darker color going on here, but that's okay. So to try and make it look
like make irregular shapes, don't make it look
too neat and also, we can do little
shapes, bigger shapes. As you can see, you can stand
up as well if you want. We're building up this
rocky look below, and it's also spreading a little because it's
wet into the um, into our base layer. So it will not look
as defined now, and later on, we
can build that up. But because my paint is
starting to dry now, I want to use just a little bit this is what I call
the marinating part, just a little bit
of some rock salt. The rock salt is
pretty. Pretty big? I also thought that this
might I might also need to maybe have smaller finer salt. I just happened to have
some salt here as well. That's a little bit finer, so maybe it will interact
more than with the rock salt. It will interact with the
paint more, is what I mean? So everything dries pretty
quickly, as you can see. And because of that, I just want to, yeah,
put my salt down. Okay. And at the same time
when that's happening, I can also just like this is not really going
to disturb anything. I just want to maybe just do a little bit more of these patterns while
that's going on. As you can see, the salt has landed in certain
places and it's making, it's making some of those patterns already,
those salt patterns. I suppose I could stop now, and I can do this later. I'm going to continue to dry brush on some
texture later on. But for now, I think
we can sort of, let that dry and maybe we
can take a little break now. And when we come
back, we can add more of the dry brushing on. So why don't we just take a break if you're happy with
the salt that you put down. I think I just want to put
a little bit down here. Oops. A lot came out, but don't worry
about it because I'm creating I'm going to create a texture of rock, it makes sense to use some salt. So if the rock salt is, you know, too large, it will create a little bit of pattern, maybe not as obvious. So it's always good to
also have table salt, like, on hand if you're
going to use salt. So I'm just going to let
this completely dry now. So don't move the salt around. Let this completely dry first. Okay? And when we come back, we are then going to dry
brush on even more texture. I'm sorry if this was
a little bit rush because we are working a little bit against time when we want
to do the add salt to it. But I promise you,
it's going to look really amazing when
this all dries. And when we see when we dry brush on the
rest of the pattern. So why don't you go
have a break now? Wait for this to completely dry, and I will see you in the
next section of this class.
5. Painting the background Part 2 : Hi, everybody, and welcome back. And I've left my
painting for about 1.5 hours and just went for a walk to let this
completely dry. So I should be completely
dry to the touch. And what I want you
to do now is to take your painting and maybe go outside to your car porch
or to your balcony, wherever you live,
or even over a bin, your kitchen bin or something. I want you to use your fingers. So you should have
clean fingers, make sure they're
not wet or anything. You might just want to
dry them just to check. I want you to gently
use your fingers to brush off all this
salt, like just, you know, in an outdoor area, just so it doesn't
mess up the floor of your house or like
I said, over a bin. So after you do that, let's come back here and look at the
final patterns that we have. I will see you back
here in a second. Okay, and we're back. And I hope you've got all
the salt off for most of it. Okay? It might still feel a bit rough and that's
completely normal. That's absolutely fine. So I'm standing
up now and having a really good look at
the overall effect. Now, when I was doing
this technique, when we had a wet background
and I started using the mop brush to mix up a
teal color and to put it on, it ended up being a lot
darker than I thought. I think I might have mixed
too much indigo in with the with the turquoise. But that's absolutely fine. I was actually going
to mix a darker color later on and layer it on
the top once this was dry. But then when I saw my
paper was starting to dry, I had to work quite quickly, and I might have
inadvertently put a little bit more
indigo than I wanted in because I had to work quickly before I put the salt in
before the whole paper dried. So it's still completely fine because I want to turn
these clums into rocks. So even though I wanted to
maybe have a lighter color and then go over it with dry brush actions to
turn them into rocks. This is fine. I can
absolutely work with this. This is what I like to
call the ugly phase of the painting. And every painting has
an ugly phase where things look a little
bit vague and you're wondering
what's going on here. So, what the plan is right
now is these are fine. These are actually
these dark areas are going to be large
clums of rocks. But because with a little bit
of help from a brush later, we're going to add
shadows and pick out a few rock shapes
and just give them a little bit of definition and they're going
to look like rocks, and that's going to
be absolutely fine. As you can see, the salt
patterns have added that nice, sort of like a speckly look that we will see with
rocks that we'll see, you know, on corals, it gives that rough texture
which I really want. And I'm absolutely
fine with this. We can actually work
really well with this. The only thing that
I'd like to do now is I want to mix a
lighter teal color, and I'm still going to
use the mop brush and I'm just going to mix a lighter color and
then I'm going to just speckle it and go outwards. All right, outwards
from this clumpy area. So this kind of
looks like, okay, there's some big rocks here
and it's gradually forming maybe little pebbles and gradually just going
out to the sand. So that's what I want to do now because I feel like
they look very stuck against the beautiful
light blue green background. Okay? So I hope
that makes sense. So what I want to do now and the reason I'm doing
this is just to have that gradual the darkness kind of gradually going into the light rather than just
looking very clumpy. So what I want to do now is I'm going to I hope you've
washed all your brushes, by the way, and you've also
rinsed your water jars. You've got some fresh
water with you. So what I want to do
is I'm going to mix. I hope you can see
this. I'm just going to probably
mix it over here. Let me just check the
camera. You can see it. Great. I'm just going to get some of this
beautiful turquoise color. I'm just going to add a
tad bit of that green that I named just now that's like aridansalled emerald green Nova from this set, but Vidian green will be fine. We're just going to do a
little test on the paper. So this is a beautiful color, okay? It's very beautiful. But what I want to do
now is I'm going to add the smallest amount of indigo to it because
what I'm after is a teal color that's
lighter than this color. So this is looking
okay, looking okay. I'm just going to mix a
little bit more of that in. So we don't want to go too dark. So I think this is great. Okay? As you can see,
it's a teal color. The other color just got
very saturated with indigo, but that's absolutely
fine because I was actually going
to go over the rocks with indigo anyway, but now I'm kind of doing stuff in a bit of a reverse order. But that's totally fine. So here is my mop
brush from just now. I'm just going to clean it and make sure it's
really really clean. It doesn't have any more traces of the indigo mixture on it. And look, I'm actually
going to dry it a bit because I want to be able
to speckle on this color. Yeah, this is good, okay? And we don't want to
add too much water to the color. Let's
start up here. So if you see what
I'm going to do now, I'm going to kind of make it look like it's
dark here and it's gradually kind of going
out into into the sand, so it's getting a bit lighter. And I'm just kind of holding
my brush almost vertically. And it's going to get kind
of sparser as it gets out. Okay? And you can apply more pressure
when you're going inside towards the middle. So that's what I'm doing
now. I'm just kind of whatever pain I have left, I'm just going to kind of
bring it out in a bit of a random sort of as always, I don't want to touch the whale shark because I really want the whale
shark to stand out. But as you can see,
this is what I'm doing. And this can look like either
little pebbles over here. And then gradually getting
smaller and into the sand. As you can see, I'm
standing up now. We're gradually
blending this color out and maybe later on, we can even add a
little bit more indigo to kind of make the color blend
it out a little bit more. But right now, I
just want to try and reduce that very stark contrast between the dark clums
and the background. That's what I'm doing now, ok? I have very little
pain left now on my brush as I go out Okay. And so I don't want to touch the whale shark,
as I said before. I just really wanted
to stand out. So that's what we're doing. So we're gradually
going outwards. And I'm going to
do the same maybe let's do this shall I do
here? Let's do this area. So we can sort of maybe take
that out here a little bit. So we want our brush
to look like this. We don't want a pointed tip. We want it to be quite dry because we don't
want to put on, like, clumps of paint, we just want to
put on, you know. We want the speckled look, and so we need to keep
the paint quite dry. And as you can see,
that's already starting to look a lot better. It's starting to look
a lot more blended. So we are leaving the
ugly face behind. And look at that.
See, this color is gradually just blending
into the background, and we have it looks
so much more natural. Okay, so we're starting
to get that really nice, maldves look, you know, like, to the water, like beautiful
tropical water because whale sharks actually only
live in tropical waters. They do need a certain
temperature to live. They're not like, you know, humbag whales or killer whales. They don't like cold water. And in fact, they are
migratory animals and they tend to migrate
to anywhere that has, you know, warm waters
because that's where they that's the main
feeding ground, I believe. I did nod out a lot and do as much research
as I could about, um, about these
magnificent creatures before I did this
class because I really wanted to have a
good understanding of them. That's what I do for
a lot of my classes, actually, all my classes,
whatever subject it is, I really want to know as
much as possible to get an overview of the creature
before I paint it. I think it's useful because it also helps
you to learn about its anatomy and why it's
shaped a certain way, depending on its lifestyle, depending on its
feeding methods. As you can see, I'm standing up. It's looking so much better. There's this
beautiful gradual, um Gradual blending. Okay, so I don't have to blend
this area too much. This wasn't actually that
dark and I don't mind a bit of that nice green
popping through. Whoops, just when I said that. Try not to be so heavy handed
as you go outwards, ok? Because we want this to look
sand and pebbly looking. Okay, so I'm going to
move on to the next patch now and I can always stand up later and do an overall look. But something's
bothering me here. I think I really need to put a little bit more paint
in this area here that's near the very
dark area of rocks, and I just want it to
gradually come out. Okay, so that's looking
a lot better now. And before I mix up
more of this color, I might just do this
smaller area over here because I'm starting to
run out of this teal color. So I'm going to
have to mix more. So I might as well
just continue with this speckly sort of pattern. Okay, maybe I don't have to do it all around
here outwards. Maybe it can come over here. All right, so let's just
take a little break. I'm just going to leave
my brush over here, and I'm just going to mix
up more of this color. We take some turquoise, and mix it with some
of this lovely green. I want to just test the color
out so it's a beautiful, I love this color. How
beautiful is that? This is where we're
just going to add the slightest amount
of indigo paint. We don't want it too dark, but I am going to need
a little bit more. We definitely don't want
it as dark as just now. Okay. I think that's
a good color. That's the teal that
we want. I'm just going to switch brushes now. So if you feel like you
know what to do now, I just want to do this
area a little bit more. If you know what to do now, you don't have to watch
me do every single rock. Feel free to speed up this video if you feel like you've got the hang of it and
you know what to do. This area was very dark and clumpy and look at
looked a little bit squarish. What I'm going to do is I'm
definitely going to have to blend this area
out a lot more. It's okay if areas
overlap, that's fine. But at the same
time, I'm going to leave that whale
shark untouched. Okay, that's looking
good. How about we do a little bit in this area? Because it's faded already. I don't feel like we
need to do a lot. Maybe just a little bit of
this sandy sort of look like, it's the rocks are getting
smaller and more pebbly. As we go outwards, Okay. Yeah, that's looking lovely. I'm just wondering if I should maybe maybe we can do a bit of sparse brushstrokes
here a little, just so the area
doesn't look too bare. Yeah, I think that looks better. I might do the same over here because we don't want areas to look a little bit too smooth because it is supposed
to be the ocean ground. If you have clumps or
boulders and stuff, I think it's probably not
going to be so smooth. As you can see, this is
looking much better. It's looking much more natural, it's looking much more blended. So my advice to
you as students is don't get scared
of the ugly phase because as you build
up your confidence, you will find that
you always able to correct anything that
you find is a mistake. You know, you may
have a plan like I did to execute a painting
in a certain way, and sometimes things just
don't go according to plan. For instance, I'm working with a much larger piece of
paper than one that I practiced this technique with the paper started
drying and I was like, Oh, I really need to
start putting salt down. And in the end, I mixed a
color that was quite dark. But, um, as you can see, if you remain calm and you use all that experience
that you've had in the past and you use a
bit of your imagination, you will find that
anything is correctable. Okay, so I'm just going to I can already pick out the
rock shapes for this one. Like, I'm just
imagining now, oh, I'm going to put some
shadows on this side, and they're going to
look really lovely. They're going to look
like nice rocks. Okay, so as you can see, it's looking very beautiful,
looking very natural. And those areas that you
find are a little bit bare. You can just very
gently touch your brush down very very very, like what am I supposed to say, in a sparse way such
that, you know, you just have very little
dots there of pain. But yet it still helps to blend the whole
picture together. So yeah, we're
going great, okay? And we've also now done a background that's
completely different from all my other classes that
I've put out of sea animals, like, you know, you now have a very interesting
background to look at. That's not just plain blue. So yeah, for me, it's always worth
taking risk in art. That's how I feel you end up really growing and then
you learn something new. And yeah, I just feel you really grow
as an artist that way. Okay. So remember, if you feel like you
already know what to do and you don't want to watch me do this for
every rock clump, please feel free to skip forward and work on
your own painting. And also remember, if you're working with something
as big as A three, which is what I'm working
on, take regular breaks, stand up like I am
right now to get the overall view
of your painting. Because when you're painting up close and you're
sitting down, you may not realize how many
brush strokes you've added. You might not
realize how dark it is overall when you look up. But I'm just loving
these colors. So I'm starting to run out
of this Teo mixture again. So I'm going to have
to uh mix more of it, but I'm just using whatever's
left in my palette right now to just do the
smaller clums of rocks. Try and keep it natural. If you find you're seeing too many very obvious
brush strokes, you may have to maybe dry your brush a bit or maybe you're pressing down a
little bit too hard. You just adjust the pressure at which you're pressing down. I'm just going to use
whatever leftover pain there is to very lightly
touch these areas that are closest to the whale
shark without actually touching the whale shark because it's going to stand
out very beautifully. Okay. That's looking
very pretty. I'm doing that step again
right now of mixing more of this teal color I might have
to get more paints out, turquoise with some of that green to make
a gorgeous color. And I'm just going to there. That's a beautiful color. And now we're just going to add a little bit of the indigo
in to get that teal color. Leave this aside for now. My my mop brush is fine, it's very dry, so I'm just
going to keep going with it. So we're gradually
blending this out. And maybe I might just kind of disguise that
a bit. The paintbrush. The strokes there looked
a little bit straight, the green ones, but it's
okay. This is the ocean. Color variations are good. Take regular break, stand up, have a look at what your painting is
looking like overall. I seem to be running out of
this teal color very quickly. I'm going to have to make more. This looks like it
might be a little bit dry and also I feel like the
color looks a bit light. I've just scraped a
bit of that color from my little well of indigo pen just to try and I just felt it
was a bit light, but I think it's okay now and And using whatever leftover
pain I have to just kind of fill in a little bit of that bare space with
some of these marks, so it's just not too bare. Let me stand up. But it's
okay I don't mind having a little bit of these lighter areas. I
think that looks good. But nothing too contrasting
is what I meant to say. Nothing like very dark area and then suddenly
very light area. So that's why I'm doing this technique of just
trying to gradually lighten the color as it goes away from these big
clumps of rock. Okay. I tried to use the
paint as much as I could, but now I'm going to
have to mix more again. You know how to do this by now. I'm mixing turquoise or whatever light blue you chose
to use with some green, overall, we want to keep
the mixture quite dry. We don't want to add
so much water to it, please test it out first. Test it out on a piece of paper before you put it
on your painting, just so you know whether
it's too light or too dark. See, it's a little
bit light for me now. I'm going to have to take
some of that indigo. That's a great deal.
Okay. All right. We're almost done, so don't
despair and then we'll take a break for a little while
before we come back and pick out a few rock shapes. But overall, that salt step, as you can see, has added some interesting
texture to look at. Try and make this look natural. Try and naturally
blend it out, right? You can even go back over
this area if you want to make the brush strokes look more natural and
then start going out. Change it so you don't
have very straight lines. Like I said, you can have
some areas here that overlap. This area looks a
little bit plain to me, so I'm just going to
go over that as well. Okay, so we're coming very close to the end,
and unfortunately, I think I might have
to make a little bit more of this teal mixture. So please, I hope you're not
getting too bored of that. But I don't want to make a really huge amount of teal mixture because
I don't know. I think it's easier to
mix it to the right color that you want when
you're working with less paint as opposed
to more paint, and then, you know, that's
just my take on it. Okay, I'm starting to
run out of color again. Let's just do this
little areas over here that we don't want
too much paint on, that we don't want
to darken too much. So we're just using whatever
paint is left on our brush. The areas near the whale shark. It's okay if a little
bit goes on the fin, don't worry, we'll paint over it and it'll be a lot darker. That's looking
really good already. I'm going to mix the last
batch of this teal mixture. Here's a little bit
of the blue again. Picks up some of that. Okay. Hopefully, this is the
last amount we have to mix. Well, I just stood up again, and I think it's
looking so good now. It's looking such an interesting
background to look at. And yeah, it's actually
looking very nice and real. I've mixed the green
in and test it out. We got this beautiful
color that's consistently what
we've used before. Now we're just going to
take a little bit of that indigo and mix it in very slowly because
indigo is a dark color. Too much of it will
just completely darken the entire mixture. So, okay, I think I'm getting a little
bit better at this now. Like, I just want a little bit, maybe a little bit darker
because we're working with some pretty dark
rocks over there. I'm just going to mix
it a little bit darker. Hopefully, this is the final
time we mix this color. So I'm going to go
outwards a bit. Trying to make this
look natural too. I think we can definitely
come out over here and frame our whale shark a little to help
it pop even more. So let's just try and leave a very slight little
perimeter around our whale shark that's not colored because that will
help the dark colors stand out so much if we have a little narrow strip that's lighter around
our dark whale shark. I'll make it pop so well, which is why I chose not
to put any rocks near the whale shark. Okay. I'm just going to take a
step up and look at this, and I think this is
looking so beautiful. It really is. It looks so cool. I'm now we can use the pain to reinforce any areas that we feel a little
bit too light. Now, like I said before, some of these light
areas, they're okay. We don't have to color
everything unless it looks really bare
and you really want to. See, I don't want
to cover too much. Maybe we can reinforce
some areas that are near the dark areas so that they look like
they're gradually going out. As you can see, my
paint is of a very, very dry consistency because I don't want to work
with too much water now. I'm dry brushing
on these patterns. So it's important not
to use so much water it'll just look very, very pale. I'll look very weak, and then we're not achieving the effect that we
want to achieve. This is already looking
so good now that we're using this method to
blend the areas out, but just wait until we pick out some of
these rock shapes. It's going to look so realistic and dreamy at the same time. Okay, I hope you're having
fun and I hope you're not feeling at all
stressed because I'm not. And I'm someone with anxiety, and I'm not feeling
stressed at all here because I feel like this is
already looking so good. I'm going to leave these
areas a little bit lighter because I feel like
it's something interesting to look at, okay? So when you're satisfied, darkening kind of well, darkening the areas around
it and gradually going outwards and
applying less marks. And what is this going on here? What is that? How did
this mark just get here? So you need to be aware that sometimes I don't
know what happens. Like, what is this?
Is there some paint? Yeah, I don't know how
I got some paint here. Maybe my brush might
have accidentally touch some indigo, but
look what I'm doing. I'm using a damp, clean brush
to kind of just lift that. Uh, Yeah, that's okay.
That looks fine to me. Okay? Like, I think my brush might have accidentally
just touched that. It's like barely noticeable now. Okay? So just do this. See, like I said before, mistakes are correctable, okay? It's been very I
kind of remember the last time I threw a painting away
because I felt like, oh, I couldn't
correct a mistake. So as long as you
stay calm and you remember everything that you taught that you were taught or, you know, and how and
use your imagination, you can usually just
fix any mistake. So I added a bit of water because my
brush was getting dry, but this is too watery, but I'm just going
to stand up now. So if you're happy with the overall look
of your painting, just make sure I've been
guilty of doing this before. Don't overdo it, with stamping the brush
with the dry brushing. Because I'm looking at this
now and I already think, I think this is looking really good and I don't want to overdo it also because I haven't even added some
definition to the rocks. So that's going to give an
overall darker look as well. So just keep that in mind. But if you are happy
with how this looks now, why don't we stop? And why don't you go
and take a little break and clean your brushes,
save the paint, clean your brushes,
change your water jars, and let this completely dry. And when we come back,
we're just going to spend just a little bit more time just picking up a few
rough rock shapes. And then we've completed
the background. And we can get to start
on this lovely guy now, which I can hardly wait, like, this is the
star of the show. So go have a break, and I will see you back here
really, really shortly.
6. Painting the background Part 3 : Hello, everyone,
and welcome back. Now, just look at our gorgeous background.
I hope you can see that. We have all this beautiful
texture going on, and now it looks
more natural that our clums of rocks are kind of coming kind of gradually blending into the
water background. Now, I don't want to spend
too much more time on this, and I'm standing up now having
an overall look at this. What I want to do now
is I want to just pick out a few sort
of rock shapes, add a little bit of definition. As you can see during the break, I just decided to add
a little bit like I was trying out just adding a little bit of
indigo underneath. Some shapes that I thought
look quite rock like. But just remember,
we don't want to put too much detail into this because I am, you know, the whale shark is the star
of the show, and technically, this painting shows rocks
that are submerged, you know, that are underwater. So we don't have to give a lot of definition
to each rock. That's what I intend to do. I just want to pick
out some rock shapes to just add a little bit of
definition to some of them. So I'm going to
use a round brush, and I'm just going to
take some of this, indigo that we had in here. What I'm going to do is
I'm going to pick out maybe some rock
shapes like that. Because the light is
kind of the way we drew our whale shark shows from the reference
photograph that the shadow was on this side, a little bit on this
side, which means the light is coming
from the top, but it's also coming
from the left hand side. What I want to do is I
feel that the shadows of the rocks should also
fall in the same way as, um, as what we see
on the whale shock. Sorry, I took me a while
to articulate that. So what I want to do now is I'm just going to use a
bit of indigo to pick out some shapes of rocks
that I see with my eyes, you know, just based
on I don't know, using my imagination and also
using the way, you know, the paint the speckles were for, um when we painted it, I just see these rock
shapes in front of me. This is a bit of
using my imagination and also seeing where
the light falls. That's what I'm
doing here, okay? I'm just adding a
bit of definition to what looks like a
little rocks to me. Yeah, I think that looks cute. I'm only going to do this, I
feel like for the So there, we got a bit of rocks going
on, some rock action. I'm not going to do this
for every single part here. So parts that are a
little bit faded. I don't think I'm
actually really going to focus so much on that. Use your imagination and see, you know, little shapes and just try and add a bit
of shadow underneath them. So I'm standing up
now, and, yeah, we look like we gave some nice just outlining a few rocks and we don't have to
do everything as well. So I'm adding a bit
of shadow here. Yeah, this looks fun. Maybe this can be kind of like a bigger weird
shaped rock. I don't know. I don't want to, like I said, spend too much time on this because this is
underwater as well, so it might not be as clear. But it is fun to pick
out a few, rocky shapes. And maybe just a couple
more in this section. Yeah, so Yeah. I hope you have fun with this. Maybe we can just pick
out a couple more here. Oops. I'm going to need
to wet my brush a bit. The paint has gotten
a little bit dry. Yeah. So the salt did
come in handy over there. Like to do to these cool rocky speckled
patterns on the rock. Your rocks might look a bit different from me if
you've been following the steps because
obviously you might have placed paint down
differently from me. So don't get too
bogged down on that. We can easily tell that
it is rocks, okay? Maybe for some of
these little areas, we can just kind of, like, or even as
it comes out here. I feel like maybe
we could just do little shapes that are not as defined because this
is also underwater. Okay. I see maybe some light
shapes here and there. I'm just going to stand
up now. That looks cool. I also feel like I'm also going to just
take my mop brush. Remember that? I'm going to
be very careful with this. I just want to maybe
add a little bit. Let me just Just a little bit of speckling
with the indigo. Near to the rocks. Okay. Just to give it the illusion that there
are some maybe pebbles, but we're not going to do
it as intensely as we did just now with the teal color. Just because I want to just maybe cover certain areas up in here without having
to put lots of rocks. Because I felt like maybe
this area should be darker near the rocks
and then it's going to slowly become spars with just maybe a little
bit of pebbling. Once more, I used a very dry brush that just
barely touch the indigo pane well to just build that color out and blend it a little bit
outwards as well, just to go a little bit
like a coat over the teal, just because I feel like it's still contributing to adding some dimension and also giving the illusion
of little pebbles. I think that part looks great. I don't think we need
to do this anymore. Okay. If you get the idea, you don't have to watch
me do every single rock. I know maybe some of
you want to skip ahead. But I'm only going
to do this now for the areas that sorry,
I hope you can just see. I'm moving I just want my
hand to be here so that I can reach the rocks higher up. Let me just check
that you can still see what I'm doing. Great. Let's try and work a
little bit faster now. We're going to just
add some shadow kind of like to the left side. Maybe that's like I got a few rocks going on here. I've just done the
outline of a few. So and just adding that shadow on this side. Yeah. Who would have
thought that when you were doing a whale
shark painting, you were going to
end up working on your rock skills as well. I don't want to do too much too much definition
of the rocks. I think if you can I think
you can make it out. Okay, so the shadows are
going to fall on this side. Maybe this rock, I'm just going to make it look a
little bit more. Okay, whoops, very dry brush. Maybe these guys can just be a bunch of little rocks here. Okay. So like I said, I don't want to spend
too much time on this. So make sure the shadows
are falling on this side of the on the right
side of your rock. This can just be a
low shadowed area. I'm just standing
up now. I'm just wondering how much more
rocks I want to do. Maybe I don't have to do the
areas that are very faded. I got one big one here. Maybe a smaller one
kind of over here. I got one behind there. Yeah. This rock looks funny, but maybe I can just I might just remove
some of that color. But like I said, I don't
want to spend too much time. Sorry, this rock just looked
a little bit strange. I'm just trying to add a little bit more shadow at the bottom. Yeah. It looks like
a clump of rocks. Using indigo, by the
way, just a reminder. Reinforcing the shadows that
are falling on the rocks. Over here, as you
can see, these are just little smaller
rocky shapes. Okay. I am a bit of a
sucker for detail, so I'm just going to do the
parts that look more defined. Maybe for parts over here, we don't have to I might this is where the mop brush
is going to come in handy. Maybe we can just
suggest that there are smaller pebbly looking rocks over here that are going out. I'm using a very dry
mixture of indigo, maybe a little in between here and just around
the rocks too, it's just concentrated near the rocks and then slowly
gradually coming out. I don't want it to look,
sorry, too, brush like. I want it to look kind of
like sandy, like pebbly. So just using a little bit of
that darker indigo color to just kind of stiple on a little bit more of indigo to look like pebbles and sort of blend
everything in as well. Okay. All right. So maybe just when I said that, I just might pick out just a
couple of rock shapes, okay? That I see very
clearly with my eye. Okay. But remember,
we're underwater, so we don't have to
do a lot of detail. But after I just did that
that stipling action, I ended up seeing
a few rock shapes. So I'm just very
lightly, as you can see, it's not as dark as this, very lightly going over
these rock shapes. I think it creates some
variation underwater as well that some of the rocks
look darker than others. I'm just going to pick out
a few rocky shapes here. Yeah, these are obviously
the smaller rocks. They're not as they
might be, you know? Not as defined because maybe they're not as
close to the surface. Okay. Okay. I ended up doing a lot of rocks, more rocks than I wanted to do, but I can just pick
up the shapes now. I can see them quite clearly
after I did the sipling. That's what I call doing
that with your brush, stipling I believe
that's what it's called. I think that looks good already. I think maybe I should stop. Yeah, you know what to do now. You're just going to
use some indigo that is quite concentrated to pick
out some rock shapes. I remember try and put
the shadow towards the right side because the
sun is shining this way. Maybe this can be a bit of a kind of a jagged shaped rock. There we go. So we got some
going on there as well. So I'm going to leave
this up to you, how much detail you
want to put in to it, but I feel like I've already committed myself to
the rocks and to doing a little bit
more pebbling with some some of this indigo. I'm just building up the layers of texture for the background. So I'm going to leave
this up to you, how much detail you want to do. But if you want to do
what I'm doing, remember, this starts the stipling starts right around
the rocks and we gradually bring it out and we do less of it
as we go further away. Okay. So it's more concentrated
nearer to the rocks, but then we're building up
that ocean floor texture. Okay. So that looks good to me. Okay. We could actually use a little bit of this color
around the whale shark. But like I said before, I don't want to touch
the whale shark. I really want the whale
shark to stand out. Okay? Okay. That's looking good to me. Looking really good.
We can keep going. I'm just going to get a
little bit more indigo because I'm running a bit low. Then, I hope everything's
going well with your painting. I hope that yeah you don't
have to do every single rock. I'm only going to do in the darker areas and
then I'm going to just suggest that
they're rocks, okay? And the speckled salt
really does help to add a bit of textures to these shapes to suggest
that they are rocks. Remember, it's underwater. So the way the light falls on the water surface
may play tricks on the eye and make some rocks look more defined than others. As you can see, I'm
just very quickly just suggesting the shape
of some other rocks here, and using whatever paint
is left on my on my brush. Maybe some smaller ones, yeah. Okay, now going to do a bit of that
speckle action thing again with the stipling I mean, with the indigo with avoiding
the tail as best I can. So all these is gonna
contribute to texture. And I'm just wondering how
much more rocks I want to do. Like, um But we've been
painting for a while now. I'm just wondering if we
should take a little break. Let me just adjust my
camera a little bit. Yeah. Let's see. I'm standing up now just to get a good look at what
we've got to work with. How about we're just
going to continue, and it's okay if you guys
want to take a break now. I know this is a
little bit of work, but I'm just gonna to just
get a couple more shapes. Pick out a few rock shapes,
suggest suggest, okay. At the bottom right of your
rocks, it looks like rocks. You don't have to spend
a lot of time on it. Now I'm just using a light
pane to kind of go over a few more shapes
that I see. Okay. I'm also working a little
subconsciously now, just trying to,
yeah, get this done. Okay. How many more rocks
do I want to paint? I think I might just This
area is quite light, so we can just kind of work very quickly doing a
few clumps here and there. I'm just going to
outline a few rocks. Okay, so not even thinking
too much about it. Like my rocks all have
kind of, you know, organic shapes that I'm just making up as anything that I see which looks like a rock. Okay. We got a few there. How
about we move it along a bit and I don't have to
do every single part here. Let's do that stipling
thing again with the with the brush. So I'm even doing it a
bit over the rocks so that it's kind of a
little bit blended. And finally, um, let's just
add a little bit of shadow. Okay. Standing up,
having a last look. I don't know why I made
these very defined, but I might just fill them up a bit just blend them
a little bit into. But that's all good. I
like a bit of variation. We're getting there, I promise. How about we can do something here, like what we did up there, where we're using
just a light amount of pain to just pick
out a few shapes. I shall we just do this section and
then call it a day? I think you definitely
deserve a break after this. I'm just going over it to maybe even blend it
into the background. So it's like there we go. This looks a bit squarish. I'm just going to do that. Looking really
great. Shall we do the final patch of rocks
before we call it a day? Something is just
bothering me here. I'm just going to use
a little bit of um very light warded down
pain to just paint some very faded rock shapes that are just really
blending into the sand. I think this is looking good. Let's do the last patch
and then please take a well deserved break before we start doing the really
exciting whale shark. Let's do a few
define rock shapes. H If you have the patience to do this, it does give a really cool overall
effect and it will make your whale shark really
look like it is just cruising through some beautiful tropical waters with
some rocks in it. I'm standing up now
and I honestly feel after I do just a little bit of this stipling for this part, I think I might be done. I'm just going to go
on the inside here. So remember, using
concentrated paint to do the stifling part. We don't want it watery. And it's going to gradually get less and less as we get
further away from the rocks. We've only used indigo for
this entire step, okay? Okay. Okay. I just want to do a little bit more of the stipling over here because I feel like it's
going to come out gradually. So that's looking great to me. I'm standing up to just
get an overall view. Oh, sorry, I think I did
I just move that camera? Yeah, I'm getting I think this looks
really, really awesome. I hope you can see it all
the way to the bottom there. I think that this is
probably enough for me. I don't think, I
want to do anymore. And when I say that, I just because I
was standing up, I just saw some rock
shapes that are really just jumping out at me and begging me to
please fill them in. So yeah, I only saw
this when I stood up. And where else? Maybe over here, I see some shapes. Just standing up now. Okay. I think I'm
going to stop now, and I'm really happy with this. This looks great. And remember, our whale shark is
going to be painted in. So I think we don't have
to do so much anymore. We do want some of that gorgeous turquoise
and green to show through. So right now, I'm going
to put my brush down, and I'm really happy
with the overall result. It looks really, really good. I hope you can see that. Let
me just show you a close up. Look at that. This is going
to be a wonderful painting, and I want to say thank you very much for your
perseverance for, you know, sticking with all the steps to create
this cool background. I know, maybe doing some of those rock ships
were a bit tedious, but the overall look
is just gorgeous. And please go have a break. When you come back,
we are going to put down the base coat
of our whale shark. We're just going to
watch it come to life. It's gonna be so
much more fun than doing a background.
So I can't wait. Go have a break, please
rinse your brushes, rinse your water jars, keep your palettes
and your paint, and I will see you in a
very, very short while.
7. Whale shark base coat: Hi, everyone, and welcome
back to our class. And yeah, during the
long break I took, I was just really just looking at all these little
areas that we've done. And I'm really, really happy
with the overall look of it. It really looks
like we've created a very interesting and vibrant
background to look at. That's not just a plain
colored background, flatwh, you know, even though there's nothing
wrong with that, it's always cool to
try new things out. And I think art looks more interesting when
you take a risk and try some new techniques out or try to create a
new sort of effect. So yeah, I'm so happy
with how this turned out, how we see little
clumps of rocks. And even at the very end, after just looking
at this result, I was thinking that
maybe after we paint the whale shark and
we can possibly think about maybe adding some
ripples to the water to just make the surface of the
water look even more real. But I'm just totally
loving the colors. And, you know, look at
this little area here, right where we use the mop brush to kind of speckle
on some dry indigo. It kind of looks
like a little school of fish just kind of, you know. Hanging out in that area, too, and I love the way the
greens and the blues just look like I actually
looks like an ecosystem now. It's not just a flat wash. So I'm actually really really stoked about
how this turned out, and I hope you're loving
your painting as well. But before I talk a lot
again, I just want to say, Yeah, I can't wait to start
painting the whale shark. So let me just sit down. I was just standing up
when I was talking. So I had a good, think about what colors I want to use for
the whale shark. And as you know, the
whale shark in general, speaking, it is a grayish color, and what they have is these dots which we
haven't put down yet and these lines that look very beautiful beautiful
pattern on the whale shark. That is actually unique to
each individual whale shark. That's right. Their pattern
of lines and spots, it's like what a
fingerprint is to us. That's how yeah, scientists
can identify individuals. I just thought that was
really, really interesting. It's a really interesting fact. That actually their spots
are unique to them, just like a leopard, or a cheetah, a giraffe. That's just the cool
part of nature. In many photographs,
I'm sure in some of the photographs I've included in this class in your
resource section, depending on the angle that we're photographing
the whale shark from, also depending on the lighting, also depending on
whether we're taking the picture underwater
or from the top, the color of the whale shark
can look quite varied. Even though it's true color
is a beautiful bluish gray. In some photographs, it
can look quite blue, especially underwater photos and sometimes on a very sunny
day when it's very, very glaring light, it can
actually look quite dark, like the deepest dark bluish
gray that you can imagine. But for this particular picture, even though we did sketch it from a photograph
that I've provided, but bear in mind
that photograph was taken under artificial
light in an aquarium. So it appeared quite blue, whereas the ones
that are in nature, they kind of a light gray. I was just thinking for
this particular painting. I want to try and
do something that is true to it, but bear in mind, the white spots and
lines on it are really going to stand out if you have a darker background. So if we went with
a very light gray, the spots might not
look as prominent as, yeah, they might not
just be a striking. For that reason, I
want to custom make a bluish gray using the indigo paint
that I'm sure you're now quite familiar with
that we used earlier. So indigo is basically
the darkest blue. I want to mix this
with a bit of pains gray that I haven't
quite used yet. I might just move
my paper over here so that you can just see this
little well in my palette. So I wouldn't use with the
gray even, it is quite dark. The paint's gray
is almost black. The reason I want to
just customize the color is not just because I want
to be a bit creative, but I think I would like my
whale shark to be you know, a good amount have a good amount of tone
and color just so those spots are going
to really stand out because that's where we can decide what we want
to do with our art, whether we want to
completely follow reality or just use
reality as a guideline, and then let's be artists
and do what we want to do. And since this photograph was drawn from a reference
photograph that I provided where
the light is kind of coming from above but
coming down this way, that's why we kind of have that little shadow for
the fin over here. I didn't draw the shadows here. I think when we paint, we should make this half of the whale shark just
slightly darker, okay? And then we can put
the deeper shadows in. Okay? So yeah, that's just my
idea of what I want to do. What I want to do
next as well after I I'm custom make a color is I want to just
paint the body first. Because I want to have control over a smaller area rather than let's wet the entire
whale shark and let's put colors in everywhere. Let's just do this
continuous segment here that goes from
the head right up to before the tail starts
and we can do the tail and the pectoral fins later. So we have more control
because I'm looking at quite a big piece
of paper here, and I don't want areas to dry up too quickly
while I'm working. So if you chose to go with
a smaller piece of paper, like an A four size,
that's fine as well. But for me, I like to
have as much control as I can over each area, okay? So because of
different drying rates and things like that, if you work with
too large an area. So before I talk a lot again, let's custom make
this color now. And it's very important
that let's start with a lighter base color and then later on we can
add more color to it. Not that I think anything
is really going to be disastrously wrong
with a whale shark that's a little bit darker
because like I said, if you look up the Internet, you can find a lot of different pictures of whale sharks and
you will notice that the color variation in
them is quite distinct. Like you can see very
light whale sharks and you can also
see them very dark, but that's really due
to the lighting and also whether they're submerged
and as I said before. This is just indigo. This is already
indigo, and if I want, I can make this even lighter by adding more water to
it like you just saw. That's a little bit
blue for my liking, just using indigo,
which is why I wanted to mix a
little bit of this. But I just want to show
you before I start, this is just Pains
gray by itself, Pains gray by itself
is already quite dark. But if we dilute it down, now we start getting a color and we can even dilute it
down even further. We start getting a
light gray color that is quite reminiscent
of the whale shark, okay? But just personally,
I want to mix a little bit of indigo into it because I also want to consider that some of the reflection
of the water and stuff, color of the water is
going to play a part in the overall color
of the whale shark. I think that's also
kind of my preference. So we already had a layer of turquoise painted
on underneath it, which is great because
this is all going to add to the color of our whale shark. So what I want to do now is I should like the way
that gray looks on its own, even though my plan
was to mix a bit of how about we just try and custom make a little color here. I'm just going to
take some of that. Let's just see, if it looks better with indigo
or just by itself. That's why it's great to
test colors out before you start painting your
actual picture. This is a mixture of of
indigo with the pains gray, but I don't know
whether maybe I didn't put enough pains gray in. Remember, the darker we go, the more our spots are going
to stand up. So how about? I think I want to just
go with maybe a very, very I want to go
with mainly gray, mainly paints gray with just
a touch of indigo to it. Okay? Just so it kind of reflects the color of
the water and, you know. Okay, so let's try and
do a color like this. So this is indigo. Bear in mind, this
is very strong. Once we actually water it down, it will look quite different. I think I like that color. It's more like gray. We
have enough gray here. I'm just going to put down a
little bit more indigo into my palette just so
I don't run out of color when I'm mixing this
for the whole whale shop. Okay. So like I always
say with all my classes, you don't have to use the
exact same color as me. If you want to be
adventurous and turn your painting into something
that's very colorful, you might even consider maybe adding using indigo
or the gray and maybe adding dropping in some
splashes of color like some of the viridian green or even
an ultramarine violet, I think that would, you know, it depends on the effect
that you want to create. If you want to create
a very vibrant and arty looking painting
that's up to you. So just mixing this color in again with a little
bit more black. I mean, not black gray. Sorry. Okay, I think we're ready to go. All right. So I'm
just going to take my large size 12 round. And like I said
before, I'm only going to paint the I mean, I'm only going to wet right now the area of the head going
all the way up to the tail. And for now, leaving
the pectoral fins and the tail unpainted just so
I have more control over, you know, like dropping
in paint and blending. Like I said before, the light is coming from the left side, according to our photograph. I'm just going to
stand up momentarily before I paint just to
see that I've covered the area that I want because of the reflection of the
light above my desk. Make sure you've got
a nice even sheen so that different parts are
not going to dry faster. Well, as best as you
can. Okay. Here I go. I'm just going to
put this brush down. Sorry. That's my smaller whoops. Starting at the
head. Look at that. That's a pretty color, isn't it? Like, and I'm going to make sure, let's
just do the head first. Oop, so just be a little bit
careful around those edges. I can actually rest
my hand down here. Don't worry about
that little edge. We can fix that later. Okay, remember, as
I said just now, I think the left side should be almost all my paint
got used up very quickly. As the whale sharks pretty big. The left side should
have more shadow. But I think we're
going to have to put more paint on
because this is a very light basecat But
I'm loving that color. I mean, that's really
beautiful, isn't it? Looks very whale shaky, it's okay if the top part
looks a little bit lighter. That's absolutely fine because, um, it does have a lot of
spots concentrated there. I'm just going to quickly
while this is wet, mix up some paints gray
with a bit of indigo. While this is wet, now switching brushes,
that's annoying. But while this is wet, I'm going to drop in
more color on this side, Because this is the side where it's kind of a little
bit away from, from the light source, but especially up here
where the fin is, the dorsal fin, because
that's why we have a shadow being cast in
our reference photograph. You see, I'm just
putting more color here. What we can do also
with that color is you remember those ridges
that I was talking about. The whale shark has some ridges three ridges on each side. I thought maybe I could also just add that color over there. I'm adding a line that
looks like a ridge. If you refer to my, um, my drawings in the resource section,
you can see that. Tell you the truth, I
think I might just paint this part in and then I just
feel it's really light. So why don't we also just
add a little bit more color? As you can see, you're
seeing a little bit of separation of color
here as well. I just think maybe
the base layer is a little bit too light. I just want to add a
little bit more color. I'll drop in on both sides, but I'll drop in more color
towards the right side, okay? Over here again, we're
going to go darker that very top midline where
the dorsal fins are. Okay. This side is just going to
be a little bit darker. Remember, we can dry
brush on some pain later. But I think I like
this base color now because the spots are going to really stand out much better now because it's
a nice dark color. O Okay. That's looking
really cool to me. Okay, don't worry about anything that went a
little bit out, okay? I'm just going to just do use my brush to just kind
of really fill in those the very edges that's
important because we want some nice good definition
on our whale sharks edge all the way up
to that pencil line I drew this looks like a gorgeous base layer that
we've painted already, okay? Okay. So it's just only
subtly darker on this side. But when it dries, we
can add more on later. All right. That being said, I just want to mix a little bit more of that gray color mixture. Yeah, I know sometimes it
can be quite annoying when your mixture of color runs out like that while you're painting. So just dropping in more
color right on that midline. Maybe on this ridge
that I drew earlier, and maybe all the way
to the very edge of it. We'll dry brush dry
brush on later, okay? So paint. But for now,
I love that color. I think it's gorgeous.
It's going to be great. It's going to stand
out really well. I just have to fix this part
here that was unpainted. What I'm going to do
now is I can't really paint the pectoral
fins or the tail right now while this is drying because then the paint is just going to bleed into it and I don't really want that
effect right now. Why don't we all just
let this completely dry, I thought about sprinkling salt in here, but then
I just thought, I don't think I really want the salt pattern
because that will maybe interfere a little
bit with the dots and then maybe they
won't be as striking. So I've kind of resisted, and I also feel like maybe
it's not the right texture. So we can just let
this completely dry, and we'll be back in just
a very short while when this is completely dry and we'll paint the fins and the tail.
So see you really soon.
8. Whale shark fins and tail: Hello, and welcome back. And as you can see,
my whale shark has completely dried and I'm
in love with that color. It's like a beautiful gray. But we're maybe with
a hint of blue, which is what I think the Well, what I like the whale
shark to look like. And yeah, as you can see, this part is on the right
side is only subtly darker. But that's fine. We can
add more color to that, but I'm loving the
effects so far. Before I start painting
the pectoral fins and the tail or it's also
called the caudal fin. I want to use a small
size four clean, damp so damp brush, not a wet brush to
just slowly try and get rid of this
pain that kind of went just slightly
outside, okay? I don't want to
do that too much. I don't want to aggravate
it too much, though, as I, you know, lift the
color underneath it, which is not what I want. So I'm just gently doing that, but you can very much see the the very clear boundaries
of the whale shark. So, you know, it's not something that really bothers me too much. Anyway, later on, I
think I might just, it's okay, just kind
of blends in now. And I don't want to disturb it too much because, you know, it's just a small
mistake that I went a little bit off line when
I painted it out of line, but I don't want to lift the
background color too much. How about let's
get this done now. Let's do the fins. Just bearing in mind
again that maybe this fin will be slightly
lighter than this one. Just because of it being a on the side that
the light is hitting. Before we start, I just
want to mix up a little bit more of that color and it's okay if I don't have the exact color. The color that I'm looking for is mainly composed
of the pains gray. Always test it out
on a spare piece of paper first before
you put it down. I'm just going to add just a
little bit of blue to that. As long as it's mainly
gray is what I'm saying, and I'm just going
to dilute that down. Yeah, I think that's okay. It's all right if the fins
are slightly different color, that can also be
due to the light. What I'm going to do now
is I'm just going to use my small brush
just to wet the area. It just helps the
paint to flow better. I always like to wet the
area I'm working on, especially if I'm going
to drop in some pain. I'm just going to cover,
I think the whole fin. Oops I might have gone a little bit outwear over there,
but that's fine. I'm just going to
cover the whole fin. Don't worry, I can
correct that later. So let's just cover it, and then maybe we can just drop in a little bit more paint. We can actually
kind of, you know, leave a little bit of it like
lighter in certain areas, just like a play of light, you know, light and water. I'll tell you what. Actually,
I might paint this and then maybe lift off a little bit of color with a smaller brush. Just because I thought, oh,
look, why don't we maybe add make this part a little bit lighter due to some
water patterns. I'm just kind of lifting
a little bit of pin off, but nothing too much. Just to give it a
little bit of a glow. Yeah, I think that looks cool. Now, I'm just going
to do the same. My brush is wet,
so just going to add a little bit more
of that paint over here and drop it in and it will be darker
towards the body on this side because sorry, I actually want to paint
with my bigger brush. It's easier. So There we go. I feel like this is quite
diluted the color here. I think I'm going to have to maybe drop in a bit
more gray here. There is a bit of a shadow
line right over here, but um How did that shadow look? Maybe we can just extend the shadow a little
bit more over here. I just think that would
look more interesting. Just before, maybe
we can just use a small clean damp brush to remove a little bit
of color just over here to give that impression of the light sunlight acting
up, causing patterns. It is a little bit wet
here, so I'm just going to. I think that looks cool.
One we let that dry and if we want to darken it
more, we can do that later. Right now, I'm just
going to do the tail. I'm just wondering, do I
actually have paint on this? Yeah, I do. Okay.
Going to wet the tail. It's fine to wet the whole tail because I'm
going to have to go over the top part of the tail
later on with more paint. Just using that same color. And I'm just going to bring
this color down here. I'm just going to maybe drop in a little bit more
pain here where there is where it meets the
top part of its tail. But like I said before, I think this part is going
to have to all be darker. We'll do all the shadows later, but this part is
darker over here. There's a shadow being cast
by the top part of the tail. But I will do a whole step
to doing the shadows. Let's just paint that in
anyway since I see it. A bit of the top tip
is the more color, we can drop in more color
here on the top of the tail. Okay, that looks great. Sometimes the reflections
are a little hard to see, so I have to move
my head around. Okay. Yeah, I think
that looks cool. I'm just wondering if
I want to maybe just try and use a clean dm brush, while this is still
a bit wet to kind of just get some of those
water patterns, you know? I can actually see that I didn't quite do the
fin all the way here. So yeah, there's
that edge there. A bit of a whoops
here, but that's okay. I can always do that later. It's probably better
to lift colors off when it's dry so it
doesn't just spread down. I also see this part here
that is connects to the body. Yeah. Standing up and
that looks great. All right. That looks great.
While these fins are drying, I think we can just
start putting in. I'm going to rinse my brushes
and I'm just going to use a small brush to start painting the ridges that
we see in the photographs. You can wait for this to dry. I'm just a little bit impatient. I'm just going to rest
my hand over here. But I can definitely see. I'm just using the same color that we just used
to paint over here. There is this ridge here that
I see very, very clearly. This is mainly at the
top of the whale shark. But it's casting more
of a shadow over here, I'm going to do this line
a little bit thicker. What I'm doing now is I'm just adding a little bit
more details now. Over here too is the
first large dorsal fin. Just watch where you
rest your hands, when you're working,
that you don't rest it on your palette.
I've done that before. I'm just going to
move my palette a little bit out of the way so that I don't do
something I regret. I can see the dorsal fin, it's casting a bit of a shadow because the
light's coming this way. I'm just going to paint the
very top of the dorsal fin, but there's a bit
of light there. And then we can sort of
do maybe a very mild, a little very faint line, and then we got the
second dorsal fin. And I'm just going to this one also I'm
just going to leave the top a little bit unpainted, just like it's sort
of reflecting light. And Then there is still
that line that goes here. We see that. I'm
just now looking at my I'm just wondering
if I should just maybe dry brush on a little bit more color,
thinking about that. Because this side does still look a little bit lighter
if we want to have that, um, sort of that cool, shadowy sort of effect. But I don't think I
can do that right now while everything
here is still drying. So why don't we take a
very, very short break? And when we come back and we let everything completely dry, I'm going to start doing a lot more details
on the body, okay? And just getting the
shadows right before we do the very fun and exciting part of adding the
spots and the lines on. So let your painting
completely dry, and I will see you
back here in no time.
9. Adding Definition : Hi, everybody, and welcome back. And my whale shack has completely dried all the layers
that we've just painted. So what I want to do now
to just kind of show that this side in this
side is in a little bit of shadow is I want to
just dry brush on just a little bit more of that same color
just on this side. Okay. But we have to
bear in mind that the whale shark is not an animal that's that's very thick. In fact, for its length, it has a very flat head. So I just want to
keep that in mind. And, you know, it's
quite a flat head, but then the body
is sort of like, you know, kind of
roundish and long. So bearing that in mind
before I just add a couple of just dry dry brushing on. Okay. Before we start adding
some more details, I want to also kind
of do the ridges that we can see on either side. So before I do that, I'm going to have to mix up
more of that color again. So I hope you're not sick
of seeing me do this. But I'm just going to mix up use majority of that
beautiful pens gray. It is such a great color, isn't it for a whale shark. I'm being quite true to
the whale shark's color. I feel like in reality anyway. But, um I can't wait to see your paintings and what colors
you chose to use. I guess that's close to what we've been using just
now, so that's fine. Now, what I want to
do is I don't want to use too much paint. I'm also going to wet I think
to help the paint flow, I'm going to use my really big
brush, my big brown brush. I'm just going to
very lightly lay a bit of water on this
side, on this side, of the whale shot because it is casting it only has,
like, you know, a ridge that's not as, um, I think I might
just wet this area, and later on, we
can blend it out. But don't worry too
much about doing a perfect a perfect, you know, about having it perfectly smooth with no marks
because we are actually going to cover that with
the markings later. So it doesn't matter if this is not perfectly, what am I saying? It's not like completely smooth,
if you know what I mean? If you can see a few marks underneath and it's not
completely blended, that's absolutely fine because I'm just going to bring
that shadow down here too. I don't mind if If it's
not perfectly smooth, but I'm just going to
use a dam brush to maybe blend some of
this color out here. But it's not going
to be half dark, half illuminated perfectly,
that's fine with me. I just want to try
and smooth this so that it doesn't look too
stark, the line over here. I might just smooth
it into this side. I mean, like I said
before, the head is flat, so and just more water
to just kind of gently. So the shadow is mainly
on this side, right, where the body is thicker
and the head's quite flat. So I'm sorry if I articulated
that really badly. I don't want it to be such
an obvious distinction like half in shadow,
half in light. I just want to try and blend that out a little bit over here. So this part's going to be, as you can see now
when I stand up, like darker don't worry too
much about this line here. I try to blend that
out a little bit, but I don't want to
mess too much with it because I think it
looks fine and yeah, I don't want to leave
very hash marks, but what I was saying
just now is don't worry if you can
see some moks now, it doesn't have to
completely be smooth because we will be
covering it with patterns. So, that's what I was trying
to say while painting, so I'm sorry if I didn't
say that very well. I think this part could just
be a little bit darker, so I'm just going to add
a bit of colo there. But other than that,
we also have to add some shadow with the fins, from the reference photograph. So don't worry too
much about it, but I don't want to touch
this so much anymore. I'm just looking to see whether
I want to darken the fins anymore before I start
doing the dotted pattern. I think that is quite
dark or I think that's dark enough
for my satisfaction. We will have to paint
some shadow over here. So I think what we should
do now is we should wait for this to dry before
we add some of those lines, like some of those ridges
that you see and some of these lines that go
perpendicular to them. So once more, just take a little break and let
everything completely dry. Yeah. So these are just like, several steps that we
have to do to achieve that overall effect
that we want. So just a quick break and I'll see you back
here really soon. Hi, everybody, after a very
short break, we are back. Yeah, let's get to work
and let's finish this. What I want to do now is I'm going to take that same color, and I want to start painting
these ridges that we see. Last time I drew one over here. I'm just going to
use that same color, and I'm just going to
use the very tip of my size eight round
brush to go along here. Okay. Just following that line
that we drew last time. If you didn't draw that line last time when you were
sketching, it's okay. You can just do it now. I also want to put in
another ridge just because I feel like
maybe last time I should have done one
this ridge is also still going to go pretty
much in the same direction as the last ridge
where we're going to trace the length of the body in a very curved well, we're just going to
trace the length of the body, the orientation. That's looking great. Now I'm going to do the same
for this side as well. But as you can see
in the photograph, I see this ridge somewhere
starting over here, but don't worry
too much about it. You don't have to
be too particular because we are going
to cover this anyway. I'm just going to
bring that ridge down here because there's
a photo that I've included in the resource
section that shows a close up of the skin of
the whale shark. You can clearly see that it's not smooth,
it's actually rough. This one, I went a bit thick
there, but that's okay. This ridge disappears a
little bit over here, as in we're seeing
the above view, so we're not going to
see it very clearly, but it's a great
opportunity to just outline very carefully
outlining the body. There are our ridges. Now, I think we should use the same mixture and start tracing those lines that
we drew as well last time. That are the contos of the body all the
way up to the midline. We're not going to pass
the midline right now. We just want to trace that it looks a bit like we're doing just
drawing a grid on our animal, but I just want to
tell you we're doing this for a reason and
we're just going to stop maybe maybe a little bit before the where the fin stops, we're
just going to stop here. Now, what we're going
to do now is remember, this is the side that's lighter. We're just going
to use your brush. To kind of almost coloring
each of these sections. But we're going to leave
the middle part of the section still well,
do it as best as you can, kind of, um, middle
part kind of unpainted. I'm just going over
with very light paint because I feel like these
parts are little sections. Okay. So as you can see, I'm just
darkening each section a bit, but leaving the
middle part light a little bit of the middle
part light because I'm trying to soften these hard
lines is what I'm doing. Because these lines are actually going to these hard
lines that you see here, they're actually going
to be the parts where we are going to use a Either a white gel pen or a paintbrush with gouache on it, a small paintbrush to trace
these lines because that is also part of the
pattern of the whale shot. You see, I'm creating
this textured skin. Yeah. I thought a
lot about how to do this because it's
quite a complex, quite complex skin
that this animal has. The good news is,
we don't have to be as detailed on the other
side because it's darker, but I just want to soften the grid a little
bit, so to speak. That's what I'm doing.
I'm just retracing each little segment
that we've created and outlining it and
going around it. So that it doesn't look
so angular and pointy. I'm just leaving the
inside unpainted. But it really doesn't matter if you get some
paint in the middle. We're just making
these rectangles look more roundish because I feel like that's
how we're going to achieve this effect
of the whale shark skin. This is my interpretation of whale shark skin and
how I would achieve it. Okay. Then I want you to stop before we get to the head because the
pattern changes. See, I'm softening those
lines and that's cool. I think the overall look is
pretty cool, what we've did. I might just use some of
that color to just retrace the areas that I might
have softened a bit too much because I want the
body to be very defined. That's what we've done and
it looks a bit weird now. I know it looks a bit
weird, but don't worry. When we add the little dots, it's going to look a lot better. On the other side, I'm
going to do the same thing, but that means I'm going
to have to make up some of that famous gray and
indigo color mix again. Just test it on a spare
piece of paper before you. Okay. I think that will be fine. Okay. And this time, I think you can go in I'm
just applying more pressure, I think, on my brush
with my brush, just doing this quite fast now now that we already
know what to do. How detailed you want to do
this is really up to you, but I'm someone that
I like some detail. On this side, it's okay if
we pretty much just leave a little bit of that light area in the middle
of the rectangles exposed. Because it is a darker side, it's okay if you cover some parts up as
well. That's fine. Because we are going to
cover this area anyway. So I've actually never
really done a method like this before where
I've drawn a bit of a grid on an animal
and then softened it. But sometimes you need to think outside the box
when it comes to, how do I want to create
this type of texture, you? Yeah. Also this depends on how much detail you
want to add, okay? So, this part noticeably darker this half than the other
half and you can actually see a little bit more
of the there are more what am I saying
more shadows here. Okay, so that didn't take
too long, okay? All right. We achieved that effect. I'm just going to sorry, just darken this ridge here. Whoops, I might have lifted a bit too much color
there, but that's okay. We're actually going to
cover our whale sharks with patterns soon and that
will be the very fun part. Okay? Now, while this dries, I just want to take
you through the head. The whale sharks patterns
are a little bit complex, and how detailed you want to
do this is really up to you. I'm going to leave
that choice up to you. Where we drew the grids the
lines that go this way, I just want to tell you that we're going
to actually apply. I want to try out a
method of applying white gel pen first to trace these areas with broken
lines because the pattern of the whale shark is
broken lines and dots, or poker dots, whatever you want to call
those spots that you see. That's why we did a
grid just so we have a bit of a guideline
for when we do that, and the dots are actually
going to go in the middle. I'm going to try a white gel pen out to see whether it
stands out enough. So if it stands out enough, then we might not
even need to use a small paintbrush with gouache paint because,
I mean, for me, if you can achieve
the effect that you want as easily as possible, then by all means, use the easier method rather
than the harder method. So how about we do
the body first, we're going to
start putting down these cool white marks
with white gel pen. If that doesn't work,
then we can talk about using white gouache, okay? So are you ready? We're not going to
do the head right now because the head also has a pretty complex pattern that I want to talk to
you about more in a bit, and I actually do want to show you some pictures about
what the head looks like. Okay. So in the meantime, how about we get going with
the lines on the body? Let's begin with
a white gel pen. So I'm going to very
lightly just use broken lines to trace the lines that go this way. As you can see right now, I'll only know whether this
is light enough when it dries because sometimes
the white gel pen can look a little bit light. So as you can see, I'm just
tracing some lines like that because sometimes people don't notice that they actually
have these lines on the side. They are these
beautiful broken lines. That's all I'm doing
with my white gel pen, as you can see, the white gel pen is
working very beautifully against this darker background. Okay, so we've done one side. We're going to do
the other side, but because this
side is a little bit darker, my advice is, let's just we might
not have to do, as many of those lines, or maybe we might
have to go over them with a damp brush later to just kind of fade them a little bit to make them
look a little bit darker. But let's just see what
it looks like first when the white gelpen actually dries. So try and follow those
condors that you drew earlier. All right. And we're
going to just stop here. That's already looking
really, really cool. So now is the fun part that you've waited
this whole time to do and you deserve to do it. We're going to put a.in each of these little lighter
areas that you see. Before you know it, your
whale shark is going to just it's just going
to start popping. Because we actually
left a little bit of the center of each little
rectangle that we drew lighter, it actually gives the impression that your spots are glowing. You know how the
whale shark looks so magical because it
actually looks like it's glowing and I've
been fortunate enough to swim with one of them
in the open ocean. I was terrified, by the way, not of the whale shark, but just how rough swimming
in the open ocean is. I'm an avid snorkeler, but swimming in the
open ocean with all the swell is actually
quite different from, swimming off a beach or,
you know, on a reef. Yeah. So that's worth noting. So, um, I'm just going to maybe try and put a little bit
another one up here. As we go higher, I think
I might just try and Squeeze another guy in or maybe, increase the number
of dots I see. But I'm being a little
bit technical here, so you don't have to do this,
but I was just thinking, I think I'm starting to see in the photograph more
dots as we get higher. But so far, Just like stand
up and look at what you did. It's actually has this
really glowy look, which is so cool and
I really love it. Now, on this side, because
it's in a bit of shadow, my suggestion is maybe just do, you know, those very, very small areas
that are lit up. Yeah, that looks gorgeous. It really does look
like it's glowing. Maybe we can start increasing the number of dots as
well as we get higher. So the white gel pen actually works quite
beautifully here. So no need to use squash. The great thing about
the white gel pen is it's more precise. You can actually just touch the tip and do
a nice small circle, whatever you're after
as opposed to having to control your brush a lot. So there we go. That looks so beautiful and glowy when you stand up and
have a look at it. So that's looking great. It's really looking awesome. I also want to use the white gel pen to do
something like you see this area here right on the top
of the of the tail, we can add a highlight here with the white
gel pen as well. And if you feel like it
looks a little bit too bold, we can then use a
clean damp brush to kind of soften it a little to kind of
blend it a little bit. Okay. So that's looking
really, really good. I love the way our
wheel shot looks. So now let's do the pectoral fins before we tackle the head because the head has a pattern of its own. So now let's do the fin. The fin also kind of
has a pattern that is like lines and dots. Okay? So it also consists of lines
and dots, right? But we want to do
something to simplify it. Okay? I think we
should just start by maybe doing a line
on the very edge. I've looked at a few
photographs of them, but like I said, it's like
a fingerprint, right? So like, you don't have to try and copy an exact
photograph because, you know, it's really very
depends on the individual. But from what I've seen
from a lot of photos, it's kind of like a
series of lines and dots. So I'm just adding a few
kind of squiggly lines, but, you know, there's no,
correct or wrong, okay? It's just like a pattern. So I think I'm just
going to make up my own pattern of adding
a few lines like that. Okay. And now I'm just going
to try and do dots, okay? And these dots are
just going to, like, pretty much act like
a bit of a perimeter, like, you know, of the fin. So maybe let's just
add a line there now. I'm just doing this as I
go along just improving because it's not exactly,
you know, a science. Maybe I'm going to add
a short line there. So just get creative. Don't get too, like, bogged down about what is
supposed to be line? You know, it's just
a fun pattern. So feel free to get creative. So I'm going to
start with the dots, you know, going around. And then I'm going to
kind of go inside now, kind of circling inside now. Just my only advice
is maybe try not to make the lines or the
dots touch each other. This is where your gel
pen is so precise. Maybe we can do, I don't know, a dot and a line here. I'm just making this
up as I go along too, and I just advise
you to do that, too. Maybe do a line here. I don't know. Okay. All I'm just going to stand up and I think that looks
cool. I think it does. Okay. Yeah. All right. I'm going to leave
that because I feel like that looks good enough. I want to darken
the shadow later, but I might do that later
after doing the body, after doing the markings,
if that makes sense. Because then I can just paint
over some of these dots, okay, where the
shadow falls here. So I was thinking of
first of like, Oh, do I want to darken the
shadows on the body and stuff? But I think it makes
more sense if I paint the shadows over later, then they'll also mute those areas where they
have the white dots, then it looks more
like the white dots are also falling in the shadows. So like the last one, I'm just going to go
with the flow about these lines that Look
a little strange. Maybe we can do, I don't
know, another line here. Turn this into a dot. Yeah. Maybe we can do a few more squiggly
lines in the middle here and it's such a unique pattern. Please feel free to go and either look at some of
the photographs that I've provided or Go and look up
photographs on the Internet. That's a great
source for artists. I think I might do a
squiggly line there. Maybe turn this into a
squiggly line. I don't know. Standing up and yeah, it looks very I think I also see a higher
concentration of dots maybe or maybe
I'm imagining that closer to the
edge of the fin. I might have to darken the
edges of the fin later, but okay, so we're going
to let everything dry now. And what I want to do is, let's take a little break, and when we come back,
we're going to do the head. That will be fun, and I will see you in just a really,
really short time. Just let everything dry.
Let's take a break, and I'll see you back here.
10. Whale Shark Final Touches: Hello, everybody,
and welcome back. And we are so close
to finishing. I hope you had a nice little break to go and
stretch your back. So what we can do now is
we can just maybe move the palette out of the
way for now because we're not gonna be using pains. We're just gonna be
using our white gel pen. Okay. And, yeah. So let's just create a
little bit of space here. So, what I want to do
before I start doing the um the head is
I just wanted to make some dots maybe a little
bit a little bit bigger. I think the bottom
ones are fine, but when I took a break, and I stood up above it, I just felt like, Oh, maybe some of these dots
could be bigger. And also, like I just, um with the whale shark, because we know now
that the pattern is not the same for
every whale shark, please feel free to maybe, you know, get adventurous. Like I said earlier,
you don't have to copy a photograph that
you see on the Internet, like, you know, exactly
the same to try and achieve accuracy.
This is art. So we want to have fun, right? We don't want to just get
bogged down on details. So I've tried to imitate
this as best as I could, like the whale that I mean, the whale shark
picture that I had, as well as looking at other whale shark
pictures that I had, as well as looking at
Internet photographs, okay? So now the very final part of doing the pattern
on the head. Now, the pattern on the head
is a little bit trickier. It has a lot more obvious
lines and curves. So my advice to you is, if you don't want
to freehand this, even though there's
no right or wrong. If you don't want to
freehand this, that's fine. I was also thinking
that as well, some of these lines
that come here, I've noticed in some pictures
that you can also do things like make some of these lines curve up and
do things like that, to try and make it look natural. You don't have to do this, but I noticed that some
of the lines go up from the fin or they
appear to come up from the fin. As well. These are all little
cute things that I've only observed later on. This all adds to that whole feel of the
whale shark, right? The head is a little bit
stranger and because of that, I want to just give you a very
general description of it. At the very top of the
head, we have a lot, a very high concentration
of tiny dots here. Okay, tiny dots also around
the sides of the head. And then it starts becoming larger dots and we
also start getting these squiggly lines that kind of act as a
contour to the head. Because of that, I really
think you're better off if you're like
me and you're a bit nervous about
free handing this. I think it's a good
idea to maybe draw, kind of sketch some of these
lines that you can see, and then you can trace over. So I think let's do some squiggly lines that kind of they kind of come up here, and they go into I know I
drew some lines earlier, but now I've changed my mind and I've decided I don't
really like them. But that's cool. I
can change this now. We've got lines that do this, I know it looks a bit weird. But yeah, my advice
let's just go with it. It's not right, it's not wrong. Okay. Also, over here, you start getting some of these lines that go in a
totally different direction. It's almost perpendicular to
these lines we just drew. Then maybe sum down here. My advice is maybe try and replicate what you
did on this side too. But there's no right
or wrong answer. My advice is just have fun. We got squiggly lines,
squiggly lines here. And we're going to have
a high concentration of small dots on this side. My advice is just
put down a few of these squiggly lines and try and make it look a
little bit symmetrical. Okay. Let's just have fun now, I've put down a few lines, but I might even change
them as I go along. If we're over here now, I notice, let's just
add a few dots here. Maybe this is where we start getting some lines.
Let's do that. And then, sorry, here's the
line that I drew earlier, and then it's kind of broken, and then we got more lines here. So it's just like yeah, a very strange,
beautiful pattern, but they're all different
for every whale shark. So who knows what's right? Who knows what's wrong? I'm just going to just follow
these lines, okay? Okay. So let's start doing a high concentration of little dots over
here that are small. Maybe even add some lines here. It's come to the point
I'm not afraid anymore. I'm just going to
do what I like, I'm not scared of
making a mistake because in the end every
pattern is different. In between the lines, I'm even going to
put some dots down. The dots near the
edge are going to be small and then maybe get
larger as they come inside. Maybe these are larger here. Okay, so small dots here in
a very high concentration. Maybe we can just even dot
them very near the edge. And they're going to get
bigger as they get inside. It's looking very starry,
which is really cute. Now I'm starting to get
bolder and I'm just going to do these patterns. I think I'm also going to
start doing these ones, let's have fun with the lines. I think I'm just going
to do something that looks symmetrical
to the other side, but even then, I don't know. It may not even be Let's just add a line here for
fun. Maybe more dots. Okay. Now, let's just, I'm thinking I'm just
going to try and do try and make it symmetrical, but if it's not, it's okay too. And these lines are going
to frame it a little. Now we're going to maybe
start getting bigger dots. And what do we have
here? So lines again. My advice is maybe try and do something a
little symmetrical, to what you have
on the other side. I think anyone can tell
that this is a whale shark. In between here, we can also
start having shorter lines. I'm just getting creative here. Maybe that can be a line. We can even more dots here, maybe something that looks
like lines in between them. Let's go back here. Maybe we can have a line here. If you are like me, a little nervous about
free handing this, just put down some lines in pencil and I think that will
give you more confidence. But that's looking so good. I think I want to add maybe, maybe a few more of these little broken lines in
between the dots. My advice is just try
and make them not touch. Just counting how
many lines I've done, I think I lost touch. Maybe let's add a
line here in between. Maybe add some dots in between. Yeah, just get creative. Maybe these dots can
follow the contour of these lines. One. Okay. My advice is also
keep taking breaks and stand up to see the overall
look of your whale shark. I just feel like it needs more
dots here down the front. That's looking beautiful. Yeah. Okay. Just try and
fill up those gaps between If you find that there's too much
gaps between the lines, then I think you can definitely just maybe add a
few dots there and maybe try and get them to
follow the contours of a line. Let me stand up now.
That's looking great. I'm also feeling maybe
I could also connect some of these dots and fill
in some spots in between. Yeah, I'm sure, when we
all look at our paintings, our completed paintings,
we're all going to have very different whale
shark patterns, and that will be wonderful. Okay, so I'm just going to maybe make a few of them bigger, maybe add more smaller
dots closer to the front. I think that's
looking really good, and I want to finish this up
by maybe just maybe adding a few more spots where we
see it looks a bit sparse. Let's just add a little line here. Maybe another one here. Okay. Maybe I might just thicken a few
of these white lines by just going over them again,
so they just stand out. Oh, maybe I might make
one over here, too. So just try and alternate
squiggly lines and dots. I'm almost finished.
I think maybe I could add a bit of
a dotted line here. So see now, I'm just
starting to get really loose and just, you
know, have fun. Okay, and at some point, I'm
going to have to put down the white gel pen.
Let me stand up. I think that's looking great. So I want to try
and finish up now. So let's just get
our lines all good. Yeah. You don't want to
overdo it either because then we're covering up
all the dark areas of the whale shark's head. And then it might
just look white. So at some point, you can decide when you
want to put down the pen. I think for me, that time
is coming very soon. So I don't care if a bit of
that white overlaps here. I think that's the general
pattern that, oh, look, it's a very high concentration
of dots over here. Let's just do lots
of small dots around the very edges of
the whale shop. I think it's looking
really good to me now. I don't think I
want to overdo it. What I want to do now as a very, very final thing is, I want to just it looks great. I want to just bring
back my paint. I'm going to use a
very small brush. I'm just looking
at my photograph again on my computer
of my whale shark. What I want to do is I'm
just going to darken those shadow areas using the same mixture that
we've used earlier. What I want to do now is last time we drew a
shadow over here, so I'm just going to darken that all the way up to the tip, it's going to cast a shadow that goes something like that,
a pattern down here. I know we've covered
it with a lot of layers of paint already, but I still roughly
I'm just looking at my photograph now and I just roughly see the lines
I did just now. This is just going
to add a bit of realism to our painting. As you can see, I'm covering
those dots in this area. So it gives that nice, um, shadow effect like, oh, look, the sun is shining and
this dorsal fin is casting a shadow on the
body, which is great. Now I'm also going to use
that shadow color again for the tiny dorsal fin
over here where is it? I almost can't see it. Let me just outline it, and then I'm going to
leave the top part. The very top part of it, like the very tip
top part light. Then it's going to cast a
little shadow that looks like that because it's not as big as the other dorsal fin. But it still adds a bit of realism to our
painting, which I like. And finally, running
out of that color, but I want to just
there's another shadow over here that's cast
by the top of the tail. Now's the time to just reinforce those shadows now that we've
already done the pattern. I'm going to have to
mix that color again. But we are actually very
close to finishing. I can't believe it.
Okay, mix that color up, test it on a piece of paper. That's a bit concentrated, so I'm just going to
water it down a bit. Okay. I'm just going to kind of race that
trace that shadow. And maybe just fade it
out. Fade it out here. I might just drag some of that paint down here to just add a little bit of a shadow on this part of the
tail, this very edge. What we can do with
the shadow color as well is at this point, we can go and outline that edge. I'm just going
here where the fin is first and I'm
just going to give Our gorgeous whale shark that little bit more emphasis I just went out of that a
little bit, but that's okay. A little bit more shadow
emphasis that hey, this is the shadow side, It also helps to define the very boundaries
of our whale shark. What I want to do too
is there's a shadow cast over the fin here. We also have a ridge here
that's very prominent, so I'm going to reinforce that. I might have changed my
painting a little bit from the reference photograph
because I just wanted to emphasize certain
stuff. That's fine. Like I said before, we can
use it as a guideline, but then change the
reality if you want. This part is also
going to be in shadow. I believe that's the ridge
casting a shadow over here. Very finally, we're
going to see that fin, painting my paints
a little bit dry, so I'm just adding
a little bit water. We're also going to see how about we just draw the
boundary over here? Okay, that's covered. So this part's going to be in
shadow, and this is great. I'm painting over, but
yet you can still see some of that white
coming through, which just shows it's kind of in the shadow,
and I love that. Okay. Maybe we can also just use some of that
dark color to just define this very right side
of the whale shot, okay? That's looking great. Looking great. I also feel like this fin could use a
little bit more definition. It looks a bit light here, I might just go over it with
a bit of the dark color. Standing up? Wow. That's
looking really great. I also want to use a
bit of that color on this very top part of the
whale shark that I see. Okay, so it just kind
shows that, hey, look, the whale shark has
definite grooves. I'm also just going to
define this ridge over here because it is casting a bit of a shadow as well
because it's a ridge. It sticks out, it protrudes. Maybe we don't have
to do it so much on the top because the sun
is still hitting there. But then over here, we should see shadow just
like in the photograph. But some of those spots are
going to come through, okay? Wow, that's looking
really great. But what I want to
do now as well is, I feel like some parts of
the head of our whale sha, even though, like I
said before, it's flat, could just use maybe a little
bit of color to try and help to try and help some of those
spots really stand out. What we can do is very gently, I'm going to use a little
bit of this color to maybe maybe layer it on very lightly without I just want to darken certain
parts to help that white stand out more,
if that makes sense. I don't want to be
too heavy handed. Maybe I might just trace
some of these lines. It's just something I
feel like I want to do. As you can see, that's already by tracing some of these lines and not covering the lines, we're helping the pattern
to stand out more. I feel like maybe we can also do a little bit of
that on this side too. Even though this side is
supposed to be lighter, I just feel like it kind of helps the lines
kind of stand out. Maybe that can just be, you
know, part of the pattern. As you can see, it seems to really make a nice difference. Maybe we can do this edge more, we can add more shadow here. These are just ideas
that came to me now because I'm just looking at what I've done and then I'm just trying to think what else can I add to make this pop more. As you can see, that
really seems to lift to make that white
stand out even more. But I've obviously
done it a bit lighter on this side because
I feel like this side is in the light, so to speak. Okay, so maybe I won't do it that much here,
but over here, maybe I can be a little bit more generous with these
dark markings. Even if I go over this area, it's not covering
the white too much. Let me just stand up now. That's looking very that's
looking a lot nicer. I think I want to do that
to just the lines, you. They seem to really make it pop. Okay. I don't want to overdo it, but famous last words, but I just want to maybe just do a little bit
more of that over here on this edge because I love the effect and just seems
to make it just pop. I'm just going to, I feel like this fin has ended up
being quite light. So it has a very
turquoise look about it. I'm just going to kind
darken it a little bit very carefully with a
bit of this colour. At the same time, going to help that pattern to
kind of stand out. What else are we gonna
do as the final steps, making sure, maybe
adding a little bit of shadow here where it
connects with the body. And this is honestly
looking really, really beautiful
that I don't think I have to do any more to it. I really, really don't
is looking really great. Maybe the only thing I want to do is just watch your hands, like, whether, you know,
you're not resting it. Maybe more of those
small dots over here. Since I covered some of that, let's just go over that again. But Maybe just fill in some parts with smaller dots. Okay. I think that I think we've created each of us have created
a unique pattern. These dots look a bit small. Let me just maybe make
them a bit bigger. I'm just thinking if
these should be a little bit bigger before
I put my pen down. Oops. Maybe I'm only going to do the areas that
I didn't add the shadow to. Okay? All right. I think that rest is fine. Let's just re
emphasize these areas that I painted around. Then let's put down our pen. I'm going to let you judge your own painting about
how much you want to do. I had to do one last thing. I would just take
a little bit going to dry brush on a bit
of that color using the very tip of my
brush because I know I already I already just
went over that area again. So last minute touches. I just feel like maybe let's just bring a bit of that color
in here around the edges. Okay. Pen down. I'm not
going to do anymore. I think this looks
wonderful. Hey, everyone. In my excitement on
finishing the whale shark, I actually realized that I hadn't removed the
masking tape yet, so shall we do that together? Okay. So let's just start
with Oh, look at that. A nice clean border. Lovely. I'm just going to
go tear it slowly and it's pulling off a
bit of paper over here, but that's absolutely fine. As you can see, there's a nice clean
border that we've made. Wow, look at that. Okay. Now, let's do the bottom. Hope you can see that.
Might just zoom out. Anyway, I'm sure you
know how to do this. Like just hold your paper
down when you remove it. There we go. Nice clean borders. Almost there. Wow, that really helps to frame it
even better, doesn't it? And the very final
one is right here. Come on. Oops. That's just very let's just be very careful. It's the very final piece of muskin tape. And there you go. There's your beautiful painting all perfectly framed
with the muskin tape, and this just looks so stunning. Thank you so much for doing
this painting with me. I know that maybe
this was a little bit challenging some parts of it, but I'm glad that you
stuck it out with me, and I hope that
you're in love with your beautiful whale shark swimming through the
tropical waters. I love mine, and please I
can't wait to see yours. Please upload them. Using the submit
Project button in the projects and resources
section of this class. Thank you once more for
doing this class with me. I hope you've had a good time and you've learned new skills, and at the end of it, you are in love
with your painting. So just very briefly, I just have a few last words to say at the very end of this
class in the next section. I hope you will
join me for that, but thank you once more
for watching my class, and I will see you in the
next section of this class.
11. Whale shark outro: Once more, as always, I would like to begin by
saying a heartfelt thank you. Thank you so much for
watching this class or any of my other art
classes on Skillshare. It really means the world to me that you're
taking time out of your busy schedule and that you want to learn art
skills from me. It really, really makes
me feel very grateful. I also wanted to talk a
bit about the painting. After I walked away
from my painting, and as much as I loved it, I came back and
started, you know, maybe having some ideas of
what more I could have done. For instance, I
could have, like, maybe added some ripples on the water with
the white gel pen. Or maybe added a shadow
just slightly to the right of the whale shark
to even add more realism. So these are a couple
of ideas that you could incorporate in your
painting if you would like to. But the truth is, I like the way my
painting looked because the whale shark's dark color just seems so striking against the turquoise background that I decided not to add
any of these in. But these are just little
ideas that I thought I would mention because
sometimes when we walk away from a painting
and we come back, we have fresh eyes and
we start thinking of other ideas and stuff
that we could add to but more importantly, in this class, I hope you absolutely love your paintings
that you've created, and I can't wait to see them. So please feel free to submit them in the projects and
resources section of this class so that myself and everyone else can have a look
at them and admire them. Also, if you would
like to just stay in the loop of any other classes that I have coming
up on Skillshare, feel free to follow
me on Skillshare. I'm also on social media at
Alicia Puran on Instagram, if you'd like to see some of my other paintings or
my music. Uh, yeah. I would just like
to say once more, just thank you so much
again, for all your support, and I wish you all the best
in your watercolor journeys, as well as happy
NewY happy 2026. And I hope that this is a huge
year in your life for art. So once more, all the best in your watercolor journey
and see you really soon.
 Alicia Puran, Artist, Musician, Teacher