Transcripts
1. Welcome!: Hi, My name is Jacob Lam. I'm a musician and
a music teacher. In this course, we're going
to cover the basics of learning the Columbia
or hand piano. Now, we're going to look at
the parts of the instrument, how to play the instrument
and different notes, as well as tuning, reading tabs. And by the end of this course, you should have the
basics of the Columba. Very comfortable. You'll be able to
write your own songs and play any song that you find. I'm really looking forward
to jumping in with you. So let's begin.
2. Why Learn the Kalimba?: Now there are a whole host
of instruments out there. So why would we even bother
to learn the Columbia? Well, first of all, it's got a really
peaceful sound to it. It's really nice on a rainy day or to just play while
sitting around on the couch. It doesn't play all too well
with other instruments, but it is a fantastic
solo instrument. Now, probably the best of
all is how portable it is. So when you travel or
when you visit a friend, you can just stick it in
your backpack or in a case.
3. Kalimba Sizes: Now there are many different
types of Columbus, but most importantly
for this course is how many notes you've
got on your instrument. Now, some columbus have less, and some have more. Of course, if you're
Colombia has more notes, it's going to be easier to play some of the songs that we find. If you're Colombia has
less notes, don't worry. We're actually going to
be doing this course on a 17 note, columbia. And there are many with
more notes than that. We're learning on one of the
more average sized ones. But we can also do something
fancy with tuning to change some of the notes to fit the note that we
need in our song.
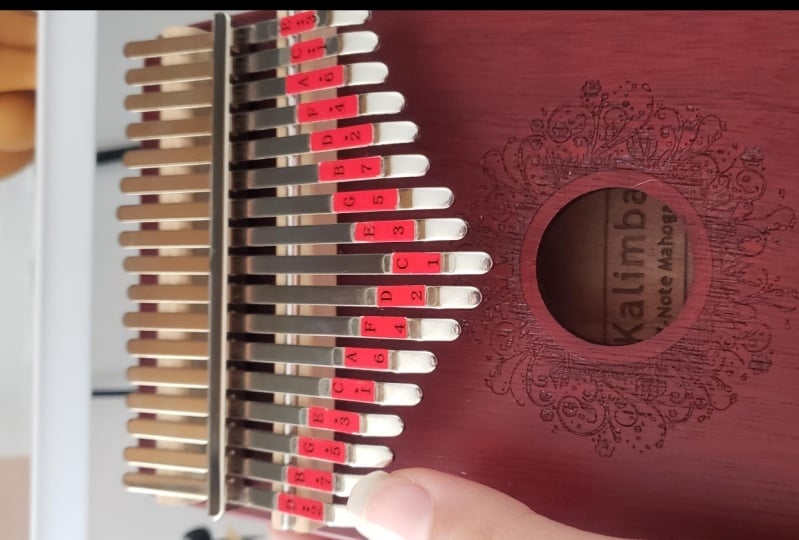
4. Parts of the Kalimba: Now we want to look at the
anatomy of our instrument, and there's really only
a couple of parts. First and most importantly, we've got the times on
the Columbia and that's the actual metal
part that you pluck. Now, the times here you'll
notice have notes on them. That's going to be incredibly helpful as we learn
the instrument. These are all
attached to the body, which is the main wooden
block of your instrument. Now, the body has
got three holes, one in the front and
two on the back. The one in the front is
called the sound hole. This is where the audio is
actually coming out of. The two on the back are going to be used for
effects later on.
5. Tuning Your Kalimba: Now we need to know how
to tune our instrument. Each of the times
on the Columbia has a certain note that we're
supposed to be aiming for. And as we look on them, it's going to tell us
exactly what note, what letter we're going for. We're going to pair
that up with an app, which I'll put on the
screen right here. There are many apps out there, but this is the one
that I've chosen. And we can use this app to listen to each time
on the Columbia. Then we'll tune
it with a hammer. Now, not any normal hammer, but a small tuning hammer
that's come with your Columbia. Now, if you're
Colombia has not come with a small tuning
hammer, that's okay. You can always go out
and get one or will also look at how to tune
it without the hammer. Now, with this app, we're going to have it listened to each one of these notes. The way we tune our
instrument is to physically move the metal time
back and forth. So I will play a time. Okay. Now, if we wanted
to adjust this note, we're going to look
at the app and pay attention to the
needle in the middle. If the needle is in the middle, that's exactly where we want it. If the needle is to the left, that means our note is flat, which means it's too low. We would raise our note until this needle shows us
we're back in the middle. If our note is too high, we're going to call that sharp. If our note is sharp, we need to lower the note until
it's again in the middle. So let me adjust how
this middle note sounds. I'm going to do that with this hammer and I'm
actually going to tap the metal bar the time
that it's attached to. Now we listen to the same note received that that's
a little too low. Now, we can always use the
hammer on the other side to push it higher away
from you is higher. But I personally like using my fingers on the way
back up and moving the note back and forth while slightly
pushing away from me. Let's give it another listen. That's closer. I'm gonna
do the same process again. And just a little bit at a time, small changes actually
make a big difference. That sounds pretty good. It's a long process when
we consider that we have to do that for
each of the notes, but don't get discouraged. Although it takes a
little bit of practice, the process does speed up the more used to
it that you are. Soon, you'll be tuning
your Columbia quickly.
6. Holding and Technique: Now let's talk about
technique when actually holding and
playing our Columbia. The most standard way to
hold it is with your thumbs on top and the rest of
your fingers on the back. Now, with the rest of
our fingers on the back, we want to be careful to
not cover those two holes. We're still going to have some
audio coming out of there. And when we cover them, we tend to mute the
audio a little bit. Now, I'm going to play these with my thumbs and
I have two options. I can either play
with the pads of my thumbs or I can play with
the nails of my thumbs. The nails produce a little
bit sharper of a sound. Nice and loud and clear. Palms are the pads of my thumb. Still produce a nice sound, but it's a little quieter, a little more peaceful. Another way we can play the
Columbia is to lay it on a flat surface and use our
fingers instead of our thumbs. A little bit more
like playing a piano. Now, this is going to
give us the option to hit many more notes at a time. So we could play something
like intervals or chords, which we're going
to look at next.
7. What are intervals?: Single notes on the
Columbia are great. We can play melodies, we can play lead lines. There's also something
called an interval. Now, intervals are just how we measure the distance
between two notes. It's important to know our
musical alphabet for this. Our musical alphabet
runs from a to G and then repeats over
and over and over. The first note on your Columbia, right down the middle
is likely a C note. And our notes work
outwards from that. See every other note
left-hand and right-hand. C, D, E, F, G, a, B. And the pattern repeats
left, right, left, right. Now, intervals we just mentioned measure the
distance between two notes. They're calling things
like seconds, thirds, fourths, and fifths, but
they're really easy to measure. For a second, we just count 12. So if I played C and D, I just played a second interval. A third would be counting 123. So C to E would be
a third interval. And the pattern
continues with a fourth, fifth, sixth, and seventh. Now, oftentimes on the Colombo
we actually use integrals. One note is going to be playing the melody or the
main part of a song. If it's a song with vocals and replaying
it on a Columbia, that would be the vocal
line is what we're playing. The other part might
be playing harmony. And so we'd be playing two
notes that work well together. And those would be intervals.
8. Playing Chords: The next thing we want
to understand is how to play a chord on the Columbia. Now, cords are any
three or more notes that were playing
at the same time. So e.g. maybe I have
a cord that's C, E and G notes all put together. Well, on my Colombia, I would find a, c, e, and g. And I have two ways
to play all three notes. I could play them
using my two thumbs. Or again, I could lay it on a flat surface and
use my fingers, which is especially useful if the notes are a little
bit more spread out. Or if we've got four
notes at a time, which will sometimes get
chords jump every other note. The name of the chord is
whatever note we're starting on. So in the example of C, E, and G, You'll notice we
started from a C note. So this would be
called a C chord. We moved every other
note skipping over two. If I wanted to play an F chord, it would work the same way. I would start from an F note, and then I would jump to notes
to a and two notes to see. Now, considering intervals,
you'll notice for cords were moving up by thirds each time.
9. Adding Vibrato: We talked about the back
holes on the Columbia and how we don't want to cover them with our fingers
when we're holding it. Well, now let's talk about what they're actually used for. And this may be best to
practice on your own. It's a little bit difficult to pick up through microphones. These can add an
effect called vibrato. Now vibrato is when we take a note and kind of make
it a little bit wavy, instead of taking a
single note like this, we hold a note and we let it
move a little bit like this. That would be vibrato and we
can do that on our Columbia. The way to do this
is by covering and uncovering and covering and
uncovering the back holes. So I'll play a chord. Now I'm going to add vibrato
simply by doing this. This can be a fun effect, especially with notes that are ringing out for a long time. It's also nice to finish a song with a little bit of
vibrato on the last notes.
10. Playing Songs and Reading TABs: Now we know the parts
of our Columbia and we know how to actually
hit notes and chords, but how do we translate
that into playing songs? Well, this is where we get
into reading Columbia music. And it's actually very simple. Columba tabs kind of look like
Guitar Hero or Rock Band. If you're familiar
with the game, the notes come at you or they drop down from top to bottom. You get a page that shows you every note on your Colombia. Then you read it
coming down at you. So the note that hits you first is the first
one that you'll play. Over on the left side. It's going to tell
you the beats per minute or BPM of the song. This is something you can
put into a metronome which keeps beats for you
to make sure you're playing at a proper pace. Now, That's good to
know when you're comfortable with the song. But as you're learning the song, you can always practice
with a metronome just to get comfortable
with the notes themselves. Now, you'll see some of the notes are written
a little differently. Maybe they're filled
in, maybe they're not. Maybe they have bars
on the left side. And this is where we
get into note timing. See a metronome keeps
count or beats for us. Every click you hear
counts for one beat. Now, these notes are held
for different amounts beats, and that sounds difficult, but I promise it's really not. A whole note is held
for four beats. So we would play a note
and we would count 1234. Half-note, half of a whole note. It's held for two beats. So we'd play a note and
we would count 121212. A quarter note is one beat, so we would simply count 11111. An eighth note is fast, it's held for half of a beat. So for every click you here, you would play two notes. Now, you may also come
across some notes that are on the same line and they
hit you at the same time. Well, these are notes that
we would play together. So if we encountered a, C, E, and a G, we'd play those at the same time and we know by now we'd
be playing a chord. So let's practice these
tabs and see if we can actually play a song on
our Columba using them.
11. Song: Ode to Joy: Here we're going to
look at Ode to Joy. It's a classic
song and we've got the tabs for it on the screen. So can we play this
on our instrument? Give that song a try. Yourself. Practice it until
you're comfortable with it, and then we'll move on.
14. How to Write Down Your Songs: Now playing songs and finding songs to play that you
love is a ton of fun. But what if you're playing
on your instrument and you come across something
you made that you love. Well, you can write
your own Columbus songs down using a free app
to make your taps. The app is on the screen here. Now, just like with
the tuning app, there are many of
them out there, but this is a free one
that won't cost you any money and can be
a lot of fun to use.
15. Cleaning Your Instrument: We know the parts of our Columbia and we
know how to actually play the notes and even find and write songs that
are fun to play. But how do we take care
of our instrument? Well, one of the most
important parts of taking care of your
Colombia is cleaning it. You'll notice, of course, that your instruments
made of wood. And so like any other
wooden instrument, we want to be careful
with how we clean it. When we're cleaning the tines. We can do so with
a little bit of soap and a warm, damp cloth. We want to make sure that we dry the tines thoroughly so
that they don't rust. That's one of the
major problems with times is that they can
rust if they stay wet. In fact, for that very reason, it's smart to just
wipe them down with a cloth when you're
done playing it as well. Now, for the body of your
instrument, it's very similar. We don't want to use soap, but you can use a damp
warm cloth to wipe the body of your
instrument and then dry it thoroughly as well. Since it's wooden, we can always use a little bit of wood, oil or finish to keep
it fresh and happy. When we're wiping the body, we want to be sure to
wipe gently to not remove any of the oils are finished that are
already on there.
16. Storing Your Kalimba: The other important part
of Columbia maintenance is how to actually store
your instrument. The biggest and most important
thing about storing is making sure that the temperature and humidity are consistent. Wooden instruments don't really like rapid temperature changes. In fact, you can use me as
a cautionary tale because I once kept an acoustic guitar
in the car in the winter. And of course that
acoustic guitar got a crack down
the middle of it. So if you're Columbia
came with a case, especially a hard case, I recommend keeping
it in there and then keeping it in a
really moderate room. Something without
changing temperatures and something without
huge humidity changes to, we'll put it like this. Columbus don't like change. So if you've got an environment for it that doesn't
change all too often. That's perfect.
17. Final Project: Now, as a final project to this introduction
to the Columbia, we're going to take
the knowledge that we have now and we're going
to put it into practice. We're going to go out
and we're going to find a song We Love. We're going to look up
Colombia tabs after the title. If you can find
tabs for that song, play them and record
yourself playing it. Or if you're feeling
adventurous, you can also write your own song and record
yourself playing that. You can upload it as
either an audio or a video file or if you're a
little bit recording shy. You can also make mention
of the song you chose or tell us the notes in
the song that you wrote. And then how it went. There is anything
you found really easy or anything that
you had trouble with. I'm really looking forward
to hearing your project.
18. Congratulations!: Congratulations, You made it
to the end of this course. By now, you should have a really good understanding of the basics of the Columbia, but don't stop there. There's always more on
your instrument to learn. Other courses and new songs. Always be progressing. If you have any questions or comments you can reach out to me at Jacob at lamb lessons.com. I love hearing from
students and learners. Or you can visit me directly
at lamb lessons.com. And I'll see you there.
 Jacob Lamb, Musician, photographer and videographer