Transcripts
1. Introduction and What You Will Need: Hello, everyone. Welcome to this skill share course. Today I will be teaching you how to make stickers using procreate. I would teach you how to make this water on sticker. And you can use all of the knowledge you've learned today to make your own consistent what I used. I used Matt vinyl sticker paper and iPad, an apple pencil and scissors, which is for cutting out the stickers.
2. Making Your Canvas: Okay, so now I'm going to teach you how to make your canvas. So you have depressed the plus button up here, and it comes up with a new canvas. So there are so many different options. So all of these a creature are included, but I made thes three. So what I did was I went to the plus button here, and I clicked inches and I did 8.5 by 11. The reason why I do this is because this is like the standard printer size paper. So then you can name it something like I'll just do standard printer guys paper. Okay. So you can create it. So then it comes up here. But if you ever want to access it again, it's going to be right here.
3. Tips and Tricks: Part 1: Okay, so I'm gonna go here. Now, here's your canvas. You can move it all around like this. And now I'm just gonna tell you some tips. I guess I'd say so. In order to change the color you go to the color wheel thing. You're this color Will. You can change it to any color you would like, And then you can change it like this to it. Like if you wanted a different blue. So there's so many different blues. So I'm gonna choose like like this one. So there's so many different colors. I'm going to choose green today and I'm going to go. I use an apple pencil. So when I do it, something special at the apple pencil does you can like the more you press down on, the darker the color is going to be. So if you lightly pressed on, it's gonna be very light, like you can see. But if it's really dark when you could If you want really dark, then you can just press Adele in this. Okay, so now a tip. So you can either press this button like the backwards, but like this, or you can tap it twice like this. And then everything goes away. We have I'm gonna just do no tip number two. So what you want to do now is you want a color, and then you want to We're gonna make a triangle. So I'm not very good at drawing trying. Gholston, if you just press down like this, it makes a triangle for you. I'll do that once more for everyone to see. And this happened make a circle. So I'm gonna do the circle, and I'm gonna keep pressing down on it. And look, it forms into somewhat of a circle, so doubles happened, and then it comes back to that. So what I'm gonna do is I'm going to I'm just going to use this color and I'm going to make a triangle. This works with any shave, except all of the borders have to be connected. So I'm gonna choose purple, and I'm gonna press down on this and bring it over here. I dropped it And look, it's filled in for you. You don't have to fill in. Sometimes it's not 100% accurate, which I think you should know. So then you might have to go in and filling things. But this time it did it accurately. So now I'm going to use one of the tips I showed you before, which is double tapping. Okay, so this is the final tip I'm going to give you right now, so I'm going to make a squiggly line, right? And then I'm gonna go up here to these two things, and I'm going to add a layer. So when you add a layer, I'm going to make it a different color. When you add a layer, you cannot touch this layer. Now you can't erase it, so I'm gonna show you would know their squiggly line. So then when I hit the erase button, it will erase the purple, just erases the black, You see that? It's actually a pretty cool feature that I really do. I think it's super important to be able to do this, So this is definitely one of my favorite features. You can hit the plus button. I'm going to go like this, and I'm gonna go here and then you can lock it or duplicated. I haven't really used block, so I'm not going to show you how to do that today. But I'm gonna hit the duplicate button like this. So we have two different layers. I'm gonna hit this and see it becomes you. Since I've duplicated it, you can move it around like, so I'm gonna make it smaller. I guess I'm just not doing much with this right now. And there are so many different things you could do. You can flip it horizontally, flip it vertically, rotated to screen, and you could do Reset it and you can distort it. It's pretty cool feature.
4. Tips and Tricks: Part 2: so I undone everything I did. So then here is where you change the brush size. So you want 0.1 brush. It's gonna be there thin. But if you want brush as a hunter is going to be very huge. And like the closer you go in cause you can minimize it, the quotes you go in, the bigger it will be. I'm going to change the opacity. So it's now lighter on this. I'm pressing down as hard as I can.
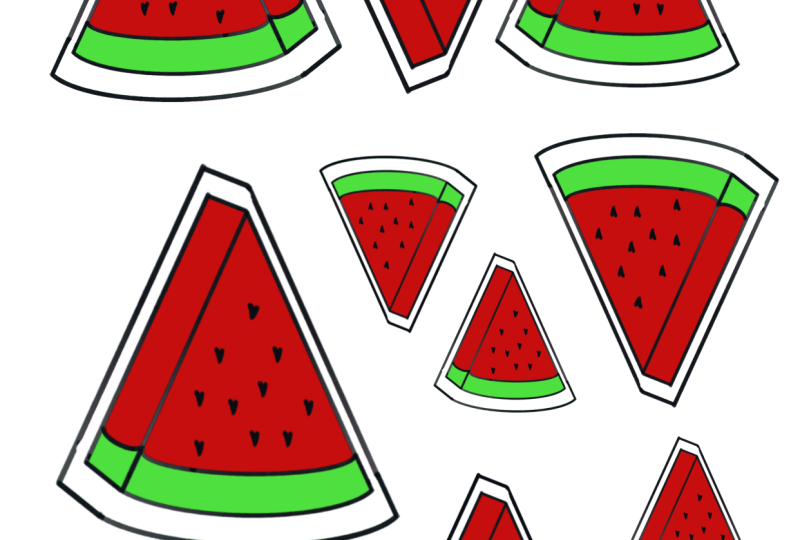
5. Creating the Outline : way. So now we're actually going to start drawing the sticker so you obviously don't have to make the same stickers. But for today's lesson, I'm going to be making a watermelon sticker because it is close to summer in watermelons are really fun. Okay, so I'm just gonna go going a little bit. I'm going to change my brush size to 4% because I'm going. Teoh, make a wine and I've repressed down. It will become a straight line. You obviously can make your secrets because you want, But I'm going to make it on the smaller size because I want to make a ton of stickers on the sheet. So I just did that line. So now I'm going to go over here and I'm going to duplicate that layer, and then I'm going to click this, and I'm going to flip it horizontally. Since you can move it around, I think I'm gonna move it, actually, but I'm gonna move it closer, so that and easy. That's right. So now I have this triangle base there, even so, you don't have to worry about that. And there are two different layers. So, like I showed you before I'm going to erase it just to show you like you can't erase this line. You can just race this line, but I'm going to take it back and I'm going to now create and a different layer because it's good to have as many layers as possible. You sometimes do you forget to put a layer. So I'm going to go to the brush here, and I'm going to connect with two. So I like this line. Okay, so I see there's something that he'd fix. I will fix later, but right now you just want the basic shape. I said you can just keep on making this sticker. So, um, since this is a bigger flop, I'm just gonna race part of that. We have a cone shape now, which is good. I like this. This is going to become an amazing watermelon. So now I want to be drawing the Rhine, which is the green skin of the water. Non. So I'm going to do now is I'm gonna go in closer because I feel like it's important. So we have this line and since you want me even yet again, I'm going to duplicate this I think it's important and I'm gonna go here and I'm going to bit horizontally. I'm going to go over here and I think I'm going to drag it close like this so I could get Obviously not everything is going to do Well, let's see how it looks now. What you can do now is you could duplicate this and then make it bigger. But I think I'm just gonna try and free handed and see what it looks like. And if it doesn't look good, then I'll probably go back and duplicate it. But I'm just going to try it. So I'm going to create a new layer Now that we have this this best there is another tip I want to share with you before we go any further with this. I wanted to show you that there are so, so so many different brushes you could use, like you can goto like. Look at all these brushes. I usually use the round brush in the painting, and you could. There's also so many different erasers you can use and then click this button. And there so many other one. I wanted to be a three d watermelon. So I'm going to draw lines here and yet again, I'm going to create a new layer. So I think this start up here. So I'm just going to draw a line. And I'm glad your line you could, like, duplicate this, but I don't think I want to do that because it's not gonna be long enough. I tried it. So I'm going to go in and create a new layer. Someone's gonna
6. Coloring the Sticker: So here's the time we're going to start coloring now. But here's the problem. Since we made so many layers, if I try and fill it in, since it's just like one line, you can't feel it. I see. So what you have to do now is combine all of them. I made layers so that I could erase anything without erasing other lines. But now it's time to combine them all together. It's very important storms going to combine them all together like this. So not everything is just one layer, so you could duplicate it. And it's not just one line. It's the whole entire watermelon. So now we're going to choose the colors for our watermelon. I'm Woods go the classic Red angry. And like I said before we you could do is drag it like thistle and then drop it in and super easy. I love I'm gonna drive that and that I'm going to choose a green. I like me young green, So I feel like I'm just gonna go through me on and I'm going to drag getting and I want to drop it and
7. Adding Detail: thing is starting to look like an amazing water amount. And now the only thing left to do is the seeds for the water. So what I think I'm gonna do is I'm gonna use another layer so that if I make a seat and I don't like it, then I could just erase it and not have to race the whole creation, which I think is a cool idea. And I think you should use that. And I'm going to make the seeds heart because I think hearts are just so cute. I think I'm gonna make the brush size a little bit bigger and, um, is human closer because I want to make hearts like this. So it's, like, closer together. So now we have one heart, and obviously we want more than one, and I want them also exactly the same. So I'm gonna go up here and I'm going to duplicate the heart, and I'm going to move it like this, and then you can do kid again, and I can move it like how everything is. So I'm just gonna. But the Baltic killer
8. Creating the Border: Okay, so now that we have everything done, I feel like all the lines are pretty good once you call it the man. Most stickers have a border like a white border. You don't have to do a border. But I found a very slow way to do a border. Is I'm just gonna duplicate this. I'm going to change. There's no background color NASA built transparent. So there are two ways to do this. I will show you both. So the first way is the way that I'm probably not going to be doing so I'm just gonna add a new layer. Yeah, I'm gonna like above it. So, like when you draw, it will be above it. I want a white border, so it could just, like, outline it like this. So I just kind of showed you. Obviously, this is not perfect, but this is one way you could do it. I will show you the other way. I use it. I do it. So I'm just gonna duplicate this. And what I do know is I go here. This is the tricky part because you want to make it even. But it is like handheld. Okay? so I'm gonna click it dogs pretty good. Obviously you can, like, fix things up if you want to. So now what I'm going to do is I want to add a white to the line and add it to their if there into their. So we have these lines, you can just go in and brush and just use that. I think this is the slicker way of doing it for me personally.
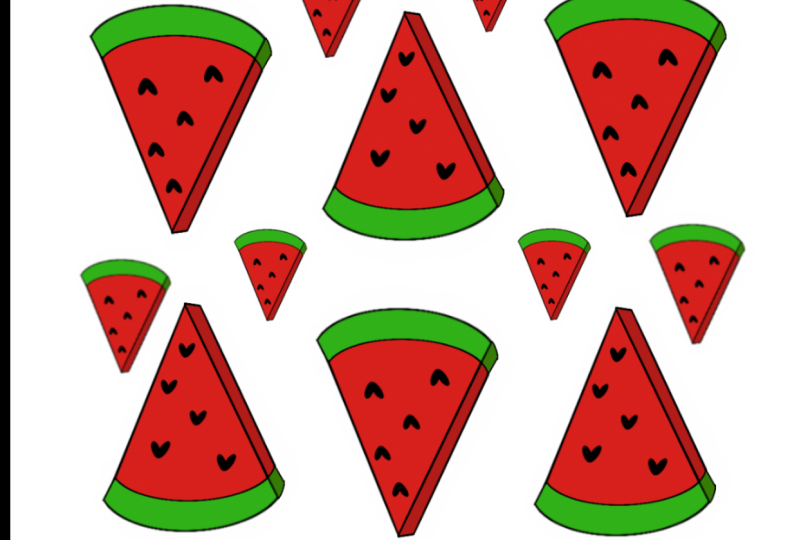
9. Creating the Sticker Sheet and Exporting It: So now I want to show you how to make a sheet of stickers. You can see this is a piece of paper, and that's how big the sticker will be. But I usually like to like a test print to see how big it is. Once I do like once I figure out like where I'm wanted, I use a test friends before I printed on sticker paper. So I'm just gonna I'm gonna put these layers together. I'm gonna go over here. You don't want it all the way around the edge, because when that prints, prints, look with the border. So I'm just gonna be able to hear. And now what you do is you just like I said before, you basically just duplicate it. And like for a watermelon, I think it's better to, like, flip it this way. So they're like more room. You can make them as close to each other as possible, But just make sure you're good with, like, the scissors or if you're a cricket machine, which I personally don't. So I don't really know how that works. You could make it further apart like this, and I'm just gonna repeat the steps over and over again in like and I'm just going to forget this. I'm just gonna keep on moving them like this. So and you could do like this, put it to four together, like all these four together, and then you could just duplicate this and then move it down. So I have all of these. You could put a bathroom color. I made it a little bit too light. When I did it, I thought it would stand out, but it didn't. So I would like So you can actually see it. I would make a darker So now that you're stickers are all ready to go, you know, everything's looking good. You have to export them. You press this tool button and you pra share. So I share the image a PNG. It's just supposed to make the resolution higher, so I just click it as a PNG and exports it to your photos. So I'm just gonna save the image to photos, and I'm gonna go to my photo. What I'm gonna do now is I'm just gonna go here. I have this and then you hit the expert, but and you can print it. I personally get it printed out. A printer shot of what you do. If you do choose to use their printers, you just hit the print. But core. You could email it to a computer and put it on a flash drive and take it somewhere like I do. So those are your options? I'm just gonna hit print and it prepares. And then here becomes here. Use print it. And now I'm going to show you what mine look like when they're done.
10. Conclusion: So I just printed these stickers and this is what they look like. So this is what they look on the screen. Obviously, you won't be telling resolution. This is what they look like when they're done. And like I said before, I wouldn't put them too close to the edge because sometimes, like, cuts it off, like right here, it cut it off. So I definitely recommend, like, making more space. So this is what the end product looks like. I used to spy on my paper. I found it online, became with 15 sheets, and I printed two of these out. So this is just an example. So now I'm just going Teoh, stick it somewhere. I'm just going to stick this sticker on this fuller the paper. So there's one sticky side. There's one time that's not so sticking to this society. Discard on. And then you just stick it so I'm gonna stick it up here. C six, wonderfully. Thank you guys. So much for watching this class. It was so much fun to make use water amount stickers. I can't wait to see what kind of stickers you guys make. Your project is to make a sticker with all the tips and tricks that I showed you and print them and stick them somewhere and show you what they look like. Thank you so much for watching once again see next time.
 Alison M, Classes by Alison