Transcripts
1. Intro To Filmmaker Pro: [MUSIC] Welcome to Filmmaking Pro. I'm Mauricio Celis,
and in this class, I want to be teaching
you how to get your first film-making
job fast so you can quit your
9:00-5:00 job that you hate and enter in
the video industry. Whether you're a beginner
or intermediate, I think you'll definitely get a lot of value out
of this class. I will be discussing
what's geared by, how to use your gear, how to record audio, how to light up your scene, how to make your image look
cinematic, storytelling, editing, building a portfolio, and reaching out to clients. For my introduction, since you guys are
watching this video, which I appreciate it, I'm going to give you
a few tips for free. Yes, free. Let's begin. When you're
first starting now, before you even
start buying gear, think about what kind of
videos you will love to shoot. This can save you a
lot of money and time. For an example, if you
wanted to shoot real estate, you need a wide-angle lens and a camera body that does
well in low light. If we want to shoot sports, you need a telephoto lens to capture the action and
fill in your frame. If you want to shoot feature
films and your goal is for one of your films
to featured in Netflix, you need a cinema camera so you can get the
highest quality. First decide what genre
of film you want to shoot before buying the gear. But then, you're
probably thinking, how am I supposed
to pick if I've never shot anything before? Well then I recommend buying
a cheap camera kit like the Canon SO2 with the
18-55 millimeter lens. You can try out all of
these genres of videos, you can make a decision
because now you have experience and can choose
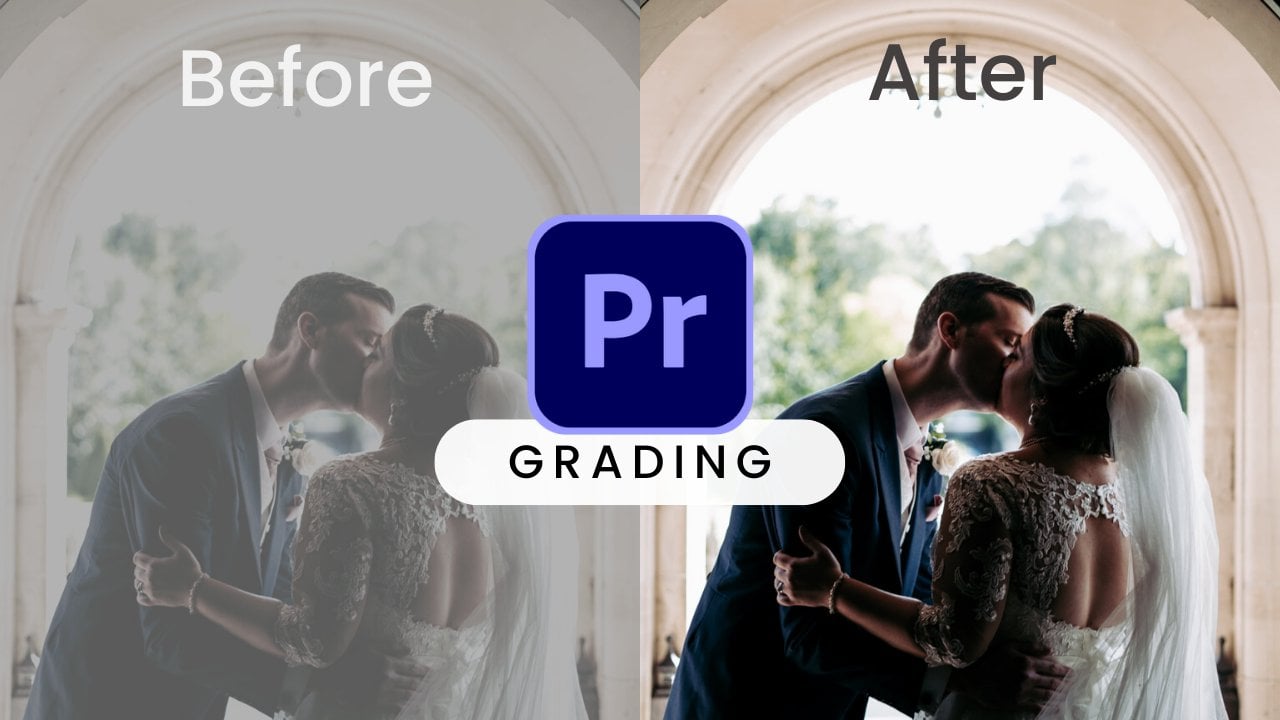
which one is your favorite. Next is cinematic. How can I make my
image more cinematic? Well, it's mostly done by
lighting and composition. Lighting to give the look
and emotion of your film. Like if you want
to make your film feel moody and dramatic, then a dark blue could
be the best for you. If you want to make your
film look happy and dreamy, then having more light
will be the best. There are many types
of lighting styles, so there is no right or
wrong answers to this. Which is the best
part of this career? You are the artists. You are telling your
story your way. If you want to do it like this, no one can tell you
it's wrong because this is how you want to
express yourself. This is how you want
to tell your story. Sure, there maybe better ways, but you decide how
you want to do it. Other than lighting,
composition is a big deal in cinematography. How you place your subject and how you compose your image is important on making your
film look more cinematic. Those are just parts of the things you'll
learn in this class, but there's so much more like the settings
on your camera, movement, drone,
audio, sound design, music, transition, color
grain and much more. Also, I will be teaching
you what clients in jobs look for when
hiring a videographer. I've been told multiple times by other
people that they are impressed by my work with only having a few
years of experience. They've been told me that
my work is up there with other filmmakers who have
10 years of experience. That's insane. This shows that you practice
and do it every single day, you can get your first job in a matter of just a few months. If you're interested in
making money shooting videos, make sure you purchase
the full subscription, and I'll see you guys then. [MUSIC]
2. Gear// What Camera To Get: [NOISE] What's up guys? In this video, we're going
to be discussing cameras. So what camera should you get? Well, it depends on the brand, your budget, and the specs. If you have no money to spend, you can use your smartphone. Phones these days are becoming better and better
throughout the years. If you had between
$400-$800 to spend, I recommend getting
the Canon SL2, the Sony a6400, or the
Panasonic Lumix G7. If you have around $2,000 I
recommend the Canon EOS R, the Sony A7c, or the Panasonic GH5S. If you have $5,000 to spend, I recommend getting
the Canon R5, the Sony A7S III, or the Blackmagic 6K. When buying your first camera, make sure you check
the release date especially if you're
buying a used. You don't want to buy a camera that came out several years ago. Make sure you do some
research and find a newer updated version
that came out recently. I have a video later in this
class discussing resolution. But typically,
what this means is how many individual
pixels are on the screen. You need a camera that
can at least shoot 1080P because that is
the standard resolution. Most cameras these
days can now shoot 4K, which is a good and bad thing. The good thing is
that you'll have a much better quality but the bad thing is that
when you're editing, it will slow down your computer
taking longer for you to finish the edit and also
it has bigger file sizes, which you need more
storage space, which will be more expensive. Next on the list is frame rate. If you're buying an
older used camera, make sure your camera can shoot at least 1080P at 60
frames per second. This means that you can
shoot in HD and slow-mo. You definitely need that
option to shoot real estate, weddings, and action sports. All of the newest
cameras can now shoot up to 60
frames per second, so you don't need to worry. Some of the most
expensive cameras can shoot 4K at 60
frames per second, like my Sony A7S III, and even more expensive
cameras can shoot higher frame rates like up
to 1,000 frames per second. This is super slow. Next on the list is sensor size. There are four main sensor sizes you should
know, full frame, APS-C, micro four-thirds, and smaller than half. So the bigger the sensor, the better your
camera will be in low light because it
provides higher ISOs. You also get more
depth of field or background blur and your image
will be less compressed, meaning it will be a
much better quality. For an example, 4K
on a full frame will be better than
4K on a smartphone. Yes, the resolution is the same, but the 4K on the full frame, will look a lot better. Also, depending on
what camera you get, you need to make sure you get the right lens for your body. For an example, if
you get a Canon SO3, you have to get a lens
that fits that camera, which is the APS-C. If you have a
full-frame lens and put it on a crop sensor camera, it will crop it in and
then also vice versa. Next on the list is color. Which camera provides the best color straight
out of camera. Canon definitely has the
best color in the market. But recently Sony has
been stepping it up, like the Sony A7 III their color is probably as good
as the Canon colors. If you don't want to spend too much time color correcting, I recommend either getting
the Canon or Sony. Next on the list is autofocus. Since I'm a one man crew and I shoot my tutorials by myself, I need a camera with
great autofocus. Canon and Sony are
the best ones so far. They both have great
features like face tracking, eye tracking, and many more. More expensive cameras don't have autofocus because they're built to have another person
dedicated to pulling focus. Last thing on the
list is the function. Does the camera have a flip out screen so you can film yourself? Does it take great
photos as well? Does it feel good in your hands? Is it too big, too
small, too heavy? Does it fit on your stabilizer? Are the menus easy to learn. All of those questions
you need to ask yourself before buying
your first camera. Buying an expensive camera is worthless if you don't
know how to use it. So make sure you learn
and master the settings and techniques I'm going
to show you in this class. A camera is just a
tool to help you tell your story or
sell a product. Don't focus too much on gear. Buy the equipment you need, then start learning the basics. Well, that is pretty much it. If you have any other questions, feel free to hit me up. [NOISE]
3. Gear// What Lens To Get: What's up, guys?
In today's video, I will be teaching you
about camera lenses. I will be discussing
the sensor fit, zoom versus prime, focal
length and the brand. This is definitely one of the most important
piece of gear, it's up there with having a great camera body.
If you think about it. You spend thousands of dollars buying a great camera body, but then you put a
cheap lens on it. It's like buying a
Lambo with no engine, then purchasing a Toyota
engine and you put it in the Lambo, why? You spent thousands
of dollars of your body and you end up
buying a crappy engine, that's not even a
Lambo in my opinion. Anyway you get the point. Make sure you invest in
some high-quality glass. First thing on the
list is sensor size. You got to make sure you get the right lens for
your camera body. I already talked about this
in the previous video, but typically when
buying a lens, make sure it fits
on your camera. When you buy a lens, in
the description it says this lens is for full
frame or a crop sensor. Although you can't get
a crop sensor lens and put it on a full-frame body, but it will cause
vignetting on your image. Then the opposite, if you get a full-frame lens and you put it on the crop
sensor your body, it will crop it in, like for an example, my Canon 80D is a
crop sensor camera, and this SIGMA lens is
a crop sensor lens. When I zoom in to 50 millimeter, it actually is 50 millimeter. But if I get my prime
Canon 50 millimeter lens which is built for four frames. It has a 1.6 crop, making it a 80 millimeter. It's not the end of the
world because you can do the math and find the
focal length you want. Next on the list is zoom
versus prime lenses. Which ones should you get? One of the difference
between the two is that the zoom lens, it comes with multiple
focal lengths. Like for example, a 24-70
will be considered a zoom lens because that lens covers focal lengths between 24-70, so you can go from wide to
zoomed in, really quick. This is great for filmmakers
that shoot weddings, live events, documentaries,
and travel videos. Another pro is that
you can save a lot of money by not having to
buy multiple lenses. Like if you just
buy zoom lenses, all you need is a 16-35, 24-70, and a 70-200. That covers from as
wide as 16 millimeter all the way to 200 millimeter and you only need three lenses. But some of the costs
is that there is a limit on how low
your aperture can go. I have a separate video later in this class talking
about aperture, so I'm not going to
go into full detail. But typically what
aperture does, the lower the f-stop, the more depth of field and
the light you will get, because the lowest
it will go is a 2.8. Unless you have Canon's RF lens, the 28-70 F2.0, but it's super expensive. Next is prime lenses. The biggest pro on prime
lenses is the f-stop. These lenses could
go as low as F1.2. Imagine how much
depth of field and light you will get
from this prime lens. The con of this lens is that you only get
one focal length. You can't zoom in and you
literally have to get closer or change lenses
to get your shot. If you're just starting now, I highly recommend
getting zoom lenses then later in the future
you can get prime lenses. I forgot to discuss focal
length that's why I got a haircut and the
setup is different. But anyway, next on the
list is focal length. There are three
different categories: wide, standard, and telephoto. Wide angle lenses are
good for landscapes, real estate, or if you want to capture more of your
scene and frame. The 16 millimeter lens
I mentioned earlier, this is a great lens
because you can easily go from 16 millimeter to 35 millimeter really quickly and the standard lens is the 24-70. You can get wide and you can zoom in all the way
to 70 millimeter. You can pretty much use this lens for any
journalist video. Last is a telephoto lens, which is a 70-200. This lens is great for scenarios where you can't
physically get closer, so you have to zoom in like if you're shooting
action sports, concerts, or wildlife
and much more. Last thing on the
list is the brand. What brand should you get? Well, you should always get the original brand of the lens. Like if you have a
Sony camera body, I recommend getting
the Sony lenses, but I know they're
super expensive, so these are the brands
that I recommend. SIGMA is probably the
best third-party brand and maybe even better. Not only are they
high-quality glass, but they are super solid
and also the price. These SIGMA lenses are literally half of the price of
the original brand. Some other companies
I recommend are Tamron, ZEISS and Rokinon. Other brands I don't recommend, try sticking to these
companies that I listed. Those are all the
things you need to know when purchasing a lens. If you have any other questions,
feel free to hit me up.
4. Gear// What Mic To Get: What's up, guys. In this video, I'm going to be talking
about microphones. I'm going to be showing you
the different types of mics, audio test, and price. There's basically four
different types of mics, a shotgun mic, a boom mic, a lav mic, and a studio mic. Having different types of mics works best in
different scenarios. The first mic I got is the shotgun mic because
it's super versatile. It's great for
running gun shooters. Even low in cash, I recommend getting this mic. The mic I own is the Deity
D4 which cost me $90. There are other options
like the Rode VideoMic pro-plus that costs around $200. Not only can you use this
as your shotgun mic, but you can also use it as a
boom mic and a studio mic. It doesn't do the
greatest in all of these categories but is
a great micro startup. Next mic is a boom mic. I don't have a boom mic, but this mic is used
on a stand like this, and you have to connect it with the XLR cable and the
audio interface like this. The one I've seen other
creators use and recommend is the Rode NTG5 costing at $500. The best audio interface
I've seen is the Zoom H6. Next mic is a lav mic. This mic is great for scenarios where the talent is going
to be moving around. I use this mic when I'm out in the field shooting a tutorial. So it doesn't matter where I go, the audio is going
to stay clean. This mic I'm using is the
Tascam DR-10L costing at $200. The last mic is a studio mic. This mic is used
more for talking headshots like
this for podcasts, voiceovers, singing, and
recording instruments. The mic I use is the Rode
NT USB costing at $170. It's super easy to set up. It comes with a pop
filter and a USB cable. All you're going to do
is connect your mic, then bring your
laptop or computer. Plug it in, open up
the voice memos app. If you're on a Mac, adjust your settings and
start recording. As you can see, each
one of these mics has a different purpose
for different scenarios. Just like having
different lenses, they all have strengths
and weaknesses. That is pretty much it. If
you have any other questions, feel free to hit me up. [MUSIC]
5. Gear// What Tripod To Get: [NOISE] In today's video, we're going to be
talking about tripods, model parts, sliders,
and gimbals. I'll be discussing what
they're built for, how to use it, and
when to use them. Tripods are probably the most common used gear in filmmaking. Every filmmaker owns a tripod because it comes in super handy. Tripods are built to
have a static shot, like in interview, a
talking head shot, shooting a moving
subject so the viewer focuses on just that,
or a timelapse. But just because
you're on a tripod, doesn't mean you can't add
movement or be creative. Here are a couple of
movements that you can do from a tripod. But first, make sure your tripod has a fluid head with a handle, so you can do these movements. First one is a tilt, either a up or down. Second is a pan, either a left or right. Third is zooming in
using your lens. Fourth is using
keyframes and posts, whether that's a digital zoom, a side to side, or up and down. Fifth is a focus pull. This is technically
not a movement, but you're using focus to
add motion in your shot. You can get super creative
with just a static shot. Let me show you a
couple of examples. First one, clone yourself. Second one, the masking. Third, [NOISE] the disappear, and forth, the jumpcuts. [NOISE] There are so
many other creative ways you can utilize your tripod. Next on the list is how to
use it. It's pretty easy. All you got to do is place
your camera on the tripod, make sure it's nice and tight, extend the legs, make
sure it's level, adjust your fluid
head, and that's it. You can now begin shooting. Last on the list is, when to use them. I already talked about this, but typically you want to
use a tripod if you're not planning on using
a lot of movements, like an interview or a
scene where it makes sense depending on the
style of your film. [NOISE] Next on the
list are monopods. It's like a tripod, but instead of
having three legs, you only have one leg. You're probably wondering, why should I get a monopod
when I already have a tripod? Well, for starters, a monopod is a lot lighter and
easier to carry around. Also when shooting
the hyperlapse, a monopod is much
easier to shoot on, because when you're
shooting the hyperlapse, you're taking a hundreds of photos and turning
it into a video, and when you're on location, it's much easier to
pick up a monopod. Another thing is if you purchase a monopod with a wide feet, it can stand on its own, so you can use it as a tripod. The last thing you can
use it is as a gimbal. If you want to add a bit
more movement to your shot, you can pick up your monopod
and get those smooth shots. Sure, they're not going to be as smooth as a real gimbal, but there are a
couple of tricks. First, check every camera
or lens has stabilization. If it does, turn it on. Second, do the ninja walk. Third, walk super slow, and forth, add warp
stabilizer in posts. That's it, you got yourself a smooth shot without
using a gimbal. [NOISE] Next in the
list are sliders. There's definitely
a time and place for this specific equipment. Typically, sliders have much smoother and
slower movements. This is great for interviews, music videos and scenes where you want such
little movement. I currently don't own a slider, but there are two
types of sliders. A manual slider, what you physically have
to move it yourself, and a motorized slider, where the slider pretty much
does all the work for you. Slow movements is not my
type of shooting style. I like having intense
movements on my shots, and I do that either
handheld or a gimbal. For sometimes when I'm
shooting a commercial, a slider would have
been nice to have. The last thing on the
list is a gimbal. This is used for
situations where you want to add movement
and keep it steady. You can pretty much
use a gimbal for any genre, like real estate, music videos, commercials, documentaries,
events, and weddings. Any type of video, a gimbal will come in handy. I currently own the DJI Ronin-S, and I absolutely
love this gimbal. It's super easy to
use and set up. I'm going to quickly show
you how to balance a gimbal. First, attach all the
pieces correctly, then remove the
quick release plate, attach your camera on the plate, put the camera with the
plate back where it was. Now, we're going to
start balancing. First, start with the tilt axis, which is on a right
side of the gimbal. Your goal is to have a balance
to the point where you can move your axis
and it will stay put. Start messing around with it until you find the sweet spot. Next, is a row axis which is
in the back of the gimbal, just like your tilt axis has to stay put whenever
put you move it. The only difference
is now side to side. Last is your pan axis. Tilt your gimbal to
the side and start adjusting the bottom
part of the gimbal. Again, has to stay put. So start adjusting the axis
until it doesn't move. That's it. You have efficiently
balanced your gimbal, and now you can start shooting. As you can see, each
one of these equipments is used for different
situations. You can't just say one is
better than the other one. They're built different. You figure out what you're
going to be shooting most, and then just go from there. Well, that is pretty much it. If you have any other questions, feel free to hit me up. [NOISE]
6. Gear// What Lights To Get: What's up, guys?
In today's video, we're going to be
talking about lighting. I'm going to be
talking about the different types of lights, price, quantity, quality, and features. First is the type of lights. There are a lot of
different types of lights that produce
different results. Like this Godox light I have. I'm using it as my key light, and I'm using a softbox to make the light look more
natural and flattering. You can also use this
light as a rim light. You can put this cover hood to only light up a certain spot, which is the back of my
head because I don't want this light to
spill on my background. Next light is a LED panel. This was my first
ever light I got. It's super versatile because you can use it as a key light. Is not the softest light. If you want to make it softer, you can get something
white like napkins or a piece of paper and just
tape over the light. Another way you can use
this light is a backlight. This light comes
with panels here, so you can take [inaudible] and bring some color in your shot. Last one is a tube light. These are made for situations where you're lighting a product and you don't want
a huge reflection showing on your product, so it uses light to
make it look natural. You can also use this as
your practical light, meaning you can use this
light on your shot. I'm sure you've
seen this light on music videos and commercials. Next is price. I'm going to be showing you
the best budget lights. For your key light,
the best light I recommend is the Godox SL-60W. The newer light or
the newer LED panel. There are more expensive
lights like the Aputure 120d, the Falcon light, or
the GVM LED panel. Next is quantity, meaning
the brightness of the light. Typically when you put your softbox in
front of the light, is not going to be that bright because the
whole purpose of your softbox is to spread
the light making it softer. When you have no softbox, the light is in one direction, making it brighter but harsher. When you buy cheap lights, sometimes you get a
bit of color tin, and you have to end up color
correcting it in post. But with the more
expensive lights, you get a true white
color to your look. Next is quality, meaning
hard versus soft light. Typically when you're
lighting a person, you want to use a soft light, but that's not always the case. Sometimes hard light
can be a good thing. Great examples of
hard light would be any dramatic scene when
they're using ambient light, backlight to make a subject
silhouette, or a spotlight. These are just some
of the examples, and there are
plenty of more ways you can use this
lighting technique. Last thing on the
list is features. Make sure you do your
research on the light before purchasing it because not all of the light can
do these features. I'm going to tell you. Ask
yourself these questions. Do you want the light
to be dimmable, bicolor, RGB, having controller, you
want to take batteries, or do you want to
plug it in an outlet. Not everyone is going to
want the same features. The things that I want on the
light maybe you don't need. For an example, I want
a light that's bright, dimmable have the option to use soft or hard light,
and a controller. First, as we solve
these questions so you can find the perfect
light for you, make sure you find the right
light because this is what makes your film look
cinematic and professional. Just by changing
the light it can improve the production
of your videos. That is pretty much it. If
you have any other questions, feel free to hit me up.
7. Gear// Do You Need A Drone?: [NOISE] Do you need a drone? If so, what drone should I get? What specs do I need to
get the best quality? Do I need a license to fly? All of these questions I'm
going to be answering. First, do you need a drone? Well, it depends. If you're going to be shooting
in real estate and that's the only type of
video you want to do, then that's a big yes. You definitely need a drone. The agent is going to
request it for sure. As for other genres of
video like music videos, commercials, feature
films, events, you could get away with
it but most of the time the client is going to request a drone and just to be safe, if you want to keep
your client happy, then I recommend
investing in a drone, so just in case you need it. Next thing on the list
is the type of drone. What drone should you get? Well, DJI definitely makes
the best drones out there. Depending on your budget
and what the drone offers, here are my top three
drones I recommend. If you're on the budget
and all you want is a drone just to have one just in case whenever
clients asked for one and you don't really care
about the quality for now, then I recommend
that DJI Mini 2, coming in at $450. If you have a little bit
more money to spend and are willing to invest
more of the quality, then I recommend the DJI Mavic
Air 2 coming in at $800. If you have a much
higher budget and want to get the highest
quality possible, then I recommend
the DJI Mavic 2, coming in at $1,600. Next thing on the list is specs. Well, typically you
want a drone that can shoot 1080p at 30
frames per second. But now that technology
is getting better and clients are
expecting better specs, I recommend getting a
drone that can shoot 4K at least 30
frames per second, and 25 minutes of flight time, at least 25 megapixels for photo and focused
tracking which means the drone has built-in
presets to follow you without having to
control it yourself. Last thing on the
list is a license. If you're going to be
flying commercially, meaning you're getting paid, you need a FAA Part 107 license. It's an exam you have
to take and you have to pay $160 to take the exam. I personally don't
have a license because I rarely fly my drone
but in the future when I start getting
more clients I'll probably get my license
or I can just hire someone who is licensed so I don't have to take the
exam and maybe they have a better drone like the Inspire and
they already have the Mavic Air 2 or
the Mavic 2 so that way I don't have to pay for the exam and buy another drone. It's a lot easier, but
that's pretty much it. If you have any other questions, feel free to hit me up.
8. Tech// Resolution & Frame Rate: [NOISE] In this
section of the class, we're going to be discussing the tech side of film-making. In this specific video, we're going to be talking about resolution and
frames per second. Resolution is the detail
and quality of an image. A 720p footage is going
to be softer and have a lower-quality look
than a 4K footage, why? Well, because 4K
has more pixels, the standard 4K has 3,840 pixels horizontally and 2,160
pixels vertically. While a 720p has 1,280 pixels horizontally and 720
pixels vertically. When getting the
camera, makes sure it can shoot at least 1080p. 720p is outdated,1080p is a standard resolution
as of now in 2021. But with no doubt 4K will eventually be the
standard resolution. A lot of TV programs,
shows, movies, computers, televisions
are now using 4K. I recommend getting a camera
that can shoot 4K as well. But you're probably
asking is 4k worth it? Or should I just
stick with 1080p? Well, pros of choosing 4K is you get a better quality image, you can digitally zoom in
posts without losing quality and your work can stay up to date with a standard resolution. Cons, the file size
will be larger, slowing down your
computer when editing and taking up more space
in your hard drive, which will be more expensive. But I think 4K is a
great investment, it will be worth it long-term. Next, we're going to be
discussing frames per second, it's literally how
it sounds like, it takes a certain amount
of still frames per second, turning it into a video. When you're choosing
a frame rate, whether that's 24, 60 or 120 frames per second, you're literally choosing
the mountain photos to appear in your image, making a motion image, or what we call video. Depending on where you live, it will depend on the
standard of frame rate. The two most popular
ones are NTSC and PAL. But since I live in the US, I will be using
NTSC in this video. If you choose NTSC, your options will be 24, 30, 60 and 120 frames per second
and if we choose PAL, your options will be 25, 50 and 100 frames per second. Now let's talk about when and why to choose a
certain frame rate. 24 frames per second is
what I call normal speed, because it's not slowed
down and it is what we normally see in real time. Right now I'm shooting at 24 frames per second
because I'm not planning on slowing it down
and it looks cinematic. A lot of Hollywood
movies are shot at 24 frames per second for
the amount of motion blur. 30 frames per second gives a broadcast few twists smoothing out the
emotion of your image. I rarely shoot at 30
frames per second, but if I ever shoot at 30, I will use that option
if they want to go for that broadcast
news report look. I also chose this
frame rate if I want to slow it down by 80 percent, which is slightly
slower than 24. 60 frames per second
is slow motion. I choose this frame rate if
I'm planning on slowing down, which is 40 percent slower. I normally choose this option
when I shoot real estate, weddings, burial or chars where there's a lot of movement. A 120 frames per second
is super slow motion, this is 20 percent slower. Not a lot of cameras
have this feature, but definitely a unique option
to have in your camera. I've seen many people who shoot
at 24 frames per seconds, then slowing it down, never, ever do that. It will be super choppy
and unprofessional, but what if you don't know that you're going to slow
it down later on posts, then I recommend shooting everything as 60
frames per second. I'd rather shoot everything
at 60 frames per second, not slowing down the footage and having this smooth
broadcasts look, than shoot everything like
24 frames per second, slow that down and
have choppy footage. Keep in mind, depending
on the frame rate, your shutter speed will be
different on each frame rate. I talked about shutter
speed later in the class, particularly when your
shutter speed does, it affects your motion blur
and the reason I brought up shutter speed is because when choosing a specific frame rate, your shutter speed has to
be double the frame rate. For an example, if you
choose 24 frames per second, your shutter speed must
be one over 50th of a shutter to get the most
natural motion blur. When choosing 60
frames per second, you have to choose one
over 25 of a shutter. Make sure you learn these
techniques and have your reason why you are
choosing a specific setting. So that is pretty much it. If we have any other
questions proofread, hit me up. [MUSIC]
9. Tech// How To Expose Your Footage: [MUSIC] In this video, we're going to be talking
about shutter speed, aperture, ISO, picture profile,
and white balance. Exposing your image is
used with three settings, your shutter, aperture, and ISO. Shutter speed. Shutter speed
affects your motion blur. The lower the number, the more motion
blur you will have. The higher the number, the less motion
blur you will have. Think of it like this, when shooting video
is basically taking still frames and turning
them into a video. Like in the previous video, we talked about
frames per second. Each frame your camera takes, the shutter speed is taking a photo with a specific shutter. When you take a photo
with a low shutter speed, there is a lot of motion blur and when you bring
up your shutter, your photo is sharp, and it freezes your action. It's the exact same
thing with video, but you're now taking
multiple photos and turning them into
a motion image. But keep in mind when you
bring down your shutter speed, it receives more light into your sensor, making it brighter. When you bring up your shutter, it makes your image darker. There's a rule in filmmaking
about shutter speed. Typically, when you shoot
at a certain frame rate, you have to double
that frame rate to your shutter speed to have
the most natural motion blur. Humans naturally
see motion blur. If you wave your
hand back and forth, you will see motion blur. For an example, if you
shoot 24 frames per second, your shutter must be at 1/50 and when you shoot
at 60 frames per second, your shutter must be
at 1/25 of a second. Yes, you can shoot at a
much higher frame rate, but it's not going
to look as natural. When you're shooting outside on a sunny day and have
the proper settings at 24 frames per second
shutter speed at 1/50, your aperture wide
open that F2.8, and your ISO as low as
possible to avoid noise, it's overexposed, or
it is too bright. There are three things you
can do in this situation. You can bring up your
shutter speed and have that jitter,
unrealistic look. Bring up your aperture
and everything in focus, or keep ISO settings how it is and get yourself an ND filter. I'm not going to go
into full detail, but typically what
ND filters do, it makes your image darker, so you can keep the
settings you want to have that cinematic
natural look. [NOISE] Next on the
list is aperture. Aperture affects the
amount of depth of field or background
blur in your image. The lower the f-stop, the more blur you'll get, the higher the f-stop, the less blur you will get. Also, keep in mind when
shooting with a low f-stop, your image will be brighter because your aperture
is wide open, letting tons of light
into your sensor. The higher the f-stop, your image will
be darker because your aperture is almost closed, not letting a lot of light
through your sensor. That's why lenses with low
f-stop are more expensive because it gives
you a more depth of field which everybody likes, and it lets in a lot of light, making a great lens
for low-light. You'll probably hear a term like a fast lens because when
your f-stop is super low, you're forced to bring
up your shutter speed to around 1/2,000 of a second, so you can properly
expose your image. Next on the list is ISO. ISO basically gives
you extra light. For this setting, it's
the complete opposite. The lower the ISO, the darker it is, the higher the ISO, the brighter it is. When you're in this situation where there isn't
a lot of light, and it's too dark, this is where your ISO comes in handy. But be careful not to
bring up your ISO too much because it will cause
noise and grain in your image. There are some cameras
that are going to do better in low light. For an example, a full-frame
camera are going to do better in low light because
of the bigger sensor size. Also, depending on
the brand you get. Sony tends to have more cameras that do better in low light, especially the Sony a7S III. Since this camera only
has 12 megapixels, it will do better in low light. That was Sony's overall
goal for this camera, since it's a dedicated
video camera. Next on the list is
picture profile. Picture profile is
the type of image. For an example, on
my Sony a7S III, there are multiple
picture profiles, but I can tell you the
top four picture profiles I choose and why. The first one is SLOG 2. I choose this profile when
I'm shooting in low light. The second one is SLOG 3. I choose this profile to
get the most dynamic range. The third one is CINE 3. I choose this profile to get the most natural colors
straight out of camera. Lastly, number 4 is HLG 3. I choose this profile to get the best dynamic
range, but less flat. It's in-between a standard
and a log profile. [MUSIC] Last thing on the
list is white balance. White balance is the color
temperature from your camera. When adjusting your
white balance, your goal is to have
your whites look white, not too blue or not
too orange but white. How do you do that? You may ask, well, it depends
on the lighting. First, let's talk
about your options. It goes from as low as 3,200 Kelvin and as high
as 6,000 Kelvin. Thirty-two hundred Kelvin
gives you a blue look and 6,000 Kelvin gives
you an orange look. Typically, when you're indoors, the lights are using
are 3,200 Kelvin light, so you got to match
that by choosing the 3,200 Kelvin option
in your camera. When you're outside
on a sunny day, typically you'd be
using a 5,600 Kelvin. When it's twilight hour, you'd probably be
choosing 6,000 Kelvin. Think of it like you're
adding a filter. You're either adding a blue
filter or a orange filter. Your DSLR gives you presets
built-in like daylight shade, cloudy tungsten, and
white fluorescent. Another option you can choose
is auto white balance. This option lets the
camera choose what it thinks it's best
according to the light. This is a great tool
to use if you're just starting now
but eventually, you'll want to learn
how to use it manually. Unless there's a show
where you're going from inside to outside and
the colors are changing. If we set it to manual, your indoor shot will
be set properly, but once you go outside, it will be too blue. Another reason you can use
auto is if you're vlogging because you don't
really care about the production of the video, but you want to tell your story, and you don't want to
spend too much time adjusting your settings. Those are the only two
reasons I can think of when it's appropriate to
use auto white balance. Other than that, I
recommend you learning how to set your white
balance manually. That is pretty much it.
Those are the main settings you need to learn when
you're out shooting. I highly recommend learning these settings really
well because if your white balance is
off it would really be difficult to
correct it in post. Or if your exposure is off, you'll probably get a lot
of noise in your image. Make sure you get
it right on camera. Well, that is pretty much it. If you have any other questions, feel free to hit me up. [MUSIC]
10. Tech// How To Shape Lighting: [NOISE] [MUSIC] In this video, I'm going to be showing
you the different types of lighting techniques. These are the lighting
techniques that I use and I've seen in movies. [NOISE] First one is
Rembrandt lighting. This originally came from
a patron named Rembrandt. He uses lighting technique
on most of his paintings. What does lighting do? It creates depth on
the talent's face, creating shadow on
the opposite side. It also creates this
triangle lighting shape on the talent's cheek. A lot of Hollywood
movies use this type of technique giving it a
more dramatic look. Also, depending on the position
you place your camera. If you place it on
the bright side, it's called the broad light. If you place it
on the dark side, it's called the short
light or dark side. This is the lighting
technique that I use on all of my videos. I just like the way it looks, it's not too dramatic
and it's not too flat. Second technique is
the front light. This is by far the least cinematic lighting
technique from all, because since the lighting
is right in front of you, there's no shadows on the talent's face
making it a flat image. This technique is used more on beauty commercials,
comedy shows, because their goal is
not to make it look cinematic, rather more natural. Third technique on the
list is split lighting. Half of the talent's face is dark and the other
half is lit up. This technique is used
on dramatic movies or scenes making the actor
look more tough and mean. Forth technique on the
list is top light. What this lighting does, it gives the subject
half shadows in the eyes and they
call it raccoon eyes. Typically, this is used for scenes with artificial lights, like a light bulb spotlight, or even the sun outside, making them more motivated. This look can give a
dramatic look to the actor, and making him look like
the bad guy of the movie. Or if you can soften the light, they can have more
of a natural look like an overcast day. It can also lit
up an entire set. Fifth technique on the
list is the bottom light. This technique is used
more on horror films, giving them more of
an evil look to it. This lights up the
most unflattering look of the talent's face, like the chin and
under the nose. But if you're going
more of a hard look, then this is the lighting
you should go for. Sixth technique on the
list is back light. This will give the talent
have silhouette look to it. This is good if you
want to introduce a character but not fully yet, and having more of a
mystery look to it. Or if the talent is doing
some sort like dancing, running and things like that, this lighting is
perfect for that. Seventh technique on this
list is the rim light. I use this light to
light up behind me so I can separate me
from the background. These lighting can
be used to introduce a character but not showing
the entire face yet, giving more of a mystery look like the previous
lighting we talked about. As you can see this shot, the back of my head is
the only thing lit up, and it can give a cinematic
mystery look to it. Last but not least, the eighth technique on
this list is color light. This can enhance the look on your subject, giving
more contrast. You can add contrast
by lighting, depth, and color. You can get super creative
with the color lighting, and it's endless what you
can do with this technique. I'll just show you examples
on screen right now. Depending on the story of
the film and or scene, lighting could
definitely help you give the appropriate look
to tell your story. All these lighting
techniques have a purpose, and you should have a good
reason why you're using it. Don't just pick a certain
lighting position just because it looks good, have a reason why
you're doing it. If you learnt something out of this video, make sure you like, subscribe. I'm out [MUSIC].
11. Tech// How To Shoot Outdoors: [MUSIC] Hard versus soft light. What's the difference? We're also going to be
talking about natural light. But first is hard
versus soft light. Hard light is using light
with no diffuser or softbox, making your subject have deep shadows and
bright highlights, while a soft light is
the complete opposite, it gives your subject a much more soft and flattering look. Notice how the shadows are
gradually blending in, it's not a hardcore like the
other lighting technique. By achieving this soft look, all you're going to do is place a diffuser in front
of your light or you can get a softbox and
attach it to your light. Some of the gear I use to create hard light is a
Neewer LED Panel, the Godox SL60W with no softbox, and the Neewer Round Light. The gear I use to
create soft light is also the Godox SL60W, but now using the softbox. Also, use the Neewer
Round Light but I keep the brightness at 10 percent
to avoid hard light. When to use hard and soft light. Well, 95 percent of
the time you'll be using soft light
on people's faces. It gives you a more natural
and flattering look, but a great time to use hard light is in
a dramatic scene. If you use hard light
directly above you, it will create this moody, dramatic, and tense look. Another way you can
use hard light is recreating a silhouette look. This technique is super simple. All you're got to do is
point the light behind your subject or point
it at the background. Next is natural light, there are three
things you should be aware when shooting outdoors. Number 1, the time
of day, Number 2, the direction, and Number 3, the weather. Time of day. Depending on the time
of day you choose, it will give you
a different look. For an example for portraits
shooting at noon is probably the worst time because not only the sun is
directly above us, but it will give
you a hard light. The talent's face is not going to look flattering and you'll be able to see every detail
on the talent's face. It will cost unnecessary
shadows on the talent's face, or what we call raccoon eyes. Avoid shooting at noon, but what if you are
forced to shoot at noon? What can I do to have
the best lighting? Well, there are three
options you can do. First option is find a shaded
area to have even lighting. Second option is
bring a diffuser, and the third option
is to use a reflector. This will fill in
the shadow parts of your subjects
so it's more even. Shooting at noon isn't all bad, it's great for landscapes because of the hard
lighting which creates contrast and the law
of saturation on your image. It's also great for sun
flares, drone shots, and golden hour, which brings me to the best
time of day to shoot, which is golden hour. Golden hour happens before
sunset and after sunrise. This is by far the prettiest
time to shoot because it creates this golden yellow
light on your image. Take a look at these two shots. One was taken on a cloudy
day and one at golden hour. As you can see, the one taken at golden hour is a
lot more beautiful. I always try to shoot at this time when
shooting landscapes. Next on the list is twilight. It's also referred to blue hour. This happens before sunrise, which is called dawn, and that happens after sunset, which is called dusk. This is the best time
to shoot real estate, to show the lights in the house while still having
some ambient light. This is also a
great time to shoot silhouettes of your subject. Lastly is nighttime. Before I get into the shots, you can get make sure
you got the right gear. First, make sure you
got the right lenses. I already talked about
lenses in a previous video, but what is this? It's a one focal length lens
that has a lower aperture, which lets in more light. Another big thing to look
at is the camera body. Full-frame cameras are
going to do better in low light because of
the bigger sensor size. Now let's talk about the shots. Shooting at night
gives you a whole another feeling and
vibe like depression, loneliness, flashbacks,
and a tragic scene. But you can flip that
around and change it completely like
freedom connection, a happy ending, and fun. Shooting at night
can be difficult because of the low light issues. What you can do is
fake the night look, so pretty much you
can film at daytime, I recommend an overcast day. In your camera, you could change the white balance to have a bit more blue look
like 4,000 Kelvin, and underexpose
your image a bit. Then in post-production,
you can color grader a footage to
have this night look. This is much easier and
a lot less work because you'd have to deal with
lighting your scene onset. [NOISE] Next let's talk about weather. We're going to be
discussing sunny, overcast, and rain since these are the main types of weather
that I have in my State. A sunny day is what
I call normal, especially here in California, almost every day is a sunny day, so there's nothing
special about it. As for a cloudy day, I
guess super-excited. A cloudy day can be a
great opportunity to shoot time-lapse because
you can't create movement. An overcast day is the best
time to shoot portraits. The cast create a big
diffusion in the sky. Remember earlier when I talked about lighting people's faces, you need to put a
diffusion in front of a light to create a
much flattering look. Well, that's exactly
what clouds do to create a big
diffusion in the sky. Lastly is a rainy day. I have yet to shoot a
film on a rainy day, but I've shot a
couple of photos. A rainy day is a great
opportunity to shoot reflections. I shot a couple of
photos downtown using portals as reflections for my subject and it definitely enhances the photo or it
can enhance your video. You can also use this
opportunity to create texture on your subject by the
drips of water like a car, a bench, buildings,
and many more. As you can see, there are many different lightings you
can choose for your videos. But be aware, don't just pick a certain lighting just
because it looks cool. Have a reason why you're
choosing that specific light to tell your story or to have
a certain feel to it. Well, that is pretty much it. If you have any other questions, feel free to hit me up. [NOISE]
12. Tech// How Set Up Your Audio Settings: [NOISE] I showed you
what mics to get, but now I'm going to show you how to use it and how to get the proper settings to
get the best quality. The first mic is Deity D4, which is a shotgun mic. I don't use this mic anymore because I upgraded
to much better one, which we'll talk
about in a second. But this mic is
super simple to set up and doesn't need
much adjustments. All you got to do is put the audio cable on
the output jack in your mic and connect the other end to your
camera audio jack. Turn on your camera
and you're all set. The best thing about this
mic is that it turns on whenever you turn
on your camera, so you never have to remember
to turn on your mic, especially when you are
running gun shooter. To get the best quality, there's literally
only two steps. On your mic, there is a switch, for me it looks a
old shape heart. But what this does, it allows you to get audio from the front and the
back of your mic. If you notice, the backside
also has another mic. By switching it to dual, you'll be able to get
audio from both sides. Right now I'm using
that the Deity D4 with the front side only. If I turn it over, it's going to sound
muffled because the audio is only
coming from this side. Now I'm going to switch
it to the double. Now this is it house
sounds like when they have the double switch on. As you can see,
it could get from the background and
when I switch it over, it could also get the
backside because I have the audio or the mic from
the backside turned on, so it's going to capture audio from the front and the back. Honestly, I don't think I've
ever used this feature. I just let the mic come from the front side because it
sounds a lot more crispy. Also when you're
shooting outside, you're going to capture a
lot of background noise, so I just keep it at
the front side to capture just my speaking voice. As for my camera's settings
I have Sony A7S III, and have my audio level at nine. I find that a perfect spot because it's not too loud
or it's not too quiet. You want your audio
levels to sit between negative 18 dB and
negative six dB. If it's too loud,
you're going to hit that red mark and
once you click that, you can't fix that audio. It's too distorted
and not usable. But if it's too quiet, you'll be forced to bring up your audio and pause and
it will cause noise. Just like when your footage
is underexposed and you have to bring up
the exposure in pause, you get noisy footage, same goes with your audio, but instead, you'll
get background noise. Now, obviously you want to get the audio right in camera, but how to choose between
having the quiet or loud audio? I would choose the quiet track because you could
bring that audio up and add a base filter to reduce background
noise, and post. It's not the best quality, but at least it's usable and you don't have to risk
losing it completely. Once you've got the
settings correctly, it's now how you place it. For a shotgun mic you
want to have the mic between 6-14 inches
from your mouth. I found that that is
the best distance to get the best quality. If you're too close, then it's going to
sound distorted and if you're too far, you'd get a lot of background
noise and some echo. Next on the list
is the newest mic, which is the Rode NTG. This is actually built
as a shotgun mic, but I'm actually currently
using it as a boom mic. This mic does have
more button switch, but still very simple to use. On your mic you could
see three buttons. The first one is the
low and high filter. What this does is it gets rid
of the low frequency noise, like traffic outside, all the
rumbled noise on your mic. This feature will
benefit most if you're shooting a talking
head shot like this. I have that set as 75. The next button, it actually
it has two features. The first one is it reduces
negative 20 decibels, basically just making
it a bit quieter. This will be great if you're
shooting a loud concert. The next one, it
allows you to have two tracks: one normal
track and the other one, a much quieter track about
negative 20 decibels lower. This is a good backup in case your normal
track does peak. You can replace it
for the lower track. You can have this feature
on just to be safe, but I usually have it off. The next button is
your power button. But just like the previous
mic I showed you, this mic turns on when
you turn on your camera. Last is this now. This is the gain level. Most of the time
I keep it around nine or 10 depending
on the situation. For the cameras settings,
it's the same thing. I keep it at nine with
the levels between negative 18 dB and
negative six dB. For the placement, pretty much is the same thing as
the previous mic, 6-4 inches from the mouth, and I don't point it
directly towards my mouth, but down in my chest. I do that so I don't capture those weird mouth
noises like this. [NOISE] I point it out a
few inches below my mouth. Next, let's talk
about the TASCAM, which is the lav mic. First, let's talk on settings. I'm only going to
show you the most important settings
that you need to know. The first one is the mic gain. I have that set at medium for the low cut which gets rid
of the low rumble noises. I have that on limiter. I also have that on. It basically keeps your
audio from picking. Auto level, I have that turned off and you'll see why later on. FS sample, I have it
set at 48 kilohertz, because most cameras are recorded with that
exact setting, so it will be much easier to
sync up in post bit length. Set that up to 24
because it will basically give you
the best quality. File type, set that
out about mono. This will allow you
to have an audio on both through left
and right channels. Dual record, I have that
set at negative 12 dB. This will give you two tracks, a normal track and
a quieter track. That's why I set my auto
level off because I will have two tracks and sometimes
when I have it set to auto, the audio gets a bit
loud in the middle of the clip and I get a bit noise. That's why I have
the auto feature off and that's why I recommend
having two tracks for backup. Track inc. I have
that turned on. What this does is
when you're recording audio for more than 15 minutes, it will make a separate track. Last thing on the
list is power save. I have that turned on because sometimes I forget
to turn on the mic, so when I stop recording and for some reason I
forget to turn it off, it will automatically turn it off after 10 minutes
without using it. I can save battery. These are the most important
settings you need to know. There are other
features on there, but I will just leave
them the way it is. Next on the list is
the Rode NT USB, which is my studio mic. I use this mic, when I do voice-overs or sometimes
when I do tutorials. It's super easy to set up. I have this mic in the stand, it's clamped into my
desk so whenever I need to record a video or audio, I can easily grab it
and begin recording. Next, you need a cord with
a printer to a USB cable. It comes in a box, but it's just way too long, so I got a shorter one
that's six feet long. After you have the cord
connected to the right place, I adjust the
settings on the mic. The bottom one is for the
volume gain to monitor the audio levels and make
sure it sounds crispy clean. The top one is for
the audio levels. I set it pretty low between
Level 0 and Level 1. Finally I open up
them Voice Memos. If you're in the Mac, it
comes absolutely free. I do some tests, check if everything's working, and then I finally
begin recording. For this mic, it's built for you to get close to the mic. It has a pop filter
for when you use words like [NOISE], it
won't distort it. Investing in different
mics is super beneficial because they're built for different situations. If you're in the budget
and you could only choose one mic out
of all of these, I would honestly choose the
shotgun mic because not only you can you use
it as a shotgun mic where you put it on
top of your camera, it could also be used as
studio mic like this, or as a boom mic like how
I'm using that right now. It doesn't do the
greatest at all of them, but it's definitely a
great tool to start off. Then after that, I'll go with the lav mic and then
with the studio mic, and then with a legit boom mic. You can have the greatest
mics in the world, but if your settings are
off and you don't have the basic knowledge then might as well just
don't get a mic. Use the built-in mic in your camera and just
set everything to auto. That's just my opinion. But
that is pretty much it. If you have any other questions,
feel free to hit me up.
13. Shooting// The Importance Of Storytelling: In this video, we're going to be talking about storytelling. Telling the story through a visual imagery
is very important. I'm not going to be talking
about screenwriting like a feature film because that is a whole separate career and I don't have any plans
diving deep into scripting or screenwriting
any feature film. In this video, we'll
be talking about the basics of storytelling. Your number one goal should
be to create emotion. No matter how great
your gear is, how expensive they are, the beautiful shots
is not as important as telling a great story
that people can feel. When creating a story, figure out what you want
your viewers to feel. For an example, a travel video you want them to feel inspired, motivated, adventurous,
and entertained. A realistic video, you want them to feel warm, welcoming, peaceful,
and comfortable. For a commercial, you want
them to feel like buying excited, convince,
and impressed. Depending on your style of
film or story you want to tell it will be different
for each genre of video,. But these are the
main feelings each of these videos will make
your viewers feel. Number two is how can
you tell your story? Well, there are two
main things you should know and that is
the flow and shot. The flow is how you
edit your video. For example, a fast-paced style of editing will have an intense, quick and aggressive field and the slow pace will
have more of a calm, peaceful, and usually
beautiful field to the video. Another way you can
tell your story is by the type of
shot you choose. For an example, if you
want a subject to feel strong and dominant
I will choose a low angle shot and the
complete opposite of that is a high angle shot making a subject look weak
and frightened. Spend time on choosing
the right angle to tell your story and don't
confuse the audience. Number three is music choice. Music can make your
film ten times better. Make sure you spend time on
choosing the right music. It makes sense to spend
as much time finding the song or even more
time than shooting and editing the actual video because you spend
hours or even days planning and shooting your
video and to just end it with an average song
is just a waste of time. You could have
found a great song and turn your video from a okay video to
an amazing video. Also, songs naturally have
stages like an intro, rising action, climax,
falling action, and outro. Pacing the music to your
video will be a bit easier. Number three is color. Depending on the
story you're telling, it would depend on the
color grade you choose. For an example, a warm tone
will fit best for a happy, peaceful, beautiful,
and hot view. A cotton will fit
best for a dramatic, intense, cinematic
and action field. These are just my
opinions but you can definitely choose
any color grade and have your own meaning
to it as long as you have a good
reason to back it up. Some other color grades, you can choose are
desaturated teal and orange saturated
and a dreamy look. Number four is stages. There are five stages
when telling a story. The background or intro,
the rising action, the climax, the falling action, and the resolution or outro. The background is used to show where the scene is
going to take place, like a wide-angle
shot or a drone shot. This is a great way to introduce your location or time of day. Well, you can completely
scratch that off and have a mysterious
intro by having detail shots or a dark
lighting technique to now fully introduce
your character. Doesn't make the audience feel curious on who this character is and why they're mysteriously introducing this
character this way. Stage two is the rising action. This is where this scenes
starts to happen and can also introduce the
character depending on how you started your intro. It can also be a scene where something important is
going to happen and you want your viewer to wonder what will happen
later in the film. Stage three is the climax. This is where the scene
everyone was waiting for, whether that's a
beautiful shot showing the product being used
or if it's a film, this is a great time to begin solving the problem of the film. Stage four is the
falling action. You need to ask yourself this, what can I put there that I
can keep the viewers engaged? If you are was
shooting a short film, this is usually
when the characters in the film are
solving the problem. Finally, stage number
five is the resolution. How do you want to
end your video? Well, it depends. A wedding video, you
want it to end it with a couple being loved and happy. A realistic video, you want a drone shot showing
the entire property, preferably at dusk showing the viewers that the
video is almost over. Any product video is
showing the product with the logo and
a call-to-action. Each video is different, but these stages can work
with any type of genre. As you can see,
having a great story is very important
when shooting video for clients because having a
great story equals emotion, emotion equals happy clients. Happy clients equals
money in your pocket. Money in your pocket
equals more clients. Keep in mind when shooting
the video for a client, your main goal is to
make them more money or document their day that
they're willing to pay you. Well, that is pretty much it. If you have any other questions, feel free to hit me up. [MUSIC]
14. Shooting// How To Pre Plan Your Shoots: [MUSIC] In this video we're going to be talking
about pre-production. I'm going to be showing
you how I plan my videos. There are other
ways you can do it, but this is how I do it. Maybe by seeing how
I plan my videos, you can get an idea on
what works best for you. Number 1 is the idea concept. Whether you're doing a video for a client or a passion project, brainstorming idea
and figure out where you'll go for this
particular video. Whether you want to say product, a service, or tell a story, write down your thoughts so
that way you got options to choose and can pick the
best idea for that video. Number 2 is inspiration. When I already got my idea, I started finding inspiration
from other film-makers. I watch a couple of videos and write down the shots I like. For an example, this sparkling ice
commercial I recently shot, this particular clip I got the idea from Austen
Paul on YouTube. There's other drink
commercial that were two clips in particular. The first one was
the can opening and the other one was
more of the style. I added texts of the
flavors of the drinks, and I got the idea from a
YouTuber named Daniel Schiffer. There's nothing wrong with
getting some inspiration from other creators as
long as you don't copy them exactly
how they do it. Number 3 is the shortlist. When I'm watching
other film-makers, I write down my favorite shots. I also write down others
thoughts I have in mind or what I've seen in
other genres of video. I try to make a longer
list than I need so I can have more options
in the editing room. Also, sometimes you
have a show in mind and once you're
onset you end up not being able to do that
particularly shot because maybe the location is too small and there
isn't enough room, you forgot to bring props
or a specific gear, or the talent can do a
certain move and that usually happens when you're shooting a fitness commercial. I have multiple shots
in your list in case you can't do certain
shots for some reason. Number 4 is music choice. By this point, I already
have the type of music I want and the
mood of this commercial. For an example, for this
sparkling ice commercial, I wanted an happy song with a slow and chill intro with a strong beat in
the middle of the song. The place where I get my
music is Epidemic Sound. I absolutely love
this music platform. They has some of the best
music for commercials, and you can also download
sound effects like brushes, impacts, risers, and many more. When finding the perfect song, what I do is I find a
playlist from Epidemic Sound, and I just go through
each and every song. I sometimes even go through the genre and mood of the song. I then download 2-3 songs and listen to it multiple times. I picture the shots I
listed with the song like if I'm editing
the video in my head, It's what I call shoot to edit. I'm organizing and
imagining the flow of the music with the video
I'm planning on shooting. When you shoot to edit and makes it much easier when you're out shooting because you already know what shots you want to get. It also makes it
easier when you're editing because you
already know the flow. You have it all organized, and all you got to do is place those certain clips
in the right order. All you got to do is
now add sound effects, speed ramps, text if needed, and just cut by the beat. These are the steps
I take when I plan a new commercial or
a passion project. Hopefully you can get an idea or learn something from my process. Well, that is pretty much it. If you have any other questions, feel free to hit me up. [NOISE]
15. Shooting// Composition & Angles: [NOISE] In this
video I'm going to be discussing
composition and angles. Each composition and angle has a purpose and meaning to it, so make sure you pay
close attention and have a reason why you chose
that particular shot. Before diving into the different
types of compositions, I want to talk about
filling in the frame. So many beginners neglect this rule of filling
in the frame. When you ignore this rule, your videos become
amateur and boring. Here's an example of a clip not filling in the
frame and then shot of the subject almost
filling in the entire frame. This makes it a bit more
engaging, interesting, and more professional
because it captures all of the details
of the subject. As for the first clip, the
subject is way too far away. There's too many
distractions and there's unnecessary things in your shot. Always try to fill in
your frame unless you're doing it on purpose and you
want to show the landscape. Ideally, you want to
use this shot when it's showing a beautiful
location and want to show the viewers how smart the person is compared
to the landscape. When it's possible, try
getting close or zoom in. But also it's not just
within your frame, it's also what is
not in your frame. For an example of this
shot of me in my office, there are so many things in the background that
distract the viewer. You can either get rid of the things in the
background or bring down your aperture to have
a more background blur to it or you can also do both. Ask yourself, this, does my background help
tell my story, or is it a distraction? If it is get rid
of it right away. Next on the category
is composition. Composition is the
way elements of the scene are arranged
in the camera frame. Basically how you place your
subject on frame to make it look as beautiful and
enjoyable to look at. I'm going to be
discussing the top five compositions, rule of thirds, symmetry, leading lines,
patterns and straight lines. First one on the list
is rule of thirds. Basically when
composing your subject, you want to place it in
these four quadrants. When you're shooting someone looking away from the camera, you want to place the
subject either on the right or left side, depending on where
they're looking, you want to make room
in front of them, giving them leave room, not behind him but
in front of them. Ideally, you want to use his
composition when someone is looking at something
or talking to someone, let's say you're shooting two people talking to each other. Let's call this guy Talent
1 and this guy Talent 2. For Talent 1, I will
be framing him on the right side and Talent 2 will be frame on the left side. How cinematographers
bring these types of scenes is shooting
over the shoulder, still applying these
same principles, but now you're adding the
other Talents shoulder to add depth and to fill
in more of the frame. Another way you can
use this composition is when you're
shooting a landscape, where you place
your horizon would depend on how much
you want to show. For an example on this shot, I put the horizon
on the top third to show more of the
cars passing by. For this shot, I placed
my horizon on the bottom third to show
more of the clouds. Make sure you pick the
right framing to tell your story and what you want
the viewers to focus on. Also be aware of headroom. You don't want to give
them too much space or cut off their foreheads. Typically you want to
place their eyes on the top third to properly
frame your subject. For tighter shots, you want
to place their eyes on the top third and their
mouths on the bottom thirds. As for framing,
I'd prefer to cut off their foreheads
instead of their mouth, especially when they're talking, even though they're not talking, I still prefer to show their mouths in the
frame because it definitely looks a lot better than if he showed
their foreheads. Number 2 on the
list is symmetry. Symmetry refers
to material being organized in such a
way that it conveys a sense of unity through the repetition of one
or more elements. Basically an easier way
to put it is having equal size from the right
and left side of the frame. Like for an example,
this talk in headshot is very
symmetrical because we have the floating shelves and the light bulbs on both sides. It would be weird
if I was placed on the right side and having
more leading room. That's why I placed
myself in the center. Sometimes it makes sense to have the horizon in the center
like for an example, this shot of the pier. I place my subject
and my horizons on the center because
it's very symmetrical. You don't always have to put your subject on
one of the thirds. There are some situations
where I've placed things in the center because
it looks a lot better. Number 3 on the list is depth. There are so many ways
you can use depth. I show you other ways on
other videos in this class, but in this section I will
be discussing two ways. One way you can use depth
is lowering your aperture. By lowering your aperture, it will create depth
in the background, or what we'd call
is depth of field. I always use a low
aperture because I like having that
background blur. If I raise my aperture to, let's say F22, everything is unfocused and it
will not create depth. Another way you can
create depth is having something
in the foreground just to make your shot more three-dimensional and
interesting to look at. Another reason why you want
to use this technique, especially when you're in a wide focal length,
it creates movement. Take a look at these
two shots, on the left, I'm not using any depth and it looks like I'm
not moving at all. As for the clip in the right, I did something in the
foreground and it's obvious that I'm
panning side to side. Also it just makes it 10 times better when I add something
in the foreground. Number 4 on the list
is leading lines. When shooting in landscape, I always try to
find leading lines. This makes it pleasing
to the eye and those natural lines always
lead to the subject. As a cinematographer, I always try to find bridges, pathways, trails, and fences. Also when shooting people, you can place the talent near
a place with leading lines. Those lines can lead to the viewer's eyes and
to the main subject. Lastly, Number 5 on the list is patterns and repetitions. When using patterns
on buildings, walls, or even the landscape, it's super pleasing
to the human eye. I also use shapes to
frame my subject. It just makes it
more interesting and more satisfying to look at. Now that we've talked
about the composition, Let's move on to angles. I'm going to be talking
about 10 main angles that cinematographers,
filmmakers use. A drone shot, a wide shot, cowboy shot, medium shot, close up shot, extreme
close up shot, low angle, high angle,
cutaway, and POV. When it comes to
telling your story, having multiple
angles can either help or take away your story. Usually when you're
shooting a cinematic film, you need to have
multiple angles to tell your story and has your film keep the
viewer's attention and just make it less boring. For an example,
here's a short film using all these
angles. Check it out. [MUSIC] [NOISE] As you can see, that film told the
story very clear. Yes, I use a camera that can
shoot 4K with color grading, sound design, black bars, music, and transitions. But it was mainly of
the angles that I used. But sometimes using
a lot of angles can take away your story and
make it more confusing. For an example, if
you are going for a more slow paced, lonely, and sad feel to it, using multiple angles is
probably not the best choice. Let me show you an
example, check it out. [MUSIC] As you can see, it was a bit confusing. We're going for a
slow and sad film where the pacing and flow of the video doesn't
really match the emotion and what the
viewers are feeling. Now let's do that again
for this time only using one shot, check it out. [MUSIC] Now that's a lot better. Using one wide angle shot
defines that this character is lonely because of its mass
subject in a big environment. Now let's talk about the
angles I used in this film. First one is the drone shot. I love using a drone
shot to establish the place or to get a
different perspective. Second one is the wide angle. This angle could also be used
to establish a location, but mainly filmmakers use this angle to show
more of the landscape. Three is the cowboy shot. The cowboy shot
gets its name from its popular use
in Western films. It was used to show
the cowboys gun in his waist while still
showing the full body. It's in-between in a
wide and a medium shot. Speaking of a medium shot, which is the fourth
angle on this list, a medium shot is used to make the viewer feel like you're
close to the subject. This is also a great use for
interviews since this is the angle that we normally see when we're
talking to someone. Number 5 is the close up shot. Close up shot is used
to get tight shots of the subjects face to get
the expression and emotion. It's also used to get some of the detail shots of a subject, but still be able to see
the surroundings of it. If you want to
achieve that look, you have to bring up your
aperture so you can see more of the background
and it's not so blurry. Six is the extreme
close up shot. This shot is used to get a very specific
detail of a subject. Whenever I use this shot, I really wanted
the viewer to pay close attention to
their specific spot. Since usually I'm zoomed in
all the way at 70 millimeter, it creates a shallow
depth of field, making the subjects stand
out from the background. This shot is produced by
having a tight focal length, like a 50-100 millimeter. Numbers 7 is a low angle. This angle is to make
the subject look bigger, dominant, and more powerful. It's also used to
show the subject wander around the
beautiful location, showing the subject and the
location in the background. Number 8 is the high angle. It's literally the
complete opposite of the previous angle. It makes a subject
look a lot more smaller, weaker, and vulnerable. Number 9 is the cutaway shot. A cutaway basically interrupts a continuously scene by adding something
completely different, still adding to your story, a cutaway can help
transition from one scene to another smoothly, and it can also show a completely different angle
from another perspective. Lastly, Number 10 is the
POV shot or point of view. A POV shot creates an angle of what the character
is looking at. This is a very interesting
angle to show, especially when it's a film where there's a lot of action. Sometimes there's like crazy and trippy effects involved
in this angle. Like for an example,
you can make the character feel drunk, high, dizzy, and many more. You could definitely get
creative with this angle. This is also used in
sports and action scenes to bring the viewers to a
whole another perspective. This angle is usually shot in a wider lens to show more
of the surroundings. Those are the top
angles you will see in films and you
will commonly use. As you can see, involves all of these ingredients to
create a cinematic film. Do not ignore these depths because your films
will probably not look professional and you will
not get any paid clients. Make sure you really mastered
these two principles and practice all those
shots I just taught you. Don't just watch this
video and forget about it, write notes in your
journal and go out and start applying it
to your next shoot. Well, that is pretty much it. If you have any other questions,
feel free to hit me up.
16. Editing// How To Start A Project: [MUSIC] What's up,
guys, in today's video, and in the next four
or five videos, we're going to be talking about post-production,
the editing side. In this specific video, I want to be talking
about organizing your footage, creating folders, how to start a project, all the features
you need to know in Premiere Pro, and
keyboard shortcuts. This first lesson on the
post-production side is a must-know because this will drastically improve your skills, and you could begin
editing quick, especially if you memorize
those keyboard shortcuts, and you customize your keyboards
that works best for you. Everybody's different,
I'm going to show you my custom
keyboard shortcuts, and why I chose those
specific shortcuts, and I will tell you
what each feature does, and everything, and why
I chose it, so that way, you could implement that into your keyboard
shortcuts so that we could finish edit all your videos
much quicker, let's begin. I shot a headphone
commercial, just for fun, just to show you how I
plan these commercials, these films, these videos, and then I'm going
to run you down from choosing the topic, pre-planning, creating a
shot list, a storyboard, and then after that, I could tell you why I chose that shot
when we're editing, and then the music choice, the flow of the video, how I want it to play out. Right now, let's
go to our folder, and right here I already
have the commercial, which is the
headphone commercial, and I have a folder footage, these are the footage that
I shot, and the music. Right now let's open up
Premiere Pro [MUSIC]. When you open up Premiere
Pro you're going to get a page that looks like this, and all you are
going to do is go to New Project on the left, and then you could title it, I could title this, I don't
know, headphone commercial, and then browse, and then choose where you want these premier
files to save. I already know where
I'm going to save it, I'm going to save it in
my Premiere Pro folder. I'm going to go to save
the premier files, commercial, and it looks like
I didn't create a folder, so I'm going to do
that right now. I'm going to go over here,
and create Premiere. We can do that again,
and find the folder. This video is going to
be a 1080p sequence, I shot at 4K, but I'm going to put it
in a 1080p sequence, that way I have room to crop, and just the quality
comes out better overall. What I'm going to do is just get the assets or the footage, I'm going to get the
footage, and music, just drag, and drop. What I'd like to
do is, I like to label these by
color, for footage, I always label them in blue, and then music, I always
label them as yellow. You can label them
wherever you want, and to do that you could even create your own custom
colors, and to do that, you could go to
Premiere, present, preferences, and labels, and you can just customize your own color however you want. I'll talk about this in
the keyboard shortcuts on every number on my keyboard
is a different color, every time I create a new
folder for Premiere Pro, I label it on each color. Then to begin a project, to have a sequence, since I mentioned that
it's going to be a 1080p, and this footage is shot at 4K, I'm going to have to
create my own sequence, every time we do a sequence, I create another folder
right here, new bend, and I just labeled
this sequence, and I put that in green. What I do is go up
here to file, new, sequence, I go up
here at digital SLR, 1080p, and 24. That creates a 1080p sequence
with 24 frames per second. What I do is just
drag the footage, drag all the footage, and there is your first step. As you can see, it's crop in because we're getting
a 4K footage, and doping it in
a 1080p sequence, it is going to be
zoomed in, that's okay, we can just zoom
out at 50 percent, and we could just copy all of the sequence for every footage, just like this, and we could
get the rest of these, and just copy the
exact same sequence. Now, that we've got
all the footage, I want to talk to you guys about some of the main features that
you knew are now in here. What we have here
is the timeline, this is where you're going to spend most of your
time when editing, this is the place
where you're going to put all your footage, all your sound effects, music, assets, titles, transitions, everything is done in here, and if we go to the right, this is your audio levels. Make sure that when you're doing a talking
headshot, in this case, we're not going to be
doing a talking headshot, but like for example, a talking headshot like this, you want to make sure
your audio levels is around 12 to six, that's like the sweet spots, so you can have that
crystal clean audio. On your left is just
like other features, I don't normally use these, I have shortcuts
which I'm going to be telling you guys later on. Right here in the left
is your project pin, this is where you're
going to put all of your footage assets, and just organize it
like, oh, I have it here, I have the sequence,
I have the footage, music, eventually I'll
have sound effects, and we could label that
and color it, put a red. Then we could have titles, we could label that as green, or maybe blue, and then we can have
another one for assets, we could label that as green. Also in this folder or this bin, you have the effects
panel, you have presets, you have audio effects, you have audio transitions, video effects,
video transitions, and all these stuff. When you buy a preset or a transition on a website like motion or race toy blocks, typically, this is where
it's going to be placed. At the top it is your
effects control, this is where you control the effects of your
footage, for example, we go click on this footage, you could scale it, get zoomed-in or zoom out, you could adjust the position
from left to right, up, and down, the rotation, and all these stuff. Also when you color correct, you also have this
panel appear in here, and then you have this other
ones like audio clip mixer, your Lumetri scopes, this is where your
color correct. Speaking of color correct, there's another panel right
here where it's color, I don't know why it disappeared. If you don't have this
Lumetri color scope, you could go up here to Windows, and just click on
Lumetri scopes, and that will appear, I don't know why it's
appearing like this, it normally appears bigger. This is your Lumetri scopes, this where you're
going to be looking at when you color correct, and we'll talk about it later, but this is where I look out when I make sure my
skin tones are accurate, is that too saturated, too desaturate it, there's enough contrast
is not too overexposed, underexposed, the
colors are just right, this is where I monitor, and make sure that my color
correctness is on-point. Then we have the Effects panel, this is where you add Leno acids or motion graphics, audio, it's pretty self-explanatory, it is where you
adjust the audio, make sure it's
sounding crispy clean, captions, there's the
captions panel or section. I've been using this
lately for social media, I'm not going to be
talking about this in this video because we're
not going to be using it. Well, if we want to
create those subtitles, captions that
you've been seen in TikTok or Instagram,
there is the place to go. Those are the sections
that you need to know. Now, for the keyboard shortcuts, I will be showing you how I customize my shortcuts, and why. We want to customize the
shortcuts or know how I did it, you go to Premiere, and
keyboard shortcuts. If you want, you could screenshot this or
take a photo of this, and maybe copy
exactly how I did it, but the reason why I
did it like this is, it makes it easier for me, it makes my editing
flow go much smoother, much quicker that
way I don't have to keep going to file, and finding it, I just click. The ones that I recommend you putting in your keyboard
shortcuts is right here. Q, I have the ripple trim, basically what that does is, the footage that I
want to start or the part where I want
to start is right here. What Q does or I
think it's ripple, it cuts what's before it, and it starts from this point. If I started from right here, if I press Q, it deletes everything
before that, and it starts from right there, and if you're a beginner, you'll typically just
go to C for cut, cut that part out, delete this, and delete that. That's like three
steps right there, instead of doing that, all I got to do is
just press one button , just like that. For the other one, which is W is the
exact opposite, once before it, it
cuts right after. We go right here, we want
to cut this part out, all you got to do is press W, and if you want to delete
what's in-between, for example, if I don't want this video
or this clip completely, I could just press R, and that deletes the whole clip, and it merges the clip before, and the clip after together. This is what I
mean, if I press R, it does everything for
me instead of having to delete this, and bring those clips together. The ones I mentioned, W is ripple trim next
ahead to play ahead, and R is ripple delete, make sure you put those
keyboard shortcuts, and to your keyboard. Remember, I mentioned
that on my numbers, I have every color, well, here are all the
colors that I have, one having a royal blue, two red, three yellow, four green, and so on. You can see all
the colors I have, and I try to mix the colors so that way
they don't look similar, I tried to have from dark
to saturated to light, that way, all of
them look different, and I don't get confused
in which one it is. Just other random ones
like the type tool, the mark in, mark out, the pen tool link. Link is when you link
two clips together, and then other ones,
just like the hand tool, the audio gains, the match frame, the redo, the cut, razor tool, all of these I recommend
you putting into your keyboard shortcuts so
that way you're editing, post-production goes smoothly, and you finish your
edit much quicker. That's pretty much
it for this section, those are all the things
you need to know. In the next video,
I'll be talking about sifting
through the footage, how to pick the right footage, why I chose that footage, reasons why I deleted
specific clips, and just running through
the sifting process. I'm also going to be
showing you the plan I have for this video, why I chose that plan, and just how I'm going
to execute this video, that way it makes sense. It's good for marketing, it's good for businesses, and what you need to look
forward to when you're editing these projects
for other companies, if you have any other
films questions, please let me know [MUSIC].
17. Editing// How To Sift Through Your Footage: What's up, guys. Welcome to Part 2 of the
editing side of filmmaking. In this video, I'm really
talking about how I sift through my timeline, what clips to pick, why I picked that
particular clip. Just like creating the flow
of the video, the story, and just the pre-planning
on creating a commercial. This video or this commercial
is going to be simple. It's going to be a
headphone commercial. The main reason or the main
purpose of this video is, so a video creators or even professionals
in the workplace, we tend to get distracted by all this sound and noise
on this environment. The point of this video is
to create a commercial. Wearing headphones
could help you get focused into your work. It gets rid of all
the distractions. It's noise canceling. I want to create a
commercial that gets rid of that and it helps you stay
more focused in task. I'm going to be scrolling through choosing the best
of the best footage. For this first clip, I think this clip was
just like a test. This is a test. We could get rid of that. This is the very first clip. For the intro, I
started off with me opening up the
laptop. Let's see. I think I do multiple times. Usually, the last
try is the one. Let's go back, right here. The reason why I want
like this is I want to make it feel like I'm
about to sit down. We could start off
from right here, and this is where the keyboard
shortcuts come in handy. Right now I want to press
Q because I want to delete everything that's
behind me right here, that's behind this clip. If I press Q, look what it does. It gets rid of everything
that I don't want. Maybe I could go back again right when I'm
about to sit down. Like this, I open up the laptop. As you can see, my face is
going crazy, I can't focus, I have a lot of work to
do and I can't focus on my work because of all
about the distractions. I just scroll. All this is usable. Right here is when I begin
doing that part where I'm going crazy and I'm about
to reach for my headphones. Maybe we can keep this part. Maybe just cut this
part, make it shorter, and get the part where I
start to get stressed out. Let's see, I do
multiple takes when I begin doing the face
expressions. Right here. You can see my face is
like I have anxiety, stressing out, frustrated
because I can't focus. This is why I pick
up the headphones. Wait, I have another one. I like the one with the shirt better. This is the better clip. I reach for the headphones. Then that's when I
start nodding my head, going to the beat,
getting focused, going with the flow. That's one clip. Then I decided to
get a medium shot. I probably don't need me of opening the laptop
in this angle, but it's good to have it just
to be safe because I mainly use this shot for my
facial expressions. We can just cut this
part and just make it shorter so that way we don't have a lot of unnecessary
footage right here. You can start my face
getting into it. This is a close-up shot,
me opening up the laptop, just so I can have
different angles. Let's see. We can start from
right here. Play that out. This is only going to
be used for a second. That's pretty much it. I want a shot of opening up Premiere. Because this commercial is
going to be pretty short, maybe like 15, 20 seconds, somewhere around
there, I don't want any unnecessary clips.
That's about it. That's all we need.
This next clip is going to be a clip of me. I'm going to mask a clip in this black rectangle,
the sequence, and I'm going to zoom in into a video that I shot in the
past, going with the music, a fast beat video and
just representing that when you have a good
noise canceling headphones, you get in the zone and you actually focus and you
could get creative. You eliminate all
the distractions, and that's what I want to to do. I want to make you feel like you're vibing
with the music, you're vibing with the video, you're vibing with the
editor in this video, and that's what
this clip is about. I want to get a clip. This clip I did move a
little bit where I'm going with the beat of the music. I'm enjoying it, but I
also don't want my shirt to go past this rectangle because I'm going to be masking it out and it's going to take a lot longer for me to keyframe
each and every movement. Something like right
there. That's the shot. On this clip of
opening the Premiere, I'm going to zoom
in because I don't want all these distractions. We can go all the way to 100. That's a good thing
about shooting in 4K and opening up a 1080P sequence, is they have the flexibility to zoom in and you won't
lose that quality. Technically, this shot is
1080P because I'm zooming in, and 4K OB if I zoomed
out to 50 percent. But I want the viewers to focus on Premiere Pro,
so I'm going to zoom in. The great thing about it
is that you can scale and position it how you
want it like this. I might zoom in a little bit
on this one, but we'll see. For this clip, I got a shot of me moving my feet to the beat. I did multiple ways of me
lifting my foot to the beat. I might get just a
generic one of just going like that. Or I'll have two
options, but we'll see. That's all I need. I only need three seconds.
We could cut that. We could find the other one
of faster beat, this one. We could cut that part out and then we
have the other one. I think I want to keep
all three of them just to have the flexibility. In this shot, I did
wanted to get a shot with my dog moving
his head around, but I didn't get that shot, so we're going to
have to eliminate this shot entirely
unfortunately. This shot, I wanted to get a
close-up of the headphones, especially on the
logo right there. I wanted to get a shot of
me moving my head around and nodding my head to the beat. We could go right here. Also, I'm paying attention to my eyes
because if I look down, I'm looking literally
down right here, but I want to look at my
laptop, which is right here. I need to pay attention
to that as well. Right here, this is
where it starts. I only need a few seconds. This shot is a shot of me
turning on the headphones, then I might put some
titles of this is Bluetooth and this
is noise canceling. I think the last shot
was right there. We can start from right there. That is pretty much it. I have two minutes of footage, and that's all I need. After I have the clips I want, I sift through it.
Usually, it's longer. I usually have to go
through an hour, two hours, four hours, eight hours
worth of footage, and I always condense it down. For example, if I have eight
hours worth of footage, I condensed it to,
let's say, four hours. Then I take that four hours, I condense it now to an hour, and then I condense it
down to half an hour. The less clips I
have, the better, so that way I don't have to go through every single clip, or the shaky clips, the footage where
it's looking down, the autofocus,
unnecessary clips maybe because the shot wasn't good, it was out of focus or it was overexposed, whatever
that may be. I always get the best of
the best footage and I make sure I have the right
footage to tell my story, or to tell the story
of my clients. I want to be showing
you the music choice that I chose and why I chose it. I have two types of music, one, a fast beat song, and one, a slow song. Here's why. Let me show
you the sounds first. I think this one
is the fast one. This song is the fast one, and this going to play out almost throughout
the entire video. Then I had to slow song,
which is right here. The reason why I have this song is because when we're editing and
we get in the zone, we have this loud, intense, fast-paced music and we
think that we're so cool, editing great footage
from sunset or at the beach or downtown LA with the buildings and
they look so beautiful. But reality on the outside, we're just a guy in a laptop. That's why I chose
this slow pacing song. I wanted to make
a joke about it. When you have
headphones, you're in the zone with no distractions, no one is dragged him unless
they remove your headphones. That's just the whole
purpose of this video, and why I chose these two songs. Right now, I would be choosing
the sound effects because this commercial does require
a lot of sound effects, especially for the beginning. The distractions I'm
going to put traffic, I want to put another TV sound, the radio, auto adjust. Other stuff that I could
think of are fine, that's a distraction in the
workplace or in your home, or maybe someone mowing the lawn or the dishes
or just stuff like that, something that you hear on a regular basis that's distracting and
I'll be right back. Now that you've found
your sound effects, it's time to paste
this video together. For my intro, I'm probably not going to be talking a lot on this section of the video. But, I'm going to be showing you literally step-by-step
on how I edit it. I'll try to explain my thoughts and my process and what I'm
doing the best way possible, but mostly just going to be
huge as watching me edit. What I'd like to do here is, let see, let me figure this out. For the music, thankfully that the fast pacing music
has a slow intro. For an example,
this, not that part but for here. But like I said, I'm going to start it off with the loud music or louder
environment, the distractions. I'm going to get a lot of
sound effects and place them right here so that way it sounds natural.
Here's what I mean. If you see down here, this is all I have, I only have two sections of the audio portion,
but I want to make more. When I do that is click
"A" for add tracks. If you go to audio, I'm going to add
maybe five more, Because I'm going to add
way more sound effects. Then right here, let's see. Let's bring those over here. I'm going to use the close-up
shots, but we'll see. I don't think that's necessary, the close-up, because it's fast. Then cut it. Right went to open it. Right there. We'll take this out. Then I'm capturing the one
where I get stress right here. Partly to get the close-up shot. The more I think of it this close-up
shows necessary. Whenever I'm not
sure of the shower, I usually just enable it and
I add the shortcut as deep. Basically, not hiding the eclipse,
eliminating the clip. That way I don't
delete it completely. If I wanted to come
back to it or I have second thoughts or I changed
my mind absolute right here. Then maybe on this shock
we'll have the white. Now it occurs smoothly, there's no jump cuts. Let's see. Right there. That we'll go over here. Then I need to get the shower, I turn it on. Sometimes these audio clips
is I'm not going to use the audio built-in from the camera, I can
just delete it. You can press "L" for unlink, and then just remove
the audio because I want to be adding my
own audio piece to it, same goes with this one. That's it. Now, we're
down to deal with that, and they can mess
up our timeline. Then I could just
cut the good part. It's already 18 seconds, so we need to make
it a bit shorter. I definitely want to condense this, maybe over here. This and then I grab the
headphones, I turned it on, and grab the medium
shock then I put them on like that. I start nodding my head, and then I go to the
other shower where I open the premiere. Where is it? Open the premiere? I think is this one, unlink it. Then we get that footage. Could these over just like that. The commercial,
maybe 30 seconds, a little bit longer than I
wanted to but it's fine. This one, it slowly picks up. Actually, I feel like I don't really need to show
premier open up. We can probably eliminate that, or we could just hide
it like I did on a little clip.
Just go like that. Then here's where the
clip is good to zoom in. It'll have a little
montage for two seconds. I wanted to delete some of
these unnecessary shots, maybe copy this clip, find that part, and then find this
part because I really wanted to get
my shock like that. Put it in here, scoop this just like that. Then right here is where the
montages would come out, and then I'll be
going with the beat. Let's see. Maybe my far and then that one. I could begin putting the song. So this is where I find my
feet moving to the beat. Let me find one. Let's see. Good thing I kept
the three samples. So that one. Maybe the first one fits. Let's see. This one, this is
going to be the video showing like the
Montage. Let's see. I want it for six
seconds, to 23, to 28, something like that. Maybe less. Up to 28 for now. Then hit to the beat. Then we'll grab the headphones. Then we'll grab another one. Close-up. I might zoom in. That's the good thing about shooting 4K that
you could zoom in. Maybe right here. Then right here
is where we shift songs and we shift the mood. Still the same mood,
the character is still in the same mood
and the same feeling, but the viewers are seeing it differently.
Here's what I mean. So what I'm going to do is
maybe find a sound effects, where it's like the
rumbling sound where it makes a mistake. Let
me show you instead. That sound, like that record scratch
that you see in cartoons. We're going to cut that song abrupt. We're going to add
the other song which is more of a slow song. Maybe put it a little bit quieter like 10. Or maybe what we could do is get
rid of that song completely and use
the same song, but lower it so
that we only hear a little bit from the
headphones, say 20 percent. Maybe more. Let's raise it up 10 so we
can play with the bass. I'm going to be messing
around with the bass. I think I'm going
to take it out. We're going to go up here into the Effects panel and go to Audio Track Mixer, go to this little
arrow that says "Show/Hide Effects and
Sends", click on that. Since I don't want to mess
with the previous audio, we're going to put this
in the second track. Obviously, I have no
idea what I'm doing, but I'm going to find a filter that makes that audio
take away the bass. You know where you blast out your music or you blast the volume from your headphones and then from the outside, you could still hear it. I want that sound
or that feeling. I think what you need to
do is take out the bass. I'll come back and
I'll show you guys. I'm back. I did find
the exact filter. It's a bass and band-pass and this is what
it sounds like before. So I found the perfect filter. This is exactly what
I was looking for. Then next what we're going to do is put in the sound effects. So starting from the beginning, we're going to put
the sound effects. Let's see. Let's
start from the baby. I want to put a fade on all of these. Let me not end in. Let's make this bigger and
let's turn off the baby sound. This is all going to be quiet. Then, right here, that's when it rises. So I'm going to bring
this down very low. I need to add another
one like this. It's going to be extremely low. I want that part to be super quiet. More quiet. I want it to be
quiet to super loud. There you go. Perfect.
Maybe a little bit louder. So all the sound effects are going to end at this point. I'm going to add a
whoosh or a riser to hype the headphones like, when you put these
headphones on, you're getting in the zone. There's no distractions, you're going to focus on the work that you
need to get done, and you're going to do it good. So next one is
maybe city traffic. We can get like any point of it. Then we could add more tracks and maybe
bring some intensity. So maybe we could shift from
right here to more quiet. Then we could add that
one, that ringing sound. Maybe I start it right there. What we could do is cut all of these
and make like I'm in my own thoughts or
I'm like thinking. What we could do
is get all these. Make these a bit more
quiet like 20 percent. I want to echo this and then
we could do a small whoosh. Yeah, that was perfect. Maybe this one can
be a good one. I'm going to be messing
around with the sound design and how I want it
to look and sound. On the next video,
I'll be discussing on what I did with the sound
design and why I did it, as well as the color grading, the titles, the transitions, any of creative stuff that could be added
into this video. If you have any other
further questions, please let me know.
18. Editing// Adding Transitions, Color Grading, Titles, & Music: What's up guys? This is Part 3 of the editing section and
in the previous video we talked a little bit about
sound design but I really didn't show you the process
or the final result. Now that I'm almost finished, I feel like I still could
add a little bit more. I'm going to be showing you what I did with the sound design. Not only that, but I'm
going to be showing you the fun stuff; the color correcting, color grading,
animations, transitions, titles, the outro,
stuff like that. I'm going to be
showing you what I have so far with
the sound design. As you can hear, I have all the ambient noise
like auto distractions. That's like traffic,
babies crying, the TV turned on all the way up, the lawnmower, just
stuff like that, and right there there's
a whoosh that goes into the talent's
head like I need to concentrate or I need
to focus and I can't because if all
these distractions in his head, in his mind. He's frustrated, he's stressed, and he's trying to
find a solution, but he's going to find
one just right now. Then you can hear that heartbeat and then back to reality. You heard that, Bluetooth. Then we're in action. As you can see, it transitions from light. This character or this editor being in the zone with
his project or what he's editing but in reality is just a person in a
laptop, that's it. As filmmakers, editors,
content creators, we get in the zone we
were editing the video, we go with the vibe, with the music, or the emotion of what we're
producing, which is a video. We try to get in the
zone but in reality, this is how we look like. We're vibing into the music, but we look
ridiculous and funny. That was the whole
purpose of this video is that these headphones are meant to cut away distractions and to get in the zone and
they're super high-quality. That's why I created this
little short story and, yeah, I also added some
other things like this. With this clip what
I did is I grabbed another short commercial I did a few weeks ago and I basically
added in into my laptop. This is the original
clip and this is what I did to it and
it's pretty simple. All I did is I went
into the effects. I searched the corner
pen and what this does, it allows you to adjust
the clip so that way it fits perfectly into this
sequence from a laptop, and then after that, I added a zoom transition so that way it feels like we're going
into the commercial or to the ad and then towards the end, that's about it and
then I'm going to add a sound effect on the zoom
so let's go find one. Let's see, Sound Effects. Then we could grab any of these. Maybe this part is too loud. Put it down to five. Same with this one. There you go. I realized on this second
row on the audio file, I took away the
base for this clip. That's why it's
sounding like that but I put it on the third
row and it sounds perfect. Let's now adjust it. Then towards the
end, I want to add another whoosh or another
rise effect. Let's see. Something like this. We should probably
make it a bit quieter. Number 10. We're almost there. Maybe two stops. There you go. Here's where I want
to add the logo, so we could do that right now. Go to Assets or Misc. I haven't put it yet. I grab the logo which
is somewhere over here. Right here. Thankfully, they have a PNG
file. Here it is. I'll see if I want to us check it to
have like a slogan or something so I went to the
website to get that logo. Yep, they do have a slogan, so it's make your life better
and let you live smarter. That's what Boltune does. We're going to make
a title sequence. I made another folder
like how we mentioned. The title is blue and all these other folders
had their own colors. We're going to go to Titles, New, and then Legacy Title
and we can just name it, I don't know Slogan. Then we could add the
title right there. Paste the other, or
paste the slogan. For fonts, I mean, I'll choose a simple font. Make it smaller. Let's see, make your life better and
let you live smarter. Like that. Drag that over here. You could cut to the logo. Maybe it's a bit too late. Really great. They're
trying to get the B, and we just fade it up. Maybe a bit smoother. So what we could do is go to the effects and then go
to audio transitions, crossfade and exponential fade. This fade, quicker and just a lot smoother. There you go. Now that we got the sound
effects, the sound design, the music right, it's time to color grade, or actually color correct. Color correcting is super easy. As you can see,
this clip is flat. The reason why I did it, I shot out like that is to
get more dynamic range. I shot him with 4k and 10 bits, so it will be pretty easy. The first thing I do is just add contrast and then
I'll go to the curves. I add a bit of highlights, and I add some shadows. Then I lift up this
part in the middle to add a bit more contrast. That's pretty much it. But my face is too overexposed. I'm going to bring
down the highlights. Not too much. Maybe
like right there. Maybe add a bit more shadows. That's looking pretty good. That is what color grading does. Basically it just turns your flat image just
adding more contrast. I just add the LUT
that's already here. I've been using a lot of this LUTs which is the
SL Big Minus Blue. It makes that teal and orange. I tone it down to another
20 percent and that's it. Then I maybe correct
my skin tones, I go to the HSL secondary. I grab my skin tones to
make sure it's looking orange and not too
magenta, not too green. I just grab my skin tone because skin tones do get
a bit complicated. I'm just grabbing
every part of my skin, the light, the dark,
the mid tones. Then I blur it. I go down to my correction and my skin tone stands
in the mid tones. I just lift that up a little bit more yellow and it's
looking pretty good. You don't want your skin
tone to land too yellow, like this, or too
red or magenta. You want to be like right in the middle and it's
looking pretty good, but I think I'm going to
add a little bit more yellow. That is looking good. You don't want it to look
too yellow like this, or too magenta like this. Right in the middle and as for color grading
that says about it, color correcting
and color grading. After that, what I do is I go to my Effect Controls and I just copy the color gradient style and I just apply to all
of the clips like this. Then I just go make sure
all of them are selected. That's about it. That's
good. I'm going with color. Then just double-check
if none are overexposed or underexposed or is too contrast here,
or too saturated. Maybe this one is a
bit too underexposed. So what we can do is
just bring it up a bit. It is going to cause
a bit more noise, but I don't really care. Then this one, I see that there's my forehead
is overexposed, but that's fine because I was exposing for the headphones. You could try but I doubt it. That's fine and that's pretty
good for color grading. For transitions, the only transition
I have is just this one [inaudible]. I feel like that's
all I really need. Titles. Maybe this one we could add it like Bluetooth
or something like that. Maybe add on the corner, want to make it
obviously blooper. I want to add the logo. See editing and then
trying to find it. This is why you need to organize all your files so that
way it's easier to find. That way you're not
spending half an hour finding a clip and
asset, a sound effect. Make sure you're organized
and label your files, your footage, your assets, just to make it easier for you. Then assets is right
here and Bluetooth, there you go, easy. Then we'll scale this much smaller and that is
looking pretty good. Then we can make the blue part just a bit brighter so that
we can stand out. The way to do that is
go to the Effects. Go to RGB Curves. Grab that effect and put it in the clip and then just
make it brighter. Go to the master and the white and you just
make them brighter. Pretty [inaudible] simple. We're going to add
little transition on the Bluetooth logo. You could go to effects
and add some plugins. If you want, you could leave
your comments down below. If you want these plugins or LUTs or any of the effects
that are I'm using, please leave your comments
down below of you. Like to have this
[inaudible] give them to you for free, no charge. Just because you
guys are watching this video and your are supporting me and
supporting this class. I'll be making more
online courses if you want that you can leave
the comments down below. Maybe something involved with content creation
like social media. If you're interested in
that, please let me know. We're going to grab the presets. I've a go-to preset that
I have in the Zoom. Let's see how that looks. For this one, you need to
make a [inaudible] and have two or 10 keyframes. What I mean by that is, hold shift and click to your right. That will give you a
five frames, one, two. You plug in and you
drag your transition. That gives it that
transition right there. You could play around
with all of these. It just takes up
the whole space. I speed it up. First I nested, so that way
it's a whole separate clip. Then I speed it up,
maybe like 140. Maybe a little bit faster, 160. That's pretty good. Right here, I want to add
something like you get in the zone or something like that. See if I could figure
something out, but then also get in the zone. That sounds like the
slogan from AutoZone, get in the zone, AutoZone. Don't use that one. You zone
in. Yeah, I could do that. You will zone in. I've noticed that this part, after I put on my headphones, I want to have
something like boom, but I don't know what. Maybe I could transition
to a wide one and then maybe we can add some overlays. We could add some light leaks for this to take out the black. All you got to do is
click on the clip, go to the Opacity, Blend Mode and change
from normal to screen. That makes black transparent. Since I'm not really a huge fan of this
part on the left side, like using the
door, the backpack, I'm going to flip this overlay so that way the light leak is on this side and it could cover a little bit of the
backpacks and the door. How to do that is
go to the Effects. If you want to see the
effects right here, you could click on this
right arrow, click on it, and then click on the "Effects"
or you could type it out. You could click on
"Horizontal Flip", drag that into clip and then it automatically flips your clip. There you go. I might tone down
the opacity a bit, so now it's not too strong. This is more of like a
storyboard commercial, I don't really show
the product itself. It's not like those commercials that you have been seeing on Instagram where they
have cool transition, these cool shots, these cool trick shots
gotten there, that stuff. It's more of a storyboard, something that you will
probably see on TV. I know the setup in the
sense is not the best, but if I was paid to
do this commercial, I'll definitely hire an actor. I will get a better location. I will pay attention
to the audio, making it crispy clean. The music choice,
the storyboard, telling a story, having emotion. I will spend more time on that, but this is just to show
you guys of how I edit, how I come up with ideas, how I execute it, pay close attention
to the sound design. As you can see, sound design, there's 12 rows of sound. As you can see, audio is half of the
[inaudible] experience. I want you to spend a lot
of time on the viewing, but also on the
audio experience. Then for exporting, it is pretty simple. First thing, every
time I edit something, I always save it
manually just in case. Premiere offers this
feature that auto saves your file or your project
every 5-10 minutes, so you could customize. I can show you right now. We could go to Premier Pro
Preferences and Auto Save. I haven't said that it saves every single
five-minutes because Premier Pro is
known for crashing. It does crash, especially when you're involved
with 4K footage, 10-bit, RAW, ProRes, whatever. Or if you add a lot of effects, it can crash Premier Pro. Make sure you have this set every five minutes and maximum, you could set however you want. I just have it, it saves for 25 times and then also I
like to manually save this. Actually, I go to File, Save As, and then I just
put this is the third one. Then to export it, it's a command M
for the shortcut. I will leave everything
like H264 Match. Then just title it, maybe Headphones
Commercial - Final. I always like to save
it in the desktop so that is easier to find. Then I always go
right here where it says Basic Video
Settings Match Source. I click on that and
then I scroll down where it says
[inaudible] settings, I raise that up to 15 and
then make sure this bottom left where it says Use
Maximum Render Quality, make sure that's clicked
and that's about it. I don't really focus
that much in exploring. If you want your video to
come out high-quality, it's all on camera
and the lighting. Because if you're
shooting in 720 P, it's not going to come
out as crispy and as sharp and clean than
if you shoot at 4K, 10-bit, ProRes, RAW and all that stuff. It's all about what
you do on camera and also how you light up your set. After that, it's an export
and that's pretty much it. That's how I shoot a commercial from pre-planning to filming, to pre-production
and to exporting. That pretty sums up on my process and how I
edit these videos. On the next section, it's probably the most important one. You can have all these skills. You can know a lot about camera and these tech
stuff and editing, but if you don't have
the business sight, then all of this is
completely useless. In business, the people who are great at
marketing, wins. You could be selling
the crappiest product but if your marketing is good,
then you're going to win. If you have both, if you
have a great product or service and your
marketing is on-point, then you're definitely
unstoppable. Nobody could stop you because
you got the marketing side, which in this day and
age, it's very important. There's free marketing
resources in social media. But on the next session
I'm going to be talking about the business side, how to hit up clients, how to find companies
to hire you, what these other
businesses look for when hiring a videographer
or filmmaker, how to grab their attention, how to get the first shoots. If you have no
experience shooting, I'm going to be teaching you
how to get your first gig, get your first shoot,
all that stuff. That way you are not
a struggling artist, you're not a starving artist. That way, you could
do this full time and be able to do what you love, which is shooting and editing. That is pretty much
it. I will see you guys in the business side.
19. Business// How To Get Your First Client: [NOISE] Now that you learned
about the filmmaking side, it's time to learn about the
business side of things. Look, I understand
you didn't get into filmmaking to
learn about business, marketing, and
operating the company, but these skills are
very valuable to learn. You don't have to
be an entrepreneur and own your own business, but you could be an
in-trepreneur and help the founder scale and
operate his or her business. An in-trepreneur refers to
a businessperson finding an entrepreneur who owns a business and helping
them scale it. Essentially becoming
business partners, but you're not
really attached to the company as
much as the owner. If the company goes bankrupt, you could pretty much just bounce and not have
to worry about it. Obviously, that's messed up, just leaving your business
partner with all of this messy stuff that gets
involved when going bankrupt, but if you're tired for
working for that company, it's a lot easier
to quit without worrying all the
investments and sacrifices. Not as much sacrifice as the owner because
he had to build a company and put in investments for that
company in the first place. Tip Number 1 is
master your craft. It doesn't literally mean to be a master at it and be
the best in the world. It means to master
it good enough that people are
willing to pay for it. This means having to
put in the reps on a daily basis and
for hours a day. Don't just pull out your
camera for 20 minutes, edit for two hours
and call it a day. No, it's going to take you a lot longer to truly
master the skills. I've had people tell me, how did he get to
good or how did he achieve that cinematic look, or how can I get clients? Then I asked them, how long
have you been doing it for? They say about a month, thinking that's a long time. Well, a month of work
is not a long time. How do you expect
people to pay you with their hard-earned money to a filmmaker who's only
put in a month of work? This takes a long
time to master. I didn't get my first
paid gig after a year of having clarity and deciding whether I wanted to
do this full-time. This is just booking a paid gig, I still need to find more
clients so I can go full-time, and there was still a lot
of work for me to do. Don't get discouraged and keep practicing what you preach. Speaking of practicing
what you preach, when you're watching
these tutorials, have a notebook out and
start writing some notes, or if you're watching a video talking about the
settings on a camera, have your camera out
and follow along. Don't just watch these
videos for entertaining purpose and not apply
what you just learned. A lot of people
consume content rather than actually
creating the content. You know why 90 percent
of the people in this world are consuming
instead of creating? Because it actually
requires work and not many people are
willing to put in the work and time to do this. If you want to be like the
rest of this world and just watch this video
and not do anything, then do it, [NOISE] but if you want to
beat the other 10 percent, then you need to actually
master the skills and put in the reps because
practice makes improvement, not perfection, but improvement. Tip Number 2 is
create a portfolio. Once you feel like
you've mastered a few basics and have created demo videos
here and there, it's time to actually create content that's needed
for marketing. As a filmmaker, you have
to think to yourself, what kind of videos
would I enjoy doing, and what industry
actually needs video? You need to trial several
videos for you to know what industry you
would enjoy most so we can avoid burnout and
figure out what industry needs video so you can
make a living out of this. For an example, real estate and wedding videos are always a high demand because
there's always homes being built to sell
in the market, and couples are constantly
getting married. These two industries are by far the most consistent gigs you can get because they
always need video. On the other hand, there
are other industries you can get involved,
like commercials, events, corporate, music videos, and social media content. Yes, some of these are a
lot harder to get involved, but you can make the
most money if you stay focused and consistent. Once you know what industry
you want to pursue, it is time to
create some videos. For an example, if
you want to get involved into product videos, you can begin doing commercials from the comfort
of your own home. You can get any product
line around your home. Obviously, it can't
be any product. It has to be a product
where there's demand for video or what people
actually want to buy. It can be coffee, an energy drink, protein shake, a watch, shoes, clothing, products that not
only look great on video but a great product to brand and create content around it. Don't just create
five commercials and put these five videos in your portfolio because
your first videos are going to be your worst. I recommend creating
15-20 videos and picking out five of the
best out of those 20. Don't put every video
in your portfolio, only put your best work. Tip number 3 is
marketing yourself. In today's day and age, it's so easy to get
seen and heard. You could do that by uploading
social media content. With TikTok's success, these other massive platforms are replicating
TikTok's algorithm. We're talking
Instagram, YouTube, and possibly Facebook
might release some short-form content like what these other
platforms are doing. What makes TikTok different from the rest is how you get noticed. You can upload your first
video ever and have more chances on going viral
than these other platforms. It's designed to
push your content to a new audience every time
you upload a new video. You can pretty much just use social media to market yourself. Now, it's not
guaranteed that you'll lock in a client consistently, but I recommend utilizing social media as an extra
marketing strategy. Also, figure out other ways to consistently bring in leads. Speaking of getting leads, that's one of every
filmmaker's biggest problem. Yes, you have to get
the skills, knowledge, and build a portfolio to show the clients that you're
capable on doing this job, but you have to know
about marketing, sales, negotiating,
and bringing value. That's where the business side on this class comes in handy. I'll talk more on that
in the next video, so make sure you
keep on watching. Tip Number 4 is the
free-to-fee method. When you're first starting out, you have to offer your
services for free. It's a must because
nobody knows you, nobody has never heard of you, and you haven't shown
anything for your portfolio. It's your job to show off
your skills and prove to these potential clients that
you've mastered your craft. This brings me back to my first point on
mastering your craft. Make sure you know what
you're doing when you get onset and know exactly
how to expose your shot. You got the audio locked in, you know how to properly
light up your subject, you know the purpose of each and every project you
get yourself into. Booking the first gig
is always the hardest. Think about it,
you're reaching out to someone on the Internet, convincing him to meet up to shoot a commercial
for their business. On their perspective, what usually goes in their
mind is either fear, anxiety, skepticism,
untrustworthy, and somewhat of a
nonchalant attitude. In order to get their
intention and booking the gig, you have to let them
know that you're willing to do a video for free just so you
can get the experience, have a video for
your portfolio and potentially work with
them in the future. If you do a good job, then you have mastered the first step. Yes, you have to sacrifice just a little portion
of your time, but in return, if done right, you can begin your
filmmaking journey. As you can see, having
some business knowledge is a must if you want to become
a successful freelancer, start your own
production company, or even work for
another business. These aspects are extremely valuable and it doesn't
hurt you to learn about it. Well, that is pretty much it. If you have any other
further questions, please let me know. [MUSIC]
20. Business// What's Next After Booking A Paid Gig: [MUSIC] In this video, I'm going to be discussing
the things you should keep in mind once you locked
in your first gig. Whether it's a paid gig or not, this will apply to whichever
situation you're at. Tip Number 1 is clarification. When you're on a
call with a client, ask them questions about the project so you
can set expectations. These are the questions
that I always ask my clients: What
will I be shooting? Who is your targeted audience? Do you have a video
sample for inspiration? Where will this be distributed? How long do you want
the video to be? How many videos do you want? How many hours/days of
shooting will it be? Will this project require
hiring more people? When is the shooting day? When is the deadline and
any other special requests? By asking these questions, this will give you an idea on how they want the final
result to turn out. This can also help your
clients get clear on what they want and truly
need in this project. So it's a win-win
for both parties. When you're discussing the
project with your client, mention this from the get-go. Ask him to get crystal clear and what they want you to
include in the video. Because when I deliver
rough cuts for approval and they want me
to make any big changes, there's a fee for revisions. I personally charge revisions
after the second round. I offer two free revisions. It's all about communication. If there's anything
in their minds regarding to the project, let them know that you're
always open and willing to hear their ideas,
thoughts, and opinions. Clients like it when they're
heard and they are allowed to add their concept
in the project. Tip Number 2 is preparation. Once you've asked all
of these questions, this will give me an idea
on what gear to bring. Make sure you bring the
appropriate camera, audio, lighting, lens, and more. You know if you're shooting
a real estate video, you need to bring a gimbal and
a drone. It's just a must. If you're shooting
a product video, you know you need to
bring a slow-mo camera, lots of lighting, some stands, and maybe a slider
depending on how your work. Also, if you're
renting out gear, make sure you learn
how to use it and test it out days before
the actual shoot. You don't want to show up
on the shoot and not know how to use the gear
that you rented and end up having
a bad experience with a specific equipment just because you didn't spend two hours learning
how to use it. Once you got the gear handled, make sure you know the
schedule of the shoot. Like for an example,
if it's an event, knowing the schedule of
the event is a must. Ask them to send
you the schedule so you're prepared and
ready to capture the day and you don't miss
some of the important moments. Not only does this give you prepared to have the right gear ready but it also gets
you prepared mentally. I've been in situations
where the plans have drastically changed and I
wasn't prepared mentally. When you're mentally prepared, you have the shot list
in mind, the story. If it's an interview,
you're ready to direct the talent and having time to figure out
where you'll be standing to get the best angles. So please be prepared and it also looks good
on you that you know the schedule of the
shoot so you can be somewhat in control
of the actual shoot. Tip Number 3 is contentment. This is by far the
most important aspect when it comes to
business and in general, and that's being a
pleasure to work with. People do business with
you when they know, like, and trust you. Don't be this negative, selfish, person with the ego. That will stop you from
doing business with people and no one's going to
want to refer you to anyone. One of the most
powerful ways you can get clients is by word of mouth. When someone refers you to one of their clients, partners, friends, family
members, or colleagues, I can guarantee
that they will at least give you a chance and allow you to present your pricing package
or your business. But I cannot guarantee that
you will lock in the deal. Maybe that comes to budget-wise, availability, or they found someone else
that meets their style. It has nothing to do with
you not being great at it. Some clients just prefer a specific video style
and that's totally fine. But just be easy to work with, be kind, helpful, caring,
thoughtful for others. You can take criticism and you're actually good
at what you do. Some clients are willing
to do anything to have you film their event or their
video and here's why. Let me tell you an
example of what has been happening to me lately. Last year in 2021, I reached out to an
entrepreneur named Nick Long. I asked him if I
can shoot the event that they were hosting for free. I was doing the free fee method like we talked about
in the previous video. Then he finally
gave me a chance. I met the team and once I
was there at the event, I was being friendly
and easy to work with. I wasn't giving them
a hard time or wasn't making them even harder
for them to hire me again. After the event, I
decided to overdeliver, which is one of the tips. They only asked for a recap
video of the whole event, but because I wanted to stand out and really
get this job, I delivered a two-minute recap, three quote cards, and two soundbites
for social media. They were blown away
by the results. They were blown away
that they invited me for the second event
a month later. After the event, I was paid $300 and then after a
week of discussing, I was officially in their team. But that doesn't stop there. I was working with him for a few months and started
getting their trust. Unfortunately, they had to let me go due to budget-wise, but a few months later
in February of 2022, they were hosting their
first ever event of the year and they asked me
to film for that event. I offered my pricing but couldn't move forward because
they were tight on budget. After a few days, I was thinking
I should be thankful for the opportunity they
gave me last year by giving me a job in
the first place, introducing me to new friends. Since you guys gave me
a job to begin with, that paid the bills, allowed me to make a living on something that I enjoy doing. I was surrounded by mentors, I met some of the nicest people. You guys gave me
travel opportunities. They allowed me to
talk to someone when I was in my darkest
place in my life. I was willing to help
them with no charge. I didn't care about
them paying me. I just truly wanted
to help them from the heart because all does this thing called the
law of reciprocity. When you're willing to
help someone because you're a great person and
you have a big heart, the other person is also willing to help
when you need it, and that's what I did. After that event, Nick
wanted to help me out by giving me more work. He connected me with
this guy and he's hosting an event in
St. Louis, Missouri. I am getting paid $3,000
for that event to shoot one recap video and 10 social media testimonials and all travel
expenses are paid off. That's the power of
contentment or being a pleasure to work with and also just being
a great human being. A lot of these clients
are willing to fly you out just because they know, like, and trust you. You see how powerful
that can be? Lastly, Tip Number 4 is overdeliver, what
I just talked about. I already talked about this, but essentially when you're
delivering a project, think about how you
can impress them. How can I make them
want to hire me? If they don't hire me, it's their loss for losing
someone that they can add value to them and
potentially scale the business. I always over-deliver to clients I truly
want to work with. Maybe that's the business they have and what it stands for, their goals and plans, they're impactful or we've
build that connection and I truly like them as a friend and I want to help
them get known. Whatever that may be,
always overdeliver. This will impress them and
want to work with you. Filmmaking is getting
extremely competitive and you have to do something
that makes you stand out. When booking is shooting gig, make sure you apply these
into your career and I promise you if you
actually implement this, you will get clients and open
up so many opportunities. Whether that's on
big-budget projects, paid travel gigs, going full-time in this
career, and other occasions. Not only is it important to master before booking the gig, but also master the aftermath. In the next video, I'm
going to be discussing the importance of building
relationships and networking. But that'll be it
for this video. If you have any other questions, feel free to let me know.
21. Business// Your Network Is The Secret To Getting Clients: [NOISE] Building relationships is the key factor for success. I don't care who you are or
where you're at your career, networking is a
powerful thing and you can potentially
meet new friends, partnerships, clients, employees, collaborations,
and investors. There's a phrase in business
about relationships. If you want to be successful, it's not just what you know, it's also who you know. Your net worth is a
reflection of your network. You may be a very
skilled filmmaker with expensive gear and
years of experience, but if nobody knows you
and you're not networking, you're missing the biggest
aspect when it comes to building a
successful business, and that's people knowing you. A lot of filmmakers miss this part of it because
they only focus on the creative side and don't improve on the
networking side. That's why masterminds
are extremely powerful and they're
super expensive to join. Some masterminds you
actually need to qualify. You need to be making a certain
amount of annual revenue, have x amount of employees, and actually be a successful CEO generating profit
in your business, but once you're
finally at that level that you qualify for mastermind, you know for a fact that every person you
interact with is a high achiever and can
potentially give you advice, ideas, you can partner up, or build something amazing. With the power of
two minds colliding, you could build
something extraordinary. Also when talking to someone, don't jump straight
into business. Get to know each other
before discussing ideas and projects that
you can do together. Find out if you
guys actually like each other's
personalities and are a great fit for collaboration. Most of all, build
that friendship, build that connection and become more than just
business partners, but actually become friends. If you're getting started
in business in 2022, we are so lucky that
we have social media, the Internet, and technology that wasn't available
20 years ago. We have so much free
and valuable resources in today's day and age, and we should be
taking advantage of it like joining Facebook groups. I've actually gotten a few paid gigs from
Facebook groups. Do not underestimate
groups in Facebook. It's actually the same
thing as masterminds, but you're meeting
people online. Maybe not everyone
you come across in these Facebook groups have
a successful business, but you can meet
someone who have somewhat of a decent company. Building relationships online is a lot harder since you're not talking to them face to face or you guys
are not in-person. You're just behind the screen. It's a lot more difficult to trust a stranger
in the Internet. What you should do is have a genuine conversation and
build that relationship. Once you've been
chatting back and forth, maybe you can hop
on a Zoom call to virtually meet each other, and eventually once you
build that trust a little, then you could meet in person
and finally work together, and that is the
power of networking. The reason why people quit
or end up not moving to the next level is
patience and consistency. Not only does it take time
to master those skills, but to actually profit
from your business, it can take years to do that. We're in the business
of having to learn the camera, creativity,
storytelling, and marketing, and
that's impossible to master those
skills in six months. You just can't do it.
You can maybe cut your learning curve and get
there a lot quicker if you're smart about it and
invest in education like online courses and
maybe a coaching program, but it still takes
time to master the skills you need to build
a successful business. Another reason why people
fail is not being consistent. They don't shoot at it every day and learn every single day. They watch a lot of
YouTube tutorials, gear reviews, montages,
and way too much Netflix. Sure we're human beings and we need our break once in a while, but if you're
consuming content for hours and not learning,
you will fail. It's absolutely simple guys. It's all about putting in the
reps and being disciplined. You're not going to get
there without sacrifice, hard work, being comfortable,
and not networking. The more you work, the luckier you will get. If you want to get new clients, you're not going to
call five people and lock in those five people. You will need to call at least
50 people a day so you can potentially lock in those
4-5 people out of the 50. Consistency and discipline
is what you must do. [NOISE] Well, there you have it. I hope you got some
value out of this video. In the next video, I'm
going to be talking about what to charge, how to create a package, what to include, and how to stand out from
your competitors. If you have any other questions, feel free to let me know. [MUSIC]
22. Business// How Much Should You Charge: This is the question that
many filmmakers ask, how much should I charge? Well, that depends. I can't really tell you how
much you should charge. Because I don't know where
you are in your career, what your skill level, how many clients you
generate each month, and what you include in your package if you do offer
more than one service. But typically, you should
price it by hourly. How much do you think
you're worth per hour? When you're a
beginner, maybe start between $10 to $20 per hour. If you're an intermediate, you can price between
$20 to $40 an hour. If you're at a professional
advanced level, you can charge starting from
$60 up to $100 per hour. But you're probably
asking how do I know which category I fall into? Well, that's a good question. It doesn't really
come to experience, although that can help, but it boils down to the results you can offer to your clients. They don't care about
your experience, the gear you use, how
you edit their projects, where you edit their projects, what software you use, but the end result and
the value that you offer. If you master marketing and paid advertisements early
in your film making career, or realize how important
this is that you hire someone with more
experience to help you, you can easily be in the professional
advanced category in your first two
years in business. You could be charging
$60, $70, $80, even $100 per hour in the
beginning of your career. Figure out how you can help your clients profit
from this investment, and that will determine how
much you should be charging. But if you're shooting
weddings, real estate, action, sports, or
social meeting content, it's hard to give them
results because for weddings, you're not creating the film
for results when you're documenting their special day
to create their memories. In this case, you have to think, am I generating consistent
clients per month, that I'm overworked, and can't take any more clients? Well, that means you
have to increase your price and
take on less work, or are you barely getting any work and you don't know
when your next gig is? Then you should be
charging a lot cheaper. Maybe anything with the client offers because you don't
have a strong portfolio, you need more marketing
and experience. So start low and
once you have the ball rolling and started
getting clients, without having to
cold e-mail them, you can slowly start
to raise your prices. Next on the list is
creating a package. Most filmmakers offer
pre-production, the filming and
editing, and that's it. Then later clients figure
out the marketing aspect. But I think you should be adding marketing
into your package. Here's why. A lot of clients don't know what to
do with that video. They think by just adding
that video into social media, the platforms are
going to do the work for them and generate leads, traffic, and sales, which that can happen, but it's highly unlikely. I recommend learning about paid advertisements
or at least hire an expert to help your clients
get the results they want. So we can ultimately charge
more for your packages. Remember what I said
in the beginning? If we can offer them a profit
and help them generate more money than what they paid for your package or
for this investment, they're going to
rehire you again. I definitely guarantee it. Let me show you how I price my packages and what I include. So I offer three packages, a bronze, silver,
and gold package. The Bronze, I offer
a Facebook campaign. A Facebook campaign is
a paid advertisement, utilizing a system that
makes it extremely easy for the client to book in a car and potentially work the client. That comes at a total
price of $1,450. The Silver package, I offer the same Facebook campaign
both width 16 reels, shots, and edit it. You can repurpose this
on Instagram, TikTok, and YouTube shorts, totaling the price at $2,450. Lastly is my gold package. I offer the same
Facebook campaign. This time I offer 28 reels
and four YouTube videos, totaling the price at $4,450. For most people that
seem super expensive. But if they look at it at an
investment standpoint and they offer a great
product or a service, then the prices make sense for the value they'll
be receiving. Next on the list is workflow. This indicates the rules, boundaries you separate clients, so things go by smoothly. You don't overwork
yourself and you set expectations when the
clients work with you. I created a PDF that sets all
the rules about deposits, revisions, raw footage,
canceling issue, and more. I recommend you doing this to not only look more professional, but you let the client
know on how you operate. If you want this
PDF for reference, so that way you can use
it for your business, make sure you leave
your comments down below with your email and I will email you the exact PDF
I send to my clients. Last thing on the list is standing out from
your competitors. What makes you different
from everybody else? Is it how you work, how you price your packages, how you deliver, or how you
represent your clients. There are many
filmmakers in the world, but only a few build a
sustainable business. A business that's
profitable and valuable. But at the same time, there's never been
a perfect moment to become a filmmaker. So many businesses and entrepreneurs need a
video for marketing. Marketing is always
going to be around and it's up to you if you're
willing to adapt. There's always new things
coming like TikTok, entities, and the reverse. I still think TikTok
is relatively new. A lot of people
don't realize how powerful their algorithm is. Let's now begin talking about
entities and the metaverse. Those are extremely new. The point is if you want to have a successful video business, your work either has to be the greatest people
have ever seen, you have connections, or you're doing something
completely new. Learning about business and knowing what's going on
in the world when it comes to economics is very
important to succeed. In the next video, I
want to be sharing my final thoughts and comments. If you have any other
further questions, feel free to let me know. [MUSIC]
23. Conclusion: [MUSIC] This is the final video of the Filmmaker Pro class. In this video, I just want
to talk about my final task, my conclusion, any comments, last advice that I
can give you guys. Some of the things
I want to talk about is implementation. Actually apply these
into your career, whether that's the business
that we just talked about, the skills that
we're on the camera, the shutter speed, aperture, ISO, and so on. Because you could be
watching this entire class, but after you're
done watching it, you're not going to
know anything about it. You didn't take any notes,
you didn't re-watch a video, watch the video like
two or three times so that way you can actually dial in the information
that you just soaked up. It's super difficult
to actually remember. We just learned if you
don't write about it, if you don't re-watch it, if you don't actually
follow along like the settings that I gave you how to properly expose
your camera or how to have the perfect settings. Make sure you have
your camera out and actually follow along. Then also if I talk
about a technique, a camera movement or a editing, keyboard shortcut, or something
wherever that may be. Make sure you actually do it right after you watch the video. Watch it two three times, and then after that, go
out and start shooting. If I talked about let's see, how to get the proper settings, I actually go outside and start messing around
with the camera. Also play around indoors
because it's different. Obviously indoors
is a lot darker, so you need more light, you need maybe a
better, faster lens, you need to increase your ISO. If you're outside, you definitely need to
decrease your ISO, increase your shutter speed, maybe add a ND filter,
stuff like that. Make sure you learn the basics
and you actually practice. It takes time guys. Like me explaining how to expose your image manually to a newbie, a beginner, they're
going to be confused. They don't know what f-stop is, I have to teach them
like what f-stop is, what I saw this. In order for them to know
how to expose their image. Make sure you learn the
basics and you master it. Also practice doesn't
make perfect. We're never going to be perfect. It's impossible for
us to be perfect. Me being in this
industry for four years, I'm still learning,
I'm still improving. I could still get better. Practice does not make
perfect, it makes improvement. Just have the mentality that I'm always
going to get better, I'm always going
to produce better, higher-quality videos. I want to be better than
when I was yesterday, a month ago, last year. I look at the videos
that I shared last year, they're not horrible, but I
could definitely do better. Like the commercials, I want to get into product
commercials or product videos. Every year I make like three or four super
high-quality videos. I always replace my old ones from my portfolio
and add new ones. I will only want to
add the best of the best of my work into my
website or portfolio. Always have the mindset that you're never
going to be perfect, you're never going
to be the best, or you're never going
to stop learning or you're not going to
have this mindset of like, oh, I learned everything about filmmaking so I'm going to stop. There's always new technology
and new gear to learn, new techniques, strategies, and you just have to
be willing to adapt, that's just why we got
into in this industry. There's new cameras coming out, new softwares that
make our lives a lot easier, a lot quicker. We just need to learn
all those things or we could hire someone. Hopefully, you get to the point where you could hire someone, and you don't have to learn everything because it
gets overwhelming. Just learn the things
that you enjoy doing, and that you're
actually good at, so that way you don't
burnt out and you actually get to do this
for a very long time. I can't believe I'm
actually saying this, but you've got to take action. If you want to be a filmmaker, you actually have
to create films like a client is not
going to magically like knock on your door and offer you $1,000 to
shoot their commercial. That's just not going to happen. You have to work for it. You have to actually
put in the hours, and you have to just take
action and you got to be uncomfortable because it is uncomfortable learning
all these skills, and it gets overwhelming and
you actually have to do it. You have to put in your ribs, put in your time, and master the skills
that you need so that way clients could
actually pay for your work. In this business, it's
a horrible rejection. At first clients are going to reject you because I don't know, maybe they already
have a videographer, they already have a production team that they're working with, and you're like
this new video guy that doesn't even
have a portfolio, and it's shooting
their first ever video and only has a few
months of experience. Obviously, they're not
going to hire you. You just got to
have those skills. You're going to create and produce high-quality video that people actually want and
people are willing to pay for. You probably going
to get like 10 noes, if you like cold call people, you're going to get
rejected as so many times. Also it just builds, it just makes you stronger,
makes you tougher. That way in the future you will be able to
handle rejection. That is pretty much
it for this class. I hope you got so much
value out of this. I promise if you apply these
aspects, or these tips, or these strategies
that I just gave you, I can guarantee
that you will get your first filmmaking job
or your first paid gig. My first gig was $100 and that took me almost a year to get, and it was a real estate video, and I was offering my
services for free. I was doing a pretty free
method for a very long time and I still do that method. Don't think just because you
have ten years of experience that you should stop doing
this pretty free method. This is never going to stop. There's always going to be
new companies being built, new opportunities,
and you're not always going to have
that experience. You always need to offer
your services for free, so that way you could get those opportunities and
build your portfolio. Well, that is pretty much how. I hope you guys had so much
value out of this class, and I guarantee that you
can get your first film making gig if you apply
this into your career. I hope I see you guys next time. [MUSIC]
 Mauricio Celis, Filmmaker