Transcripts
1. Selling On Zazzle Course: Hey everyone, welcome to a new
course here on Skillshare. If you're interested in
learning how to sell on basil, and you need a
step-by-step guide. This is going to be
the course for you. We're gonna show
you everything from getting runs Oslo.com, create an account on
there, creating a store. We're gonna be talking
about some general rules on Sasso as we go out
throughout the course. And I'm gonna be giving you guys a little tutorial on how to create your first design and how to actually select what products you want to sell on Amazon. If you're interested, go
ahead and get started. I'll see you guys
on the other side. Let's go ahead and get to it.
2. 1st: Create A Zazzle Account & Store: Okay guys, so the first
step to selling on Zola's, you want to head
over to Zazen.com. Now I'm gonna go into
an Incognito tab here and show you guys
what you're probably going to be looking
at is you're gonna be seeing a website that
looks like this. So what you wanna do
here is click cell on basil and you're gonna see this button
that says salons as well. You're going to click
on this as well. Now what you're gonna
do is you're going to login to your account. I actually have a demo account. So this is just for
public use only. So I'm not actually
selling on this account, but I have a public account
here and I'm just gonna go ahead and click Zell on Sawzall. And I already have
a few stores open. But what you're gonna do
is you're gonna fill this out here and you're gonna click, you're gonna add
your store name. It could be any
name you want to. It's not really important. This is the name of your
shop, of your store. Now keep in mind that this is a pro tip that within
nozzle you're allowed to have multiple stores
as opposed to other print on-demand platforms where you're not allowed
to have multiple stores. This platforms allows you to create multiple which
will show you how to do. But you want to go over
here and click on, enter the store name, you add it, you select
I'm not a robot. You could clearly creates store. Once the store is created, we're gonna go over
here to view stores. So we're gonna have a few
different stores here. I have this store called
mythical, for example. Once you create a store, it will show the products that you have. But more importantly,
when you edit your, your store, you're going to
have to add a few things. You're gonna have to
add your store name, your tagline, some information
about the store, a banner. If you want, you can
add a website URL, some tags, city,
province, and state. And these are not required,
but they're optional. Once you add all
that information, you're going to go over
here and hit submit. And all of that information
is going to be public. And let's go ahead and
just get into how you can create an icon for your
store and a banner. We'll go ahead and do
that in the next lesson.
3. Create Zazzle Store Banner & Profile Image: Okay, so to create
our little icon and our banner for our
store on Basil, I'm currently using
a tool called Canva. Canada is a free, free, unpaid, but you could use the free
version to create your, your, your, your banner
and Profile icon. So let's go ahead
and get started. Click Create design here. By the way, you could sign
up to Canada for free. It's canva.com, CAN va.com. And what you're gonna do
is you're going to type in here a custom size. So the custom size is
going to be 1920 by 1080. That's gonna be the
size for our banner. And what we're gonna do
is we're really just going to use the middle part. So when you create a banner, you can go with really anything. You can go with an image
like this, for example. And you can just edit
the text in the inside. On the left side, you
can see a bunch of different Canva templates and you can come up with the name. So if you want to call
your store hello, fashion, you could do that. You can name the store
wherever you want. You can always add some graphics and things like that here. Now in terms of the
icon for your store, good size is, and I
always like to do this. I like to do 500 by 500 for my icon and I can add whatever image or icon that I want for my profile picture. So I could go over
here to my uploads and I can upload an
image related to it. So here I have a
picture of a fish, for example, and I can
use this as my icon. Now when you're ready to
download your images so that you can upload them
into your xoxo story. Just go over here to the
Download button and download it. It will be an image and you can go over here to your store. Let's just use this
store for example. And let's go back
here to this door, but I have the wonderland store and let's go ahead and
click Settings here. And we could just give a little tutorial
on how this works. The first thing
we're gonna do is we're going to change our icon. We're going to go over here
to the top left and click on this little house button
and click Change. And what we can do
is actually upload our icon bridges,
dragging and dropping. And you can see here
it's actually constant. It's currently uploading
our, our fish image. It's going to take a
second just to load. But if the image is below
a certain pixel size, it will not upload. So in our case, we actually did a 500 by 500. We're going to have
to resize that. So let's go ahead and do
this and let's resize it to, let's say 600 by 600. That is a better size. So 600 by 600, let's go ahead and resize that. Let's hit Download here, and let's download this. And there we go,
we have the image, and let's upload it
here into Zazen. And there you go. We have our image uploaded
now in terms of the banner, Let's go back into Canada here, and let's click on that
banner that we once had. And let's hit
download here as well and download this image. And then when we
go to dazzle here, we're going to hit
Add store banner. I'm just going to
drag it and drop it. You can see here
it's uploaded and we have now the size
of how we want to go. So we can make this as big
or as small as we want. You can see I like this size
and I can keep it just like this so that when I click
Save or submit here, you could see that my
settings have been updated and my store now has the banner
which you could see here. It's a little blurry,
but now it's kinda good. And then you have the icon. So that's all you need to do for your icon and your banner. You can solidify your, essentially your store identity. All right, so now
that your banner and your icon is created, it's time to get started with
the actual basil platform. So let's go ahead
and get started.
4. Creating Your First Design On Zazzle: Okay, so let's go ahead and get started where we
start to learn how to create our first
design to actually sell the cool thing about Zazen, that you have so many different products So
you could actually sell. We can head over here
to the cell button. There is just loads
and loads of products, like thousands of products. And we can look at
that selection here. And the way you can
come here as you go to Zazi.com slash Custom. And you can click
Enter and you can see what comes up from there. And it will take
you to this page. Or you could just
type in Zazen.com slash gifts as opposed to Zappos.com slash custom.com
slash custom slash gifts. And it will take you
to the page where we have all the different
kinds of gifts here. The reason why it's docile.com
slash custom and not on the other link is weren't
going to actually be customizing these products. So this is pretty cool and
this is really, really fun. If you love arts and crafts
are gonna love doing this. I mean, I remember being
a kid in school doing arts and crafts and I love
doing stuff like this. So let's go ahead
and get started. We can edit anything, we can do phone cases, we can create business cards, we can create mugs, we can do a whole lot
of different stuff. The first thing I'm thinking of, Let's go ahead and create a mug. So let's select the mugs here. And when we create a mug, we can actually have a selection of the primary product
that we can work on. So let's just say I wanted
to work on this product. I wanted to create
a design here. And notice here how
it says, Sorry, the style is temporary
sold out, please. And select another style. I can still add this. I won't be able to check
out or add an image. I can add an image
and things like that, but I won't be able to buy it. So let's go back
and actually sell something that is going
to make us money. So here I can click create
my own on the first one, and let's click add an image. This is the built-in
editor that Zazen has. Okay? Xylitol has
a built-in editor. And the cool thing
about Zazen that when you edit your design, somebody else can
edit it and also essentially by that
same product after they edit it and you take
the profits from that. So here we can add some
texts like my name or we don't even have
to say is my world. Let's just, let's
just type something else in my name is as good. My name is. And we'll add that
piece of text. And we'll add another
piece of text here where we'll have it, let's say Rick, okay, The cool thing
about this is that whoever is coming
into edit this mug, they can edit this
text here to have their own name. Here. When it says My name is, let's say we want
to customize this, the font so we can look here. And we can have a
custom style font here. And we can make
this significantly larger than what it is. So my name is we
can drag this here. And the name Rick, we can drag right there. So my name is Rick. So let's say we were creating
a Halloween styled mug. This would work for Halloween and we could
create a background color. So the way we do that is we just select on the actual
background here, or we can actually go over here two elements or even
background on the left. And we can pick the orange
color, for example. So we have black text
with the orange color. We can also look for
different icons. So I can type in things
like emojis here, I can have pictures of emojis. I can even upload
my own elements. So something that I
would want to do here is I can go to PNG tree.com. So let's go ahead and go to PNG tree.com and we can
actually upload. And this is the cool thing
is we can find an image we'd like and actually upload it. Let's say we want
something that's a pumpkin in our mug so we can go find
a picture of a pumpkin. And let's go ahead and hit
enter here for a pumpkin. And once again, this is not, it's not like this is
required for you to do this, but this is just custom. And let's say I
like this design. That's a Halloween
related design. Click download here. I can download this image. And in about a second
it's gonna be downloaded. And there we go,
it's downloaded. So let's head over
back to the puzzle. And we could actually upload it. And notice how it
says loading here and here I have my image. Here I have, I can change even the texts
instead of My name is we'll label this
Halloween Mug M. Then we'll have let
me go ahead and fix that Halloween mug and you want to make sure
you're spelling is correct. So just in case take the
words that you type in, make sure it's
spelled correctly. In our case it is. Let's type in okay,
Halloween mug. And then we're going to have, Let's just elongate this rather because we wanted
to fit really well. We don't want to
cram everything in. And instead of Rick,
we're gonna have R6. So this belongs to Rick, Rick apostrophe S, right? And I will say R6,
Halloween monk. So we can put this
on the bottom. We can put this over here
and put this over here. And now we have text with an actual image that makes this mug actually
look pretty good. So at first it was just bare bones didn't
look good at all. Now we have something that's
custom and it looks better. So we can click Done here and we actually have an image
that is completed. So if you look here, all right, and all different angles, The mug is completed and
it was just that easy. Now if somebody wanted
to actually sell it, they can, well, we're going
to go ahead and click cell. We can give this any
title we can call this Halloween mug, right? And we can just
select here and we can add any tags we want. Now, I'm gonna give
a little tutorial in just a minute about how to add the right tags and title, etc. But in the future, anybody who wants to buy
this mug can actually go in and edit the name
of the actual mug. Instead of Ricks,
it could say marks, it could say Jason's,
he could say Tracy's, Mary's cartilage,
whoever's Halloween mug. And there'll be able to, you know, essentially customize
it the way they want to. Alright, so in the next lesson, we're going to talk
about how to add all this information here
and go through that.
5. Making Your First Design Public: Once you want to
actually public or make public a design
and actually sell it, the first thing we're
going to have to do is give this a title. I gave this a bare-bones
titled call Halloween mug, but you can call it
anything you want. You could call it a ghost, Halloween monk, because we
have a picture of a ghost. And that could be good. And we go over here
and select a category. In this case, we actually
have a category for us. Here in the description
we could say get the best Halloween
mug on the market. And once again,
spelling matters. So here's a little typo. Get your mug with your name stamped on it,
something like that. Just a short description for
people to get interested in. Just explain what
the product is. Here we can change
our options of how we want the product
to be presented. For example, if I like this area of how the
product was presented, I could just click
Okay, over here. I could select all options because of where I
want to present it. So let's just say I want
to only presented on coffee or travel mugs or
beer mugs or whatever. In my case, I want it
presented on all products. And in terms of the recipient, it could be for anyone
who could be for handy won him, her kids, whoever. So in this case, we have
anyone in terms of anyone, we have any person
store category. For the categories we have all different kinds of
categories, new products, etc. In this case, we'll just go ahead and just leave
it for new products. And for tags, we
have some obvious, we have a picture of a ghost, we have a picture of Halloween. All right. So we just want to
make sure Halloween is spelled correctly. It is. We have a picture
of, let's say pumpkin. Pumpkin. We have,
let's say scary. And let's say we have the
color orange as well. So because it's an orange monk, those are the tags that I feel
comfortable using for now. If this was a competitive niche, I would definitely focus
a lot more in tags, but this is just a quick,
easy tutorial here. In our case, it's suitable
for all audiences, so it's rated G for everyone. Here we have public
consumption is perfectly fine. Public visibility and we do
want to allow customization. So show your customize
it button and the answer is yes, absolutely. Now in terms of the percentage, I've seen some mugs go
up to $20 for sale. I've seen some mugs
stay $15 in this case. I'll just keep it at
five and select posted. Now if we completed
everything correctly, it should say
congratulations here. Now we can just wait for the
product to be published. And it will take a
little bit of time, but could take up 24 hours for the product
to be published. But now our product is essentially in the
processing phase.
6. Summary Round Up: So just to do a quick roundup
of everything that we did, we created a banner
for our product. We created a icon for, excuse me, for, not
for our product, for our Sasso profile, we created an icon, we created a banner. We also created
our first design, and we even learned how to publish it properly
with the name, the title, the tags, etc. Well, what we're gonna do in the future lessons is
we're going to create two more products
and we're gonna have fun with creating
these products. So let's go ahead
and get started.
7. Example 1: Create Wrapping Paper On Zazzle: So since I created
some products here, I want to go ahead
and create more. So let's go ahead and create gotos azole and follow
the same process. Let's click cell and let's pick something that
we can sell here. So in my case, I want to do something fun,
something entertaining. So let's just go ahead
and read through some of the things that we could
actually sell here. So we can sell stuff
for home and sports and games, mugs, pillows, blankets, aprons, tapestries, face masks, magnets, playing
cards, coasters, etc. The clothing we have t-shirts, women's clothing,
men's clothing rather. Kids clothing, hats, tote bags, key chains, buttons,
bandana has etc. Invitations and the stationary
we have greeting cards, invitations, announcements,
postcards, thank you. Cards, note cards, envelopes, notepads, rubber stamps,
return address labels, and we have even more products, which invitation is a
little boring for me, so it's not something
I'll go into. Here. We have art, crafts
and party supplies. We have wrapping paper stickers, posters that actually
gets my attention. Let's go ahead and create
some wrapping paper so we can actually choose what kind of wrapping paper we want. I'm gonna go ahead and
pick the cheapest one so I can generate
the most profit. Well, actually, it's technically not the most profit because this one is 19 inches
by 2129 inches. I'm gonna go with this one
because it's six feet, so that's probably going
to be the cheapest one. Let's go ahead and
hit Add Image here. So for the image, I want to go with a pattern. I'm going to create a pattern
on my wrapping paper. If we go back here, the
wrapping paper size looks like it's
relatively like a square. And I'm going to be actually doing the same
thing here in Canva. Since it's gonna be a square. I'm gonna go with the button, 4 thousand by 4 thousand here. And let's see if this
fits on to Canva. And we're going to create our
own design within Canvas. So I'm gonna go and
let's say I'm thinking of a Thanksgiving or forget it. Let's go with Halloween again. Let's go with a Halloween
wrapping paper. So let's type in Halloween and let's type
it into our elements here. So I'm going to copy here, I'm going go into my elements in Kanban type in Halloween. I have all these
different kinds of characteristics that
fit into Halloween. So let's say I liked
this hat here, and I want to minimize it. And let's say I
have this pumpkin. And I want to put it here. Remember I'm creating
a pattern here, so I have this sculpture. What I want to do is actually I want to create a
background as well. So let's just say I go with
this orange background color. That would mean
for this pumpkin, Pumpkin would have to be a
different kind of orange. So let's just go with actually let's go with a black for the, for the background
so it can make the orange pumpkin stand out. So let's just go ahead
and go with that. So we have our pumpkin, we have our skull here and our skull, I'm gonna go with like a
gray tint instead of purple. We have r hat here
for which we have this grim reaper kid
here with a costume. So let's go ahead and do that, and let's add this. And let's see if any more
icons that we can add here. We have a spiderweb. Have a cat. I'm going
to make the cat white. And I'm, or actually
I'll go with purple, went up. Let's go with purple. And let's make her
whiskers stand out with white whiskers and
white shadows. Just like that shall stand out the cat. What else do we have? We have some candy here. We've got a picture
of some candy. We have a picture of a bat. Mat actually looks perfectly. I liked the way that looks. Let's see what else
we can get here. The V spiderweb option
is another option, even though we had a one here. So this is looking pretty good. So we have, let's just
arrange our products here. So the first thing
I'm going do is go here to form the four corners. And I have a picture of pumpkin spiderweb
candy, okay, here. Here. I'm just going to add
pictures of graphics here. So here you could see we have
a whole line of graphics. Then we're gonna do the
exact same thing here. So I got an image here, I got an image here. And I got this one. So let's go with, let's go
with this one. Just like that. And let's go with this
one which is right here. Actually, we already did
something with a pumpkin. Let's go with this
cauldron right here, the culture, and I'll actually make it a little bit brighter. So let's go with something. Let's go with something like
a dark gray just like that. What we could do is
increase the size or make everything fit properly. And what we're gonna do is we're going to drag this here to the middle and drag this
here to the middle as well. And we have now our pattern. So obviously you can alter
things just to make everything fit a little bit
better since this is for a wrapping paper. And you can make things bigger, you can make things smaller. It's really up to you
how you want to go ahead and design things. For example. This is about a good size for most of the stuff
that we're doing. What I could do is I
could just go over here and hit download
just like that. So let it download here. And once again, this is
going to be our pattern. We're going to go
to our creator own, and we're going to upload this. So let's go ahead
and hit Add Image. And we're going to upload the
image here into our system. You can see here it's
uploaded and it's added. And what we're gonna
do is we're going to push this all the way to the
left and open this up again. Just like that. It will be essentially two
images on top of each other. Just like that, It's
almost like a pattern. Since we have that, I'll just go ahead and click Done here. And there we go. We have wrapping
paper for our gifts. And you can see here, every
aspect of the image is shown. Here is a flat
aspect of the image. Here's a regular aspect of the image and this
is pretty cool, pretty fun to be
able to do this. And we could just hit cell, it will go ahead and do
the exact same thing. So we could type in Halloween
themed Halloween themed. They already know that
it's wrapping paper. It says Halloween
themed wrapping paper, but it's already added. They've automatically add the
word wrapping paper to it. Description is and get ready
for Halloween this year. Some basic type of who
is ready to hand out some Halloween gifts with this epic Halloween
wrapping paper. Something very basic. And we'll go over
here and just make sure we submit it
just like that. We have different options. Obviously, I'm gonna make sure
all options are selected. We have events here, we're
going to look for holidays, and I want to go for
the Halloween holiday and select that. In terms of recipient, we are good for anyone. Store category. We'll just select
a random category. Here we have a bunch of stuff. We have bats, we have vampires, we have stuff for kids. We have pumpkins. We have, what else do
we have in the image? Let's actually go back
here and let's take a look at the image
that we created. Because we would do
want to make sure we got black cats, right. We have a picture
of spider webs. One, 23, we have eight
tags, so we have two more. We have, uh, which, which we have costume. Let's go ahead and make
sure we spell that right. Spelling is important.
Then we go, we added our ten tags. It's suitable for every one that we're going to set
a 5% commission. And just click post. We have an error here. Yep, we have to
select what kind of product category
and that's it post. And you can see here it's
Congratulations were completed. So let's go ahead and have
a little bit of fun and create just one more design.
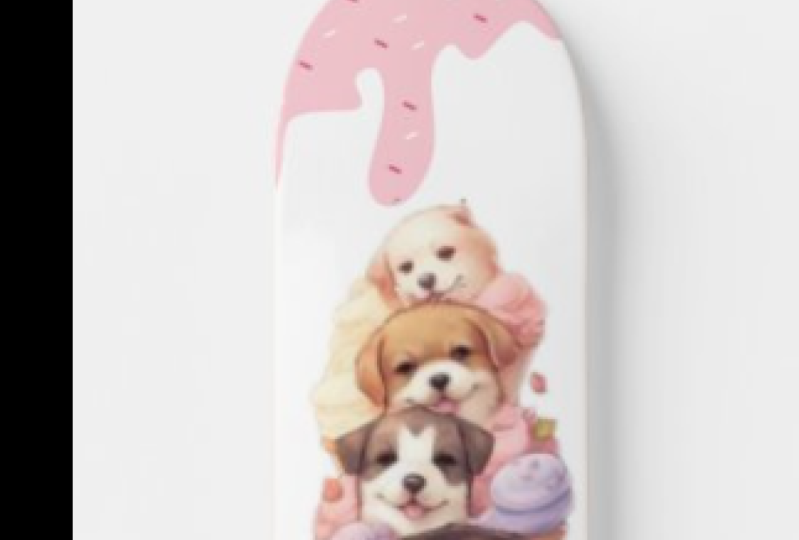
8. Example 2: Creating A Skateboard On Zazzle: Alright, so now that we
created our wrapping paper, Let's go and have some more fun and create another design. So let's go over
here to click cell, and let's find
something else we can tell I'm actually thinking
about selling this skateboard. So let's go ahead
and hit Add here. And what we can do
is we actually get to create the skateboard. So this is the other
side of the skateboard. And what I want to
do is I want to add my mythical design here. We'll actually see
if this works. If this doesn't work, it's okay. I'll go back and make a
customized customization myself, and we'll see how
this looks like. So this is okay, we can actually make this a little bit smaller
and see what happens. So let's go ahead and try to do that and see if we can fit
more of the unicorn image. And we actually can. Let's go ahead and do
this just a little more. See what can come
up here from this, because you never know, it
could look pretty decent. K, just a little bit more. We could, we could
actually resize this just a little
bit more as well. And that's about right. So I have this mythical
skateboard here. And I couldn't just, Let me see. What I could do is this
looks a little bit like it's upside
down just slightly. So what I can do here
is can I flip this? I believe I can, but we'll go ahead and see here. Let's go ahead and see. Can we flip this? Yes, we absolutely can. So we have this flipped and let's go ahead and
drag the size here. This was already a design
that I had created earlier. This mythical design here I
did create it within Canva. You can see here, there we go. I find that this is a cool
little skateboard design. And so that looks
pretty cool to me. It says here there's
an issue of design. Let's see what the issue is. The product contains
some images that have been made larger than
their original sizes. This may make it blurry. Well, it's not bad at all. It actually looks
pretty good since the preview makes
the image look good. So what I'm gonna
do is I'm actually going to publish this. What I'm going to do is here, I'm actually going to select, I can't select any, any additions here
to the product. Still can't sell it. So I
have two actually improve it. So what we'll do is
since this is blurry, there will be a good
little live demonstration. We'll go over here to the
product and remake it. For the design of
our skateboard. I'm gonna go with
something basic. I'm gonna create a
new design here and we're going to go with
our custom design. We're gonna go
with 1920 by 1080. Let's hit Create the skateboard. I'm guessing he's gonna
go from left to right. So let's go ahead and whip
out a gradient color. So let's cope, Let's
get a gradient. And the gradient I like is, let's say this green
gradient, right? And let's type in the word here. Gobbling. I just liked the word goblin because it's green. It's like you're riding
on a Green Goblin. The Green Goblin. We're going to add some cool
text to it just like this. We actually have to
be aware of how we're gonna do this because I can add the word goblin in my
skateboard just like this. I can type in here
text, add text, and I can type in the word
Goblin. Just like that. What I could do all That's
a really sick font. That's really, really cool. I can make this nice
and big just like that. Maybe just make it a
hint smaller just so that none of the
text gets cuts off. Gets cut off, just like that. You can see there's a preview on the bottom here as
to how it looks, but we don't want
it to be in white. I want to have this
gradient backgrounds. For the backgrounds,
I'm gonna upload my, my own image background. I'm going to go with
this, but I want to find pictures of goblins. Maybe that will be pretty cool. Goblin. Maybe I could take
something like this and just make it
transparent throughout. So I could take something like
this and multiply it out. So make like a little
pattern out of it. And I could do
something like this and just make it nice and
transparent, just like that. I could take this,
multiply this out here, kind of like this, like this, like this. And like this, get as many as I can in
there. Just like that. So that'll be perfectly fine. What we're going to
do is hit Download. Let's hit Download here. This is why I love sizes
because you get to do so many things on basil. And let's go ahead and go and
add this as our background. So we're going to upload
this as our background. I'm just upload this
background here. You can see here it's added now. So you see the pictures or the faces of the
goblin is added. And we could drag and drop this and do whatever we want to
do here. But this is good. I liked the way that it's
structured like that. I can go over here
and selected done. And you can see here
the word goblin is added in any direction and
recent to the word it works. We can hit sell it. We can do the same
thing we can say in Goblin and its escape board. I don't need to add
the word skateboard. I'll just add the
word goblin here. And it's added, the word
skateboard is added in the back. The description, let's just
say feel like a goblin. When you're scaling
something basic, just, you know, it
doesn't have to be crazy. Descriptive. This is just good enough
for a beginner's guide. And we'll add some
basic keywords like goblin, let me green. And let's say cool, rad, kick, flip,
maybe I don't know, that'll be decent enough. And let's go ahead
and click Post. If we did everything
right, once again it says congratulations
and that's it. That's all we have to do. So thank you guys for
watching the course. Hopefully you enjoyed this
course and hopefully give you enough information
and a guide on how to create some
designs for basil. All right, See you guys later. I hope you enjoy Talk
to you later piece.
 Auto Pilot Passive Income, Guides To Help You!