Transcripts
1. 1 intro: Welcome to my new video. Today I'm going to show you my exact process for starting a charcoal drawing and solve your problems with measuring once and for all. I'll show you my personal five-step checklist that'll give you an accurate block in every time, which is the key to getting a likeness and the number one issue students struggle with. Then I'll demonstrate the process on a charcoal portrait to show you how it all works together to produce a beautiful, lifelike portrait that you can take and use with your own portraits at your own home or art studio. So let's get started.
2. Check proportions: I wanted to talk about measuring and proportion. And I've got just the thing for you. These are my five steps. It's like a little checklist that can be helpful to you for dealing with proportion and measuring and proportion. What is the definition of proportion? Well, portion is the relationships of the parts to themselves and to the whole. So again, I'll repeat that proportion is the relationship of the parts to themselves and the parts to the hole. So it's some it's ratios. So if we look at this top number one, what I find helpful for me is if I check my proportions, okay? And you'll see here, just go through and check your proportions. Number two is you simplify shapes. 3 is you check your angles. For is check placement. 5 is positive and negative shapes. So if you follow these things and there are many ways to measure and find proportions, but this could help. Then, let me just take a sip of water. So proportion, right, a to b up on the top here. Comparing is a comparative measurement within the whole. There's the parts and I'm comparing the Part a, Part B. Okay. And so it's the relationships of the parts a and B are the two parts to the whole, this whole line segment, okay? Simplifying shapes. You want to find shapes, device shapes that are simple but characteristic of the object that you want to draw. Checking angles. And we'll get into that checking placement. Positive, negative shapes. So let's kinda jump into this a little bit. Yeah. Nick Oh, says Yes. I think he's saying yes because he loves life. He's just yes in the chat. But you might also be saying, yes, proportions might help him. He's an IT guy. So I think the proportions in IT come in super handy, probably more handy than, than we know. Alright, so I'm going to have my little checklist off to the side here. And you can just take, take a screen of that if you want. And let's look at how this works with a common pair. John R says yes to put the kid, looks like him on the right track. I'm in the right group or in the right universe. It proportion is something you find applicable to your drawing. Okay, so competent well, within this shape, within this pair, I may have a couple of parts, right? Let me just see what took up this. We have the height and the height incidentally is easier for us to judge by sight than width. I don't know why, but I start usually with how high, how tall something is so top of the head, bottom of the chin, let's say, or top of the head to the feet. If it's a figure, and I get that height and then that height doesn't change, it stays the same. Then I get my width by measuring the height, finding the width. So, but if we look at this proportion thing and we take the whole from top to bottom. And then we look at the relationship of the stem connecting to the pair, right? It's about there. And then that stem to the rest of the body of the pair is, is b, right? So there's, there's a, there's b. A. Pretty, pretty simple. Alright, so we're just checking things. Another way is to, let's say we take the height of the body of the pair, and now we need to find the width. What are we going to do? Well, it's going to take that rotate it. And then take a comparative measurement from the height of that pair to the width of the Paris at the widest part. And I'm going to find it's a little bit, it's taller than it is wide at the widest part of the pair. So it's going to be a little less, right? If we change the color of this one, say make this like this. Okay, so the red one is a little bit longer than the blue ones, so I don't get too technical about it. If I can find that it's exactly halfway or it's a third, I'll go for that. But if it's anything a little more or less than a half or more or less than a 3.5th or three-quarters. I just kinda go It's a little less. So I'm not too precise about it. But I know that if I take this measurement of a here, this one, and I use my pencil, and I mark off that space. And then I tilt it like this, right? I'm going to know to draw the width a little bit less, right? Not all the way here, a little bit less. And then I can check that. Okay, so I'll take kind of an initial measurement, a kind of a rough estimate, and then I'll check it, right. I make a, make a guess, an educated guess based on that vertical measurement. Little less. Put that down on the paper, make a mark, and then i'll, I'll check that. So what else can we do here? We could say, let's say we want to kinda know this part of the pair right here. There seems to be a skinny part of the pair. And then you've gotta kinda of around a wider part. Okay, well where where that well, maybe that's a third. That seems to me to be around a third. So if I could split this pair into thirds. Thirds work because it's kind of obvious where this with change occurs. You know, I could split it into half, but it's sort of half doesn't really help you that much. Or we could, again do the total length from the Tim, the tip of the stem. And we could find out maybe, you know, what is that? Maybe that's a quarter, roughly speaking, right? So now I've got a fourth. So I could divide it by fourths. And I could take that one, that one known unit here and then just move it down until I find an account for the total height of my pair. Right? So I'll use that one unit that becomes my unit of measurement or fourth. In this scenario, I used a third to find the, you know, how tall that pair, that pair is or within the pair. Where does that change come? Where it starts to become wider? Okay, so that's sort of the proportion part. It's taking a comparative measurement of one thing in the pair or the face and comparing it to another thing. So we take the height compared to the width. We take a stem and we compare it to the total length or the total width, right? You could use this stem and find how. Let's see, we take this stem here. That's that stem. We can move it. And say, how does this leaf compare to that known unit of the stem? Because that's going to be my unit of measure. And I could say, well, maybe we're lucky. It's twice as long, roughly. Okay, That's pretty cool. Right now, I don't have to guess exactly where that stem is. Now have other tools I can use to compare that to see if that's right. So let's move on to tool number two.
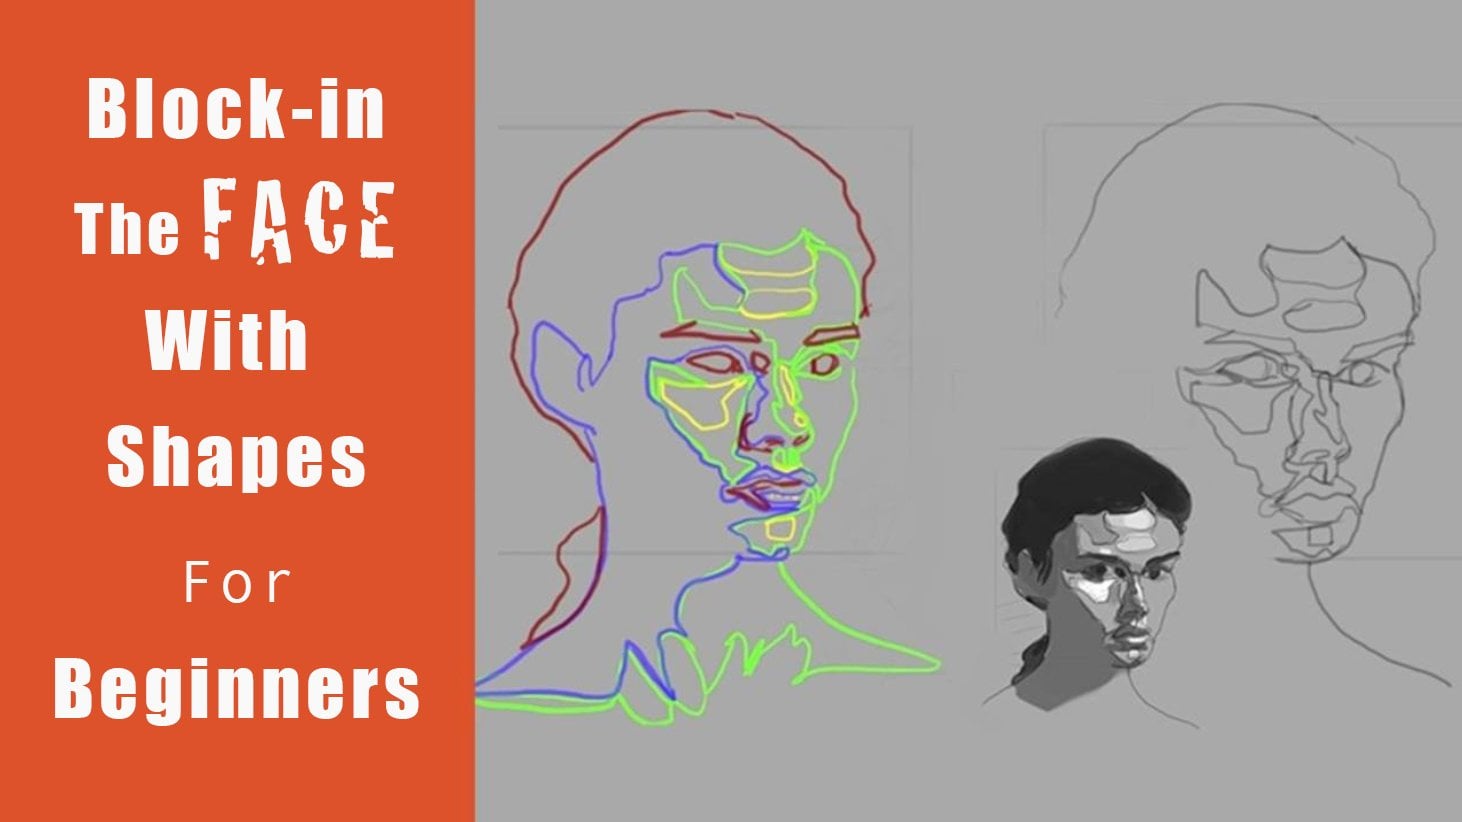
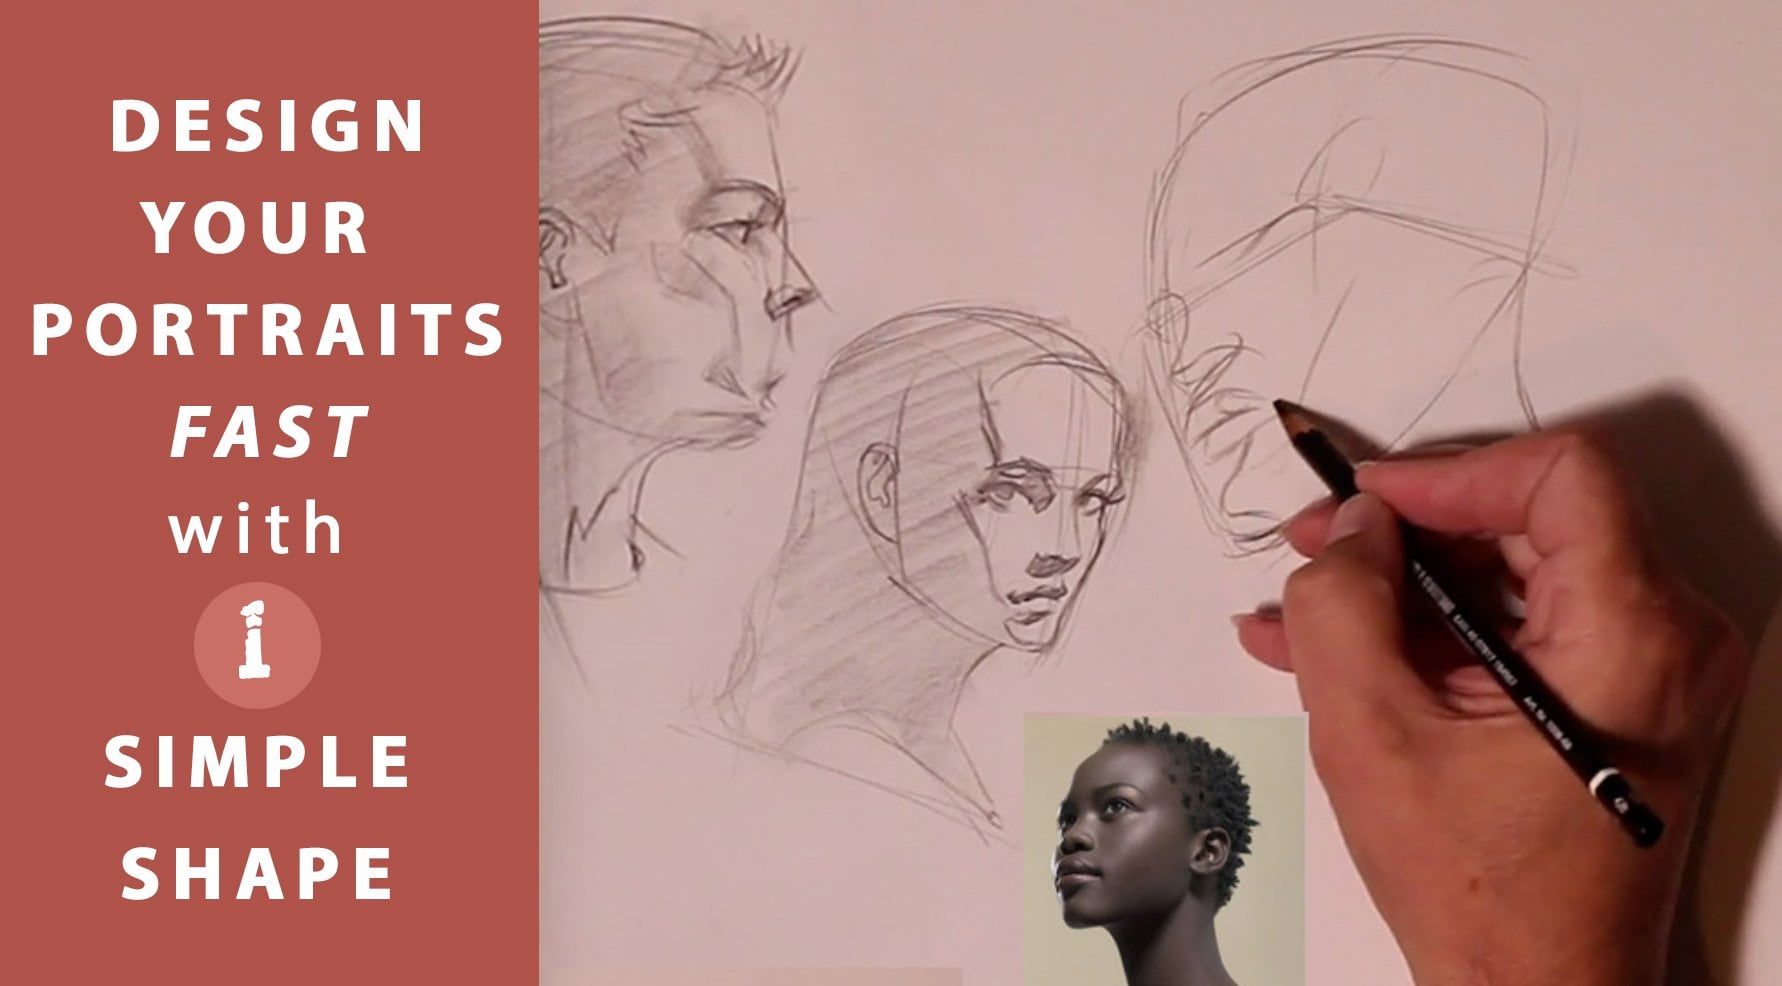
3. Simplify shapes: Simplify shapes. Simple. What does this mean? Well, it means simple, but characteristic. It has to be it has to be simple. Right? Or it has to be simple. Or maybe no, simple, right? This is the easiest thing we could do. But if all I do, it's simple, but it's not too challenging, It's not too satisfying. And it's not that accurate either. But if I do this one, now this one is, tells me. It might be a pair, could be a face, needs a little more information. Maybe it needs this. And now you pretty much know what that is. It's not all the way there yet. It's low resolution, It's blocky, it's rough-hewn as if you've cut it out of granite, right? But that's what we want to get it on the paper. So simple. But characteristic, this one on the right is more characteristic than the one on the left. They're both simple, but this one, at least, you know, that is some kind of fruit. I, um, I would wager that you might guess that. Okay. So what we do in traditional art is the straight line block in, like the straight line envelope block in, so in the block and it's called block. And because it's blocky and rough-hewn as cut from stone, right? Low-resolution, straight lines. We call it the straight line block. And so if we're going to do this, simplify the shapes, then I'm going for straight-line stuff. So I create a straight line block in. Remember I find the height of my object. I might even put the angle in that attitude that I think that it, it's got a slight tilt. It's not completely symmetrical. And then I'm going to just throw down very straight lines to try and account for this, this thing as best that I, that I can to where they connect as if you stretched cellophane or Saran Wrap tight over this thing. Can you imagine that? Or just some kind of material? Some cloth. And you stretch too tight, it would look like that. It would get caught on the vertices, right? The places where it was most, where the corners we're, so it's going to show you the corners. It's easier to draw straight lines than for me to approximate a one-in-a-million. Will I get this curve of this thing exactly right? So it's easier to straighten that out and then come around and round out the curves. Okay, So line segments are easier. So I've got a lot of work to do. So if this is the tip here, let's just I'm a little bit high, so and just correct that. Okay. So I've got the tip, I've got the bottom, so I have this height. And my parents somewhere in here took out the construction lines so it doesn't get confusing. And I know that the top of the actual pair is in here, let's say. So I'm going to vertically take a measurement there. And it comes out to the left and then it makes its descent here. So I'm cutting away, right. Then it takes another term and moves towards the bottom. Straight line. Envelope, block hint. So again, I'm just kinda stretching cellophane over this thing, Saran wrap. This is kinda fun. You know. It's, you get a lot of structure with this. When you draw with straight lines, you get a lot of corners. You get a lot of structure. And I think that that's. Good, because structures the first thing to go in a drawing. Because remember, we're just, this is all illusion. It's flat and 2D. It's not 3D. So it's easy to get this x y thing. But the z illusion part, that's the first thing to, when you get into a drawing to have things start to flatten out. So you want to really keep that structure, overstate the structure and then back off on it, right? Overstated, and then back off my little theory. Okay, so I've got this more refined faceted envelope and it's looking more and more hopefully like this, this thing. I'm going to erase this just to a little bit here. And so I've got to account for this. Hoeing. How do I know how far out goes? Well, if I drop a vertical plumb line from the edge of the pear, I'm gonna get my answer because they line up exactly somewhere, let's say there. And I'm just going to block in this thing. I'm going to find the member. I'm going to capture the action. There's the action, right? That the, the attitude, the lifeline, everything has a gesture or an action line. And so I'm just going to get its orientation, its position in space, and then start to describe the form. That's all you need to draw, capture the action and describe the form and space that's drawing. How do I know that? Because someone greater than me said it, that someone is Glenn bill pu, the awesome, amazing teacher. Who still alive. He's an octave generic and I think a teacher. So there's my kinda simplified shape type deal. Straight line block and straight line envelope block in. That's simplifying your shapes, right? So I gave a little more information there than I could've used to. Two circles. Simple shapes. Again, I used straight line simplified shape initially. So yeah, let's find whatever works for you that you can distill down that information that conveys what this thing is and use it. Okay, So that's number 2. Simplify shapes. Number 1, what's the proportion? Check your proportions. Let's move on.
4. Check angles: Check your angles, are right. Angles. Might move this down here. So we get some room here. Okay? So when you check your angles, I'm going to be checking the angle. Let's see. How do I know what angle is something like this? The angle of this thing. Where the angle of this thing, the angle, right. You've just kinda checking angles one against another. These two seem to be parallel to these two sides are kind of parallel. And you sort of try to find comparative angles within the object that you can relate one to another. So it's kinda, it's a way of measuring. And the idea is, if I know points a and B in the chat, if this gets too lost or something. But if I know C, I can find a third. Let's say, let's say here somewhere on this curve B. Okay, let me check the chat real quick. Yeah. John says he sees a lot of good measurements techniques being used and not a lot of face planes. And I'm confused. And starting portrait when the face is on a slightly side angle. Yeah. Well, that's what it does get more tricky. One thing for that is to find the center line and then that helps with the symmetry. But things do change from when you're looking straight on and neutral. And everything is symmetrical. Ever three-quarter view. It's quite dramatic. The relationship of one thing to another. So, but, so these simple ideas may help. So if I know a and C, okay, I can find the third B. So if I, if I know where a and C are in relationship to one another, and then I find the relationship of B. Take this off. So there's a and B, a and C. So I'm kind of guessing that this is the angle of this line segment between a and B. It's still a question. So to really focus in and tie this down to find out where B is, I've got to find the angle between B and C. Okay? So this is called triangulation. The triangulating. Just the way the sea captains did in the open seas. They use the stars, they use landmasses to triangulate, to find their way across vast distances. Okay? So, so these angles here, between C and B, between a and B, between a and C helps. So if we know a and C and we know the angles there, right, we can find B. And so if I had, my angle was off here, say I went over here and that angle became bigger than my b would be, would be off down here, and we'd be incorrectly placed for B. So I'm using these angles for precise placement. So I've got now three tools, proportion, simplifying your shapes with straight lines and run this triangulation thing. And then you can check placement.
5. Check placement: It's helpful to, you know, if you have knowing your vertical and horizontal plumb lines, right? Those are Billy absolute things that you can check their standards. You can check every other angle by because it's a lot easier to check by a true 0 slope or, you know, vertical. We kinda know those are easy. They stand out vertical, horizontal, and the angles are harder to judge, so we need something to compare and buy. But for here, the placement of let's say this line a. And we need where b is. We can measure this line segment here. So we're using this little place where the pair bumps out. It's an obvious corner right here. And we're using that to draw it like a tangent of vertical plumb line up. So we can compare. Right? Let me see if I can. We're taking this space in here and we're sort of using it, measure the relationship between B and a. So for finding, we're checking the placement of things. Just check in the placement of stuff. So let's say we've we've gone through a few steps, maybe 123 or 12, and now we're just checking placement. I can check where b is, how far this thing c is over here. This, right? I can just kinda again use a plumb line and kind of measure with a verdict with the horizontal. And see what's the distance, just what is this amount? Dividing that up. What is that distance? That distance. That is the question to answer. Right? What was that distance? And I'm just checking a placement one to another. You use these places on the figure or the object where it's an obvious the widest point, or it's a corner. Or you could do it at the narrowest point, right? You could say, well, thing comes in here. And I want to compare it to this base d out here. So I'm, I'm just comparing that unit to see if I've got it right because if I drew D out here and this line was way out here, it'd be wrong. My my pair is way too plump. Right? Is way too why? Because it wouldn't I compare it against the photo of the pair or the pair in my still life and I'd be able to see it's not right. And so I would measure this and then measure on my drawing. So that's really kind of a simple when you're just checking the placement of stuff. And yeah, that's really helpful too, to find the widest points or the narrowest points because there's the most obvious. And then find the placement of other stuff.
6. Positive and negative shapes: The last one on my checklist here is positive and negative shapes. Positive and negative shapes. This one's pretty obvious, but may not be obvious at first as what's the positive and negative shape. And anybody who's. So let me do the positive shape is the thing that you want to draw, and the negative shape is everything else. So it's often helpful to draw a frame around your subject In that way you can use. Okay. And now you have a figure ground relationship. This figure is the pair. The ground is the thing, the crowd, the ground is the background or whatever else isn't the pair. So this pair is the positive shape or space. We use those two interchangeably. And everything else here is the negative shape or space. And I'm going to use both tools in the tool belt to get this thing drawn incorrectly. So if I'm having trouble drawing this pair, and let me just, I'm gonna take that out and use this pair to the left. I'm having trouble drawing this day. What am I going to do? I'll show you what I do. If I'm just drawing this thing and I just can't get it with what I'm looking at as this pair. I just, you know, Well, maybe it's too low. And maybe this leaf is here. But I just, I don't know, maybe it's too small. Maybe it's too I just don't know. Right. Well, helped me is I can use it for him. I didn't know the frame. There's my frame to another frame. So this is helpful if you're drawing exact sides, like cites, size, the color. Okay. So in my drawing, I'm drawing this thing. I can compare. I can use the positive shape. But when I get stuck and I don't know about this leaf. And how big is it? How tall is it? I can also say, well, I'm going to use at the positive shape, but I'm going to use the negative shape. And I'm gonna say this distance from this leaf to the frame, right? That's shape. Looks like something. Right? There's a distance here. It's not up here. Distance now is too small and it's not down there because that distance, when I compare it, that doesn't work so well. It's maybe somewhere in here. And then the question is, where's the tip? Okay? Well, I also have a relationship of that tip to the outer boundary of the frame on the left side. So I could measure that and just bring it over. Right? And so I'm using again the negative space, right? The, in, the inside border of that leaf right in here. Well, I can just use this space and measure that. I can use the leaf and say, well, this leaf is this wide, this tall, and this y. Or if I can't get that, I can use the negative shape and say, Well, shape in here is so why? And so tall. And I'll use that. So kinda draw. So what I'm doing is I'm drawing this shape in here. I'm not drawing the leaf or the PAM, drawing the shape in there. Makes sense. So now I have two ways of getting at this thing. If one way isn't clear of this switchover and come at it through that lens. Right? So in here, this shape has a certain height, width, and slope. Maybe I can get to my pair. Drawing that shape in here. Not drawing the pair in here, but just drawing that other leftover piece. So you've got a switchover. It's like when you see an ink drawing of one head, There's two heads in there. Is that there's a head of a young lady and the head of an old, which you've seen that before. And you can't see the other one until boom, suddenly it's there. And then you can't switch back and see the first one. You know what I'm talking about? It's kinda like that. You've gotta kinda get good at this. And draw this stuff in here. If you can't draw that stuff in there. Okay? And so that's another way to help you look at the positive and negative spaces. And that's going to help you account for everything. So there's five ways. A checklist, I hope that helps. Let's see. Subject is positive part. The frame is helpful for portrait. Yeah. So if you frame things, it can be helpful as a boundary to really account and measure things against especially the negative space because it comes, becomes a shape without the border of the frame. It's just goes on to infinity so there's no shape. Their Fitbit weekend. Reckon with that we can age. Okay, So I hope that's helpful. And in the next lesson, I'll show you how to apply these five steps on a real portrait drawing, such as this one. Let's go.
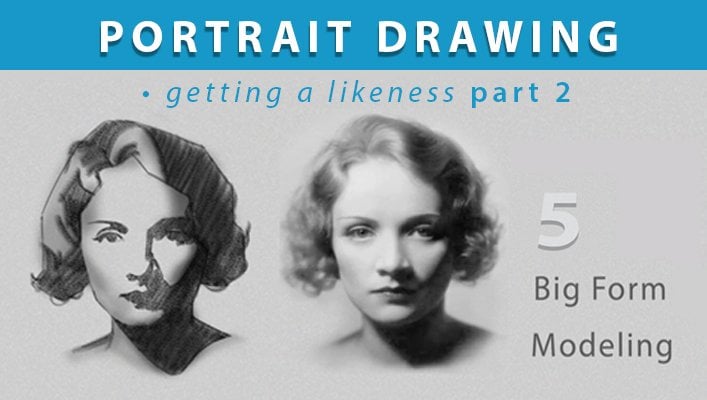
7. Practical application to a portrait drawing: Students often ask, how do I start? Where do I start? How do I place the head? How big? So I would suggest drawing life size or a little bit smaller. So life-size is something like the span of my hand from my pinky to my thumb. And I would favor putting the head a little bit higher on the page rather than lower. If I put it lower, I risk cutting off the neck and shoulders. So I don't want to do that. And somewhat center, not too far to the right or to the left because I might cut off the front or back of the face. Also, I want to accommodate the gaze. And Candace is looking off the camera left, so I want to accommodate that and give her some space as if she has somewhere to look. So if I put my hand up on the page and it will just make a mark here. Mark there. That would be about life-size. So life-size or a little smaller, it's fine. So now we've got two marks on the page, the level of the head and the level of the chin. And I want to make one more mark and that is the sternal notch. That is the place where the collarbone meets the throat. And if I break up this distance into thirds, I'll be able to find the sternal notch placement somewhere here. So let's go with that. So in this block and phase, I'm going to use very straight lines, thus the name block. And I'm going to reduce the model to very basic geometric forms. And I'm going to go from the biggest to the smallest, to the general, to the, all the way down to this specific. And drawing straight lines is a lot easier than drawing curves because curves has a lot of ups and downs and peaks and valleys. And I'm just going to try and find the average and straighten them out. Because if I go for the curve right away at the outset, I might make it too round, I might make it squishy. And if I have too many curves, I risk losing structure at this beginning stage. So once I have these three points, I want to find where the peak of her edit head is the longest dimension vertically. And so the top of her head is a curve, right? And that peak of her head is usually towards the back of the head beyond the halfway point. So just where that is is going to be a point or a tangent along this line somewhere. We don't know where it is. So I'm going to look at the model and that point on her head is around halfway between the front half of her face and the back half of her head. So given that and I want to accommodate the gaze on the left side, I'm just going to say that that point is there. That's the apex of the curve. Now I want to find a line that represents basically her chin. And the reason for that is the chin is on the center line. And since the face is bilaterally symmetrical, it's left side is a mirror image of its right side. I kinda want to know where the center line is at this early stage. So what I'm going to do is take that point, the highest peak of her head and hold my hands straight out and use my measuring tool like it's the hands of a clock. And I'm going to try and keep it parallel to the picture plane. I'm not going to break that plane this way. And that'll help me find the angles. And I'll just measure that, find that on the drawing or on the, on the model, and then move that over to my drawing. And that'll give me the center line where the chin is. So I can check and recheck, which I recommend doing. And that seemed about right. At this stage. It's good to get just an approximation. It doesn't have to be perfect, but you want to get something on the page. You want to get your foot inside the drawing, get it started. And so this is really the flat 2D analysis as if Candace is made of paper cutouts and shapes are easier to handle and forms. So we're going to, for the flat. 2d shapes. Right? And that's just an approximation where her sternal notch is. Now, once I have these two points, I need to get the lateral extremes of her head. We've got the vertical. So how far left does her face go and how far right does her head go? Well, I can do comparative measuring where I measure one dimension or placement on the model against another dimension or placement something else on the model. And then reproduce that on my drawing. So let's take the height of her head. And it's about equal to the back, to the width of her head. And that's true in profile, that the head is mostly a square in a one-to-one relationship. So given that there's a one to one relationship is going to be something like this. But I'm going to use another method because the method isn't always true. And I'm going to show you something called triangulation. And that is the idea that you can find any one unknown point by two known points. So if you know two points, you can find any other point given the angles between them. So they use this in land and sea and air navigation, and they also use it for satellites. They help to satellites and locate a place on the, on the Earth. So again, I'm going to use my drawing tool like it's hands on a clock. Then I'm going to find from the tip, the top of her head where that point is on her right side. That's the most extreme edge, something like that. And just draw a construction line there. Kind of a plumb line diagonal. The clean that up a bit. And then since I know this where her chin is located, I'm going to do the same thing. Draw that angle out and where these two lines intersect should be that third. So point a and B, I found point C by triangulating them, finding that angle between them. We know that this angle between a and B is correct, its orientation just because of that angle. That's the angle that tells us that these two points are in relationship correctly. So now when a string that out and this is the perfect time to do it, right? Take your time, go slow. Accuracy at this point is not perfect, but we're striving to get in the ballpark. So now on our left side, that boundary, That's the most extreme part of it, I would say is her eyebrow. So I will again take an angle and the top part of her head. It's something something like that. And then again, from the chain rule, take an angle up to that point. Just to check that further. The horizontal line between those two points should be about level. So I can check it that way too. Okay. So that seems about right. And I can check the placement of the sternal notch by dropping a vertical plumb line straight down from the peak of her head. And I find that it's just off to the right. So here it might be somewhere like that. So you can see that this is, is giving me points, it's given me coordinates. That I can find more points. Kind of plot, a map, if you will, of Canvas this face. And that's all this is. At this point is finding the proportion of the head. I'm going to start to add more points to this. And we're going to use that same technique of triangulation to, to do that through remember, triangulation is vitally any 1 given any two known points. So let's go ahead and do that now. Okay, after stepping back, I was able to clean up the drawing a little bit, make some adjustments, especially the ear and the jaw, and just refine some things so we're still in the block in phase. And at this point, the temptation for many students is to jump in and start drawing the details of the eyes, the nose, and the lips. Not yet. Resist the temptation to do that. We're going to basically still be in this block and phase, but where we finding a little bit and we're spacing and placing the elements, we're trying to find where things go, where they seem to fit. And so we will do the features. But we're just going to find their relative shape and placement vertically. So what I need for that now is a center line. The center line is crucial because it gives us so much information about the axis, the tilt of the head side to side, forward and back, right? And also its way the rotation of the head. So that's centerline is crucial to line things up and give us information about those things. And the center line is basically where the right side leaves off from the left side because the face is bilaterally symmetrical. It's a mirror image of each other. And so that center line gives us a lot of information about where the right and the left. And to the center line is a concept. Candace doesn't have a center line drawn on her face, but we need to find the center line nevertheless. So I'm going to draw a line from the chain up to about the middle of the eyebrow. So let's see if we can cite an angle from there. And then it changes direction from the middle of the eyebrow. It starts to go backward. On the forehead. It falls back. And then somewhere along the top of the head, it starts to recede. I didn't even steeper angle. So I'd say it's something like this. So I'm estimating that her brow is going to be somewhere here. The center line is also important for helping me find the vertical alignment of the features. So the eyebrows, eyes, nose, lips, and chin. So let's find the eyes. The eyes are the rule of thumb, the areas that they're in the center. Okay. So on average, the eyes are in the center of everyone. Sometimes a little bit higher, some a little bit lower, but it's safe to say there in the middle somewhere. So let's let's measure the distance from the chin to the eyes and Candace, and see if that's turned on her. She's got the hair. But basically it reaches to the top of the skull without the hair. So let's find the midpoint here. So let's say somewhere here. Seems about right. So we're using the head as our standard cutoff to measure against and we're breaking it into two halves. And the eyes sit in the center of those two halves. Now, we're going to shift now from the head as a measuring device to the face. And so that's going to come in handy because the face, if we divide the face from the hairline into thirds down to the chin, then we're going to be able to place the eyebrows, nose, and mouth. So let's do that. Let's say if we take this measurement here where we estimated the pile and the hairline and see if it's a third. If we can break it into thirds roughly, we can. So let's do that again. That's where the nose would be. Okay. Let's try it from the chin. One 23. Somewhere there will be the level of the nose. And then just checking here. And Candace, her nose is a little bit lower than the IRR, the bottom of the ear. So maybe here. Move that down just a little bit. We can take the distance from the bottom of the nose to the bottom of the chin. Split that in half. If we do, we find the bottom edge of the lower lip on average. So the split of the legs is going to be higher than that. Now the center line not only gives the vertical positions of the features, it's going to give us the lateral positions as well. Because if we know the satellite and we can gauge how far out the outer corners are of the features from the center line. And now let's place the place where the root of the nose comes out from the frontal bone of the forehead. Check this angle here. It's still kinda really using the shapes and the shadow shapes to help me here. Let's take an angle, sine of angle there. It's a little bit more. I'm just staying with the big shapes, spacing and placing the elements, not rushing in. Staying out as if I'm far away and maybe I'm 15 feet away and I can only see a very basic shapes and values. Okay. If I do a poem line streak down, usually the tear doc, lines up with that. So the nose or the I will not intrude over that line, but will stay just outside lined up with that. If he goes to close in, it looks cross-eyed. And that shadow shape under the nose can really help us get from the bottom of the nose to the lips. It's really handy. And the angle of this little vascular node here, the colon and the nasal labial fold comes just outside the terminus of the lips here. So the block in stage is essentially complete and as you can see, the drawing goes through many stages of measuring where to place the head on the paper, lining up the features vertically, laterally and then filling in the shapes from general to specific. And then your dark and light Yin-Yang statement, then adding details and textures. And that final stroke to make the drawing complete is to give it your signature. So I really hope this lesson has helped you with measuring and proportion and how these simple tools at the beginning of the drawing become immensely important in taking your drawing all the way to a beautiful conclusion. Now if you're interested in learning more about me and the courses I teach online, head over to my website at drug use.com. You can follow me on Instagram at draw juice and YouTube. All right, So hey guys, thanks so much for tuning in. And we will see you next time. Bye bye.
 Chris Petrocchi, I help artists grow on their journey