Transcripts
1. Introduction: Hi, my name is Alicia and I'm a watercolor illustrator and YouTube artist. Drawing and painting the human form is my favorite form of artistic expression. In this class, we're going to learn how to draw noses. We'll start by going over a few basic materials, keeping the list pretty simple. Our first drawing exercises will involve breaking the nose down into basic geometric shapes to better understand the form. Using those fundamental building blocks, we're going to move into drawing noses from various angles and perspectives. We're also going to cover some tips for simplifying and stylizing the nose, warping the basics we've covered so far to begin to develop your own unique style, as well as representing a variety of character types. After taking a few moments to cover some common mistakes often made when learning to draw the nose, you'll be fully equipped to dive into drawing your own noses and the faces that accompany them. I'm going to share my class projects with you as well. Whether you're a beginner looking to understand the basic anatomy of the nose or a more experienced artists seeking to refresh and deepen your understanding, there's plenty of information here that I can't wait to share. Let's get started.
2. Materials: Let's start by talking about the materials I'm going to be using during this course. I'm going to be keeping it pretty basic, and to be honest, you can keep it even simpler. Let's get started. First, I have got a sketchbook here. This sketchbook is filled with eight and a half by 11 standard sketching paper. We've also got a mechanical pencil, a red and blue pencil, I like to use them for different details and construction, a pencil extender for when my pencil gets too small to hold myself, a standard Bic ballpoint pen, which I really like to use for adding darker lines, a pencil sharpener, and an eraser. For the purposes of this class, I'm also going to be utilizing this nose that I sculpted out of bake-able clay, baked in the oven, and painted with white acrylic paint. This is going to be really useful in helping us to view the nose from various angles as well as in a couple of different lighting situations. You're welcome to just grab a mirror and use your own nose. As long as you've got yourself a pencil, and eraser, and a sketchbook, and that's really all you need. Let's go ahead and move forward.
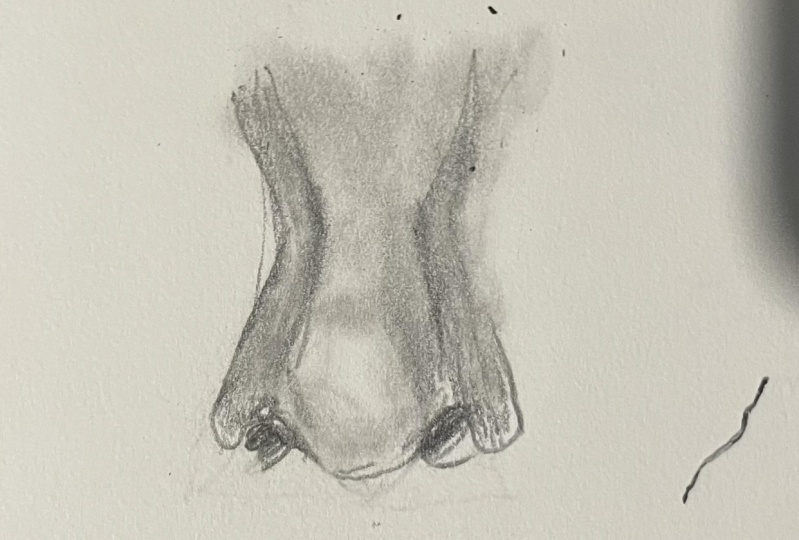
3. Parts of the Nose: To get started, we're going to be breaking down the nose into a few basic shapes. For the purposes of this class, I'm going to be referring to those shapes as the overall wedge of the nose, the bulb, the nostrils, and the bridge. Understanding these shapes is going to help us not only to draw the nose from various angles, but to be able to manipulate those shapes to draw different types and sizes of noses as well. Let's start with the overall wedge shape. What you can see here is this wedge, and it's going to be weighted a little bit more at the bottom, so the point is going to fall closer to the bottom, and that's going to be where our bulb will fall. What you're seeing here is me sketching out this wedge shape from a couple of different angles so that we can understand where all of those shapes are placed. The bulb can be drawn as an oval or a circle depending on the style that you're going for. But if you're going for something a bit more organic and a bit more closer to realism, even if you're still stylizing, I prefer to use a diamond shape. What this does is it helps us to get slightly more organic angles. The circle overall tends to look a lot more cartoony, so really, the shape that you use depends on your own preferences. The bulb of the nose falls right at the bottom of the bridge. You can also think of it as the button of the nose. It is the central point of the nose. Up above will be the bridge and to either side of the bulb will be the nostrils. What I'm doing here is just sketching in some examples of where the bulb sits in relation to other parts of the nose. If you think about this anatomically, there's not actually any bone in this part of our nose. The nasal bone will have made up the bridge of the nose, and this is just cartilage and skin sitting off the edge of the actual nasal bone. When it comes to drawing our nostrils, I'm sure you can remember a time as a beginning artist when you were very first getting started, depending on how close or far that is from now, when you think of nostrils, you just think of black dots may be little holes on the edges of the nose, or even just some curvy lines to denote the nostrils. But it's important to remember that these are the beginnings of our nasal passages. These holes go straight up into our heads and we breathe through them. Another important thing to remember is that the nostril refers not only to the hole, it really more accurately refers to the skin that creates the hole, so the skin around the bowl of your nose that forms the nostril. What I'm trying to denote here is that it's not just a circular hole, it's much more effective to remember this almost bean-shaped folding of skin around the bulb of the nose. The nostrils may venture a little bit higher or a tiny bit lower than the bulb of the nose, but we'll get into that more when we talk about variations, and drawing different types of noses. The bridge is going to be the longest and most triangular shape that we'll be discussing today. The bridge of the nose starts approximately between the eyes just below the brow bone, and stretches all the way down to the bulb of the nose. There's a lot of variance in visibility as far as how much of the bridge you can see, depending on the shape of our noses. Varying the shape and size of the bridge is one of the most effective ways to change the type of nose that you're drawing. Whether that's feminine, masculine, or variance, depending on different character types or ethnicities. As stated earlier, our nasal bone is under there, so this is really the only part of the nose that has any bone underneath it. Now that we've discussed these three primary nose shapes, let's go back up to that wedge we started with, and go ahead and put one of these shapes onto each of the wedges. I'm going to go ahead and also make a couple adjustments to the original wedge shape that I'd set forward to better include all of the shapes of the nose. I want to talk about a couple other key anatomical features that may not be these three primary pieces, but they're still very important to drawing accurate noses. In order to best demonstrate this, we're going to take a look at this little watercolor sketch I did a couple of days ago. Here, you can see a nose. Here, first off, we've got the bridge up at the top, and the bridge flows down into the bulb of the nose. On either side of the bulb, we've got our nostrils. The space between the nostrils is referred to as the septum, and the cupid's bow, which goes down from the nose to the lips, is referred to as the philtrum, so septum and philtrum.
4. Angles and Perspective: Let's take a look at some tips and techniques for drawing the nose from various angles. When observed from the front we can spot a modified wedge shape created by the three primary elements of the nose as discussed earlier. You can see I've added a few simple planes so we can start thinking about this shape in three dimensions. Now let's see a slightly different angle. This face is turned at a three-quarter view and when we draw our wedge over top, you can see that the plane on the far side is now less visible while the side closer to us appears wider as we can see more of it. When turned completely to the side, our front plane as well as the far side can't be seen at all. This particular reference also introduces a new question. What if the nose is pointed not just from side to side, but up or down? This nose is angled slightly upwards, as a result of the shift, our bottom plane, where the nostrils can be found, is now much more visible. As the nose turns up, the length of the wedge, the bridge, will appear to compact and seem shorter with the adjusted perspective. Let's pull out our sculpted nose to see a few more angles. I'm going to be drawing over top of this nose again, but this time I want to focus on the changes that occur as the nose shifts as opposed to the overall wedge shape. Starting with this three-quarter view, we can see that the individual elements stay in the same place horizontally. It's the width and visibility that changes here. At the side view, the side of the nose will be at its widest, as it is now representing the full width of the nose. The same thing happens when the nose is turned to the other direction, but of course with the opposite effect. Let's tip our nose down, see how the bottom plane disappears from view. The bridge will also appear wider when the nose is viewed from the top, as this area is now closer to us. As we tip our nose up, the bridge will begin to look smaller and smaller as it moves away from us and the nostrils, that bottom plane, will become larger and wider until they are the only thing visible. Perspective plays a big role in this directional turning, so it's really important to keep these things in mind when you're considering drawing the nose from different angles. Set yourself some landmarks and use a three-dimensional shape when hashing out how your nose will look from different angles.
5. Connecting the Nose to the Head: Being able to accurately draw the nose is a great first step. In order to create convincing, effective drawings, we also have to be aware of how the nose connects to the rest of the head. To illustrate this, I've done a couple of quick skull sketches over top of which we will be constructing the nose and surrounding forms. I'm going to use my kneaded eraser to lighten the sketch. The first area I want to focus on is where the nostrils and the bulb of the nose will be. As you can see, this will be right over the hole created by the nasal bones. You can accurately determine the width of the nose by drawing or imagining lines from the inside corners of the eyes going straight down. Our nostril should fall within the space. When constructing the bridge, this area begins between the eyes and will slope down and out into the cheeks as we move down. An important thing to keep in mind about the area below the nose, is that the mouth is not a flat plane. It's actually quite round, as the maxilla, the upper lip area, the mandible, the lower jaw, and the teeth actually curve outward. As I place my eyes into the sockets, I can think about how the skin and muscles that curve down from the higher nose bridge create deep shadows above and between the eyes, and also affect the curved shapes of the cheeks. Our nose should fit within a rectangular shape between and below the eyes. You can also imagine a triangular shape connecting the centers of the eyes to the bulb of the nose. This can be really useful if you're trying to draw the same person from different angles. Keeping these shapes like the rectangle and the triangle, the same size will help you to draw characters that look the same, even when you're drawing them from different angles. There are two important tools to be utilized when drawing the nose and head from the side as well. The ear, which I've loosely sketched in back behind the jar here, helps provide landmarks for the nose or vice versa, depending on which you decide to draw first. The beginning of the ear should line up horizontally with the center of the eyes and the top of the bridge. This can often be where the bridge is curved most inward and closest to the eyes. The bottom of the nose should line up horizontally with the bottom of the ear. We can see the curved shape of the mouth from the side very well. When properly drawing in the nose in relation to this eye, we can imagine a rectangular shape placed diagonally that will encompass the nose and help us to know where to place the eyes. The bottom of the nose, that bulb, will fall at one corner of this rectangle; while the eye, that triangular shape that represents the eye from the side, will fall into the upper opposite corner of the rectangle.
6. Simplfying and Stylising: Now that we've taken a more structural analytical approach to drawing the nose, let's talk about simplifying and stylizing. The key to simplifying the nose is to choose which element you're going to start to omit; so some parts of the nose you're just going to not draw. When simplifying the nose into fewer elements, the outside of the nozzles can be one of the first things to go. The most important thing to keep in mind when removing elements is lighting. Areas that are hit with more light, usually don't need to appear as much. As long as we can enforce the areas of shadow, our forms are still going to read as what we intended them to be. As the outer edges of the nose as well as the bridge are usually lit, we can remove them stylistically, and still recognize the simpler lines as a nose. I usually drop those outer edges first. But then after that, if you're looking for something else to take away, removing the bridge gets us closer to this simple button nose shape. As you can see, we are starting to get a little bit closer to what might be considered a more cartoony style. Sometimes I like to emphasize the redness or the darker color of the nose to help solidify that form itself. In the end, even just a few simple bean shapes or lines for nostrils are all that's needed to tell people, this is a nose. Why? Because the nostril openings are almost always in shadow. As we've said before, as long as we can denote the areas of shadow, people are going to be able to tell what our forms are. If we were looking at a simplified form from the side, we could go with a simple V-shape, and that's going to be something that gets us closer to that pointy animate nose. The circular knows bulb with squiggly lines for nostrils creates a cute cartoony look, or a more angular approach with triangles could push you towards that animate style. Once you have the anatomical foundations down, we can stretch those truths, emphasize them with the cohesive shape language, and create a style of your own. The most important thing, no matter how you choose to stylize, is that you have that underlying structure. No matter what, you want to make sure there's room in your fictional skull for the things you're trying to put it in. Whether that be a nose, or eyes, or a mouth, as long as they make sense, even if the proportions of the skull that would be underneath that head are massively stretched, isn't skewed from what may be natural in reality, things will make sense as long as the underlying structure is there. That's why when you're learning how to draw, it's better to start learning the anatomical foundations in a more realistic way, and then learning how to stretch those truths and setup going, "I really like this style and this is where I want to start." Starting by learning the foundations is going to help you to be able to stretch, and skew, and transform those truths into whatever you want.
7. Variations in Nose Shape: To start our talk about variations in no shape and appearance, we're first going to cover the broad categories of masculine versus feminine no shapes. This is easiest to see from a side view. Starting with the male profile, these shapes can be broken down into sharper, more angular forms. A more feminine look can be achieved by swapping out those sharp angles for soft sloping curves. There are as always exceptions to these rules, but I've found considering the overall shapes to be helpful when my faces don't quite look right. As we begin sketching, I want to make a quick note about the importance of warming up. I believe this page here is the first drawing of the day for me, and the first few sketches were very stiff. Don't be too hard on yourself while you work through the first few concepts. Give your arm, hand, and brain, some time to warm-up and loosen up. I think the best way to illustrate the way nose shape variations come into play is by constructing them in relation to the rest of the head. You'll see that I'll still be using all of the same building blocks, no matter how different the end result may be, creating this variety of no shapes based on gender, character type, or ethnicity. It's going to be all about stretching, skewing, or squishing the same pieces over and over again. In this first nose for example, the bridge is hooked and jets out quite far. You can almost imagine my grabbing the line of the bridge and stretching it out to create this different angle. In reality, this shape is created by a difference in bone structure where in this case, the nasal bone probably protrudes out a bit more. The second profile is much rounder overall. You can see that the shape of the nose reflects this difference as well. I was specifically referencing an Asian model for the purposes of this sketch. These two sketches are a good representation of varying shape language. You can see that the face on the left is more angular and long. While the second phase on the right is made up of more circular shapes and has overall more of a squat appearance. If I draw in the basic nose shape next to both of these drawings and fill in our building blocks of the bulb, nostrils, and bridge, you can see how I've manipulated the same components to create very different noses. Here's one more quick example, this time with a straighter bridge. Creating variation is going to be all about manipulating the base wedge form. Test out as many different varieties as you'd like and from as many different angles as you'd like. I've found that the variation in nose shape is most easy to view from the side. It's also going to be most effective to have the curves and angles of the nose reflected in the overall shape language of the head. Don't forget that the bulb of the nose is round and three-dimensional. This often creates an additional angle as the nose curves down to meet the philtrum, which then connects to the lips. Without this ridge, your nose may seem flat or undefined. If this is a stylistic choice, that's perfectly fine. It may just be something useful to keep in mind if you're finding that your noses aren't turning out quite the way you'd like them to.
8. Class Project: Just like that, it's class project time. While you're more than welcome to focus on just the nose for your project, I would highly encourage you to draw as much of a full face as possible with focus on the placement and rendering of the nose. For my project, I decided to start with a quick thumbnail sketch to hash out the concept and composition I was going for. I wanted the face itself to fill the entire frame of the sketch. I was also planning to establish a very dramatic lighting source to emphasize and highlight the nose itself. I find ballpoint pen to be really useful for this kind of exercise, as I can immediately lay in super dark shapes and very roughly hash out my details without encouraging myself to focus too much on details because I wouldn't be able to erase anything. To keep things easy, I decided to keep my final sketch on the same page as my thumbnail. Always make sure that thumbnail is visible when working on the final sketch, piece, or painting. You wouldn't want to do the work of creating the thumbnail only to forget what it looked like when you turn the page. If I'm working on a fuller, more official piece or painting, I'll sometimes removed my thumbnail from my sketchbook or have it nearby so I can reference my thumbnail when working on the final piece. I started by hashing out the proportions and blocking in large shapes that I would later sculpt out of the figure to define and refine the features. I really enjoy using a standard graphite pencil for this, because when I lay down the initial blocks of shadow, I can smudge them with my finger to create softer lines and softer blocks of shadow. I'm sticking with a standard HB mechanical pencil here so I can focus on my values without getting distracted by color. If you have a set of sketching pencils of various hardnesses, this can really help to push the values even further. I do have sketching pencils, but I wanted to show you what you can do if all you had was a standard mechanical pencil. I want to thank you all so much for joining me for this class. I can't wait to see the noses you come up with. Practice sketches and final drawings alike. See you next time.
 Arleesha Yetzer, Watercolor Illustrator & YouTube Artist