How To Draw Flowers : Lilies Made Easy With A Step By Step Guide
 Inprint, Lover of Art!
Watch this class and thousands more
Watch this class and thousands more
Lessons in This Class
-
-
1.
Introduction
0:26
-
2.
Supplies
0:16
-
3.
Guide
0:52
-
4.
Stages & Pro Tip
1:03
-
5.
The first three petals
0:48
-
6.
Background petals
0:40
-
7.
Pistil and stamens
0:52
-
8.
Depth and detail
1:42
-
9.
Final touches
1:01
-
10.
Second Guide
0:49
-
11.
Starting your second lily
0:39
-
12.
Adding two more petals
0:27
-
13.
Background petals
0:50
-
14.
Stamen lines
0:23
-
15.
Second lily details
0:57
-
16.
Buds
0:57
-
17.
Application
3:12
-
-
- --
- Beginner level
- Intermediate level
- Advanced level
- All levels
Community Generated
The level is determined by a majority opinion of students who have reviewed this class. The teacher's recommendation is shown until at least 5 student responses are collected.
206
Students
8
Projects
About This Class
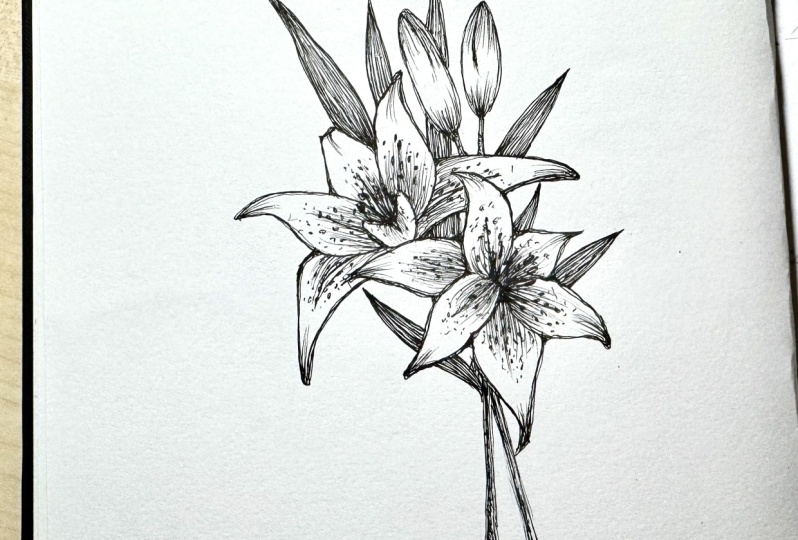
This is a simple step by step video showing you exactly how to draw the beautiful lily flower. After watching this class you will be able to draw a lily!
The class is an easy guide that will teach you the basics of how to draw a lily flower, you will learn all the techniques and tricks that I use when drawing flowers.
This class is designed for everyone and can be enjoyed by beginners and advanced artists.
You will learn how to:
- Construct and design a simple lily
- Create petals
- How to outline the flower
By the end of the class, you’ll be enjoying drawing a lily for yourself!
Meet Your Teacher

Aska (inprint) is an artist who was born in Japan and creates art videos for YouTube and Skillshare. You may know Aska best from her Youtube channel inprint, the channel focuses on: journaling, art tutorials, and watercolor. Her unique plan with me videos are the most popular, as she creates original fun designs in her bullet journal each month.
She is here on SkillShare to help people become better artists and be more confident with drawing and journaling, and of course to have fun with all the students!
You can get involved more at youtube.com/c/Inprintart
You can get the art supplies Aska uses here - https://inprint.xyz/
Her Flower Drawing Tutorial Book - Flower Book
See full profileHands-on Class Project
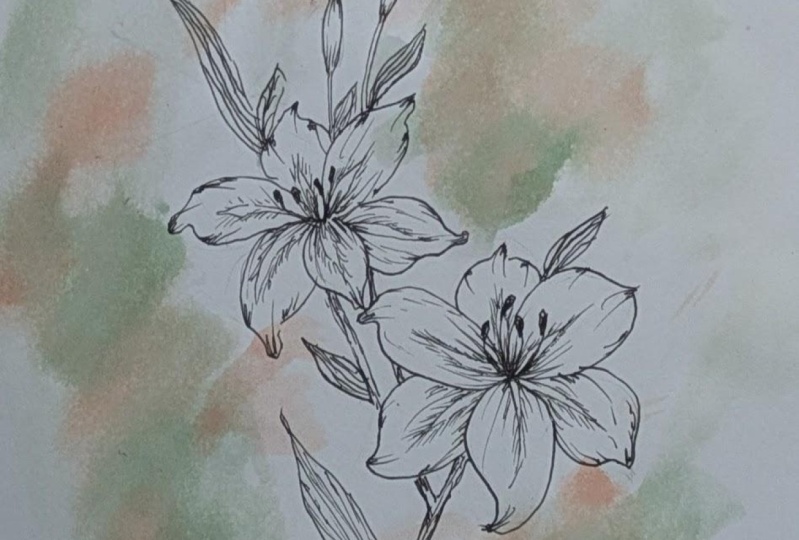
For the class project, you’ll be illustrating your own lily!
To complete the project, you will need:
- Any pencil
- Any pen
- Any paper
- Any rubber
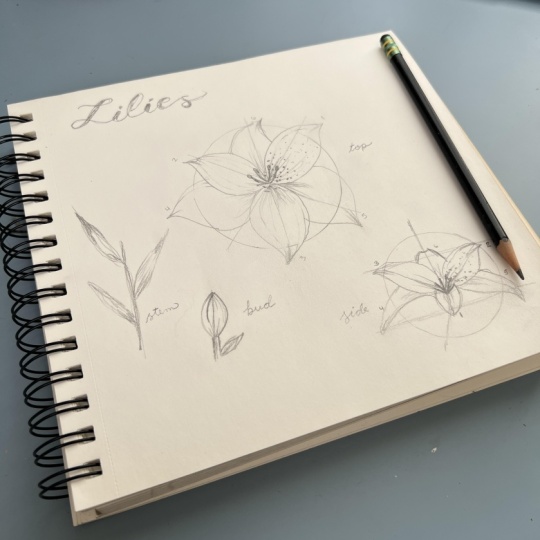
Step 1: Draw the basic lily guidelines.
Step 2: Create your basic lily outline.
Step 3: Outline and add details.

Class Ratings
Why Join Skillshare?
Take award-winning Skillshare Original Classes
Each class has short lessons, hands-on projects
Your membership supports Skillshare teachers
Learn From Anywhere
Take classes on the go with the Skillshare app. Stream or download to watch on the plane, the subway, or wherever you learn best.


Related Classes