Transcripts
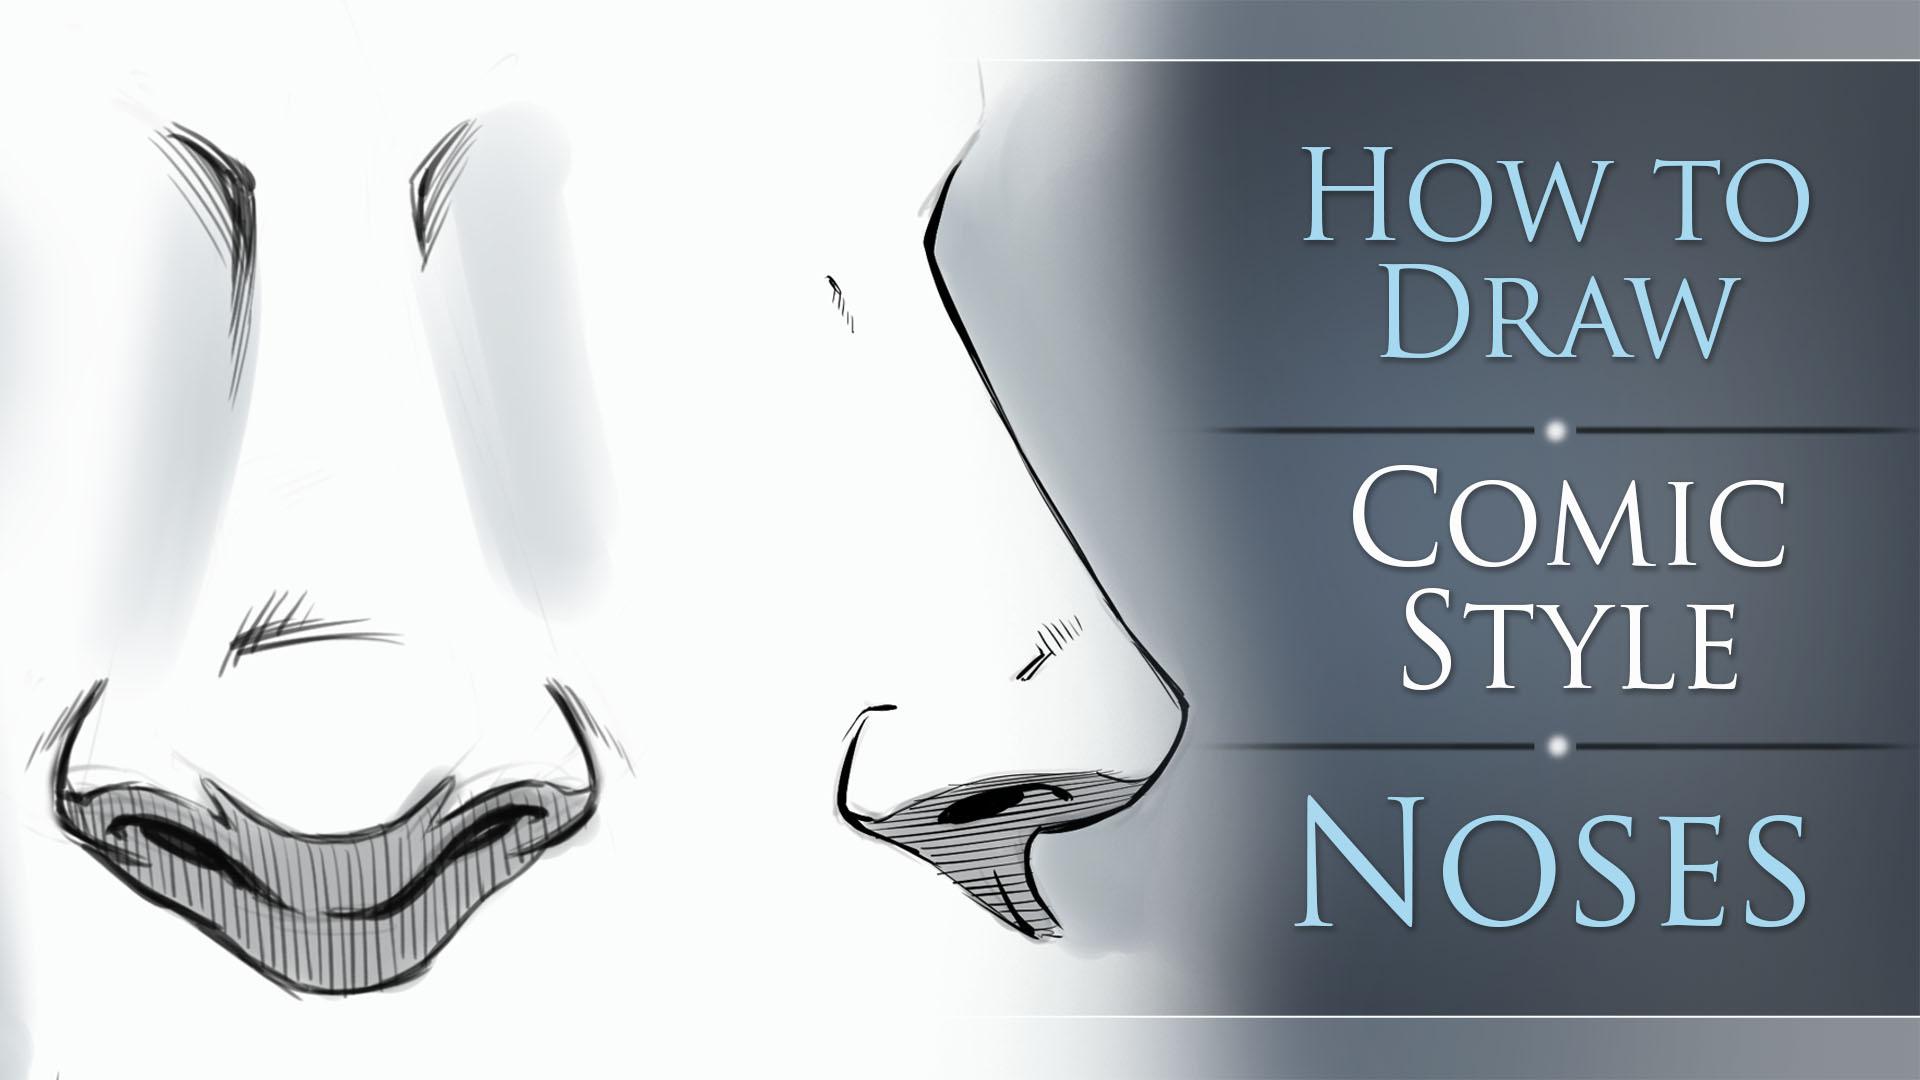
1. Introduction Video: Hello everyone. Welcome back. My name is Robert Marzullo, and I'll be your instructor for this class, how to draw comic style noses, male and female, brought to you by Skillshare. First, we'll talk about using basic shapes to draw the nose. This will simplify your perception of the nose, and allow you to draw the more advanced angles much easier. Then we'll draw the noses on a downward angle using the same techniques as before to build up the forms and volume of the nose. Then next we're going to draw the noses from an upward view. Then we'll get into some concepts for exploring different forms of the nose. Then finally, drawing lots of nose variations for practice. I'm excited to bring you this class. I hope you find it to be very informative, and I can't wait to see what you come up with. Good luck with you all. I'll talk to you soon.
2. Using Basic Shapes to Draw the Nose: Now, we're going to walk through some common book style noses and what I want to first do is show you some structure. What I like to do is if I'm trying to get confident with something or even explaining it to somebody else that I think needs to build confidence was something, I start with primitive shapes. Now, you always get people that down this process, but I think they forget that when in doubt, when you're struggling primitive shapes really help you. If you were to take half of a triangle here and cut the end off, that's going to be the side of our nose just to start and the reason why I like to explain it this way is because almost anybody could draw what we've put on the page here and if you can't draw that yet, then you need to practice here. You need to work up to your more advanced forms or what I would call organic forms. Angular can help you fix a lot of things like proportions and structure and just getting that base information in place. We'll say this is the side of a nose and what I'm going to do, I'm going to stages over. We'll draw this is our base shape and bring this over. Don't worry, we're going to get into some more advanced drawing here real soon, but I want to just first explain some of that. This is the bridge of her nose. This would be the bulbous part of the nose and the part where it starts to curve down. We're going to have the nostrils back here. I'm just going to draw these other wedge shapes right there. It could almost be said the stop right about there and we could say that there's more of a rounded shape here, but not specifically a circle, but just rounded and we'll change some angles as we draw through this. Then you've got the bridge of the nose that kind of tapers. It starts about here and obviously this is going to vary a lot based on the nose that you're drawing. There's just so many different noses out there, right? This is just some base information to get us started. Again, let's go ahead and take that and I'll just make a copy of this so we can watch the progression. Let's go back to here. The better way to do this for me is the bring it over here and just try your copy. Now we may erase back again. Again, these are very basic rudimentary primitive shapes. Now what we can do is since we've got that structure in place, when you start to think about some of the other things like one of the things that a lot of people will forgo in their noses and different parts of illustration. They'll just do something like this and will go okay with that. That looks like a nose, right? It's there and that's okay, but what we're foregoing if we jump right to that, is we're not really getting a lot of the plane changes involved. We've got some of it right here. This is a plane change, the bridge of the nose but the other one that I'm thinking about is the bottom of the nose. As the nose comes down and meets the top lip, this is where you get part of the nostrils showing something like that and then you get the flange or flare side of the nostril, but you essentially get this bottom part of the nose and this is that plane change I'm talking about. You got to be aware of that if you want your illustration look a bit more dimensional, you can see it didn't take much more to incorporate into the design. But it automatically makes it look a lot more well-thought out and not realistic, but it's got some better shapes and they are not putting that in place, then you would connect the top lip to that. Let's just say and notice I put a little bump there for character and I'm changing the shape as I go around the nose. I'm not just using a straight line, okay? Likewise with the tip of the nose, I see it as a couple angles like this, this and this. But I don't draw them overly angular like that. I just come down then I had a little curve of a little curve that a backbone for the top lip. That's just how I see it as I'm illustrating it. I could bring the nostril way in like this. It just depends on how detailed your style is, sometimes people will leave just a little mark there. Sometimes they'll overlay, draw it. They'll come all the way back to the bridge or ridge of the nose like that. It is nice because when you start to build in more of these plane changes, you got a lot more to shade with 10 silica a lot more structured and designed, but sometimes less is more as well. You can just get away with like little bits of hinting to this line as well. You don't need overly illustrate it. Okay so let's bring this over again. Then now I'll bring this over and I want to talk to you as well about making these small changes. After you've got this structure in place and you've drawn up those nose. You're ready to soft erase and start rendering and start shading it but you also want to think in terms of can I make any changes last minute that really fix any of the things that I would like to see in the design. What I tend to do is I'll soft erase and as I'm cleaning this up, I'll try to just fix things if I can. Let's say that I get over to the bridge of the nose here and I'm like, I like this little bump, but I've got a little bit too much curve there. Maybe I'll straighten that out and actually I think I like that little bit of a bump right there. Let's keep that but just not as to overlay defined. Then maybe how about those? Maybe the nose comes out a little too far. I'll bring that back just shy of that edge. What I'm saying is basically areas like this are a good opportunity to change proportions and just really refine the work a little bit more. Maybe I bring up this nostril a little bit further. I'm not being too in the habit of settling on something if you can get a little bit more out of it and you can make it a little bit better then shoot for that. You see I'm changing the nostril trying to make that look a bit more realistic or a better style to it. I think you've got it too far forward and bring that back just a little bit. We'll always try and to move things around and always trying to check the worth and get a little bit more out of it. Again back to the plane change, so I'm going to bring this line up and around, maybe something up through here and through there. Again, I'm trying to think about the shapes that you might see. This one might come back this way and I believe it does so going to go back here and if it comes up like this. If you just think about it more dimensionally than just going while there's just this line that goes across the bottom. That's okay. That's obviously better than not putting that plane change in there but you really want to study some noses and see how it actually comes up. Maybe around, hits right here and then goes up like that. It's up to you base on your style, but that's something that I would try to focus on, is noticing those little details like that. The ridge of the nose, some shading there maybe. You'll see a lot of times people put little lines across here and these are just rendering choices and style choices. I want you get to this point and then obviously real popular one is just to throw in this little bit of a drop shadow under the nose and move to small lines or something. Just whatever you want to do for your style of comic drawing. Again, I think that by defining this plane change, it looks more impressive and not so plain and get some of those construction lines out of there. You can also put a little bit more line weight on the line that used for the plane change, the bottom of the nose so on and so forth. That gives us our starting point, this hopefully gives you an idea of how you can work up to a bit of a nose concept of drawing the nose from a side view. Again, the reason why I think drawing it in from the side view is so important is because it's a confidence builder, it's a lot easier to process this. Once you draw something from a side view, then becomes a tricky part of trying to turn this in your mind's eye and draw it from an angle, a downward shot and upshot. But you need that base information so I always think it's best to start here. Let's go ahead and move on to the next lesson and we'll approach them different angles and styles.
3. Drawing Noses on a Downward Angle: Now for this one, I want to show you a different way to do this and we're going to do a downward angle. We're looking down at the character's nose, and I wanted to do that with first defining a curve for the bridge like this, a downward angle for the tip of the nose, and then a couple of small angles to work back. If we picture that the face essentially would be, if we were to do a rectangular definition of the direction, it's going to look something like that. Without doing that, we'll just draw floating here, but get the bottom of the nose, comeback and the nostril. Very angular except for that curve right there that we get in first. Again, you could think of it like a circle for the nose, oval for the nostrils and you can work into this and sketch a bit more. Whatever you feel really comfortable with, but again, keeping it very basic in the beginning is always going to help you. Let's take this and actually do this the other way, bring that over there and I'm going to erase this back now. To make this look like we're actually looking down with a character, the more we look down the character, the more the brow is going to start to do this right here. In fact, everything is going to start to take more of a downward angle. The eyes will reside on a bit of a downward curve, the nose, the mouth, all of that. The more we look down at the character, the more it's going to occur. In this case, I'm going to bring that brow over pretty horizontally, pretty straight over and then come down. I'm going to change proportions like I did before, but this time I'm really going to focus on just the downturn of the nostril and not seeing the opening of a nostril. Again, this only occurs when you're really looking down at the character, but it does occur sometimes. Probably I'll change this curve back a little bit and shorten the distance. Again, always nudging these lines, always moving them around to get the best out of it. There's our base information for the nose, we've got the curve that shoots straight down, little bit of an [inaudible] just comes out just a little bit. Then it sideways down and around and depending on your style, these could be more curved, more angular, whatever style you're looking for, something like that. Then again, we still want to get a little bit of that ridge line to that plane change so we can get that in there just like that and immediately it pushes a lot more depth and it gives it a three-dimensional feel. A little bit of rendering like that. Actually, I kind of jumped the gun on that one, let me take this over and we'll solve to erase this one more time. I'll just show you some of the detail that you could add. Just keep in mind with female noses, you're generally going to want to keep it more on the light and airy side, so less is more. But you can define a lot with line, weight, and shadow, so you could put a significant shadow on line right there, maybe a thinner one on this side and be careful not to over illustrate the bridge of the nose unless you're trying to convey a darkly lit room and a shadow. Then you can really skip all of this information, you'll see this done a lot in comics. A lot of people won't even put the top line and so then you can get right over to the bottom information like this, and you can even drop in a drop shadow. Again, you almost want to keep that a bit light as well just because the more you add and haft your lines, drop shadows, details, things like that, you're going to make the nose look a little less feminine, and you're going to start to make it look aged if you add too much line work. Again, there's lots of variations within style for that to be all over the place, but this just generally the way I look at it. You could do something like that and get a little bit of a drop shadow in place, and you could put a thicker shadow on this side of the nose, so thicker line weight, and then maybe a few lines across here. Again, you can pretty much just forego the line on the end of the nose like that, still reads pretty well. Again, with the plane change, put that in like that, and maybe a couple of little rendering lines here and there, but not much. That's it. Just as quickly as that, you've got a pretty readable nose. It obviously makes a lot more sense when it's on the face with the other elements of the face, but that does the job. Now let's do another one and we'll make this one quite different, we'll just do an angle pointing in the other direction. Same method though, we're going to use the perimeter edging, the line, we're going to make sure this is a downward facing nose. Keep in mind too, if you get it to where it's downward facing a not on the right angles, then you're going to start to catch more of this nostril on the other side. What I'm going to do here is just make this a little bit more animated, it's going to be kind of straight down, downward turn nose, and we're going to catch a little bit of that nostril on the other side. Again, if you needed to break this down, this could be justified to simply be almost a box shape like that and a bit of a circle there and an oval on the sides. That's the basic rudimentary shapes pretty much, and then I just connect them with curves. Let's bring this back over, and actually I'm going to make this a bit larger. We erase this back. Now on the male nose like this and something that's what I would consider this being almost more of a not a bad guy or villain's nose, but it could be anyone. What ends up happening there is you can generally render more nose scenarios. Again, sometimes adding too many lines and too much shading and rendering can convey age or certain grittiness. It can also convey mood and an area next to the characters, which obviously for villains, is pretty useful. Essentially, you can get some of the bridge of the nose and here you can over illustrate some of these details. Keep in mind too when you rough sketch in the beginning, adding in more details is always beneficial because of the soft erase and it just gives you more ideas as you work through it. I'll probably reiterate that multiple times in all of these lessons, but I really feel it's one of the things that's helped me explore a lot more ideas and creativity in my own work. Lots of sketch lines, lots of trial and error with the design of what I do. It's not always a very clear cut concept in my mind as much as and take away and repeat that process. Here I'm going to jump right into it and just detail this one. We can say that this is our secondary bit of information so I will just bring this over to here, one last copy, and then from here, obviously everything's in place and I can really just refine it and add in any shading that I want to see. Again, I want to push the depth of this, so I'll go through the outside edge first, add in a little bit more line weight, and this is also the part where I start to think more about style. I think that if you get the structure out of the way early on, then you can allow style to come out and really explore ideas that way more freely because you've put all the space and volume and you're not having to worry about that anymore. I'll just style and what I always consider having, always think of it as more fun. This is the part I enjoy the most, which I enjoy all of it because I just enjoyed drawing, but this seems to be a little bit more enjoyable than the rest of it. Again, just giving it some rendering, picked about different styles of lines and trying and to make it look expressive and a bit my own. The way that I would do it kind of thing, that's really all style bolds down to it's not always a right or wrong thing as much as just showing, it's like signing your name basically. You're just showing the way that you would do it. Like that, you can add more little lines, and I would say the more lines I start to add, the more shadows, the more it appears to be a bit grittier and edgy or something like that, dark and ominous, whatever. I can just throw some of these in there and it's tested out, put a cross edge in here, I always like to soften up the edges of the lines a little bit and that's what these lines are. Just make the area more of a smooth transition and then same thing with the drop shadow, I would even tend to make a heavier drop shadow, obviously because the nose is a larger mass in this case as well. But really just because it fits the design, you can get in here and make this a lot more definite shadow on the male nose than the female nose. We'll fill this all in and if you don't want it to be entirely filled in, again, you can just take over this shadow, soften it up and put in some tapered lines. Just like that we've got a couple of different style of noses rendered out. Now let's move on to the next lesson and see what else we can come up with.
4. Drawing Noses on an Upward Angle: Now we're going to do the upshot to the nose or you know nose at an upward angle in this can be a tricky one but let me show you how to simplify it. Essentially, if you start with just two triangular shapes, so we've got a triangle here, and another triangle back this way. We're pretty much drawing a pyramid with one side being stretched out. That's the upshot to the nose so this was the center of the nose, there's the basic primitive shapes just if you were to define it with one dimensional shape. Now let's take that and let's add in a little bit more information there. It's all software is this bag. Again, we could add a circular shape. My color back here. We could add a circular shape to the end and I do recommend that because what ends up happening is you don't want to get in the habit of placing the nostrils too far up. The nostrils actually set back from the bulbous part of the nose, of the tip of the nose. Generally, you know, obviously again, there's so many different noses out there, but from what I've studied anyways. We're going to start with a basic shapes. Now these look like commas, but they are rounded on each end but I'm going to start with just these angular shapes just to get everything in place. Then the bridge of the nose as it passes this way, generally can do a lot of different things. If you're doing like a feminine quality to the nose, you can do like a bend back. I shouldn't say feminine quality because this could be masculine or feminine, but a little bit of a rollback to the nose like that. If you're doing something more of a brutish nose, you can have this large bump to the top and different ways that you connect it to the face you're going to get the nasal cavity. It comes back like that, and actually I think from this way it would actually push back this way. Then when we get to the nostrils, flaps or the sides of the nostrils, the wings, they're going to come around like that as they meet the face. Again, these are the next stage of primitive shapes that you could use and what you want to look for and, as well as the, I believe it's called the septum as it comes down this way, it's going to block that one nostril. Now let's take this and move it over again. Let's go and increase the size just a little bit but let's erase this back. Now we've got that base information in place and we can get in here and start to refine this a bit. Now one of the things I'll try to do, at least with the way that I like to draw a nose is for comics is I tried to mix up the angular and organic shapes that I see, for instance, I don't want to just get in here and go. Let me just trace around what I got and there is a nose. Now it's quick and it's easy, but it just doesn't look interesting enough for me, at least the way that I like to try to draw stuff. This is up to you and your style, but I'll get in there and maybe bring this part in a little bit push this down and have push out and segue around real quick. I try to think about organic shapes and adding variety to that look because nothing just overly straight in the body or overlay, smooth or symmetrical, any of that really so I just tried to get a little bit of that in there as I'm doing this. Now as we get to the nostrils, I tend to put, like I said before, roundedness on both sides, almost a bit of a bean shape and something like that but the one thing that I tried to pay attention to, to the nostrils is that it doesn't just abruptly stop like this. If you were to just fill this in and don't get me wrong this is good for like an animated look. You'll see this a lot in animated styles, but it just doesn't look realistic by any means. What I'll do is I'll put a little bit of a segue from this side. You're going to your eye is more on this side than it is on this side so you're going to see the edge here and maybe a little bit of round over there. Maybe even get a little bit of a line worker shading right there. Trying to round that out instead of just giving it an abrupt and to the shape and it looking a bit weird I would think but and then also with the way the septum is here, the nostril. I always find it tricky to place this other nostril just properly, but I feel like this needs to be moved over. I'm going to select this, move it over a bit. You've got to really practice with what you see is as foreshortened perspective in the work. This really I think goes back to not just settling on the very first thing. If it looks good enough and you've got a deadline, you got to do it, what you got to do. At the same time, if you're trying to improve your work and get the most out of it, just don't settle on the first thing and just keep picking at it. Sorry, nose picking at it but I was purely unattainable on that one. Bring out the ball of the nose like this. A little bit of shading there, a little bit of shading to soften up the line right there, the transition of the septum and just so on and so forth. Now, just like we added this little bit of a ridge here to the nostril, you can probably even get a little bit of that over here as well or you might just be able to get away with just adding the lines and not that additional line, but I think it reads okay. Again, I just like try to think about a little more dimensionally than just that abrupt into to it. There's that, so let me go in softer aces one more time, render it one last time so it reads a bit better. Now I feel like I've got the the overall length of the bridge of the nose to elongate it there's too much there. Not to say that there aren't noses like that because obviously again, they come in all different shapes and sizes. I'm going to go and shorten that up just a bit and then from here you would just start picturing the way the brow would come up. I don't know that it would come up like that, but that's what I'm seeing. Maybe something like that and then maybe it shoots over and this would just be the eyebrow, not the full brow itself. That would start to go up a ways. Again, you start to connect the dots, so after you get some of this in place, you can figure out where the next piece goes. Obviously studying from your photos will help you to gain confidence in what something looks like from a specific angle because it's always tricky when we do these shots like this where it's not as noticeable. It's not something that we see every day. We're not always looking up at people. Sometimes, but not as much, we spent so much time looking directly at someone that, that's the first thing that we're good at drawing. Then we try to tell a story and we realize we need all of these different angles and all sudden we're like, well, we're not as good as we thought, we just have to study more and that's what this all boils down to. Always imagine these lines around I'll, keep reiterating through these lessons because I think that's the best way to find what you're looking for. You got to constantly be experimenting and constantly shift things as you go. It's not about redrawing it and just cleaning it up. It's about adding a little bit here and a little bit there and making decisions as you go. There's the nose from an up-shot and again, there's lots of things to think about what shading you're going to need for the bridge of the nose. You're going to get this little bump here like we talked about so you could figure out how you want to shade that, how that's going to transition into the face with the nasal cavity and things like that, for now we're just going to leave this one right there. Let's go and bring this down here. Let's go ahead and try another one. Now let's try one that's got a little bit more of a feminine quality. I would look at that as more of a masculine nose, but I guess that's, again, subject to whatever you see in your own style and things like that. Let's go for something a bit more feminine. One of the things that I would say is that the feminine qualities of the nose are going to be a little bit more petite. I'm going to immediately do a curved line right here instead and around over the end of this almost immediately. I'm going to use something like that for my base shape. Let's go ahead and bring that over, and that's actually part of that layer, so let's separate that. Let's make a copy of that. Remember, I'm just using digital software. This is for digital and traditional artists. I'm not going to make mention too many of the tools I'm using. I am using mango studio five, also known as clipped studio paint, but it's entirely up to you. What you want to use to draw with. There's lots of great drawing programs out there, and pen and paper is awesome as well or pencil and paper, I should say. Now what the nose right here, let's go ahead and bring this up. Let's try to smooth this out a bit, we've got our center mark here where the septum is going to be, and let's take this. Again, we want to think a little bit more about making the proportions of the features, things like the nostrils and stuff like that. A little more petite. I'm going to make these a bit thinner starting out this, and like that, I'm going to make the wings of the nostrils smaller by comparison. Even the ball of a nose, I'm going to bring that back a bit, and I'm going to do a little less definition and stuff. We're going to have the same details, but it's just going to be a little bit less defined. We're also going to get into shape on the bottom. I actually should have added that over here, but we'll fix this as we go. That's going to be our next stage to that. Let's move that over now, and let's soft erase this back quite a bit. As I refine this, I want this to look again, kind of feminine, so I want to keep the line work even lighter. Like if I was drawing this from a top view and we'll talk about this too, I would actually eliminate a lot of the lines. Let's go ahead and take this and let's say, comes down this way, comes out and meets the side of the nose. I'm also not going to trial, it goes telling you, and here I was trying to get a little bit more angular and effects go on more organic lines. Here I'm just going to go with something a little smoother, and let's get this order here. Same kind of shape for the nostril, a bit of a bean shape and then just make sure the two sides aren't equal, top to the bottom or whatever. Again, that little bit of a ridge line to show some depth, now strolled there. Now the only thing that bothers me about this, and this could be said to be an angle, but I just feel like the bridge of the nose should come up like this, and meet up here. I think would look a lot more natural. Let's go ahead and move that, and again, some of this is going to be understood better when you're drawing your entire faces, but I like doing the breakdowns this way to give you an idea. We're just focusing base kind of key element or set of elements that were not all over the place while drawing the face and all the different features, you really have to break down the basics first, then confidence with that comes and you can start drawing all cool imaginative stuff, and I think that's about right. The only thing I would say is we probably could even just test the waters and shrink the nostrils a little bit more just to see, I always like to experiment as I'm going here. I think that looks a bit more feminine like that, and then like I said before, we're going to also think about any kind of ridge line that we get, I'll plane change, and that plane changes probably going to go something like this. I want to bring it up right here and we're going to get a little bit of that roundness of the nose, we got to remember the nose, is it just rounding this way? It's also rounding this way, this way, back this way, it's a compounding curve or curves in different ways. You can't really define that by just drawn a straight line around it like that. You can, but it's going to flatten it out, what you want to do is move that line around and think about the different forms and try to get some variation there. We'll say something like that. Let me soften that up a bit, I don't know that I want to be a complete line there. We'll say for now, that's what we got, and then we can get in there. We can say, what kind of shading do we want to do here? Again, we're trying to push the depth, and really make it feel like we're underneath the character looking up. We're seeing that plane change and the side of the ballpark of the nose, and that's about it. I could get in there and try to render more and I could keep moving lines around so I get just the right tip of the nose because I almost feel like the tip of the nose is a little too rounded. I might put a little bit more of an angle, and then a quick curve down. Again this is where experimenting with this type of stuff, you get the right look. Just always moving this stuff around to find the right feel to the work. Let's go ahead and move this one down now and actually increase the size a little bit like the other one. Hopefully even with the size increased, it still has a feminine quality. Now, obviously side-by-side, I'm going to want this to be smaller to enhance the look. One is feminine and masculine. Back to the male nose over here, again if we wanted to get that plane change in there, try to draw a representation of that into here, back out this way. Here's something like this, I'll somewhere in there roundabout. I might even render this more. That's another thing I think I've already mentioned that, but I'll probably reiterate. I do tend to over render the male counterparts just to make it look a bit more rugged, I guess is what I can do it but, so I might use half to your lines, I might do crosshatching, whatever, or I might even just do more lines underneath the base of this portion. Like what the shading of a nose and all that, I might get an error and do more little details and then draw this over top. But again, trying to give a little bit more overall definition to it, to make it look a bit more masculine, and that's really is. That's how we do a couple of the upshots or up views of the nose. Now what we're going to do, is do an extreme down shot and talk about the differences within that. With that, let's move forward.
5. Memorizing the Forms of the Nose: I want to show you another way to study the nose that I think is helpful. Let's just go and get our structure in place. We'll do the scheme, slight angles. This will be the bridge of the nose, the tip of the nose. As it comes back, we'll just get the flare the nostrils like this, maybe a little bit of the one side. I guess from this angle we're not going to see that. We have to perceive the depth this way. You're not going to see that. Really we're going to do away with this side right here. That is our basic shape, and then you'll probably get a little bit of the nose right there just like that. We go it and all races back. What I want to show you here, I'm not even going to stage this one. I'm going to increase the size of this and just show you another way to get this in your mind as far as the forms and the shapes in this might help if you're having problems getting the noses to look more rounded. After you draw enough of them, you'll just start to skip steps like anything else and you'll just draw it from memory. But up until you get to that point, you may need a little bit more practice and visualization techniques. This is one that I always find myself using that I think is just very helpful. One of the things that I'll do is I'll draw a center line. What I want to do is imitate a wire frame grid that you'd see in three-dimensional animation or 3D design. What's neat about this is you can sit here and try to visualize where each one of these lines would go. Really round them all as the shape around this and widen as they get to the base or some like that to show the compression of the top of the nose, in the direction change. As this one comes down like this and it widens out, you want to really try to perceive that it comes outward and back under that little bit of. Again, plain change or roundness that you get to the very bottom. This type of exercise can be neat because it forces you to really think about what your illustration might look like, and more of a three-dimensional perception. Something like that. It's probably isn't entirely correct, but we'll just make it as correct as we can. But again, a really great way to study. I just want to give you a lot of different tools for your toolbox when it comes to perceiving what you're drawing in a three-dimensional way. Something like that. Then you can get in there and you could still shade or do whatever. But the real purpose of this is to show that depth and dimension there. Let's move that over and try it again. Let's do quite a bit of a difference here. Again, trying to incorporate as much variation as we do exercises like these. This one I'll do a more [inaudible] nose. Something a lot more exaggerated, a lot more caricature like. Try something like this, and we'll make that the bridge of the nose more defined. This come out further. Again, just very almost animated or overly caricature arise like that. Then I'm just skipping ahead and drawing in the things that I see here. But then the really helped push the depth, drawing these three-dimensional lines. I'll start with the horizontal ones for this time. Just helps you to really feel like, okay, what directions would these forms take as they wrap around in a 3D space like this and then didn't get that center line. Those, then as it starts to come this way, you got to think about this information going around like this. That's really the importance of it, that it just really allows you to see into it a bit further and go, where would these bits of information go, and ultimately get a better understanding of the 3D forms in the dimensional forms that you're trying to convey. Just another simple technique but, go to tries to come up with, and I think it can be helpful for really memorizing these forms. Let's move onto the next lesson.
6. Drawing a Variety of Noses: Now what I want to show you is some of these inaction, so try to get some variations in here. These types of studies are very important because allows you to see into the work a bit further. What I want to first do is start with one that's a bit over-rendered. A little bit more grotesque or more overly shaded text drives I guess, and showing all the little details the plane changes, the over-exaggeration of features. This is always a great way for me to practice because I feel it's easier to tone back the information than it is to over-render it, and by over rendering it, I can really push the depth a bit further and generate a better study. I'll start with this. Again, it's just adding larger amounts of shading, texturized lines, cross hatching, rendering lines of different effects, and really trying to push a bit of eeriness, or age and overlay detail the nose from the side view here. Again I'm really focusing on those plane changes and different shapes that I can see into the anatomy of the nose. Now for something more simplistic, so I'll do a female nose from the side. I like to warm up with profiles because there are generally easier to focus on, and then jump into the more complex angles and upshots of the nose. But again, anytime I'm trying to re-familiarize myself with something, I can go to a profile and do a warm-up study of it. Again, some of these are going to be a little bit more overly-detailed than I would generally do it for a comic, but I want to make sure to illustrate the plane changes. That's why you see me doing the lines under the nose, and notice too that I try to make adjustments to each one as I go. Again, that's my way of trying to look a little bit further into the work and not just settling on the very first thing that I draw and exploring some other opportunities as I go. What this one even purposely drawn it on a bit of an angle, I think that's very important with noses because you're going to have to draw these characters in every conceivable angle and format. You have to get in the habit of even doing your studies that way. If not, it defeats the purpose and then you may get to a part in your illustration where you're uncomfortable. But if you're comfortable drawing things on different angles, even upside down, then you're going to be ready to illustrate any number of poses and concepts within your book. Again, this is more overly-illustrated, more overly-rendered than I would normally do, but again, having fun with it and see what I can come up with there. Making sure to change things like the bridge of the nose, the size relationship of the septum, which is at lower, above the nose, or the bottom of the nose, and the size of the nostrils, the flavors of the nachos, all these thing. You have to really play with the proportions to get a nice variety in your work. It's not always the most easy thing to do. That's where studying from reference is going to help you, studying from other artists, whatever you can get your eyes on really. Then just pick it apart, analyze it, and try to come up with your own style and depiction of it. That's generally how I learned the best really is just to absorb as much information as I can., and then put my own flair and my own style with it. Again, trying to add in lots of little curvatures and organic shapes. Once I've got that base structure down, I just go back through and draw through it and try to add in as many variances as I can just to see what works and what doesn't. By all means nothing gets taken off the table. It doesn't always work, but I always look at it as good food for thought. When doing these studies, I think mistakes are just as important as success because it teaches you what not to do. Don't worry too much about it. There's definitely some pretty crazy looking noses out there so I don't know that you have to get perfect by any stretch of the imagination, but creating variations is probably the most important thing so that you don't just fall into the habit of drawing the same nose over and over again, which is very easy to do. Here doing a little bit more that structure of straight on shot, and then trying to make something that's a little bit more clean, and symmetry, and that kind of thing. Where the top-left and the lower-right had a lot of variation to the organic shapes that are involved and even some angular shapes. This one I'm trying to make a little bit more smooth and symmetrical, which a lot of times I think is more tricky because it's real easy to spot flaws on something that's lightly done or symmetrical. A lot of times you can hide mistakes in your rendering. You can over-render something and really just say, well, that's what I was shooting for. But when you go for a really clean look, you have to be very aware of the lines that you put down. Less is more, but then you have to be very specific with what you put down and pay attention to gaps in the proportions or gaps in the line of work itself and things like that. A nice flow needs to be evident. Here working out a little bit of an up-shot. A lot of times with the nostrils, they are almost always present from any angle. There are some shots where you just really want to eliminate them like an extreme downing shot, or again, if you're trying to push a certain look to a character, you might just draw it more angular and downward than normal. But the nostrils when you pay attention to your studies are almost always evident in some way. Definitely with an upshot, and I think the tricky part about the upshot is getting what I call the the bulb-part of the nose just right. If you bring it out too far, you can definitely change the overall look of the nose. I felt that here it was a bit too large, and proportion, and comparison, so I have just the shadow. Again, I'm always moving things around and trying to figure out the best decision I can make with obviously not absorbing too much time into something that's not important, which again, can be a double-edged sword. It's tricky to make that decision on what areas are important and effective and what aren't. Here I'm going for another side view of the nose, but notice I'm trying to make it as different from that lower-left one. I'm trying to make it more of a straight bridge, a smaller more petite, I guess features of bulbous part of the nose and even the flair of the nostrils. Again, this is me just trying to create variation so that when I go to draw a female character, I don't give them all the same nose, there's got to be that difference from character to character to really have that depth and the storytelling. With this one, I want to go back to something a bit more eerie but I guess more rendered, more the wrinkles that you get and the expression. It's always tricky to stop a part of a study and say, well, I just want to draw a nose, because the nose relate to the brow, it relates to the mouth, so you have to push into those next areas to really even do a study of the nose, I think. But with this one, I wanted something that looked a bit more brutish. With the bigger brow relationship, I want to show that, and I want to illustrate the skin buildup that you get from the frown and the grimace. All of that is not only fun to do I think, but just very important to look at so that you think about expression with the nose and not just how to draw a nose and you draw this static, a nose are static, but this boring nose when there's actually some expressiveness that goes with the nostrils, with the way it reacts to the brow and even the way that it transits to the side of the face. That's where all that little shading is for or what I'm trying to illustrate there. Now with this next part I want to do another smaller, petite female nose. Again, hopefully you're realizing that I bounce back and forth, that I try not to do all of them together. I'm trying to show that variation. In here, I want to show the variation by actually drawing one with the same level of rendering I would say as the rest, still trying and get some variations in the line-weight and things like that. But I want to show you hopefully a difference from the way that you could render one to the next with the very same structure. Because typically, like I've already mentioned, I wouldn't generally render these always. It just depends on the scene. If it's a dark character, I'm going over render things like that. But there's a lot to be said for less is more and just getting in some basic quick clean lines. Less lines will generally make the nose appear more feminine or even less aged. It's another great exercise to study these forms and see what you can convey with the least amount of lines possible. I find it as a really good way to study and it works really well for your comic or ambitions. But again, that is going to be very dependent upon your style and what you're really after with your illustrations. That'll complete these lessons on drawing noses. Practice lots of variation in your nose construction and rendering and things like that. Have fun with it and see what you come up with. As always, thank you for watching. More lessons around the way real soon. Keep drawing, keep having fun and bye for now.
 Robert Marzullo, Online instructor of Figure Drawing and Comic Art