Transcripts
1. Welcome and Introduction: Hello, I am Erika full Gilman, and I want to warmly welcome you to my course, how to design a room in ten easy steps. The reality is that for many people, interior design is a challenging task. Put together a room in a way that is both functional and aesthetically pleasing can be incredibly time-consuming and expensive. And you may not even end up with a room that you love. But pulling together a room does not have to be difficult. In fact, most designers follow a fairly systematic approach. And I am here today to help break down the approach for you in an easy to digest way. By the end of this course, you will have all the tools that you need to pull together just about any room. And it's only going to take you 10 distinct steps to do so. In fact, throughout the course, if you choose to participate in the activities, I will walk you through the main steps to designing a room in your own home. Now, that said, by the end of this course, you obviously won't be an expert in interior design because there is quite a bit of education and experience that goes into this particular field. But I am confident that you will be able to design a room that you are definitely happy with. During this course, you will learn and be able to quickly apply the key elements to creating a fantastic group design. Including, but not limited to identifying your preferred style. Choosing a great color scheme with a simple formula. Selecting the right size, run for a room, choosing the right furniture, creating a layered lighting scheme as the functional and dramatic. Selecting the right finishing touches, including your window coverings, greenery, and your accessories. And finally, you receive some great recommendations from me on where you can purchase your current machines at all. Price points. First though, let me go ahead and tell you a little bit about myself. I own my own residential interior design business called error codon interiors. I have a tremendous passion for designing rooms that create excitement and comfort for both myself as well as my clients. And I am so excited to be able to share some of my knowledge with you so that you can begin creating your own beautiful and your own functional rooms.
2. Overview of the 10 Steps: As I mentioned, designing
a room well can be broken down into
ten distinct steps. What are these ten steps? Well, without any further
ado, here they are. Step one, measure your room. Step to decide on
your key activities. Step three, twos your style. Step four, choose
your color scheme. Step five, choose your rug. Step six, choose your furniture. Step seven, choose your
wall art and wall decor. Step eight, choose
your lighting. Step nine, 2s, your
window coverings. And last but not
least, step ten, choose your accessories
and your greenery. During the course
of this training, I will be breaking down each of these ten steps in
detail so that you walk away with the
knowledge that you need to replicate this ten step
approach all on your own. Alright, with that said, let's go ahead and get started.
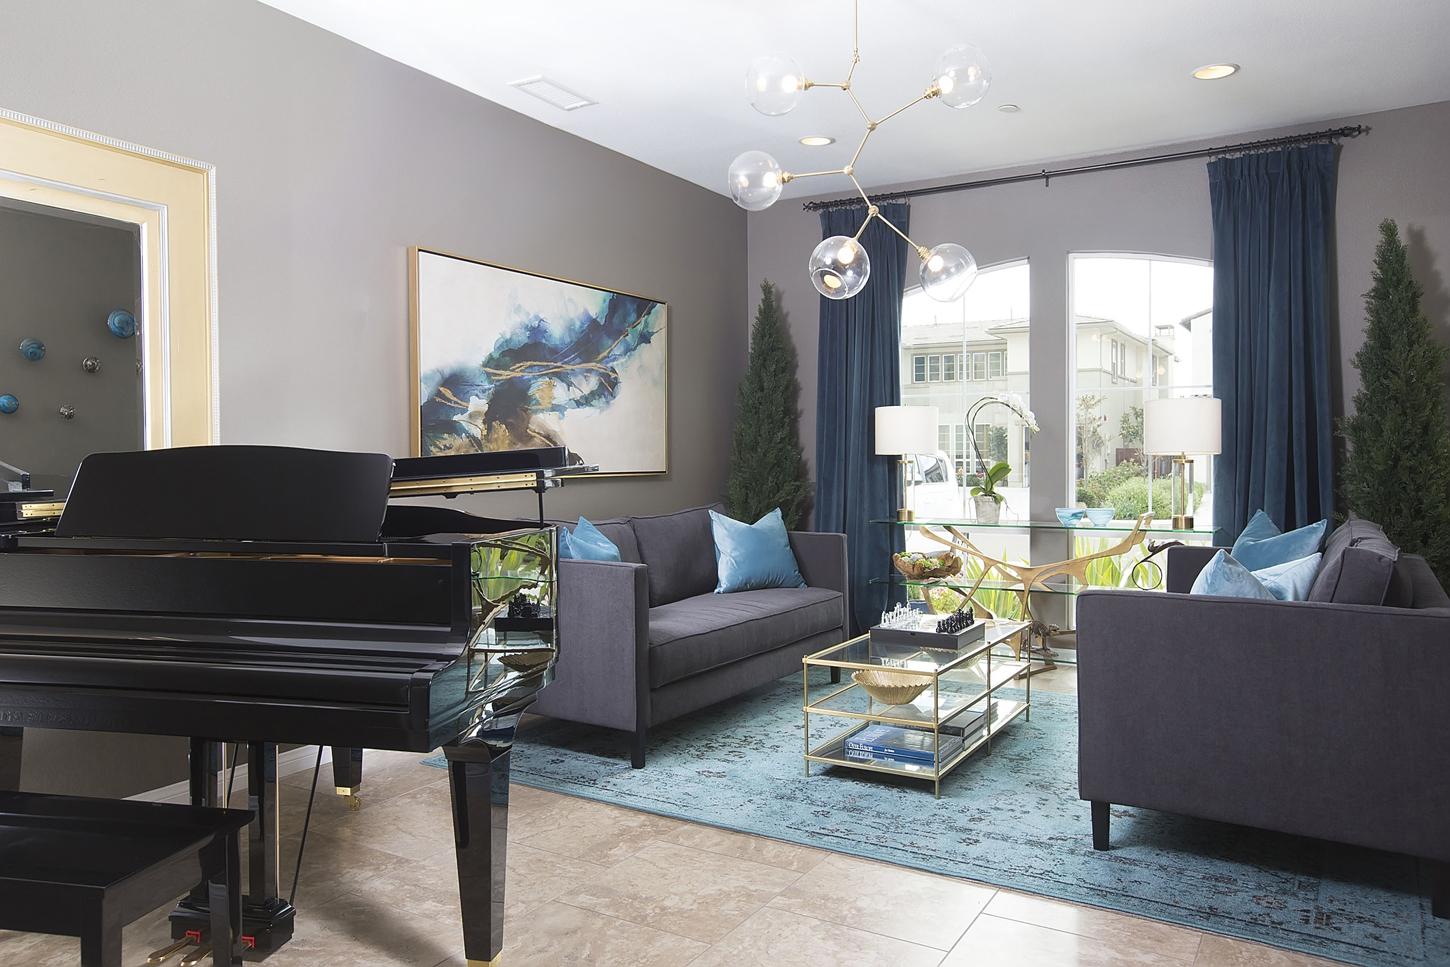
3. 3 Easy Way to Make Any Room Look Better NOW!: Now I realize that this is only a one hour course. And in that one hour you will learn a lot about how to pull together a well-designed room. But for those of you who are anxious and looking for a way to make a big impact in your space right now, in this lecture is definitely for you. I am going to show you how adding just three elements to a room will make it look instantly more polished, pulled together, and frankly, just downright better. I use these three elements all of the time in my work. Either in staging homes for sale or with clients who don't have a lot of money to spend and are just looking to refresh their space. Are you ready to hear what these three elements are? I know you are. So here they are. A rug, drapes and greenery. Let me now show you what a big impact these three elements have on a room. Take a look at this dining room I put together in room sketcher. It's not too bad, right? We have a farmhouse style dining table, a nice coordinating buffet, a console table opposite the buffet, a pretty iron chandelier. And we even have some artwork over the buffet, which is nicely proportioned. But watch what happens when we add each of these three elements one at a time. Watch how we will take this room from good to great. First, let's add a rug. I'm going to pull the blue out of the painting and choose blue gray rug. By adding this rug, we have just grounded that dining table and added texture and interest to the wood floors. In a later lecture, you will learn how to choose the perfect size rug for any room in your home. Now let's go ahead and add some drapes. We have a nice size window. But when those and rooms always look better with curtains or drapes, for many reasons, it softens the edges of the window. It adds texture to the walls. It allows you to repeat other colors that you have in the room, which is always a good thing to do with color. And it also allows you to adjust lighting and privacy in a room. So I'm going to go ahead and add in some light gray drapes which reflect the colors we see in the picture and in the undertones of the rug. Wow, what a difference that makes doesn't it? Instantly, we have softened the entire look of the room and we have added some depth to our walls. Later in the course, you will learn how to choose the right height drapes and also how to take inexpensive off-the-shelf drapes and make them look custom. Ok. The room is looking good, but I am not done yet. I always, I repeat. I always add greenery to a room, whether it's real or foe. Although I prefer real if possible, greenery simply always mix a room looked better. So because I also like formal symmetry, I am going to add some matching trees to each corner of the room and a vase of tulips to the buffet to the left of the picture. Look at how much interest in color these items add to our dining room. Did you notice that I chose yellow tulips to reflect the yellow that we see in the painting. Again, look for a way to repeat color throughout the room as this is very important. Now let's once again look at where we started. And now let's look at how much more beautiful this room looks by simply adding a rug, drapes, and some greenery. You too can do this with your own spaces. I challenge you. Take any room in your home apart from your kitchen and try this out in one of your rooms. I am sure that you will love the results. I hope you found this lecture helpful and easy to follow.
4. Step 1 - Measure Your Room: Step one, measure your room. Yes, just like
architects and builders, we designers do spend
time measuring. Actually we measure quite a bit. So why is this important? Well actually I think this is the number one area where people most often make
mistakes in their home. I'm sure many of you have been there where
you end up with a couch that is just
too big for your space, or a table that looks way too small compared to other
pieces in the room. Or the room just doesn't feel
right when you look at it. Often this is due to simply not taken the time to
measure the space. Now, as I mentioned, interior designers spend
a significant amount of time at the beginning
of any project, taking measurements of
every aspect of the room. However, I'm going to make
it much easier for you. All I want you to do is to take three measurements
of your room, the length of the room, the width of the room. And if you don't know the
height of your ceiling, then you will want
to go ahead and measure the height of
your ceiling as well. Now use a measuring tape
like this that you can pick up at your local
home improvement store. Dry, very simple
floor plan like this. Making sure that you notate the measurements of each wall next to the respective wall. How do you capture the
measurements on your paper? I want you to do it
and half inch scale. How do you do that? Well, it's actually quite easy. Let's say that the length
of your room is 12 feet. Then all you need to do
is divide that in half, which would be six. And then using the
regular ruler like this, go ahead and draw the
two lines that are six inches in length like this. If the width of your
room is eight feet, then draw those lines as four inches on your
paper like this. Once you've done
that, then you will want to measure the
width and height of each of your windows
for your window coverings. Here is how I notate
the windows on the floor plan with
the measurements. Label each window
with an a, B, C, etc. And then no, take
the measurements on the side of your paper. Don't be concerned with
placing the Windows exactly where they should
be on the floor plan. Just try to place them in approximately the right
places like this.
5. Activity #1 - Measure Your Own Room: For your first activity, go ahead and print out
the guide to designing your own room using the ten step method in
the resources section. And then go ahead
and grab a pencil. You will find your first
activity on page one, which will be to measure your room and draw a
simple floor plan. Now you can use a pen, but I always use a
pencil as sometimes I have to erase some
lines and start again. I really recommend
using a pencil. If you have one, choose a room in your home that
you are looking to design. Or if you don't have
an actual room that you want to design
right now, that's okay. Just go ahead and pick out
any room in your house. Just to get the practice. For the first activity, your floor plan
makes sure that you draw your lines in
half-inch scale. Again, you do this simply by dividing the actual
measurement of each wall by two and capturing that in
inches on your paper. Now one note about measuring. If you do have something that extends from the wall
like a fireplace, make a note on the floor plan
as to how far that extends from the wall as this will impact your furniture selection. Also, if you have a curved wall, then measure the wall in a straight line from
one end to the other, and then simply draw
and using freehand, the shape of the curve. Don't be concerned with ensuring that the curve is
exactly correct. But just try and
make it as close as possible to the depth
of the actual curve. Finally, be sure to draw an
any windows that you have in the room as you learn to do
in the previous lecture.
6. Step 2 - Decide on Key Activities: Step two, decide on
your key activities. What I mean by this is you need to spend some time thinking about what key activities will be taking
place in the room. For example, if
it's a family room, will you be using,
uh, to watch TV, entertain guests, play games, read a book, or spend
time on hobbies. For a bedroom, you will be
sleeping there, of course. But you may also want a
place to pay your bills, relax, drink some wine, or just kicked back
and read a great book. For a dining room, one of your key activities
will likely include eating, but you may also want to
place to display your books. Or perhaps this is a place where kids can do
their homework. So here's a list of all
major key activities. Once you've identified
which key activities will be taking
place in the room, you also need to think about how many people you
are planning for. Obviously, if you have
a large family of ten who gets together
for dinner regularly, you're going to need a
much bigger dining table then for a small
family of say, three.
7. Activity #2 - Decide on Your Own Key Activities: For your next activity, I want you to capture
your key activities on the second page
of the same guide you use to draw your floor plan. To do that, just take a look at the screen in just a
minute and then write down which key activities
will be taking place in the room that
you want to design. Again, if you don't have a specific room that you are
looking to design right now. Then go ahead and stick
with your practice room. Again, here are the list of major activities
and of course, or maybe other activities as
well that I haven't listed.
8. Step 3 - Choose Your Style: Step three, twos your style. Given that you are watching
this training course, you may already have an interior design style
going on in your home. But if you don't or if
you want to change it, It's important to figure out the mood and style
that you are going for before you begin picking up any furniture or accessories. As this will help you
to greatly narrow down your choices and make your
shopping much easier. There are so many wonderful
and unique styles out there. Here are some of the main ones. Contemporary, which is
characterized by straight, clean lines and the lack of
patterns and accessories. Traditional, which
has a lot of wood, formal symmetry, soft curves, and generally a more
neutral color scheme. Transitional, which
can be described as traditional with a
contemporary twist, transitional incorporates
warm neutrals for its color scheme, including neutral fluorine,
lots of different textures. And the furniture has
simple, clean silhouettes. Mid-century modern,
which is a revival of the interior design
style of the 1990's, characterized by simple lines, graphic patterns, and an
indoor, outdoor vibe. Industrial, which is all
about industrial metals, reclaimed wood, leather,
and a cool color scheme. Urban modern, which combines
different styles like contemporary and industrial to project the vibe that
makes you feel like you're in a cool new York loft. This style uses large, low-profile furniture and graphic patterns in
its accessories. Coastal Sheikh, which is
known for having lots of light and uses
a lot of white, cream and blues and
its color scheme, along with natural fibers
such as jute and seagrass. And of course, beach
and ocean life decor. Scandinavian, which like
contemporary, has clean lines, that is known for its light, bright color schemes
and organic materials. Friends country, which
is meant to replicate the laid back lifestyle of
the French countryside, and often has roosters
in its decor. Zen, which is a simple,
clean, minimalist style, neutral color scheme,
water features, and generally low
profile furniture. Bohemian, which you can see as wild and messy unit's
approach with a bold, bright color scheme and
includes rich patterns. Farmhouse, which is somewhat like the French country style, and includes distressed woods, upholstered linen, and
a lighter color scheme. Finally, Western,
which is known for its leather furniture
and specialty items like cow hide rugs, ATL or chandelier, and yes, even wagon wheel coffee tables. Now if you don't already
know your style, which of the styles
are you most drawn to? You can definitely mixed styles, but I have to admit that
this generally takes a little forethought
and time to do it. Well, my advice is to just pick one to make it
easy on yourself. Now that being said, if you really love two of them, then what you should do is pick a primary style and then add in some elements
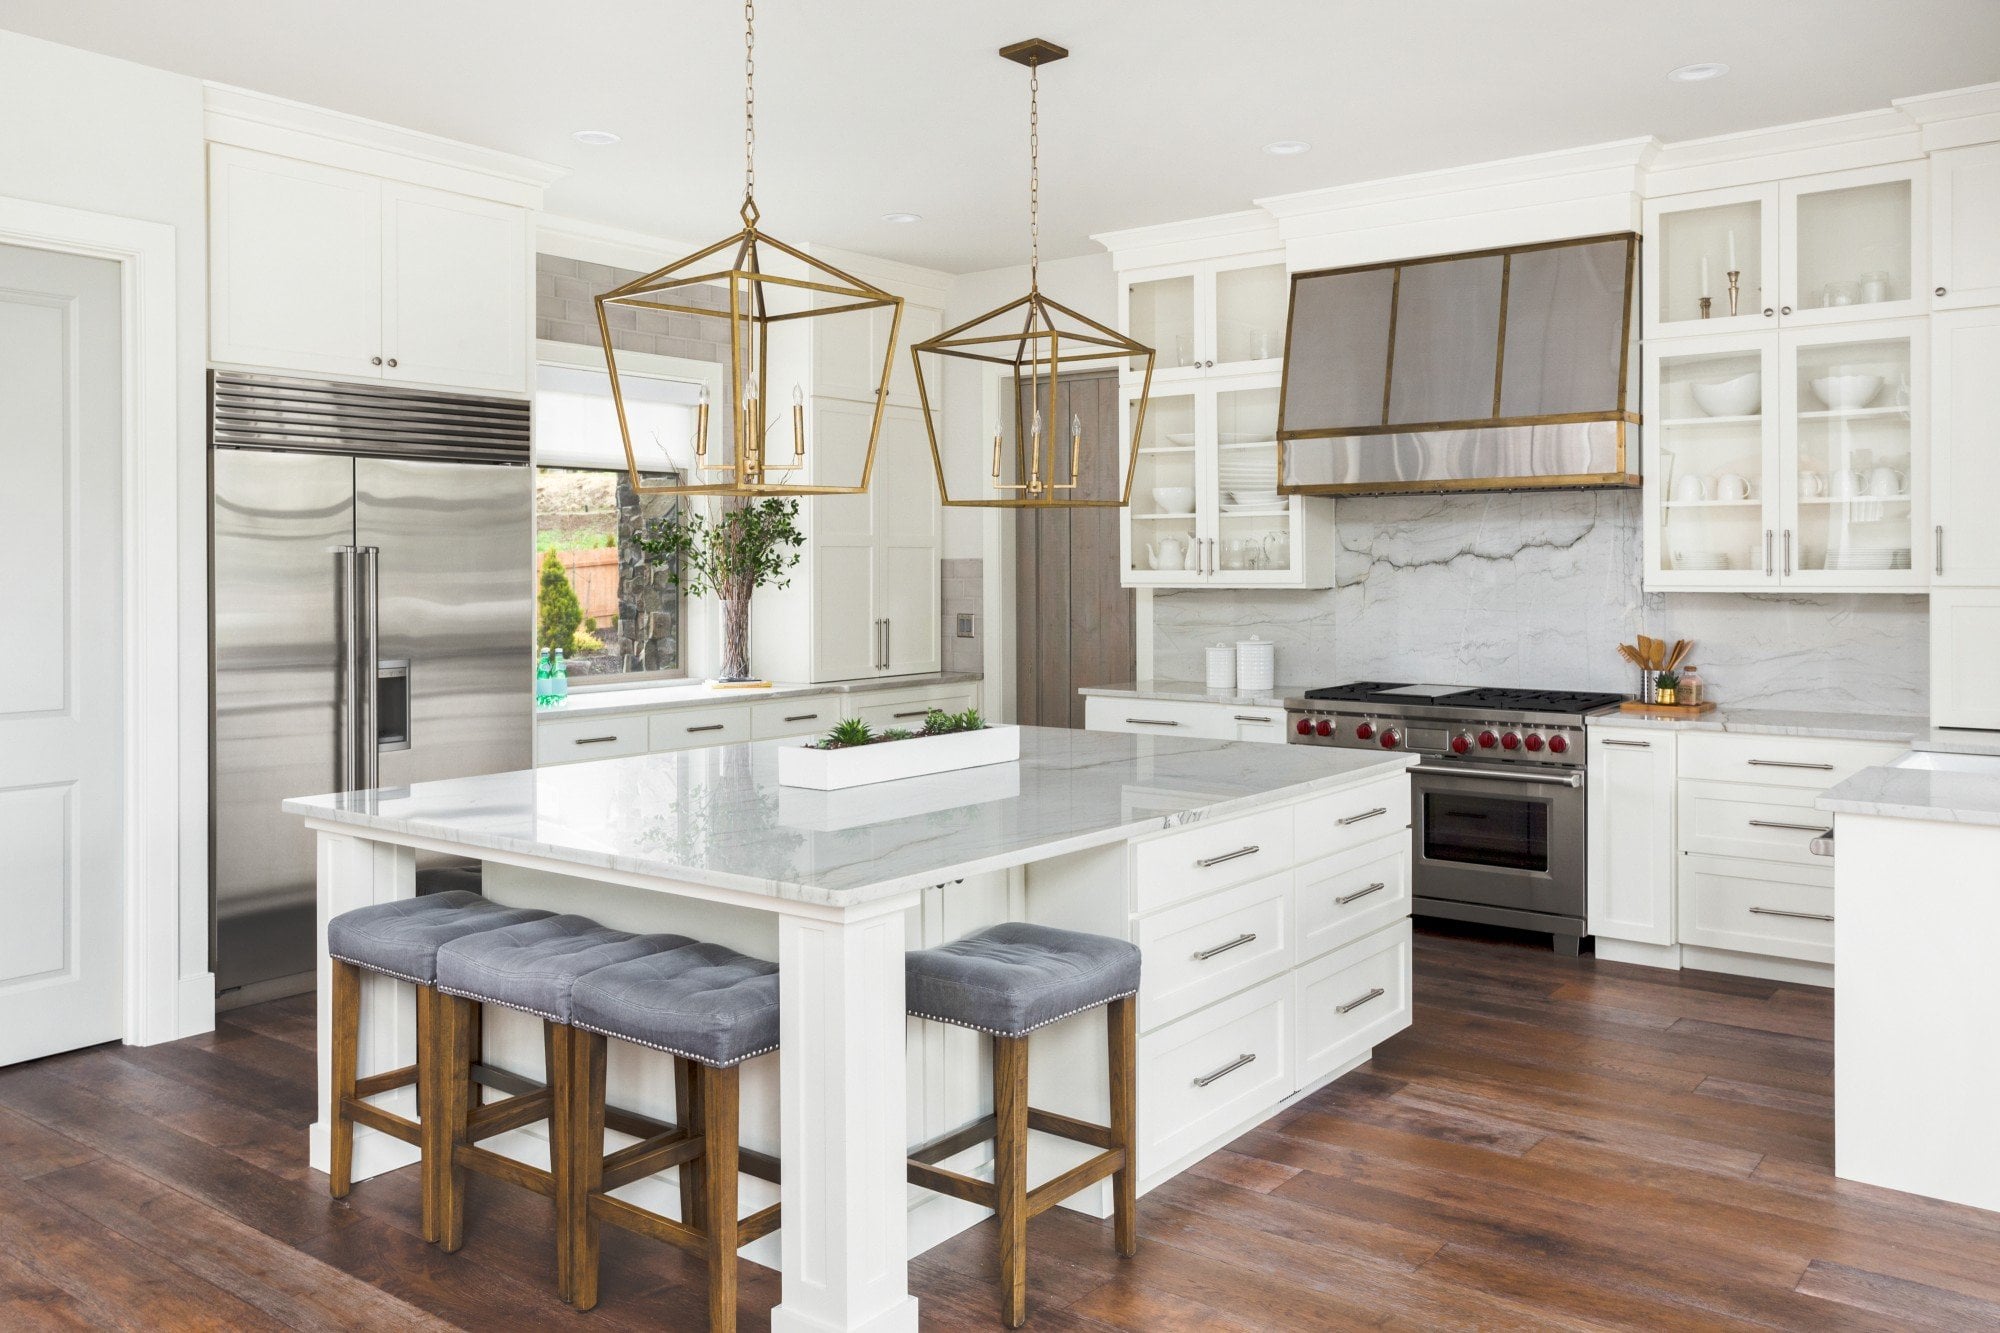
of another style. For example, industrial actually mixes quite well with
almost any style. I've seen it mixed with a
traditional style like this, where you see very
traditional case molding and an industrial pendant light with industrial total
excited chairs. You can also mix
industrial easily with a transitional style
or a farmhouse style. In general, though, the
style throughout your home, it should be fairly consistent. Otherwise your home
will feel a bit disjointed rather
than harmonious. However, one way around
this is to choose a primary style and then use some styles if you will,
in different rooms. For example, in one
of my projects, the entire houses decorated
in a transitional style. But one of the rooms has
industrial elements mixed in, while another room has
contemporary elements mixed in. And get it all flows
together quite well. So how do you choose a style? As with many things
in interior design, this really comes
down to what type of mood you want for your home. Do you prefer a more
laid back lifestyle? If so, then I would recommend
you choose an industrial, coastal chic, French country, Bohemian or farmhouse style? Or do you prefer a more
elegant feel to your home? If so, then go with a traditional
or transitional style. Maybe you are a country
girl or boy at heart. If so, then look to farmhouse
for Western styles. But if you love big cities
and urban lifestyles, then I would
definitely recommend a contemporary or
urban modern style. If you want your home to have
a calm, relaxing feeling, the Zen er, Scandinavian styles will
probably be right up your alley.
9. Activity #3 - Choose Your Own Style: For your third activity, I want you to capture the style that you will be using for your room on your guide. As a reminder, you can choose to have more than one style in a rumor home. But it's important to choose a primary style and then choose one or possibly more secondary styles. Here are the main styles, again, with a representative photo next to each of them. First, we have Contemporary than traditional, transitional, mid-century modern, industrial, urban, modern, coastal Sheikh, Scandinavian, French country, Zen, Bohemian, farmhouse and western. Now, go ahead and jot down the style or styles that most appeal to you or that most closely reflects a style that you already have going on in your home. If you want to stay with that style, of course.
10. Step 4 - Choose Your Color Scheme: Step four, choose
your color scheme. The world of design, both interior designers and color specialists will
work with you to choose the perfect pink color or to help you choose the right
color scheme for your home. But personally, I think that
this can be done pretty well on your own if you follow an easy, straightforward
formula. Here it is. First, pick a neutral that you
love as your base. Neutrals include today's
very popular gray. Or it can be beige
or brown or gray, which is what happened
when Gray and beige had a baby or anything in the
white or cream family. Black is also
technically a neutral. However, most people don't
want large amounts of furniture or most of their
walls to be shades of black. Which I understand. Although black is a
fantastic color to use, particularly in certain
styles such as industrial, transitional, contemporary,
urban modern and Zen. Pick your neutral. I personally have different
shades of gray on my walls throughout my
house as I love gray, but I have a house with
primarily beige tile floor, grades walls allows me to easily integrate gray pieces of
furniture with the base floor. Sometimes I'm asked, Can I have two main
neutrals in a room? You can, but if you do, it looks best when you have one that's dark and
one that's light. For example, dark
gray and a lighter beige or chocolate
brown and light gray. Dark gray and a light grays. Once you have your neutral
or neutral selected. Now go ahead and choose
123 accent colors. The best way to choose your accent colors
is to take a look at your closet and see what color clothes you
have in your closet. People including myself,
tend to buy clothes and colors that they love and
no look flattering on them. So why not decorate a room in
a color that you both love? And you know, we'll look flattering in when
you are in it. For me, I love blue. So that is one of my
main accent colors throughout my home. If you choose to have only
one accent color like blue than a room looks
really rich and layered. If you pick items that are
different shades of that blue. Now by shade, I mean either a lighter or a darker
version of that color. So for example, in
the case of blue, maybe you love a bright
blue like the Caribbean. Then be sure to incorporate some lighter and darker versions of that color into your room. Can you see how using
different shades of a color in a room creates so much more
interest than one shade. Now if you decide to have
more than one accent color, then here is what you want to do to get it right every time. Either choose to have an analogous color scheme or a complimentary color scheme. So what does that mean? Analogous just means
that these colors sit next to each other
on the color wheel, or also on a rainbow. For example, a warm color
scheme would be red, orange, and yellow because
these are all warm colors. Cool analogous color scheme would be green,
blue, and purple. As these are all cool colors. Analogous colors schemes
are often found in nature and are generally
quite pleasing to the eye. So you can't go wrong here. Conversely, a complimentary
color scheme refers to colors that sit opposite each other
on the color wheel. So orange and blue look great together and so
do yellow and purple. The other piece of your color scheme that
sometimes people forget about is what color you want the hard surfaces
to be in your room, meaning the legs of your tables, legs of your soap as in chairs, basis of your lamps, etcetera. Colors for hard surfaces
generally include Cromer, silver, brass or gold. Various shades of wood or
black such as wrought iron. Crawl or silver looks best with contemporary,
transitional, mid-century modern, industrial, Scandinavian
and Zen styles. Brass or gold looks best with transitional mid-century
modern and Bohemian styles, would, looks best with
the following styles. Traditional, coastal Sheikh,
Bohemian, friends, country, farmhouse, Western, mid-century
modern, and urban modern. Black or iron goes best
with an industrial style. Now I'm sure you're
asking yourself, can you mix hard surface colors? Of course you can. But just like with the styles, I generally recommend choosing one main hard surface
color and then using small amounts of another hard surface color
throughout the room. Unless you have a
really large space, in which case you can
mix them at nearly 5050. But in general, thing, Two-thirds of one hard
surface color like silver, and then 1 third of another hard surface
color like brass. That in a nutshell, is an easy formulaic way to pick a great color
scheme every time. So to recap, pick your neutral, pick 123 accent colors, and then pick the color
of your hard surfaces. And there you go. Now a final note
about color schemes. If you intend to paint the room, I strongly suggest that you
wait until you've purchased all of your furniture and your accessories before
picking your pink color, there are literally a
million or more pink colors, but not nearly as many choices
with your furnishings. So I will pick out all of the furniture and
accessories first. Then I will choose
my pink color. How do you then choose
your pink color? Well, first you want to decide
on the mood of the room. Do you want a light
and airy or a warm, moody, or romantic feeling? If you're going for
light and airy, then choose a light color. And it could be either
a shade of your neutral or one of
your accent colors. The darker the color, the moodier the room becomes. I personally loved
dark pink colors, but I use them sparingly. For example, I chose a dark charcoal gray
color for my powder room. And it looks very dramatic, paired with primarily gold and
some silver accent colors. Also consider how much
light the room gets. In general, northern
facing rooms, which generally get less light, do best with a
lighter pink color. Unless there are a ton of windows and or you live
further south on the equator. And southern facing rooms which
generally get more light, can definitely
handle darker hues. Also, if you have
a room that you are trying to make
appear larger, I would recommend a
lighter pink color. As a lighter color will help the walls to feel as
if they are receiving. Conversely, if you have
a really large room that you want to appear
smaller and cozy. And I would recommend you
use a darker color as dark colors tend to make walls appear as if they are advancing. But again, design rules
can always be broken. And in nearly all cases, I think you should
go with what type of mood you ultimately
want for your room. Finally, remember that paint is the easiest thing
to change out. Don't be afraid to
experiment because you can always paint it
again fairly easily.
11. Activity #4 - Choose Your Own Color Scheme: So now I want you to jot down some possible color schemes that you are interested in on your guide. Here are the main neutral colors. Again, which one or ones are you drawn to? Here is a color wheel again. What accent colors would you say reflect your personal style? Finally, choose your hard surface colours and finishes. Remember when thinking about metal finishes, consider selecting more than one as mixing metals. If done well, will look great.
12. Step 5 - Choose Your Rug: Step five, choose your rug. I am a firm believer
that nearly every room, except maybe the kitchen, should have a rug. Regardless of the type
of fluorine you have, even if you have wall
to wall carpeting. Why do you think that is? It's because a rug always helps to pull a
seating arrangement together and helps to
define zones in a room. I also start with
the rug because it's easier to match pillows, lampshades, et cetera, to a rug than the other way around. There are three factors
to consider when buying a wrong size, color,
and material. Let's start with size first. If you are going to go with
just one rug in a room, than I recommend buying the biggest rug that your
room will comfortably fit. By that, I mean, you do
want at least 18 inches of space between the wall
and the edge of your rug. That said, many family
and living rooms can accommodate an eight
by ten drug easily, and perhaps even a
nine by 12 wrong. Also for family
and living rooms. I think a rug looks
best when either all of the legs of your
main seating furniture are completely on the
rug or you have the front legs of the furniture only on the rug like this. It generally doesn't
look right if none of the feet of your seating
furniture is sitting on the rug, as the rug then looks like
it's just floating in your room rather than being
anchored for bedrooms. I love placing rocks
under beds for a bedroom, you want to extend the rug from the bottom two-thirds
of the bed, about two feet around
the three sides. For a dining room, ensure that your rug
extends at least two feet out on all four sides
of the table like this, so that when you pull
back the chairs, you'll still have all four
legs sitting on your rug. To figure out the perfect size
rug for your dining room, simply measure the
length and the width of your dining table and add
two feet to each dimension. That should be the
minimum size of your rug. Finally, a rug looks best when it matches the
shape of the room. For example, use
a rectangular rug and a rectangular room, or a square and a square room. You can use an oval rug
in a rectangular room, or a round rug in a
square room as well. You can also use two rugs to create different
zones in a room. Particularly if it's a
large open floor plan. But make sure that
something ties the two rugs together,
ideally color. Now let's talk about
what type of rod you should get in terms of
color and material. First for color, I think
it's great when the rug is the color of or has the
colors of your accent colors. If your accent color is blue, then find a rod that has
a lot of blue in it. Now, whether to go with a solid colored rug
or a pattern rug, don't be afraid to go with
a boldly pattern rug, which can act like a great
piece of artwork in your room. And we'll add amazing
visual interest to your space like this. For a more toned down
approach, something like this. If you do choose a pattern rug, then that would greatly
limit any other patterns in the room so that the rug
really stands out and shines. If you go with a solid drug such as a jute or a sizzle road, then definitely try to add some patterns on items
like your throw pillows, your window coverings, etc. Although that being said, there are some styles
like contemporary, Scandinavian and Zen now are often completely
devoid of patterns. In terms of the
material for your rug. There are so many
materials out there, and Tuesday and material
should be based on your style as well
as functionality. First, let's talk
style wool rug, generally considered the
gold standard for quality. Works with just about
every style out there. You can find wool rugs at
different price points, from a couple of $100 to tens
of thousands of dollars. Synthetic rugs like
polypropylene, a much less expensive option, also look great, generally
with every style. However, a dude or sessile rug, like the one shown here, doesn't look so great with
an ultra traditional style. It's much better suited to
transitional, industrial, coastal Sheikh, Scandinavian, Zen, bohemian, and farmhouse. Now that's not to say
that you can't use a jute or sessile type rug. In other styles. It just may be a little
more difficult to pull off. Well, real and folk how hydrides are incredibly
popular right now. And they look great
with obviously Western, but also many others, including
industrial, contemporary, transitional, urban,
modern, bohemian, and farmhouse styles for high traffic areas
such as an entry way, choose a low pile or flat. We've run mainly so that your front door doesn't
get stuck on the rug. Finally, it's
generally best to keep high pile or shag rugs to less frequently used
places like your bedroom. They'll best places to buy
rugs include rugs usa.com, Wayfair.com, Overstock.com,
and hey, needle.com. They have a huge selection
at various price points.
14. Step 6 - Choose Your Furniture: Step six, twos your furniture. You are now a half
of the way there to designing your own
fantastic room. Let's move on to step six,
choosing your furniture. There are many considerations to what type of furniture
you will want to buy. The main considerations I
will be discussing today include functionality and size. First, let's discuss
functionality. And of course we need
to break this down room by room for a
family or living room. You'll need to reference the main activities
that you wrote down earlier on your guide that will be taking place here. And ensure that you include furniture pieces that will meet all of the needs of your key activities for
that particular room. For example, if you just want a place to talk and entertain, then ensure you have
plenty of seating. This could include a
couch and two chairs to couches or a
sectional anti chair. You can also include
Ottomans as extra sitting tucked away
under a console table, or next to a coffee table. Other furniture for a family or living room could
include side tables, console tables, coffee table, or a bar chart. By the way, you
don't have to use a bar chart to hold alcohol. Especially if you have
kids in the house, you can decorate
it with glasses, vases, books, candles,
or just about anything. Then when you want to entertain, it can be used for its
originally intended purpose of holding alcohol and bar
where now for a dining room, obviously you'll
have a dining table, but you should also consider
including buffet or server, a console table, or
even a bookcase or two. For a bedroom, obviously, you'll need a bed, one
or two night stands, and possibly a dresser, a side chair with a side table
to side chairs or a desk. So let's go ahead and look at some sample furniture layouts
for each type of room, because you really should choose what furniture layout you want before you begin
shopping for furniture, for your family room
or your living room. Here are some example furniture
layouts for a tiny room. Here are some example furniture
layouts for your bedroom. Here are some example
furniture layouts. My advice is to pick
a layout that you like and try to replicate
that in your room. How do you pick one? By looking for a
layout that meets the needs of what activities
will be taking place there. Let's look again at the family and or living room layouts. I would go with option a
if I want this room to be more about conversation
and entertaining, but I would go with B if
this is the primary TV room, C is a great option
of how to zone a room so that you
can have an area for conversation and an
area for working on a hobby like
crafting for bedrooms. Option a is if you just need
your room for sleeping. Option B gives you a nice
area to read them relaxed in. And options see carbs on an
area for writing or taking care of bills or other
administrative type work. Now that you have an idea of what you want to
put in your room, and therefore what your floor
layout should look like. Now, let's talk about
the size of your pieces. Again, this is where I think
most people get it wrong. They don't buy the right size
of pieces for their space, and they end up with
a room that looks too crowded or off balance. But now that you've
measured your room, you're on your way to never ever making
this mistake again. Here's how remember
the floor plan you drew on page
one of your guide. Go ahead and take a look at that as you'll need
it for this part. Here's what you're going to do. Go ahead and draw in the pieces of furniture that you want. I recommend making them generally box shape
to make it easy. For example, draw
a sofa like this, a chair like this, and a table like this. Once you draw it in all of your pieces in the
floor layout you want. Now here is the most important
thing you're going to do. Measure the distance between each piece of furniture
that you've drawn. Make sure that you have
at least three feet for each main passageway into
and throughout the room. How do you do this on paper? Remember, we're drawing
in half-inch scale. So take the three feet
and divide it by two, which is 1.5 or 1.5 inches. Here are some other
key measurements. Make sure that you
have about 1.5 feet between your coffee
table and your sofa, which would be three-quarters
of an inch on your paper. And make sure that you have
about two feet or a little less between areas that
people need to pass through, which would be one
inch on your paper. Also makes sure that
the furniture is a balanced and spread
throughout the room, meaning no big empty
spaces like this. In fact, I aim to have something in every
corner of a room, even if it's just a large plant, that's a good way to ensure that the room will feel balanced. Finally, be sorted, draw
on the rug that you plan on buying as well onto
your floor plan like this. For our review of
these measurements and other key measurements, checkout the
Measurement Guide in the resources section of
this training lecture. As a reminder for dining rooms, if you're going to place
a rug under your table, then be sure the rug extends at least two feet
around all edges of the dining table so
that your chairs fit comfortably on the
rug at all times. For bedrooms, if you're a place in the rug
under your bed, which I highly recommend you do. Again, you want
to extend the rug from the bottom
two-thirds of the bed, about two feet around the
three sides like this. So now that you know
what pieces you want, now comes the fun part. Finding your furniture pieces. There are obviously lots of great places to
shop for furniture, but I highly recommend doing
as much as you can online. First, you can view a lot of pieces in a relatively
short period of time since you don't have to
drive from store to store. Also, some of the major online
home decor retailers like Wayfair.com allow
you to enter in the measurements of the pieces
that you are looking for, which will greatly narrow
down your choices. Places like Wayfair.com, Overstock.com or
hanging needle.com are great because of
the huge variety of styles and price
points that they have for nearly any type of furniture pieces that
you may be shopping for. Once you find a piece of
furniture that you'd like, just make sure that the
dimensions are similar to the dimensions that you've
drawn in on your floor plan. The FBI didn't you love
is a little bigger or a little smaller than simply adjust the size of the shape on your floor plan
to match the item. But then you may be
to adjust the size of the other items in your
floor plan that you haven't yet picked out to maintain the required space for your walkways between
furniture pieces, etc. Now, here's a
designer tip for you. What I do and what
many designers do. Once we find a piece of
furniture that we intend on recommending to a client or
buying for ourselves even, is we copy and paste that
image into an application like PowerPoint to create a
mood or a design board. We will copy and paste all of the images for that room into one PowerPoint slide so that
we can see all of the images together and makes
sure that all of the pieces are harmonious
with each other. The final note about
buying furniture. If you are someone who
cannot imagine buying a sofa or a chair without
sitting in it first, which I completely understand. Then definitely choose
a store that has both an online presence as well as a brick and mortar
store in your area. So you can try out
the piece in-person. While shipping is
often free to get to, it's almost never free to ship it back unless there's a defect. So you don't want to end
up having to pay for shipping to return a
sofa, for example.
16. Step 7 - Choose Your Wall Art / Wall Decor: Step seven, choose your
wall art and wall decor. For any wall art or wall decor, know that you don't
have to match the color or the piece to the
color scheme of your room. But it often looks best if you have at least one
piece of artwork in the room that has at least some of the colors of your
rooms color scheme. Minute, when deciding on what
type of wall art to use, you should certainly consider
if you prefer photography, abstract art, or more
traditional pieces. However, you should
also consider the interior design
style of your room. For example, abstract
artwork works particularly well in styles like contemporary
and transitional. Black and white
photography is perfect for the industrial and
urban modern styles. And reproductions of
classic pieces are ideal for traditional and
French country interior design. Once you notice style of
Walmart, you would like, you then want to
match the artwork to the shape of the space of the wall that you
are hanging it on. For example, you shouldn't
have any rectangular piece in a rectangular space in terms of how high you
should hang your artwork. Another mistake that
people often make is that they hang their
artwork too high. The center of the picture in general should be hung between 6066 inches or 150 to 168
centimeters from the floor. Be aware that any large
wall art that you hang over a couch
shouldn't be hung about six to ten inches or 15 to 25 centimeters over
the back of a couch. A great place to buy large canvas pictures of nearly any type of
image is great. Big canvas.com. Their prices are fantastic as long as you wait
until they are having a 40th 50% off
sale, which happens often. If you're going to do
a collage of pictures, always lay out all of
the pieces on the floor first and aim for consistent
space between each picture, whether it's a grid or
an eclectic pattern. Take a picture of
the collage and write down the
measurements between each picture before you begin hanging the different
pictures in the collage. Again, try to have the
middle of the collage be about 60 to 66 inches or 150 to 168 centimeters
from the floor. Besides pictures, other great ideas for wall
decor include mirrors, long shelves, which
allows you to easily change out artwork
anytime you feel like it. A flock of ceramic birds or an, a collection of ceramic
or metal items, decorative plates,
candles, conses, wall sculptures and wall decals. They really have
come a long way. One of my favorite
places to find really unique wall decor
items is Etsy.com. I also love that I'm supporting individual artists
when I buy from Etsy.
18. Step 8 - Choose Your Lighting: Step eight, choose
your lighting. Lighting hands down is my
favorite design element. Lighting really makes all
the difference in a room. Too often people just use
one overhead light or a couple of table
lamps to try to meet all of their
lighting needs. And they are really
missing out on an opportunity to add some
serious drama to their space. The first rule of
lighting is to always, always, always have different
layers of lighting. Here is what I mean by layers. Every room should have
three layers of lighting, if at all possible. Ambient lighting, task
lighting and accent lighting. First, you should definitely have one or more
fixtures that provide ambient lighting or all over general lighting
for your room. Forms of ambient
lighting include chandelier, flush
mountain lights, semi flesh mountain lights, recess can lights whilst conses COVID lighting or a
light kit from a ceiling fan. Next, you want to ensure
that you have dedicated task lighting for each activity that will be taking
place in your room, such as reading,
writing, working, food preparation,
eating, hobbies, or playing a musical instrument. Examples of common
task lighting fixtures include table lamps, floor lamps, desk lamps, Track Lighting pendants,
and under cabinet lighting. Speaking of pendens, one
of my favorite ways to use them is in lieu of table lamps on either
side of your bed. This is a really great
look for almost any style since there are pendens
in nearly any style. Finally, to really take your lighting scheme
to the next level, add some accent
lighting to areas of the room that you want to draw
attention to or highlight. This could include a floor can
applied for a large plant. Track Lighting or directional
recess can lights to light up artwork while
the court or sculptures, picture lights for artwork, wall or step recessed lights, or one of my favorites, LED strip lights, which can
be used in many applications, including insider under
cabinet tree, bookcases, open shelving, or
on the toe kicks of your kitchen bass cabinets
or bathroom vanities. Just to name a few. Going back to directional
racist can lights for a minute. They not only can be used
for lighting artwork, but they can also be
used for highlighting architectural details as CAN
recessed floor lighting. All in all, I always try to have three to five different
light sources in a typical sized room. And I spread them out throughout the room so there aren't
any dark corners, are areas having three to
five different light sources may seem like a lot, but flexibility in lighting allows you to change the mood of a room and ensures
that you will always have adequate light so you
don't strain your eyes. Speaking of mood,
I place as many of my fixtures on
dimmers as possible. As dimmers are one of
the easiest ways to control the mood of a
room through lighting, as well as the lighting level. Of course. Here's an example of a room that has a layered
lighting scheme. We have recess can lights
as ambient lighting, waltzes, dances and table
lamps for task lighting, LED strip lights in the
built-in bookcases, and recessed lights
installed to provide Walgreens into the
wall treatment on the right side of the room. Great lighting also
makes you look good. So don't skimp in this area. In terms of finishes, choose the lighting
fixtures to match the color of the hard
surfaces in your room. If you are going with
Chrome or silver, focus on light fixtures
that have this finish. Although I love mixing
metal finishes. So an easy way to do this
is to choose to have one statement lighting fixture be in a different finish than
the other light fixtures, such as this brass
chandelier that we see here. Here are some final
tips on lighting in terms of how big a
chandelier pendant, semi flush or flush mount light should be for the
middle of your room. The standard professional
formula is to add the width and length of the room to determine the diameter. For example, if
your room is ten by 14 than the fixture should
be around 24 inches. However, I often add on five
inches to this measurement. As I like larger light fixtures. For a ten by 14 room, I would look for a fixture
that has a diameter between 2429 inches in the
metric system, just add the length and width
of the room and meters, divide that number by 12 and
then convert to centimeters. Again, I would personally add about 13 centimeters
to this measurement. For a bit of a more
oversized look. In terms of how high
to hang chandeliers, independence for fixtures
that are going to hang over a table or
a desk hanging out roughly 3234 inches or 76 to 86 centimeters
over the table or desk. For a chandelier that is going to hang in the
middle of the room. The bottom of the
fixture should hang no lower than seven feet or 2.1 meters from
the finished floor for adequate walking clearance. For dependence over an
island, hanging them 30th, 36 inches or 76 to 91
centimeters above the island, depending upon how tall the
people are in your house, as you don't want the lights
to impede their view. For waltzes dances,
hang them so that the light sources
roughly 66 to 72 inches or 168 to 183 centimeters
from the finished floor. Again, depending upon how tall the people
are in your home, as a light source in the sky should be roughly at eye level. For a review of
these measurements and other important
lighting measurements, checkout the Measurement Guide
in the resources section. The best places to
purchase lighting in a variety of styles
and price points includes lamps Plus shades of light, Wayfair.com
and Overstock.com. For some studying higher
and fixtures checkout, why lighting.com and
circle lighting.com.
20. Step 9 - Choose Your Window Coverings: Step nine, 2s your
window coverings. To me, a room doesn't really look finished without
window coverings. Window coverings
are essential for both aesthetic and
functional reasons. As window coverings
can provide warmth in the winter by helping to
hold the heat inside. Keeping a space cooler in the summer by blocking or
filtering the sunlight. Most common types
of window coverings include curtains or drapes, blinds, vertical blinds,
shades, and shutters. With all these
choices, what type of window covering
should you choose? I personally like having a combination of
shades and drapes in a room like this to further help you
narrow down your choices, also consider what style you have chosen for
your room or home. For a contemporary,
mid-century modern, industrial or urban modern look. Great window covering choices would include flat Roman shades. Roller blinds would lines, or very simple and clean drapes. For a traditional style formal and heavy curtains
or drapes are a must, but hobbled Roman
shades are also a great choice for a
transitional style. Any window covering
will generally work. For a coastal Sheikh look, consider light and airy
curtains are drapes, simple Roman shades
and shutters, or light filtering roller
shades in a natural material. For a Scandinavian
or Zen style go was simple light-colored curtains or light filtering roller shades. For French country, consider
curtains or drapes. Roman shades, or shutters. For a bohemian style, consider richly colored or
pattern curtains or drapes. It blinds and Roman shades. For farmhouse in Western, you can use simple curtains. Drapes, would blinds, and for just farmhouse gutters
are also a great choice. Remember that they do come in different colors
other than white. They look great in a
dark espresso color and come into other shades, such as natural wood colors
and even gray and black. Now in terms of color, you can either
choose to have it be a shade of the neutral
you've chosen for your room. For example, if you're
neutral is grey, go for light or dark
gray drapes or shades, or choose to have it be a shade of one of
your accent colors. You can make the
window coverings the same color as the wall. But I like to provide some
contrast for visual interest. Unless you have a small
room, in which case, I would match the
window coverings to the pink color as
unity of a color, particularly a light color helps a small room
to feel larger. Another point about small
rooms is if you are going to have a pattern on
your window coverings, 2s, a small pattern. Larger patterns are best
used in larger rooms. Also, unless you have
a really high ceiling, hang the curtains as high
and as wide as you can, about four to five
inches from the ceiling, and then have the
curtain rod extended about 12 inches or more on
each side of the window. This makes your windows look much larger than
they really are. This means for the standard
eight foot ceiling, you want to purchase, curtains are drapes
that are 96 inches. Now, I know you're thinking
that is eight feet, which is the same height. But here's a designer
trick for you. Take them to a
seamstress and have them hemmed about five inches
up from the bottom. So now you have curtains
or grapes that are 91 inches in length and
they'll look custom. You can do this with any
drape from any price point. For a knife with ceiling, go with a 108 inch
curtain panels and again have them hand 56
inches from the bottom. Now another important point, I generally will get
my drapes altered before I hang them up
on the drapery rod. Once my drapes or altered
all either slide them onto the drapery rod or a hang them from the rod
on curtain rings. Either way is fine. And then they'll
have someone hold up the drapery rod with
the drapes on them. I can make sure that the
drapes hit the floor at exactly the right point before
I install my drapery rod. This will tell my
installer exactly where the curtain
rods should be hung. Here are some additional
tips when choosing window coverings for
curtains and drapes. Always ensure that they
always hit the ground. Otherwise, they look like
someone who is wearing pants that are simply too
short for them, not good. Or your drapes can even pull on the ground by a
couple of inches. If you'd like a more
formal or a romantic look. Window coverings
throughout the house and do not have to match, but they should
be complimentary. For example, the same
type of covering, Roman shades or just
similar colors. The smaller the home, the more important it is to have your window coverings
be cohesive. Finally, for shades and rapes, consider whether you need
a room darkening liner, which is a must, in my opinion, for bedrooms, but also a good choice for all
of the rooms in your home. My go-to retail location for custom window shades and
blinds is blinds.com. But my go-to place for
curtains and drapes at various price points is
Wayfair.com and Overstock.com.
22. Step 10 - Choose Your Accessories and Greenery: Here we are at the final step, step ten, choose your
accessories and greenery. In terms of accessories, think of them like
jewelry for a room. They really elevate any space and give a room great character. Accessories can come from items you've accumulated
over the years. For example, from your travels. Or they can all be purchased at a place like home goods
or Crate and Barrel. Examples of accessories include
but are not limited to, pillows, blankets, framed
pictures, bases, bowls, bar where trays, sculptures,
books, coasters, candles and candle
holders, lanterns, collections, clocks, nature
items, flowers and plants. Just a quick note
about collections. Do try and limit one main
collection to a room. Otherwise it starts
to look cluttered and loses its ability to
be a focal point. I mentioned at the
beginning of that accessories add
character to a room, but they do so much
more than that. One of their most
important functions is to help reinforce the
style of the room. Let me explain. While some furniture pieces clearly belong to
a certain style, such as the obvious mid-century modern furniture we see here. Other furniture pieces can
be used in multiple styles, such as clean lines sofa. If you have a room
in which the style is not immediately apparent
from the furniture, you can easily reinforce the
style through accessories. Just take a look at these
groups of accessories. Clearly, these
accessories belong in the Zen er Japanese style. These belong in the
Art Deco style, and these belong in the
industrial or steampunk styles. Additionally,
accessories allow you to layer in additional texture, which is critical to
great room design. Whether it's a variety of
different colored pillows on the sofa or carefully
styled bookcases. There's no question
that accessories adds great visual interest
and texture to a room. Finally, accessories
can tell a story about who you are and those
who live in your home. Most people don't
want to live in a house that feels
like a stage tome. Rather, we use personal
mementos like frame photos, concert posters, or items from our travels to make our home
feel uniquely personal. It's these items that bring a different level of
happiness to a space. That said, I have seven rules
that I have successfully used repeatedly when accessorizing
any particular space. Whether that's a
bookcase, a coffee table, a console table, a dining table, a fireplace mantle, etcetera. First look to decorate items and groups that share some
sort of similarity. For example, a color palette, a theme or that share our purpose such as
vases or candles. Second, I typically,
although not always, use odd numbers
and the grouping, odd numbers always
looks great though, and be sure to keep the
tallest item in the back. Third, I vary the height and scale of my accessories forth. I tried to include
books as they allow you to easily add color and
height to my vignettes. Fifth, I tried to ensure that
some of the accessories in the room reflect one or more
of my rooms accent colors, as repetition of color is
important to creating harmony. Another important
design element. Sixth, I usually include some
beam from nature such as flowers, plants, driftwood, etc. As these items naturally add a feeling of warmth
to the display. Seventh and finally,
when in doubt, formal symmetry always works, meaning using the same item
on each side of the vignette. Formal symmetry always
makes a vignette, as well as a room, feel incredibly polished
and pulled together. Now let's take a look at
these rules in action. Here we have a styled
bookcase and you'll see that I've used every
rule in this design. First, you can see that
I've grouped items together based on both
color and a coastal theme. You can see I've used odd
numbers here and here. I varied the heightened
scale most noticeably here. I've obviously included books. Given that the large amount
of blue in this design, it's safe to say that blue is one of the accent
colors of the room. I've included two
items from nature, and I've used formal
symmetry here. As a result, the entire bookcase feels cohesive and
pulled together. Do I style every plot
surface in a room? Unless I'm trying to create
some negative space in the room designed in the contemporary or
minimalist styles, then yes, I do. Whether that's a single
striking accessory on a coffee table or a more
carefully layered console table. I again accessories a flat
surfaces to reinforce style, add texture, and tell a story about the
people who live there. Now for a special
word on plants, always, always include
greenery in a room. It's one of the main
elements that people forget, but can make a big
difference whether it's real or a great photo version. If you've ever
visited a model home, you will always see
at least a couple of plants in each room. This is because greenery adds
instant warmth to a room and has the added
benefit of providing oxygen if the plant is real. While one plant is great, I think too is often better. This could be a tall plant
which is a great way to fill a corner and a small plant
on your coffee table. Or it could be too large plants or trees flanking the size of a fireplace or placed in opposite corners of
your focal point wall for formal symmetry. While many varieties of
plants work in many styles, there are some classic are well-suited choices
for certain styles. Specifically palm trees are a great choice for coastal
and Art Deco styles. Yucca or Madagascar
dragon trees are ideal in contemporary spaces
for the leaf figs look so good in
transitional style rooms. Cactuses are a favorite
for mid-century modern, industrial, urban, modern
and Western styles. And there are some great looking for cactuses on
the market today. So no need to be scared. Ferns are lovely in traditional
and French country homes. Box woods and wreaths
are common in farmhouse. Bonds eyes of course, are a natural for the Zen style. And any type of plant
seems to work well in Scandinavian and
Bohemian style homes. Trying to find great silk plants can often be hit or miss. But some of my favorite
places I've had good luck on generally include
nearly natural.com, West Elm and Wayfair.com.
24. Watch me Create a Room Design Using the 10 Step Method: I am so excited about
this lecture because this is lecture where
I get to show you the ten steps in action. Specifically, I am going
to use my ten step method along with the guide to create a room design from
start to finish. So let's get to it. Here is the room that I'll
be creating a design for. As you can see, it's a living
room and it's also empty, which means that I
won't be incorporating any current furniture pieces or other furnishings like
I often do for clients. And you may be doing as well. That said, as you know, step one is measure your room. I've gone ahead and
created the floor plan. I could have certainly
drawn it by hand, but I chose to use a
software program instead. You can see I've included
the windows here and there's a large cased
opening here to the room, which is just another
way of saying a doorway with trim but no door. Step two is decide
on key activities. As this is a living room, this is going to be a place for entertaining and relaxing. I loved to read, so I'll choose that
activities specifically. Step three is choose your style. With this beautiful wood
fluorine as inspiration. I've decided that I'm going to go with mid-century modern as my primary style and contemporary
as my secondary style. Moving on to step four, choose your color scheme. I'm going to draw from the
existing architecture and we'll be using white and
beige as my neutrals. And blue and green will
be my accent colors. I'll be using walnut for my wood finish
because nothing says mid-century modern like walnut does for my metal finishes, I'll be using a combination
of brass and Chrome. Choosing our rug
is the next step. As you can see, this is a large room and can easily
accommodate a nine by 12 or 274 by 366 centimeter rug. That is what I'll
be looking for. Based on my color scheme, I'm going to select a rug that incorporates the accent
colors from my color scheme. For the material, I've decided
that I'd like a wool rug. I've just completed my online
searching and I've found this rug because my secondary
style is contemporary. I decided to go with a
contemporary abstract drug. And I think it's going to work
really well in my design. Moving on to step six,
choose your furniture. I've decided on the
following pieces based on the key
activities for this room. A sofa to accent chairs, coffee table, and end table, to bookcases to store
all of my books. A backlit bench, and
a console table. Now that I've drawn
in my pieces, I made sure to
confirm that I have appropriate clearance
for all of these items. Specifically, that
I have a minimum of 36 inches or 91 centimeters for the main passageways
through the room. 22 inches or 56 centimeters for space between
furniture pieces. One can pass comfortably
between 1418 inches or 3646 centimeters between my
seating and coffee table. I also made sure that
the coffee table is roughly two-thirds the
length of my sofa. Now that I've drawn
in my furniture, I'm also going to check to ensure that I have
the right size rug. And I do because all
of the pieces of my seating arrangement
sit perfectly on the rug and is
not interfering with the bookcases or
the console table. Again, because I'm
starting from scratch, I'm going to need to source
all of these pieces. I've spent some time doing that. Let me show you what I've found from my secondary
style contemporary. I've chosen the
following pieces. This gorgeous leather sofa and this streamline console table. All of my other
furniture pieces, specifically the
accident chairs, coffee table and table,
bookcases and bench. Or in the style of
mid-century modern, which of course is the
primary style of my room. Now let me go ahead and put
all of these pieces into the mood board so we can see
what it looks like together. This is looking great. You can see that the
accident chairs and bench pick up the colors
that are in my rug. And I've repeated
both circular and straight clean lines to
create harmony in my design. I've also made sure to store all of the links
to these pieces. I can go back to purchase
them when I'm ready to do so. Unimportant note, make sure to double-check the sizes of the
pieces that you selected. I double-check the sizes
and ended up making a few minor adjustments
to the links of the sofa, coffee table and
the console table. Fortunately, this didn't create any issues with spacing
between pieces. Moving on to step seven, choose Wall Art and wall decor. Looking at my floor plan, I definitely want some
artwork for the north wall. And they'd like something over the console table
on the west wall. I don't need wall art or decor for the
remaining two walls, as the east wall is
nearly all windows and the south wall has a
large cased opening. And my plan is to place large indoor trees
in those corners, which I'll get to in step nine. But I'm already thinking ahead. For in-between the
two bookcases, I've selected the striking contemporary abstract
artwork piece. It was important to me
that I find a piece of artwork that had the same green
that we see in the bench, given the close proximity
of these two pieces. This piece is perfect. For over the console table. I've chosen this beautiful
round brass mirror. Now let's go ahead and put
them in the mood board. This is really coming together. But next is my favorite
part of the design. Step eight, choose
your lighting. For ambient lighting,
I want to use a large flush or semi
flush mount light. For task lighting.
I'm going to use table lamps on the
console table. And for accent lighting, I'm going to use LED strip
lights in the bookcases. Picture light for the artwork. And I'll use some floor can apply for the indoor
trees I mentioned. I've gone contemporary
all the way from my lighting and chosen the
statement, flush mount light. These beautiful table lamps
and the sleep picture light. You might have noticed that
they all RNA Chrome finish and that is a great contrast
with the brass in the room. Let's go ahead and put
them in the mood board. Yes, perfect. I like that from
this perspective, the light fixture
does not obstruct the view at all of the
eye-catching artwork. On the step nine
window coverings. Obviously, I only need to worry about window treatments
for the east wall. Since these are my only Windows. Because my primary style
is mid-century modern, I could leave these
large windows bear, and that would be completely
style appropriate. But as I mentioned in
the step nine lecture, I always like a way to control the natural light
and my privacy. I'll be using simple
white drapery panels. Finally, we've
arrived at Step ten. Choose your accessories
and greenery. First, let's start with
the console table. I'm going to add a trio of mid mod candle holders and a small
contemporary sculpture. Now I will go ahead
and add books and a mixture of stylish
accessories from both the mid-century modern
and contemporary styles to the bookcases. But I'll leave the beautiful
coffee table bear. In a nod to the
contemporary style. As I previously mentioned, I will be adding two
tall indoor plants to these corners of the room. Here is the plant I'll be using. And I'll also add some matching succulent arrangements to
the bookcases in the back. There it is a
beautiful room design using my ten step method. I hope you found this
lecture helpful. But more importantly, I
hope it makes you feel confident to try this
method in your own home. Happy decorating.
25. Use Focal Points to Take Your Design to the Next Level: Now that you've
learned how to design a room using the
ten step method, and you've seen me use
it in this section, I want to move on to some
additional techniques and more advanced
topics that you may find helpful with your
own interior designs. Let's start by talking
about focal points. There is no question that focal points are an
important design element. And chances are you've
already included one in your room during
the ten step process, whether you were
aware of it or not. But first, what
is a focal point? Put simply, it's a
standout piece or element that draws your attention
upon entering the room. It's the star of the
show, if you will. In a bedroom, the bed is often the focal point.
In a dining room. The dining room table
or light fixture over the table is
typically the focal point. In the living room. A fireplace usually
plays that role. However, there are definitely other elements that can
play this role as well, including a beautiful wall
or ceiling treatment. Even if it's just a
vibrant pink color, a gorgeous light fixture, a striking piece of artwork, a large mirror, a standout rug, or a unique coffee table. A view outside a large window can also make an
excellent focal point. Why our focal points important? They actually can serve
multiple practical purposes. First, let's say
your focal point is artwork or a large rug. That item could serve as the inspiration for the
rooms color scheme. If the focal point is
your fireplace or a case could items such as a coffee
table or a beautiful view. This can help you to determine how to best arrange
your furniture, namely around the focal point. If your focal point is a ceiling treatment or a
ceiling light fixture, such as a chandelier. It will draw your eye upwards, emphasizing the vertical space. This is an excellent focal
point choice for a small room, as it will be especially
effective and distracting from the
smaller size of the room. If your style is minimalist, a striking focal
point is absolutely essential to keep your room from feeling plane and uninteresting. Finally, whatever
style your room focal points help you to create a
wow moment for your room, which will always elevate
the overall interior design. So does every room need
to have a focal point? Well, I and I'm sure the majority of
designers would say yes. But sometimes you may have a nicely designed room in which nothing in particular
stands out. While there's nothing
wrong with that, if you want to
elevate your design, then absolutely
incorporate a focal point. So how would you apply this
using the ten step method? Go back to your room design. Let's look at mine
as an example. Is there an element in this design that
draws your attention? Yes, in my case, It's that back wall with the beautiful
bookcases and artwork, which is reinforced by the accent lighting in both the bookcases
and on the artwork. But let's say there was nothing in particular
that stood out, but rather, everything is
simply works well together. What can we do? I would look to replace one of the items in my room with
something more striking. That could be something
like artwork, the ceiling light
fixture or coffee table. Or I could add in a beautiful
wall or ceiling treatment. You can also start a room
design with a focal point. If you already have an
item or element selected, such as a unique piece of furniture or a
specific wallpaper. In that case, you would insert the focal point selection
somewhere between steps 23. Your focal point piece will then likely helped to inform
your selections. In the remaining steps, including your style,
color scheme, etcetera. Final important
note in step eight, choose your lighting unless your focal point is
a light fixture, I would consider
using some form of accent lighting to
highlight your focal point. If it makes sense to do so, such as a picture
late for artwork, directional racist can lights
the highlight wall decor, or LED strip lights for
a beautiful bookcase.
26. Open Floor Plans – Considerations and Challenges: Most people would agree that they loved the look and feel of an open floor plan. In the context of a ten step method you just learned, you may experience challenges around measuring ideal placement for your furnishings to create zones, and proper lighting techniques. Let's talk first about measuring. Often the simplest approach to creating room designs with an open floor plans is to create separate floor plans for each functional area or zone. So for example, let's say we have a living room, dining room, combo area, like we see here. You have to decide where the dividing line is between these two spaces. So you can create a floor plan for each area, the living room and the dining room. Sometimes you may have natural architectural bricks in the room that can help you to easily find a natural dividing line, such as a door frame, window, pillar, or cabinet tree. You can think of the dividing line as an imaginary wall. Once you've done that, then if needed, you can place something on the ground such as a piece of masking tape. So you can use that as the border for each of your spaces, which will allow you to more easily measure your space. It doesn't matter how many functional zones share an open area. The approach is the same. Find the dividing lines, mark them, measure each area, and draw your floor plan. Now let's discuss how to most effectively use your furnishings to delineate your zones. By far, one of the most effective items is a rug. Now only do rugs feel great underfoot and are an easy way to add color and pattern to a room. But they are also one of the easiest ways to define a space within an open floor plan. You can either choose to use the same rug or choose coordinating rugs, preferably in a coordinating color and style. So how do you choose whether to go with the same rug or coordinating rocks? If you're rugs are going to be within two feet or 61 centimetres of each other. I would lean towards using the same rug. If there is at least three feet or 91 centimeters between rugs, either the same rug or coordinating rugs will work. It's important to ensure that the main furniture pieces are either sitting partially on the rug or completely on the rug within each zone. You can also use furniture to help separate zones within an open floor plan. Specifically, bagless benches, console tables, buffets and open back bookcases are all stylish and effective room dividers. And the last three options have the added benefit of providing extra storage. One often forgotten element for defining open floor plans is a strategic use of colors and or metal finishes. Clearly, when you have an open floor plan, you need to have a cohesive color scheme for the entire space. Ideally, your color scheme will include one to two neutrals, m1 to 3x and colors. However, you can use colors strategically to help to find the separate areas, like we see here with the red accents in the dining area. You can also use wallpaper or paint to help delineate an area by papering or painting the focal point while of that area in a different color. Finally, you can use metal finishes to help define zones. I love mixing metals. And while you might decide to go with the same one or two finishes throughout the entire open floor plan. You could choose to use different finishes to define a space like we see here. In the foreground, we see the living room has used black for the chandelier, the wall decor and the side table. But they've used a Chrome or nickel finished for the two pendants, that table lamp and the wall mere. Now let's discuss lighting in the context of open floor plans. First, just like rugs, you can use lighting to help delineate functional zones. In fact, after rugs, light fixtures, in particular, chandelier and attendance are probably the second best way to help to find individual spaces within an open floor plan. Ceiling fans also work. You want to hang your fixture in the middle of the space. Additionally, how high you hang the fixture also matters. More specifically for larger areas. You hang your fixture at a higher distance. Your eye will automatically make the connection that this is a larger space. Contrast the height of this fixture with the chandelier hanging over the dining area hanging at lower, helps you to quickly determine that this is a smaller space in terms of how much lighting to use in an open floor plan? Well, you want at least one lighting source for every functional area. But depending on the location and function of the zone, I would aim for three to five light sources if possible. Remember, this includes your accent lighting. It's always better to overlay to space than under light it. And remember to put as many of your light sources on dimmers as you can. You can control the lighting level and the mood. To final techniques that you can use to define zones in a room include, first ensuring each area has its own focal point. As I mentioned in an earlier lecture, common focal points for rooms include but are not limited to, fireplaces, artwork, ceiling light fixtures, unique ceiling treatments, or a unique furniture piece such as a beautiful coffee table. Second, use formal symmetry. Formal cemetery is one of my favorite techniques, And I particularly love it in an open floor plan, because symmetry automatically brings order to a space which is critical to a well-defined open floor plan.
27. How/When to Use Wallpaper in Your Design: I absolutely love wallpaper. There are so many choices
when it comes to wallpaper, regardless of your style
and at all price points. So it's definitely an
element to consider incorporating as you
design your room. To that point in this lecture, I want to talk about when you should consider using wallpaper, how to best utilize
it in a room design, and how to incorporate it
into the ten step process. First, I want to
state that I consider wallpaper different
and unique from paint. Paint is what I
always select last, partly because
there are literally thousands of pink color choices. So it's pretty easy to
find one that works well with all of the
colors in the room. Wallpaper is different and often it can be the inspiration
for a room design, just like a rug or fabric can. Where does wallpaper fit in? Then, first let's talk about when you should consider using
wallpaper in your design. Wallpaper works in most
interior design styles. There are very few
styles, if any, that I would completely
avoid wallpaper, even in a style like
industrial that is so pared down and neutral
and it's color palette. There are some excellent fot, concrete papers that would
look great in this style. Now let's talk about which
rooms to use wallpaper in. I especially love using wallpaper in dining
rooms, bedrooms, and powder rooms,
but they can also look great in nearly any
other room of the home. You have to be
careful, of course, with using wallpaper
in areas with high humidity and bathrooms
with tubs and or showers. It's definitely possible to install it in these
types of situations. But you need to have
the right paper, the right paper hanger, meaning the right installer, and have the proper
prep work done. Now let's talk about how to
use it in a room design. Wallpaper is commonly
used in two ways. It's either used on
a focal point wall or it's used in the entire room. For a long time. It seemed as if accent
walls were more popular. But I think that
has to do more with the size and style of the room. For smaller rooms
like a powder room, hanging the wallpaper on all of the walls is pretty common. For a larger room, you might see wallpaper
installed on one wall, just on the ceiling, or on all four walls
above a chair rail. You can also use a style of
the room to help guide you. Specifically in
more contemporary, modern and or casual spaces, it's more common to keep the paper to one
focal point wall. Whereas in more formal
and, or traditional rooms, papering all four
walls would not be uncommon in terms of what
type of wallpaper to use. Obviously, you want it to work with the style of the room. And you want to decide
if you want it to be a subtle accent to the room, or if you want it to
be the focal point. These are two very
different approaches and you should decide how you want to use the paper before you begin
looking at options, as there are many, many options available and
it's easy to get overwhelmed. For example, if you want something more
subtle and you just want to add texture to a room than I would
consider a grass clop, a photograph's clop, or a solid colored paper
with a subtle pattern. You should also consider the general color or colors
you want in your wallpaper. Again, to help you narrow
down your choices. If you are just using the
paper on an accent wall. Wallpaper looks best when it coordinates with a pink color. For example, you could go with a dark gray faux
grass cloth that will sit next to a mid tone gray paint on the
adjacent wall or walls. Even when going with
a bolder wallpaper, I would ensure that at
least one of the colors in the paper is comparable to the pink color on the
adjacent wall or walls. Now if you are papering
all four walls, then you only have to
worry about coordinating the colors in the wallpaper with the other
furnishings in your room. Now let's talk about how you
incorporate the selection of wallpaper within
the ten step process. The answer to this
depends on what type of wallpaper you
envision for the space. If it's going to be
a more subtle paper, then I'll usually select it after I've selected
the furniture. However, if I plan on
having the wallpaper became more prominent
design element with a strong pattern and
color in the room. Then I will likely
select it after I've selected my style as the wallpaper will
help to determine or dictate this color
scheme for the room, for some great choices
and wallpaper, again for many different styles
and at all price points, I would recommend checking
out Burke decor.com, wallpaper direct.com, and
Brewster wall covering.com.
28. Common Design Challenge: Room With No Windows: Where I live, this is a common problem in basements, but obviously occurs with other interior rooms in a home. There are some great strategies that one can use to really brighten up this type of space and even fully in the eye into thinking that there are windows. So let's get to it. First. I would definitely use a light pink color, particularly warm white or cream, but also light beige or gray would work. Just make sure that paint being used is not any flat finish. And I would absolutely use at least one large mirror somewhere in the room to help reflect light and provide the illusion of a window. I would be sure to incorporate a strong layered lighting scheme, meaning light fixtures to provide ambient lighting, task lighting and accent lighting in the room, as well as to further brighten the space and make sure that all of your lighting needs will be met. I would also incorporate a large piece of artwork to serve three functions. First, it will help break up the wall space, which is what Windows typically do. Second, it will help to distract from the fact that there aren't any windows. And third, it may be able to be used as your rooms focal 0.1. Other technique I've used is to hang Florida ceiling drapes on a wall where a pair of windows might naturally be. This has two advantages. It provides the impression that there are windows behind the drapes and it softens a space visually. Finally, I would include some higher quality SOC plants to the space to help liven up and soften a space. At the same time.
29. Common Design Challenge: Child and/or Pet Friendly Designs: When I'm working with clients who need their home to be child and or pet-friendly. There are some go-to materials that I will frequently specify for fluorine, tile or vinyl are usually my top choices. Even if you wanted, would florine. There are many porcelain tiles on the market now that looks so much like wood without the upkeep and luxury vinyl plank or MVP, which is designed to look like wood or stone, is becoming an increasingly popular choice in homes with pets and children. For fabrics and rugs, the selection of indoor, outdoor choices is excellent. Not only do they work well, but they look great. Cinderella fabric is a particularly good choice for seeding. Otherwise, I would be sure to apply fabric protection to all of my seating. There are many competitors to the original Scotch guard that are excellent and companies that will be happy to apply them for you. Slip cover furniture and washable curtains are also a smart choice for that. These covers can be easily washed as needed. Along the same lines, one trick all uses to purchase fabrics such as curtains, sofas, rugs, et cetera, that are similar in color to the pets for so that when they do shed the hair on the fabric is not so obvious. Going back to rugs, if you prefer the feel of something softer underfoot, I would look at dark pattern polypropylene rugs, which are generally great hygiene stains. And because they aren't terribly expensive, it's something you can change out every year or two if needed. As far as accessories, I would look to incorporate non unbreakable lightweight materials such as wood and plastic. If the pets are inclined to eat plants, I would incorporate higher end silk plants instead and either go with taller indoors so trees or placed smaller real plans on higher surfaces out of the reach of small children and pets. I'd be remiss if I didn't mention the importance of providing a scratching post for any cats and regularly trimming, buffing a dog's nails as well to cut down damage to the soft fabrics in the home. For those pet who are not easily deterred, there are enzymes, sprays that can be purchased or homemade and sprayed on fabrics that are meant to deter pet him scratching and biting your home furnishings. I really believe that you don't have to sacrifice style with small children or pets. You just need to think a little differently.
30. Common Design Challenge: Techniques for Hot/Humid Areas: If you live in an area that is hot and humid year round, you may either know or suspect that certain materials and colors schemes are preferable and you would be correct. First and foremost, I highly recommend using a light color scheme and include colours like white, beige, gray, light gray and other cool colors, such as blue, green, and lavender for the main colors in your room. So why do I say that? In a study by a company with a website called color matters, they found that test subjects who entered a room with a cool color palette stated that the temperature of the room was six to ten degrees Fahrenheit cooler than the rooms based temperature. And those who entered a room with a warmer color palette, conversely, stated that the temperature of the room was six to ten degrees warmer than the room actually was. That is pretty phenomenal and worth considering as you make your color palette choices. Okay? But what if you love warm colors? Does this mean you can't use them? No, of course you can. I would personally stick to using them in the accessories of the room, such as your artwork, wall decor, throw pillows, floor pillows, proofs, throw blankets, and possibly your rug. Also, I would use fabrics that don't absorb much heat, like cotton, linen and polyester and avoid fabrics, leather, vinyl, and wool. Other materials that generally work well in humid climates include steel, stone, and glass. So these can be great choices for furniture pieces and tabletops. Having good window treatments are important for keeping the hot sun out. I like to combine a shade specifically meant to keep heat out, such as solar shades, insulated cellular shades, faux wood blinds as real wood can warp and humidity. And appropriately line Roman shades with linen or cotton curtains. In the cooler evenings, the shades can be opened and the lightweight curtains can be drawn to allow the cool breeze to come in through an open window while maintaining privacy. In addition to using ceiling fans, installing window film to block sunlight and heat can also help drive down that air conditioning bill. For fluorine, stone or tile is a great choice for hot, humid climates. Additionally, I would choose synthetic rugs, such as polypropylene, as these can usually stand up to more humid climates. Sadly, wool rugs are not a great choice because they can absorb quite a bit of water. And while jute, another favorite of mine is great for hot climates, it doesn't work well for humid climates as it can attract mold and mildew. Finally, I recommend investing in a portable or whole house dehumidifier, which can help greatly with reducing the humidity level in your home.
31. Common Design Challenge: Radiators and Window Treatments: In many parts of the world, it's not uncommon to have a radiator directly beneath the window, which can create a bit of a design challenge when it comes to window treatments. So let's talk about some viable solutions. If the radiator is directly below your window and does not extend past the window edges than one great option is to hang stationary curtain or drapery panels that don't move on the sides of the window to frame your window. And then layer that with a simple window covering like a roller shade, Roman shade, woven shade, or stylish blinds for privacy. Alternatively, you could forgo the curtains are drapes altogether and just use a roller shade, Roman shade, et cetera, for that window. If your radiator does extend beyond the edge of the window, then your best solution is to hang inside or outside mount shades or blinds over these windows. If you have other windows in the room that don't have an obstruction, then I would hang the same shades or blinds on the other windows. But consider pairing them with curtains are drapes that coordinate with the shades to add texture and softness to your room.
32. Common Design Challenge: How to make a Large Room Feel Cozier: First, let's just clarify that this is a single large room, for example, a large living room, and not an open floor plan situation. The best way to make a large room feels smaller and cozy or is primarily through strategic color and lighting selections. Let's first talk color. Darker colors in general, make a room feel cosines and in a big room, more manageable. In particular your walls, whether that's your paint, wallpaper or some other wall treatment. Darker paint or wall treatments will help the walls to feel as if they are advancing and a smaller room feels cozy. Or this is also true if you have a high ceiling. In general painting your ceiling need dark color or even a few shades darker than your walls, will help to visually lower the ceiling. Going back to your walls, you can either use the same darker pink color on all four walls or you can absolutely choose to have an accent wall. Accent walls will break up your space visually and help it to feel a bit smaller and cozy. Additionally, choose any dark primary Hugh, such as navy blue, charcoal gray, deep red, or dark green as your primary color in your color scheme is always a good choice in this type of situation. However, to avoid a cave-like feeling, be sure to use mirrors, glass, or polished metal case good items, a variety of textures, light fluorine or light or bright rugs, as well as some lighter or brighter furniture pieces. Additionally, using chair rail or wanes coding in the room. And in the case of chair rail, using two different colors or treatments above and below the rail will also help to break up the vastness of the room and help your room to feel a bit cozy. But if you're not a fan of wanes coding or chair rail, then as an alternative, I would recommend painting your base and crown molding a different color from your walls along the same lines, I would be sure to use window treatments that contrasts with the wall, contrast on walls, whether that's through wall treatments or window treatments help a room to feel a bit smaller and as a result, cosines as well. The design cousin, the color is patterns, and using a variety of patterns in the room will create a number of visual breaks and help the room to feel smaller and cozy year. Same with texture. Be sure to use a variety of different textures in a large room from maximizing that cozy feeling. Now let's talk lighting. If I were trying to make a large room feel cozy or I would use a number of table lamps and floor lamps with opaque shades positioned away from the walls throughout the room. And I would pair these with a low light chandelier or a chandelier on a dimmer placed in the center of the room. Apart from color and lighting, be sure that you are using furniture that is appropriately scaled for the room, of course, meaning large or even oversize pieces. For example, any large bedroom, I would be sure to use a large or even oversized headboard which helps to fill up some of the empty wall space. Additionally, be sure that you have the typical distances between your furniture items as you would in a regular sized room, such as 14 to 18 inches or 36 to 46 centimeters between your sofa and coffee table. And no more than ten feet or three meters between individuals in a seating arrangement. If you can't find a coffee table large enough for your space, consider using two identical coffee tables instead. Finally, be sure that there aren't any empty corners or large empty areas in your room, which just emphasizes the large space. Instead, consider large floor plants, console tables, or create an extra seating area in these empty spaces.
33. Common Design Challenge: Irregular Shaped Rooms: Irregular shaped rooms can include many different design challenges, including walls that are too long or too short, columns or other architectural features that break up the room and small nukes that seem unusable. Of course, each room is unique, but there are some general strategies that will work in most irregular shaped rooms. First, I would use a light color on the walls, ceiling, and all architectural features in the room. This will help soften all of the lines and make the room feel more balanced and cohesive. Second, it's important to create separate zones in the room, which will make furniture placement much easier as you can measure and think about each zone separately, just like I spoke about in the lecture on open floor plans. For example, if you have a small looker area, this may be the perfect place for a small writing desk and chair, or it can be turned into a small reading nuc. Not having to consider how this area fits into the bigger space, frees up your mind to consider how the area can best be utilized based on its unique shape and size. This approach also goes perfectly with step to decide on key activities. Once you've decided on your key activities, you can then decide which zones will be used for each activity. Now if you have separate zones, it's important that you still use a single color scheme in the room and repeat colors, patterns, and elements throughout the space so that the rooms designs still feels cohesive. Another excellent approach is to have custom furniture, such as bookshelves, built specifically for that space. Anytime you have the ability to add extra storage, is nearly always at plus for any home. Now if you haven't awkwardly placed window, install Florida ceiling drapes along the length of the entire wall, which will give the impression of symmetrical windows and provide balance to your room. Finally, having a great focal point is especially important in an irregular shape room. Because just like with a small room, a focal plane will also help distract from the shape of the room.
34. Best Measurement and Floor Plan Apps: Earlier in the course,
I taught you how to easily measure a room
using a measuring tape. I also showed you how to
convert those measurements to create a floor plan by
hand in half inch scale. That said, there are so
many technology tools today that will easily
do this for you. So in this lecture, I wanted
to share with you some of my favorite tools for measuring
and drawing floor plans. All of the tools
I'm describing are free or have a free
version or trial. Let's start with basic
measurement tools for both IOS and Android. If your phone or tablet is IOS, the easiest tool I found
to use is the measure app. Although this tool is very
close on its measurements, it's not always precise as it rounds to the nearest
inch or centimeter. That means if you need
exact measurements to scale furniture
tightly in a small space, I would double check the measurement with
a measuring tape. If you have an Android, AR ruler app is free and is a comparable tool
to the measure app. Although I personally
haven't tried it. That said, it's good to
know that these free, simple tools work best in smaller rooms
that are well lit. Since it's a manual process, meaning you measure
one wall at a time, it's ideal when you are just creating a floor plan
for a single room. When you start getting
into large spaces, angled spaces, cluttered spaces, multi room layout
or shadowy spaces, consider programs
like Room scan Pro, which works on IOS
or Magic Plan, which is available for
both IOS and Android. Both of these programs
will allow you to measure your entire space and create complete floor
plans with furniture. However, the ones I reviewed only allow furniture
placement within the app. I prefer to work on my desktop, so this wasn't a
good option for me. But if you either prefer or don't mind working on a tablet, these might be good
options for you. Once you have your measurements, while you can certainly draw
your floor plan by hand, as I showed you
earlier in the course, it's easier to use
an online tool. Two of the easiest to use are floor planner
and room sketcher. Both allow you to easily
draw your room, add windows, doors, and change the size of furniture pieces from their
library, which is critical. However, if you plan on
sticking with the free version, floor planner is the better
choice as it allows you to change the size of some of their furniture
and other objects, whereas you will
need to pay with room sketcher to get
that functionality.
35. My Favorite AI Tool for Bringing Your Design to Life: Let's talk about
the AI tools that are available to help you
bring your designs to life. I have spent considerable time trying out different AI tools, and it's been surprisingly fun and a little
frustrating, to be honest. You'll understand why as you
go through this lecture. That said, the world of
AI is rapidly evolving. So in this lecture,
I'll share with you my current favorite AI tool
and how I've been using it to source items for my design
projects and translate mood boards into photo realistic room designs
for an actual room, building on exactly what you learned to do
in this course. Please note that
I've also provided a downloadable
resource that includes all of the detailed prompts
I used in these examples. After reviewing a number
of different AI tools, I initially narrowed
it down to hat GPT, spasly AI, and interior AI. However, after considerable
time trying out these tools, while there's no
perfect tool yet, I found the best overall
choice to be hat GPT. Chat GPT has a free version, but when you are doing
image generation, you will quickly run out
of free image generations. You'll then have to wait
24 hours to generate more. So the monthly fee is well
worth it to knock out a room design and then cancel your monthly
subscription when you're done. All that said, let's dive in. My favorite use for Chat GPT is to take a design that I've created in another program and create a photo
realistic render. For example, here is the original design that I
used earlier in the course, and with a simple prompt, here is the result. What a beautiful rendering of this design and so easy to do. Now, you'll notice that it's not completely faithful to
the original image. For example, the top on the
end table is way too small, and it's added a floor lamp that wasn't in the
original image. But overall, it's impressive. Now let's talk about how to use this tool for the design steps you learned
in this course. First, Chat GPT can provide some assistance
in sourcing items. I've spent considerable
time asking it to source specific items
with very mixed results. I find it's more
helpful if you ask it where you should source
specific items, such as, what are the best
websites to source an eight by ten polypropylene blue, green and orange
abstract rug under $400? Here is the type of
information you will receive, which is useful if you have
no idea where to start. Additionally, if you see an
item in an inspiration photo, upload the image and
use a specific prompt, such as search for specific
verifiable product links for matching the gold arched floor lamp with
dome shade in this photo. Here are the results. Most were a good visual
match, but not all. My experience overall has been hit or miss
with this feature, but I have no doubt
it will improve. Sometimes it returns
better results if you can crop out the
item you're searching for and pasting that image into the prompt area so it knows exactly what
you are looking for. Apart from a single item, you can actually have it
search for items that try to match everything
in an inspiration photo. But again, you need to specify exactly what
you want it to source. And you can also see
that I instructed it to look beyond Wayfair
and Amazon, as well. It actually did a decent job returning similar items
with this search. Beyond experimenting
with sourcing, the next way I've been
using Chat GPT is to populate a photo of an actual room with
items from a moodboard, which can be done
in mere minutes. This is truly incredible. All you need to do is upload two images and a
detailed prompt. The first image should be a picture of your existing room, and the second image is a JPEG
or PDF of your moodboard. And this is what hat
GPT can do for you. As you can see,
some of the items aren't an exact match to
what is in the mood board. This is because Chat GPT interprets each item with
a degree of variation. This means that it may slightly
adjust furniture shapes, textures or object sizes without being explicitly
asked to do so. This is due to the fact
that it can't simply cut and paste from the mood
board, at least not yet, but the biggest benefit is to
be able to see the items or rather very similar items from your mood board inside an
image of your actual room. That said, if you also want to change the finishes
in your room, such as your paint
color or your flooring, you can also do
that with chat GPT, but I find this process
works better in three separate prompts or steps. The first step is to
upload a picture of your existing room and
have chat GPT empty it. It usually does this
extremely well, although it might make minor
changes to the architecture. The second step is to tell it to make the changes
you want to make, such as changing the paint
color and the flooring. When changing the paint color, you can either specify the exact paint color
you will be using, such as Benjamin
Moore's decorators white or use a general term, such as a cool
white paint color. The third and final step is to upload the mood board that
you've created with all of your items and ask hat GPT to furnish and
decorate the empty room, using the uploaded
moodboard as a reference. And here is the result,
not bad at all. I've also tried uploading a furniture layout in addition to a photo of the room
and the mood board, asking it to follow
the layout as well. It does a pretty decent
job provided that you describe in detail what the layout should look
like in your prompt. Additionally, it seems to work best if you break it
into two separate steps. First, empty your room,
as I just described, then ask it to populate from the mood board following
the furniture layout. Again, the items
will very likely not be the exact items you
have in your mood board, but they should
be quite similar. You can also use hat GPT to make small specific edits to a design or a photo
of your space. For example, you may want to center a light fixture
over a piece of furniture, move a plant to a
different location, or make a piece of
artwork 50% larger. This is also hit or
miss in my experience. Let me show you an example. Let's say we want to see how a different chandelier will
look in this living room. You simply upload this photo along with a photo of
the new chandelier and ask Chat GPT to replace
it. And here is the result. It did a good job of
rendering the new chandelier, but made small other
changes I didn't want, as there's currently no
true lock this change that capability that we have
with other design programs. As a result, other small changes often creep into your design
each time you render it. I've also found that
hat GPT can usually handle multiple changes
well in a single prompt, provided you are as
specific as possible. Beyond what we've
already discussed, there are a number of other helpful tasks hat
GPT can do for you. It can change the
lighting in your room. It can convert a sketch into
a full color rendering. It can change the aspect ratio
of an image to 16 by nine. It can swap the interior
design style of your room with new furnishings that match your requested style. This is very helpful to see how a certain style may work in your home without you having to source specific items first. Finally, it can change the view or camera
angle of a photo. Although beware that when
you ask it to do that, you likely will get changes to architectural details
that you don't want. So it's best to take a
picture of the room or the space straight on
rather than at an angle. In short, be as specific as you possibly can
be with the prompt, and maintaining your
patients is key. That said, this tool has
some incredible potential, and I can't wait to see how
it improves in the future.
36. Where AI Goes Wrong and Possible Fixes: Now let's talk in
more detail about the frustrating aspects of
chat GPT for interior design, and more importantly, possible
fixes for these problems. I say possible because
based on considerable use, these solutions usually
work but not always. First, it's very important
that you give it a full prompt each and every time regarding your
desired final output, even if you are just making a small change like
removing a light fixture. Remember, it regenerates the
image every single time, using your prompt as
a generative prompt rather than a strict
image editing task. It may feel like you
are being repetitive, but giving it a full and
complete prompt each and every time improves your
chances of the best render. This is why I keep
standard prompts in a separate document for
actions I use repeatedly, such as converting designs
into photorealistic renders, making specific
changes to the render, and populating a room photo
with items from a mood board. Second, in my experience, the first render is
the best render. The more changes
you try to make, whether at once or in sequence, the more difficulty
it currently has. Again, it doesn't have the
ability to lock everything down like you can with
other design software, so more iterations means more likely variation
with each render. Third, if you want
to move an item, I found it works better to
break it into smaller steps. For example, I might say, remove the large
cabinet on the right, then reinsert the
large cabinet on the mood board centered between the two windows
on the back wall. It doesn't always follow
your commands exactly, but it will often get close. Fourth, you can
have hat GPT help you fix errors on
renders to a point. For example, if it returns something that
is clearly not right, meaning it ignored
part of your prompt, you can ask chat GPT why it
didn't follow your prompt. In my experience, it will immediately recognize the
problem and will try again, or it may ask you
permission to try again. Sometimes that works
and sometimes it doesn't it doesn't best to go back and upload the
best image and give it a very detailed prompt with the change you
are looking for. I have also found that it
often works better to have Chat GPT rewrite
the prompt for you. Fifth, it's not able to create useful floor plans or furniture layouts on its
own at this point in time. This is something you will
still need to do on your own with the methods I described
earlier in the course. Finally, be aware that
different versions of chat GPT have different
capabilities. I've been using versions
four oh and five. I have had better
success with four oh for renders and Version five
for sourcing products. I have found it's
helpful to give the same prompt to
different versions and see how they perform. The bottom line is that
you need to have patients, patients, and more patients in these early days of using
AI for interior design. Despite all of these challenges, I still think it's an
excellent tool for anyone to use with home
design projects because being able to quickly
and easily see how new pieces are going to work in a decent approximation
of your room, change finishes, and try out
different styles without having to source
pieces, priceless.
37. Alternatives AI Tools for Interior Design: As you know, I am currently
recommending hat GPT as the best overall AI tool to help you with your
interior design projects. While it's not perfect,
it is incredibly easy to use and will enhance many of the skills you
learned in this course. Additionally, as I mentioned, you really do need
the paid version if you plan on doing
image generation. While there is a free version, unless you create a free
account with a login, you won't be able to do
any image generation. But even if you do create a
free account with a login, you will have very limited
image generations, and they will be lower
quality renders. That said, you may be wondering, what are the alternative AI
tools for interior design. As I discussed earlier
in the course, I did spend time using
Spacely AI and interior AI. Let's talk about
Spacely AI first, as this was a good runner up
with similar functionality. Regarding cost, it's
definitely more expensive than hatGPT about twice the cost for unlimited monthly renders. Technically, Chat GPT has
a limit on daily renders, but I have yet to hit it,
and I've used it a lot. Also, although Spacly
AI can turn your design from another program into
a photo realistic render, I don't think it does as
good of a job as hat GPT, although it is faithful to the original image,
which is excellent. Now let's compare it
with my favorite thing to do in chat GPT, namely to populate a photo of an existing room with
items from a mood board. Like Chat GPT, Spacely AI does a great
job of emptying a room, and it seems to stay faithful
to the architecture. However, there's no
quick way to apply items from a mood board
to an existing room. Instead, you can
upload images of your own sourced items and insert them into
your empty room. But that's essentially
the same process we use with other
design programs, which, of course, is
more time intensive. It's not the quick, easy turnaround that you
get with Chat GPT. For me, this is a major
disadvantage with Spacey AI. That said, it does a great job of applying
a style to a room if you are simply
interested in seeing whether or not a specific
style will work in your room. It also has a nice feature of providing four different
renderings each time. It will also follow a
furniture layout prompt fairly well if you give
it a detailed prompt. Like chat GPT, it will hallucinate items
you didn't ask for, but generally it followed
the majority of my prompt. Interior AI is similar
to spacely AI, meaning it can transform designs into
photorealistic renders. It can redesign an
existing space with a different style and can
populate an empty room, which is ideal for those
in the staging business. But it has the same
major limitation. It can't populate your room
with a custom mood board, either all at once like
you can with chat GPT, or item by item, as you can with Spacely AI. It also isn't able to
follow a furniture layout. Now let's talk about
specific functionality and where to turn beyond
these three programs. If you are looking
to convert designs, mood boards, or sketches
into photorealistic renders, you can also check
out re room AI, Canva AI interior design, and home visualizer AI. If you want to change finishes
in a photo of your room, check out remodel AI, Home Designs AI, and the
SmartRplacer tool from IDLHouse. If you're just interested in
trying a different style in a photo of your room without
sourcing specific items, many AI software
programs abound, including but not limited
to home designs AI, my room designer AI, Canva AI, interior design, home styler, reimagine Home, Room GPT, and home visualizer AI.
38. Conclusion: Great job, and that's it. You now know how to design scheme much any room in ten easy steps. As a quick review, here are the steps again. Step one, measure your room. Step 2b, decide on the key activities. Step three, twos your style. Step floor, choose your color scheme. Step five, 2's your rug. Step six, choose your furniture. Step seven, choose your Walmarts and wall decor. Step eight, 2's your lightened. Step nine, a window coverings. And step ten, choose your accessories and the greenery. Hopefully, you are now feeling confidence to tackle your own design project and create a beautiful and practical space in your own home. If you have any questions, please do not hesitate to send me an email. I am more than happy to help answer your follow-up questions. Thank you so much and happy decorating.
 Erikka Fogleman, Interior Designer