Transcripts
1. 1 Introduction: Welcome to How to create a customizable calendar
in Adobe and design. A month, any year, any
style, in minutes. Hi there. I'm Deb Jeffrey. So I used to have a
boss who would say, Can you go push a few
buttons and make it happen? If it were anyone else, I
would have been offended, but because he knew that I knew how to use shortcuts
to get the job done, I would go push a few buttons, and a, the job was done. Today, I'm going to
teach you how to set up a calendar template
so that you will have the ability to create
a calendar for any month of any year with style options simply by
pushing a few buttons. This class is beginner friendly. So even if you've never
touched InDesign before, you'll be able to follow
along step by step. And if you're already
comfortable with in design, you might just pick
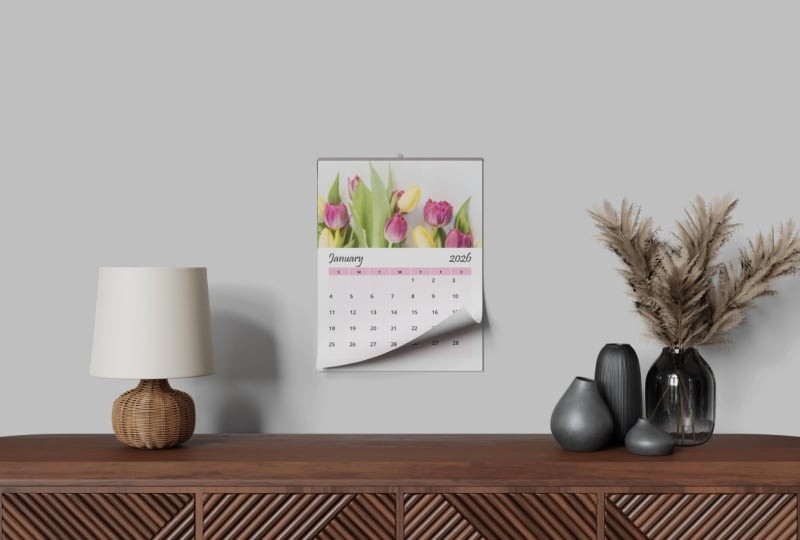
up a few tricks for automating your workflow. Here's the calendar
we'll be making today. We'll create this
design together, and then I'll show you how to
automate it even further so you can change the appearance with just the push
of a few buttons. Are you ready to get started? Then head on over to
the next video where I will share the class
project and resources. I'll see you in the next video.
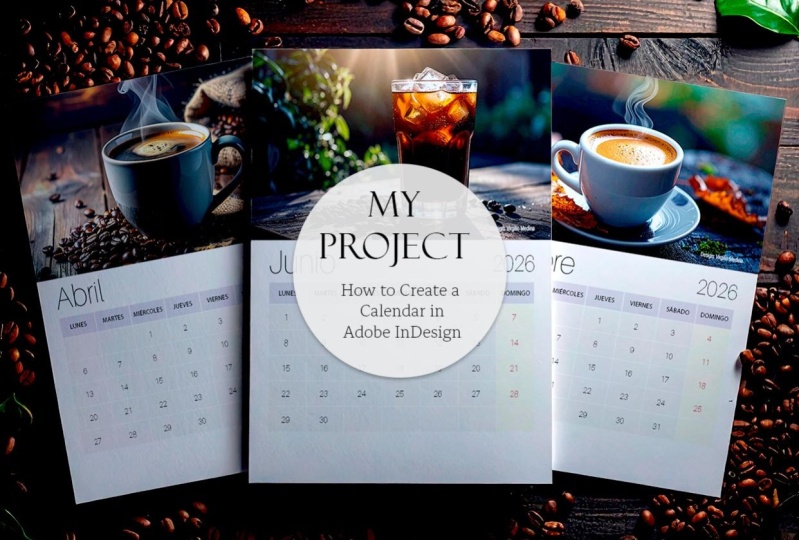
2. 2 Class Project & Resources: Welcome to the Class
Project in resources video. Your class project is to design a single month calendar page using the techniques you
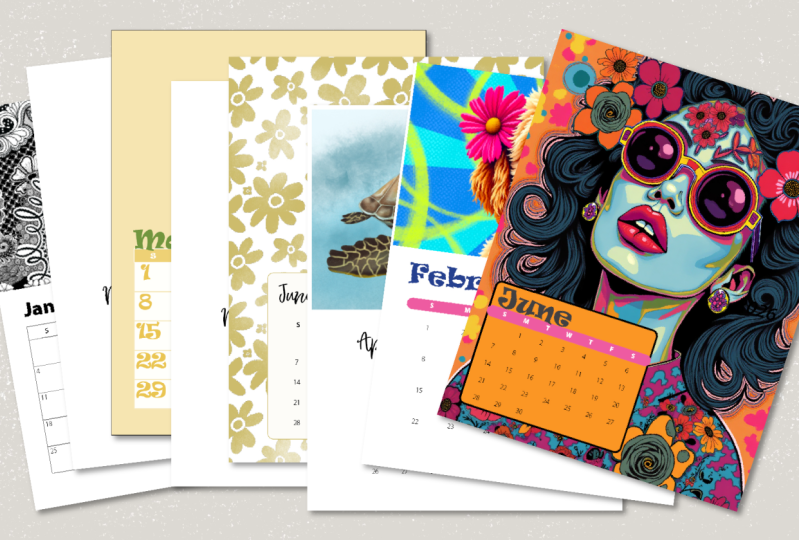
learn in this class. You can choose any style, maybe it's floral, minimal, modern, seasonal, or even features your own
photography or artwork. And when you're done, upload your page to the
project gallery. You can take a screenshot, export a PDF or JPEG, or even place it in a mockup to see what it would look
like hanging on a wall. Here's what you'll
need for this class. Adobe InDesign. I'm
using Creative Cloud, but an older version
will also work. A font or two that you like. You can use ones that are
already on your computer or download free fonts from
a site like Google Fonts. The important thing to
remember is that if your calendar will be offered
for commercial purposes, your fonts need to be
licensed for commercial use. Images or illustrations
for your header area. You can use your own work
or royalty free images from sites like Unsplash
Pexels Pixabay. And finally, your
calendar creation guide. You will find it in the
resources section of this class, and you can download it by using the password
shown on the screen. That's it. Now, click on the next video and we'll set up our document and workspace. I'll see you in the next video.
3. 3 Setting Up Your Document & Workspace: Welcome to the setting up your document and
Workspace video. Let's launch InDesign and
click on New Document. We will be setting up our calendar and
portrait orientation so that it has an image on the top and the
calendar on the bottom. For page size, I'll be using US letter size paper that
is 8.5 " wide by 11 " tall. If you're outside the US, you can use paper size A four and set the
orientation to portrait. Under pages, enter 14. We want to make
sure that there is not a checkbox next
to facing pages. Under margins, we want to select half an
inch on all sides. This will give us enough
breathing room for our design without
crowding the edges. And if you'll be sending your calendar to a
professional printer, go ahead and set the
bleed to 0.125 " all around so that your artwork goes right
to the edge of the page. If you're printing at home, you can set the bleed to zero. Then click Create. So
my 99-year-old dad used to love to watch
the prices right. So I have to confess, I've watched more than a
few episodes with him. In some of the games, they say, Lock in those numbers. Well, next, we aren't going
to be locking in numbers, but we are going to save
ourselves a bunch of time later by locking
in some presets. First, let's set up a preset for the primary font that we'll
be using for this class. To set up your font preset, go ahead and select
the text tool from the left
toolbar and head on up to that top menu and select your primary font from
the drop down list. For this class, I will be primarily using
myriad PfontFamily. So I'll select that from
the drop down menu. Next, let's set up our
image fitting preferences. This will allow our images to be placed exactly like
we want them without having a fuss with resizing and placement each time we want to place one of our
calendar images. So to set up our image
fitting preferences, let's go up to the main menu
at the top of our screen and select object frame
fitting options. Let's check the box next to Auto fit and under
content fitting, select fill frame
proportionally from the menu. Under a line from, click on the center
box, then click Okay. Now let's save our file with those presets by going up to
the main menu at the top of our screen and clicking on File Save and giving it a file
name of calendar template. Now, in order to create our calendar template
with push of a button Es, let's start by creating a calendar workspace that
holds all of our calendar making tools in one place so that we're all at the
same starting place. Let's go up to our main
menu at the top of our screen and clicking
on Windows Workspace. Then select Essentials Classic
Workspace from the list. Once we're on
Essentials Classic, let's go up to our
main menu, and again, this time, go to
Windows Workspace and select Reset
Essentials Classic. We're now ready to
add the tools that we will need for
creating calendars. So let's go up to Windows Styles and click on Cell Styles. A Cell Styles
dialog box pops up. We want to click and drag the entire Cell
Styles dialog box into our tools panel
on the right by placing your cursor
over the top bar of the Cell Styles bar and clicking and dragging it over to the toolbar
on the right. When you see a blue
horizontal bar appear in the right toolbar, go ahead and release your mouse. You should now see
Cell Styles table and table Styles in
your right toolbar. Now we're going
to do that again, but this time we're
going to move Paragraph Styles into
our right toolbar. So let's go up to the main menu, Window Styles and click
on Paragraph Styles. We want to click on
the tab that says Paragraph Styles and drag it into the toolbar
on the right. And when you see the
blue horizontal bar appear in the right toolbar, go ahead and release your mouse. Go ahead and click on the two right facing arrows on the character Styles
dialogue box to close it. Now, just one more thing. You want to make sure you can see your left and top rulers. If you don't see
them on the screen, go ahead and hold down your
Control or command key and press the R. You should now see a ruler just to the
right of your left toolbar and one along the top of
your document creation area. Great job. Your tools
are now in place. Now, let's save this as
a calendar workspace, and you'll be ahead of the game next time you want to
create a calendar. To save this as a workspace, go up to the main menu
Workspace, New Workspace. Under name, enter calendar. Then click Okay. Your
calendar workspace is now saved and can be accessed anytime you want to
make a calendar. Simply by going up
to the main menu, window workspace, and
selecting calendar. Okay, with the setup work done, let's get into the habit of saving our work and
using the keyboard shortcut Controller Command
plus S to save our document. Now, go ahead and click
on the next video, and we'll get started
building our calendar.
4. 4 Building Your Calendar: Welcome to the calendar
creation video where we start
creating our calendar. If you've taken
any of my classes, you know that I
like to explain how Indesign works before
teaching the subject. I'm going to try something
a little different here and just dive right into
creating a calendar, and then I'll share more about in design and the
tools that will help you style your calendar
with push of a button Es. But if you're new in
design, don't worry, I will still walk you
through each step of the way so that you don't
get lost. Are you ready? We set up our document already, so we have a portrait oriented document
showing on our screen. Now, we aren't going to create our calendar template
on that document. We're going to go
over to the toolbar on the right and click on pages. You will see that
the pages panel is divided into two sections, a top section that
holds a parent, a dividing line, and numbered pages down below
that dividing line, and they all have an A on them. We will be building
our calendar template on the A parent page. So let's double click
on the A parent page up at the top of the pages
panel to open it up. You will know that it's
open because the page to the right of Aparent
has turned blue. The blue color lets you know that this is the page
you're working on. Let's go ahead and close the pages panel for now so
that it's not distracting. You can close it by clicking on the two right facing arrows at the top of the pages dialog box. Okay, let's start building
our calendar template. We want to start by going up to the main menu,
table create table. We want our table
dimensions to be body rows six, columns seven, header rows one, footer rows, zero, table style basic
table, and click Okay. Your cursor is now
loaded with that table. So we want to place our cursor around the six inch mark on our left margin line
and click our mouse. Your calendar grid
should now fill the bottom portion of
your document space. Next, we want to add
our days of the week. I'm going to use a single letter to indicate the
days of the week, but you can spell out
each day if you want to. To enter our days of the week, we want to grab
our text tool from the tools panel on the left and place our cursor into the very first cell at the
top left of our table. Now enter S or Sunday,
if you choose. Then hit the tab key to
move to the next field. Go ahead and enter all of the
remaining days of the week. Now, let's go ahead
and enter our dates. Place your cursor into the first date cell
just below Sunday. Now we're going to go
up to our main menu, type bulleted and numbered
lists, apply numbers. It looks like nothing
happened, but it actually did. Go ahead and hit your space bar, and at one period should appear. Now, let's click and drag to
select the cell that holds the one period and copy it by either going up to the
main menu, edit copy, or using keyboard shortcut
Control or Command plus C. Now, let's select the Monday
through Saturday fields in the same row and paste by either going up to
the main menu, edit paste, or using keyboard shortcut
Control or Command plus V. Now let's select all of the remaining
date cells and paste. Again, using the main
menu, edit, paste, or the keyboard shortcut
Control or Command plus V. Now let's add our month
in year placeholders. If it's not already selected, go ahead and grab
your text tool from the left toolbar and drag out
a text box for your month. Then enter the word month. Now drag out a text
box for the year and this time enter the actual year that you are creating
your calendar for. For this class, we
are using 2026. Next, we will add an image
placeholder by going over to the left toolbar and clicking on the rectangle
with an X through it. Then clicking and dragging
out our image placeholder. You can go from bleed
line to bleed line for an image that fills the
page from left to right, or you can leave a margin
all around. It's up to you. For this class, I'm going to drag it out from the top left of the bleed line intersection to the right bleed line at about
the 5.25 inch on the ruler. Let's save our work by holding down the controller
command key and hitting S. So here it is,
your calendar template. I know it doesn't look
like much right now, but let's just see how it works, and then we can come
back and style it. Go ahead and click
on the pages panel in the right toolbar. You'll notice that
the pages down below the dividing line are now filled with the calendar grid
that you just created. That is the beauty of design. We created the calendar
template on Aparent and the A parent template
is applied to all of the pages in the
bottom document section. Now, we want to place
our cursor on page one and double click our mouse. Then we want to
right click on page one to open up the options menu. We want to click on Override
All parent page items. You'll notice that
in the pages panel, page one is now blue
indicating that it's now the active page or the
page that we're working on. So now that we're on page
one in our document, let's grab our text tool
and click and drag over a month and replace it
with the word January. Next, we will adjust
the calendar dates so that the calendar
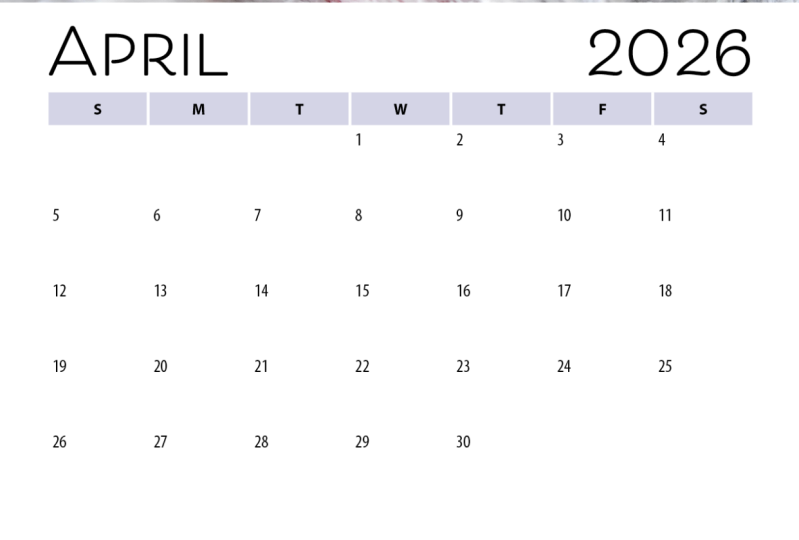
reflects January 2026. January 2026 starts
on a Thursday. So in that first date row, we want to select
the numbers that appear from Sunday
through Wednesday, then hit our delete key. You'll notice that
the first is now on a Thursday and all of the other numbers have
readjusted themselves. January has 31 days in it, so we want to select
and delete all of the numbers after the 31st. Next, we want to
place our image. So let's grab our selection tool from the left tool menu and click on the Image
placeholder in the top section of
your document page. Now, let's go up to File, Place or use keyboard shortcut
controller command plus D, find our image, and
then click Open. And it's as easy as that to
create a calendar template, then edit your monthly
calendar page. Let's go over to
the pages panel, and with page one in our
document section selected, let's hit the trash can at the bottom of the pages
panel to delete it. Then head on over
to the next video, and I'll teach you how
to style your calendar.
5. 5 Create Your Calendar Styles: Welcome to the Create your
calendar styles Video. This is where we
create the styles that will allow us to
create and style a calendar format with push of a button Es to
style our calendar. We want to work on
the parent page. So let's go over to
the pages panel on the right and double
click on Aparent. The rectangle to the right
of the A parent should be highlighted blue to indicate that this is the page
that you're working on. Now, let's style our calendar. With our text tool selected, let's go ahead and
select the word month. Then go up to the text toolbar and select the font
of our choice. Since we set our
primary font earlier, it should be just a
matter of selecting the style of the font that
you want to use and the size. I will be using Myriad Pro
Black at a size of 50 points. Now, let's style our year. Again, I will be
using Myriad Pro, this time semi bold italic
at a size of 40 points, and I'm going to write
a line the year also. Next comes our days of the week. Go ahead and select
all of your days of the week and style
them the way you want. I will be using Myriad Pro semi bold at a point size of 14. And this time, I'm
going to center them both horizontally and
vertically within the cell. Now, with the days of the
week cells still selected, let's adjust the
height of the rope. You can do that by either using the table dialogue at the top of your screen or the one
that's in your right toolbar. You can use the arrow keys
next to the row height box, or you can enter
a set dimension. I'm changing my days of the
week row height to 0.375. And finally, let's
style our dates. We will get rid of the
periods in just a moment, so you can ignore them for now. So let's go ahead
and select all of the dates in the date
cells and style them by selecting the font style
and the size that you want. I will be using the myriad
PfontTs time I'm going to use light condensed and
bump the size up to 20. Okay, it's looking better but still not quite print ready. For the next step,
we're going to get rid of the periods
and the date cells and save the styling we have just done by creating
a paragraph style. A paragraph style allows us to format text once and then apply that style or update text that uses that style at
push of a button Ease. I can show you what I
mean by asking you to select the number one
cell in your calendar. With the cell selected, let's click on
paragraph styles in the right toolbar to open up the paragraph styles dialog box. Now, while holding down
your alter option key, click on the plus
symbol at the bottom of the Paragraph Styles dialog box to create a new paragraph style. Under style name,
enter Ps dates. Now under bullets in numbering, under numbering style number. Select and delete the
last three characters so that just the carat and
the hash tag remain. Then ensure their preview box
is checked, and click Okay. You will now see that
the period after the one in the first
date cell is gone. Now, let's see how
paragraph styles work by selecting all of
the remaining date cells. Then with them selected, click on the PS dates paragraph style that
you just created, and you'll notice that all of the numbers are now styled
without the period. Now let's apply
the same principle to other sections
in our calendar. Let's go ahead and select
our days of the week. Now, with our days of
the week selected, let's go up to our Paragraph
Styles dialogue box. And while holding down
our alter option key, let's click on the plus
symbol at the bottom of the dialogue box to create
a new paragraph style. Under style name, Enter
Ps days of the week. Let's make sure
the apply style to selection box is
checked and click Okay. Now let's do the
same for a year. We'll select the year. Let's go over to our Paragraph
Styles dialogue box. And while holding down
the alter option key, let's click on the plus
symbol at the bottom of the dialog box to create
a new paragraph style. Under style name, Enter PS year. Let's make sure
the apply style to selection box is
checked, and click Okay. Now let's do the same for month. Let's select the
month, then go over to the Paragraph Styles dialog box, and we're holding down
our alter option key. Let's click on the plus
symbol at the bottom of the dialogue box to create
a new paragraph style. Under style name, enter
PS month and click Okay. Now, let's create a
paragraph styles group that includes the four paragraph styles that we just created. To do that, we want to hold down our controller command key while clicking on each of the paragraph styles that
we just created. With all four styles selected, right click and select
new group from styles. Under name, call it PSA. Now, there is one
other style that will help us create highly
customizable calendars, and that is the cell style. We'll create two
different sell styles, one for the days of the
week and one for the dates. To create the dates sell style, let's click on Sell styles in the right toolbar to open it up. Then grab the text tool from the left toolbar and
select all of our dates. Then let's click
on the Sell styles and the tool bar on the right. And while holding down
the alter option key, let's click on the plus
symbol at the bottom of the dialog box to
create a new style. Under sell style
name Enter CS dates. Make sure there's a check
in the preview box. Then click Okay. Now let's do the same for the
days of the week. Let's highlight our
days of the week, go over to the
Cell Styles panel. And while holding down
the alter option key, click on the plus
symbol at the bottom of the dialog box to
create a new style. Give it a style name of CS days of the week
and click Okay. Now, let's create a
cell style group, just like we did for
the paragraph styles. Let's hold down the
controller command key and click on each of the
cell styles we just created. With both selected, let's right click and click on New
Group from Styles. Let's give it a style
name of CSA. Great job. With our calendar table created, basic styling done, paragraph
and cell styles created. We're ready to put all of
these pieces together to change the look of our calendar
with push of a button Es. Let's save what we've
just done by holding down the controller command
key and hitting S. Now, I want to show you
this little trick so that you can
use it throughout the remainder of the class to view your calendar
without guidelines. If you place your
cursor anywhere off of your document
and hit the W key, it works as a toggle
to alternately turn your grid lines off and on
each time you hit the W key. Now, in looking at our calendar, it seems a little
high on the page. So let's grab the selection
tool from the left toolbar. Click on the calendar grid. Then use our arrow keys to adjust the calendar
grid location. I'm going to move mine down a bit by using the down arrow key. Next, I'll select the
month and year and move them a little closer
to the calendar grid, again, by using the down
arrow key to reposition them. Now with everything in place, let's hide our guidelines
by clicking outside of our document area
and hit the W key. Now to preserve all
that we've just done, created and styled our
calendar template, created paragraph
styles group PSA, created SL styles group CSA, and touched up the overall
look of our calendar grid. Let's save our work
by holding down the controller command
key and hitting S. Now, go ahead and head on
over to the next video, and I'll show you
how you can create any calendar month for
any year in any style, oh with the push
up a few buttons.
6. 6 Putting It all Together: Welcome to the Putting
It All Together video, where we will see just
how easy it is to create calendars for any month
of any year in any style, simply by pushing a few buttons. In our last video, you
learned how to create paragraph and sell styles to automate this styling
of your calendar. You can work from the styles
you've already created and simply update them to get a new look for
your calendar. But I wanted to show you how to duplicate the work that you've already done to
preserve that work, plus give you options for other calendar styles with
the least amount of work. So let's preserve our work by duplicating the A parent page, the PSA paragraph style group, and the CSA cell style group. To duplicate the A parent page, let's go up to the pages panel and double click on a parent. Then right click on it to access the Options box and select duplicate
parent spread Aparent. You will see that a B parent
page has now been created. Next, we're going to duplicate our paragraph
styles group. So let's go over to the Paragraph Styles
panel on the right. Click on the PSA group name, then right click and then
select Duplicate StyleGroup. Now, we want to rename the
duplicate style group. So go ahead and double
click on PSA copy and change the name to
PSB. Then click Okay. Then go ahead and click on
the right facing arrow to the left of the group name to open up the new style group. Now let's duplicate
our cell styles group. Let's go over to the
Cell Styles panel and click on the CSA group name. Then right click and select
Duplicate Style Group. Now we want to rename the
duplicate style group. So go ahead and double click on CSA copy and change
the name to CSB. Then click Okay. Now go ahead and click on
the right facing arrow to the left of
the CSB group name to open it up. Great job. You have now created a
calendar set that worked together to create your
first calendar style group. The hard work is done. So now it's just a matter
of copying the work that you've already done and
making some changes to fonts, grid lines, cell
colors, position, and you have the
ability to create any calendar style
you can imagine. Let's make sure our guidelines
are hidden for this part, and you'll see just how easy creating new calendar
style options can be. Let's go up to the
pages panel and select the B parent by
double clicking on it. Now we want to apply the PSB paragraph
styles group to it. So let's click on
the paragraph styles in our right menu to open it up. Now, let's grab our text tool and select month
in our document. Now go over to Paragraph
Styles Dialog Box and click on PS month under PSB. Next, let's select the
year in our document. Go over to the Paragraph
Styles dialog box and click on PSY under PSB. Now, let's select our days
of the week and click on PS days of the
week under PSB. And finally, let's
select our dates and click on PS dates under PSB. Now that we have connected our B parent page to the
PSB paragraph styles, let's connect them to
the CSB sell styles. Let's click on Cell Styles in the right menu to open it up. Now let's select our days of
the week in our document. Go over to Sell Styles and click on CS days of the
week under CSB. Now, let's do the
same for the dates. Go ahead and select all of
the dates in your document. Go over to SellStyles and
click on CS dates under CSB. Now it's time for
a little magic. With nothing selected on your document and your
guidelines hidden, let's double click on CS
days of the week under CSB. Now, let's click on
strokes and fills. Let's make a change that
will be pretty obvious. So under strokes and fills, change the weight to two. The color to paper and
the type to solid. Then under cell fill, let's change the color to the dark blue and give
it a tint of 15%. Then click Okay.
You will see that you now have a shaded header row and the black border is gone. Now let's add some shading
to our date cells. Go ahead and double click
on CS dates under CSB. Then click on strokes and fills and under
strokes and fills, change the weight to
two, the color to paper, and the type to solid. Then under cell fill, let's change the color
to the dark blue. But this time we'll
give it a tint of 5% and then click Okay. Now, let's say you wanted to change the look of
your month and year. Let's go over to
Paragraph Styles, where we will be working
with the PSB style group. Let's double click on
PS month under PSB. Under basic character
formats, font family, highlight the
current font family, then use your arrow
up and down keys to search for a font that
you would like to use. I'm going to use Rave. I like the size
that it is already, so I'm just going to
change the font for now. When you have found
the font that you want to use, go
ahead and click Okay. I'm going to change the year
to the same font family. To do that with
nothing selected, I'm double clicking on PS year, and under basic
character formats, font family, I'm
going to highlight the current font
family and then use my arrow up and down keys to search for a font
that I want to use. Or in this case, since I already
know I want to use Rave, I'm going to select
that from the list. I like the size that it is, so I'm just going to
change the font for now. When you have found
the font that you want to use, go ahead
and click Okay. So you can see that
just by making a couple of changes to your
paragraph and see styles, you can create a
totally different look just by pushing a few buttons. Feel free to duplicate this method to create
as many parent pages, paragraph style groups, and see style groups
that you like. Some additional things
that you can do are change the color of the grid lines or any of your character colors, remove the grid
lines altogether, change the column
width or height. Move the month and year to different positions on the page, change your image size, place an image behind your calendar to fill
the entire page. With parent pages, sill style and paragraph groups created, you have completed the
hardest part of this process. So now it's just a matter of selecting the calendar
you want to use. Let's save our process
by holding down the controller command
key and hitting S. Now, let's head on over
to the next video, and I'll provide you with a calendar making walk
through to show you just how quickly you can create a full calendar from the
templates you've created. I'll see you in the next video.
7. 7 Calendar Walk Thru: Welcome to the calendar
walk through video. We're using the parent pages
and styles we just created. We will create a calendar from start to finish in a
matter of minutes. Our document now
contains 13 pages. Page one will hold
our cover image, and pages 2 through 13 will hold our 12 monthly
calendar pages. Let's double click on page
one in our pages panel. Right click and select
Apply parent to pages. Under Apply Parent,
select the NN page, and to pages Enter one. Next, we need to decide on which parent page we want
to use for our calendar. For this demo, I'm going
to be using parent A. So in the pages panel, I'll double click on page two, then right click and select
Apply parent to pages. Under Apply parent,
I'll select a parent, and under two pages, I am entering two Hyphen 13. Next, we need to override
the parent page items. So in our pages panel, we want to select
pages 2 through 13, either by clicking on page two, holding down your shift key
and clicking on page 13 or by clicking on
each of the pages while holding down the
controller command key. With pages 2 through
13 selected, we need to right click to
open the Options menu. Then click on Override
All parent page items. Now, starting with our cover, let's grab the rectangle tool
with the X through it from the tools panel on the left and drag out our
image placeholder. We can now go up to
the main menu, file, place, find our cover
image, and hit Open. We will be creating
a 2026 calendar, so let's scroll
down to page two in our document and start making
our January adjustments. We will change month to January. January starts on a Thursday. So we'll delete Sunday
through Wednesday dates. January ends on the 31st, so we'll select and delete
any dates after the 31st. Now we'll place our image by
grabbing the selection tool, selecting our image placeholder, and using keyboard shortcut
Controller Command plus D to find our image, select it, and then
clicking Open. Now let's move on
to page three where we will replace
month with February. February starts on a Sunday, so no dates have to be deleted
at the start of the month. It ends on the 28th, so we need to select and delete all of the dates after the 28th. Next, we need to place
our February image. Now, we're onto page four, and we'll replace
month with March. March starts on a Sunday also, so we don't need to select and delete any of the dates at
the start of the month. It ends on the 31st, so we need to select and delete
the dates after the 31st. Next, we'll place
our March image, and then we're onto page five. Let's replace month with April. April starts on a Wednesday, so we select and delete
the dates in the Sunday through Tuesday field of
the first date cell row. April ends on the 30th, so we need to select and delete all the dates after the 30th. Next, we need to place
our April image. Then we're ready to
move on to page six, and we'll replace
month with May. May starts on a Friday. So we'll select and
delete the dates in the Sunday through
Thursday cells. May ends on the 31st, so we can select and delete all of the dates after the 31st. Next, we'll place our May image and move on to page seven, where we can replace
month with June. June starts on a Monday, so we'll delete the date
in the Sunday cell. June ends on the 30th, so we'll select and delete
all dates after the 30th. We will then place
our June image and move on to page eight. Now we're ready to
replace month with July. July starts on a Wednesday, so we need to select our
Sunday through Tuesday dates. July ends on the 31st, so we will select and delete all of the dates after the 31st. Next, we'll place our image
and move on to page nine. Let's replace month with August. August starts on a Saturday, so we will select and delete the Sunday through
Friday date cells. August ends on the 31st, so we'll select and delete all of the dates after the 31st. We'll place our August image. Then let's move on to page ten and replace month
with September. September starts on a Tuesday. So we'll select and delete the Sunday and
Monday date cells. September ends on the 30th, so we'll select and delete all of the dates after the 30th. Next, let's place
our September image. Then we can move on to page 11, where we can replace
month with October. October starts on a Thursday, so we'll select and delete Sunday through
Wednesday date cells. It ends on the 31st, so we'll select and delete all of the days after the 31st. Next, we'll place
our October image, and then we'll move on to page 12 and replace month
with November. November starts on a Sunday, so no adjustment is needed to the cell dates at the
start of the month. It ends on the 30th, so we will select and delete all of the dates after the 30th. We can then place
our November image and move on to page 13. And replace month with December. December starts on a Tuesday, so we'll select and delete the Sunday and
Monday date cells, and it ends on the 31st. So we'll select
and delete all of the date cells after the 31st. Now, let's place our December
image, and you did it. You have created a
fully styled calendar in a matter of minutes. You can now go back
through and make any minor adjustments
that you choose. Things like hiding extra
rows, resizing cell heights, adding text or images to fill in any empty spaces on
your pages. Great job. There's just one more
thing you need to know how to export your
calendar for print. Go ahead and meet me
in the next video, and I will share how to export
your calendar for print. I'll see you in the next video.
8. 8 Exporting Your Calendar for Print: Welcome to the Exporting your
calendar for print video. To export your
calendar for print, go up to Main Menu File Export. Under Save As type, select Adobe PDF Print. Click Save in the Export
Adobe PDF dialog box, under Adobe PDF preset, select Press Quality print if you will be
sending your file to a printer and high quality print if you will be providing
your PDF as a printable. Under pages, select all. Under Marks and Bleed. Under offset, change to zero. And under Bleed and Slug, check the box next to use
Document bleed settings. Under advanced, change fonts, subset fonts 1% of
characters used is less than changed to 0%.
Then click Export. To save one or more
pages as a JPEG or PNG, go up to the main
menu file export. Under save as type, select JPEG or PNG. Click Save. Select your pages. Change Image resolution
to 300 and click Xpt. That's it. Go ahead and click on the next video and we
will wrap up this class.
9. 9 Class Wrap Up: Welcome to the final video. You did it. You learned how to create a calendar workspace. You learned how to create
a calendar template, how to create and
edit Cell Styles, paragraph styles, parent pages, and you learned how to
put them all together, place images, edit your styles, and create a personalized
calendar for any month of any year in any style in a
matter of minutes. The options are
really limitless, and my hope is that you are
armed now with knowledge and ready to go and create calendars that you can
give away or sell. Please know that I appreciate you taking the time
to learn how to make a calendar for any
month of any year with push of a button E's. At this point, I'd love
to request two things. One, that you please post a
page from your calendar in the project section
for this class so that we can all see your
beautiful calendar page, and second, that
you leave a review. Now, if you have any
questions or would like to suggest content
for future classes, please contact me. I'd
love to hear from you. Thank you again and
happy calendar making.
 Deb Jeffrey, Artist/Planners/Skillshare Teacher