Transcripts
1. Intro: Never before has it
been easier to create high end professional sounding music right from your home. In fact, the device you're
watching this on right now is more powerful than
recording studios were 20 years ago. But the moment you start
looking into gear, cables, interfaces, doors, microphones, it can get
overwhelming really fast. And I've been there
myself, and I promise it does not have
to be that complicated. Let me show you. Hey,
friends, how's it going? I hope you're a a great
day. My name is Mike. I am a UK based
musician, producer, and music instructor, and also proud to be a top teacher
here on Skillshare. And I've spent the last 15 years making music in all
sorts of places. I'm recording studios
to classrooms, care homes and tiny bedrooms. So, trust me, when
I say, I know what it's like to piece
together a studio just about anywhere
with all kinds of budgets, all kinds of rooms. And that's exactly why
I made this glass. I wanted to take the stress and the confusion out of
building a studio at home. Whether you're making
your first song or you're looking at building a space to make really high
end professional recordings. To start, I'm going
to help you choose the right device for
your music making. Be that MAC, PC, tablet or even your phone. We'll explore the
most popular doors, the pros and cons to each, and which one to pick that
best suits your style. Break down interfaces and mini controllers in a
simple straightforward way. I'll walk you through
different mics, as well as how they work
and how to use them. We'll also talk about headphones and monitors so you
can listen back, mix, and control your
sound with precision. And finally, we'll learn
how to sound treat your room so it sounds great
without spending a fortune. By the end of this
class, you're going to have all the
information you need to set up and build a studio that feels like yours and hopefully, it gets you inspired to create. I really believe that every
artist deserves a space where they feel inspired and
like their ideas can grow. So hopefully, this class
enables you to do that. So I hope to see you
there on the class. Oh
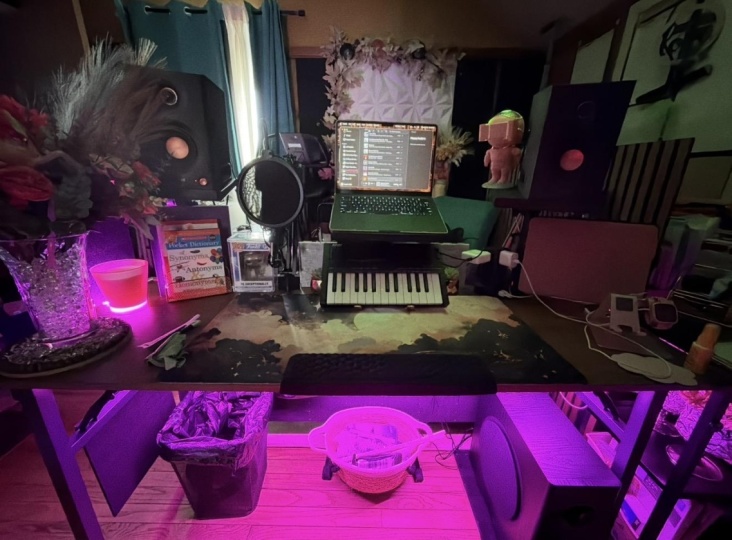
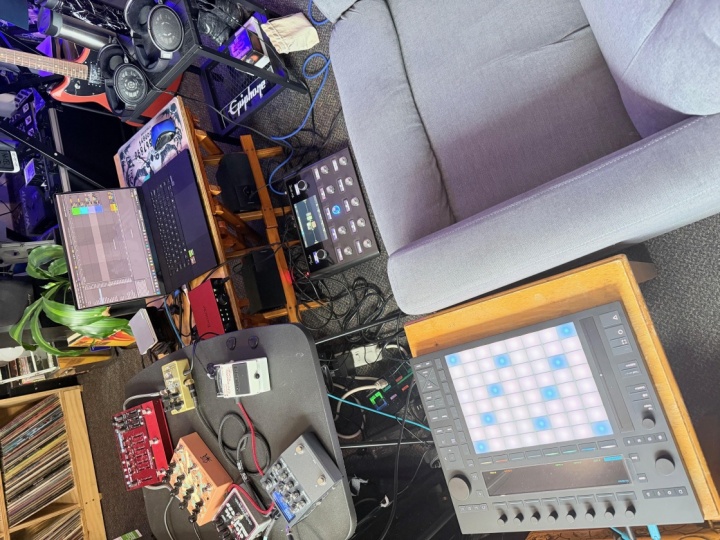
2. Class Project: Hey, friends, how's it going? Massey, thank you for joining me here on my How to Build
a home studio class. Really, really excited
to have you here. I really hope you enjoy it. You have a good time
and learn lots of cool stuff about building
a studio at home. So just before we
jump into things, I very quickly want to talk
about our class project. So our class project for
this class is going to be to send in a picture of your home studio once
you've built it. And I want you to
detail what kind of, like, speakers you've
got, interface, microphones, any of
the gear that you've got or built up over time. I
want to see a picture of it. I want to know what you've and if you want to
include, wave chosen, certain microphones or
certain interfaces, I'd really love to
hear that, too. It can be really
inspiring, I think, to see other people's setups, what other people have chosen. And I think it would just be a nice communal space
where we can talk about, yeah, what works well
for certain people, what kind of mics
maybe work best, or if someone's found a cool interface that
works really well or someone's got
a particular door that they really love
using, all that stuff. I just love to
hear all about it. I'd love to have
a chat about it. So if you've got a
studio space set up, even if it's just a matter
of a laptop and some really, really basic gear, Um, I think that's
just as inspiring, if not more inspiring than
having a big expensive studio. So if you would like
to take a picture and then detail a bit about
what your studio looks like, upload that into
the class project, and let's have a chat about music gear and herd off
about, yeah, music stuff. Hope to see there in
the class project. Let's jump in with the
class. I'll see you there.
3. Computer: All right. So first up,
we're going to talk about the heart of
our home studio, and that's going
to be our laptop, computer, tablet,
or even your phone. Now, people often overthink
this part and think they need a super expensive pro setup before they can
start making music. But the reality is, whatever you have right now is probably
more than good enough. For example, Steve Lacy
literally wrote and produced a Grammy award winning album on an iPod touch from
2010 or something. So you're already way ahead even if you've got a newer iPhone. I said, if you do want
something that's reliable, it's going to last
you a long time and it's going to
perform really well, let's break down some of
the options you can choose. So to keep this
simple, I'm going to break this down
into sort of like three camps that you can
choose from either MacBook, PC, or, like, your
phone slash Tablet. So let's go through the
pros and cons of each, and I'll give you my
personal recommendation first up in a MAC or a MacBook. Macs, I find, are really, really great because
they are super, super easy to use, very, very beginner and user friendly. There's not really
too much need to fiddle around with
settings and stuff. A lot of the modern models have incredibly
good performance. A lot of the M chips are just incredibly fast,
incredibly efficient. And just about anything
you frott them, it's going to handle with these. And also, they have what's
called core audio built in, and this essentially means a
lot of the audio interfaces, mini keyboards, and
things like that are just going to work
straight out of the box. You don't need to
download any drivers or faff around with anything. It's just very plug and play
very easy and streamlined. But then the cons of a MAC is that they are very expensive. You can find good use deals, but yeah, new, they are
a lot pricier than PC. And also, if you're going
for, like, a MacBook air, they can have quite
limited ports, so you might need
to buy an adapter. But overall, I think
they are a really, really good choice if
you can afford one. The second option in PCs
is also really great. I do have a PC, but just
don't use it for music. They're great
because you can get them a lot cheaper
than MacBooks. You have a really,
really massive selection of lots
of different kinds of laptops or
towers or mini PCs. There's a ton of variation. They're highly
customizable, as well, and you can upgrade
things like your RAM or your CPU over time if you
need to change things up, and they're also great if you
move between, say, gaming, for example, if you
want a machine that can do work, gaming, and music. Pieces are great
because they can handle all of that with these. The cons to pieces
are that they tend to have a good bit more
setup and maintenance. You have to download a lot
more drivers for sort of MIDI or your interfaces. Any bits like that, you tend
to need to download and FAF around with the settings to get them to work properly. And on that, you may
need to install ASIO, which helps with, like,
latency and stability. Yeah, just can be a
little bit of a FAF. Also, they tend to
age a bit faster and have not quite as
high a resale value. So that's something
to consider as well. And third, we've
phones and tablets. And these can also be
kind of split into their own camps in
that you've got iPad, an iPhone in IOS, or you've got Android and Google phones
on the other side. IPhones and iPad, again,
would be my choice. I know I'm probably sounded
like an Apple fan boy here, but they have some of the
best music apps in the world. Garage Band, logic for iPad. CBAsis is also on iPad as well. And yeah, for me,
garage band and logic are always the ones that
I tend to recommend, and they're just so packed full of features and instruments
really easy to use. And yeah, I really do
just recommend those. So iPads are great for. So
they're very low latency. They are just built to handle music and interfaces
really well, so you get no delay
between your playing. Again, they feature core audio, which makes everything
easier to plug and play. The newer iPads support
USBC interfaces, mini keyboards, and mics. So it's just relatively easy
to plug in and play again. Some of the cons
to iPad and iPhone are that they are again,
a bit more expensive. Tend to be more on
the premium end. Their file systems
can be a little bit limited if you're
trying to share them between different devices. Because most of them only
have one port at the bottom, you do often need an adapter if you want to plug in
several things at a time, but that is the case for
most phones and tablets. The other end, we've got
Android and Google Phones. These are great because they
tend to be a lot cheaper. They also have
expandable storage. If you want to load up lots of samples and sounds
onto your device, they have a more
open file software, so they're a bit easier to move files from one
device to another. Some of the cons for
Android devices is that you're more likely to
experience latency, depending on what
device you have. There's fewer pro
level apps I found. You don't get the same kind of library of great music apps, although there is
good apps there. And also, because there's
so many different brands and builds, it can be quite inconsistent what kind of performance
you're getting. Some cheaper phones
may struggle to run certain doors
or certain apps, whereas iPhone is, again, sort of built to a certain kind of standard and it's
so popular that they tend to have better app support for
these kind of things. Lastly, when you're going
to buy a PC or a MAC, you'll often see a big list of specs alongside each product. So to break this
down a little bit, I would recommend when
you're looking for RAM, I would suggest an absolute
minimum of 8 gigabytes. Ideally, I'd say look for 16. This is better for most
people, and it gives you a little bit more of a longer
life on the machine. You can go up to 32 gigs, but this is more for professionals
if you're looking at, big sessions, film scoring and orchestral libraries with
tons and tons and tons of tracks and minimal latency. If you're building
a home studio, 16 is probably more than. In terms of a CPU
or a processor, if you're looking
at going for a PC, I think the minimum
I'd recommend is like Ito I five or a
rise in five CPU. If you can stretch a
little bit further, an ItoI seven or a rise
in seven is also great. On the MAC side, I think I'd suggest a minimum of M one MAC, which is probably
about 4-years-old now. But since then, any of their
M processors m2m3 and four, anything with a processor with an M in it is going
to be really great. In terms of storage, a lot of
MacBooks start at 256 gig, which I do think is
on the lower side. I think if you're
looking to keep your computer for a
long period of time, I would suggest
trying to go up to around 500 to one
terabytes, if possible. Also, if you're storing lots of samples and instruments and
you're writing lots of songs, they do take up a lot of space. You can obviously
get a external SSD. But I just think if
you can spend a little bit more at the beginning,
it just goes a long way. You can obviously
look at going to one to 2 terabytes if you're
a really serious producer. But I think for most people, 500 to 1 terabyte will
be the sweet spot. And just remember
that SSD hard drives are an absolute must. Anything with HD or hard drive
you want to try and avoid. These are older
systems that don't handle storage quite as well. SSDs are much faster, much more efficient,
much smaller. And for music and producing
are an absolute must. Please don't get an old school hard drive,
whatever you do. And in terms of tablets, if
you're looking at just having a bit of fun and just
sketching out some ideas, any basic kind of Android or Apple tablet
are going to work great. If you're looking
into slightly more serious music
production, I'd say, if you can stretch
to an iPad Air, they're incredibly good
because they've got those M series
processes in them. They're going to handle
big projects easily. Latencies can be great, and they're just
going to work really, really effectively
for a long time. And if you want to just
go absolutely crazy, iPad pros are a bit
ridiculous in their setup, and you'll probably
not need to replace it for about ten or 15 years. But yeah, anything from the last five years is
going to work just fine. But just remember that
IOS and Apple devices are going to have a better ecosystem over the long term, I think. Okay, great job, everyone.
Hope that makes sense. Next, we're going to talk
a little bit more about doors or digital
audio workstations, the kind of programmers
that we're going to run on these machines. So so I'll see you over
there in the next lesson. Here's guys. And
4. DAW's: Hey, everyone. Welcome back. So now that we've spoken about the device that
you're going to be using in the middle
of your studio, we're next going to
talk about the program that we're going to
run on that device. And this is called a door, which stands for digital
audio workstation. So this is going to be
where everything happens. You're recording,
editing, arranging, mixing. Adding any effects. Just if your studio
was a kitchen, it would be like your cooker, like everything would be
happening in this space. And now this part can get really overwhelming
because there are a ton of different
audio workstations, and every person will tell you, No, cue base is the best. No, A Wooton is the best, and there's a lot of
online debate about it. But the reality is
every single door can make amazing sounding music. And the best door is the one that you just
stick with and learn well. But everyone's going to have
a slightly different style, a different workflow,
and it's just about what one you sort of feel
most comfortable with. Certain doors are better set up for certain kinds of music. So let's break that
down a little bit and simplify this door mess. And it's also worth saying
that in every single door, you're going to be
able to record audio, use midi instruments,
add effects, edit and arrange tracks, export your song,
mix and master it. So you're not missing out by
choosing one over the other. They all just feel a little
bit different to use and have their own sort of quirks
and bells and whistles. So the first door I want to
talk about is Ableton Live, a super, super popular
option for both Mac and PC. I find it's best for,
like, electronic music, people that really like
sort of beats and loops, live performance, dejing, and also lots of
sampling and remixing. It almost feels like
using musical lego. Like, you can just piece
all these little loops together and chop and change
them, and it's very unique. It takes a bit of
getting used too if you come from a
different kind of setup, but it's super, super fun. Great for, like, hip hop, lo fi, EDM kind of stuff. It has a ton of great
built in instruments. Some of the keyboard sounds
on there are just beautiful. And it's amazing for live
performance, as well. If you're doing
anything if you're like a deja or you perform
electronic music live, it's wicked for those sort
of loops and live sets. On the con side, I
find it a little bit less intuitive if you're
doing a full band recording. So we're like a drummer
and a bass player and a guitar player
and a vocalist. It can still work, but it's
just a little bit different. But yeah, all around, a
really, really good door. Lots of people
absolutely love it. They also have a free
version that you control. So if you want to have a little tinker around
with it before you buy the full version,
definitely worth checking out. Second, is my personal
favorite in Logic Pro. It is Mac only, unfortunately, but I find it just the most intuitive to use, really smooth. So many different tutorials and courses to help you
learn how to use it. It's great for the
kind of music I play. So I play slightly more
traditional stuff with guitars, vocals, full band, kind of sit ups, suits that really well. Range of midi and
inbuilt instruments into the app is just incredible. And I just find that
logic gives you everything you need
out of a door. Like, it has a huge
library of loops, samples, great
instrument effects, a ton of great guitar amps, bass amps, keyboard sounds. There are literally thousands. And if you can't find
a good sound in there, I would be incredibly shocked. On the timeline,
incredibly easy to follow and understand and
use. It's very intuitive. Also, it basically has a free beginner version
in garage band. It's basically like
logic on easy mode. The whole layout is
almost identical, but garage band is just
a bit easier to use. So I find if you're a beginner, picking up garage band and
learning that really well, and then translating it over to logic is just so
seamless and easy. And you can actually take the projects that you've
written and produced in garage band and opening them
up straight into logic. It's just, like,
such a sick system. And if you need a guide on
how to use garage band, I have got a class available
that you can go and watch. It is the class I recommend to every beginner
if they have a MAC. Next, we've got FL Studio. So this is really, really
great for, like, hip hop, trap music, EDM, lo fi, and lots of pattern
based production. If you like drawing in chords and melodies
and you're more of a sort of like mouse and keyboard clicker
kind of producer, as opposed to like
an instrument, guitar player, keyboard
player kind of person. As basically the piano role
inside of FL Studio is just like the industry standard for drawing and
chords and melodies. It's just really, really easy and great for people
that don't play instruments. Also, it's just like a sort
of fun, colorful interface. Very beginner friendly.
There's lots of guides on how to use it
as well. Great for loop. Beat. Got great in built
synth sounds as well. It's not as ideal was logic for recording
live instruments, and mixing can get a little bit messy unless you
know what you're doing. But just as powerful
as any other door. If you've listened to
any modern rap song, there's a good chance it's
been made in FL Studio. So if you're into
making those sort of trap beats and
things like that, I definitely say
look into FL Studio. Next up, we've got ProTools. So this is kind of like the
industry standard door, incredibly good for,
like, film and TV scores, recording big bands. If you go into, like,
a high end studio, there's a good chance they'll
probably be using ProTools. ProTools has probably the most, precise expert level
workflow when it comes to, like, mixing and mastering. You can get really, really
nitty gritty with it, but it can be very
overwhelming, like, a little bit like walking into an airplane and
expecting to drive it. There's so many buttons,
so many things to learn. But also very stable if you're using big projects
with lots going on, it's just yeah, very
much industry standard, hardcore kind of cut of program. But great if you work in, yeah, a professional studio or
you're hoping to become a sort of like
film and TV mixer, but that might not be
the case if you're building a home studio. Some other honorable mentions that I haven't used
too much myself, but are very popular are reaper. It's like, very, very
cheap, super lightweight. It's very sort of minimal. You have to pull in
a lot of your own instruments and
sounds and stuff. But it's incredibly
customizable if you like tinkering and playing
around with softwares. This is great for that. Also,
studio one is a great door, very, very beginner friendly, looks quite similar
to logic, as well, but what's great on PC,
if you haven't got a Mac. It's super easy to use a really good balance between sort of like power
and performance. I'd say it's definitely
worth checking out if you like the look of logic, but you haven't got a MAC. And I also believe they have
a free version to try out, so definitely worth
having to play around with if that
sounds up your street. Now, if you're using a tablet or a phone, my top suggestions, if you have a iPad or
an iPhone would be garage band or logic for iPad. I believe logic is just on iPad, but on Garage Band, you can get them on both
phone and tablet. Incredibly powerful,
super easy to use. I've also got a guide
on Garage Band IOS. If you're interested
in checking that out, it is just mind blowing
how extensive and how many features there are in just for a phone
and a tablet app. You can really make, like,
the most amazing music. On the apps is crazy. Also, banab is really great on IOS and Android. It's free. They have a ton of
built in loops and sounds that all sound
absolutely amazing. I believe it's all
cloud based as well, so you can pull in a
ton of different loops without storing loads of
stuff on your device. Also, FL Studio have a mobile version for
phones and tablets. Works really, really
well, very similar to the desktop version. Okay, so the wrap
up. Don't stress too much about
what door to pick. They are all going to
do a very similar job, and it's very much just what
kind of style you like. Try downloading
some free versions. Things like Garage Band
and FL Studio are free. So worth downloading them, having a little play around, see what kind of suits
your vibe the best. And as long as you really commit to learning one, as opposed to, bouncing between all of them, I think that's where the
most progress is made. As yeah, it's mainly about just getting comfortable and learning
about where things are, where the right buttons
are, and sort of building a bit of a
system around your door. Again, whatever one you choose, I'm certain you'll
make absolutely amazing music out of it. So don't stress
about it too much. But yeah, let us know
what one you go for. It's a bit of a
tricky one to choose. Alright. I'll see you
in the next lesson.
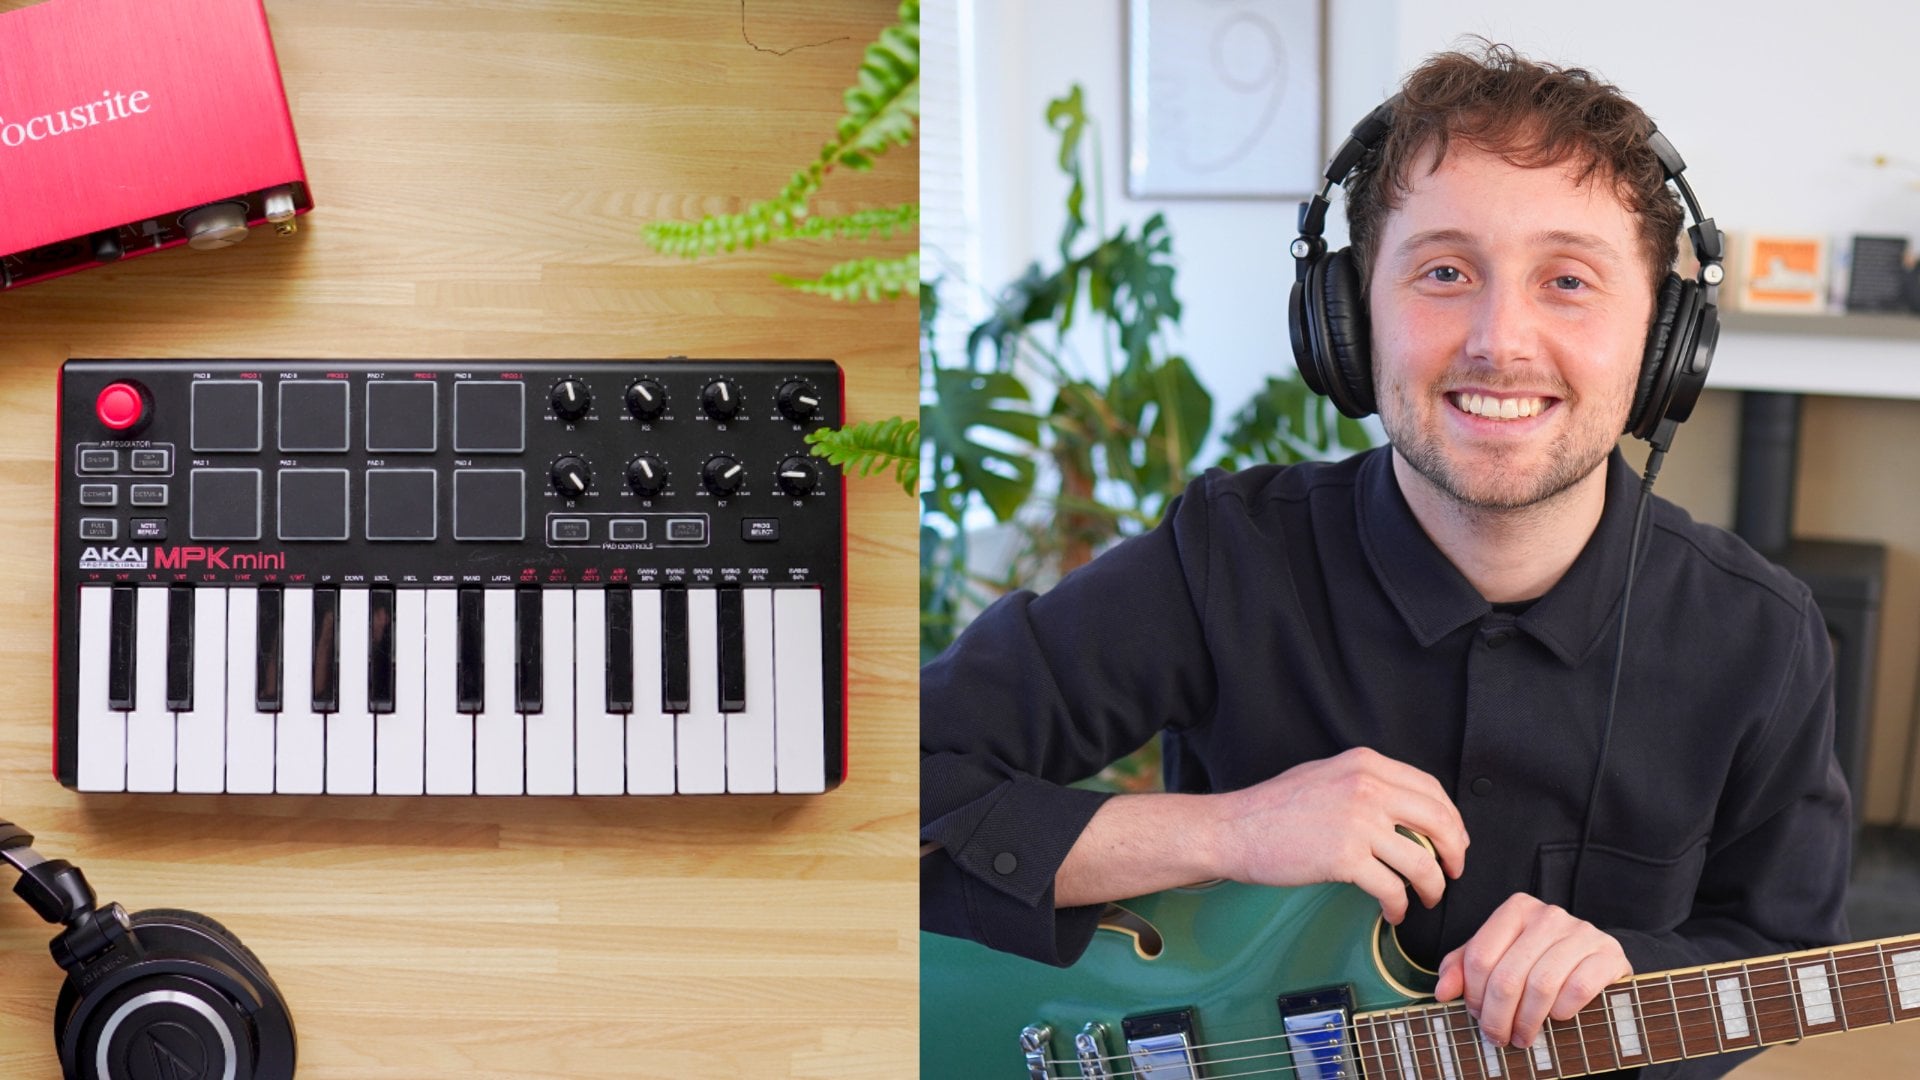
5. Interface: Hey, guys, welcome
back. So now that we've spoken about our doors
and our devices, we net go to speak about an incredibly important bit of equipment in audio interfaces. So what this is going
to allow you to do is connect microphones,
instruments. It's going to let you connect proper headphones and speakers. It's also going to
allow you to use phantom power for certain
kind of microphones. And it also means
that we can monitor our sound without any latency when we're singing or
playing with instruments. They're basically just
part of the bread and butter of any kind of studio. But what do they actually do. So essentially, what an audio
interface is doing is it's converting analog sound like from a microphone or a guitar, and it's processing that into a digital signal that your computer or your
laptop can understand. So it works a little
bit like analog to digital audio translator. And like I said, we can use these inputs from
the front to connect things like EcelRs,
microphones, instruments. We've got a headphone
output here, and we've also got
monitor outputs on the back so we can connect
up high end speakers. And also most interfaces are
going to have 48 volt power. So things like
condenser microphones that need a bit of powering, it can make them work too. Also, most interfaces will have a direct monitoring system. So this means that
you can just hear your voice or your
instrument instantly as you're playing it without any delay straight
from the interface, which is great for like, Yeah,
singing, playing guitar. As often if you
try and monitor it through your door, you'll
experience latency. So there's a bit
of a weird delay between you singing and hearing it back in
your headphones. So most interfaces are
incredibly easy to use. All you need to do is plug
them in via USB C or use USBA. If you're on Mac, it's pretty
much just plug and play. I'll often just work straight
from plugging it in. Your computer will recognize it. No driver is needed,
thanks to care audio. If you're using a PC, you may just need to check
the instruction manual for whatever interface
you're using, and you may need to download a driver to make it work properly. But this is pretty easy
and straightforward to do. Next, you want to go into
your door and look through your audio settings and try
and find your interface. Then you want to make sure that your input and output device is both selected
as the interface. Next, you want to plug in whatever instrument
you plan on using, so like guitar or a mic. Next, you want to set your gain. So you'll want to play or sing at a normal kind of volume, and then you'll want to
turn the gain knob until the signal is strong,
but it's not clipping. And clipping is usually always
shown with a red light. So you want to just
avoid any red lights coming up and it
should be golden. If you're using a
condenser mic or any microphones that need a
little bit of extra power, you can press the 48
volt power button down. This should
make them work. Next, you'll want
to turn on your direct monitor if you want to hear yourself playing or singing in real time through
your headphones. And lastly, you want to
plug in your speakers, if you have some or
your headphones or both and just check that that's all running out of there properly, and you're ready to
start recording. Simple as that. Now, there
is an absolute ton of different audio interfaces that you can buy can be
a bit overwhelming. So let's break that
down a little bit, and I'll give you some
suggestions on what I recommend. So first, we need to think
about how many inputs we need on our interface. So this is just how
many instruments plug in at the same time. If you only ever record solo, one or two inputs is going
to be more than enough. Also, it's great for
guitarists recording two microphones at
once can be really effective for recording
a nice guitar tone. You can also get interfaces with four inputs if
you're looking at recording a couple
people at the same time or maybe a drum kit on a
sort of smaller scale. Acoustic sessions and
things like that. But you can go way
up to, I think, like 12, 20 inputs,
if you want to. Obviously, the more
inputs that you have, the more expensive the
interface will be. So I think for
most home studios, 1-4 is going to be plenty. So in terms of specific model
recommendations, I'd say, if you're a beginner or
you're just a solo artist, a really good option is the
focus right scarlet solo. It's around 90 to 120
pounds slash dollars. Really, really reliable,
great pre amps. It has one mic input and
one instrument input. So it's great if you're
singing and playing guitar. And it's just,
yeah, really nice, small cheap system that's just going to work
really, really well. For some more
intermediate options, I'd highly recommend
having a look at the Universal audio volt 276. This is really, really
great because it features built in compressor, which just adds a bit
of punch and a bit of warmth and roundness to whatever you're recording if
you choose to turn it on. It also has a vintage
mic preamp mode, which just gives a
nice bit of warmth and sort of classic analog tone to your microphones,
if you want to use it. A lot of these things
you can add in post, but it's just nice to
sort of have things like compression and certain preamp sounds baked in
to the recording. Some people like also on
the intermediate side, you've got the focus
right two I two, which is what I've got here,
slightly older version. This is great as it's just
like an industry standard. The mic pre amps sound
absolutely great. You can use both mic and ExcelR
inputs on the front here. On the newer models as well, you get this air mode, which creates a bit of, like, top end sparkly kind of sound. Uh, also, they have auto
gain and clip safe modes. So you basically never
like, clip your recording, and it always keeps the game under control, which
is pretty cool. Super, super popular, and they come in a range of
different inputs. If you want to go 4-6, I think, they have, yeah, loads of different options. And now, if you're going
to go, like, top tier, super high end expensive, I would say,
definitely check out the universal Apollo
solo or Twin. These are incredibly expensive. I think they start at like
1,000 pounds or $10,000, but they are like the
world class interfaces that are used in lots
of high end studios. Comes with a ton of
incredible sounding plug ins for voices and guitars
and bits like that. There is zero latency with a
lot of the effects, as well. So if you want to
sing while hearing, compression and reverb or
delay, there's no latency, so you can yeah, hear those effects in real time as you're singing or playing, which a lot of people
really, really love. That's its sort of
killer feature, really. And they have a ton
of different sort of preamp modes that can emulate loads of famous pre amps from sort of like fender, API manly, loads of, you know, classic analog, sounded pre amps that you can emulate
through it, as well. But, yeah, lot of money. Okay, so to wrap up
all your interfaces, really great and
piative bits of kit if you're looking at recording
any kind of live instruments. Don't stress too much
about what one to pick. Even the super cheap end ones are going to sound
absolutely great. It's all just about getting
something that works for you, something that's in your budget, and just getting recording, figuring it out, having fun. That's the most important
thing. Next, we're going to talk about midi and
mini instruments. So I'll see there on the
next class. There guys.
6. MIDI: Guys, welcome back. So
next we're going to talk about what I think is the most
fun part of a home studio, and that's talking about MIDI and midi controllers like this. So if mics and
interfaces are for recording real life instruments
like guitars and vocals, then MIDI is on the other side of that
in that it helps create music with digital instruments
like digital pianos, digital drums, digital synths, basses, strings,
things like that. So how this works is
that MIDI doesn't actually create
any sounds itself. What it does is it
sends information to your door on what
note you played, how long you played it for,
how hard you played it, how long you held it for, which knobs and sliders removed. So it's all just information. Your door then uses virtual instruments to turn those instructions into audio. So it's basically
like a remote control for digital music. So if I was to play a melody
on this digital keyboard, I could record it in
as a saxophone, sound. But then I could
choose to change that into a symp sound
if I wanted to, because it's all just like
digital information that can be chopped and changed with different
digital instruments. So it essentially
means that this can turn into any
instrument you want. A Midi actually stands
for musical instrument, digital interface,
if you're wondering. And again, because this
is just information and not actual audio, it means that we can yeah change instruments even
after we've recorded. We can correct mistakes easily. We can move a note
back half step or we can if we hit
the wrong note, we can change it afterwards. We can move notes around and create different kind
of chords or add on extensions or other kind of sounds into those that
midi information. And yeah, essentially
make huge changes and different arrangements
without needing to record another take or bring
in a different instrument. It's all just in
built in your door. Lots of doors like Logic, for example, have
hundreds, if not, thousands of inbuilt
virtual instruments that you can choose from so it's just really
fun to dive in and play and use them in your music. Also, because no
mics are involved, it doesn't matter what
your room sounds like, or if you're talking
over what you're doing, or there's your doorbell rings, it's not going to interfere
with the recording. If you make a mistake, you
can just tweak it a bit. Your drums aren't quite in time. You can quantize it and
make it all in time. It's just, like,
incredibly effective, easy way of making music. So talking about different
kinds of mini controllers, the most common ones are ones
like this where you have a sort of basically a mini keyboard to play in your notes. This one does have the
drum pads as well, like we spoke about. It's great for little
chords, melodies, bass lines, drum patterns, and it's nice and small
and compact, as well. This is only a mini 25 key one, but you can get bigger
ones like 49 key, 61 key, full size piano keys, so you can have a proper
piano system midi setup. You can also get
Pad controllers, which are especially good
for drums, beat makers, samplers, live loop
kind of performers, really good for controlling
effects as well with lots of dials and sliders
and things like that. Using a midi controller
is incredibly easy. All you need to do is plug it
in with the cable provided. If you're using a PC, you may
need to download a driver. If you're on Mac, it most
works straight out of the box. You will then want to go into your door and find
your midi settings. And within that, somewhere
there should be a way you can find your midi controller,
make sure that's selected. Load up a virtual instruments like a piano or a
synth or a drum, and it should just work as
soon as you start pressing those keys and buttons,
and you're away. In terms of what kind of
mini controllers I would recommend for beginners or if you want to save
a bit of money, I'd highly recommend looking
at the one I have here. They have a more modern version, but this is the Aki MPK mini
it's super, super popular. You've probably
seen this all over the place if you're
at all into music. Nice and small with 25 keys, but it's got the
drum pads built in, the dials for any kind
of effects editing. It's got an piator and
a knob thing here for, like, all sorts of stuff. You can adjust the pitch,
the tone, effects with that. Use that a lot, actually.
That's really fun. For a more intermediate option, I have used the novation launch
key 49 mark three before. That is really, really good
as it has full size keys. So if you're a piano player or feel a bit more natural to you, Um, really good
door integration, particularly with Ableton
works really well. And yes, just a great
all rounder, really. But it will take up a
little bit more room with all those keys than being
full sized, as well. And if moneys no objects
and you're looking at building a very
fancy home studio, check out the native
instruments complete control, either the 49 key or the 61 key. This is like a crazy bit of kit. There's kind of sounds
that they have in. In there is absolutely crazy. Native instruments make some of the best sounding
virtual instruments I've ever heard.
Incredibly realistic. And they have, like,
light guides to show you different
chords and notes. It shows you different scales and all sorts. If
you're looking at it. Yeah, a really fancy studio. Definitely recommend
looking into that. But very expensive.
Okay, so wrap this up, MIDI and Mini Controllers, super, super fun bit of
kit in a home studio. As, yeah, it just unlocks a whole world of
instruments and sounds, ways of expressing
yourself through music. And yeah, let me know if
you've used Mini before. Maybe this is your first
time. Maybe you're just about to buy your
first Mini controller, super fun bit of kit, and I'll see you on the
next lesson. Jus guys.
7. Mic's: Hey, guys. Welcome back. So next let's talk about microphones, a very important bit
of any home studio. So you probably
already know what mics do. I need to explain it. They are going to
capture whatever is in front of it, voices,
guitars, keyboards. This is an area that can get
very confusing as there are literally hundreds if not thousands of different kinds of microphones that you can get. They all do slightly
different things. So to simplify this and
really boil it down, um, particularly as we were
talking about making a small home studio, there's basically only
two different microphones you're going to need that we're going to
talk about today. One is the dynamic microphone, and the other is a
condenser microphone. So let's break down
exactly what they do, how they work, and I'll give you some options on some
good ones to buy. Let's first talk about
dynamic microphones. So these are great because they're very tough, very simple. And it's for that reason
that they're just very durable and handle
very loud sounds. They tend to sound very warm, very controlled, not very sensitive, which can
be a good thing. And they work absolutely
perfectly in any kind of, like, untreated room, like a
bedroom or an echoe space. Great for sort of voiceovers
and podcasts, guitar ramps, drums, acoustic
guitars, violins, any kind of acoustic instrument. And they're basically
just absolutely perfect if you're trying
to avoid any kind of, like, background noise
or noise of a room. Whereas a condenser microphone is basically the most
sensitive kind of microphone that you can
get and it'll pick up ton of detail that we can't
even hear with our own ears. They are just super,
super sensitive. But the trade off with
a condenser microphone is that because
it's so sensitive, it's going to pick
up much more detail and clarity in a
voice or a guitar. It's just going to
catch every little kind of frequency that
you can imagine. And it's also worth noting that condenser microphones require 48 volts of power to make them work properly again because they're
so sensitive, they need a bit of a oomph to really capture that detail
or make them work properly. They tend to sound very
bright, very clear, very detailed, very
open and wide, as well. And they're best
used for vocals, guitar, piano, softer
instruments, any kind of, like, ASMR or anything where
you need lots of intricate detail
as they just pick up every little sound,
but they are much, much less unforgiving
when it comes to recording in a bedroom or a space that
hasn't been treated, it will just pick up
lots of nasty sounds. So you really want to
use this in a place that's properly
soundproofed if you can. And it's for that reason
that if you can only afford to have one
at the moment, then I would suggest going for a dynamic microphone first, as it's just a bit more adaptable and flexible to
whatever you're recording. And it's worth noting
that Bonnie's debut album for Emma forever ago, he recorded, essentially
the whole album with just this sure SM 57
dynamic microphone. All the voices, guitars, apart from some strings, was all recorded,
yeah, with this, which is just crazy, another Grammy nominated
album, I believe. It's also just worth mentioning that lots of different
microphones, particularly condensed
microphones can have different polar patterns. So this essentially means, like, where the sound
is picked up from. Most microphones have what's called cardioid polar pattern, which basically just
means everything in front of the microphone
is picked up. But you can get microphones
that are omnidirectional, pick up sounds from the front and the back
or from the sides. There are tons of different ones for very specific use cases, but really the only
one you need to worry about for now is cardioid. So a couple beginner
tips on how to record, well, with just about
any kind of microphone. So you ideally want to be about a fist away from your
mouth or your instrument. So maybe about like, sort of 5 " or so. And ideally you'll want
to get a pop filter, which eliminates any kind of popping sounds
that are made from your mouth when you
speak into a microphone. Like that. Ideally, you want to be near like
soft furnishings, like curtains or by a
wardrobe or on a sofa. Any kind of hard
surfaces you're near, it will just reflect that
sound and create a bit of muddiness to your recording. You want to try and be as
consistent as you can. So if you're recording with
your voice or your guitar, try not move around too
much as you don't want the signal to be changed too
much when you're recording. And when you're selecting
your gain on your interface, try and turn it up as much as possible without
going into the red. So the higher the gain, the more detail you'll
get from your mic, but, yeah, do just ensure that you're not clipping because
that will sound really bad. And in terms of what microphones I would personally recommend, if you're looking at a
cheap dynamic microphone, the Shure SM 58 is a great
option used by, like, vocalists all over the
world, super reliable, super hardy, basically
instructible, and really good in
untreated rooms. If you're looking at a cheap condenser, begin a microphone, the audio technicaeT
2020 is a great option, really clear and detailed sound, very affordable and
just a great sort of intro to condenser mics. If you've got a bit
more of a budget, um, I would suggest going for one of these sure SM 57
for a dynamic bike, an absolute legend
of a microphone. Like studios all
around the world use these really low
background noise, great for vocals and podcasts, really smooth and
warm sort of sound. And yeah, just so ideal
in non treated rooms. It just sounds great, no matter what you
do with it, really. And for condensers, I'd
recommend what I have here, which is the road NT one
A, very, very detailed. Like, you just need to
have a tiny bit again, and the amount of detail you get on this mike
is absolutely crazy. Just all around,
really good quality, incredibly highly
reviewed, comes with a shock mound
and a pop filter, which just means
you're going to not get any shaky
sounds when it's on a mic statnd and you're
not going to get any pop sounds from
the front with vocals. And if you've just got a ton
of money to splash around, the Neumann TLM one oh three is a very legendary
condenser microphone used in all the top end studios, super premium vocal
tone with them, just incredibly high
end, sparkly detailed. Of stuff going on.
Okay, so to wrap up, you really don't need a
massive microphone collection. Just one good one is
more than enough, especially if you're beginning. But I'd say, if you
really want to expand the kind of things you can
do, having two is great, a dynamic and a condenser
basically covers you for almost anything you
really need to do and gives you a ton of cool options. Choose one that suits your space and pair it with
a good interface, and you have got some really professional
high end quality that you can use
straight from home. Really excited to hear
you get recorded. Please feel free to
send in any songs or any bits you come up with
your cool new microphone, and I'll see you in the
next lesson. Just guys.
8. Headphones & Monitors: Hey, guys. Welcome back.
Okay, so now that we've got our device to door
interface, MIDI, and microphone sorted, let's next talk about
how we're going to actually listen to the music and the songs that we are
making in our studio. So in this lesson,
we're going to talk about speakers and headphones, the differences between them, open back versus closed
back headphones, what to look for when buying
headphones or speakers. We'll also talk about how to
set up monitors properly, and I'll also give you a load of recommendations depending
on your budget. So first, let's talk
about headphones. So a good pair of music specific headphones is imperative to any music studio. And I have to stress, music specific ones
are a must have. Your general kind of like Sony or Apple headphones aren't
going to quite work here. You'll really need to pick up a specific set that are
made for music and mixing. This is often
because these pairs are much more flat
and neutral sounding, whereas a lot of, like, commercial headphones
will have, like, a base boost or will be edited so that they
sound a specific way. But what we really need is a super neutral pair so
that when we're mixing, uh, we're recording instruments. We can hear the correct details and things like the
bass isn't blown out. They're going to be much
more neutral and uncolred, which is going to mean
we're just going to make much more accurate mixing
and recording decisions. So there are two
different kinds of headphones that audio
engineers generally use. One is closed B, and the other is open back, and they work
slightly differently. So first, let's talk about
closed back headphones. This is how most headphones
are, by the way. It's when there's,
like, a closed cup over the open back is
instead where there's, like, an open sort of patch here that lets
the sound leak out. With closed backhadphones,
these are going to be really good when
you're recording vocals or any kind
of instruments. As with open back headphones, all that sounds going
to leak out and go straight into the microphone,
which is not what we want. We want to really
clean signal or clean recording from our
guitar or our vocals. So these are a must
for recording. Closed backhadphones tend
to have a more, like, tight focused low end because a lot of that bass
is being sort of trapped in. Makes you feel a bit
more isolated and a more like sort of in
your head kind of sound. You're probably just
very used to these ones. Now with open
backhadphones, like I said, they have like an open ear cup, which allows you to
sort of hear things a bit more like,
clearly and freely. A lot of people that
are critical mixers tend to use open backhadphones, because it feels a little bit
more sort of true to life sounding more like
you're listening to the track out of speakers. They sound a bit
more natural and airy with a slightly
wider stereo image. But, yeah, they are
not appropriate for any kind of recording. It's much more of a mixers
kind of pair of headphones. You don't need
both, but if you're looking just to get one
good pair of headphones, you don't want to
splash out for two, I'd say just getting one pair of closes backs would be
absolutely perfect. They can very much
do everything. Just thought I'd
mentioned open backs in case you wanted to
have a bit of both. And if you're making a studio, you're also going
to need a pair of good studio monitors or
just speakers, basically. Just like our headphones, we're ideally going
to want to get specific studio monitors
that are built for audio engineering
and music as sort of like regular
speakers are again, going to be colored with, like, base boosting, and they're
not going to be very neutral. So we're really going
to need to look out for studio monitors
specifically. And they really go hand in hand with a good pair of headphones. Like, headphones are great for recording and listening back to mixes for a bit
of a reference. But monitors generally
are a little bit better for mixing
and hearing a true, honest reflection of the music. You're going to get
sort of true bass, proper stereo width, and you're also going
to get better sort of like dynamics and yeah, true representation
of what the music really sounds like moving
through the air, you know? So to set up any pair
of studio monitors, what you ideally
want to do is set up like equilactural.
Is that the word? Equilacual triangle between
you and the speakers. You and the speakers
to be in like a perfect triangle
with each other. So you want the distance
between each speaker to be basically identical
to the distance between you and the speaker. Again, making a
perfect triangle. And this is usually around
like one to 1.5 meters, depending on what kind
of space you've got. And second, you'll ideally want the tweeters to be at ear level. So the tweeters are the top part of the speaker, you'll see here. This just helps
keep the frequency response nice and accurate. It may sound obvious,
but you kind of want to angle the
speakers toward you. So they're almost like hitting your ears, if you
know what I mean? And that's just going
to help with clarity and your imaging of the sound. And you're ideally
going to want to use monitor stands if you
can fit them in uh, these are going
to avoid any kind of vibrations through your desk, which makes like a sort of
a muddy bass kind of sound, also stops any kind of reflections from
the desk, as well. Sound bouncing off
a hard surface, which can, yeah, sort of
corrupt what you're hearing. And yeah, you're going to
get a more accurate low end. You're going to
get clearer mids, a bitter stereo field. It's just going to
sound a lot better. If you can't get monitor
stands, even isolation pads, just to put underneath
your speakers are much better than
nothing as they just help reduce the rumble and the vibrations from
the speakers to yours. Still don't place them too
close to the wall behind, you ideally want to have about
15 to 30 centimeters space between the speaker and
the wall behind them. Again, just to
reduce any kind of, like, reflections and
muddy sounds going on. We're going to talk a
little bit more about sort of sound treatment
in the next lesson. But if you can, having curtains. If you've got a hard floor, having a rug, putting cushions around the place
or duvet somewhere, hanging that around a wall, a little bit of a
golden rule I have is to predominantly
mix on my speakers. I'll then double check them on a closed back set of headphones, and then I'll take a track, and I'll play it through
my phone, my car speaker. I'll make some notes,
and I'll yeah, try and make sure it sounds good over all those different spaces. If it sounds good everywhere, I know the mix in terms of recommendations
for headphones, I would recommend these
to just about anyone. They are the ado
technica 80 HM 50 X. They're closed back headphones, but they are another kind
of industry standard, just kind of all round, amazing workhorse, a ton
of very famous people. Use these. You'll see them
absolutely everywhere. They're very affordable,
all things considered, really well balanced,
really reliable, just great for recording
and general use. For a more sort of intermediate to pro level headphone, I'd say, take a look at the
buyer and dynamic DT 77 oh P. These are just super famous industry standard
closed back headphones. And they also have
a similar version in open back headphone in the DT 990 P. So if you're looking for
open back headphones, those are the ones
I'd said to go for. There's not an awful lot of
open um budget headphones. I tend to be a little
bit more towards the intermediate
pro side of things. And then if you want
the absolute nuts, the Sen his HD 660 S. Open back headphones
are like crazy good, super high end mixing and
mastering kind of headphones. In terms of studio monitors, if you're looking at slightly
budget beginner options, Yamaha HS five are really, really popular,
very, very famous, very flat and honest sound. Also, the KRKRocketFives, are super popular. You
see them everywhere. Really nice warm, low end sound, they also have built in
room tuning as well, which is really great
for bedroom studios. Intermediate options,
the ADAM Audio t5v t7v are very, very popular. They've got ribbon tweeters, which just make the super
clear detailed clarity in their sound. Sound amazing. And if you want the
absolute top end stuff, the Adam audio A seven X, is like the high end studio
industry standard speakers, if you have lots of money. Okay, great job on
this lesson, guys. Hopefully, that
gives you a bit of a better understanding
into the world of sort of headphones and monitors and maybe
what to look out for. So let's talk next about how to treat our
room so that we get the best sound possible out of our speakers and all of
our fancy bits of kit. I'll see you in the next lesson.
9. Sound Treatment : Hey, guys, welcome back.
So in this next lesson, we're going to talk
about sound treatment. So this is something that gets often very quickly overlooked. You know, it's very
fun to talk about shiny laptops and
interfaces and keyboards. It's not so fun to talk
about foam and pillows. But for this reason, yeah, it's often so overlooked, but can make a huge
difference to the sort of sound and quality of
your home studio space. And it matters because
poorly treated rooms can sound very echoy, very boxy. It can have this slightly
ugly room reverb sound. Generally, like an unprofessional
sounding recording. You can sort of hear this
sort of muddiness to it, and it's often because the room hasn't been treated
where it's been recorded. And so what proper
sound treatment is going to do is going to make sure that all your recordings
have a nice bit of clarity. They're really
clean. It's going to give you a much
better vocal tone. Also, when you're
using speakers, it's going to mean that
they sound a lot better, and there's not
these weird echoes bouncing around your room,
muddying the sound again. And in lots of cases, it's not even about buying anything. It's just about
arranging your room in a way that is going to make it sound better.
So let me explain. I'm going to talk about
three different kinds of sound treatments
that you can use. The first kind of
sound treatment you can use is absorption panels. And these are either
like big foam pads or you can get these
really nice panels now, which just absorb a ton of
sound and stop that kind of slapback of audio
bouncing off the walls. Even just like one panel slapped on a big wall will
make a big difference. You can also get base traps. These go in, like, the
corners of your room, and they just help
control a bit of a boomy base that can
fly around your room. Helps control the low end when you're mixing
and just in general, gives a speaker response makes your room sound
a lot less muddy. And you can also use diffusers. So these are just
things like you just scatter around the room to
help just absorb sound, even just like pillows, blankets, rugs, anything to help absorb the reflections
bounce around hardballs. So it can be tempting to put sound panels just like all over the place with
no real direction, but we can make it look
more like simple and easy with a few simple methods. So, for example, when
you're recalling vocals, if you put a panel
behind the singer, and behind the microphone, that in itself creates a much more dead
neutral kind of sound. And what a lot of people do
is literally just, like, hang a douve over
at the singer and the microphone if you can get a washing line or
something like that, creating that yeah, sort of soundproofing
around the vocalist. Is perfect for deadening that sound and creating a better
clarity of recording. Even recording in a wardrobe full of clothes is going to be absolutely perfect
and just absorbing all of that harsh sound. But yeah, the main things you'll remember is any kind of, like, sound absorption
behind the microphone and behind the singer
is going to be ideal. Also, the same goes for if
you're recording instruments, if you can try and ensure that there's
some kind of, like, soundproofing either behind
the microphone or, like, behind you and the guitar, it's just going to
sound that bit better. Terms of soundproofing around your monitors and your desk, having any kind of soundproofing directly behind your monitors is going to be really great. The ceiling above your desk is going to help absorb
that sound, too. And if you're in a small room,
having any kind of, like, sound paneling absorption behind you is also going to be a great. If you've got a
wall there, again, it's just going to sound
just to end off the lesson, some very simple,
common mistakes to try and avoid when
recording in your studio. So singing directly at
a wall is a big no no. You're going to get, again,
this harsh slapback effect unless you're really
well treated the wall. So try and avoid
that, if possible. Putting your microphone in
the corner of the room is going to create this
really exaggerated bass. So try and avoid that, too. Try and put them either
in the middle of the room or by a deadened area, like a wardrobe we spoke about. Don't ignore the ceiling. There is a ton of
slapback that can happen from the
big open ceiling, especially if you've
got a big echoi room. Lastly, if you are going
to buy any soundproofing, try and make sure it's
as thick as possible. Putting a tiny thin layer of foam is actually going
to do very, very little. You want a big, chunky, meaty load of foam to try and
absorb as much as you can. A small thicker piece of foam is going to go a lot further
than lots of thin, weedy foam all over the place. Okay, so for example, here I am in my kitchen. There's worktops, loads of
hard surfaces, hard floor. There is very little of any kind of soft furnishings to see. And hopefully you
can hear there's, like, this weird
kind of bounce back. You can, like, hear the room,
if you know what I mean? And what is happening
is the sound is, like, bouncing around on
these hard surfaces and coming back into the mic, which is kind of like coloring
my voice a little bit. And there's these all
these other sounds coming from all over the place, which in a studio kind of environment isn't
going to sound good. To try and, like, craft a vocal tone or like a guitar tone, how
you really want to, having this sort of like mud
room sound is just going to not going to be the
best unless you're absolutely certain you
absolutely love the room sound, which is kind of rare. Whereas now I'm speaking in my bedroom with my
wardrobe behind me. And hopefully, you can
hear there's this lovely, like deadened sound and there's no muddiness or reverb or
sounds bouncing around. It's a nice, like,
deadened space. And I'm literally just
set up in my bedroom. I haven't made any
adjustments other than just setting this
microphone up with my wardrobe and my clothes behind me and my
beds in front of me. So it's lots of soft
furnishings carpet in here, so I haven't spent a
penny but I've created this studio like sound just
by moving into my bedroom. But it's also worth noting
that even though I'm in a sub optimal room by using
a dynamic microphone, because the microphone is
only really picking up, like, what's right in front of it
and it does a great job of rejecting any kind of sounds around it and it's
a lot less sensitive, you can still get a
very good clean sound. From a sub optimal room
with a dynamic microphone, if you maybe don't want
to cover your room in foam and go like ham
into a crazy studio, you can very much just work
with dynamic microphones, just know that you may
not get the same kind of quality and sensitivity that
you would with a condenser. Hope you've enjoyed
this tour around my house. Back to the class. Okay, so to summarize
today's lesson, sound treatment is
really the secret behind getting a clean, professional
sounding recording. You don't need expensive gear. You don't need a
fully treated room. Just using bits
around the house can really help create
a dead end sound. And once you produce
those reflections and control the room, just everything is going
to sound way better. You monitors, your
microphone recordings, everything's just gonna
sound a lot lot better. So hopefully you get on well, pitting foam or
around your house. Hopefully, that doesn't drive your other half or
your family too wild. And I'd love to see a photo
of any kind of, like, soundproofing you have done
in your house or your studio. Alright, we're nearly wrapped up. I'll see you in
the next lesson.
10. Final : Hi, guys. Welcome
back. So a massive, massive congratulations
for finishing the class. Thank you for bearing with
me and putting up with my ramblings and chattings
about music gear. Hopefully, it's not
got too nerdy for you and you've
enjoyed the class. I just wanted to say, yeah, a massive thank you for bearing with me and watching the
class all the way through. If you did enjoy
it, by me chance, if you would mind leaving
a positive review, that helps massively for people like me making
online classes. And it's just genuinely
really nice to hear feedback and have a chat
with you guys about music. I've had some
really, really nice responses from my
previous classes, and my favorite
thing about doing these kind of online classes, workshops is to hear the sort of feedback and have a chat
with you guys about music. It is absolutely
beautiful and amazing. So yeah, feel free to
hit me up for a chat, send me Instagram DM or message
me on the platform here. I also have some other music
classes that you can find on my profile if you're
interested in learning about music theory, garage band, or songwriting
or anythings like that. I've already check
that out. Thanks again for sticking around
for the class. Hope you have a lovely
rest of your day, and I'll spitch you
soon. Here's guys.