Transcripts
1. About the Class: Are you ready to sprinkle some artistic watercolor
magic this holiday season? And what if I told
you that we'll be doing that by using
everyday objects, such as a jar, a sponge? Join me today as he creates
studying holiday cards that will spread warmth and joy to your
family and friends. Hi, my name is Jolly. And I'm a watercolor artist, online art educator and sculpture top teacher with nearly a decade of
painting experience. My art revolves around painting. Loose watercolor
flowers, creatively capturing nature on paper in a loose and expressive style. A personalized card created
by you is not just a card, it's also a piece
of your heart and a unique expression
of your creativity. In this class, we
will first talk about the materials
that you need. Apart from watercolor, we will also be incorporating white Ah and gold paint to add
the touch of holiday magic. Next, I'll be sharing
exciting tips on how to fully utilize HR to create
wreaths and ornaments, and how to use sponge to add, that's no effect on our card. You will also learn how to paint simple holiday botanical
elements as a form of exercise. For our project, we will
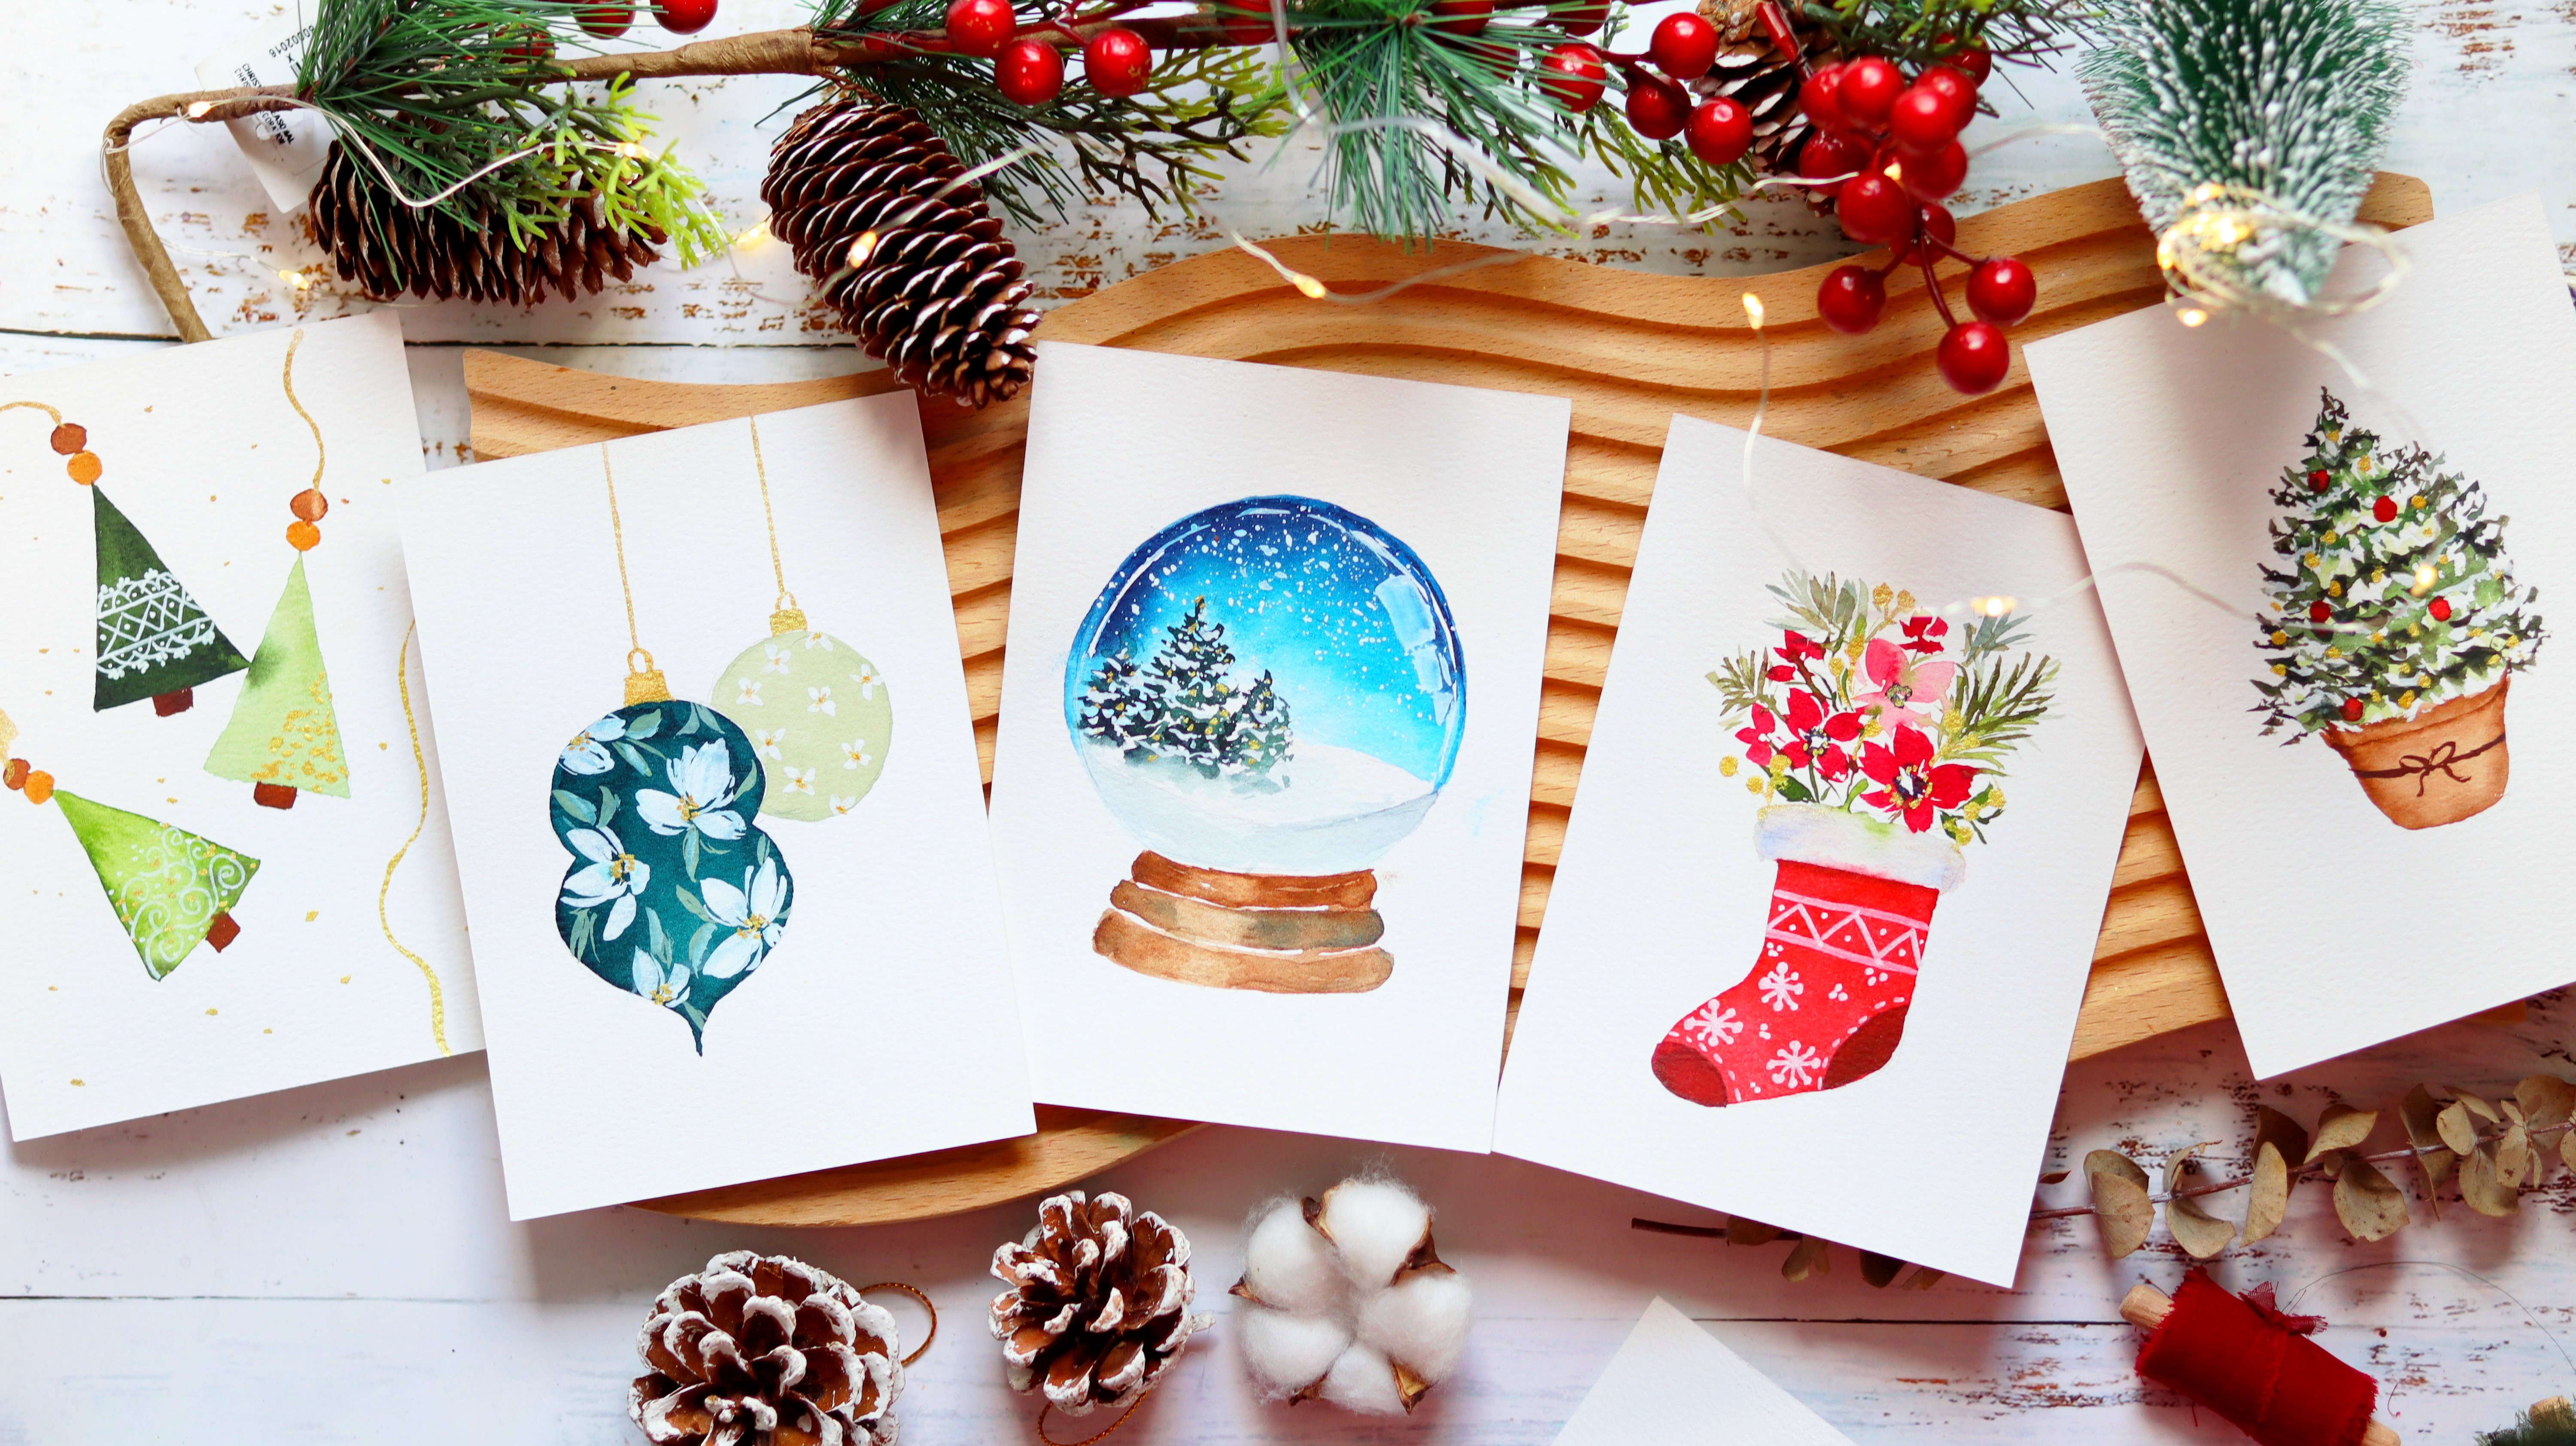
create four beautiful cards. A gold leaf wreath, a lush holiday wreath set on
a softly blurred background. A Christmas tree bubble
with a snowy effect. And a hand painted ornament where you can
customize a greeting, whether you're a seasoned artist or just starting
with watercolors. This course is
designed for everyone. I can't wait for you to
create your own holiday card, so let's get started.
2. Class Overview: Welcome to the class overview. I'm really excited to share this class with
you because we'll be using everyday objects
to paint holiday cards, which is something unusual, and I'm hoping that this
will spark your creativity. Aside from that, I hope that
you'll be able to create meaningful holiday cards
for your loved ones. Or you can even start your
own small card business for the holiday season. Okay, so let's check
out the projects. For our first project,
we are going to paint this beautiful holiday wreath with gold leaves and
also white berries. So we're going to use our jar to create the base
of this wreath. Next, we're going to
paint this simple Christmas tree bubble again, we're going to use the jar
to create that round shape. And then on the inside, we're going to paint this tree with some snowy effect
using a sponge. For the third project, this is going to be an
interesting wreath because we are going to paint it on a
soft, blurred background. For this one, we're going to
do a wet on wet technique. First, let it dry, and then we're going to
paint those beautiful leaves and berries and also add some
snowy effect using sponge. Next, this one was inspired by hand painted ornaments that
I have been seeing online. So we actually even made
an air dry clay ornament, which I'm going to
show you in a while. What I love about
this holiday card is that you can write a
greeting in the middle, so you can see that
white space over there. We are going to use a tape to achieve this white
space in the middle. That's it for our projects, but you can definitely
make so many versions of holiday cards using
the techniques that we will learn
in this class. All right, let's not jump into the materials
that you need.
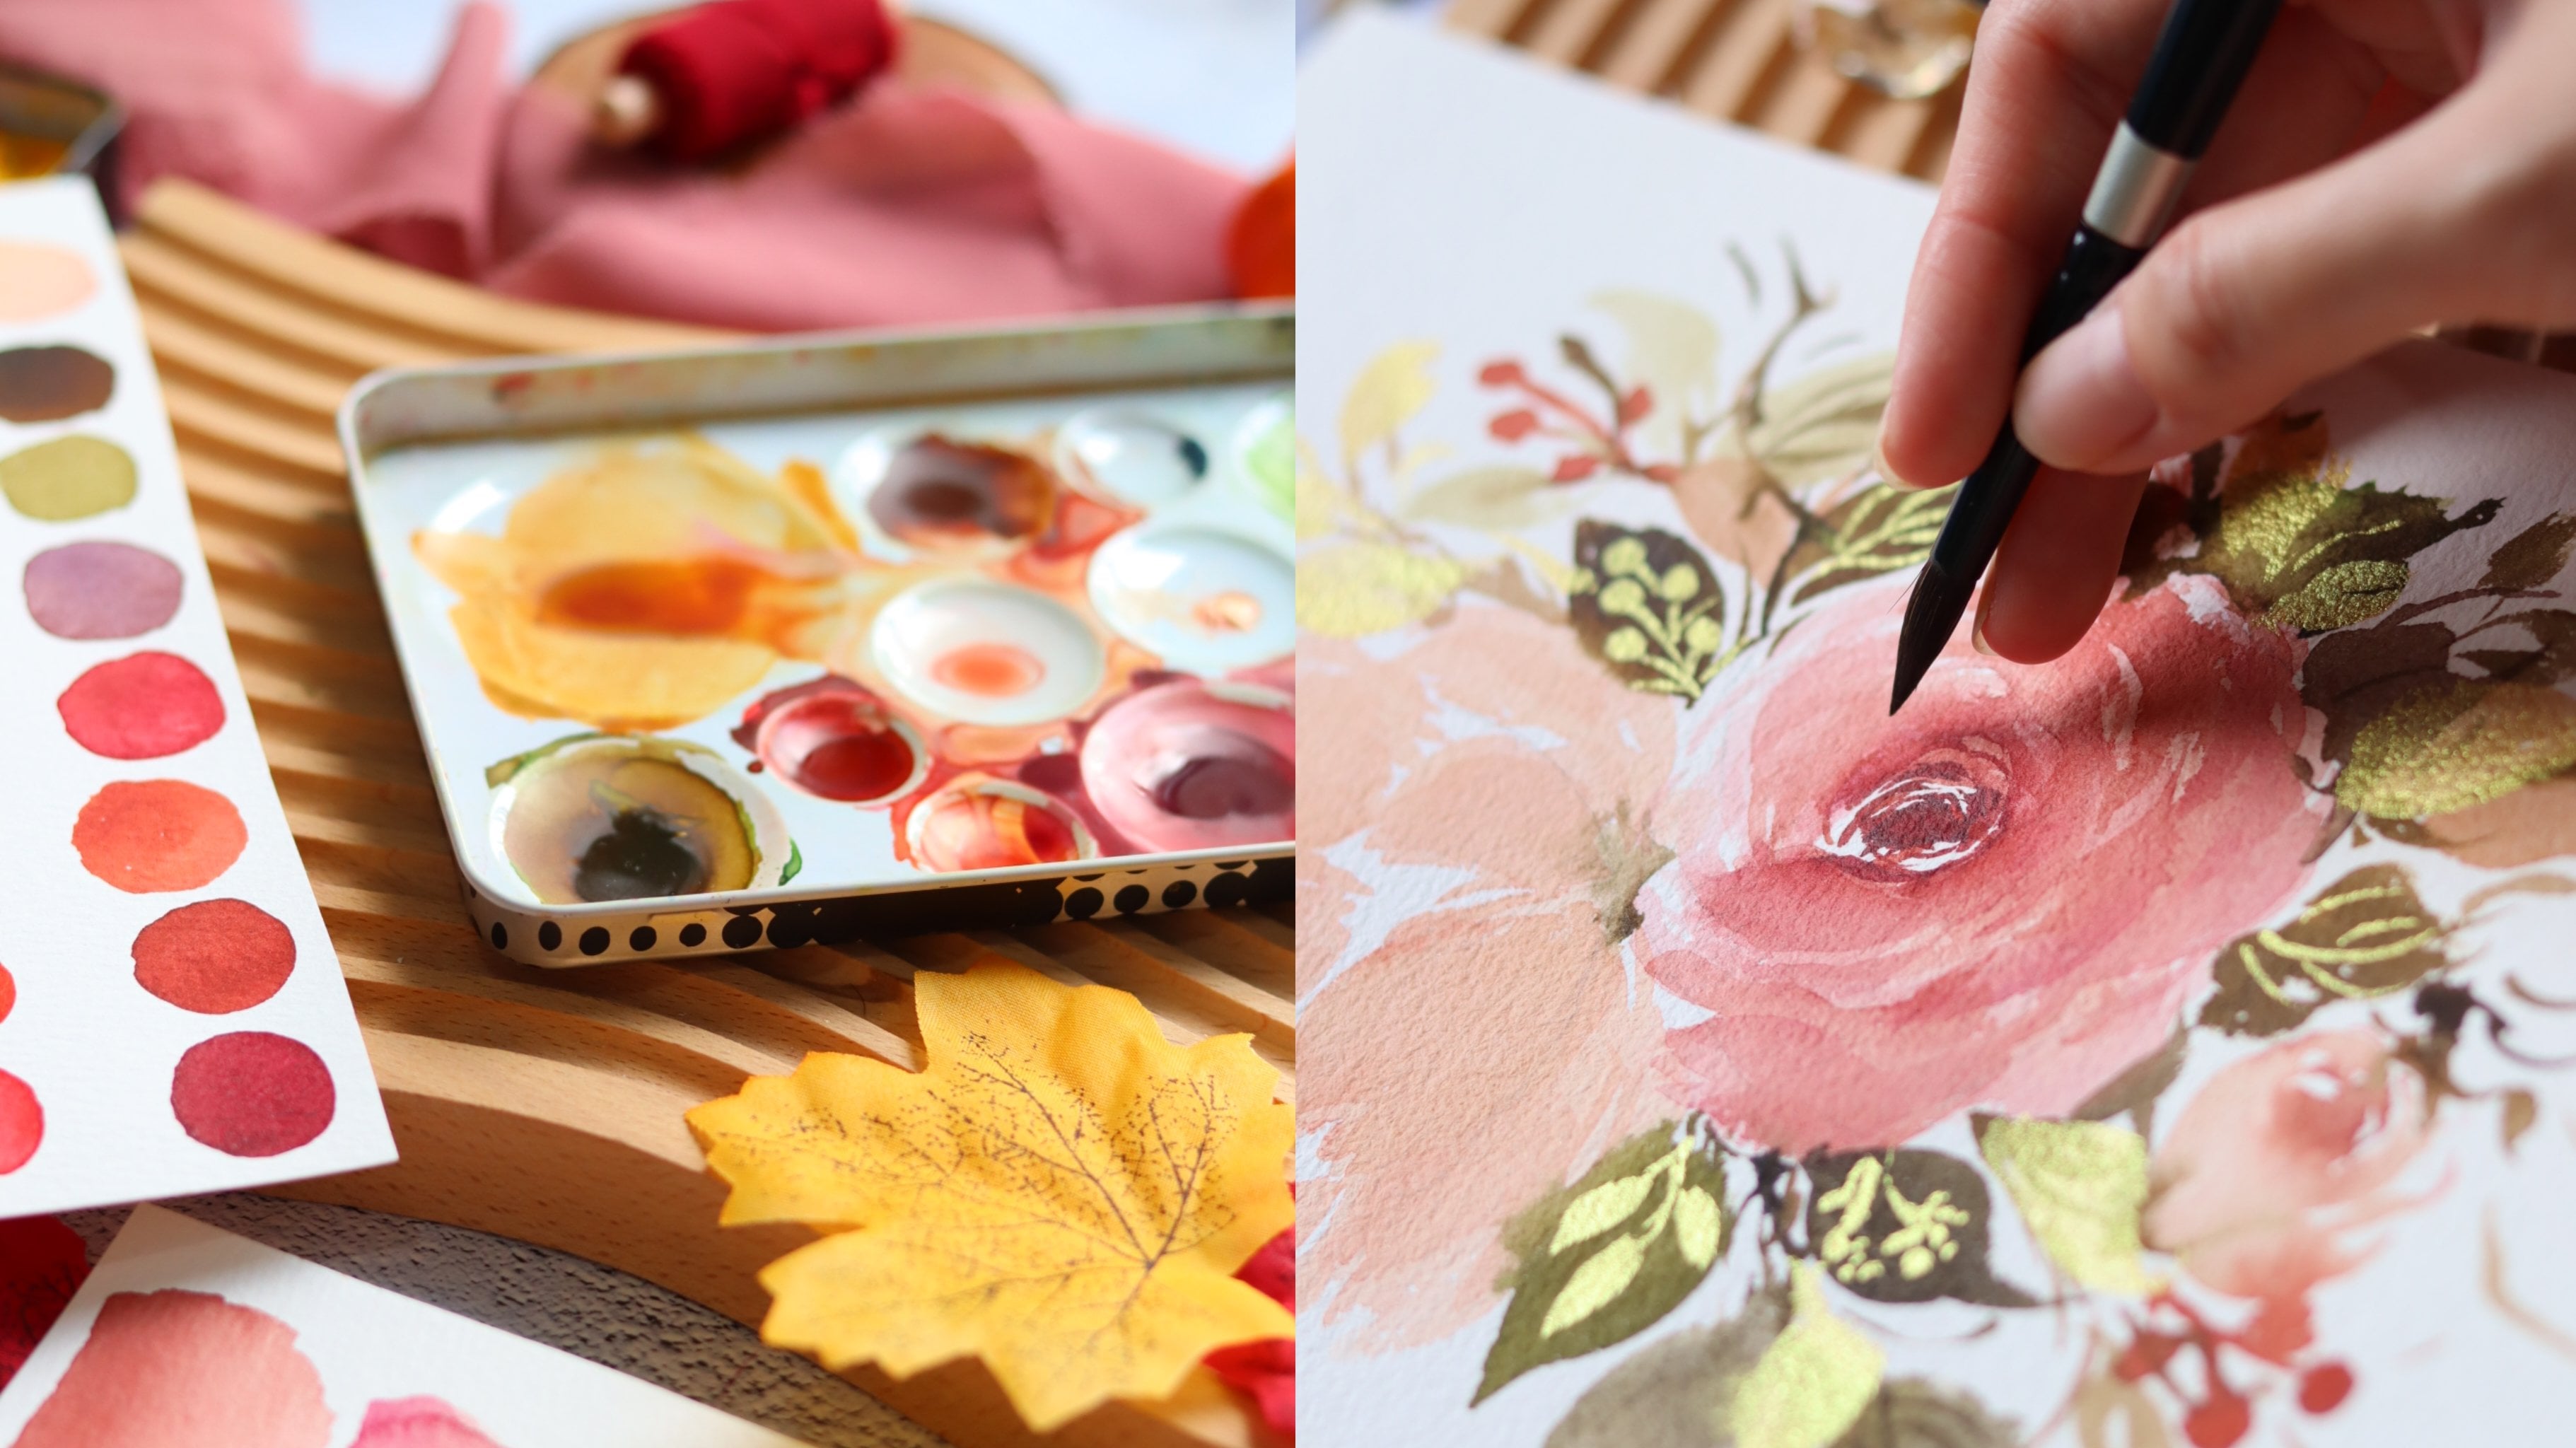
3. Materials: Let's talk about the
materials that you need. So, the first one is paper and you're going to use
the Bahn Academy. This is the brand of
paper that I'll be using and the size
is five by 7 ". For our projects, this
is 300 GSM in thickness. On the inside, I will show
you that there's a bit of texture here because this
is cold pressed paper, which is really nice
for loose florals. It comes in a block form. All the sides are glued, except for this part, where you can use a cutter or a palette knife to
slide off one sheet. After you're done painting, just make sure that the
painting is already dry before you take out one sheet
so that it will be flat. For the paints, I will
be using Sheen hand PWC. This is a Korean
artist grade paint and it comes in tubes. But I usually pour them in just half pants like this so
that it's convenient to use, but you can use any brand
that you have next. We also need a palette
to mix our paints. This is just a lid of
my watercolor tin. You can use something like this. It's a resin palette and I love it because
it's so beautiful. But you can also use plates
or other ceramic palette for the brushes I am
using size six in the size four round brush
from the brand silver brush. I love using this
brush because it can hold a lot of water and
still keep its point. Next is this silver ultra mini designer round
brush in size eight. I recently discovered this and I love it for all
the small details. It just has this
very fine point. For example, you can use it to paint the thin pine needles, but of course this is optional. You can use just a smaller
round brush to achieve that. Because we're going to
paint some holiday cards, we need some sparkle. I'm using the cure.
Takes tyre colors. This is a set with a paints. I love that this one gives a really nice shine
to my paintings. But of course you can use other brands such as
paints from Era Lab. Using white gash is
a great way to add some snowy effect to
your holiday cards. I'm using the brand Whole bin and the color is
permanent white. I love Whole bin because
it has a creamy texture. But of course you can use
other brands as well. Next, I am also going to
use a Sakura micron pen. I love this pen because
this is waterproof. I use this pen to write a merry Christmas in the middle
of this Christmas bubble. Because it's waterproof,
it won't much, just in case you accidentally
spill some water on the area where you
wrote your greeting. Of course, we need
jars of water. I have one for my
regular paints and then another cup just
for my gold paint, because I don't want
any small glitters or gold pigments to mix
into my regular paints. Then we also need some tissue paper to plot out the excess moisture
in our brush. And then for our wreath, we need a small charge like this to stamp the circle
in the paper. You can use other
objects as well, but I do prefer one
that has a thick rim. And then next we
need some sponges. These are just kitchen
sponges that I cut up into smaller pieces that we will use for our snowy
effect later on. Next, we need a tape that we
will use for our project. Just like this, I'm actually using this Washi
tape that I bought in Japan. But normally I use
a masking tape. Just a regular
office masking tape. I just did not have the
thickness that I wanted, so I use this washi
tape instead, just in case you find
this in your stores. It's a beautiful tape
that's super gentle on the paper and doesn't tear up your paper. Okay, so that's it. Now let's move on to the next video where
I will be sharing some tips on how to use this sponge and jar
for your projects.
4. Tips on Using Jar and Sponge : In this video, I'll
be sharing how to use a jar and a sponge
for your projects. We're going to use
the jar to create the outline for our
wreath for jars. I usually prefer one that has a thicker rim that it has more space for the
paint to stick on. For this demonstration,
I'm going to use this gold paint from
let me just mix it. Usually, it's best to spray your gold paint
with some water. Leave it for about a minute
so that it will soften. I'm just going to mix it some
more to make it creamier. Whenever you're
using gold paint, just use a regular
synthetic brush. Don't use your nice brushes on the gold paint because it might settle in
between the bristles. Eventually, it might
ruin your brushes. The paper I'm using is just
a regular scrap paper. Don't use your nice
papers for this exercise. I'm going to just paint gold
on the rim of this jar. You just need to go over it
a couple of times because sometimes the paint will become dry or it will move to the side. Okay, It looks ready. The surface of the paper is dry. Later on, I'm going
to show you what it looks like when you
stamp it on a wet paper. But you can see that you have a defined circle because
the paper is dry. If it looks imperfect,
that's definitely fine. It's going to create a nice
character to your wreath. And also we can cover
it up with some leaves. Anyway, just in case you want
to add some more texture, you can go back in and stamp your jar so you can see
that beautiful effect. I love doing this because you have some unique
markings. All right. So why don't we
try just painting some regular leaves all around so you can better visualize. This wreath is actually a
beautiful style as well. You can do this for your
holiday cards and just paint some metallic gold on black paper so that
it will show up more. Okay, I think it's
looking really great. You can also use other colors
for your metallic paints. I really love how
minimalist this looks like. Now that you have seen what
it looks like on dry paper, I'm going to show you
a different technique. This is a wet on wet
technique using a jar. This is the project
that we will do. You can see in the
background it has a blurry effect and that's
because of the wet technique. Just grab clean brush and paint some water
on the surface. Make sure you use
a different brush, not the brush that you
use for the gold paint. Just paint a light
layer of water. You can see that
sheen over there. All right, for this project, I'm going to use green. This is just sap green, but you can use other colors
as well in your palette. So I'm going to stamp this on
the wet surface. All right? You can see it's creating effect because the
surface is wet. And that's what we want. Next, let's start painting
some leaves along this circle. Don't worry if it
looks imperfect. I know it doesn't look
that great right now. But just trust the process. This part right here is going to be just
in the background. We are definitely going to paint on top of
this first layer. What we want is
just a fuzzy effect in the background of our wreath. Okay, we'll learn more about this in our project later on. Now let's move on
to using a sponge. This is just a regular
sponge that I cut up. I'll be showing you in
this video how to properly use the sponge technique to create the nice
opaque snowy effect. First, just grab any dark paint, you can use indigo paint gray, or any blue color, just so that we can see
the snowy effect better. I want you to paint two
rectangles of this dark paint. It's best if you can paint
something very pigmented. After painting this, we
are going to let it dry, then we're going back in
with our sponge technique. All right. So this
is already dry. You can try to touch it first to check if there's no
smudge in your hand, then that's good enough. Okay, This is our sponge and
you can see that it is dry. With a dry sponge, we're
going to apply some gosh. I'm going to put the
gosh on the palette, but you can also squeeze
it directly on the sponge. Now, grab your dry sponge
and then tap it on the gosh, just like So try to tap it a few times because you don't want a dollop of gach
on your painting. You want it to spread
nicely on the sponge. Next we are going to
dab it on this surface, you can see that it's creating a beautiful effect
that looks like snow. This is a really fun
technique that you can apply to other
paintings as well. I think it's fun also for
kids to try this next. Just go back in and
grab some more paint. Because our sponge is dry, you can see that the texture
is very clear and sharp. It's not smudging on the paper. We are not lifting any
color from the first layer. It stays intact because the gash and the
sponge are both dry. We did not add water. Let me show you what will
happen when your sponge is wet. I'm going to wet
this intentionally. You'll see that it will
create a different effect. Now let's grab some gas. You can see that it's
now a little bit watery and quite thin
because there's water. With this one, you
can see that you have a more solid texture. Also, it's slowly
lifting the first layer, You'll see that blue color in our spotch that is from the first layer
that we painted on. Now we don't have that
nice, crisp snowy effect. You can clearly see the difference between
the left and the right. Personally, I think the one
on the right still looks nice and a technique that you
can use for certain styles. But for our projects, I think I prefer a nice,
crisp snow effect. We are going to use the
technique on the left, where everything is
going to be dry, dry sponge and a gah that
is straight from the tube. These are just simple
tips that I hope will help you in
painting your projects. Now let's move on
to the next video, as we learn how to paint the
holiday botanical elements.
5. Holiday Botanical Elements Exercise: In this lesson,
we're going to learn different holiday
botanical elements that we will use
in our projects, such as different leaves
fillers and also flowers. Let's, let's grab some color. I'm going to use sap green, but you can use any other color. I'm also using a size
four round brush because I want to paint
some smaller elements. Let's paint some simple leaves. I'm going to start with stem
using the tip of my brush. Now let's start
painting the leaves. Start with a light
pressure and then press your brush onto the
paper and drag it. Now this is my go
to style of leaves. We can also try to vary this. We can paint some
smaller leaves just by applying less
pressure in our brush. It's always nice to vary the size of the
leaves in a wreath. Next, let's grab a little
bit of this indigo, and I'm going to mix it to my green to get a darker shade. We can also paint
some rounded leaves. You can just paint a loop. Or you can also try to stamp
your brush just like this. I just press my brush and you'll end up with
a rounded tip. You can just try to
slowly fix the shape. Okay, let's try
this one more time. Right here, I'm just
painting the outline first, and then I'm trying to fill
in the space in the middle. Okay, let's move on
to the next leaf. I'm going to mix sap
green with burnt umber. This is a nice neutral brown and you can see that we
have a warm color here. I'm going to paint
some eucalyptus. Let me show you right here. We painted some eucalyptus
in that project. Just paint a straight line
and paint some oval shapes. You can also rinse your brush, tap the excess water, and then you'll end up with
a lighter green color. I usually do this just
to change the value so that it looks more interesting
and it doesn't look flat. Okay, now let's try
a darker color. This is one of my go
to greens as well. It's Hookers green. With CPA, it's going to produce a
really dark rich green color. You can also use this
for painting eucalyptos. Sometimes I do paint the oval shapes first
before painting the stick. It really all depends
on your preference. All right, let's move on to a different botanical element. Now let's start painting
some pine needles. I'm going to use burnt umber. And you can just paint two thin lines so that we can
try to practice the more. Okay, next I'm going to rinse my brush and
grab this green color, this is Hookers green with Pa. I will start painting
some really thin strokes. I'm trying to paint this
in different directions. You can also rinse your brush just to add a different value. You can see I have some strokes here that are darker,
some are lighter. If the strokes are overlapping,
that's completely fine. You can drop in some
darker color as well, while this is still wet. Let me show you another
painting of a pine needle. This time I'm using
a different brush. This is the ultra
round designer brush. And you can notice right away
how thin the strokes are. It's just so effortless to paint some thin strokes
using this brush. We're somehow getting
a different look for this pine needle
because of the brush. But don't worry, you don't
need to use this exact brush. Any small round brush will do. If you want some
really thin strokes, then you can try to use
a size two round brush. We're done with the
leaves now let's just try to practice
painting this tree. I'm just grabbing
any green color in my palette with a size
four round brush. Now let's paint some
practice strokes. I'm going to use just
the tip of the brush. And you can see
I'm trying to sway my brush to create
these strokes. It almost looks like a
letter or a check mark. What we want to happen
is that both ends of this stroke are
supposed to be pointy. You can continue
practicing this stroke for our Christmas tree bubble. All right, so I think we can
start practicing the tree. We start at the top and we're just going
to sway our brush. Create these tiny,
wispy strokes. You're going to do
this layer by layer. Just make sure that you
leave some spaces in between your leaves if you want
it to be interesting. You can also try different
shades of green for your tree. I'm just going to rinse my brush to create
a lighter value. You can see this is a
lighter green color. As I go further down the tree, my strokes become
slightly bigger as well. And I'm also trying to vary
the size of my strokes. Some are just dots like
what I'm doing here. Some are broad strokes. Using the tip of my brush, I'm going to lightly
tap it on the paper. Create this nice wispy strokes just to make it look loose. Then you can go back in, in the middle to add the darker green that is the
base of our tree. Later on, we will be painting
some nice ornaments. We'll also do some snowy effect. This is just a practice
for the base tree. Next, let's paint some of the elements in this
Christmas bubble. These are just simple florals, and we're going to try
and paint that first. Just as a warm up for you guys, I'm going to use permanent red, but you can definitely use
any color that you want. I just thought that red is such a festive color
for the holiday season. I'm going to use the side of the brush and slowly
move it up and down and create one
petal first Next, where you can go
back in to the side of this first petal and
do the same technique. Again, use just the side of your brush because I
don't want it to look too structured and making
sure that the tips of the petals have some
pointy strokes. It's not a rounded petal. While this flower is still wet, I'm going to grab indigo. But you can also use black. And we're going to
add it in the center to give some contrast
to this flower. Just slightly tap your brush and make sure that your
brush isn't too wet. We want a very pigmented center. Next, I also painted some nice peachy pink flowers to complement this
bowl red flower. In order to achieve that color, we're going to mix
a brilliant pink, which is a pastel pink color. And then I'm going to
add a little bit of this yellow ochre to
create this peach shade. It depends on if you want it
to lean on the pink side, then you add more pink. If you want it to
be a bit orange, then you add more yellow. I'm just painting it in the
same style as the red flower. Just sway your brush
onto the paper. Move it up and down. Just leave the center open. Let's grab some indigo again. You want a thick mixture? You don't want this mixture to spread all over this wet flower. You want it to be concentrated
in the center only. Okay, so we're done with
the simple flowers. Now let's move on to
some of the fillers. I'm going to grab indigo, but you can use other
colors as well. I'm going to just create this small stem
and tap my brush, create some small dots that
will look like small flowers. This is a very easy
filler that you can add to your wreath
and it's a great way to add contrast to your wreath. Next, of course, we're
doing holiday wreath, so we really have to
put some red berries. So I'm using permanent red
here and just painting some shapes and
attaching them to stems. But if you want a
more maroon color, you can simply add a little
bit of green to your red. So you can see the huge
difference in that you have some bright red berries and you have some dark red
ones on the right. Okay, so that's it for our
simple botanical elements. Now let's move on to
painting our first project.
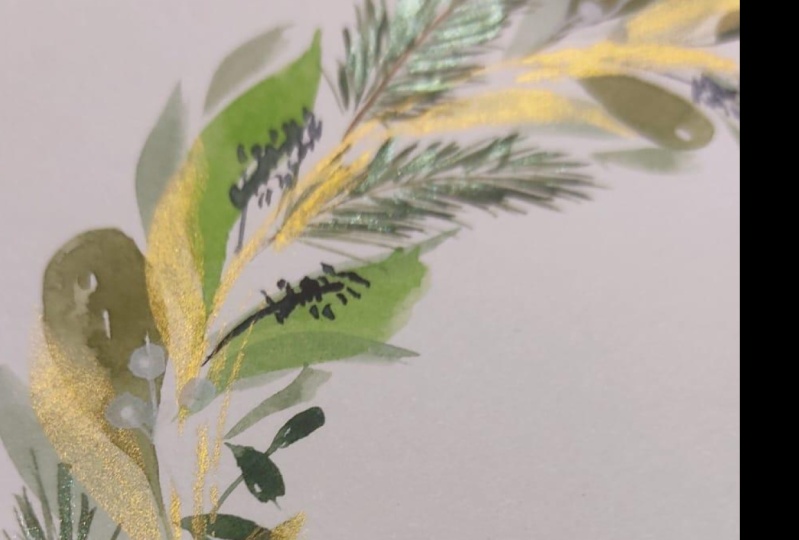
6. Holiday Gold Wreath: For our first project, we are going to paint
a simple wreath, but we're going to
spruce it up with some gold leaves and some
white berries. Let's start. The paper I'm using
is five by 7. ", Just grab any
round object I'm using a jar and you're going to paint gold on the rim of the jar and stamp it on
the paper right here. I'm using a take, stary gold color, but you can use other
gold paints as well. You can even use gold
gah if you have that. We want this nice and creamy. So you can see, I'm really
trying to mix that gold paint. I get that opaque color. I always use a synthetic
brush for gold paint. Now I'm going to paint
on the rim of the jar. Just go over it a
couple of times so that the paint will really
stick on the glass rim. Okay, this is good. Now we are going to
stamp it on the paper. Just press it really hard so
that you get a nice circle. Okay, this looks great. It's okay if it's not a
really dark gold ring. I'm just going to
prepare my greens. I'm using sap green. I'm also mixing Hooker Screen and CPA right here to
get a dark green color. Next, let's grab Sap
Green and Integral. You can also add different
blues to your greens. It depends on the
palette that you have. Next I'll be mixing
sap green and burnt umber for that
earthy green color. All right, let's start
with some simple leaves. First, I'm going to
grab sap green and just paint a pair of leaves and add that all
throughout the wreath. One of the easiest
ways to build up a lush wreath is
to add a pattern. You can see I'm adding a pair of leaves all
throughout this wreath. And then I'm going to
add a different kind of leaf in between that, we're going to add
some pine needles. I'm using burnt umber for the
center of the pine needle. Okay, now let's grab our greens. I'm going to use the Hooker's
green and sepia color. This is a nice dark green
color and let's just paint some really thin lines facing in different directions. I'm also using my
really thin brush. This is the ultra round brush, but you can definitely use a smaller size brush
if you have that. Adding pine needles
to your wreath instantly makes it
a holiday wreath. Okay, let's go over the
other pine needles. I'm going to just paint some
brown sticks right there. And then we're going to add some of those thin green lines. We can also rinse
our brush to create a lighter green color
and just pull out some of that green next
you can in a green color, while the pine needles
are all still wet. I made a mistake right there. I'm just going to
blot it out with some tissue paper.
Don't worry about it. We can always cover it up with some more leaves instead
of two pine needles here. I'm going to put just one just to change
it up a little bit. All right. Next
we're going to paint some rounded leaves and I'm going to use sap green
with burnt umper. When you're painting wreaths, it's important to change the shapes and the
sizes of the leaves. You can see right here, I'm trying to really add some texture by creating
different leaves. You can play around
with the shapes. It doesn't have to
be a real life leaf. You can paint leaves
from your imagination. You can also start layering, just like what I'm doing here, some of the leaves
that we painted in the beginning
are already dry. You can layer it up. And just paint on top of it. Next, I think we need
to add some contrasts. You can see it's
looking a little flat. I'm going to add some CPA to my green and just paint
some Eucalyptus. You can paint some
oval shapes and then put the stick
in the middle. I'm just adding it in the white spaces in between
some of the leaves. Okay. So you'll notice
that I also tried to rinse my brush to
create a lighter value. It's important to change
the different shades of green and a wreath.
It's looking great. I'm going to add a
little bit of this blue. I use indigo and
I'm just going to paint some more leaves to
fill in some of the spaces. You'll notice that
the mixture is very thin and you could barely
see some of the leaves. That's a great way to fill in the white gaps without adding
some overpowering leaves, because sometimes you
just want a subtle color. Next, let's add some fillers. I'm going to use indigo. It's a really pigmented
color on my palette. I'm just going to put
some really tiny dots right here and add a stem. They actually look like very
small berries in a wreath. I'm also making sure that I have enough spacing in
between my fillers. You can paint the fillers
beyond the wreath. Right here I'm painting one. And then you can also paint
on top of existing leaves. Now let's add some layering
on the pine needles. This is the same Hookers
Green and CPA color. I'm just going to go over the first layer and add
some more thin lines. I want this to be really wispy. We're adding a second
layer just to make it look like it
has more contrast. All right, it's
looking really good. But this time we're going to add some more gold to our wreath. So I'm gonna grab my
jar and I'm gonna paint some gold
on the rim again, because we painted
so many leaves, we lost the gold rings. I'm going to put it
back into the wreath. We're just going
to stamp this jar. It can be a little
tricky when doing this. Okay, I'm just going to
go over it several more times using some
parts of the jar. Okay, I think it looks good. Now let's add some gold leaves. I'm using my ultra round brush. We are going to layer this
wreath with gold leaves. The gold paint will show up more if the
background is darker. You can paint this on
top of darker leaves. As I'm adding this, I'm
also being mindful of the spacing because I don't want this entire wreath to be gold. I just want some
subtle gold sparkle for that holiday magic. This is also a great
way to cover up some mistakes that you might have made when
painting this wreath. Next, I'm missing this posca, acrylic white pen, but you
can also use your white gas. We're just going to paint some white berries and I'm going to add this near the dark
areas or the dark leaves. After painting so
many holiday cards in the past few years, I realized that adding some white berries to
your wreath or bouquet makes it look more like a holiday wreath or a
holiday floral arrangement. I think it's because it somewhat looks like a
missile too as well. So I really like adding
these small details that just makes a huge
difference to my painting. All right, so now we're going to add just some finishing touches. So I'm going to paint
some really small leaves or just some wispy strokes. I'm going to extend the part because this wreath is not
in the middle of the paper. Just to divert that attention, I'm going to add some more
leaves on the right side. But at the same time,
I'm trying to be mindful that it doesn't look too
chunky on the right side. That's why I'm adding
some really thin leaves. Okay, so we are done. Congratulations for finishing
your first project. Now, let's move on
to the next video.
7. Christmas Bauble Tree: Before we start, here are
the colors that we need. You can take a
screenshot or you can check out the projects
and resources section. In this lesson, we
are going to paint this beautiful Christmas bubble with a Christmas tree inside. And we're also going to apply
some snow using sponge. First, we're going to apply
paint on the rim of our jar, so we are going to
stamp this later on. I'm using cerulean blue, try to choose a
happier shade of blue. You can also use turquoise, and that's because we just want a subtle color blue in the background of
this Christmas tree. Okay, I'm just going
to press my jar, it's a little bit further
down the paper because we're going to paint a string for
this Christmas ornament. Next, I'm going to rinse
my brush and just try to fade away the
inside this ring. As you can see, we were
not able to get paint on the entire rim of the jar. That's okay. We can just slowly fill it in with some more paint. Right now. I'm just
trying to really fade away that harsh line. Okay. This entire
circle is already wet. I'm going to go ahead and put back some color on some areas. Just grab some more paint, just to add some dimension. I'm going to put more color
towards the bottom part. It looks like there's more shadow at the bottom part
of this Christmas bubble. Then you can also
slowly fade it away. This looks great. I'm
going to let it dry. Once it is dry, it
will look like this. So you can see that
the color blue is actually a very subtle color. Now let's grab some sap
green and burn under. I'm going to prepare
the color for our tree. We do want more pigmented
mixture for this part. Let's start right here. I do want to leave some space at the top so that we
can paint our star. Let's start right
here and just paint some nice small wispy strokes. My brush is too wet. I'm just going to dab it in tissue paper. Let's go back in. Just use the tip of your brush and move it from left to right and try to create some texture by changing the shape and the
size of the brush strokes. I'm also making sure I
have spaces in between my strokes that it
doesn't look too chunky. Now let's rinse our brush
and try to just fade away. Some of the strokes towards the bottom part of the tree. I do want it to be darker because that's where
the shadow should be. We can just grab a more pigmented mixture
of burnt umber and sap green just to make
it look more wispy. I'm adding some tiny strokes towards the edges of this tree. If you'll notice,
it's easier to do some nice Swiss piece strokes
when you do it quite fast. You need to do quick strokes. Okay, this is
looking really good. Now it's time to fade
away the bottom part. I'm going to rinse my brush
and we are going to fade away those leaves at the bottom so it will look like it's blending
in with the background. So I painted over that line. I'm just going to blot it out while waiting for
this tree to dry. I'm going to grab my gold paint. I'm going to paint a star. You can also use a
small round brush, such as a size two or a
size four round brush. I want to really mix this gold paint until
it's greamy and opaque. The top of the tree is
still a little bit wet. I'm going to go ahead and paint this part of
the Christmas bubble. All right? I'm going to
just paint a straight line, but later on we're going
to add some beads. Okay, so just paint
some round shapes. I actually left some
space in between the gold beads just to
make it look nicer. If you don't want to use gold, you can also use silver
or maybe rose gold. All right, so this part
is a bit dry already, so we're going to start
painting the star. This part is my favorite. We're going to use a sponge
to add some snowy effect. You can actually put the gosh straight on the sponge
just like this, or you can also put the gash on a palette and
your sponge there, just make sure that your
sponge is really dry and don't add any more
water to your gosh, we're going to use it
straight from the tube. My advice is to
cut your sponge in smaller sizes so that it's easier for you to
manipulate the sponge. Okay. This is also a
great way to cover up some mistakes that you might have made while
painting the tree. It's really, really fun to
add this gage right here. I hope that you're
also having fun. Okay, so in case you put
too much snow, it's okay. You can always go back
in with some more paint. Just like what I'm doing here. I'm painting more
leaves and I'm making sure it's a dark or a
more pigmented paint. I'm adding this underneath that snow just to add
some shadow as well. All right, and
then let's go back in with some more gold sparkles. I'm going to use my
gold paint and just add some Christmas ornaments
and also a string again. Just make sure that you
have enough spaces in between your ornaments so that it doesn't
look too cluttered. If you have metallic paints
in different colors, that would be a
good way to use it. You can add some red
Christmas ornaments or blue just to add some color to this
Christmas bubble tree. All right, so we're just doing some finishing touches
and then we're done. I'm just showing you
this beautiful glow from the gold paint. I hope that you enjoyed this
simple watercolor project. Now let's move on
to the next one.
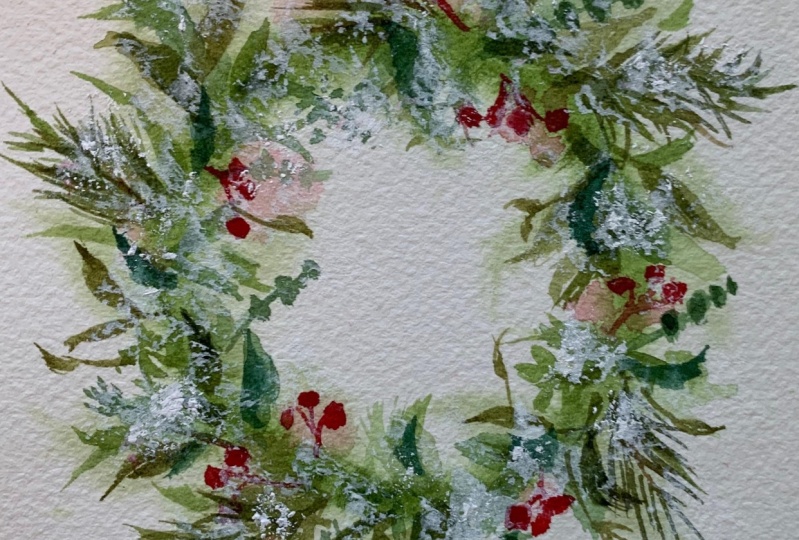
8. Holiday Wreath on Soft Background: Before we start, here are the list of colors
that you need. You can take a screenshot
or you can check out the projects and
resources section. In this project,
we're going to paint this beautiful wreath set
on a blurred background. And we're also going to add some berries and
some snowy effect using a sponge to get
that blurry effect, we need to paint the base first. I'm going to paint the entire sheet with
just clean water. It doesn't have to
be dripping wet. You just want the
paper to be moist. It has a nice sheen to it. I'm using a flat brush, but you can also use a regular
round brush to do this. All right, so this looks good. While this is still wet, we are going to stamp our jar, so I'm going to grab this
sap green color. All right. We do want just a soft
green color since we are just going to paint the
background of this wreath. Now on this wet paper, we are going to stamp our jar just like so you
can see that fuzzy effect. I'm just going to
leave it as is. Next I'm going to grab some burnt umber and mix
that to my sap green. All right, let's prepare
another green mixture. I'm going to mix
sap green with CPA. All right, let's start
painting the leaves. As you can see, this mixture
is not too pigmented. We just want a soft
color in the background. I'm just going to paint some
random leaves all around. I know it's not going
to look great for now, but just trust the process. I'm going to grab some
more of that CPA color. Just continue adding
some more leaves. It's going to really fade away in the background because
the paper is still wet. That's the effect that we
actually want to happen. We don't really need a very
defined leaf shape, okay? Because I'm going to
add some berries. I am going to use permanent red. While this wreath is still wet, we're going to try
and add some berries. And you can see that it's also fading away into the background. It has that blurry
effect right here. I'm trying to add
some more water to my mixture so that
it looks more loose. Just add it in different
spots so that you'll have a nice background for the
main wreath. All right. We need a little
bit more colors. I'm just grabbing
more permanent red and just adding it
in different spots. When this is all dry, we are going to add
some more leaves. I know it doesn't
look that good right now with some ugly
patches, but that's okay. We're going to cover it
up with some more leaves. I'm using a size
four round brush because we're going to
paint smaller leaves. So let me just mix up
green and burnt umber. Let's paint the simple
leaves alternately. And I'm also going to
paint on the green areas, only for the ones
with the red berries. We're going to paint
something on top. Later on, you can also rinse your brush to create
a lighter green color. Change the shades of cream
that you have in your palette. Okay, this looks good. Now we are going to
add the pine needles. I'm going to grab burnt
umber or any brown color in your palette
and paint some sticks. That will be our guide later on as we paint the pine needles. Now for the pine needles, we're going to use
fucercreen and Pia. I just want the
deeper green color. Using the tip of the brush, just create some
really thin strokes that are facing in
different directions. So you can also use
this ultra round brush. If you have this type of brush for some of
the pine needles, you can paint it a little bit curved since we're
painting on a wreath. All right, so it's looking
really good thinking, I'm gonna add one more
pine needle over here. Yes. So when painting a wreath, I always say that it's best to vary the shape of the leaves. So right now I'm going
to grab some blue, this is indigo, and
add it to my green. Let's paint some rounded leaves. Okay, So I'm just
going to add it in between some of
the leaves that we painted and I'm just going to go all
around the wreath. All right. So with this
darker green color, we can add some more fillers. I'm going to paint a thin stem and just tamp my
brush all around. This is going to look
like small leaves. Next, we can also
add some Eucalyptus. I'm just painting some
oval shapes right here. And you can also start
layering some of the leaves in case they are already dry paint on top of
some of the leaves, and that's okay, in order to
create a really lush wreath. It is all about layering
and you just have to be patient because
it's a long process. Next we're going to
add the berries. I'm using permanent red. I'm going to add it near the blurry red background
that we painted. Just choose the red spots
as a guide for you. Now, it's also up
to you if you want to change the color
of the berries, you can add a little bit of green so that it will look like maroon or just a deeper
shade of red if you wish. You can also decide to turn it into white berries
or maybe even gold. I really love this
technique that we're doing. I love the glowy effect of
the soft blurred background. It looks like this wreath is floating and it looks very soft. Right here, I'm
just going to add some more berries just to
make it look more balanced. All right, the color of this
wreath is already beautiful, but I feel like we need to
add some more contrast. I'm going to use a
dark green color and just add some tiny leaves. So adding these darker leaves will give our wreath more depth. Just create some
really quick strokes so that it will look
more expressive. Just to give you a
different perspective, I suggest taking a photo of your painting now
and look at it on your phone so that you'll see it from a different perspective. And you'll notice if you need to add some more leaves
in different areas. Sometimes when we look at
our painting for too long, we may feel a little bit stuck
or we don't know whether we need to add some
finishing touches or so. I'm just going to
let this painting dry and then we are going
to add some snowy effect. So again, this is just
our kitchen sponge. And just make sure that it
is dry before you use it. Cut it up into smaller pieces so that it's easier for you to dab it on the
painting. All right? So I'm going to squeeze
out this gash on my palette and I'm going
to leave it as is. I'm not going to add some water. So I'm going to use my clean and also dry sponge and dab it. We want it to be
evenly spread on the sponge just to be sure. You can also try to dab it
on a scrap paper first. All right, so this
is the fun part. Start dabbing away and we're
going to add some more snow. Okay, so we can just go back
to our palette and grab some more gah and start
dabbing away again. We just want some
subtle snow effect. We still want to see the
green leaves from the wreath. This is actually very
therapeutic and also it's a great exercise or a great
activity for kids to do. All right, so I needed to
speed that up because it might be boring for you to see
me just dabbing my sponge. Now let's move on and
add some more details. I'm going to grab a
dark green color and just paint some
more leaves also. This is a great way to
add back the color in case you put too much snow
effect on your wreath. For some of the leaves, I'm just going to paint on
top of the previous layer. You can see that I'm also
bringing in more contrast. We can also go back in and add back some color to the berries. I'm using permanent red. So you can see that
beautiful pop of color. I'm going to add some
more finishing touches. This is something
that I always do. I add some really thin leaves. I try to extend these stems just to make this wreath a
little bit more loose. These are just a
few simple strokes, but it makes a
huge difference to the overall look
of the painting. All right, so now we're done. Congratulations for
finishing your project. Now let's move on to the next, and also the last
project in this class.
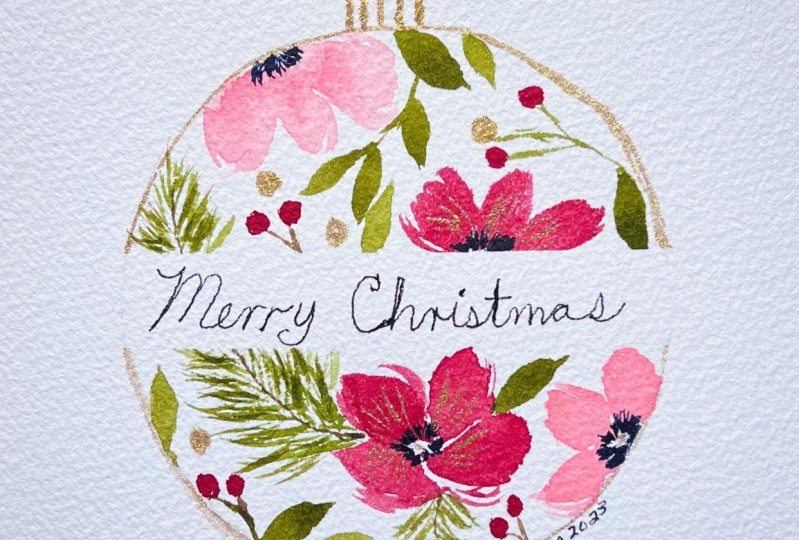
9. Handpainted Ornament with Greeting: Before we start here,
the colors that we need. You can take a
screenshot or look at the projects and resources
section for reference. Welcome to the last project. So we are going to
paint this hand painted ornament that was inspired
by one of my DIY projects. I love this because
you can write a greeting in the
middle of this bubble. All right, so first we
do need to get a tape. I'm just going to put it in
the middle of this paper. Just use any masking tape. I am currently using
a washi tape here. Now grab your jar and paint some gold on
the rim of the jar. Okay? So I am going to
stamp this on the paper, making sure that the
tape is in the middle. It's actually a little
bit tricky doing this. All right? We're going to
add some more of that gold. We're going to
stamp my jar again. We are going to start
with the flowers. I'm going to grab permanent red, but you can use other
colors as well. You can also grab crimson if
you want a deeper red color. We are going to use
this as a reference. This is the DIY project
that I did on air dry clay. I've been seeing so many hand painted Christmas
bubbles online. I really got so inspired by it. Now we're going to paint just
maybe four or five petals. So this is the same
flower that we practice in the holiday
botanical elements. You're just going to
sway our brush to create these nice
organic strokes. Now let's add some
more petals right here at the top of this tape, so that it looks like
it's peeking from behind. We are actually painting
really small petals, since we don't have a lot of space in this Christmas bubble. Next, let's mix brilliant
pink and yellow ochre. I really love this
mixture because it gives that nice
beachy pink color. And we're going to
use this to add some softness to our
Christmas bubble. I'm going to add flowers
in the white spaces. So we're just going to paint just about two or three petals that looks like it's
peaking from behind. I really love this color palette because I love the contrast between the bold red color and that nice soft, peach color. All right, it's time
to add the leaves. I'm mixing here, just sap
green and burnt umber. Now we're going to
paint the pine needles, so I need this brown center. I'm using just burnt umber. I'm going to paint
on top of that tape. I'm going to start at the
bottom and just paint upwards. You can see that
there's a continuity, except that there's a tape in
the middle of this bubble. This will look very pretty
after we take off that tape. I'm just going to add
some more pine needles right here at the bottom part. Now let's grab Hookers green or any green paint in your palette. We can start adding
some leaves as fillers. I usually like adding
more details near the tape so that when we peel it off you can see a
nice fine line. Okay, So you can vary
the shape of the leaves. You can even paint
some eucalyptus. It's also best to use a smaller size brush
for these leaves. Now let's add some contrast in the center of these flowers. I'm going to grab
the color indigo. If you want this to blend
in with the petals, you have to add it while
the flower is still wet. But if you want more contrast, then you add this detail when the flowers
are already dry, there are still some
small gaps here. I'm going to paint
some small red berries just to fill in that space. For that top part
of this ornament, we're going to use gold paint. All right, we can also paint
a simple loop at the top. Let's make this sparkle by
adding some round gold dots. If you have some glitter
or a glitter glue, you can also put that on
this Christmas bubble. We can also add some gold dots in the middle of the flowers, and also we can draw some
thin gold veins as well. I'm adding some
finishing touches. I'm just making sure that
we have a lot of paint near the tape just so that
we get a nice clean line. All right, so it's time
for the grand reveal. I love peeling the
tape because it's just so satisfying to see
that clean edge. Okay, for this space
in the middle, you can write a greeting. So I'm going to put
Merry Christmas here using a Sakura micron pen. My handwriting isn't
really that nice. If you do love
doing calligraphy, this is a perfect
project for you. Another idea is to customize
this by adding the name, the recipient in the
middle of this bubble. You can also cut
up this card into a round shape and
hang it on your tree. Okay, that's it. It's a very simple
project that you can do in different
color palettes. I think this is my favorite
project in this class. I hope that you enjoyed
painting this as well. Now let's move on to the next
video as we end the class.
10. Lets Wrap Up : We have reached the
end of the class. Thank you so much for watching. To sum up the class, we have learned how
to use a char to create the base of our
ribs and ornaments. We also learned how to
use a sponge to add the snow effect without smudging the first
layer of our painting. Then we did some simple holiday botanical
elements exercises for your class project. You can follow the
paintings in this class, or you can search for
reference photos on websites such as
Splash or Pixabay. It's so fun to use a jar
to paint holiday themes. The possibilities are endless. Let your creativity flow in
painting these holiday cards. You can also add some
goals for that sparkle. I look forward to
seeing your project in the project gallery
section of the class. Simply take a photo
and upload it there under the Projects
and Resources tab. Hit Create Project
to share your work. I'm excited to offer
feedback, encouragement. Feel free to tag me on Instagram and use this hash tag
so I can see your word. Leaving a class
review would mean a lot to me and it
will also help others discover how this class help you in your
watercolor journey. You can check out other holiday
theme watercolor classes for more inspiration. That's a rap. I'll see
you in my next class. Don't forget to hit
the Follow button for more updates on upcoming
classes and Giveaway Spy.
 Joly Poa, Watercolor Artist