Transcripts
1. Welcome Plant Parents!: Did you acquire a lot of houseplants during the pandemic? ...and now some of them aren't doing so well? Maybe you are new to houseplants and you want to make sure you keep your babies thriving. Perhaps you're an experienced houseplant hobbyist, but you have that one plant that is causing you grief. Whereever you are on the houseplant spectrum, this course is for you! My name is Laura and I am a houseplant parent. I have over 100 houseplants and I've kept them driving through harsh, dry Canadian winters, pest infestations and the occasional over-watering. I'm also a teacher, which means I love explaining new concepts! In this course, you will learn how to diagnose common houseplant problems, and I will show you a range of solutions so you can SAVE YOUR PLANTS! I've divided this course up by plant problem, so feel free to go through the course at your own pace and you can jump ahead at anytime to the plant problem that best suits your needs. Here we go!
2. Lesson 1: Watering: We are starting with watering because unfortunately, over watering is one of the most common ways houseplants die. Watering seems simple at first, but if you've ever lost a plant to root rot or a plant has dropped all of their leaves because they were too dry, you know that sometimes it's not as simple as it may seem. Now, before I say anything else, if you are struggling with watering, not knowing when to water, watering too much, watering too little. Please make sure your plants are in pots with drainage holes. So a drainage hole is just a hole, a plot. So whether it's a nursery pot or a terracotta pot, make sure there's a drainage hole. And actually this plant, some roots are escaping from the drainage hole. Drainage holes help excess water escape. You can also then feel the bottom of your plant to see if it is still moist. And overall it just keeps your plant healthier. If you really want your plants in a cute pot which usually I do too, you can always just put your plant in a pot with drainage holes or keep it in the nursery pot it comes in, and then just put that inside your cute pot. That way, when you go to water, you can just remove it from the cover pot, and things will go a lot smoother for you. Here are a few tips on how I personally keep my plants hydrated but not waterlogged. Many thin-leaved plants such as pothos, scindapsus,
00:01:34.280 --> 00:01:35.585
tradescantia, will actually let you know when they are thirsty. They will start drooping, their leaves will curl under, and that is a sign that they have used up all of the water in their leaves, in their stems and they are thirsty and you really don't need to water until they start showing those signs. So if we look at this neon pothos, the leaves are perky, they are not drooping, they are not curling. So this plant really does not need to be watered yet. However, if we look at the scindapsus some of the leaves are starting to curl under, not all of them. I usually wait until about half of the leaves are curled under and then I would give it a really good drink. So this guy, I would say, is ready for a drink. Plants with thicker, plumper, more succulent leaves such as peperomia, ceropegia or string of hearts, goldfish plants, lipstick plants. All of those plants that really have plump, succulent leaves will also show you when they're thirsty. But we're looking for little bit of a different sign here. And it took me a while to get the hang of this. What I recommend is something called the taco trick. The taco trick is only watering when a plant can have its leaves folded like a taco. These leaves, I cannot fold them without breaking them. They are plump. They are not limp in any way. And if I were to fold it, I would break the leaf. I could feel that they are that firm. So that means this plant, we don't need to water. If we look at the string of turtles. same thing. These leaves are plump and firm and I should not be watering. Let's check the string of hearts. These leaves. I can fold like a taco. Don't need to fold it all the way. But they have a little bit of give there. They're not super firm, which means this guy could use some water. Let's try the hoya. On a hoya, the new leaves tend to be very soft, so I would do the taco trick on the more mature leaves. And as you can see, these are super soft, super flexible, can definitely make sort of a taco-like shape. So this plant would also be needing some water. This trick has saved me a lot. I used to kill a lot of my peperomias from over- watering them because they can go for so long without water, you start thinking, Oh what if it's thirsty? But if you can't fold the leaves like a taco, don't water! For succulent plants, you probably don't want to fold the leaf all the way in a taco, but you can just give it a little pinch. These all feels very firm. One has a little give, but I would wait still. Succulents are very, very sensitive to over-watering, so you really don't want to water until they feel soft. Like if you could bend this without it breaking or really give it a good squish. You don't want to water just yet. There's many examples of plants that you do need to go a little bit further than just looking at the leaves. Many people, myself included, will use a moisture meter. With a moisture meter, you literally just stick it into the soil, like so. And it will show you whether the soil is dry or moist. And most moisture meters will come with a chart. My chart is obviously well-used! And it will show you depending on the type of plant, what level of moisture would be best. And then if it gets anywhere below that point, you're going to water. So as you can see, my philodendron is pretty dry. And philodendron, on here, is a number 2. So that means we don't want to get below number 2. It is below number two, so I am going to water. Another method of measuring the moisture in the soil, sort of similar to a moisture meter, but you don't have to go buy a moisture meter, is using a chopstick or barbecue skewer or any type of wooden utensil. I'm using a skewer and you just stick it into the plants as far as it can go. Take it out and just feel the end. Mine is moist. So that means there is still some moisture in the soil. And depending on what your particular plant likes, you know, whether it needs water or not. So philodendrons like to be a little tiny bit moist. Not a 100 percent dry, but they don't like to have super wet soil, so I would wait to water because the bottom of the plant is still moist, according to my skewer, The last method to use for plants that don't have any visual cues is to actually just feel how heavy the plant is. Now this method works best if you've had this plant for awhile, you know what it feels like when it's bone dry, you know what it feels like when it's just been watered. And you can sort of feel your way. So this guy likes to have moist soil and I can feel that he's pretty heavy. I can of course also feel with my finger that there's a little bit of moisture in there. But if he's pretty heavy, that means that he's still got a lot of moisture in his soil. If this were to be feather light, you pick it up, feels like almost nothing. That means the soil is very dry and your plant probably needs a drink. If you're growing any type of caladium or colocasia begonias or any type of prayer plant. And that can include calatheas, stromanthes, etc. These plants just like to have moist soil. So in some ways, they are easy to keep track of soil moisture because you just touch it. It's pretty moist, doesn't need any water. This one is not very moist. So I'm going to water this one. So in that way it's easy because you just touch the soil, check if it's moist or not, and water as needed. These plants can be considered picky because if you are not being constant in your watering and the soil is going from very moist to dry. The plant might start showing some brown on their leaves. They might have some crispy edges like this. And that's just how they are. So if you are a very constant person and you check your plants every day, you should be able to keep these guys pretty happy. But if they do go through phases of drought or over watering, you might end up seeing some pretty sad plants. I'll show you my calathea orbifolia, which unfortunately I let her dry out quite a bit. And then when I did start watering her again, I was, in my opinion, over watering. And now we have these brown, crispy edges on her leaves. We do have new leaves coming in though, so she will be okay. But this is an example of just unstable watering conditions for calathea. These brown edges can also come from too much fertilizer use. They can also come from watering with water that hasn't been distilled. And I do not use distilled water on my plants. I feel like they should just drink what I drink. But some people that really don't want to see any brown edges will use distilled water to water their calatheas and begonias. If you suspect that you've been over watering your plants and you're starting to notice some black or brown spots on the leaves, or perhaps some leaves have turned yellow and fallen off. It's possible that you have over watered your plant. So first step is to let it dry out, make sure it's not sitting in a pool of water. And then start to water slowly using the tricks and tips that I've taught you to water appropriately. If after a few weeks it starts to bounce back, great, no damage done. But if you've started to water appropriately and a plant continues to decline, it's possible that your plant has root rot. To check for root rot, you're going to dig up the plant and look at the roots. If the roots are soft, mushy, don't look so great. They've probably started to rot. In that case, your best bet is to propagate. Plant propagation is actually the class project for this course. So you can skip ahead to learn more about propagation or just wait until we got there. By propagating the plants, you're going to take a healthy cutting, which is going to grow nice healthy roots and your plant can then continue to live a happy, healthy life.
3. Lesson 2: Light: Lighting conditions are a little bit more flexible than watering because most plants have a range of lighting conditions in which they can thrive. However, some problems can still arise from way too much light or way too little light. In general, house plants are divided in three different lighting categories. We have low-light plants, medium to bright light plants, and plants that need a ton of light. Low-light plants include Philodendron, Aglaonema, ZZ plants and others. Now, when a plant is considered low light, that does not mean that they can survive with no light. Any plant that is not receiving any light eventually will die. Low-light means they can be a few feet away from a window, a few feet away from a grow light. Or perhaps they're in a north-facing window that receives a little bit less light. These plants can survive with low-light, however, if they are given medium light or a little bit more light, they will probably grow faster. Low-light means they will survive in low light, but they will probably thrive with a little bit more light. If you place a low-light plant in direct sun or direct light, such as right in front of a bright window, their leaves can become scorched or sunburned. If you notice that the colors of your plant have faded and it is really close to a light source, cut off the leaves that have been burned or scorched and move the plant to a lower light situation, you should notice an improvement in the color of the leaves and you shouldn't have any more scorching. Secondly, we have medium to bright light plants. These include Ficus, most types of Peperomia, Tradescantia, and many ferns. These plants do want bright light, but they still don't want that direct sun on their leaves. So consider keeping them a couple of feet away from a south-facing window, perhaps a couple of feet away from a grow light, and they should do great. And again, if you notice any scorching on the leaves, move it a little bit further away from that light source and cut off any sunburned leaves. However, if you notice that your medium-light plant just isn't growing, try to give it a little bit more light and it should start thriving. Like low-light plants, these plants can survive with a little bit less light. However, they might not grow as fast and they can also become leggy, meaning they will stretch out to get closer to the light without necessarily having a ton of leaves. So if you notice that your plant is really stretching, consider moving it closer to the light source. And lastly, we have those sun-loving plants. Those include Hoya as well as succulents and cacti. And these plants really need bright light to thrive. So if you have a warm, sunny window sill or a shelf right up against a south-facing window, these plants are going to thrive. Both Hoyas and succulents can become what's called "sun-stressed." "Sun stress" is when the plants puts out new color because of the amount of light that it's receiving. Many people will sun-stress their succulents or Hoya on purpose because they like the new colors that emerge. If your plant is still thriving, still growing despite this sun stress than the sun stress isn't damaging the plant. However, if you notice that the plant has stopped growing, or maybe the sun stress is starting to look actually more brown and crispy. I would move your plants away from that light source. Succulents, if they don't receive enough light, will stretch out. This stretching is called etiolation, And it's the plant trying to get closer to the light source. If your succulent stretches out too much, it can die. It can also really change the aesthetic of the plant. So if you notice that your succulent is really stretched out, you can chop off the top and put the bottom part back into a bright light situation. The top part you can propagate, which of course is part of your class project, and you will learn more about that in the propagation lesson. Hoyas can bloom and Hoyas will only bloom if they're receiving the bright light conditions that they require. So if you love growing succulents, if you love growing Hoya, you really do need a bright light situation in your home to make them thrive. What if your home does not have the light conditions for the plants that you love? Perhaps you live in a basement suite or perhaps your home just doesn't have any bright windows. You might want to consider purchasing a grow light. You can get strip lighting that can attach to a shelving unit, or you can get a free-standing unit like this one. You can set that up to be super tall and be amongst your bigger plants. Or you can have it set up like I do over a countertop. You can also buy a grow light bulb. And this you can put into any floor lamp or hanging lamp that you already have or that you want to buy to fit your home's aesthetic. This is fairly cheap. This was under $10. And I love that you can just fit it into anything that you want to use in your home. Here I have a grow light bulb in this regular floor lamp. The top light bulbs are regular light bulbs. And then the one pointing towards the plants is the grow light bulb. And that just gives these plants a little boost.
4. Lesson 3: Pests: Time to talk about pests! Now if creepy-crawlies give you the heebie jeebies, you might want to consider skipping this lesson. However, plant pests happen! If you have a lot of plants or you are constantly purchasing plants, you might see pests on your plants and you're going to want to treat those pests. If you're giving your plant adequate water, adequate light, and you still see that it's not thriving, perhaps some of the leaves are coming out deformed, perhaps you're seeing little bumps, spots, lesions on the leaves. You might have pests! But that's okay! We can treat pests! In this lesson, I'm going to talk about treatment. The treatment that I'm going to talk about can treat all pests, so I'm not really going to go into how to identify each different little type of creepy crawly, because in my experience, you can treat all pests in the same way. If you're really interested in what type of pest, what type of bug you have, you can do a Google search, you can figure that out. However, the treatment for all pests is pretty much the same. And that's what we're going to go over today. But first, you're going to want to make sure you look at your plant really closely to see what there is, to see. First of all, you're going to want to take a really good look at your plant. And I mean, look really up-close. Might even want to use a magnifying glass for this part. You're going to want to look at the top of each leaf, the underside of each leaf, any little crevices that exist on any leaf. You want to look really well at the area where the stem meets the leaf. And you want to really inspect any new leaves that have come in or are going to come in as pests tend to really like to chew on that tender new leaf. You're looking for anything that crawls, anything that flies, any little dots that might be either larva or eggs. You can look for little spider webs. Some larva or nymphs can be so tiny that they look like a speck of dust. So if you're not sure you can poke it with a toothpick or your fingernail and if it's scurries off or flies away, it is a bug. Unfortunately this ficus, does have pests. It has thrips, which by many, is considered the worst type of a pest, which is why we're going to be treating it today. We can see those white little specks crawling around, those are the larva. So they have not yet grown into grown-up thrips, thank goodness! We're hopefully going to get them while they're still in this stage. So the first step when finding pests on a plant is to isolate that plant, We want that plant somewhere where no other plants are so that it can't spread pests to your other plants. You're also, of course, going to want to check your other plants for pests to make sure that the pests have not spread. If pests have spread, you can treat all of the affected plants at once, which saves a lot of time. Next step is to wipe down or shower down all of the leaves. You can use a lint-free cloth, which is what I'm doing. I find I can do a more thorough job. You can also use a removable shower head to just hose them all off. Some people really get in there with Q tips, especially if it's a plant that has a lot of crevices or little nooks and crannies that are hard to get into with a cloth. And you're trying to wipe off any pests or any eggs that you see. If you have spider mites, you are going to see some spider webs. You're going to want to clean all of that off. You can also take this time to remove any leaves that have really been ravaged by pests. The leaves aren't going to repair themselves, so if they are really ravaged by pests or if they have a ton of pests on those, sometimes it's best just to take them off. That way you're not trying to save a disfigured leaf. Next, of course, we are going to treat the pests. There are many, many products you can buy online or from a home & garden store or from the plant nursery. They all, in my opinion, are very similar. They have similar ingredients and they will work great. I've tried a couple of different ones. They worked great. I've since switched to making my own insecticidal soap and I'm going to talk about that in one second. But if you don't have a ton of plants or you just want to buy one product and be done with it. There's nothing wrong with just buying a product from the store. However, I have a ton of plants, I also have a pretty big garden and this recipe works for outdoor plants, and for indoor plants. I have kids and dogs in my house and I feel better using a more natural product. But whatever works for you. So first of all, you use a spray bottle. This spray bottle is about one liter, might be a little bit under one liter, but you're going to mix approximately one liter, (which is a little bit under one quart) of water. You can do one quart of water if that's easier for you, then you're going to use dish soap and you can use any dish soap that you have. This is what I had in my house. But you can use any dish soap and then neem oil. Now, you can use canola oil or olive oil or a range of other oils that you have in your house. However, the neem oil has added benefits to help keep pests away. It will also make your plants look really pretty and shiny. You can buy this online, you can buy it from a health food store. The brand does not matter. Neem oil! I already added the water to my spray bottle, then you're going to add anywhere between one teaspoon and one tablespoon. I've seen recipes that say both, I've done both. Today I'm adding one teaspoon. I'm going to do one teaspoon of each ingredient. The neem oil, you can't smell it, but it smells horrible. I don't know why it smells so bad! Then I put those both in. And that is it. I'm going to shake it up and it's ready. You can treat your plants outdoors. I'm doing mine inside, but I have put it in a tub to catch all the extra liquid. So I'll give this another shake. And then you're going to spray your plants. Top side, underside. You want it to go everywhere. This is going to make it harder for bugs to hold onto the leaves. And like I said, the smell of the neem oil will hopefully keep them away. The smell does dissipate! Once it dries, it's not like your whole house will smell like neem oil now.
5. Lesson 4: Winter Care: Winter care. Maybe you live in a place where there is no winter, it is a tropical paradise at all times, in which case you probably don't need to watch this lesson. However, if you're like me and you live in a place that gets cold, dry, drafty, gray in winter, you might have struggled to keep your plants alive or thriving during that time. In this lesson, we'll cover winter care for those of us who live in places that have a winter that, under the wrong circumstances, can kill our plants. When we think of winter plant care, we should think of what our plants maybe missing compared to their native tropical habitats. Firstly, in general, winter brings reduced light. The days are shorter. Often the days are cloudy and your plants are going to get less light. To give your plants a boost, you can move your plants a little bit closer to the light in your home. So if they're usually a few feet away from the window, you want to move them closer to the window. You might also want to consider investing in a grow light. And of course, you can learn more about grow lights in the lesson about light. Secondly, in winter, houses tend to be really dry, Either because of the electric heating that we're running or just because of the dry air outside compared to the plant's tropical native habitat. Our homes can be extremely dry, so there's a variety of methods that you can use to increase the humidity in your home to keep your plants happy. Plants are constantly releasing water vapors from their stomata. A stoma is like a pore on a plant. So as these plants release water vapors, they up the humidity for the plants around them. So if you group your plants together, they will have overall higher humidity and do a lot better in the winter. Placing a glass of water or a pebble tray, which is a dish full of pebbles and some water, around your plants, you can even put a pebble tree under a plant, will increase the overall humidity around your plants as the water evaporates from these containers. You can, of course, mist your plants with a good old spray bottle. I personally do this in the winter, a couple of times a week. Misting your plants has the added advantage of keeping away spider mites that don't like damp leaves. And if you add a couple of drops of neem oil, you will also be preventing other pests. You might also want to consider investing in a humidifier, which is a machine that releases humidity into the air. This can be especially helpful if you have a lot of plants or very large plants that are really struggling. I haven't purchased a humidifier yet because I just have found that I haven't personally needed it in my climate. And one last note about humidity. You do not need to add humidity to succulents or cacti. These plants will love dry air and can die from too much humidity. You risk making them rot so you don't need to mist them. You don't need to place them near a humidifier. Just let them enjoy the dry air. In winter, like outdoor plants, indoor plants will grow less. Because of that, you need to reduce your watering frequency or you really run the risk of overwatering your plants. So just because you were watering your plants once a week in the summer does not mean you should water once a week in the winter. You need to go back to really testing the soil as we talked about in the watering lesson and making sure that when you water, your plants actually need that moisture. Because plants are growing less or perhaps not growing at all in the winter, you do not need to fertilize. Do not add any fertilizer or plant food to your plants at all when it is not growing season as fertilizer and plant food can actually burn your plant if your plant isn't growing and doesn't need that extra energy. So cut down on your watering and do not fertilize at all during the winter. And remember, it's totally normal for plants to have some yellow leaves or some falling leaves in the fall and winter. Just like outdoor plants, indoor plants need a rest. They might stop growing. They might drop a few leaves. It's okay.
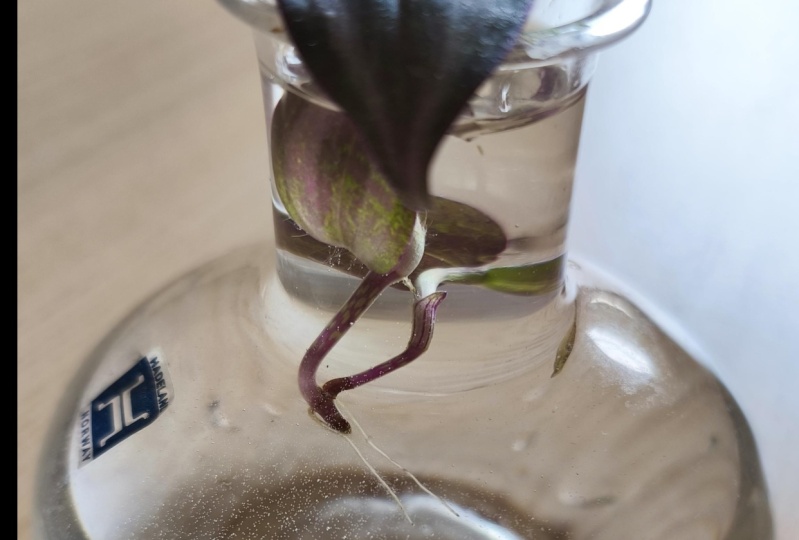
6. Lesson 5: Propagation (Class Project): Propagation. This last lesson is also your class project. Now, propagation can be a fun project just to make more plants, either to have more plants in your home, to give plants away to your friends, to sell, to have for a plant swap. However, propagation can also be a way to save your plans if you have been unsuccessful in fixing the light, fixing the water, getting rid of pests. If that plant is still struggling, sometimes it's a good idea to just take a cutting, get rid of the old struggling plant, and start fresh with that cutting. It can also be a solution to saving a struggling plant. There are many ways of propagating plants and I'm going to go over those in this lesson. I would really encourage you to try all the different methods, maybe not all at once, but eventually, because it's really fascinating to see how plants produce roots differently based on the propagation method. You might also find that one propagation method works much better for you or for the type of plant that you're growing. And it's also just fun to try out different methods. So here we go. First method for propagation is called water propagation. So first step, we're going to take our cutting. You can use some sharp scissors, make sure you wipe them down first so that you know that they're clean. And then you're going to find a node on your plants. Now a node is the swollen part where leaves come out of, and in our case, where roots will come out of. So you can see here is a node, here is a node, here's a node. Here's an inactive node, nothing's growing out of there. Here's a node. You want at least one node. Now, I'm going to cut here because these nodes are all inactive and hopefully we can get them growing something. So I've snipped. One node, two nodes, three nodes, four nodes, This cutting, you're going to let it callous over. Callous over, meaning that cut part is going to harden off so that it doesn't rot when we put it in the water. So for some plants, this will take a couple of hours, for some plants, it takes a couple of days. You're just waiting until that cut end does not look raw, but looks a little bit calloused over. I'm going to take a second cutting here. This one has less nodes, but we're going to cut right there. There's one node, the second node there as well. Next step in water propagation. Once the end of your cutting is calloused over, you're simply going to put your cutting into a container of water. And you can use any container as your propagation vessel as long as it's transparent. So I like to reuse jam jars or serum bottles. Anything can work. Then you're going to put this somewhere bright. So perhaps on a window sill and you're going to wait for roots to pop out of those nodes. For most plants, it'll take a couple of weeks. Some plants will take longer, perhaps a couple of months. It is important to note that cuttings will root much faster in the spring and summer than in the fall and winter. And I think that's just because of having more light, but you can propagate anytime in the year. Once the roots are at least one inch long, you can put your cutting into soil and you're going to keep the soil a little bit moister than you would normally until new growth appears and you know that is growing well, the roots are healthy and you've got a new plant. A variation on water propagation is LECA propagation or perlite propagation. LECA are these baked clay balls, perlite is a volcanic rock and it's white, and both of these growing mediums work in a very similar fashion. So for propagation, you're going to put a little bit of water into your propagation vessel and then add your LECA or your perlite. The water only goes up a little bit. Then you're going to add your cutting. And the tip of the cutting is not going to be touching the water. So the cutting is standing upright, held up by the LECA or the perlite, but not touching the water. And the idea here is that the roots will grow out of the cutting towards the water. But because they're getting a little bit of resistance from the LECA or perlite, they will be stronger. And also because of the spaces in the LECA and perlite, there will be more oxygen available to the roots. So the roots should be a little bit stronger than if they were just in water. Personally, I like to get the roots going in water, and once they are a couple of centimeters long, I like to transfer them into the LECA or perlite and let them get really nice and long and then eventually put my cutting into soil. You can also propagate cuttings by just pushing the cut end into moist soil. This method works especially well for Tradescantia or for this Callisia Repens which is related to Tradescantia. But many plants won't do as well with this method. Many plants will rot I've found, but with Tradescantia or Callisia Repens, if you just push the ends into moist soil, keep the soil moist, they will route up really quickly. And this is just called soil propagation. Here I have all my little propagated Callisia Repens. Soil propagation works amazing for these plants, but like I said, not great for others. So it's all about experimentation. Have some fun with your propagation and figure out what works for your plants. Similar to soil propagation is moss propagation. For moss propagation, you're going to push the nodes of your cutting into moist moss. Here you can see some roots have started. Here. Some roots have started, and there's a little bit of new growth coming in so these cuttings are doing really well. I keep these cuttings inside a container with some air holes. I actually got these cuttings through a planet swap and they are growing so well that I've just kept them like this. This is a Monstera Dubia. If you love growing succulents, the easiest way to propagate your succulent is through leaves. So you can either pluck off a leaf, sometimes leaves fall off on their own. I like to just throw them back in the pot and get them going. Some people will lay them on top of soil in a separate container and mist that container. But I find in my home, they tend to just take off on their own. In the pot, we can see some leaves that have grown roots and are now growing tiny plantlets. I'll pick that up to show you a little bit closer. That's obviously pretty fragile at this point. I'm just going to put it carefully back in the pot. But just to show you that plants are amazing and will reproduce on their own. But you can also, of course, help them along.
7. Thank you!: Congratulations, you have completed this course! You are now ready and able to save your plants. I hope that you found some solutions for that plant that's been showing some problematic symptoms. Or perhaps you'll be able to prevent some of those common plant problems. If you found this course helpful, I would love to hear from you. I'd love to hear your comments and feedback. Also, if you have any other plant-related subjects that you'd like to learn about, please let me know. I hope you enjoyed this course. I had a ton of fun making it. Thank you so much and have a wonderful day.
 Laura L., Let's save your plants together!