Transcripts
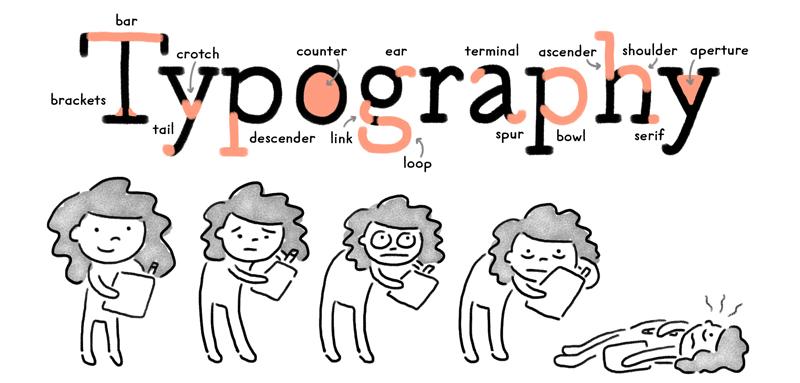
1. Introduction: Hi guys. It's Christine Fleming, illustrator at Might Could Studios. In this class, we're going to make a working font from your own handwriting. There are many different ways to make a font, and the process can get very complicated very quickly. Type designers can spend months and even years crafting perfectly designed letter forms. For this class, we're going to stick to the basics and use a simple process that anyone can complete in just a couple of hours. Plus, the font is based on your own handwriting, so you've already got the design data. We'll go through drawing the letters, using a third party service to vectorize your letters and create the font file, and then refining the letters and the way they work together. All you need for this project is a pen and paper, a printer, a scanner, and a copy of the free downloadable programs that I'll go over in the class. Making a font from your handwriting is like the gateway to font design and I guarantee that after making this far, you'll want to dive deeper and start designing more fonts. If you end up deciding you do want to dig deeper after this class, I've included a bonus PDF on type design that digs into type anatomy and design details. So grab your favorite pen and let's get started.
2. Gather Materials: Before we begin designing, let's get all of our materials together and do some prep work. For this class, you're going to need to grab your favorite pens and markers, a few sheets of regular paper, and a scanner and a printer. You're also going to need to download a few things, but don't worry, they're all totally free. First, let's go to myscriptfont.com and download the template here. It'll look like this when you click on it and you can just click on this button to download it to your desktop. Then go ahead and print it out now. Then we're going to go to the website FontForge, and you can find the link to this website in the project page. FontForge is a program that will let us edit and refine our typeface. So back on FontForget, we're going to click "Mac OS Install", and then instead of making you pay for the program, they give you the option to donate and subscribe to their newsletter, so I think that's a pretty good deal. I'm just going to subscribe to the newsletter and then continue. Then I'm going to click the detailed guide here and follow these instructions. We first have to have the program XQuartz, which allows us to run FontForge on our computer. So first, click on either one of these links to download XQuartz. Then you'll see a window like this and you'll double-click to open the package. You go through the install windows until the installation is successful. Then you want to open up XQuartz. Then you want to click on XQuartz in the top menu, and then preferences, and then choose input here. Then here you want to make sure enabled key equivalents under X11 is unchecked. It'll probably be checked when you first download the program, so you just need to uncheck this box. That just means that the next time you open up FontForge, XQuartz will automatically open as well. Then we need to actually download FontForge. You can click on either one of these links to do so, and then you'll see a window like this. Double-click to open the package, and then FontForge will in your Applications folder, and it'll ask you if you're sure you want to open it and you do, I have this program on my computer too. Then FontForge will open and you'll see the FontForge program. So that's it. It may seem a little confusing on the surface, but it's actually really simple, and these are great programs to work with fonts, especially because they're free. So now we've got all our materials, let's go to the next video.
3. Creating a Handwriting Sample: So the first thing we're going to do is write out a test sentence to get our handwriting down on paper. I suggest using the sentence, "The quick brown fox jumped over the lazy dog".This sentence is often used in type design because it uses every letter in the alphabet. Try writing out the sentence with lots of different pens to see what you like best. The design we end up with here will be our basis for our font design later. Having our handwriting written down will also help us later on when we're refining our typeface, because we'll be able to refer back to this as an example of our own handwriting design. A little public service announcement here, you may be confused on the words font and typeface. Designers can be really nit-picky on how these words are used, but generally here's the difference. The word font is used when we're talking about the actual font file that allows you to type on your computer, and the word typeface is used when we're talking about the design of the letters. Okay. So I think I've decided which one of these handwriting I like best. Let's move on to the next step.
4. Writing the Letters: Now we've got our template here and we're ready to start drawing your letters. Remember to have your handwriting samples nearby, just in case you need to refer to it while you're drawing your letters. You've got a little guide here, on the templates, telling you which letters to draw in which box, but don't feel like you have to stick to the shape of the letter exactly. For example, my handwriting tends to be a lot more narrow than those letters in the guide. Refer back to your handwriting samples sentence from before, and try to draw each letter as true to your handwriting as possible. It's okay if you have to try a few times to get it write. Just print out the template and start again. If you want to have axis marks for other languages, don't forget to draw the optional letters at the bottom, and definitely don't forget the punctuation. I think I'm happy with that, and I'm going to move onto the next step.
5. Converting to a Font File: Once you're happy with how your letters look, scan in your template at 300 DPI. Then go back to the myscriptfont website and upload your scanned template. First, we're going to click choose file and then select our file that we just scanned in. You can name your font whatever you'd like here. We'll be able to edit this later if you're not sure what you want to call it. Then here in output format, we want to choose OTF. Your only two options are OTF or TTF, and OTF will give you more options down the road if you end up wanting to dive in and make a lot of changes to your typed face. Then we'll hit Start, and it's going to process your image and convert it into a font. Now here, we see that we have a font based on our handwriting that we drew. Click here to download your font. This is what I like to call the MVP or minimum viable product. This is a startup term and I like to use it for a lot of my art projects. It's like the stages that your project can go in. This is like the bare bones of your handwriting font. You can stop here if you'd like and have a quick and dirty font, or we can continue and fix some of these small issues that you can see where there's things jutting out that I don't want it to be jutting out. Some things have been cut off a little bit, you can see there are a few mistakes that we get by using a free program. But now, we can use another free program to fix those mistakes and refine our font, so let's keep going.
6. Refine: Cleaning Up: Now let's refine that for a little bit more. First, make sure you have XQuartz open. Then open FontForge. This window just tells us the XQuartz is open so we can exit out of that. Then you'll see the FontForge window up here. Now we need to open our font. We'll go to, File, Open, and then navigate to our font on our hard drive, then click "OK", and a new window will appear with our complete font. I'll just pull that out. Now we can see all our letters here in FontForge. The first thing we need to do is save this as a working file. You can see that this is a.sfd which is our working file from FontForge before we had an otf. Click "Save". Now we're good to go and we can keep working in here. First, let's see what our test sentence from before looks like with our font. Go to "Metrics" and "New Metrics" window. Now I've got a window here where we can type to preview our letters. I'm just going to adjust some of the spacing. Let's type our sentence. We can zoom out here so we can see all the letters. We want to look at this sentence which shows us all the letters in our alphabet, and see where the adjustments we want to make are. See if there's any mistakes, like I see this j here got cut off. What probably happened was I was drawing the letters in the boxes and I went over the line a little bit and just didn't realize that I did. Now we can fix that here in FontForge. I see the j here, I see that q here, I see this on the c. There is a little funny spacing here. The y is a little funny, and the g is a little funny. I'm just going to go through and make some of those adjustments. Let's start with the j first because this one's really obvious. We can go over here and find the letter in our alphabet. Here's the j right here. You double-click it, and a new window will appear with the vector form of your letter. If you hold the spacebar, it will find the letters. You can see what it will look like when it's typed out. This interface is a little bit like Illustrator. These are vectors here, and we've got our points, and the Xs which we can pull to adjust the curves just like an illustrator. We've got the arrow, the pen tool, the hand tool, the zoom tool. This is the rotate tool. I'll go there and show you how to use some of these. First, let's zoom in, and you can see that this is a little funky here. I don't want everything to be perfect because this is a hand-drawn font. But I don't want it to be totally wonky either. With my white arrow select it here. You can just click one dot and it will be yellow to select it and drag it wherever you'd like it to be. I'm going to drag a little over to be more aligned with this. Then here, this will adjust the curve, so I can just pull that, and adjust it just like this. Now that curve is looking a little smoother. I could also do it over here if I wanted to adjust this. This dot is more of an oblong than a dot, and so I'm going to pull out some of these to make it a little rounder. Then down here is where the real problem is. We'll do the same thing over here. Then you can see that some of these points are squares instead of circles. That means that you have a hard angle here instead of a smooth curve like this. If you just choose the square and right-click, you'll get this little menu and we can click, "Curve". Now we've got a round curve here instead of a hard angle. Then I'm going to do the same thing over here. Sometimes you have to click on it twice to get it to go. I'm going to adjust these curves to make it a little smoother. Now we can zoom out and see how that's looking. I think that looks pretty good. I'm going to exit out of this. Now remember, anything I do isn't saved until I click "Save" just like in Photoshop. Now that I've made that change and I like it, I'm going to go ahead and click "Save". Now you can see in our sample sentence that the j has already been updated, it looks a lot better. Now I'm going to go through the rest of the letters and adjust any of the mistakes that I see.
7. Refine: Using Consistent Elements: You can seen here that this bracket here is all messed up. So instead of spending the time making this look better, I'm just going to delete it, like that. Then I'm going to open up the left bracket, select all of it, Command C to copy. Then go back hear in the right bracket and paste it in. Then I still have it all selected, you can tell because it's all yellow here. I'm going to go to Element, Transformations, Transform. Then we have this little window here. We have a few different options of what you can do with the selection. For this, I want to flip it on the horizontal axis, so I'm going to, Okay and there we go. But now it's slanted the wrong way and so I'm going to transform it again on the vertical axis, and there we go. That was a lot quicker than spending the time and adjusting all the points. I'm going to go through and make a few small adjustments. But instead of showing you every single letter, I'm going to move on to the next step.
8. Refine: Adjusting Kerning: Now, let's go back and look at our sample sentence. You can see that the kerning, meaning the spacing between the pairs of letters, is a bit off in some places. So let's go through and fix those issues. This is super easy to do. You just click and hold the letter you want to edit and move it in the direction that you want it to go. You can seen down here that it changed the left and right variance, meaning the amount of space between the left and right of the letter. When you move the letter here, it automatically adjust it in the front. So now you can just go through and adjust any of the weird spaces that you see this way.
9. Refine: Adding Accent Marks: Down here, you can seen that a lot of my accents got cut off. It's a little hard on the squares when we're drawing our letters to tell where the end is, so a lot of times this happens to me even when I stay inside the box, but we can edit that really easily here in [inaudible]. Just find one of the accents from the lowercase that hasn't been cut off and open that up. Then make sure this is how you want it to be making any adjustments before you copy it. Okay, that's pretty good. Now I'm just going to select all of this, command C to copy, and then open up any of the ones where the accent mark has been cut off. Then I'm going to delete the part that was cut off and paste in the new accent mark. Then you can just drag it to wherever you want it to be and X out. Now you can see that we've added in our new accent mark, and I'm just going to save the file.
10. Generating the Font: Once you're happy with your letters and kerning, let's edit the font info real quick. Just go to Element, and then Font Info. Here you'll be able to edit the font name and copyright info. When you're finished with your typeface design and you're ready to export your font, first save your working file again to save all your changes, and then go to File and Generate Fonts. The name of your font should already be here if you edited it in the Font Info before. You want to choose the.otf file. Then hit Generate. There you go, a refined, gritty, hand-drawn font.
11. Typing with the Font!: Let's see our font in action. To install your font and start typing with it, just double-click the font file. Font book will open, and you click "Install". Wait a second, and it's ready to go. You can open up any program and start typing with your own handwriting. That's it, we've got our own working handwriting font. Thanks so much for taking this class, and I hope you decide to make your own handwriting fun. If you do, please be sure to upload it to the Project Gallery so we can all see and share our work. One last thing I want to mention, if you enjoy my classes please consider signing up for my e-mail newsletter. I always announce my new classes, new products, and tips, and resources on my blog in that newsletter. So be sure to join if you're interested in seeing what big things I've got cooking up. Hope to see you in the next class, and happy type designing.
 Christine Nishiyama, Artist at Might Could Studios