Transcripts
1. An Introduction: Hey. Hello. My name is Rich Armstrong and I've been designing and building websites for last 10 or so years. This class is about learning how to make your very own website from scratch. I'm going to teach you how to write your own HTML and how to write your own css. The ability to write your own HTML and CSS opens up a world of possibilities. It's fun, it's empowering, and you get to pretty much, make your own piece of the Internet. So by the end of the class, you will have made your made first one-page websites, you'll have a basic understanding of HTML and CSS, your friends are going to be jealous, your mum is going to be proud you, and you'll be able to share your creation on the Internet, which is pretty cool and you'll be able to understand this, which may be even cooler. So I hope you're excited because I'm excited to teach you.
2. This Class Has Been Updated!: Hey, I'm super excited that you've decided to take this class. A ton of students have taken it and they've great reviews, created awesome projects, and asked a bunch of questions. But I made this class in 2015, which means a bunch of stuff has changed, works differently to how it does in this class. I created a new version of the class, which is more up-to-date and has better audio and video quality. You can carry-on watching this class. That content is still super awesome. But, I highly recommend checking out the new one. Learning to hand code your own website will open up doors, lead you down new career paths and empower you to share what you want with the world. Visit this link to check out the new class.
3. What we gonna make, learn, do?: What are we going to make? What are we going to make? We're going to make a one-page websites for your favorite animated or cartoon hero. So mine is Wreck-It Ralph, and here are three different styled websites that I took you through and I show you how I make. I teach you how to use Sublime Text. I teach you how to use Google Chrome. I teach you how to use GitHub and how to share your websites and your web creations. We start really small and easy, and we pulled up and I teach you how to use HTML or how to write HTML, on how to write CSS and how to link them together. Everything's visually narrated and I provide simple metaphors of how things work. So join me and you'll learn how to build your characters' websites.
4. Download these 3 free apps: To make building websites fun and easy, we need three things. Open up your browser and search for something called Sublime Text 3. Sublime Text 3 is a code editor. Download the one for your operating system. It'll make writing HTML and CSS a breeze. The next thing we need is Google Chrome, so search for that. Google Chrome is, like, Internet Explorer or Safari, but it's got some really great tools for people who build websites. I'll show you exactly how to use it. Download it and you'll be well on your way to understanding how your websites work and look. The next thing we need is GitHub Desktop. What GitHub Desktop allows us to do or what GitHub allows us to do, is it allows us to store code and track our changes to that code. What we'll be using it for is uploading and storing and hosting our websites and as a tool to share it with others. Let's download that one. With these three apps, we can pretty much conquer the world, not the whole world, but the HTML and CSS world. They're going to be really helpful and it's going to be fun and you'll learn a lot. I'm going to skip ahead to when all the apps are downloaded and show you how to set them up. See this now.
5. Install the apps: My apps are finally downloaded. Now, all we do is we've got to open up the Downloads folder and start installing these bad boys. The first thing is the Sublime Text. Let's open up that DMG if you're on a Mac, on Windows, you guys do your thing. If you get really stuck, give me a shot. We just pop into Applications folder. If you already have a copy, replace it like I do. Fantastic. The next one is Google Chrome. Let's double-click on that, same sort of thing. Drag them into Applications folder, this one is a little bit bigger, it might take a little bit longer. Again, if you already have a copy, replace it like I do. The next one is GitHub Desktop. We're just going to drag that straight into our Applications folder. There are the three things that you need to install.
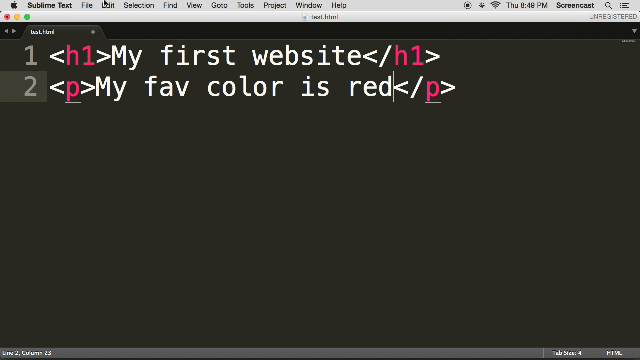
6. Make and share your first webpage: We've downloaded those three apps. Now, let's make a website. We're going to go to our Applications folder and we're going to search for our GitHub app. I'm just going to type G-I, which will take me to the GitHub Desktop app. Let's open that up, and you'll be asked for passwords or authentication. You'll be taken through a bunch of interest screens, and eventually you'll come to something like this, which will ask you for your login and password, which you probably won't have, so we're going to get one from github.com. Open up this link. You'll need to pick a username, put your email in and create a password, and then sign up. If you already have an account like me, you can sign in. My username is mrra-screencast, and my password is a secret. Once you've signed in or signed up, you will get to a screen that looks like this. Very important though is to verify your GitHub account on your Gmail or on your mail app, wherever. Without verifying it, you can't actually host pages properly. This creates a new repository, which is like creating a new project. Let's call it cartoon-hero or gero. I would prefer hero. The description, my first website or let's say a website about my cartoon-hero. Let's keep it public so that people can view it, so that people can copy the code if they want. Let's initialize it with a README, there but sticky about this, so I'd rather include it, and create your repository. What we need to do first of all, I know it's really overwhelming seeing all of this information, all these links, is just to click this drop-down and type in gh-pages and create a new branch called gh-pages. Either press "Enter" or press that link there. This creates a new pages, and this is a special branch where we can actually host our website. That's Step 1. Step 2 is going to the GitHub Desktop app and logging in again. Remember your username. It comes in handy just now. Sign in, and from here on out, you'll be logged in as that user until you log back out. Let's close this window. What we need to do now is that we need to basically get that project from GitHub. There it is. I'm going to clone it to my local computer. I'm going to select the desktop as my project directory, and voila. Next, select cartoon-hero, and make sure that you're working on a gh-pages branch. This is very important. We're going to be creating a website so we want it to be a GitHub page. That's the first part of the GitHub story done. What we need to do next is search for Sublime Text. In your Applications folder, I'm just going to search for or type S-U to bring up Sublime. Let's open this up, and then just follow along for now. Type in h1 My first website, and h1 again. You'll notice that I'm wrapping an h1 with a smaller than and a greater than sign, and I'm closing it with a smaller than, a slash, and a greater than sign. Doesn't look too remarkable. But you'll see that as soon as I save it in my folder as an HTML file, I'm just going to save it as test.html. You'll see this color. It actually starts to color code my file. What it also does is it starts to give me suggestions about what to write, and it also completes a bunch of code for me. If I press "Enter" now, you'll see that it does quite a bit of work for me, and I don't have to remember all of those funny characters. In here, I'm going to say My fav color is red. Fantastic. Let's save this. The next thing that we can do is search for Google Chrome. I'm going to type G-O in my Applications folder and open up Google Chrome. It's going to ask me if I want to set it as my default browser. I'm going to say yes, please. Mac is going to be a little bit cautious, and I'm going to say yes, use Google Chrome. Then we've got Google Chrome, Sublime Text, and GitHub Desktop installed and we're using them. I'm just going to drag them slightly to the left so it keeps them in my bar at the bottom, even when they're closed. In my Finder window, I'm going to go to desktop, open my cartoon-hero folder and drag my test.html file into Google Chrome, and there is my first website. Now I want to share it with the rest of the world. I go to GitHub Desktop. I see that there's one uncommitted change, test.html. This means that it notices that there's a change. Now I want to say yes, commit this change, because I've actually finished working on this little bit, and I'm going to say, created my first test file. You can give a description if you want. Your summary and description are really helpful when you're working through a lot of changes and you're working with teams so you can say, this is exactly what I've changed and this is why I've changed it. Then you commit to gh-pages, which commits it to your local projects on your computer. Now, to get it online, you actually want to synchronize it. Now, this is really helpful. It means you can keep a bunch of changes on your computer, and then when you're done, you can send it all up to GitHub online. There we go. The next thing we need to go to is go to Chrome, create a new tab, and now remember, your GitHub username. Mine was mrra-screencast, and now, you need to go.github.io/ your project name, so cartoon-hero/test.html. Press "Enter." There is an error. Let's have a read. It doesn't contain the selected file. That's because I misspelled it. Let's actually spell right, test.html. There we go. You can share this URL with anybody. But now, I actually want my red to be red. Now, this is where it gets really powerful. Go back to Sublime Text, and we're going to type span, not spam, and you see how it also completed there again. Fantastic. We're going to give this elements and attributes. There we go. I'm going to save it. Now, in Chrome, you'll see that. I'm going to go back to our local one, which you'll see that there's a file, and you'll see that the online one is our username. I'm going to refresh this one, and you'll see that my favorite color is red has just appeared. Now, how do we get that online again? Go to GitHub Desktop and you'll see that it's picked up some changes. You'll see that there's a bunch of red texture and a bunch of green. It's saying that the red one's going and the green one's arriving. Fantastic. Make sure that you're committing to gh-pages, and then we're going to say, put a span in. My red is now red. You're welcome to change your test file as you see fit. Experiment, have fun. Put in whatever you want. Then I say commit to gh-pages. I do a quick synchronize to make sure that it's going up to github.com. Once this has finished synchronizing, I'll wait just a little bit longer before GitHub to get its act together. I'll then go to the second tab and refresh. If nothing appears, it may take a little while longer for things to actually happen. I do another refresh, and another one. Maybe it doesn't happen super fast, but eventually it's going to get red. If nothing really happens, go to Safari and go to your commit page, which you will see that something has happened, put a span in. Actually it's happened. Go back to Google Chrome and now refresh, and you'll see that it says, my favorite color is red. Sometimes things take a while. Sometimes you need to just wait a bit. There we go. Your very first website.
7. HTML box theory (easy I promise): Okay, what is HTML? Well basically, HTML is a language that humans write and browsers can understand, it's the language to display information. But what is it? I don't understand. Yeah, very good question. HTML is actually a bunch of boxes, boxes inside boxes, inside boxes, inside boxes. The main box is actually your browser. Inside any given box, you can either have another HTML box or you can have text, or you can have nothing. So there's really three options for every single box. Some boxes are invisible and every box has a different purpose, and every box is displayed differently by default, by the browser, it's pretty powerful. So by default most boxes are only as high as their contents, other boxes are as high and as wide as their contents. Most boxes like to sit as far to the left and as far to the top as possible. So what is an HTML box? Cool analogy, cool metaphor, but we don't understand. Let me explain it to you. Every single HTML box or most of them, has an opening tag and has a closing tag and has content. Remember, the content can either be text, blank or nothing, or it can have another HTML elements inside of it. An opening tag has smaller than or less than symbol. It has the tag name, and then it has a greater than symbol, that is your opening tag. The closing tag has a less than symbol and it has a forward slash, the tag name, and then a greater than symbol, that is the closing tag. Now the whole HTML element has an opening tag, the content and the closing tag. What's really cool about HTML elements is that they can have these secret little bits and pieces called attributes that the browser can understand. So like for example, a link tag or anchor tag, which is a tag name of a, it has different attributes. One can be an href, the URL that you want the link to go to. You can also have how should I open the link as targets. You can also have a title attribute, which tells the browser when the user hovers over this for a little period of time, what should we display? So those are some basic attributes that you can add to the link tag. That is HTML theory for you.
8. Start writing your own HTML: Enough theory. Let's make some stuff. Drag cartoon here into Sublime Text and let's start writing some HTML. Another theory, I'm just going to follow it. Until we save it as an HTML file, you're not going to get any cool code completion. Save it in your cartoon hero folder as elements.html. There we go. You now say that there is some code coloring. There is also code completion h2. Heading 2. Let's do a paragraph. This is my first paragraph. We've got some elements, there's a ready default and basic one called a div tag. This is your basic box and it's the most common one to put more boxes inside of. We can actually just carry on putting boxes inside boxes inside boxes. Eventually you need to put something inside of something. I'm going to put an a tag in here. Now an a tag is a link or an anchor. It comes with a special attribute called href, and inside that href, you specify url. You tell the browser, if the user clicks on this, where should we go? You put something inside there. Let's go and put http.skillshare.com. The content of it should be, visit the skill share website. Fantastic. Let's save. Now, right-click on elements of HTML reveal and finder, and then drag it into Google Chrome. Then we have something, you see how different the h1 is from the h2. Heading 1, heading 2. It's very different from your paragraph and it's very different from your link which is underlined and it's purple because we visited it before. If I click this one, hey, it's going to take me somewhere. To skillshare website. That's cool. Back to sublime, I can now change or give the a tag or the a elements an extra attribute called target, which would allow me to set it's value to underscore blank. Save it. What this will do, is it will actually open in a new tab, which is pretty cool. It means that you can just keep on opening new tabs and new tabs and new tabs and eventually get to so many that you don't even know what every single one of them is. I digress. Let us go back to Sublime Text, and I'll show you a few more other elements and their attributes. If we create a new paragraph tag, we can say, "Hey There". But if I want to say "Hey there, my name is:" Now I want to actually put that on a new line. I can use a br tag, which is a break. Now you can press ''Enter''. We don't have to. But I'm not going to. My name is Richard. Let's save this. File, save. From here, you can see it. There's actually a line break. That's one of the special tags. It doesn't have a closing tag. The next one that I'd like to show you is the image elements. Image tag also doesn't have a closing tag. Another special one, another rule breaker. If we type in test.jpg and we save, go back to Chrome, refresh. You'll see that it comes up with a broken image link. Now what I want to do is find an image. Mr. R.A. I'm going to search for this. Mr. R.A, Richard Armstrong. I'm going to search for some images. There's a good one. Now, I'm going to right-click and I'm going to save image as test.jpg. Fantastic. Now when I refresh, my image will come up. Now with an image, it's really cool because it means that you can also specify a different one. If I click on this one and I right-click and I specify, well, copy the image URL. It means that I don't actually have to download that. It means that I can just copy and paste that inside my source. When test.jpg is a relative URL, it's saying where can I find that locally? You can also paste in an absolute URL, which starts with HTTP or HTTPS://. Now I'm going to save this and go back to my browser, back to elements.html, and refresh. You'll see that I now have a new image. The final thing that we need to do for all HTML pages is that we need to wrap it in an HTML element. Do you see all of that? That was pretty intense. I'm just going to edit, undo, and I'm going to do that all by myself. Let's go HTML. Let's write the closing HTML tag and then cut it and put it at the bottom. What we then need is that we need a head tag and we need a body tag. You see what happens when you close things automatically. Body tag. I'm going to cut that body tag and I'm going to put it right beneath the last element. What HTML recommends is that you put all your invisible elements inside your head tag. I'll show you an example of invisible boxes and all your visual stuff or visible stuff inside your body tag. This is just the formality. You don't really have to have all of this, but for all the browsers and to make things work super smoothly all the time, I would highly recommend it. We'll be doing this from now on. Inside your head, we can do something like title and we can actually change the title of the webpage. At the moment, the title of the webpage is elements.html. I want to change it to something else. In Sublime Text, I'm going to say elements with a few exclamation marks. Save that, refresh. You see it says element and the few exclamation marks. That's about it in terms of how to rock HTML. Now what's really cool is that every single visible elements can have a style attributes and inside the style attribute, you can start to play around with some CSS. We can say color is blue. We can also say text decoration underline. Sounds pretty cool. File, save. That looks like a link, even though we can't click it. You can see how you can start to mess around with some CSS here.
9. CSS theory (very short): We've learned how to make boxes and put boxes inside of other boxes, but how do we make these boxes look pretty? Well, this is where CSS comes in. What the heck is CSS? It's a bunch of styles that can be pinned with specific HTML tags through various means and ways, but basically a CSS rule contains a list of key and value pairs. It means that you can say: color is this, background color is this, font size is this, margin is this, padding is this, is a lot of them, I'm not going to go through all of them now, so that's the theory. Let's get into it.
10. 3 ways to skin this CSS cat: Let's do some CSS now. Drag your Cartoon Hero folder into Sublime Text and let's create a new file. Let's save it as stylish.html. Let's save it and I'm just going to write an HTML tag and let Sublime complete it for me. You'll see a little bit of extra bit of information at the top here. That's okay. We're going to call this stylish document. Inside body, I'm just going to create a few h1 tags, Heading 1-1. I'm going to copy this, and then I'm going to paste it a few times. Then I'm going to create a new one, which is an h2. I'm going to call it Heading 2-1, and I'm going to copy that and paste it a few times. I'm just going to make a difference that you know exactly what's going on. Okay. Let's save this. Then to give it some styling, we can say color, colon, and then give it a color, and then semicolon. Then if you want to change the font size, you can have 90 pixels because it's such a big h1. Okay. We save it. We then right-click on the stylish HTML file, Reveal in Finder, and then drag it into Google Chrome. You'll see that then there's a bunch of elements there. One One them is red. But the font size doesn't look too different, and we call it a fon size, so let's change it to a T. Save it. Go back to Google Chrome. That's big. That's exactly what we want. Okay. But now I want all the other headings to be exactly the same. What we do is we can copy this and paste it. I just go Control C or Apple C and paste. Okay. Wow, that takes a long time. File, Save, and you'll see now that, wow. Heading 1s and heading 2s look exactly the same, which should have defeats the point, doesn't it? Now actually, I want all the h2s to be green, then they will look different. Now, again, you have to change one. Change them all. It gets a bit messy, and it's very time consuming, but it does the job. Okay. But there's a better way. Instead of using a style attribute on the HTML element inside your head elements, we're going to create a style tag. Sublime will finish it off for you and inside your style tag press "Tab" twice, and then type h1. Inside your h1, I'm just going to press "Shift" and "Tab" just to un-indent it. Your h1, we can say, color should be red. Okay. Now I want to take out all of these color should be reds. Fantastic. File, Save. Refresh. There we go. Now, you may not notice how cool that is, but if I wanted to change all of them to orange, spelled correctly, of course, I could just type one line and then Save, Refresh and then all three of my elements are changed. Now this is the power of CSS, especially when you take it away from the actual HTML elements, you can start changing how your site looks from a different file and it changes your whole site, your whole website, not just each and every single element. This makes making your site different, more stylish and upgrading it really, really simple and easy. Okay. Let's take out the font size too. Let's cut it, and let's paste it. Okay. I'm going to take out the style attributes of all of these h1s. You'll see that I've kept in the style attributes of h2s for now. Okay. I don't want to purchase it just yet. Thank you very much. I'm still trying it. Don't even know if I like HTML and CSS yet. Okay. Your color's orange, font size is 90 pixels. Maybe you want to do something else. Let's say, text decoration. Let's give it an underline. There we go. File, Save, Refresh, and voila. Amazing. So you can start to see that having one line of code can start to fit your entire site or all of certain elements on a site. Okay. Now, I want to do the same thing with h2s. I want the font size, not the font weights. I want the font size to be about 40 pixels. So let's Save this and Refresh. Nothing happened. Okay, but I'll tell you why nothing happened. Because when you write styles in a style attribute, they override the styles and the style tag. Okay. This is the nature of CSS. There's a lot of overwriting or overriding that happens. So if it's first, what's written first and something else after it is written, if it's got the same rule, then it will override. So if I copy this and paste it, and I change it to 60, the value of the second rule will override the value of the first rule. Likewise, if it's in the style attributes, the font size will override the previous font sizes. Okay? So that's something to remember. I'm just going to take up all of these styles, because actually, we don't want them. We'd love everything to be inside a style sheet, inside the style tag. Okay. But I do want my color to be green. So let's Save this, and let's go see what happens. Okay. That looks good. But now, how do we know that that is actually what we want? How do we know that that's 40? How do we know that that's not 60? How do we know what's what? Now Google Chrome comes in. Right-click on something. Inspect the element. Wow, you'll start to see that it actually knows HTML and CSS. You can inspect a bunch of different stuff. So what we can do here is that we can actually go and click on this h2 or inspect an element, and see that the font size is 60, and that the font size used to be 40, but it looks like it's being overwritten by this h2. You can see that on line 15 and on line 12, just like so. It's really, really helpful. What's also really helpful is that you can go, "I wonder what size it should be, because 60 isn't quite right So we can actually write him 50 pixels, or maybe 22 pixels is just right. Voila. You can see how it looks, but when you Refresh, things go back to normal. So let's go back here. Changes to 22 and remove this h2. Fantastic. But now what happens if I want some of my h1s and some of h2s to be a different color? This is where it becomes really interesting. So I'm going to say class, a new attribute, class. I'm going to give certain elements a certain class. We're going to say, small. I'm going to copy this, and I'm going to paste it on some of them. Okay. Now, how the heck do we just get h1s with a class of small, and just get h2s with a class of small? Well, in CSS, there's a certain way to do this, and it's that dot and the class name. The same rules apply to class names. So let's say, font size is 12 pixels and Save this. You'll see that some elements are really small. You'll start to see that, hey, that one is small, that one is small, that one is small, because they all have a class of small. That's really cool. Now the thing is, even if we had to move the small class above the h2 selector, it would still override it. You can see here. So you might expect that because the small came first and the h2 came second, that this font size would override this font size. But what CSS also does is it has weightings. So a tag name has a smaller weighting than a class name. In the same way something with an ID of first has an even bigger weighting than a class name, and a bigger weighting than a tag name. So if we put a font size of 150 pixels on the first element, or the element with an ID of first, you would have a 150 pixels. But what is an ID? Well, an ID is almost like a class, except it can only be on one element. So one element only can have an ID of first. Okay? There is our big heading, with first, and you can see that even though it's further up the page than the other rules, it took preference because it's an ID. Even so, if we are to put out a style attribute on here and change the font size to I don't know, let's change it to 20 pixels. File, save. You'll see that an inline style on a style attribute takes preference over an ID. So there's various weightings to think about when doing styling. The next thing that we need to consider is what happens if I want to target something else inside an element? If there's a span here, and inside the span, I say, "Try me." Outside, I've also got a span that says, "Try me." Let's save this and let's see what happens. The first span, I'm just going to inspect this element, says try me, but it's green like the h2. You see what a span does, it inherits its parent's container or the parent boxes styling. Just like I'm going to inspect this guy and inspects its buddy. Sorry. It inherits from the body container because that's it's parents. You see, spans are pretty clever by default. But now I want to make all spans italic, so let's try that. Now I've CSS here, just type span and let's say, what could it be fonts? There we go. Font-style, Italic. There we go. Let's save and voila, an italic. But what happens if I want just this span to do something? Well, we could put a class name on it which we hope, or what we could do is we could say h2 span, which means the span or all spans inside all h2s let's do something. What shall we do? We could give it a background color, we could give it a strike-through. Let's do that. Font-style, font-family, no. Text decoration? Yes. We can go strike-through. Spelling is terrible. Strike-through, but doesn't look nice. Maybe there's a dash. Who knows? Let's see. File, save, refresh. Nothing really is looking too good. Now the power of the Google is really helpful when it comes to CSS and HTML because the whole web is built on HTML and CSS. Let's do a quick Google for CSS strike-through. There we go. There's a few websites that are really helpful. Text-decoration property, line-through. There is a bunch of different information, but hey, let's copy this. Let's see if it works. Line-through. Now let's do back here and refresh, there we go. I've got a strikethrough or a line-through as they call it and what's more, I only have it in the h2. There's just one more thing I'd like to show you. As you can see, my styles are growing even though I don't have that much CSS and even though we haven't styled our page that much. The best way to go about styling things is to actually create a separate style sheet file. What we're going to do is we're going to create a link tag and sublime text. Just order complete set ready. Well, it's a style sheets, it's a CSS type style sheets and the HREF means where the heck is it? We're just going to say it's in the CSS folder and it's called test.css. Now what I'm going to do is I'm going to cut all of this stuff. I'm going to remove these style tags, and then I'm going to save. Now I'm going to say file, new file. I'm going to paste it and I'm going to say file, save as create a new folder called CSS, and then I'm going to call it test.css and save. Then going to add an indent by saying shift-tab, just so that it's neat and tidy. Save it. Go to Google Chrome, refresh. Nothing changed, but that's good. Just to make sure that everything is working, I'm going to add a new rule and I'm going to apply it to the body. The body I'm going to say background color. Let's ask for light gray. Save, refresh, and it's light gray. Now, this is really cool because it means that we can write a bunch of CSS without complicating our HTML file. We just have one line that relates to the test.css file. Fantastic. That's HTML and CSS for you. We'll learn a bunch more as we create our project, but for now, if you want to synchronize that to the web and share this with your friends and share your experiments, create new files, new folders, new HTML, new CSS, go for it. There's a bunch of links to CSS. Hope guards is a bunch of links to HTML. Hope guards, you can reference all of the HTML elements, all of the CSS elements in the resources provided. What we want to do here is just make sure that we're on the gh-pages branch. We are then going to commit saying we've done a bunch of stuff or whatever you want. Commit to gh- pages. Fantastic. Synchronize. Once it's synchronized, we can actually open up Google Chrome. Open up a new tab and then what we're going to do is go to GitHub and we're going to sign in. So remember your username. Mine is mrra-screencast. Remember your password, sign in. Go to your cartoon-hero directory or repository, click on the one commits. You'll see that there is an initial commit. Cool. But now you need to go to your gh-pages branch. You'll see that we've done a bunch of stuff. Now that you know that the commits come through, let's open up a new tab. I'm going to say, mrra-screencast.github.io/cartoon-hero/stylish.html Let's see. There we go. We can share our good-looking website with the rest of the world. Have some fun, play around, do some crazy stuff. Share your links in the project gallery, feedback on other people's codings, answer questions, ask questions, go wild, have a jol.
11. Planning first :): All righty. Now we're going to start planning our site, and planning can take any form that you like. It can happen before a stage, and after a stage, before another stage. There's no such thing as planning once and then never planning again throughout the entire design and development of the site. You need to be planning before pretty much everything that you do. Planning is amazing. One of the ways that I like to plan is, first of all to do a quick sketch of the site if I haven't designed it yet. After I've designed it, I then like to do a wireframe, and this is not a typical wireframe of how does the site look? How does it work? But a box label wireframe of how are all of these boxes going to fit together on the website or on the page? Let me take you through my character website and how I've laid out all the blocks. First of all, there's my page, which is one big box. What I want is the header box and inside that header box, I want a profile image box. I want it to be round, and I've put a cross through the box to signify that it's an image. The next element is a heading, still inside the header, and this is going to be my character's name, and maybe there could be a subheading. But for now there's just a heading. The next thing is inside the content, I'd actually like there to be another heading, and maybe this could say about my character. Then there's going to be a paragraph tag with a bunch of copy, a bunch of texts above my character. The next thing, another heading, and this could be saying something like My character's favorite things, or My character's favorite friends. What I'm going to do is I'm going to put it into an ordered list box, and inside that ordered list box, there's going to be a bunch of list elements. After that, I'm going to put an image and again you see the big cross which signifies the image. Under that there's going to be a small caption, and then beneath that, another heading with an unordered list, with a bunch of list elements. This list can be favorite things to do, or friends again, or characteristics, or a whole bunch of different things you can put in lists. After that, I'm just going to include a small footer and inside that footer I'll say, this is who made the website, this is where you can find me and any other small information that my users may want to look for. This is what I do for all websites, from going from a design into HTML and CSS. This is a really good process, a really good part of the planning. When I can say, how does it all fit together as boxes? You do the same for your website, you can copy mine or you can come up with a few different ideas of your own. But it's really good to think of how it all fits together in boxes, and which boxes fit in which boxes.
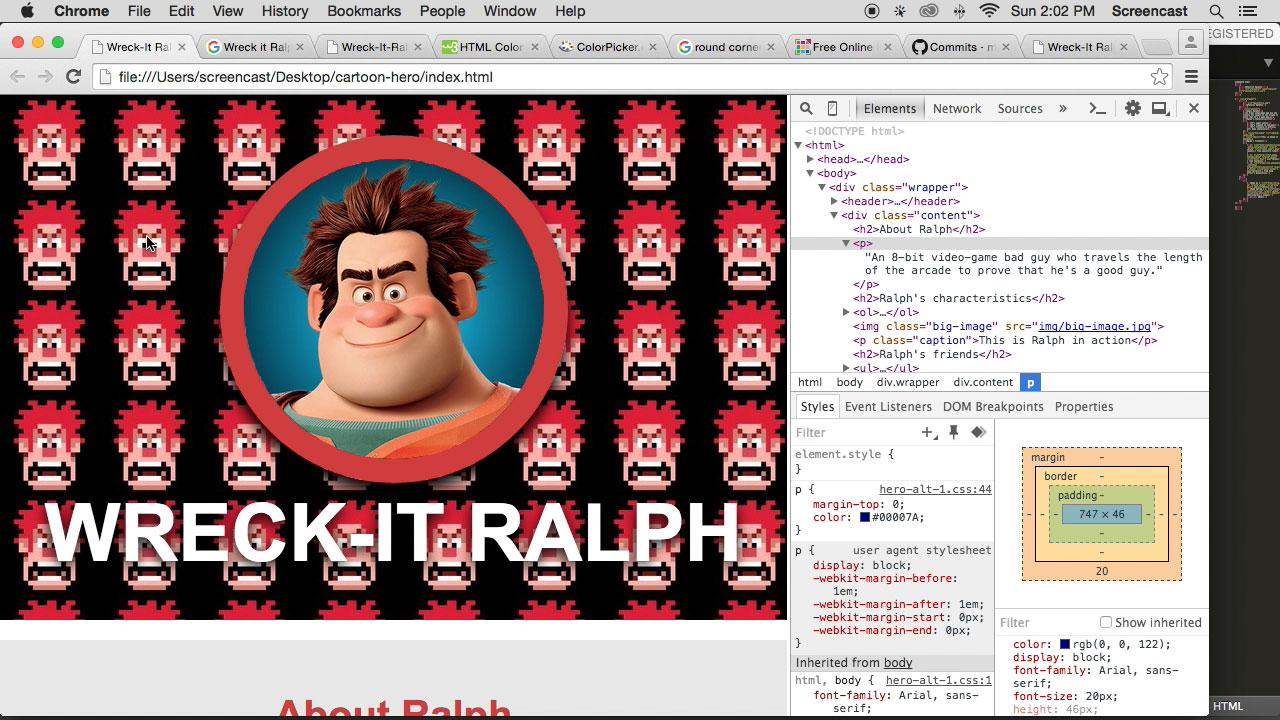
12. Let's write our website's HTML: Let's write our HTML for this project. Let's open up our cartoon-hero folder and drag it into Sublime Text and the first thing that we're going to do is create a new file and we're going to save it as index.html inside our cartoon-hero folder. The reason why we call it index.html is because when the browser gets to a website, it needs to know which file shouldn't load first and it always looks for your index file. The next thing we're going to do is write an HTML tag and let Sublime Text fill in the rest. We're going to remove this smaller than symbol, we're then going to start writing our HTML. So my character is Wreck-It Ralph. I really enjoy him. Whoever your character is, it could be a cartoon character, an animated character but if you're not into that, choose a movie character or choose someone else to do it on, it makes it a lot easier and a lot funner. The next thing we're going do is insert a link element and Sublime Text knows that it's a CSS1 which is great so we'll say css/hero. css so it knows where to find it. I'd like to save as I go just in case the computer crashes or something bad happens. That's our head element. Now, I'm going to be referencing my box-wireframe here and there. Let's see what I need to do. I need a header element first of all so let me type my header element and inside my header element, I need an image which is our profile image and a heading. Let's do my image tag and my source is going to be img/profile.jpg and then underneath that, I'm going to create an h1 tag and call it Wreck-It Ralph. Fantastic. That is my header but now you'll see my wireframe that I've actually got an outside container and this is not the browser, this is actually a wrapper. I'm going to create a new one called wrapper or a new div with the class of wrapper and it's going to wrap all of my content. The next thing we're going to do is create a div with a class of content and inside here, I'm going to put all of my content. The next thing is a footer and even though in my preview or my wireframe there's no real box here for a footer and there's no real box for content, I have decided that I should put those in. Your wireframe doesn't have to be super concrete, it just helps you plan. So the next elements I'm going to put is my footer. Now, inside my content, what I need to do is I need to create an h2 for this title or this heading, I need to create a p tag, another h2, an ordered list with a bunch of list elements inside an image, a p with a class of caption, another heading, an unordered list with some list elements inside and inside the footer, I need to create a few elements which I'll use a list to create. So let's start writing this. The first thing that I want to do here is write about Ralph and I'm choosing an h2 because there's already an h1 on the page so these aren't as important as the h1 but they are fairly important. My next is a p tag and inside this p tag, I'm going to write a little bit about Ralph, so an 8-bit video-game bad guy who travels the length of the arcade to prove that he's a good guy. He also has massive hands. We can take that one ought to reckon. The next thing I want to do is write about Ralph's characteristics. here I'm going to use an ol and inside the ol, we're going to create a few list items. The first thing, he's super cool. The next list item, he's treated as bad-ass, cool. The next one, he's friendly to glithy-girl game characters. It didn't start off that way, but it ends that way. After our ol or our ordered list, we're going to have a big image so I'm going to give this image a class of big-image. It makes sense, right? Source of the image is going to be also big-image.jpg. After that, we're going to get a p and I'm going to give it a class of caption and in this caption will say, this is Ralph in action. After that, I'm going to create another h2 and say Ralph's friends spelled correctly, of course. Here, I'm going to use an unordered list. It creates a few list elements. I'm just going to copy and paste this. Inside here, I'm going to find a few of his friends. The first one is Jake from Adventure time. The next one is Bloo from Fosters. That's Foster's Home for Imaginary Friends. The next one is Arthur from King Arthur's Disasters. Now, what I'm going to do is quickly go find some links for those three guys in the Google Chrome. Let's type Jake from Adventure Time. It's going to go a little bit, and yeah, this is one that I found earlier. I'm going to copy this and I'm going to create a link around Jake. The href is going to be that, the targets is going to be underscore blank, and the title is going to be Visit Jake's page. I'm going to do the same from Bloo. Search Boo Fosters Home, Chrome. Here's one that I found earlier. Let's copy this again. Inside here, let's create a link around Blue. The href will be that I've just copied. The target will be underscore blank, and the title will be Visit Bloo's page. The next one will be Arthur. Let's do the same thing for Arthur, let's create a link around him. Again with an href, a target underscore blank, and the title of Visit Arthur's page. We now need to find a link for Arthur. I love Google and [inaudible].There we go. Let's copy that again. Go back to Sublime Text and paste it in the href. That's pretty much our content. Now, inside our footer, we just need a few little things. I'm going to use an unordered list again with a few list elements, we'll list items, I'm going to say, Made by Rich. Then the next list item, I'm going to say, Made during a Skillshare class. Then finally, I'm going to say, this list item should be copyrighted, even though I have no right to copyright it, it should be, and or ampersand copy, semicolon 2015. Now, this is a special way of writing your copyright symbol. I'm going to put a link around Skillshare, and then I'm going to start filling in all of these details. That's my websites. Again, the target should be underscore blank and the title should be, Visit Rich's website. I'm just going to copy and paste all of this to make it a little bit easier for the Skillshare one. For the Skillshare's websites, the href is going to be skillshare.com. That's pretty much our HTML, but we need to see that it's working. Let's go to our finder, drag index.html into Google Chrome, and it should be something like this. We need to find two images. Simon search for Wreck-it Ralph. I'm going to go into the images tab. There's one really super cool one that I like. This is him. I'm going to use this from our profile image. I'm going to go to cartoon-hero. I'm going to create a new folder for all my images. It's great to store your CSS in your CSS folder and all your images in your image folder. I'm going to call this profile.jpg. Fantastic. Then the next thing I'm going to do is look for a really cool big image. That might be a good one. Can we just see if there's any else? Yeah, that's good. I'm just going to click, "View Image," and it's going to load. While it's loading, I'm just going to put my test image in the image folder, and I'll keep the box-wireframe one up just because it's not really part of the site, it's more of something to refer to. Here, I'm going to save the image as big-image.jpg. Fantastic. Let's see what happens now. We've got our profile image, we've got the big-image. It's really, really big, and that's our HTML. From here, we can actually start styling this art in an amazing way. We can do a bunch of really cool stuff with it. If you want, open up GitHub Desktop and synchronize your files but I'll only be doing that off to the CSS video. Cool. See you in the next video.
13. Let's write our website's CSS (the funner part): Let's write some CSS. Open up your cartoon-hero folder, drag it into Sublime Text, and open up the index file, as well as your hero.css. What we need to do is we need to style the header and its elements, we need to style the content and its elements, and we need to style the footer and its elements. You can either switch between index and hero, or you can copy and paste, which I like to do. I like to say copy, and I like to paste, and then I like to comment it out. A comment is something that the browser won't see, and you write it like so, which is great. In HTML, you can write a comment with this syntax, which is really cool. If you want to leave yourself some notes like, "Hey, check this out." You can do that too. That doesn't come through to the browser, and doesn't even notice it. I like to just comment it out, and then reference it from here. My header. What I want to do with my header. I want it to be a solid color so I'm going to say the background-color, I want it to be a blue but I want it to be a special blue. In Google Chrome, I'm going to open up a new tab and I'm going to search for a color picker. I normally just grown for the first option and I want to blue. That blue looks pretty good. We'll resize the browser. This one here looks good. I'm going to copy it. I'm going to put a hash in front of it, and paste it. Fantastic, that's my background color. I want it to be a bit of space around the elements inside the header, so I'm going to give it a padding. I'm going to give it a padding of, say 40 pixels. Now I could write it like this, padding-right I could give it a value. I could say padding-left and padding-top and padding-bottom and padding, whatever. But there's a shortcut. If I want them all to be the same I just say padding, and give it a value. If I want to do all of the values I can do in one line. I can say the top value, I can then say the right value, the bottom value, and then the left value. They can be different. If I want the top and the bottom to be the same, and the left and the right to be the same, I can literally just write it like that. But because I want it to be all the same, I'm just going to keep it as 40 pixels. The next thing I want to do is say my h1. Now I could write it as all the h1s in the header, but I know there's only one h1 so I'm just going to keep it short. I want the font-size to be about 90 pixels, we'll see what it looks like just now, and I want its color to be white. Fantastic. I then have this image inside my header, but I know there's another image. This is where I will say the image inside of the header, and I wanted to be in the middle. I want to say my header, let's text-align center, and this will align my header and my image. What else do I want my image to do? I want it to be round. I'm going to give it a border-radius and I'm going to make it 150 pixels and we'll see what happens. If you are like, "What the heck. How do you know it was border-radius?" Well, if you don't know something, just Google it. It is the easiest way to do something. If you Google something like round corners CSS, you'll find a bunch of information. Click through on any of the links, they're really helpful, they'll explain a lot, and then just implement it in your site. After we've saved, go to Google Chrome and refresh. It looks pretty good. You'll see that the corners make it not quite round, you'll also notice that I fold in a bunch of extra information like about Ralph, his characteristics and his friends at the bottom, with links. If you haven't done so, do that. Now, I want this to be round. Inspect it. Let's just increase the width of the inspector. You'll see that as I hover over the image, it says that it's 450 pixels by 450 pixels. There's two ways to go about this. I could either search for an image resizer, use Photoshop or any other image app. PicResize is pretty cool. Or I could just leave it as is, and change the width and height. That's what I'm going to do. I'm going to see what it looks like, and say width. Let's go for 300 pixels because 300 pixels and 150 pixels go together as 150 is half of 300. That looks good. I'm going to implement that in my CSS file, width 300 pixels. I don't need to change the height, simply because it auto-resizes with the width. I could change the height and the width, with auto-resize with height. I can skew things and make things disproportionate. If I set a different width and a different height for a square image. The next thing I want to do is I want to put a border on it. There's a few lines that you need to know here, but just like there's a shortcut for the padding, there's a big shortcut for border. Here I want to say, I want my border thickness to be 10 pixels, I want the border style to be solid, and I want the color to be a red color. I'm going to go find that. Needs to be red, and so I mark this, CC0000 looks good. If I copy that, and I then paste it here and I save, let's have a look at what it looks like. Looks pretty good, and could be a bit thicker so let's see what it looks like if it's a bit thicker. I'm just pressing the up arrow here. That looks pretty good. Twenty four, but then, my width, the border-radius is wrong. So I'm going to change my border-radius until it looks good again. It looks good. What's that? 174. I'm just going to copy all of this because that's exactly what I want. Fantastic. Then I'm going to save. Refresh. You'll now see that there is a border which It's different from the actual width. My width is still 300, but my border on top, bottom, left and right is 24. All in all, my height and width of this image is 348. The next thing I want to do is change all of this text to something a bit more superherowy. I'm going to use some default text, I'm going to set the HTML and the body's default text or font-family to Arial, and if they don't have Arial I'm going to say sans-serif. If you don't know what a font-family is, just Google it. You'll find a bunch of information. Let's save. Come back here. That looks a bit more superherowy. Looks good. The next thing that we need to do is get rid of this white border around everything, and is also an HTML and body attribute. Let's change that. I want to say padding. Sometimes it could be padding. I'm going to set that to zero. These are the default styles that come with a browser. It doesn't look like it's padding, so I'm going to add margin. Let's set that to zero, take padding away. Let's save that. Wow, I don't know what I just did there. What of that. New view into file. Wow. Let's just save, make sure you close that. Let's go back to Google Chrome, and voila, the little white gaps around the whole page disappear. That's pretty much our header, looks really good. Looks Wreck-It Ralphie. Now the next thing I want to do is, do some stuff with our content. Let's remove the header HTML and we can refer back to the content like this now, just for a different way. This content, there's a bunch of h2s, ordered lists, images, and whatnot. The first thing I want to do is, address the content elements. I want to give it a max-width just so that it doesn't always span so wide, and I also want to put it in the middle. I can say margin, zero for top and bottom, and also for left and right. Now auto, makes it really nice, it resize it for you, but only on the left and right. Let's save this. Let's see what happens. Let's close this. Things look a bit weird, don't they? What's really cool is when this happens, we can inspect and we can say go to our content, and let's say max-width. Let's change it to 400 for now. Let's give it a background-color of, wow, cornsilk, that looks good. Let's go coral. Coral looks good. You can see that that's the max width. If I increase that, you'll see that there is an equal space on the right and the left. But now this image it's doing some crazy stuff. What I want to do here, is I want to set the big-image,.big-image, and I want to say max-width is 100 percent. I'm not giving in an absolute value. Let's see what happens here. I don't want to buy just yet. Thank you. Refresh. You will start to see that, hey, it's actually sitting at a percentage. If you resize your browser, it actually scales it for you, which is great for mobile. The next thing I want to do is in the content I want to put a bit of padding on just so that it's not always touching the left and the right. So i want to say padding is zero and 20 pixels. When I save this, I can then see that there is a bit of white space on the left and white space on the right. But not for my header. The header looks perfect. The next thing to do is this caption. What I'd like to do here is address it, and I want to make the font-size about 16 pixels. I want the font color. So let's get the color to be lightgrey. Then I also want the font-style to be italic so that actually looks like a caption. Let's save this and see what it looks like. This is Ralph in action. That's fantastic. The next thing I want to do is just make this look a little bit nicer. So my ul, I don't want those disks, so I'm going to say list-style, none and I'm also going to give it a padding of zero and a margin of zero. Let's see what happens. Fantastic. But you'll see that the ul and the footer also got to change when I did this. But that's okay. So Jake from Adventure Time, Bloo from Fosters, Arthur from King Arthur's disasters. But those links look a bit weird, so let me change the links as well. All the links, I actually want the color to be red because that's Wreck-it Ralph's color, and I don't want them to have an underline. So I want to say text-decoration, none. Let's save this and see what it looks like. Fantastic. The next thing to do is our footer. Let's change our footer a bit. I want it to be a very, very lightgrey with some padding. Let's say the padding I was going to set to 40 pixels and 20 pixels. Now it doesn't quite look like a footer at the bottom but remember, it's just a guide. Footer at the bottom, let's say I want a background-color. Now, well, what should the background color be? Let's go pick a color again. I'd really like a black, but I'll make it a really light color black. So let's try this color. Let's just copy this and put a hash here and paste it. Let's see what it looks like. That looks pretty good, but it's still quite tight to the rest of the content. So what I'd like to do is I'd just like to set a margin, with just a margin-top of about 20 pixels. Then I would also like to change its ul inside a bit. What I'd like to do here is the ul text-align, center. So we'll take the center. But then I'd also like to say all the li's inside the ul but inside the footer only, I will like to display as inline. Now at the moment, it's displaying as a block. I can show you that here. If I have to inspect this element, you can see that it's actually a whole block. You can see by the blue highlight color. Now I'm changing the display to inline. I'm saying the li's inside the ul, inside the footer display as inline. Let's see what this does. Refresh. Made Made by Rich Made during a Skillshare class copyright 2015. But it's a bit bunched, so what I'm going to do is change this to an inline-block, which means I can apply the margin to it. So margin, top, zero, and the left and right, I'm going to say five pixels. I'm going to save, refresh here, and that looks pretty good. This, on the other hand, is in the middle. I don't want that to be in the middle, so I'm just going to put the footer ul and just make it text-align, center for the ul and the footer, and refresh here. Now, that's our website. Now, share it. Go wild, do whatever you want, style it how you want, and then share it. I think the most powerful thing about the web is that you can share it. You can share information. This way is pretty much free. Now what I'm going to be doing is I'm going to be showing you a couple of different ways in which to style it. Same HTML, just different CSS. We may put a bit of images in there, but that's basically it. Once you've created your site, once you're happy with it, well, when you're happy to share something of it, go to your GitHub desktop app and make sure you're on the gh-pages branch, and then let's commit our files saying, First commits for our character page or websites. Commit it, synchronize it. Remember what we have to do now, once it's finished synchronizing, we have to go github.com. In github.com, we have to be in hero, we have to go to the commit section, we have to make sure that we're on the gh-pages branch. HTML files are written. Let's see what GitHub is doing. It's still synchronizing. It's taking a long time. I wonder if it's because we have some big images there. Okay, there we go. It's synchronized, let's go back to github.com. Let's refresh, and you'll see First commit for our character page. Here we go. Now what we want to do is we want to go into mrra-screencast.github.io. Obviously, use your GitHub username. Go to cartoon hero, press Enter. You'll see that there's no index.HTML and that's because it's picking up that index.HTML as your first file to go get. That's your website. You can read it on your mobile phone, you can share it with your friends. It looks pretty good. There we go. Have a dance, have some tea, pat yourself on the back and tell your mom you've just made your first website and you can share it.
14. Oh how versatile CSS is!: Okay, so you can see this is where we left off. We had a really good-looking character sites. Now what I've done is I've written two more style sheets. One is called hero-alt-1, and the other was called hero-alt-2. So just by changing the style sheets, let's save. You can see what happens, I didn't change any HTML. You'll see that there's a tiling background. This is done by setting a background image this is special syntax for going a folder up. So from all I'll here, I'll one CSS, it goes up a folder and then it goes and looks in the image folder for the pixel image 100 JPEG. Then I'll set a background repeats over repeats. Then I get something looking like this. You'll also notice a tech shadow. So if I inspect this and I just take the background image off, you'll notice that there's a shadow on that text and a shadow on the image itself. This is done by two different things. The h1 has a tech shadow, and this is the x value, this is the y value, and this is the blur amount. Then the color of the shadow. Again there's a box shadow on the header image. Its x value, the y value the blur amount and the color. So that's the top section. I've changed a few colors. I've sent a text, I've taken off numbers, and then I've changed the photo and little bit. So that's one version. Another version, I'm just going to change it to two and save it. Let's see what happens now. Wow. So it's really red. Yeah, really red. It's very flat. It's a square image. There's no shadows. The Allies have borders around them, and they all rounded boxes. Captions changed. What are these? Well, these are links, and they have a background color, and they also have a hover setting applied to them. So in hero-alt-2 to, I'll show you in the A tags. There's a background color. Then when they hover, and this is called a pseudo-class, the background changes the color. That's how I'm getting that darker color when I'm hovering over a link. Just by changing CSS and absolutely no HTML, am I able to come up with three totally different pages? So that's the power of CSS. You can radically change how your websites look and feel just by a few lines of code and by changing your CSS files.
15. Thank you, and next steps: It's the end of the projects. I really hope you've had fun because that is the most important thing. The next thing that I really hope you've done is learned a lot. We've covered HTML, we've covered CSS, we've covered how they relate to each other. We've started to use Sublime Text. We've started to use GitHub. We've used Google Chrome and started to inspect elements. There is much more to all of these topics. If you've enjoyed it, learn a little bit more every day, write HTML and CSS every day, even if it's just two lines. It'll help your brain keep fresh, but most importantly, share your projects with other people. So in a project gallery, post links, answer questions, ask questions, and remember that Google is your friend. The web is built by people who write HTML and CSS. The whole web is raised on HTML and CSS. That is your first ports of call, otherwise, ask a real human. Cool, I hope you've had fun. I've had fun doing it. Look out for some more videos.
 Rich Armstrong, ADHD Artist + Designer