Transcripts
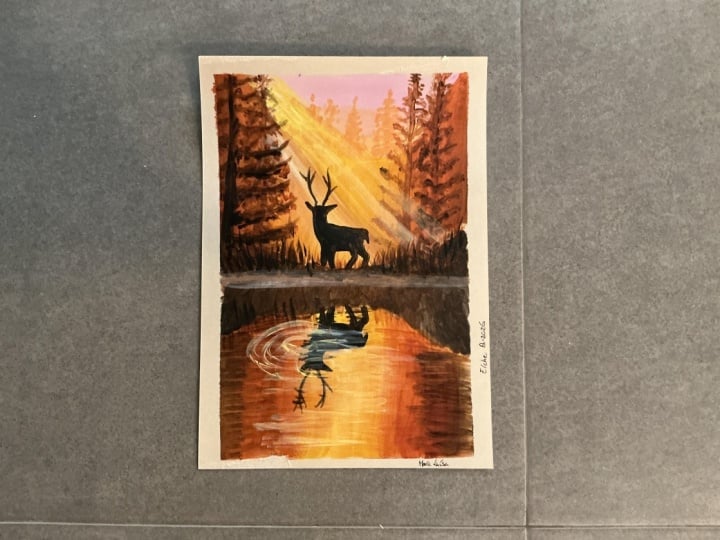
1. Intro: Step into a peaceful golden
forest and learn how to create a beautiful
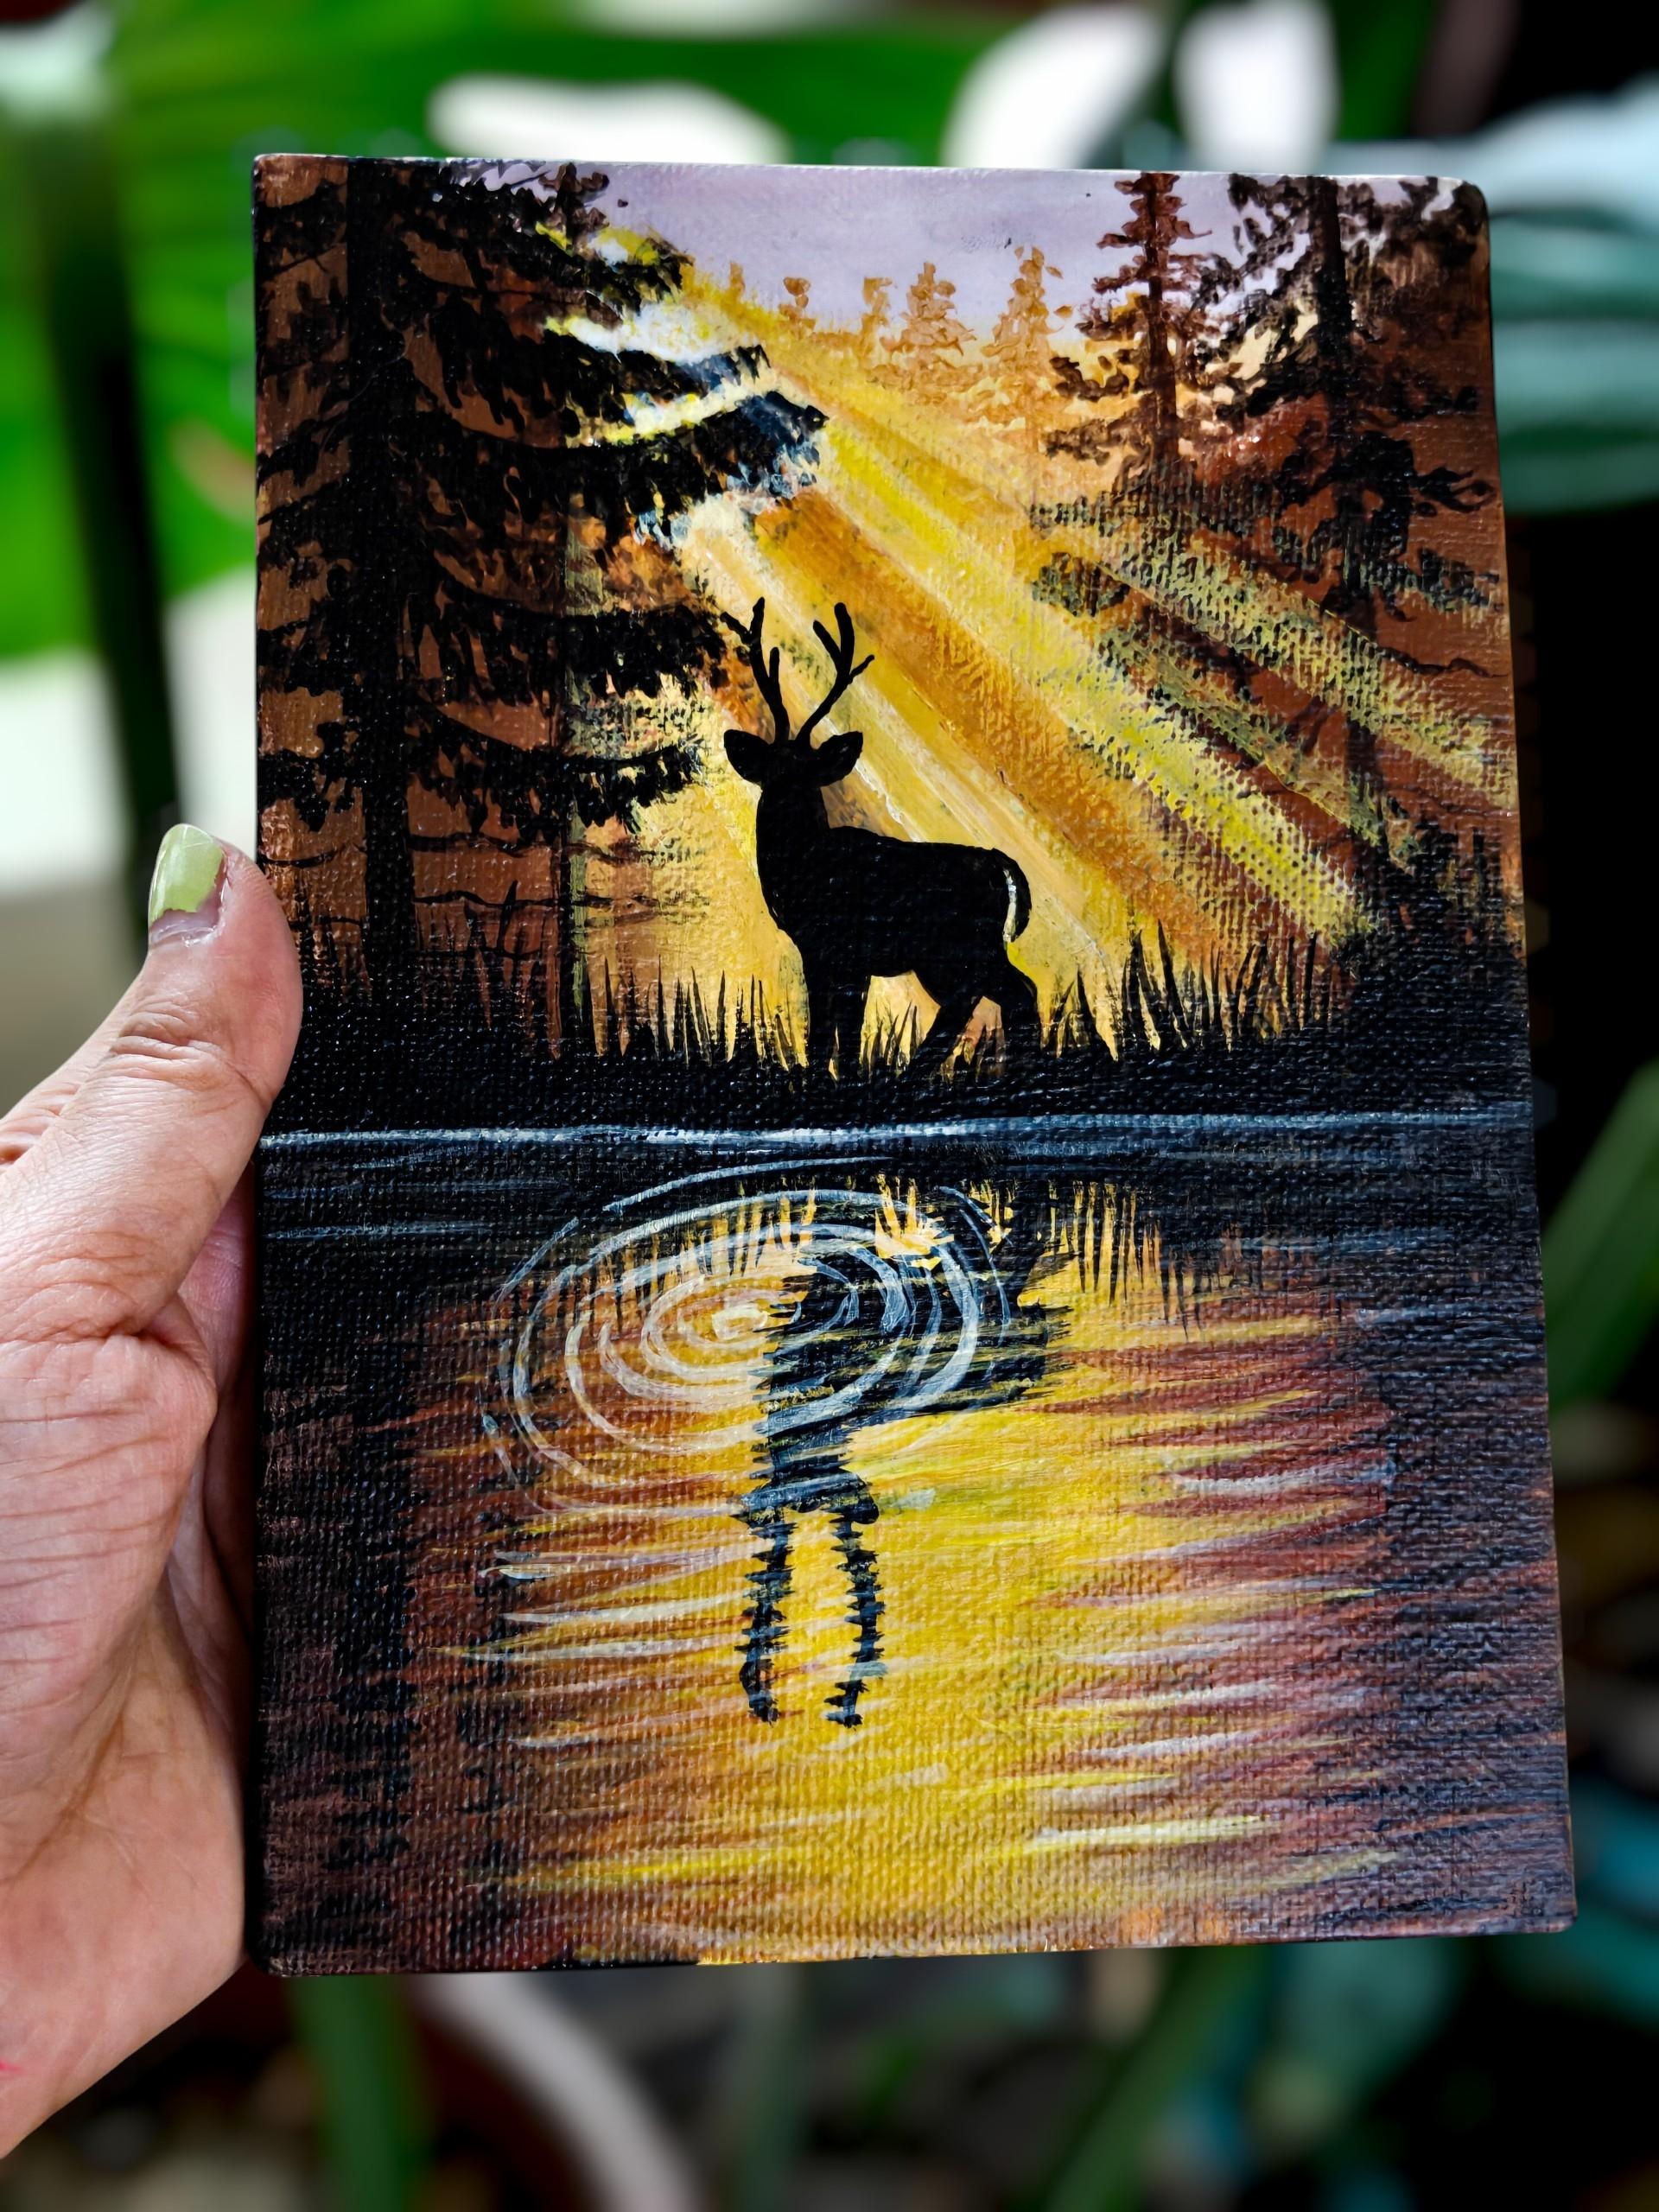
acrylic landscape filled with warm sunlight, tall trees, a graceful deer, silhout and glowing
water reflection. So in this painting, we will learn how to
paint the background, how to blocking the background
in vertical direction, then the foreground
blocking and how to blend the colors perfectly to create a nice blending effect,
then the back tree, then the front tree, we will explore how to create depth and atmosphere
using layers, lights, shadow, contrast and
expressive brushstrokes. You will also learn
how to create the magical reflection and
the sunlight on the water, bringing the entire
scene to life. Along the way, you will
learn how small details and contrast can transform
a simple landscape into a magical scene. This class is
bigner friendly and perfect for anyone
who enjoys nature, landscape, and expressive
acrylic painting. Come paint with me and create your own
Golden Forest story.
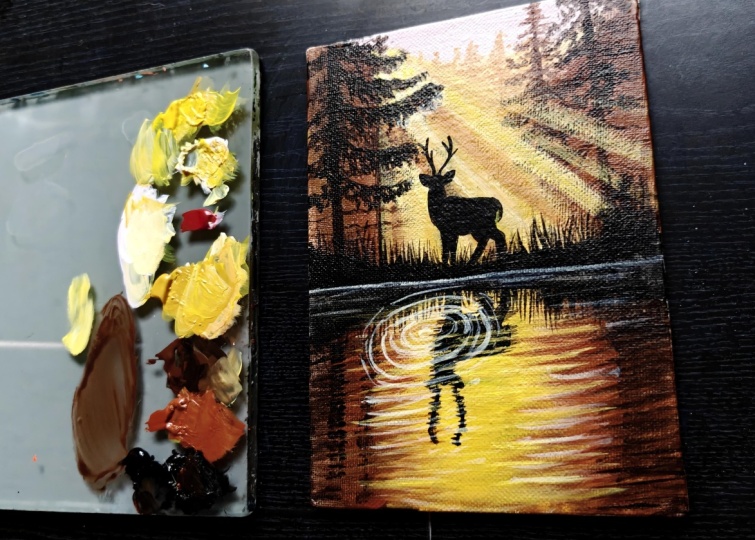
2. Materials Required: Welcome back. So let's
discuss about the materials. So firstly, the canvas, which is the boat canvas,
which I will be using. It is five is to seven, and I will be priming it two, three times, and these
are the colors, white, then yellow Ochre,
cadmium yellow, black, burnt umber,
ElazarinGrimson, and burn Sienna. So all these colors I
will be using here for the painting of this beautiful
deer and reflections. So all these reflections, I will be using the
brown color and the yellows and the mix of yellow and browns
are these colors. Then comes the brushes. So mostly there are
flat brushes of two, three sizes, and then
it's the round brush, then the fan brush, then the liner brush, technical pen, and
this technical pencil for drawing and scale. All these things we
will be needing. Apart from that, we need cloth. Then the palette is a glass palette which
I will be using. Then comes the tub for water. So all these things
we will be needing. So let's start with this
beautiful vibrant painting.
3. Blocking: Welcome back. So
let's start first with the drawing and
then the blocking. So let's first draw a
little rough sketch of the center line and the small small
details, not too much. Rest of the things we will
be doing while painting. So I'm just drawing a line which is a little below
from the center. Suppose if this is
my center line, it is a little below
the center line. So just a centerline and then a little bit of grassy
parts which will be there, and then the upper tree
part, which will be there. That's it with the drawings. So we don't have to
do much of drawing here and little bit above, which is a light color sky. So that part, I'm
just drawing it. And rest of the things
we will be doing just by using the colors. So let's little bit below the
reflection of the grasses. So that's it with the drawing. And let's start now
with the painting. So let's discuss about
the colors first. So the first color is the
cadmium yellow, white, Alzarin crimson,
then yellow Ochre, burn tumber, burn
sienna, and black. So first, we'll start
with the above part. So let's start first
with the above part. So that is a very light color. So first, I will take white, lots of white using my small size flat
brush and mixing Alazarin crimson and a
little bit of black. So it will be like a grayish, purplish color, which
I want my sky to be. Try not to make it
very dark color. It's a very light color. So I will be just
adding the above part. So I feel it's a
little bit dark, so I will just add a little bit more of white to it to make it more lighter and just applying
it on the above part. So water is only
there on my brush, rest all our colors. So try to grab thick
amount of colors. So when you will grab
thick amount of colors, your colors will
not dry very fast. After that, we will be
doing the lower part. So you can see I've just
applied a thick layer of it. Now, I'm just adding a
little bit of yellow a little bit below just to
make it a little bit glowing. So that's why I've added a
little bit of yellow below. We will be doing one
more coat on this. But first, we will
do the background, and then we'll start doing
the background trees, and then we will do the
rest of the things. So let's first color
the above part. So let's blocking in
the above part first. So how we have to do this. We will be using
here flat brush, and this time we will
be painting vertical. So first, color which
we will be using here is so the darkest
color is burnt umber, then burnt sienna,
then yellow ochre. So first, I'm taking flat brush, which is loaded with water, then burnt umber, mixing
with black a little bit, and starting first
from the corner side. So the corner is
mostly dark in color. So don't worry about
the brush marks. We are just figuring out how
we will fill the colors. And then we'll start
doing the final finish. So starting with
both the side with darker color that is
burnt umber and black, then again, just burnt umber. And as we will go inside, it will be a lighter
and lighter color. So just applying first burn umber and a little
bit of black mix. Then comes the burnt sienna, which will be blended
with the burnt umber. And middle part is
quite light in color. So I'm just taking
this yellow acre and a little bit of
white mix to it, and I'll just add
it in the center. So this is the whole
blocking which we have to do for the send this
whole background part. Rest, we'll start doing the detailings as
we'll go further. So just taking more of white and just putting it in
the middle section. Try not to push the brush
towards the lighter part. Otherwise, some of
the colors might go to the lighter part if you push the brush
from dark to light. So every time you have to push the brush from light to dark. Now, same thing we will be
doing for the lower part also. Same color combinations, but the pattern
will be different. We will do it in the horizontal
manner, not vertical. Again, taking the
similar color which we took that is burnt umber and the mix of black,
little bit of black. So try not to add too
much water in this, try to use directly the color, and my color is a
little translucent. That's why my canvas
is visible, but yes, I will be adding
two coats of it, so my canvas will
not be visible. So just adding the similar
color what I have added there and same color
in the center, and I'm just trying to blend
it with the lighter color. So again, applying it in the center and trying
to blend the color, then taking more lighter color in the center just by taking white and yellow ochre
and putting it in the center and trying
to blend the colors. So this is the first layer of color blocking
which we have done. Now we will wait for
this to dry and then only we'll do the second
blocking of the colors.
4. Second Blocking: Welcome back. So let's start
with the second blocking. So the first coat has
dried up completely. Now we will be doing
the second coat. So same color and same brush. Now, this time, I have taken
a little bit smaller brush so that I have more
control on my brush. And I'm just mixing
this cadmium yellow and this yellow ocher mix and just trying to apply
it first in the center. And gradually we will
move towards the outer, then burnt sienna, and
just the darker one, which is the burnt umber. Now I'll start
blending the colors, pushing the darker color
a little bit towards the so just taking
again this side. So once this dark color
first and then the lighter, I haven't washed off my brush. I'm directly using the colors. So just applying
a thick layer of color so that it
doesn't dry very fast. If you feel your
brush has dried up, just take water on
your brush and again, start with the blocking. So just taking again
the lighter color, which is a mix of both
the yellows and just pushing the lighter color
towards the darker color. So this is how we have
to do the blending. Whenever you will
do the second coat, you will see that
the second coat has a much richer color
than the first coat. So it happens every time
when you use canvas. So again, I'm taking a
smaller size flat brush and just applying, again, a lighter color on the top, the similar color
which we have used earlier and just
applying it on the top. And then I will start creating a nice yellowish tone below and try to blend with
this middle yellowish tone. So just trying to blend the colors using my
small size flat brush. So when your color is wet, you can easily blend the colors. But when your color dries up, you have to again apply that
color and blend the colors. So these things you
have to keep in mind when you are
blending the colors. Now, once we have
added the textures, now we will start applying
the tree formation first. And then we will start
creating the rays. So first, we will
create the back trees, then the rays, and
then the front trees. So using my liner brush, a little darker color than
the background color, which is the upper yellow color. So I'll just take a
nice thick color, which is a mix of
yellow and brown. And first, I will
make other line, which is the center line of
the that is the horizon line, actually, and making the color thin and creating the lines. So whenever you are
creating any lines, your color has to be thin. Now using the same color a little darker than
the base color, mixing a little bit
of burn sienna in this yellow and then adding
some nice trees which are the back trees which are very blurry shade trees which are visible
from the back side. So just creating
first the lines, and then I will add the trees. Small pine trees are these. Some are big in height,
some are small in height. So just adding some textures So this type of tree I have used in so many of my paintings, if you really want to
watch some of the trees, how to make these trees, you can watch my class, which is for absolute bigness. I will attach that link in the section so you
can check it out. So this is the tree
which I will be adding to the background. It is a little darker
than the down color. A little orange type, but not totally orange. So this will create
the back tree, which is not visible and
which is very hazy type. Then one more layer
we will create, which is the front tree, and then the rays and then
again, the front tree. So this is how we have
to do the tree creation. So currently, I am doing
the back tree which is very hazy and not totally
visible. It is like blurry. These are just dots and
textures which I have just created and to create
the shape of the tree. Now we will create a
little front tree, which will be a little darker. So I will be using
this color and little bit trees I will add
here also, the back tree. Now I will start creating the little mid tree which
has a mid tone to it. So I will be using
this burnt sienna and little thin color. I should not be a thick
color and also a mix of burned tumber and just
creating first the line. Little bit of black
you can add because background is already
very dark in color. So just adding a line
and then we'll start creating the front tree that
is the second front tree, and then the so there are trees which
are in three layers. One is back, one is mid, and one is more in front. So this is the mid trees
which we are drawing here. So just creating the line first, and then we will
create the tree lines. All these things
has to be done with a milky color, not thick colour. So try to use milky
color, not thick color. So a little darker color than the one which we
have used behind. Do it slowly
patiently one by one. These are just small textures
and dots which I'm creating here and creating the
shape of the pine tree, starting from small leaves and then ending towards
the bigger one. So as I'm going down, I'm making the colors a
little bit more darker because this area is a
little bit more darker. If I will use the brown color, it will not be visible. So that's why I have
to mix a little bit of black in this to
make it visible. So mixing black in
this burnt umber and just adding some
nice tree structure. Similarly, I will do for
the other tree as well. So just enjoy the process
and do it slowly. If you're not able
to do the tree part, do it first in a rough page and then try to do it in
the main painting. So one by one, we will be
creating trees over here. So here you can see the main
tree is the front tree, which is black in colour. This is the mid section of the
tree which I'm doing here. So this tree is almost done. Now we will do the second one. So the second tree also
similarly, we have to do.
5. Adding Trees: Welcome back. So
let's start further. So we have added the first tree. Now, let's add the second
one using the similar color, just a mix of burnt umber
and a little bit of black and using my rigor brush. In this first, I will
create the lines. So this is a little bit
different type of pine tree. In this, I will first
create the lines, and then I will add
the tree textures. So this way also, you can do your tree part. So first create the lines
in the downward direction. And then add some
random textures to the lines and try that the
lines are not visible. You have to cover it up. So this is one of
the technique of creating another
type of pine trees. You just have to
create the structure and then you have to
just fill the textures. So just I'm trying
to fill the textures and creating some nice
tree textures below, adding a little bit
more black so that the colors are visible because the side colors are
already very dark. And if you will use
a similar colors, it will not be visible. So you have to make it a little
darker by adding black to it and just add the
textures to it. Similarly, we will be adding the tree textures to
the other side also. So one side we have done, we have to do the
other side as well. So filling it everywhere so that the line which is there
behind it is not visible. So you can see how nicely
it has got covered. Now we will do the other side similarly like we did this side. So just first creating this line and then creating
some nice tree textures. Do it slowly one by one. Don't do it in a hurry because there are lots of
layers in this painting. The first layer was blocking, then second layer was
giving a nice blend to it. Then the third layer was
adding some back trees. Then again, another layer, which is the front tree, and then again, we'll draw the rays and then
again the trees. So this is how we have to do the whole background painting. It's a bit different, but yes, it is if you will follow each and every step step by step, you will be able to do it. So try to first watch it and then do it that
also you can do, and you can do
along with me also. It's totally up to you
how you are comfortable. But take your time
and do it slowly. You can see how I'm
adding the textures. Some of the lines are down, some of the lines are straight. So it depends how you want to arrange the
pine tree leaves. So just adding the
textures and below, I'll just add the lines. Just you have to
make it feel that it is full of dense forest, full of pine trees. So now we will add one
more to the sites. So just I will add one more, and then we are done
with the tree part. Or you can leave
another one because there we have to
create another tree. I'm just blocking the
below part which is there. So this will be actually
the grass part, but we can do that later also. But first, I will add
the water part below, and then we'll start
doing the other part. So here I will just
add the layers again. So we have just
added first layer. Now we're adding second layer. So second layer we
will be doing in the horizontal manner
because we have to create some nice water lines. So just using my same flat brush and taking first
the darker color, that is a mix of black
and burnt tumber and just painting it in horizontal direction like to and fro directions and
covering the edges first, the side edges, and then
the middle part with the lighter color
than the center part with the more lighter color. So this is how we have
to blend the colors. So same colors, I will be
using the other side also. Then comes the lighter color, which is the burn sienna, which is in the mid part. Try to blend this color
with the darker color. If your darker color has dried, you can just push
a little bit of more darker color again
and you can blend it. Then I'll use the
lighter color that is the yellow ocher and try to
blend with this burnt sienna. So this is how we have
to do the water part. Blending in
horizontal direction, and then the center part
with much lighter color. So you can see how the water is looking when you
add these details. So already the lines
of the water part, it's coming and the
ripples are coming. So you just have to
use your edge of the brush and do the
entire painting. So this is how we have to do it.
6. Adding Rays and Front Tree: Welcome back. So
let's start further. Now we have to add
the rays first, and then we will add
the main front tree. So from the corner of the tree, I'll start creating the
rays. So from here. So first, I will just take this cadmium yellow and mix it with a little
bit of white, and just I will make that
area a little brighter. And then from there, we'll show that some rays
are coming from that end. So for creating the rays, I will be using flat brush, which is of small
size and scale or anything you can use
for creating the rays. Try not to directly draw the lines because
sometimes the lines may get like curvy when you
are drawing with free hand. So it's better to
draw with your scale. So just mixing this
yellow ochre and white, and just taking a little
bit of color on my brush, and my brush is not wet. It is damp brush, and I will just push it a little bit down. So try to take colors very less. Don't take too much colors. Otherwise, it can happen that a dark and a thick
opaque line will be made. So try to take the
colors, mix the colors, and just remove the extra
color and then use the brush. So again, creating more rays. So try to make your
brush damp, not wet, then only pull the colors
and make sure that you are using any ruler or
something to create the lines. So mixing a little bit of orange texture in it and
creating some more lines. The color has to be lighter
than your background color. It should not be dark. We will be adding some
darker rays also, but first we will
add the lighter ones and then the darker ones. So just mixing some
nice light colour with yellow and white mix and taking my scale and drawing the lines. Do it one by one, slowly, take your time, try not
to do it in a hurry. And now some darker colors I will also be
creating in between. So some darker lines. So take very less
amount of color and try to use the damp brush to
draw all these lines. So you can see I'm just
creating some more lines. So this is how we have
to create the lines by creating with the help of the scale or something
straight, you can use. Now I will make a little
bit more lighter color that is white and yellow mix, and I'll just pull it
down a little bit more. Here, also, you can use the
scales I am doing directly, but try to use scale over here also making the colors a
little bit more lighter. Every time I'm using damp
brush, not wet brush. So try to use damp brush only. Colors also don't
have too much water. It's directly the colors and
little bit color I'm taking. I'm not taking lots of
color on my brush also. Very little little amount
of color you have to take and damp brush and you have to just make a
nice translucent lines. So these are not opaque lines. These are little
translucent lines. So a little bit more I will add, and then we will be
adding the main tree. So this is how we
paint in layers. First, we paint the
background tree, then the mid tree, then the rays, and then we
will add the front tree. So it will create more glow when I will start adding
the front tree. And it will also
create a little bit of depth in the painting. So you can see all
the rays are done. Now we will add the front
tree which is there. So for the front tree, I will be using a mix of
burn tumber and black mix. So more black and
less burn tumber. So it's mostly black in color. So first drawing
a straight line, keeping my brush vertical and
drawing a straight line and then some leaves of the pine trees like we
did for the smaller one. Here, we will add a
little bit bigger leaves. So I'm just adding
some lines and then we'll start
adding the leaves. So one side, it will
be a little longer, other side, it will
be half visible. So we have to make completely
dark color leaves here. Make your color a little
bit fluid when you are creating some nice
tree textures. So just adding the tree textures like we did on the other trees. This time, it will be a
little bit more longer. So a little bit of textures, I will pull a little
bit like diagonal, just some lines and
textures which are coming and creating
a nice leafy shape. Some falling textures also
I'm creating, you can see. So I will be doing
for all these lines. So it's better to create
first the lines and then draw these textures. Do it one by one
slowly, take your time. Just random textures are these
random dots and textures. There's no particular structure is here, just random textures. You have to add just to
look as if there are leaves which are there and filled
with small small leaves. So some bigger
leaves in between. So likewise, we can
add the pattern. Similarly, I will be doing
for the other ones also. So this is the front tree, that why it is very dark
and very dark in color. The mid trees are in the
middle, the backside, which are the blurry trees, which are hazy ones,
they are backside trees. So this is how we create
depth in our painting. So you can see I've just
added one side, the leaves. Now we will add the
other side as well. Just do it slowly, take your time and do it
one by one, the leaves. Always use your rigor brush or liner brush for doing
all these texture part. Or you can use round brush
also of side zero or one. Try not to use a bigger
size brush and take very little little
color on your brush and then create all
these textures. The color is mostly fluid. It's not thick color.
It's fluid color. So we almost done with
the front tree part. We'll add some tree textures with lighter color a little bit, which is coming in between. So this is how we can create
the depth just by adding some few brown
color tree textures which are visible backside. So the front tree is done. Now we will do the grasses
and then the center, the deer, which is there
and the reflection.
7. Adding Grass and Deer: Welcome back. Now we
will add the grasses, which is at the horizon line. So here also, we will
be using black color. So fluid black color
here we have to use. So a little bit of textures, I'm just adding to
this tree just to give a little bit more
clear shape to it. Just making it a
little bit more dense. Now we will add here
the black color first. So you can use any brush
for filling this area. I am using the same liner brush, but you can use any
brush for filling up this area with black colour. It is easy to control
the smaller brushes than to take the
bigger size brushes. So just first outlining it, and I'm just filling it
with first black color, and then I will create the grass lines again
with thin colour. Now, when you're filling
it, you use milky colour, but when you are creating lines, try to use thin colour. So just filling it up with
a nice milky black color. So now I will
create the grasses. For creating the grasses, you have to make
the colour thin and then try to create the grasses. So just taking, again, the same brush or you can use a triple zero or double
zero fine brush. It's your choice what
brush you want to use. Just taking my rigor brush and creating some
more thin lines. So wherever you are
creating thin lines, you have to use thin color. So just use your rigor
brush and create some thin lines in different angles and
different directions. So it should be
filled in such a way that lines which are filled, it should not be visible, so
it should be so much dense. So try to make all
these lines over here. Here you can make some
bushy areas which are in the side part of this area. So likewise, you
can make it here. And just add some
lines in between. So on the whole,
this horizon line, I will be adding these
small small grasses. And try to make it
at different angle, some straight, some right, some left, some curves. So different different
angles so that the grasses will look a little bit
of little bit real. You can also use
here your fan brush for creating the grasses, but I wanted to create
with the rigor brush. So that's why I'm creating
here because rigor brush gives a more fine
look to the grasses. But yes, here you can use your fan brush for
creating the grasses. So just I'll fill the entire
thing with the lines. Do it slowly. Take your time. Enjoy the process of
creating some lines. After creating all these lines, we will now add the main center
part, which is the deer. So that is the main center
traction, that is the deer. So this is a cutout
which I have taken. I will share this cutout
also in my resource section. So you can just create a cutout of your size and you can just uh put it there and
just outline with a technical pen or any
chalk pencil or anything, whichever thing you
feel like to outline, you can just outline it, and then you can just fill
in it with black color. So the easiest way to do the deer part because
if you will draw, there are chances that there will be some mistakes
or some errors, but you cannot remove it. So it's better to
draw it first on a separate page
and then just take a cut out and just
put it here and then draw the lines and
then fill the colors. I'm just outlining it
with the technical pen. Similarly, I will outline on
the reflection part also. Because the reflection
also should be the mirror image of what you
have created on the top. That's why you have to
create it on both the sides. So just outlining it. Now I will do the same
outline on the below part. So try to make it
just a mirror image. This I have put it
in a wrong way, so I will just put it in a right way because the legs you can see the back
legs are this side, so it should not be this side, it should be the other side. I'll just remove it and
then I'll just correct it. So this is the correct
way of putting your image because image is the mirror it should be the mirror image. It should be the copy
of what is above. So outlining it
with technical pen. Once we have done
the outlining part, then we will do the
filling of the colors. Whenever you are
drawing this cutout, first check the proportion of the size of the
cutout which you want, because the size may
vary depending upon the size of your
paper or your canvas. Try not to make
very big size deer. It should be small in size. So first take the measurement
with the scale and draw in that proportion and then take the cutout
and then place it. So this is it with
the drawing part, and then we'll start
filling the colors.
8. Deer Painting: Welcome back. So
let's start further. Now we have already
traced down the deer, and now we'll start filling
up with black color, simply black color
we have to fill. I will be using my liner
brush here for filling it up, but you can use any liner or round brush for
filling it up. I have chosen liner
brush so that the colors should not
come out of the line. It should be accurate. So it's better to use a small size brush than to
use a bigger size brush. But it's totally up to you
how you want to paint it. Try to use milky
color, not thin color. Otherwise, the color will
become like translucent. We want thick opaque color. So try to make the
color opaque only. I should not turn out to be a translucent or
transparent color. So simply I'm just
filling it up. The easiest way to draw the deer is to first
take a cut out and then put it on top
of the acrylic paint. Or one more thing you can
do is you can draw it with a watercolor pencil and
then fill the colors. Because with watercolor pencils, you can easily remove the
colors just by using water. And you can correct
your mistakes. But when you're using
the watercolor pencils, try to use the
lighter color pencils rather than using
the darker ones. Oh try to fill the colors very slowly and carefully because
this is the main part, and if the colors come out, you will not be able
to correct it because this color is already
very dark color. Do it very patiently
and very calmly one by one and try to use
smaller size brush only. So I'm just filling
it up very slowly. Also, I will make the lines of the horns of
this tear as well. Some more smaller
lines like branches. Similarly, I will do
for the below also. Now you can see the
tail has just joined, so I'm just making it
a little visible by adding the light
yellow color to it. Now, similarly, we have to
do the Blow deer, as well. Adding few more grasses
here and there. Now, just rotate your
painting upside down and we'll just paint
the other side, which is the reflection. So painting again, this with
completely black color, and after that, we'll create the ripple lines and
everything, the water lines. First, I'm just filling
it up with black color. So whenever you do
such type of painting, try to do this part in
the last because this is the main part and it should look like because this is the
center of attraction, the deer, and then
comes the rays, and then comes the trees. So this has to be perfect. So do it very slowly, fill the colors slowly. Once we are done with
the filling part, then we will create the lines
of the waters, the ripples. So that will be the last
part of our painting. So try to do very slowly
and very patiently. I have done this
painting on canvas, but you can do this
painting on paper as well. Try to use thick
paper when you're doing any painting on paper. So just enjoy the process of
filling this entire shape, and now it's almost done. Now we will do a little
bit of filling of this below grass
part, the reflection. So now I'm doing the
reflection of the grasses. Similar way, I have
to do here also. So just covering the below part, which is the reflection
of the grasses. So similar way, I'm just
filling it up with black first. Again, use a thick color, not a thin color
for filling it up. Otherwise, the color will become grayish or it will
become translucent. We want thick color. So just filling up with
my flat brush because my liner brush will take a lot
of time for filling it up, it's better to fill
it with flat brush. After filling it up, we will create
some nice strokes, some nice reflection
of the grasses. So just try to fill it
up with black colour. Now you can see the
reflection is done. Now I will add some
details of the grasses, which will be done with. Let's first rotate the image, and then we will add
some grassy effect. So this is it for
the lower part. Now I will add the line
which is in between, as you can see, a
white grayish line, which I will add in the center. So for this lining part, I will be using my rigor
brush and just taking nice black color
first and making this color a little
bit more thicker. And just taking white
and a little bit of black and just drawing
a line in between, just to give a division between the foreground and
the background. Again, taking this
grayish color, so it has more white than black. So just a center line, that is the horizon line. Now adding some grasses
below with my liner brush. So instead of using
liner brush here, you can use a dry fan brush, and it should be
completely dry and just the colors or a
damp fan brush you can use and take color on
the tip of the brush and just pull the color downwards. So this will create a nice
grassy effect in one go. The easiest way to make grasses. This technique you
can also use above, but when you are using above, it will not create
some sharp lines, so it's better to use for the reflection than to
use for the main part. So this is how I'm creating the reflection of the grasses. Now we will add the ripples.
9. Final Details: Welcome back. So let's start
with the final details. Now we have done
the main structure. Now I'll just make this
black color a little bit more dark just by applying
one more coat onto it, taking a normal black
color and just applying one more coat on this part where there
is a black section, especially the grasses and the deer and a little bit
on the trees as well. So whenever you do second coat, the colors become more
vibrant and more opaque. So it's better to do
at least two coats when you are doing or
blocking anything. So just adding some more
grasses with my round brush. So just adding
some more grasses, just pulling my brush
above upward direction. And also, I will do the
lower part as well. I'm just filling
one more coat on this der just to make it
more black and more opaque. So whenever you want
your painting to be more accurate and more clear, it is good to add at least
two coats on your painting. Just a few more
textures on the tree. This is the front tree which
is more darker in color. That's why I have made it black. And the sun rays are
coming from behind. Also some more darker
colors below as well. So here in the below part, we will be adding lots of lines and the ripples over here. Just making some
long, taller grasses. Also some lines horizontal
lines we will add to the deer section because this is a reflection and the shadow
should not be perfect. So I will just create some lines of the
water lines across the deer just to make a nice
reflection of the water. So as it is not a still water, so that's why I'm
making some lines across this whole structure, very small, small
horizontal lines. Also, we will add some lines
across the water part. So first, I'll just take the yellow and white
mix and just create a nice thin yellowish
lines so that the body and the tail is apart and looks
perfect and in shape, little bit of whitish, yellowish color across this area where actually the
light is coming from. So these are all the final
steps which we have to do while finishing
up this painting. So just making this area
a little bit more glowing just by adding more white
and cadmium yellow mix. Now we will add some reflections
also to the water part, some ripples, some
round ripples. So just adding first, the lines of the trees, the shadow of the trees, the reflection of
the trees which are coming with my flat brush, some horizontal lines
with my flat brush. Similarly, some
more thinner lines. So just to give a little bit of reflection of the three
lines which are there, another one, the other side
with a little brownish color. So all these reflections, when we add the painting
looks more real. Also we will add some more
lines towards the sides. So just making some
more darker lines, mixing the brown and black mix and just adding some more lines. So this is the final touch that we are giving
to our painting. So just making the
sides more darker. And then a little bit
of lines I will add across the middle part also. So you can see how beautiful
this painting is looking and very vibrant and with
a golden touch to it. So just mixing all
the yellows and adding more lines to this part, which is the area
where the tear is. So make sure that
this black has dried. Otherwise, it will mix
with this black and it will tone the color to green. So it should be dry when you
are creating these lines. So just few lines, I will not cover
each and every part. Just few lines with
my flat brush. I'm just using the
tip of my brush, and my brush is a damp brush. It is not a wet brush, and then I'm just moving the brush into and
fro direction. So this is how we
create the ripples, water ripples and the water
lines and the reflections of the trees of the
animal, anything. The reflection is
done like this. Especially these type
of water effects create a very nice
and realistic look. Move your brush into
and from motion. Your brush should be damp
and just the colors, and you have to just take very little little color
on your brush and try to move the brush in to
and fro direction with a very light pressure
on your hand. Don't press the brush. Otherwise, it will create marks, so it should be with
very light pressure, and your brush should
be in vertical angle, not like 45 degree, it should be in a vertical
or 75 degree angle. So we have almost
created the lines. Now we will create the
center circular ripples which are being formed. So you can leave
it like this also. It's looking very beautiful. But yes, you can add some
nice ripples also in between. Just taking the white color
and a little bit yellow. I will add more
white to that area. So this is how we make that area a little bit more glowing. And then we will add
the circular patterns which are there in water
with my round brush. Try to make the colors thin
and then add these circles. These are actually not circles. These are ovals which
are in a round shape. So try not to take very thick
colors, take thin colors. You can use liner brush also while adding these
circular motions. And do it very carefully, very slowly when you
are drawing such lines. So more lighter lines
across this area. So you can see how beautiful and it is looking when we are adding those
small ripples around. Little bit more brightness I'm adding just by
overdoing on top of it. Because this should look
more clear and neat. So this is it with the painting, and do try it out and share it. Share your project work.
I will love to see them. You can also tag me on Instagram that does
Mohini Art Gallery. I will love to re share
them in my stories. And if you will follow
this step by step, I'm sure you will be able to do this painting. So try to do it. And if you have any questions, any queries, you
can always DM me. So just some thin lines, and then we are done
with this painting. A few more lines to the sides. I'm adding. Just wait and check if you have
not left anything, and then you are finally
done with your painting. And thank you so
much for watching. We'll meet in our next class.
 Mohini Sinha, Acrylic and Gouache Artist- Nature Lover