Transcripts
1. Welcome to Gohighlevel Masterclass: Welcome to the ha
level Master Class. I'm Heather Softer,
and I have been working on Koha levels in 2020. In this class, we will
learn how we can utilize the ha level for your business and for your client business. I will teach you how
to create a funnel and how to create automation
for that specific funnel. Go haevel is all in
one marketing tool, so we will learn all the
cool things ha level do. It's like having
magic powers for your business and making
things faster and better.
2. Getting Started: Welcome to the basic overview of the platform where I will go a different function
and layout of the menu. So let's start with
the launch pad. When you log into the system, that's the first screen
that you will see. We have a few options here. The first option is
about download our app. If you click on Send link, it will allow you
to send a link on your phone so you can download the app and also use a
platform on your phone. Then we have generate Mate
from Google Mybusiness. If you have Google
MBusiness account, you can just connect your
Google Mbusiness account here. Same for the Facebook,
if you are running your Facebook business account and you have a Facebook page, let's connect your
Facebook account here. And if you already
have any website, and if you want to put our
webchat git on your website, you can just click and connect, and it will give you a brief overview of
how you can do that. Then we have stripe. If
you have stripe count, you can also connect
your stripe account and use the payment things in the
platform. Then we have X. If you want to list
your business on 95 plus 95 plus porters to boost your business visibility
on different platform, you can also try X and do
listing for your business. Then if you already have
a WordPress website, and if you want to keep
everything in one place, you can move your press
hosting into the platform. Then the last one is about quickly add one
or more team members. If you want to add
any team members, you can click on Add button
and add the team members. Then we have dashboard. So your dashboard is basically a overview of your business,
where you will see, how many opportunity you got, how many the
opportunity value is, and then the conversion rate. You will be able to see the final and
stages distribution. For now, that's
the demo account, so we have nothing in there. You will be once you connect to your Google
My Business account, you will be able to see your
Google Analytics reports here, your business profile. You will be also able to see your Facebook
ads report here. In the conversation, you
will be able to see all of your conversation here in one place. Then
we have Clenders. You will be able to manage
your appointments here, and if you want to
set any lenders, you will be able to set
your clenders also. Then we have context area. Here, you will be able to see all of your
contact phone number, e mail, and all of
your context data. So, in opportunities, you will be able to see your
pipelines and things. And then we have
payments in payments, you will be able to send
invoices, create contracts. You will be able to send
payment links, transactions, products, you will be able
to do all of the stuff. You have to integrate
your repayment getway. Then we have marketing. So in marketing, you will be
able to use social planner. You can connect all of these
platform and scratch post and post that on like in one in
hre in our platform, and it will be posted on
all of these six platform. Then we have emails, template, trick ns, we have
affiliate manager. Then if we go in automations, we have workflow where you
can do a booking thing. You can do like you can create any automation
related to your business. And then we have sites.
Insights, you will be able to see create new funnels,
new websites, blogs. You will be able to manage
your purse hosting here. You can create a client
portal, form survey, chat get, we have media, we have R retracts. Then we have
membership. If you have any course or if you want to create any community like school or if you want
to sell your courses, you will be able to create
and manage your courses here. We have reputation management. In a petition, you
can connect to your Facebook and Google, my business account, and you can send reviews
to your clients, and you will be able to
manage that reviews here. Then we have reporting
in reporting, you will be able to see
your Google as reporting, Facebook as reporting,
your attribution report, your call reporting,
Asia reporting, appointment reporting, like all of the reportings
will be in this area. Then we have App marketplace. We will discuss that letter, but for now, let's
go into settings. You can see we have
business profile. In business profile,
you can update your business business
name and everything here. Then if you have any
business physical address, you can update that here. And let's dive into profile. So this is like your profile. You can update your name, first, last name, email, and if you want to
change password, you can also change
your password here. You can update your
user availability here for your slender. And you can also connect your out loud like
everything here. And then we have
company billing. For that, you have to
add a payment method. Let's dive into my staff. So if you also want to
add a employee in detail, you can just click or add
employee, and you can add that. And next option is
about pipeline. If you want to
create a pipeline, we will see that
in detail letter, but you can create a pipeline
by clicking on this option. We have clener you will be able to manage and
create your cliners here, and conversation AI If you want to create
a board that do conversations in the chat, you'll be able to create
a conversation AI here. But for now it's deactivated, if you want to activate it,
you have to let us now. And then we have
e mail services, and then we have phone numbers. If you want to create
by a phone number, you can buy a phone number, and you can also apply for your A two PnLCre in Dal Center. We have what's abita reputation
management is ready. Discuss that, but then
we have custom fields. If you want to create
a form and if you want to add any additional
optional custom fields, you will be able
to add them here. Then if you want to
manage your custom use, you will be able to create
your custom will use here. Okay. If you want to do
scoring on some actions, you'll be able to
manage your scoring here for specific contexts. Then you'll be able
to add domains here. Then we have media, all of your pictures and
videos f po here. We have URL rex as if you want to re specific URL to
a specific domain, you will be able
to do that here. Then we have integrations. In integration,
basically, you have to connect all of
these platforms. If you have them, we have conversation provided,
then we have tax, if you want to create a tag, and you can create and manage
tags here. We have labs. When we launch a new feature, you will be able to
enable that feature here. Then we have audit logs. Then we have companies. If you have any clients companies, you will be able to
manage them here. I hope this all makes sense. Let me know further questions. Thank you. See you
in next video.
3. Dashboard Overview: In this video, I'm
going to give you the overview of dashboard menu. So when you click the
dashboard menu here, you will be able to
see these rows here. So the first row from
the left hand side, first column is about
opportunity status. So it's mean like how
many opportunities you got into your pipeline. So we got ten, and we
have six open and 41. It means six lead are still
in nurturing process, and for 44 is one we already
make sales with them. Then we have opportunity value. So in opportunity value, you can see the total value
of the opportunity is one k, but $600 leads are opened
and $400 leads are closed. So within these ten leases, we can see the
conversion rate is 400. Then the next row
is about funnel. So funnel is basically, we can see all of the
stitches of the leads. So the first stage was new lead, and we had opportunity
to close one k. And then we had then nine of
them will go in hot lead. And then from salmon from Son
of the son of these leads, we'll go in appointment book, and we closed service
completed with 400. So $400 like four leads one. We 14 leads. So if we have multiple pipeline, we can also toggle that here, but for now, we
have one pipeline. So we have stages distribution. So it's basically
a live overview, like how many leads we
have. In which stage. Let's say we have one lead we have total one lead
in new lead stage. We have total two leads in
appointment book stage, we have total one
lead in no show. So we are able to see the life status of the
leads in stages distribution. Then we have task If we want to assign a task to
a specific lead, that will show up here. So let me show you if we
go back here in contacts, and let's say I'm going to add
our task to Medicine here. And here you can see from
the right hand side, we can add a task
here. Call this lead. We have to call this
lead within two days. So I can also sign
this to myself, and I can define the
date and I can hit save. So once I did that, We can see we have a
pending task here, and if we go back in four again, we are able to see that
pending task here. We can see pending
tasks completed or all. This is how these
task thing work. Then we have minimal actions. Let's say to this specific lead, If I want to assign a manual task to this lead
manual action, basically. So for a manual action, we have to basically
create a workflow. Let's create a flow for that. So in this way, you will be able to understand how everything working
in our dashboard. So I can create a new
workflow, continue. I can define the
trigger for now, I'm going to skip
that and we can say, manual SMS. Hi. We can select Custom value
and define custom name. And whatever we want to say, we can define the content here. Well, I'm going to publish this. So SMS Manual action. Okay. So let's go to
the flow contacts. And I'm going to add medicine So let's add Dolly. I guess the medicine. Okay, so the medicine don't
have the phone number, so that's why I
can't assign him. So let's use TC. Okay, so that was the issue. So let's use Tc
and we can just We also a new thing that if someone don't have
any phone number, so we can't add them
in manual sections, call actions because they
don't have phone number. So let's add here. So once we have added Tucker, so now we can go back
and dashboard and we can see I should have
one SMS in pending. Okay? So now this
thing makes sense. Then we have lead source
report because I have added all of these ten leads by a CSP file with no source. So that's why it's
saying no source. But if we getting leads
from Instagram, Facebook, or something else, we will be able to see
the sources here. Uh, then we can connect
our Google account, we will be able to see
Google and Eric report. And we can also connect our
Google My Business here. We can also connect
our Facebook account, and we will be able to see Facebook put here
and Google Apt here. I hope this all makes sense, and it will give you answer
for you dashboard thing. And the last thing
is we can also filter out the date
for a specific. Let's see if I only want to
see the leach data that I got how many leaves I got
in March in this month, and how many leaves
We got in Feb. So we can differentiate them. We can also differentiate the crossing rate
and everything. So this is the best
thing to track like, how much business we got in
specific month in this month. So yeah, I hope this
all makes sense. And yeah, see you in next video. Thank you.
4. Conversations Overview: In this video, we
are going to take a look at the conversation
area of the platform. We can navigate between
100 recent stored and all. Hundred messages
are the messages that have not been seen yet recent messages are the messages that have been received
in last few days. The stored vigil will
allow you to bookmark specific messages so you can refer them back
if you need them. And of course, all will be all. You will be able to see
all of the messages here. And then we have a
search field here. We can search any messages here. We can filter them on the
based on assigned to inbound, outbound manual automated
and lost message channel. We can also create
a new messages and we can select a new contact
here and send them. We can type name, or let's say, We can add contact or maybe we can search
our existing contact, and we can message
them from here. And then here, in the center, you can see the history of the messages with
that specific lead. Then in the right hand side, you can see we have information about that specific contact. You can see their email phone
number nor are assigned to. We can see if they
have any tags. We can see any active
automations here. We can also see if any D&D
active for them or not or we can also see their source and the date when we had
created that specific lead. We also have two icons here. So here, one is
about a point pin. If we want to book a Pointpin
with that specific lead, we can just click on book a point pin, and
we can book that. And if we want to see the history of that
specific lead opportunity, we can click on that
opportunity icon, and we can see that or we have to update that to
another pipeline, and if we want to move them to our specific stage of
a specific pipeline, we can also do that from here. Okay. This was the
quick overview of the conversation area. See you in next veto. Thank you.
5. Opportunities Overview: This video is an overview
of opportunities tab and we can see we have
pipeline named sales pipeline. And if we have
multiple pipeline, we can tugle between here and we can see we have
multiple stages here. And on and we also have opportunities or
we can call them lead, whatever you'd
like to call them. We can trigger automation whenever we move Ali to
some specific stages, or we can also trigger
some automations whenever if we got a
lead in Net stage, and if they replied, we can make automation. This lead automatically
will be moved here. And we can also like
full up to close. If we move trigger
to full up close, we have our pecend automation,
which will be triggered. So like on based
on these stages, we can trigger some
automations or we can move some automation
when something done. Like, if someone
pots appointment, like if they are
in new let stage, we can move them like we
can set up automations, so they will be automatically
moved in appointment pot. And we have such field here. We can search any
opportunity here. We have a salt like we can sort the opportunities on the base of deal
value or date added. We can also select
ascending and descending. We can also filter the
legs on the base of status or like
honor the follower, like to who is following
up with the le, it can be assigned user. We have status campaign type, we have all of these filter. So we can do a filter, and we can also see the legs. Then we have menu. If we want to see the
additional details of the lead. We can also see that. So we can call this lead. So Medicine have assigned a task here. So we can see that. And if we click on opportunity, we are able to create
new opportunity here. We have to put we can
select opportunity and we can just add them directly
to a specific stage. So this is the quick
overview of the mary tab, and if we want to
create a pipeline, I will make a different
video for that. Thank you.
6. Contacts Overview: Video will walk you through the contact section
of the platform. When you are in contact tab, you are able to see
the basic information, the basic information of the contact like
their name, phone, e mail, the date when they have created and
lost activity and tags. And also, we have a
column option here, like if you click on column, and if we want to see any additional information
about this lead, we can just click
that and we are able to see the additional
information about them. So let's start from these icons. We have top icons here. If if you want to
add a new contact, you can just click Add contact, and you can put that information and you can hit
save at the bottom, and you can create
a new contact here. If you want to add
if you want to select some specific contexts and want to add them into
a specific pipeline. You can also add them by hair. You can select some contacts. You can select the
pipeline stage, and you can define the action, and you can add
update opportunity. When you click on this button, the specific selected
lead will be added to that specific
pipeline on this stage. Then same like we have when we select some
specific contact, we can also add them to a
specific campaign or workflow. So here, we are able to select any specific workflow here,
and we can add them there. And the next option is
about send SMS and Sandm. We can select all
of the contexts, and we can just
send them byte SMS. I just selected all of them, and we can just type message. We can define action, and we
can send them in schedule. We can send them
at a schedule time or we can send them
in a trip mode. So same for the email, we have selected all of
the emails or we can also select any
specific contexts, and we can send them we can
select an email template. If we have or we can just
define from name from email and we can send a
bulk SMS to all of them. And the next about adding tag, if we want to add some specific
tag to a specific lead, we can select
specific lead and add a tag by clicking on add tag. And same for the remove tag, we can also do that
by selecting a lead, and we can click on this icon, and we can remove a tag
from a specific lead. If we want to delete
a specific contact, we can also select our contact
and click on delete icon, and we can delete that
specific contact. And also, we have a
review request icon here. If we want to send SMS review request or
email review request, we can select that
specific contact. We can select the SMS review
request or review request. We need to set up these into
the reputation management. I will show that in A VTO. For now, and we need to define the action and
send review request. And then if we want to export this specific contact,
we can export that. If we want to import
any other contexts. I already showed that in another context how to
import the context video. You can wipe that and learn
how to import the context. If we want to assign a company to this specific
contact, we can also do that. For assigning company, we
have to back in company. I'm just going to G
Timo company name. We can add all the
details for now, I'm just going to add the name, and let's go back
to the contacts, and let's add medicine to
that specific Tamil company. So we can just define and add. Okay, now medicine is added to that specific
company also. Okay. Also, if we have similar
details of any of the contacts, we can also merch them here or if we have any other detail. I will create a
specific another video for merging contacts. We can have quick
search field here. We can search the
contacts by contact name, email, business name or tag. We can also search
them by phone number. Also. If we want to filter the contacts on the base of
business name, company name, email tags, and any of the business of the
context information, we can also do that. So this was all about
the context tab. I'll see you in next
video. Thank you. Okay.
7. How to import contacts: In this video, I'm going
to show you how we can import a contact list
into the platform. The first thing you have to
do from the left hand menu, you can click on contexts, and then you will be able
to see the top icons here. You can just click
on Import contexts, and you can click
on Upload a file, and you can select
this mock Data here. And then you can hit on next. So now we have to map all
of the contact field. So you can see first
name, last name, email and phone or map, but domain name domain name and job title did
not matched here. So what we have to do,
let's track here and see. Yeah, we can use website
instead of domain name, so we can keep the
domain name data into the website, contact field. And for job title, I don't think we
have something for now for this job title thing. We have to create
a custom field. So let's create that. Cancel this for now, and we have to go into settings. And in settings, we have
to click on custom fields. And we have to click Add field. And I'm going to use
single line for now, we can also use radio select. If it's specific option if we have specific option
in that field. We can also use checkbox, drop down single or multiple. For now, I'm going
to use single line. Click Okay. So here, I'm going
to type title, and the group is
contact, and I hits. So once that field
added successfully, we have to go back
into the contacts. We have to go back
into the contact tab, and now we have to
click on Import icon again and import that file next. Okay. So now you can see job title is automatically
mapped because we have created a custom
field for that. So for domain name, we can map the domain
name on website here. So all of the fields
are mapped now. So now I can click on next. And here we have some
option in advance. We can add them specific
tags like if we want to tag them like FB leads
or something like that. And we can also add them
into a specific campaign. Like, if we have campaigns, we can tritly add
them in natural campaigns or something else. For now, I'm just
going to go off that and let's use the
FBL tag and submit. So once we submit that, we can see the progress here. So you can see, all of the leads are correctly
uploaded into the contact tab. So we can go back
and contact tab and we can see all
of the fields. And in column, we can
click on column and we can select our job title. And, created. We don't need that name, job title phone, tags, and we had website. Okay. So we are able to see
all of the fields here. So this is how contact imputing work within
the system. Okay.
8. How to add new employee/user: In this video, I will
show you how to add a new employee or user
into your account. The first and esist way
is click on launch pad, and you can see that
loss option here. Quickly add one or
more team member. You can click on
ad. You can type your e mail address
and send invite. The new user will
have same permission like s except the
ability to add new user. The second way is come
down to settings, and now if we go in my staff, you can see we have our add employee purton on
the right hand side. We can click on add employee. We can type their first
name, last name phone. And if you click on add setting, we can also add a specific
passport for them. And then we can
define their access. So we can give them some
specific permissions. Like if we don't want to
show them conversations or if we don't want
to show them like social planner invoicing
payments, a freight manager, like all of workflows, lending page or settings or
any specific if we want to restrict that user from
that specific features, we can just toggle them off. And then we can also define
the role of that user, like user or admin. And then if we have any if we want to assign them a
specific phone number. Let's say if they are
our sales guy and the only role is to
call to call the leads. So we can assign them a specific to number here by selecting
that phone number. And also, if we can
forward that calls, if someone calls on
this phone number, we can forward call to
web app or mobile app or any forwarding phone number that will be set up in
phone number settings. We can also set up a voicemail
for that specific contact. In user availability, we can define the user
availability here, and then in user
Clender configuration, we can connect their
Google account, and we can synchronize specific calender to
that specific user here. So this is how we can add our team member
into our account.
9. How to send broadcasts and newsletters: Hi, everyone in this video, I'm going to show
you how we can send out the SMS and email broadcast, such as monthly newsletter. So there is two ways. The first thing is we can
go into context and we can select all contacts or we can just select a
specific smart list. If you want to learn how to
create a specific smart list, you can watch my contact
smart list video. So let's see how we can
send the monthly or weekly or whenever you want
to send broadcast SMS, e mails, you can
select those contacts or specific smart list, and you can just
hit and send SMS. And you can type that SMS and you can
just define the action, and that SMS will send to
all of these contacts. Let's say you can just type hay, and we need to select the
custom value like first name. So one thing that you have
to make sure like user is you and contact is the
contact name and content, whatever content it will be, and then Tanks or maybe
we can say pest records, best records, and it
will be used full name. So this is how basically
and we can use the dynamic custom we use here for for all
of these contexts. So it will say
each contact name. And then we can define the
action name like SMS or leads, and we can sell SMS. So whenever we do that, we can also send all at once. We can send all
at schedule time. We can send in dripping
mode depend on us. Or we can also create some specific templates
that we can use a time. We want to broadcast something. And so this is the same
thing for the email. So this is how we can do like
we can select an template, and we can define from name
from email main subject. And define the
content here by using custom values and define
action and send e mail. So this is how we basically send out the broadcast SMS and email. And the other way is, if we have marketing, if we go in marketing tabs, let's say if we want to send them like monthly newsletter, we can go in templates. And we can design our templates. Let's say it's about
health and wellness. I'm going to select this one, and I can just continue. So it's adding the template
into our sub account. So once the template is loaded, we can customize this template. And we can update our logo. If we want to update the image,
we can update the image. We can update the content, and we can update
the CTA button and put some URL here for our
inside c or something. And then we can just click on safe template, like,
safe template. And once our template is saved, we can create our
different templates weekly or monthly
newsletter templates. And whenever we
want to use them, we need to go back and campaign. We can create a
campaign new campaign. And we can select blank or
if we have an template, we have just loaded
this template. We can just chose
that template here. And then We can just click
on send or schedule. And now we can send all at
once. We can schedule it. We can use the trip mode, which is bad schedule. Let's say if we want
to send e mails, like ten emails, after 12 hours. So after maybe 10 hours or we can update minutes
second stay anything. So let's select
send now for now. We can define from e mail. We can define the centered name, and we can type the
subject of the made here, we can define the preview text, and then we can send
it to all contexts, we can create it a smart list. So we can send it to a
specific smart list. So we can just select here, we have a one smart list here, F we lead smart list. We can send only
to the smart list, or we have any other smart list, we can send it to them, or let's say if we
want to send it to some specific context, let's say we have
voicemails DAG, I want to send broadcast
e mail or we can say a newsletter e mail
to the specific or the person who have a
monthly newsletter tag. I want to send them
there. So just select tag define all of these. And we will be able to send it. Okay, zero contacts. Let's select APD. And we can define name, email Let's say account
account e mail, and I'm going to use
here a cove name. And now we are able to send it. So this is how basically
we can do this. We can do monthly or weekly
broadcast for something. If I'm going to do a live
session, what I will do, I will send out a
proacast e mail to everyone who are in in
that specific list. So this is the process,
like how we can do that. I hope that will make sense, see you in next
video. Thank you.
10. How to create Smart list: In this video, I
will show you how to create contact smart list
and how to manage them. So let's say if I have
total 20 contacts, but I want to
differentiate artists. I want to create a
separate smart list for those who have FBL tags. So what I will do, I
will go in more filters, I will fill contact and tag is, I will select like *** here,
and I will apply that. So when I will apply that, we have an option here,
like S as smart list. I will fill that
option, and I will named that Smart list
as F smart list. So now we can differentiate the contacts between all and between the
contacts who have FP. So like these, we can create different smart list on the based on different
filters that we apply, so we can create like so many smart list based
on our requirements. The second thing
is, if we want to share this smart list
with other users, we can also we have to
go into Man Smart list. And here, you can see add Smart list name or copy
Smart list share Smart list. If I click on share Smart list, I don't have any user for now, but if other member of
the agent of the account, if not able to see
your Smart list. So that's the way like you
have to click on this icon. You have to select that user, and you have to share that. And So that's the all you need now about how to create SMAT list and how to
manage them or share them, or maybe you can also change their name if
you want to. Okay.
11. Email Signatures: Everyone in this video, I'm
going to show you how we can set our email signature
within the platform. We need to go into settings, and here we have my profiled
menu, click on this. And then you can see here, we have signature section here within the profile
in personal data. Here you can type your name. Your role, your company name or whatever you want
to basically put into your email signature,
you can just type here. Or so that's the first thing. And the second thing
is you can do, you can upload and
add any image, like you can paste image R here, or maybe you can just
upload it Again, okay, I have a Damo e mail here. So we can use a Damo
email signature. So I have a Damo
email signature, which I downloaded
roughly from Google. We can set the size. We can adjust the size here, and we can update the profile. So once we have
updated the profile, enable signature or
all outgoing messages. Like, if we want to do that, we can just update profile
and enable this option. And now, if you go
in conversations, and here you can see, so you can see whenever we
are going to type anything, our e mi signature
is already there. So the second thing that we can do here in my profile
for email signature, we can We can remove this image, and we can use some
source code here, and we can use this type of we can design anything with
steel and CSS or we can use any email generator that will give you source code, something like
this, and which you can just use in your email. Email signature. So now go back and now you can see our email signature
will be like this. So it's up to you if
you want to use, like, normal name and email thing, if you want to use
that image thing or if you want to use
some source code. So, this was a quick video about email signature thing
and how to utilize that.
12. How to make Phone Calls Dialling Out: In this video, I'm
going to show you how we can make phone calls
within the platform. The first thing is you can
click on this icon on the top, and it's showing up dial pad. Like we can type
any number here, and we can select our call from number if we
have multiple number, these all number will
be come up here. But if we have one number, we can just select
that number and we can tie the number and just
click on this tile icon. It will dial phone call to that specific contact
or specific number. Then we have contacts. If we want to search anything
like any contact name, we can just select that contact, and we can just click on
this call icon to call them. And then the Next thing is, I'm in opportunity tab, and here you can
see the opportunity with whom we have
the phone number, we have a call icon here. If we click on this call icon, it will also call them. So that's everything
you need to know about how to make calls within
the platform. Thank you.
13. Ringless Voicemail: Hi, everyone in this video, I'm going to show you
how we can create a workflow to send
out drin email. So let's create that workflow. So I'm going to create that
workflow from scratch. So here is two things. We have to define a trigger. So let's say I want
whenever I add a tag like Vemil send. Whenever I add that tag, someone in the contacts, I want to send them email. So email. I have selected the
VS Mail action, and now I have to upload a
file. Let's say this file. And we can just save
action for now, and I can name that like
Ringle email campaign. Whenever I tag someone send, this voicemail will
be sent to them. And I can also add a trigger whenever someone submit
the Facebook lead form. So this Voicemail
will be sent to them. This is how we can create a voice mail campaign
and utilize that.
14. Out of Office Emails and SMS Messages: In this video, I will show
you how we can create out of office SMS and
email campaign. First, we have to click concrete workflow
button on the top. And now we have to hit
continue start from scratch. And here I want to define a
trigger whenever customers applied and apply
channel is like SMS. Okay. And so I can just define here SMS.
Customer replied. And what I want to do here, I want to reply them back. And we can message them like we are out of office.
Thanks for reaching out. Save action. And I can define
the name of the workflow. Out of Out of office. And I'm going to set in
this like specific time. So whenever someone replied me, eight, or maybe I can just
define this to nine A. Whenever someone
message me between 5:00 P.M. To 9:00
A.M. What it will do, we can include Sunday and Saturday or which day we
can, which day we want. We can include We can include Sunday and Saturday or we
can skip any day if we want. So basically, so now we
have specify the time. So whenever someone reply
in that specific time, so they will receive
this message. Or what we can do if we also want to do the
same thing for e mails. I can just define
customer replied. Channel and mL mal
customer replied. Let me save this and let me
just refresh this workflow. So once we save the triggers, and if we want to use
them in condition, we have to refresh
our workflow ones. So now condition if else. And here I want to do whenever someone
someone send me SMS, I want to send them this. And if there is any
other condition, I want to send them e mail. So we can define
from name and email, and we can define subject, and we can paste that message. Like, we are out of office. Whenever someone SMS or emails, they will receive the SMS or email depend on
what they send. So they will receive that we are out of office
at that time.
15. Custom Values vs custom Fields: In this video, we are going to compare custom value
and custom field. We will understand what is custom value and
how we can use this, and we will also
understand what is custom field and how
we can use that. So let's start with
the custom value. So custom value is something
that account admin or use it defined and which can be used like anywhere
in recurring process. So we can say like this is a custom data that
we already defined, and we can use that somewhere. So you can see we have a
custom value here and his name company name and the
key, and then the value. So I can create a
new custom value, and I can just type in from
email, and I can define, like, heather at atoms.com, and I can just create this. So now what I did, I just created custom value, which is already defined,
and the value is this. And we can if we want to
delete this or add it ladder, we can just add it
and update that. And so now let's see how we
can use this custom values. So we can use the custom
values in our SMS on our landing page or any some where like in SMS campaigns
or email campaigns anywhere. So let's see how we can use this custom value in
our conversations. So you can see we
have more C here. Click on More and you can
see we have custom value. So I can basically define
in my company name here. So if I send this message,
so what it will do, it will use the data
that we have chose, and it will try to send them. So you can see, so it's
automatically pick up that value. So the now second use cases, if we have any automations, we can just go into any
of these automations and add a new e mail event, and we can just use
that custom value here. So we can just select
custom value and for email. So basic we can also use another custom
value, the company name here. So basically, that's
the second use case that how we can utilize
our custom value. So now let's discuss what is custom value and
how we can use this. So custom value basically
in custom values, we have if we go into forms, And if we create a form here, So we already have
some built in fields. But what if I want to use something that is
not in our fields. So what I will do, I
will add a custom field. We have to select the type. We can select a single line, multiple line and drop down. We can also see the preview, like how this will be. We can also preview that. And let's say I can
select upload file. So we can also use file
upload and I can hit next and upload CSV file here. So we can just select that
and we can select all. Once we have created that field, it will take some time
and show up here, so we can track it here. So this is how we can
create a custom field. Once a custom field is created, and it will also show automatically in contact
tt Let me show you. So we just have added
a new custom field, which is plosureFile,
and you will be able to see that
custom field here. So now we can see that
custom field here. So that was all about
you need to know about custom values
and custom fields. I'll see you next
video. Thank you. Okay.
16. Workflows Overview: In this video, I will give our brief view
about automation, like workflows, like
how you can create and manage workflows to
automate business process. You can see we have
workflow folder here and we have
different workflows here. So what you can do, you can just create a folder and put all of your
workflows in there, or you can just
keep them separate, like we have like
this right now. So let's create a workflow. Okay. So we have
to click on that. So there are some option. Let's review all
of these options. So the first option is
start from scratch. Like we can start work flow from scratch or we can
import from a campaign. So campaign was the
previous option previous feature
of the platform, but we are not choosing
that right now. It's only for the old choosers. So you can just skip the
campaign part for now. And here you can see, so these all are recipe, like these all templates
that you can import. Like, if you want
to do anything, you can just click
and import them. So you can see we have
appointment booking. Template. So when someone
when we got a lead, we can send them booking link. So there's a nurturing campaign nurturing template for
appointment booking, so we can send them
to the client. Then we have appointment
confirmation and reminder. So if someone books the call, we can send a follow
reminder for our call. Then we have appointment
confirmation reminder plus survey press
review request. So we can send a survey, Like, the first thing
is confirmation, then we will send
them reminders. Then we will survey the result. So how our coal goes. So if the result was sale, we can also send them
a review request. So there will be a template
for whole automation for that specific things like these action happening
within that. So there's a specific
template for those business processes that are happening
within that domain. Then we have to miss
call text back. If if someone call on
our platform for number, so what did we do, we'll send them a notification, and also it will
pin the chooser, like admin or user
of the account, so they can get back
to them as App. Okay. Then we have
birthday template. If we want to create a
birthday template for all of our clients, we
can also create that. Then we have e mail
trip sequence. Then we have fat auto reply. If someone ask any questions
with relative any keyword, we can just reply them
back on Instagram, Google Chat, SMS or Facebook. Then we have Facebook messenger, we have Fast five light. Fast five light is also
a nurturing sequence. So if we want to nudge lead to do something
that's for that, then we have first five Then we have GMB business message. We have list reactivation if we want to run a
reactivation campaign. So there's a template for that. Then we have long term
reactivation email thing. Then we have sent
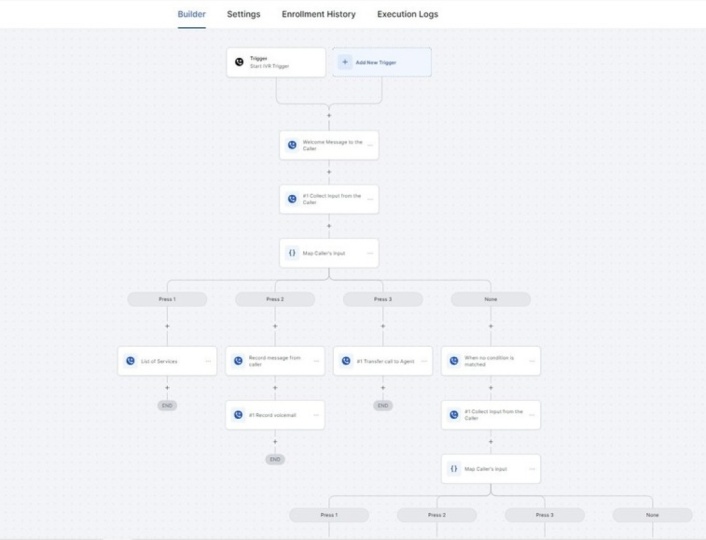
review request. Then we have webinR recitation and information and binders. Then we have IVR, and then we have no shows. So that's the template we have for all of
these workflows. So let's start from
scratch for now. So the first thing
here, you can see, we need to give
this workflow name. So you can just say
like Damo workflow. And now you can see
add a new trigger. So basically, our
automation consists on basically two things our
trigger and our action. Like when something
happened, let's say, I can say when someone submit
the Facebook lead form. Okay? When someone submits
the Facebook lead form, I want to send them SMS. So this is how we basically do when someone when someone
submits the form, so we are able to send
them a quick passage. Um, So we can get back to them and we can write this message
according to our business. So we can save action. So now you can see when
someone submit Facebook form, we will ping them this message, so we can customize this
message according to needs. And we can also
add more actions, I can say wait for 5 minutes. And then I can send
another SMS or e mail, or maybe we can also
send them a voicemail. So we can upload a file here, we can save action, and we can also send
them a voicemail. So that's the builder review
that we have settings. So that's the next step
we have in workflows. So in settings, if we are
sending same automation, if that's appointment
conformation workflow, and we want leads to re enter again and again when they books
appointment, you know, if that's not the
Facebook lead form, if if the action is basically, appointment when someone
books the appointment, okay? So when someone books
the appointment, I want to I I want to
turn on allow re entry. So they can re enter in the same campaign
whenever they book the inside code or if
it's a 30 minute session. So whenever they
book the session, I want them to re
enter that workflow. So I want them to receive
these actions again and again, whenever they do that trigger. So we can allow that trigger
it should trigger one time. Like this whole workflow
trigger one time for a specific contact or we
can allow multiple time. So that's the first thing
we have in setting stare. Then we have stop on response. So whenever someone replies, I want to stop the campaign. So then we have time zone. We can select our time zone like we can select
account time zone. That's our company time zone or we can select
contact time zone. Then we have specific time. We can also define when
this SMS will send to them, or when this word flow
basically start and ends. So we can define the time
like 9:00 P.M. To 5:00 P.M. And then we include days. We can also include the
days and we can define the sender name and send e mail, if our action is email,
we can also define that. So we can type
email, send email. And you can see if we have
name and from email here. Like, if we don't want to type this firm name and from
e mail every time, we can just write it once
here in sender details. It will so for each action
that we put in this workflow. So it will be
automatically populate when we're sending
the images to leads. A loss open is conversation. Let's see if it's a reminder campaign or maybe
something else. Whenever someone receives this
message and if they reply, the google will be
like marked as red. So we don't need to so we don't need to
manually mark as red. If everyone are going to
say a specific response. So in conversation tab, we can just mark as red, so we don't need
to do it manually. Then we have enrollment
history in next menu. So whenever a added
in this workflow, we can see their contact name, date enrolled, current action, current status, or
next execution. So we will be able to see enrollment history
of a specific lead here when they are
in the workflow. Then we have execution logs. So in the execution logs, it will be the detail about the action that happening
for a specific contact. So whenever our action trigger, we will be able to see all
the execution logs here. So this was a quick overview
about the workflows. What's the workflow and what's the menu thing and how you
can once the last thing, once you have corrected
your workflow, you have to publish that
here and just click on s. See you next
video. Thank you.
17. Appointments in Workflows: In this video, we
will learn how we can create automation for
our appointments. So let's create a workflow
for our appointments. Let's click on great
workflow Buturton. And here, we can also use this template here that we have in recipe and appointment
information reminder, or we can create
it from scratch. So for better understanding, I'm going to create
it from scratch, so you can understand that. Now, we can name the first
thing that we can do, we can name that workflow. So now, we can add a trigger. So whenever someone
books an appointment, I'm assuming you have
already created a calendar. So if you do not create tach it, you can watch that video and
create a calendar first. So you can see
appointment status. And here, we can just add
appointment what we can do, basically, we can
select that calender. So let's say I want
whenever someone books a call Whenever someone books a call on 30 minute
orientation calendar, we can also select
cancellation, shod, and no show and create
the automation for that. For now, we are going
to create automation, whenever someone books
the appointment, like confirm appointment,
what it will do. We can add opportunity
to the pipeline. So whenever someone books, so we can just add a new opportunity like
appointment book, and we can name that opportunity
as contact full name. We can define the source, we can select the status, like open or one. It's up to us, like
whatever we want to do. And now we also have
two option here, allow opportunity to move
to any previous stage in pipeline or duplicate
opportunities. So for now, I don't think
we need to togal them on, let's togal them off
and save action. So now, whenever someone books appointment,
what happened, it will create an opportunity to that sales pipeline
that appointment booked. And then I want a
confirmation SMS. So we can just define
here confirmation SMS. Like thanks. Thanks contact first
name for booking call. So I'm going to put the specific information here just to show you how
everything works. You can customize this as per your recommendation or
you can use the template. Okay, save action. And now we can add
wait wait two minute. And after 2 minutes, I want to send another
SMS SMS one reminder. And we can mention
here. Contact name. We have an appointment. We can use a custom value
appointment, start at time. We can select the
time zone here. Okay. We can also define meeting link. It can be a Zoom link or
it can be a phone call, so we can just define
meeting location. We have an appointment at this. Okay. So we just send them first total and
now we can also put a weight here and define like
before the before one day. And we can just say
here before one day of the call or appointment
before one day. Okay. Okay. I want to
send a second reminder. We have an Agency
This quick reminder. We have an appointment tomdel. And we can use the custom
value to define the time. And we can also define
the time zone here. Now, we can also use
the email events. This is how automations works within the workflow
for specific calendar. When some one books appointment, we can create actions like this and create the automations, and we can publish them. And there is another way, if I go back here and you can see if I click on
great work flow again. You can see we already have
some built in template. If I click on Slack hare, You can see we just need to add a fielder here and select
that glander t orientation. And now you can see
we have confirmation me everything is there already. And if we want to add
another action here, like opportunity status, if we want to update the
opportunity status, we can just add a action here. And here we can just
select the pipeline, and we can select
the pipeline stage, and we can update the status
and we can save action. And we can also we can
publish this and we can still use this for
our clended automations. We just need to review all
of these template e mails. You can see all of the custom value that should
we need is already here, and we just need to update like meeting location is not right. We just need to update the
meeting location here. We can select meeting location, and now it's good. So we just need to double check all the events and
update this thing. So this is how the
email automation works for specific lender. Thank you. See you next to.
18. How to Integrate Zoom to GHL : In this video, I will
show you how we can integrate Zoom
with the platform. So the first thing we have to do is we have to come
into settings. And from settings, you
can see if we have a tab here from the left menu like
put five, pick on that. And now we can see
integration section here. We have to just
click on Correct. And it bring a pop up like this, and we have to allow this app and we have to click on Ahre. And once it is allowed, it will say our zoom
is connected now here. And once Zoom is connected. The second thing we did to do in user availability section. So we have to update
our meeting location. Whenever I have selected the zoom here and
I'm going to update. So whenever any meeting any of my meeting
booked in my calendar, what it will do it will
automatically pick up my Zoom and use the dynamic link there
for each appointments. And if we have calendars, we can also make sure Let's go back in free
consultation added. And here, let's assign a user to this team clender we can
see Zoom is connected here. So whenever someone
books the appointment, what it will do, it will automatically assign a dynamic
link to each appointment. So this was all about the Zoom integration
with the platform. Okay.
19. How to create affiliate campaign : In this video, I'm
going to show you how go high level affiliate
Manager works. So we will learn
everything that you need to set up your go high
level affiliate manager and setup campaigns. So I have created a mindmap so I can show you
how basically each works, so you can basically
understand the concept of affiliate manager
within go high level. So the first thing
will be campaign. Uh, for campaign, we need a funnel with whom
we have integrated a product for which
product our affiliate will market that product and
like promote that product, so they can get some bonuses, like affiliate
payments, basically. Then we have Portal. So Portal is kind of like
we can say Klein Portal. So client portal to set
up our client portal, we need a custom doing. We need to set up brandings, and there will be like
magic link that we can give our if they are having issues
with logging the system. Then we have media. So media is kind of
like branding kit, if we need if we want to set up any branding
kit for our afflet manager, we can set up that in media. So these were the basic things. So now let's see and go high
level like how this works. So now you can see. The first thing is
we have campaign. So when I click campaign, So when we normally
click campaign, it asks us to integrate stripe and apload
affiliate or skip. So what I did in the
right hand side, there should be a
button which says skip. So we can just click
on Skip and skip that. So the first thing
that if we want to promote one of our
campaign with our affiliate. We have to create that campaign. So I really showed you here that campaign works with
funnel and products. So basically, to
creating a campaign, first we have to do we
have to set up a funnel. So I funnels, I have
a temo funnel here. We can create a product
page product page. And I can just create the step. I already attached that
funnel with a tamo domain. So, you also need to connect
our domain to that funnel. Scrate from blank. So let's use two step order form. Or maybe we can just
chose one step, I guess. Let's hide the shipping
details for now. We don't need Cotinu. Okay. So let's
publish this page. So this is our
Damo product page, you can customize this
page, or it can be. I'm just going to show you
the basic functionality, like how the affiliate
system works. So publish, I, let's go back. So once our product
page is set up, what we have to do we
have to create a product, and we have to add that
product to this lending page. So let's go into payments. Let's Let's create
new product here. I'm going to name it
like demo product. Save we have to define the
payment like 20 bucks. Save. Once it's saved, let's go back to the site again. Landing page product page, and let's add that product. D S. Okay. Okay, so they are asking like, we need to integrate one payment integration
like stripe or whatever. For now, there is I did
not connect stripe yet. But in your case, you can integrate
the stripe here, you can go in payments and
you can click integrations, and you can connect one
of your payment method. Okay. So that's
the important part of setting up campaigns, like if you're going to
run that in real time. Then once our product
page is set up, what I will do, I will
go back in marketing. I will go back in campaign. And I will click Add. So we have to name
that campaign name. I can say affiliate. DHL affiliate Campaign. So we have to select funnel. Then product page, and the product is selected here.
I'm going to grit next. And how what will be
the percentage of the commission that you are
going to pay to your clients. So I'm going to say 50. That's a one time product. We can just say 50 here. And we can also select the tire how many ties they
can add for their aff. Let's skip that and let's
finish this campaign. So I'm going to
publish this now. So our campaign
is published now. So now what I will
do. Let's go back. And now, first thing is
our campaign is created, and I'm not going
to integrate stip, but in your case, you have
to integrate the stip. Then I'm going to
upload the affiliates. There's two ways to
upload the affiliate. First way is We can upload our affiliates were going to import
them from contacts. The second way is we
can upload a CSV file, and other way we can just
manually add them here. I'm going to manually add for now, add the test. And let's assign the campaign. And we can also define
the company name here, and we can just click on next. So what we did that? What it will do? It will
give us the magic link for the client can just click on this magic link and log
into the client porter. For now, I'm going to
just click on D. Okay. So now you can see we
have added affiliate. And when we added affiliate,
they will receive a e mail. So they will receive
a e mail like this. You can begin. So they will they will receive
the welcome campaign, the affiliates to whom we have added in our client portal. You can see to
access the account, they can click on this link. So once they click on this link, it will take them to
the affiliate portal or or we can just strictly
use the magic link for now. So our affiliate
login on that link, they will see this
is their link. So they can just
copy the link and they can paste that
link in the browser. And when they paste that link, what it will do, they will be able to see
that demo product. So let's say if I
had at automation, we can skip this thing. Oh, no payment method available. So if we have any payment method here, so what it will do, it will and basically, I'm using the I'm using
this affiliate link. So when someone submit this
form, what it will do, it will generate a lead here, and it will generate
their amount. Like we paid like if they paid like this
affiliate, if affiliate, like let's say there's
this heather is the basically
affiliate promoter, like, basically a lead that
we get from our affiliate. So what it will do it will add one lead here
for our affiliate, and it will show the amount they paid and how much revenue
they have generated. So in this way, they will be
able to use the campaign. And in this way, they can utilize the campaign, And promote our campaigns
to their leads, and they can generate
that revenue. So that's the whole thing
that how this thing works. And let me explain you
about border and branding. So you can see, we
have five option here. The first one was
for our campaign, and the next is
about affiliating. Here, we can manage
our affiliates, and I showed you how I added the affiliate and how
I assigned the campaign and how they can log in here and how they can share the links
and track everything here. So we can also see the status of these specific affiliates. So here, we can also manage our payout thing here for our affiliates,
then we have media. So in media, what we can do, we can basically create a
folder for branding kit, and we can upload our
logo and things or any documents that
our affiliates needs to market our product, so they can just
download that here. And then we have settings. So if we go here in settings. So I settings, basically, giving us some payout terms, affiliate welcome
email template. If we want to create welcome if we don't want
our email like this, if we want to ask if we want
to customize our email, we can also go in marketing
in e mails and templates, and create our own template
and use that template here. And we can define
the okiife here and also the poums
and customization. If we want to change
any of these menu name. We can just change it here. So these were some basic
things. Then we have portal. This is basically
our client portal. So About client portal, let's discuss that here. So you can find out your
client portal in sites. So you can see we
have client portal, and you also need
to brand set up your white label domain
for your client portal. So you can go in client portal. I have set up like AH, app client click up tot. So you can also type any of your subdomain here and you
can click on custom domain. You can add a same record
and a record and then update in your domain provider and then click Update Domain. So what it will do, when someone
log in to client portal, it will give them this link. For now, It's not showing
up here in email, but I can see that
in my process. That's my client portal domain. And then we can also
set up the brandings, we can set up portal name, portal description, like favicon or anything that we need. We can define the portal, sport, e mail, copyright, and everything and we
can hit settings. And then we have
advance in advance, if we need any custom coding or custom designing for our portal, we can also do that. And then so that was
all about our portal. And this is how our affiliate will be able to see
like this is dashboard. Then they will be able to
see the leads and customers, then commissions, then media. The media was the folder
that I showed you, like, they can go in media and they can download the
document that they need. So this was basically
the whole overview of GHL affiliate manager and how these everythings are links and how these
everythings work. I hope this video is helpful. Let me know if you
have any questions.
20. Recurring Workflows: In this video, we are going to discuss recurring workflow. So what I mean by recurring
workflow, let's say, if you are going to do a
client meeting every week, let's say you have a PAM and
you normally do a tech call. We can say a tech call
every week and you want to send notification every week to your new clients and
your past clients, your recurring
clients, we can say your recurring client
with whom you're working, you want to send
them a notification. How you can do that? What I mean by recurring workflow,
let me show you here. Let's say I have added a
trigger here at the top. You can see here, I have added a trigger contact tag
like weekly tech call. And I want whenever
I add that tag, that contact will be added here where I already
defined the time, like wait for 1 minute, but resume resume on
Friday 1:00 P.M. EST. So ESD is basically my
account time, so 1:00 P.M. And what they will receive they will receive
this text message. Hey contact name, just a
quick reminder to join our weekly tech call
tomorrow, sorry, I should say today
at 1:00 P.M. ST, looking forward to discussing all the things tech with you. Okay? So what it will do what make its recurring vol
flow. It's a go to action. So what go to action do
go to go to save action. You can see we have
a go to action, and we can select here a action
where we send them back. So basically what you do when I add a new
prospect at this tag, they will be added here on this action, and
they will wait. Let's say if I add a test
workflow and if I add heather, no we can add some
Let's say if I add D. Let's add Dolly
here and run test. So what it will do it will add the D in this workflow,
you can see here, D is enrolled in this workflow, and the next execution will
be happened for D on April 5, 2024 at 1:00 P.M. So what I defined
here in this action, this action will trigger. So when the time will be
Friday and 1:00 P.M. EST. So until that contact will be
stay here at 1:00 P.M. EST, they will receive
this text message. And after this text message, they will wait for five
days and they will go back, go back to I can
remove this five days, but this is optional. I just added that five days to make our workflow
more efficient, there will be no ing itches. So, what it will do, go to action, put
them back on this ad. So whenever we add
what happened. So whenever we add contact the
tag like weekly tech call. They will be added here,
and this sequence, this automation, this
text message will be recurring for every week. So it will make it a
recurring workflow. So these automation will be in a loop and it will be
a recurring process. So this is how we can
create a recurring workflow or a workflow with a loop
with a infinity loop, there is no thing
that can stop this. I hope that makes sense, see you in next
video. Thank you.
21. Membership Introduction: In this video, we are going to learn about membership area. We will learn how we
can launch a course, how we can give the
access of that course to our leads and or maybe they can be our
clients and how they will get the certificates and how we can basically
manage the course. So let's start from here. You can see We have dashboard, so we are in dashboard now
where we will be able to see the stars of optan members,
checkouts and sales. Then we have products. So products are
basically your courses. We can create a product or we can import
them from Kajabi. If we already have
a Kajabi account, we can import our Kajabi
course directly here. Let's start from scratch. Okay. So here, we have some template that we
can use for our course. Let's start we can
start from scratch. For now, I'm going to start we can select membership here, and we can name this course like membership test
and great product. Okay. So once the template
is loaded, you can see, that's our course modules
like training module, additional content
and resources. So this is how we can also
create a new category here, and we can name it
like wrap you can see, I just created a new
category and we can add the lessons add lessons one. We can add a subcategory
to these lessons also, this is the main module
category wrap up and we can add sub category to
that wrap up thing. We can also add the assessment. Let's say if we want our
client to get the certificate, we want them to
submit assignment or we want them to do a
quiz, Let's say quiz. So you can see to pass
the course, they have to. They have to answer
the question. I can say single choice. Question one, add choice. Option one, Option
two option three. We can change these options. For now, I can just market correct
option and add question. And now we can add
second question here. But now I'm going to save this Let me just relate
question two and save this. Once it is saved, you can
see we have a quiz now. We can also add assignment here assignment test one, save. You can see, we
can upload a file here or we can just give
the instruction here, our prospect or our clients can submit their
assignment here. This is how we can create modules with lessons and
with quiz and assignment. Once our course is created, we also have some menu here. So options let's discuss
these if we click on detail, You can see we can change
our course name here. We can put our course
description here, and we can put our
course image here. We also have a
customization option. In customization option, we
can define the instructor. We can define the
instructor like their name, title, their image,
and their bio, and we can also put
our company logo here. Favicon, this is our
membership favicon, or it can be our course favicon. We can also use our
company favicon here. In advance, if we want to modify our membership
order with some coding, we can also do that. Then we have customize. In customize, we have
these three themes. We can select any of this
theme to apply to our course. Then if I go back and offers. So once our course is created
and if we want to offer this in free or we don't
have any offer yet, but we will see in this offer menu tab, then
we will discuss that. Then we have comments area. It's up to us if we want
to allow comments to everyone like both or we
don't want the comments. So it's up to us if we want to allow them to do
comments or not. And then we have certificates. Let's say if I go back
here in certificate, we can create a certificate. We can use a template. We can select any
of these template, and we can define the
course name here. Let's say membership course, Certificate acomoation
membership course, connect name, this, this, and we can modify these and we can define
here membership. Certificate. And
we can save this. And then we can just go back. We can go back in our course and we can open our course and we can assign
that certificate to this. So whenever someone
completed our course course, they will be able to
receive that certificate. Now if we go back in products and you can see
if we have offer If we want to manage our course
with the offer So in offers, we can define our title products
and we can select type, and it can be free
or it can be paid. So we have to define our
course offer basically, and then we can
just create this. And once it's created, we can publish this offer. We can also define the
price if we want to have to connect we have to connect
our payment method here. For now, I'm just
going to save this. And we also have analytics, where we will be able
to see the analytics, where our leads are doing, how the course progress
they are doing, what's the assessment report, and what's the member
analytics, revenue analytics? We can see all of these things. Then we also have settings. These settings are
for membership area. We can define a custom
site domain setup. We can define our site details. We can customize
our email setting. Whenever we give
someone course access, what email they will receive. For now, this will be
a default template, but we can we can go back in marketing
and email template. We can create a unique
template for this, and we can also
replace that here. This is how basically
we can create cores, we can create offer and we
can give this to our clients. Let's say if I go back
and contact area, and here you can see, we have some different contacts. Let's say if I want to give this client,
that's me, Heather. If I want myself to give access
for that specific course. So what I will do, basically, I will go in offers
at the bottom, and I will just
select that course. Once I select membership
offer, what it will do, it will send me a
welcome default email. We're glad to have you here. This is your membership logins, user name and password
and login here. So this is how basically
we can launch a code. We can create a offerd and we can give access
to our clients. I hope that makes sense. Thank you for watching
this video. Okay.
22. Funnel Vs Website: H one. So in this video, we are going to discuss
funnels and websites. So what's the main difference between funnel and website and why we will use funnel and at what point we
will use website. So let's discuss that in detail. So the main difference
between a funnel and website is their purpose
and their structure. Okay. Website is a basically
collection of web pages that offer detail about accompany like home page,
page, contact page. But what's the difference
between funnel. So funnel is basically
a online pages that direct users or we can say visitors toward
a certain objective, completing a purchase, subscribing to our newsletter or setting up an appointment. So ad pages and sales pages are the
example of the funnel. Funnels basically
funnels converting visitors into lead Let's
see in this platform, and we also have
some limited ability between funnel and website. Let's say, So this funnel is basically a example of
appointment setting a page. So we go out the
lead detail and lead will go on Clenderpage and
as books the appointment. So this lead so this is
basically a example of funnel, and funnel basically
kind of follow up. Someone fill up the form. They will go on Clenerpage and they will go
on Thank you page. Let me show you here. So funnel
have a specific ability. Let's say if someone
submit the form, funnel will give us option to move them
on next page because funnel is basically
in a chain and funnel are basically
following each of the pages. So someone we got a lead we
got a lead on captured page, and then if they
fill up the form, they will go on
appointment page. So basically forms and
calendars, and these page. This is a chain. But
website is not like that. Website is kind of
for information. Let me show you funnel. Okay, so we have a survey here. So you can see in
redirect action, We have option to
go to next step. So go to next step mean
it will go on next page, which is our appointment page. So we can after someone
fill up the form or Svy, we can send them to a
specific next step page, but we can't do this
thing in website. So let's go back in websites. Okay. So let's go
into website now. So I website, you can see, we have pages like home contact, Link in bio link tree
page and AS page. So these are kind of
collection of information. So this is what we
can do in website. So if I if I added home page, and So let's say we have the two that's a column. If we expand that column and
add a new form element here. You can see now if
someone submit this form, we can't redirect them to
any of other pages like contact page about a
page or any other page. So basically, funnels are
linked with each other. But website are not
structure like that. Website specific we can link the website pages with
menu navigation menu. But website, but we can't use the website for specific
objective to convert our visitor into las
that's the main difference between what's the capability of a funnel and what's the
capability of website. So this is how this works. I hope this makes sense. Thank you. Okay.
23. Funnels: In this video, we are going
to discuss about funnels. So basically, we use funnels to convert our visitor into lads. So funnel will help us to generate leads
through our visitors. So here, in sites menu, you can see, we have
funnels websites. So both the builder view of funnels and website
is basically the same. The only difference
is in structure of how these both works. I have a different
video on this. What's the difference
about funnel and website? Let's start from funnel. In funnel, you can see if
I click on new funnel, we can create a funnel from scratch or we can
select a template. In our case, I'm
going to show you how we can use a template here. Let's continue here. We have different niches here. You can select financial
here or health and wellness, whatever your nis is, select your nice and
just select a type here. So I have selected the holistic wellness
ps template here. We can click on continue
here on the top, and we can add this template
to our platform account. Once that template is added, We can add this template or
we can create a new step. Let's add this template, and I will show you how the funnel builder
basically works. Okay. Let's start from here. You can see from the left top. You can see we have add
element icon, this icon. If I click on add element, we have a lot of these
elements that we can add in our template. Let's say if I want. We also have
different menus here. If I click on section here, I can add a section
here on the top, you can see here,
and then I can click on rows and I can
select a column here. And then I can add an element. And if I go back in elements, and now I can add
a headline here, and then I can drag
that form element here, and we can use a form here. And then You can see
we have Tage slider. We have all of these elements. We can use these to whatever we need and we can
customize our web page. Then you can see we have
second icon here about layers, and we can see we
have two layers here. The main layer is page
and then we have pop up. And you can see we don't
have any pop up here, but in page, we
have the sections. And then we have pages. So for this specific funnel, we have two step pages, so we can see these pages here. And if we go back
to the second page, we can just click on
Thank you con page. It will take us to that page, and it's asking us to leave. I'm going to cancel that out, but we can google between
these pages by clicking here. We have tracking code icon. If we need to put hydra tracking code and
photo tracking code, we can put here. Then we have custom CSS. If we want to customize any
element of any leen row or any column or row of the funnel, we can use the CSS here
and customize them. We have typography. If we want to define the global typography for this specific step,
we can define here. Then we have background. We can define the background
of that specific funnel. Let's say, if I go back and a background color,
I can select yarrow. So that yellow color will be selected for all of
this funnel page. And then we have pop. If you want to add a pop up, we can add a row, we
can rack a column here, We can drag the form, and here we can
select that pop form. So this is how we can
create a pop in a funnel. And then we have Ao matter data. So we can also
update our ACO here, we can update the content, what will be the
title and description for this specific page, what will be the keyword? What will be the author name? What will be the
social image for this specific page when we
share the link with someone. What will the specific
tax and links? What will the language. So we can define all
of these things. So this will help us to
rank our page on Google. And then if we want pre custom
code, we can click here. Then we have cookie consent. We can also enable
or disable this. And this icon is we can preview our funnel is in auto
mode or two column mode. You can see that's the
two column mode where we will see in
right hand column, we will see the features or we can say details
of these element. If I go back to Auto, it will take us to the one column where we
will review the page. So then we have Daxtomd
and mobile mode. Let's say if I want to customize this funnel in mobile mode, we can just click on this
icon and customize that. So we also have virgins. Let's say if I save this, and if I go back to the last
ergon before saving this, we can click on Virgins, and And we can select
that last version where we have loaded
the template, where we did not add this first yellow
section with the form. So you can see, that's
our first version one. If I click on restored version. So what it will do,
it will take me to the basic template when I loaded the template,
what it was. I will remove the lost version
where I made that date. Okay. I we want to update
anything for existing template, we can select this element. And in the left hand side, you can see, we
have image option. We can update the image here file logo or we can update
the size of that logo. And if we want to
update this element, we can just strictly
customize this. We can make it bold or we can
we can update this content. So this is kind of
a word document. If we want to update
any of these content, we can just directly
make changes here. So this is super easy to use. And let's say if
we want to change the color of this whole section, we can select this section
and we can change it here. If we want to change this image, we can select from the right hand side
on this image icon, and we can create an
image using AI or we can just directly update
it from our meterpy. This was the quick
overview about the fun builder and how we can use a template
and update that.
24. How to integrate domain to website: This video, we are going to
learn how we can integrate a domain with our
funnel or website. Let's say we have a funnel here. The process is the same
for funnel and website. Let's see how we can integrate our domain with that
specific funnel pages. Let's click on settings, and here you can
see we have domain. I already have this
specific domain, but I want to add
another domain. Let's add new domain. Okay. So take us to
the domain menu, and here you can see we can we have add icon and
we can click Add. Okay Let's type the domain
name here, quick assist.com. Okay. Okay, so there is two
process to add our domain. Once a manual process, and second is R process. In Art process,
we need to log in to our domain provider
in the same tab, and once we have log in,
we have to click continue. Let me show you To process. Let's click on continue. What it will do, it
will find the provider. It will set that records, and then it will ask us to
give authorize that domain. Once we authorize the domain, it will add the records automatically in
our code I account. So it's asking us to connect to add A and C name records
in that specific domain. So I'm going to
just say connect. So once I click on
connect, what it will do. So now you can see
if we go back here. It's authorizing and our domain will be connected here
in a few seconds. Now, our domain is connected. It's asking us to link a
domain with any funnel. We have a website and
we have a funnel. Landing page template
is a funnel and live coaching appointment
is kind of I guess website. So we can connect it to any of these funnel
and website we want. It's asking her to select
default funnel steps, which means whenever someone Q it will take them to
that specific page. I'm going to just select
that landing page and link domain Okay. Now if we go back and
if we go back in sites, and now you can see our funnel is connected with
that specific to me. You can see if we
want to publish, if we want to change this URL, let's say if I want to
say homepage or anything, we can write it in small
letters, by the way. Okay. So you can see we
can also change our URLs. And let's go back in setting. Let me show you the
manual step now. Let's say if I want
to add a subdomain. This is root domain, and
that's the subdomain. Let's say if I want to add go quick product com how
I can manually do that. Let let's do this. Click add. Let me type. If I want to add it Auto, we just need to click
continue and it will ask some permission
that we did ready. Let's do this manually. Let's click on a
record manually. And now he's asking to
verify these records. So what I will do now, I will open my domain provider
and add these records. Okay, so now I'm in
my domain provider, so you can see it's
quick assist pro.com. So what I will do, I will
click on managed domain. I will click on DNS here. And I will add new record here, and I will select C name because you can see he's asking
us that a record type is sname and the name is C. I name we have to paste
in the record value, we have to copy this and
paste it into the value, and we can select the TTL 1 hour or it does not matter if
we select half hours. I'm going to click on save here. Okay. So once you save, we have to go back here and
click on verify records. Okay, so now you can see
our domain is connected. Now he's asking us link
this domain refunded. What I will do, I'm
going to connect this website with Home page
and click Link Domain. Okay. Now you can see if we go back in sites and if I
click on websites. And here you can see our domain, if I click on settings,
our domain is connected. Our subdomain is basically connected with that
specific website. This is how you can add domain subdomain
with your website. That was a super easy process. I hope that will make sense. Thank you. Okay.
25. Adding One Time Products to Your Funnels: In this video, we are going to discuss how we can add one
time product to the funnel. The first we have, if
it's a one time product, we have to go into payments, and we have to click on products and we have to create
a product here. Let's say test one time product. And we can define the amount
and we can save this. Once you save, let's click
back and go back to sites and we can go back to any of these funnel and we can create a
new checkout page, we can say payment
page we can define the path payment page
and we can create funnel step. Create from blank. Here, we can add a row and
we can add two columns, and in one column, we can add a image about
the product and now here, we can add a
headline, and we can add one step order form here. Here you can see, we can We can select
that one step order, and in advance, we can turn
off that Copen thing first, by the way, disable the
Cardboard price information. We can give the
price information. We can disable the Copen thing. We can also add some bullet
points. Under this image. And we can select the
content spacing from left. Okay. Now, you can see our
checkout page is added here. So once our checkout
page is created, What we have to do
we have to go back. What we did now, we have created a
one time product, and then we have created
a checkout page. When our checkout page
payment page is created, we can click on products and we can add a product here
and we can select our one time product and
we can save this here and now we can go back and
we can prove this page. Now you can see our one
time product is added. You're seeing no payment
method available here because my stripe
is not connected yet. But if your stipe is connected, there will be no issues, it will be open for payment. If your stripe is not connected, you can go back and payments, you can click on indications, and you can connect your
stripe here. Thank you.
26. Adding a Subscription Product: In this video, we will
learn how we can create a subscription
product and how we can use that on
our checkout page. The first thing we have to do is I have to go in payments, and then we have to
select products here. And here you can see we have
to create a product here. And let's say I'm going
to say like premium plan. And I'm going to
define the type here, the type here is occurring, and let's say ten
bucks per month. I'm going to the billing
period will be the monthly. We can also select
weekly or yearly. So I'm going to select that monthly and the number of days. If we are going to give
any trial for now, I'm not giving them a trial or these payment will be unlimited until they cancel
the subscription. So there is no
limit for number of payments and there is no set of fee let's save this for now. Once it's saved, let's go
back in sites In sites, we can see in this funnel we can add our payment page
and we can click on product and we can add our premium plan and we can add our
recurring product here. This is how we can create
a subscription product, and this is how we can add that into our specific funnel. Okay.
27. Form & Survey Creation: In this video, we are going
to learn how we can create survey and forms and how we can add them in our
funnel or website. So let's go insides. And here you can see we have builder forms and survey options here. And let me explain. So this is builder,
where we will build that for analyzed portion, we will analyze how many
submissions we got, and in submission we will see how many submissions we got. So let's start from builder. Okay. So I'm going to
click on Add a Form. So there is two ways we
can choose a template and start customizing that or
we can start from scratch. Let me show you the
scratch process first. The first thing that I will say, we can start from
customizing the name. Let's say test form one. And here you can
see we already have some default field
here first name, last name, email phone. What I'm going to do let's say if I want to
add a new field, let's say address city, state, country postal code. We can just drag them
here in this form. This is how basically
we can build a form, and here you can see we have
terms and condition thing. If you click on button here, we can customize the
button name like submit, if you click on this icon
from the right hand side, you can see we have
style and options. Here you can see we
can line the form. Like this, or we can unline let's in line for now and we can show
the labels or not. So let's keep them off. Then we have background. Let's keep the
background like we can keep it like half
white kind of thing. Okay. And we can also customize. I'm going to put the
border for zero, but we can also if we
want to put a border, we can also put a border here, so I'm going to
put zero for now. We can also the border type. We have border radius. If this is basically the form
radius, form coal radius. I want that form to be radius, so you can see this is
kind of radius now. And we can increase the d, but I would recommend
the default. But if you want to create this, you can customize it here. We have pending. I'm going to make the padding
zero for now, so we have to make it zero. I will keep left and
right pending as 40, but for top and bottom, I will keep it like zero, zero. And then we have shadow. We have field style. If we want these
field background, let's say, as black, as ing color that we want, we can do that also here. We can change the fun
color in the field. And skip it white. And we can also increase
the field border size. I'm going to keep it zero. And we can also do the
same things with that. And we can increase the padding, we can decrease the pending or we can increase the left right pending.
Then we have shadow. We can also increase
the color and we can spread that shadow
like this or two, we can select vertically or
horizontally, how we want. This is how we can give a
shadow to field of a form. Let's keep them zero
for now. This is lab. I already turned off the label, but we can also customize
the label color. If I go back here on top
and show the labels, and if I come here
and choose the color, you can see labor
color is customized, and we can also select any fund, and we can select
the size and weight, let's increase the
weight to 800. This is how we can
customize the label. We have short labels.
Then we have placeholder. Placeholder is in this thing. If I want to change the color of placeholder,
we can do that. And then if we want to do some customization through
CSS. We can also do that. We can also upload a background
image to that whole form. But for now, what
I'm going to do, I'm going to turn off labels because I don't
like them for now. It's not looking right, but we can also change the
settings, by the way. So we can also add a header image if we want to add a logo
on the top heading, we can We can turn on and
off the agency branding. For now, we don't
need to do that. We also have themes. We can use any of these themes and apply
this on our form. You can see this
is customized now. In option, the first
thing is form name. We can customize
the form name here. On submit, what will be the message will
be showed to them, who is submitting the form, so we can customize
that here or we can just redirect them
to a specific URL. So now, I'm going
to select message. And then we can also customize this message fund,
color, size, everything. We can also add a Facebook pixel ID to this specific form, this form submitted, it will
trigger a specific pixel ID, and then we have pixel events. If we want to trigger a
specific pixel event, we will add that pixel ID here, then whenever that
thing happened, a new new event will
trigger in our picture ID. We can turn on and turn
off the sticky contact. We can turn on turn off the
GDPR compliment form thing. We can enable or disable
the time zone also. This is all about forms. So let's save it for now. Okay. If I go back again here, we can also select
a template here and we can use a template also. So I'm going to
add this template and let's click on continue. Okay. And I will name
it like we can click an option and rename
it like template from one and we can select
message here by the way, and we can hit save on the top. This is how we can
create a form from scratch or we can create a form from any template. We can still customize
that template thing. Now let's see how we
can analyze them. We don't have any
submission yet, so there is no record for. Let's see if I go back
and if I Share this form. Oh, if I go here and
if I pre this form. And if I submit this form,
let's say, have there. So if we go back now
and if I click on Ns. Now we can see we got one submission in
that specific form. So in this way, if we have
data submission of all forms, we will be able to see
how many submission we got from that specific form, which form from which form we are getting so
many submissions. So we will be able
to track that, and then we have submissions. So whatever someone submits, we will be able
to see their name and whatever field
they have submitted, we will be able to track them. So we can also track
their time zone. Okay. So this was
all about forms. Now let's see surveys. Survey same. They have analyzed the summation
and builder. Let's see the builder, and let's add a survey. We can also we can also create the survey from scratch or we can
use that template. For now, we're going to
create a survey from scratch. Now, let's start from survey. First thing that I will do, I will just I'll
just rename this. I can say survey test survey. The basic settings are
same with survey and form. The only settings that
we need to now here, there are a few specific things like disqualify immediately. Whenever if we want to someone, if they did not
answer correctly, we can disqualify them immediately or we can
disqualify them after submy. We can select that thing, and then we have some
survey settings here. One question at a time. And disable auto notification. So let's understand
these two things also. We have sticky contacts. You know what is sticky contact like whenever submit the form, someone submit the form, and if they have submitted
the details like once, they did not need to submit their own personal
information again and again. So it will be
automatically failed. One question at a time, and let's keep it
enable for now like nification scald top
and if we turn on this, the survey will scald
top on the next slide. This tonification is the survey will not automatically
go to next slide. If someone selected a
specific radio option, Uh, if we enable this like
it's enabled right now, it will automatically go
back to next question. But if we disable this, they have to click
on next every time. So I will show you also that. Let's test this survey. So we're going to create
the survey from beginning. So full name, email, and now, I'm going to
create a custom field here. Let's say add, Let's say we can select a radio
icon and we can just define. We can define the field name how what's your annually menu. So we can select a group, and I'm going to
give option like greater than 50,000 or we
can just say like 50 or we can just say like 15250 or we can say like above 1 million. So I can just put question
mark here and save this. So what I'm going to do now Let me our new field is not showing up here.
What we need to do. I'm going to save this, and I'm going to refresh this page. So sometimes it will
take some time to take new custom's wh when we
create a new custom, we have to add them, and then we have to save that survey form then we
have to refresh the page. Now we can see. Five more. What's your annually revenue.
Let's select it here. So I'm going to show you what's the sticky contact thing
and what's the navigation. Let's save this. So let
me show you first here. You can see one question
at a time is enabled, sticky contact is enabled, and to navigation is
disabled for now. So let's go in preview. You can see, I already
fill out this form. So this form I already
submitted any other survey. Now this survey is
showing up my name here, like this call sticky contact. And now, if I click next. So if I select 5,000, it automatically auto
navigation thing was enabled. So it automatically go
on next survey page. But what if I disable this, save this and if I
refresh the form. Next, I have selected
this option. It's not going up
to next question. We have to manually
click on next, and we will go back
to this e mail thing. This is how this thing works. We have understand how one
question at a time works, how sticky context works, how disable auto
navigation works. These are the most
important thing you need to know when you're
creating a survey. So this was all about how we can create survey and
how we can create forms. Now, let me show you
how we can add them to our specific fun websites. So I already told you like
funnel and website works same, but let me show
you how we can add our survey and forms
to a specific page. Let's say we already
have a learning page, and I'm going to add this. And here you can see, I'm going to add a new section. And we can add a column. I'm going to add a new element, and I'm going to add a
new form element here. It's asking us to select a form. I'm going to select
our test form one. You can see this was
our test form one. Now if I click on a element, and I can select survey here, and we can select
our test survey. Now you can see, This
is how we can add new form and new survey
on a funnel website, then we can just hit Save
and we can preview this. Okay. So I hope this
all makes sense. Thank you for watching
this video. Okay.
28. Creating and editing calendars: In this video, we are going
to learn about calendars. Basically, we will use
Clender for managing our different events that are happening with our
prospect and clients. So if our Google
calendar is connected, and all of the events that we already have on our Google
Clendar will be show up here. If I go back here in my Google Clendar I
open my calendar here, and let's say if I'm going
to block my Tuesday, log. And if I save this
and if I go back to platform and if
I refresh this. So now you can see here my
Tuesday is also blocked here because my platform calendar was integrated with
Google Clender. So if any of our events are on our Google Clender
they will show up here. So in calendars, the first
tap that we'll see is Clender we will see all of
our combine ement here. And then if I go back in appointments in
appointments, basically, we will see all of
our appointments, and the name, their status, their request time date added Clinder name and
appointment honor. And then if I go
back and calendars, that's the main area, where we will manage our
calendars and group. So let's start from Clinder
if I click on create Clinder I'm going to create
a Round Robin calendar. So we have different
types of calendar. So we have service
calendar, simple calendar, round Robin calendar, class booking and collective booking. So mostly that we will
use for our business. It will be round Robin
around Robin Clender. So it will be for
our inside calls, our client inside call interviews or any
troubleshooting calls. So let's select this type. And here we can define a name
like 45 minute inside call. And we have to assign
the team member here, and then we can
just type our slug. What will be slug
of our calender? And let's say this. Let's define the
time to 45 minutes. And we can set the
availability time of our calender 1:00 P.M.
And then confirm. Once I confirm that, we will be able to see
this calender here. You can see we have 45
minutes inside calendar. So our calendar is created. Now if I added this, so you can see we can add
our calendar logo here. We can add the description. We can add that calendar
to a specific group. We will also see
what's the group is, and then we can also
define the meeting detail, like 40 minute 40
minute meeting. And here in automation
crew and team members, we can also select
our meeting location, and then we can select
our event color here. Then if I save this, We can define our
availability in detail here. And we can also add
any specific hours. We can define our
meeting interval. We can define our minimum
scheduling notice. Let's say if this
calendar is open from Monday to Friday and today
is let's say Monday. So if I won it's Monday
10:00 A.M. Right now. And if I watch someone to book
a call before 30 minutes, then I will define my define my minimum scaling in notice to like maybe zero. So no one like if
I'm free at 11:00 A.M. And the time is right
now it is 10:00 A.M. So they will be able to book
a call right now with me. We can also define
the date range like for how many date range we want to show up
on our relendars. Okay. And we can also define
the maximum booking per day, maximum booking per
slot, it should be one. But if you're handling multiple appointments at a
time, you can select two. We can also define
the pre buffer time post buffer
time of the meeting, and then we can hit save. Now if we want any
customized questions before before our call, so we can create a form and we can integrate
that form here. So our prospect or our clients can answer
before hopping on the call. Then we have notification
and additional options. We can turn on the notification for assigned user contacts, or if there are any
additional e mail, we can also add that. We can allow Google lender
to send invitations. In customization, we can select
the calendar cover image. We can select the git style. We can define our
primary colors here, and we can put our custom
code here if we want, and we can allow
them to if there is any more members than us, then we can also allow the staff selection so
they can select with whom they want to meet if
this is a team calendar. So we have created a
14 minute inside call, and we also have a 13 minute
orientation calendar. So I'm going to create a group. So what the meaning
of the group? So let's say, if I so
let's say if I want to create different grander for my prospects and
for for my clients, so I will create
two different Okay. I will create two
different groups, one for my prospect and
one for my clients. So let's say if I want to
duplicate this calendar, and let's create a
15 minute inside call and let's save it
for now without changes. And let's duplicate
this again and let's create a 15 minute client care. We can also change the time here in availability,
by the way. Meeting duration will be 15, we can save this. So that's the whole
process is demo, so I'm just going
to show you how we can understand the basic
of linder and group. So let's define the groups now. So if I go in prospect, if I added that or we
have what we have to do, we have to go back in site
call and we can define the group here and we can
just save this. Okay. Okay. And now we can do same with 15 45 minute inside
call and save this. Now if I go back in
groups and if I click on these three torts and
copy the sketching link. So here you can see, we
have a prospect group. So we can give this specific
link to our clients. So our prospect, so they can decide how many minutes
they want to meet us. By the way we can update
this 45 minutes to 15. So how many minutes they want
to meet us like 15, 45, 30. If we want to give them option. So in this type of clinders we create a
specific calender, then we assign a
specific group to them. So in this way, we can
differentiate like appointment types within
the prospect clients or any other types of leads. So this was the basic
introduction of the calenders and
growth and how we can manage the
clinder and how we can update our minimum
scheduling voters, our buffer time, our
availability and everything. I hope that makes
sense. Thank you. Okay.
29. Sync GHL Calenar & Google Calendar: In this video, we are
going to learn how we can integrate our Google calendar
with our platform account. We have to click on setting
at the bottom here. And now we have to
select integration menu. Now we can see we
have an option here. Sign Google, we have
to click on there. Now it's asking us to
choose an account. If I have multiple account, we can select the
account that we want to indegate with
our plate pm for now. I have one account and I
need to integrate this one, so I'm just going
to select this one. So once we have selected is asking sign in to lead
connector, so continue this. And now it's asking us like lead connected with
access these things. So we are going to
simply allow this. Okay. It will take a few
seconds to load fresh data. And now you can see asking like we don't have
any business account. So if we already have
and if we connect that, there will be a drop down, we
can select the dropdown and if we want to connect our Google My Business
account, we can. If we do part, we
can just close here. So now you can see our
Google account is connected. Now we have to go
back in MPfile here, you can see we have
calender configuration, and you have to click on AD and you have to choose
this calender here, and you have to hit save. Okay. So this was the simple process like
how we can integrate our google lender with
our plateform calendars. So this is how
these things works. I hope this makes
sense. Thank you.
 Haider Safdar, Automations Guru