Transcripts
1. Introduction: [MUSIC] I'm very inspired by different types of abstract art. I'm particularly inspired
by the cold wax and oil medium that I see a lot of my very
favorite artists using. I have the cold wax and
oil paint and you may too. But some of the issues that I have with that
is the dry time. It takes forever to dry. In-between all the
different layers there may be a day
or two or three in-between where
things are drying before you get to the next
element of your painting. I got to thinking, how can I do this
in a similar way, but with acrylic paint, something that would give me a little bit less dry
time, a lot less. [LAUGHTER] A lot easier to
use and clean up and work at, at my table for an
afternoon of art-making. That's how I came
up with this class. I'm very inspired and
I'll show you some of my inspiration through the
cold wax and oil paint pieces. But I'm trying to recreate
those with my Gelli plate and elevate some of the
stuff that I get off a Gelli plate to a nicer, more elegant abstract
look in the paintings. I think you're really
going to enjoy some of the very
interesting looks and techniques that I've created in this class for you
to give a tryout. I can't wait to see
what you're doing with your Gelli plate after you
see some of these techniques. I'm Denise Love and
I'm an artist and photographer based out
of Atlanta, Georgia. In today's class, I want
to show you how to use your Gelli plate in a
different way than you might normally be
thinking to use it or introduce you to the Gelli plate if you've never seen it before. You can come up with a one print of some paint that
you've put on that plate, so it's a monoprint. I'm layering the
different layers of paint to come up with
beautiful abstracts. Most of the time when people
are using a Gelli plate, they're making very
kitsch things. Maybe it's first scrapbooking
or maybe it's for collage work and
maybe it's using stencils and things
that are very cutesy and I want to use the
Gelli plate in a way that's going to give
me some very dynamic elevated abstract art pieces. I hope you loved
the projects and the techniques that I'm going
to show you in this class. Can't wait to see the ones that you make and the colors
that you come up with. Definitely come back and
share those with me. Let's get started. [MUSIC]
2. Class Project: [MUSIC] Your class project
is to come back and share any of the things that we
painted today in class. I would love to see
what inspired you, what colors you selected, and what your end abstract
pieces looked like. So any of the
different techniques that really inspired you. I'd love to see the
projects that you created. Come back and share those with me and I'll see you
in class. [MUSIC]
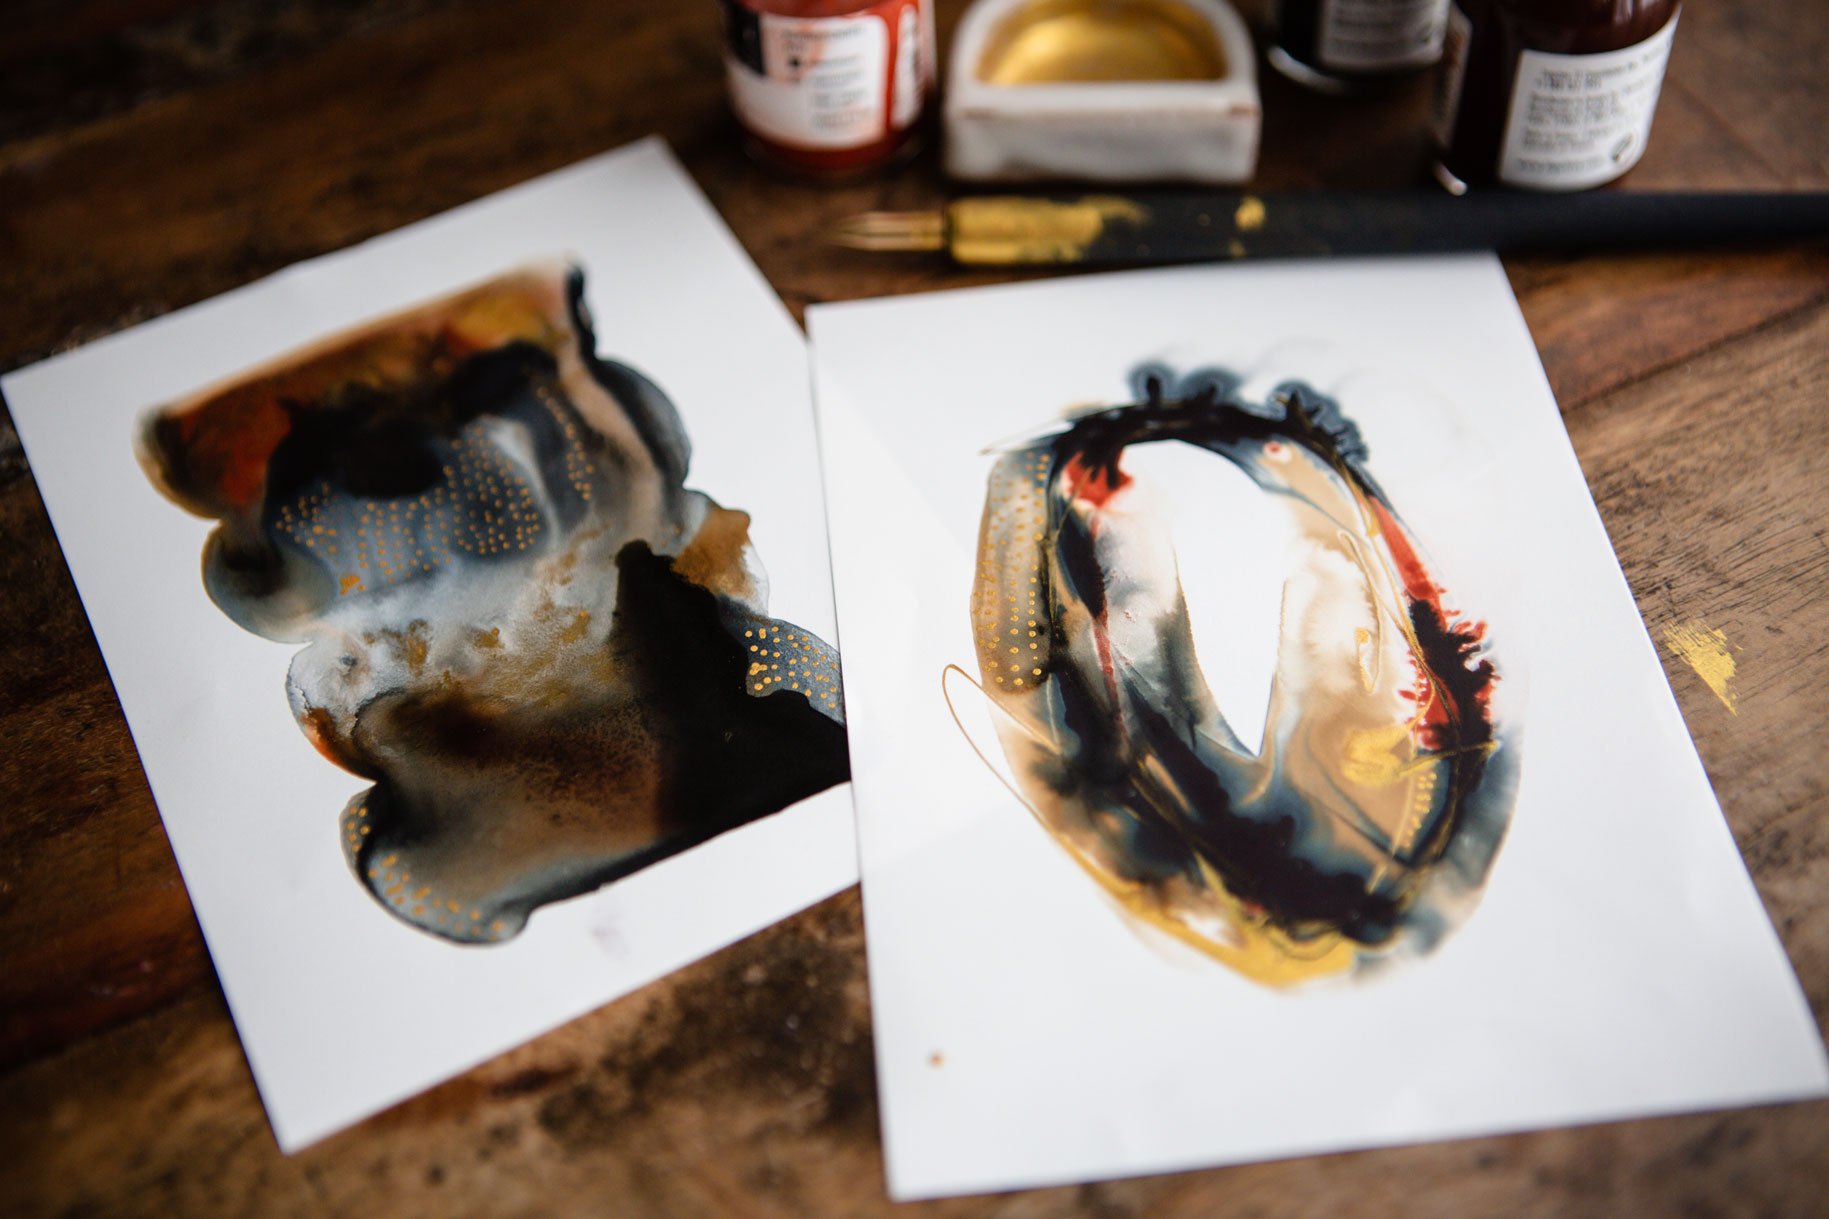
3. Inspiration: I wanted to talk a
little bit about inspiration for
where my head was when I was thinking of
creating these pieces and I created
several for myself, long before I
created this class. Just because I'm fascinated
with oil and cold wax. For some reason with
the oil and cold wax, I've done quite a bit of it, but I've never
personally mastered this layered look
that I was going for. That probably just has to
do with me experimenting and playing some more. But I got to thinking could I create this look
that I love so much? Could I create that
with acrylic paint? That's when I started playing
around with my Gelli Plate and doing different types
of print and stuff. I tell you one of the things
in the class not to jab or drag sharp items on
your Gelli Plate because you'll damage the plate. But you could drag some of these Gelli arts
combs through it. Because as we're looking here, these are really soft and they'll create a
design in your paint. As we're looking here at some of these oil and
cold wax pieces, you can carve through them and create very interesting shapes. It's an interesting
thing with the combs. I'm just very inspired by
the colors and the layers. Look at that right there. Beautiful. I experiment with the
Gelli Plate layering. I really loved this. I need to stick a piece of
paper right in that page. I really love the
look of cold wax and I like the way that they've done the
colors and the layers. I'm just inspired by the
abstractness of the pieces. This is a nice inspiration book. I'm also very inspired
by Rebecca Crowell. She's my favorite cold
wax artist to follow. I love all the texture and the dimension that she
gets in her paintings. This book is like the
Bible of cold wax. I look through and you see other artists and some of the
things that they've done. Look how amazing this piece is. I like having the inspiration of the cold wax but thinking, how can I create that without dragging out all my
oil paints and waxes? Look at these. That right there
is so beautiful. I feel like with a lot
of these abstracts, we've come very close to
creating some of these looks and feel that I wanted
within a medium that dries a lot faster and
doesn't require days and days. That's the other thing
with the cold wax. That's probably why I've
gotten a little frustrated with creating these layered
abstracts in the cold wax is because with every
layer that you put on, there's some point where
you're going to have to stop and wait a day or
two and let that dry and add the next layer
and wait a day or two and let that dry and
add the next layer and wait a day or two
and let that dry. When you see how many
layers that I do on some of these pieces
I create in class, you could easily be working on this piece for months,
adding layers, scraping back, adding layers, combining colors,
changing things. The time commitment is so great that I think I've
just given up very quickly on some of
these sometimes. You can see that we're using
a similar tool is that she's using to paint these. That's a brayer
that she's using to mesh paint in to get
that next layer. These look exactly
like the layers I'm getting with
the Gelli Plate. I love that. Look at that right there. I just wanted to take
a little look at what inspired some of my abstracts and then once I got through, some really loud stuff
like that right there. Does that not look
very much so like what we were just looking at? Some of these work out great. Some of these don't work
out very great at all. Some of these are
beautiful surprises because of whatever
we were pulling off. Then I've got some
that I'm just like, that's terrible, but I'm
not going to throw it away because maybe it's
a collage paper. Or maybe I could go back and
keep adding layers to this and then I would
definitely like it. But for the moment I've
thrown it to the side. In today's class, I
just wanted you to see what inspired the
different projects. It didn't necessarily
inspire these as much, but it still did because
I was looking for some very dramatic ways
to give me a punch. Then the little
shapes and things was just another iteration
of experimenting. But I really love
the ones that look most like those abstracts
that I was Googling. That's my inspiration and where this class started. Rebecca Crowell is my
favorite cold wax artist. If you want to go
look on her Instagram and just be inspired by some of her paintings
and her color choices. Highly recommend her to see just things that
blend that you might enjoy and might want to
try with your Gelli Plate. I'll see you back in class.
4. Supplies: [MUSIC] Let's take a look at the different
supplies that we're going to be using in class. We're going to be
using first and foremost, a Gelli plate. A couple of different companies
make the Gelli plates. I have some from Gel Press
and some from Gelli Arts. The Gelli plates come in
a lot of different sizes. They used to come in
two or three sizes but over the past several years, they've really extended
the offerings. I have several sizes. In class, I'll be using for my projects a five by
seven because they're easier to work in the
space that I film in and they're a really
nice size to work on. I'm using a five by seven. The nice thing about a five by seven plate is you usually
have plenty of time to spread the paint
on and get your print without the paint
drying terribly on you. When you get to
the bigger plates, you'll want to mix
your paint with some type of acrylic
paint retarder. Golden makes a good one and you would mix it
with about a third of the retarder and
about 2/3 of paint. Then you would put that
mixture onto your plate to get more time to roll it where you need it
and to get your press. Because if you're doing
the great big plate, that paint dries pretty fast
and it's a real thin layer, so it may be drying and not
giving you a good pressing. Just be aware of that
if you're going to use a larger plate and your paint's drying too fast,
that's the solution. I'm using a five by seven in class for the
different projects. I'm going to keep it simple. I have a larger plate than
the ones I just showed you. I also have a square
six by six plate, so it comes in all sizes but for the purpose of the
things I'm showing you, five by seven is a great size. I'm also using acrylic paint. You can use the
acrylic craft paint. You can use the
acrylic flow paint, the high flow paints. I really like the medium flow, like these acrylic basics by Liquitex because it comes in
so many different colors. I have a few large
tubes of this. But I decided that
because I don't have that many colors
in the large tubes, there's all brands here. Let me just pull a
few of these out. I got some Amsterdam, I got some Master's Touch, I've got some Liquitex basics. These are the ones
that I prefer when pouring in this
technique because there are medium viscosity and they roll really nicely on the plate and they give you
a good pressing. It's available in
lots of colors. It's generally probably
a little cheaper to get those than it is to get
these high flow paints. I'm using some of these in
class because I have them. There are color that I like. I think, let's try
this with this color. But it's not necessary to use the most expensive paints
that you have with the Gelli plates
so don't feel like you have to go out and buy
lots of expensive paint. What I did myself was I thought
I really want to try out all these basics colors without buying those
gigantic tubes of paint, which are 5, 6, $8 each, I really want to be able to test
out all the colors I can. Then go back and buy bigger
tubes of the ones I love. I actually found this
Liquitex 48 set, and these are 0.74 of an ounce and those bigger
ones are four ounces. But it's plenty of paint for everything that I
wanted to do in class. Then also did lots of projects
that I did before class. It has so many yummy colors
in it that I got to try out. Now, will tell you if you go for this yummy little 48-box set. Price shop these
because I found these on Amazon for $45
and some change. I found that my Michael's
in stock for $70. I was like, are you kidding me? $35 more. I don't know if they're
claiming that for supply chain issues or what. But I would recommend
that you price shop something like this if it looks appealing and
that's what you want to do. Otherwise, pick out your favorite colors of
whatever paints you have and roll with that
because you certainly don't need to buy any
additional paints. I'm using some of what I had, I wanted to experiment
with those other colors and that particular
brand and viscosity. I thought, I'm going
to try this little 48 cents and see what we can do. You need acrylic paint. [LAUGHTER] You also need
these rubber brayers. This is what we roll the
paint on our plate with. I have two different sizes
and I use them all through class and these are
my favorite too, this is the standard
with on this one. Here's a newer one because
I like to have a clean one. These are by speed ball, both of these are. This one, the bigger one is the four-inch and the
smaller one is the two-inch. Two-inch and four inches. I use both of these in class and I like having both of them, so you might consider that. Then I also like having a clean one that's
never been used because I use it to roll the back of my paper to really
get a good pressing. I have three of these. You don't need three
if you only want one, get one in the four-inch. This is the hard rubber. This is not soft rubber, it doesn't have holes in it. It's not squishy. This is the hard rubber roller
that we're talking about. I also like using these
silicone paint brushes. This is Master's Touch, this one-and-a-half
inches, a nice size. I like them because
they're silicone. I can go and just let this
sit in water and I can just rub any paint that
I've let dry on my brush, I could just rub it back off. I like this because it's
not like a paintbrush. You're not getting lines
like a paintbrush. You can use it to spread on your Gelli plate or spread
little extra paint on a print. It's a nice piece to have. Also like using a disposable
palette paper so I've got a Number 12 paper
palette that I'm using all through class
to spread paint, clean my rollers,
do lots of stuff. I also have some shop towels that I like to clean up with. In some of the projects, I'm also using
mixed media paper. I like the mixed media paper
over watercolor paper, here is some samples. Because mixed media
paper is smooth, it's going to give
you a clean print, you're still going to
get texture and variety. Whereas watercolor paper,
because I really wanted to do some nice high-end
abstract T things. The water paper and
I do like these, but it's different than
the mixed media paper. It's got so much extra texture
in it that I was like, no matter what layer it is, you've got extreme texture. If that's the look
you're going for, cold press watercolor paper
is what you want to do. I did not want extreme texture. I wanted some layers
that could be smooth and some layers that
could be textured and I wanted the choice. Whereas this was a
little harder for me to get the look I was thinking, even though in the end I really loved the
pieces that I got. This is cold press
watercolor paper and this is mixed media paper. In class, I'm using
the mixed media paper. I'm using the pre-cut pages. These are 6 inches by 8 inches, which is 16.2 by
20.3 centimeters, because it's a good size to
play and experiment with, and then I've got
larger pieces for the larger jelly plates if I wanted to make a
bigger print size, I have more of the mixed
media paper to do that with. In some of the projects, we're going to use Yupo paper to make some stencils
for ourselves. That's how we made some
stencils for these shaped ones. We also, in some
of these projects, are going to use some
pre-made stencils. When I say pre-made, it's not really a stencil so much as like leftover
sequence stuff. I'm using punchinella, which is the leftover parts
when they cut out sequence. It's my favorite stencil to use and I get these off Amazon. You can also use other
grungy stencily things. I just wanted it as a touch, very slight in some
of my paintings. Now that they're all done, I'm not sure you can even see where I use the punchinella, but I do show you in
one of these projects how to use some stenciling
if you wanted to. I shy away a little bit from the stencils on these
nicer abstracts because I don't want it to be
too kitschy or too crafty. I wanted these to look
more like fine art, high-end pieces rather
than scrap bookie, collage elements,
things like that. I wanted these to be
able to be framed as beautiful,
high-end abstracts. Kitschy stenciling like little flowers
or something in it. Just didn't fit in with
the view that I had for this particular
set of projects, but I do like punchinella
with anything. [LAUGHTER] Then I also have tape that I tape
off my pieces with. Some of these all through class was white and then I ran out of the white so
I've got the black. You could use painter's tape. I have plenty of painter's tap. I liked this thickness, which is not very thick at all. It's about a centimeter,
I think. Let's see. It's about a centimeter thick, which is about not
quite half an inch, just under half an inch. I like that better than this one that's right at an
inch big because I want clean edges and I wanted that clean edge to be
about a half an inch. I didn't want it to
be the inch large. You can get painter's tape
in different sizes and so if you can get that in
the half inch size, that's the size I
really liked for these. Because we're not
taping it down to our work surface using these and moving them
around like this. I want to be able to set it to the side
and move around. Because I'm not taping
it down to my surface, it's not like half
this tape is on the surface and half
this tape is on my page. This is too wide. Just throwing these ideas out etching when you're out
looking and you're thinking, [LAUGHTER] you want
the thinner one. Then the other thing that
I'll talk about in class. Let me tell you what
you don't want. You probably don't want
acrylic inks as much as the acrylic paints because the acrylic inks are a
little splotch here, but you'd have to
experiment with those. I did end up playing
with the inks as some mark-making
on top at the end. I do like having
some of the inks, but I don't love them in the working on the
jelly plate as much as I did the solid or paints. Now that I'm actually
looking harder at this, this is actually
my watercolor ink, which worked great on top. That could be why I was getting some splotchiness in
some of the projects. I probably need to
go where I can get the acrylic inks
I've got over there. [LAUGHTER] I would
recommend acrylic inks on top and then you can experiment and play
on the jelly plate, but they are so thin and
liquidity that I just found that the thicker paint is more my preference so you just
need to experiment there. I also talk about cleaning
your jelly plate. It's a mineral oil
on that plate. They recommend that you
clean that with baby oil, which is mineral oil. This is how you'll clean it up really good and
get the paint off. I'll show you in one
of the videos how to clean your jelly plate and that's what I'm
using to do that. I think that is everything that I've
got here for in-class. I've got several different types of abstracts that
we do in class. I hope you have some fun
creating these with me. I can't wait to see
what you come up with. I'll see you back in class. [MUSIC]
5. Cleaning The Gelli Plate: Let's talk about
cleaning our tools. I've got a dirty jelly plate here and I'd like to
start a new project. In this one, I would
really like to not have all this extra
paint on my plate. I usually keep my
plates stuck to the plastic that it comes
attached to on the back side. But if you ever take
this plastic off, they say not to put
the plastic back on, because when you put this on, you end up with
air bubbles in it, and the air bubbles will create great big divots in your plate that then
don't print correctly. So if you ever take
both sides off, don't put that back on. What they say to do is
clean your jelly plate, and then just put a piece
of printer paper on top to store it and make sure you put it down really good and get
all the bubbles off. Then when you're ready to
use it again, it's ready. So the jelly plate is made
up of mostly mineral oil. You can add water to your plate and clean
it off like that. But a lot of these
really baked on, I guess you could say, really dried good spots may
not just come off with water. So you want to clean your
plate with baby oil. It's made up of mineral oil. Baby oil is mineral oil. They say that you can clean the plate really nicely
with the mineral oil. So basically what I do is
just spread the oil on here. Baby oil is good for your skin, so don't worry about
getting it on your skin. Let that soak in some
and really do its thing. Then you'll notice
that you can then just peel the paint write-off and we can take a towel and help with that
cleaning off if we want. Then if one layer of the baby oil doesn't
get everything off, then do another layer
of the baby oil. But this is how
you're going to get a really beautifully
clean jelly plate. They say that you
should clean your plate in-between uses and not store
it with the paint on it. I'll be honest, I'm a
lazy jelly plate owner and I don't normally clean
it between every single use. But I want a clean plate for the next project that
I'm thinking of. So I thought I would
just go ahead and take this opportunity to clean this off and talk about
cleaning the jelly plate. So let's just really just
working it very gently. Not scraping down really hard or using any tools
on top of the gel. I don't want to ruin
the surface or create deep crevices that are going
to really ruin my plate. Now I'm just taking my towel. This is just a shop towel
and just really gently but firmly getting any of this
paint off the surface. My reasoning here is
because, you know, as you put more paint on top of paint that's dried on there, loosens that paint up so it ends up on your
piece that we saw that on some of the projects
that I did in class. I want to make some
abstracts where the color is very solid, firm. I don't want to have any
of this paint coming off. I've managed to get
paint on the back. I'm going to go ahead
and peel this off and clean the back side. I got paint on the
plastic now that I see that so that's not
such a big deal. Let me get rid of these
paint chips on here. Then I'm just going to not always had the plastic
on both sides, so I must have taken
it off at some point. We can just put white paper on the back side after
we clean it good. This is how you preserve
that jelly plate from getting dry and becoming unusable too because it's made of this mineral stuff. This is how you're
going to keep that good and really make the
longevity of your plate. I've got some paint
on the edges. I don't care so much
about the edges I'm just trying to make sure that I definitely get the paint
off the top and get rid of any spare paint chips
that are sticking to it. I'm just going to
stick a piece of paper on the back side. Front side is clean so I'm not worried about the backside. But I just wanted to cover cleaning it
and then storing it. Storing it, just wipe it off really good
paper on the top, make sure you got
any air bubbles out. Then you can store that with
the two pieces of paper on there and then the next
time you are ready to use it, you just peel that paper
off and you're ready to go. Bugs me to have it on the edge, but it doesn't really
matter if it's on the edge. I could get real picky and clean it
off of every surface. It's just peeling off
as I'm saying that. So that is how easy it is to clean and store
the jelly plate. They say don't store
it with the plastic on it because you create
the air bubble divots. So once you put the paper on, just get the divots, any air bubble out
from under the paper. Then that's ready to be
stored and we're actually now ready to use our
jelly plate again. On your tools, let's talk
real quick about the tools. I noticed that on my rollers they eventually
stopped rolling, and I have to go
and clean the paint off of the edges and
offer this little one, I got it off the edges
and then I thought, oh, it's still not
rolling very easily. Then I noticed that there
was paint on the edge here that had built up that was
then stopping the wheel. So I had to get the paint off the edge in there
and I just did that with a flat palette knife and just scrape that out of
there pretty easily. If you've got paint
on the brush that you're not able to
easily peel off. You know, you can
just set this in a thing of water and it will loosen those layers
of paint so you can just get it scraped
off really easily. So now I've got two cleaner, not 100 percent clean, but cleaner rollers ready to do whatever my
next project is. I'll see you back in class.
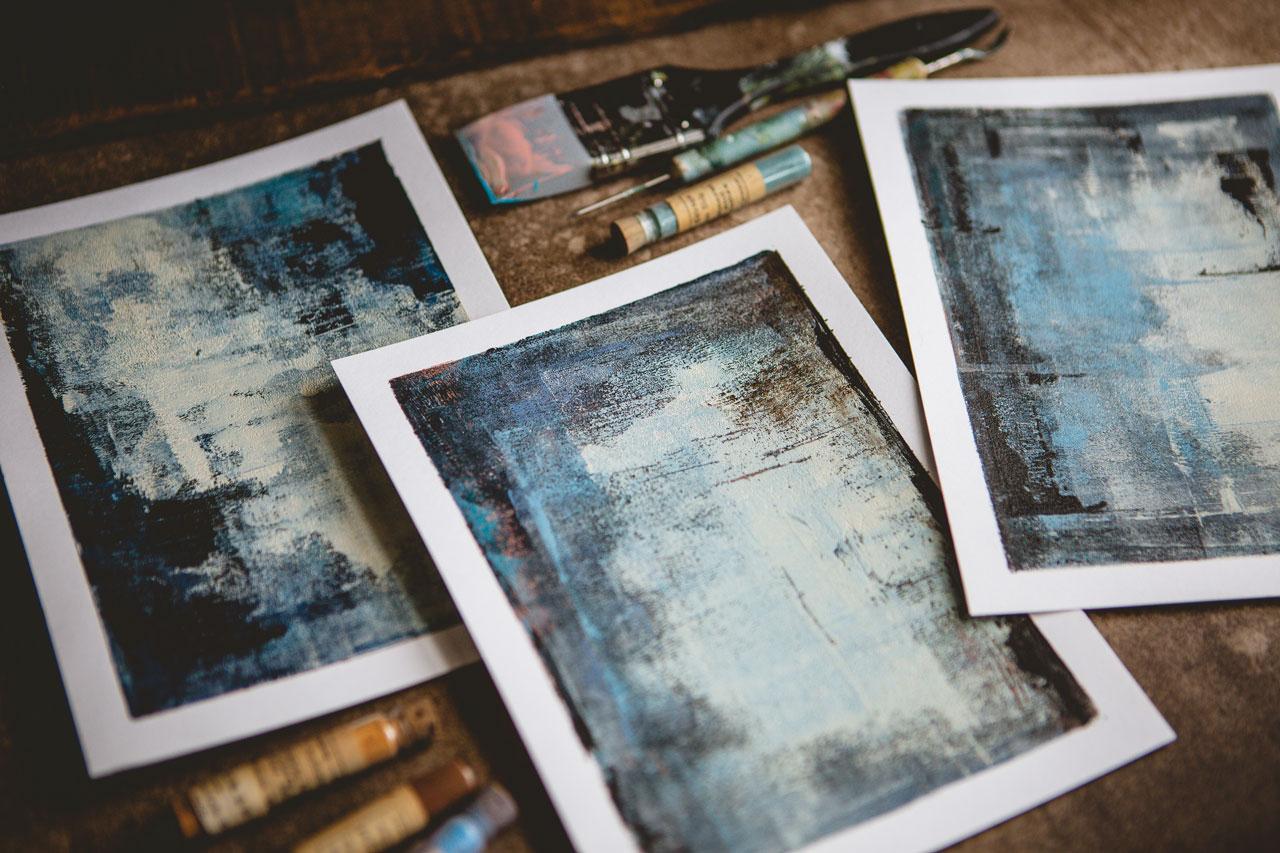
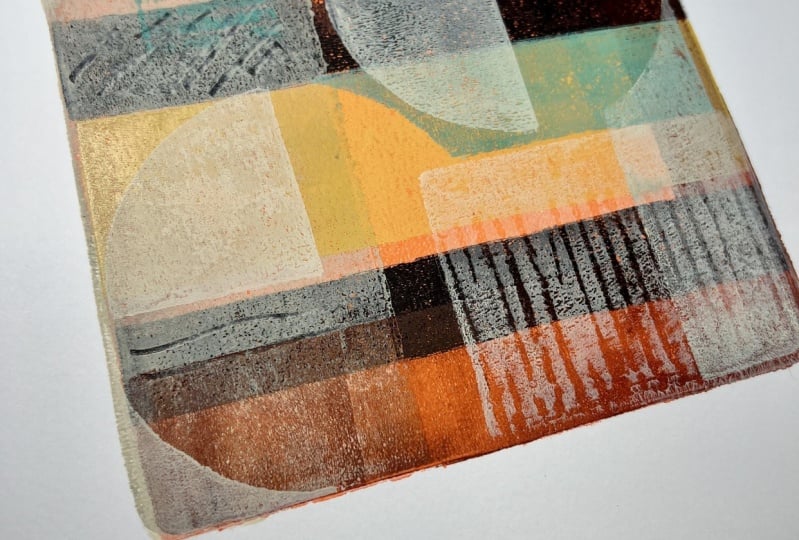
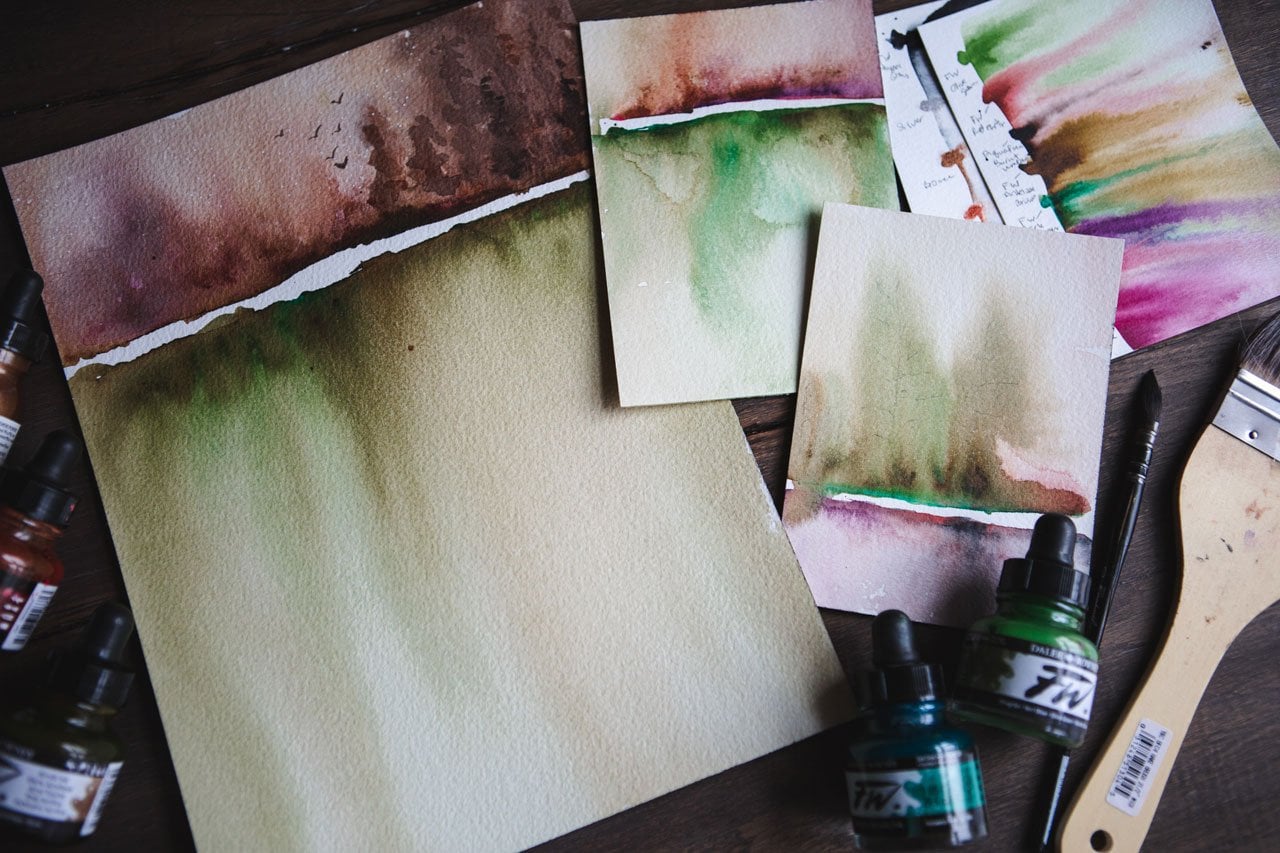
6. Learning To Layer Colors: [MUSIC] In this project, I'm going to take some inspiration from my pieces that
I've done in the past. This blue set is one one
my absolute favorite so I thought I would do a blue
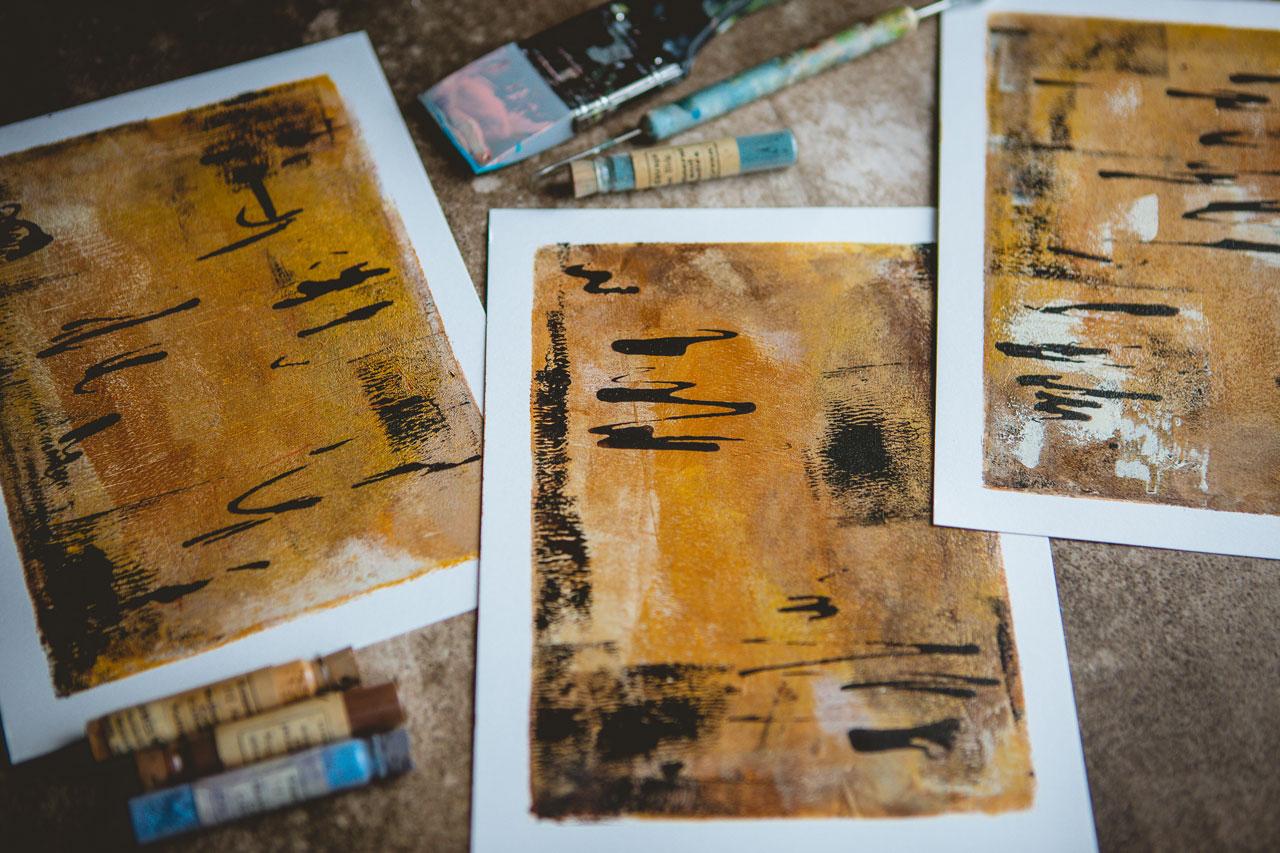
set to add to this series. The other favorite
that I have over here is this set with the browns and some ocher with a little
tiny bit of blue thrown in. I'm just looking at all the
paints that I have here. To do this blue set, I'm going to lay down a layer of orange because
I actually laid down a layer of orange underneath
here so that it would just sparkle through a tiny bit from the colors I put on top. Sometimes it doesn't
show at all, but it is fine to just
have that just in case. I'm just pulling out of my
little Liquitex Basics, the cadmium red light hue, which is an orange hue. Then I'm pulling blue light
out of my Blick matte acrylic paints because I like
this grayish blue shade. I also might pull
up brighter blue over here out of my Liquitex
Basics just in case. Maybe this light blue permanent. Then I've also got
a Payne's gray. For some reason, in
my Liquitex Basics, there's either not a Payne's
gray this dark or I'm just not recognizing it
as I'm looking through. It may have a Payne's gray, but I don't see it. If it's in here, it's a lighter blue than
I think it should be. I want this really
dark, Payne's gray. Then I've got a great
big Titan Buff, which I've got a pretty cream
color, and my Liquitex. Unbleached titanium. I might be using one of those. I think that's going to be
my colors for a blue set. Then if we go on to say
make this brownish set, then I might pull
together a few of these. I think I still might use that blue and then
I'm feeling like I need a burnt umber,
maybe yellow ocher. Possibly, [NOISE] I'm over here in these
browns because I've got all these sitting
in like this. I definitely want this
burnt umber, yellow oxide, maybe this raw sienna, [NOISE] and then a
little bit of this blue possibly, and this titanium. I feel like those might be my colors for both
of these colorways. I'll just set those to the side, shut telling you where
my thinking is there, and then let's make
a few Gelli plates. The first thing
that we're going to need to do is I want to do three pulls of each of these. Two of the pulls are going to be the actual art piece
that I'm attempting. [LAUGHTER] Then the third pull is going to be what we
call the ghost pull, where I'm just pulling extra
paint off my Gelli plate. Sometimes the ghost pull is my very favorite
of all of them. It serves two purposes. One, you get the
extra paint that you can off of your Gelli plate, and two, the pull is an amazing
piece of art in itself. I've decided after doing
lots and lots of these, let me just grab that
stack again that I had, that I really like
it when it's got a firm edge and you can pull the tape and everything
is confined in that square. Some of these, where I did not tape the edge, it's a little more crooked. It is sometimes just
as interesting. This is another piece that
I really, really love, but you can tell on these that they weren't taped
and then there's paint on the edges and they're
just not as neat on end product as they are when we're purposely trying to create with the edges taped. The edges are taped here. This was my ghost pull and
I didn't tape the edges. Now I'm going to even
tape the edges on my ghost pull because
I love this piece, but I don't want all of the
dirtiness on the edges. I want it to look like a pretty finished piece
of art in itself. So I'm going to tape the edges even on my
trash paper, basically. Those are really some of
my favorite at the end. I'm just taping it off
and moving it around. I'm not worried about
extra tape leaning off the paper here because what you can do to keep
these edges out of your way is just fold
them on themselves like this and then we're ready to start using that
to pull prints from. If you have any big pieces that you think are going to
stick on something, just fold those
down on themselves. We've almost got my
third one taped. This will be the third. I like doing this in
a series of three because then you have
a nice little series. You could definitely
do more than three but I wouldn't do less than three unless you're
just going to do a pull and then a ghost pull. Your choice there. I tend to like them in
series of two or three, so I like to pull three
prints as I'm going. Now we are ready, I have my Gelli plate,
got my paints here. Let's just push these
back a little bit. I've got my Gelli
plate over here. It's still dirty from stuff I was playing
with last night. That doesn't bother me. I don't mind if this extra
paint ends up on my pull. This plate that I'm
working with today is the five by seven plate
and we're just going to have some little brayers
over here that I use to roll the paint
into my Gelli plate. I have a clean brayer that I use on the ghost pull usually, to really push the paper down and not get paint
on the backside. I do have a clean brayer over to the side ready also. [NOISE] The little brayer
are mostly used for little details and
additives near the end. If we look at the little
blue pieces here, you can see I've come back in, added some extra
little dark details as I was going at the end because I really like the
pieces to have a nice amount of contrast and depth and dimension
with all that pattern. Sometimes as you're
layering things, if you had a dark
layer underneath and you layer to
layer things on top, you lose some of the really dark
details that might be nice just to have them
brought back a little bit. That's what I use the
little one for a lot, so got it to the side. You want to be careful with
how much paint you let buildup here on your brayer because it builds
up on the edges. I go through and I pick the
extra paint off the edges occasionally because
it'll stop it from rolling if you get too
much paint on the edges. I will go through and
clean the paint off of this one before I start rolling extra paint on
the top because it's impeding the brayer rolling now because it has so much paint
build-up here on the edge. You can see I can just
pull that paint off with my fingernail with just a layer that builds up on
the end of a roller. Now in addition to getting your paint off the end of your
rollers, if it builds up, you also want to keep your paint not too thick on
the rollers themselves and really keep cleaning it
off because the paint builds up on here. Then each time you get more
acrylic paint on it, it might let loose some of the paint underneath
and then it will create different paint
splotches on your piece that may look great and
may not look great. You just want to be careful with your tools, keeping them
fairly clean if you can, so that you don't
have unintended marks and things end up on your print. Let's start with the orange, and I've got orange
on my plate here, and I'm just putting
a little bit of paint on the actual plate, and I'm just going
to roll that paint around until I get
a nice thin layer. You don't want the
layers on here to be super thick because then they transfer funny on your paper and I'm
just guesstimating here, it doesn't have to be perfect
when I put my page down. I'm guesstimating about where
the print is going to be. If I end up with some
edges, that's okay, that's going to be some
interest layer in my piece. There's my first poll, I can add some more
paint to that. You want to work fairly quickly because acrylic paint dries very quickly in these thin
layers on your piece. This too is another reason
why I like working on multiple pieces at the
same time because it dries pretty fast on your paper also. So by the time I get
back to that first piece, it's dry and is ready for
me to put another layer. We will look at that one.
Now you can see that I've had some dirty splotches
or dirty paint or whatever leftover on my Gelli plate and so that
transfers onto the new print, but I don't mind that
for my abstracts. But if I were doing something
where that was a big deal, then I would clean the Gelli
plate up quite a bit better. The thin layers
of paintwork very quickly and then have your papers ready to
pull your prints. Do all of that taping off
right at the beginning. Then when you're on
that third ghost print, I just take my clean one and you can do this on any
of those prints. You don't have to wait
till your last one, but I definitely
want as much paint off as possible
by the third one. You can see how much
we pulled off of that plate and you can see I have definite other colors
that I have pulled from that. There's our first layer
and out of those, when I say sometimes
that ghost print is my very favorite because I've held that down so wonderfully
tight with the brayer. Look at all those layers
that are already built in from the paint that was
stuck on my Gelli plate. That right there, we could
probably call that done. We can say that's
our print and go, but I do want to go ahead and layer these with the blues, I want these to be blue pieces. Now I still got
paint on my roller, I've got some paper over here, the disposable palette paper, and I'm just rolling
the roller on there. I will be putting
paint on here and using that to roll paint also, but to start with, I'm using that as a trash paper for the moment and that could be too much paint, but we'll see. That's why I like
having three papers also because if you roll
this and you're like, whoa, too much paint, you can pick your
least favorite. Let's do the first one. If we had too much
paint in that transfer, then that's pretty though, then it's not as big a deal. I don't want to ruin something when I'm
doing this right here, I'm not moving the paper. I'm being very careful to move my hand but not
move that paper. You'll notice I had enough
paint on there that I decided not to roll another
layer of paint and I have enough
paint on my roller for my ghost print since
that pulled off pretty good. Then I can just clean the roller
off here on my paper. I don't want thick layers
to build up on that paper. Look at that. That's what might
be my favorite. See if you'll do more than one. If you do one and you think it's not turning
out the way I like, but then you do two
and you're like, this might be getting there and that third one you're like, I think that's my favorite. Then you get excited about
your pieces because you've got something that you liked where it's just hard sometimes. [MUSIC]
7. Working Layers & Brayer Marks: [MUSIC] Now in this third color, there's plenty of
paint in this thing. But it's gotten thicker and I don't want the
paint everywhere. I just want the
paint some places. I'm just going to see, if I put this on here like that, then what can I get
in that one spot? That's very light, so
that's not going to show up, so very interesting. Let's do the cream instead, for the moment and we'll
come back to the blue. My paint could still
be too wet too. I might not have to let this dry enough if I had enough
paint on there. So you could use a heat
gun in-between layers. Oh, yeah. That's exactly
what I'm thinking. Let's do that. You could use a heat gun in between
the layers if you want to make sure each layer is dry, because sometimes, I'm going to put it
on the whole thing. But I only want it on
one part of my prints. I'm only going to push it
down on part of the print. If you put too many layers
in a row pretty fast, then it might be too thick and you'll want
to let it dry some. Oh, okay. This is my
favorite one [LAUGHTER] let's roll this pretty good. See, that just gets cooler
and cooler and cooler. I want to go back to the blue. Now, let's see if I
can get some blue. It doesn't matter if you mix the colors on your power a little bit, that's
perfectly fine. See, it's almost
dry to the touch. If you've got paint on
your fingers that would get on your paper,
but that's okay. Its closer we're getting there. I'm not trying to exactly mimic my original piece
that we were showing you, I'm just going by feel and
looking at it and thinking, "I like what that
did, kind of thing". It's not any specific thing that I'm looking for or doing, it's a little bit more
about feeling and just feeling your way
through the process. Now at this point, what we could do is, I do have extra paint here on my palette that I did not
intend to leave there. So I might have
another spare piece just as my true trash paper. But Murphy's Law
says that the end, I still might love this one. But you want to get as much
paint off of that as you can. See, that's pretty cool. So I'm going to set
that to the side. We'll set this to the
side for a moment. I'm feeling like I want to
go ahead and do some brayer rolling to get some of these colors moving in the direction that
I'm thinking to. So maybe I want some
of these titanium. This is Titan Buff, sorry. You can use any paint. I'm using the larger
fluid acrylic because I have it and
I didn't want to go buy a large one of the acrylic basics because I have a little
one if I need it. Look at that. Using your brayer on your piece after you get
some of these layers in here, is what makes this
exciting to me. [LAUGHTER] look at that.
Let's go ahead and do a little bit to this one. I'm only using that one because that's what I have not because it's better or worse. I don't want big splotches
a color like this. Let's stop at that right
there for a moment. But yeah, if you've got the
fluid acrylic or you've got the medium acrylic and you've got a specific
color that you like, either one of these is fine, for this kind of technique. I do like the medium
thickness of these. I like that a lot. It's
not super necessary. Either way is fine. Let's do some of
this blue over here. I'm going to go with
the little brayer. Just see. I like that. Now I don't think I've gotten
my Payne's gray anywhere. Let's put that one right here. I like that I can
now add the darkness to the top because right now we are shy or contrast. I'm trying to be careful. I don't want this to look like a little brayer all over it. Kind it does, but
I don't want it to completely look like a
little bitty brayer. I am being careful. Then if there's any thick
pieces of paint that have come off your
roller into your paint, go ahead and scoot that
out of the way because you probably don't want that
on your finished piece. Look at that one.
I'm loving that one. So let's go back. Like say a real thick glob
of paint on there from some extra piece on our roller. I want to go ahead
and get rid of those. I don't want them to
stay in my piece, so go ahead when you see it and be real careful about those. Let's pull this Payne's gray. I want the darkness in
there. Way too much. Definitely going to have
to get me some more of this Payne's gray. This is the golden,
the Payne's gray. But I do like on blue pieces to have some Payne's gray
available. [NOISE] We'll go ahead and put
more blue on here. Come back with my lighter
colors again because I just feel like there was just no contrast
showing up for us here. Another thing that you can
consider and I'm going to be using in one of our other projects is a
silicone paintbrush instead. Just to take a look at that. Let's do this with
silicone brush. Just to look at the differences because I might go back on our other one and add some
light things back in there. You can see with the brush, we can maybe get some color moving out there in a different way
than the brayer does. That's interesting to
experiment with that and see, is that going to give
us the look we want. [NOISE] Just throwing
that out there. You can play with that too, just to give you some ideas. Let me add some dark blue to our
last piece here. You want to be
careful when you're putting this on this brayer, that you don't have
a dark spot because that dark spot is what
shows up and then goes. That's fine. Let's
let that one dry. Let's put this one over here. Let's go back to our first one. [NOISE] Maybe I'll put some
more in this light down now. It's all just a little back-and-forth game
until you're like, Oh, all right, I feel like I'm there. If you get too much paint on your brayer,
it quits rolling. I like using the brayer
too because we stay within that jelly plate look. Even though I do want to
change it up a little bit. Look at this. From
just solid jelly plate where to really finish it off. It really keeps the whole look, jelly plate-ish because
I'm still rolling that paint really flat. I like that jelly plate look. Look at that. That's
looking pretty good. All right. Let's work on this. See how we can make
a spot disappear a little bit by just rolling a little extra
paint on top of it. If you end up with something that's weird and you're like, Oh, I didn't want
that spot there. Let it dry a little bit. Come back with a tiny
bit of extra paint in another color. I like that. You do want to keep in mind where you put that roller
down and roll from, because like right
there I created like a line that I didn't intend because I started
it and went to the side, and it looks like I
stopped and started something or I didn't
intend to, so like that. Let's pull back this one. [NOISE] Just letting these dry a little bit and coming
back, adding more layers. If you really like
a color underneath, like say that orange, you want to pull some back in, then you might pull some back in with your silicone brush. This is the Master's
Touch painters, silicone tipped brushes here. I've got a couple of sizes. I might like even like one
that's a little wider, so just other tools. You could also use [NOISE] a catalyst wedge possibly
if you're thinking. Oh, I have the wedge,
can I use the wedge? You could probably use
the wedge just fine. I'm getting really nice
control with the brush and that's what I happened to have over here at the
table when I was thinking, maybe I could play
with this brush. [LAUGHTER] I got some
blue paint on there. Let me get some more paint. Acrylic paint dries really fast. When you're doing a
really large paintings you need to consider, especially with the
jelly plate getting some retarded by golden like acrylic retarder
because that will help with keeping that paint
wet a little bit longer. You know see now what I don't
like about using a brush as you totally
change the texture of a specific area that
you were working in, and not wanting to have one area that's a
different texture than say the rest of my piece. That could be the look
you're going for, but that's not really
the look I'm going for. Now, I'm just back-and-forth
it until I'm like, Oh, this is where I want
it and I feel done. I just want to edge it off
here if I can a little bit. [NOISE] Oh, yeah, see I like that. I don't like that.
[LAUGHTER] I'm just going to come back
with a little bit of this cream and push
that dark back some. I can let it dry. There we go. That's what I wanted. I could let it dry
before I do that, but I'm just pushing
that back a little bit. I really like that one. That's completely different
than my original ones. It's a little heavier
in the choppiness. It's like a little
more pattern in there, but I still love it. Let's call that one for
the moment and come back to our original
piece here and just see. I like that. I also wants a lighter color all through
this front part here. [NOISE] If you get too
much paint on your roller, it almost works
against you so keep a towel over here to work
that off if you need to. I want more of a center
focal point on this. Let's put this on
the jelly plate and see if we can make that
because this is drier. It's probably not
why I just did that, but it is overall
a little drier. There we go. That's
more what I wanted. Then maybe a little
more with the blue, so maybe I'll do this one. Let this dry a tiny
bit. [NOISE] We're okay. We're getting closer. Let's take our true junk piece so I can get some more
of this paint off of my roller before
it really dries. Where's my clean
brayer? Here we go. Oh yeah, that one's looking
super cool. Look at that. [LAUGHTER] Let's see. [NOISE] Yeah, I like that. Maybe a tiny bit more
of that bluish color. [NOISE] [MUSIC]
8. Finishing Layers & Details: [MUSIC] That's pretty cool. I think I'm loving that one right there, so let's set that right here. I like that. It's almost like I want
some black on one of these, a mix of the black
and the blue maybe. [NOISE] This was just the Vallejo lamp black just because I have it
not for any other reason. Yes, now I feel like
I'm getting that dark. That's what's going
to do it for me. Just feel like there needs to be that little bit of contrast. There we go, so loving the
extra contrast that gave me. I think that's what I was
looking for here with the blue. In my original piece that I
did quite a long time ago, I must have mixed
the Payne's gray and the black and just not
remembered that I did that. [LAUGHTER] Look at
that right there. I do have like one
little fun secret that I do when I
really love something. If I want to remember the colors later is that I really
love the colors. I really love this really strange combination
here that I did. If I really love it, I will actually then create myself a cheat card of
what those colors were, and if you're really remembering it in the layer that you did it. So maybe I did the
red oxide first and some raw sienna on top
and then the yellow Naples and then the
gray and the green, so that you can
then keep this with these pieces and then
you'd know later, here's how I did that, I want to do it again, or if you wanted to
record of what you used. On our first piece
which remember this one was our ghost
pull, this last one. Let's go back one more time and really get
these darks, dark. [NOISE] Then I'm feeling pretty good about those. Before you get too far
and too excited and you start pulling the tape
off of your pieces, don't let the paint
sit too long on your rollers and
then maybe go wash them off because dried paint on the roller is
not your friend. I'm loving these. At
this point right here, there was a lot of
back-and-forth, and I don t know that
I'm going to love all three pieces equally but let me tell you,
pulling the tape is what makes the
magic for these. Let's just start
pulling some tape. Then we can look at it. I'm already loving that. It's going to see
a tinge of orange shining through this one. [LAUGHTER] See, pulling the tape is
what just elevates it instantly to a finished piece. You'll notice on these that
I was strictly doing paint. I wasn't doing mark-making. I wasn't doing extra pens and pencils and things like that or scraping through the paint, but we could certainly scrape through the different layers and make marks if you wanted. Oh, yeah. Maybe not my favorite. This one might be my
favorite, we'll see, but after you do a couple
of these and you're like, I think I got it, I love the colors, I'm really loving
what I'm getting, then throw some other
techniques in there, but I wanted these to be pure Gelli plate and
brayer, look at that, just to see what could
I get as a color, abstract pure sample. Got a tiny bit of paint. There we go and look at that. Here is my blue set
that I did today. I'm actually really loving this and I might
go through and do a brown set just as a second collection to see
what is another colorway, but I like that you saw the whole process as I was
doing it and thinking it. When I'm doing the set
of three like this, I do easily spend 30 or 45
minutes on this set of three just going back and forth between the color
and the pattern. Let me pull some of
my originals back up here just to look
at some of these. Here's some other
blues that I did. This one actually, I can even
see some brown in there, so I must have brought
some burnt umber in. Then I really love
the brown sets. This one I was
playing with teal and some maroon and some cream, and when the blue
and the red blended, we got some purple that
just naturally mixed. How fun is that? Here we've got
some of turquoise, green and some cream and
some sienna and some ocher, and a darker red here. Just experiment and play. There are going to be plenty
of ones that turn out good. This was a very unusual set, red oxide, raw sienna,
Naples yellow hue, natural gray Number
5, and green gold, and it was in all of these
little Liquitex basics, and I was like, "I love
this set so much." There is a little bit
of mark-making in here with a sharp tool. I love the one that doesn't
have any mark-making at all just because of
the way the color pool, there's so much
texture in there. There's enough of these that
some turn out beautiful. I did these pink ones. This one's got marks
all in it. Super fun but there's plenty that I
was like, "I hate these." This is a ghost
pull, I love that, but some of these, I'm like, "No,
that's a failure." I didn't like that at all. I didn't like this one. Terrible. So much heavy
paint on it, didn't like it. I didn't really
care for this one, but it's actually okay, but I didn't really care for it. Some of these are going
to work out great. Some of these you're
going to end up and say, "My goodness, most favorite
pieces I've ever created. This one's got a little
mark-making in it. I might do one more set in
browns and stuff just to see what can I get in
a different colorway, but these are super fun
for today's project. I'm going to let
you go and maybe experiment in some
colors of your own, and I'll come back
and do another set, and we'll do some mark-making
because I want to talk about mark-making in
your Gelli plate. I'll see you back in class. [MUSIC]
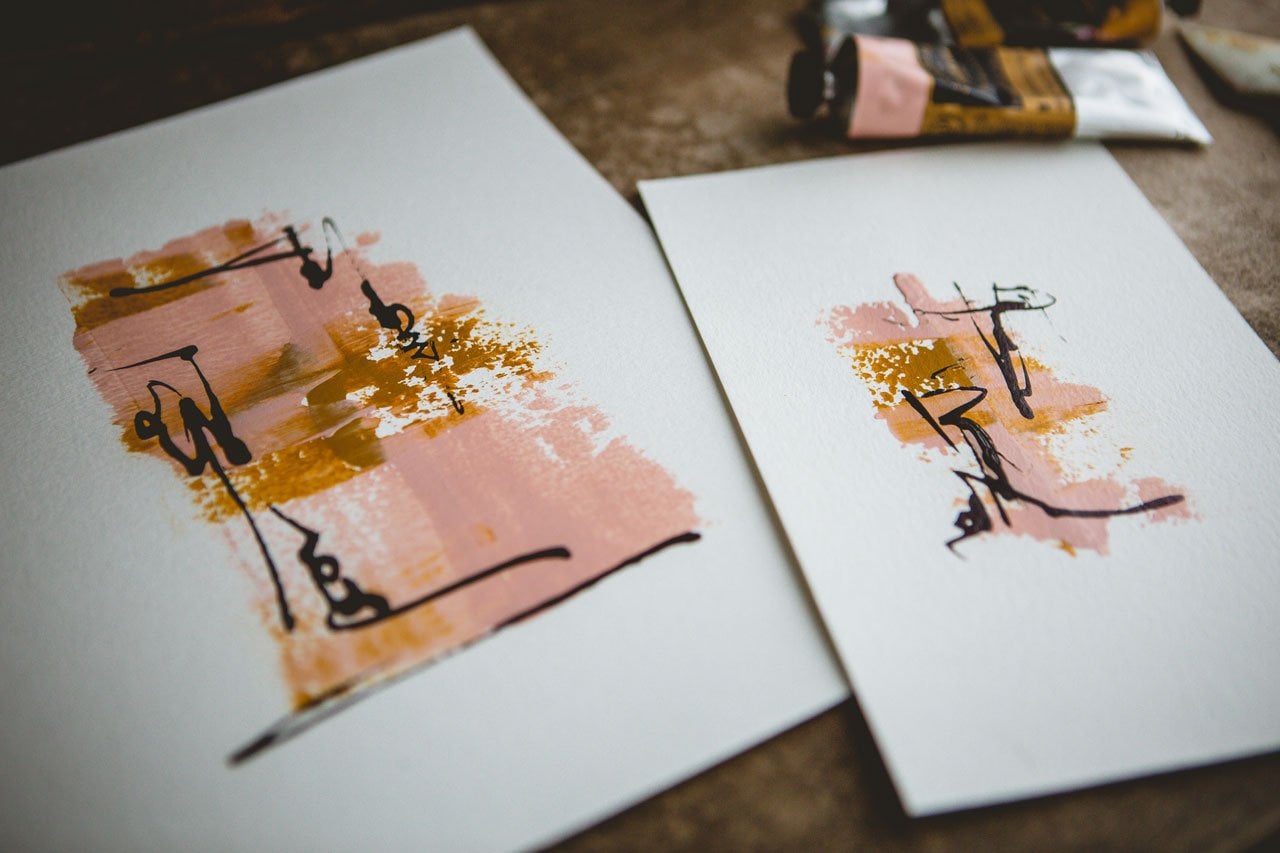
9. Different Colors & Mark Making: [MUSIC] On this
set, I've got paint still on my jelly plate, but this is the
very first layer. So I am going to just go with it and let that
be on the jelly plate instead of going through
and doing a hard cleanup. If you don't want residue
color from earlier pieces, then you definitely
need to get that off before you start
your next set. This set, I'm going
to do the browns. Look at that, such a great color. I'm going to start off
with a layer of gold. Not worrying about where on
my paper, I've got it taped. I don't mind overlapping edges. Then let's just get in the
last color here off of our thing and you see three is just perfect
for the jelly plate. See pretty, pretty. All three. Got a fun little
variation there. Let's talk about doing
some mark-making. Let's do another layer. Maybe this next layer
up is going to be, this is yellow
oxide, raw sienna. Let's do a layer
with the raw sienna. Maybe I'll do some mark-making a little bit on the
raw sienna layer. Just to talk about it for
a second. Look at that. Let me pull this one here real quick before that completely dries on our plate.
Let's leave that. When we're using a sharp tool or a pencil or anything that could jab into something.
You never want to use that. Look at that, pull
the extra paint. I love that serendipity
that we get. Let's say that we've put this on here and you're thinking, I want to mark-make
right on my piece. You never want to do that
because you're going to be jabbing your tip
of whatever you're using right into
your jelly plate, and denting a scar into it like you're
physically slicing. Oh, look at that
one. I love that. You're basically
digging down into it and making a scar
that's going to be permanent that paint
could get into. You never want to mark-make, write directly on
your jelly plate. You want to work quickly with
each piece and then maybe mark-make in the wet paint
on your piece itself. Yes, this paint is drying
pretty quickly and I'm using something to scrape in the paint so it may or may
not scrape very easily, but scraping with a sharp tool is one of my favorite way
to put marks into things. This tool is over there with your clay tools at
the craft store. It's like an ice pick
is what it looks like, but it's for clay, it's
in those clay tools. But you could also mark-make
with pencil, pens. You can mark-make
with different items, like this is just graphite, just a pencil or maybe I
want some marks in here. You can, on these layers,
do anything that you can normally do
with acrylic paint. We could use a pencil. You want to be careful
using oil pastels, like the real oily ones, because this is
acrylic paint and you can't put more acrylic
paint on top of that. This is a Stabilo, which is one of my favorite
mark-making pencils. It draws on just
about everything. I can get some good
marks with a Stabilo. Maybe we'll just do some
scribbling in there as an underlayer that
we may or may not see. You can see that's much more prevalent than the
scratches or the graphite. Just be careful and
experiment with what you put on some of these layers
as the mark-making item. Because we're putting
more acrylic paint on top of this, and
you have to think, oh, wait, will acrylic
paint go on top of that? So oil, creamy oil pastels don't usually take acrylic
paint on top of it, so I wouldn't do that. If you wanted to do chalk
pastels or something like that, you could probably do
that as an upper layer, but those are powdery, so I would save that in
my finishing layers. This is the titanium
and bleached titanium. I really do like, look at that. I like all that texture
that the brayer created. Don't be afraid to
let your brayer to create some of these
marks and textures. I'm going to show you
another trick too, I think in a moment, hang on. Look at that. Oh my
goodness, see this set? I'm always glad when I
go ahead and say, okay, let's do one more
colorway because sometimes the first thing I think of in the day
is not my favorite. Then I'll add to it
and I'll be like, oh yeah, we're getting there. I don't know about you, but some people can be
in their art room all day and just work, work on all the stuff
they got to do. I get exhausted. [LAUGHTER] I think it's because
I get so excited [NOISE] that then it's just overwhelmingly
exhausting by the time I'm done playing
and experimenting. Let's do our brayer here and really get this last layer off but I'm tired. So I'm not
one of those people that can stay in my art room for days and days,
and days and hours, and hours and hours. It's not going to be
40 hours art-making. Sometimes for me, I'm
just in-between these, just absolutely beat up. Let's go back with some brown. This one, I'm moving
a little faster. I'm going to show you one more
thing. Let me go grab it. Super quick. I want to
show you one more thing. I need some more paint on here. I want to show you maybe using some stencils on
your jelly plate. This is not quite
in the same way that a lot of people are using stencils because a lot of the jelly plate things
look very crafty to me. I'm not really
looking for crafty. I'm looking for more
interesting. See, look at that. I've made this pattern on here. I don't want it everywhere. Let's just see if I spread
my finger in certain areas. Look at that. I don't want so many
stencils and the line to be where it looks
like I'm creating like a crafty scrapbook page. I really am looking to create beautiful, high-end
abstract pieces. I don't want this
to look like I'm working in my art journal
doing a couple of, that was fun right there, doing something real crafty. I want this to end up something
amazing and high end. In doing that, I'm
going to be real careful if I do stencil work to pick things that
are going to fit in with the aesthetic
that I'm shooting for. On the second pool that really
put in a little tiny bit of those holes without
looking cutesy. Like that's what I'm trying
to avoid in my abstract art. I'm not wanting it to
look super cutesy. Now, this is pretty cool and I will put a layer on top of that to push some of this
pattern further back. So It's a little closer
in with how this looked but I wanted to show you how
easy it is to use stencils. This is punchenella which is the stuff that they
punched stencils out of, and it's the leftover paper. This is my favorite
stencil and you can buy punchenella online I got a pack of several different
types of punchenella, different sizes and
stuff off Amazon. You can also get some of those ranger stencils that look like grunge
things, those are fun. I just would avoid things
that look too cutesy. For higher-end
piece of abstract. Like I personally am
hoping to create. I think I'm going to do a
layer of some of the white. I'm using the fluid
buff titanium because I have a
big thing of it. Oh, look at that. I like when I get
this texture too in my paint itself with
the brayer because I feel like that adds to the final piece with some of the texture that we
might get from that. Oh yeah, so we've pushed a
lot about way, way back. I don't like that it made a big oval in here
but that's okay. We can do another layer of
that and see what we can get. I've obviously got paint on
my fingers so I'm getting paint on the back of
these, but that's okay. Oh yeah. I love what this
is doing right over here. Let's do this with the really get it off of there with her. Yeah, I see. We've pushed
some of that back there. Let's see, what else
do we got here? Might come back with
some of this orange. Orange is actually rosy, but it's an orange-y
shade, I like that. Go back to that first one. Oh yeah, that's what I wanted. Let's see if we can get that to push that
back on this one. Oh yeah. So what I'm going to do is continue to paint, push, and pull the color back-and-forth and then
speed this up because I wanted to talk about a
couple of specific things in this particular video, stencils. Don't carve into
your jelly plate. Look at that. Okay,
I'm loving this. So I might put some scratches
into this while it's wet. So very specific things
I wanted to talk about. Don't dig into your jelly plate. Maybe consider some mark-making. A little bit of
stencil work is fun. I'm going to go ahead
and push and pull these until I'm thinking,
okay, I'm there. So I'm going to speed this up and we'll see where I end up. One more thing too,
don't be afraid to just pull paint from
part of that plate. You don't have to pull the
entire plate the whole time, so just a little bit on one side will give us
some pretty cool texture. So I wanted to tell
you, don't forget, pull from certain spots, just experiment with
the whole plate and then certain spots. Then see what you get
on your junk piece. So still working with
that same junk piece because all three of
these are turning into beautiful pieces of art. I'm going to continue to push
and pull and I'll be back. Let's talk about this too. This right here is burnt umber acrylic ink and so I
actually don't love using acrylic ink on the jelly plate. Because it just does not do very well as far as it bubbles up, but if there's some other
paint on your piece, it can add some other different. We could maybe do
some mark-making with the ink, but
not necessarily. So let's experiment
with a little bit of the ink spread
around on our piece but not spread completely out and see what kind of additional mark-making that would give us. See, now, I just
don't love that. That's what I'm not
loving with the ink but I wanted to bring
it up and recommend. You could play with ink
in your piece if you wanted but it looks
more like ink splats. I don't love that. I'm going to go over that
now with something else. So if you try something, and I wanted to talk about doing something like that
because we didn't really mention it and the
heavy bodied acrylic paints, not a good choice either. Where is my towel that
I clean up paint with? Let's just get another one. I'm getting this from myself. There's too much paint going on. Anyway, the very
heavy bodied acrylics don't work very well and the very liquid-y
acrylics, not my favorite. I really want you to experiment
with the fluid acrylic and the medium bodied
and stick with those. All right, not good. If you're going to
use acrylic ink, you could do it on the very
last layer after you're done. Do some mark-making with
the ink like I like to do with some of
the things that I create but it's not going to be a good layer on
your plate itself. [MUSIC]
10. Finishing Touches: [MUSIC] Now, I've just put some brown and some black
over here on my palette, some of this burnt umber
and this lamp black. I'm just going to come
back in here and add some dark mark-making and see what I can do here. I don't like all the black here on that piece right there so I might come back with my little rubbery brush and take that back a
little bit with that with some color on the brush, spreading that to look
a bit more like a mark. I might, at this point,
to decide to add in some other marks so that doesn't look like it was
all on its own. [LAUGHTER] I like that right there. Let's come back with some little roller
marks and just see. Now I'm just, at
the end, playing, thinking, what do
I want this to do? I started playing on this one and realized
I wasn't filming. [LAUGHTER] This one's
maybe more my favorite. But what I wanted
to talk about was add in some little dark marks
on the edges if you want. Then maybe you consider
coming back with our ink at this
point and adding in some marks and some additional finishing elements
at the top at the very end. Oh, and I see now I like that. I was starting to not like
that with those extra marks, but now, with the acrylic on it, I'm definitely loving this. That's how I'm going
to finish these. I want them to have just some extra interest
on the top. I love that. We're going to have to let
that one dry before we can do anything else. Then I will let this one dry. Here's our third piece, which I'm really
loving this one here. [NOISE] I'm going to try to add some darkness in just a little bit maybe
here on the edges. I like that little bit of when we can get some contrast
showing in there. [NOISE] I like that. I don't
want to go any further. Let's go ahead with our ink. Maybe I'm going to add some mark-making here with our ink. Look at that. I love this one. Now I'm glad I did
another colorway for us. So the ink is
definitely not dry, but I want to see what
these finish up as. As carefully as I possibly can, I'm going to peel the tape so we can see what
we've ended up with because that is what
truly finishes it off. Seeing the clean edges, look at this, might
be a new favorite. Look how beautiful how that is. Oh my goodness, this
one is beautiful. Let's do this next one. The other thing I like about a series is, let's
say, you think one is amazing and you
think two are okay, but as a series, they're amazing because it is so dynamic to see three
of a kind together. I am in love with this one and that you'll remember
is the one I told you, you might not like it all but
I am loving it both ways. I love that. Let's get our third
one over here. Let's set this to the
side for a second. Pull our tape. This one was so worth
doing. [LAUGHTER] Now I got the blue set that
I've done in the past. That's my very favorite. Now I have this set. Don't stick your
finger in the paint. Be careful sticking your
finger in the paint. There we go. We'll just let
that do its thing and dry. Don't touch it again. I got to tell myself
don't touch. [LAUGHTER] Look at that. Which way? I like it better that way. Yes. There we go, that way. Piece Number 3. [LAUGHTER] Look how beautiful these are. In this second collection, we talked about
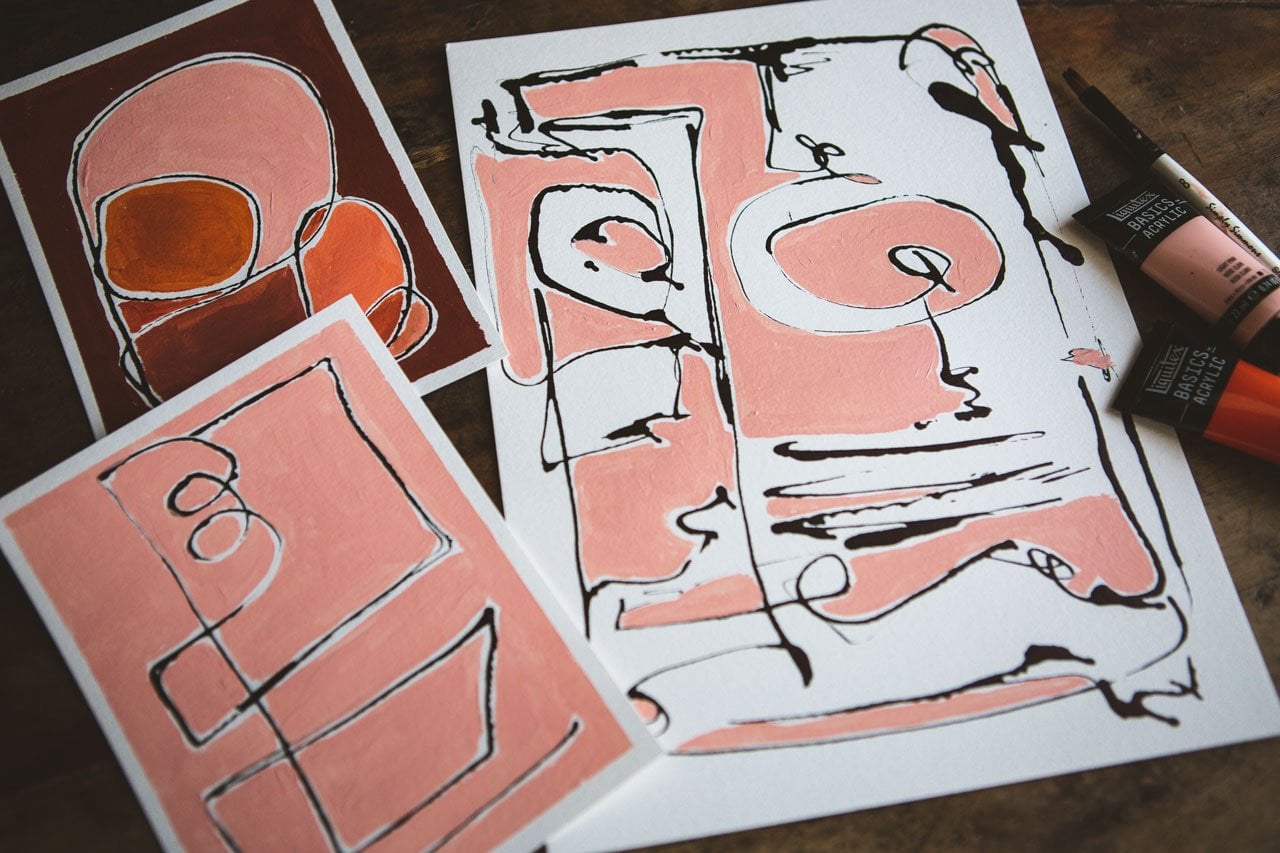
putting our paint on, doing strategic areas on our Gelli Plate rather
than the whole plate, maybe tossing in a stencil. But again, I'd be really careful on your stencils that
you select if you do that because my goal
was to not be so crafty and maybe be a
little more elevated for some beautiful finished, fine art abstract pieces. I would not have wanted to do stencils that had flowers on it, for instance, unless
that really fit in with the theme
I was creating. Be careful with the stencils. I like grungy stencils, shapes stencils for like a dot. You might consider
some of those, but definitely keep
in mind the tone of what you're trying to create with the stencils that you use because it's going
to take it towards a crafty side or an elevated, more upgraded side depending on what you're picking there. Then don't scratch into your Gelli Plate
with a sharp object, scratch on your paint piece itself if you want
to scratch paint, and then finish
off possibly with some other tools that
you particularly like. I particularly like
my acrylic ink. If I'm using the ink on
something like this, I want it to generally
be the top layer, because putting it
on like Gelli Plate just makes big splotchy areas. I wanted you to see that, which is why I did
that on one of these. But you'll notice, even though I did
something that I'm like, oh, I don't like that at all in the middle of this piece, by the end, I was able to layer enough things on top of it where you don't even
know that you did that. If you're doing your
pieces and you're like, oh, it's looking terrible,
I'm not liking it, I'm just not loving
any of these, that just means you don't
have enough layers on there. Let that paint dry and layer some more
paint on top of it. Then there are a few
that I finally just gave up on and I'm like,
no, I don't like these, and I took them to the side, but that doesn't mean
that they're junk. If I throw it to the side, I'm not throwing it away. I'm now considering
other uses for that particular one and I'm
just tired of working on it. Maybe I'm going to tear it up
into its own piece of art. Maybe I'm going to use it for
some collage papers later. I'm going to stick it in my
collage basket of papers. Lots of different things I
can do with the Gelli Plate, ones that I just give up on. But one or two of
these I might have gave up on in the
middle of the process, but I kept adding layers and
certain spots of layers. I want you to definitely
play with just doing a certain place and peeling it rather
than the whole thing because these are amazing. Now that I'm done, I love them. I hope you have fun with this project and I'll see
you back in class. [MUSIC]
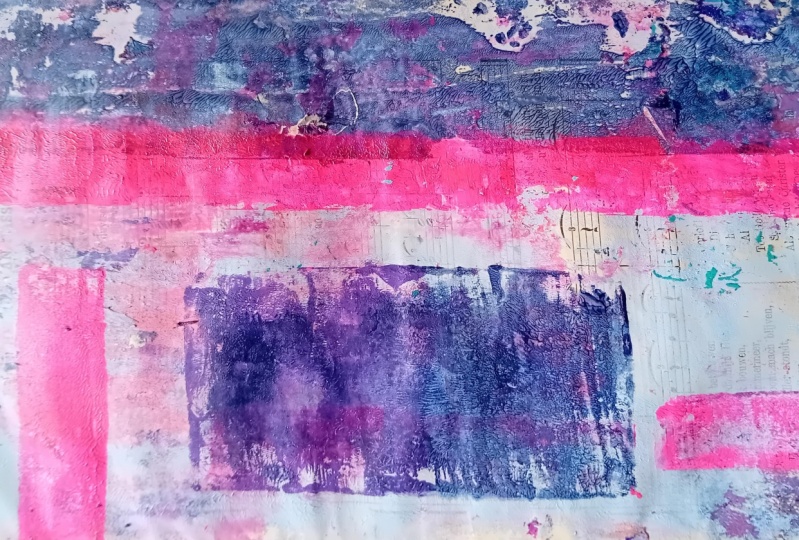
11. Creating Bold Abstracts: For this project,
I am going to make some very helpfully dramatic
abstracts. [LAUGHTER] We'll see hopefully
because sometimes what you have in your mind works out
and sometimes it doesn't, so we'll see how this works out. I have just taken some of that mixed media paper and taped it up with
my tape already, just to have it ready
to start pressing down my designs and
I have decided, like I talked about in
that first project, that I like the edges to be
clean and the artwork to be defined with the
prints that we pull. But you can certainly leave the tape off if you
don't want to use those. I have a clean jelly
plate that we cleaned off and I'm going to
use some wax paper. This is heavyweight
premium dry wax papers. It's a deli paper
that I basically got at one of the big
box stores, Sam's, and I want to use these
sheets as, [NOISE] they resist like to keep paint off certain areas so
I can put paint, do a pool. Maybe I'll move this around
and put paint, and do a different pool and
I want to use these as just pieces that can keep paint off of different areas of the
painting as I'm going. I like the wax paper because
it's not easy to tear. It's not going to immediately soak up paint and tear on me like a regular
piece of paper would. It resists the paint really nicely and I'm just going
to have some of these handy for whatever idea I
happen to come up with. The first idea I'm
thinking is I want to make a dramatic landscape where we've got one color up here and a
different color down here. Maybe we have some mark-making, maybe we have a splash
of a third color. I don't want so much going
on that it's distracting, but I want it to be a
dramatic statement piece. So let's just see
what we can create. This is completely different than the earlier
pieces that we did, because the earlier pieces, just as an example
piece I've done before, we were doing whole colors
basically on the whole piece or I was putting some color in the piece and
different areas. This piece, I want
to be more dramatic. I want it to be big
blocks of color and the statement to be
made by those blocks. We could start the base off as a different color if I wanted some other color
shining through all of the colors. So I'm feeling like I want a really
dramatic maybe black and cream, and do I want
some other color coming through the black and cream
like maybe yellow oxide? I really like yellow. I really like orange. I do like to do more
than one at a time. Let's go ahead and
actually cover the whole thing in one
color and then come back. Let those dry a little bit. I do want these to dry
in between the layers. I'm going to go ahead
and do a full pool. Look at that. Not
quite on there. That's okay. Let's go
ahead and do a second one. We can change this
up as we're going but let's do a second one. I'm off the same amount. That's okay. Look
how pretty that is. Then I do have just my random trash
piece just to get any extra paint off,
so there we go. Now, I think I want to go ahead and do a block off so let's just use the paper
to block off our piece. Doesn't have to be exact, but it's hopefully
going to be close. Then I think I want
a dark top and a light bottom. So maybe if we
go with a brown, let's see. Like maybe this brown. Just going to put
like a little up here and then try to
see what we can get. Maybe I'll use the littler brayer for that. [LAUGHTER] I'm just letting that wax paper be the area that we're going to pull off so
these might not be dry enough, but let's just start
layering in here so I'm going to pick
the wax paper up. I'm going to try a little
harder to get centered. Oh, yeah, that's pretty
cool. Look at that. Doesn't have to be exact. I'm just experimenting here. I might go ahead and
put this back on there. If you've got ways that
you want to do this, there are a little more exact than I'm doing it and you know, definitely go for it. It's all about experimenting. Look at that. This should
be a little different because we've got that. I did leave it with
the paper on there, but [LAUGHTER] kind
of a cool look that, that did. Look at that. I like that to actually
right under there. I left the paper accidentally, but that was interesting
the way that did that. Maybe I want to do
a little bit more of this black on
here. I do like that. Much heavier dramatic
look. Pick that up. Yeah, super cool. Look at that. Let's go ahead. Let's go ahead and do
this other southern bit. Let's just do that right there
and I think I'm going to use my fluid paint just
because I have so much of it. I don't have a large cream. I have that smaller cream, so I'm going to
save some of that. Let's go ahead and take that. Well, I'm going to
flip this over. I actually want to have this protected so let's just
go ahead with a clean one. I don't think I got paint on it, but if I did, there we go. I'm being real careful not to squish the paper back and forth. I want the paper down. I don't want to pull the print. Oh, look at that. [NOISE] That's what
I was thinking. [LAUGHTER] We could
actually pull this off. Let's put some more
paint on here and then I could decide where
to put that wax paper. I could do that and then the top of the wax
paper is clean. That probably would've
been a better way to go. Now we can decide where
we want this wax paper, so let's put it right there. Then let's go ahead. It's further down
than I was thinking it was. Okay, hang on. See, still pretty cool though. Look at that. Super cool. You know what we could
do too is we could use the wax paper to pull our
print too if I needed to. Like this could be
my my jump pool. Wanted to just clean this off. That would be a great scrapbook, not scrapbook collage paper. Now that we've got
this on deli paper, it would be a really
great collage papers, so we could set that to
the side and save it. See, I think I want the black on this one to be heavier
than I've got it. Let's see if we can go ahead and maybe do a little more on this one and this is
just like the other set. I'm just working back-and-forth, thinking, what do I
want out of this? I'm going to work
fairly quickly. Got plenty of deli
paper over here. Let's go ahead and
put that down. Oh yeah, that's
cool. Look at that. There was something
else up in there. Super cool. Let's go ahead. Because the original
one that I pulled, [NOISE] I just want that
to be even heavier. Oh, that's super cool. [NOISE] I do have some paint on my thing down here that I
don't want to pull off in the next pull but I
do want some thicker. [NOISE] Cover all the
brayer over here. It's clean. Always keep
one completely clean. [NOISE] Oh, that's cool. Now I'm wondering if we take this and maybe get a dramatic color in the middle. [NOISE] Let's go ahead and
clean off some of this. What if we do something dramatic here on this one? Maybe something
like this sienna. Just to see. We could
just take some of this. [NOISE] Here's what
I'm going to do. I'm going to actually
paint this on. That was a lot of paint. Then I could take a couple of
sheets of this, place it where I want it
and we're just going to pull that one area. I'm just trying to judge where that stripe is going to fall. Oh, look at that. I'm loving that right there. I'm feeling like I
don't want to do anything else to this one. Let's do something
to this other one. Just pull the paint off of here. Actually really loving what's going on with
this other piece. I just got to paint everywhere. [LAUGHTER] It's really nice
if you're working on say a great big piece or a great big table
so that you can swap back and forth
between all your stuff. That would work really nicely. If you've got more space than
my little filming table, a great big table to
move back and forth, that would be super fun. I'm feeling light. Let's
take a look at this. Let's think, what
do we want to have as an extra element on here? I like the yellow. I like the black. You know what? How about
some crazy like pink? I love pink and ocher. Let's just try pink and ocher. Let's get some of this
[NOISE] color off of here. It's going to still
be on my plate. I could have cleaned
my plate off if this were something super dramatic that I was wanting but let's just do
it like we got it. I'm going to take some paper. We could save some paper by tearing
some of these. [NOISE] Let's see what we get there. Maybe if we offset it so I have a little bit of
yellow on one side, that might be fun.
Let's do that. Oh, look at that. [LAUGHTER] Look at that. I'm feeling that.
I like these two. Let's go ahead. I'm going to clean my
little jelly plate a little bit here and then we can then do another one. I want it to get that paint
off of there real quick. Before we do that, I got lots of paint
on the brayers. I want to look at pieces
but I don't want to leave all this paint just drying on my brayer,
if I can avoid it. [NOISE] Keep some of these little things handy so
that you can wipe them off but I want to look at
these without the tape and see really getting
what I want to get. Don't be afraid to
stop and evaluate, see what you're getting, make changes, go
different directions, but I'm not doing this. Look at that. When you peel the tape, it instantly turns into that yummy dramatic piece of
art that I was hoping for. I will say on this one, I almost wish that this
were a little more solid. I may go back and revisit
that with my silicone brush but then again, I like
it, so you know what? We're going to go with that. I like it. I'm
loving this one too. You pull that tape and then
you get these defined edges, super cool. Look at that. Super fun. I like that this
is angle instead of straight. I liked that this has the
yellow peeking out of it. Very fun. [MUSIC]
12. More Bold Abstracts: All right. Let's do something
with some different. I've got my dirty Gelli plate,
which I can keep using, or I'll clean it off, or I start with a
clean Gelli plate. I have several Gelli plates. It might be fun just to start on a new clean Gelli plate and see what it is that we want to create
for our next piece, I'm going to go ahead and
do a clean piece of paper. I want to have maybe
three-quarters and something bigger here
and then on the third one, maybe a third, and then a third. There's several different things that we can play with here. We could do the color
on the whole thing and then come back and
do separate colors. We could actually do the
color on the whole thing with the dirty plate and then come back and
do the clean plate. I really love the creams. I really am feeling,
what am I feeling? Let's go ahead and just do a
whole plate with the cream, and then I'm going to come
back with some on top of that. That will give me
a starter color. Not doing very good
about getting these on the plate where
they need to be. Let's try a little harder
here. There we go. Also wonder too. Go ahead and do another one. I got a bunch of them over here because I want to do several. Let's go and say I
also wonder too if we put the plate down on top of the print if that would work out because if I don't have
the white paper on the back, we can see better where we were. Look at that. Oh, I might leave this and do
some heavy color blocking. Let's do one more because
that's cleaning off my plate really well. I was wondering, you
might try and experiment, but if we do it this way, and we don't have the
white paper on it, we could see exactly where
we were setting this down. You could try that. I don't
see why that wouldn't work okay because we could see
that from the backside, but I've got the
white backing on it but see now I love this. Now I'm feeling like a stripe of one of these colors that I just pulled out of
there would be really nice. That definitely helped me focus on a direction like maybe we want red oxide
and light pink. Why not? Let's put the Gelli plate
back over here. We'll put that right there. It's pretty neat. I love how dramatic this one is. This is more what I was
thinking with this. I might go back on this one. Do that again because I had to pause and
I started coughing. I think the ink started to dry. Let's see if we can get this
a tiny bit more dramatic. Still like this one better, but definitely super cool. Then we might just see what we can do here with a different color so let's see what we got here. What would be really cool
is to maybe have a line or a shape or a stripe or
something in a place that maybe we weren't
exactly expecting. Let's get some pink on here. Then let's see about this here. Might not be dry enough. Let's do this one first and I'll let that one dry some more. Paints thinner on this one. Look at that.
That's really cool. Now I think before I move
on to something else, I'm actually just
going to take some of this paint and even this out. There's nothing saying that
we can't touch this up if we want so let me just take
some of this pink paint. I want it thicker and smoother. Hope I've got some of that
other color on my brush here. I think I'm going
to let this dry, and then we'll come
back and add this thicker and smoother
on that one, and I like that. I want that pink
thing to be solid. Let's go ahead and pull
this paint off of here. I'm cleaning my brayer off
here on the other side. Look at that. That's
looking pretty cool there. I'm thinking I like
that pink line. Maybe this one has dried
enough now that we can get a better
print on this one. Let's just do it all
the way down that line. Well, let's see. I
like it right there. I love that right there. I love that. That one might be a favorite. Let's get this
paint off of here. Might go back to this one now that we've let that
sit for a second, I know it wasn't very long, but I think it was long enough because these
are thin layers. Acrylic paint dries fast, so I just want this box to
be thicker on this side. More solid. There we
go. That's what I want. Look at those. I like that. Let's pull our tape. I had a clean plate over there, and I ended up not using it. Let's pull your tape off. I do like having more than
one Gelli plate though, if I'm doing a project, and I'm going to need to do a lot of different
color changes and I want to be able to have a clean plate without
cleaning it every time. They are very
convenient just to have more than one while
you're working on a project like this. That's super cool. I like it. I even liked the variations
in the background paint. I'm very happy with that one. This one, I'm
loving the way that pink stripe landed
on top of there. Look at that. Oh, look at
that another colorway, super fun, a very
dramatic dynamic. Here's our other
two that we did. Super fun. I'm loving those. Almost wish the pink were a
little heavier on this one some may go back and color
that in a little heavier, but I still do love it just
like it is, super fun. I want you to give
this a little try-out. I want you to take
your Gelli plate with big swashes of solid color, a stripe, a line, a square. Some type of dramatic
element that you've used your deli paper
to close off parts of the plate to then just get your particular element that you're creating on your pole. I really like this one with
this pink stripe on there. I'm also thinking on these
rule of thirds, so third, a third, a third, a third, a third, a third, so when I was thinking, which third do I want
my element to be at, on these two, it
was on the top third, but really, we could say, that's even better flipped over. We'll say top third, this one bottom third, I want a big two-thirds of some color and then a little
splash off some element. Love that. On this,
I was thinking, the third being one side, center could be where
element overlaps, and then one side
with a solid color, and again, if we flip that, nicer because I like this show through pieces being
on the bottom. So just think a third
and two-thirds and then element in-between that and see what you
can come up with. I hope you like playing
in this technique where you're masking off some of the Gelli plate
with some type of deli paper to create
your dynamic elements. All right. I'll see
you back in class.
13. Cutting Stencils From Yupo Paper: [MUSIC] On this project, I want to show you one other technique that would be really fun
to experiment with. I'm using some YUPO paper
because it's basically plastic. What I like about it is I can
cut shapes and a design out of it and paint on it, without it getting soggy and tearing and stuff
like that on me. Say for instance, I'm
just going to take a pencil and draw
my shape out here. Don't have to be exact. This is the 74 pound YUPO paper. I like it because
it's not so thick, that it'll keep us from
getting a good print. This is about the shape
of the gelli plate. What I'm going to do, got an exact dough knife here. Let's get a cutting mat. You don't want to be cutting anything on your gelli plate. You'll cut your plate, but we're on a cutting mat. I want to draw some type
of organic shape and let this be my stencil
that I'm cutting, that I'm going to be
creating on some of these pieces of paper. We could draw the shape
out if we wanted, or I could just be real organic about it and
see what I end up with. There we go. Now I've got
a stencil to start with, and I've got some
scissors somewhere, but they're hiding from me. Let's just cut this out out, with my exact dough knife. I didn't do that very well but now I've got a
stencil that I can use. It's plasticky. It's not going to tear or get soggy when I'm adding
paint to stuff. I also like this shape
of what we just cut out. I might keep that. That's a fun little shape. I could also take one of these and cut some shapes out of it. I'm trying to just
make sure I'll leave myself enough room that I'm not ripping this
when I go to do something else with it. Maybe I'll do another
shape in here. Maybe even over here we could do like a circle within
a circle, maybe. Let's just think here. I could do this. Here we go. That's what I want to
do. Let's do this. Let's cut out this. Now we actually could
use that as a resist. We've got different things
to use as a resist. Let's go with some of these. We could also, here we go. I got this. I could
do something with. I like this last
second on the fly. Just cut and see what you get kind of thing with
your knife rather than being so precise and drawing it out and
cutting an exact shape, but you can certainly
do either way. I did that. I think another circle out of this
circle would be cool, but I like the
organic spontaneity of just cutting these out of
these to see what we get. There we go. Let's
do that. [LAUGHTER] I like it. Let's get
rid of our cutting mat. Got a gelli plate stuck to
the bottom. There we go. Now, we have stencils
to play with. [LAUGHTER] I've got some paint
on my gelli plate already. I might, just to test this out. Let's do this with the black. Put these where I can find them. I tend to lose
things. [LAUGHTER] Start hiding stuff for myself. Let's put these right up here. I still have paint
on the gelli plate. I'm okay with that. I'm basically going to
paint inside the stencil, and then do a poll. What I like about
this is then we're going to get the
shape of the stencil. Something really
interesting and unique. Got a couple of pieces of
paper here that I did not tape up because I thought we
could just see what we get. Now, see how I can
just move that, and have a shape. I may be pulling the shape of the paint that's
on there already, but hopefully that's dry enough. I could have started
with the clean plate. I probably should have. Look at that though. I think we want to do is
put this plate to the side because I do actually
have a clean plate, and then I'm going to pull another one of those
without the extra color. There's my scissors
right there. [LAUGHTER] See how I hide
stuff from myself. Then let's do a clean pull. Remove my stencil, see how nice that is and that
paint just dries so fast. Look at that. I wanted
to do a ghost pull, but there's not
enough left on it. It's because I've pulled
it from a clean plate. Clean plate everything
comes right off of it. Dirty plates, plates
you've been using forever, all kinds of stuff sticks to it. See, I love that one there. Three dramatically
different starts. Look at that. I'm
loving all of those. Now I don't want this
one for the moment. I'm going to set it to the side, and I'm thinking I want to pull some shapes out of my stencil, and maybe I want to do those
with a different color. I could also fill in like, do I really want
to do with that? Let's see. Let's do a blue. What you might
consider here is using our silicone brushes to get that paint in the stencil
if that would be easier. I think I've got dried paint on my brush so I'm not getting a nice even, that's good enough right there. Pull our stencil.
[LAUGHTER] Look at that. Then this is an instance
where I've got clear on it. We could, I'm thinking, do this and see where it is. If you leave the
clear backing on it it might be an option for you to then be able to see where you're putting
that on your piece or you could just free
go, just like that. Just see what you
get. I love that one. I like that. We could also come back in here now with something like
this and I don't know, maybe the green gold. Let's just see. [NOISE] That's not exactly perfect. I didn't get it all out though. Then we could see like
where's that going to go? Let's see. Maybe I'll
flip it over and judge. It's fun to just go for it too
though to see what we get. My clean brayer. Look at that. The green gold wasn't very strong but it sure did make an interesting
color on that. I did like it though. Let's see. Maybe if we did. What if we do this cream? That is the titanium white. Let's just go for it
right there. [LAUGHTER] Just commit. [LAUGHTER]
Look at that one. Except I have dirty fingers. Look at that. I put
fingerprints on that. [LAUGHTER] Get the paint
off my fingers here. I really like that cream and that blue dot and because I just put
paint all over that, let's do another one. I've got this third one that I pulled and I can
keep on making and pulling prints using different
shapes, different colors. I should just go for it because this I could
do 100 of these. I love random pieces. I like that. Let's go
back with a blue circle. Paint on that one too but
that's not for my finger. I must have paint on the gelli
plate that's doing that. If you have paint anywhere else on the gelli
plate that you're afraid it's going to
get on your design. You could go ahead and
use your wax papers again and [NOISE] close off any area that you are not doing the print from
and that will keep your print clean from random
marks, something like that. Then we can come in
here with our print, pull that color. Look at that. Super cool. [LAUGHTER] Now, feeling like
something right down the middle of that
would be cool. I'm going to do this. I'm going to do a pull with my print here that I'm doing bridges trash pulls
just to get rid of paint. Look at that. [LAUGHTER] Still got paint on there
but that's all right. There we go. Then I know it's clean when I'm not pulling
any more paint off of it. These stencils are super cool. You can use these over and over again once you get
some that you like. What if I do something crazy, like this green gold? [LAUGHTER] That's the whole
height of the paper. Don't think I want the
whole height of the paper. Maybe I'll go ahead
and just cover these. Well, probably would
have helped if I hadn't used that right
there, wouldn't it? Let's try that right there. That's crazy. These are super fun. Think I want to try these
on a different colorway. I really do love this and this, and this, but maybe we can
try some different colors. Maybe something lighter
than the black. It's just very interesting
to see if you do different shapes maybe
an odd ball shaped start with what we
can come up with. I really love these. [MUSIC]
14. Trying A Different Colorway: I grabbed a few more
pieces of paper. Still using that same
mixed media paper but what if we start off
with say this pink, I've got other colors on my thing here I know
that, but that's okay. Let that be a dirty poll. [NOISE] I like that let's try a different color as the base, maybe raw sienna. This will have some
other color in it because the pink is
still on my paper, my paper on my plate
and my roller here. I think it'll be interesting
to pick up my stencil. I just love the
freaking stencils and how easy they are to
create with YUPO paper. Keep that in mind
too if you ever want to create some of
your own stencils, YUPO paper, great choice. Love that one with the
pink and the orange mixed. Though, unlike these colors, are definitely my colors. Let's try this third one. What color do we want to try? Don't want to do those, what do we got up here? We'll try this fun. Bluey gray. This is light blue, violet. Blue and orange are fun so I do like blue and orange mixed together so let's
just see what we get. What I like about using, especially like one
big main shape. Look at that, we can create then a whole series with different shapes and different
lines and different things going on to do our
different prints. What if we did this and then? Did a couple of these in here. Like that, look
at that. Maybe we can even do this piece here, so don't throw out any of these. We've got a pink one
here so maybe if we did, I really like, how about we
try out this Pompeiian red. That looks very bright. [LAUGHTER] [NOISE] Remove
some of this over, [NOISE] get all the paint
off that little one. Let's put some of the
Pompeiian read on our palette paper [NOISE] and roll over our stencil
from our palette paper see, might be easier on this. [NOISE] Then very quickly
pull your stencils up. I love it. Then I might go ahead and flip this so I can
judge it correctly. Mostly want it to
be right on it, got my clean one. Are my fingers clean? I hope so [NOISE]. Look at that. That's pretty darn cool. I do love that. Now, let's come back and put this one back about right there. Can move where we've
put our little shapes. Don't be touching the
stuff with wet paint. Fussing at myself now. It's actually nice if I cut
these off, there we go. What if I did one of these here? I like this thing, right there. Let's see here so
we've got the pink. Maybe the lighter
pink to pull the pink off of what we already
got going on there. It's also going to be a
little different because we've got this
bright pink on here. Let's just put some of
this on here [NOISE]. We're just going crazy
here, aren't we? Once you've got it
where you want it pull your stencils off. Love it, let's try
this on top of here. That wind-up got
my clean Breyer. Just breyer that down. Look at that. This
one. I like it. Let's do a ghost pull on
this blue one, why not? Let's just go crazy. Yes, super cool look at that. Now I need one more element
I'm really loving these, I need one more element. Let's just see, what
can we do here. Let's bring our shape back I
want to work in the shape. Then maybe we would
come off this way. Maybe just some shapes in there. Maybe orange let's go
back with the sienna, what do you think?
Let's just try it. Let's see, you know
what I think I might do with the orange. Maybe we could do that one on this one and just
see what we get. Let's pull off our stencils. Shoot. That one's
right, there we go. Let's get the paint
off my fingers. Shoot, paints on
my fingers, shoot. Breyer, it let's see
what we got here. See now I love that I'm going to show you what I'm
going to do because I got paint on my fingers
but it's far enough out where I could
do deck old edges around this piece and cut that right off and you
wouldn't even know that I had a spot on
there I didn't like, but I love that enough
that I want to keep that. Let's do it goes pull
on this blue one. See if you leave that clear
on the bottom how you can really judge where
that's going to be. Super cool. I really feel like this needs something more
dramatic though. It's almost all the same color and that was not
dramatic enough. Let's get more dramatic. Got this on here. What do you think if we
try quinacridone magenta? It's like a good burst of color, it's darker than some of the
other ones that we've tried. Well the only thing about that is I don't like
this straight edge, so let's do like
that, I like that. Then also I'm liking this, what if we do this? We have that line right
there in the middle of that. I'm filling that. Let's go ahead and get
some paint out here. Feeling good about this [NOISE]. Feeling good about magenta.
Let's see what we got. It's pull our stencils off, you see how great
this YUPO paper is, it's insanely great. I actually want to do it
on this one and we'll use that blue and
as our pole piece. I'm filling it on this. This will give me my drama
hopefully on this piece. [LAUGHTER] We're
going to be used to. These are more exciting
to me than the black. I'm just not a black
grungy person. I try to be I'm trying to
be the black grungy person, paint person that
artists like to be, but. That's what that
needed. I love that. Because we have my
fingerprints on one of these that I didn't intend let's move some of this out of
the way and I'll wipe the paint off my fingers but we want to keep
all our stencils. We're going to just
put the stencils on something to dry
and set these to the side because you
want to be able to continue using your
little stencils that you cut out because if
you really love it like I really love how these turn
out on these abstracts, I want you to be able
to keep using them and that YUPO paper doesn't go bad. It's just nice thick
plastic key paper that you can keep using. [MUSIC]
15. Creating Deckled Edges: Okay, so I've got
everything moved and I want to show you a trick
on these that we can do. If we get paint off
the edge of something and we still love it, we still want to maybe
use it and frame it. One of my favorite
things to show in the workshops is a
float frame piece. This is a piece I have
hanging on the wall up here and it's floating and hanging and it's got these
deckled edges. This would be the
perfect type piece to induce some deckled edges. If I got paint off to the side and I still wanted it
to be like salvaging it and maybe selling
it and using it and framing it or whatever. I want to be able to
still use this piece. I would come back with
either a ruler or rip ruler. I have rip ruler that came
from dualedgeripper.com, which is a Dual Edge Ripper. I like this because it has such a beautiful natural deckled to it that's a little
different than the deckle, that I get from just
a regular ruler. I can see that I'm
really wanting to trim about this much, but I don't want to trim it on the top side because
I want that deckled to look like it's just
flowing over the paper. I want to deckled
it from this side. There's a couple of
ways you could do that. You can look at the
edge and say, okay, I need to come in, however much space
this is with a ruler. One-and-a-half centimeters
would be perfect, to get past that edge there. If I flip it over, I could then figure out what one-and-a-half
centimeters was. I could set my
ruler up there and I'm ready to tear at that edge. You need enough here to tear or it's just really hard
and I'm tearing up towards the ruler to get it
that nice finished edge. Well, you can use a regular
ruler to do that too it's just has less of
this variation there. But now you can
see we've tore off that edge that I did not like. Now I need to know that I've
got about a centimeter. It's all even about
a centimeter over. For here that would be like one and a quarter centimeters. Let's do one and a
quarter right there. Now I want to make
sure that I have about the same amount of
paper all around. I could tear from the top edge, but what I don't
like about that, is that you have a line
where the ruler was. If I'm tearing from that side, there's a line right here
whereas I flip it over, It's not a line there. It's real smooth and you can see I didn't tear it
completely even, but it's even enough. That's enough, it's
enough to make me happy. You could just play around with what's going to work
out for you here. This out really only do on these if I just tore off
a mistake basically where paint got on it or
I didn't want it on it. Here I'm just trying to tear
off a little tiny amount. Just grab the edge
and do the best you can on something like that. Because the more edge there, the easier that is, there we go. Then because it's not
even shaped anyway and it's tilting up I'm okay
with that tear on that. But I could have
tore from the top. It just is a different
look on the edge. If you do make a
mistake and you get a fingerprint or something
where you didn't intend it that's how I would fix that, I would turn this into
a deckled edge piece and I would tear the edges. Just to show you the difference of what
it would look like, just using saying
a regular ruler. I'm going to use my marketer because it's easier
for me to see and we'll tear it
up instead of down. I could judge pretty easily like where I wanted these
because the ruler is clear and then I get all
the edges lined up and I would just tear
that just like that. Then you're going to see a line where that's tore but
it's still is okay. But you can definitely see
all your edges easier. You could judge how even
you get it better this way, because I can see where that
artwork ends on each turn. See, super easy
with a ruler also. Then we have that one also torn. We can have like a whole little
series with deckled edges or if we were super careful, we can have the full thing
with the regular edges. This one is super
fun I'm extremely happy in this pink color way. I love this one right here. That's my particular favorite. I also love this one. This one I like, wouldn't
say it's my favorite, but I still do like
it quite a bit. I love this. I love the black, the grungy is just
not my favorite. It is a nice finished
piece and this, I had something on the edge here and so I'd probably tear
the edges of these. But I like the
colors that appeal to me better than
starting with the black. That was a very
interesting experiment. Just know if you do
like a set that maybe you don't love to change up the colors to something
that you're like, okay, I know I love these colors are here's something I have in mind or here's a colorway
I wanted to try and see if you can
surprise yourself with something that's amazing. I hope you love
experimenting with YUPO stencils that
you create yourself and the abstracts that
you create with those and I'll see you back in class.
16. Experimenting With Scrapers: I thought we could do
another small project so that I could show you
another little trick here. We talked about not carving into your Gelli Plate a couple
of times in the class but I want to really
hone that point in. If you're wanting
to make marks on the paint before you
press your print, you don't want to
use something sharp. You will mar and scar and
ruin your Gelli Plate if you're using sharp
stuff on the plate itself. You'll want to put paint on your paper and scrape the
paint while it's wet. You've got to be
fairly fast because the paint is so thin
it dries very quickly. That's the only way that
I would use anything sharp on my paint with a Gelli Plate on
the print itself. Don't use it on the plate. That being said, you could use softer silicone things. If you've got the
silicone brush, you could come in
and make marks and drags and do different stuff. The Gelli Arts company has soft silicone pieces
with different edges. I've got several different
type scrapers like this but I like the Gelli ones because they're very, very soft. They're silicone, they're easy to use and
you can just drag them through and get different marks and drags on your
piece that way. You could use any of
the Catalyst Wedges. If you've got some of the
silicone wedges by Catalyst or anybody else that
makes some that are soft, you could use those
on the Gelli Plate. They've got some of those
with cutouts on them. I would not use
anything that's hard. I've got some of these
that are very hard. If it's hard, I would use that on the print
but not the plate. I don't want to damage my plate. I've also found some other
little rubbery things I was just thinking about. These are silicone spatulas. I haven't had these in a
couple of days because I saw them when I
went to Michaels and these are soft
silicone spatulas. We could use something like
this on our Gelli Plate if we needed something
with a finer comb on it. I like these, it
looks like each end is just a duplicate of
itself but these are nice. We could get some smaller marks. That's Recollections, It's a silicone spatula set and I just found that at
the Michael this week. It's a fairly new thing
in my little toolbox but I'm glad I have it. You could also make your own rubbery
spatula kind of things because I've made these in
the make your mark class where we were making different tools for
mark-making and stuff. You could get some
of the speed ball, speedy-curve rubber and you can just cut
that rubbery block into your own spreader or scraper with different
marks and teeth on it. That's another option
if you really want to create something
just all your own. Some different options of things that we could use to
scrape on our plate. I have not cleaned the plate, it's still dirty from yesterday. I like that and I'm going
to put cream on this and I'm going to use
what I've been using as my trash page because I
really love this side. If I'm all done and I love this so much that I want to use it, there's nothing saying that
we can't frame that out with a piece of mat board and then you won't even notice that we had stuff outside
our initial paint area. It can still be easily framed
if we love what we did. I'm feeling like just
seeing the mat around it. I'm in love with that
piece right there. I almost don't want to
do anything else to it. Decisions, decisions, I almost want to do this side and then if I don't love it
but I'm at least showing you the example then I could
still frame that side. I think that's what
I'm going to do. Too funny. Let me get my scraper, my roller, because my clean one, I keep it clean. I don't want to get paint on it. I want it to be the clean one. I'm going to put
some ivory on here. I don't even mind that I've
got painted already on here. It'll pick up and be
an extra element. I like that but I could have cleaned the plate off
if I'd wanted to. Moving fast, we are just going to do some interesting lines
and then right on top, I'm just going to
use my clean brayer and get a good print
and see what we get. Look at that. It's exactly what I wanted. Now, we could put a
different color on here and I've got two others that
are just random prints. What we could do is we
could pick a color. Let's see, I got so
many colors here. Do I like the blue? Let's just do blue. I'm just going to
spread the blue on here and we'll just see what we get. We should even still have some
of those markings on there but what we could do is come
through with a different one. I really like this thing here, these little tiny ones. There we go. It probably would help
if I had a towel ready to get some of this paint off because I don't want to let
all the paint dry on these. There we go. Let's do this one or not. I've got my clean one, let's
just get a good clean. Let's see what we got. Let's do this one because we
got a lot of paint on there and see if we can
get a better pool. Look at that, that's super fun. I actually have so
much paint on there that I really want to
get more of that off, so let's just take a clean one. There we go. That's pretty cool,
look at that. I think that's my favorite, I can see the cream,
I can see the blue, I can see the lines
that was underneath, I can see the lines on top. We could actually say that is a pretty
cool finished print if we wanted to say
that's finished. I'm actually loving
the third one. Again, apparently working in threes is my favorite way to
go because on the third one, we get the most pull
and the most interest. I might just save these
for a later pull, for when I want to do
something like this again because this
is pretty cool. Look at that. If we go ahead and say, that's finished
now I could frame that side if loved it. Super cool. I just wanted to
give you another fun little option on
your paint pulls and trying out some of
the silicone scrapers and rubber silicone, different tools that are
out there to pull a print. I like this one, so we're going to call
that one a good one. I want to know what
your paint pulls, where you've actually
scraped through paint, what did you come up with? What are you scraping with and what piece did you
love when you were done? I'll see you back in class.
17. Going Larger: [MUSIC] In this project,
let's go bigger. I have got some
nine by 12 pieces of our mixed media
paper and I have the eight by 10 piece of jelly plate because it's about big enough to
be able to film, I have a bigger one too but I'm going to play on this size today with this size of paper. Nine by 12 is quite a bit
bigger than eight by 10 obviously and so I
think what I'm going to do because I like clean edges. Look at that already have paint while I didn't intend to from those rubber paints
[NOISE] I'm going to go ahead and tape off the edges as long as I didn't
get any paint on the edge, I'm going to be covering
it so it doesn't matter. I just get paint everywhere
when I'm creating. I'm going to tape all the
edges because whatever I do, I want to keep it
within the square. I want to be able to peel
the tape and it'd be clean when we're done [NOISE] because it's my favorite part [LAUGHTER]
peeling the tape. I'm using the painter's tape for this because it's the
one I have that's a little bit larger and I've
got three pieces of paper. I like working in threes
because I don't know that third ghost
print seems to be my favorite out of
the ones that I do. Let's have a three in
case the third one is the magic charm [LAUGHTER]
Third time is the charm. Then any that I
don't love, again, we can just cut those
up into other pieces of art which I love to do. I think that's my favorite
way to create anyway, it takes off all the pressure
so I could cut those up. I can create a little dot art. I could create some little arts. I could do any of those
other yummy projects that I've done with the
leftover part. I'm just bending
the tape down and then I don't feel wasted so if I love all
three of them, that's great. If I love one out of the three, I consider that a win. Now the thing with going larger, I have tried it where I'm just trying
to go fast enough to get my print before the paint dries but really if you would use a little bit
of retarder in your paint, it will give you a little
more time if you've got some other special things
that you want to be doing. If you want to be dragging
through the paint with one of your silicone draggers, if you want to be using
your stencils on the paint, which I have those right
over here and ready. If I decide I want to use one of my Yupo stencils or
if I want to cut some more Yupo paper up for this particular project [NOISE] I have all of those over here. It looks like I
stacked on the paint a little bit wet. I did. Don't get that on anything [LAUGHTER] But now
they're ready. Some of these are big
enough to definitely use on my larger jelly plates so if I decide while I'm doing stuff
to use my stencils, I can. Now the thing with the retarder, we're retarding the
dry time of the paint so we may have to allow a little bit of
dry time between layers, just consider that it's
not going quite as fast. Maybe it's the smaller
one because we're extending the dry
time of our pieces. I'm going to put the paint
probably on the pad here, mix it with the
retarder with just, say, a spatula, and then I'll probably
get it rolled and then roll it onto here, and then do my print, and then maybe do a ghost print, and then maybe add some
more to our piece, and then you just got to decide, are you creating one of the
many different types of projects that we did
where we're doing the general abstract
or are you're creating something where
we're doing the bold, shapes and lines or
did you want to do the stencil part
where we're doing shapes and stuff with
all the stencils. I really liked those. Are you doing a combination
of all of that? We've got lots of
techniques that we learned on all the different
projects in class, now how are we going to create a big piece
with some of that? I particularly love that there's dried paint on here
that we could be pulling up and so I'm
almost thinking if I do one with a cream layer because I do like how that
pulls paint with the cream, then we could stack
on top of that. Let's just try and
see what we get. I'm actually going to use the medium body paint and you may have to use more
paint than I've pulled out. You're using about
two-thirds paint to one-third retarder. I'm excited to do this bigger
project so that we could talk about the retarder
so that if you have bigger ones that you're
doing and you're like, paint's drying too fast, can't get nothing or smaller ones that you're
doing and you're thinking, paint's drying too fast,
I can't get nothing. The retarder is extending
our paint time for us, that's how we're going to
be getting that extra time. I'm just going to keep
this over here and then let's go ahead and
spread some of this on. I may need more paint than
I've put out, but that's okay. I'd rather start off and build. I had plenty of time to
get enough paint on here hopefully and then let's
just go for it [NOISE] We got a nice pull. Still some paint on here, let's see if we can
get a ghost pull, wanting it to pull some
of what's on that. Play with it [NOISE] I
keep knocking stuff off my table [LAUGHTER] I liked
that ghost pull better. Let's see, I don't have
enough paint left out here. Let's just start
layering some stuff on. I really like pinks and
oranges so maybe we'll just do this in some different
pink, orange, yellow. Let's just see. Let's just pull all these out and
see what we got. I love these colors and
we've got the Naples. Let's do the Naples. This is the Naples yellow hue and this is cadmium
red light hue, this is Quinacridone
Magenta, and a light pink. Let's just see what we can get. You can mix colors on
your palette here. You don't have to just do different layers
in just one color. Consider that you could mix up more colors on the palette, you just got to think
and get creative here with your paints and your abstracts and
after you do a couple, then think, okay, now
that I've done this, what can I change and how
can I do it different? What can I get with
the next pull? Let's just go ahead [NOISE] If you're doing
two or three pieces, you might just do each piece, each layer different and see what you get as you're
pulling each piece [NOISE] I'm not being real
exact. I want these. They don't have to be
perfect in the square. That's why I've got the tape. If I end up upper, little bit higher on one
color and not the other, and I get these weird
different edges, I'm looking for that. I want some of those differences or I could have taped it in tighter to make sure
everything's in the square, but we can always frame it. However, we need it later, so I just don't worry about it. [NOISE] I love that right there. That one's looking good. I'm setting these to the side as I paint decide on
the next color. Here's where maybe we will
use some of our stencils. Could use our original stencil. I don't like that square edge in there though or maybe I do. Maybe I like that right
there. Let's just do that. [LAUGHTER] Maybe
will work in some. Let's start with the light pink. You can see how easy this is
to mix with the retarder. I'm just getting
it mixed in there. It's giving me plenty of time to work and get it
rolled on my canvas. I'm not going to worry about the paint that's
already on my roller, I'm just going to
keep on adding. [NOISE] Then of course we have
to pick our stencils up. They're going to
be wet, so don't set them on anything important. [LAUGHTER] Just exactly what I end up doing setting them
on things I didn't intend to. [LAUGHTER] Now,
when I'm moving it, I'm not moving the paper. The paper is not
squishing back-and-forth. The paper is on there, it's
got a good adhesion and I'm just pushing it
flat. Look at that. [LAUGHTER] That just
got very exciting. Let's just do a ghost
pull on this one. [NOISE] Yes, so barely visible on that one. We could go back with some more. Let's see. I could
actually do like this way. I did like this enough on that to maybe do this. Let's see. Let's go for the yellow
see what we get. A little bit of retarder. Do some mixing. You can see on my little
print there the layers are so thin that I'm still getting [NOISE] a pretty fast dry time on my actual print over here. I'm able to keep
coming back layer in these thin layers for
a minute before I really need to let those
dry to keep going. [NOISE] The retarder even though it's giving me a longer
dry time here on my paper, still drying fairly fast. I think I want to go ahead. Let's just do that on this one. Let's flip it over.
Let's do it this way. [NOISE] I'm filling these, look at that. [LAUGHTER] We will go ahead and do our ghost
pull, split that over. [NOISE] Nice. Let's see. What do we want to do? Almost feeling like [NOISE] got a lot of paint over there. Let's come back
with some orange. Working from one of
our earlier tricks, we could do an orange stripe. [NOISE] Let's do an orange stripe. I'm doing a stripe
and that's not so big and I've already got
some paint on my brush. What about my brush? My roller. I think I can do this fast
enough without the retarder. I'm not going to keep all
the messy paint pages, but you can definitely
keep those. If you get paint where
you didn't intend, we might take a scraper
and scrape that. Perfect for reining in extra spots that we didn't
intend to do like that. Really I could have just done the whole thing. Look at that. [NOISE] Look at that. Let's do that on
this lighter one. I want it right here. Look at that. I love it. I love it. Let's do this
one. Get the rest of that. I'm feeling that stripe, definitely like in the stripe. Let's see. What else
do we want to do here? We're just playing. Just seeing where we can go
using up some paint here. [NOISE] I have a
third piece of paper. I'm just trying not
to waste the paint. [NOISE] Look at that. That one's really pretty. I might do these as a cut up piece of
art when we're done. Since we all know that's
my favorite way to create. I should have liked that. Let's think. [MUSIC]
18. Experimenting With Marks & Color: [MUSIC] I think I'm going
to work a little faster. Just wanted to introduce you to the retarder more than anything but I would want, now that I'm looking at that, the one that we made earlier in class and the oranges
that had the pretty ink left over bits, wanting something like that out
of one of these pieces. Look at that. [LAUGHTER] I'm
just going to spread some of this stuff on
here and I might grab a fourth piece of paper. I have plenty of
paper handy to do other ghost poles because the ghost poles all
tend to be my favorite. [NOISE] Look at there. That's going to be our
true trash piece of paper, which I'm sure when I'm done. We'll turn into some
pretty piece of art. [LAUGHTER] This is really how
my creative process goes. I've got something in my mind, I try some of it out. Maybe it's working, maybe it's not, maybe I do a little
turn on myself. [NOISE] I love that. With the direction
that I wanted to go, I wanted to introduce you
to the retarder so you got a little bit of how
that works that feel. But maybe right in
the middle of that, if we're working fast enough or if you're not doing a
piece that's so gigantic, maybe you don't
need the retarder, but I just wanted
you to know that was available. That's pretty, pretty. [NOISE] That's beautiful. [LAUGHTER] Let's see. What else do we want
to add on that? I love that a lot. Maybe we'll come back in here around the edges
a little bit. [NOISE] See what we get because on this one, I do have near the top
edge, not really any paint. Super fun. Let's turn that
over and do that again. There we go. Filling
in to my edges here. Let's do with the trash piece. I'm telling you the trash pieces always end up being my favorite. [LAUGHTER] It's always
the leftover paint that does the most
interesting stuff. Super cool. Now I want something more vivid. [NOISE] Super cool. See now, if I did this as
a cut-out piece of art, this right here is looking
super interesting. Fun. I could come back to, once I get it to a point where it's really
getting heavy on the paint and it's
starting to create weird. [NOISE] I don't know, almost like divots
and weird stuff. I could go ahead now
and start pulling in some brighter marks like I did [NOISE] on those smaller
pieces that I liked so much. I can see now that I've got all these little paints that this light pink is
going to be a favorite. I don't have to buy
all the colors big. I can just go buy
the ones that I actually ended up
loving and using. I know the light pink is
going to be that color. At this point we can
look at it and think, is there anything else
I want to add to that? Do I love it? Do I hate it? Look at that, paint still wet, so we can drag stuff through it. Look at that, I just
made that better. [LAUGHTER] I like that. Also, do we want to add
marks with other stuff? Is the paint still
wet to even do that? It's wet in some spots. Also, do we want to try out any acrylic ink to add
any extra things to this? In the end, am I going to cut this up or am I going
to love it just like it is? Lots of different things
to think of here. I do love the Payne's gray, so that might be
something that we could come in and do some marks with. Super fun. Now the thing with the ink, if you come through and do
stuff with ink like that, you got to now set this to
the side and let it dry. You can't really do
anything else with it. I almost feel like that this
could be a cut up piece [LAUGHTER] with different parts in here that maybe I
loved, so we'll see. Let's set that to the side while that ink is on there
and pull back these. I really love this one. I'm wondering, do I want to
add anything else to it, or do I want to
call this one good? Because just as it is, this is a beautiful
piece and I know this is a little bit smaller mat, but we could frame that right there just like it
is and I love it. I think I'm actually going
to keep this one like it is. I'm going to say
that one's done. I like having these
little mats because then I can judge stuff. Let's see if we pull
this off. [NOISE] Not every piece has to
have a million layers. If you get to a layer
that you're like, "Oh, I love this," you are welcome to give yourself
permission to stop there. [LAUGHTER] Look at
how gorgeous that is. [LAUGHTER] We're going to
call this one good to go. I'm in love with that. Now, this one is very similar, but I don't love it as much. It could be because
overall, it's darker. What I could do is do
a cream layer maybe on top and then do some more
dragging through the paint. Why don't we do that. Let's just give that a whirl. Oh, honey, the gelli
plate. Hang on. [LAUGHTER] I moved
the wrong thing. I'm going to go ahead and use the flow cream
because I got it out. I'm going pretty fast, and we'll just hope I get
enough before it dries. [NOISE] I could drag
through right now, but I think I'm going to wait. [NOISE] If I'm more organized and have more space, I don't pile stuff on
top of each other, so I keep the backs
of my paper clean but in the end, what
does it matter? Look at that. That totally changed what this
is. Look at that. There's not enough to drag, but that totally change that whole piece.
That's pretty cool. Now, I think because
it did that, let's put some stencils
back on there. I did like the stripe, so we could do some stencils in here with some stripes in there. Let's just do
something like this. Maybe I want the
retarder in there, so I have a minute to do that. I definitely need
more paint on there. [NOISE] Sometimes art is just go on until you're
like, "Oh, okay. This is it right here." Because all art has ugly stages, so we're trying to get
through what we consider as ugly to get to the
part that we're like, "Oh, this is
amazing." [LAUGHTER] Let's pull that. We could go ahead and do
some stripes through this. Let's see. Actually, let's just do the
one-side stripe. Let's just see what we get here. [NOISE] Oh, sweet. Now, that's pretty cool. Maybe if we do maybe a big
yellow line, let's do that. Let's do some yellow [NOISE] right
through this orange. Here's another
color that I know. I want a big one of. I want to like having
all these little ones, [NOISE] you can test out
colors and see what you like. When you love something, then go buy the big one. [NOISE] There's that. Now, I'm thinking we've got
some retarder in there. I got a second. I want to
have any lines in here. Let's just do a few right here. Then we can take this, clean up anything
we got over there. Let's see what we
get. I think I want the stripe come in right there, so let's flip that
over right there. [NOISE] That's pretty cool. I think I wanted that
down there though. [LAUGHTER] That one's
pretty fun. Let's see. Maybe we can get this
stripe here too. Let's see, [NOISE]
[inaudible] pull. [NOISE] Look at that. That's super fun. Now, out
of this whole section, let me get that right there. This one is definitely
one I'll consider cutting up because out of
this right here, I'm really liking
that right there. Out of that right there, I could come back and do
some ink on top of it as a little finishing
touch if I wanted to. It doesn't have to
be in Payne's gray. It can be in any color
that I want to do it in, but I'm feeling like
this one I might cut up. How do you like that? A lot. I'm going to stop right
there for a second. Move my gelli plate. Let's pull the tape and see what we're
actually looking at. If you pull tape and you
think, really not done, you can definitely come back, put that tape back, and do it some more. I don't think I'm
going to do that. I'm thinking I want to
see that like it is. I'm feeling like
I'm going to cut that to that right there. I'm loving this whole pink and
yellow and stuff going on. I'm going to grab
a couple of pieces of ink, I'll be right back. I decided to go ahead
and cut this one just so we're again looking at other
things that we can do. Then once I've done that, I'll get this piece right here. Amazing. Now, we can have some
other unique pieces. [NOISE] We could finish this off and frame it
as a print itself. Don't think that's straight, straighten that up some. I could've used my cutter, but I was already
using the scissors. I could frame this out as
its own unique piece of art or I could use it as a bookmark, which I might do because this might be my favorite
piece today. This might be a piece I just
save for some gift tags, maybe some heart cutouts,
some collage papers. I'm going to put that
one to the side. On this one, I'm
going to finish it off with maybe some hot pink or I might come back with, what I could've done, I think I would like maybe
some cream ink. [MUSIC]
19. Finishing Up & Marks with Inks: You know what's
really interesting about the inks
that I've noticed. I got a lot of ink than white, but they don't have ivory. Ma'am, I'm just loved
this one right here. Might be my favorite
piece right there. Do we want ivory as our mark? Or I could have got orange, but I also got this
yummy hot pink. It's like, what
do I want to make an extra mark or
something on here? I can also use paint
pens like my posca pens. That might be something, but let's just color it. Got air bubbles,
which I didn't want. Sucking out these air bubbles. If you're shaking your ink because you need to to get
the ink all spread around, you do run the risk of then
having some air bubbles, which is fine, but I don't want that air bubble drawing
in there like that. I'm just popping some of those. Look at that, I just did something that did
a little sprinkle. Now I'm going to get
a little paintbrush, that's what I feel like I need. Let's get a little brush. Let's get a little bit of water. Put a little ink on
my palette paper over here. That's a lot of ink. I don't want to get
that everywhere. Then, let's do some splatter. I do love some splatter. I think I'm going to
let that one be done. Look how pretty that is. It adds an extra little ump, it's on my rule of thirds. I've got it separated
third, third, third, and I've got a
focal point on that top. Third side. Got a
little splatter, got a lot of interest. That's really pretty. Then just for giggles, let's see what this would
have been like if I had picked pink as an ink, for instance, let's
just do it on our fun little bookmark. Look at that. We could
do pink splatter. Little pink over here. I have a bad habit of
dumping ink bottles over, so be careful and
put your lids on. Now that I did that
on the little one, I do like the excitement of
the white on my big one. That's a really nice thing to do here with these little pieces, is to test out your
ideas and say, Okay, am I going to like, say for instance
that pink on there, or do I think that
white would be better? If you've got these
little pieces like this, that's the perfect time
to try out your samples, or if you did like little sampler pieces and started playing with
some color ways, you could have figured out, I like the pop over the white or I liked the
pop of the pink. You could have made
that decision. I'm going to set
these to the side. That's super fun. Here is our original
large piece, which now that we've been
playing in the inks, we could look at
this and say, okay, I love the ink on these littles, maybe a little bit of ink on
this big one would be fun. I could go back and add some fun little ink
details if I wanted. I need some of my
little tools to move. I could come back on this
and add some extra details, I really love it
like it is though. I'm going to leave
that one like it is. Here we go, using
our big jelly plate, playing with all the
different techniques that we have played with
throughout the class and ending up with three really
pretty pieces out of that. I do have my trash piece
that's really pretty also. I could come back, add maybe a stripy thing to this and some more ink and I could make this
into something too, or I could just keep
it as my trash piece. We'll see. Then of course, this piece that still drying
with the black on it. Got to move the wet
stuff real quick. Let's just pull the tape. The ink is still wet
so I'm not going to move it too much. Now this tape just
as a side word, this tape, because
this is cheaper paper, some of the tape is
tearing the paper and if you have trouble with
your tape tearing the paper, you can heat the tape
up a little bit with your heat gun to
release it better so you don't end up with
torn paper on the sides if that's going to
really drive you insane. But this is a really
pretty piece and it's a piece that I might cut up depending on when
it's dry, what I like. I might not cut it up though. I just like keeping
my options open. These are really fun. I could cut it up and then
add to it. That's pretty. Out of the different
colors here that I've done with this, I think I like the
white ink on the top, and that would have been a nice choice on
top of this one. So super fun, experimenting
with some extra marks on top and seeing how the different colors work
on the different pieces. I want you to experiment here
with this larger piece with all the different skills
that we learned all through class and then just see
what we can come up with. and if you create something
that you really love, especially if you're inspired by a small piece that you're
going larger with, definitely come back and
share some of that with me. I'll see you next time.
20. Final Thoughts: I hope you enjoyed the different projects
that we had in this class. Definitely, I had a lot
of fun coming up with it. I loved showing you where
my inspiration came from, from the cold wax abstract, paintings, and artists that I particularly love to follow. I hope you will start looking around at different
abstract things, and instead of saying, "I don't think I
could do that because I don't have a bunch of say, oil paints and cold
wax, and all of that." Instead, think,
"How can I recreate that with some of the supplies
that I already have?" Because that's what I've
done in this class. I have the oil and cold wax. I have done plenty of oil
and cold wax paintings. Some of the things that
I haven't taken as long and had as
much patience as I probably needed to create the many layers and colors in the pieces that
I love the most, and so then I started
thinking, well, how can I do that with
acrylic paint and maybe come away with looks
that are just as beautiful. They draw a lot faster and maybe when I'm done
painting for the day, I have something I really love rather than something
two months from now. Some of the things that I create just came about because
I'm thinking I love that, but how can I create
it with what I have or with the time
constraints that I have, or what could I create with
these different elements? This is my inspiration. I hope you enjoy playing in the acrylic inks and
your jelly plate, and maybe even look at
your jelly plate a little differently than most of
the things out there, because most of the things
are very crafty looking. They're for collage papers and scrap booking and they're very kitschy, maybe very cutesy. I'm looking to possibly elevate
the looks that I get off of my jelly plate into
a finer abstract feel. I hope this class
inspires you to create differently with
the jelly plate if that's something that
you've used quite a bit of. I have enjoyed having you here. I can't wait to see some of
the things that you create. Definitely come back and
share those with me. I'll see you next time.
 DENISE LOVE, Artist & Creative Educator