Transcripts
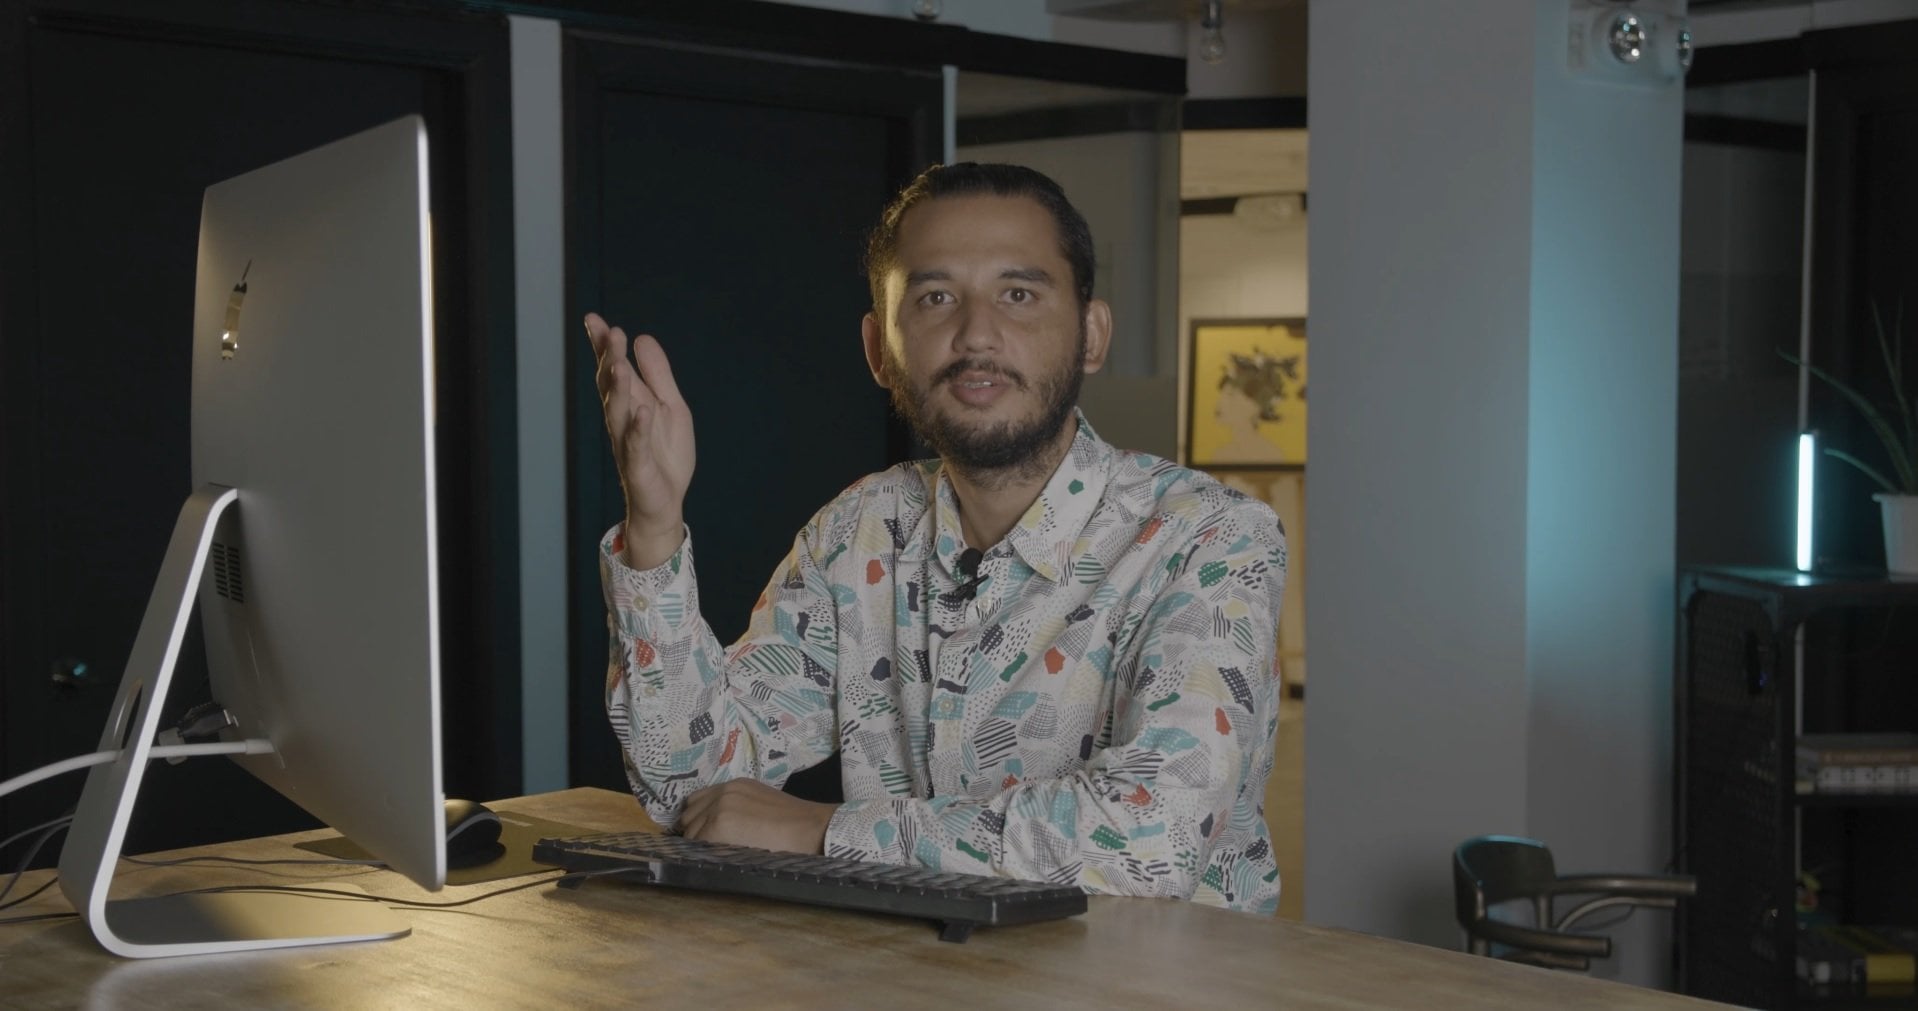
1. Introduction: Okay. Okay, so let me stop this video for a second. As you see here in this video, you see that we have orange light as our rim light here from the side. As you see we have here in the background a tail light. And in the foreground, like on the right side, we have our main light, which is a soft light with our limited budget. We don't have the luxury and changing our location. We don't have any set design when we're shooting a portrait. We have any ropes where we could use certain colors. But what we have are those two tiny LED lights. And even with those two tiny LED lights, we can already create a color contrast. Those two complimentary colors are going to use in a lot of feature films. And those are not the only colors that are working together. But when you have a wheel, a color wheel in front of you, then you see that those two colors are on the opposite side of each other. So green and red are working, Orange and Teal are working. And this is also the reason why we have set up this one here because as you will notice in the further videos, this is the light setup we are almost using all the time. Now I'll show you a breakdown of all our lights that we have used for our past passion projects so far.
2. Taking Advantage of Natural Light: Okay, so here is a little breakdown on how we have shot everything. So in all the cases, we have never been to the location before. We have not scouted it. And with our limited time, also limited equipment, we have to make sure to make the most use out of the existing light when we're looking here, the first sequence we see basically the main light source is all coming from the sunlight and we can see it here. We have used something to block the sun and to give it a little bit more depth in terms of variation. So we have put something to create some shadows that when he's moving in the first scene, we see really that the light is changing while he's moving. So when he's moving here, we see light. It's going to get dark, bright. But as soon as there is no more main light, you can clearly see we have here another light source. And the reason why we put here another light sources, we didn't want it to give him too much contrast since the background is already dark, we wanted to and less contrast on his face. But the idea here is to put only a little spotlight. So when he's moving even further, we see he's moving into the dark, which is basically the longest shot in the entire film. This is how we usually start all our portraits with basically the longest shot. And also with the most interesting voiceover part. Since this portrait was about someone who's boxing, we really arrived to the perfect time. It was already around five o'clock. And here the sun is basically going down at around 530. So we make the most use out of it and try not to give them light. So this is how we shot it. We basically were sitting behind the car and we give him a little light, but just a tiny bit as you see here, there is some like tiny red light and we have just used a non tube lights. And the goal was not to give him full exposure, but we also didn't want him to lose completely in the darkness. In the next scene, we have also here use two lights. You see our main light source, this red light. And for the other light, which was not coming from us. But it's basically the available light from the location itself. The light was coming here. And we just turned the white balance in the way that this green light basically was matched. So basically use this year as our rim light also here creating some light contrast between this harsh red light. Why we choose to shoot it in red was to give it even more contrast in terms of the background and foreground in terms of color. Okay, So in this scene, we really reduce the amount of light because in this case, we wanted to create the contrast by making him brighter. But using the light in the way that we have here are bright spot where the sun was coming from. And we positioned his angle and the way that he really just gets the sunlight from behind. And we just use, again like some contrast light. We turned it so little. And also from almost the same angle as the sun, but just with a different temperature. So everything was shot in under three hours. And really we have just focused only on going from shot to shot. We rarely shot anything twice or even like a repeated it three times because to go was ready to get as much B-roll as possible, different kind of B-roll him boxing, but also introducing the city where he's from. So I think this location was really amazing. And because we have here three layers. So we have basically him and foreground. But as we notice, like he's not even in our focus area. But then we have here the tricycle bit, which basically explains already kinda where we are. Because if we just have the background that could theoretically be everywhere in the States and in Europe. But with a tricycle, we give it really another layer. And this location was just next to his gym with just one shot. We have basically explained already everything like where he is currently and where he wants to be. And I think we don't have to explain certain things, but it's just like the layers and like what is happening in our mind. And, and I think that makes it even more interesting than if we would explain in his voice over where he is and what journey he wants to have or he has. I think sometimes we have to find ways where he's explaining it in his voice over. But on the other hand, we are also showing just with the image itself. And this image, for example, is also edited in compared to the other shots before and after, slower. So we have here a little break in slow-mo and that shot was a little bit longer than compared to the other shots before and after. And we use the same spot basically over and over again to tell the narrative that he is not in the States and he is like having this dream basically like this is where I want to be anytime soon without saying, okay, so let's just go to another example.
3. Making Use of Available Light Source: Okay, So here another example of someone fighting. And one question I got a lot was how I was liking this one here. So as you see, the first thing we've done is turned every light from this chimp out. But of course we couldn't turn the street lights off. But that was exactly the main light we had in mind first, like how can we make use out of this specific light for this shot, we had all our shots. This orange light coming from the street, which we always used as our background light to give it a little bit contrast we have here, use the small non tube light just to give it here a little a rim light. And we wanted this dark moody feeling, but we didn't want it to lose him completely in the dark. The main light source for him as character was this daylight, also from non-life four, so 60 with just a small simple grid and softbox, we had to make sure that this main light is not hitting anything in the background because the goal here was of course to be as dark as possible but without being just black. So here we have basically the same light setup. We have here a small non-life used as rim light, as we can see here. And on the other side we have here our main light source. And we also use that non-life and just let it as daylight and didn't apply any filter because we wanted to have here again, a little contrast between the background. I think this shot was really interesting because we have used here a probe lengths, which usually is just use if you're shooting anything macro, mostly in food commercials, or if you want to shoot something that close. But we use it here to show his eyes. And I think when he's talking about facing this stage in his life, that image is just a perfect match because almost feel like he's dead here. But one thing we have used here was of course the force or 60 as our main light source. But we wanted to have that light streak here in his eyes. So we use the tube light in a way that we could see it also in his eyes. We tried it without and we noticed like when we put it even looks more the way we want it to look like. We used the problems also in the fighting scene when he and his partner, our heads bar ring together. So here I think we have changed the direction. The only light we have used was this small tube light. And instead of using daylight, we have decided here to use just another non tube light to give it here, the rim light. And the reason why we have chose red, because we had this tiny clock in the corner. And when we have switched the angle, we basically saw that this light actually already created some of the rim light. And the reason why we didn't want it to put it here is again, like a contrast. So we have here the red spot. Then we have in contrast our, our teal. And in the background we have again something red. So this shot was actually done. We reverse it in the edit. So that was how we started and the camera was moving backward. But as you see here, it looks like the camera zooming in. But that would be just too dangerous with the problems. I didn't want to risk to hit him with a lens in his eyes. So we started really close and then move the camera backward. And while we have moved the camera backwards, they have then started to spring again. Yeah, so here we have the wide shot, which is actually quite straightforward in terms of lighting. So this is the street light, which basically makes it interesting in terms of color contrast. We have year, nice orange light. But that doesn't affect anything in terms of the foreground, in terms of the actors here. So what we have done again, it's the same set light setup as before, and a nice soft light from the front. But we have put some elements, as you see here, we have created shadow leaks. So it was just one soft light. Basically. The purpose was here to create, to use it as main light source. But as you see, he's a little bit more than him. And the reason is again, we have used elements to block the light that we are creating here. More light bargains and not just like everything bright, but only certain parts bright. On the other side we have a small non tube where we again created here a nice little soft rim light. Not too much, not too obvious. But again, I think in combination with orange and a little bit here it gives it some more contrast in terms of color, which makes it hopefully more interesting.
4. Color Contrast: Okay, So here one more example. On this portrait. We haven't started with a long shot, but we have used old footage from him to give the introduction that okay, he's doing it already for quite a bit. So we wanted to showcase in some bits and pieces all his experience he had before on the stages he had performed before. That was basically the intro. So we have edited it in the way that first we see the old footage. And this whole backstory basically gives already the direction for the rest of the film. We didn't add anything on that one. We just did a parallel cut between the now. So this is basically now 2021 and are moving basically always back between the past and the present. So the past, the present, that story of him and basically who he was and now who is the way we have created this light seen here by using three different lighting sources. So in the background as you see, we have here a really strong teal that was coming off from one none light tube. And then we had our rim, which is not only the rim light, but actually quite dominant light here, light source, a contrasting light to the background. We turn it a little bit red, but lower the saturation of the red because we didn't want it to make to read. And then we had a little soft box coming from the front as you see here, and probably in his face. So it was a little bit further away, but that was a little force or 60 with a soft box. So we have changed the light for him completely all the time. Because we thought like he is a character with basically different faces. He is not only a singer, but he also is a dancer and an entrepreneur and basically has so many things he had done in the past, also in the present. And that's why we thought like, okay, the way we can tell it without saying or telling it is by using different light source, different colors. We had here. Again, our main light, one, non light in the foreground on the side, with a soft box, which we use a little reflector on because we didn't want to give it too much contrast. So a little reflector just near the camera to reflect this light here at that area. But then we also use one non-life tube to basically color the background a bit. So that was not done in post, but we use the colored none tube light. And as we see here, the light was positioned in the way that we use it also as a rim light on his face and body. I think with the haze we created year. Quite interesting look. Especially when we are checking that every shortest, basically different from the shot before and after every light is not really consistent. Again, with a purpose to showcase like he has different passions in life. So this location, I think we were really lucky because we have shorted without any permission, the owner of the park hose give us literally 15 minutes to shut it. So we didn't have time to prepare any bigger light setups. The only lights we have been using here are the two none tube lights. And since there are in general, quite hard, it was really dark. And most of the shots we have shot in slow-mo, we had to get the light as close as possible, but without lighting his face too much in the way that they really had to find a balance here, the way we are basically editing everything is in combination with the music and sound design. So we are always looking that if there is a slow motion shot before and we're using some sound design elements. We are also doing some speed ramps, like doing it from slow-mo to fast forward. So on this shot, we have used the lights from the dance studio itself. So those are pretty cheap lights you can buy in every supermarket basically. And what we did here to make it a little bit more interesting is we haze to room. The only problem we had once the Hayes was not sustaining quite long. So we just use the haze when those lights were on since we also couldn't dim then or adjust them in the way we wanted to have during the post-processing, we applied really strong blur effect. Otherwise the light source would be just too strong. As you see. Though. Every light source is basically blown out and with blur effect, we have spread it a little bit. So in general, it didn't look that harsh anymore, although they smoked help. But with the additional blur in post-production, I think we were able to make its way softer than if we wouldn't apply anything at all.
 Vonas PH, A network of creatives