Transcripts
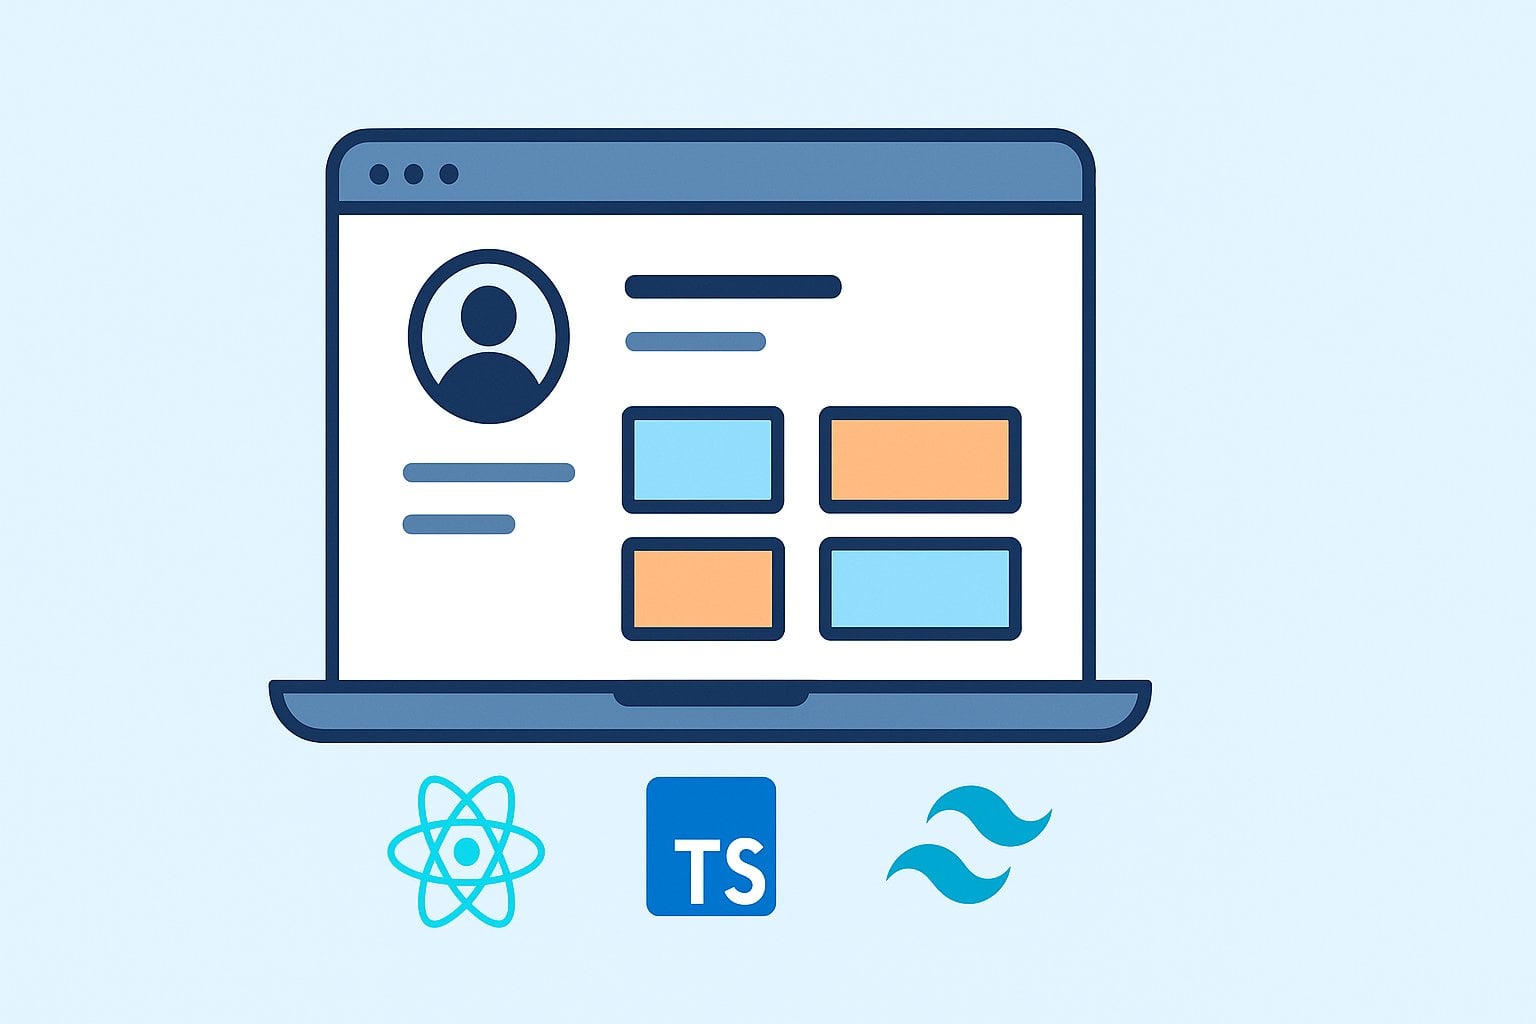
1. Course Intro And Project Demo: Hello, everyone. In this course, I build a production MerntC app and integrate AI services. So I will take you
step by step to build a full stack AI chat
application using nod, Express MongoDB, react with VT, tw CSS and open AI. By the end of this course, you will be able to build a chat crowd with
persistent messages, integrate Open AI for
text and image features, and upload images to
Image kit and deploy your application to
production using versal. We will cover server situp and Mongo Debe authentication
and protected routes, chat and message handling, integrating open AI
for text and images, building react front end with Tew CSS and deploying
the finished up. This course is ideal for web
developers who want to add practical AI features to
projects and prototypes, especially if you want clear, deployable example
and protection tips. Thanks for watching,
and let's get started.
2. Prerequisites For This Course: Hello, everyone. Before we start building our
MEN application, there are a few
important prerequisites you need to have installed
in your machine. This will make sure everything runs smoothly
throughout this course. The first one will be, you have to install
Visual Studio code. This will be our code editor
for writing JavaScript, react, no JS, and everything
else in our project. If you don't have it yet, go right here and
download it from this. Next one, you must
have nods installed. Nod will allow us to
run back in code, create servers, and install
or project independencies. You can download
it from nogs.org and make sure you download
the latest version. Finally, make sure Git
Bash is installed. We will use GTBsh
to run commands, manage repositories, and
interact with Github. You can download it from here. Once you have
install, all these, let's jump into next
step and next lecture.
3. Building a Basic Express.js Server with Environment Variables and Middleware: In this lecture, we will create a symbol express
GS backend server. You will learn how to import required modules, load
environment variables, use middleware like
Cords and JSON parsing, define routes and
run our server. First of all, let's
create our folder project and rename it to be GenfI
Inside this folder, we will create our
back end folder and open it with VS code. First of all, we will
initialize our application. So right here, you can
select the terminal and open a new terminal Make
sure you are in this path, which is Genifi backend
and right here, hit the command NPM in Y. You will see right now package JSO Now we will
install our packages, which is ExpressGs which
is for backend server, CRs and dot ENV. So in the terminal, hit the command PMI
express and course and dot ENV at Enter and you will see now package
lock JSON and nod Medules. Let's close it now and go right here in the Backeg
JSON and right here, we will add type. The default value
will be common GS, but we will use
modules in order to use import or the packages
instead of require. And right here, the main, we will make it server
Js because right here, we will add server JS file. Okay. First of all, we will import Express framework
to build our web server. So import express Express. Then we will import Course Medulware to allow
cross origin request. So import course from
purse and close it. And also, we will load environment variables
from dot EMV file. So import dot ENV config dot JS, and right here, we will add a
new file which is with name of dot ENV like this to add
our secret values inside it. And after that, we will create Express application
instant to const p equal express like this. And we will set the ser port. So we will use
environment variable or pull back to 3,001. So let's go right here and add
our port value equal 3,000 and we will back
right here and add cost Port equal process
dot Env dot ORT, which is the same name
of our secret value PRT, or if it is not available, we will add 3,001. After that, we will
enable cours for all routes allowing front
end, back end communication. So up, dot use CRs like this, and also we will enable
JSON request body barsing from incoming requests. So up dot use Express
dot JSON, like this. And right here, we will define assemble Get route
at the root URL. So app dot Get Method, and right here, we
will add our path, which is slash, and
here we will add Rick, which is for request
and response. Then we will send
sores Send method. And here we will add some text. So hello from second
server like this. And in order to start the server and listen on specified port, we will add app dot LISN with our port value right
here and right here, we'll add arrow function with
console log of let's add acti in order to
add some variables inside our value here, the server running on
port And right here, add duller sign, cli Bracket, and add our port value
in order to load it. Okay. And now, in
order to run our app, let's go back here
in the back adjacon and let's remove this
script and add start. And here we will add node
space server dot js, which is the name of our app. So in order to run
the application, let's open the terminal. You can click on Control and Batick and make sure you are in this path and run MBM
run start like this. And right here you will
see this message which is server is running
on port 3,000. And also, you can go right here. And at the command TTB. Local host of 3,000 and you will see
this message which is hello from backend server. But the problem now, if you make any update
on this string, you will not see this update
right here in the output. In order to make it
re run every change, we will top our application and install another package
which is called nod Mon. So in the back end, let's add MPM install
nod Mon, hit Enter. And let's go back right here in the package and add
another script. Let's name it server,
and right here, we will add Nodmon
space, server, Js. Let's try now to run our app. But this time with MPM run server let's try
to update this value. So you will see it is
restarting and add the updated value right here.
As you see it like this.
4. Connecting our Application to MongoDB Using Mongoose: Now we will start to establish
a connection between back end and MongoDB
database using Mongos. You will understand how to load database URL from
environment variables, listen for successful
database connections and manage errors in a
clean and organized way. First of all, let's
open our terminal. And right here, you can add new terminal and make sure
it is on the back end path and hit the command
PMI Mongos like this, hit Enter Okay. And right here, we will create a new folder with
name of config. And inside it, we will create a new file with
name of db dot JS. First of all, we
will import Mongos, which is the ODM library used
to interact with MongoDB, import Mongos from
Mongos and we will create an asynchronous function responsible for
connected to MongoDB, const connect DB equal
async, function. And we will add catch method. And in the try, we will listen for successful
MongoDB connection event. So Mongos connection
dot on method. And right here, we
will add connected. And the second argument will be R function with console log to log dot Mongo EB
connected successful. Like this. And we will
attempt to connect using the URI stored
in our environment variable that we will
create it right now. So let's go to our web
browser and search for Atlas Mongo Dib,
select this URL. And in my case, I will sign in. If you don't have,
you can sign up either with Google or GitHub. And right here in
the organization, let's click on it and create
a new project with name of Jenify click on
Next. Create Project. Now we will create a cluster, so click on Create. Then we will choose
the free version of Mongo DB and click on
Create Deployment. Let's copy this password and
click on Create database, URL, and we will choose
connection method of drivers. Let's copy this URI in order to store it in our dot EMV
file, click on Done. Let's go right here
in the cluster, and it will take some time, so let's go to VS code and
right here in the EMV, let's add our Mongo DB URI. Mongo DB, underscore URI equal. Test the link and remove the rest of it until
you reach mongodb.net. Let's go back to
our database file. And right here, we will connect our URI that's stored in
environment variable. So add await Mongos
Connect method. And we will add dacti
in order to include variables, Dlarsg Kelli Bracket, and we will call our variable from process dot EMV and let's copy this and paste
it right here. Sometimes you may the password
not included directly, so make sure you put
it inside right here, and we will add slash Ginifi which is the
name of our database. And in the CAT error, we will log error message
if connection fails. So console log error
dot message like this. And we will export
this function in order to call it in
our server file. So export default, connect D. And we will go now
on the server JS, and right here, we will
import our function. So import, connect DB from fig DB and make
sure you add dot gs. Otherwise, the app will crash and right here, we will call it. So add a weight,
connect DB like this. It's open the terminal
now on the running one. And let's stop our server by clicking on Control and C.
And let's re run it again. So MPM run server. So as you see MongoDB connected successfully and server
running on Part 3,000, let's remove this value, which is fixed value. And this message came
from database dot Gs, which is right here. And if there is any
error in the connection, it will log the message. That's it for this lecture
CEO in the next one.
5. Creating a Secure User Model with Mongoose and Password Hashing: Welcome back. In this lecture, you will learn how to design a secure user model
using Mongos. We will define a schema that represent how user data
is stored in MongoDB, and we will implement automatic password hashing using
B crib GS package to ensure that
sensitive information is never saved in plain text. But before we start,
let's just back to our MongoDB Atlas and
make sure the project is our project Genifi and what
we will do is to prevent a future issue that happen if you run the application in
different IP for your network. So let's go back to database and Network Access and
IP access list. And right here on the edit, you can click here. Allow access from anywhere, and it will change to access list entry and
click on Confirm. In this way, whenever
the IP change, you will login to the
database without any issue. Okay? So let's start now. Right here, we will create a new folder in the back
end with name of models, and inside it, we will create a new file with name
of user dot JS LTS. First of all, we will import Mongos to create
schemas and interact with Mongo DiVimport
Mongos from Mongos, and we will install B crypt JS to securely
hash user password. So let's open another
terminal, and right here, let's hit the command
PM crypt Gs like this, Enter, let's close the
terminal and import Bcrypt from B crypt GS. And now we will define
the structure of the user document
using Mongo's schema. So const user schema equal nu Mongost schema like this and add Kelley
Bracket inside it. First of all, we will add
the name field, so add name, and it will be with type of ring and required
set to be true. So this field will be
with type of string, and it will be required. Let's copy it at Coma, and paste it right here. And here we will add the email, and the type will be string, required set to be true, and also we will add extra
field, which is unique. And make it true also because each user should
have unique email. And for the password, let's past the name
and change it to be password with type of string
and required to be true. And also, we will add credits, and the type now will be number and the default value
of it will be 100, for example, and this credit, it is the amount of
attempts that you can ask the AI model
or generate images. If it has become zero, you cannot add or ask
the AI model anymore. Okay? And we will implement
now pre save middleware. We will automatically
has the password. So user schema dot p, and right here,
we will add save. And the second argument will be async function and here at next. If the password is not modified, we skip the hashing. If not, this dot is modified, which is the password. So we will add here, return next like this. After that, we will
generate assault and assault is a random data
used to enhance the hashing. Const, SALT equal Awat B crypt, GenSLT and we will make
the value of it to be ten. And now we will hash the user password
using generated SALT, this password equal
await crypt hash method with this password and SALT. Then finally, we will
proceed to saving the user. So we will add here next. Then right here, we will create the user model
based on the schema. Const user equal Mongoose but model with name of user. And right here, we will
add our user schema. Then we will export
default user. Here, it should be
with Braket to make sure it is next with
Brackett like this, and that's it for this
lecture, C in the next
6. Building Authentication APIs Register, Login & Protected User Data: All right, now we will start to implement a full authentication
system for our backend. Step by step, we will generate JW tokens for secure
authentication, register new users while ensuring passwords
are securely hashed. Log in existing user by
validating credentials and retrieve authenticated
user details through a protected API. First of all, let's
go in our project and add a new folder with name
of controllers inside it. We will add user
controller dot JS. First of all, we will
import user model to interact with our Mongo
Di Be users collection. So import user from Models, user and make sure
you add dot ds. Secondly, we will install
a new package which is JSON web token to generate and verify
authentication tokens. So in the terminal, hit the command NPM JSON
web token like this. Enter, does the terminal, and right here,
import JWT from JSON. Web took in, let's close it. And also, we will import BCRbJS to securely compare hashed
password during the login. Like this, import. Bcrypt from BcryptJS now, we will create a
function to generate a JWT token for a given user ID. This token will be
sent to the client and used to authentic
future request. Cost Generate Token equal. It will accept the ID of
the user, and right here, we will return JWT dot Sign
method or selected ID, and right here, we will
add proststEnvt JWT underscore secret and the
third will be right here, we will add expires in 30 D. So this token will
expires in 30 days. And for this WT secret, let's copy it and
go to the E and V, add it right here at equal, and let's get some secure password
from password generator. Let's select this website, and let's make it
include all characters, and you can change it. You can regenerate
it as you wish, and let's copy this one. And back to our as code and paste it right
here. Let's continue now. So we will start now to
implement register API. We will create an API
to register new users. So export const register, user equal Async and with
request and response. And first of all, we will extract user data
from the request body. So CST, name, email
and password. Which is the same value types
or fields that added in the user model
equal request Body that entered from the user. After that, we will
add tryCatch block. And in the try, we will check if the user with same
email is already exist, D CST already exist. Or should be const user exist equal await from the user schema dot Bind one method to
find the user email. And then we will add if statement
if user already exists, we will return a status of 400 to include this
email is already used, so s dot status of 400 dot JSON, and we will include message which is user already exist
because like we said, the email should be
unique for each user. And now we will create a new
user if it does not exist. So Const user equal await
from usermodel dot Create, we will create a user with
name, email and password. Would be comma right here. And the next step, we will generate a JWT
token for the new user. So const, token equal, generate token for user dot
underscore ID like this. And we will respond with
success and the token. Rest Thetas of two oh
one dot JSON with xis. True and also with
the generated docket. And if there is any
unexpected server error, we will return right here in
the cache res dot status of 500 dot JSO with message from error dot
message like this. Now we will create API
to login existing users. So right here, we will implement a new controller to export const login user equal Async with
request response, and right here, first of all, we will extract login credentials
from the request body. So for the credentials, we will get only email and
the password will be from request dot body
and using Tr CAC, we will find the user
by email so const, user equal Await user dot
Find one method with email. And we will add IF statement. If we have this
user registered in our or stored in our database, we will compare the
entered password with the stored hashed
password in the database. So cost is match should be a match like
this, equal await, B crypt, and we would
use compare method, so dot compare or password and user dot
password like this. Okay, right next to this or
inside this if statement. So if is match, so if the password match, we will generate a GWT token
for this logged in user. Do Const, token, equal, generate token with
user should be racket, user dot underscore
ID like this, and we will return axis stated. Rest Thetas of 200 dot JSON with success through and also
with the generated booking. And right here, if the user doesn't exist or
the password is incorrect, we will return rest Thetas of 400 dot Json with message of invalid email or password. And we will make this
message to include that either email or password
is incorrect for security. Okay. And if there is
unexpected server error, we will log same
message as this. So let's copy it and
paste it right here. Finally, we will create a protected API to retrieve the currently
logged end user's details. So sport Const get user, equal async with
request and response. And we will add try
catch in the try to if request dot user is expected to be set by authentication middleware
after verifying the GWT, cost user equal rect user, and we will respond
with the user's data. So return res dot Thetas of 200 dot JSON with success True and also
user data like this. And if there is any errors, we will log this server error
right here, just like this. Okay? That's it.
For this lecture, see you in the next one.
7. Implementing Auth Middleware & Securing User Routes and test it in postman: In this lecture, we will
secure our back end by adding authentication middleware and we will build user API routes. So we will implement middleware function
that verify JWT tokens, attach authenticated
user to request object, protect
sensitive routes. So only logged in
user can access them. And finally, we will
implement the user routes, file itself and connect
the middleware with register login and
user data routes. So let's start now. We will create a new folder
with name of middleware. And inside it, Oh dot JS pile. First of all, we will import JWT to verify JWT
tokens that sent by the client from JSON web token and also
we will import user model so we
can find the user based on decoded token info. Import user from models
user dot s. And now we will create
middleware to protect routes by ensuring
only valid users are allowed through export protect equal async with
request response, and also you will add next. First of all, the token will be passed in
the request headers, authorization field,
so that token, equal request headers dot authorization like this. And we will add try catch block. In the try, we will verify the token
using our secret key, so const decoded equal
wt dot Verify method for our token and also with our secret value. So Didability underscore
secret like this. And we will extract user ID from the decoded
token, so const, User ID equal decoded dot ID. And we will find the
user in the database. So const, user equal await
user schema dot find by ID method for this user ID. So if the user doesn't exist, we will block the access. So if statement, if no user, then we would return
response status of four oh one dot Json with message not authorized user, not found. And the next step will be to store the user details
and request dot user, so the next route can use it. So rect user equal user. And finally, we will move to the next
middleware or controller. So adhere next. With practice like
this and in the catch, if the token is invalid
or verification failed, we will return response
status of five oh one dot JSON with message of not authorized token failed. Okay. All right. Here, it should be
response and here, and here as well. Now we will implement
the user routes itself. So let's go back right here, and we will create new
folder with name of routes and inside it,
user routes. Yes. We will import the user
controller functions that we implemented earlier, which is for register, login and Guser data. So import from Controllers
userctroller dot Gs, First of four, Get User and login user and register
user like this. And also we will import protect middleware so we
can guard private routes. So import protect Otho Gs. Make sure it is dogs, and we will create a
new router instant. So const user, Router equal express Okay, we should import also Express. So import Express from Express. And right here, we will
add express dot Router. Then we will define all
user related API routes. The first route will
be for register user, and this route will be public. So we will add user
Router dot post method, and the path will
be slash register, and right here, we
will add register user Also the second one will be for Loginser and
this also public. There is no need to
make it private. Because the user
already should login. Slash login and right
here, login user. And for the get user data, this route should be protected. So we can add user route outer Get
method to get the data, and the path will be data. And right here, we will add our protect middleware to ensure that the logged
end user is valid. And we will add get user
controller like this, and it's very important to keep the protect
in between them. Okay. And finally, we will export the router so it can be used inside main server file. So export default
router like this. Let's go now to our server
file in order to import it. So right here, we will add
app.us and the path will be APIs User and we will
add here user router, and let's make sure it
is imported with the GS. Yes, it is right here. Now it's time to test
user functionality. So first of all, let's make
sure our app is running. And in order to test, we will use tool of Postman. You can download it or
use the online version. I already download it. So right here, we will
create a new request. The method will be post, and we will try to register. So we will put the URL, which is local host 3,000 ABI users Register B right here, the registration path
is slash register. And we will go to the body
and select Raw and here. We will put the three fields, which is name and email
and also password. Let's add name and email and let's make the
password and click on Send. So right here, you
will see success True, and here is the token. You can now test the login. So let's remove
this and add login, and we will remove the
name because there is no need and we will send. So as you see right here, it is work very well. You can see now the Mongo DB. So in Atlas Mongo DB, select clusters and
owe collections. You will see now list of users, which is with name of John
and email and the password. As you see, it is hashed. Also, the credits of 100 because
it is the default value. But if we login with
wrong email like this, let's see what's happening. It will run invalid
email or password. And also, we will try
to test register with same email and let's put different name like Joan and we will add
comma right here. Let's send it now. So it will look a message
of user already exist. That's it for this lecture, and we will continue
in the next one.
8. Designing a Chat Model for Storing Conversations in MongoDB: Hello everybody. Now we will start to create
Mongo's model that store user chat session and all messages that related
to those sessions. This model will serve as
backbone of the AI chat system, allow you to store messages, track chat ownership,
and save the date, and also we will organize each conversation
with clean structure. First of all, let's create
in the models folder a new file with name of chat JS, and we will import. Mongos from Mongo's package, and we will create
the chat schema. So this schema will
define how chat and its messages will
be stored in Mongo Div. So const chat schema equal new Mongos schema. And with this field,
first of all, we will store the ID of the
user who own this chat. So user ID with type of and the type will be
reference the user model. So we will use object ID, so type of Mongos dot schema type object ID like this. And the reference will
be from the user model. So F with user schema like this, and also we will add
required cited to be true. Next, we will store
the user name. So username with type
of Ring should be type and required it to be true. Also, we will store the name, so let's duplicate it
and just add here name. Next, we will add
messages array. Each chat contain
multiple message objects. So messages will
be type of array. And right here, we
will add object. First of all, we will
indicate whether the message contain an image or
not. So is image. And this will be with type of Bullion and required
set it to be true. Next, whether the message
has been published or not, so is published with type of Bullion and we will also
add required through. Also, the role. So who sent this message,
user or assistant. So roll with type of ring and required we
will add through. Also, the message content. With type of ring and also required set to
be through as well. And for the message itself, we will add time stamps, for individual message,
there will be its own date. So the type will be date, and also the default
will be date dot now. And right here also, we will add timestam or the schema itself. So times SAMs will be true. And we will convert the
schema into a model. So chat equal Mongo's
model with name of chat. And right here, chat schema. And finally, we will
export default, chat schema like this. It's published, the required will be false. Sorry for that. And also, this is
just time stem. That's it for this lecture, and the next one, we will
start with Jat Controller.
9. Chat controllers create get and delete chats: In this lecture, we will
implement controllers to manage chat sessions for users. So we will create a new chat session and associate
it with logged end user, retrieve all chat that belong to user and sort them by
most recent update, and delete a specific chat while ensure only the
owner can delete it. So these controllers from
the backbone of chat model. So let's start now. In the controllers, let's add a new file
with name of chat. Controllers. Dot GS. First of all, we will import the chat model to interact with
database, so import, chat from models, chatmdeltGs, and we will create
a new chat session, so export Cs create chat, equal async with
request and response. And first of all, we will add tryCatch
block and the try. We will get the authenticated
user ID from the request. So this will be set by
Protect Middleware. So const User ID equal request dot user
dot underscore ID. And we will prepare
default chat data, so const chat data equal first, we will add user ID. So we will link
chat to the user. Also, we will add
array of messages, which is empty array and
also the default chat name will be new chat like this
and also the user name, user name will be from
request user dot NII. After that, we will create the chat document in
the database cost, hat equal ot chat from chatmdelt Create method
with these chat data. And also, we will respond with success and
new created chat. So res dot status of two
oh one dot Json with Sexis Trough and the message will be chat created
successfully. And also the chat
itself like this. And in the catch, if there is any error
right here, we will add. There is the status of 500 per diesel and
success will be false. And the message will be from
error dot message like this. The next controller will be to get all chat
or logged end user. So exports get chats equal async function with
request and response. And we will add try catch block, and in the try, we will get the ID
from the request, which is same as this, let's copy it and
paste it right here. And we will find all
chat that belong to the user and sorted by
updated at descending. So const, chats equal
await chat model dot, find that belong to the
user ID, dot sort method, and we will sort them by updated with minus
one, like this. Then we will send
response with the list of the chats Torres dot status of 200 JSON with excess of two and the charts itself. And if there is any error, we will add right here
response dot status of 500 dot TSN with
success of pools, and the message will be
from error dot message. Finally, we will
implement a controller for deleting a single
chat to export const, delete, chat, equal
ASN function with response and request and
then in the tri cache, first of all, we will get the authenticated
user ID, so const. User ID is same as this. Let's copy it and
paste it right here. Then we will get the chat ID to delete it from
the request body or const hat ID equal
request dot Body. After that, we will
delete the chat if it is belonged to the user
by delete one method. So await chat model
Delete one or the ID of chat ID and
belonged user ID. The next step will be to
send the response with success messages dot
status of 200 dot Json, and success will be true. Also, the message will
be deleted successfully. Okay. And in the catch, we will add the same error. So let's copy this and
paste it right here. That's it for this lecture, and the next one, we will continue with
chat implementation.
10. Implementing Chat Routes Create, Fetch, and Delete Chats: It is time to implement
the chat routes file to connect our chat controllers
with Express Route. So we will secure routes using
authentication Middleware, create endpoints for create, pitch, and delete chat. Ensure only authenticated user can perform actions
on their own chats. So let's start now right
here in the route, create new file with
name of chat Route. S. First of all, we will import Express. And we will import the chat controllers for
handling API request. Chat should be controller
with JS and make sure. Okay, let's rename
it right here. Okay, and make sure
it is dots like this. We will import, create chat, delete chat and get chats. Also, we will import, protect middleware to
secure our routes. So import, protect from our middleware OthJS Okay. And we will create a
new router instance, so chat, Router,
equal express Router. Then we will define
chat related routes. So the first one for
create so chat Router. Dot post method, and the
path will be slash Create. And right here, we will
add protect middleware, also create chat controller. Then we will add
another chat router, and the method will be
dot G. And in this path, we will add Get, protect
and get all chats. And also chat
router dot, delete, and the method will be slash or the path will
be slash delete, and here protect
and delete chat. Finally, we will export the chat router to use
it in our server file. So export default chat Router. And we will go now
to our server file. And right next to this, we will add Abd and
the path will be slash API slash hat and right
here will be chat router, make sure it is imported
without any issue. Now we will test our chat
implementation in the Postman. But first of all, make sure
the back end is running. In my case, it is running
without any problem. And let's go to Postman. So we need this token. So let's login
again and copy it. And we will add or
create a new request. The first one will be post
to create a new chat. So let's add this one, and the ARL will be ABI slash Chats Create and
click on Syd Okay, we should put the tooken
right here in the headers. Let's add a key of
authorization and the value, the token itself that
we copy from here. And let's try now to send. As you see, message or
chat created successfully, let's check Mongo DB. So first of all, let's refresh and click on
Prouse Collections. As you see, here is the chat with default
name and the user name, and it's include the ID of the
chat and also the user ID. Let's now try to get all chats. But first of all, we
will create another one. So let's add Send
and we will refresh the MongoDB now we
have two charts, as you see, let's
try to get them, change the URL to be G, and here the method
will be G send. So as you see here is the charts inside array and finally, we will test the delete. But first of all, we
should copy this ID, which is the chat ID, and we will change the method
to be delete and here also, delete and in the body, we will add in the row,
Kelly bracket, chat. ID and right here, we will paste the
ID. Click on Send. So as you see, success True, message chat, deleted
successfully. And if you check the
Mongo DV after refresh, you will see that we have only one chat message
as you see right here. That's it. For this lecture, see you in the next one.
11. Configuring External Services AI Model (OpenAIGemini) & Image Uploads (ImageKit): In this lecture, we will set up two important external
service integrations required for our application. The first one is AI
model configuration, which is from Open
AI or Gemini API. So we will configure an AI client that will
allow us to generate text, images, and other AI powered responses
in our application. And the second one is image kit configuration
for file uploads. So image kit is used to upload, optimize and store
images efficiently. We will initialize Image
kit with our project keys so the back end can upload
or manage images securely. By the end of this lecture, you will have two fully configured service
files that will be used throughout the
project to interact with both AI and image kit. First of all, let's go right here in the config and we will add a new file with pi dot JS. First of all, open the terminal, make sure you are in
the back end path and hit the command, NPM install Open AI
like this and it Enter. After that, let's go to web browser and search
for Jim andi API, go right here with this link, a google dot DIV and click on Explore
Models in Google AI. Then we will create
APIKey from here, and we will enter
our app project and select Create a project with the same name and
click on Create Project. Let's wait for it. And press on create key. So as you see right
here, here is the key, so click on this link
and copy this URL. Let's go back to our VS code and go right here to dot ENV we will add a new
variable with name of Dimini underscore API
underscore key like this. And right here,
we will paste it. Let's go now to Open AI
and on the web browser. Let's click right here
in ABI, Quick Start, select Open AI compatibility, and we will copy these lines
and import them right here. And instead of this, we will put our variable name
that's in the environment. So we will add process dot Env dot
Jiminy underscore ABI, P like this, and leave
the space URL as itself, and we will export
default, open AI. After that, we will create a new configured
file or image kit, so let's add a new file in the configured boulder
image kit dot js, and let's install this
package in the terminal, hit the command MBMIimage. Kit like this, hit Enter. Okay. And now we will import image kit from image kit
and step number two, we will initialize image kit, so we will need public key, private key, and URL endpoint. So right here, let's
add it, image kit, equal new image kit, and let's close the brackets. Right here, we will
add public Key. And let's leave it now empty, private key, and URL point. So we can get them. I open the web browser
and search for image kit. Then you can sign up. And in my case, I
already logged in. So we will click on Dashboard, and you will see this sidebar. You can click right here
in Developer options, and you will see
this public key, private key, and here
is URL Endpoint. If you don't have, you
can click on creating you and you can add them easily. So let's copy this URL Endpoint. And go right here and
we will name it Image. Underscore or image kit, underscore URL in point, and we will paste what we copy and also image
kit, public key. So let's paste it now
and go back right here, you will see this public key, copy and paste it right here
and also the private key. We will get it from click on the icon and
you need to provide your password and submit. And you can copy it
now without any issue. And right here, let's paste it. And we will add the ARL
endpoint in our image kit file. So from here, let's add
process E and V dot, and we will paste
our variable and make sure it is
same as right here. To avoid any error, and we will copy the public
key, and right here, let's add process dot env dot, and we will paste
our public key. And finally, right here, let's copy our private
key and private key, so process dotnw dot
Private underscore. And finally, we will export
our configured file. That's it for this lecture, and the next one, we will
start with message controller.
12. Building the AI Text Message Controller (Part 1): Hello, everyone.
In this lecture, we will begin construct
our AI messaging system. We will focus on the text
based AI message flow, including validating
user credits, pitching the correct
chart from database, saving the user prompt, and request an AI
generated response using Gemini and return the reply
back to the front end. And in the next lecture, we will implement the image
generation controller, which handle transforming
AI generated images, uploaded them, and save them
inside our chat history. First of all, let's create a
new controller with name of message controller dot JS and let's open the
terminal in order to install a new package
which is Axios. So at the command, NPM, I Axios and let's close it. We will import Axios first
from Axios and import. Chat. From our
models, chat dot JS, and we will import User schema from Models and user dot JS. Also, we will import Image kit. Should be Kit small from our Config file,
which is right here. Yes, it is Image kit config smagit dot Gs
and make sure all of them are ended with
dot ds and Import open ai config openi dot JS. Okay. First of all, we will implement text based
AI hit message, controller. So export const text message. Would be M and right here, controller equal async, request response
and RroOFunction. First of all, we will
add ry CAH Block. And in the try, we will get the
user ID, so const. User ID equal request dot user dot underscore
ID like this. And we will check
if the user have enough credits in the database. So I request dot user dot credits
below the one. Then we will return response dot status of
four oh three dot JSON. And right here, we
will add excess of force and the message
that will appear. Not enough Credit. Otherwise, if he
has enough credit, we will construct chat ID and also the prompt
prompt request body that requested from the user, and we will find the chat
belonging to the user itself. So chat equal await from chat Model Wind one method. We will find it from ID with chat ID and
the user ID itself. Then we will push the
user prompt message. So right here, we will add
chat dot messages dot push. And right here we will
add the role will be user content will be prompt, and also timestam will be
from date now like this. And because it is text, we will make his
image to be false. Okay. And then right here, we will request an AI response
to const choices equal At open ai dot HAT dot Completions dot CRE with model name, and the model name will
be Gemini, two point oh, and the messages array, we will add array,
and right here, we will add the
role will be user, and the content will be front. Okay. After that, we will construct the AI
reply right here. Reply equal dot dot choices with index of zero dot message, and the timestam
will be det dot now, and also his image
will be false. Then we will send reply
back to the front end, so there will be response
dot status of 200 dot JSON, and success will be true, and we will return or
send the reply back. Okay. After that, we will save the AI
reply to chat history. So chat dot messages
dot posh method for the reply and then await
chat dot save method. Then we will deduct one
credit from the user. Await user schema update one. And this will be
with ID of user ID. And right here, we will add DulerSgn ink and the credits
will be deducted minus one. And finally, if
there is any error, we will send response of 500 dot JSON with
success of pulse, and the message will
be error dot message. That's it for this lecture, and the next one, we will
start with image controller.
13. Building the AI Image Generation Controller (Part 2): Licture we will continue from the previous one and build the image
generation controller. This part of the system will verify credit balance
for image generation, send prompt to image
Kit AI engine, and fetch the generated
image as binary. Then we will convert
it to this image to be Base 64 and upload the final
result to image kit storage, and save the image message
inside chat history, and finally, we will
detect user credits. So this controller completes our AI powered messaging system by supporting both
text and image. Let's get started right here. Now we will implement image generation, AI
message controller, so export post image
message Controller will be equal asynchronous
request and response, and cat Book first of all, we will get the user ID, so user ID equal request
to tutor underscore ID. Then we will check if
there is enough credit. So the image will have
two credits for images. So if credit or should be if request dot user dot
credit iss D two. Then we will return response dot status of
four oh three dot JCO, and success will be false, and the message will
be not enough credit. And right here, if everything is okay and
the user has credits, then we will construct chat, ID, prompt, and also is published. Request dot Buddy. And we will find the belong
chat from user, so const, hat equal Await chat Model dot Wind one method with underscore ID for chat
ID and the user ID. Okay. After that, we will
store the user prompt message, so chat, dot messages
dot push method. And the role will be user, content will be prompt, time sta will be dead now, and this image will be false. After that, here,
we will encode, prompt or image kit generation. So const, encoded, prompt equal encoded URI component or the prompt, and we will construct image
kit AI generation URL, const generate image URL, equal. And right here we will
add backtick with duller sine and Kali bracket
to include a variable. So the variable will be
process dot E and V, and we will get the
image kit, URL endpoint. So let's copy this and
put it right here. And here we will add slash and Jenifi which is
our Project name, and right here, we will
add another variable, and we will add dt dot. Now, like this and here
we will add dot B and G question mark ER equal 800 comma hundred to include the width and
the height of the image. After that, right here, we will trigger AI image
creation, so const, AI image response
equal a weight, and we will use Axios dot
get method, and right here, we will add generate image URL, and the second right here, we will add response type
will be array buffer. Okay. Then we will convert binary image to be
base 64 string, so const, base 64 image. Equal. Let's add acti with Data image NG and right here, we will add Base 64, coma and we will add
variable of buffer from in the frame we will
add AI image response Data, and the second one
will be binary. Like this. And right here, we will add dot to
string to convert it to Base 64 string, like this. Okay? And finally, we will upload final image to image
kit storage, do const, upload response equal at image kit Upload. And in the upload, we will include the
file that will be Base 64 image and file name, we will add backtick and we
will add our project name, Genifi AI Image we will add variable date dot NOW. Like this and right here dot PNG to save the
image with PNG format. And right here, we
will add folder. The folder name will be Jenify. Okay. And now, right here, we will build the
assistant reply object. So const reply from
the AI itself, right here, we
will add role will be assistant and content. Will be upload response dot
URL and timestam will be dot, dot now, and as image now, it will be true because
we use it is image, and we will include is published to include it
in the reply itself, because it will be riggered
in the front end, okay? And right here, we will send
the result to the front end. So response to status of 200 to JSON with
success of true, and we will include
the reply itself. And then we will save the
reply inside the chat. So chat, dot messages dot push
with reply and then await, hat dot save like this. After that, we will detect
two credits from the user, so await user SchematUdate one. And right here we will
include the user ID. And here we will add increment it be dollar
sine increment, and here we will deduct
credits of minus two. Finally, if there is any error, we will return, same
as error right here. So let's copy it and paste
it right here. Okay. Let's just back here in
the generate image URL, which is right here, and here we should add slash
and between them, it should be K GenMGm we should include
the encoded prompt. So let's add Da
sign, Kelly bracket, and inside it, we will
add encoded prompt. Okay? That's it.
For this lecture, CU and the next one.
14. Implementing the Get Published Images API + Updating User Routes: In this lecture, we will
focus on completing the user controller by implementing the final
missing endpoint, which is Git published images. This API will allow us to fetch all AI generated images that user have to choose
to be published. To achieve this, we will
use MongoDB aggregation, which is let us to unwind or flatten all messages
inside every chat. Filter only the messages that
are images and published, extract only the needed fields such as image URL and user name. And we will return
a clean array of published images to the
client or front end. At the end of this lecture, we will also update
the user routes, file and add missing
published images route. So this will make it available for public image
gallery feature. First of all, let's go right
here, user controller. And right here, we
will import the chart. Schema from models
slash chat dot JS. And right next to here, we will add our API to
get all published images. So this controller
will return a list of all AI generated images that user have to
chosen to be published. How at work, it will be. We will use Unwind. This unwind will
split the messages, array into individual documents, and match will filter all
the messages where is image is equal true and
is published equal true. And project will
extract only image URL, which is content of the
message and user name, owner of this chat, and reverse will ensure that
newest image appear first. So export const get published Images, equal
asynchronous function. And right here, we will add
try catch block in the try. We will add const,
published images messages. Equal await, chat,
schema dot aggregate, and right here, we
will add array. First one, we will
break messages array into separate documents. So right here we will add G bracket with
duller sine unwind, and right here we will add
ring of Dularsge messages, and we will only return
published images messages. Right here, we'll add only y Blackett and slash
or Dollar sign match, and we will match every message. Dot is image will be true
because as you know, we also have message of
text and also messages. Dot is published its value
should be true. Okay. And right next to here, we will return a cleaner
object for the front end. So let's add Kelly bracket and
right here, Darin project. And the project will
include underscore ID of zero and image. URL will be dollar sign
messages dot Content and username will be duller sign user name like this. And right here, we will reverse. So latest images
will appear first. So response dot JSON
with success of True. And right here, we will add
images from published images, messages reverse
method like this. And if we have any error, we will add response to
JSON with success pools, and the message will be from
error dot message like this. After that, we will update
the user route file. So let's go right
here into user route. First of all, we will import
also get published images. And then we will add right here, user router dot G method, and right here we will
add the path will be published Images and right
here, get published images. Here it should be underscore ID. So please make sure
it is underscore ID. And also, since we
implement chat Model, let's go back right here. And here we should
default chat creation. So let's add await chat
dot create Method. With these fields, which is
user ID, user underscore ID, and user name, R user name, and name of the chat
will be as default. New chat. And finally,
messages array. At the beginning, it
will be empty array. So that's it. For this lecture, see you in the next one.
15. Implementing Message Routes for Text & Image AI Messages: Hello, everyone.
Now we will connect our AI messages controller to the back end through
dedicated API route. These routes will allow
our front end to send text prompts that's handled
by text message controller, image generation
prompts that will be handled by image
message controller. Both routes are protected, and meaning the user must be authenticated using our
protect middleware. We will also update server Gs to amount these routes
under API slash message. So first of all, let's go right here in the
route at Message route the DS and we will import
Express from Express. Then we will import. Protect Middleware from middlewares both to GS, and we will import Controllers message controller to JS both image
message, controller, and also text
message controller. Then we will add right
here, const message. Router equalpress dot Router. And we will add route for sending a text
based prompt to AI, so message router post method, and the path will be slash text. And right here we will add our middleware and then
text message controller. Then also message
Router, dot post, and right here, the path will
be slash image and protect. And we will add image
message controller. After that, we will export
default message Router. Then we will go right here in the server JS and update
it to use message routes. So right here, we will add app, and the path will
be API message. And right here, we will add
message router and make sure it is imported
withGs like this. That's it. For this
lecture, see you in the
16. Test text and image api in postman: Alright, now it is time to test both text and image
route for AI generation. But first of all, we should
run our server first. So BM. Run server. Make sure you are
in the back end. And okay, it's appear that there is
error, missing public key. Let's go to Image kit. As right here, it
should be public. Now it should re run again
without any problem. Okay. So let's open. Postman now. And here we should
include the token. So let's login again
and copy this token. And add new request. First of all, we should
create a new chat. So write HTB local
host ABI HATs CRT and we should include
authorization with our token because it is
protected, and we will send it. Okay, now we should
copy this chat ID because it is needed
in our message route. So as you see right here, so let's go back to
ostman and create a new request this time
will be also post, and here we should add API Message Next at first
because in the route, we have two routes for
image and text generation, and in the server, it should
be ABI slash message. Okay? And also in the headers, we should include
possarization with token. And in the body, we
should include chat ID, and we will paste
ID that we copy, and also it should
include the prompt and the prompt will be another, for example, and is published should be false
because it is text. Let's try to send now. It's need some time. Okay, as you see right
here, here is the content. And the role, it will
be assistant because it is come from Gemini API. So let's now go to Atlas Mongo Dib and try
to refresh the page. Now as you see, the
credit decreases by one, and let's see the chart. So right here, we
have array of two. So let's open this object. You will see the
role of user and the content and the
object number two, it will be with role of
assistant and the content, which is the reply
from the Gemini ABI. Okay. Now let's try
to generate an image. So instead of slash text, it's image, and right
here, keep falls, but here we will try to venerate an image of a dog with a ball. Let's try now to send it. All right, here is the generated URL for our
image and the content. So let's try to open it by
clicking on Control and click. It's Open Web Browser,
as you see right here, here is the generated image
for a dog with a pole. So let's go also right here in the Atlas MonguV and
refresh the page. And let's go right here. For this user, here is
array of four objects. So let's open them. The first one will
be for the text. The second one for the text
reply from the assistant. The third one should be role
of user generate image, and the fourth one will be the content and the
role of assistant. And also, if we try to
open it right here, you will see here
is generated image. Let's also check Image Kit, open it and go to
Dashboard after login. And here in the media library, we should see holder of Jenifi that we named
and click on it. And here is our generated
image. That's it. For this lecture,
and the next one, we will start with front end.
17. Setting Up the Frontend – Installing React, Vite, and Tailwind CSS: Hello, everyone. Now it is time to start with
implementing the front end. First of all, let's
go to our app folder, write a click and
open it with GTPash. Make sure it is end
with the app name, and we will go to
web browser in order to install VT react. So search for React Vet
and select website, and we will go right here
and copy this command, which is MPM create
VT at latest, and we will paste it right here. And add space, and we will add the name of
the app or the UI, which is front end and
hit Enter, proceeds, and we will select framework, which is react, and it
is with JavaScript. Select no and yes and wait
until it is installed. As you see, it is installed
and the server is running. So let's close it first. And close this Gitbash
and go right here in our application and you
will find the front end, write a click Open with VS code. Let's close the back end. And right here, you
will see our front end, you can run it. So change directory
to front end, and to run the front end, you can hit the command MBM, run the because in our
Back agson in the script, you can run this script. Hit Enter, and you will see this is local URL,
you can click on it. And right here, here it
is our starter pile. Okay. Next thing we're going
to do is to clean this. Let's go back right here
and open source folder. First of all, let's clear this
AbCSS and make this empty. And let's go right
here in the app GSX. Let's clear all of
these line of codes. And as beginning,
let's add this text, clear this counter, and also let's clear all
of these like this. Let's check the main GSX Okay. And we will go back right here. As you see, here is our
output after clear it all. Okay? Then we will install
tailwind with react VT. So right here, search for
react WT let's go to tele CSS. First of all, we
already install VT app, and now we will install Te CSS, so let's copy this command and go to VS code,
Open the terminal. Let's add a new
terminal right here and make sure it is
with front end pth. Then we will paste it and hit Enter let's also go back to
see what else we should add. So in the tf gs, let's copy this line
and go back right here in the tf dot Gs. Let's paste it right here. And also, we will add in
the plug ins tailend CSS. So right here after this
react, let's add TedTSS. And in order to test
our Twin styles, let's go right here
in the index CSS, and let's see what should we
add so in the index file, we should add this one, this line right here. Let's go to abjX and right here, we will add class name and text. Let's make it four
xlarge and text red, 900 to make it with red color. Let's also add fonts
from Google Phones. But in my case, I will paste it. All these styles, and you will find it in
the lecture resources. It is from Google fonts. You can select what you want from searching on Google fonts. And go right here. You can search on the style
that you want, and you will find this button, which is G font and right here, get embedded code, you can select this or select
Import and you will find this URL like this as in our case, as you
see right here. Okay? So that's it. For this lecture, see
you in the next one.
18. Building Global State Management in React for Authentication & Chat Handling (AppContext) part 1: In this lecture, we will create the app context for
our main application. This context will store
user chats, selected chat, token, and helper
functions such as switching user data and
creating the chats. By using React Context, we will make our
authentication and chat data accessible anywhere
inside our hub. We will also show how to wrap entire app with
AppContext provider so the global state
becomes available across all components and pages. First of all, let's
create our AppContext. So right here in the source, we will create a new folder with name of Context and inside it AppContext dot JSX. First of all, we will import React helpers use to create context
and manage state. So ret context, from react, use Context, use effect, and also use State. Then we will install
some packages. So Make sure you are in the front end and
hit the command PMI. First of all, we will
import or install, React dash router, dash, Dom, also, Axios for API request, and also we will React hot
toast for notification. So reacts hot, dash,
toast. Hit Enter. Okay, it should be axis. So add right here. Okay. Now we will import navigation hook
from react router Dom. So import react router Dom, use navigate. And also, we will import
axis for ABI request. So import axious from
Axios and also import dost from would be toast React hot toast. Okay. First of all, we will set axis default
base URL from EMV file. So let's add dot ENV right here inside Hours should
be inside front end. So let's move it to front
end and here we will add WT underscore
server underscore URL. I will be equal local host, and the port will be 3,000. Let's go back right
here and we will add axios dot defaults dot s uRL equal Import
dot meta dot ENV. Dot the server URL variable. So let's copy it and
test it right here. And this is the
way you can import EMV file inside
react with. Okay. Then we will create a
new context for the app. So cost AppContext,
equal, create context. Then we will create and export context
provider component. So export const
AppContext Provider. I will accept children. And right here in the
return, first of all, we will initialize
Navigation hook so const, navigate, equal, use navigate. And we will store log
end user using U State, so const, user set user, equal us State and the first. It will be null, there
is no registered user, and we will store all
charts for this user. So Cost chats and set chat to be used
stat with empty array. After that, we will store
currently selected chat. So C selected chat, set selected chat to be null. Okay. Then we will
store token in the state that loaded
from local storage. So Cost Token and
set token equal. Use the state from local storage dot G item
and the name of this. It will be with key of token. Otherwise, it will
be null if the user is not registered and the
token isn't generated. Then we will add loading
state for switching user, so const loading user
and sit loading user. First value will be true. After that, we will implement a function to fetch
locked in user data. So const pitch, user equal
asynchronous function. And right here, we will add try catch
block. So try catch. And right here, we will send Get request
to protected ABI, so const theta equal
At axios dot G method, and the API request will be API user data. And the second argument
will be for headers. So let's add headers,
and it will be with authentication
from our tok in. Okay? So if success, we will store this user. So right here, let's
at F data dot succes then we will set the user
set user from data dot user. Otherwise, if it is filed, we will show error message. So let's adhere.
Else st dot error. And right here, it will
be data dot message. And in the cat, we will catch
any network server errors, so tostt error from
error dot message. And also, we will add finally in order to stop loading
regardless of the result. So add here finally, and we will set loading
user to be false. Okay. And right here, we will set now a function
to create a new chat. So const create. New chat equal A
and Cs function. And right here, we will
add try catch block. And in the try, we
will prevent creating user chat if the user
is not logged in yet. So if not user, then we will return toast with message of please login
to create a new chat. Otherwise, if we
have already user, we will navigate him to
the homepage with slash, which will be the home screen. And we will send API request
to create this chat or cost data equal await
axios dot post method, and the path will be
APIs, chat slash Rate, same as URL in the back end and the headers will be with
authorization with talking. Okay. And I chat,
created successfully. So right here, we will add I data dot Xs then we will sit, created chat as
selected sit selected chat to be data dot chat. Okay. And we will refresh chat list and
select preferred chat. So await pitch. Users chats. And right here, we will
add preferred Chat ID. And this function, we
will implement it later. So data dot chat
dot underscore ID. Okay. And right here in the s, we will show error
if it is filed. So toast dot error
from data dot message. And in the cache, we
will catch any issue. So toast dot error
error dot message. Okay. That's it
for this lecture. In the next one, we will
continue with this file.
19. Building Global State Management in React for Authentication & Chat Handling (AppContext) part 2: Welcome back. Let's now
continue with our app context. So fight here. We will implement now a function to fetch
all users chats. Cost pitch users chats, which is same as this
function and equal Async. And right here, we will
add preferred chat ID. And here equal empty
square bracket. Then we will return
Right, catch. First of all, we will get
charts from our back end, so const data equal await axis dot G method
to get our charts, and the ABI will be API hat G. And second argument
will be for headers. Let's add headers with
authorization of talking. Okay. So if API
success right here, we will add F data dot Xs, then we will store
charts in our state. So set charts to be
data data dot hats, and if a preferred
chat was provided, so if preferred chat ID, right here, we will add const referred hat equal data dot hat, and we will use find
method for each chat. We will make it chat
dot underscore ID, equal preferred chat ID. Okay. And right here, if it is found, we
will select it. So if preferred chat, then we will add sit selected
chat to be preferred chat, and we will stop our
function by using return. And right here, if it is already selected,
we will update it. So I selected chat,
then right here, we will add cost existing selected equal data dot
chat dot find method for each chat. We will add right here, chatnersce ID will be equal selected chat
dot underscore ID. Okay. And if it is found, we will sit it as selected. So right here, if existing
selected, we will add sit, selected chart to be
existing selected, and we will return to
stop this function. Okay. Otherwise, we will select
the first chart or null. So right here, we will
add sit selected chat to be data dot HATs, dot nth. If it is greater than
zero, if statement, it will be Data chart with index of zero to
indicate the first chart. Otherwise, it will be null. And right here for
this FI statement, we will add s, and in the s, we will
show back end error. So toast dot error
from data dot message. And in the cache, we will catch any
errors that show up. So it's Trust error
from error dot message. Okay. And when the
user is changed, we will refit the chat. And this will be by
helping of use effect, so use effect, right here. And so if there is a user, we will pitch chats
or logged in user, so we will add
pitch user's chats. Okay? Otherwise, else, we will set or clear
chats if user log out. So set chats to be empty array, and also set selected chat to be null in order to remove it. From the UI, right here, we will add div dependency for every time the
user is changed. Okay? Next, right here, when to in is changed, we will fetch the user data. So we'll add another use effect, and let's add right here, if token so we will fetch
the user using a token. So we will add fetch
user function like this. Otherwise, in the else, we will clear user data
if there is no token. So set user to be
back to null and also set loading
user to be pulse. And for the if dependency, it will be changed
whenever the user change. Okay? After that, we will make global state
accessible to our application. So right here, we will add
cost value will be equal. Navigate user, set user, and chat set chat
and selected chat. Be come right here,
selected chat. And set selected chat
and also create new chat and loading user and switch
user charts and took in and set took in and finally axis. Okay. And right here, we will return provider with global state return
AppContext provider with value equal
value from this. And right here we
will add children. Let's close it like this. Then after that, right here, we will add the custom
hook to access context. So Export on use Context equal function
that we will return, use context with our app
context that we implemented. Then we will go to our Manji aSX in order
to import the provider. So right here, let's
import AppContext. Provider. Our context AppContext. Let's make sure it is
imported. Yes, here it is. And we will wrap our app
in with this app provider. So AppContext,
provider, and it is. Let's make the app inside it, just like this. That's it. For this lecture, see
you in the next one.
20. Building the Login & Registration UI in React for Our MERN Chatbot App part 1: All right. Now we will start to implement login and registration screen
for our application. You will learn how to
manage form states, switch between login
and register modes, handle API authentication
request using Axios from our global context, and we will store JWT tokens and how loading indicator
while request proceed. We will also style the UI
and integrate react icons for a clean user friendly
login experience. First of all, let's add
a new file right here in the source folder with
name of style Gs. And you will find
in the resources all style that we need in our application in
order to save some time. And let's create now a new
folder with name of screens. And inside it, we will create a new file with name
of login dot x. First of all, we will import use State in order to manage state. And also, we will import the global context hook for Axios Instant and
Log in handler. So import from our context AppContext here, we will import use AppContext. And we will import
tost notification for showing errors and messages. So import toast from
React. Hot Toast. And we will install now
a package for icons. So let's open the terminal, change directory to front end, and hit the command
PMI React icons. And hit Enter, then
we will impart from react icons
IA, these icons. First one is if a user, if a envelope and also if a look and if a sign N it's if a sign Alt and also
if a user does Okay. And also, we will import styled classes
from style dot Gs. So import star would be star as from our style gs. Okay. So whenever we
need to use some style, we need to add dot the
name of our variable. Okay? And now we will create
our login component. So let's add const
login, equal function. First of all, we will add state to toggle between login
and register screen. So cost, state, and set state, equal, use state, and the default one
will be login screen. And we will add state for
storing name and put. So cost, name and set name equal use
state of empty string. And for the email, cost email and set email, it will be also empty string. And for the password
will be const password, set password, equal use
state of empty string, and const loading state
and set loading state, it will be where default
value at first will be false. Then we will extract axis instant and
token sitter or from context or const, Axios and set. Okay, equal. Use context. And now we will
implement a function that trigger when
form is submitted. So it will be to handle, submit. So const handle, submit with a synchronous
function and here the event, and inside it, first of all, we will prevent the
page from refreshing. So we will add edtPrevent
default like this, and we will select
correct API endpoint that depending on the mode whether
it is in or it is register. So const, URL, equal state, and if the state equal login, it will be API user
slash login as an hour. Back end. Otherwise, it will
be API user slash register. Okay. Then we will
add try catch. So in the try, we will
enable loading state. So set loading to be true. After that, we will send post
request with user inputs. So const Theta equal await
axios dot post Method. Xs dot post. And right here, first of all, we will add the URL, and the second argument
will be with name, email, and our password. Then we will check if back
and respond with success. I data dot success we will
save the token in our context. Set token Rm, or
inside Deta dot Token. And also we will persist
token in our local storage. We will save it
inside local storage. So local storage because
as you remember, in our context, we will get this token from
the local storage. So now we will set it if
the user is registered. So we will use local storage
dot sit item method, and this sit item will accept
the key and the value. So the key will be with token, which is the name, and the
value will be from DetaTkN. Okay? And right here, else, if there is error, we will show this
error message from our back end else
tost dot error, it will be data dot message. Okay. And if we have
Network error in the cache. We will add or extract
error message safely. So const message equal
error dot response, and we will add question
mark dot data dot message or error dot message. Otherwise, if neither of
these error happened, we will add an error occurred. Okay? After that, we will show toast dot error
from our message. And for the try catch, we will add finally finally, we will disable loading state, set loading to be false again. Okay?
21. Building the Login & Registration UI in React for Our MERN Chatbot App part 2: And for the return right here or the GSX,
let's return now. And in the return, we will add main page Rubber, so div with class name equal
in order to add our style. Probably, we should
add Calibra kit and first Login page
Rubber like this. And inside it, we will add
our Form container tag. So for and this
form will be with submit function from our handle submit that we
implement right here. And class name will be equal
at Login for container. And inside it, we will
add the title section. So div with class name of S Log in Title Rubber, and right here, we will add dynamic title
based on the mode, whether it is login or
it will be register. So right here, we
will add ETag with class name equals Login title. And right here, in
order to use dynamic, we should add Kelly
Brackett and if the state equal log in. Then if a statement, if it is true, otherwise, it will be for register. So if it is login, we will add will come
back and right here, if it is register, we will add get started now. Okay? And also, we will
add a dynamic subtitle. So B with class name
of st Login, subtitle. And right here, we will add also Kelly Brackett that bays on the state if it
is equal, Login. Then we will add right here, sign in to access your account or if
it is register, will be create an
account to get started. Okay? After this closing div, we will now add the
name input that will only visible
when it is register. If it is login, there is no need because the user
already put his name. So if the state equal, register. And so if it is register, then we will add normal Bracket with DIV and this div
will have class name of S Log input rapper. And right here, we will add
the field label, so label. And this label will
have class name of t Login Label. And right here, we
will add the name. And then we will add wrapper
for icon and the input. So Dev with class name will be a login input
relative wrapper. And right here, we will add
the user icon from FA user, and this FA user will have
class name equal a login icon. And also the input
field for this name, so input and the type
of this will be text. Also on change, we will
have event and we will return set name to be
e target dot value. Okay, and the value of it will be equal the
name that inputs and the placeholder
enter your name. And we will set it
to be required. So he should input
his user name and the class name will be
equal as dot Login. Input, like this. Okay, that's it
for this lecture. In the next one,
we will start to implement the email and
other input fields.
22. Building the Login & Registration UI in React for Our MERN Chatbot App part 3: All right. Now, let's
continue with our login file. So right here, we will add
now the email input field. So D with class name equal this Login
apper for the input. And right here, we will add label for the email, so label. And this label will have class
name equal S Login label. And here we will
add email as text. Then we will add rapper
or icon and input field. Div className at Login input relative wrapper. Here, there will be email icon. So if a Envelope and it will take last name of Login icon. And here we will add input
field for the email, so input tag and the type
will be email and right here, we will have unchanged
handler will take event, and right here, we will add set email to be et
target dot value. And the value will
be email and also the placeholder will
be enter your email. And it will be required and the class name will be
equal a Login input. Okay. Then right after
these two closing div, there will be password, input trapper, div with class name equal a
Login input wrapper. And right here, we will
have password label, so label with last name of a Login label. And here, there will be
password and inside it. Right here, there will be rapper for icon
and the input itself. So D with class name of a Login input, relative rapper inside it. There will be FA L for password. And it will have class
name of Login icon. And also, there will be
password input field, so input and the type will be password and
here we will have unchanged with event and set password to be
et target dot value. And placeholder will
enter your password. And it should be required. After that, we will
have class name equal p dot Logan in boot. Okay. And right after here, we
will add our submit button, button with type of submit
and class name will be equal this Login button and here will be disabled
if it is loading, if the loading value true, it will be disabled. And now we will show loading spinner
when sending request. So right here, we will add curly Brackett
if it is loading. If this statement, we will have Div Would we close it. Right here, Div. And this div will
take class name equal p dot chat box loading spinner. And right here, let's
take it this bit empty because it will
show a loader that implemented in the style
and else right here, if state equal register. And if a statement,
we will add right here the act fragment, and in the react fragment, we will have if a user loss, close it with text of create account like this and right here in
this closing bracket, we will have our sign in
so let's add fragment, and here if a sign in alt like this with
login as a text. Here we should close
this prequet that belong to F argument
if it is true. So let's close it. And we
should remove one packet from these in order
to solve the bug. Okay, and write
after this button, we will say switch mode link. So B tag with class name
equals Login switch. Text, and right here, we will add dynamic text
that based on the state, if the state equal, register. So if statement, and right here, we will already have an account if he is on the register screen and he want to
navigate to the login, we should show them this text. Otherwise, if he is on the login and he didn't
have an account, we should add don't have
an account like this. Okay? And we will add
clickable switch button. So right after this text, we will have span, and this will have last name of S Login switch button. And here, also it will
have nClickHandler, and OnClick we will set
state to be if it is equal, Login or should be inside. Like this, should be small. If it is login, it will be register. Otherwise, it will be login as itself in order to switch
between these screens. Okay. And right here, we will
add state if it is equal. Register. Then the text will be login. Otherwise, it will be register. And finally, we will export
default this login page. Let's go back to
the password field. I forgot to add the value. So let's add it right here
and also here on this click, it should be the set
state right here, and if the state equal
log in, like this. Okay, that's it
for this lecture. In the next one, we will
add our login inside up to JSX in order to test it
on the UI. See you there.
23. Integrating the Login Screen, User Context, and Toast Notifications into App file: In this lecture, we will
connect our login screen to the entire React application by updating the Ab GSX and Min JSX. You will learn how
to conditionally show the Login screen
or the main app based on user
authentication status that comes from global context. We will also integrate toast notification
system at the root level and wrap the entire application with browser Router
in the Min GSX. So let's get started. Go right here in ABGsX. First of all, we will import global context to
access user state. So let's go right here
and import Context. Should be context
slash AppContext, and we will import from
it use AppContext. Also, we will import
login screen. So import login from screens login. Okay. And let's
remove one of these. Okay? And also, we will import toast
notification container in order to enable it. So we will import
toaster, react, hot toast, and also we
will import the style. So stars from our style got Ds Okay. And in the app, we will extract user
from global context. So on user equal, use AppContext like this. And inside the retail,
let's remove this, we will First of all, add react fragment, and we will add right here
the toaster component. So in order to enable the
notification and messages, then we will conditionally show home screen
or login screen. So we will add dynamically,
so curly bracket. And if there is a user, if statement let's
add this, else, let's add another packet, and if there is a user, let's add or now just Ptag
and inside it on screen. This we will implement later. And right here, else, if we don't have a
user and any took in, then on this time, we will show our login screen. So let's add div
and this div with class name equals
hub Oth container, and right here,
our login screen. Okay. And also, let's go to the Manji sex in order
to add our browser router. So let's add import rower
outer React router Dom, and we will wrap a
container from this router. So let's make sure it is rubbed app component and the
app contact provider. Now it is time to run our application in order
to see the result. So first of all, let's
navigate to the back end, make sure you run it. The NPM run server. And also, let's add a
new terminal from here, and we will navigate to the
front end and run our up. So let's open it. So
as you see right here, once we run the application, it show us this login screen, and you can click on Register in order to navigate to
the register screen. And if you see inspect and go right here
in the application, you will see this local host. So let's try now to login with the same user that
we add in postman, which is I remember
it is jon@gmail.com. And the password,
let's try to gin now. So as you see, let's navigate
us to the home screen, and the gin is right here because as you see
in the conditionery, in the app, if we have user, it will show home screen. Otherwise, it will
show the login screen. Okay? And now if we remove this token by clicking
right click on this, and if you refresh now, you will redirect it to
the Login screen again. Let's try now to
register with new user and email and the password. And let's try to create account. So as you see, it's register. Let in and navigate us
to the home screen. That's it. For this lecture, see you in the next one.
24. Building the Sidebar Component for Chats, Navigation, and User Account Management part 1: We will start with building the sidebar component
for our application. This sidebar will allow user to create new chats, search chats, navigate to image, library, delete, chats, and
manage their accounts. We will integrate our
global app context to access the chats, navigation, token
handling, and Axios. Additionally, we will
add Minutagle for mobile responsive and implement
lookout functionality. So first of all, right here in the source, we will create a new
folder with name of components and inside it, we will add a new file
with sidebar dot sx. Let's create our app like this. And first of all, we will import state and
import global context hook. So import, use prom Context, AppContext. Use b context. And we will import tostfication. Rm, React. Hot toast. And we will import some
icons from react icons. So import. From React icons fI here will be if it
and if I side bar, and also import from the act icons AI. We will import from
this AI outline. Search and also impart React icons IOive IO image outline. Import React icons. If we will impart from it. If I look out icon and also import React icons. If a user and finally, import React icons RI. We will import RI,
delete Bentex line. Okay. Then we will impart
our tiles to import stars from our style dot JS right here in the side bar, we will pass is minu open and also set is menu open. And these, we will bust
them from our AbgSX. So let's go right here in
the AbgSX and first of all, we will import side bar from our component and import
also side bar icon, which is FI Tide bar from React
icons FI, and right here, we will add Cost is menu open, and I minu open to be equal use state with
pulse at beginning. User state and make sure it is imported and right
below the toaster, we will add dynamically to
check if not is menu open, double and we will make
if a sidebar on show with class name of as
dot Minutagle icon. And this will be with OnClick. And if the user
click on it to be set as mini open to be through. Okay? This menu icon will be for responsive
for mobile screen, and we will see it
once we run our app. After that, right here, we will extract values and functions from our
global context. So it's a curly bracket equal, use context like this and here we will extract
chats and also set select let's copy them from the app context
itself, from here. Let's see what we need. Or actually let's copy them all and paste them right
here like this. Okay? And we will implement a
state for search input. So cost search and set search to be equal use
state with empty string. And now we will implement a Lou function that clear
token and look user out. So const Look out equal function and this function will only clear
the local storage. Local storage remove item
that with name of token, and we will set token to
be null again as it is. All right. And also, we will
implement a function that will delete chat by its ID. So right here, let's add B delete chat equal
asynchronous function. And this function will
accept event and the t ID. And in the return,
let's add here. Okay. We will add Try Catch. First of all, we will prevent
triggering parent click. So E dot, Dp propagation. Like this. Should
be E, not se. Okay. And also, we will add
window confirmation pop up, so confirm, equal Window confirm
with this text. Are you sure you want
to delete this chart? And if not confirm, then we will stop the user. If he click on Cancel. Otherwise, right here, we will send requests to
back end to delete the chat. Cost data equal OD Axios delete
method with this API, which is API chat, delete. And right here, we will add chat ID to indicate the
needed chat and also we will add headers to be with authentication
or authorization, so to be with token. Okay. And right here,
if it is succeed, so if data dot axis, then we will update
the charts locally, so sit chat to be with
previous one and we will add previous filter method to filter the charts
for each chat. And right here, we
will return chat with underscore ID that is not equal. The chat ID that is deleted. After that, we will
refetch latest chats. Await, fetch users
chat function, that's in our AppContext. And finally, we will
show Tost success, and with data dot message. Okay. And if there is any error, we will log it in
the toast dot error, so toast dot error with
from error dot message.
25. Building the Sidebar Component for Chats, Navigation, and User Account Management part 2: And in the return UI, it's add a div wrapper
with class name equal. And this will have backtick
because we have two styles. The first one will
come from our style is the side bar container, and the second one, if nut should be inside
Calibraket Nut is mini open, and so if it is closed, we will add these
styles max MD to B translate X O so this slide bar will be away
on mobile when it is closed. Okay. And right here, we will add the logo. So IMG and the Alt
will be logo and the class name will be
equal as side bar, go. And the logo, you will
find it in the resources. So in the source, it
will be logo dot png, and it will be located
right here in the public. So this is the logo of our app, and after that, we will add right next
to this closing image, New chat button, so button. And this will be with class
name equals dot sidebar, New chat button, and
on click handler. So it will run or
create new chat from our context and
also set is menu open to be false to
close the sidebar. If it is on mobile as well. And right here
inside the button, we will add if a edit and this will be with
class name of adt sidebar. New chat icon, so
this will be for Edit icon and a new chat. By default, the chat will
take the name of new chat, but you can edit it. So then we will implement search input
for filtering the chat. So right next to this closing
button, we will add a div, and this will be with class
named Bar search wrapper. And inside it, we will
have a Outline search, and this will be
with class name of at Tide Bar search icon. And right here, we will
add input field in order to search the
input with type of text, sholder will be with search
charts and class name will be as sidebar search input and change handler will take an event and set search
to bet target dot value. So it will update
the search state. Okay? That's it.
For this lecture, see you and the next
one to continue.
26. Building the Sidebar Component for Chats, Navigation, and User Account Management part 3: Welcome back. Let's now continue with our
side bar component. But before that, let's add
here value for this search, the value will be
search and right here, we will implement a div to
navigate to a major library, so div with class name equal as dot side bar library
wrapper inside it. Or before that, let's
add OnClick also and click to navigate us
to the slash Library. And also, we will close
the menu on mobile screen, toss yes, right here, it should be function. And this will be
inside K Bracket, and that is menu open
to be pulse like this. And right here, we will add
some icons, IO image outline, and this or gallery
icon with class name equal is sidebar Library icon. And right here, div
with class name of sidebar Library text wrapper. And inside it, B
tag with Library. And then right next
to this closing div, we will show a chats title. So it's at curly bracket. If chats Link is
greater than zero, then it means that we
have already charts. So add and BTAg and this peak tag will be
with class name equals dot sidebar chat writer. And here we will
add chats as text. And for the list of
chats right here, let's add div with class name ofs dot
sidebar chats list. And here we will
dynamically filter chats filter method
for each chat. We will return right here. Hatt message with index zero. If it is true, then it will be chat
and dot message with index zero and add washing Closing dot
content dot to lowercase. Dot includes search
dot lower case method in order to search
for this chat. Otherwise, right here, let's
stick where is the closing, it should be right here, s
will be chat dot name dot to lower case dot includes
search dot lower case. Okay. And let's close this with bracket in order
to prevent any error. And here is our filter code. Okay? All of this, we will map through it, so dot map for each chat, and we will return right here, a div close it. And this div will be with key because it should
have unique key, and the unique key will come
from the ID of this chat and also the class name
equals dt bar chat item, and click we will add a function and we will
navigate through homepage. The path will be
slash and right here, we will set current chart, so sitelected chart to be the chosen chart and also we
will close Mobile sidebar. So let's add set is menu
open to be false. Okay. And right here inside this div, we will show the First
message or chat name. So B tag, and with class
name equal at sidebar, chat item text, and inside. This P tag, we will
show the message or Jatname we will dynamically show chat dot messages dot link if it is greater than zero. If a statement, it will be chat dot messages
with index zero, content dot slice
in order to take only the first 32 character
from this chat name. Otherwise, else, if it is small, we will take it as it is. Okay. And next to
this closing div, we will add delete icon
with toast promise. So RI, delete been six. This will be and here we should add div in
order to rub these tags. So div and let's close it and cut it and
paste it right here. Okay. And for this delete icon, it will take on click
handler with event, and we will return toast dot Poms or
delete chat with event, and also chat to underscore ID. And right here, we
will add loading. You take text of loading. Okay. And this tag or icon will take class name ofs dot
sidebar, delete icon. Okay?
27. Building the Sidebar Component for Chats, Navigation, and User Account Management part 4: Then right next to
this closing div, we will add user account
section for div with class name equal a bar user
account wrapper, and inside it, we
will add user icon, so FA user with class name equal a sidebar user icon, and also Ptag for the user name, P with class name equal
sidebar user name. So tight or user
name and right here, if we have a user, then it will be
username user dot. Name, otherwise, login
to your account. Okay. And for the
out right here, we will add Logout icon only
if the user is logged in. So user, double and if I Lou icon with one click handler. I will handled by Logout
handler that we implemented, and the class name will be
asdt sidebar Look out icon. Okay. And after that, this closing div, we will close sidebar button for
mobile implemented. So if I sidebar icon, and class name will
be SDT side bar, Goggle icon, and OnClick will hire a function that will sit as menu open to be false. Let's now go to the Ab JSX in order to import the sidebar. And right here, instead
of this static homepage, let's add our side by by
clicking on Create Div tag, and this will be with class
name of at main layout. And inside it, we will add our sidebar with
passing these props, which Es menu open to
be equal Es menu open, and also set Es Mini open, to be set su open. Now, let's test
our app on the UI, make sure both front end and back end running like this
and let's test it out. It seems that we have an issue, so let's check it
out in the console. So not read properties of undefined reading
zero in line 109. So let's go to sidebar and
check all possible errors. Let's read these
unused variables, and this icon should be with us. Let's search for this icon and make sure it is
IO images outline. Also, or the delete should be API chat delete, and let's cut this
and add Eli bracket. And here should be
with data of chat ID, and also the headers
with authorization. To be from token. Okay. Also for the
toggle tight bar. Minus translate X. And also, let's go to the line 109
to see if there is errors. Yes, here should
be messages with. So make sure you edit
them, and let's go back. Yes, here it is our app. So right now, we
logged in with Joan. Let's try to log in
with joan@gmail.com. Yes, this user have no charts, and the other one already have. So if you notice that, we check the lookout
functionality and it's work very well. And let's try to login again. You can delete charts as well. So let's try to delete one. As you see, you will
see this prompt, and if you click on Okay, it will be deleted. Okay. Let's also check the
responsiveness of this app. So write a click Inspect, and let's make it bigger. So in the big screen, it
will show the sidebar. Once it's collapsed, it
will be just this icon. And if you click on it, it will show this sidebar. That's it. For this lecture,
see you in the next one.
28. Building a Fully Functional ChatBox Component part 1: Hello, everyone.
In this lecture, we will build our chatbox
component for this application. You will learn how
to manage messages, integrate APIs, implement
text images mode, apply credits logic,
auto scroll messages, and how loading state, then update user information
globally using context. Each part of this code will
be broken so you can fully understand how it works and
why it is built this way. First of all, let's
go to components, add a new file with name of chatbox dot JSX and
with our Snippet. We can now import, react hooks for state ifs
and life cycle effect. So import use effect. Use RIF, and also use State. Then we will import our global app context
to access user, chat, token, axis, and so on. Import use AppContext
from our context file. AppContext dot gs, right here, it should be use AppContext. Then we will import the
toast notification. So import, toast, React, hot toast, and we will send
icon for submit button. So import FA arrow React icons. If A, let's make sure it is. If A up, yes, it is. And also we will import
all classes from style GS, so import star as S from our style S file. And right here, we will first create a reference for
scrollable chat container. So this is used for auto scroll, cost contain f equal. Use Rf and first
value will be null. Then we will pull values
from our global context, select chat to be
current chat info, user, which is logged in
user info, custom axis. It will be reconfigured
Axis instant and token, which is for user
authentication, and set user to update
user data globally. So right here, const,
equal use AppContext. And right here, we
will add selected. Hat Axios and it will be custom Axios and also
token and set user. Okay. Then we will add state
for messages for current chat that's stored
in our component state. So const messages, set messages
to be use the state of empty array and loading state when the AI is
generating response, so const, loading and set loading at the
beginning will be false. Also, we will add text prompt that type
by the user, so const, prompt and set prompt
to be empty string, and also the mode can be either
text or image, so const. Mode and set mode to be usted, and at the beginning, it will be text also, we will add
checkbooks to publish generated images to
the community library. So cost is published and set is published to be
at the beginning, false. And also, we will determine
required credits, which is for text equal one, and for image two credits as we implement
in the back end. So Cost required credits equal if the mode equal image, then if statement,
it will be two. Otherwise, or the
text will be one, and if the user doesn't
have enough credits, we will disable
input and warn them. Const, not enough credits equal. If user credits below the required credits like this. Now we will handle sending
a message to the back end. So submit handler,
so const, submit, equal Ayn cransFunction
with event, and we will return first
of all, inside, try catch. Firstst of all, we will
prevent page reload. So E dot prevent default. After that, the user must be
logged in to send messages. So if not user, then return toast dot error. Please login to continue
and we will stop. We will stop if credits
are insufficient. So if not enough credits, then we will return
tost dot error. You don't have enough
credits. Okay. After that, we will
enable loading animation. So set loading to be true because there is no issue
after check all of these, and we will backup prompt
in case API request fail. So const prompt,
copy, equal prompt. Then we will clear input immediately for smoother
UX so set prompt, to be empty string again. And we will add user message instantly to the user chat UI. So sit messages to be with
revis and right here, we will return array with
vis and also right here, we will add the role and the role will be user
and also content to be prompt and timest would be time times TAMP bit now, and also this image to be false. Okay. And right after here, we will send requests to back end depending
on current mode. So const, data equal await, custom axis post method, and the path will be APIs messages and
we will add mode. So make sure it is back tick and we will add the mode right here and in the second argument, we will add chat
ID to be selected. Chat, underscore ID, the prompt, and also is published. Also, we will add the headers. So right here, we will add
headers to be authorization, and here is our token. Disclose it like this. Okay? And if back end
replies successfully, we will append the AI message. So right here, we
will add F should be F Theta dot Xs then we will set messages
to be vous message, and we will return previous
and data dot reply. And then we will detect the
used credit from user data. So set user to be vous, and we will return previous. And also credits. To be previous credits minus required credits. Okay. And right here, else, if the ABI returned an error, we will restore the
prompt and show toast. Toast dot error to
be data dot message. Message and also set
prompt to be prompt copy. And in the catch right here, we will catch unexpected errors, so toss error, something went
wrong, please try again. And also, we will add
finally and in the finally, we will clear up status to set
prompt to be empty string, and also set loading
to be false again. After that, right here, we will load the chat messages whenever selected chat changes. So use effect. And right here, we will add F selected chat. Then we will set messages to be selected chat dot Messages. And this will render whenever
selected chat is changed. Okay? And also, we will implement Autoscroll to bottom
whenever messages update. So use effect and right here, F container dot current. So we will add container
f dot current, scroll two, right here, we will add tub and the tub will be container Rift current
dot scroll height. Okay. And the behavior
will be smooth, and this will render whenever
the messages is changed. But here, right here, should we add the messages.
29. Building a Fully Functional ChatBox Component part 2: Welcome back. Let's now
continue with our chat box. So in the return right here, we will add div container
for our chat box. And this will be with class name equals dot chatbox container. And right here, we will add scrollable container
for chat messages. So Div with reference equal container v we implemented
and also class name equal a hat books message
wrapper and inside it, we will show a
friendly intro message if the chat has no messages. So if messages Linthequal zero, double and we will
show this message with DIV and class name of s
dot chat box, no message. And right here, paragraph
with the class name of dot. No message. Text. And right here, we will
add user dot name. And here we will show D to dive in. It's a bear that
user is not defined, so let's make sure we
add it in the context. Yes, we should add it. So user in order to
prevent any issue. And right here, we will loop through all chat messages
and render them. So messages dot, Map method for each
message and index, and we will return right here. For now, let's keep
it fragment because we will implement a
message component in the next lecture. Okay. And right here, we will add loading spinner show when waiting for AI response. So if it is loading, double and we will show
a div with class name of that book loading
wrapper and inside it, another div with class name of S dot chatbox loading
spinner. Okay? Because these classes will
appear to us as loader. And right next to
this closing div, we will implement now, we will only show
BablshTagle in image mode. So if the mode equal. Image, and we will show the Segel label with
class name equal. Let's add a hat Books,
publish Tuggle label. And inside it, we will add paragraph with class
name of s dot hat Book, publish Tag in text. And here we will add publish generated image to library. And here should be normal
bracket, not curly bracket, so let's make sure it's added
and close it right here. Okay. And right here, we will add checkbook
state or publish option. So input, and the type
will be checkbox. And let's remove name and ID. We will add class name of cursor would be cursor pointer and also we will add checked. If equal is published, if it is true and unchanged, we will take event and retail that is published to be
adt target dot value. And also, we will add disabled. If it is equal, not
enough credits. So if we don't have any credit, it will be disabled. Okay? Then right next to here, we will show credit warning when the user doesn't
have enough credit. So enough credit, double
and, and right here, we will add paragraph with
class name equal credit. And here we will add not
enough credit as text.
30. Building a Fully Functional ChatBox Component part 3: And right here, we will add form that containing
the mode button, input field, and Send button. So form, and we
will add onsubmit, equal submit handler, and class name will be
equal as chat box form. And inside it, we will
add buttons to switch between text and image
generation modes. Dive with the class name
of Let's dot chat mode. Buttons rubber and inside it, we will add button
with type will be button and click handler, it will change the mode, so sit mode to be inside
ring text like this. And also right here, we will add last name with us, or should be backtick in
order to include two classes. The first one will be at
chat box mode button active. And also the second class
will have F statement. So if the mode equal text, then it will be at the FI
statement should be right here. So if the mode is text, it will take chat box. Mode button, active, else, it will take that box
button inactive, like this. Okay. And right here, we will add text. And the second one
will be the same. So let's copy this button
and paste it right here. Okay. And right here, it will be for image. So sit mode, image, and right here, we will change. If the mode is equal image, it will be button active, else, it will be inactive
and for the text, it will take image text. Okay. And then right after
this closing div, we will add now input field where user types their prompt. Low input. The
type will be text, as holder will be type. You prompt here. And the last name will be
dot Jet Box prompt input, and it will be required in
order to submit this form, and it will be disabled if
there is not enough credit, so we can disable it. And unchanged
handler, it will take event and on the return, we will set the prompt to
be e dot target dot value. And right after here, we will
add Send button with icon, so button, first of all, will be disabled if
not enough credit, or it is loading, so we can prevent issue
if the state is loading. And right here, we will add addi with class name with as chatbox. Send button, wrapper,
and inside it, there will be FA arrow
app with class name of at send chatbox send icon. Okay. Let's now check if we have some bugs in our code
in order to prevent it. At the beginning, here in the mode should be
treble, equal, not two. And also, we should check and the checkbox input field. Yes, right here, it should
be E target dot checked. No value because value, it will be for input. And also, right here for this
class name and this one, it should be mode, buttons base. And also right here because the active and inactive will be
dependent on the mode itself. Okay? Also, in this input field, it should have a value
of prompt like this. Let's now go to our AbgaX and we should add the route
in order to run our checkbox. First of all, we
should import from React Router Dom
route and route. So import Route. And also route from React router Dom and right
next to the sidebar, we will add route and close it. And inside it, we will add
our route for check box, our chat box, and the
path will be slash. So this is the home page and
the element will be equal. Let's add our chat box. From our components, and let's see if it is
imported. Yes, here it is. And let's also add here
the proper starting tag. Let's now run our application. First of all, check the
terminal if both front end and back end are running.
Let's open it. So as you see right now, here is our homepage
with this text because we don't have
now any message, and here is the
input field that we can add our question inside it. And you can tuggle between two types whether
it is image and text. And if you see the image now, it shows this
checkbox because we can publish the image to
our library right here. And if we play with these values right
here, let's tick it. This required credits. Let's make it 200 and 111. You will see not enough credits
and for the text as well, not enough credits in order to indicate that
there is no credits, and you cannot click
on this input. It will be disabled and
also the submit button. That's it. For this
lecture in the next one, we will start to implement
the message component.
31. Building the Message Component part 1: Hello, everyone. In this icture, we will walk through the
complete message component that used in our chatbox UI. This component will handle everything related to
displaying a single message, whether it is from the
user or from the AI. You will learn how we render Markdown using react Markdown, highlight code syntax
with prism JS, build a copy code feature, and render AI
generated images with a custom download
button and display different avatars
based on message roll and format this message time. So let's get started right
here in the components. We will create a new file
with name of message dot DSX. And let's add our Snippet. First of all, we will
import react hooks, such as use effect and U State. So import use effect and
use State from react. Also, we will install a library for formatting the
time, which is moment, so let's open the terminal, navigate to front end and
hit the command BMI moment. And click Enter. And right here, we will add Import
moment from moment. Also, we will install
Markdown package so that will re render for
formatting bold list code. So right here, BM, I React Markdown, and hit Enter. And we will import it. So import mark down from mark down or
react Markdown. And also, we will install BismGS for syntax highlighting
inside code blocks. So PMI BIS s. And right here, we will import it to import
BISM from resin, JS. And also, we will import
icons for Avatar, Copy button, chick Mark
and download button. So import from React icon A for fontosm right here, if a user, and if a copy, and if a chick and
also if a download. And also, we will import icon
for AI generated syntax, so import from the Act icons HI. And right here, Hi sparkless and we will
import our styles, so import rss from our styles file. And right here, we will implement a custom
code block component. So we will add syntax
highlighting copy to clipboard button, and also language dediction and formatted UI
around code block. So const code block, equal, it will accept line class name, and also children and
ropes and like this. And first of all, we will track whether code was copied to club board or not. So st is copy it and sit is copied to be equal, uses Tt of false. And then we will extract the
language from language JS, like language dash, JS, language dash, SGML, and so on. So Const ch equal. Or. Language and W plus right here, C C. Or class name
or empty string. And for the language,
const, language, equal. If it is match, then match with index. If one, otherwise,
it will be fixed. After that, we will convert the code content
to clean string. So const code, content equal string with children dot replace method. With these signs and the sign comma, Empty Syring. And also, we will implement Copy button handler,
so const handle. Copy, equal function. And first of all, we will add navigator clipboard, dot write text with
our code. Content. And we will sit is copied to
be true after it is copied, and we will add sit time out. And right here, we
will add sit is copied to be false
after 2 seconds. Okay. And for inline code, we will return
simple styled code. So right next to here, we will add if line, then right here, we will return, and in the return,
we will add code. And right here, we
will add class name from dot message inline code. And also, we will add here the props and inside
it, children. Okay. Otherwise, we will return a full code blocki with
header and copy button. So right here, we will add
return and right here, we will add div with class
name equal at message, code Blokrbper and inside it, div with class name of message, Code Block header. And right here, a
span with class name of message, Code Block language. And right here, we will
insert the language itself. And for Copy button,
let's add here. Button with click handler
to be handle Copy and class name of as message
code block, Copy button. And then we will check or change icon and label
depending on copied state. So if it is copied,
if statement, it will be if a check with class name equals or sorry, it will be text ImR LD 500. Otherwise, it will be
if ACB, like this. And also, if it is a copied, then we will add a text of COVID else we will add
copy in order to indicate that you
can copy this code. Okay. And right here, we will add the
code content area. So let's add div with class Names dot message
code content wrapper. And right here, we
will add code and this code with class name of it is actually
two class names. Let's add here C Bracket, and the first one
message Blok content and the second one will be from class name that's
passed right here. Okay? And right here, we will add children. Let's close it like this. That's it for this
lecture, and the next one, we will start with implementing
our message component.
32. Building the Message Component part 2: All right. Let's now continue
with our message component. So in the message right here, we will pass message. And right here, we will apply BRS syntax highlighting whenever
message content changes. So we will use effect. And right here, we will
add if statement if type of window not equal undefined. Then we will add BRS
highlight all function, and right here, we will
make it rear ender whenever message content change. Okay. Then right here, we will check if message
belong to the user. So cost is user equal message
roll equal user. Okay. And we will conditional
style depending on sender, whether it is user
or the AI or const is user avatar equal
if it is user, if is statement, then
the style will be s dot message Avatar user. Else, it will be as dot message Avatar AI
and a user alignment, so const is user
alignment equal. If it is user, then it will take flex
dash, row, dash, reverse. Otherwise, it will be flex also, if it is user text alignment, so const is user text alignment, equal a user, if statement, then it will take
style of items. Otherwise, items start and const is user bubble, style, equal if user as true, then we'll take S
message, bubble. User, a message Abel AI. Okay. And now we will
implement a function to download AI generated images. So const handle image, download. Equal asynchronous function. And right here, first of all, we will
add tryCatch block, and in the try, we will fetch
the image from the URL. So const response equal at bit method
message dot content. And also const, ELO equal
A response dot glob. And we will create Temporra
object URL, so Const, URL equal window dot
URL dot create Object, URL for this plug, and we will create a anchor Link tag
element for downloading. So const, Link equal
document dot Create element with tag of A and link dot
href will be equal URL. And also for file name, we will include timestamp
in order to avoid any similarity in the file name. Okay, so link, dot, download, equal Bac tech, AI, Genify and right here, we will add moment, dot format, and also the format
will be Here, month, they underscore our
minute and second. And right here, dot, E N G. And then we will
trigger the download, so document dot body
dot apinhild with Link, and also we will
add link dot click. After that, we will clean up, so document dot body
dot removehild for this Link and window dot URL dot revoke Object URL for this URL. And if we have any error, we will add Console Log. And in the console, we will add message download, build, and we will
include error. After that, we will add fall
back to open in New Tab to window dot open
and right here, message dot content, and right here it will
be in ank page. Okay. And for the
JSX right here, let's add in this div class
name with two classes, so we will add backtick
and the first class will be dot message mean wrapper
and the second one, it will depend on whether
if he is a user or not. So a user, if statement, it will be tify and
otherwise, tify start. And right here,
we will implement fixed black bars caused by BrismDS for default background. I will include it in
the resources because it is quite difficult to
write, which is like this. And then right here, we will implement
message raw wrapper, so div with a class name equal, it will be two classes. So let's add backtick. The first one will be at message content
area and second one. F is user alignment. And right here, we
will implement Avatar, user or AI icon. Class name and the
class name will be s dot message Avatar Link. Or should be Avatar
ring inside it, div with class name equal. It will be also two classes, so let's add acti. The first one will
be at message, Avatar base, and the second one, it will be a user Avatar. And right here, we will
dynamically check if it is user, so let's add is user, if statement, then it will take. If a user with size of well, otherwise, it will be bakless or AI response with size
of 12 as well. Okay? And then right next to
these two closing divs, we will implement now the main content area whether it is text,
markdown or image. So div last name of two classes, actually, it's Advecti
and right here, we will add SDT
Message text wrapper and if it is user alignment. And for bubble wrapper
so div class name of two classes also, so it's Albati and
first one will be dot message Buble base, and right here is ser PBL tile. And here we will dynamically
check if it is user, it will be Blain text. So is user, then it
will be with B tag, and right here, we
will at s class name of at message Markdown. Body, and right here, FAI send a message or sorry, it should be here message dot content
because it is a text. Okay? And here in
the else statement, we will check AI response whether it is markdown or image. So div this div with class
name equal at message, Markdown, body, and
if AI sent an image. So if message dot is image, then it will be div
let's close it. And right here, we
will add class name of message image wrapper. And right here, we
will add image tag with source from
message dot content. And the ALT will be AI
content and class name, it will be a dot message
underscore image. Okay?
33. Building the Message Component part 3: Otherwise, right here
in this closing. Bracket. We will add s if it is Aitext, so we will use Markdown render. Okay, so Mark down, and let's close it. And right here, we will add components double curly bracket, and it will take code, and the code will be
from Code bloc and UL. It will be with hops, and we will return
UL and it is self closing with class name
of a message list, UL, and right here, we will include the props. Okay. And for the
OL, it's add OL. And with props, we will
return self closing OL. And right here, we
will add class name of as dot message list L, and we will include
the props as well. And for the paragraph,
let's add here. B, with ups as well, and right here, we
will add S closing. B tag with class name equal
at message, paragraph. And also, we will include
ups and finally, the A tag. A with bs. And we will return a tag with class name equal
as message link, and also we will
include these props. And right here, we will
add message dot content. Okay? Then right next to
this closing div, we will add tar
containing timestamp and image download button. So div with class
name of two classes. So let's add backtick and
a dot message underscore, Boter also, it will be
dependent if it is user. So it will take flex reverse, else, it will be flow Okay, let's remove this
to be flexo like this. And right here in the content, we will show time in
X minutes ago format. So span with class name of at message underscore
timestam right here, we will add moment for message timestam dot format or should be from now to
be added as a go. Okay? And after this closing spa, we will only show download
button if AI sent an image. So if not a user and double and message his image
would be his image, so let's stick it in
order to avoid the box? Yes, right here, it
should be image. And let's add it
right here like this. So and double and we will add button on click with handle. Image download and
class name will be dot Message. Download button. And that title will
be Download image. And right here,
we will add icon. So if download with
size of Tin and also span tag with download image like this. Let's now check if our code
is included any error. So let's go from the beginning. First of all, right here, it should be language
dash, not equal. And also, here and here we should add
another Y for years. And for text trapper, here it should be his
user text alignment. And for the message
content right here, it should be a
message user content. And for the timestam here should be time
sam wrong Tae Bo. Okay, I think now all is good. So let's go right here
in the chick book. And if you remember, in the map, right here, we leave
it empty because we didn't implement
this message component. So what we're going to do is, first of all, import
message component. And right here in this map, we should now add message component in order
to map through each message, and it will be with
key of index because the index is unique
and for the message, we will pass the message that passed through
this component. I think now all is good, let's test this application. Let's open the terminal. And let's run front end
and the back end as well. So let's try now
to add some text. Let's wait for it. Okay, as you see, it is
generate for us this response. And with all these styles and this alignment
for this paragraph. And now we will try
to test this image. It's type and prompt. And let's it now. And if you notice that,
this chart title, become what is
Marin Stack because it is what we ask right here. And let's test also the search. So as you see, once
I click on what is Merntak it is now
work very well. And here is our image
generated with Image. So let's try to download it. And here it is, as you see, downloaded without any issue. And also, let's
try now the code. So a and let's make it Javascript. And also for the moment, if you see it is a
few second and a go. So here it is, our
JavaScript code. And if you notice that you
can copy this as you see. So that's it. For this picture, see
you in the next one.
34. Building the Image Library Page App: In this lecture, we will build the library page of
our application. This page will retrieve
all published images that created by users and display them inside a clean,
responsive grid. So we will fetch data
from back end API, store and manage images
using React state, render a dynamic grid of images, apply styling for our
shared style file, and we will handle errors gracefully using
React hot toast. So let's start right
here in the screens. We will create a new file
with name Library dot SX. So, First of all, we will import Use Effect and US State and we will import global
application context to Axis Axios instance. Import our context. Use context and import
toast from reactor toast. Then we will import the styles. And now we will define
the library component, const, library, equal function. And right here, we'll
export default library. And right here, first of all, we will implement local state to store all published images. So CT images and set images equal use
state of empty array. Then we will get Axios instant
from our global context. Cost Axios equal use context. And now we will implement a function to fetch images
from our back end API. So const, fetch images,
equal asynchronous function. And we will add try catch block, and in the try, we will send
Get request to the endpoint. So const data equal
await axios dot Git. And the path will be
API slash user slash published Images. And if success is true, we will update
state with images. So data Success, then set images to be
data dot Images, else, we will throw a back
and error using Toast. So toast dot error from data dot message. Okay. And in the cat, we will catch any request
errors and show them. So toast dot error from
error dot Message. Then right here, or right here, sorry. We will fetch images only
when component first loads. So use effect and keep here
empty dipendency array, and we will add Fitch
images function. Okay? And in the
return, right here, let's add return,
and in the return, we will add our div
with the class name. Of a library container,
and inside it, we will add the title of
the library Badge show at two with class name
equals library title. And inside it, we will
add images as a title. Then if images exist,
we will show the grid. Otherwise, we will
show a message. So we will add grid packets, and if there's images
length greater than zero, statement, we will
show D Let's close it. And right here, we will add
last name of st Library. Grid and inside it, we will loop through images
and display each one of them. So images dot map for each item and also the index, and we will return
anchor tag with a key of index
because it should be unique and achif
will be equal item. ImageURL. And also class name ofs
Library Image Link, and the target will
be underscore blank, and right here, we will
display the image itself. So let's add image tag and the source will be from
item dot Image URL. And we will have class name
with AST Library image. Okay. And right next to here, we will display the user
name who created this image. So BTAG with class
name of ASDT Library. User label, and right here, created and we will add item User Name. Okay. And in the ESA
statement right here, we will show when there is no messages
images, sorry, right there. So B tag with class name has
taught library, no images. And right here, no
images available. Okay. Now, let's add our library
route inside AbgSX. So go right here and right
next to the chat box, we will add route, and it is self closing
and the path will be slash Library and
element will be equal Library there and make sure it is
imported right here. So now let's test it out. Make sure both back end
and front end are running, and let's go to our application. Click right here. So as you see, there is no image available. Let's try now in a new chat
to generate a new image. But in this time, we'll
publish them in the library. So let's try now. Okay. Let's now go to library to check
if it is right there. So as you see, here is our image and this
created by John. So if you click on it, it will open in a new plank, as you see, and you
can download it. And also, we have a
small bug right here. If you click on Newhart, it will show this
request filled. So in order to fix it, let's go back to
our back end and in the app context in the
create new chat context. Here, we will add empty Key bracket and close it between the bath
and the headers. And let's try it now. So if you click on Newhart, it will add a new chart without any problem and you can
navigate between them. Okay? So that's it.
In this lecture. And the next one, we will deploy our application in versel.
35. Uploading Our App to GitHub and Deploy It On Vercel: This lecture, we
are going to take our full functional
application project and deploy it on the cloud. So we will walk through, prepare project for deployment, upload, fall up on Github, and configure versel for both backend and front
end deployments, and also we will set up
our Git Ignore properly in order to avoid uploading node modules and
some sensitive data. Before that, we will change this fav icon in order
to make it look bitter. So let's go to our VS
code in the index HTML, right here, you will
see this v icon. So you will find this icon
in the lecture resources. So let's change it here
to be PV icon dot NG. And let's check it now. As you see, I think
now it is better. So let's now go to
our application, and in the back end, we will create a new file
with name of versal dot JCO, and I will put this
configuration inside it, and you will find it also
in the lecture resources. And for the front end, also, let's create a new file with
name of versal dot JSON. And inside it, I will
put this configuration. And finally, right here, we should add dot
G Ignore in order to ignore the files that we
will not upload it on Github. Either it is nod modules or EMV because it have
sensitive data. Okay? So right here, we will add nod
underscore modules and EMV in order to
avoid it from uploading. And now let's open Github. And right here, you can
create a new repos tree, and it will be unify
Hub and create repo. Then we will copy this link and go right
here and get Bash, change the directory
to the path you want. And at command, get clone, and we will copy or past
this link right here. So you will find it right
here after clone it, and let's make it easy way, so we will create a
new file front end, and also the back end and we will copy
and paste from it. So in the back end, let's copy all these files except
node modules and paste it in the back end and
for the front end as well. Let's go right here,
copy them all, except node modules and put
them inside front end folder. And finally, for the get ignore, let's copy and paste
it right here. Then we will open this folder with GBs and
you can add command, get add dot, then Comet M, and you can add
your note, upload, pull up, then get push. Okay, let's go now to
our repo and refresh. And you will find right here, back end, front end
and get Ignore. After that, let's go to
Vercel and right here, click on Add New Project. First of all, we will upload
back end for deployment. So after you click on Adne, you will find here the
app, click on Import, and first of all, we will change the
root directory from this path to be
for the back end. And we will click on Continue. Then for the
environment variables, you can embort environment. So let's go right here and InnifyApp back end and click on it in order to upload all Environment and
click on Deploy. Let's wait for it
until it's finished. After it's done, if
everything is okay, you will see this message that in our back end
that we implemented. And let's click on Continue to Dashboard and click right
here in the domains, and we will copy this URL
and go back right here. And now it is time to
add our front end. But let's first of all, refresh in order to
see the back end. Then click on Add new Project. And also we will
import same app. But now we will import the
front end, click on Continue. And for the environment, let's import it
from our front end. So let's go right here in the front end and
click on Environment. But now we will not
add this local host. We will test the app, but make sure you remove the slash right here in
order to make it work. Click on Deploy and let's
wait for it. A is done now. You can click on
Continue and click on the domains in order
to open it in our versel. So now you can login with the same email and passwords that are
restored in the MongoDB. So as you see, here is our
deployed application and you can ist it out
without any problem. So you'll see the
response directly. And if you click on the library, you will see all saved chats. Okay? That's the last
lecture of our course. Please, if you
enjoy this course, I would really
appreciate if you take a moment and rate this course
and share your feedback. Your support will help
me to continue creating more high quality content
for you and future students. Thanks again for
learning with me, and I will see you
in the next course.
 Hani Aburisheh, Full Stack Web and Mobile Developer and Instructor