Transcripts
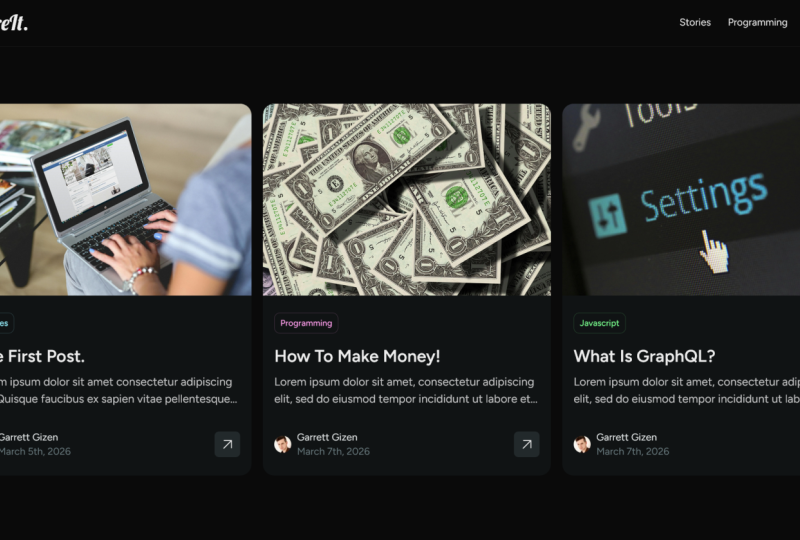
1. Course Intro: Hello everyone and welcome. My name is that cell and I will be your instructor in this course. We will build a full-stack blog. So before we get into the different technologies used, Let's first take a look at what we're going to be building. So this is how our website is gonna look like. It's very basic, very minimalists, beginner friendly, as you can see here. And basically you're going to have just a header, as you can see here, a nav bar that contain a logo, and here's some categories. And then we're going to be fits into posts. And for each post we're going to have its category over here. So if we click on one of these posts, see here, this is how it's going to look like basic tile, a date. And we're gonna be working with date F and S library to generate on the date. The way we want is 100% customizable. And this is the content. This is how it's going to look like the content of our website. We're not going to be using markdown. We're going to be using for our content, plain HTML, so that it will be 100% customizable as well. So we can work with it however we want. Plus if we go to any of these over here. So for example, if we go to soar is, you can see here that for the routing, we're going to have slight stories and that's going to generate for us only the posts, for example, that has the category of stories. So for this website, for the backend, we are going to be using graphs EMS, as you can see here, graphically, CMS is a headless CMS, a content management system. And it's what we're going to be using for the content of our website. The reason why we will go with graphs EMS say it's 100% free, as you can see, a free forever. Plus it gives us a GraphQL API, not a rest API. Graphql API, it's very, very good. In simple words, we ask only for the data that we need. We don't have to fetch all the data. Plus it gives us an API Playground, which makes it easy to ask and to use even if you have no idea about GraphQL. For the front end, we're going to be using next JS. Next JS is a React JS framework. It gives us so many features. It's like React on steroids. So for the routing for degenerate and dynamic pages, you don't have to use any other resources like the reactor after or any of that. And plus, we can use the index.js to generate static pages. And that's exactly what we're gonna do with our website. We're going to be generating static pages at build time using the incremental static regeneration. So you should be familiar with Next JS. If you don't know Next JS and you can go to the official website, take a look at the documentation, or you can check my previous course, which called Nix ab.js for beginners to learn the fundamentals. And you can grasp, defend the muscles in the legs in less than one hour. We're going to use in other technologies along the way. Because for the CSS, for example, we're not going to be using any framework, is going to be, as you can see here, plain CSS for everything. So you should be familiar with CSS and HTML, of course, JavaScript and react as well. So that being said, let's get started.
2. Make a graphcms account: First things first, let's start off with the black and the whole website. We can simply build the backend using graphs, EMS. Let's go to get started to create an account. This is how it's gonna look like. You can create an account using Facebook, GitHub, Google, or just go with a regular e-mail. After that, make sure you agree to the terms of service and privacy policy and sign up when you're going to sign into the website. This is how it's gonna look like. You can see that we have some boilerplate template and starters for not for us, we're going to be building our website from scratch. So let's click on Blank. Give your project a name for me. I'm going to call it share it. As you can see. You can give it a description as well, which is going to be for me, fantastic. Blog. Again. Go here and choose the city where you want your project to be hosted. For me, I'm gonna go with Frankfurt in Europe and just create a project. It takes few seconds. And you can see now that we have to choose a plan for me, I'm gonna go with free forever. And by the way, It's an amazing plan. Let's select just this plan. Here. We can invite your team members just by typing their mail address. And you can select from here, they're all whether you want them to be an admin or medulla. For us, we're not going to be inviolate in any team members. Let's click on invite later. Alright, so now as you can see, we have just finished the sign up process on graph CMS. In the next chapter, we're going to start building blocks of our website.
3. Creating Schemas: It's time for building the blocks of our website. For that, we need to create some schemas. For us. We're going to create only two schemas, one for the posts and one for the categories. So let's go here to models, and let's click add the display name. We'll just call it posts. And as you can see here, it's going to be pluralized automatically. And let's create this model. You can give it a description as a hint for content editors and API users so that they can know what they are dealing with. Let's create this model. The second schema that we will need is a schema for the categories. So for the display name, let's just call it category grade. The first schema that we will start off with is the category schema. The first thing we need is an aim. So let's go to a single line text here, and let's call it display name, name. We can and validations here and make this field required, which means that we need to define a category. You cannot go without defining and ink for our category. We need to set this field as unique as well. Because we don't want to categories to have the same name. You can go for them more and limit the cardiac cell count or Mitch match a specific pattern or restrict a specific pattern. For us, we're going to be keeping it simple. Let's create this. The second thing that we need to give to our categories is a color. So let's go down here and you can see color, the display name. It's going to be called Color. And let's go to validations and make this field required as well. Fantastic, this is all what we need for our categories schema. Let's go now to our post schema. And the first thing we need for a post is a title. Let's go to validations. Analysts make this field required. We don't want to send the title is unique because we might create some other posts with the same title. You can limit the character count of a title. So for example, for us, we can go with the minimum of six letters, for example, in the maximum of 20. The custom error message that we can give is, for example, the title can go, it can go only between 620 characters. Not going to be doing that. Let's just create. Great. The second thing we need for our post schema is a slug. Slug is the URL that will be responsible for generating a blog post. So let's go to the display name and logistical that slug. We can go here and check an option called generates luck from template. Which means that we can automatically generate a slug from a template that we have already defined. For us. We can generate that from the title. As we know, most of the slugs out there in the web that can be generated from the title. And even though if we check this box, we can customize slug later on when we start creating a post. So let's go to validation here and let's make the sphere the required. And you can see that it automatically selected as a unique because we cannot have the same slug for different posts. The third thing we need is a thumbnail. That's going to be different, that's going to define our post. So let's go to asset picker over here, and let's call it from now. Let's go to validation. And let's make this field required. Last but not least, we need a rich texts. We can go with mark down here as well. But let's go with which texts which can generate for us and HTML content, the display name here it's going to be called content. And we can go to validations and make this field here required. Finally, we want each posts to have a category. So we want some sort of a link between the boast in the category. We can simply do that by going to relation over here and go to reference. And you can go to the model to reference and select the category. Here we want it to be two-way reference. And you can stay with many posts to one category. For us, we want mileposts to be related to many categories. Let's continue, continue and just create. And that's it. We have just created a schema for a post and a schema for the category. In the next chapter, we're going to be creating our first post.
4. Creating a post: Now it's time to start creating the contents of our block. To do so, let's go to content here. And as you can see here, we can start by creating the categories of our website, or we can start by creating a post. Let's go to posterior and let's create an item. The first thing we need to define is a title. So for example, let's call it. This is our dy first posts. Here. As you can see, it's slug is generated automatically from the title. Of course, we can even modified it, the first post and maybe something else. But for us, we'll just generate the slug from the title. We can simply click regenerate, and that will be regenerated again from the title. Let's go to somebody else over here. We don't have any assets yet. So let's go and click on Upload. Select files to upload. And let's go to documents here. I have here in assets. And as you can see, I have here and an image. Let's upload it. And now we have a formula here. We can create, we can start creating the content of this block. This is the content of the first block. And let's make for example this as an each one. And later on we can gain some content for this block. Here for the categories, we cannot add an existing categories since we don't have any. Let's go here and create a new category. Let's call it, for example, stories. And for the color. Let's go with any color that you like. Fantastic. Let's save this and publish it at the same time. Fantastic. So now we have our Posts link to a story categories. So let's go now to save and publish. You can see here that it's telling us that the asset we have uploaded, it's still just a draft. Do we want from us to publish this thumbnail or not? So I'll just check it. And let's click, Save and Publish. Let's go and how to post. And as you can see here, we have just made our first boast. If we go to category here at the same time, you can see that now we have a category called stories. And this is the color.
5. Create nextjs application: Okay, So let's start creating the front end of our web application. In order to do so, let's go to the terminal. And the first thing I want my project to be on the desktop. So let's cd to the desktop. And after that, let's create an x js application. In order to do so, let's click MDX, create next app, and let's give it a name for me. I'm going to call it generate, hit Enter. And now let's wait for npm to install all the dependencies that next JS need to run properly. As you can see now, it's installing dependencies ES lint. Oh, great. So as you can see here now, it says that we suggest that you begin by typing CD to share it and run the development server, or just 38 coat, share it in order to open it with Visual Studio Code. And as you can see here now, we have our project on Visual Studio Code. The next chapter, we're going to start messing up with these files over here.
6. Setting up the project: Let's get rid of all the unnecessary files to set up our next JS application properly. The first thing, let's go to styles here and the folder here. Let's just delete it. Let's go to the public folder here. And let's just delete that as well. Let's go to the pages and let's delete this API folder. Another thing that index.js. Let's just delete that as well. Fantastic. Let's go now to this app.js and let's remove this import soils from global dot css intake. Let's go to the pages now and let's create the index page. Let's go to Extensions and look for ES 7. Just by typing ES 7. You can see here that there is an extension called S7 React redux GraphQL, and React Native snippets. Because we're going to be using it to create all the functions. So just type SFC. Right now when you have the adding salt. And you can see that's going to generate for us a stateless functional component. And let's just call it index. And that's going to return for us in each one. That says, Hello, World, Hit Save. Great. Now let's go to the terminal. And let's run the local server by typing npm, run dev. So that's going to start a local server on our machine where we can see our next JS application. You can see here that the server is going to be started at localhost and port 3000. So now you can see that compiled successfully logistic out. Click on this. And as you can see here we have now our hello world. In the next chapter, we're going to start by creating the header.
7. Creating the header: It's time to create our first component, and that's going to be the other component. In order to do so, let's create first a folder, and let's call it components. Inside this folder, let's create our first component. And that's going to be Heather NodeJS, SFC once again. And let's call it header. Please be careful, this is a React component. It needs to be capitalized. So the first thing we're gonna do is that we want to generate a header. Inside the header, we're going to be making a div with the class name off container. And after that, we will set up two things. The first thing is a link. And let's import link from x js. Great. So now this link here, we wanted to have an H ref that's gonna take us just to the homepage. Inside this link, which is to make an a tag. And inside the a tag, let's just say share it, like so. So this is going to be our logo. The other thing we want is an unordered list. And inside that unordered list we want some lists. And each list here is going to contain an I tag. So before doing an a tag, we'll just get the link first. Within each HREF. That goes nowhere for now. Inside it. Let's make an, a tag. And inside that ETag logistic make, for example, particularly. Great. Let's go now in import this header inside our application, let's go to the index. And here we'll just make a div. And inside that div, let's call the other. Here. Don't forget to import the other from components slash header. So now let's go to our application, refresh. And as you can see, we have share it into we have category 1. Let's go to fonts dot google.com to get some fonts for our application. For me, I'm going to go just with Open Sans. Fantastic. So now let's go to Import. And let's import this link. Let's go back to our application. And let's create a new folder. And let's call it styles inside soils, let's make a new file. And that going to be our global dot CSS inside it. Let's Control V, that link that we have just imported from Google Fonts. The first thing we're going to start off with is to set the margin to 0 and the padding to 0 in the box-sizing border-box, like so. After that, let's get to the body and let's make the background color to be 000, 000 and the color to be FFF. We want the background to be black and the color to be white. Another thing is that the font size, the font family. We want it to be the opposite sense that we have imported. So now if we go to our web application, we cannot see the styling because we haven't imported the global dot CSS yet. Let's go to Pages and let's go to this app. And as you can, we again import styles, slush global CSS. Here we can make it global, not global. Let's go back to our application. And as you can see here now, the background is black. And here we have our links. They are not white because they are links. So let's just make that all links. We want to give them a color of fff. And now we can see our links. Great. Another thing we want to add is the unordered lists. We want the list style. Type to be none. One think we want as well, is that the container, we want it to be a width of 60%, for example. And the max width to be one hundred, one hundred pixels and the margin to auto. So that's going to center everything out for us. Can even give it a background to take a look at this. As you can see here, this is the container which are going to wrap all our application. Great. So now we want to start actually styling d'Azur. We're going to be using the models. So let's create our first module, and that's going to be header dot model, dot css. Fantastic. Let's get back now to the header and let's import style, styles slash header, dot module, dot CSS. So now we have anything in it className that we can add here. We can import it from the sides here. Great. So the first thing we want is to start manipulating, for example, this a tag over here. Let's give it a class name of style, logo. Let's go to the header module over here. And let's create a local class name. After creating that will just give it a font size, for example, of three rems. Hit Save, get back. And as you can see here now, the silent is applied to the logo. Let's go back to the global CSS. For all the a tags, we don't want any text decoration so that we remove these underlines. Let's get back to the header module over here. And let's give this logo a different font. Let's go back to the fonts here. Remove all the fonts that we have. Go back to Home. And let's pick another font. Let's go with lobster. Let's add this to the soil in here. Let's click on Import and let's import this link. Let's put it in our header module. And let's get back to the Ford family here. And let's add it to our logo. Go back to our application. And as you can see here, we have just changed the forums of our logo. The other thing we want, Let's go back to the header here, and let's add some allies, because we can have many allies. In this. Let's call it, for example, category two. And as you can see here now we have category 1 and we have the link. So another thing we want is for this container over here, we want to give it a display of flex and justified content to be space between so that we can set a spacing between logo in the UL. In order to do so, we can wrap everything inside another div, or we can simply get back here to the class names and keep that container make a space. And then let's make here style dot container. And let's get back to the header here. And let's create a container that's going to have a display of flex. And let justified content to be space between. And let's align the items as well in the center. Let's go back. And as you can see here now we have this space between both of them. The other thing that we want to add is this list over here. We want them to be one next to the other. So we can simply, since we have only one ordered lists and unordered lists inside of our header, we can simply go here. And first of all, let's make a header class. And I'm just going to give it a border, bottom of one px, solid CCC, and then we can pick the color of our choice. For me. I'm just going to give it a transparency over here, as you can see here. So now we need to get back to the header. Go to the header here, give it a class name of style dot Heather. And you can see that we have now a border bottom. Let's give it as well, a padding of 20 pixel and 0. So that we said the padding only from the top and the bottom. Now we can just simply type the header for the container, the unordered list to be display of flex. And now you can see that we have each category next to the other. Let's get back here. And now we want to get to the header UL allies. And let's give each one of them HomoloGene left. For example, 20 pixels. So now we can see that there is a spacing. Let's make it 30 pixels. So now we can see that there is a spacing between the categories. Another thing we want to add is the text transform, but let's add it to the ETag header, UL LI a, and let's give it a text transform. Capitalize. Another thing is default size, logistic. Make it a little bit bigger. As you can see here. That way, way bigger. Let's just give it a font-weight as well of 100 to make it very, very light. And let's decrease different size. Great. So now we have the categories and we have everything already set up. In the next session, we're going to finally link our backend to the front end by getting all the categories over here.
8. Fetching the categories: Now we want to integrate our content into our application so that we can get all the categories over here. But first, we need to make our API accessible. Let's go back to Graph CMS. Let's go to the settings. And after that, let's go to API Access. And let's create a permission. The rules that we want to give it just to read. For the locals, we have only one. She's English. In four stages, will want to read only the published content. And let's create. Great. So now if we go to the top here, you can see the Content API. And let's copy that. Let's get back into our application. And the first thing we wanna do is to create an environment variable. So when you foil and let's call it E and V dot local, we want our environment variable to be accessible from the browser as well. In order to do so, we have to initialize the name of our environment with next public, and then the name for us. We can call it I. And then let's give it the link. Fantastic. Let's get back now into our components, the hazard. And the first thing is that we want to fetch the categories. So let's import two things from React design. The first thing is a US effect hook. And you say Turk. Great. Now let's go down here, being the first thing to create, for example, category links. And set the category links like so. And that will be equal to a US state. And as an initial value, Let's just give it an empty array. After that, Let's go to US. Effect look like so. And let's create a function, a callback function. The first thing we want is to add here an empty array, which means that we want this huge effect run when the page loads once. Let's get back here. And we want now something to contact with our API. And since our API is using GraphQL, we need the library for that. There is a library called GraphQL requests Control G here. Let's go to this rash control C to delete everything or Control L. And then we can npm install something called GraphQL requests. Hit Enter. Can see here. Now we have GraphQL requests installed. Let's go to the package.json. And as you can see here, we have GraphQL requests as a dependency grade. So we want to create an instance. So we're going to be using over and over in our application. Let's get back here. Let's create a new folder, and let's call it lib. Inside this folder here, Let's make a new file. And let's call it, for example, graph CMS dot js. Inside this, Let's import from GraphQL requests. We want to import something called the GraphQL client, as you can see here. Let's get down here. Let's export a constant called for example, graph CMS once again. And that will be a new GraphQL client. And here it needs a URL which is a string. The URL with cheese confidential for us. We can get it from this environment variable. So let's come back to it and let's copy the name. Let's go back to the graph CMS dot js instance. And here let's type process dot E and V dot. Next, public API. Fantastic. Now we can import that instance, solids imports from the graph TMS, as you can see here. And let's import that graph CMS grade. So now inside the US effect, we want to make a asynchronous function because we would like to await for this to connect. So let's make it counts the data that we want. And let's wait. That graph CMS dot requests. But how we can request the data. Let's get back to graphs EMS over a year. And we can go to this API playground. After that, we want to get all the categories. So let's go to explorer. Let's go to categories over here. And we want to get the color and the CSS of the color. And we want to get as well the name of the categories that we have. Hit the Play here. And you can see the form of the data that we will be receiving. You can see that for the categories we have only one which is stories, and this is the CSS color. Let's copy all this. Let's get back to our application in here. Let's make some backticks. And inside those backticks, Let's paste our query, as you can see here. So now from the data, if you take a look here, we have the categories, which means that we can destruct for them. So from this data here, let's get the categories. And the after sending this request and get an old categories, we want to set the category links to those categories. Great. So since we have now all the categories, we can go down here. Let's just remove this LI. Let's keep only one, and let's cut it. So now inside this URL, we want to get all the categories to the critic category links. And we want to map through them. When we mapped through them, we're going to have a link, for example. In this link we want it to return for us. Excuse me. When we map, we can have a link. And this link is going to return for us all what we have just cut rate. So now inside this link, since we are mapping here, we need to provide a key. So the key, for example, it's going to be lync dot name. It's unique if you remembered. So now inside this link ports each href as well, we want it to be slash that link part name. And for the category one here, we want to get names. Well, so let's make lync dot name. Fantastic. Everything is set up now the only thing we need is to tell our server and run it all over again. So inside the terminal control C to kill the stirrer. And let's run it again. We did this in order to load our ENV file that we have just created. So now it says compiled successfully. Let's go back to our replication finger crossed that we're not going to be faced in any error. Let's wait for it. And as you can see here now we have stories. Let's get back to graph CMS. Let's go to content. Let's go to the category here. And let's add another category. For example, it's colored programming. And for the color, What's give it this color? And let's see, let's click, Save and Publish. Let's go back to our application, refresh. And as you can see here, now we have stories and programming. We want the color of these to be the color that we have set here. So let's get back to our application. Let's go to the components D3.js. And for these links over here, logistically of the muscle and the color to be the link. But color dot CSS, it save. Go back to our application. And as you can see here now we have stories and we have programming as well. If we click on any of these, as you can see, it takes us to localhost slash stories. And if we click on one of these year programming, for example, it takes us to slash programming. But there is a problem here. The header, we can be only found on the homepage. We want the header to be found on all the pages inside our application. So as a result, we need to create a wrapper. And that's what we're going to be creating in the next chapter.
9. Creating a wrapper: And the problem that we faced, it was that the header can be found only on the homepage. And that's normal. Because if we go to our application pages index and here we have the header, the header we have an only on the homepage. In order to get across this issue, we can go to components. Let's make a new file. And let's make, for example, a rapper that's going to wrap all our application SFC once again. And let's call it wrapper. Inside this wrapper, for example, let's make a div. And let's just wait. Let's go back to our pages folder here, and let's go to the app store js. Inside the app.js here, we want to import our wrapper so that it can wrap all our application. Let's go to everything we have here, and let's cut it. And Ryan a year, Let's open up these brackets and inside them, Let's call the wrapper, as you can see it as radically imported from components lash wrapper. Inside this wrapper, Let's based what we have covered. Hit the Save. So now we have these components inside our wrapper. But how we can get to them from here, we can reach a property called children. And what we want is that inside this div to get all those children like cell. If we get back now to our application, you can see that nothing has changed. And if we go to programming or something, we're still facing the same issue. We can't see the header. In order to get across this problem, all we need to do is to get back to the index. Let's remove D either from here. And let's go back to our wrapper and let's put the header over here. Let's import it. I'm components slash here, they're great. So now if we get back to our application, let's go to the homepage. Let's go to stories. We can go to programming. And now our header is found on all the pages. In the next chapter, we're going to be fetching up the posts of our application.
10. Fetching posts: Okay, so now we want to fetch all those posts on our homepage. In order to do so, let's get back to our application and let's create a post component, components new file, and let's call it postdoc JS, great SFC again. And let's call it post and ethic. So now inside this box, the first thing we want to make is a div. Inside this div here, we can make an image like so. This image, we have to import it from next slash image. Great. So the image, it needs an SRC. It's going to be empty for now in its needs as well, a width, any height. For us, we're just going to give you the layout of gray. And now we want to make another div, which is going to take the title like so grade. And later on we're going to be making another div for the badge. The badge that's going to indicate the category of the posts as you're gonna see you later. So let's first go back. Let's save this. And let's go to the index page. Here. We have a div, we can give it a class name of container. In that said, let's go here and let's export an asynchronous function that's going to be called get static, props, like so. It takes no parameters. So the first thing we need is to import the graph CMS instance. So let's make a constant called data that will be equal to wait for the graph. Cms instance dot request. Let's first import paragraphs EMS instance from graph CMS. So now we can go to Graphs EMS here. And if we do request, and let's request the data. And just like we did with the categories. So let's get back to graph CMS here. Let's go to the API Playground here. And let's remove everything we used before the Explorer. But actually we can write, we can type what we want just by ourselves. So here's how simple it is. It's open up the brackets has for all the posts. And from the posts we wanna get the title. We want to get slug, want to get the thumbnail as well. And for the salmonella, we want the URL of the image. What else? We want the category as well. And from the categories, we want just the name and of course the color. From the color. We want the CSS. Ok, so now if we hit this, you can see that we have only one post. It gives us the total and it gives us a slug, the URL of the thumbnail. And here as you can see, it's for the Saudis, We have afforded categories. We have only one category that belongs to this post, which is the stories and this is the color. So let's take this with a copy. Let's get back to our requests and let's paste this over here. Great. So from the data, if you see here we have posts, so we can destructure those posts. Like so. After that, Let's get down here and let's return. Props. Props that we want to return are the posts gray. Another thing we want implemented as well is to revalidate this each ten seconds, for example. This is, this is what's going to be actually, this is what's going to be responsible for generating those posts over and over again even after we build our application, this is what's called the incremental static regeneration. Fantastic to know since we have the posts here, we can go here and we can get the posts from the properties over here. Great. So now we haven't used yet. We can simply go down here. Let's make another div. And inside this div over here, let's just get all the posts. Map through them. And when we mapped through them, we're gonna get a post. And for that we want to return that boasts like so. This post here component, we need to import it. So let's import. From components slash hosts. Great. So for this pose here, the first thing we want to add to it is a key that's going to be the post dot slug. We know that slug is unique for each post. Another thing we want to add to this post is a post property that's going to take the post itself. Great. Let's get back now to the post itself into components. So here we can reach that ghosts. And after that we can destructure what we want. So the first thing we want is the title. We want the thumbnail. We want to slog, and we want the categories as well from the coast. So now we can go to the total here, versed in just you choose the property that's called the constant, that's called title. Let's just comment this image for now. Because for the image, we need actually to add the domain to the config dot js. Let's save this, gets back to our application, fresh. And let's here. As you can see, we have the first boasts, which is the title of our posts. Great, as you can see, let's add another thing, for example. So now we want the salmonella. In order to do so, Let's first go to the SRC over here, and we want to thumbnail URL. But here as you can see, we are going to be facing an error. It says that for the images, we need to add the host name of media dot graph CMS.com to our config dot next JS file. So let's copy this. Let's go to our next dot, js. Let's go down here. And let's do images like so. So that's going to be a, an object that takes domains. And here we can add all the domains of our images that we have inside our application. So now we have to close this control G here, as you can see, the terminal now is telling us that there is a change in the next dot conflict or JS. So we need to restart the server, Control C to stop the server. And then npm run dev once again to start the server all over again. Great. So now let's get back to our application. Wait for it to refresh. And as you can see here, we have our image that fills the whole page. We will actually get to that later on with this CSS. So now let's go to Styles and new file, and let's call it Post dot module dot CSS. Let's import that over here. Import from style slash post module dot ASS. Fantastic. So the first thing we want is for example, for this div here, Let's give it a class name of style posts. And let's go to the posts here. Let's make a post and let's keep it empty for now. We want to modify this image. So how we can do that? And we can simply go to the ghost image over here. And we can give it a position of absolute. And for the post itself, we want to give it a position of relative Control S. Let's go back to our application. And as you can see here, now, this fills only the posts. Great. Another thing we want is for this posterior to give it a height. So for me, I'm going to give it a height of 300 pixels. Let's get back here and you can see this image. For the position of the image, it's going to be absolute. And we wanted to have a width of 100%. And the height as well. For 100% For the Z index, we want to give it as an index of one. So now we want to detect the title to be appeared over here on top of our image. So for that, this div here, Let's give it a class name of prose, style, dot overlay for example. So let's get back here. Let's make an overlay here. Classname. And let's give it a width of 100%, a height for a 100%, a position of absolutes. And we want to give it a background color of zeros 0000 and the color white. So now if we get back here, hit refresh. And I think there is a problem over here. So what is the problem? Is the zed index. Let's give it as an index of two to be on top of the image. So now as you can see, we can see only the title bar, we can see the image. So let's go to the background color, and let's give it a opacity. Like so. Let's go back now. And as you can see, we can see the image on the back of our posts. Great. So for this overlay here, we want to give it a display of flex. And we want the flex direction to be column. And let's justify the content to be flex end so that we have the title on the bottom of the post. Let's go now to the title itself. Let's make overlay each one. And we can, for example, first give it a padding of Searcy pixels, for example. So you can see here now that the posts has a padding, we can go further more. And let's give it a font weight, for example, of just 200. Great. So now we want to handle those posts. We don't want them to take just one post to take the whole width of the container. In order to do so, let's get back to the index over here. And for the index, this div, Let's give it a class name of Maine, for example. And we can modify this just from the globals. We don't want to make a whole module for the page. So we can get here and make main. Let's give it, for example, a display of grid and the grid template columns to repeat two times one FR. And let's give it a grid gap as well of three or four amps. Let's just keep with three ramps. Now if we get back here, you can see that we're going to have two posts for each column. Another thing we want to give is a spacing. So let's give it a painting, for example, of 50 pixels 0. So that's going to give it a 50 pixels from the top and from the bottom as well. Great. So for this pose here we want when we click on it, to take us to the posts itself. For that reason, let's give it a link. So let's get back to the posts. As you can see here. We want all this over here to be a link. So card everything here. And let's make a link with an href. That's gonna take us to slash posts, for example, slush, the slug, like so. And inside this link, Let's make an, a tag. And inside this a tag, let's make everything like so. Fantastic. So now if we get back, we can see that link is not defined yet. So let's import link from next slash link. Let's get back here. Wait a few seconds. And now we can see that we have a link for our posts. So that when we click on it, it takes us to post slash the first post. We don't have that page yet. So you can go even further with the styling at Harvard to it and manipulate it however we want for us. In the next session, we are going to be adding a badge that's going to critique the category and indicate the category of this post.
11. Adding a category badge: Okay, so now we want to display an edge that's going to indicate the category of that post. Let's go to the post. And here Let's add a div. For example, with a class name of style dot badge is closed div. And inside this div over here, Let's make for example, NH3. Nh3 is going to simply tells us the categories. And since it is an array, let's get the first one. And from the categories over there, Let's get the name, like so. So let's go back here and we can't see it for now. Let's go to styles. And let's go to the post-modern well over a year. And let's give a class name to the badge, as you can see here, dot badge. Okay, the first thing we want to give it as a position of absolutes, as it index of three. I think now we will see stories as you can see here. Great. So let's give it a width, for example, of 50 percent. From the top, let it be 20 pixel and from left to be minds 20 pixels. And as you can see here, we want to give it a background color of the color of third category. For that, Let's go here. And let's give it a style. And let's give it a background color from the categories 0 dot color, dot CSS. Let's go back here. And as you can see, it takes the same color of the category. Let's get back and let's continue with silent dispatch. Let's give it, for example, a padding of searching pixels. Let's see how that's going to look like. That's too much. But just give it a padding from the top and bottom of five pixels and from left and right. Let's give it, for example, 20 pixels. As you can see here. Great. Another thing we want is to add the fault effect. In order to do so, let's just go down here. And let's make a div with a class name of psi dot, for example. Effects. Great. Let's go to the post here. And let's make the effect className. So for that effect, it's going to have a width of 20 pixels, a height of 20 pixels as well. And from the left, we want it to be 0. And from top, Let's give it 20 pixels. Great. So now let's go to that effect itself and give it a position of absolute. If we give it a background color now, for example, red, we can see it as you can see here. We don't want it to be over there. Let's give it from the bottom. Bottom. We want it to be minds, 20 pixels so that we have it right under the soil is DIV over here. Great. We want to make a clip path. So let's go to Clippy. As you can see, if we go to Bennett Philly.com slash Clippy, we can make a sheep. The sheep that we want, it's going to be like so as you can see here. So let's copy this. Let's get back to our application. And let's get this over here. Fantastic. So now you can see here that we have this rectangle. All we need to do for the background color to be inert it so that we have the same background color. And another thing we want is the given an opacity, for example, of 0.6. So now we can see here that we have this nice effect, as you can see. Great. Another thing we want to add as well is let's go to the process itself. And let's give it a hover. So both hover and transform to scale 1.1. For example. Let's go back here. So now when we go on top of the posts, as you can see, we have this nice effect. The only thing we need to make it look great is to give a transition of three seconds, for example, is out. So now if we get rack here, we can see that this is how it's gonna look like. Fantastic gray. So what we want, Let's add another post. Let's create, for example, a new item. Here. Let's see how to make a block. For example, let's add an existing tunnel or let's import another one for example. And let it run for example this one. And let's upload it. Great insight of how to make a blog. Let's say how to make money. For example, online. It's over 20 characters, so let's just keep it how to make money. We can see that slug is automatically regenerated. And here we can make some content. How to make money. Let's go to the categories here and let's add an existing agree. We have a category called programming. So let's choose this one and let's add the selected category. Let's save and publish. This is a draft. We want to publish it as well. So let's check it and click, Save and Publish. Great. So now if we go back to our application, let's refresh. And you can see here that we have one for programming and one for the stories. But we need to fix some things. This category badge here, the font, it looks horrible, as well as the scale. It does not look that good. So let's get back here. And for the batch, we have a CH3. Badge. Me get this right. Edge. Logistics make the font weight to be 100, for example, grade. And we want the text transform to be capitalized as well as you can see here. And for the scale, Let's go back to the hover and let's make the scale 0, for example, 1.05. That's it. Let's get back now. And as you can see here now it looks way, way better. We can even give the overlay and opacity of a little bit darker, like so. So now, as you can see here, we have everything set up correctly. So let's create, let's click for example now in a post, and as you can see here, we cannot see them. The next thing we wanna do is that we're going to start generating a single line for a single page. For each post.
12. Fetching single post: So before we get into fetching a single posts, peach, I messed up a little bit with the CSS, so forth. For the posts over year. I gave it a style, as you can see, your vars or with one px solid and the background of that border, the color of that water. It will be the categories, color CSS as you can. And another thing I did is just I give the category badge a width of 60% of 15 percent. And another thing is that instead of giving a whole div here that we call effect, I deleted that div and I went to the badge over here and I give it an after and just add a content like so and keep all the whole, all the properties. And by the way, you're free to do whatever you want with your blog post k. So now we want to fetch actually a single boasts four hour for each post that we have in our application. So now if we click on, for example, this first posts, you can see here that it takes us to slash posts in dense, lush. That's luck. So let's create that first. Let's go back here and let's go to the pages. Let's make a new file. Let's call it posts in den slash, slug dot js inside curly brackets. Okay, Here let's make an SFC and let's, for example, call it single pose. Like so. Great. So now inside this single posts over here, for now, we'll just make a div. And inside this div, Let's just give it an each one. And let's say this single post page, like so. And for this Devi, religious give it a class name of container so that we have everything curbside container. So now if we get back, Let's refresh. So now instead of this 40, 40 is supposed to see that this is single post page. Okay. But even if we go to any pets, like resemble slash both slush, anything that was going to show up. As you can see, you're not going to be seen any 40 for 40, 44 now. And the reason why? Because you still don't have the pads of our application. So let's get back here and the first thing we're going to start off with is the bat, so exports and asynchronous function, and that's going to be called static. That's great. So first thing, let's make a costs here. And the data once again. So we want to get actually now just all the slugs. This is what we need. So let's go to Graph CMS here. Let's go to the API Playground. Let's delete everything. So what we want is just from the posts, we want to get all the slugs. So if we click here, as you can see here, we have only two posts, one with the first boasts in the second one is how to make money. So let's copy this, go back here. And for the data, we will wait for graph CMS and let's import it. Import. I think we need to get back once again and then go to the live over here. And from graph CMS, let's import graph CMS like so, so graph CMS dot request. And let's paste our requests over here. Great. So now we will get all the slugs, right? And here we don't want the data, but we want this due to the structure, the posts from the data. Like so. Great. So what we want right now, we'll just make a constant called bets. And those bet, they're going to be simply the posts dot map. So what do we map through those posts? We will get posts like so. And what we want to return, we want to return just an object that's going to be called parenths and ramps over here, that's going to be the slug. So instead of just making params slug, slug, It's going to be, for example, repost dot slug like cell that, That's too much. So I'll just skip here. It's look like so. And let's destructured slug from the posts over here. Great. So now we can go down here and let's return. The first thing we wanna return on all those paths and something else, which is to fall back and forth, fall back. We're going to be color blocking, like so. Great. So now we have now all the paths. What we need to do now is just to exports another asynchronous function. And that's going to be called get static props. And we need to get to those paths over here. So let's form the params. Let's just destructor it from the pets. Here we have the paths and we can destructor these params from here. So let's go once again to cancer. And it's called, Let's bring all the data like so. And let's await once again for graph CMS dot request. Okay, so now we want to request the post itself. Let's get back to here and let's start all over again. And from the posts actually we want to get the posts with the slug. Okay, we want to get, for example, when we go to slash post last, the first posts, we want to get the boasts that has dislike controversy posts. In order to do so, we need to create, for example, a query. And let's call it, for example, single posts. And that's actually it takes a slug, for example in that's going to be a string like so. Okay, and inside it we're going to get, we can use actually the Explorer. We can go, for example, to choose just not boasts, excuse me for a dad. And can read. Yeah, okay. So we wanna get posts actually. Where where the slug is equals to that slug, like so. And when we get that, we will just give, we get the title. We want to get as well. For example, created at that's automatically actually provided from the API. We don't have to add it. So created ad for example, we want to get as well the content. That's it. And from the content, we can choose whether we want it to be HTML, mark down row or texts. For me, I'm gonna go with HTML, like so. So let's copy all this. So now actually if we run this, it's going to give us an error because really able slug must be defined. So if we do to query variables here and make for example, a slug, which is the variable here. And let's copy for now this look. And let's place it here. Let's run this. And as you can see here, it gives me the post. So let's copy this. Go back here, and let's paste it over here. We need to provide this lock variable, right? So that's exactly what we're gonna do. Let's get back here. Let's copy this. And let's do a comma and paste it over here. But we don't want to get only for the first posts. We want slug to be a variable. It depends on slug itself. So Let's delete all this. And from the params over there, over there we can get to grams. Dots look like so fantastic. So now when we get that, that will be, if we go back here data, we can get to a post, so we can destructure that posts from here. Great. So now here we can return the post and we can as well revalidate that as well every ten seconds. Great. So now if we just like, for example, log this out. Let's just log, Let's log on their posts, like so. Let's get back here. Refresh. Let's hope that we're not going to be seen any errors. So it says here the additional keys were returned from good static props. Property is intended for your component must be nested and plops, okay, let's see what's wrong here are we are. So we have returned automatically this. We just need to return props, excuse me for that. And let's paste this over here. Great. Now let's get back here. Hotel not going to be seen in errors. And as you can see here, we're not gonna see any errors. Let's inspect this. Let's go to the console, refresh. And I think that we cannot console logged out yet. But if we go here, let's just get to the post from the component itself. So let's get to the posts from here. And for example here in this one, let's just make a post dot title like so. Let's go back here. And as you can see here, it gives me the first post, which means that we have fetched our data successfully. Let's get back to the homepage and here let's go to how to make money. And as you can see here, it gives me the title how to make money. And if I'm trying to go to any other slug that does not exist, That's actually it's gonna say an error because we cannot get to any slug or any posts which still does not exist. So let's go back here. And as you can see here, so now we have fetched our data properly. In the next actually elector, we're going to be actually making, we're going to be making a single page for that and give it the CSS as well.
13. Customizing post page: Okay, So let's start customizing on the single post page. And the first thing, let's go back to where CMS, and let's add some content. So for me I go to the posts and weaker, I go actually to how to make money posts. And I add some content over here as you can see. Great. And then save and publish and just published this. Fantastic. So now what we wanna do is just to get back to our application here. And let's, for example, make a div. And inside this div over here, the first thing we want is a one, and that's going to be the title. And after that, Let's make an example and it's three. And that's going to be created, created at creative hat like so. And let's make another live. And let's give it a property called dangerously set inner HTML. So this is how it's gonna, we gonna get our rich texts. And here that's going to be HTML. And for the content, it's going to be content me for that and content data HTML grade. So let's start destructure all these oral dose really wants so const. And let's get the Tyrol, Let's get created at, and let's get the content as well. From the coast. Like so amazing. So let's go back now to our application. Let's go, for example, to how to make money here. And it says that created ad is not defined. So let's see here. We made a mistake. It's not clear that with capital T, with small t, as you can see here. So now we have our title. As you can see, we have the date and we have here everything we want. So let's start actually missing up with the CSS of this. Let's go to Styles new file, and that will be called single posts, for example, dot module, dot CSS. Let's copy this. And let's get back to the slug over here. And let's import from files slash the single post module.js ESS rate. The first thing, let's go to this div. Let's give it a class name of style dot. For example, single post. Let's copy this. And let's go back to the single posts module here, and let's Control V. And the first thing we want to give it as a padding of 20 pixels and 0. So that will give it some spacing. Let's wait a few seconds. And I think that the reason problem here, let's get back to this style.css. Suppose we decide className or single posts. There is something wrong here. We don't know why. And let's get, for example to this title here. And let's give it a class name of Tirole style dot title. And let's get it back to you. Let's give this a title. For example, a color of red. Get back to our application and let's see if that's going to be applied. Yeah, it's applied and advocacy, you know, even the spacing is now applied. So for the title, we're going to give it a color, for example, of orange. I don't know. Orange seems to be good. And I'm going to give it as well a font size of three RAM. Want to make it bigger. Great, fantastic. And don't forget about the text transform to be capitalised. Like so. Let's get now to the date. Let's go here. Let's give it a class name of style, dot date. And let's make sure that they eat. And let's give it first the padding, for example, of 10 pixels from the top, 0 from right and from the bottom. Let's just give it 30 pixels, for example, 0 from left. See that how it's going to look like, like now. And yeah, as you can see your snow, we have some spacing and we can even set the color to be CCC. Like, I'll never forget the font-weight can make it a little bit. Just 300, for example, gate. So now here we can see that we have the date, we will, we will actually manipulate date in the next session. So for now, we can stick just to this here. And as you And we have here some links, but we can't see them. Because actually we did, if you remember in the global CSS here, we make that all the a tags with a color of white in there is no text decoration. So now this is what's good about a headless CMS. We can customize everything however we want. So now we're going to be customizing our formatter and how we will do that. And let's go to the slug here. And let's, for example, give this a class name of dots, for example, the formatter. Okay. Let's go here and let's make that formatter. Format like so. The first thing we want is as you can see that we have, we are facing a problem with the image. The image goes over the container. So the first thing we want is the formatter image to have a max width of 100%. Let's go back here. And as you can see here, so now we have the image aligned as well with our content. Great one, give it actually a max-width as well. Is there a max height? The max height, for example, of, let's make it 400 pixels. Let's see, that's how it's going to look like a 100 pixels, That's this, make it 600 pixels for example. And as you can see here, so now that looks way better. Another thing that we want, for example, for the formatter is to have a background color. Let's make it now CCC. And here in the bottom, Let's just give it this nice color. So now you can see we can distinguish between the leader, the rich texts in the content, and the background of our application. Another thing we want is this. Let's give it a bad thing. For example, of 20 pixel. See how it's going to look like right now. Two pixel now that's not too much. This is a skill. It for example, 30 pixels and not for the image, excuse me. For the foreign matter. Like so. Fantastic. And let's just give it a border radius, for example, of ten pixels rates. Now we can see that this is going to be everything in now we can start missing up with the formatter. So for example, for matter and the H1 here and everything, not just the H1, all the headings. So let's make, for example, for it's two, it's three. And a chore. For example, we want them. Let's remove this comma on the last one. And let's give them, for example, they always have to add a margin bottom, for example, of 20 pixels. So now we can see that we can distinguish, as you can see here, all the headers, they're going to have a margin bottom of 20 pixels, as you can see here. So now let's get to the paragraphs, all the paragraphs that we have inside our formatter. The P, for example. And we can give them a margin, bottom just of 10 pixels. So now you can see that all the paragraphs, and you're going to see now all the paragraphs, they're going to have a margin bottom seems to add maybe I have misspelled this format I like so. And you can see here that the paragraphs now we can see that on the riza, a margin-bottom for all, from all the formatters, from all the paragraphs. So for example, let's even make forward the image here to have always a margin, bottom as well, for example, 20 pixels. And as you can see here, so now we have this margin bottom. Well, we can actually manipulate the paragraphs here, for example, to have to manipulate their font way to manipulate the color of our paragraphs. You can do a lot of stuff. So now the last thing I'm going to be customizing is for example, the a tags because we can't see links. So let's go to formatter, like so. The links. And let's first things versus the text decoration. Let's make an underlying, as you can see here. So now we can see all the links of the speech. And another thing, we can even set their colors. So for example, the color of all those. Let's go with CCC and then pick the color of our choice. For example, all links. We want them to be like. For example, as you can see you. So now we can see that all links inside this, they are showing in a different colors. So this is just the idea and you can even go further more and start missing up with all the elements that you're going to have inside our inside your format. Like for example, the unordered lists, ordered lists, the other headlines, the paragraphs, div, tags, everything, everything. In the next chapter, actually we're going to be working with date if ns to manipulate this date over here so that it can be a little bit readable.
14. Customizing the date: Okay, so this over here is not 100% readable. We want to make it readable little bit. So that's where we're going to be using a library called D to F and S. It's an amazing library by the way, and it can be used in any project and it's a famous, famous library. So let's go back to our project control G to get to the command, Let's add another terminal, and let's do npm install date F and S, like so. So let's wait for it until it's finished. And advocacy years now it's finished it from our package.json. And we can see here that we have date F and S. Great. So what do we want to go? We want to do now is go to Pages and let's go to the slab inside this post. Let's go to that slug. And where is the date? This is our date. So what we wanna do now first, just to go and import from date F and S, we want to import something called format, like so. Great. And let's go to this each three over here. And here we have our date created that let's just delete that for now. And let's make here the format like so. As you can see, and here we are going to be making a new date. And inside it, we're going to, we're going to create the created at. And after that here we can actually define what we want. So let's go to Format, format here. And first thing we can start working with is the day. Okay, So let's go to the day. We want to get the name of the day. And here as you can see, day of the weeks. And we want this E. So let's go back here and let's do u0 v0 4 times Control S. Let's see what we have right now. Refresh. And as you can see here, we have Saturday. Today's Saturday. Great. Another thing we want is the day of the year. So here we want not the day of the year won the day of the month. So we can use this DiDi over here. Then a comma. And we want to get the d. And let's see now which it is. As you can see here, 11, we want to get the month. So let's go to date F and S. And let's look for the month and which we want them to be like. So, so let's add four LLL. Let's get back to our application. Let's see what we are going to get. So as you can see here, Saturday and live in September, and we want to get the year as well. So let's go to the year. The year, I think it's going to be on the top over here. And we can get this. Why, why, why? Yeah, four times y, y, y. And that's gonna give us the year as well. Control S. Let's get back to our application. And as you can see here, so now we have the date which is Saturday 11 September 2021. So this is how we can work with date F and S. You can check out more if you go to date FSIS.org slash and go down to the format. And here you can see you can get number of the day, the quarter demand, the ISO week of the year, and you can mess up with the date however you want.
15. Creating Category page: The problem that we're still facing and in our application is they add when we click on one of the categories over here, for example, to get all the posts that have that belongs to the category, for example, stories or programming, we get a 40 for. So let's make that. Let's go to the pages here. And inside these pages, let's make a new file and let's call it name like so inside square brackets, SFC again. And this will be called for example, category page like so. So inside this category page for now, again, can just make a div with a class name of container. And inside it, Let's make another div with a class name of Maine. And for now we just want an H1 that says, Hello. Great. So now what we can do is that we can go down here and let's get first all those pets. So export an asynchronous function that's called get static bets, like cell counts here. And that will be all the categorical data first. And let's wait for the graph CMS. Let's import this graph CMS instance. So import from, I think it's called lib slash graph CMS, like so. And here we can import that graph CMS instance. Let's make you read requests. Great. So the requests here we want to requests all the categories. So how we can do that? Let's go back to Graph CMS over here. Let's go to the API playground. So we can simply go to the categories over a year and requests all their names, like so. So as you can see here, we have two categories so far. Let's copy this and let's paste it over here. Great. So what else we can do is to go down here and let's make the paths. And that's going to be from the data. We can destruct the categories. And then we can go to the categories over here, mapped through them. So when we map, we're going to find a category. And we want to return from here a, actually a, an object that has params. And for those params, we want to get the name and the name we can distract from the category over here. Great. So since we have all this right now, we can return on those bets. And what else? Again, we want to get a fallback of blocking. We didn't use here the fall back or false. We used fallback lock-in. So it's works properly with the incremental static regeneration. Way better than fall back hauls. Let's go down here and let's export an asynchronous function once again. And that's going to be called gets static. Props. Here from the params, from the parents were gonna destructor those params that we have set. And we can go here and make a const data in that we'll wait for the graph CMS dot request. So we want now to request only the post would the category mentioned. So let's delete everything here. Let's go to the Explorer, and let's go to posts. And we want the posts where the categories, every category name. As you can see here. We want, for example, if we type here bloke, Remington, we want to get all the posts that has a category called programming. So let's type here just the title, head that and as you can see here, it says how to make money. If we change this by, for example, Saudis. You can see here the first post. It works great. So what we need here is just to set a, Let's say the main here to be a string. And we can use it over here. Great. So what do we want is not just the title, we want the slug as well. We want to get the fontanelle. We want to get the categories as well. And from the categories we want to get the name, the color, and from the color we want the CSS, from the thumbnail here, we want the URL as well in that set. So let's now copy all this. And let's paste it over here. We need to add as well that name. It will be actually from the params dot name, like so. Fantastic. So now we can go here and return perhaps. And those prompts that we want to return is here, not just the data. We want to return the posts. We can distract them from year, return all the posts like so. And let's just set the revalidate to 10. Great. Let's go back here. We can now reach the posts. And here in the main, we can go to those posts, mapped through them. And when we mapped through them, we're going to find the post. And we can get the posts components like so. Let's import the post components from components. And then we can get to the booth here. And let's first give it a key. And the key it can be boost dot. Both daughter can work with slug here because it's unique. And what else we want to do is just to give it boasts. Boast, like so, let's save this. Let's go back to our application. Let's go to the homepage. Let's go once again to programming. Excuse me for that. Let's go to programming. And I think that we're still facing a problem here. Let's wait. No, we're not facing any problem. So as you can see here now when we go to programming, it gives me the posts that has the category programming. If I go to stories here, you can see here it gives me the posts with the story tags. It's click on it. And that tech meters, sorry, is we still don't have any content for that. We can go now to programming. Click on this year. And we can go to the post of how to make money. So this is how it works.
16. Sort posts by date: Okay, So I have just added actually another post and it's called, for example, what is GraphQL? And you can see here, there we are facing a problem. We don't sort those posts. Y dy dt. This is the last books that I've just added in, in it is not the first posts. So how we can do that? We can simply do that if we go now for example, to the index which is the homepage here in the posts, we can simply do reverse. Okay, so it's an array, we can reverse it. And if we hit the Save here, Let's go back to our application. And as you can see here now we have the post sorted by date if we go to Program and for example here you can see that we are still, we don't have that sort. So what do we can, we can do is to go to the name here, go to those posts and reverse them as well. Mike. So excuse me for that. Reverse like so let's go back here. Hit the Refresh. And as you can see here, so now we have all our topic sorted by date.
17. Adding titles to the pages: Okay, so now let's try to handle some SEO using Next JS. The first thing we wanna do is that maybe you have mentioned that for all the pages inside our application, there is no title. We have only this localhost and that's not good for the SEO and not good even for the users that's going to visit our website. So what we're gonna do now is let's work with the head tag off next js. Let's go to pages. And for example, let's start first with the homepage. Let's import the head From next slash. And, and by the way, we can use the head inside this container and that's not going to effect, that's not going to affect what we can see now. It's not going to be on, actually seen on the page. But just to feel like we are using just a regular HTML page, I'm going to put all this inside. I'm inside some empty tags. So what I'm gonna do now is I'm going to do Cut to all this year, opened up some empty brackets like so, and close them over here. And let's go down here. So this is going to be like the body of our website, as you can see here. And now I'm going to put the head over here. Like so. So as you can see here, so now we have the head and that can be in this actually here can be considered as the body of our HTML page. So now inside the head here, for example, let's go with a title. And the chiral for example, it's going to be share it. And for example, like this and let's say welcome to share it. And that's actually crucial for, for those were crowds out there and search engines like Google and Yahoo and document girl, this is how they can recognize your website and that's what's going to show, what's going to be shown actually on the search results. So now with this, if we hit Save, Let's just get back to our application. We told it to refresh. And as you can see here, we can see that now the title has changed. And for example, now let's move to the spacious. And for these pages, for example, we don't want to see this as well. So let's go back to them. Let's import the head as well here. I think you get the idea right now. So let's import the head from next slash head, like so. And let's go here for this time though, just to illustrate to you how Lookalike we can put the head just here without using those empty brackets. And just inside his head for example, let's give it a title. And for this year it's going to be for example, Sarit. And then here we want to get on actually the name of the, the disparaged, okay, how we can get that, as you can see here we have here posts and here we can get to the posts. So what do we can do here is just like so I think maybe so if we type here boasts. And then from the posts, we want to get just the first one. And for the first posts, we can go here and get to the categories, the zeros. Well, and we can get here to the name. Let's see if we get this right. So let's refresh. And as you can see, we have now share it stories. So there's no need actually for this dollar signs of, excuse me, we can just simply do some brackets and we're good to go. So as you can see here. So now we have shared stories. If we go to programming, we can see share IT programming. And if we go, for example, to JavaScript, you can go share it JavaScript. And by the way, for JavaScript over here, I just manipulated a little bit the categories over here, as we have mentioned before. And I just for the posterior it says, what is GraphQL? I moved it to, for example, this category that's called JavaScript. And I messed up a little bit with the colors as well. So as you can see here, we can get to the title. And moreover, we can even work with some Meta tags. Like so. For example, we can add a meta, for example, with the name of description, for example, description like so. And here we can give it the content as well. This is crucial for, for the essay. Okay? So the content, for example, where programming, for example, topics shared every day, for example, this is actually crucial and this is, this is a major factor when it comes to rank first on search engines. So we can give, we can go even further with the posts as well. And here we can say that for the posts over here, let's import the head as well. Next slash head, and we can use them here. So let's use d hat over here. And then we can use the title, excuse me, for this chiral like so. And here for example, we want to share it as well. Three words. So share it and then we want the title of our coasts. So we can simply get that by seeing here title. So now I think if we go to any posts inside our arm, inside our application, like for example, what is GraphQL over here, you can see here that it says share it in. It says, what is GraphQL. So you can take a look actually at, you can search the web for the Meta tags and how you can handle the keywords and how you can enhance the SEO off your website just by using HTML. And this is actually a good thing that Next JS provides for us. So it will be good to use it as well.
18. Add a custom favicon: Okay, so now we want to add the icon to our project. We can basically go to our project over here, and let's make a new folder. Let's call it public. Like so. Inside this public folder, we want to add our fab icon. So let's go back here. As you can see here, I've just downloaded a basic fav icon. There have S and H. So I wanna do is that we want to go inside our folder over here. And as you can see here, we can see the public folder that we have just created. So if we go inside, we can just drag now our farewell I can, as you can see here. So make sure that you stop the server. So now let's go to the terminal and let's do npm run. Dev likes are great so as you can see a compiled successfully. So let's go to our website. And now you can see here that we have our fav icon. If you want to generate fav icons, all you need to do just to go to a website called fav icon generator. So you can convert your images. Like for example, if we have, if you have a PNG or JPEG image or even not Ico image, you can just choose it from here and you can create your flag icon for me for that over there, I just search here for S and H. And as you can see here, it gives me this fav icon and I don't load it. And this is what we have just used in our project.
 Atlas C., Professional Web developer