Transcripts
1. About the Class: One of the amazing
things that I love about painting flowers in
a loose style is how a few strokes on the paper suddenly become
a beautiful flower. A common hurdle for
beginners is having the petals come out stiff
rather than expressive. But don't worry, as this
can be easily solved with the approach that I will share with you in this class. Join me today as we learn and focus on brush stroke
techniques that will add movement and softness to your loose
watercolor petals. Hi, my name is Charlie. And I'm a watercolor artist, art educator and skillshare, top teacher with nearly a
decade of painting experience. My art revolves around painting. Watercolor flowers,
creatively capturing nature on paper in a loose
and expressive style. In my classes, I
simplify chal***ging watercolor techniques into
beginner friendly steps. In this class, we're going
to use a round brush, which is a versatile
brush that can go from precise detail strokes
to loose and broad strokes. We will talk about
parts of the brush, how we can apply
painting flowers, simple warm up exercises to hold the muscle
memory in your hand. Next you learn a variety of
petal painting techniques, such as combining strokes, varying the pressure and speed, and a lot more exciting tips
at the end of the class. These essential techniques
will allow you to confidently create brush strokes that you can apply to your own style. I'm a firm believer
that practice is key in mastering loose
watercolor flowers. As such, I have prepared several projects
that are designed to fit in smaller sheets of paper and can be done in
small pockets of time. Choosing to do many
small paintings, let's you concentrate
on perfecting the br minus the worry of
nailing the composition. Each project is unique and filled with different
watercolor tips, such as how to mix colors and how to paint using
a reference photo. If you're just starting
out with watercolor, this can help build the
foundation for painting loose watercolor flowers
for seasoned artists. While this class can definitely enrich
your existing skills, I'm excited to see you guys
dance with your brush, So let's get started.
2. Class Project Overview: Hello, welcome to the class. So I'm here to just share an overview of the
projects in the class. So I've chosen a round brush
to focus on in this class, as this is a brush that most beginners have when
they're starting out. We'll learn how to fully utilize this brush to create
beautiful brush strokes. Also, I decided to paint the projects in smaller
sheets of paper. They are five x 7 ", so that you can just focus
on the brush strokes alone and not worry about
the composition so much. Alright, so let me just show you all the projects that
we will be doing. All right, so for
the first project, we are going to
paint peach florals. The first project is
usually the easiest so that it will also serve as
a warm up exercise for you. Next we're going to
paint a pink peony. This is going to be a
simplified version of a peony, and we're also
going to use wet on wet technique to create
those soft petals. Next, we're going to paint a white flower using
a reference photo. I'm also going to teach
you how to mix white using just two colors and we'll
create these expressive petals. Okay, for our fourth project, we're going to paint this
yellow butterfly nucleus. In this project, you
will learn how to make the flowers dance in a
composition like this. For project five,
we're going to paint my signature rose that
I really love painting. You learn how to
paint some C strokes, and you'll also
learn how to create those fluffy petals at the
bottom for the sixth project. This is one of my favorites, It's my imaginary blue flower. I really love the combination
of brush strokes. Here we're going to practice
broad strokes along with some tiny strokes
that will serve as the details for this flower. Next, we're going to paint
this purple anemone. You will learn how to
paint layered petals, and at the same time use gash in the middle to add more depth. Lastly, we are going to
paint an iris flower. And I will teach you how
to vary the stroke in each petal so that
we can capture the movement in the
petals of an iris flower. All right, so the common theme
among all the projects in this class is that
they're going to be simple flowers that
you can paint. It's a great way to practice your brush strokes in order
to create soft petals. Okay, I hope that you are
excited for this class now. Let's move on to the next video.
3. Materials : All right, so let's start with the materials that we
need for the paper. I'm going to use the Power hong artist grade watercolor paper. You don't really need
to use this brand, but try to choose a cold pressed paper that
is 100% cotton paper. This paper is actually in
a watercolor block form, which means that all sides are glued except for this one area. I use a palette knife to slide off one sheet
when I'm done. Using a cold pressed paper is really good for loose florals. As you can see, the
texture is very nice. It will absorb the
paint right away. For this project, we are going to paint on smaller
sheets of paper. So I'm just going to paint
on half of this sheet. We can just draw a line
or just put the tape. Our projects are going
to be around five by 7. ". I'm going to show
you another one. This is the Abajo Academy. Now this is their
student grade line. It's also in a
watercolor block form. You can also try to
find this because a bit more affordable compared to
their artist grade version. Now there is a slight
difference with the quality, but I really don't mind. I actually recommend
this paper for beginners because it's one of the best student grade
papers that I have tried. Now let me show you
the difference between these two papers in case
this matters to you. So you can see the difference. On the left side is the
artist grade paper, on the right side is the
student grade paper. You can see that with the student grade paper
you have hard edges. You have more patchy areas, which you can also easily avoid by limiting the amount
of water in your brush. I also feel like the paint spreads better on
artist grade paper. Other brands that I would
recommend are Arches, Saunders, Waterford, and
Fabriano, Artistico. Okay. Now let's check out the brushes that you
will use for this class. For the brushes we're going to use silver brush, black velvet. These are round brushes
inside 6.8 What I love about these is that even if you soak them in a lot
of water or paint, they will still
keep a fine point. Let me just show
you. As you can see, the tip is really still pointy. And what I also love about
this brush is that it's quite soft and it
follows my flow. And I can easily create some
nice expressive strokes. As you can see as a press brush, the bristles will fan
out and that will make it easier to create
beautiful strokes. All right, let's move
on to the paints. I am going to use
screen hand WC. This is a Korean
artist grade paint. You can definitely
use other brands, but these are in two forms. And I would usually
just pour them into smaller half pants like this because it's more
convenient to use. For the list of colors, you will see the names right
before we start a project. I love this brand because the
colors are quite pigmented. And when I pour them
into half pants, they are still moist and they don't crack or dry up too much. Aside from that, these
are actually quite affordable compared to
other artist grade paints. We also need a mixing palette. You can use ordinary plate or any plastic mixing
palette. It's okay. Here I'm using just the
lid of my watercolor tin. This is a different
brand of watercolor, but I just use the tin itself. The paints inside are actually
screen hand DC that I have customized for my use when
it comes to mixing palettes. I actually prefer something like this with little wells inside. I can mix different
colors and they won't contaminate each other. I have been using white
gah for a while now. The color here is
permanent white. I love adding this to
my watercolor paints. I can mike some pasta colors, can add some highlights. Just adding these small details will give the
flowers more depth. For some of the projects, we will be using a pencil to just lightly
sketch our guide. You can use any
pencil that you have. It doesn't have to be this one. Also, we need tissue
paper so that we can blot out the excess
moisture from our brush. Lastly, we have our
jar of clean water. Okay, that's it for the
materials that we need. Now let's move on
to the next video.
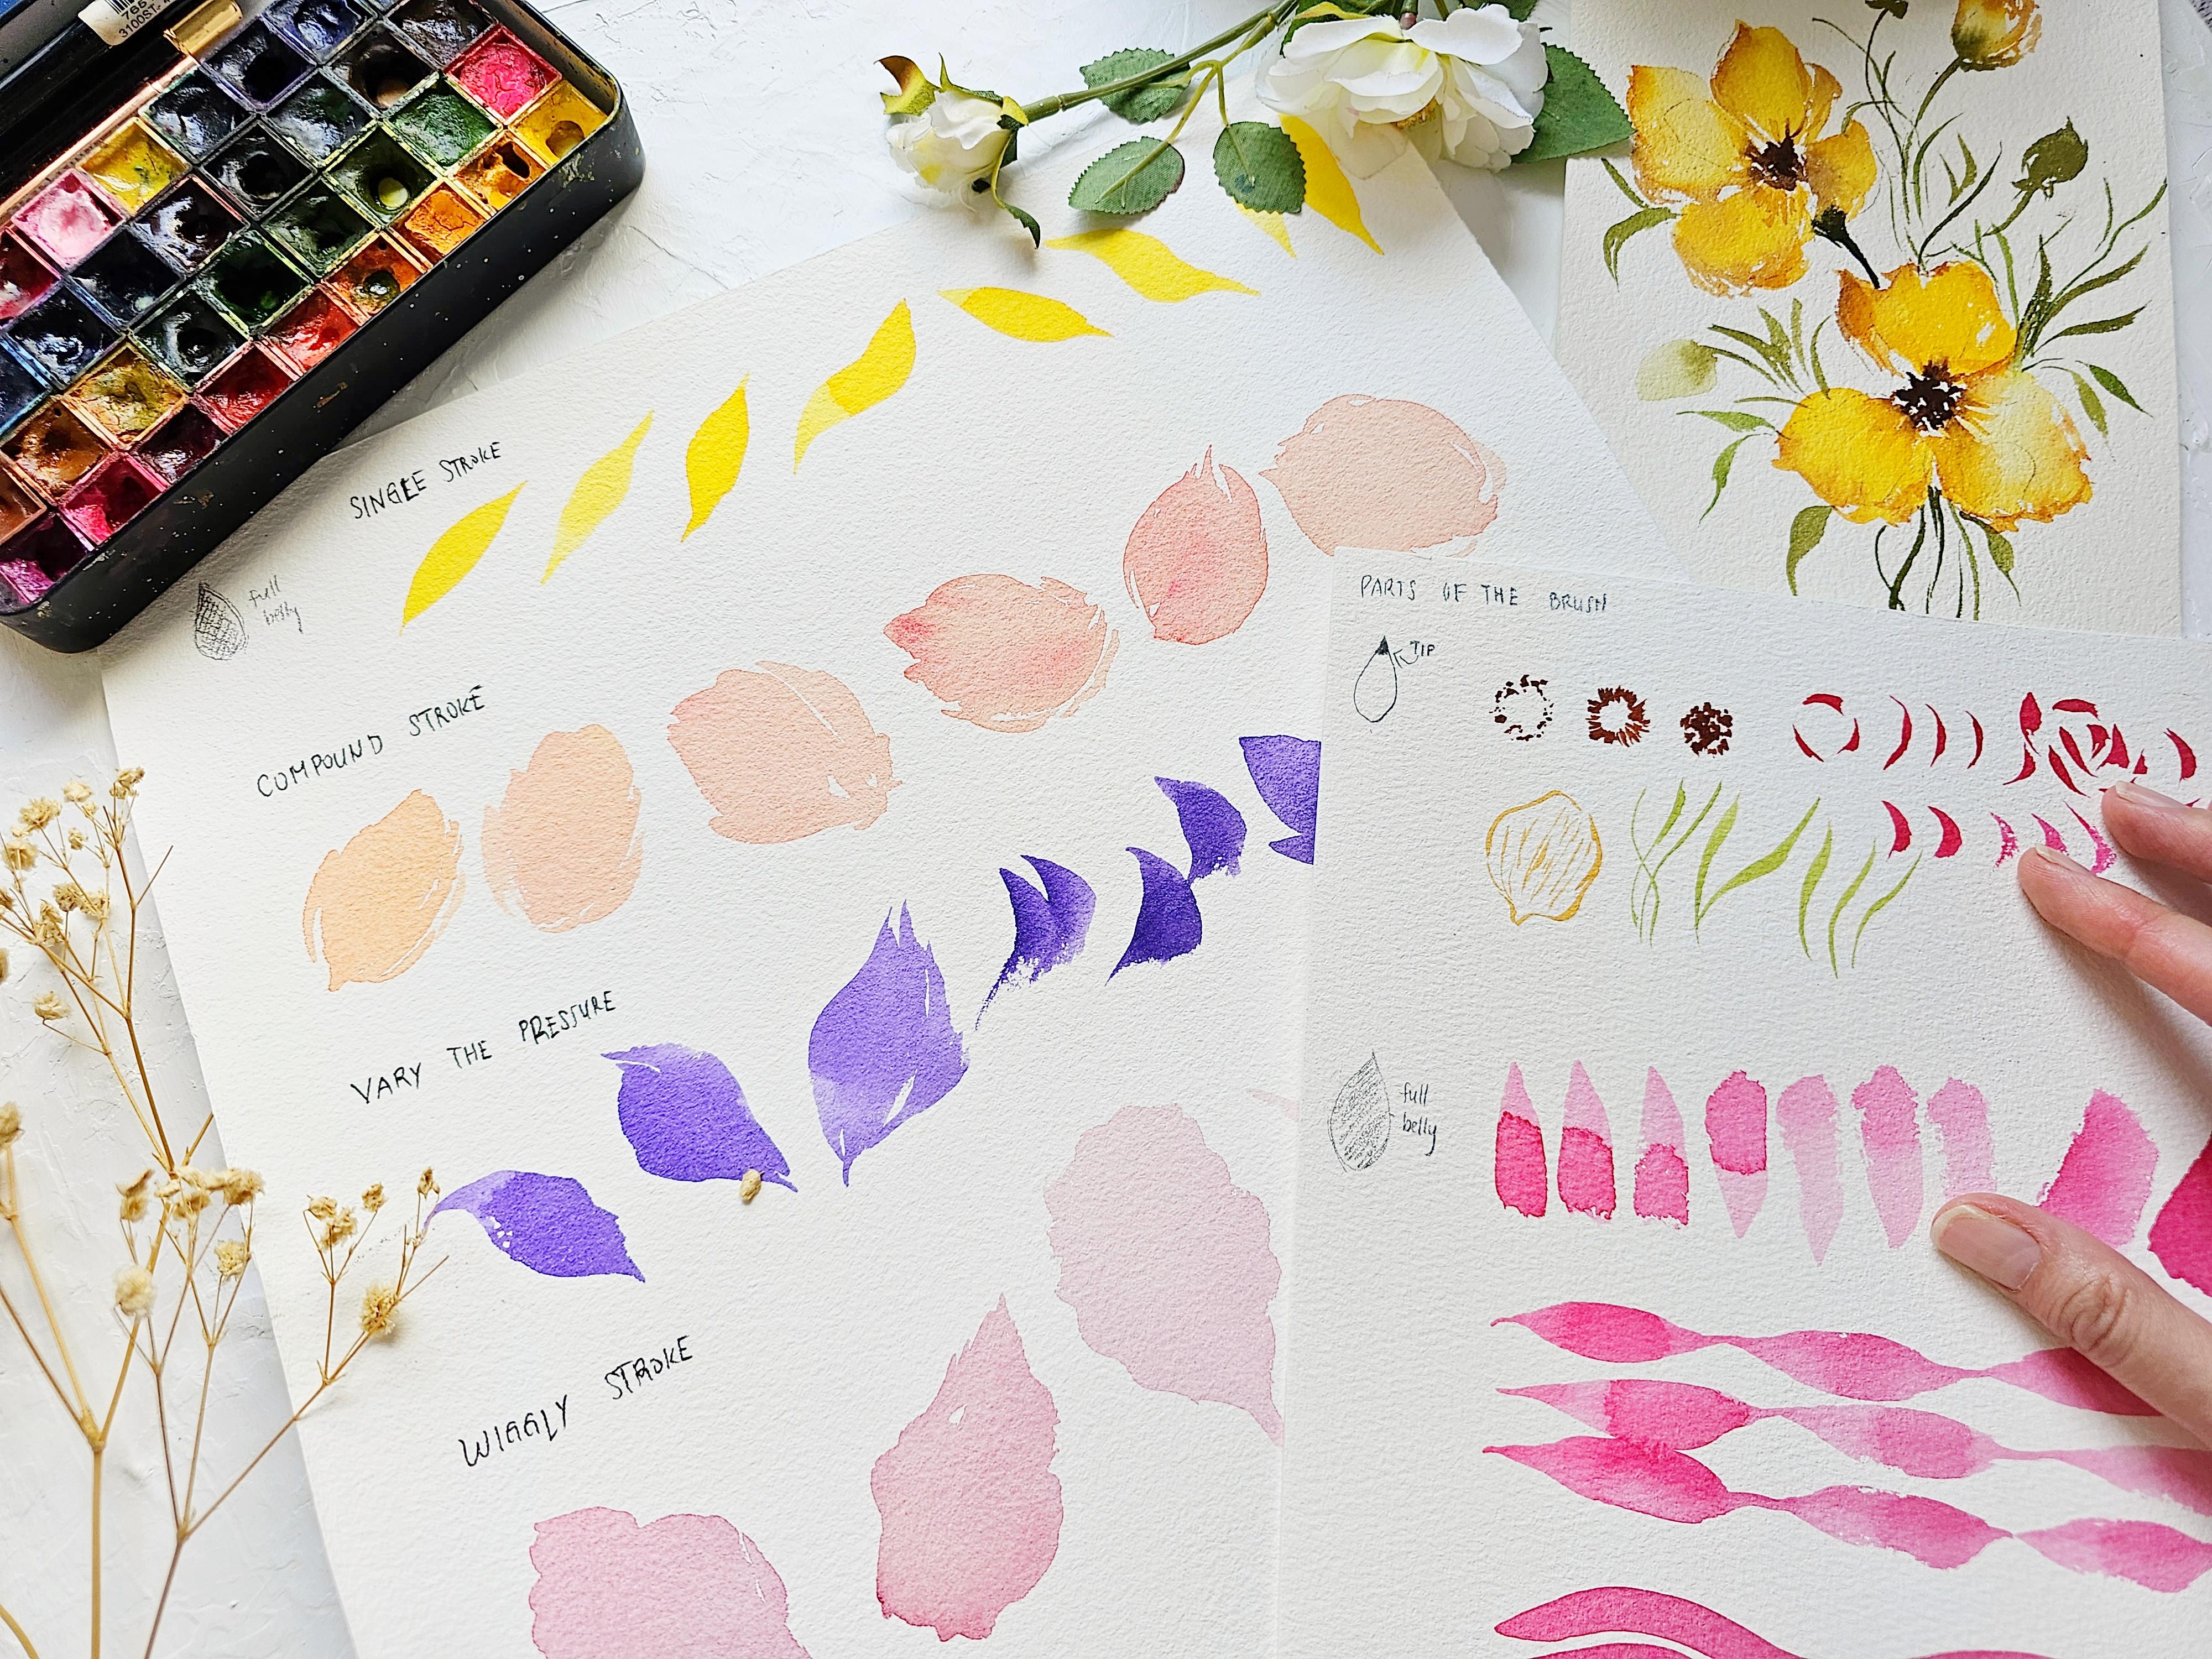
4. Parts of the Brush: In this lesson, let's talk about parts of the brush and how you can apply it to painting different
parts of the flower. I have here my silver
brush size six. And you can see this
nice fine point, that is the tip of the brush. And we're going to try
and paint simple strokes. Just use any color
in your palette. I'm using burnt sienna. I use the tip of
the brush to paint, usually the center
of the flower. You can put small
dots like this, make a ring of small dots. Usually, this is also the
darkest part of the flower. Next, you can also paint
some short strokes, just like for this flower that we are going
to paint later on. You can paint short, thin strokes in a
circular motion as well. You can see, I'm trying to
just flick my brush to create these nice wispy
strokes that are short. Now, you can also use the tip of the brush to create the
center of the flower. You can fill it in with
small dots like this. Just make sure that you have
****** in between the dots. I'm holding the brush near the bristles because I
want to be more precise. I want to have more control. Okay, let's move on to
the different stroke. I'm going to use permanent rose. Again, you can use other colors using the tip of the brush. We're going to paint
some letter C strokes. These are strokes that I
usually use for roses. You can see that only
the tip is bending and I'm trying to paint it in a curved motion, just like this. You can apply these strokes
to flowers like this. We're also going to paint
this in our project. You can see those
nice thin strokes. Also, you can apply it to adding details like in
this blue flower, you can start with
a light pressure and then slightly
press your brush and lift towards the end so that you have that
nice pointy tip. Let me do some more for you so that you can really
observe it better. This is from a different angle. Just look at how
the brush bends. It doesn't have to be perfect. You don't need to paint
the exact same stroke. You can also paint this stroke
in different directions, just like what I'm doing here. It's also easier to do this
if you paint it quickly. You can see that I am trying to flick my brush towards
the end of the stroke. Adding that movement also gives the strokes a
more expressive look. This is also something you can apply to other strokes as well. You can press your brush more
to create bigger shapes. It is best that your
brush is soaked in enough paint so that it's watery enough to
glide on the paper. Let me show you
what it looks like. If your brush is dry, you can see those white specks. That means that
your brush is dry. It's also more
difficult to move on the paper if you want to
create certain strokes. But this is also
another technique, actually, it's a dry
brush technique. However, when you're
painting loose flowers, you usually don't add
this dry brush technique. We usually want a juicy brush. You can also use the tip of
the brush to create veins, which will add more details
to your loose flowers. For example, let me just
draw a petal right here. And then next, you
can use the tip of your brush and just draw
some thin lines inside. Sometimes I find it easier
to put my pinky finger right here on the paper so that it
keeps my hand more balanced. But of course, it
is a preference. It depends on you, if it
will feel comfortable. Next, we need a green paint. We also use the tip of the
brush to create thin steps, just like in this painting, and also some thin leaves. Let me just show you,
You hold your brush at roughly a 45 degree angle and then you just
drag your brush. Seeing only the tip of the brush towards the
end of the stroke, you can actually put more pressure so that
you have a thicker line. I'm going to start with
the light pressure and then slightly press my
brush in the middle. And then lift again
towards the end. And you can do this in
different directions as well. All right, now let's move on
to the belly of the brush. We are going to try and create some strokes using
the full belly. This brush is still dry
and you can actually try to practice on your paper
and press it like this. Let the bristles fan out. This will help you
get the feel of your own brush and just add some movement
to every stroke. Let's do some simple strokes using the whole
belly of the brush. For the petal strokes, we are actually
going to learn more about it in the next lesson. Right here, we're
just going to do some simple exercises so that you will have some warm up before you paint the florals. What you can do is you can
try and press your brush, and you can see that nice
pointed tip at the top. Use any color that you have. Right now, I'm going to
start from the bottom. Going up. These are
not perfect strokes. We are just trying to do
some warm up exercises. I just want you to observe
how the bristles fan out as you add more
pressure into each stroke. Okay, we can also
use the side of the brush to create
a broader stroke. I usually call this the side
stroke, just like this. Later on you will
be able to apply this to painting broad petals. Okay, let's move on to
a different exercise, which you might have seen in
my previous classes already. This is the thin
and thick stroke. It looks like a wavy line. We're going to start with
the light pressure press. Drag and then lift
towards the end. Then you do it a couple
more times to practice. If you're having a hard
time, don't worry about it, because this exercise
will actually help hold the muscle
memory in your hand. When we're painting loose
and expressive petals, it's all about varying the
pressure in each stroke, which is why exercises like
this are very important. You can do this a
couple more times, you can do it slow, you can do it fast. You can even do patterns
for this and frame it. Now if you want to
practice some more, you can actually just use
student grade paper so that you don't have to spend
on expensive paper. Next we're going to
do some wavy lines using the belly of the brush. You can see I'm really pressing the brush onto the
paper and I'm trying to maintain the same distance
between the two wavy lines, that white space in between. We want that to be uniform, we want it to be in
the same distance. The goal is to maintain control over that one long stroke. Even if I have been
painting for a while, I still have struggled
with these exercises. It's really important
that you practice. And if you do feel
it's definitely fine, you can always try again. Don't forget to always have fun, Always remember that beginners
have to start somewhere. I also started from scratch without knowing anything
about watercolor. As cliche as it sounds, practice really makes progress. All right, so these
are simple exercises, warm up for you next. Let's move on to the next video. As we learned more
about petal strokes, that you can actually apply to painting loose water
color florals, you learn how to create
more organic petals. Okay, now let's move
on to the next video.
5. Petal Brush Stroke Drills: Let's talk about brush
stroke techniques that will help improve the
way you paint petals. Okay, for all of
these exercises, we're going to use the full
belly of the brush right now. Let's start with
a single stroke. I'm using my size
eight round brush. Use any color that you
have in your palette. Now we're going to start with
the light pressure and then slowly it towards the middle
and left towards the end. It looks like a leaf shape. You can see how
the bristles will fan out in the middle
of the stroke. Let's do it from
the top going down. Now, it's always nice
to experiment and do this technique from
different directions. You can even do a
wavy technique, so do like a letter S shape, and that will give you
a different shape. This is a very basic
petal stroke that you can even apply to leaves
and other flowers. You can see that in
one single stroke, you can create one petal. So we want the top and
bottom part to be pointy. And you can see that
in one single stroke, you have a body. You have curves on the stroke, and that will make it
look more organic. Next, let's go to
the compound stroke. Okay, use any color
that you have. This is just permanent
rose with a little bit of that yellow to create
a peachy pink color. Now for this technique, we want the brush
to be really juicy. You want it to absorb
a lot of paint with a single stroke that we painted earlier that was
just one stroke. With the compound stroke, you are going to paint
several strokes. Create a petal, you can use the
side of your brush to start with a broad stroke and then use the tip to create those nice thin
lines that you will attach to the first
stroke that you did. Again, you can also do a loop
like what I'm doing here, and then just add some
tiny strokes on the sides. You can leave some ****** in between your strokes as well. You can apply this
stroke to many flowers. This is an example. This is a project that we'll be doing. So you can see those
nice broad petals. I use the compound
stroke to paint that. You just move your brush up and down until you create
the desired shape. You can see towards the bottom, it is more tapered or pointy because that will attach to the center
of the flower. Now let's paint the
petals on the side. Okay, let's just press or
create this curved stroke. Then you can fix it by adding some thin lines
using the tip of the brush just to make it more
wispy and more expressive. You're going to paint the lower
left side of this flower. Let me show you how to do
that using a compound stroke. Use the side of a brush and do a check mark towards the end. You have to lift your brush to create that nice pointed tip. Now I'm just filling
it the sides so that we can make
it look nicer. Just use the tip of the brush. Create some thin strokes. Now let's try painting this
lower right petal over here. We're going to do a loop. Just press your brush and
create a loop towards the end of the stroke so that you have a
more rounded tip. Then you can really your
brush onto the paper so that the bristles will spread and create
a broad stroke. Just remember that every
time you paint these petals, your direction is
that it's going into the center of the flower. All right, now let's move
on to the next technique. This is what I call
varying the pressure. We are going to play around with the pressure in each stroke. Okay, we can start with the light pressure using
the tip of the brush. And then we're going to do a curved motion and
slowly press it. Then you can push it
down and then lift. You can see that nice,
beautiful, organic shape. The inspiration for this petal is the petal of an iris flower. You can see all
those nice ruffles. Now let's start with a
stroke from the top. And then you can see I tried
to wiggle it a little bit, and then towards
the tip, I lifted my brush to create
that nice pointy tip. Just by varying the pressure, you can see that the stroke
will have more movement, which is something that
we are looking for if you want a looser, more
organic petal. So I do encourage you to try this technique and just paint it again from different angle,
different directions. It's going to really help hone the muscle
memory in your hand. Next, let me show you
a technique that I usually use for flowers
just like this, so this one looks like
a rose or a pony. We usually paint strokes. Let me show you how, again, we are going to
start from the top and just press your brush and
then lift towards the end, it looks like a crescent moon. But this is going to help paint some nice
petals for roses. Using this technique, you can
do some compound strokes, like what I'm doing here
to create a bigger petal. The speed of the stroke also
helps create organic petals. You can see right here, I'm creating some quick
strokes and it looks like it has more movement compared to strokes that were
painted slower. Next, let's do the
wiggly stroke. Use any color that you
have in your palette. I use this technique usually
for petals with ruffles. You can see that I'm just trying to wiggle my brush
onto the paper. Now you can just drag your brush to create
that nice pointy tip. Let's try to do it again. Just press your brush onto the paper and
try to wiggle it. The tip of the brush will create the nice ruffle edges and that's going to
create a nice texture. When you're doing
this technique, it's also best that your
brush is soaked and paint so that you can easily
glide onto the paper. If the petal is too small, you can go ahead and try to push your brush even more
to expand that petal. Now let's start from the bottom. The pointy tip is going to
face us, just like this. Then try to wiggle your brush. Going to really pull
it towards the end of the stroke to create
that nice pointy tip. Now you can also try
and rotate your paper so that it feels more
comfortable for you to paint. Let me do one more exercise
for you so that you can really observe how
I do this technique. All right, now let's learn
how to add ruffled edges. I know this looks a little bit similar to the
wiggly stroke, but I'm going to show you
how to do this same petal. Now let's grab some paint. Use any color that you want. Let's do this part over here. I'm going to paint one petal. Let's start with a
compound stroke. Just use the side of your
brush and just glide it onto the paper until you create
your desired petal shape. Now you can see that we have
a clean edge right here. It looks rounded, but we can try to add some ruffled edges. To make it look more organic, just use the tip of
the brush and slowly push it on the
edges of the petal. You can see that
you're now going to form some nice uneven edges. What you can also do
is add a shadow, A, using a violet color
here is going to put it towards the
tips of this petal. Okay, let's do another one. When you're adding
the ruffled edges, you have to make sure
that the base petal is still so that you can
still work on it all. We have this looking petal and going to use the tip
of my brush and just slowly push it along the edges to create that
nice ruffled texture. I do like adding this style because the flowers naturally
have some curly edges. Let's try to practice some more. I'm going to paint the petal that is on the right
side of the flower. You can start with a rounded
petal just like this. Again, use the tip of the brush and just wiggle along the edges. This is also a good way to
change the shape of the petals slightly while the
petal is still wet. You can add another color. I'm going to add a bit of yellow here just to make it
look more interesting. This is a nice technique
to add to your own style. Let me just show you side by side what a plain looking
petal looks like. This is actually a nice shape, but the edges are
clean and quite stiff. You can see that just by simply adding those
ruffled edges, it makes a huge difference. Okay, now let's move on to
the next video as we play around with the brush strokes
and create some flowers.
6. Brush Play Exercise: For this video, we are going to do a brush plate exercise. I thought it would be nice to do some warm up exercises after we have learned the petal
brush stroke techniques. Now you can see that this
paper is actually quite big, but for our projects, we are going to paint on
smaller pieces like this. That's because I want you to focus on the brush
strokes alone. And I don't want you to think about the composition first, so we can paint on student
grade paper first. Since we are just
practicing now, I don't want you to feel any pressure as you're
painting this. We're not aiming to do a
nice floral composition, we really are just painting
some open flowers. To practice the brush strokes. Let's now, let's start
to loosen up our wrists. We want to start painting
some broad strokes. Just really pressing on
that brush onto the paper. Like what I'm doing here, you can grab a
reference photo or any flower book that it will be easier for you to imagine
what you're painting. Nice book color,
flower color theory. Try to look for flowers
that are quite open. Like this, Puny, you have
some petals hanging. This is another nice book. I love this open flower with
some frills on the petals. To start, you can grab
any color that you want. I'm going to start with pink, which is my favorite color. This is permanent rose. You want a nice juicy
brush with a bold color? I'm holding my brush
at a 45 degree angle. Just slowly press your brush and go up and down to create
that petal stroke. Next, rinse our brush and do
the same thing on the side. You can try to hold your brush towards the end of the handle, just like how I'm
holding my brush here. And just move your
brush up and down. You can use the tip of
the brush to create some thin strokes that will
complement the main petal. Don't worry, you
can always go back in and fix the shape
of the petals. You can also try to flick your brush to create
some nice pointy tips. It's also best to leave some ****** in
between your petals. That negative space
really creates more depth when it comes to painting loose watercolor
flowers for the center, grab any dark color. This is just permanent rose, but it is more concentrated. Just put it in the center
to give it more contrast. Okay, let's start
with another flower. We're going to paint
another open flower, but this one is a little bit
on the side or at an angle. I'm using the color
yellow ochre. I'm holding my brush at a 45
degree angle and you can see how the brush or
the bristles just fans out as I press
it on the paper. Okay, we can slightly
rinse our brush. You can see that there's
a lot of water and that makes it easier for my hand
to glide on the paper. When you're painting, the petals facing in different directions. You can also change the
direction that you hold your brush right here. Let's paint a small oval shape that will give it an impression. This flower is at an angle
because the petal is folded. Let's go back in and
add some ruffled edges. I'm using the tip of my
brush and just pushing back that paint to create
those nice jagged edge. If you want a little
bit of contrast, you can grab some darker paint and add that in
between the petals. For the center, we can
grab burnt sienna. Or you can use any dark
brown color in your palette. Again, adding that contrast
really makes a difference. It makes the flowers pop up. Now let's grab our greens. I'm using sap green with a
little bit of burnt umber. I love mixing green and brown to create a nice
earthy green color. So I'm just going to add
it in between the flowers. Use the tip of your brush
to create some nice stems. And you can see
that I am painting some leaves using a
combination stroke. For this exercise, you
can just observe how I hold the brush and how the brush just glides on the
paper to create. Nice petals. All right here. I was struggling
a little bit with the composition because
there's a lot of space. That's why I decided to really create smaller projects
for you so that you can just focus on painting
one flower right now. I'm going to paint a small bud. As you can see, I just pushed my brush onto the paper to
create that broad stroke. And now we're adding
some thin lines to add those wispy
sides of the petals. We can change the
value of the color. It means that you can add light green and
dark green colors. Next, I'm going to add the stem. We're going to attach
this to the main flowers. You can also try to
stamp your brush onto the paper to
create a petal stroke, just like what I'm doing here. Then you can just slowly add some more strokes to
create a softer petal. When you're creating soft
and expressive petals, it's not always just one stroke. You usually go back and
forth and try to fix it. Now to be honest, if
you want to really improve on painting
expressive petals, you really have to practice and just try to get a
feel of your brush. So we all have
different brushes, or also different
preferences for brushes. It's important
that you try to do some exercises to hold that
muscle memory in your hand. So once you become
comfortable with painting, everything becomes
easier and you almost don't really think
when you're painting petals, it just comes out naturally. So here I just painted
a white mixture. This is ultramarine
blue and burnt umber. Don't worry, I'm
going to also teach you how to mix this in
a separate project. Now let's paint a big
white flower right here. Again, you want a juicy brush so that it's easier to
paint on the paper. Also, painting expressive petals involves varying the
pressure in your stroke. We'll just press
your brush and then slowly live towards
the end of the stroke. That will give the petal
more body and more movement. You can also try to
wiggle your brush, like what I'm doing here, create some swift
or quick strokes. Okay, let's get some more paint. I'm going to paint
just a few more petals To close this flower, you'll notice that it makes
a huge difference if you leave negative space or white ****** in
between the petals. Now, for the center, I'm going to use
the color indigo. You want a nice dark
concentrated mixture added in the center? That's a nice pop of color. I'm holding the brush towards
the end of the handle. As I paint these leaves, it helps me let go of the control and helps me
create nice expressive leaves. Because sometimes if you hold the brush near the bristles, you grip on it too tight, that creates stiff petals. But if you hold it a
little bit further back, then you can be able to
let go of that control. That also comes with practice. When I first did
this, sometimes I would accidentally let go of
my brush, but that's okay. It's part of how you learn
how to paint loose petals. You can use the tape of
your brush to create these small brush markings and it will give an
illusion of small flowers. Okay. I'm going to show you
how to do some swift strokes. It looks like a
check mark stroke. You can see I'm trying to paint it from
different directions. That will make it a
nice loose flower. Every time I paint flowers, there is like an
internal rhythm. You can see that
I mixed a lot of broad strokes and then I'll
suddenly go with small, tiny strokes using
the tip of the brush. If you think about it, it's
like listening to music. Sometimes the beats are faster, sometimes it's a bit slower. You can also practice by
painting expressive leaves. You can see right here, I'm
going to like dance with my brush and just paint the leaves in
different directions, create some long stems. And I'm also holding my brush towards the end of the handle. It's almost like
I'm just flicking my brush and just changing
the pressure in each stroke. Okay, so now we're done
with our warm up exercise. I hope that you enjoyed painting this free style floral painting. When you're practicing, I do
suggest to keep it simple. Just like what we did here. We just painted some four
or five petal flowers that are open and most
of them are top facing. That's because we just
want to focus on painting beautiful pros strokes to create some nice
expressive petals. Okay, so I think
that we are ready for our small projects now. Let's move on to the next video.
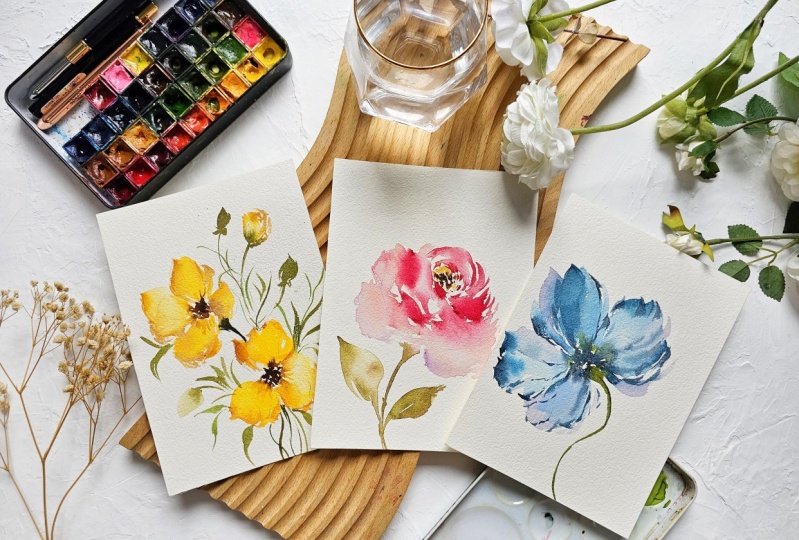
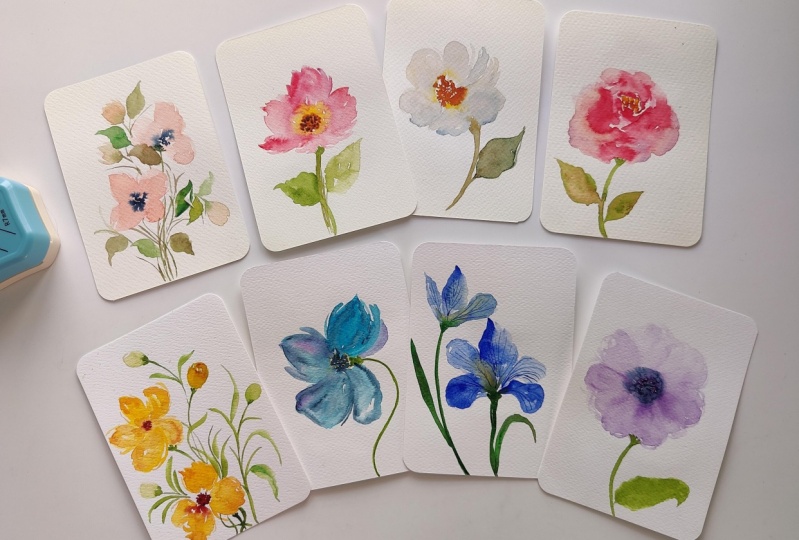
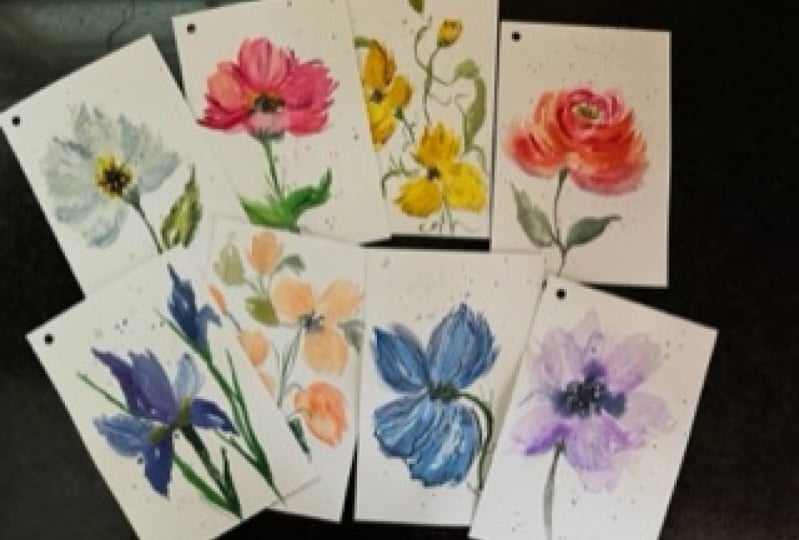
7. Project 1: Peach Florals: Here are the colors
that we need. Brilliant pink, yellow, ochre, indigo, sap, green,
and burnt umber. For our first project, let's start with
something simple. These are open
flowers at an angle. Here's a time loss
video for you so that you'll have an idea on
how to paint this piece. Before we start,
let's start with the main flowers that are
diagonally across each other. You can see that
I'm really trying to press my brush against the paper and sway my brush
to create those nice petals. I'm also using a lot
of water to do that. Next, let's use
indigo and put it in the center of the flower
to add some contrast. Then we're going
to use sap green to add the stems and the leaves. All right, now we're just
going to try and fill in all those small ******
in between the flowers. And then we're also
going to add some buds by just simply pressing
a brush onto the paper. This is a very easy
composition that you can definitely follow along
among my classes. Usually the first
project is the easiest. It's like a warm up project
that you won't feel that much pressure as you
paint the next few projects. All right, let's start.
I'm first going to mix brilliant pink
and yellow ochre. This is a very beautiful
color combination that will give you
a soft peach color. You can just adjust the ratio. If you want it a bit
more on the pink side, you add more brilliant pink. But if you want a
more orange color, you add more yellow ochre. We can put a small dot
right here to serve as a guide that this
will be the center of the flower from the top. Just press your brush going into the dot and create a loop. Okay, let's add
some more petals. Just rinse your brush. Tap the excess water. I'm going to move my
brush up and down to create a nice
motion for the petals. This petal is going to
be a little bit smaller. You just going to wiggle
your brush and it will look like a
petal that is folded. If you want more contrast, just grab a darker mixture and put it in
between the petals. Feel free to adjust the
shape of the petals. You can try to extend some
areas to make it look bigger. Okay, let's move on
to the flower that is diagonally across
the first one. We're going to do the same
method as the first flower. This is another flower
that is at an angle. Just make sure that you really
press your brush and move up and down to create
the beautiful petal. You can also use the tip of your brush to create
some thin strokes. You can definitely
go back to some of the flowers and just
add some more color. Next, let's grab some indigo and put it in the
center of the flower. The petals are all still tab. You can see the blooming
indigo in the center. But make sure that
the mixture is quite thick as you don't want it to
spread all over the petals. Okay, let's move
on to the greens. This is going to be sap green. It burnt on bar to create
that earthy color. And we're going to
paint a very thin stem. We also want it to be
a little bit curve so that it will look like
the flowers are dancing. Okay, we can start adding some loose stems
and also leaves. I'm trying to rinse my brush to get a more watery mixture. I want to paint some
expressive leaves. That's why I'm holding the brush towards the end of the handle, and that will help me let go
of the control on the brush. Okay, I'm going to also
let this leaf touch this wet petal and you can
see a beautiful effect. And then we can also add some thin stems just to fill
in those small white gaps. When painting leaves, I do
suggest changing the values. It means that some
leaves are darker, some are a bit lighter. We can also paint some
small buds just by pressing our brush onto the paper to
create a petal like stroke. To make your composition
look more interesting, you can place the buds facing
in different directions. As you can see, the bud on
the right is facing downward, while the others
are facing towards the left and towards
the upper left. Now let's try to fix this area because
this green part here looks too prominent. Just grab a clean, damp brush and we're
going to slowly absorb the excess green
color on the paper. Okay, there you
go. It looks a lot better because the green is
just a subtle color there. If there are still some white ****** that you need to fill in, you can add some really
light colored leaves, just like what I'm doing here. You can simply add more
water to your paint mixture. When it comes to composition, you can also take a photo of
your painting right now and look at it from your phone just to give you a
different perspective. It will help you decide
whether you need to add some more flowers or
leaves in your painting. All right, the congratulations for finishing your
first project. I hope that you enjoyed
painting this peach floral. Now let's move on to the
next video where we will learn how to simplify
a watercolor peony.
8. Project 2: Pink Peony: All right, before we start here, the colors that we need. Permanent rose, crimson leg, permanent violet,
permanent yellow. Light print number
pia, sap green. For this project, we
are going to take inspiration from a peony flower. As you can see, a pony
has just so many petals, it can be overwhelming. But we're just going
to simplify it. We're just going to focus on big petals and then
add a dark center. I'm going to show
you a different way to paint soft petals. That's very easy. But first, let's watch this time lapse video so that you have
an idea beforehand. Okay, we're just going
to grab some water and we're going to start
painting just two petals, two big petals with just water. Next we're going to
grab some paint and just paint it on top
of that wet surface. And immediately you can see a beautiful soft petal emerge. In combination with this, we also need to do some
nice brush strokes to create a more
expressive look. You can see right here, I'm
really pressing my brush to create those beautiful
wispy strokes. Then next we're going
to add a dark center. This is just a simplified
version of a pony. I don't want you to think too
much about so many petals, but at the same
time I want you to create a fluffy flower. And we're going to do that by
adding two smaller details. You can see I just added some small lines and that
really made a huge difference. Next we're just going to
paint some simple leaves. It's quite amazing that
you can do this in just less than 10
minutes just with a few simple protres already
have a nice peony flower. Okay, so let's start. We need a jar of clean
water for this project. Let's use a size
eight round brush. Make sure it's soaked
in a lot of water. Let's paint the
petal on the side. Just simply press your brush and just move it up and down. I'm going to tilt
my paper so you can see the reflection of my stroke. Since you can't see anything
because it's just water, let's do a petal on the side. I'm going to start from the top, go down and just move your
brush again up and down. You can use the tip of the brush to fix the shape of the petal, and you can see that
there are actually some ****** where I
did not put water. Okay. It's time to
add some color. I'm using permanent rose. Okay. Let's just lightly press
or brush onto the paper. And start with the left
part of the petal. I'm going to move to the
right side of the petal. I left the middle without color. Next, let's go to
the next petal. And you can see I also
rinse my brush so that not all the petals will
have that dark pink color. To make it more interesting,
let's add violet. Just dilute it in more water so that the color is
a little bit light. Just adding it towards
the sides of the petals. Next is add one more
petal, just using water. You can also flick your brush, just like what I'm doing here, to create some more
expressive strokes. The key here is not to fill in the entire
petal with color. You need to leave
some ****** as is, without any color, so that
it will dry beautifully. This will make the petals
look softer and lighter. Next, let's grab Crimson Lake. I'm going to use this color
to add some contrast. Let's add it towards the
sides of the petals, or in between the petals. Then for the bottom part, we're just going to paint
this tiny petal right here. Press your brush, create
some small check marks. Use the tip of the
brush and just flick your brush to create
those tiny strokes. This is a flower
that is on its side, that's why you have that
smaller petal in front. Next, let's grab some yellow
and also the burnt sienna. This will add a nice contrast, but I think we need
a darker color. So let's grab PA. This is a nice dark brown color. So when you're painting
loose flowers, you have to make sure that
you have the dark center, because that will pull it all together and
make it look nice. You'll notice that the CPA color is actually not moving so much, and that's because
I made the mixture more concentrated
with less water. As I'm looking at
this from afar, I figured that I needed
to add more volume. So I'm going to use this
diluted permanent violet and add some more strokes. You can see that
I'm really pressing my brush onto the paper and creating some little flicks to create that
nice wispy stroke. You can, of course, extend
some petals as well. As long as the petals
are still wet, you can still work on it. Right now, I'm actually using
a size six round brush. Since I'm just trying
to adjust the shape, you can add some darker colors. I mix CPA with a little
bit of that crimson lake, and I'm adding it in between the petals while the
petals are all still wet. You can see those
strokes are very soft. Okay, let's move on to the stem. I'm going to use sap green with CPA or use any brown
color in your palette. We just want this screen
to be a little bit earthy. And then let's just paint a
thin stem for the leaves. I want it to be softer as well, so I'm going to use water
to paint the leaves. And you can see I'm holding
my brush towards the end of the handle because I want
this to look more expressive. What's nice about
painting leaves is you can play around
with brush strokes. You can paint from
the stem going out or from the tip of the
leaf going into the stem. Right here, I'm just
adding some darker greens and just dropping it
everywhere on the leaves. Okay. The petals
are all still wet, but I feel like it's
a little heavy. Grab a clean brush and
dab it in a tissue paper. Next, I'm going to just
absorb some of the colors. This is one way to erase some of the petals
that we painted. It's also a way for us
to separate some petals just in case you painted
more color in that area. There you go. You can see just a huge
difference with what we did. All right, so that's
it for this project. I hope that you enjoyed it. Let's now move on
to the next video.
9. Project 3: White Peony: Before we start, here are
the colors that we need. Ultramarine blue,
burnt, umber indigo, permanent yellow, deep print. Tiana Pia and Sap green. For our project, we're going
to paint a white flower. And we're going to use
this reference photo. I'm going to put it
in the Projects and Resources section so that
you can download it. I love how the petals are
dancing in this photo. And we're going to
try and interpret that into our polter
color painting. Let's watch the time last
video first so that you have an idea of the process
before we start painting. So I started with
the center first, and then next we're going
to add the white petals. And you can see that we're just trying to wiggle or brush, create those nice ruffles. And this is also interesting because we're painting
a white flower. I'm going to teach you how
to mix the color in order to paint a nice white
flower for the center. We're going to add some
yellows and browns. Of course, we need something
darker in the center. I'm going to use CPA for that. Next, we're going
to add the stem. And you can see that this is really just a simple project, because I want you to just focus on creating those
nice soft petals. Of course, let's not
forget the leaves. I also love how expressive the leaves are in this painting. Next we're going to add a
second layer just to add some more detail and depth
to some of the petals. You can go back in and add a darker center and also
add some finishing touches. There you go. That's a very
quick and easy project. Now let's start. All right, let's prepare the
colors that we need. I'm going to grab some
permanent yellow deep, and we're going to use
this for the center. Next, let's mix our white color. This is ultramarine
blue with burnt umber. You just have to keep on
mixing these two colors until you achieve the
grayish color that you want. I prefer it a little
bit more blue, so I would usually add
more ultramarine blue. And keep in mind, you need
to really add a lot of water because you want
this color to be soft. Next, I'm also going to prepare
a little bit of indigo. Let's start with the center of the flower using the
tip of the brush, create some short strokes. So we're going to form
this into a circle. Now, try to vary the strokes. Some are a bit shorter, some can be just knots that will make the painting
look more interesting. Okay, let's switch to a
size eight round brush. I'm going to grab a lot of that juicy color and we're going to start
from the bottom, going up and then down. Then just slowly
fill in one petal. You can see that I was able to grab a little
bit of that yellow. And that's okay. Let's add some more water to our mixture. Now let's put one more
petal on the side. We're going to go up
and create a loop. And then add some lines. Now let's add some
indigo right here. Add a few strokes. When it comes to white flowers, it's always nice to add
just one more color. Since the indigo color
is a little bit darker, we want a lighter
petal on the side. This is almost like just
water that I painted next. Let's grab some more of that white mixture that
we did right here. I'm going to try and just wiggle brush from the tip of the petal. I'm going to go in to the center for the bottom
part of this flower. We're going to paint
short strokes. We're going to flick
our brush back and forth to create the
nice pointed tips. I'm going to grab
a little bit of that indigo and add
some color over there, just towards the
side of the petal. Then maybe we can add
some more of that indigo. I'm going to add it towards
the tips of the petals because there are shadows there from the
ruffles of the petal. You can add it in between
the petals as well, to suggest that these two petals are separate from each other. So you have to do this part while this flower is still wet, so that the colors are still
b***ding in with each other. Okay, now let's grab Burn Siena. I'm going to add this
in the center as well, just to create more depth. It's always nice to add different colors for the
center of the flower. As you can see, the yellow part is actually still
a little bit wet, which is nice because these two colors will sort
of b***d with each other. Now, I want a little bit more
yellow in the white petals. So I'm going to grab
some yellow and add it near the base of the petals. You can see that this
flower looks like it's glowing because we added
that yellow detail. Okay, let's grab CPA, which is a nice
dark brown color, just to give this more
contrast and more depth. Next let's paint some
stems and leaves. I'm going to use sap green with a little
bit of burnt umber. But you can also use pa, or use any brown in your palette about
halfway through the stem. I'm going to rinse my brush and just continue painting the stem. That will give me a nice
soft base for the stem. You can see the top part
is a little bit darker, the bottom part is lighter. Then you can drop in
some darker green colors and it's going to just
flow into the wet stem. Next, let's grab some more green and I'm going to
paint the leaves. We want this to be
really expressive. Just press your brush and
do some wavy strokes. We're going to go back in
to the base of the stem, then go back out. You can see that my brush
is also not too wet. That's why there are
some jagged edges, which is just a nice accident. You can go back in with some darker green color and just drop it in different
parts of the leaves. You can also paint
some thin lines. Okay, it's looking really good. Now let's add a second
layer to the petals. This is the same white mixture
that we painted earlier. I just added a little
bit more water. I'm going to paint
strokes in between the petals just to separate
them from each other. You can also add it
towards the tips of the petals to suggest
that it is folded. Hold your brush
lightly so you can create those nice,
delicate strokes. Now, we don't want
to overdo this part, because we want this
flower to still look soft and expressive
using a clean brush. I'm trying to soften some of
the strokes by fading it. The center is still
not dark enough. I'm going to go back in with more CP because I really want that punch
of color in the middle. Now if you don't have CPA, you can also use
the color black, or you can also use indigo
or maybe paints gray. All right, we're now onto
the finishing touches. I'm just adding a little
bit of green details on the stamps and also on the leaves just to
add some more color. Okay, so we're done. I hope to see your project in the project color
section of the class. So now let's move on
to the next video.
10. Project 4: Yellow Florals: Before we start here, the colors that you need,
permanent yellow light, permanent yellow, deep print, sienna, burnt umber
and sap green. I really love
butterfly Ranunculus. Because look at those petals. They look like they're dancing. This project is a good
exercise for us to learn how to paint petals
with a bit more movement. This also involves a
little bit of drawing, just as a guide for us, but it's completely optional. First, let's watch
the process video, just so that you have an idea
before we start painting. So I'm going to start
with the center of the flower first, and then we're going
to paint some strokes that will form this
beautiful petal. For this project, we're going
to have two main flowers, and you'll learn how to create those nice jagged
or ruffled edges. It is going to make these
flowers look more delicate. Next we're going to add our
stems and also our leaves. I added some thin leaves, and then we're going to paint
a small bud right here. Again, we're going to
add some movement. You can see that the leaves and the steps are a
little bit curved, it's facing in
different directions. Once this is dry, we
can also start adding a second layer just to add
more depth to the flowers. This is adding some darker areas towards the edges of the
petals because in the photo, the edges are a bit more brown. Okay, let's start. I'm using this book called
the Flower Color Guide, and this is going
to be a reference. I'm going to put the photo in the projects and resources
section. Just check it out. You can download it. I'm
going to use a pencil and we're going to just lightly
sketch some petals. I'm going to start
with this flower over here and just paint that petal that's
separated from the body. Then we're just going to add
some more petals beside it. You don't really need to
draw all the details, we just want a general guide. I'm going to add the stem next. I want to also include this
flower and start putting in the center and then going
to do some ruffled petals. Make sure that you
draw lightly because once you paint on
top of this sketch, you won't be able to erase
the pencil markings anymore. So those are just
the two flowers that I will include
in this project. Just to make it simpler then, I'm just going to
add a small bud in the upper right part. Okay, so let's start
with the center. This is burnt umber. We want a nice dark mixture. Going to put some small
dots in the center. Just use a tip of the
brush and staple it on the paper to create
these brush markings. Now for the petals, I'm
going to mix two colors. This is permanent yellow, deep, but a little bit of
permanent yellow light. You can definitely
use just one color. I just wanted to mix it a little bit to get
the right shade. That's almost the same
as the reference photo. Okay, and then I'm also using
a size six round brush. By the way, I'm going to
just press my brush and just slightly lift it towards
the end of my stroke. You can see that I'm almost
like dancing with my brush. Now we have a beautiful,
organic petal. Let's rinse our brush. I'm going to add one
more petal right here. And just slowly move your brush around to create
a broader stroke. I'm just going to add one
more stroke over there. Let's grab some more paint. Going to start from the tip of the petal going
down to the center. You can also try to
wiggle your brush to create that nice ruffled edge. When you're painting a flower, all the petals will point to
the center of the flower, where it's coming from. If you'll notice the petals
have some brown spots and I'm going to use brinci
to add that detail. While the petals
are all still wet, you can add it towards
the tips of the petals. Okay, let's move on
to the second flower. This is a burnt umber. Again, I'm going
to add the center. Just use the tip of the brush. Create some small dots. Next, let's paint the petals. Just press your brush and drag, and then go up and down. You can paint some lines. Let's grab some more color. Going to use the side
of the brush and just wiggle it and go
back to the center. Let's start at the
center again and then just press and
drag our brush. I'm using the side of the brush
to create a broad stroke. Let's add one more. And this is going to
be a shorter stroke because this flower
is on its side. Now let's grab burnt
sienna and add some brown spots as
well on the petals. Of course, we're
going to add this while the petals
are all still wet, so that these two colors
will b***d in beautifully. This is also a good way
to fix some petal shapes. You can extend
some petals or add some ruffled edges while
they are all still wet. Hold your brush
towards the end of the handle and just slightly tap it on the edge of the petals to create
these tiny strokes. Okay, for the stem, I'm going to use spring
and burnt umber. We want the stems to
look like they're dancing and you can paint
like a letter stroke. Also, they look good. If the stems are thin, make sure that you
paint thin stems. Okay, now we can start adding some leaves
and fill in the gaps. Again, we want it to
look like dancing, so you can see that
the leaves here are a little bit curved as well. They painted over the petal. So now I'm just going to
try and erase it by adding some water in that spot and blotting it out
with tissue paper. Now it's gone. In
the reference photo, there is a small bud and I'm going to use a
permanent yellow deep. Going to put some small strokes. Let me zoom it in for you. You can see I'm using just
the tip of my brush now. We want this to be
quite concentrated. I'm going to add the
outline of this bud. Let's rinse our brush. Tap the excess water
and I'm going to fade away these strokes so
that it will look soft. To give it more contrast, we can grab a little bit
of that burnt sienna and just put some color in
the center of this bud. Okay, we can grab some green and add it to the base of the bud. I'm going to add some more
details, some more stems. There are small buds
that are still green, and I'm also going to try and add that to
this composition. It's a great way to fill
in some small gaps. All right, it looks good. I have here a mixture
of the yellow with a little bit
of burnt sienna. I just want it to
be slightly darker. I'm going to add some strokes towards the outline
of the petals. I'm doing this to add
more depth to the petals. I'm also looking
at the reference to the brown spots are
actually quite prominent. I do want to add that detail. Just use the tip of your
brush and just wiggle it to create these
tiny brush markings. Now we can get a clean brush and fade away some of the strokes just in case some of them
are too dark or too sharp. This is optional,
but you can add some small or short strokes
in the center of this flower. Okay, so we can also
grab burnt umber and add a darker center for this flower just to
give it more contrast. All right, Satan,
I hope that you enjoyed painting these
delicate petals. Now let's move on to
another video so that we can practice some more
of these brush strokes.
11. Project 5: Pink Floral Rose: For the polars we're going
to use carmine, yellow, ochre sap, green, burnt
umber, and permanent violet. For this project, we're going
to paint a simple rose, and we're going to learn
how to paint soft petals. The techniques that you
will learn here can also be applied to painting
a watercolor pony. You'll also learn how to paint those strokes for the petals
and how to fade them away. You'll learn how to vary the
pressure in your stroke. This flower is at an angle. As you can see, the
bottom part has more petals compared
to the top part. Now let's move on to
the process video. We're going to start with small sea shapes in the center and then we're going to use a juicy brush and
paint bigger petals. We're going to really
press our brush onto the paper to create
a nice broad petal. Then we're going to try and
wiggle our brush and just add some jagged edges that will give more texture to our petals. Next we'll add some
leaves and also stems, and we're going to just
keep it quite simple. Then we're going to add
the stamen in the center. I usually like adding
a shadow effect. I will add a little bit of that violet towards the
tips of the petals, and that will just give
it a more elevated look. Okay, let's start
painting as a guide. What we can do is we can
draw a letter U shape, or it looks like a cup, just like what I'm drawing here. We're drawing this cup because this flower is at an angle. I'm also going to put
a small.in the center, that will be the
center of the rose. We need a really thick
mixture of carmine. You want this to be
really bold in color? I'm using a size
six round brush. Just imagine that you
have an oval line there and we're going to paint all around it with
some little strokes. Use the tip of your brush to create variety of small strokes. You can see some are dots, some are smaller shapes. And make sure that you have
****** in between them. I'm going to leave
the center open. Now let's get our size
eight round brush. You want this brush
to be really wet? I'm going to just
lightly press it on the paper and create
another stroke. You can see that I'm
also trying to fade away some of the
strokes in the center. Next, let's grab a
little bit of color. I'm doing just quick strokes all around that middle
part that we did. Now let's grab some yellow
ochre and mix it to car, mine. I just want to give
it a warmer color. You can use any
yellow color as well. And make sure you dilute
it in a lot of water. Make a sweeping
stroke like this. Then towards the
end of your brush, you have to drag and lift
to create a pointy tip. The ****** in between your
strokes are very important. That will create negative space. The petals are still wet, but we can try to apply
a few strokes like this. It will give it a soft effect. We are not going to fill in
the entire flower with color. You can see that
I left some areas white and that will give it more dimensional
or more depth. Now we can try to wiggle or brush to extend the
petal at the bottom. That is going to give us a more expressive look
and more organic look. Use the tip of your
brush and just wiggle to create
some jagged edges. It's best to do this when the
petals are all still wet, so that you won't have
hard lines. Okay? That looks really, really good. You can add a little bit of that yellow ochre
and carmine mixture. You can see it will look
like a two toned petal. Okay, Now let's mix, spin and burnt umber. And we're going to add
a really thin stem. I want it to be a little
bit curved as well, just to suggest some movement, we can add some leaves.
Now this is up to you. If you want some more
expressive leaves, you can try to wiggle your
brush, add more water. Then next, you can add some dark spots and that
will b***d beautifully. Let me just get a little
bit more of that brown and just drop in some darker areas. Now for the statement, we're
going to use yellow ochre. And just put some short
strokes in the middle, create a ring of short strokes. Okay, for the center, I'm going to use burnt umber. This will give it more depth. This looks really pretty, but I think we can add a
little bit of shadow effect. I'm going to use
permanent violet and add it towards the sides
of the petals. You want this color
to be really diluted. You don't want a
prominent violet color. You want it to be subtle. As I'm painting this, the petals are all still a little bit damp. Okay, this is a little bit dark. Let's grab a clean brush
and try to lift that color. Okay? It looks much better now. Okay, so that's the
end of the project. I hope that you enjoyed
painting this Rose. Now let's move on
to the next video.
12. Project 6: Expressive Blue Floral: Before we start here, the colors that we will use, Prussian blue, indigo, sap, green print
number, and permanent violet. This is going to be a
really fun project. It's one of the flowers
that I often paint. If I want to practice, it's like an imaginary flower. So we're just going to
paint a few petals. You can choose three
or four petals, and you want the
flower to be tilted. This is another
version that I did as part of my personal
daily chal***ge. I decided to go with
blue for this class. We're going to play around
with different brush markings. So let's start the
process video. So I don't want you to feel any pressure as you
paint this project. Just paint three to four
petals and bunch them up. And we just want to
really play with our brush and create different strokes to
form that nice petal. Next, I'm just going to add the tark center and also a stem. We're going to get darker
Prussian blue and add it in between the petals and
towards the tips of the petals. That will suggest that there
are ruffles in the petals. Next we're going to give
this a shadowy look, that's why I added some violet. And then once this
is already dry, you can get a darker paint. Using the tip of my brush, I'm going to put some precise
details just like this. Adding those small markings
will really make a difference and make your petals
look more organic. Okay? So I hope that you
will enjoy this project. Let's start, let's play with our brush and create
some long strokes. And we're just going
to vary the pressure in our stroke for the color. I'm going to go
for Prussian Blue, but you can definitely
use other colors. We want the luts
in a lot of water. I want to have a
light mixture first. Just put a small thought as
a guide that this will be the center Lowly press
your brush going up, but this feels a little dry, so I'm going to add
more water to my brush. I'm going to repeat the
process and then go down and use the tip to
create some thin lines. I'm just going to pull this part so that we
have a nice pointy tip. Then next, let's do the
petal on the side again. You just go up from the center, move your brush up, then go down again. You can grab a little
bit more color and add it towards the
sides of the petal. Again, going to rinse my brush. And just use the side
of my brush and really press it and create
this nice broad stroke. Okay, let's move on
to the fourth petal. You can see that my brush
is a little bit dry here, so you can grab some more paint. I'm going to grab
a little bit of water to fix this petal. You can try to use the
tip of your brush and create more jagged edge. Let's grab indigo and
add it in the center. You want a more
concentrated mixture because you don't
want this color to spread all over the place. Then next we have here sap green with a little
bit of burnt umber. I'm going to add a really
thin stem in like an S shape. As you can see, the petals
are still a little bit plain. But we're going to go back
in with some more details. I'm going to grab some
more Prussian Blue. This time the mixture is darker. And you can paint
some strokes from the tip of the brush
going to the center. And it's best to do
some quick strokes. I'm going to add
some more Prussian blue to get a darker color. I'm going to adapt by brushing the tissue paper and continue
adding these small strokes. Now, if you want a darker color, you can use indigo. You can add just
some tiny strokes along the tips of the petals. Use the tip of your
brush to do this. You can create some lines
like what I'm doing here? This is one way to make viewer petals look
more expressive. It almost looks like I'm
painting some small check marks. Okay, let's add some more volume to the base of this flower. I'm going to add
some more green. Okay, let's grab
permanent violet and make sure to dilute
it in a lot of water. We're going to add a layer of violet and make sure that
the petals are quite dry. I'm just going to paint
it over the petals. But I'm not going to paint on all the petals because that
will look overwhelming. We just want to fill
in some ******. You can see that it's just
a subtle hint of violet. Okay, just as simple as set, just a few strokes. Next you can grab indigo. And just use the tip of your brush to create
these small lines. These could be veins, or it could be just
folds in the petals. We're doing this to suggest that there is shadow in this area, that's why we're adding
some darker lines. If you want precise lines, wait for the petals to dry. But if it's still damp, you can see that the
strokes are blooming. Or it looks a bit softer. Now let's do this part. You can see that my
strokes are going to be precise and that's because
the petal is already dry. I'm trying to do
some wiggly strokes. This is just a good way to add some detail to your petals. Okay, So there's an
ugly patch right there. It's not looking so good, so I'm going to just get some more color and
paint on top of it. That's how you
troubleshoot it if you have that same patch
in your painting. Okay, it's looking really good. I'm going to hold my brush
towards the tip of the handle, and I will add some more strokes towards
the tips of the petal. It's also nice to
put it in between the petals just
to separate them. Now if you want a glowy look, you can add a little bit of
that yellow in the center. Okay, so we are, Don, I hope that you enjoyed painting this expressive blue floral. Now let's move on to
the next project.
13. Project 7: Purple Anemone: Before we start here,
the colors that we will use, mineral violet, indigo, sap, green, burnt umber, and also white gash. Okay, so for this project
we're going to paint a flower that was
inspired by anemones. And this is just a
beautiful flower. You have nice soft petals
with a nice dark center. In this project,
we're also going to learn how to
layer the petals. So let's watch the
process video. Let's start with
concentrated dots and then with a clean brush, I'm going to paint some nice loose strokes that
will serve as the petal. I'm not adding a
lot of paint here, it's mostly just water and I'm just grabbing the
color from the center. Okay. It looks a
little bit messy now, but it's going to come together later on
when we layer it. Okay, So I just
added a dark center. And next we're going
to add the stem. Okay, here's the exciting part. We're going to layer the petals. We're going to paint
alternate petals, so you can see that they're
not all beside each other. This is going to give us a
nice soft look for the center. We can add some gosh. We're going to add
some small dots that will give it more depth. This will create the
magic for this flower. Okay, so I hope that
you're excited. Let's start. The first color that we need is mineral violet. We want a really
thick mixture because this is going to be used for
the center of the anemone. Feel free to use
other colors as well. I'm going to use a
size six round brush and put a ring of small dots. But you also want to put
****** in between your dots. We want a nice juicy.it has to be really wet so that we can
grab the paint later on. And you're going to understand
that as we add the petals, just put some small dots. If you want to be
more adventurous, you can actually put
different colors. For the dots, I'm
going to use my size eight round brush and
get a lot of water. Just use the tip of your brush
and lightly touch the dot. And just try to sweep your
brush onto the paper. Really press it against the
paper to make broad strokes. Okay, I'm just going to go
back and forth and even wiggle my brush to
create soft petals. Again, just use the tip of the brush to lightly
touch the dot. We're not going to
grab the entire dot. All right. You can
grab some more water and just really press
your brush onto the paper and move it up and down to create these
nice beautiful petals. Using the tip of your brush, you can try to wiggle it, create some jagged edge. Okay, I'm just going to grab some more
color from the center. Just try to move around
the color as well. We can grab some more paint and create some swift strokes. Just to separate
some of the petals, use the tip of your
brush to just add some small strokes towards
the tips of the petals. Okay, so let's grab
a darker paint. This is still mineral violet. I'm going to add it in the center and just let
it bleed into the petals. And that will give it a punch
of color in the middle, just like how an
anemone looks like. And I'm also going to put a
small circle in the center. We don't really need to
put all the details. This is just a loose
interpretation of an anemone. We're going to grab
some indigo to give it the darker color. We're just going
to let that color spread in the center going out. Then we want the outer petals to still look soft and light. Okay, let's go to the stem. I'm going to grab a sap
cream and mix it with bred Uber to create this
earthy green color. It's my go to
mixture four greens, but this time we're going to add a little bit of that
mineral violet. It's always nice to
add the color of the flower to the
green leaves or stems. Okay, so we're just paint a stem here that's a
little bit curved. Let me rinse my brush and
just soften the bottom part. I also love doing this
technique because it just gives it a
more three D look. When the petals are already dry, we can add a second layer. This is roughly the same mixture that we use for the first layer. We're going to paint
alternate petals, so the petals here are
not beside each other. You can see that there's a
huge space between them. Okay, this is what it
looks like on top view. Just try to sweep your
brush onto the paper. To create those broad strokes, I'm going to extend
some of the petals and make it a little bit longer
than the first layer. This technique will give a
nice soft look to the flower. You can see that
it has more depth. Now that we added
the second layer, I'm going to do
some jagged edges using the tip of my brush. Try to wiggle your brush
Now for the center. Let's grab some more
of that Indigo, just to give it a darker center. Just put some small dots. Okay, I have here
some white, ah, we're going to add
some small dots just to add more depth. And this is like the same details that you
can see in anemone flower. I'm going to put it around. It's best to add this white when the entire
flower is already, the center is still
a little bit wet. So you can see that
even if I put white, it's not going to pop up, it's just going to mix
with the wet center. Okay, so we can add some
more finishing touches. You can definitely
apply the techniques here to painting other
flowers as well. Okay, so we're done
with this project now. Let's move on to the next video.
14. Project 8: Iris Flower: Before we start here, the colors that we need, Permanent violet, Prussian blue, sap green, permanent yellow light
and burnt umber. Okay, so for this project, we're going to paint
an iris flower. This is a great way to practice loose and
expressive strokes because iris flowers have
nice ruffles in their petals. I will be using this
reference photo. I'm not going to paint all
the details in the photo. I just want two
flowers right here, one in full bloom and one
that's about to bloom. Now, let's watch the
process video first. You can see that I'm really
trying to press my brush and just create all of
these ruffle strokes. I'm also trying to vary the pressure in my stroke
from light to heavy pressure. After learning the
techniques in this project, you can definitely paint your own iris flower using a
different reference photo. Okay, I'm going to
add a little bit of yellow in the petals because there's that detail
in the reference photo. With just a few
expressive brush strokes, you can create your
own interpretation of an iris flower
for the leaves. You just need to drag
your brush up to create that nice
elongated stroke. Then you can add some more
details, like some veins. I'm going to go back
in with more yellow, but this is optional. Okay, so that's looking great. Now we can start
painting the project. All right, so this is
the reference photo. I am just going to
loosely draw the petals. I'm going to do the
main petal at the top, and then two petals
on the side Next, let's do this other flower. You can see I'm just
actually drawing just the petals and it
doesn't have any details yet. If you're not yet comfortable with painting loose flowers, this is a great way to start. You can loosely sketch the shape or outline
of the flower. I'm going to follow the color
in the reference photo. It has a bluish violet color. I'm mixing Prussian blue
and permanent violet, but you can definitely use
other colors in your palette. Now I want this to
be nice and dark. Okay, I'm going to
start at the top petal, point the brush up, and then slowly press and then wiggle your brush to
create some jagged edge. And then you can try
to rinse our brush. You need to rinse
my brush and tap the excess water and go up. Then you can go down
again to fix the shape. It depends on you on how
much ruffles you want. You can definitely try and
wiggle your brush some more. Let's do the one on the right. Start from the light
pressure press, wiggle and then go down. You can definitely
go back in to add some more color or to fix
the shape of the petal. All right, now let's move
on to the one on the left. Start from the center of the
flower and go to the left. And then slowly press your brush and then you
can try to wiggle again. It is all about varying the
pressure in your stroke. Now let's just
release our brush to create more petals on the side. Use the tip of the brush and
try to wiggle it towards the edges of the petal to
create some more ruffles. Now we can add a stem, going to use sap green, a little bit of print umber instead of one
stroke going down. I'm going to do
several strokes to create more texture to the stem. It almost looks like a
dry brush technique. In the reference photo, there's a little bit of
yellow in the petals. I'm going to add
permanent yellow light for the flower on the left side, we are going to paint
just two petals. It's about to bloom. Just press your brush and go down to create that
nice pointed tip. Then from the bottom, you're going to go up
and go to the right. You have to press your
brush like this again. It's just a play with the
pressure in your stroke. Now we can add a stem. We're going to get
our green mixture instead of one long stroke. We're going to short
strokes so that we have a more
expressive looking iris. Also, my brush isn't too wet, that's why you can see
some texture in my stroke. Okay, let's get some more paint. I'm going to just drag
my brush and go up. I'm just trying to copy the leaves in the
reference photo. Okay, we're actually
done already, but if you want to add
some more details, you can definitely add some veins or maybe
some darker areas. It all depends on you and also depends on your reference photo. I really love painting
iris flowers because it really develops the way you
paint expressive petals. And it's also nice to do one sweeping stroke with different pressure
as you go along. Right here, I'm
just trying to add a little bit more color and also fixing it because
it's a little bit wet. Okay, so we are done
with the last project. Let's move on to
the next video as I share my final thoughts
for the class.
15. Let's Wrap Up: We have reached the
end of the class. Thank you so much for watching
the sum of the class, we have learned parts of the
brush and what it can do. We also learned different
petal painting techniques to help you achieve soft
and expressive petals. And then we did the brush
plea exercise as a warm up to loosen up
your class project. You can follow the paintings
in the class or you can find a different reference
photo and apply the techniques that you have learned in this class
to your own style. I do suggest painting
on smaller sheets of paper so you can focus on
the brush strokes alone. Remember that this
is just the start. The real magic
happens when you take these techniques and apply
it to your own style. Practice really makes progress. So be afraid to
splash some color, experiment with your strokes and let your creativity bloom. I look forward to
seeing your projects in the project gallery
section of the class. Simply take a photo of
your artwork and upload it there under their
Projects and Resources tab. Just hit Create Project
to share your work. I'm excited to offer feedback
and words of encouragement. Feel free to tag me on Instagram using my Instagram
handle at Joli Poa, and use this hashtag so
I can see your work. It's a great way for me to admire your beautiful creations. A class review would
really mean a lot to me and this will help others discover how this class help you in your watercolor journey. If you're hungry for more
watercolor flower knowledge, then here are my top
recommendations. Okay, so that's a rap. I'll see you in my next class. Don't forget to hit the follow
button so that you'll be notified every time I have a new class or a giveaway
announcement. Bye.
 Joly Poa, Watercolor Artist