Transcripts
1. WELCOME: Hi, I want to welcome you to this fortigate firewall
administration course. First. I want to thank you for investing your
money and investing, your time in my course. That's mean that you are
serious about your career. So I guarantee you that you will learn something
from this course. Every session of this
course is a lab that handle one of the usual administration
configuration that you, as an administrator, you will face working with
fortigate firewall. That's mean that it's
a practical course. More than theoretical. So I want you to complete
each lab and put your hands on
configuration as soon as you can for greater
understanding. Because one of the best
way to learn is by doing. For the lab, we will use
GNS3 to create our lab. And I will show you how
to sit up it and use it. And for the course content, we will see all the
changes that you as an administrator
need to deal with. For example, we will
see basic setup of the fortigate from
installation to access. to it via the management
interface or via the console port. Then we will see interface
configuration including, vlan's and link aggregation and redundant
interface and more. In rotting, we will see static and dynamic routing and of course,
firewall policies. So we can allow or
deny certain traffic. And also we can apply in the firewall policies,
some restriction. Like we can block an application or we can
block a certain websites. In authentication, we
will see how to create local users and LDAP integration to use some remote users. And for VPN we will see IPSec
and ssl, and more. So without wasting your time, I will let you start your journey with fortigate firewallll. Please. If you
have any questions, don't hesitate to ask
me and good luck.
2. GNS3 LAB PART -1: Hi, In this video we
will see how to set up our Arrhenius really
love to use 40 gate. So first, we need to
install some programs. And one of those programs
are VMware Workstation. And of course GNS3
all in one program. And GNS3 VM machine. And some images like 40 gate
image and some other images. But don't worry, I
got your buck and I put all that in a folder. Next, I will share with you, and you will find it in the
resources of this video. I've already downloaded
the file here is it? I will start by installing
VMware workstation. We will follow the wizard. So after the
installation completed, we will need to activate it. I put the license here in this file and we'll
find it in the folder. We would copy it and hit
Enter, then finish it. Next scene we need
to do is to import the file to GNS3
to VMware machine. Perfect. Now our GNS3
VM is fully imported. Or in one program will
follow the wizard again. Next, Next, Next. And Finish.
3. GNS3 LAB PART-2: After installing
all the programs, now we will need to
do some sittings to GNS3 VM with a GNS3
program or in one. So first thing we
need to do is to open GNS3 all in one program. So after the program
is launched, we need to go to Edit
Preferences. Gns3, VM. Uncheck this box
here, then apply. So like we see, GNS3 VM is starting
automatically. And here I want to
give you an advice. And when you want to start
working on gene is 3, please don't start
GNS3 VM machine before lunch in the program. The littered the program
started automatically. So please don't
start ceremonially. And if it is started, please make sure to turn it off. Then Lunch Program
gene is through orange one or it's an all or it's
when network with you. Okay. This is my
warning to you. Okay? Now, after we think GNS3
VM with the program, we will see here instead of a summary that GNS3
VM is on green. After that, we need to import
our 40 gets appliance. To do that we will go to
file import appliance. And the editor is 40 gate open. Next, next, next. And here in 40 gate 6.4.5, we select this file
here and we do on port. Now I already extracted
this file here. You will need to
extract it first. Here is it select 40
oils and then open. Okay, perfect. It is now ready to install. We need to select
it and do next. Yes. Next, next, next. Next. Next thing we need to
add is a web browser. And go to Import appliance. Okay? The web browser here is web term or that is in the
file I share the video. Open. Next, next, next, finish. Ok. Now we will see how to
add a Cisco switch. We would need Cisco switch a to-do and practice in villas. Okay, We will go to cure me VMs, new and the mixture, mixture. Joel chosen run this
QME VM on GNS3 VM. Next, give it a name. Give it at least 500
megabytes of RAM. Next. Next, new image, blobs. And this is the
image of a switch. Open. Then finish. Okay, next thing
to add is a rotor. The rotor, you go to
genomics iOS rotor. New. Again, make sure to run
this rotor on GNS3, the n Next browse. And this is the altar image up and yes, Next, Next. Next. Here we can add a'd, some others, other
ports if we want. I would add another port here. Next. Finish.
4. Fortigate Initial Setup: Hi. In this video we will see the
initial setup of 40 gate. So first thing to do is to open Genesis 3 program and
create a new project. Name it 40 gate. Okay. Then we need to drag
and drop 40 gate appliance. We're going to go here. Here is it will drag it and drop it. Okay. To start it and we need to
right-click on it and press start on the wireless
starting setup in a, we need to give you
some information. And one of this
information is by default at the factory
sittings of 40 gate is a he comes with a
port one already configured to access so it
from the graphical interface. So to access our 40 gate
and we need to connect our, our laptop or our
administration PC or machine to port 1 and make sure that our
network card is on the ACP. Because 40 gate will
give us an IP address. And the management IP or
40 gate is on port one, is 1921681, 99. This is the management IP that our foresee Gaige Cum,
already configured with. And for login, he comes
with the username admin. With no password. We need to create the
password ourself. But in lab we need to know to configure all
that by, by ourself. This is not pre-configured
in the 40 for CD8 appliance. That's what we need to
configure ourselves. So to connect to it, we will double-click on it. He is still starting. Okay, Perfect. So like I said, the username is admin and
there is no password. So I will just press Enter. And here a asking you to
create a new password. So I will create a new password and they will tape it
again. And that's it. We are our login
into our 40 gate VM. I will name it if gt. So let's see how we will
deal with Viet CLI. So first thing
first common today is config system global. Sit, Hosni. If GET, then and, and then we will need to configure
the IP address. So to do that, we will do a
config system interfaces. And if I do show here, here we've brought us all
ports so that we have in 40 gate and configuration
of the ports. And like we see
here, and port one, there is no IP address
preconfigured, so it's configured, it. We will do idiot port 1. We will by default on the ACP, so we will put it
on static mode, sit mode, static density, IP. The mask is 24. Now this command here, sit or low access. It's a permit us to enable services that we
want on this interface. For example, pink. I want to enable pink, I want to access it
via ACP and V is h. And there is
another commodities. So this command here
allow us to choose what role we want to use interface and you
wanted to V line, okay. And we can also give it a name. We need to do. Sit
on the US one end. And that's it. That's
all what we need to access our force you get from the anterior, the
graphical interface. So we will go back to our project and we will
drag and drop a browser. The browser, That's all
we already started. It's WebGL, which
is the web browser. And we drag it and drop it. We need to wait for it
to, to be on started. Started now. Now we need
to give it a static IP. We will right-click
on it and do it. It's config and
uncomment those line. You give it an IP address. And cutaway will be our
40 gate IP address. Then save. Then we will link
it to the port one. This is port when we fix it, the IP address, IP address here. Then right-click on
it and start OK. To access it, we will
double-click on it. Now we will type the IP
address of our 40 gate on a 1921681, 99. Perfect. This is login page. Here we will put our username, and here we will put the password that we
created previously. Perfect. We are in now. Begin. Here I chose
comprehensive. It's okay to choose optimal
or comprehensive difference between optimal and
the comprehensive is like the set here as
optimal is a set of popular default dashboards
and 40 Viewer monitor. So 40 views monitors. So our widgets that we monitor, our 40 gate forum in
comprehensive will show as a model widgets then the
optimal, That's why I chose it. Then. Okay. Don't show again. Here it shows us an
introduction video with this version here. Okay. This is our dashboard. And those are the widgets
I talked about before. In comprehensive mode, we see a lot of widgets,
like we see here. But an optional mode, we see just three
or four widgets. So this is our dashboard. If we go to System Settings, This is the hostname that we
already configured before. And to see the interface
configuration, we will go to
network interfaces. Here in part one, we selected and to edit. And this is the configuration
that we did in CLI. This is yes, this is the role. This is IP address, and those are the
services that we set. And we press AKI. So that's it for
the initial setup.
5. Fortiview Menu: One of the most meaningful that you as a network
administrator or a network engineer
should know about is 40. So 40 view amino
allow us to have a better visibility on our network and on what happened
in our 40 gate firewall. So if we want to
check for review, we need to go to dashboard. And here in dashboard we
will have 40 view tabs. You can see that we
have a 45-year sources. We have 40 viewer destinations, we are 40 view obligations and more useful tabs. Here it is. We can also check from
here IPSec monitor. We can check the searchers of the IPSec tunnels and
also the SSL VPN tunnels. We can see what users are
connected to our 40 gate, even taught a IPSec
or captive portal. We can also see the searches of our 40 client and
point and more stuff. So 4000 is an important
thing to know about you. You should check it
from time to time. And you can check it
also when you're done now configuration and you want
to just sit, for example, if you create a
captive portal and you authenticate with our user, you can check a
statues of the user from the firewall user monitor. And you can also check from the ICP monitor
lasers you can, if you have a gas cp server, you can check here the lasers. You can also check the table, the routing table from air. This is the routing table. You can even check the
routing table from air and more stuffs like
a 40 viewer policy. What 40 viewer polycythemia
is he showing you what policies are used in real time or in
the past one hour. You can change this
one our air to now choose to only
see real time. Or you can change it
to one hour to to see what policies are yours
the NOR hour or 24 hour. Those are the options
that you are here. If you want to add
any other tab in this menu here in the 40 view
and you can scroll down. After you expand the dashboard,
you can scroll down. Then you need to press
the plus sign here. And the area will find all the widgets that
you can outgrow your 40 view in the network or end-user
and authenticating. And in the Wi-Fi, for example, it's, let me see. Let's are the 40 view
Cloud application because because we
don't have it here, I will add it to audit Unit 2, but press the plus sign air. You can give it a different
name if you want. You can change the time
period from five minutes to one hour or 24
hour like you want. And you need to
press out monitor. When you added, you
will go back to your 40 view amino and you
will find that area editors. Okay, perfect. After
you are that you can go here to this three dots here. And you can even change here. Change the name. It tells
you can change the name, or you can audit
joy or fall for it. You can delete it
from the medial. One last thing I want to tell
you about 40 view is when your first setup of
your 40 gate for everyone here will ask you if you want to
configure your dashboard. And in the dashboard
here will give you your options into
configuration dashboard. Here it will give you
the optimal option and comprehensive option in the optimal option here give
you just a little 40 view. We're just that he showed me, show you what by default. If you want to see
any other widget, you will need to go by
yourself and added. If you show the
comprehensive menu, you will have a
minuss like that. You will have all this 40
of your menus like that. And you will have only a little bit of menus
that don't shown here. Normally that those minerals are not used a lot here gives you only the minuss
that you will need, like IPSec monitor
and this is L, this menu are used a lot. And the RCP androgen monitor, he gives you only the menu that you will need to use a lot. So that's it for 40 View
menu. Thank you for watching.
6. Features Visibility Menu: One of the 10 that we
need to know about our graphical interface
of our 40 gate, fair? Or is that not all futures are visible in our
graphical interface. So there is some
futures that are Hayden in our
graphical interface. And we can only
configure them from CDI under those futures is, for example, explicit proxy and Web Application
Firewall and more. So, in order to
enable those futures to be shown in our
graphical interface, we need to go Joe season. And here we need to find
future vis-a-vis t. And here are the futures that
are not enabled in our physical interface,
like an IPV6, like that in my filter, like the explicit proxy, and like the web
application firewall, or those future air
that are not enabled, we can configure them and see them in our
graphical interface. For example, if we go to
Exit proxy and we expand it, click on the plus sign here. We can see here as more
description of what's explicit a proxy is and
how to configure it. And we're where we need
to go to configure it. For example, if we enabled explicit proxy air
and we press Apply. Okay, not to configure it, we need to go like this. Say to us, we integrate
your network. So if we go to a
neutral or care, we will see that
there is a menu here. We named explicit proxy. If we press it, we will find there how to
enable explicit proxy. And then we can configure
explicit proxy from here. If we didn't enable
this future air. If we didn't enable it, we can't see explicit
proxy in this under the network menu where we can only configure
it from sale. I saw where it is. It is used for Jordan,
future visibility. We can find on it or odd futures that we can configure an hour
40 gate firewall. We can enable any
future that we want to configure from the
graphical interface and the press Apply. And we can, if we don't
know where the future is, we need to, like I said, expanded by clicking
the plus sign air. And we can find a
way where we can we can modify it like that. Please note that a
motor oil futures are available in all the
40 gates, uh, models. There is some models that
don't support some futures. So if you believe that
your model support our future and you can't find it in the
graphical interface. You can easily go
to your system, future visibility and search
for it and enable it. Then press Apply. And that's it.
7. Admin Users: Hi, In this video
we will see how to create unloaded mean
users with fold axis. So let's connect to our
40 gate for a reward. I will login to it. Now to create an admin user, we need to go to
system administrators. In the administrator is we need to create new administrator. Here we need to
put our username. And I will choose,
for example, manager. Here, I need to
type his password. Okay? Here in the
administrator profile, I will choose super admin. Okay? Then I will do, okay. Now I create a new admin
user would fall access. Let's try to connect with it. In username I would put
manager and they would put his password and login. Perfect. So I'm in now. One of the 10 that I
want to see also we do is automated profiles. So we have by default
to admin profiles, we have supper Ottoman and
do we have prof. Udemy? So in software, Udemy
and like the name says, it's the admin with full access. If we did view on it, we will see that you
have permission, read and write in all
the access control. In the other hand, the prof
Ottoman is a custom profile. So we can, for example, if we want to use a tool, only have read access to
security fabric menial, and also have read access
to only need you to work. I always do. Okay.
And there we create a new admin user
and will name it, just create a password for it. I need to choose the
administrator profile. I would choose the prof
Udemy and profile. Okay. And I will try to login with it and it will look
out for my manager, USA. And I will type here, just test. Okay? Okay. I'm connected with the user just here. If we go to, for example, network and they will
go to until faces. If I select, for example, portray or what you
Javier is only view. I have not editor permission
to edit this interface here. I can only see it. Like I can't modify nudging. You can only see it. Now, let's see how to create
Ottoman users from CLI. We were up and console. First I need to login with
the super admin user. I will log out from the user, just login with the user. Ottoman. Dna will open the console. And common to run in CLI is
config system are the mean. Second tin to do is edit. And here we need to
type our username. For example, I will
choose the username user. Then we need to do set, Vidar, root and sit. Ok. Counter profile will
choose super admin. And I will set a password
for my username. And a will do to a confirmed configuration.
And that's it. Now let's try to login to our 40 gate for our
world, we do username, user logout from my Ottoman. And they will do user. And they will type
their password. Perfect. I'm in
now. And that's it. We are created our username from the graphical interface and
from the CLI interface. So this is ultra create
automated users. Thank you for watching.
8. Secure Access: As an admin, one of
your responsibility is to secure access to
your 40 gate, fair? Or and one of the things that we can do to secure
our 40 gate access is to setup a strong password and to restrict access
to all later ostinatos. That's what we're gonna
see in this video. So first, I will login to
my 40 gate for a reward. Okay? To change
our admin password and create a strong password, we need to hover in the academy here in the
right corner and click it. Then we need to select
Change password. And here we need to
type our password. Then we need to create
a strong password. A strong password
will be combined offer uppercase and the
characters and numbers. So it will create
a strong password. Perfect. You kick me off and they need to login
again with the new buzzword. So we would use my new
or strong password. Okay? The next thing we're gonna do is to restrict access to only atrocity losses. To do that, we need
to go to a system. Administrators. Here in our admin user. You will do it. We can change our
password also from here. We can see this change
password there. And it is a same
menu. Here it is. Now to restrict access
to only trusted host is we need to enable
disk parameter here. And do we need to type
our host IP address? So for example, I will type
my current host IP address. So why typing this
IPR only a machine with IP or can access and login to my 40
gate for your world, joe manage it and
to configure it. And one of the other change
that we can do to seek to secure access to our
40 gate and raw force, our security policy is to
create our password policy. So my admin can only
create strong password. To do that, a will go
to System Settings. I will try to find their
password policy where it is. In the password policy. He asked me if this
policy I wanted to apply to only admin or two
IPSec uses or to abort. For now I will
chose only Ottoman. Here it asked me for the
minimum length of our password. By default, it's eight. And here in the character
and requirement, I will find how many
uppercase letter I wanted to be in my password. For example, let's put
tool for lowercase. I want 64 numbers. You want to also for
special character like art and any special
other character, I will, I want to only one. And here I can also enable
password expiration. So our Udemy can change
the password after, for example, 30 days. And they will apply. I need to anchor is the minimum
clumped of the password. I will put 11 and they
would apply. And that's it.
9. Password Recovery: Hi. In this video we
will see how to elicit our 40 days firewall
admin password. So we can lose our firewall
admin password in somehow. And we need to recover letter
to access to our 40 gate. So first thing to cover
our admin password, we need to have physical
access to our 40 gate, and we need to do it
via console port. Second 10 we're going to need is the serial number of
the 40 gate firewall. So in this case here, I forgot my admin password and the acts and they can't
access so it anymore. It is I can't access so it
So to access so wetter. Like I said, we need to
have physical access to it and we need to have the
serial number for 40 gate. You will find serial
number in the back of a or 40 gate firewall
or a rowboat, your firewall 40 gauge you will. And you are connected to it via console ports where you will
find serial number here. So let me make a circle. Like I said, I forgot
the admin password. So what you need to do
now is to a robot may 40 gate firewall. Sutural voted. I will right-click on it
and they will reload. And physical 40 gate. You will need to unplug the
power cable and plug it back. Okay? Our firewall is reported. Now in the username, we need to type main container. Okay, in the password we need
to copy and serial number. Okay? And before
the serial number, we need to type B, C, P, V, and serial number. So let me copy it. Okay. It's coming back
to our 40 gate firewall. And let's pass it. Perfect. Now we need to do config. Since sin admin, then Edit Admin and set password and type
your new password. Okay, Then, and Now let's exit. And let's try to login to our farewell 40 gate
with the new password. So you pass word. Perfect. Now we're access to our 40 gate with
the new password. So this is how to revisit your 40 gate firewall
admin password. Thank you for watching.
10. Configuration Backup & Restore: Hi, In this video we will see how to backup our
40 gate firewall. So as a network administrator, you should backup your
firewall constantly. In case of a
configuration lost off. If you want to go back to
a previous configuration, you will need to have
backups versions, multiple backups
versions to come back to you then
if you need them. So let's see how to
backup our firewall. Form a CLI on from the
graphical interface. I have here, a force,
a great firewall, and they have here and not either I get from devices here. This is not either I get
another output here. So I will access to my 40 gate. This is Part 3 axis. So my 40 gate, I
need to configure the interface so we can access my farewell from the web
browser via its IP address. So it will go to convince
the same interfaces and it will do edit part three. I will put it on the RCP mode. Okay? Dna will enable
HTTP is h and pink. So I can't access to it. And that's it. Now to get to the IP address that
the ACP give us, we need to do get
system onto your faces. Physical. So this is portray and this is the IP
that it does SciPy give us. So I will copy it and
they will access. So it perfect. And we login into my 401 k. Okay. Now to walk up my
40 gate farewell, I need to over my Admin
icon here in the top right. You need to go to
a configuration, and here I will find a backup. Now in the mockup,
I have two options. I have backup to a
local PC and USB disk. No, a USB disk. If it's plugged into
your physical firewall, you can backup to it. But in my case here, I really just a backup to my local PC. And we have another option here, which is on corruption. We cannot corrupt our
configuration fired via password. We will see it later. We will do now, just
a normal backup. And it really did.
Okay. Okay. Perfect. It's access to our backup. Open interview, and launch bid. Perfect. This is
our configuration which is on plain text. This is our configuration. We can see odd configuration. Now let's see how it looks like if we encrypted by a puzzle art. And it's Don't corruption. It's still a password. Okay. It's okay. No, we can't we can't
read the contents of the fly because
it's uncorrupted. To restore our configuration, we need to go back to
our admin configuration. Restore. And do we
need to choose all fly here and we need to upload it. Here it is. Now if you did, okay, our configuration
will be restored. So we know now how to do it
from the graphical interface. It's Cl2, the width
from the CLI. Now in order to do
which from CLI, we need to download the program, which is to FTPD. This program here. We need to download
it and install it. And you've already on slide it. Second thing we need to do is
to choose our unshare face. In my case, it's this interface
here with this IP layer. This is, this is IP dotted LCP. Give us this, this is the
range, this is subnet. It is. That's why it
shows this face here. And we need to do a robes. And they will choose
that folder where I want my backup to start. So I would go to Document
40 gauge backup. Now, I will access my 40 gate. And they will execute this
commandeer execute backup, config, and they will choose
where I want to put it. Since I am storage via TFTP, which should see FTP, I will give a filename, 40 gate. I can name it. Version one. Dna will give the IP address
of my TFTP server. Okay, so let's see it, fine. If we do show directory, you will find it Here it is. If you go to the
file, here it is. This is our backup.
If we open it. This is it.
11. Upgrade: You as an administrator, one of your tasks is to daily check firmware
update and implemented in. So before doing a
firmware upgrade, what we need to see
is there really is not of these firmware
to check the fixes that this firmware come with
at the new features that this new version of the
firmware come with. So in our case here, we have firmware version 6.4.5 and we will do an
upgrade to the version 6.4.7. So let's see how to do it. So before doing the
firmware upgrade, we need to have a
license of a firmware. So if we have a license, we need just to go to system. Then firmware. They're in the firmware, in the 40 guard
firmware here tab, we will find under
it the firmware that we can upgrade to butter. We don't have a license. That's why we are not
seen any firmware air. But if you have a license and you are connected to 40 guard, you would see the
largest firmware. And also you can choose from old available firmware to downgrade your
version if you want. But in our case, we will just downloaded
firmware from the support website of Fortinet. Then we will upload it manually. So to do that, we need to
go to Support dot 148.com. And if you don't
have an account, you need to register first. I have an account, so
I will just login. Perfect. I'm logged in now. Now after you've logged in, you need to go to support. And here in support, if you have a real appliance, you need to go to
firmware download. But in our case here, we have a virtual machine. So we need to go to VM images. Okay? Here in the product, we need to make sure
that it's 40 gate. And here in the platform, we need to choose k over m
because we have a KVM 40 gate. And they're in the versions. And we will choose
the version 6.4.7. Okay? And here I need to go
and choose this version here. There will be, say, upgrade from previous version of 40 gate
for calving in here it is. If we have a new deployment, we can choose this
a firmware here. But we are watching
it procreate from a version to another version. That's why you need to
choose this version here. I already downloaded. So you will not
you don't know it. Now, I will go back to
my 40 gate fair award. And they're in system
firmware, upload firmware. I will do browse and upload my firmware that
I have downloaded. Here it is the say here that a valid upgrade part
cannot be determinate form one, you'll upload it firmware on sure that you're
upgrading 20, 40 OS version 0.4.7
from for iOS. Version 6.4.5 is supported. Otherwise, it may
result in loss of configuration because there is a big difference of a futures and configuration
between the firmware. That way the parents
as this warning here, because some versions have a new futures that there is not in the other versions data. Why does say that? Well, we can make a loss our configuration. In our case, we are good
to go because there is not a big difference
between the two versions. So I will do a backup
config and upgrade. And we back-up my configuration. Okay. The image is uploaded now. Here a boat okay, is reported now
and he is up now. So I will enter my
credentials now to login. Perfect. And if we see here, our firmware version is 6.4.7. So we are upgrading our 40 gate for our
world successfully. So this is how to upgrade your
40 gate firmware version. Thank you for watching.
12. Addresses Object: Hi. In this video, we
will talk about other is walk in
40 gauge fair war. So to configure others, book in 40 gate firewall, we need to go to
policy and objects. And here in other cases, we will go and create new. So here we have address and
we have others grew up. So other is group, is a group of
multiple addresses. Let's first see how to
query data and address. Okay, here in others, we will go to type, and here we will find the
types that we can configure. So we have, for example, subnet and we have IP range, and we have FQDN. And do we have yo-yo graphy
and we have dynamic, and we have the Vice, which is a MAC addresses. We can create an object
for a MAC addresses. So for example, I want to
create an address for subnet. So I would say lecture subnet. And this address will
belong to DMZ subnet. So here I need to
put my DMZ subnet. My DMC address is 172
dot 16 dot one dot 0, and the mask is 24. Then in the interface a need to choose my DMZ and answer phase, which is this
interface airport one. Here it is. And this is my other facilities. Perfect. Now I will do, okay. And perfect. My other is
object is created now. So we can use the other is
objects in a firewall policy. So let's see how to do it. And we'll go here
to firewall policy. I already have a policy
from the Team Zed toward my one until phase
to give access to my DMs, it's server to
access to Internet. So I will choose the
policy and I will edit it. And here in source, we can not just that I have
selected the addresses. So instead of selecting all, we need to be more
specific and select only subnet that we wanted
to go to the Internet. So in this case, I will choose
my DMZ subnet charities. Okay? And they will do okay, Perfect. Now instead of creating objects or allowing all
subnets will go to Internet. We can be more specific and we can allow
only an IP range, or we can even allow
only one IP address. So let's see how to do it, is to go back to addresses. And they will go create new, and they will do an address. And a will do the MZ range. And here in type I
will choose IP range. And for example, I want to
allow only this orange here, only one dot chain
to 172 dot 16, dot one, dot two. And here I will choose
mediums event your face. So only machines with those IPs here within
this range here, from the 10 to 20 can
access to Internet. If I chose it in my policy. If I go back to my policy and a chose the mid-range
instead of the DMZ. If a, if a choose that only those IP addresses here can access to internet.
Okay, perfect. Now let's see how to
choose only one IP. For example, let's say if I have in my dean did
I have a web server? I will name it here. Web server. Okay. If we have a web
server and there, if I want to only the web
server to access to Internet, I need to put his IP, for example, one to10. And here in the mask, I need to put dirty
tool. That's important. The mosque in short
be turgid Joe. And here in the interface
I need to choose the MZ and they will do okay. Perfect. Here it is. This is IP. So if I did the 24, Let's see what's happen. If I go back and change that to 24. It see what's happened. Here it is. It will select subnet, which will in your, our IP address and replace it
with the, with the subnet. So I don't want that. I wanted to choose my IP. So I will put 20 back and I will do church Utah as a mask
and they will do okay. Perfect. Now we can also in the policy block or allow depends on the
geographical location. So if I did create new and
they will do it others. And therefore example I went, I want to create
another object, object. For example, British, okay?
And they are in subnet. A will choose geographic and
you're in country region. I will try to find the
range of the kingdom. So I will do uni. Here it is, United Kingdom. It is perfect. And they will do, Okay, I will not choose the interface.
They were lit at all. Our any, and if I want, I can choose a color. For example, is choose
the color, the red color. Okay? And you can do okay. Perfect. So this is how
to create another object. Thank you for watching.
13. DHCP Server: Hi. In this video, we will see how to
set up and configure the API server or our
40 gate for a reward. I will show you a fair
cell to do it via the CLI. Then we will do it from
the graphical interface. So let's login to our 40 gate. Okay? First thing to do is this command config
system, the ACP server. Then it did and give it an
ID and we'll give it one. Then sit sit in it mosque. Okay. Then sit onto your face. This is the interface that will serve as the ACP to the client. I will choose port 1. We will give it a gateway. The gateway is the IP of
our 40 gate, of course. Now I will disable the VCA, my niche, and we
put it in, disable. Okay? Now we will configure
our range, config IP range. We'll do it sits IP. We wanted to start
from 10 to 15. And we can also give it a DNS. So sit DNS server. And that's it,
this command here. And when we tape it and press Enter and the
configuration is auto save it. So when you, when you
are working in sale I, and you want to save your configuration when you
are in the config mode, you just need to
enter a command and press Enter and your
configuration will be saved. Okay? Now we will just
our configuration and we will see, I will close that. I will stop my machine. It will go to edit. I would put it back to the ACP. I will uncomment those two lines here in the end and
they would put safe. Right-click on it and
start double-click on it. Okay. Let's open the terminal. If config, and it is, this is IP, is login to
our 40 gauge. To see that. If you go to dashboard, I'll tell CP monitor. Here we will see that
our 40 gate gives on our web browser. Here it is. Another thing that we can do
from this widget here is to right-click on it and
create a DHCP reservation. So all four together
we're always give the same address
to this machine. I can name it a web admin. Whatever name I want
to do and press. Okay, Perfect. Now let's see what's happening in the graphical interface. We sit, we saw that before. How to create gossipy from CLA. But let's see how it looks like. In the graphical interface, we will go to network
and your faces. This is the port that
we enabled the ACP on. Let's do Edit. We scroll down. And there it is. This
week we did talk with when we created
the ACP server. So we check this icon
here, we check it. This is the range.
This is net mosque. There in 340 Gateway
we see same as interface IP dots mean
here we choose this IPR. He would serve
this API, Gateway. And Dennis, who you choose a specified DNS to
the Google DNS. And that's it. This is the
configuration of the ACP.
14. Fortigate Internet Access: Hi, In this video
we'll see how to configure policy to
access to Internet. So first thing we need
to do is to go to devices and search
for Cloud niches. We will drag it
and drop it here. Here we need to choose GNS3, VM. Then press OK. We close this. I will name it an Internet. Right-click on it, configure, check this box here, and try to find this
interface here. And press, Add. And make sure that seizes
appear in this list here. Here is our interface
here. Then, okay. Now what we're going to do is to link our 40 gate with Internet. So shows this interface here. Okay, perfect. I would prefer
to show the interfaces. So interface that face and
the red is the port 3. And we'll go to
navigator or the web browser login into my 40 gate. Now first thing to
do to give internet access to 40 gate
until lunch users, we need to go to
Internet and go to anterior face says and
the configure port. The port that is face
it to Antoinette. This part here. You can choose
whatever port you want. I've chose pour three, but you are free to
choose whichever port. So it shows, portray,
it will do it. Here in the role, I will give it one role in the IP address. I will give it 192168120 to 240. The mask is 24. So I give it this IP here because the IP of
this interface here, it's 192168120 to one. This is the IP of this, of this interface air. That's why I've chosen this IPR. Okay? And we will do okay. Okay, so the IP is configured. I will choose, I will just to the quantity VT between
our 40 gate and our gateway. The gateway, I mean
this interface here, this is our gateway to internet. So I go here, this is a constant. And comment that I will execute. Here is execute being. And they put IP
of the interface. And we are flipping
in dancer face. So remember this command, it's a useful command, executes being allow us to test connectivity
to other devices. So like I said, first thing we need to do
is to configure the one on your face and give
it, right, right IP. Second thing we need to do is to configure a
sludge approach. We will go to a sludgy corrode. It will create new where
we will get this session. We'll give it a by default. It's a default, sludgy
colors, getaway, others, we will give it the IP
address of our gateway, which is 0.1. And onto your face is what? Port 3. This is
our one interface. Okay. Now let's see if our
40 gate can access internet. It's sudo execute pink, 8.8.8. Perfect. Or 40 gates can
access Internet now. But let's see if our
machine can access Internet and open a terminal. And they would see if
I can ping Internet. And pink is not reachable. We can't, we can't
access the Internet. So I make the test
from this user, and this user is
behind a firewall. So what we have to
do is to create a policy to allow the
user to access Internet. To do that, we
will go to policy. I'd objects, firewall
policy, create new. We rename it internet. In the incoming interface, we will choose our
LAN interface. This is the interface
facing our client. In algebra relative phase, we will choose our
portray interface, which is our one and
phase in source. We will choose all for
now. In the destination. It's all because we
are go into Internet, we would leave it
all in services. It's also all here. Not is inhibited.
We will leave it. Let's scroll down. We will chose all sessions in log or lower
traffic to log all traffic. And okay, let's do this again. Now we can access
the anterior it. So after we created the policy, we can now access the internet. It's just from the
navigator. Perfect.
15. Email Alerts: One of the best futures
that we can have in our 40 gauge for your wall
is in my earlier chain. So as a network administration, you need to know about e-mail alerting and
he has benefits. So one of the benefits of
e-mail alerting is notify us, we never are network bridge happen or a turret or
our antivirus detected or any system or configuration changes in
our 40 gate for a rod. So now you know how on
Parsons is e-mail other 10. Now let's see how
to configure it. In today's video, I will set up email alerts
when we the gy. So follow up with me. We, we need to go to System
Settings, scroll down. And here in MI service, we need to use custom settings. In SMTP server. We need to use a Gmail server, which is smtp dot gmail.com. Important, we need to specify
the port which is 5, 8, 7. And in authentication, we need
to enter in our username, the, the email that we want
to sent from the others. I will type pair or run them in while a
random gene might emit. So I will type, for
example, 40 hero gmail.com. This is just an example. You need to enter
your correct him. I hear you're correct. Gmi at MIT here. In the password, it will enter
a password. Okay, perfect. In security mode, make
sure to select Start JLS. It's an important tool. Select Start TLS. In the default reply to area, we need to specify
the default image that you want to
send other tool. Or you can say
repeated email here, this image, you can repeat it or you can use a
different e-mail. So I will just repairs my
amide and they will apply. Perfect. Now we configured
the image server. Next thing we need to do is
to configure the alerts. Such a configure the alerts. We need to go to security
fabric automation. We need to create new. And we will name it in my alert. Here in the trigger. I will choose for
joyous event log. And in the event I have here so much event
like we see there. There is a lot of events
like our failover 66 us. And a lot of events
I will chose, for example, odd me
and login failed. So we can know we never
anatomy and Troy to or login to our 40 gate
and filed in the auction. I will chose e-mail. Perfect. And here in the image, I need to choose our recipient. So I will try pair. Another. For example, like I
said, 4000 at gmail.com. In subject login, I can create a subject of my
email login attempt. Failed, login attempt. Okay. And they will type, okay. And that's it. So whenever a user login
Java 40 gates and failed and an e-mail alert will be sent to this same idea to
this MAC layer. So let's see how to do
that from CLI interface. And it will open
a CLI interface. So to do that, we need to go to config system in my server. Okay? If we did here show we will
find our configuration. This is the reply MI, this is our server, this is the port. And here we can find security, which is start thetas. Perfect. Now let's see how to configure the alerts with the events. So what you need to do is
config alert my sittings. Perfect. I will need to do set username. And here I will put the
email that we send alerts, which is 40 here at gmail.com. And here I will center, I will say to the recipient, which is my tool. And they can choose, for example, 40-year-old one. For example, at a different GMI. Or you can type the same
GMI, there is no problem. Okay? And for example, I will choose like
a event a will choose admin login logs. So all the logs off
my admin account from login and logout
or fail op amps, or a successful attempts
or any login logs, I will be received on the
analogy mayor of them. So I really did enable then end. And that's it. Now you know how to sit up. In my earlier Tin. I hope that you're using it in your 40 gate for our award.
Thank you for watching.
16. Control Traffic using Policies: Hi, In this video we will
talk about policies. So policies although us to allow or deny traffic
in our network. So let me explain to you the topology that we will
work on it in this video. So if you go to GNS3, you will find that I have
here my 40 gateway award. And they have here a DMZ zone
and they hear a lens on. Okay. And there my name's Ed zone is insulated from
my lens on why? Because by default
in 40 gate firewall, there is a default
policy that deny traffic from any interface
to any other interface. That's why. So for example, in my topology here I
have here a web server. And if I want my line user here to access
this web server air, I need to create a
policy for that. So let's see how to do it and we'll go back to my
40 gate fair world. Then I will go to policy and objects and they will
go to firewall policy. And they will do create new. And before that, let me, let me try to access my my
web server air from my line. First, let's me see what is
the IP of my web server. Okay, this is the IP
of my web server. Here it says, okay, I'm in white line now. And like I said,
it's a web server. It should access so
it from the web. Okay. Let me see the IP of my client. Here it is. This is LAN range. Okay? So apparently I can't
access to my web server, which is located in the zone. Okay. Let's go back to the
firewall and discreet policy. Okay, we name it LAN 2, DMZ web. Okay? And they're in the
uncommunicative phase. It will need to choose
my line and chin phase. And the algebra will interface. I will choose my DMZ GFS. And here in source, I will choose all. Or I can choose the line
object if I created. Here in the destination, it will choose my web server. Here it is, this is IP of
my web server I've created. The other is object for my
web server, IP address. Here it is. So I need to be more specific
and not allow my land to access to all my
DMZ or the resources. That's why I've created
this object here, okay, I need to select it. And they are in services
and needs also to be more specific and they
will chose only HTTP, and they will choose pink. Although if I want tested
connectivity, okay? There is no need for not. I can disable it. There is no need for not. Okay. And I can enable log
and they will do okay. Perfect. Let's wait for the
policy to be created. Occupied for here it
is, it's created now. Let's try to access to it again. And perfect, we can access
now to our web server. Entertained easy.
Let's try to ping it to see if the pink also work. Okay? Okay. And being also work. Perfect. So that was an example for the
creation of a policy. We see before how to give a 40 gauge wire or
internet access. So you by now know an hour to create our policy
toward the Internet. And now you'll
know how to create a policy between
your interfaces. So if you want to
allow an interface, for example, in here,
the anterior face, a portal to communicate with the interface port one
with a specific IP, which is IP of our web server. Your way now know how to do it. So that's it for the policy.
Thank you for watching.
17. Traffic Shaping: When we want to control
our bandwidth uses, or we want to draw a door
quantity of services. In 40 gate fair award, we have traffic shaping. So in traffic shaping, we can control our bandwidth
uses by user or by IP. By that I mean that every
IP or every user can use. For example, if we have one anterior face with
a 20 megabyte link, we can specify for this IP or that user that we have
in our network to yours, only two omega white from
this 20 megabyte link. So this is traffic
shaping or we can, we can specify that, that user, if you
want to access, for example, to Microsoft Teams. If you want to use
Microsoft Teams, you can use only 10 megabyte
of our 20 megabyte link. So let's see how to
configure traffic shaping. To see how we can do that Sartre configured
traffic shaping, we need to go to policy on the object and their
employee sound objects. We need to go to traffic shaper. And dear in traffic
shaper when we specify how megabytes
or how a gigabyte. So we want to use
our users to use. So we will do a Create New. And here n-type, we would
see that we have two types. We have shared and we
have peer IP Shaper. So shared means that the
value that we put here, this volume of air, be
shared to our users. For example, if we
have a link with the four megabit and do we
have two users in our network? Those two users were not used
the wall formula weight. One user, widows videos
j Omega weights, and other user with
us to a megabyte. So it's shared, it will be sharing into those,
those two users. So a opposites,
it's makes sense. So here we're going
to have that unit. It's a kilobytes and
megabytes and gigabytes. For example, let's set
a megabytes, megabytes. And for the maximum bandwidth, Let's set it to 20 megabyte. Perfect. And here it's the,
the guarantee, the bandwidth,
it's the bandwidth that we want for each user. So I want each user to
use one megabyte, okay? Then I will do okay. So if, if, uh, if I
have to use this, I will do this
configuration here. You will, you will configure
those volumes here dependent on the users that
you have in your network. For example, if you
have four users and you want to give each
user one mega weight, you need to put here four. And the area when the
PO2 one megabyte. Okay, then I will do okay. You need to give it a name. For example, I will
put here for in the ok. And then next thing
I need to do is the policy. So I will go to traffic
shaping policy and they will create new. Here. I can give it a
name, for example, shared for me got weight. Okay? And they are in source. I need to choose my line. This is my line here, this is my otherness in the destination. And you need to choose all. And here in services, you will choose odd. And here in the algebra
way to interface, I will choose my
line until phase, which is port four. Okay? And here we
have a shared Shaper. So I need to check
this box here. And it will choose it
from your editors and they will docking.
And that's it. Now if I have in my
network for users, each user will use a by user, I mean IP, IP, or each user can use a one megabyte for from
this formula right here. Okay, Now let's see
the other tape, which is a pure IP. Here it is. This is your IP, name, it Peer. Ip will give it here
to make our white. Here, I will choose megabyte and they are in the
maximum bandwidth. We will choose tool. I will do. Okay. Then I need to go to the policy and the or any
TO create new policy. You will name it Peer IP. Here in source. In year 2, choose my land and their entity situation
in which shows all. Instead this is a rituals all
in algebra when interface, I will choose my line interface, which is port four. And here I need to
choose your IP shaper. And this is my pure IP shaper. And a will the AKI, perfect? Now let's see, sit. Let me first delete
the first shape first policy because
they don't want to test the shared IP. I need only to test
their peer IP fares. It will go to my topology.
This is my topology. I hover my 40 gate, and this is my browser
that I will just from it, the chamber that I
just configured here, we'll see if it
is a user air can use only two omega
weight of my link. And this is air,
my internet, okay? I will go to my browser and
I will go to speed test. Okay? Then a will go and
launch the test. Okay. Let's wait for it to stabilize. Okay, like we said, it's
almost two megabytes. It's not more than
two megabytes. So our user cannot use more than two
megabytes and our network. And that's, that's okay,
that's what we want. Okay? So our shaping
policy is working. Perfect. Now what I want to see we do, it's a weekend to only
applied policy like that. We can also specify
the destination. It's me, it is my policy. For example, I want to
hear any destination. Let me see if I want to go to NTP or I want to go
to DNS or I want to use, for example, any of the
internet services here. And I can specify, for example, Amazon FTP or Amazon DNS. If you want to use Amazon's DNS. And you can specify traduce destinations here
to use only 20 megabytes. Or for example, if I want
to access to applications. Here in the application,
for example, like I said, Microsoft, which means shares Microsoft. Microsoft, okay, For example,
Microsoft, microsoft. I'll zoom if I want to access. So Microsoft US or application, I can use only 20 megabytes
and all the other traffic. You can use all my bandwidth
if I have a length of, for example, like I said, 20 megabytes and I specify in shape or
hair to omega white, this shape rare
20 megabyte and H shows here in application
in Microsoft Azure. If I want to access
to Microsoft Azure, it will use only 20 megabytes. And if I want to access
to any other obligation or to any other
websites, I use them. I may want my world bandwidth, which is a 20-megabyte. Okay? I can use only omega white when I want to use
to this application here. Okay? Like we said, we have
all the application that we have in our
network or application, including LDP, Dr, all
the tin that we have. For example, if we have each me, see if I have here
zone. Here it is. So for example, in
XOM we want to, we want to do are called enzyme. We need to specify a shape
or more than two megabytes, of course, because we need to have a quality and our cold. Then we need to choose a, we go to the peer IP shaper and we need to
increase the Islamic. I'll retire to at
least 10 megabytes. Okay? So this is a traffic shaping.
Thank you for watching.
18. Vlans Configuration Part-1: Hi. In this video we will see
valence configuration. So in this scenario, we will see how to
create villains in Cisco switch and link
them with a 40 gate. So what we're gonna do today
is create three virulence, VLAN 10, VLAN 20, VLAN Turkey in switch. And we will put this
interface here in axis mode. So this 40 gate here
will be in villain 10 with this Udemy
and browser here, although in villain
tin and toes villain here are 20 and 30. And we will do anti-Soviet
on routine in switch. And we will see if the villains will communicate
between them and if 40 gate will see and
communicate with other neurons. So let's start. I will start by creating
villains in the switch. So I will go to the switch. I ever create first virulent. Second fill out. Perfect. Now next sip is assigning IP addresses,
stored villains interfaces. So we can do until routine. I will start with I feel on tin. Now fill on to fill out. Let's check our configuration. Show IP interface. Brief. Perfect. Our IP addresses are perfectly assigned to the
fill on sans-serif faces. I need to, I need just to bring the interface up face
of volunteer chain. Okay? Now next step is assigned in the interfaces to a villains. So I will assign interface
giga 000 and until Phase 0, 0, 1 to VLAN 10, 10, perfect. And until Phase 0 to 2, villain perfect, and 3 to
villain THE perfect. Now I will start
those machine here. I will assign an IP
address to this machine. And this machine here, I will give it 10 and 20 feet away is the IP
address of the switch. Because switch, who we will do the
entrepreneurial routine. So we will need to give it
an IP address of the switch. This is the IP. It's Do show Ip. Perfect. This is IP. Show IP and IP. So the last thing we
need to do is to give, to configure IP
routing and switch. So we need to launch this
commandeer IP routing. Perfect. Now we are done with switch and with
the PC's configuration. We need now to
configure 40 gate. So I will configure for ticket from
scratch. Again, we do. So you can get used Jiu CLI commands because
they're like amines are very important and we need to know then we work from the
graphical interface. But in troubleshooting, CLI will be perfect for troubleshooting.
So let's start. The user is automated. There is no password,
so I will just press Enter and I will
create a new password. Perfect. Now I will
give it a host name, config system, global. Sit, hostname. Perfect. Now I will go to
interface configuration. So we'll go to config system. And TFA's, I would edit for one pour one is the pore here, this point here, which
is directly connected to this interface of the switch
in villain, Jen. Perfect. I will give it on my p in
the range of villain 10. So I will change the mode
from the acid pH or static. So I can give it a sludge. Ip sit IP 190 to 168, 10. And one mask is 24. Sit. Sit, Yes, 11. And sit along axis of CTP, pink. And this is ash. And That's it. And from here, I
will start my admin. I already give it a static IP. This is the IP address. And the gateway of course, is the IPO of the switch. Because like I said before, switching who is gonna do
the antediluvian routine? So I need to give it an IP address of the
switch so we can communicate with other
than the other virulence. Okay, So now I will try to ping my admin from
one of these pieces here. And we'll go to PC1 and
they will try to ping it. Perfect. I can ping
it successfully. So the pink is what
perfectly between villas. So now I will try to
ping 40 gate firewall. So let's ping the
IP address offered 40 gate firewall being a 192, 168, 10 one. No, we can't be
in good. But why? So I will give you some
time to think about it. I will show you the
topology again. This is apology. I have a switch here, I have 40 gate here. And they assign VLAN 10 to this interface here
and this interface here. And they assign VLAN
20 introduce interface and fit onto it into
this interface. And I configured IP
routing in this switch. And I try to ping the villains. And they can't being a
pink and pink between the villains is
bus successfully. But I can't pink 40 gate. So I will give you some time
to think about it a little, and I will give you
the shortest one. So please pause the video a
little to think about it. To try to find the Y we
can to paying 40 gate. Then follow up with
me to seed solution. So I will now tell you why
that 40 gate counts being and the just those pieces here count 40 get and 40 get
cancer pain in any of them. Hear it. You can pick only the upwind because
they are insane villain. But you can ping a village when advantage and its
waveform 40 gate. And we'll go to 40 gate. I will try to ping
my admin browser because they are insane villain. So we can pin gets perfectly. But if I lie to pink, this procedure, this procedure, I can't ping it. Or even this is IP. It can spin good.
Also. I can spin it. So the solution is we need
to give it a static route. So in order to know
those villains here, we need to give it a
sludge recruit with the gateway is the IP
address of villain tin. So we can know that
those villains here. So follow up with me. Okay. I need to go to
network, to network, stodgy corrodes, create new. So we're, I will give
it in the destination, I will give it an IP
address of the villains. First villain is 20. The gateway. The gateway is the IP address In switch. And the interface is bought one. And I will clone it. And it will change the
destination to 13. And okay. So now I give it a sludge,
recolor, a villain. Now I will try to pink villa
Georgian. And here it is. I can ping get successfully. Let's swipe VLAN 20. Here it is. Now let's try from
the other side, being passed successfully. And from the other PC. I can
ping it successfully. Also.
19. Vlans Configuration Part-2: Hi, In this video
we will see how to configure VLANs and
40 gate firewall. So I've already created those three villains here
on this switch here. Now, we need to configure
and create if you land on 40 gate and
communicate with switch. So I will show you first how to create villains via
the CLI and 40 gate. Then we will create them
via the physical interface. So we need to do config
silicium and TFA's. I will do it on the air. I need to give the
anterior face and name. So since I am, we want to create a VLAN 10, I will give it a
name villain 10. Next thing to do is sit, vigil, root, then set type. Since I'm creating a villa and I need to give it the type velar. So sit tight and then
sit fill our ID, the ID of the Villa. Of course. Then the inset. Here in sit on surface, we need to sit the interface where
this villain is belong. So since we are connecting directly to the switch
via this interface here, which is port 1. We need to sit export one. So I will do part one. And it will give it an
IP address. Mask is 24. And we will enable HTTP ping. And this is h. And they
will do, and that's it. We are now creating our first villain on 40
gate for your own via CLI. So let's see if we can access to it from the web browser layer. So first, the next
thing we need to do is to put this interface
here on track mode. So to do it, we need to
access to the switch enabled. The interface name is this
is name of the interface. So to put it on track mode, we need to do is
switch port trunk, oxidation here, then
switch port mode trunk. And that's it. Our interface
now is our mode trunk. And of course I set a
static IP HO the browser, this is logic IP. And our giveaway is a 10 0.1, which is our 40 gate IP. So let's try to access
our 40 gate here from our web browser
via VLAN 10. So double-click the browser. Let's put IP of our 40 gate. This is IP of our 40 gate. Perfect. I can't access, so it, Let's login. Now to check our configuration, we need to go to
network. And she faces. And we need to expand port 1. So go to this icon
here, click it. And here we can find vid on
tin belongs to the port one. Here is belonging to a port 1. If we did. And if we do it. This is it. This is what we previously
configured via the CLI. So now let's see how
to create villains, the graphical interface,
Create New and gt phase. Give it a name. In our case, VLAN 20, n-type, we
need to choose VLAN ID. We need to give it the
tag of the Veyron, which is VLAN 20. And to give it an IP address, we need to choose
the ports where the villain belong,
which is port 1. Now let's create
the last villain. And we'll give it a name. We choose the interface ID
of course is 13 IP address. And it said phenyl
idea not verified. Okay, fill our ID. And okay, if we
expand port 21 now, we will find that our villains
are successfully creating. So this is how we create
if you're not on 40 gate.
20. InterVLAN Routing: Hi. In this video we'll see how to do antivenom routine on 40 gate. So in the previous video, we created and recreated
them villains on 40 gate. And we successfully connected
for on the web browser. In villain 10 to 40 gate. We are rare and we are created, we are connected to 40
gate via the villain 10. And now we will see
how to do routine on our 40 gate here to allow communication between
those valence here. So let's see how to do it. So will I will, I will show
you now told me towards to do entrepreneur
origin on the 40 gate. So the first method is
by creating a policy. So to do that, I need to go
to System, future visibility. I need to enable a future year. This is the, this is the
future that initial to enable multiple interface policies and will enable it and
they will do apply. Then you need to go to a policy on the object
firewall policy. It will DO create new. And we'll give it
a name, which is anterior villain login and 40 gate in the
communist your face. I will choose the
trivial answer. And algebra when interface, I need to choose also
the trivial ones. And source. I will choose on and destination
I will choose on. Instead of this is
if we chose on, we don't need the
not in this policy, so I will disable it. I can log all traffic
if I want the Inaki. And this is our policy. So to just sit and
we'll go here. And they will give this BC here. Unlike the others in fill on 20. And we'll give it an IP address. Dot gen. Take you to a will be
our 40 get of course, the IP address of our 40 gate. Okay? Now other PC. Perfect. This giveaway here is the IP of the
villa on 40 gate. It's chicken to whether we
will go to network interfaces. We would expand port
one. And there it is. This is the field onto your
genitals is the villain twin. And this is the villain
10 software on PC1. I will try to ping my
40 gate IP address. Okay, perfect, I can ping
it in the video on ten. So let me try to ping the
IP address of villain to10. I can't pin get. Why?
Because they didn't enable it village winning or interval on 13 and
the service pink. So if I go to village
Winnie and to edit, and if I check here in administrative
access, and they do, okay. Now I can pink. Perfect. Now let's try to
pink from this PC here. From this specific year, 2010 to this specific year to see if entrepreneur
origin is working perfectly. This specific search engine. Perfect, I can ping it. Let's try the other side. I can ping it also. This IPR is the IP of
this pissy. This is it. So now I will show you
the second method. First, I will
remove this policy. And they were just again to show you that the
pink will not pass, then I will do second method
and we will just sit also. So I will delete this policy. I would go back and
they will try to ping again. And they can't pink. Okay. Second method is, is we need to go to a
network and she faces, we need to create new zone. And we'll give it a name, which is villains zone. Here in interface members. I would say that all
my trivial runs. Okay? And this is the trick. Here. We need to
disable this a policy. This policy is a mean that
the anthro zone traffic, it's mean the traffic between those will only be
blocked. If we disable it. The traffic between those
villains here will be a load. So I will press Okay. And they will try to pink again. Perfect. Now I can pink. It's flowing from
the other side. And pink also work. So now you have the trematodes pseudo entrepreneur
origin from the 40 gate. My recommendation to
you is to do it via the policy so you can have a
visibility on the traffic. Because when we do it via zone, we can to see the traffic
passing tones our 40 gate. But if we do it from the policy, we have the transferability
and 40 gate. If we go to log and report
and forward traffic. Here we can see that disappears here is
being in this piece. And this piece here
are pink in this. So this is how we create
a entrepreneurial Rajan. Thank you for watching.
21. Redundant Interface: In this video, we will
see how to configure redundant interface on
40 gate for your award. So I have here two
ports, port nine, and they are actually
connecting to my switch here. And they have a PC here that
is going to turn my switch. So we'll start by creating the Rather than 10000 face enjoy my 40 gate via CLI commands. Then we will see how to do it via the graphical interface. So say we didn't. I would login to my 40 gate and we'd go to config
system and see your face. And it will do it. And
they will name it. I can give it
whatever name I want. So I will set Vietnam wrote and they will sit
type of course, redundant. Dna will sit members, the members of this into our
port line and port chain. Then it will give
it an IP address. And we'll give it 10.1. The mask is 24, will give it enable HTTP ping. And this is h. And we give
it a role, which is long. Then we will do. And so this is a satellite configuration
or further than 1000 face. Let's see how it's look like from the graphical interface. So I will connect to my web browser and it will
login to my firewall. I need to go to
network interfaces. Okay? This is the
redundant interface. This is their name and
those are the parts of the interface. So
it's due, I did. So this is the configuration from the graphical interface. Let's try to create
an out-of-phase 47. I will create new
onto your face. I'll give it a name, for example, onto the type. Here we choose
redundant interface. I can give us unlike the others. For example, between one and enabled ping,
HTTPS for example. And they will docking. And that's it. It's simple. So to just sit. I will go to my PC here and they will launch
a pink toward my firewall. Okay, This is the IP address
of my firewall. Perfect. Now I will try to delete
one of these links here. So it will delete port. And they would see if
the pinks working. Perfect. I can see
it being done. Now I will put it back and they will delete
the other interface, port nine, and it
will delete it. We checked being one pockets dropped but the
pink seed surplus. So this is outer query either
than the denser phase. Thank you for watching.
22. LINK AGGREGATION (LACP): Hi, In this video we will see it ACP configuration on
40 gate for your voice. So I have here my
40 gate firewall connected directly
to the switch. And they will create an ECP configuration here
in these two links here, port nine and port in
the 40 gate firewall and port G21 tool and G13 on switch. So here I would have it asap. So when we configured it ACP, which unifies forum redundant and from
bandwidth augmentation. So if we have here
in this link here, 50 megabyte and
in this interface here also have 15
megabytes in total, we will have 100
megabyte of link speed. So I will start by configuring the 40 gate
for Edward VI had CLI. I will have to 40 gate. I will do config
system interface. It will do it and I will name. It will give it the
anti face and name, and we'll give it a it ACP name. Okay. Then I will
get a vital route. Then sit, type, aggregate,
then set members. Members of course, is
our port 9 and 10. And I will do sit in
ACP and they will give, give it the more active. Okay. This is the configuration
of 40 gate. So those outcome wants to create a CPR interface on 40
gate switch via CLI. Now I will switch tool
and they will go to the switch and switch, like I said, we haven't
two-phase giga 12 and 13. So what you will do, you will do is interface range G go on to 23. And no shut down. Then Shannon, Shannon group 1 mode, octave, then Sean it. Then Shannon. Protocol, ACP. You want to use it
ACP. Then exit. Dna will go to port channel, port, interface,
port, channel 1. To switch to rank capitulation. Total one can open the
switch port mode trunk. So this is the
configuration when switch. So now we have to check
our configuration. I will go to the graphical
interface of 48. I login into my 40 gateway road. And you go to work. And we'll go to interfaces. Here. In interfaces, you will find the entrepreneurs that
I've created from CLI. Here it is. This is
the anterior face. This is the ports that
the members of the, of this, of this
virtual and surface. Perfect. Now let's see how to create it from
the graphical interface. So I will create new interface. You rename it Aggregate query. In the type. It will
choose aggregate type. In the interface members. We will choose, for example, Portugal and port
three. Perfect. And they will do. Okay. And that's it. This is ultra created from the
graphical interface. We can create a villains
and the test connectivity. So that's what I will do now. I will go and create villain. I will just, let me see. I will just with
villain twinning. I will create a villain tuning. Here in the interface, I need to choose an ACP. Need to give it ID. I would enable pin
in this interface. Perfect. Pink, the 40 gate. Perfect. I can't being good. Now I will try to remove one of the interfaces and they will save the ping will
see are working or not. So stay with me. And we'll remove
this interface here. So one packet is dropped, but the pink still working. I will put onto Facebook and I will delete
the other interface. Okay? And we delete null, port 91, pocket dropped,
and pink surpassing. So this is how to create
and configure it asap. Thank you for watching.
23. Transparent Mode: Hi, In this video, we will talk about 40
gate operation mode. So our 40 gauge firewall
have two operation mode. First mode is not, and second mode is transparent. So we, like we see here
in system information. And the mode we have more NADH. So not mod is a
commonly used mode. By default, 40 gate
is a NOT mode. In not more than 40 gate
firewall beehives as our rotor. So a can perform routine and two NADH and VPNs
and whatever rotor candle and the mode each interface 40 gate need to
have a different IP address. We can't assign that same IP
address for the interfaces. On the other hand, when we talk about
transparent mode, our 40 gate for your
wall act as a switch. So when the switch
we can't assign IP addresses on interfaces. And we can do root, and we can't do routine or
any future that router can. We use a chip, the
transparent mode? We know we have our
40 gate firewall sitted behind the rotor. Like in my case here. This is my topology
where we have all 40 gate here and
this is the rotor. So in this case we have to do to configure our 40 gate firewall
as a transparent mode. So let's see how to
change the mode of our 40 gate firewall from
not mod totals parents mode. So to do it, I need to access to our 40
gate firewalls CLI. First scene we need to do is to disable 14 encounter phase. So we will go to all
your faces and they will get 14 ink onto your face. And any to disable it. Perfect. Now we need to go
to config System Settings. And here we will do
sit operator mode. Like we see here, there is not more than
transparent mode. So we need to change it
to transparent mode. Okay? Next thing to do is
to give it an IP address. Ip address need to be in this
range here. In this range. Okay? And they will
give it a gateway. The key takeaway is the
IP address of my router. This is the rotor, and
we give it as a gateway, this IPO for this
interface here. You want to confirm
my configuration and to change the operation mode from
natural transparent. Okay? He says that our 40 gate for your role is changing too. Transparent mode. George's set, we need to
do get system statues. And here it says, our
40 gate operation mode is transparent. So to access our 40 gate, we need to enable HTTP access
to this interface here. It will go to config
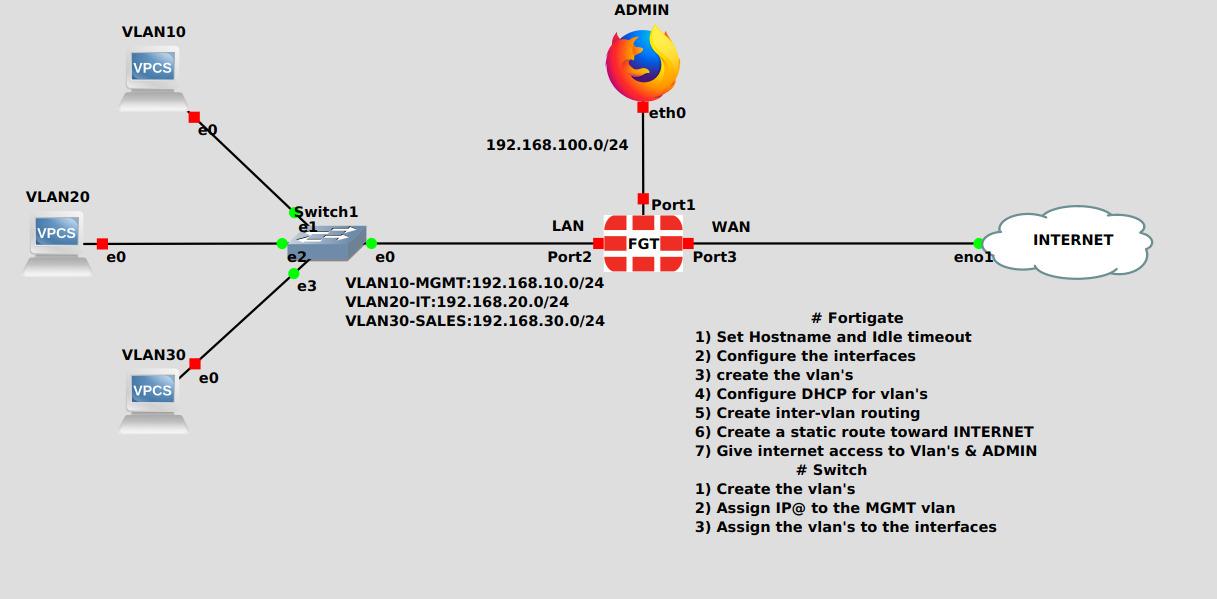
system and your face in it port to then sit
along axis HTTP. Http. Then, and now I will
access your browser. And they will type the IP
address of my 40 gate. I will access saw it. And here in CCMR
formation in mode, we can see that our 40 gate is successfully transform
it to transparent. If we go to System Settings
and we scroll down here, we will find our
configuration here in system, operate in sittings. We find that the current operator mode is
the most potent. And this is the IP that
we give to all 48. Perfect. Now it's CO2 will give our 40 gate here
and the Internet access. Because if we try
to pink execute being we can't bring internet. So to give it an
alternate access, I need to go back and
configure my rotor here. And we'll access to it. I've already give it a IP
address on his interfaces. So if they did show
IP interface brief. So in the interface
Fast Ethernet 0, 0, I have this IP air, and in the other interface
I have this IP hair. So in order to
access to Internet, we're not sure we
need to configure, not in our router. So to do it, I will go
to config terminal. And firstly, we create
an access list. A standard access
list on there will permit my subnet. Perfect. This is the subnet that I
permitted. This subnet here. Then I will get IP not
inside source list. I will give it a list
ID, which is one. I will choose my all
my outgoing interface, which is first one, sludge 0. And they will choose
overload not DNA will need to go to
Interface Fast 0, 0. And the will need to
do a knot inside. Okay? Now we need to go
to the other until phase. And we will do IP not outside. Okay? Exit. And do we need
to do a static route? Okay, perfect. Now let's try to ping
Internet from our router. Perfect, It's working. Now let's come back to
our 40 gateway firewall. It's pink again and turn it. Perfect. Now we
can't pink Internet. It's chicken from the rotor. If we did show IP
lot translation, this is the
translation of a lot. Here we ping 8.8.8 and
this is the local, which is my 40 gate IP address. This is it. So this is how we configure a transport
mode on 40 gate. Thank you for watching.
24. Enable Nat on TP Mode: When we talked about
transparent mode, we said that in
transparent mode, we can't enable, not
turn the routine and the counter assign IP
addresses to all interfaces. Because our photo gate for
your wall acts as a switch. But can we not really enable, not on this firewall
in transparent mode. That's what we
want to see today. So I'll follow up with me. So first thing we wanna
do is to check if they are already come to assign IP addresses to
the answer faces. It see. Lets me access to all Porto where it's checker. It seems like a really, I can't assign an IP address. So the interface,
so that's true. But let's see, in
policy and the object, if it is in him for not it seems that there
is no money for not. Okay. But we will enable it. So let's see how to do it. First thing we need to do
is to access to our CLI. And we'll do a config system. Sittings in, sit, manage IP, and we'll give it
the current IP, which is one, 1909. The mask is 24, and they
will give it another IP, which is our one IP
address, 122.240. And the mask is also 24. Perfect, and they
will do an end. Now let's go back to the policy. In the topology. I will remove this rotor here. Okay? I will remove
the switch also. I would connect my admin
directly to a portal. Like I said, in
transparent mode we can, this is our 40 get from any
port with the SCP access. Enable it. So I will
connect directly to a portal and they will
connect my 48 port 3. They are actually
draw my internet. Okay. This is subnet
of my alternate. That's why I choose this
IP air. That's why. Okay. Now let's go to System Settings and
see what's happened. Perfect. Now let's go to
the sittings and here in the Managed API and
operate under operation mode, we will find that our 40
gate takes two IP addresses. Here, the odd Detroit
by addresses. The first address
is for our land, and second address is for
our line, for our one. Now the second thing
we need to do is to create a static static route. So into gateway IP address, we need to type our gateway
IP address, which is 1221. Okay? Perfect. Any to remove the first one because
we can't have two sludge IP in ones. You need to have one
default static IP route. I mean, perfect. Now let's go to
policy and object. It will do create
new and renamed policy and tear yet. Okay. In the uncommunicative face
a which shows me port 2, which is my land interface, which is my one. And we choose odd here. And also here in the services, I would choose all.
Okay, perfect. But here in the policy, we can't see any
any option for lot. So we can't enable not. It is no option for lot. Like we say, there is no
option for a lot here, which is the old policy
we can't enable, not from the policy. It will just do. Okay. So to enable not we need
to deal with from the CLI. So I will go back to the CLI. Here we'll do config,
firewall, ip, pull it, and they
rename it port 3. Then I will set type and
they will choose overload. Okay? Then I will do sit, start IP and they will
give it the IP address, which we fix it before. We added the before. And the way we did sit and IP and a, we repeated the IP address. And they will look at. So to show you this IP, this is IP that we give it here. Here it is. This IPR. Okay? Now, we need to go back to the policy, config
firewall policy. Idiot. And the idea
of the policy is one. Then you will do
sit, not enable, then sit IP port enabled, then sit IP port. Poor name, rename it or
name it, portray DNA. We need to choose portray. Dna, will DID and perfect. Now let's try a vacant
being the internet from what my 48-year-old execute. Pink. 8.8.8.8. Perfect. I can't be good. Now let's try to ping
it from our client. It's open a terminal
and let's bring it. No, I can't pin
get y. Let's see. Y. It's the IP address of
the gateway in the client. It's stopped it. And
we'll go to config. Yes, it is the gateway. To give it to 99. As a gateway. It will just save. They will start it again. It's conduct its open
the terminal again. Let's check our gateway. Perfect. Our good
gateway is changed. Notice it's being again. Perfect. Now we can again pink. So to resume, what we
did in this session is here we have our 40 gate
firewall and transparent mode. And introns, introns,
pardon mode. What 40 gate tells us
is we can't enable not. But we did it today. So you are now knowing how to enable not all transparent
mode in case if you needed. Thank you for watching.
25. NAT - IP POOLS: As all lawyer tree the voices, our 40 gauge firewall
can also do or not. So not or network
address translation. Here, our internal IPs, Joe translated to our public IP. So the conserve and GeoNet. So in our 40 great firewall, we have four type of a not. So let's see how to
configure them on. Now to configure not
on 40 gate, fair. All we need to go to
policy and objects. And from here we'll
go to IP Pools. Then we will go and create new. And here we can see that
we have four types. We have overload. We have one-to-one, and we have fixed port range. Then we have port
block allocation. So let's see what's
overload type mean. So overload tape is a pot. By pot I mean port
address translation. So in overload the type, we can have only one
public IP in our network, and we can do a translation for all our internal IPs by port. So if we have an internal IP, it can be translated to our
public IP using a port. So don't worry, we will configure it and we
will see how it works. Okay? So we're in name. I will type over load. And here in external IP, others, I will type my one IP address, which is 192 dot 168, dot 112, dot 133. And here, if I have
only one public IP, I can copy it and use it again. Perfect. If I have arranged, for example, if I have two or
four IP, public, IPs, I can put my range
n, for example, 36. If I hover range. In my case
here I have only one IP, so I will repeat it
and they will do okay. Okay, perfect. Now to use it, we need to go to our
firewall policy. And here in our Internet policy, you will do it, it didn't. We will go to the section. And here we will do
use dynamic IP port. We will not use the
object oriented phase. We will do use dynamic IP port. And from here we will choose our IP pool that we
have just created, which is overload.
Okay, perfect. Then we will do okay, perfect. Now let's go back to GNS3. Now we're engine is three. I have here my 40 get firewall, and in line I have
my client here, and this is my one. Here it is. So from my clients I will try to ping Internet and they will
see how the translation made. Okay, So you'll go to my client. My client. I would think I think
eight dot-dot-dot eight. Those eight occupy perfect. Now if I go to my 40 gateway
award from CLI and Ada edge, this compound here, GET session. Session. Yes. And they will do a pipe
then grip ICMP because ADA, the pink, so ping, it's amazing. P.ball DNA will DO Enter. I can find here that
my client with IP 192, 168 dot 10 to10 use
this port here. This is the
anticlinal port, a 3, 4, 5 to communicate
with our public IP, which is 192 dot 168 dot 112 daughter 132 with
this port here, port. And the destination
lot is our H dot, dot h, which is Google DNS. Okay? And this is a number 8, it says the number of the
protocol, which is ICMP. It is, It's mean
that we use ICMP. Okay, Now from the graphical
interface to see it, we need to go to Dashboard, then 40 view sessions. And we can see it
from your editors. This is our
translation leverages. Okay, perfect. Now every, every internal IP can
use a different pore. So if we are, for example, another client in
our network here, we'll use a different pore, then, then this part here. Okay, Now let's see
the other type of mud. So we will go to
policy and object, and we will go to IP Pools. And they will do create new. And other port is one-to-one. So one-to-one, not, is static. Not mean that every internal IP need to have an
external public IP. So if we have, for example,
three internal IPs, we need to have also trip
public IPs or otherwise. If we have only one
public IP and we have three clients in
our internal network, only one client can
use our public IP. If a finished, the
other clients can use also the public
IP and so on. So it's not recommended
to do that. So I prefer to do overload. But if you have, if you want to assign a public IP
to your client, you can use one-to-one
if you have a, if you have a big
range of public IPs. So let's try it. I will do one to one. Okay? And here we'll type
also my public IP. Okay? Okay, I need to, I need
to remove the overload because there is a
conflict in the addresses. I need to remove it first from my policy so I can delete it. Okay. I will go to my policy
and they will do in it. And here I will use or I will, I will change on it. It will not touch my policy. It will just change the type
of overload to one-to-one. Here it is. So perfect. I will do okay. So if I go to all
my firewall policy, okay, and here, here
it is, the poll. Let me change this name, also. Change it to one. To one. And it will do OK. Ok. Ok. Perfect. Now if I go back to my client and the pink again, I can see it being just a thing. I can see if I run
the command again. Here it is. I can see that we chose different ports,
which is the pore. And you choose the same
pour in our public IP. You see it's the same pore. That's why I said that you need to have
multiple public IPs. So for example, if I had
a client in my network, let me first say stopped pink. Okay. I will add another client here. It's other, another client. I will drag and drop a switch. And they will drag a VPC. The effect. Now let's
link it back. Okay? Now I will go to my VPC and
they will do it, It's config. And they will enable DHCP. And they will do a save. Then I will start it. It will go back to my client and they will run
the pink again, which is the thing sorted. Say firstly, the internal
IP of my client. Here it is, This is 20, okay? Now it's being again. Now, I will go to
my client that they will answer to it to make VPC. Now this is IP that he
talks the talk to anyone. So let's try to ping from it. Here it tells you
you can spin up because our public IP is busy, is visit with our client. So let's go back and
extend the range. We will go back to our IP poll. Okay? And they will do it. And then I will
extend the range. So instead of
having only one IP. We'll add two to
four to 12 to IPAs. Now please make sure that
you have enough IPs. So we are in a knob, then we can use
whatever IPs we want. But in your case, you need to make
sure that your ISP provides you with a
range of public IP. It will go now, okay? And now I will
back to my client. And they will nest
thing again here. And a we launched
being also in the VPC. Okay, like we said here, the torque lions
can think internet. If we have another client here, we can't access to
Internet because the two public IPs are busy with our array took lines
here. Okay, perfect. So now let's see the other type. So the third type is fixed. It bought range. Now we're
in fixed port range. He allow us to specify the public range and
also until tonal range. So for example, if we have
those two i2 is here, he allow us to specify
what's until now IP range that can use
this public range here. So for example, I will do 1821681101 to 182 dot 168 dot 10 dot 820. So I will exclude the
my my my client here. So when I test, I should only have
internet access in my client here because
it is within the range. Okay? This is the IP of my client
is within the range. But my client here, this is your IP, so
is algebra my range. Okay? It's just for the test. Ok. And they will do, Let
me change is a name first. Here we name it, fix it, port, range. Okay,
and they will do. Okay. Now I need to
go to my pulley C here, then edit. Okay? My API port is already
taken by the policy. Okay, then we will do okay. Now we will first
go to dashboard and sessions to make sure
that there is no session. And we can see that
there is a citizen here and we will end it. Okay? We need to end our sessions. Perfect. Now I will go
back and pink from here. And like we see, we can ping. So if I go to my VPC client with the IP to anyone that
sit out for the range, I should not pink. And that's it.
Like I can't pink. So I hope that's clear. Now we will go to
see our final type. Okay. I will go back to
my policy on the object. Then it will go to
a people's. Okay. And here we will see
port block allocation, which is the last type of a not. So where important
block allocation, It's a tie plates like
the overload type. It's also a pot by putting him in port
address translation. But here import
block allocation, they allow us to determine or to specify how much port
can or user use. So for example, here
in the block size, the block size mean how many
ports can our user use? And the air in the
blocks per user, it's mean how many
block week or we want to give to a user. So for example, to find out how many ports can
a user phi use, we need to multiple
128 with the eight, and we can find how many
ports our user can use. So I hope that makes sense. So again, Block says
mean how many port. So here we have 128 pore
and we have eight blocks. So each rock or blocks
have within it 128 bar. So our user will use 128,
pour multiple eight. Does, those are the ports
that our user can use. So I will do AKI. So that's it for the not I hope
that makes sense for you. If you have any question, please don't hesitate to ask me. So thank you for watching.
26. Destination Nat - Port Forwarding: Hi. In this video we will talk about the CNOT or what
Fortinet called VIP. So d naught is the initial not. And we use d naught job, publish our internal server to be accessible
from the Internet. So let me explain to you my topology where I
Javier my 40 gate firewall and I have here my internal web server with
Apache server and started. And I use this Roger here as
a simulation of internet. And I have here my client. So let's suppose that this
client here is connected from our internet and you want to
access to our server here. So let's see how to publish
this server so our clients can access so it So let
me access to my admin. Perfect. Fifth
scene we need to do is to go into
network until faces. And to make sure that we have a static IP address
in our one interface. This is our one on
GFS and this is our sludge IP
perfect, we have it. Next thing we need to do
is go into a policy on the object virtual IP. This is our VIP object. We will do create
new virtual IP. We can give it a name and
we will name it web server. You can name it whatever
you want here in until phase a will choose port tool, which is my one interface
here in external IP address. I need to type the IP address of this
part here, this IPR. Okay? Here in my IP address, I need to put the
locum IP of my server. So let's see what is the
local IP of my silver. This is it. So I
will put it here. Okay. The next step we have to do is to go
to a firewall policy, Create New, and we'll
give it a name. Okay? So since we
are trying to access our internal web server
from external network, we need to choose in the
on-camera interface, our one until phase, and in object oriented phase. And we will choose our
line perfect inserts. We will choose all
in the destination. And here I want you to make
sure that you selected the web server here that we just created in
the virtual IP. That's what we need
to choose here. Okay? And services. Since we are using
Apache server, I will use a Sharpie. Okay. We need to make
sure to deceive and not, like I said, we
are already up at our internal server to
our external IP address. So knowing no need for using
not so we are disabling it. I will log all the traffic. Okay? The policy is enabled,
I will choose, Okay, perfect.
Policy is created. Now. Now I will go back we do to our server and they will tell
you what a didn't own it. So what I've done here is I
created a did Apache epidays. And the other thing I did is installing our Apache server. The comment is Apache, OnStar. Apache. So I've
already installed it. The second thing I did
is I started wide. Come on there. It
may find command. This is the command
that I started with. So because I'm using
a Docker Machine, I need to get started
with this common there. So to check if my web
server is started, I reduced, come on, need, sate. Perfect. I see that my Apache server is started
and this is his spot. Now I will try to
access so it from my Udemy and web browser
via its local IP address. This IP layer.
Perfect I can access so it now what I want to do is to access so
it from my client, which is seated in Internet. So I will access my client. I will type pair the
external IP of my 40 gate. And perfect I can access so it. Now to check it, I will go
back to my 40 gate firewall and we'll go to dashboard
40 view season sessions. Let me refresh again
this page here. So we can see it in our 40 gate. Perfect, I can see it. This is the IP address
of my 40 gate, IP until the interface. And this is the
part that we use to access our web server. And do we access so
it from this IP, where this IP is
IPO of my client. Let's see if it is
really the client IP. And this is it. It's
our client's IP. Now what I want to see
we do is, for example, if you want to access
our server with the portal different than
the default port, we need to know how to do it. So to do that, we need to use port forwarding. So I will be back to
a policy and object. I will go to Virtual IP. I will go back to my VIP
objects and I will edit it. I would enable port forwarding. And for example, I want to
use for the external port, a port like that. And the internal port is
of course, default port. We will not, we
will not change it. And they will DO okay. I will go back to my client. And I always try to access, so my web server via the new port and I
can't access, saw it.
27. Dynamic Routing: As all layer 3
devices or 40 gate firewall can also
do dynamic login. We is in mode not. So. In this video, we will
see dynamic login. One of the benefits of
dynamic regime is he can fill up our ROCE
enjoyable automatically. So a save us time and effort. And the opposite, we
have started to corrode. In start to corrode,
we can fill up our Roche intelligible
only manually. So in this video, we will see three protocols, RIP, OSPF and BGP. But first, before
starting configuration, let me show you on my topology. Here. In my topology, I have my 40 gate firewall connected directly to my rotor. And the rotor here
have two interfaces. And the Javier, a PC I pointed
to this BC are just true. I'll make this onset
phase goes up because if the anterior face not
connected to any of the wise, it will be saved on even if we run the command no shutdown. And they have this not here, just to administer it. My 40 gate firewall
from my local machine. So I will back to my
40 gate firewall. And let's start with the
first protocol re-up. Now here in the ribbon, we need to make sure to
select the version tool. And here a network, we need to put the network
that we wanted to. We want to redistribute. In our case here, I want to redistribute this network here. So oil will enter the network. So I went back to my
40 gate farewell. And I will type in
network. Okay, perfect. I can add another
network if I want. If I have more than one network, then you will need to go to interfaces and they
will DO create new. Here an anterior face. I will choose my one port, which is connected
directly to my rotor. Now, I want to make
a quick note here. If I enable this option
here, my anterior face, we're only receive
a routine updates and D will not send in. So if you want your interface, so only receive Entente said, enable this option here,
then, okay, perfect. We have some advanced
options here, like the default
metric and timers. Let the default value is like a lake that don't
change the default values. And they will do apply. I need to remove this
and they will do apply. Perfects my sitting
saved successfully. Now let's jump up
to all my rotor. So I will do a config, germinal, then rotor RIP version 2. Then I need to
mention my networks. So I will start
by first network. Okay? And my second network. Those networks here, this
network and this network here. And that's it. Now if I come back to my 40 gate for your wall and go to dashboard. And let me find
routine monitoring. Here it is. Here I
can see a new Enter. Here is my new entry
with the type rib. And it's come from this interface here and
may get away is that, and this is my new
neural network. So now if I try to ping
from my 40 gate firewall, this network here, I
will, can ping it. So let me try to
pick this interface here from my 40 gate firewall. I will open the console. Okay, Execute being 41
dot 141, dot, dot one. And they can ping it. Here it is. Perfect. Now let's see
it. Other protocol. First, I would remove my
previous configuration. So here move this. And it will remove this
and they will apply. Now, let's see. Now in our SPIF, we need to configure
a router ID. I will make it one dot, one dot one dot one. In the aria. I will
let it 0 like that, and they will do okay. And here in networks, I need to type my network
in the one on your face. Okay? And they will do okay. And also in Ontario faces I need to choose my one
and should face. And they will do,
okay. Then apply. Now let's jump up to the
rotor config terminal, then. Rotor or SPIF one, and they will create
a rotor ID for it. So Roger, ID to dot
to dot, dot, dot 0. Then I need to mention
monotone. It works. So I will DO network
and they will give it my first network
with reverse mask. Then I will need to
choose the aria 0. And then I always mentioned
my cyanide network. And that's it, like we see here. Our OSPF is a
finding. Our labor. One dot one dot one dot one, which is my 40 gate firewall. Now if I come back to
my 40 gauge for it away and go to a
row chain monitor. Here. I will find in type OSPF, and they will find
that my network is added in my routing table. So if I try to ping again, my network, I can't
pin get successfully. So that's perfect. Now I need to move my OSPF configuration to go to our last
protocol, which is BGP. And we removed the Roger ID. I will remove the aria first
any tunnel mode network. Then aria, and apply. Now our last Protocol, BGP. Bgp, we need to
configure the local AS I can give it
an ID if I want. Here in the neighbors, I need to give it the IP
address of my gateway, which is the IP of
this interface here. Perfect, Let's go back. Now we're in the IP, I need
to give it my gateway. Ip. In the run mode is I need
to give it that my getaway. As. So I will choose
ten for it also. Then Aki. Here in networks, I will type my one network. Perfect and apply. Now let's see our rotor. So I will do Roger, BGP. And here we need to type our
autonomous system number. So we are in BGP. Unfortunately gate,
we select 10, so we need to type tin also. So I will do a ten. Then I need to
specify the rotor ID. I will do a BGP rotor ID. I will set it to a 0.2.2. Then I will do, I will know Nivre and they
will type my 40 gate, one IP address, which is two, then the remote is also 10. Then I need to type my networks. Network. 41141 dot one dot 0, and the mask is okay. Then I need to type
my second network. Okay, Perfect. Then, and we see here that our VGP labor
is up. Now let's see. Our 40 gate for all
are watching tele MER. And we'll go to
dashboard, Rajan monitor. And here in Roche and monitor, I can see N-type
my BGP protocol. And I can see that we show me my other network. Here it is. Now if I try to ping it, if they do execute pink and I type Enter, I can successfully being good. So that, that's how
to configure dynamic. And unfortunately, award,
thank you for watching.
28. Static Routes: When we talked about
dynamic login, we said that difference visually and dynamic
login and splotchy color, which is in dynamic routine, our routing table is
filling up automatically. But when we talk
about static route, we said that we need to feed
our routing table manually. But that doesn't mean that we
don't use start to corrode because we see a near to set up and configure static routes. For example, if we
have a small network, we see the sludge growth
and to access to Internet, we use although sludge growth. So in this example here, I have my 40 gate
fair year and they will configure data structure
towards the Internet. So I will go to
network until faces. Here. This is my port 3, which is going to
directly draw my network. This is your IP. And to
get away of this subnet where it's 112 dot one. So I will configure
the sludge you co-wrote with the
good giveaway here. Okay, I will go to study
corrodes, create new. So since we are going to internet and indicates way I will type my
gateway IP address. In the interface I need
to choose portray. And okay, perfect. Now let's see if we
can ping Internet. I will open a console. Okay. We will try
to pink on turn it. Okay, it can't pink Internet. It seems that our gateway, it's not a 0.1.2. And Okay, now let's, let's try to ping again. Perfect. Now we can
pick on internet. Now I would see with your another sludge storage
configuration. Let me go back to my topology. Here. I have this network here, and they helped
me get away here. This is my, My Gateway. I will create a sludge
storage firewall to reach this network here
using this interface, this interface IP As a gateway. So follow up midway. I will do it from CLI. I will open my console. I said before, do that, let's try to ping this network. I will try to execute pink. The network is literally the
right tool. This is network. Okay? I will try
to ping it. Okay? And it seems that
I can't reach it. Now let's see how to configure the sludge growth to
reach this network here, I will do config rotor static. And they will see what throat
sludgy colors that we have. So we have one root. So I will do idiot
and a wildtype, a different idea than one
I will choose to deny. We'll do sit, destination. And the destination, I will type my network that
I want to reach. Okay? Now into gateway. Any to type my
address, my getaway, others, which is this IP here. The IP of this interface here, like I said, the IP of
this interface here. Perfect. Now in the port, I'm connected to port 1, okay? It's bought one, sit
device, port one. And I will do, and then I
will try to ping it again. Okay? And they can pick it now. So this is ultra configured sludge growth on 40
gauge for our world. Thank you for watching.
29. AntiVirus Profile: In this section, we will
see security profiles. Before starting configuration
of security profiles. I will make a quick note here, like we see here in the licenses tab here,
in this widget here. We need to have licenses
for antivirus and IPS and web filtering and all
the secretory profiles in order for them
to work for us. Right now, I don't have a
license because I'm using the Fourier license
or 40 gateway VM. But that's where not prevent us from seeing and
how to configure it. Perfect. No, I will jump up to the
security profiles here. And the first profile
we have is onto virus. So what is an anti virus? A virus is a total
variance of viruses. Senior data is used to
identify malicious code. We know under our network onto your virus engine to find them. Much of his senior in the
database, if he founded, the file will be considered as a virus and the firewall
will apply the action that you would define my blockage or let it pass
or here we just monitor it. Those are the options
that we have and we will see them in
the configuration. Now in order to detect the
virus 40 guide for our water, use, a tourist
Kanien techniques. And first is contact Nick
is Andrea virus scanning. And discount is the default data for sugar juice because
it's the first SOA. Because you only
try to find the, the senior editor of the
fly's onto our network, the database. That's it. That's what Andre
virus can't do. The second scan that we
have is grey water scan. And this can detect is unsolicited programs that have been started without
the user knowledge. For example, some programs
have inside them, another program that run in the background and we
didn't be aware of them. So the dangerous of those programs is that
he may be a backdoor or him or use your BC to do a malicious didn't like my Indian or use it as a botnet. Yeah, that's that's what
gory where moon 40 gates where one is able to scan files that are very
aware and block them. Perfect. Now, for the tear, the scan method is heuristic scan and discount is based on
probability detection. So because he using
probability that increase the possibility of false positive,
that's me in here, my consider legit him
file as a virus and the blockage or apply
the oxygen that you define what the
power of the scan is that he is able to detect the virus has and what zero-day viruses
mean is new viruses. Delta dare Sunyata is
not in the database yet. So basically there are
new and the firewall know nothing about them and their signature is
not in the database. So that's the power
of a heuristic scan. But in order to get
to Dr much security, we need to know that we use more resources
in our 40 gate. That's me and performance. Now, we know the three
scanning techniques that fortunate gay to use. Let's see how to configure them for the antivirus scanning, its default scan, it's already
configured for great way. Under juristic scan, we need
to configure them from CLI. There is no way to configure them from
the graphical interface. So we will go to see it. I configured first gray where we will do config
onto virus sitting. Then we will do sit
gray where enabled. And that's it. Now, great. Where is in arid? While we are in the
antivirus settings, I will just tell you a
quick information here. Like I said before, I
onto virus is a database. So 40 gates where wall us
database, so much worse, signatures for ticket fare will use two types of database. The first database
name is extended. This database hub, the recent Sunyata is offered
recently detected viruses. So it's half the
new senior judges of the new awarenesses and also have the signature of viruses that are
no longer active. The second database that we have extreme these
data, whereas hub, the seniors are
often known viruses also have the Sunyata or off viruses that targeted
legacy operating systems that are no longer use it. So basically in high
security environment, we can use extreme
database and to use it, we will need to tape
it following command, Sit, use extreme database
and we will do enable. And that's it. Please make a note to data, not all 40 gates module
have the extreme database. So please make sure that
your model supported, then type end to apply. And that's it. Now let's see how to
configure the sticker. It's gone. So we will do config onto
virus. He always stick. Then sit mode. Here. We have two modes. We have bus and the
block in pulse mode. Do you say her
neighborhood heuristics gone but detected
files opposite. But fortunately,
the firewall will leave a log message for
the detected flight. And of course for block mode here will block the 5s detected. So obviously we will
do a block and end. Perfect. Now we are inhibited. The three scanning techniques
that fourth year ago. Nobody to jump up to
the configuration. I will close the CLI. Here we have my default
to default profiles. Not use them. I would
create my own profile. Rename it custom
calcium onto virus. You can leave a
comment if I want. And here in detect viruses, this is the auctions
that we have. We have block and monitor. If you want to only monitor, you can show us monitor, but I will chose block in the future since we have
flow-based and the proxy based, we will see for now
flow waste and they will see approximators
after that. Here we have
AND-split protocols. Those are the protocols that the regulatory aspect
to detect viruses. So I would enable HTTP, SMTP and pop three and M up. If you are using FTP, choose FTP or zone. If you are a chair and fires
the way the Windows system, you can enable it or zone
you can enable it shifts. Perfect. Now in the protection
options here, we'll have this option here. If you are using emails, it's better to enable it. We have included mobile
malware protection. It's enabled by default. So one important Chen is here in the
algebraic prevention. We need to enable us 40 guide algebraic
prevention database so that we can use the benefits
from the database or 40 gates if people forget
to enable this option. So please don't forget it. Because if we forget it, we
will not use the database. And all these configuration
here is min login. We have very little
warning message that tells us that we
don't have an essence. Yeah, I will do. Okay. Now we have our profile, true. Now the profile is created. It is not applied yet. To apply it, we need to go
to the policy and object. And here in firewall policy, we already have a
Antonius policy. I will go down here to the security profiles and here in security
profiles in onto virus. I will enable it. And I will
choose my custom profile, and they will do okay. That's it. Here it is. Now we have onto a
virus in our policy. Now the profile is activated. Go back to the
security profiles onto virus, cause some antivirus. And let's see now, the
proxy buys because what's the difference between a
flow-based and peroxidase is in proxy based. We have more options
to configure budget. In flow-based. We have speed. In proxy based, we
have more security. When we enabled proxy ways, we might notice some
latency in the network, but it's mean that
we are more secure. I will chose proxy based. Here. When we chose it,
we can see that a new protocol is added here. In APA, it's a Microsoft
protocol of message1 like SMTP. Inhibit. Perfect. Here we can
see that another option here that added its content
does arm and reconstruction. And basically our future du is remove the
activity content such as hyperlinks and
embedded media as macros and so on without affecting the integrity
of the textContent. But the limitation of
this future is that it's only apply or
Microsoft documents. So if we have any other documents that rather
than Microsoft documents, it will not work. Perfect. I prefer to enable it. Here another option shows
when we inhibit that, see that if an error occurs
when the original flyer, the transmitted, what's
the firewall need to do? Here? The port discord and other things that we have
is fight quarantine. Please make sure not to fall quarantining when
work only if 40 gate of storage on it or if you are using 4040 gateway firewall, you can benefit from
five-carbon chain. Otherwise, it will
not work for you. Another option is 40 sandbox. We can send that five to 40
sandbox if an error occurs. Okay. I will leave it discard
or quarantine if I have a hard drive in
my 40 gateway or what? Yeah. And that's it. That's the option that we have. Now I will do. Okay. Now let's go to the policy. Here in firewall policy, I would eat it may policy because I chose in the
custom anti-virus profile, I chose it too will
be on proxy based. I need also in the
inspection mode of the policy to be approximates. That's an important Chen. And yet in the SSL inspection, I needed to change it
to deep inspection because we need to inspect
although encrypted traffic. So we needed to make
sure that we are using deep inspection
and we will do okay. No. Because like I said, we chose a deep inspection. We need to download the
40 gates railroad that use for deep inspection
to onStart it in the our clients because
40 gateway firewall self-signed certificate and
self-signed certificate to show errors in the
browser offered the clients. If you are using
another certificate signed by unknown or majority, were not, have a problem. But if you are not, we need
to download certificate. So to do that, we need to
go to security profiles. Here in the SSL inspection. We need to go to the profile
deep inspection and view it. From here we have
the certificate. Here it is. We can download it. Perfect. And on started in the
client's browser. Okay, perfect. So I
will need to show one last ten decision is how to update the
database of antiviruses. So we'd go to a
system and 40 guard. Here, unfortunate
guard, scroll down. And here in 40 guard epidays, we need to enable,
accept push updates. They're fixed and weaker and
also the schedule for it. While we can disable it. If you want to do a schedule, you can enable it back
and you can do it every hour or daily, or weekly. So this is the options that you have and please make
sure that it onto virus epidemic for
the database will not work if you are not
applying profiled in a policy. If you don't have let me
go back to the policy. We are in, the firewall policy. If we don't have any
policy onto virus profile, the epidemic will not be done. So that's it for
anti-virus profile. I hope that you like it, please. If you have any questions, don't hesitate to ask
me. And good luck.
30. Web Filter : Second, security
profile is web virtual. Before start to
configuration of web filter, we need first journal, which is web filter. So basically in short, we filter is a technology that she's used to prevent users from viewing certain
URLs or websites. Now we need to know why
we use with filter. There are many reasons
to use warfarin, including to preserve
employee productivity. For example, in a
work environment, the employee should
not pass their time. For example, browsing
social media or your kid. Using web filter, we can
prevent them from wasting their working quality time and doing stuff
rather than working, like I said, the
browsing social networks and YouTube and stuff like that. The other reason that
I mentioned here is prevent children from viewing inappropriate
materials and more. So that was our brief
introduction to work better. Now let's see the configuration. I will go to the profile. And we can see that we have three default profiles
that are already created. Again, I will not use
the default profiles. I were to create my own profile, so I will do create new. Here. I will give it a name and
we name it custom web. You can name it
whatever name you want. You can leave a comment. Okay, Perfect. And here as the
anti-virus profile we have also in the future set we have flow-based
and proxy based. We will see an R
configuration of flow-based, and then we will see
the proxy based. First setting that I want you to enable is 40 guard
because you've already based on the branch in here warning because we don't have license, but it does. Okay. No problem. So here we can find all the
categories that 40 gate in his database of weight for trend in each category
have a subcategory. In each subcategory
have websites and URLs that belongs
to this category. For example, if we find
social networking, we will find on Facebook, Twitter and stuff like that, all the social networks. So we can either apply the actions that we want in
the wall category like that. We can select the category
and right-click on it and choose the
action that we want. Like we see here, we have
five oxygens, we have a low. That means that all the websites and urea is belongs to
this category will pass. Perfect. And here we have monitor, monitor also a low or the websites and the URL that's belonged to
a discussion board, Rachael pass, but it logs the
traffic, it will log them. And here we have
block and the block blocking the traffic that's belongs to detail
to this category. And here we have a warning.
What's the warning mean? It's a conformation. When we apply the warning
Oxygen tool October category, if a user try to browse our website that you belong
to this category for Seagate where open
before open the website for him here will show him a warning and you
will ask him if he wanted to really access
this website or not. The user needs to confirm that he wants to
access this website, then he can access to it. And of course here
we have authenticate and authenticate
mean that we can use users and assign them here to our group and
use the group peer. And only the users assigning toward this category go and
have access to access to it. If we didn't mention our user. Here, he will not be able to access the website
in this category. I hope that the oxygens
are clear for you. Please, if you have
any questions in the auctions and if you want more details,
please contact Sydney. I tell you all about them. This is the categories. One more thing that
I want to tell you. If you want to make
sure that you are selecting the white
category for our website. Or if you want to check this websites to which
category is belonged, you will need to go to Google. And you will need to type 40, guard 40, God, dinner. Web filter lookup. Lookup. This is the
first site on Toto it. Here in search URL. Here you will type your URL. For example, I will
type face book.com, and it will search. The inherited branch
has the category, which is social networking.
This is the category. Now let's scroll down. Here we have an important future that we have in the profile, which is a low users to
override a block of categories. What does mean is
if we, for example, child obviously in block, if we block it, we
can scroll down here. And in the override block
at categories here, we can choose a group
that have the permission to access the websites that's
belonged to this category, even if it's blocked, but all the other users were not to be able to
access the website. Okay, perfect. We have the appropriate name, the prophet named mean
that we need to assign here the profile
that we have on it. This category here allowed. For example, the
default profile, how this category here allow
it, so I will choose it. Or you can create another
profile if you want. That's it. You can apply it to users
or user group or by IP. You can choose the IP.
You can configure them. Like I said that asked
me in the water in here. It will ask you if you really want to access
their websites or not. Even if it's blocked here, if it's blocked, you are
able to override it. He would ask you
again if you are really wanted to access
this website or not. Otherwise, you can choose. The user will open the website
automatically for you, even if it's blocked without showing you any confirmation
page or notching. But if we see here the print as a warning that do
you as our selector, there must be included in the source for the
firewall policy. In the firewall policy
that we will apply on it. The profile we need to enable and add this grew up
here to the source. I will show you that
after we finish from creating the profile. Here we have schedule. The schedule will mean
that how much time the doors you have the permission to
override the category. So you can't prevent it. Category area all the time. There is a schedule.
Well, you can definitely buy days or hours
or even minutes. That's what we have
here in the override. The next sick we
have is the filter. And first option that we have
is blocked on valid URLs. So we can block on
what to do it is that are no longer work in. Here. We have eroded filter. Filter. We can override, override what we have
here in the category. For example, let me, let me find the social networking which
will make sense for you. I will try to find a
social network in. Here it is. For example, I am in an office and I
want all the employer there to not use
social networking, then I will do block for
them. I'll keep perfect. But I want them to only
access Twitter, for example. I will block all
the websites that are in the social
network category, and I want only
Twitter to be allowed. So I will go here and
enable URL filter. And I will do a Create New. And here I will type the
domain, which is twitter.com. They are in the action. I will do a low and instead use or you need to
make sure that it's enabled. And they will do okay, perfect. Now all the websites
that's belonged to social network will be blocked, but Twitter will be a load. Yeah, that's it. Here in this option here, we have block malicious URLs
discovered by 47 bucks. So this sitting near the osteo, configured a 40 sandbox. If you have a 40 sandbox, It's better to enable it. If not, you can disable it. And here we have an important future
which is content filter. Content filter is used to
block access to a website containing specific words
or pattern. For example. What I mean by specific
words or pattern. For example, if we have a state that his name is
Uriel container, for example, orange 123.com. Let's pretend that this
is a real website. And there is another website, the name Orange 12345, and another website that I
have the name orange 123456. And we want to block
all the three websites, or we want to block all
the websites that have in the URL name Orange. What are we going
to do is go into content filter air
concentration here, and we will enable it. And here we will do create new. And here in the pattern, we would name it orange. We will do Okey. That's it. All your data in their name will be blocked
and little mediated. If you notice here we
have two pattern type. We have wild God and we
are regarded expression. So for wildcard,
like I said before, he can, we can use it when
we want to block one word. Like I said, what we
want to block a text. The example here that I
did here with orange. And the regular expression is the exact same
thing as wildcard, but the only difference is
in the special character. Let me explain what
I mean by that. For example, if we want to, if we type here after orange
on a series like that. And we did the domain. For example, in.com. What's this osteitis? Me and in wildcard is that we, when we put it here, that we don't know what's
come after orange, like a Cheerio hair. There is 12 or three, and in this example air to five and this
example here to sex. We don't know what it is
exactly after orange. So that's why we put
the osteitis care. But in regular expression, what the asterisk mean is that not like the
wildcard and butter, it means that this word here, we don't know how many
times it's repeated. For example, we
don't know if it is only one or two or three. That says the difference between wildcard under
regular expression. I hope that it makes
sense for you. It would cancel. Let's keep moving. Here we have reaching
options and in the region options we have a low websites when a
writer an error occurs, I would enable it and
I will explain to you, right in after that. I will enable also rights era is by domain and IP address. That's increase the chance
of scanning the URL by his new IP or by its
domain to use the Pen tool. Here in the last section here
we have proxy options and the network HTTP, post action. And default oxygen is a low. Basically what that
means is when we want to upload the file to our
website, which will allow us, if we did block here, will prevent us from
uploading files to your website in
the anterior neck. So that's what this
option here mean. Be a credit for the way the
options in the web filtering. I think that the web filter
profile is the most, the big profile that
have most options on it. We will see approximates
they have more options than flow-based via careful with the options in the web filter. I hope that's how
you explain it. Good. Like I said before, please, if you have any questions, don't hesitate to ask me. No way will do okay. And they will explain to you the web rating because
we have it here, is related to the
job you will do, okay, in all four of these
profile to be saved. Now I will go to a web
writing override lake. We see here we have
nothing on it yet. So a will do create
new and water were writing override mean
that he can override it. A category of URL. For example. Let's go
back to the web filter. Here in the custom web. Let us try to find the
shopping category. Here it is. This is shopping category. For example, I want to in shopping category
to what example? Block it. It's blocket. Don't want my opioids will pass their time shopping in the
Internet, so I will block it. They will dorky. Now when I block it and
they apply the profile, I've noticed that
data, for example, the website, Alibaba, is still allowed and the
user can access to it. I need to know why. So you need to know what
to do in this case. The first thing
you need to do is to go here in the
web filter lockup. And let's share Alibaba. Ali Baba. Not come. Like we see here. We cannot use debt is
in category business. It's no longer in the shopping. We see air is in business. So what do you want to do is put it back to
all show up in that. Make it easier for
me to categorize it. So I will go to web raging override and they
will create new. We've typed the domain,
which is Alibaba.com. Here in category, I
will need to find the general anterior is personal and under it we
have shopping category. Me, throw it to find it. Here it is. Okay. So now I put Alibaba shopping
category in our profile. And the width profile here, we have a shopping blocked. So now Alibaba will
be blocked also. Our profile is created. Now we need to apply it. So let's go to pretty sandy
object firewall policy. And here in our policy, we need to apply the profile meet disabled onto virus that we are enabling it in
the previous video. It will enable week filter. I will choose custom width. One thing that I want
to tell your hair, the hair in the SSL inspection before we enabled
content filter. So unconscious filter will work only if we are selected
the air depth as fiction. When we're configuring
security profiles. You will see me a lot to
enabling deep inspection. Because in order to
have better security, our firewall need to decrypt the encrypted traffic to scan it and to know what
action to do to it. I will choose air inspection, deep inspection here
in the SSL inspection. So make sure to choose
deep inspection and don't forget to
download the certificate, like I said before in the
previous video of antivirus. So I show with all the tool, don't load it on from where
you need to install it in. Your browser, will do okay. And that's it. Our profile now is applied. Okay, now let's go back
to the security profiles. Web filter, null. To go and change it from
flow-based to proxy based. Here in the categories, notching will be changed. What you said before,
it stayed same. If you block a category or
the website says belonged to, it will be blocked. You can override it by
enabling me scroll down. By enabling this sitting here. We have another option
to override it. It's from air. It's a web profile override,
but it's the same. It's like we read it from here. Let me show you show
it to your quickening. Here it is. It's DO
create new liquor. We say there is also by user or by using a
range or by source IP, you can block by IP ozone. We hear in user
we can choose one singularly result or
we can choose a group. Gets the group. And we can choose the original profile that is applied in the policy. Which is custom. New profile. We need to put the profile that the category
that we have here, blocking we wanted to our
user to access to it. We can make it here allowed. So here in this category, for example, social
networking is blocked. And in this category air
social networking is allowed. Here. The schedule, when does
override here will be expired. And we need to make
sure that it's enabled. One thing that I
forgot to before is in the override the print as a warning that said that we need to choose the
user into policy. So let me go back to the
policy here in a minute. On here in source. We need to go to USL, and here we need to
choose our user. We need to make sure
that you had selected. And we will do Okay. I'm using now the guest user grew up because that's what
I have in my firewall. Now, in the previous video, I showed you how to integrate
LDAP server on port users from n. So you can use your users if you
have a new observer. If not, you can create
user manually from user add onto education here
in the user definition. Now let me go back to my
profile, custom profile it. And let's choose
proxy based again. And let's see what's added. Any new future that
other than when we choose proxy based will
be shown like that. You will see an icon like that. Here we have the
category uses quartile. So I will do Create New. And here in the category, I need to choose the category
that I want to apply to it. If we notice here, we don't have all
the categories. Why? Because the CTO only apply on categories
that have auctions, like monitor or warning
or authenticate. Those are the three oxygens
that are cota work on. If you have, for example, block or allow the
cota will not work. You need to make sure that
if you want to use goto, your oxygen in the
category will be monitored or warning
or authenticate. So for example, I
will choose Gamblin. Cota type will be by time
or by traffic controllers. For example, if a user
access are gambling website, you can stay on it. For example, Jane hours,
machine hours is a lot, but yeah, you can
access sewage 14 hours. Please make sure that this
quarter here is by day. So this time here is 24
hours and drop your care. We can choose how many
trophic that you can use. If we chose the
traffic, for example, they would put for
him five megabits. If few years, five megabits, surfing this gambling websites, they're no longer be able to
access the gambling website. So be careful with this
volume. They will do. Okay. And that's it. It's scroll down. Here. We can see that
a new section added, which is search engines. So we are in search engines, we have unforced safe
search on Google, Yahoo being an index. So what's safe search mean is
filter the search results. For example, it will not
show inappropriate chains like alcohols or ***********
or things like that. It's filter the results
of our search and also the unappropriate odds or not to be shown when
we choose Save Search. It's a good option in an environment where
we have shared Darren, I will enable it. And here we can also
do it for YouTube. We can also restrict
YouTube access. Offended the content
on YouTube or not. We will not see it, will enable, it, will keep strict. On here we have
another cold future which is log or search keyword. It would inhibit what this
mean is, for example, if you go to Google and search, for example, for
example, for hurricane. If he search for
hurricane, for example, and if he chose for Hocking
40 gates for example. How can Fortinet those words here will be locked
in our formula again. We can go to the log and we can see them from the web
filter here in the log. And then we can know
which user search this word and we can track it from there.
It's a cool future. Let's scroll down again to
discover the other futures. In the proxy options
we have restrict Google accounts uses
to specific domains. What that mean is, for example, if we want to login
to our website, we can use our Google
account to login to it. It's called IS-IS
all single sign on. So to prevent your users to log using their Google
account to a certain domains, we can add them here. And toward example,
I don't want him to sign in with Google account. The domain orange.com. 43.com suggests an
example, and that's it. Here we have a cool future, which is restrict YouTube
access to specific genres. We can block specific
genres in our network. For example, let's
go to YouTube. Youtube and go to
Chanel, or fortunate. Now we are in China,
are fortunate. What do we want to do is to block access to
this channel rare. Let's go back to our profile
and let's do a Create New. Here. It asked us for shinier ID. So let's go back to the Shannon. Right-click on it and
view page source. Then Control F to search. And let's search channel ID. Let's try to find it. It's the first one, but
yeah, this is better. I can see it now. This is the content of
showing idea will, I will copy this idea here. Copy. Then let's go back to our
profile in channel ID. It would post it. And for example, I rename it Fortinet channel.
They will do okay. And that's it. Fortunate channel will be
blocked in our network. Again, we have a
CP post-election. It's blocked like we did before. And we can also remove Java
applets and remote active X, and also remove the cookie. That's it. That's what we
have in the proxy mode. Now, I will do I will go back to the policy
and in the firewall policy, I would do Edit. And here we have a warning because we use the
flow-based into policy. So don't forget to change it to approximate the warning
gone. We will do. Okay. And that's it. So thank you for watching. And please, if you
have any question, don't hesitate to
send me a message.
31. DNS Filter: Dns filter is ****
security profile that we would see earned. As the name says, it used domain name CSM to
block access to websites. Now, a lot of papers says that DNS filter is similar
to web filter because we filter block
access to websites and Dennis filter
no exact same ten. But today I will show you
the difference between them. So starting with web
filter, like we see, he can block access to
websites based on the URL. For example, we can
block access to a fortunate.com slash images, but we can allow access to
148.com slash pictures. So we have the same URLs
that are under the same IP. But we can allow one
urine and block the other because
fortunate.com is one IP, but the red is different. We have the first
array is slash images, and second array
is slush pictures. But we can block the
first and allow second. In other hand, in Dennis filter, you can block access based
on domain name resolution. Then it's filter
counter block URLs. It will block the world domain. For example, in our case here, it will block 148.com. If we have slush images
and slash pictures, it will block them also. It will know to give
access to slash pictures and block images. It will block the world
domain fortunate.com. So from that, we can
say that web filter give us more granular control
than ten is filtered all. And here I want to add another point that
is dot DNS filter. Use 40 guard DNS to
resolve domain names. So if somehow our Firewall
can't connect to 40 guard DNS, then our profile
will mean nothing. So this is a point
to think about. Now let's see, Dennis
filter configuration will create a new profile. And here I can give it a name, for example, custom DNS. I can leave a comment
if I want to first. Futures that we can see
is redirect botnet, command and control or
requests to block portal. So we already seen botnets in diapers profile.
In our firewall. We have a local database of botnets list that you
download it from 40 guard. So we can use it
to block access to a botnet servers based on
their domain name resolution. So I will enable it. Perfect. On here
we can see that we have 0 domains in the
botnet book package. This is the package
that I told you that he download from 40 guard. He kicked bit locally. And the another
warning here is that the botnet package
epidemic unavailable because onto virus
subscription not found. So in order to use botnet here and to
use the DNS profile, we need to have a
license for antivirus. When we have it and we
don't load the package, we can click on it
and we can see it or the fully qualified domain
names of botnets servers. Perfect. Now I will close it. The next future we have
is unforced Safe Search. And if you remember, we see this future in
web filter profile. So the DNA is safe search is a future that help us
to filter explicit and an appropriate result
from showing or our results in Google,
Bing and usual. So I will inhibit. Perfect. Now let's move on. Here. We can find that
we have some category based filters provided
from 40 guard. We have the choice
to use it or not. So I will keep it enabled. From here, we can choose
the action that we want to put in each subcategory. The main categories
and subcategories. We can show us any
oxygen that we want to set for any categories. Become redirect this
category to block portal and also alcohol
TO blocked portion. You can modify the
action as you want. Perfect. Now I will go down here and static
nomial filter. We have domain filter. It is. So we can override the
categories oxygen here. For example, in businesses here. If we have a low, I can do a redirect
to block portion. And for example, in businesses, like we say and we filter, we have alibaba domain
in business category. So for example, I will
go here and I will type in the domain Alibaba.com. I would keep it simple, and here I will allow it. They will do okay?
So this domain will be a load even if the
business category is blocked. We have here also in the
type regular expression. For example, if I
did here, orange, domains that have in their
name the word orange, there will be
blocked or allowed. You have the choice to use
which oxygen you'll want. The next future we have is
external IP blacklists. If we have a list of IPs of domains that
we want to block, we can audit here. I will go and create a new one. From here I will give it a name. Domains, domains. Here I will enter the URL
where I put my IPs list. For example, HCP 192 dot 168 dot 0 dot slash dot TXT will
disable authentication. We can show our list. Perfect. Now, the next
thing we will see is DNS. Translation needs
to be inhibited. Just create a new translation. First, DNS translation
allow you to translate a resolved IP
address of a domain to another IP address
that you can specify. For example, the website example.com with the IP one
dot dot three and not four. But you want your
internal users, whenever they visit this website to connect tutorial on
internal server with the IP 180 to 168
dot one to ten. Here you can use DNS translation to translate one to
two to three adults, four to 182168 dot one
to ten, like that. Here in the original
destination will put the destination domain IP. Like that. The air, the translated,
then a destination. For example. Here in
the network mask. We will put our mask. They will do okay.
Now let's move on. Here. We have this
option here to allow DNS requests when our
rating error occurs. So you can enable
it if you want. If you remember when
I told you that DNS filter use 40 got DNS, resolve domain names
in case our 40 gates can't connect to 40 got DNS. If we enable this future air, all requests will be a load. And here we have log all
DNS queries and response. So you can enable this
option or leave it disabled. If you enable it, you will have a log of all DNA squared is under response and it will
be a long, long list. So if you are using a forte
analyser or if you have a big storage disk in your forte Great Firewall,
you can enable it. Otherwise, I recommend
you to keep it disabled. So perfect, I will do OK.
Now our profile is created. The next step, of course, is to apply it to a PTC. You'd go to a firewall policies. Here in our Internet policy. I will in every tear, the dentist filter can see
here my custom DNS profile. They will donkey. That's it. This is all for then provide and for security
profiles section, please. If you have any question in
any of the security profiles, please don't hesitate to ask me.
32. Application Control: Still with security
profiles and design, we will see application control. Let's go to Application Control, and now let's know what
application control is. So Application Control detect applications based
on their patterns. Each application has a unique
pattern that electrify it. After the detection,
we can apply different auction to
the application like a low monitor block or
quarantine can also help us to detect
application that consume lots of bandwidth
in our network. We can apply on them
traffic shaping to limit and control their
uses of bandwidth, like oil security profiles. You can see here that there
is some default profiles. But again, we are not
going to use them. So I will create my own profile. Here. I will give it a name. I can leave a comment if I want. The first thing we can
see is categories. Each category of incited
similar applications. Like here in games, we have all the senior
jurors of games. We see if we hover it here, we can see that there is senior jersey wear
those signatures. There are the patterns
that application control use to identify
each application. If we see here, we can see how many application
is in the category. For example, this is the number of applications in the category. And here, besides
the cloud here, this number air me and
how many application is a Cloud-based from
in this category? We have Cloud-based application in this category. So perfect. Now if we go and
press this icon here. Here we can see in
the actions that we can apply to each category. So we can even monitor or
allow or block or quarantine. Now, let's see what is the difference
between each oxygen. For monitor. It's allowing the application to pass and it's live a
log of the application. And for a low, it's only a load
the application, but there is no log for
block itself, of course, blogging and therefore
quarantine it score on chain the IP of the user that you try to access this application
for a certain time. If you want to modify the time, you can press the quarantine and application like
that, we will press it. And here we can see
that we can set a duration from days,
hours, and minutes. Okay, Perfect. That's just sitting there can be can be modified
for each category. So each category can have
a different duration. Here, we can apply an action to all categories,
like we see here. If we click here, Guan Jian, this duration here
will be applied to all the categories.
Let's scroll down. And here we can find network
protocol enforcement. If we inhibit, you
can see that we can create a protocol
and enforcement. What protocol enforcement
mean is that he can allow us to configure
network services like HTP, HTTP, HTTPS, and so on to block application that use
no default port. For example, if we go here and unforced protocols
and we choose FTP. Normally FTP work on port 21. But if we have an application
that use another port rather than to anyone and
use FTP, for example, 2121. We want to block this
application here because we want only to
allow default ports. So we will do block here
and we will chose block, and we will do okay. I hope that it makes
sense for you. Again. We can set protocols
that we want to block them on ports rather
than their default port. Another example is with HTTP, normally GPUs port 18. And for example, we
have an application in our network that
she was born 1818. And we don't want
it to be allowed, so we will block it like that. If you don't know. What's the ports exactly
that this UP use. You can use Wireshark
to identify it. Okay, Perfect. One thing that I
wanted to mention here is that like
your notches here, we don't have an option
to enable and set. The profile will be on
flow-based or proxy buys, like we see an antivirus and
with furniture and so on. There is no, there is no
sitting there to enable, like I said, flow-based
and approximate used. Why? Because application control use IPS engine to detect patterns. And IPS engine, it
was only flow-based. So that's why the
Application Control don't have an option to enable flow-based or proxy based because it's
used by default, flow-based because it's
based on IPS engine. I hope that this makes sense. I just wanted to clarify that. So let's go on. Here. We have application
and filter override. What's that mean?
Let's go back again. For example here
in remote access, if I block the category
of remote access here, but I want only images
should be allowed. I want all the run mode
application to be blocked, but I want only in
a desktop pass, so I will block it
and they will go here to Application
un-filter overrides. I would create a new profile. I will change the action from
block to allow or monitor. If I want to log, I will do just a low. And I will try to
search in a disk. Perfect, Here it is.
I would say addicted. And they will do okay, perfect. Now, all the remote applications
like we see here in the category or rocked must
only in your desk is a load. Perfect. And here we have some
additional options, like block applications detect on no default ports,
like we see here. We can do with, with network
protocol enforcement. If we enable it here, if we enabled block applications directly
on no default port. For example, there is FTP
here that use port 2121. And he can only allow FTP
that she was born at 21. What do we have another
application that she was TFTP with a different port
and we want it to be passed. Then we can go here
and create new. For example, we can see that the application use port 21111. This is random protocol port. I will choose FTP and a will choose the violation action to monitor the way that will be allowed and a log will
be seated for it. Okay? So this option here will block all the FTP application that use a port or other
than the default port. But here we already make
exemption for this port here. Perfect. We can low on
blogged in its traffic. Yes, we can inhibit. Here we have an important
protocol which is quick. So quick is a Google
protocol is by default blocked
because it use UDP, which is not scanned
by web filtering. That's why is blocked. On here we have
replacement messages for HTTP based applications. So what does mean is that
allowing us to replace blog content with an explanation
for the end-user. So when our end-user access to an application
that it's blocked and explaination page will appear to it that explain to
him that this page is blocked because it's under another category
that it's blocked in our 40 gate firewall. So our user can know that this
application is blocked by the network administrator
if you want it to be allowed or itching that the administrator
have a wrong choice, he can refer to n
and ask him to allow this particular
application that's set for the configuration on the
profile. I will do OK. Now our profile is created. Again. The profile is created
but it's not applied yet. To apply it, we need to go to
the policy firewall policy. Here in our policy. Will digit would
make it flow-based. It works in on flow-based
and proxy based. But we'll put it in flow-based and they will go here to Application Control. And here I can find my
application which is custom. Up. I recommend that you keep
the tip inspection to inspect on encrypted
traffic. They will do. Okay. Perfect. Now our profile is
assigned to the body Z. Now an important
thing that I said before in the beginning
of the video is that application
control or help us to identify application that you
use on lots of bandwidth. To check what application
use a lot of bandwidth. We can go to Dashboard. We can search for
Application Control. Me, find it here. It says 40 view or application. Here, unfortunately
application, we can find application and what category
it's belonged to it. And we can find there
how many sessions this application use and how many bytes in this
application console. From here we can identify
what application news, our bandwidth, and we can apply to await our traffic
shaping provide. In my previous videos, I've created the traffic
shaping and they explain it. But let's see again how to control bandwidth
with application. I would go to a network. We'll go to Paris
and object here. And we'll go to traffic shaper. I will create a new
traffic shaper. I will keep it shared
and a rename it. For example. Five.
You've got whites. They would keep
the traffic high. Bandwidth, five gigabyte. To go into it. You will also put five. I will keep it shared. And they will dorky. Like we see here. It's five megabytes. Now I will go to the
traffic shaping policy, a video create new. For example, I want this
traffic shaping hair to be up to apply to, for
example, YouTube. Rename it YouTube because
I don't want my uploads. If in our environment of work, I don't want my employee to pass the aorta and lots of
their time in your tool. I don't want you to
upload your concern my bandwidth because
it's not necessarily. So we are in source, it will show all I have
are others object. I can define it and
choose it from here. For example, the
others objects off my lawn users. In this solution. We chose all here in services. Also, all inhibit schedule
will choose always. Here in application. I will try to find YouTube. Here it is. I can apply it also
to URL categories. If I'm using web filtering, I can also choose it from here. But here I want to
focus on applications. So I take an example of YouTube. I want to control the
bandwidth that Utah abuse. In action. I would choose Apply cheaper and they are
an outgoing interface. I will choose my 12 phase. In shared shaper would choose
the profile that I create. I didn't create a profile
for Peer IP Shaper. So I will not inhibit
and they will doggy. And that's it. This is out-of-control bandwidth
that our obligation use. So this is all for
application control. I hope that you liked
the video, please. If you have any questions, don't hesitate to ask me.
33. Intrusion Prevention: The next security
profile we have in the list is an intrusion
prevention or IPS. Ips is a technology that
protects your network from cyber criminal
attacks by actively seeking and blocking external
threats before the economy, potentially vulnerable
network devices. So this says what IPS mean. So let's go through it and
let's see what it's like. We see here, we have some default profiles or those profiles have
different configuration. I will not use any of
those default profiles. I will create my own profile, needs to go and create new one. Here we can name it. You put costume. This is just an example, but your unit to put here insignificant name,
like I said before. For example, if you put your
IPS for FTP or a web server, you need to put here a name to know what this profile is for. Okay? You can leave
comments if you want. And second setting we have
here is block malicious URLs. So this future is used
a local militias. You're a database on the
40 gate to detect bad URL. Database contains more than 1 million
URL, will enable it. It's good for your
church will enable. Perfect. And the next step we have is
IPS signatures and filters. So this is the sensor. I will create a new
sensory input sensor here, we need to portray
the signature data, 40 gait, need to
inspect and look for. In the future we have
here is the type. We have BI file to filter. And by signature, if
we do it by filter, and we go through the
filter if we choose here. For example, in operating
system, for example, if we choose new next, it will bring us old signature
that have about Nutanix. But if we go just to signature, we need to manually find
our signatures are done. For example, we will
go here and put Unix. And it will print as the signature is that
you have for Linux. And we need to add
them manually. If we don't want to add
all the signatures bottle, I prefer to choose future. It's a good future
and it's easy to use because it brings us all the signatures
that have for Linux. Here its action,
It's set to default. And the body 40 d
mean that he will use the oxygen that we
find the signature. Because if we find here block, it will block a signature. And there is something else
that their action is bus. Here, we'll let it pass. If you want to override that, a suggestion or tool selected and select
your oxygen hair. For me, I will do a block or I will do
monitor, monitor me. And like I said, the
application controller profile. It means that he will
get to the traffic bus, but you will Live or log for it. I don't have a lessons for IPS. Because of that, I will
just select monitor. Perfect. Here I wanted to
log the traffic. So I will do enable. And here in searches, I will choose Enable. Here, like I said,
we have to filter. So we can filter by target. Is it a client or a server? And by severity, if it is low or medium or
high or critical. Do we have here by
protocols, TCP, FTP, ICMP, and all the protocols we have here by application
like Apache, more z-score and
more applications. That's what we have. Here. I will do cancel.
And let's say the last century we have,
which is botnet. Botnet mean is simply network of computers that is controlled
by a port header, which is the person who operate the botnet
infrastructure. In its spread, either as a payload of a
verse or a Trojan. Dangerous of a botnet
is that it can use your computer to run
attacks like the adults. 40 gate has a database of botnets that you
use to detect them. So it's recommended TO
enabled this future liquids. See here we have three
oxygens, we have disabled. If we have it on disable, it will not block any more
than that connection. And if we select block, it will block connections to both nature
sites and servers. And if we did monitor, again, it will let the connection bus, but it will Live or log. I will do block for it. Lets it. Now we will see some
configuration cases. The first case a will see
video is for example, if we have in our network
clients that use Windows, we want to protect them
from external adducts. What we'll do is to
go here to the name. And again, I told
you that we need to put a significant name. So I will chose Windows. Here, will live the block
malicious URLs enabled, it's a good future. And hearing the IPS signature, I chose the type filter. Again, oxygen I will
not related to default. I will put a block
in the bucket login. I already put enable and
stretches or it's enabled. And here in the future, because I want to project
clients, not servers, I will choose here
client for severity. If I didn't choose any severity, by default, will
choose all of them. So I will leave it empty
and they will not show it here for the protocol. If I didn't choose it also, it will chose all the protocols. What I want to choose, toys benefit The boys. And we can be also more specific and choose for
example, applications. For example. For example,
any Windows application. We don't have a lot
of applications here. Again, because we
don't have a license. If we have our lessons,
we will see a lot of applications where
more applicants, more applications will appear. Here. For example, I will
choose also Mozilla. It will choose exchange, would choose my
squeal and sambar. That's if I want to
be more specific. If I don't want to choose any of those
applications there, again, he would choose
all applications. But it's recommended
to be specific. Why I told you to be
more specific because I pass is using an hour
40 gate resources. And if we split it by default, that's what unpacked our
Portugese performance. Because here we need
to inspect filters, then you can find photos
that he can apply. That's why I told you it
will be more specific. So he can only specter
denuded the first pass. So that's it. Our sons are now is configured and
they will Doggie, I will live the botnet as Block. Perfect. My profile
now is created. Now let's apply it. Let's go to a bullish on the
object and firewall policy. And it's applied to
Antoinette faced policy. This is our policy. Here in security profiles, we can see IPS. And let's apply our profile. Perfect. Now our clients
that use Windows, CSM will be protected
against attacks. Now let's see another
configuration case and design needs to go back to GNS3 to show you on my topology. This is my topology here. I have here my 40 gate, and I have here a web
server that I do for him. This solution not going to be reachable from
the anterior net. Discussed the destination
notch in my previous video, you can come Dr, if you need. So, like I said, again, I configure destination
not for this web server. And he is now reachable
from the internet. And here I have the attackers. So I will create our custom profile for this web server hair to
protect him from attacks. First-gen, I need to
install a web server. So it's a goal and create
a web server here. The first common day we
will type is update. I will update my server. This is. Docker machine install Apache on it. So IPT, perfect, now Apache
is installed. Now let's start it. Because it's, like I said
before a Docker Machine. We will start at Bosch by
using this command here. I will add this argument
here, which is foreground. To run it in the background. I'll keep perfect note to
suggest don't need state Dutch in T. And you
can see here delta, I am listening to port 18. So let's do local host. Perfect. We can see that
we have a web page. This is the default
page of Apache. It's a default web page. Perfect. Now we have a web
server running in our machine. Now let's go to the attacker. The attacker will install a tool to perform and
not to our web server. And this type of attack
is slow HTTP test and this is a type of
a denial of services. So let's see how to install it. I will leave you with those
commands in the file. Please check the resources of this video and you will find the file perfect, started. And this is the
command that we will run to perform the attack. This is it. Let me just change this. The IP of the G0 phase. This is the IP of
the angio phase. This IP hair, this is the
IP of this unshared phase. Said, I do, I did decision
note of this server. We have our brave what IP, but we're gonna access
to it from the onto your net using the public
IP of this antifreeze here. And point us to the private
IP of this web server here. Again, if you want, you can check the
video of the solution. Not for better understanding.
I will take the IP. Now, I will copy it. Before running the attack. Go back to Allah 40
gateway firewall, and let's create
a profile for it. To go to an intrusion
prevention. Go to create new. Here I will name it
web server, IPS. Again, I would enable
block malicious URLs. There I will create new. The introduction I will do
monitor here in packet, and again it will go enable. And here in searches I
will do enable also. Here in the filter.
Because I have a server, I will chose into target server. And this server is
a Unix machine, so we will choose new next. And it's a web server. So I need to choose each GP
and its shape is perfect. Now if we search here in the
signature and the throat, you'll find if we
have the signature of slow HTTP severity,
Let's see if we have it. Perfect. Here it is, We love it. So like I said, we need to be more specific. That's why I chose
those settings here. Now I will do okay. It will enable the botnet check. We can block both net
and they will do okay. Now let's go and
apply this profile. I will go to a firewall policy. And this is the policy allo and external users to access
to our web server. Let us go to security
profile and IPS. They will choose my profile. Name it web server, I pass here it is. Perfect. Now I will do okay. Perfect
profile is applied. Nobody to go to the attacker, machine, one to attack. We can see here that the
server is still running. Now we're lost
services mean that the web server is no
longer reachable. Now, let's go to the firewall and let's check if
we have some logs are not in forward traffic. We can see that we're server. This is the IP of the attacker. And we can see that you've
reached the server. Narrators. Now let's check the log
of intrusion prevention. And like we see here, we have that the
oxygen is detected. We all have that to
detect the slow HTTP or duck. So perfect.
34. File Filter: Now we will see five
filter profile. This is five filter profile. In previous version, it was included with the
web filter profile. It was inside it. So
in previous version, we call the go-to web filter
and configure five filter, but now it has its own
separated profile. So using fire filter
profile allow us to block files BIS central to our firewall based
on their types. For example, if we don't want PDF files to Azure
or live our network, we can do it from flight filter. It's that sample. So let's go and
create a new profile. Here, we can put a
significant name, will do for example, PDF block. For example, if I wanted to
block or PDF files in here, I can leave a comment if I want. And here we have an
important future which is scan archive content. Scan archive content
will allow us to scan archive that have inside them a flight type
that we want to block. So when we enable it, if an archive file, having said that her foil type
that we want to block it, it will be detected
and block it. For example, if
our archive file, having said that a PDF file, this PDF file will be detected and the all archive
file will be blocked. That's what this future though, and it's a good
future to enable. And also in fire filter, we have flow-based
and proxy based. And again, proxy based has more protocols to
aspect than flow-based. We will see the difference
between them later. No, I will jump up to
the rules and they will create a new
role for the name. It will name it. Pdf. Files. Can leave a comment
again if I want. And those are the protocols
that our firewall will inspect to
search for PDF files. Then here we have traffic. The oncoming mean that flies
are entering our network. I would go in mean that files
are leaving our network. And we can select
both Julius's them, but to block files that enter
in and live in our network. And here under match files, we have another future which is password protected only by enabling password
project and only you can block files that are
protected by a password. And normally if a file
I have a password, then it must have inside
it some critical data. And here we should ask
ourselves if we really want those kind of flights
to live our company network. So it's recommended to
enable it if you have files were protected
password before inhibited. Which seed file types, what you have inside it. Those are the five
types that we have. We can see that we have
bought and we have, or for much of
videos and images. And if we enabled
password protected only, we go back to file type. We can see that we have only compressive
flight types like zip, rot and seven z. And we can see also that
we have Microsoft files, microsoft flights, because those are the five that are
supported password. Okay, Perfect. So I will
disable it for now. It's good to enable it
like acidic if your project your files
with password. Now let's go to File
Type and let's block. In action we have
monitored and block again, monitor will allow
the file to pass, but it will live on
log for the event. But block will block
the PDF slides. Okay, perfect. Now let's
see the proxy based. I would choose it and they will go and create
a new profile. And here I can see that I
have two new protocols. Here it says those
protocols there are supported only when we
are using proxy based. I will type a name for it. For example, I will
name it archive. If I want to block
archive files, it will choose all
the protocols here. I can disable some
protocols if I want. I can answer them like that. It's recommended to be
specific in the inspection. Firewall can behave good and the performance of your
firewall will be at its best. So I will put the protocols back because I wanted to
inspect all the protocols. I would enable password
protected only. And I will choose Files type. I will do block, will doggy. Perfect. Now our
profile is created. It will do OK to apply it and we need to
apply it in the policy. So we will go to the
firewall policy. I will go to the
insurance policy. It will edit it here in the inspection mode because I have a role with proxy based, it will enable proxy
based. Don't forget that. And they are
infrared filter will enable be there if block and they are in
the SSL inspection, it's recommended to
use depends fiction. And again, you will have to download certificate and
unsupported in your browser. Do not see any error
in your browser. And we will do Okay, Perfect. Now our profile is created. If you create this profile
and one of your clients, visit our website and try to download the PDF file or try to download or upload a file
with Project password. Firewall will block it and
you will see a log of it in here in Logan under reports
and near infrared filter, you will see log
of the event here. That's it for file future. I hope that you liked
the video, please. If you have any questions, don't hesitate to ask me.
35. LOCAL USERS: 40 gate firewall
control access to our network or sources
by using authentication. And in order to use
authentication, we need first to have users. So we have many types of users. We have local users,
remote users, like is DHAP and the radius, and we have guests users. But in this video, we will see how to
create local users. So to create a user, we need to go to user authentication,
then user definition. And from here we
need to create new. And like we said, we want to create a local user. So I will choose local user. Then next, here in username, I will type my username. So I will choose user1 and
they will give it a password. Perfect. Now I can go next and you will not use
two-factor authentication, so I will do next. Here. I need to make sure that my
account user is enabled. So it's a, it, it is, it is enabled. So I will do submit. Okay, perfect. Now my user is created, but we notice that our user is not assigned
to integral up yet. So we need to create our group
and assign our user to it. So let's go to user groups. So groups grew up in a lot
of users in one group. So if we are, for example, for users that we want them
to access to Internet, we need just to
create one grew up. And we can name it
an Internet and assign all those
for users to it. And we can use our
group in our example, in our policy here, it will show you how to use
it after we create the group. So I recreate mega rope
now and it's name it. Like I said, the Internet. And Internet. And dear in my numbers,
I need to choose my user, which is user 1. If we have other uses, we can choose them
also. Dna will do. Okay, perfect. Now my user is created. I mean my group is created. So now let's see how
to use this user here. So I would go to parties and objects, the firewall policy. And I have a policy
here. Let me expand it. So it's untarnished policy. So if I want my user to
have access to Internet, I need to edit my policy here. If I go to source
and here in user, I will choose my
anterior nitro group, which my user 1 is assigned to. So I will choose it.
Then I will do okay. So by doing that, only authenticated user can
have access to internet. So to just sit and let me
go back to my topology first to explain it
to you. Here it is. I hear my alarm and
here it is my one. And the police
that I've created, it's allowing my lawn to
have access to Internet. Then I've added a user, a user one here. So if this upcoming year one
to connect to the Internet, he in it first to
authenticate, so elitist it. I will show my user admin at node it's trying to go
to, for example, covalent. Okay, We can only access to
Google if we authenticate. So here it is, the
authentication page. Here it is. After I type google.com, he showed me the
authentication page, so I need to enter my
user and password. Okay. Now I can access the
anterior negativities. Now I can search
anytime if a church 14 it is I have access to
internet to check my user air. I need to go back to my 40
gateway toward the end, I need to go to the dashboard. And here I need to find a
firewall user monetary editors. And from here we can
see that our user one, we disappear, which assign it to disaggregate pair is connected to Internet. If we want to own
the conjugate acid, we need to click on it and we can conjugate it if we want. So this is how we
create a user from the graphical interface and the groups also now
area the seaweed. You how to create users
and groups from the CLI. So I will go to
the 40 gate setae. Now, I need to go
to config user. And since we are
creating local users, we need to type Lockean. And here we need to do it. And this is where we
type our username. So I will choose, for example, user to DNA will do set type. This type here mean
authentication method. So I want to draw my user to authenticate with a password, so I will draw password. Okay, then I need to
sit his buzzword. So I will choose, for example, user trial at 1, 2, 3, 4 as a password. Aki DNA will do end. So this is how to create a user. Now let's create a group. Say you will do config user
crop in any today it did. And here I need to
enter the group name. So for example, let's see. I will name it also user
to as the username. So I rename it user two. And here I need to chose
the user, the crop type. So it's firewall here, grew up. It's some local group also. So now I need to chose
this group members. And you will choose user tool. Perfect. And they
will do and perfect. Now if we go back to the
graphical interface, and it will go to user
and authentication. And do we go to a
user definition? Here we can find
our user to that, to recreate from CLI. And if we go to user groups, here we will find our group and the air will
find our user Joe, a member of our group user Joe. So that's it. That's
how to create local NGOs or from the graphical
interface and from CLI. Thank you for watching.
36. LDAP Authentication: Hi. In this video we will see how to integrate it up into
our 40 gate firewood. So in the previous video, we saw how to create
a local users. Much in this video we will
see how to connect to our 40 gate firewall,
your LDAP server, and use our remote users are in our active directory server to authenticate with
40 gate fair award. So let's see first how to connect 40 gates where
award with L-Dopa. So to do that, we need to go to user
and authentication, then go to LDAP servers. Okay? Then we need to do Create New. Here we need to give it a name, for example, my EDI prefix. And here we need to give it
the IP of our LDAP server. So my LDAP server IP is 192
dot 168 dot 10, dot 100. Perfect. This is a Active
Directory or LDAP port. Okay? After that we will go to
type I will draw a regular. And before that we need to go to the common line identifier. And we need to change the CN with In a count. It's some account name prefix. And here we need to
do our domain name. In my case, my
domain name is 40. Okay. Then I will do backslash. New area under my
administrator, user, add, ministry, Reuter, then
is buzzword. Okay. Now let's save our 40 gate can communicate with
our LDAP server. To do that, we need to
do a test connectivity. Perfect, it says successful. So after that we need to
choose our distinguished name. Our distinguished name mean
the tree that we need to use to derive our users grew up. So we need to press Browse. And this is our common
name, this is our DC. It's 40 gate. It's 40 gate. Okay. We chose that and go. Okay. Perfect. Then I will do okay. And that's it. Now we have our 40 gate firewall connected to Octave
directory server. Perfect. Now we can use our Active Directory users to authenticate. So we can either create
our users to connect jaw VPNs or to get access to
any network or services or, and we can also create a new storage has from
our LDAP servers. So we are, we'll see
with your old that first I will see you
how to create user. It will go here and they
will go to use a definition. And you go to create new. Okay? And here I will choose
remote end up user. Then I will do next. Then here I need to choose
my Active Directory. This is it. Perfect? No, I will go. And there we need to choose a girl
from our from our DC. So first let's go back to
our Active Directory server. This is it. This is the IP of the server. Here it is. Dna will go to Active
Directory Users and Computers. Perfect. And the air, let's
create a user. So I recreate, for
example, let's see. I will create 41. This is the first user, 41. Next, it will give
it up buzzword 41. Okay? Then 411234. This
is the password. Okay? Okay. Okay. Next Finish
is create another user. For example, 40 to 42, okay, Next, let's give
it a password. Okay. And finish. Now after we created
those show you is this, we need to assign
them to our grew up. So let's create a group also. You will name it 40 gate. And then I will assign
me tool users to it. Okay. Numbers, add 40. I will choose my tool
users. And okay. Perfect. Now I will back to all
my 40 gauge wire one. And we refresh here.
And here they are. This is my 41 user and
this is my 42 user. So for example, a will
select my 41 user, okay? And you can see it's also
my 42 years or if I want. And then they will
do submit. Perfect. I had no air. There are
my two users are added. Now I can add destroyers or say, or to a group if you want. You can go here and
choose a group. It will do create new. And here I can
choose my users if I want to put them in a group. For example, see
a buildup users. And here in numbers, I can choose my 41 and 42
user, and they will do okay. Now we can use our eldest
users grew up here to authenticate via VPN or to
get access to Internet. And the other option
that we can do to create a business is to create them directly from
the user groups. So to do that, we need
to do create new, who will give it a name? For example, I grew up. And here we need to go to Run modular ops and
we will do add. Here we will choose
our remote server. Perfect. And here we will try to
find our group that we create in the Active
Directory server, which is 40 gate. It's session on it. Here
it says Add and Aki. Now in this group
here, our two users, 41 and 42, are in disagreement. Aki. So automatically we create users and recreate
our grew up in ones. So I hope that makes sense. So I will do okay,
Perfect, Here it is. So now let's see how to create
an administrative user. Okay, It's ago to say
sin administrators. Then we will do a Create
New, then administrator. And here is give it a
name, for example, 40. And in the type we
will chose much all users in a remote
server group, okay? Then we will give IT
administration of profile. I want them to be a
super admin, okay? And here in remote user group. And you chose my Europe, which is our D group. And they will do okay, perfect. Now to just sit, I
will log out from my admin user and we
login with my 41 user, which is located too,
Active Directory server. Then I will give it a password. I will type is password, and they will see
if I can connect. And perfect, and I
successfully login. Okay, later. Okay. Okay. Now, to see it, Here it is, we see that we are
connected with 41 user, which is a L-dopa user. Now if we go to log under
port and we go to events, and then we go to
a system events. Here it is, we can see that
we successfully connected with our user 41. So that's it. This is how to
integrate LDAP server virtual 40 gate and use
remote users to authenticate. Thank you for watching.
37. FSSO: One of the best
authentication methods that I personally prefer in 40
gate is if this is all. So if this is all, is one of the passive
authentication methods. By passive, I mean that
the user don't have to purchase or enter is a username and password
to authenticate. Or what you have to
do is to be already authenticated with his
LDAP server credentials. And that's it. You can access to any
resources in our neutral walk. So let's see how to configure if this is 0 and what
if this is o means? So first, if this is all, is an agent that will be unstated in Active
Directory server. And this agent, we retrieve
our users and credentials, then send them to our
40 gate firewall to verify if the user has permission
to authenticate or not. So let's go to our Active Directory server
and install the agent. Okay. I have here my Windows Server. This is my domain. Now unstyled. The if this is o
Agent, here it is. If this is o Agent
and your own style, it maybe we'll do next. I accept the terms. The next. Next. Here I will login with my
local administrator user. It will put here the
admin password, the next, the next, and then finish. Okay, this is my server, others, this is my Active
Directory server address, and we will do next. This is my DC. I will choose it, you
will select it the next. Okay, this is my three.
This is my domain. It is. And it will do next. The next. Then finish. Okay, perfect. Now let's launch the agent. First thing we need to do is to change the password there. We need to change it
with our own password, so I will give it a possible
there. Okay, we'll do apply. Perfect. Now, you need to make sure that you're fair award or
low dose port here, or you can disable your
firewall completely. But I prefer to go to your Windows Server Firewall in the Windows Server and
allow those poor hair. The port eight hundred
and eight hundred. Okay. Now we have unstyled the agent in our Windows
Server, in our DC. Now let's see the configuration
in our 40 gauge wire or so I will go to
security fabric. I will go to a
fabric connectors. I mean, external connectors. It will create new DNA. Need to find an end points. Here I need to find if this is o Agent on Windows
Active Directory. And we'll choose it. Here,
it will give it a name. So it says, if
this is o 40 here, the IP of my server, and the password that we have changed it when we
installed the agent. Okay. Then okay. Go back. Sutures is
connected. Let me refresh. Here it is. We can see that our 40 gate
firewall using if this is o agent who would rave or the groups that we have in
our Active Directory server. So if I select it and hit Edit, and I go here to users
and groups and 80 view. You can see here
all the groups and users that I have in
my Active Directory. So perfect. Now let's see how to create our user using our
emphasis or Asian. So I will go to user
and authentication, then user groups and create new. Perfect. Now I rename it. If this is o. Group and here in type AND to chose Fortinet single sign-on. Which mean, if this
is all the numbers. If you remember
when we saw how to integrate LDAP server
to our 48 fair war, we've created the users
41 and 42 o user, and we attempt to
name the 40 gate. So I will chose that you
grew up for Seagate. Here it is closed
and okay, perfect. Now I will use this grew up
here in my Internet policy. Before doing that, let's go
back to my VMware machine. And here I have my
Windows 10 machine, which is my Windows 10 machine, and I add it to my domain name. And they login with my user 41. Let me login with it. 40. Okay. Perfect. I'm logged now. Now
let's see if my server, if my machine is
added to my group. Perfect. Here in domain, we see that my machine is
other tumor grew up 40 gate. Perfect. Now from air, Let's
try to access, for example, to Google. Perfect. Now reach the global
effects I can access. So Google, now let's go and
add our group toward policy. Here in firewall policy will automate group
to the policy. And then before that, let
me show you my topology. This is my topology here I have my 40 gate and there
is my Windows Server, which I installed that if
this is o Agent and this is my Windows machine that I've added to my Active Directory. And this is our browser. Yeah, I will just read it. The internet, literally just to try to go to Google
first from here. Perfect. I can go to Google
without any problem. Now, let's go back
to the policy. And here in source, I will choose my group. Here it is. If this is
all enclosed, the Inaki. Now what I said about O is it's a passive, the
authentication method. That's mean that the user
don't have to bow to his a user credentials as long as he is going
back to the already tool, the LDAP server WE Day is an Active Directory credentials, like in my case here, I have gone into the way
the machine windows and now I will try again
to connect to Joe, Joe Bravo's onto
your net and they will see if I still
have access to Internet after I added the
microbe to the policy. So I see that I still
have access to internet. It's just, for example, to search for
Facebook, for example. Face, book. Okay. Perfect. I can search Internet
a perfectly notice. Try to just sit from the other browser that's not connected with
Octave directory. There's a balls in the
air. And just try to find, for example, facebook also. Okay. Now he can't find it. Let's draw a pink
toward the Internet. I weeping, for example, being eight dot-dot-dot eight. So I can't ping it. I get, let's see. I have my IP, which is my IP. And they make huge way, which is my IP. And its wait for it to
print it. Here it is. This is my gateway. So I showed go to Internet. But it can't pin eight dot, dot, dot h, which is a Google DNS. And also I can
browse my Internet. That's because I've added the debugger if this is
Auger up to the policy. But here in my windows sin, I can perfectly search and
browse the internet like I, like, I want, for
example, its shares. Read it. Here it is. I can access
to read it. So that's it. This is auto configured if this is all enforced
against firewall. Thank you for watching.
38. HA: When you are planning to reduce downtime and loss of
services on your network. The first thing you
should think about is a high availability. So in this video we
will talk about each a. So before starting
configuration, the first thing that
you need to make sure of is that you will have same four zeros
firmware version on your 40 gates and
same hardware model. And the anterior
faces of the tool, 40 gates should not be on DHCP. So let's see my topology
ingenious three. So this is a topology
that we will work on. I have here my 40 gate
one at my 40 gate tool. And those are the
management IP here. And this is my LAN subnet. And LAN gateway is the IP of
those two interfaces here. So I didn't configure
this interface here. I just configured this
interface here of my 49 81 because I want
it to be the primary. And here's configuration will be synchronize it with
the other 40 gate. So we'd have the same IP
addresses in the anterior faces. That's why we say that a, the interfaces should
know to be on the ACP. Perfect. And for the management API, those IPL, I will
configure them later. Because like I said, when the configuration
synchronized those interfaces here
will have the same IP. So after the same API, we will configure and
management IP for the HA, so we can manage our
240 gates separately. Okay, perfect. The other
thing that I want to tell you is when we are trying to plug physically the ports, we need to make sure that
we plug same port number. For example, here,
when I try to connect to my four to four
tickets to Internet, I used port 3 in 40 gate, 24340 gateway, and I want
to connect them to my land. I used port 1 and
port one here also. Okay. So let's sit configuration connecting
to 40 gate one. So to configure HA, we need to go to sustain the HA. And here in the model
we have standard law. That's mean that our 40 gate, it's not in HA cluster yet. So if we click it, you can find that we
have Joe others mode. We have octave, octave, and we have active, passive. So in this video we will
see an octave, octave. So for active, active mode, you can receive or traffic. So all the, all the
network traffic received. Why our primary 40 gate then the our primary
40 gate will load balance and the traffic between him and secondary 40 gate in this
case 40 gate to normally, the traffic that accepted
by a policy that not include security profile
will not be a load balance. It that's mean if we have
a traffic that's not pass through policy that
have a security profile. We're not load balancing between our primary 40 gate and
our secondary 40 gate. So the traffic will be handling only by the primary 40 gate. In the active, passive mode, we have one primary 40 gate and the one sound, why 40 gate? So the primary 40 gate
handle or the traffic while the secondary
40 gate son, why? Why chain for the
primary 40 gate to fall? Okay? So I will select
octave, octave. And here in the octave, octave, we have here the vice priority. So this device Bertie, determine which 40 gate
will be the primary. So if I want this 40
gate to be the primary, I will give it a value
higher than 128, so it will give it to a 100. For example, the max is 250. So I will give it a 200, OK, in the group name. And we'll give it,
for example, 40. So you would name it 40
here in the password. We will change it. So I
will take care of password. Okay, here we have
session pickup. So this session pickup
pair allow us to share the session table between the primary 40 gate
and secondary 40 gate. So if in case if our primary 40 gate fed and there is a client already
have a session on it. Decision, we're not be finished and the secondary force you
get will take care of it. Okay, so I hope that
makes sense to you. Okay, here in the hair
attribute interface, we will choose, for example, port nine and 10. So where to be at
the anterior face is used by the protocol. If g, CP, it's mere 40
gauge cluster protocol, that's the protocol of a HA, It's a responsible
of the communication of our cluster in units. That's mean that is responsible for the synchronization of the configuration
and is responsible of the election of the
primary and secondary 48. So here in the
monitor interface, we will choose also
port nine and 10. Let's go and sit same priority for the hair
to create interfaces. So I will try to make it 15, 15 for the Port of
interfaces. Okay, perfect. And then you will know, okay, So let's come back to all
the topology and link the vertebrate interfaces
between our tool 40 gates, ok, support line with
port nine and port 10. With port 10. Perfect. Now I will go to all my 40 to 80 and they will do the
same configuration. So it will go to sustain each a. And here in mode,
I will do octave, octave, and it will keep the
priority, make it tears. Because I wanted to
be the secondary. And here you will type same group name and
same password. Okay? I will choose sessions
pickup enable it. Here in monitor interface. Here we'll choose port
nine and 14 or so. And in the heritability
interface, it will choose port nine and 14. It will sit with the same
priority for the two faces. Okay. 15 and 15. Okay. And they will do okay. We'll
go back to my 40 gate one. And like we see here,
it's synchronize it. But we can see our 40 gate
jaw yet on the cluster. So let me refresh.
Okay, Perfect. Here it is. It's appear here. So he says In Situ, that is out of sync. So we will take some
time to summarize it. We will wait for it. If we refresh now, we will see that
the tool 40 gate, a cluster members
are synchronized. Now, that's mean that the configuration
of our 40 gate one, which is the primary, replicated through
our 40 gate jaw. Now we will see that we lost connection to 40
to 80 because he now don't have this IP
hair because now he is a in management phase. He have the same IP of
our primary 40 gate. So we can only now see
our primary 40 gate. So if we want to manage our 40 gate tool from
our primary 40 again, we need to go to the CLI. And from here we will
execute each a manage. And if EDO a question mark, we will find that the ID of
our secondary 40 gate is one. Then we will enter
our username here. Perfect. It will take me password. And here it is. From 40 gate one, I connected to 40 gate Joe. Now what I want to do is to fix the management
IP to my 40 gate tool. To do that, I would do
config system until phase. And I will go edit port 3, which is my management
and telophase, then a reduced set
management IP, okay? And they will enter
my management API. Okay? And that's it. Okay. If I refresh now, here it is. I can now access my 40 gate
to read management IP, okay, if I type the
username and password. And you can see
that I've added to my 40 gate to marriages
and it is the secondary. So you can either connect to it from CLI via
common, like I said, execute each a mileage and the question mark
to see his ID and tape his username and connect
to it via the CLI mode. Or if you want to connect to
it via graphical interface. You need to set the
management IP like a, like a sitter before. So here it is, I can access
the graphical interface. So one thing that I
want to tell you here is when we have our
active, active mode, the configuration
will be replicated from our primary 40 gate
to our secondary 40 gate, and also from secondary 40
gate to the primary 40 gate. Because we are in octave, octave mode, in Octave passive, only the active firewall configuration replicated
to the secondary. Okay, so let's see an example. If we go in an hour 40 gate, one firewall policy, you can
see that we have no policy. And in our 40 gate tool, although we have no policy. Okay. So I will
create a policy here. In the primary 40 gate. I will name it. And here. Yet in the uncommunicative face, I will choose my line
in the outgoing, you chose my one in
source or destination. They would choose all.
Here in services, you will choose all
and they will do okay. Okay. Perfect. The
policy is created. If you go back to my 40, 80 and a refresh. Okay, let's give it some time
to replicate the policy. Perfect. Here it is. We can see that the
policy appears in the secondary 40 gate. So now let's try to create a now our policy in
our secondary 48. Okay, let's name it for example, line to the z. For example, in the
uncommunicative face, I will choose my line. In algebra oriented phase. Let's choose portal. Make it tears our DNS ID and source. And we'll choose all. This is just an
example to see if the configuration will be replicated to the
primary 40 gate. Okay, we can choose
whatever entries and we want to choose. Okay, Will do okay. Occupy perfect
policy is created. Now let's go to our primary
40 gate and let's refresh. And like we see, the policy
is created and edited. Okay. So go back and check
searches of the each a. Okay, perfect. We can see that all the 40
gates are some chlorinated. So that's it for the HA
thank you for watching.
39. SD-WAN Load Balancing: Is D1 or software defined, one is a virtue year, one until phase that allow us
to manage our one networks. So the one networks
can be landline or broadband or any other
types of networks. In this video, we
will see how to do load balancing using is D1. So first, let me show
you my topology. Okay, this is metal policy here. I have here my 40 gate farewell. And I have here 21 little box. I have first ISP
on the 2.5th ISP. And this is my gateways. Here it is my first gateway
and here's my second getaway. Okay, I have the first
ISP connected directly to portray and I have a second
ice pick ONE to took port 2. So we want to use is the
one to load balance traffic that are coming in from our land near to work toward
our Internet. So the traffic will
be load balanced between our ISPs and ISPs. So let's see how to do it. Okay? First thing we need
to go to network, then is d1 zones. And here we need to create
our virtual one until phase. So we will do a Create New, and here we will do
create T1, so on. Okay? And here in name, and
you will name it is d1. Then I will do, okay. Second TA will do is to
add the zone members. This is all members are
our one until phases. So first thing we
need to do is to add our ISP one interface
and a spiritual here I want to tell you that you need to make sure that
you are not using those interfaces here in any previous
configuration in our 40 get fair or for example, don't use those interfaces here. For example, in a policy. So if you use it in a policy, this interface here will not
appear in the zone members. So please make sure
that you are not using those interfaces
here in any configuration. Okay? I will add my
ISP one on TFA's. It is, this is the IP
of my, my answer phase. And this is made its way. Here it is. This is my gateway. So I will add it here and
we'll take it away here. Okay? And then I will
add second member. It's Porto is the gateway is 192 dot 168 dot 0 dot one. And Okay, now I will go to my ST1 zone and a will
add members to it. Ok, and we'll add my
eyes piece to it. And they will do okay. So perfect. I can see now that my
Zt1 zone turned green. And AC, that's my interfaces
is other to it. Perfect. Now the second thing
we need to do is go into performance SLA. And here in
performance is array, we will do a health check. So what I mean by health
check is we need to check the health of our
tool is d1 members. So in case if one of the phase, our 40 gate firewall will
not send the traffic to it. Okay, so I will name it. Hit Check. And here in the protocol
I will choose pink and a will choose a Google DNS. You can choose
whatever you want. Here we can choose participants. All it's D1 members. That's mean that we choose
our eyes p1 and p2. Or we can specify then you can choose them like that. Okay? Dna will do okay. Perfect. You can see here
our health check is still trying to
check the health of our 20 and interfaces to do
a refresh. Okay, perfect. We can see that it
is working now. Okay. Note seconds till we need to do is to create
a static route. Okay, we'll do create new
and they are in until phase. We will choose our
is D1 until phase, and we will do okay, perfect. Now let's see if our 40 get
fair or have Internet access. Okay, perfect. You can ping to Google DNS. That's okay. Okay. Now. The next thing we
need to do is to create a firewall policy. So we can give internet
access to our LAN network, to access a net AKI. So we're able to co-create new then in the name and
rename it and turn it. And yet in the
uncommunicative phase, I would choose my land in
the outgoing interface, and we chose my T1 and T2
phase here in sources. If I have here object
of my other a second, but for now I will chose
only all in dissemination. It will choose all in service. You chose all. You can lock traffic if I want,
DNA will do okay. Perfect. Now what I want to see
we do is, is d1 roles. So here is the one roads. You can see that we have by
default and implicit role. So this implicit earlier is where we can do
load balancing. So if I select it
and I do it here, we can see that he is doing the load balancing
shows in volume. So it can send 50%
of the traffic to my is P1 and the other 50 percent traffics
send the choice people. We can see that we have five
load balancing algorithms. We have volume, we
have source IP. That's mean that we
load valence depends on source IP and hear it a lot
of violence by session. So it's a send one session
to ISP 1 and others session to ice pixel DNAs. And the other
session two I is P1 and other choice
beautiful, and so on. And here we have spill over, so in spirit over if we reach
a specific threshold or a specific bandwidth
in our ISP in ingress and egress a threshold. Our 40 gate for your
world will load balance traffic to the
other ISP software example, if we choose here 15 kilo bit. So if our ISP one, British 50 kilobit, the traffic will be load balanced
set to our eyes butyl. So on the end other ISP, I can choose a threshold, for example Turkey, or I can
choose 50 also, and so on. So we load balance traffic depends on the threshold
that we put here. We can do it in the
upload or download ozone. So we can do it in the
download also, 15 and 15. So if we were in the
upload 15 kilo bits, the 540 gateway or all will load-balance the other traffic
to the eyes. Beautiful. Okay, and you are in source, destination IP, like I said, is a lot valence. The traffic depends on source
and destination IP, okay? And here in the volume, you can see that you
wrote violence the fifth of the traffic to ISP 1 and other fifth to the
ISP neutral. So that's it. I will choose the air volume. By volume. I prefer
volume or sessions. That's what I use in my configuration or use
volume or sessions. I find the spillover also
is handy when we have a anterior faces one interfaces
with different bandwidth. For example, if we have
a dependent of our ISP, one is, for example,
50 megabytes. And the bandwidth of our
eyes beautiful is only two t. So here I can give
my one interface. First ISP, more threshold, then the ice beautiful
here in the spirit over. For example, I can
give it here 70. And they can give one
a spiritual only 50. Okay, I will choose one
m and a will do okay. So now let's do adjust. I will go to my
topology and they would literally
see it's running. We will run a ping here
to or the Internet. Okay, Perfectly considered,
pink is working. So if I do a trouser to trace this situation that I will use to access the Google DNS. I can see that you
use the ISP one. He used the ISP one. This is the giveaway of ISP 1. Now let's run it again. And here we consider to use
our eyes, people get away. Here it is. So from here we can see that our load
balancing is working. So for example, let's
remove a link to see if a health check that
we do all before is working. So I will remove this ink
here and run the pink. Okay, can see that there.
You can see it being in. Perfect. I can still pink. If I do the trace
to eight dot eight, I can see that I
use the ISP one. If I do it again
using the ISP one. And again a CDOs, the ISP one. If I go to my 40 gate and
ego to performance ESI day. Here, I can see that my eyes PTO is done and
my eyes P1 is up. So the traffic is sending
to only my ice p1. So that's it for
the load balancing. We will see after that the roles and the option
that we have on it.
40. SDWAN RULES: So is it the one rules
are used to control how sessions are distributed
to our to our members. So we see our two on the roads. So please a McNaughton data
is still 10 rows are also evaluated from top to bottom,
like firewall policies. So let's create a
new is T1 rule. So here n is 21 role,
like we see here, give us a more flexible way
to control our numbers. So, like I said, is T1 rule allows us to control how sessions are distributed to our
is T1 members. That mean that we can control
what traffic can go to, what algebra will interface. So for example,
like we have here, we have tool is T1 members. And like I said before, I have this interface here with a bandwidth more
than this anterior face here. So for example, I can prefer to use this interface here to use some applications or to
access some destinations, then this interface here. So let's see how to do that. Okay, let's go
back. For example. Let's take an example
with Facebook, okay, and we'll name the
role Facebook. And here in source address, if I have others object of my LAN address,
I can select it. Otherwise I will select all for now and they're indecision. I can even selected others, offer Facebook or
select application. If I want to select
the application, I will select it and I
will search for Facebook. Okay. Dana, you need to
go to the bottom. And here I will have
in social media, I will have the up face volcano. It is Facebook. Okay? Or it will remove this and
they will go to addresses. And there I will create another object for
Facebook, okay? Facebook. And here n-type, I will choose FQDN and they
will type facebook.com, and they will do okay. Then I need to wait
for it to be resolved. It's not resolved. Let's wait for it and we
close it and open it again. Okay. It's still not resolved. Okay, I will do OK again. And okay, it's resolved now. This is the IPO of
Facebook. I will choose it. Okay? And here in the
outgoing interface, I can see that I have
four options here. So the first option is money. So money, I mean
that we can manually assign the priority of the
selected anterior faces. So for example, if I said x one year and I go to the
anterior face preferences, and I select port
3 or ice P1 first, then I select I spiritual. Second. What's happened is, or the traffic that's going
draw this object here, which is Facebook with
bus only throat portray. And we're not pass through a spiritual until our
ISB one is fail. So if I draw okay, here, okay. And I refresh, I can see a sign. This sign here is a meaning
that this member is selected. That's mean that we can only use ice B1 to access Facebook. So let's try it. It's a chicken that
I would go to. I will go to my browser and
I will go to face book. Okay? I will try to generate
some sessions. I will create a
page, for example. Okay? And then I will sign up. So I just try to generate
as many sessions as I can. Okay? And we'll open
Facebook again here. Then I will go back to
my 40 gate fair award. And they will go to Dashboard. Then they will go to
40 review sessions. Okay? And here I will go to the filter and filter it by Facebook. So here in destination IP, it will choose the
IPO, facebook. Here it is, This is
the IPO Facebook. Okay? Now let me add decision and
telophase apply. We can see. Here that we use only
ice p1 onto your face. So it's not load
between ice p1 and p2. It's only goes
throat our ISP one. For the other session. You will see that he,
the US IS beautiful. Marriages do use ice petal, but the traffic throat, Facebook is using only ISP one. Here it is. Okay. Now let's go back
to the ST1 roles. And we go to a network. And it's still on
roles and edited. Okay? Noted, see the other type. Okay, The other type
is this quantity. So the say here that
the anterior face with the best measured
performance is selected. That's mean that we need here to select our SLA that
we've created before, which is the health check. So we will select it here it is. So into health check, we have some criterias. And one of these
criterias is latency. And we have GTR and
we have packet loss. Then we have all
discrete area here. So we can select the quality criteria
based on our destination. So for example, if we have SIP application or
voi P decision, we want to access tool. We need to selected and the quality criteria,
latency or jitter. Because a voice IP based
on latency or jitter. Okay? So we would select
a hair net and C for example, and
we will do AKI. And that's it. So now let's see the
other type that we have, which is lowest cost SLA. So if we select it here, we need first before,
before I configured, we need to go to our
performance is LA and change and make changes
in our health check. Is it a? So we'll go here and we
will enable SLA targets. And here in SLA targets, we need here too. You can change here
the latency threshold. For example, I will do here 50. And in theatre to threshold, I don't want it to
be more than 10. And in pocket loss threshold, I want it to be the minimum is 55 percent and
they will dorky. So yo you are free to choose
whatever value you have. You want to put here. Like I said, it's based on the application or
the destination that you want to access to. Okay? And it's depend on your interface bandwidth and
your anterior face head. So if you have a good
interface connectivity, you will put a different value. Okay, Then I will go back to
my sd-wan roles and the air. And it will go to
lowest cost is LA. And from here you will
find my health check. If I didn't enable
the SLA target, I will not find why health check in the following
entries here. So please make sure
that you enable the oscillator get to
select lowest cost is LA. Okay? Then you can do okay. And that's it. Now let's
see the last type. Now here we have
maximized bandwidth. So what's that
mean is we will be neophytes from the bandwidth
of our two answer faces. That's mean that our
source traffic will be sent throat our two until faces. So we will have benefits from the spirit of the jaw
and your faces here. If we have here, in our case, we are other end
and interface with 50 megabytes and another
interface with 13 megabytes. That's mean that we've unified from 80 megabytes bandwidth. Okay? That's what's maximum
bandwidth mean. Okay? And we will do okay. And like we see here, the two members or the two
interfaces are selected. That's mean that he sent
to the traffic throat, the toe onto your faces
at the same time. You can see it from air. So that's it for the ST1 roles. I hope that it's clear. Please, if you have
any further caution, don't hesitate to ask me
and thank you for watching.
41. Site-To-Site IPSEC VPN: One of the technologies
that you as a network administrator
or a network engineer, did you short, we know
how to configure is vapor n. We have
two types of VPN. We have IPSec, VPN, and we have Ss MVPA. In this video, we will
cover IPSec, VPN. So we will configure
site-to-site IPSec VPN, between 20 and 40
gate firewalls. So let me show you
first my topology. So this is my topology. I have here my HQ firewall, and they have in the other
side, my branch firewall. I put this rotor here to
separate my 40 gates. So each one of them will
be in a different network. So they can be
like the Internet. And here in my LAN, I have different subnets also. In order to Omeka
IPSec VPN tunnel, we must have different subunits. Insulin, we can't have
the same IP address, or we come to know to
configure IPSec tunnel. So I've already configured
as my HQ rotor. I give it this IP air and land, and they sit the one IP and they give it a sludge
record toward internet. And I assume that by now
you are knowing how to configure 40 gauge wire or until faces and sludge recruit. But I would see with
you how to configure my branch or 40 gate because
I didn't touch it yet. So let's see how
to configure it. I will do all from CLI. So the username is admin. There is no password. I will create a new password. Okay. Then I will set a host name
for my 40 gate firewall. So sit hostname branch. Then I will jump to
interface configuration. It will go conflicts is
some interface port 1. So port one is my
one onto your face. Set S, one in it to make it static so we can
fix the sludge IP on it. So sit IP. What you want. But 141 dot to, dot to the mask is 24. And we go chosen
launching phase, which is port three. Okay? Sit, more static. Sit IP 100, one hundred and sixty eight. Twenty one, the mask is 24. I will enable HTTP access. The record is I will
give it also on yes. Sit dahlias. And that's it. Then I need to configure a static route
towards the internet. Okay. Sit gateway. And they would put my gateway
IP address, which is 21. Then sit the y's fourth one. And let's try to
ping our gateway. Perfect, I can ping it. Now let's try to ping
this interface here. And you can also
pin it. Perfect. Now I will log into my 40 gate firewall
with his IP address. Perfect. Perfect. Okay. Now this is my branch firewall. Will do, we will do know is
I will go to my HQ firewall. Okay. And we will start configuration knowledge or configured VPN. We need to go to the top of VPN. Here. We need to expand it. And here we have IPSec tunnels, and we have IPSec wizard. So like, you know, IPSec is complicated to
configure, so forth, Seagate, make it
easier for us and, and create us a
wizard to sampling, create our IPSec tunnel. So let's see what do
we have in the wizard? So here in the wizard, I have here name, it's my gender name, I will name it to branch. And here in the top flight
type, we have site-to-site, say two slides mean that we have 40 gate to a remote 40 gate
IPSec Janet and to open spoke hub and spoke we
are between you have one master and other 40
gate a communicator throat, my master 40 gate. So if this 40 gate here, one to communicate via IPSec
tunnel to this spoke here. He must be passed my hub
or my Muslim or 40 gate, then communicate to
my Spock 40 gate. Then we have a remote access. Remote access when
we have IPSec tunnel between our main 4840 client, 40 clients can be installed on Windows, mac, or underweight. And finally, we have custom. If we choose Custom, we will manually specify
the algorithms and the protocols that
we want to choose in our phase one and phase
two of our IPSec VPN. But in sick of this video, we will keep the work
on the template. We will choose site-to-site. Okay? Now we give our channel name. We choose the template,
set your site. And in the run mode device IP, we choose 40 gate because
we have a 40 gate firewall. Okay, now let's do our next. Okay, Next. And here we need to enter our remote IP address.
So here we are. I will type my branch 40
gate, one IP address, which is 41 dot 141 dot-dot-dot. And the chose R1 and
your face automatically, then we need to type
a pre-shared key. Okay? It must be at least six
characters and above. Then I will do next. Then in local interface, we need to choose our
line interface. Perfect. And in the remote subnet, we need to type our
remote LAN subnet, which is this subnet area. Okay, perfect. Now I will do next. This is a summary of the
objects that our wizard create. We will see them together. It will press Create. And now if I go to
IPSec journals, this is my toner there. It was created. Why? The wizard? So if we did it here, I can see that my wizard
is create our phase 1 and phase Joel Jensen. So perfect. Now if I go to policy on the object
for your policy, okay. I will find that you
create for us to policies, a policy from our
line to our channel, and the policy from our
channel to our line interface. Then if we go to a network
structure corrodes, we will find also that you create for us to study her odds. The first study
corrodes wrote is toward our remote LAN IP. And second one is a black hole. What the interface
block Hall and me is that if our channel, IPSec is known and
we try to ping, our remote lot, packets
will be dropped by this interface here to not to float our 40
gauge, fair all CPO. That's it. Now let's go to
and see your face. I will expand my one interface and they will find my gender
lunch interface here. This is my general interface. That's all created
by our wizard. So the VPN wizard
is a handy tool. It saved us a lot of time and
effort in our VPN creation. And you should use it
to create your IPSec. Vpn. China. Now I will jump to
my other 40 gate, which is branch 40 gate, and they will do the
same configuration. So in name. And we'll type tool. Each queue. You choose site-to-site
and AOL GIP, the remote device
type as 40 gate because we have in the other
side of 40 gate firewall. And it will do next. Here in the remote IP, I would type MySQL 40
gateway IP address. Perfect. And air, I need to
type same pre-shared key. Okay? And they will do next in the local interface and it shows my alarm
and chill phase. And here I need to
choose my remote IP. The next and create. Noted check if our agenda
is created. Perfect. My unit is perfectly curated. Now I will go back
to my HQ firewall. And if we go to dashboard
and we go to IPSec monitor, we will find that
our general is done. This is my template
and it's done. Phase 1 is up, but phase two is done. Now in order for the
channel to come up, we need to select it. And it'll bring up icon here. We need to expand it and
select Face Joe silica, since our phase 1 is up, if our phase one also down, we need to choose all
phase two selectors. So I will select
face your selector. Perfect. And like
we can see here, my gender is up. Like we see here,
my general is up. And I will now try to ping from this browser
here to this browser air. Okay, let's see what is the
IP of this walls in here. Let me go back to it. And then we will see what is, okay and we'll open a terminal. If I do, IF config and we
will find is IP, this is IP. It will try to ping it
from my HQ browser. So I will open a terminal
and I will ping it. So pink, 20 dot-dot-dot. And they can perfectly ping it. The pink is walk. Now if I did, IF
Config here also to see what is the IP
of this browser here. This is his IP. And we'll try to ping
it from the other side. Okay? Pink, 192 dot
168 dot, 10 dot. And pink plus also successfully. Perfect. Now, if I go back
here and refresh, I will see that
there is some data that passed throught
our IPSec generic. So here it is. Our IPSec. Jeanette is perfectly created and is up and can pass traffic.
42. Remote Access IPSEC VPN: We still with IPSec, VPN. And in the previous
video we see how to configure a site-to-site
IPSec Jeanette. But in this video
we will see how to configure our remote
IPSec tunnel. So the IPSec tunnel is
a VIP bit in general, from a 40 gate for
a reward to alkali. And in this video, our client, we will be
a Windows 10 machine. I've started previously
in my VMware machine. I started my Windows 10 machine. And now I will show you how to add it to your
agenda is three. So I will go to GNS3. In our g n is three. We need to go to
Edit Preferences. In VMware. We need to go to VMware, VMs. And do we need to go
to New here in you? We will do next. Then in vm list, we need to choose our
Windows 10 machines. So I will click on
the drop-down menu, and I will choose my machine. So I will choose Windows 10, perfect, and I will finish. And perfect. My machine is added successfully,
and they will do okay. Now I will try to find
it in my devices. Here it is. I will
drag it and drop it. Okay. Now before linkage, we need to right-click
on it and to configure. And do we need to go to
network and make sure to check this box
here. And okay. Perfect. One other thing, please make sure
that your machine is down before I link
it to Jane history, the machine short V down and not started to audit
to genius three. Okay. Now I will link
it with my Roger. Perfect. And I will start it. Okay. I started from Jane is three, and GNS3 started in the VMware. Okay, I will go back to GNS3 and I will explain to you
my topology here. So I'll hear me 40 gate, where I will configure my
remote VPN IPSec tunnel. And here I have a rotor, a pituitary to pretend
that I am in the internet, that I am connected
to the Internet. So I put it here to separate between my 40 gate
and my client here, like the ER in the Internet. That's why I put
this rotor here. I fix a static IP
in this interface, in this subnet here. And they fix the, another static IP and its anterior
face from this subnet layer. And now I will go back to
my 40 gate firewall to configure the room
mode IPSec tunnel while the machine is started. So I will go back to my 40 gate. I will go to VPN and they
will go to IPSec wizard. I renamed during the remote. You can name it
whatever name you want. I will choose the template type. It will chose remote access. That's important. So we're in the wrong
mode device type. It shows us a client-based type, and it shows 40 client
we will use for the client to connect
to our 40 gate. So I will do next here in
the communist your face. And we need to choose
our 12 and phase. Here we need to enter,
appreciate ki prefix. And here he showed
us a user group. So we need to create a user. So our client will be connected with our
user to our 40 gate. The user can be are
welcome the user in firewall or can be
active directory or user. And we will see how to create Active Directory users after. But now we will stick
with the local users. Renamed the group, rename
it depend, not user. I will name it the pen. Okay. Here in the members, I
will create my users. They will create a local user. Yes, like we say, or we can create a
user or audience. Or if this is all, we will
see that later, it will sink. Now, like I said, we'll look
at user. You will do next. I will create a user named VPN. It's just a test user. Next. And next. And I will do some might. We need to make sure
that the user account is inhibited and submit. Okay, we chosen my user
and they will loci. Now I will choose my grew
up and I will do next. Okay, here I need to
choose my local interface. And they need to choose
my local others. For now I will just
put it at all. Or let's create another
object for my nonlinear face. It to me over from
my non-linear phase. This is the IP of
my line interface. Then I will create
another object of it. It will name it. It's a subnet. And we've put my IP here. Perfect. Here in the anterior face. A need to choose
my line interface, and they will do okay. Okay, we choose
my line interface here in the client
address range. This is a, the other
is that our client, we'll get our IPSec tunnel. I will create a range for that. I will create, for example, this range here from
11 to 10 dot dot, dot. This one is a depends on how much client you have
in your network. So make that in consideration. Okay? And here we have an
important option here. It says enable APV
for split general. So it's split generally
means that a, the traffic that come from
that only the traffic that come from my Windows machine
or my client throat. My, my my my my line
here will be accepted and or other traffic will not be passed throught
my 40 gate for y. So for example, if my
machine here try to access any machine
in my local network, it can be access to it. But if you want to
go to Internet, it to reduce his own YouTube
way to go to Internet. In the opposite, if we
disable this option here, all the traffic that come from our Washington Windows 10 were passed throught
our 40 gate. So if this machine
in one to access, like I said, I'm a machine
in my local line here. It will pass through
to our 40 gate. And if it wanted to access
any objects in the internet, it will also pass from a torch, my, my 40 get firewall. But in this case here, we will need to do some extra configuration
in the policy and objects. I would see that we do later. I will just know Kip, the split general enable it. And a will go and do next. Okay? Next. And create. Okay, Perfect is
Janet is created. Now if I would see with your
if I disable the split, gentlemen, if I disable it, what would I need to
add in the policy? So like I said, in the split
tunneling is disabled. I will have run mode IPSec 49, not a split tunnel. It will be named with a 49. In our case here, I
chose split tunnel, but if I do this every
day, we'd have a 49. And 49 mean that all traffic will pass
to automate 40 gate, even the traffic to underneath. So in order for that to work, I need two other policy
here in my policies. And it'll go to a policy
objects, firewall policy. And the need to create new. I will name it VPN to Internet. And here in the
uncommunicative phase. And you to choose my
room more gentle. And in Algebra 1 and telophase, I need to choose my
one on G2 phase. And in the source, I need to choose my IP address that I give to my
joy, my arranged. This is my range here. Tell me VPN. This is the range
that I've created before, a need to chose it. And here in the destination, since we are going to
alternate, I will chose all. Here in services, I also chose
all need not, not enabled. And they will do okay. Okay. My policy is
created and perfect. Now if I choose a
fortune and IPSec, I owe my client can be
access to Internet. This client here can be accessed on journeyed successfully. But in my case here, I chose split tunnel. So I will remove this policy here since I
didn't I didn't need it. I will remove it.
You don't need it. Okay. Okay. Perfect. I'm
like we see here, there is another policy that
out of the way, our wizard, It's a policy from my room, more general term, my land. This is land that we wanted
our machine to access. Okay, perfect. Now we see how to create a
junior in my 40 gate firewall. This is a generic, it's created. Now let's see what we need to do and in doing those machine, and we'll go back to Windows. Okay, lets me make that bigger. I've already started 40 client. This is the unstyled all of it. This is my own startup. This is the version
that I've installed. You can install a newer version from the web sites of 40 client. I will put a Florio, a link to download that 40
client lattice version. Okay. Now I will open my
40 client program. Accept and we'll
configure VPN, okay? I need to choose IPSec VPN. We need to give it a name. It will give it, for
example, 40 gate. Slide. Here in the remote gateway, I need to give it the one
IP of my 40 get farewell, which is 41 dot 141
dot one, dot two. I need to put the
pre-shared key that I previously created
in the wizard. Okay. Now, if you have a 40 gate
fair war with a full license, you don't need to do what
I am going to do now. And if you don't have a
license for the 40 gate, please follow up with
me what I will do now. So I will go to Advanced it
sitting and we'll expand it. I would go to phase one. And here in phase one, I need to make changes
in the encryption. So I will go back. I will open the console. Okay? And I will do
show Ip, show VPN, IPSec, phase 1 and phase remote voting need
to find is the proposal. Here in the proposal, I need to see what protocols that he chose to
gripped IPSec tunnel. So because my forms, you don't have a license, you choose a lower encryption
algorithms and protocols. He chose D S, D S, and the MD5. And you chose D, E, S, and char to corrupt my training. So I need to put the same
protocols in my client. So I will go back to my 40 client and they
need to tie pair D, E, S. And in V5, then the A's and shop. Okay. Now I need to go to my face tool and I
need to do the same. Ten. You need to do show IPSec, VPN. Vpn, IPSec. Miniature face Joe. Okay. Okay. This is the proposal. Perfect. Okay. Okay. That's it. I will save. And now I need to set a
sludge IP to my client. Okay? I will give it this IP here since it's connected
to my rotor. Okay? Okay. The key takeaway is
41141 dot, dot one. Dnas will be 8, 8, 8, 8. And okay. Okay. And close. Perfect.
Yes. And we'll see now if my client can pink, my rotor being 41 dot 141 dot, dot one, they can
perfectly pink it. Let's see if we can pick the other network.
The other network. Yes, I can perfectly pink it. Now let's try to
connect to our webpage. So I need a name, India to choose my VPN, okay, and username, you need to put the use of this I
previously created, which is the user VPN. Okay? I need to put his password
and it will connect. Perfect. I'm connected now,
like we see here. Now, I will try to ping
my 40 gate local IP, pink 192168 dot gen D21. Perfect, I can ping it. I will ping my browser,
my Udemy in-browser. And perfect, I can ping it also. Perfect. Now let's go
back to our 40 gate, fair Walter, see
statues of our general. If a Go to dashboard and then go to IPSec monitor editors. Here I can see that my ROM
mode IPSec tunnel is up. Here it is. And they can even see the IP of my remote client. This is my IP. Here it is. This is IP layer
on which client. Perfect. Now we see how to configure
our mode IPSec tunnel. In the other position, we will see how to
configure a remote SSL VPN. And that's the most
commonly type of VPN that used to connect
to our remote users, to our local site. Thank you for watching.
43. SSL VPN PART 1: We still with the VPN, and this time we
will see SSL VPN. So like I said before,
this is elevate. The end is the most
commonly used type of VPN. And when we want our remote users to access
to our internal resources. So in this video, we will see how to
configure SSL VPN, and we will see the types of
SSL VPN because an SSL VPN, we have two modes. We have John on mode
and we have web mode. We will see how to configure them in once from a wine menu. Then we will see
how to access to our 40 gate to open SSL VPN. So let's start configuration. I will go to VPN. And here we have SSL VPN portals and we have SSL VPN settings. Much before jumping to
configuration of SSL VPN, I will create a user because we need to
authenticate to our SSL VPN, we need to configure users. So I will go to user
adult education and it will go to User Group. And they will use
this group here. The grub that we created
before and the IPSec VPN, if you remember, we created this group here with user VPN. So okay, we'd use
this girl pair. No need to create
a new, a new user. You will now go to a VPN and I will start with SSL VPN portals. Okay. I will click on
it and a window Edit. So where I have the
name of my portal. And here I have, like I said, the tunnel mode. Here
is the tunnel mode. I can disable it if I
want, if I want my, my VPN only work on mod web. I can disable general more
than I can enabled only when mod Bartlett see the configuration
of the tunnel mode. Also, like in the IPSec VPN, we have also in SSL
VPN split generally, like we see there,
there is a split unit. Like I said, if we disable it, we need to create
policy here because all the traffic that come from our remote users were throat, our 40 gate for your world. And including the
traffic tool and secure websites in Internet. So I will keep it enabled. I want only splitting it in. I don't want to 49. If you want fortunate, just disable it and
created the policy like we created a IPSec VPN, okay. Here it's the Rajan and address. The Rajan address is the address that we want our remote
users to access. For example, I have
here my remote users, and I wanted to access to these others here,
to this subnet. So I knew the other
is object with this subnet here in
the Rajan address. So let me go back here. And in the Rajan address, I will choose my LAN address. Here it is. This is my
subnet, Arctic perfect. And they are in the
source IP port. This is our range of IPs that, uh, our client get dropped. Our SSL, VPN general. This IP where our user throat is a virtual interface
that is created by default when we unstyled
our 40 client program, if we come back to our machine, Windows machine,
let me click here. We will find that there is
a virtual interface that's created, which name it? 40 SSL. This interface air
gets to this IP her to communicate to our
40 great for water altered gender more
the VIP, VIP in. Okay. Now, there is some
options in the tunnel mode, like a log line to save password and unlock lying to
connect automatically. You can enable whatever
option you want or keep it. The option that you
want these invalid, you'll have a choice. Okay? And here, and here
we have our wave mode. In our web model, we have a portal muscles,
which, which is. Mvp, important, we can change
this message if we want. And here we have a 10. The 10 year is blue, we can make it green or
whatever term we want. I will keep it blue. And here this is the information that we can see from the portal. If we log into our portal, we can see the sessions on formation and we can see
the connection launcher, or we can see our
login or a story. And that we can create our user. If you're a connect to the
portal you can create. Here's our no bookmark
if we want to our users. So not a create his own bookmark where
you can disable it. And here will only stick with the bookmarks that
we will define two m. We will talk about bookmarks right now to
understand what a bookmark mean. So let me jump to the bookmark. I would enable user
bookmarks here. It's jumped to our bookmarks. I will create new and
deer in the name. I will name it. For example, I want my client to access
my 40 gate admin page. So I will name this
bookmark, for example 48. Okay? And here in
the type which shows the protocol that
we want to enable. For example, we have here HTTP, we have also FTP, LDP, we have is H, we have VNC. And those are the
protocols that we have in the pockmarks. So I will choose HTTP since I want it to login
through the web. Here in the air, I need to type in the IP address
of my 40 gate. Farewell. Okay. Ip address is 10 dot one and there
is a description. I will name it 40
gate web access. And they will do okay. So basically what our
bookmark mean is resource. So if I want my 40 gate, I mean, remote user to connect to any resources in
my local network, I need to define tenure. So if, for example I
have 50 FTP server, I need to enable it here. And you need air
to give it a name. So for example, my FTP here, I need to give it
in the folder pot. And they can give
it a description. And then we'll click Okay, so this is what a
bookmark me know, I will scroll down. Here. We can see enabled
40 client don't load. If we disable it, we can, we cannot download our faulty
client from the portal. And if we enable it, we can see a link to download
our 40 client program. If we don't want to
access to the website of Fortinet and search
for 40 client. We can download it
from the portal. Okay. I will do. Okay. Perfect.
44. SSL VPN PART 2: Now I will go to
SSL VPN settings. This is next step we
need to configure. Here we need to choose our
one phase over 100 phase. This is our interface. And here we need to
choose a different port. Because it says here
that we have a conflict. Because the HTTPS port of my administrative
access is a 443. I need to give the SSL
VPN different pore. They will add, for
example, the eight here. Okay? Now it's perfect. There is no warning.
They can access with the 8443 or I can give it
another port like 10 443. I will signal with it for 43. Okay. Here we have restrict access. It is, by default, allow access from anywhere else because my remote users
are in the Internet. We don't know every user. Public IP, If we know from where exactly our client are connected and we have
their public IP, we can limit access to a specific horses and type
hair their public IPs. If we, if we know that
they're public IPs, if we don't really need to only allow access from
innermost arche. Here we have silver, silver certificate
because we are connected throat SSL, VPN. Then we need a
certificate TO connect. I suggest you to create
your own certificate. Don't, don't let this
self-signed certificate create your own certificate
with a certificate authority. It's shippers, which will not
cost you a lot and it's a better for your security
of your SSL VPN. Okay? Now I will scroll down and here the configuration of the range of the SSL VPN. This is the range that
we talked about in. This is a VPN portal. We can choose automatically
assign addresses. And we can use this,
this range here, or we can cause some, another IP range if we want. I would stick now with the automatically assign IP address. Okay? And here I need to
add our users that I want them to access
to all my SSL VPN. So I will do a Create New. And we'll choose my VPN user. And they will choose
the door group. And here I need to define the portal that I want
our users to access. If we have other, other portals like here we
have four access portal. It's mean that we have gender
mode and we have a web. Gender. If we have only a general mode and we don't have with mode, we can select it if we want
a user to only access mode, we can select for this
users here with the portal. And he only can access through the web mode and the counter access
Trojan degenerate mode. Okay. Here I need to give
this also for access so we can let me accept
my configuration. Okay, applied. Perfect. Now we still have only one step to finish our SSL
VPN configuration. And this SIP is the
policy configuration. So I will go to
click here and it will take me to the
firewall policy. And here I will give it a name. Here we name it remote
SSL, VPN. Okay? The uncommunicative
phase is of course, our SSL VPN, junior
anterior face. He chose it automatically
in the outgoing interface, I will choose my land
on TFA's in source. In source, I need to choose the range that we
talked about before. This is the range, the
SSL VPN tunnel address. And I need to choose the user. It will chose the group, okay? In the destination, I
need to choose my line. Okay, in service and
we will choose on. Okay. Let me see. Okay.
And it will do. Okay. Perfect. May
configuration is done. Now if you have 40 gate
for our worldwide license, Don't you don't need
to follow up with me this configuration
that we need to do now. But if you have 40 gauge for your old like me
without a license, you need to follow up with me in this configuration
that I am about to do now because like I said, we don't have a license in
our 40 gate for your own use. Low on corruptions and low algorithms and low
protocols to encrypt our data. So in this case, our SSL VPN will not work if we didn't make some changes
in the TLS version. So I need to go to the console. Just follow up with me. And we'll do config,
VPN, SSL settings. And the need to do set a max. Yes, it is. It is this
protocol version. I need to give it data is 10. Okay? On a need to give it the max. The max should be TLS. One does one. They will do. Okay, perfect. Now I will go to my client. Let me get to bigger.
45. SSL VPN PART 3: Now if we want to
connect in general more than we need to use
our 40 client VPN program. And if we want to connect
to our wave mode, we need to use our web browser. So I would see with your 40
client VPN Configuration, let me open it. Perfect. Now to create
a new connection, we need to go here and we need to do Add
New York connection. Make sure to choose the SSL VPN. And here, give it a name, we will choose the name is Ed. Remote, VPN. Perfect. Now indicated
by any to give it my one IP public of my
40 gateway at all. Okay? This is his IP. Now we need to check this box
here in customized board. And the air, we need to type
the predefined ports that we configured in the SSL VPN
settings in our 40 gate. So if you're a member, I fix it the port 8443. Okay. Then I need to do Save. And that's it. And there we need to do to
answer our user, which is VPN. Okay? Now, if I press Connect here, we will not connect because
like I said before, our 40 gate for your wall
don't have a license. So our 40 client can't connect to throw to SSL, VPN, geoid. So if I press it here, here we'll try to connect. But here we're not subsist in
the end, like we see here. He can't access to our Arabic, the n, Because like I said, it's only the license, but we see how to configure
it in the 40 gate and we see ultra configured
in the 40 client. The only thing that
we can see now is how to connect a
throw to the web mode. So I will open my browser. I need to type my 40 gate IP, which is 41 dot 141 dot one, dot two, and port is 80, 443. We need to let me take it again. Okay. It's HTTPS. It's important to
do HTTPS before. And under. Perfect, I can't access
now to my web portal. Here I need to type my username, VPN, and there's password. Okay, I will login. And here we can see our portal. This is our portal. This is the bookmark
that we created before in our portal
configuration. If you're a member and the air, we can see that there is a manure to download
at 40 client. If we click on it, we can see that a
come for our client, which is Mark Windows,
Android or iOS. We can lunch hour, 40 client program from our
portal, for our model. From our web portal. We can see here
those totals here. This first tab here is for quick connection and this
top layer for new bookmark. If we put a square connection, we can see that there is a, our protocol which is HTTP, FTP is NPV and IRR, RDP and SSH and
all the protocols. If we want to do a
quick connection without saving it as a bookmark, we can do with formula. For example, if you
want to access or to pink resource in
our local network, we can do it for me. For example, I want to ping
my 40 gate IP address. Okay? It's nipping it. Here it is. It says that this IP
here is perishable. Perfect. Now if we want to
create a bookmark, we need to create new bookmark. And then for example, I will
choose SSH and a rename it. If we have, for example, a switch in our
network, switch is h, we need to put the air is username and this
IP address like that. Okay? And here we need to type so
which is h axis and save. This is the bookmark. And now if we want to access
to our bookmark here, if we want to access
to our 40 gate, we need just talk liquid. Okay. We need to go to
username on tape it, okay, and password also. Now what I want to see we do is this bookmark here
that we created here, this is our user bookmark. Our admin came to know if a user create a bookmark or not. If we go to, let me go to SSH port
R configuration. And we will see
that the bookmarks. Okay, VPN, SSL, VPN portal. We'll go to our portfolio. We can only find the bookmark
that our admin create, which is 40 gate. But we can't see the
switch is this H. So our admin can't know what his user bookmarks are created. So my suggestion to you is your disable the user bookmark
and also to disable the, this menu here, the quick
connection to better security. So to limit your user to only the predefined
bookmark that you define to n. So to do that, we need to go back. And here in the
portal configuration, in the web mode, we need to disable connection denture and we need
to disable user bookmarks. Then we need to do, okay. Now if I go back and a logout
and login again, okay. Here it is. I can't anymore create a new bookmark or Korea. Or I do a quick connection to any resources in our
internal network. So I'm stuck with
the bookmarks that my user admin create for me. And that's a good. So I will go back to my 40 gate firewall and
they will go to Dashboard, and they will check
the SSL VPN monitor. And from here we can
see our users that are connected to our SSL VPN. This is my user, which is VPN. And this is the last
login. Here it is. And this is IP.
 Hamza Benhamani, IT Network Administrator