Transcripts
1. Introduction: Hello, I'm Roiann Ridley. I'm your instructor today for this online course in floristry. I have over 40 years experience in the floral industry and garden center business. I've enjoyed entertaining in my home for 40 years. I'd love to share all the techniques and tips with you in this course for beginners about how to make a small arrangement and a large one for whatever upcoming celebration in life you have planned: a bridal shower, a baby shower, a family reunion. But for today's class, you will be able to complete and set your table, which will include one large arrangement for a major focal point. We'll also make a small arrangement that could be used as individual place settings for gifts. If you'd like to make them in a container where you can give them, they could work as a place card, they could be used in a powder room, on a bar, to garnish or tray, any number of things. It is not dependent upon a big budget to work with flowers. The ones we are using today are cut from my own yard, foraged from a flower farm, and from the side of the road and neighbors' yards. In another course, we'll teach you how to forage for that. But for today's class, this is for beginners or a medium experienced individual who wants to share their home or event space with loved ones. I will teach you very simple, easy arrangements that you can expand or decrease based on the size of the tables and your needs. Your ability to make beautiful flower arrangements will not be dependent on a large budget, and that's what this course is going to teach you how to do, with the things that you already have, whether you gather them from your own yard, your neighbors, the roadside, or purchase them at a farmer's market. Thank you so much for joining us and I'll hope that this course is going to give you some new insight and competence that to have a big impact does not require a large budget. I can teach you how to do that and bless you and your family in your endeavors of celebrating life in an elevated manner with these beautiful flowers. We'll have a lot of fun and I'll appreciate you joining me in this journey. Here we go. Let's begin.
2. The Tools: We have two choices for containers. We have an example of silver, and then we also have glass which are repurposed jars. In this segment, the compatible pieces, if you're using glass, this would be the yogurt. If you're using the metal or the silver, this is for the jello mold. In the low flat bloom and the silver, we have also a jello mold. In the glass we have the martini glass. That would be the low compatibility. This could be a place card, individual place setting, as well as the taller vase. They're both would be equally suitable. Then to mix in to broaden the tablescape, we've got the shot glass and the regular glass, and then we've got shot glass and silver. Either way they're going to hold the same size bloom, multiple blooms or a single, whichever you prefer. In this option, we've got the julep cup and we've got the vase from the Dollar Tree. This is a dollar and then this would be from your own collection. Again, this is a great gift giving an idea. If your celebration that you're preparing the florals for now or for a wedding or college graduation, these are great items to get. They're pewter. They don't have to be polished and they could be hand monogrammed. The large focal centerpiece that we'll be making. I'll be doing it in the silver version of this. This is the glass that would be compatible for the same scale of arrangement. This also was a dollar from the Dollar Tree. In the silver, I have a precautionary trash bag measure to be sure that water does not escape, the liner which is also a recycled container. You would insert the trash bag, and then put your liner in and it fits snugly. Then you can trim the ends of this or tuck it in if your containers a little bit bigger. But that way that you would not want to see the plastic. This is just to keep the water from damaging the silver. Just to recap what we've gone over on your choice of vases. We have four smaller versions. What you're going to learn in this class is one of the small versions, we will be making the julep cup. You'll need one of those. If you have additional blooms and want to, you can choose these other items, but you're going to need either the glass or the silver option in this as your instructional part of this course. Then we'll also have one, either the glass or the silver for the large focal arrangement. You're going to learn two vase arrangements, one large and one medium size. I'm going to bring the glass up first. These are the ones that you would be using and recycling jars and containers that you already have. This is a basic yogurt. This is a nice martini glass. We have shot glasses for low flowers and that one wasn't in there. Then we've got like an olive jar. I think this is some type of vinegar. But this way, you can literally not even spend one dollar on your containers. You want varying heights, and you want to bear in mind, that you want your maximum height on any arrangement that would go on a table where someone is seated eating, you would not want that height to be over 18 inches. This would need to go at the corners or on our bar area or a buffet. Then the individual place settings, we will use the julep cup. If you choose that option, you want to have one container of this size per each guest. Like I said, there again can be used as a place card holder as well. The main thing is to think of your budget, your guest, the time you have allotted and the flowers you have to work with. But all of these containers can be mixed or matched. If you've chosen the glass as your container for the upcoming arrangements, moss could be an embellishment that you could use to cover up and conceal where the jar lid would attach. You'll need sheet moss which you can get at any craft store, a small water bottle, be sure that it's workable and damp enough to work with. If you bought in a package, it will be dried. You want it pliable where it will adhere to the jar. Then you're going to take a piece of raffia, wrap it around one turn, tied in a knot, and then cut the stems off. You'll do this prior to arranging, if you want the moss on your glass recycled jars. If you're using that for a vase and it's not necessary, you could cover it up with the stems, but this way you have a more woodland look. It just gives you, I think, a more professional finished approach. It's very little cost. This moss I foraged for, but you can buy it at a craft store prepackaged. These are the tools that we've gathered for you to use on all the arrangements, whether you're using the glass or the silver. You'll need a pointed spout watering can to add water. To that, you'll need zip ties to secure the armature that we're going to make with a vine for the larger arrangements. If you're using the glass, you'll need to use the Goo Gone to get the labels off those jars. You'll need these scissors for the raffia and other small stems. Then you'll need the straight knife if you're an experienced florist and feel comfortable with that. Or then we had the pruners and you could use both of those to do the stem trimming. You'll want a new cut for each bloom as you put it in the vase.
3. 'Processing' Flowers: We're at the beginning of processing our flowers and having the supplies that you need to extend the longer shelf life for your flowers. All cut flowers ordinarily will have a shelf life between seven days to 14 days depending on if you have just harvest them in bud state or at what stage you process them wherever you purchase them. One of the most important things is the care for your water. These are professional grade, they're called crystal clear professional, and you can drop this in without tearing it open. One packet is for a one gallon bucket. Just be sure that you know the gallon size of your container and the water level should be on the container that you use one third full of water. What you would do is mix up your water in a one or two gallon bucket, add it to the containers that you're going to put your flowers into as you process them. That's for cut flowers, and for fruit and vegetables hard fruit like this, these are crab apples from my neighbor's tree. I use a professional grade leaf shine on foliage that's acceptable to put this on, and then also on fruit. I'm going to hold this over a plastic container. You don't want to spray this on the surface because the oil will dispense on your containers or your flowers. Hold it over a specified receptacle and spray it lightly, and then this will air dry and you can see the nice shine that it puts on it. If you don't have access to a leaf shine product, which is available in some garden centers and florist, this will work, the PAM original. If you're using apples, any type of shine hard fruit, you'll want to use a little bit of sheen. You can also take a paper towel, spray this on the paper towel over receptacle, and get the oil on it and then just rub the fruit. If it's a larger fruit, it's easier and you don't get too much product on there. Just be careful and less is more. Now we're ready for the actual processing of your flowers. I've chosen three of the blooms that we'll be using, and also one stem of greenery. The hydrangea is cut from our own yard and it was cut at an angle and it's been hydrating in a bucket with the professional flower food for two days. I'm ready to get it in a position to go actually into vase. I've got a container here to take the leaves that I remove and put it in that. Because you want to have everything ready before you begin. I've got the professional grade of a stem stripper. It actually will remove the leaves and thorns without harming your hand. If you don't have access to a professional one, I've got two substitutions. This is a top grip that you would buy to be able to take the lid off of a jar, and that's good for gripping. It's not as thick. This would be the best substitution, which is a silicone mat from febrile aware. That is an oven mitt. It's got the grippers where it will actually grab on to the leaves. It's a thicker material, but I'll use the one that's the professional grade, and these maybe available at your local florist. I'm just going to literally take that and strip it. This will save your hand tremendously if you have a lot of flowers to process. Doing in one leaf at a time is very time consuming. At the same time you want to inspect your bloom, see if there's anything brown or wilted that needs to be removed so that you don't have to re-evaluate the bloom again prior to putting it in the vase. This is going to go right into the receptacle of water. Next we have garden rose. There are a lot of thorns ordinarily on especially old variety roses that can cause a lot of damage. You want to be sure that you've got on very heavy duty gloves or use leaf stripper prior to doing this. You want to hold the rose upright and you want to take it by the stem and hold it in at least two to three places. You don't want to hold the head too tight and for fear of breaking it, but you want to put your gripper in a flexible position so that it encloses the stem. Then you press gently and stripped down. As you can see, it's taken all the thorns except for one at the bottom simultaneously. This is a very much of a cost saving hand saving factor. Those have a little bug bites on, I'm going to take those off. Now this is ready to go into the vase waiting for its final cut before it goes into the arrangement. When you've got multiple stems like this, this is also from my garden. This is a coxcomb and it's got small shoots which are perfectly suited for the small arrangements we're going to be doing. You would take your clipper and you can look at it from the side and it's a very top heavy, let it rest in your hand, and just simply go along and cut off the side shoot blooms, which we want to use in the smaller arrangements. I'm going to cut off little things because it will distract from what we want from this, which is the large primary head. We don't want to lose the small blooms because they will add great value to the smaller arrangements. Now we've got that in a suitable shape, and I'm just going to pull off with my fingers the three leaves that did not serve a purpose. Now, batch ready. You do not want any leaves below the water level. These stems will be recut before they go in the arrangement, but you've got to be sure that no foliage is below the water line. Necessarily you want to take off foliage that is only going to compete for water and moisture with the blooms. We don't want that competition. We're only interested in the foliage on that particular stem. Now these small ones can be gathered up and put on the tray that we're going to prepare of all the small blooms for the shorter arrangements. The last product that we're going to trim before we're ready to arrange is this large branch of Elaeagnus. It's a shrub I grow here in South Central Kentucky. It's very hardy and semi deciduous for zone 6, and I love the shiny underneath leaf that's very durable. What I want to do is cut off the lower secondary branches that there again, will be used in our shorter arrangements. We're also processing this larger stem that will be used in our large arrangement. We don't need this additional length. I'm going to approximate where that cut will go, and now we've got a stem and all we've got to do is remove the lower leaves so that they do not get into the waterline of your container or vase. Now this stem is suitable and ready for the one large arrangement that we'll be doing. Then the separate individual leaves, they'll go on the tray for the shorter pieces to be used in our short arrangement.
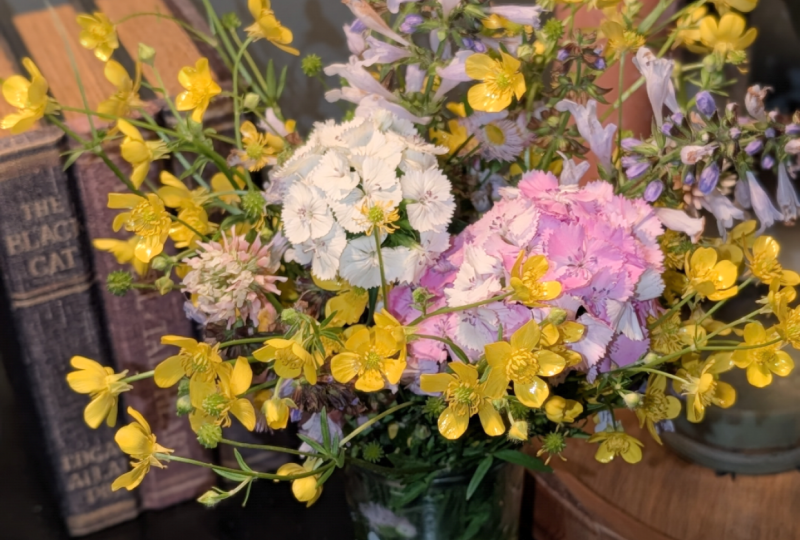
4. The 'Arrangement Recipe': Now we are ready to discuss the recipe and the prepared flowers for the shorter arrangement that we're choosing to do in the Gillette Cup. It may be that you've chosen glass, but this is the smaller size versus the one large one. To determine the recipe for yourself of what you're going to use in that particular arrangement, you've got to determine that either based on availability, by what you've grown in your own yard, by what is available at the farmers' market. Before you purchase, you want to determine the total number of these containers that you plan on using for your event. If you're going to put these at each place setting for 10, then you would do 10 of those. I would recommend that you would do two extra, maybe one is a backup if somebody damages one, you could have broken blooms, but you've always got an extra for a powder room or a bar tray. So more is better. We have the tray of the recipe I've chosen for this, and my decision was based on the availability at the farmers' flower market, and also on these beautiful crab apples in my neighbor's yard. I love these and this time of the year, they are stupendous, so we're going to be using these. My color palette began with this, and then when I went to the flower farm, I chose blooms based on what would work with this. This also matches peaches that are in season here in Kentucky, and I plan on using these on the table as well. That was the beginning for the color palette. You could stay monochromatic, would be simple, but you want to stay in subtle colors or let the event you're hosting dictate the color and the type of flower. If this is for a bridal luncheon, you would want to do maybe pastels, certainly not the bride's color choice, but it would help you decide. Once you determine the number of your containers, then you can guesstimate the number of blooms per arrangement and then multiply that times the total containers. I've chosen and prepared all of the flowers in a mise en place style, much like you would in cooking. You prepare and trim all of the flowers all at one time prior to the arranging, much like you would in preparation prior to cooking. We have this is a globe sedge, which is a wild grass that I found and I absolutely love it. This was a roadside find. Then we have lisianthus, which came from the flower farmer, and she had a beautiful blush color, and we also have lavender. These all have been processed like the example that we did in the previous lesson of how to process. In that lesson, you saw how to process a rose stem, how to process a coxcomb head, and also a hydrangea, and a stem of greenery. All of the foliage is removed and ready for us to actually grab when we start assembling the arrangement. We've got zinnias and dahlias, and these are in a color palette of the green and the ivory that will accent our peach color. I've got them grouped by color, and we will keep them in that range. I've got sage, this is white sage from the flower farmer, and I also have the coxcomb that we trimmed off previously from the one large bloom. These have all had the foliage removed from it. Then we've got greenery from the elaeagnus that we trimmed, we'll use this on each one. Then we have garden roses from my garden, and they're short stems and a little floppy head, so we'll use one and these in each of the arrangements. Now we're ready. We'll get these on the tray by color and together in the next step, we'll actually assemble these, and then let you see the recipe we've chosen for today's arrangement in the Gillette Cup.
5. Small Arrangement: Now, we have all of our flowers prepared and we're ready to assemble our recipe for the small table flower for your party. This is in the julep cup, and this is our finished product for the recipes based on our color palette and what we have available to us. I know the number count on each stem by variety. Now that I've made the one sample, I have it here in front of me and we'll go. If I've forgotten, I can actually look at the flower and it will remind me how I assemble that. We'll start with the globe grass, and I'm going to teach you the method of holding it in your hand. We're actually going to use a zip tie to secure the arrangement. I'll tell you one of the important reasons at the end of this diagram of how we're doing this. I'm just taking the flowers and putting them in as I know that I did in the original recipe. You don't have to spend a lot of time. What you want to do is get together the group of things that you're going to use and then save your focal flower the most expensive. Especially if it's the only one, you want it to go in last so that it is in a feature, prominent place. You will put in your grouping of greenery and flowers prior to that. You can just enjoy the process, enjoy the fragrance, how they feel in your hand. I'm working from front to back in a similar fashion of a European hand-tied bouquet. I'm going to loop, and I'm going to poke down in the middle where I want the larger zing in. We'll need a little bit of burgundy. I'm going to save the garden rose until the end. This is our purple Joe-Pye weed. This is actually a weed as is, this is a weed. We have several weeds in this which I think are really quite beautiful. They're very attractive. I don't focus on the category of what someone else might or might not place on a flower. It's just the intrinsic beauty that it has. We're going to put one large flower there. I need one more Coxcomb here, another group of greenery, and then we will be ready for the garden rose. It's going to go in and I'm going to try to position it where the head will be propped up. These are rows variety that trail, and so the head has a tendency to droop a little bit. This is just the handheld bouquet. I'm going to go look, clear out, make sure we don't have any greenery that's going to drop down below the water level now that we've got it arranged. The easiest way to secure this arrangement and know that it will remain in this form is to use a zip tie. I like doing it because it can be done with one hand while you're holding the bouquet. I'll buy the green ones and you can get tan, but I've tried to avoid black or white in an organic arrangement. I'm just simply putting the zip tie and you know that the flat side is the side where you insert the point. I can do this with one hand and hold the bouquet at the same time. I'm tightening it now. Before you completely tighten it, you just want to take a good little look and make sure nothing slipped out of place, which my garden rose has slid down a little bit. Before you tighten it up, just take a good little look. Gently twist it around, and then continue to tighten and there we go. This is the second of our two bouquets. What you want to do to prepare it for the container is to bring your container to the edge of your table. The greatest fear is to cut your arrangement too short. You can always cut the second time, but you can never add back on. You want to err on the side of caution when you determine the length of the stems. I've gotten our container here, and then I'll bring my bouquet down to this side of the table so that I can more perfectly evaluate where I'm going to make that cut. This is where the cut is going to be. I'm going to use my sharp pruners and make one clean trim. Then I'm going to see if this indeed is the accurate length of the bouquet. It could be a tiny bit shorter. I'm going to tighten. Now, I'm going to do the final tighten of the zip tie. I'm going to trim the zip tie at the same time that I have the bouquet held to make the final cut for the water. One of the reasons to use a zip tie, is that these flowers will last depending on if you use conditioner, the temperature of the room, there are many things that dictate the longevity of the blinks. But the best way to extend the life of the flower would be to change the water completely every day. What you would want to do then, it's so much easier. All you've got to do is gently lift this, pour out the dirty water, rinse the cup, and then add your freshened water to the glass which has the flower food in it. Then gently re-cut your stem ends, which will give you a fresh cut to draw the food. It will extend the life of your bouquet by 30 percent. This is so much easier when you use a zip tie because then the flowers are not falling apart and you've got to rearrange. Now you know that they are secure and they'll stay that way as you change the water and re-cut the stems. One last addition is, I love using multiple sources of the texture and color that I'm seeking. These are cuttings from a hanging basket. This is actually, it's in our color palette. I have trimmed the hanging basket, and now I'm just going to add this right here. It gives us that little downward motion on the cup that none of the other plant material we've chosen gives us that effect. Be creative when you look and think about options for what your recipe could be. Is it a hanging basket that needs to be trimmed? Is it roadside grasses? Is it a weed that butterflies are attracted to? Consider all the sources and then come up with your final recipe and then count your stems and multiply the stems you'll need by the number of containers you plan to use.
6. Armature Making: So now we're ready to begin the process of making the large arrangement, which will be your focal point for the buffet table or your dining room table. My focus, my entire professional life as a florist over the past 20 years, has been to be as environmentally sound and sustainable as possible. I try to avoid using foam at all cost. Only under demanding large, huge, wedding installations, have I ever used it. What I'm going to teach you today, is how to make the structure, to avoid using foam, which cuts down the shelf life of your flowers, and also fills our landfills. The armatures can be made with 2-3 different types of materials. This is a bendable wire that is very pliable, and I've simply wound it into the approximate shape and size of the liner for our container, and then it fits in so, and it's nice and secure like that. If you do not have this wire readily available or in your craft inventory, I've taken a stem from the elaeagnus that we're using for greenery, and I've made my own armature out of a bendable, flexible stem, that I have growing in my yard. You don't have to run out and buy anything special, plus it can be re-used or just simply recycled in your compost bin. The things you'll need to make this are the stem, which I have here, and then you'll also need zip ties to secure it in the armature fashion that you see that I've made for this specific size in this container. Now it's very good and secure, and I'll show you how to wind that. This also is very helpful if your flower arrangement gets very top heavy, you just want to air on the side of caution and be sure you have adequate weight to keep your liner and the armature steady and solid in your container. This way you don't have it topple over and wreck your entire arrangement that you've spent an hour on. I do hope that my 20 years experience as a professional florist will help save you the agony of last minute upsets and damaged arrangements. The other option to use would be this pin cushion. These are from the collection I have personally of my grandmother's. These were very popular in the '50s and '60s, and this would simply fit down in the liner, and then your stems would be secured in the pins. This is super easy to use, and all you do is sterilize it, and wash it, and reuse it. I would encourage you at the end of the day to use a recyclable, sustainable structure, and avoid foam. We're just going to simply take the stem that I've just cut from the yard. I'm using the same stem stripper that I used when we processed the flowers, because this is going to be submersed in water, so there again, you do not want any foliage left on the stem, and this one will break. Now we have a very pliable, usable piece of greenery, and the most important thing is that it's easily bendable into the shape, size of what we want to use. I'm going to just simply bend and actually break this gently on the tip. It might not even break, but it will lend itself, then we can attach the zip tie and hold it secure. The fashion would be to press with your hands and just gently fold the shape that you want. This is very pliable material and easily fashioned into the shape, and then you would use the zip ties to secure it. This one might need one more stem to get the structure that we have here, but this is the premise and this is the manner in which you do it. There again, you just hold this tightly, get your zip tie and tie it in at least two places, to secure it. This is the armature, and now we're ready to begin the next lesson, which is actually arranging this beautiful centerpiece that you're going to enjoy.
7. Large Arrangement: This is the exciting, big arrangement you've been waiting to learn how to do. You don't have to be a pro to make an arrangement that makes you incredibly happy and gives great joy to your guest, and enhances any gathering you've got planned. We're going to begin with the foliage that we have foraged. This is the foundation, and we're going to begin with that structure. One of my favorite sources of that foundation is the native American pokeweed. Yes, there again is a weed. Its shelf life, I've tried this for 15 years, it holds up unbelievably well. It will last two weeks in a vase if trimmed and cared for properly. I'm going to show you the first step. I use, I guess the master trade of how I cut, but I want to teach you properly the safe way to handle a very sharp knife and a stem. You want to always cut away from you. Remember, you can always cut the second time, but you cannot add the length back on, so error on the side of caution. This is going to be a quick swift cut, and you want it at an angle. It will take up the very most amount of moisture possible with cutting the stem in that manner. We're using our armature, and we're going to play around and find a secure base where this great fruit can be shown. That's one of the reasons I love this plant. We have another one, and we will use that on the side. You want to think about the general overall shape that you want to create. Trust your intuition, your style. There's no perfect way. There's nature, and don't worry about trying to be perfect. It's to do what the plant dictates, what you're comfortable with, and just enjoy the process and trust that you're going to continually learn and improve the technique that you have, and feel very, very comfortable. The more you do this, the more confident you'll become. Texture is very much a big part of everything I do. This is Rosemary and the fragrance is outstanding. I would encourage you to be creative in your greenery, and think about the fragrance and the mood that you want to set with the choice of plant material that you use. We're going to come out here. I'm going to take this more in the center, and back a little bit, and then we've got one more piece. This is just simply all our cut, so working within those limitations is just based on the availability of the material. We're going to let this sweep down, and follow the lines of this particular pokeweed. I'm going to elaborate and extend the sides by using the remainder of the stems that we have. This is a beautiful source of greenery from my flower farmer friend at River Bend flowers. I'm sorry, I don't know the name of it. This is the first year she's grown it, I'm not familiar with it. It is an annual, it is not a shrub that comes back every year, but I love the silvery texture of that. Then that will work nicely with the elaeagnus that we saved from our cuttings from the other smaller arrangements. I have that puppy dog that's playing with everything in the studio. I got this on a little Lazy Susan that I borrowed from the kitchen, and we're going to bend this and get this on more upright position. We're going to use drama here. Your proportion and the scope of the arrangement will be based on the location that you plan to use it, and what will allow for ease and comfort without intruding on a guest dinner plate or encroaching on some of the other aspects to your party. This is going to go on a buffet table, and there is our vase with our greenery. Next, we're going to use some of the hanging basket and complete the end of this and start to see the overall shape and color. We're going to tuck that in, let you see the front of that. Again, just play around. You can move what you've got, but don't be intimidated. Insert your stems with confidence and be sure that they're secure. One of the important aspects for this arrangement, for me, as I said two lessons ago, that dictated the choice of material, are the crab apples. I love these, and they've been trimmed, the leaves have been removed and they've been tinted slightly with some of our leaf shine. We're going to use that, these are larger stems, and finding a good secure location is important. I'm going to use this one in a manner that's going to come down in front of the elaeagnus. It will naturally let it just droop the way it was growing on the tree. It wants to go downward. This is actually one stem that I cut apart, so this is more upright, and this is the natural way that crab apple would have been growing on the tree. Actually, it was growing on the tree. Now we're going to start to begin to fill in this center with some of the larger blooms as these, and then we can work in the lighter blooms around it. I've chosen this for the palate of the blush, and the green. Plus they were in my yard and were absolutely free. It's important to use what you have, and there's beauty all around you, take advantage of that. The stem I'm going to shorten, I'm going to need to remove a few more of the leaves on them. We're going to turn that around. Then I have a large coleus. We've got these shorter and longer lengths that will add in for a pop of color that tie in to the color of the hydrangea. There again, you just want to be sure that you have a secure position for the flowers, you insert it. I'm going to turn this around where you can see and then I'm going to put the hydrangea. This is the front of the arrangement and I'm going to bring this short stem down. You can see where that now sits in the front. Then it's going to be joined above this cops clone that which is also from my garden. It combines the two colors of the peach and the burgundy. We're going to accent the crab apple there with that. Again, this is from a colorist standpoint, is just enjoy placing the blooms and what I want to do is use the burgundy that's also in the coxcomb, the hydrangea, and in the hanging basket foliage. Then we'll take longer stem blooms to reach out from the arrangement. I'm going to add a little bit more of this purple and silvery green foliage. As you can see, we have a little bit of an upward action, which I'm going to move this hydrangea over to accent and support the motion that's going on with the upward swing here. I just want to find a good, secure place to ensure its stability. Now, this supports and the lawn that we have going there. Then I'm going to add a few of the zinnias just to get a feel for the overall hype which I have in mind of what I want to achieve based on the table. I'm going to reach around there. You can start to see the overall shape as it continues to come together. The dahlias are a big part of this arrangement and anchoring the centeredness of something this large. Proportionately, you want to bear in mind the overall shape of your arrangement embedded as proportionate to the size and height of your container. As a general rule of thumb, your arrangement would be 2/3 high and the container would be the height, the 1/3 overall arrangement. You can go one and 1/2 times above the height of the container. I think that's the approximate size that we have now. I love these, are also coxcomb. These can be dried at the end of the event. They may dry on the arrangement, but they would be so suitable as a reminder of this event to be dried and repurposed and an arrangement that you can maintain for a long time. A lot of these flowers that we've chosen have the same qualities and that's just an added benefit. At the end of the day, it could be a nice reminder to a friend and a note made from flowers that you've dragged from the event celebrating the chapter of life that you're sharing with your guest. That is the purpose, is to enjoy and nurture those relationships and enjoy the added health benefits and beauty of incorporating flowers in every celebration of life. Have some fun grasses that I love to incorporate. These are river oats, which are in my own yard that are transplanted from my mother's yard. I loved the playfulness and the movement and motion that he did using those. Some of them are brighter green and then some are beginning to turn on the autumn color with the blush and ton changes to the seeds. But I'm leaving some of these super long. I'm going to see that we might have to shorten this but I'm going to make sure that I'm getting this down in the water. I'm not cutting it prematurely. We'll see it might do better. I hate to cut this link that may be more suited for this side with the growth and supporting that. I do think I like that there. We're about finished and we're just going to add some blooms right in the middle that support the overall shape and the color palette. This is about finished. It's less as more and the sign of a true professional is knowing when to stop and that was one of the hardest things for me and beginning floor street is I just wanted to continue to add more and more. But knowing when to stop is the hallmark of a great florist. There we have it. We're finished and we're going to spray this down. I'll show you the technique of the finishing spray that will add 30 percent to the life of their flowers. There we go.
8. Finishing Touches: Now are the final touches for the arrangements. I have too the smaller one on the table and a large, but they're centerpiece-finished. The last final step is to add a finishing spray. This is a professional spray which you could get through your local florist or with a floral wholesale account. It could be available at the retailers, but it is ready to use. I keep a bottle specifically marked clearly, it's called crowning glory. This will extend the life of your blooms at a minimum of 30 percent. I'm personally over 20 years. I've seen this hold-up wedding work unbelievably well in all types of conditions, so I highly suggest using it. You just want to lightly spray over the blooms and do like I've done here. A lot of times, I'll have two bottles. If I'm doing large work and I spray with both hands, but you want to be sure that you get. The larger the bloom you want to be sure and the more expensive then you get right in the center, and then the same things with the smaller ones. We're going to give that a quick douse and same thing here. That makes a big difference. I wanted you to see about the approximate overall size so that you'll have a comparison of what to do and use in your own setting. The shorter arrangements are overall approximately nine inches tall and they are approximately 67 inches wide, so these are what you would use on the place settings. This one is approximately three feet in width, so if you needed to adjust the shape you could do that. Then from the bottom of the container to the top of the arrangement is approximately 22 inches overall, so that'll give you an estimate of what you've seen me design here today. This is how you care for it, we talked about changing the water. The same thing with this arrangement, and the finishing sprays is critically important. Thank you.
9. Thank You & Share: Thank you so much for watching this online course. We learned to make one large arrangement and one smaller arrangement, and we learned many skill sets such as processing flowers, how to make an armature, and the importance of zip ties. I do hope you've enjoyed it, that it's brought you great peace, joy, and that what you make will in turn bring beauty to your life, and to the life of your family and friends. If you would please tag me on social media, I'd love to see what you create. That would be super exciting for me, and then if you could follow me on my Instagram and other media accounts, I'd love to let share with you what my next online course will be. We've got a great lineup, some incredible things to learn that 20 years in the floral industry has taught me. I'd love to teach you. Thank you so much for joining in, and I hope that I'll see you again on another course.
 Roiann Ridley, Professional Floral/product Designer