Transcripts
1. Class Introduction: A lot of photography
these days bore me. It seems like some photographers forgot that they
too are artists. They're afraid to take risk and artistic license
with their work. A camera is a tool like any
other and when you understand its settings you're able to take your vision and
shoot intentionally. Hi, my name is Maureen, I am a portrait and
fine art photographer. With my work, I
want to give people a safe space for introspection
and vulnerability, to spike the courage to
draw their inner voice. One of the inspiration
for this class is myself portrait, Cololina. This photo was published
in photo Vogue Italy and I created it in my mom's bathroom with whatever I have available. The success of this photo didn't rely entirely on
what gear I had to create but rather on my
knowledge of in-camera effects, my vision, and my recipe for constructing the story
I wanted to tell. In this class we'll
begin by having a brief conversation about
how to get inspired, how do curiosity and
willingness to be vulnerable can help you come up with a unique story vision. Then in each lesson
you will learn how to experiment and bend reality
with in-camera effects. For this, I have
selected five of my favorite for you to try out. They are, frozen motion, blur, zoom, out of focus, and ICM. For your class project
you will choose one in-camera effect
that you think fits your vision and
experiment with it. Your goal is not to take a "beautiful or technically
perfect photo". Sometimes a compelling
photo is just ugly or even dark but meaningful to you
and hopefully to others. This class is for anyone who feels a stock or bored
with photography. If you are someone who can take good photos that
just don't move you, this class will help
you reconnect with your inner voice while also adding dynamism to your images. Even the beginner
is welcome here. This class will provide you with inspiration on how
you can achieve meaningful work
while learning about camera fundamentals so that you can start
creating right away. By the end of it you will have a comprehensive idea of how to merge inspiration,
a storytelling, and how to take advantage of your camera settings and
lens as if you were using different brushes to create artistic work without needing
to rely on Photoshop. Know that you have
the responsibility as an artist to bring
what's within you. This is part of your legacy
so let's get vulnerable.
2. Project And Class Orientation: [MUSIC] Welcome to the class. Our goal for your
class project is to choose one in-camera
effect that you think can help communicate your story vision or emotion
and experiment with it. Then I invite you to
share your result or results in the
project gallery section. I will be more than happy to provide you with
constructive feedback. But before jumping
in to start grading, I would like to give you
some recommendations. Start with the right mindset. There is absolutely no need to take a beautiful or
technically perfect photo. This is about experimenting, practicing, and discovering a new way to express yourself. When you're trying to
achieve an in-camera effect, focus on playing
and experiment it with your camera
settings and lens. The more you practice, the easy it will be for you to create these effects on the go. This skill will become part of your photography toolkit
that will allow you to create unique
creative photos for you and why not for
future clients. For the sections
where you work on constructing meaningful
story vision, think of this part
of the process as a creative self-care practice in which you will share
what's within you, what matters to you. This ritual helps me relax and gets me into
the state of flow to deeply connect with my inner voice to create
meaningful images. I highly recommend it for you. To support you in
creating your project, I have broken down
this class in a way that walks you through
all my workflow so that you can
emulate it or get inspired to build your
own creative system. The first lesson covers a step-by-step how to
get inspired and construct a story vision all the way to how to merge it
with in-camera effects. The rest of the lessons focus
on two central teachings : how to achieve a
specific in-camera effect and provide examples
of how I merge this effect with my vision to help tell the
story or emotion. This class is packed with tons
of actionable information. To help you point gain
overwhelmed, I got to covered. I recommend first downloading the workbook and resources
manual I have created for you as it
contains a summary of all the fundamental
concepts of each lesson. This will allow you
to immerse yourself in the videos and then have the workbook handy as a guide when you are
working on your project. Other resources I
have included are a list of all the equipment I use for each in-camera effect, resources and alternatives in case you don't have
the gear I used, an ISO, aperture, and shutter speed chart, and a section to write your
camera settings while you are experimenting or any
notes about your process. The basic equipment you
will need is a DSLR camera, a tripod or a vase
to hold your camera, and any editing software
to enhance your photos. For more advanced
in-camera effects, you will need a zoom lens for the zoom effect and
a mobile phone for the out-of-focus effect
in case you can do this with your DSLR camera
or your lenses. If you don't have some of these, I have included a PDF with options in the
resources section. Lastly, it will be good to have a black background or dark bed sheet or fabric
for the motion blur effect, a shiny the object
and a constant light. It can be a house lamp as well for the
motion blur effect. Don't worry if you don't have all the equipment I am listing. I encourage you to
watch the lessons, get inspired to experiment, and why not find ways to achieve in-camera effects with
whatever you have available. There are always options to create just as I
did when creating myself portrait Elena which was published in
PhotoVogue, Italy. You are all set. I'll see you in the next lesson. [MUSIC]
3. Creative Process: Building Your Vision: While this class is about how to express yourself with
in-camera effects, it would be helpful to
focus first on learning how to integrate them into
the concept of your images. The goal is that
these effect help communicate your
story or emotion. But to achieve this, I will first show you my creative process to
develop a story or a scene. A three-steps process
that I found is quite relaxing, fun,
and insightful. It could even become a
creative self-create practice. In a nutshell, we will
talk about how to create your inspiration vault so
that you get inspired, determine what topics
or themes you're interested in expressing
with your photography, and the process to construct
your story based on your favorite topics and merge it with an
in-camera effect. This process comes in handy, especially if you have
the creator's block. You feel overwhelmed
and discouraged because you have no
idea what to create. Your mind goes blank. But that's okay, it
happens to all creators. We just need to get
inspired and apply some techniques to ignite the creative engine.
Let's start. One habit that I have developed to nurture my creativity is collecting anything that brings joy and [inaudible]
my interests. I keep these
resources into what I call my inspiration
vault or hub. For example, my sources of inspiration are painters
from the Renaissance, music, lyrics, movies, books, and my life experiences. Mutually, everything can be
a source of inspiration. You can start creating your
inspiration vault right away. Having a folder in your computer or in
the Cloud in which you can keep references of the
things that interested you, that move you,
would do the trick. I encourage you to create
your inspiration hub as soon as possible
because instead of going out with
your camera with no idea about what
story to tell, which can be very discouraging, having references of the
things you love would relax your mind and stimulate your creativity and spark
ideas for your projects. Exposing ourselves to
different artists, techniques, and life
experiences is valuable. You will have a universe
of options to pull from your inspiration
vault and mix them so that you can develop
a unique perspective. I like to think that the
creators of those resources are my mentors and
their influence on my creativity will
inform my work. The next step is to find out
the overall themes or topics you're interested in exploring and developing in
your photography. For example, my
topics are silence, melancholy, nature, vulnerability, intimacy,
and femininity. Nailing this is
important because as the core message
in your image, they could become your voice and communicate what you stand
up for to your audience. How can you find yours? We can discover them
by digging into our interests and
interviewing ourselves. This is what I would
love for you to try. If possible, find a place
where you can be alone. Look at your inspiration
vault and also look at your photos and remember stories with your friends and
family that were unique. Be curious about what
you have collected. Try not to judge yourself. Focus on observing
and absorbing. Immerse yourself
in contemplation. Then grab a paper and pen and start by interviewing yourself. You can use the
following prompts as a guide or create yours. I will add these into their resources section
if you need them. If I were to die tomorrow, what could I be passionate
to speak about? What activities have brought me the most joy or made me feel
alive throughout my life? What do I feel when I see the works of the
artists I admire? What words from songs that I
love resonate with me a lot? What are the hobbies or habits
that make me feel alive? Be thorough and underline
the words that move you, those that resonate the most and spark a passion for creation. For me, Sandro Botticelli works trigger the
words femininity. That has become one of my favorite themes and
topics of interest. This exercise is for you to
explore your inner cosmos. It is as limitless as
you want it to be. If you feel uncomfortable by being vulnerable, that's great. You will have to get to
know yourself even better. For example, when I was
working on my break father, I explored his last days
before passing away. I was nervous because looking at the past and exposing
it can be very painful. However, I knew that [inaudible]
and letting myself be vulnerable will
help me understand him better and have
a deeper connection. That openness allowed me to
create something beautiful and spiritual that came
straight out of my true self. Vulnerability is
not to be feared. We can embrace it to create
more meaningful work and connect deeply with
ourselves and with others. We have created the inspiration
vault and found out the topics to develop in
your photography. Now what? Well, the next step is constructing your
story vision based on one or two themes and adding in-camera effects
to help tell your story. Now, choose one of your favorite themes and
topics and ask yourself, what story do I see? Take your time and imagine
a scene then describe it. Be very detailed. Think about this object,
location, wardrobe, props, everything to bring your
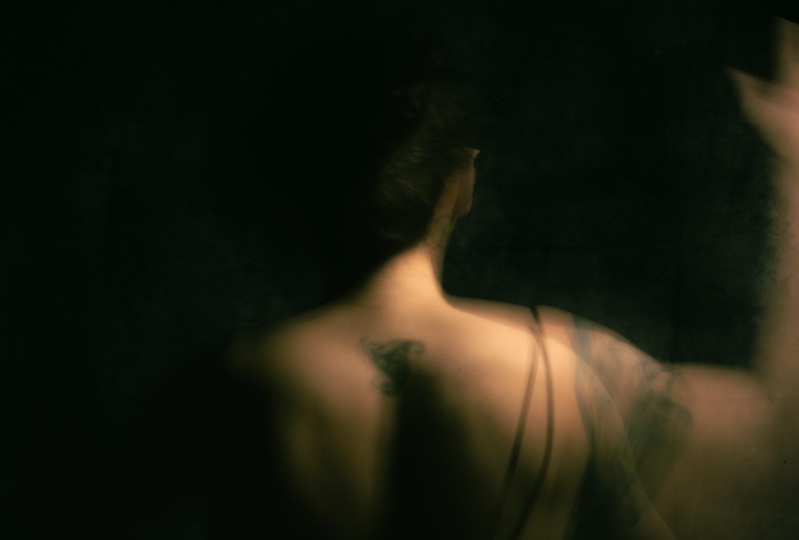
vision story alive. Here's an example. Theme, Femininity and Movement. A storytelling or
a story vision, a woman is sitting quietly. She's in a dark place but
surrounded by warm light. There is a sense of peace,
serenity, and femininity. I can see her hair. It is messy, wild, and free. She has beautiful flowers
hanging on her back. She seems confident
on her naked skin, dancing carefree,
enjoying her time. As you can see, I describe a scene as if I were
telling it to a friend. I am not trying to write a book, only imagining what
is happening there. I'm being very detailed. The goal is to have a clear idea of what we want to express. If you struggle to tell stories, follow these storytelling
elements questions as your guide to develop it. Three elements will be enough
to construct the story. I will just start by
describing first the subject. For example, Who? A woman is sitting quietly. What? She's in the dark, but there is also a warm
light surrounding her. It looks as if her
body was moving. She wears flowers, they're hanging on her back. Where? It could be her
bedroom or bathroom. Remember, the audience
does not need to know why this object is in that situation
or the end of the story. Let them wonder and
guess how it ended. That will create engagement. To finish constructing
the story, we have to think about what elements will help us tell it. In other words, what in-camera effects
and symbols will be applied to give my audience hints about what a story
or scene is about. You may have already
written them intuitively in your story
vision, that's perfect. But let's make sure that those elements
communicate something. Let's talk about these elements. A symbol can be an object that serves as a prop or
element in the image, but also signifies something
beyond its word meaning, which adds a layer to
communication to your story. For Alina, I use flowers as a sign of feminity and purity. In-camera effects are distortions
of reality created by playing with combinations of your camera settings and lens. The takeaway is to be mindful of why they will
be in your image. Make sure that the effect you choose communicate something in the story rather than selecting it only
because it looks cool. Always think about how you want yourself and your
audience to feel. Do you want your viewer to feel movement by applying
motion blur for example? For Alina, I used
motion blur with a long exposure technique to represent a soft motion
of Alina's body. With this effect, I hope that the viewer experience a sense of movement in Alina's body instead of looking
on a still image. I want to transport my audience
to a dynamic live scene. Throughout this class
I will show you more examples of my work and other artists who
express their vision with in-camera effects to
help you get inspired. A complete story
vision which includes symbols and in-camera
effects looks like this. Now you have a clear vision, the only step left is
to complete a sketch in your story vision to have a
visual map of your scene. Note that there are other types of photography, like abstract. In these, you can integrate in-camera effects
without telling a story. In this case, the idea
is to express an emotion so its creation process is different from creating a story. Wow, this was a
long creative unit. I hope you enjoyed
as much as I did. Remember, this is only how I merge a story vision
with in-camera effects. I invite you to take
this as a guide to create your own system to
create images you love. Thank you. See you
in the next lesson. [MUSIC]
4. Frozen Motion: [MUSIC] Frozen motion is the fact that allow us to see
something that is moving completely
frozen in time. What I like about this
effect is that it helps us see all the details of the
action that is unfolding. Let's take a look at
how this effect can be applied to convey a story
or to express an emotion. The story of this photo was inspired by the song
Cry Me A River. Even though that phrase
is a title of a pop song, I found it quite interesting to explore and to
create an image that will represent a heartbreak and all the feelings
that comes with it. For example, sadness,
frustration, regret, and so on. This is a scene in which we don't know who
the subject is, why she's wearing a
fancy jumper during the day and when she ended
up in shower outdoors, we have no idea. However, if we look
at the body language, we can tell she's
perhaps sad, angry. We can tell something
is definitely not okay, and that is intriguing. Not knowing what's happening in the scene is absolutely fine. It will make your
audience wonder and guess how the
story goes or ends. What I recommend
is when you shoot, shoot with the intention of expressing a specific emotion. For example, if you
look at this photo, even though it's from
the same photoshoot, her expression and body language
is completely different, and therefore, the
story changes. This could represent a
story about something good, for example, celebration
sometimes or even euphoria. To help convey this sad story, I apply the frozen motion effect to make the drops
of water look sharp and crisp as a metaphor to represent something
that can be painful. For instance, small rocks or
bullets hitting your body. The opposite of these
will have been applying motion blur to make the water
looks softer and gentler, conveying a completely
different emotion. For instance, melancholy. Elements or symbols. Other elements or symbols
used to communicate the story are the fancy jumper she's
wearing and the wedding ring, as they provide clues about
what's going on in the story. In this case, I
selected a party or a cocktail wardrobe that
is designed to be worn during the night in a
party or a cocktail so the audience can speculate
the possible scenarios. For example, perhaps she was in dinner or party and
didn't came back home. Lastly, the water itself
represents emotions flowing. Here are other
wonderful examples from different photographers. Photographer, Neal Grundy, and I hope I'm
pronouncing it well, created these awesome series of images named
transient sculptures. These idealistic
series were made by freezing pieces of
fabric in mid flight, making this look like, as the name indicates,
as sculptures. Although these photographs
do not tell a story itself, they for sure transmit emotions. For me, it is calm and
a sense of gravity. Other very good
examples are from the photographer,
Natsumi Hayashi. She photographs levitation
self-portraits, and transforms usually scenarios into very interesting stories. This is a creative
prompt for you. What scenario and subject
would you apply them frozen motion technique
to convey madness? Think about it. Now, let's talk about the
technical aspects. How can you achieve this effect? The first thing I do
when I'm ready to shoot is to stop for a
moment and ask myself, why do I need to do with my exposure settings to
achieve a certain effect? In this case, I know that
I want to freeze motion. For that, I need to
focus on shutter speed. Shutter speed allows
us to do two things. First, to choose for how long the camera sensor will
be exposed to light. Second, it also helps
us freeze motion, which is what we're looking
for in this lesson. Or it can also help us
create motion blur. To freeze motion, you need to choose a shutter speed value of at least 1/250 of a
second and above. The exact shutter
speed value will depend on how fast your
subject is moving. For instance, if it's
a person walking normally versus
freezing water drops. Now let's shoot. Once you have your camera ready, start by testing
fast shutter speed in comparison with the
subject in motion. In this case, I started testing my shutter speeds
against the water drops. Then see the difference in
each one of your test shots and choose the one that freezes
the subject successfully. I am honestly not a
technical person, so I always bring a cheat
sheet with me to review my options and my triangle
of exposure if I need it. Keep in mind that I shot
on a very sunny day, which allowed me to shoot at a very high shutter speed
of 1/1600 of a second, and with a large depth of field without needing any flash or strobe to
compensate for light. If you are shooting indoors, you will probably need a flash or strobe
that will give you the burst of light needed to shoot fast and
freeze the motion. After reviewing all my shots, I realize I will have tried a faster shutter speed because even though I really
loved the results, I notice some of the
drops were not as crisp and sharp as
I want it to be. It is definitely not a big deal, but these are things to consider right there
while you're shooting. The creative prompts
are for you to start using your imagination
and to brainstorm at home. Also remember that you
can share your project on the project section and get constructive feedback from me and from your fellow students. This is it for this lesson. I will see you in
the next one. Bye. [MUSIC]
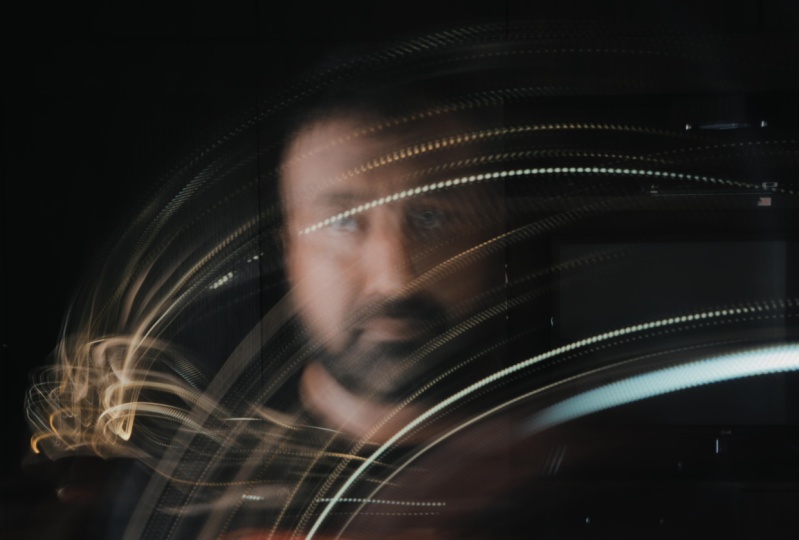
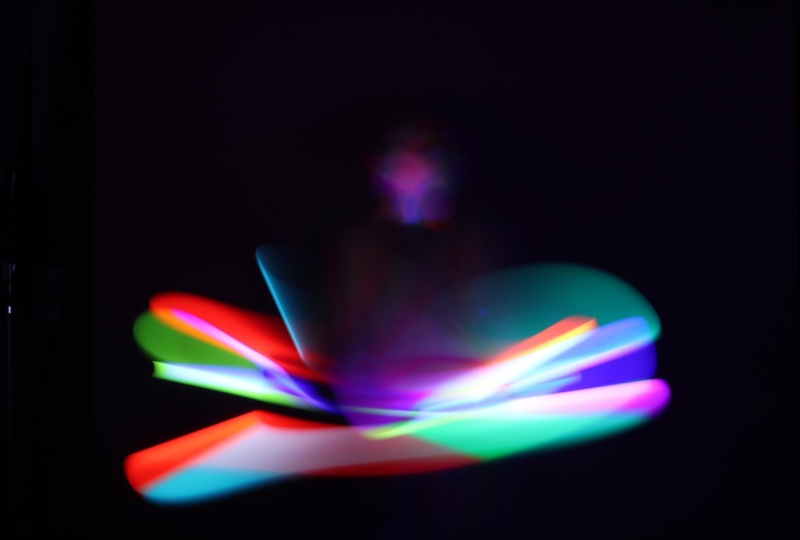
5. Motion Blur: Long Exposure Technique: Motion blur is the
striking effect recorded when your subject or your camera moves
during an exposure. As a brief reminder, exposure is the
amount of light that reaches your camera
sensor or film. It is determined by how you
set your shutter speed, the aperture, and
the ISO numbers. From all the motion
blur effect types, this is by far my
favorite because this technique has
allowed me to create beautiful editorial work
by simply using lamps that I found in my house or
a small constant lights. You will see how
easy is to create motion blur with this
technique at home. Let's talk about
the creative part of the photo shoot
first so that you can start thinking about ideas to compare an emotion or a
story with this effect. The motion blur created with the long exposure
technique gives me the feeling of
something ethereal. It reminds me of the
passing of the time. It could also be energy
that is leaving our bodies, whispers or why not sound
waves flowing around us? To give you more context, let's explore the creative
details behind this image. Inspiration, this is
one of the images inspired by the teachings of the British
Philosopher Allan Watts. The storytelling,
the [inaudible] a story about letting go on many levels: let go of the past, let go of old beliefs, and observe them as they go. The subject is in solitude; her mind is in a quiet place. She absorbs her past and let it go so that she can live
here in the present moment. The effect is motion
blur made with a long exposure technique
to create a light trail. The light trail represents
the energy of old beliefs, past lives, and pain
leaving the body, the mind, and the soul. The symbols used are the dark place to represent the quiet
mind and the solitude. I have shared with you some of the representations
that a motion blur can convey in an image but this is by no means
an extensive list. I have another creative
prompt for you. I'm very curious to know what
emotion or story would you convey by applying motion blur with the long
exposure technique. As in our previous lessons, let's now talk about how
to create this effect. The first thing, the
most important thing is to select a place where
you can shoot in the dark. Either is a dark room where
you can close all the shades, or maybe you can shoot at night. We need this type of light controlled set so that the light trail effect
can be seen perfectly, otherwise if you have more light around,
more ambient light, you will not be able to see the motion blur effect on the trail the way
we want to see it. Remember a dark room
or shooting at night. Also for the examples
I'm going to show you, I used the following equipment. A tripod or something
that holds your camera, it could be a stack
of books or a table, a dark backdrop; for this effect, the darker
the backdrop, the better. I have used black and
brown fabric that works. Bed sheets or even a dark
wall works perfectly fine. As long as it is dark, you are good to go. I also used a constant light, which means a source
of light that is constantly providing
light, it could be, for example a LED lamp or lamp that you can
find in your home. I used this small LED lamp. Nothing fancy that
totally works. Of course, you will
need a person to shoot. I mostly do self portraits, so that person can
totally be you. If that is the case, I recommend getting
remote control. I have them, this
helps me work easier. I do not have to
set my timer and run to the scene and
go back and forth. Also you will need a shiny object to reflect the light and create
the light trail. For example, I use this shoe. Literally this is what you need, something that
reflects the light. Once you have all of the equipment and the
room or the set ready, then it's time to
define where you're going to place your
constant light. I placed my constant light around 45 degrees
in front of me. The light was facing
me from above. I was making sure that the
light was hitting my face and the shiny shoe to really
create that trail of light. Let's talk about a little
bit about your settings. In the previous lesson, we talked about frozen motion, which you can
achieve by selecting a shutter speed from
1 over 250 and above. For this lesson, we're
going to do the opposite. We will again read first and foremost on shutter
speed settings. But this time, the
key is to choose a very slow shutter
speed and then balance aperture and
ISO accordingly. In other words, we will work with a long exposure technique. Remember that when you
select a slow shutter speed, more light will hit the sensor, which means you could get
an overexposed image. To fix that, compensate by selecting a
bigger aperture number, and select a low ISO,
for example, 100th. Now to create motion blur, something has to move. It could be the camera or the object that
you are shooting. When I was creating
this concept, the idea was to create
a trail of light, and also trails of
light that will reflect my face and body
in different angles, which means I will need to
experiment by moving at different paces and posing in different ways where I was
holding the shiny shoes. I will have to do this
over and over until I got the shot that really will
convey the idea of letting go. For this shot, my shutter
speed was five seconds, aperture was 22,
and ISO was 100. You can start with similar
settings just taking consideration that
your settings will change because you're shooting
in a different condition. Once you have defined your
preliminary settings, start measuring
the speed you are moving against your
shutter speed. Practice, practice,
practice until you get the perfect
combination of settings and the
way and the speed you should move to get
the result you want. I hopped you have enjoyed
this lesson as much as I did. Don't forget to share your project in the
project session. I will be more than happy to provide you with
constructive feedback. Thank you very much and see
you in the next lesson. [MUSIC]
6. Out Of Focus: [MUSIC] How many times have
you heard that your photos should be
focused and sharp? I am guessing
pretty much always. But for this lesson, I want to invite you
to think differently. To think that what may be
a pinpoint for a lot of photographers could also be another tool to express
your creativity. I'm talking about
great images that are completely out of focus,
but intentionally, you see photography is a median of expression,
and as such, there are situations when the technique is
not right or wrong. It is just another way to get a specific result
and while getting sharp focus images is in general a good practice
to get amazing photos. There are times when
the opposite is true. Just for the purpose
of this lesson, I give you permission to
grade out-of-focus images, so let's dive in. These are some examples
of how I have used this technique to create images that represent
memories I have with friends, dreams, and fictional stories. When I close my eyes, the images are not
focused or clear. That's why I love
this technique, so that my viewer can be transported into
my own experience. Is like giving them access to the most personal
parts of my mind. This image, for example, is inspired in the
story of my father. The way I remember him, and what I think he was imagining at the time
he was passing away. Storytelling, the scene conveys a story about a lonely man who loved to spend
time in the sea. It was his sacred place. The subject is in solute of
contemplating the beauty of nature and preparing
himself to transcend. This is his last memory, or perhaps his dream. Effects, out-of-focus technique
to make the viewer have similar emotions of what the subject may
have experienced. It could be a memory or a dream. The symbols used, water as a symbol of the subconscious
mind provocation before passing away
and transformation. Light as a symbol of life in
the afterlife and guidance. Here are other examples of out-of-focus images from
the artist Bill Armstrong. These images are part of his work called The
Infinity series. His technique is to do collages and take
photos out of this. When he does is
photocopying, cutting, and painting over images, and then retakes these as
out-of-focus photographs. As you can see, you can
create out-of-focus images by taking photos of
collages or why not? For instance, take
photos of a design you made in Photoshop to create
something completely new. Before continuing with
the technical part, let's check out the
next creative prompt. After you finish this lesson, go ahead and take a walk
with your camera around your neighborhood
or a place that you love, observe the surroundings. Do not rush, take the time to absorb everything
you see and then choose a scene that you
would like to see as a dream or as a distant memory by applying the
out-of-focus technique. Now, it is time to dive into
how to create these effects. As far as the location you can shoot at anytime of the day, outdoors or indoors,
that is up to you, regardless of where
you choose to shoot, my suggestion is that you will
start with a simple story, perhaps a scene with one person, so that you can start
feeling how the out-of-focus work
and build from it. To create this effect, you will need to switch your
camera focus to manual mode. This means using the focus
ring in your camera. Otherwise you're
out-of-focus settings will attempt to focus
somewhere else. If you don't have a focus ring, perhaps you can use
your cell phone and switch your focus to
manual mode as well. For this effect, we need to work on the f-stops of the lens. That means to prepare
your camera to shoot with the smallest upper two
number you have available. This is to limit the depth of field and to create
a bucket style. For instance, my smallest
upper two number is 2.8 and as always, remember to set up your camera
with the right exposure. In this case, adjusting your
ISO and shutter accordingly. For instance, I shot on a sunny day outdoors
with natural light, so I just took my
camera to ISO of 100th. Shutter a speed of
one over 600th to avoid motion blur and to
reduce the amount of light. My lens where 50 meter lens. Once you're ready to shoot, if you are working with a
DSLR camera in manual mode, move the focus ring to
focus first on infinity, and then move it
back and forth many times until you get the
right amount of work. What I mean is to find an out-of-focus image that
is still has some shape, so that your viewer can
identify the elements. Otherwise, if you
overdo the effect, it will make the image abstract, which you can definitely use for other
photography breaks, both for the purpose of
this lesson, let's focus, no pun intended, on getting a nice
out-of-focus image. Also, you may need to play with the distance between the
subject and the background, and if you have a zoom
lens or other lens, experiment with them as well as all these variables can change
the way the effect looks. Last but not least, if you
are using your cell phone, look for a way to set the focus in manual mode and
move this later, also back and forth many times until you get
the best result. This is a image I showed you
in the creative example, and this is a result of something similar
done in the park. This is how you can get
amazing out-of-focus images. This is it for this lesson. If you have any questions, feel free to post them in
the discussion section, I will be more than
happy to reply. [MUSIC]
7. Zoom: [MUSIC] In this lesson, I'm
going to show you an effect that doesn't seem to be very famous yet it is
super fun to play with it. It is the Zoom effect. I usually see this
effect applied in night photography or
a sports photography. For night photography, the effect creates an
incredibly lighted environment, almost as if we were surrounded by shooting stars
or laser beams, creating a futuristic
atmosphere. For sports, it adds dynamism
and energy to the action. For instance, in this image, I applied the effect to
symbolize the force and energy emanating from the subject
while he was boxing. But also, if you're more
on the side of fine art, fashion, or artistic
photography, you can absolutely apply this effect to any
of your concepts as a way to add drama or
symbology to your narrative, or simply as a way to
add your own style. Let's check out the next image. This image id inspired
by my observations about the strangers in the city and our vulnerability
when we walk alone. Storytelling. The scene conveys curiosity and tells a story about a woman
walking quietly and an observer wondering and
speculating about her. Effects. The Zoom
effect represents two things: the mind
of the observer who is completely focused on wondering about the person
in front of her or him and the time that is passing while the
subject is walking away. The Zoom effect itself, it represents distance, time, and the energy of
the two persons, one observing,
another walking away. I think as an artist, it is important to listen to your insights and find a way or technique that allows
you to transmit your narrative in
the way you feel it. They creative prompt for
this lesson is, as yourself, what is one technique that can potentially match what
I want to express? Now, let's check out what you will need to
create this effect. You will need a tripod. This is important
because since we need to choose as lower shutter
speed or long exposure, if you just carry your
camera in your hands, it will not be as steady and
you will get motion blur, which looks very cool, but that will be for
another assignment. You will also need some lens. We will be zooming in or
out to achieve this effect. My zoom lens are 24-7
millimeters focus length. For this effect, we have to
work on two main things. Number 1, selecting a
slow shutter speed. There is no rule or a
specific shutter speed value. Your best shutter speed
value will depend on different factors
like the amount of light where you
are photo shooting, outdoors or indoors, the speed in which you
zoom in or zoom out. Second and very important
thing, how fast, slow or smooth you zoom
in or zoom out your lens. Again, this will call for
a lot of experimentation. Personally, I have found
that assuming relatively fast and smooth gives me generally the results
I love the most. As far as the location goes, you can shoot
indoors or outdoors. I highly suggest that you
start early in the evening, in general, in a low
light environment. I recommend this because
you will need to use a slower shutter speed
to achieve this effect, which will allow
more light to enter into your camera
sensor, and therefore, you will have to compensate with a bigger aperture number to cut the amount of light and
avoid overexposed images. For instance, this image
was taken outdoors at around 5.00 PM and my
settings were shutter speed, five seconds, ISO 100, and my aperture number is 22, which is my biggest
aperture number. Or in other words, the smallest aperture
size of my lens. So basically the tiniest
aperture my lens can achieve, and that can help me cut the
amount of light coming in. Now that you have everything
setup, your location, subject and all your gear, let's talk about this steps itself when working
with your camera. Number 1, start by focusing on the point of most interest. For example, the face
of your subject, a specific thing, a building, something
of your interest. If you focus on
something random, you run the risk of getting
the attention out of the main subject of the
narrative or the whole story. Number 2, place your finger on your shutter button and your
other hand over your lens. Number 3, as you press
the shutter button, start rotating your lens
zooming in simultaneously. Number 4, see the
result and adjust your shutter speed value and your aperture
number accordingly. Try again, practice and experiment until you get
what you're looking for. This is it for this lesson. If you have any questions, feel free to post them in
the discussion section and don't forget to share your work to receive
constructive feedback. See you in the next lesson. [MUSIC]
8. Blur: Intentional Camera Movement Technique: [MUSIC] I'm a frustrated painter who has always admired abstract
impressionist paintings. I love how that style can convey emotions and mesmerizing
atmospheres. The good news for many
photographers artists out there is that there is a
cool way to create abstract, blurred images and
that is thanks to the intentional camera
movement technique. As the name indicates, we are going to
intentionally move our camera while we are
taking photographs. This means we do not have to worry about sharpness at all. We're going while
with a mindset of experiment and get
surprised with the results. In most of this class, the focus has been
to tell a story. But for this lesson
we will be working on capturing interested
atmospheres. Always remember that your
camera is a tool that will capture anything of your
interests, not only stories. Abstract photography can totally
be a wonderful medium to captivate yourself and
others. Let's dive in. When working to
achieve this effect, I always sit in a
quiet room and I start thinking and
writing about what places I enjoy visiting and
would love to see transform into an
abstract photograph. Usually I'm interested in
nature like an empty beach, forests or perhaps with
a friend or family because those places
makes me feel joyful, serine, sometimes nostalgic, and in complete sync with
the beauty of nature. Those places have
mismatch in energy that I feel eager to
capture in an abstract way. But I also enjoy
wondering through some hidden gems of the city and contemplating
the architecture and the lights when
the sun is going down. I encourage you to find
your own way to tune into the atmosphere
that connects with your interests and
feelings and that you feel eager to capture
in the abstract way. I like to think of it as if the atmosphere or the location I chose was an extension of my state of mind or
current emotions. In short, and to be more clear, when I say atmosphere, I'm speaking about a location that has deep meaning for you. As I mentioned earlier, in this lesson we're focusing on capturing atmospheres that will hopefully evoke emotions in you and your audience rather
than telling a story. However, it is
important to think of the inspiration and
the elements or symbols within the
atmosphere that you choose that is
important to you because they will help you as a roadmap to select the best composition
for your photograph. It doesn't have to
be any complicated. In fact, the
simpler, the better. Let me show you an example. Knowing these before photo
shooting allows me to ambition how I want my elements to be captured
in the final image. Inspiration. This image is inspired by the
beauty of the sea. It's never ending motion and the memories of
living by the beach. The symbols used. Water is peace, serenity, constant cycles
of purification, and life. Undefined people as a symbol
of shadow of the past. The creative prompt
for this lesson is, if you were a
landscape or a place, where would you be and why? For this effect, we need to
work on two main things: the shutter speed to get
the abstract blur effect, and second, how fast is low and in what direction
you move your camera. My focus is to first
observe the atmosphere or a scene and see
what its flow. What I mean is, are there
horizontal or straight lights that I would like to follow as if they were brush strokes. Regardless of the
flow and because I'm interested in
getting surprised, I experiment with moving the camera in
different directions. You can even mix
these technique with a simpler technique that I
teach in the same class. You can zoom in with your
zoom lens if you have them, and move your camera
at the same time. Checkout that lesson if
you haven't done so. Although we already
talked about how to tune in and choose
the best atmosphere, it is quite important to take in consideration the time
of the day you are going to shoot or the contrast you can find
in the chosen place. Let me explain. Try to look for contrast
of color, highlights, and shadows that can help
to get a good balance of blur and some
identifiable elements. Similar to the zoom technique, this will also call for
a lot of experimentation as there is no rule or a
specific slow shutter speed. However, a good
start point could be one of a second
and go from there. See how abstract the
image can get the lower or the longer you
go on the shutter speed. As I have mentioned
in other lessons, lowering your shutter
speed will mean you will get more light
into your camera, so you will have to
adjust your aperture accordingly to avoid
overexposed images. From here, it is all about
practicing tons of times. Perhaps you can start
practicing the technique first with random places and then
once you feel more prepared, schedule a special day to shoot in the place that
is so important to you and take the time to be relaxed and
enjoy your process. I hope you have enjoyed this
lesson as much as I did. I'm excited to see
what you create. I would like to
invite you to share your work on the
project section. [MUSIC]
9. Enhance Your Photos: [MUSIC] Well, all the effects
examples you saw in the previous lessons were
made right in camera, and there was no need to
editing them in Photoshop. Regardless, I always
like to enhance my photos in Camera Raw. It is a very simple process
where you as an artist, have the opportunity
to add your style. Remember, this is not
about complicating your process and changing
a lot of things, it is a soft process
if you will, where you will just make simple, easy adjustments that make your images look
even more beautiful. Kind of placing the
cherry on the cake. Now, I used to enhance
my photos in Lightroom, but then I found a better way to streamline my
process in Bridge. Within this program, I can sort my images easily
and I can also open the photos I want to enhance in Camera Raw which is
similar to Lightroom. It works like a charm for me. But don't worry if you
don't have Camera Raw. You can also use Lightroom or other editing programs
like a Skylum, Luminar, Capture One or even Apple
or Google Photos as all of them have the bare essentials to make your photos
look even better. Let me show you a little
bit of my process. While I'm here in my
editing program which is Camera Raw and I have imported my raw file
straight from my camera. I haven't done any
change to this file. The very first thing
that I do when I open my image is to ask myself, how do I envision this
image to look like? Again, this is not a
complicated process. It's very brief, it's just to put your
style into your image. I already love the photo, but I know that with
some adjustments, it will look even better
and it will have my style. I know that in terms of cell, what it means to me is that
I will apply contrast. I love dramatic
contrasty photos, and also I love for this project to be
something ethereal and that looks like it was made on a film rather than
a digital camera. In order for me to
get into that vision the first thing I will
do is crop my image and find a crop that really
helps convey the story. I like the cut square for this one so I'm really
loving it and from here, I'll just go to my Basic panel. You will find something
like this in Google Photos, Lightroom or
something like that. There's plenty of apps where you can do the same; the basics. As I mentioned, since I really love contrasty dramatic photos, the first thing I will
do is go to my contrast, it's lighter or levels and start adjusting
just a little bit. Just about that, it is already working. It's giving me a lot of drama and contrast
and I'm loving it. From here, I will just play
a little bit around with these sliders and see if
they add to my photo. It's a little bit of intuition
too, it's just style. This is exactly the
opportunity for you to tune in into what you like. One it calls for your
creativity, your style. I'm going to also
try clarity and obviously if you go to the opposite side,
it looks terrible. Again, less is more at least that's what I like to think. That's my personal opinion. Unless my client calls for
something very dramatic, I don't know, maybe
I will adjust it, but I tend to do things simpler. Just play, that's
the beauty of this. You really can play
just as if you were painting in a canvas. That's it, I will not
use this anymore. I have conveyed what I want. From here, I'm going
to do is now go to my Color Mixer
to see if I can change the color of the
wardrobe I am using here because even
though I love the tone, it's not my preference
or my favorite. I'll blue blue and look for
something more turquoise. I hope that's the
right way to say it, and just about that. I absolutely love the contrast. Not only the contrasts,
but the balance between this gold and this hue. I'm really loving it. Again, maybe I'll see if I can change a little bit on the
golden oranges or golden. I don't think it's
worth it for now. I think I like this way. By the way, speaking about making adjustments
and editing your photo, I highly recommend that when you finish
editing your photo, let your eyes rest
for a few days; a couple of days. Don't take a look to your photo. Go back again a few
days and check it out. Because what happens is that
we tend to overdo things. Because when we are editing, we tend to overdo the
vision because we are excited and you can say, "Oh, I really love it. It is looking amazing." Yeah, in that moment looks
amazing for you. But I highly recommend
that you go back and see that sometimes
it's not like that. It's totally fine. There's
nothing wrong with that. It is normal. All
artists do that. It's just a matter
of resting the eyes, coming back and saying,
"Oh, you know what? I think it was way too contrasty
so I'll go for example, to my Basic panel and adjust accordingly."
That's the beauty of this. That you can come back anytime
you want and change that. Just take that in consideration. It's a very good practice
for your art to let it rest and go back to it
and polish, if you will. That it for the basics and the color grading
and color mixer. Here in color grading
what I just did, it was just adjust a little bit the balance between all of those and make it
again contrasty and dramatic and I got that. The results is exactly
what I'm looking for. After this, usually, I love also black
and white photos. I always go to my black
and white settings and see how it looks like because
it happens to me a lot. I love both versions and to
make things easier for me, I just save both versions and I have them
in case I want to use one or the other depending of what I'm planning
to do with them. Nothing wrong with
having both versions. Actually, I encourage you to have both versions
because first, you will be able to see the
contrast in your images; if it looks flat or
it looks like it has a good range of
blacks and whites. For example, right here, I can totally see that
it's working great. I have the drama
here and bringing my attention to the parts
where there's more light, the attention and that's exactly what I'm looking
for because I want to convey a story that makes you wonder about all of
this happening here. Maybe here too,
because you don't know if she is in a dark room
or what's happening. All of these adds to your
composition, to your story. Everything has a weight
on the final project. That's the first thing why I
recommend you to do that and also because
sometimes our photos will look better one
way or the other. Sometimes you will think, oh, and color looks better. I will never change that, but you change it to black and white and you
absolutely love it. Feel free to go for it
and take those decisions. Now, there's a thing
about effects. Usually I won't use effects if I'm working
with a client that needs portrait of headshots
because I really want those to look neat, clear, sharp, and
very well-defined. For this kind of pics, I don't, I look for something that looks more like a film so I will definitely add the grain because it makes me feel
like it has texture, it has volume, it has
something different, so I'm not worried about
adding grain at all. I will do that for my fine art. Sometimes depending
on the project, it doesn't have to be
every single time, but I really, really like
to add that texture. Last but not least, presets. Here's the thing. I am not an advocate for presets because
call me old style, I feel its like another artist is applying
the style to your photo. I don't like that 100 percent, but I have exceptions. For example, if I
know how to create this and just for practical
process I use it, perfect because I know
how to make those work. If not, I will not. For me in that case, I really, really love the
black and white presets. I usually apply black and
white high contrast to my pictures because I
love the feeling of it. I really love the contrasts. Although I didn't create
these present myself, it was made writing
the software, I know I can do it myself. I know not only
that I can do it, but that this goes aligned with my idea of what I
want my from photo. I have the skill and for practical reasons I
will choose to use it, and that's totally fine. Give yourself
permission if you will, to use presets depending
what are your rules. For me, that's the rule. But for you, it could be totally fine and that's absolutely fine. I'm not saying you
do it the way I do. This is just a personal
opinion. That's it. I hope you have enjoyed this
little process. Thank you. As you can see, this was a very simple yet effective way to make your images stand out. We have finished this lesson. I hope you got some
inspiration to enhance your photos
and by the way, I would love to see
what you create. Please feel free to share your project on the
break session so that the student community
can enjoy your work and also to provide you with
constructive feedback. [MUSIC]
10. Last Thoughts: Thank you very much
for taking my class. I hope it has a spark
your curiosity to explore your inner voice and express
yourself creatively. We covered the creative
process to find out what you want to
share it to the world and the technical
aspects of creating an income or effects to help
you express your vision. The biggest takeaway
that I would love to share with you is that by cultivating your curiosity and exploring the world
inside and around you, you will nurture your creativity to create meaningful work, no matter what
artistic tool you use. Keep experimenting and
practicing so that you can express yourself
intentionally. To keep supporting you in your artistic journey no matter if you're a
beginner or advanced, I invite you to share your project in the
project gallery section. Let's nurture our community
with artistic images. Remember, I am always happy to provide you with
constructive feedback. If you have any questions. Please feel free to
reach out to me through my website or you compose your questions here
in the discussion section. Also, if you would
like to receive notifications about
my new classes, please follow me here on
Skillshare or Instagram. Lastly, if you would
like to receive insightful content about
artistic photography, creative wellness practices,
and creative productivity, please subscribe
to my newsletter. Thank you very much again, and have a beautiful
creative day.
 Maureen Eggleton, Certified Therapeutic Expresisve Arts guide