Transcripts
1. Introduction: Hey, everyone. So in this class, we'll be discussing
figure block-ins. Now, this is essentially the beginning stage of
any figure drawing, where we're going to
just take the subject matter and break it down into a handful of simple steps
so that by the end of it, we have hopefully a nice clean
proportional line drawing. Now, with this approach,
we'll be doing this with a few different
poses so you can see how I take different poses
that the model may take and approach each
one slightly differently, but again, with the
same end result. Now, this is something
that you can use, whether it's from reference, like we'll have
here in the class, or you can also use, if you take any life
drawing classes, all the same principles apply. Now, throughout the class, I'll walk you through a handful of different poses
from the model, and I'll show you how I
break down the figure from a blank page to
a completed block in. In this class, you
don't need to have any previous
anatomical knowledge. I'll walk you through
step by step how to break the figure down
using simple shapes, comparative measurement,
and landmarks throughout the body that we can use to help deconstruct
the figure. The goal of the class
is really to take a complicated subject matter and break it down to its
simplest elements so that anyone who's just
starting to draw or drawing the figure in general has a clear and specific way
to tackle the problem. Now, for all of these drawings, we will not be doing any shading or modeling of form because we're just going to focus on the initial stages of
creating a solid block in. Oftentimes, when I taught
classes in the past, students would sometimes rush through this portion
of the drawing, only to later on, have to go back and fix things
or take things out. And so you'll hear me
throughout this class, just mention and reiterate that the block in
stage is arguably the most important aspect
of beginning a drawing as it sets the stage for everything else to
happen afterwards. Now, whether you're working
from reference like we are in this class or
you're working from life in an actual
classroom setting, all of these principles
are transferable. So regardless of
how you're working, everything that we
discuss in this class, you can use right away and
apply it to your own drawings. Just like any other drawing, a lot of repetition
is involved in order to get these principles
fully ingrained. However, because we're really just working in a step
by step approach, there's not a whole lot
that you have to memorize. It simply is just a
matter of putting in the time and getting
in the practice. So I hope by the
end of this class, you'll have a very
distinct approach so that regardless of
how you're working, you always have a way forward when you start
drawing the figure.
2. What to Expect & Materials: So I wanted to spend
a few minutes just discussing what this class
is and what it is not. And the reason I say that is that with these
figure block-ins, these are typically drawings that we would spend
probably at minimum, an hour to 2 hours, sometimes maybe longer
depending on your skill level. So a lot of the
things that I discuss in this class are
geared towards that, and it's not geared
towards gesture drawing. So if you like to do quick
sketch or a gesture drawing, whatever you want to call
it, where, you know, you're doing poses
that could be anywhere from a minute to 2 minutes,
3 minutes or so on, maybe up to ten to 20 minutes, I love that kind of drawing, but it's an entirely
different process than what I would
be teaching here. When you're working in
those shorter formats, those kinds of drawings are almost an entirely
different skill set, and there's an entirely
different approach to those. And that's, again, I want
to just separate the two because I know sometimes when people just think
figure drawing, it can mean a lot of things to different people depending on any previous training you've had or any schools you attended. So I like to separate the
two because what I mostly go over is predominantly about doing longer
drawings in general. And that's kind of
mostly what I gear a lot of the style of
drawing that I do. So everything that I talk
about in this class is going to be geared towards doing these longer style
drawings where, again, the block in itself
could easily be a few hours. And when I was in school, really the greater
context of all of this is that oftentimes
figure drawings could be anywhere 40-80 hours depending on how much time we
had with the model. So when you think about it, a two to four hour block
in is actually fairly small in the total time
spent on the drawing itself. So Again, if you're used
to doing gesture drawing, this is going to be an
entirely new approach for you, which hopefully you'll be
interested to learn about. Now, at some point,
maybe I will talk about doing or do a class that is completely separate
on gesture drawing. But just wanted to mention this beforehand and before
we get started, is that, again, that style of
drawing is very different. And a lot of the rules
that I discuss in this class sort of go out the window overall
because again, when you're dealing with a
compressed amount of time, you don't have as much time
to sit there and measure, and it's kind of more of an
instinctual type of drawing. So I just wanted to mention that as an aside because, again, with this class, we're
just going to be focused on this one
aspect of drawing. So before we get started, I wanted to just
spend a few minutes talking about materials. Now, for this particular class, you don't actually need a ton of stuff,
and realistically, you shouldn't have to go
out and buy anything, but if you're
starting from scratch and want some recommendations, this is kind of what
I would suggest. Now, more importantly,
for this class, I would recommend working
a little bit larger. So this isn't the kind of
class where I would be doing these sorts of
exercises in a sketchbook, as the scale itself is a
little bit too small overall. These kinds of drawings
are typically done over the course of at least
maybe one to two, 3 hours depending on
your skill level. So I'd recommend actually
working a little bit larger than maybe
what you're used to. Now, the reason for
this is just to be able for things
like, let's say, hands or feet or drawing the
head on top of a figure, if you're working in
a really small scale, it's actually much more
difficult to draw that small. So by working a
little bit larger, those things become
proportionately bigger and easier to
draw at a larger scale. So if you're drawing
a head and, you know, your paper is this big, then your head is going
to be this small, right? And so by working a
little bit larger, it kind of just
expands everything, and I think it's
actually a little bit easier to work larger in
this particular instance. Now, that said, I
would still recommend something along the
lines of maybe you know, probably ideally an 18 by 24, is that gives you,
like, a full scale. You know, if you're
drawing a standing figure, you have a lot of
room to work with. Now, if that's too big
for you, then, like, a 14 by 17 or 16 by 20 size, I think is a good
option as well. I would not recommend
anything smaller than 11 by 14, as I find, again, that you're going to be
working almost too small to sort of get into any
details of the figures. Now, in terms of paper, I don't really have any
personal recommendations. You know, if you
already have, you know, something, go ahead and just
use the materials you have. But if you're again,
starting from scratch, I do like the Strath more
400 series pads because I find it's a good balance of quality paper
at a decent price, and you can kind of find these in general art stores
or craft stores. These are very common
kinds of sketch pads, and I think it actually
is a very good paper to kind of do these block
in sort of drawings. So that's just something
to keep in mind, again, if you're starting from
scratch and you need to get some sort of supplies. Now, I wouldn't
recommend anything, you know, super fancy, you know, like a Bristol paper or, like, a watercolor paper
or anything like that. It's just, you know, those
kinds of materials are maybe a little bit too expensive
to just kind of do, you know, block in
type of sketches. So I'd always recommend
just kind of getting a less expensive option for
these kinds of exercises. And the reason I like this paper as well is that even
though it's inexpensive, it's a good enough surface
that if you wanted to continue to work on a
drawing and finish it, this is a great over paper
that I find that I've done finishes on these kind of papers before, and
they work out great. So long as you don't
have to take out massive areas and do
a ton of erasing, you know, for a finished
drawing, it's totally fine. But, you know, if you're
just doing a block in and you just want
to do general erasing, I find that these are really
solid papers for the money. Now, outside of that, in terms of pencils, the only thing I would really recommend for these kinds of drawings is I'd
recommend something along the lines of
an H or a two H leb. Now, you can use anything else if you have
it, you know, like an HB. I don't recommend actually using anything softer than an HB. So like a B grade or a two B, those types of leads are
a little bit too soft, in my opinion, for the block
in stage of the drawing. Those kinds of leads
might be useful down the road for filling in
shadows and things like that. But for starting the
initial block in, I do recommend harder lead because it will
basically not let you draw as dark as you would
with an HB or a B or above. So an I think, overall, is probably my favorite lead to do these kinds
of drawings because it's soft enough that I can still erase it and
not have any issues, but it's hard
enough that I won't necessarily draw too dark
or heavy handed with. And again, the two H is
also kind of nice later on to kind of clean up once you kind of get the
initial lines in. The two H being a slightly
harder lead is very useful to kind of sort of finish the block in before we
move on to other things. So those are my recommendations. Obviously, wood case pencils, easy to find, very inexpensive. I'm also a fan of
these kinds of, you know, lead
lead type holders, where you have
basically, you know, a pencil that you can extend the lead out
and make it much longer. These are also nice to have if you have anything like this, just because they're easier to sharpen because you can take a sanding block and just kind of sharpen the lead really fast. A woodcase pencil takes a little bit more
effort, I think, to just sharpen, but not
the end of the world. Outside of that, again,
standard erasers. I always have a needed
eraser on hand. I always have some sort of plastic eraser that's
really good if I need to take out something, you know, that is maybe too dark or I need to get a
really clean surface back. These plastic erasers are
really good for that. And then realistically, I do you don't necessarily
need to have these. I just find they
are convenient when these kind of click
type pencil erasers are really great to have
just because you can kind of get into some details
to clean things out, or if you're working in a
small area like the head or the hands or feet,
these are really handy. You can still do it
with a needed eraser or the plastic eraser, but these are convenient
if you have one. The only last thing
I recommend to have is either some sort
of measuring tool, and this just would be like a knitting needle that I use if I'm going to hold it out and kind of try to plot angles or pull plumb lines
in the figure. You could also use,
if you have, like, the wood case pencil,
use an unsharpened one. Ideally what we need
is we just need something that is sort
of completely straight. You know, you wouldn't want
to use something that can be bent or anything like that. So a knitting needle is
like an ideal choice, but if not just an
unsharpened wood case pencil, it's great to just hold
out and measure so that you can plot angles
as you're working. But outside of those, that is really it
for the materials. You know, you don't need
to have a ton to do this. Use what you have if you already have materials that
you've already owned, so you don't have to
go out and buy stuff. But outside of that, these would be kind of just some general guidelines
or recommendations. But otherwise, you know, you don't need to have much
at all to get started.
3. Marking the Page/Enveloping: I so as I'm beginning
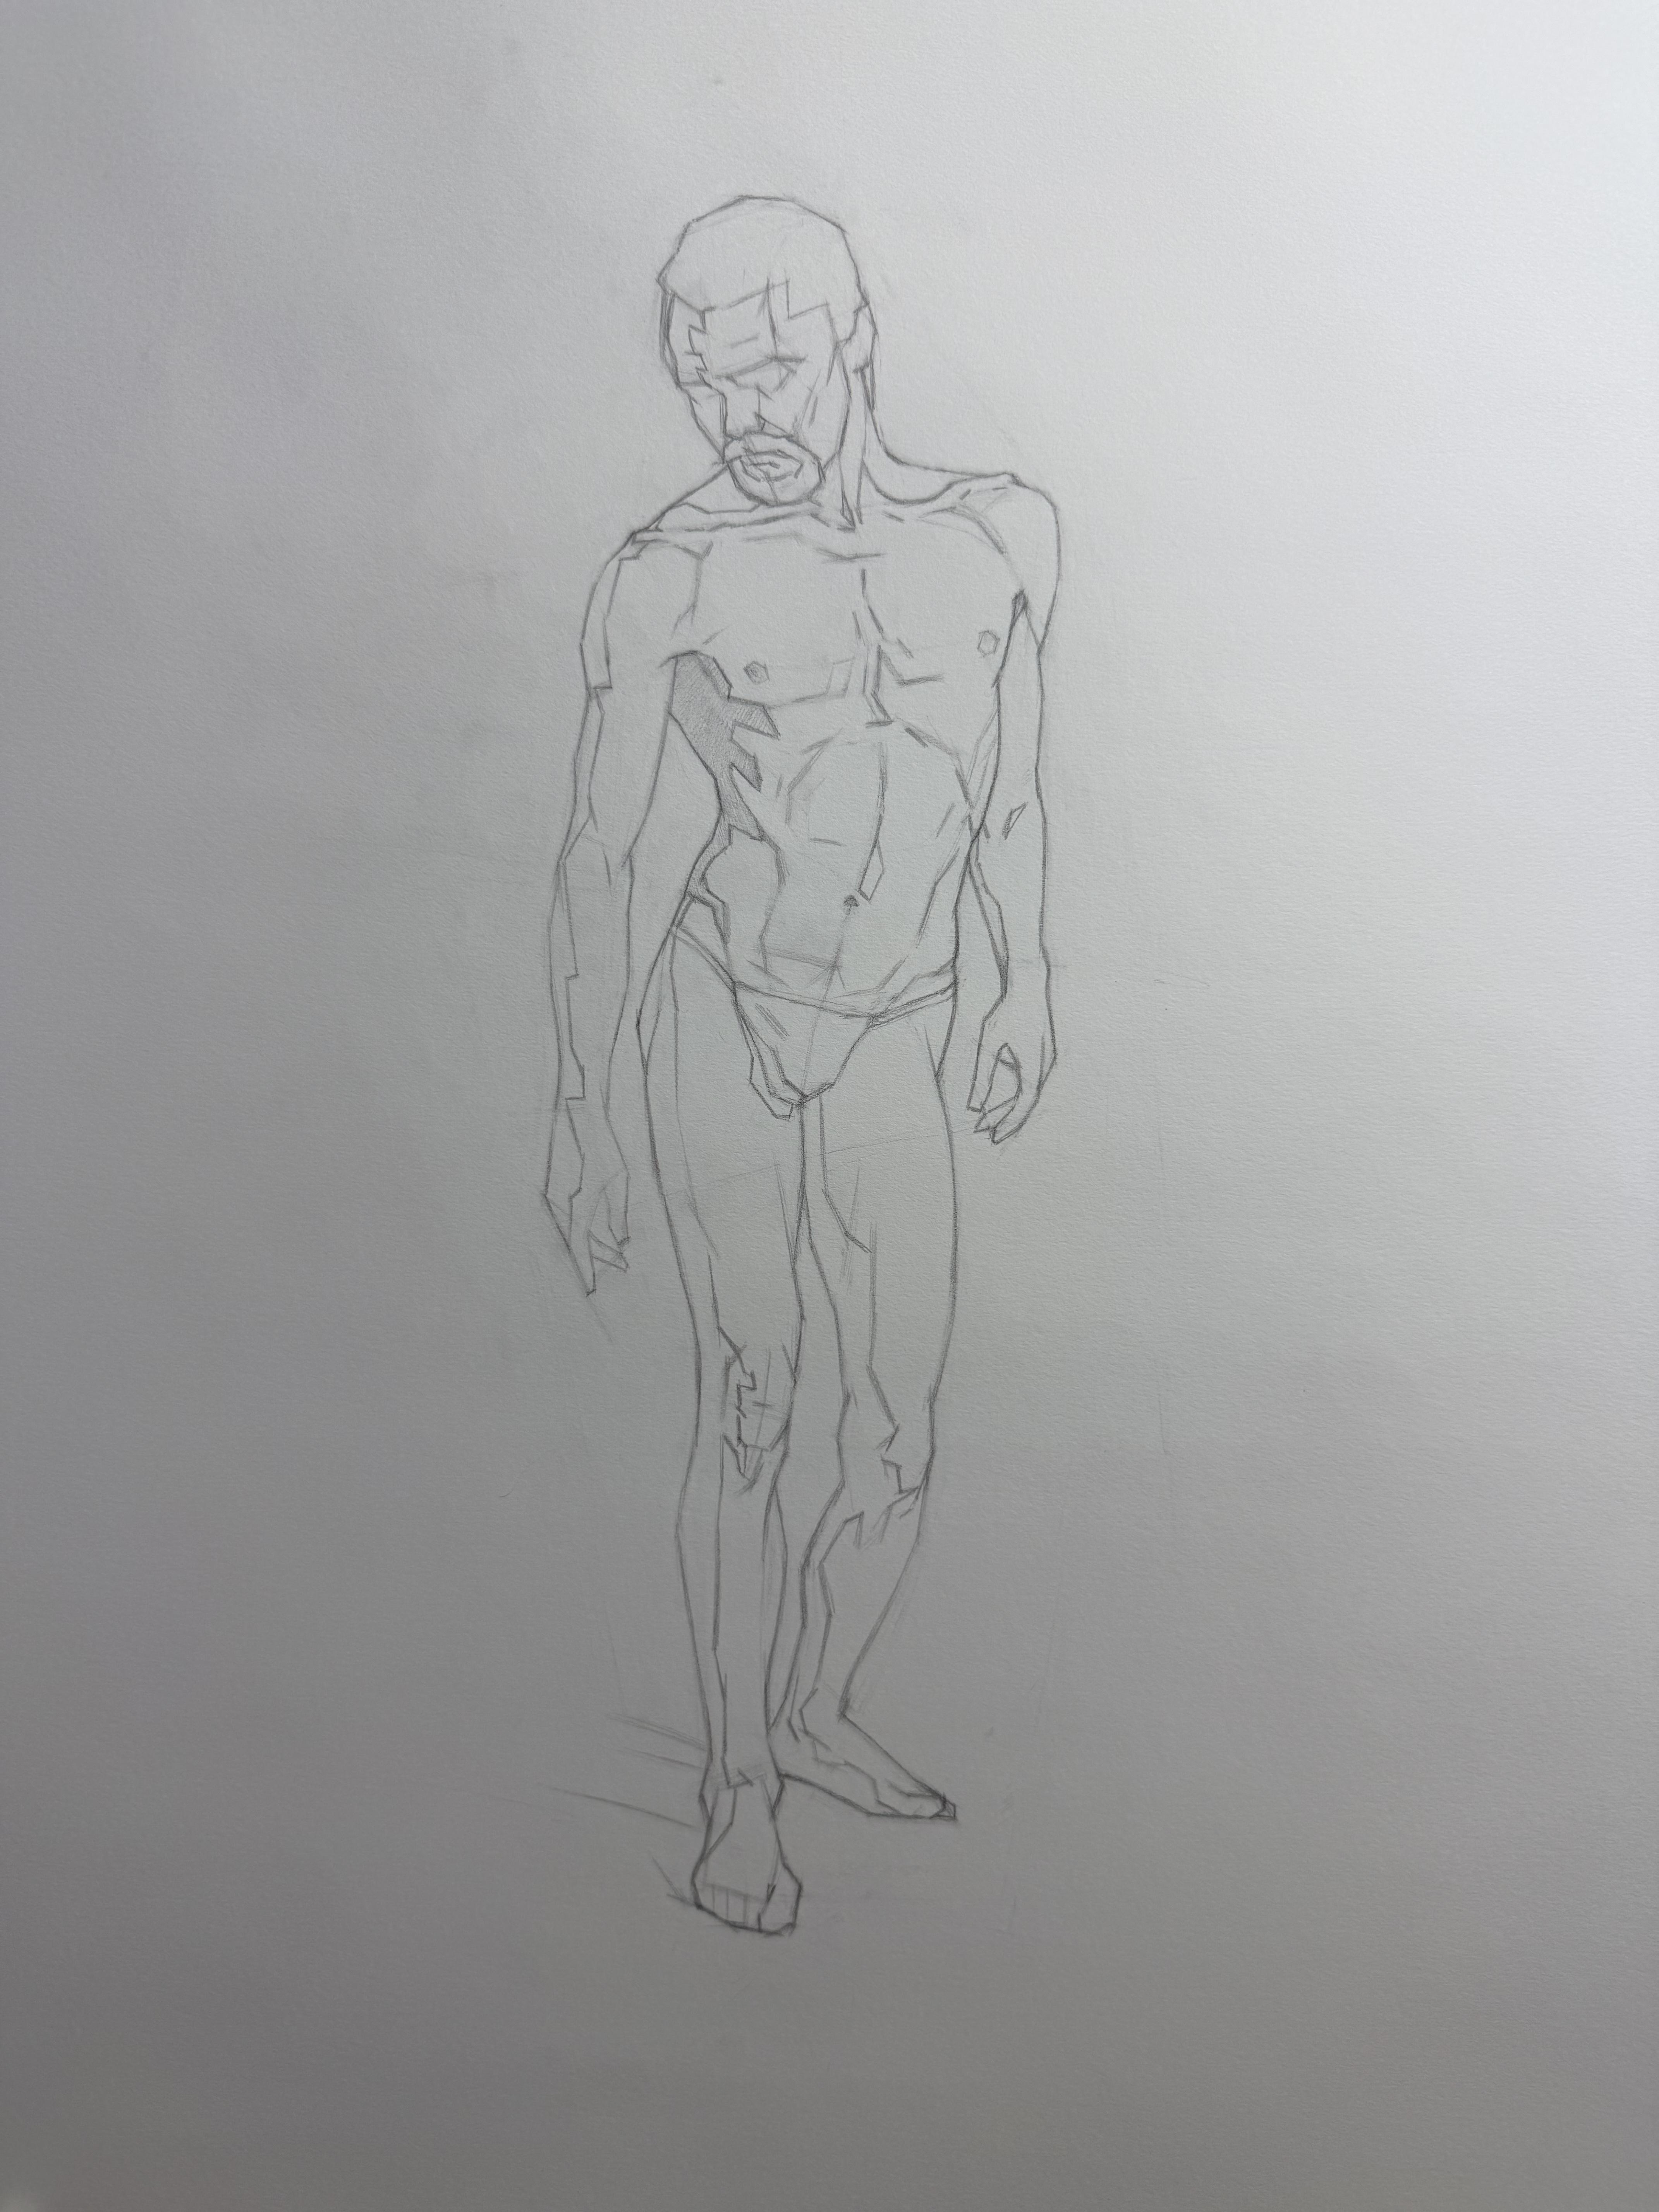
the block in, the first thing I want to do is I want to mark off my page. I want to find roughly
about the top and the bottom of where I want
the figure to sit ideally. Now, this is just a placeholder because I'm not quite sure if this is going to more or less end up where I
want the figure to be, but I need to put something on the paper just as
a visual guide. I'm also going to mark
the halfway point in the figure so that I can roughly try to find
where that's going to potentially line up as I'm
establishing the pose. Now, as I'm beginning,
I really just want to find a large envelope shape, meaning I'm trying to contain the entire pose within
some sort of parameter. Now, this doesn't mean
this is going to change, but I want to at least establish something on
the page to work into. A lot of the times,
starting a block in really is about getting something just on
the paper so that you're not just staring
down a blank sheet. And once we have a few
things on the page, we can start
breaking them down a little bit farther
into smaller pieces. Now, you'll notice I established a axes line for the shoulder
as well as the hips, along with the center line. Now, this is important, particularly in a standing pose because more often than not, the model is going to be shifting their
weight in some way where there might be a leg that is supporting the
majority of the weight. There's going to be a
pitch in the shoulder. Unless the model is standing
just completely static, we want to try and find those axis lines and see how the body is
balancing itself. I would say for standing poses, this is particularly important because if the model is seated, we have really
less to go off of, because if they're sitting in a chair or sitting
on a platform, we don't necessarily
have to think about the axes of the hip so
much as the shoulders. But when the model is standing, whether it's a
front or back pose, we pretty much have
to think about where those axes are sitting in space and how they're
supporting one another. Whether the model
is slightly bent over or twisting or turning
in any sort of way, we want to pay attention
to those axis lines. Now you can see once I've
established the shoulder axes, the center line,
and the hip axes, I get back up to the head, and I want to establish a very simple head
shape and get the head, neck and shoulders working
together as one unit. From there, I can sort of start to build out the
rest of the torso. And I really want to
establish that first because the torso is the largest mass that we have to deal
with in the body. When we think about
the rib cage and the pelvis and how much
space they occupy, they are pretty much the entirety of the
body, but also, too, is that the torso itself has less flexibility than
the arms and shoulders. So I really want to
establish this large mass, and that really kind of sets up the rest of the drawing
as I move forward. And you'll see as I
work my way down, I'm looking for more axis
lines or any sort of way I can measure off of one bit of information that I've
already put in the drawing. So as I'm looking at the
angle of the shoulders, as I'm looking at the point of the crotch or looking at the
nipple line in the chest, you can see me
constantly measure, you know, kind of
extending my arm out, using a sort of any sort
of tool to measure, whether it's my pencil or
like a knitting needle. And I want to just
work my way down the figure and gradually plot in the rest of
the information. Now, how you go about doing that can vary from pose to pose. So I don't want to say I
always do it a certain way. But in a lot of instances, I'm looking for, you know,
very specific angles. I'm looking to look
at joints like the knees or the elbows
to be able to just find different points on the body that I can sort of use
and hold out an angle to and compare them
to other bits of information as I continue
down the rest of the drawing. And really, for the most part, as I'm beginning the drawing, I'm not thinking about any sort of anatomy or
anything like that. You can see as I'm
plotting things in, I'm just keeping very
simple straight lines. I'm not overly thinking
about contour, but I am looking for
major angle breaks or changes so that I
can try and follow some of those forms a
little bit more accurately. But in regards to anatomy or making any sort
of indications to anatomy, I try and avoid that early on
so that I can just focus on the overall proportions and getting the entire
pose established. Initially, I want
to try and keep everything as
simplified as possible, and a lot of that is due to
the fact that I know that I am probably going to have to make adjustments
or take things out, and it doesn't
make sense to make things super
complicated or spend a ton of time trying to draw in details at this point yet. So I want to keep all
of the drawing fairly simplified so that if
corrections have to be made, it's not very
difficult for me to go ahead and take them
out this early on. So with the torso and
the legs flushed out, I can start working on the arms. Now, in this particular
instance, you know, he has very kind of longer arms, and I think you know, they're not necessarily
in the best sort of placement or sort of position because they're
kind of fairly even. So I still have to put them in. But what I want to do is
I want to just sort of ignore a lot of the undulations, like in the shoulders
and the bicep and the forearm because he's very
lean and kind of muscular, so it could be easy to
get caught up in some of those sort of nuances
in the contours, but I want to try and keep them fairly simple and
subdued and not try to look for every sort
of undulation that I see in the arm when I'm
first blocking them in. So with this particular
arm in the back, I'm kind of just treating it in sections where I have
the shoulder as a piece, the actual bicep as a piece, and then the forearm
as its own sort of separate pieces so that I
can just easily attach them. And part of that is that I
can't see the entire arm, so I'm just kind of building
it in sections that way. With the arm that's
in front of us, I think it could be a little
bit more straightforward, and I can kind of
use larger lines to establish the general
flow of that arm. But in this rear arm sense, a lot of it is kind of
tucked behind the torso. I just can kind of say it's easier to build
that in sections. So again, that's very
sort of pose specific. And so I'm always
making these kinds of choices depending on the
pose that I'm dealing with. So now I just kind
of have to get the rest of this arm in, and then we'll kind
of have a rough sort of blocking that we
have established. So it's by no means perfect
at this point or anything, but we have enough on the paper that I can feel a
little bit better about going back in and starting to be a little bit more accurate with some
of my measurements, start comparing
things a little bit deeper in relationship
to one another. But, again, we have something on the page that we can now sort of assess a
little bit better. And so at this point,
what I'd start to do is I'd start just
going back from the top of the head and just
start working my way down looking for smaller bits
of information that I can start making more
accurate comparisons. But it would be harder
for me to do that if I didn't have the entirety of
the figure established first. So, again, we kind of established
everything on the page, and now I have sort of a
rough template that I can work from and start breaking it down into smaller sections. I can start thinking
about individual portions of the body and start plotting extra
points so that I can hopefully get this looking a little bit more accurate
to what I'm seeing. So now, as I start back up
at the top of the drawing, I'm essentially just going to systematically work
my way down from the head and just start adding more information to
the rest of the figure. Now, how much I
decide to add, again, can sometimes vary pose to pose depending on what my
goal is for the drawing. But in this particular
case, for a block in, I want to try and establish
as much information as I can as if I were approaching
it as a long drawing. So I would start at the head and start working my way down,
finding various points. And then now we can start
flushing out the anatomy. I can start being
a little bit more descriptive with some of the
lines that I'm putting in. But that would have been
much harder to do from the beginning because I was essentially
starting from scratch. So what ends up happening is that as we kind of make a
pass through the drawing, I just make an
additional pass adding more information until we ultimately end up with
a finished block in. Now, again, this can
mean different things, depending on the goal
of the drawing or how much detail we decide to get into or what you feel
comfortable with adding, you know, in terms of just
a personal preference. So in this particular instance, I'm going to flush out a little bit more throughout
the rest of the body, so like the chest, the rib cage. And as we work our way down
to the rest of the figure, you'll see me start
adding more information. But it ultimately becomes making several passes until I sort of account for everything
in the body, and then we can kind of decide
where we go from there.
4. Building the Large forms: As we continue along, again, I'm always going to start
each new pass going back to the top of the head and slowly start
working my way down. Now, for the time
being, I'm going to leave the head shape
sort of as is. And it's just a very sort of simplistic block shape for now. And ultimately, I'll put
some information in, but I really want to just
focus on the figure and kind of start to solve
that a little bit better. Now, because he's fairly
lean and muscular, there's a lot of
little things that are very obvious on him that, depending on the
person's body type, may not stand out as
much, but, you know, things like the sort of shape of the rib cage and the sort of oblique muscles as it kind of cuts down into the lower torso. I can find little
landmarks like that, I want to go ahead and put them in because it's going to give me a clear separation of what's
happening in the torso here. Now, again, this is
going to vary from person to person and
their body type, but anytime you have
those kinds of landmarks, it's kind of a good idea to just go ahead and put them in as placeholders until you start moving the block
in further along. Now, I'm certainly not thinking overly much about anatomy. I'm just looking at what is
visible to me in the figure, and what can I use
that's going to actually explain what's
happening in the body. So anytime I see little
things like that, I'm going to go ahead
and put them in, and it doesn't mean
they're going to necessarily stay in
the final block in. But in terms of getting started, the more information that I see on the actual figure that
can be beneficial to me, whether it's to help me
measure something or to find the sort of symmetry
from one side to the other, I want to go ahead
and use that just as a tool to help move
the drawing forward. And so as I'm working
across the figure, especially in the torso is, I want to just connect
things from side to side, because, again, this is the largest mass in the body
that I have to work with. And so I want to make sure
that the overall feeling of the rib cage and pelvis
feel relatively solid. So a lot of the times
I'll be going from side to side and putting information and
just trying to find the relative symmetry of
each side to each other. So granted, we always
have to think about perspective or there's any
sort of twist in the body. I want to just make
sure that I'm locked in on the torso for a good
amount of time because, again, it's the
majority of the pose. And then once I feel good
about the torso itself, it's going to be much easier
for me to add the arms and legs or to flesh them
out in greater detail. You can see for the
information that I have established so far, there's more detail in the actual reference than I have in my drawing
at the moment. That's because I'm
just thinking purely linear and thinking
about shapes. So a lot of the shadows
or half tones that I see, I'm not going to be
putting those in just yet. I want to solve as much of the drawing and simple
lines first before I start adding some of that secondary information like shadow mapping or half tones. So as I continue to add
information to the drawing, I like to go back in
and check myself and re compare measurements as I'm adding new bits
of information. So a lot of times you'll see me as I'm adding another piece of information to the drawing, I'll go back and compare that to what I've already
established. That way I'm constantly
comparing each new piece of information that
I add and seeing where it relates to the
rest of the figure. Now, you can do this pretty much with any portion of the figure, but ideally what I
like to do as I'm working down is I
like to compare things that are much closer
together first before looking at the relationships of
things that are farther away. Meaning, as I'm working
through the torso, I want to find the
relationship of what I see in the
arms, you know, or as I'm working
through the legs, I want to see the relationship
of the knees and the feet. Now, it doesn't mean
I don't want to check the longer distances,
let's say, like, from the foot to the shoulder
or something like that, but it's a much harder
measurement to make. So that would be
something that I do later on as I'm flushing
out more of the figure. But as I'm slowly
developing what I have, I want to look for those
closer relationships first, and then once I feel
good about them, I can make those
larger comparisons from top to bottom
in the figure. As I'm kind of slowly adding
information to the legs, I don't want to get caught
up in the contours, even though I see
a lot going on. I mostly want to just be
looking for plane changes or plain breaks where I see
that something is shifting. So, for example, like the
quad down to the knee and then from the
knee down through the calf into the
Achilles tendon, into the foot, there's lots of these subtle angle
changes that I'm seeing. And so I want to
find that first, but I don't want
to necessarily be thinking about the
contour just yet. I'm sticking to predominantly
straight lines so that I sort of maintain the integrity and structure of
what I'm seeing. And ultimately, we can always add some of those contours
later on down the road. But for now, I just want to be thinking about
how these things are connecting and looking for
those plane changes or plane breaks in the forms as they're connecting
to each other. This is also true for a lot of what I'm seeing in the arms. And as I mentioned before, since this guy is fairly
lean and muscular, we see a lot of, you know, very active contours in the arm and the shoulder
and the forearm. And so I want to try and
ignore a lot of that at first, and I just want to look for very obvious plane
changes or plain brakes that I see shifting as it goes from the shoulder all
the way down to the hand. Now, sometimes there's instances where if the contour is really busy or if you're not familiar with the
anatomy in a given area, it would be best to
just simplify it down into the largest
possible lines that you can. Really, in this particular
instance, for the arm, I would want to find
the general sweep of the arm and the general
direction in which it's turning. And so any other subforms that I see I want to sort of ignore
that at first because, again, we're still in
the block in stage. A lot of those finer details
I can ultimately get to as I develop the drawing into something that is a
little bit more complete, but we're still so far away
from that that I don't want to get caught up in
any of those small details, and I just want to find
the overall gesture of what the arm or the rest
of the figure is doing.
5. Establishing the Head and Upper Torso: So I'm going to as we move
forward with the figure, I'm going to leave the hands in kind of a simple block shape because I don't really want to solve that much detail
in the hand just yet. I want to just keep them in
a very sort of simple state, and then we can
always flush them out further as we get more
information added in. But for the time being, I do want to flush out the head just a little
bit because initially, I just had a large shape, and I need to get a little bit more information
in there so I can establish a proper tilt and the general direction
the head is facing. Now, for this particular
demonstration, I'm not going to get too
crazy involved with the head. I do want to just establish the relative placement of the features so that we get a sense of where the
model is looking. But in terms of fleshing out the eyes, the nose, the mouth, and all of that stuff,
I'm not going to get too involved with that because I mainly want to focus
on the figure. Now, in your own drawings, it's totally up to you. But for the sake of a blocking, I would suggest keeping
the head fairly simplified early on and more so worry about the proportion relative to the overall size of the body and making
sure that the head feels in scale with
the rest of the body. In terms of the other
features and whatnot, I usually would just
establish the eye sockets, the overall placement of
the nose and the mouth. And then I would
leave most of left undone until I was ready to
make an additional pass, and I felt that the rest of the blocking of the figure
was looking very good, and then I would start
back up at the head again and then start adding
in more information. Now, how much information you actually end up
putting in, again, is totally up to you, and sometimes it's very
dependent on the pose. In this particular instance, I would say about, you know, his head is turned at a three quarter
downward sort of angle, and half of the
face is in shadow. So a lot of that I wouldn't
necessarily have to draw, and I would just have to focus on what I see in the light. But, you know, if you
had a head that is straight on or if it's
in a profile position, there's always going
to be all these variables that you have to consider when you're blocking in this part of the drawing. Again, I would try and keep it fairly simplified and no detail, no shadow mapping at
this particular stage. Just find the overall placement, make sure that it feels good with the neck and the shoulders, and then we can always
develop it later. Now, with this
model having a GT, I don't necessarily have to worry about the mouth as much. I can just draw the overall
shape of the GT and know that the mouth
is going to have to fit within that shape. But really, for the most part, this head is fairly
straightforward. I don't have a lot
to worry about. As long as I have everything
looking in perspective, there is a distinction between the front and side plane of the head and the
placement of the ear, and all of that is
in perspective. I can feel good about
the overall blocking and then move on to the figure. Now, if you feel like you
need any more information, it's going to be totally up to you and personal preference. Again, at this stage
of the drawing, I still want to
avoid small details, but having the eye
sockets in there, maybe suggesting the
rough placement of the ball of the eye
could be helpful to you. Again, it could very
well be very pose specific and dependent depending on how the model has
their head positioned. But again, still try
and think large shapes overall and try not to get caught up in anything too small. So with the head blocked in, I can start working my way
down the rest of the figure. And at this point,
the overall block in is there in terms of
the pose is established. I feel good about
the proportions, but now I just need
to start focusing on smaller shapes within what
I've already established. Now, at this point,
I'm basically going to be looking for
smaller plane changes or plane breaks in the individual sections of anatomy that I see
in the figure. Again, I'm not really thinking
about the anatomy per se. I'm just kind of holding my pencil and comparing it
against the model and what I'm seeing and looking
for those small changes that I initially ignored in the beginning stages
of the block in. But now that I have
everything established, I can start focusing on those smaller transitions so that the drawing is a
little bit more accurate. Now, as I'm working my
way through the figure, I'm looking for obvious sort
of separations in the body. So, for example, where I see the clavicle coming across
the entire shoulder area, there's a little
bit of the shoulder separation from the chest. There is the split down
the sternum of the chest. And then as we get
down to the rib cage, I see some very sort of
prominent shapes in there that I want to go ahead and put in because they're very
specific to this model. And so depending
on the model that you're drawing from
and their body type, sometimes the amount of
information will be more or less. And so you kind of
just have to make that judgment call as you go. So you can see here as I'm
working in the upper body, I'm just looking for smaller
refinements in a given area, and I'm gradually
going to be doing that as I work my way
down the figure. At this particular point, I'm not looking to make big adjustments or
changes in the pose. Those should have
been things I've caught early on already at this particular point
before I even get to some of these smaller
shapes or indications. Now, that's not to say
that I won't be making small changes throughout
some portions of the figure. I always want to leave myself some room for error
because inevitably, I can't catch everything
the first time. And so that's part
of the reason why I also stay fairly light
throughout the block-ins stage. None of the lines that I have right now are fully
committed to. And so if I needed to take
something out to adjust it or even just take out a portion of something to
make a correction, I have the flexibility to do so. But at this point, I would
want to have the majority of the pose solved at least from
a proportional standpoint, and everything after now is going to be just
refining that into smaller shapes so that the overall blocking is a little bit more accurate
to what I'm seeing.
6. Constructing the Legs and Shadow Mapping: So at this point in the drawing, I'm really just adding
smaller pieces of information now that the pose is pretty much established and I feel good
about the proportions. As I continue working, I'm gradually just cleaning up any initial
construction lines to try and just keep the
overall cleanliness in the drawing as
clear as possible. At this sort of stage, you know, we really shouldn't have any of the initial
construction lines. Everything should
feel solidified because we're kind of starting to get to some of these smaller
aspects of the block in. So like putting in information
for the knee, the feet, and we'll gradually
establish the hands, that's pretty much getting
down to what I would consider details in regards to
the block in overall. So as I'm putting in
this information, I want to just work my way through the rest
of the drawing and try and clean it up so that
by the time we're done, I can start mapping
in the shadows on top of already clean drawing. Now, as I'm continuing to work, if for whatever reason
I find myself catching any sort of error or mistake or adjustment that I need
to make in the drawing, the lines are light enough that I have the
flexibility to do so. So regardless of how far I get along in the
block in stages, if I catch something,
I want to go ahead and fix that
right away because, again, this is all about
setup for the finish. So even though we're still in the first few hours
of doing a drawing, if something jumps out
at me and I catch it, I want to go ahead
and remove it or make the changes necessary
to fix the drawing. And that's something
that regardless of what skill level
you're at currently, you always want to
keep that mindset that if something is off, it's best to just go ahead
and correct it right away because at this
point in the drawing, we don't have any tone
or shadows to deal with. So making those
fixes are going to be much easier now
than if I were to let it wait or just prolong the drawing without making those adjustments first. So as I'm making my
way down the arm, I'm going to start
blocking in the hand. And there's a couple
of things that I would want to mention in this regard to hands and feet in general when you're
doing a block in. And a lot of it has
to do with either A, if you're working
from reference or B, if you're working from life. Now, because I'm
working for reference, I could realistically block in these hands at any time
because I don't have to worry about the model
moving or sort of adjusting or resetting the
pose or anything like that. If it was a drawing from life, then typically what I
would be looking to do is I would aim to find a pose in the hand that I really liked
or I liked the aesthetic of the hand placement because oftentimes when
working from life, the model is going to be shifting hand positions
and feet positions, regardless of, you know, doing your best to try and reset the pose exactly how it started. It is very difficult to do, and it almost never seems
to happen in my experience. So a lot of the
times, you end up chasing hands and feet
in certain positions. So typically, I
would leave them at the very end to sort of do and then try and
lock them down. In a position that I liked. So that is something
to consider if you are using these as a
way to draw from life. But, again, from reference, we can kind of have a
little bit more leeway, and I can basically put
them in at any time. But if working from life, I would have a tendency
to wait till I found a specific pose that I liked and then go ahead and block in the
hand from there. Now, realistically, I'm
still not putting in details of the hand or the
feet or anything like that. I'm still just looking for the simplified version
of that feature. So, you know, I'd want
to maybe just get a rough idea of the
placement of the thumb, the general sort of gesture of the fingers. Same
thing for the feet. I want to find the general sweep of the foot, find out where, you know, the most
weight bearing foot and what that
position looks like. And then once I felt good about the shapes that
I've established, I would go ahead and
flush it out further, but realistically, a lot of the detail aspects of those features would be
more for the finish. I would want to get
the rough shapes of them in the block in stage, but to finalize them in their
sort of details and depth, I would wait till I get
to the shadow stage and then ultimately the
forum phase to really flush them out to
what they need to be. So that's just something
to keep in mind. And again, it also
depends on how much time you're working from the model
or working from reference. If it's from reference you have all the
time in the world, you can kind of
take it to whatever degree you feel good about. But if it's from life, you kind of have
to pick and choose because you're working
with a limited amount of time to get to those details
like the hands and feet. So at this point of the drawing, I feel comfortable enough in the blocking that I can
begin to map my shadows. Now, when I do this,
I specifically don't draw any edges or
anything like that. I'm simply looking for a clean separation
of light and dark, but I'm still just using linear
lines to establish that. So I can think about the form that I'm traversing
in the sense of, you know, a shadow is wrapping around a rounded form or around a
bony feature of the body. I'm still thinking
in regards to that. But I'm not adding any sort of soft or firm edges or anything. That would happen later
as we start adding shadows and modeling
to the drawing. So at this point, I still want to air on keeping the drawing
as clean as possible. So all of my shadow
lines are going to remain linear just like
the rest of the block in. Now, one thing to
consider as you're mapping is you still
want to squint down your eyes when you're
looking at the shadows and really try and
simplify them down. Don't get caught up in excessive detail in
the shadow because, again, to me, it's all about
readability in the drawing. And if I were to break
up the shadow into too many small pieces because my eyes are just seeing
too much information, I want to at least avoid that initially in this
particular stage. Once we get to modeling
and everything like that, we can inject more details
into the drawing itself. But for now, I really
just want to focus on the overall light
and dark effect and to keep that as
simplified as possible. Now, occasionally, you may
find yourself running into areas where there's things
that are not quite shadow, but they're really dark
half tones because they're obviously not part of the overall light structure
that we're seeing. And so in those
instances, like on him, I see in the stomach
and rib cage area that there's some portions that are really dark half tones, but they're not quite
part of the shadow. I might put some of that
information in there, but a lot of the times
it could very well be just a case by case scenario. So ultimately, it's up to you
if you want to put in some of those darker half tones or make distinct
shapes out of them. But that's just something
to consider in the back of your mind as you're flushing
out your own drawing. Ultimately, I don't
think there is necessarily a right or wrong. It's really up to the
individual and what helps you figure out the
drawing for yourself, and everyone is going to maybe require different levels of
information to help them. So initially, I would say, try to simplify everything
as best you can. And if there's other
things that you feel like you need to add or you think like they're going
to be a benefit to you in moving the
drawing forward, there's no harm in
putting them in there so that it
at least gives you something to latch onto
as you push the drawing into filling out the shadows and then ultimately
modeling form.
7. Refining and Finishing Block-In: Oh Alright, so as we're getting towards
the end of this block in, you can see that we've
mapped out the shadows. There's a clear delineation
of light and shadow. Again, just purely in line. I'm not there's no
edges or anything like that in the shadow
maps themselves. And this, to me, is enough of a description about where the
drawing is headed. And ultimately,
again, at this stage, how much information
is in the block in is kind of up to you. Some poses or some models may require more information
than others, and it's really just dependent on what you're dealing with. So again, if it's
from reference, you have a little bit more
control in what is going on, but if you're drawing from life, you kind of don't know
what model is going to show up and you're kind of
at mercy of the classroom. So, there's a lot of variables
that are out of your hands when you're working in
a classroom environment and you're not quite
sure of the model. But nonetheless, for me, regardless of working from life or working from reference, I treat the approaches
the exact same way. So really, you can see here, we have everything
accounted for. I feel good about
the proportions, the shadows are in place. Now, what realistically
needs to happen now is that we would
sort of move on to an isolated shadow stage where I start to fill in
the shadows with some relative value so that I can gradually move
towards modeling form. Now, at this stage
of the block in, again, everything should
be very legible and clear. There should be no
ambiguity about what is going on in the
pose, the proportions. You want to have
all of these things solved because, again, having to go back and make those kinds of
corrections later once we introduce tone into the drawing is going to be that much
more difficult to do. And so a lot of
what I'm doing at this stage is really just
cleaning up the drawing. If some of my lines
got too thick, then I want to go ahead and
just trim those up so I have a nice clean,
definitive line. If there's any sort
of excess lines from my original construction, I want to take
those out and leave only the essential information that I need to move forward. Now, again, this is going
to highly depend on what you're comfortable with and it's going to vary
from person to person. And sometimes, you know, in
this particular instance, with this model
and his body type, I think sometimes having a little bit more information
can be beneficial. Now, if it was a
different model, different body type, then the
scenario changes slightly. But again, it's one
of those things where you're just kind of making a judgment call for yourself and every person is going to
interpret things differently. So in this particular
instance, you know, I feel like I have the
essential information for this particular pose
and for this model. And, you know, maybe
the same model, but in a different pose would require different information. So there's all of these
factors that come into play, and it's different every time. So I don't want to say that it's always going to be
this way or there's, like, a formula to this. You know, there really isn't you can see from
the drawing itself, it's fairly simplified relative to what I'm seeing
in the reference. And obviously, later on, if I were to complete
this further, we would start
adding more details. But for the time being, the
drawing feels like it's in a good place that I can gradually start introducing
the next stages. One thing I will mention, and this again, is kind
of personal preference. But sometimes on a given
model or a given pose, when you introduce the shadows, a lot of the lines can
start to appear busy. And if you find yourself
in that situation, it's totally okay to just very lightly put in a soft tone in the shadow area just
so that you get a much clearer delineation of what is light
and what is shadow. Now, again, it should be fairly obvious based
off the reference. But also, too, like I said, sometimes you end up with a
ton of lines in the drawing. You know, for some people,
that could get a little confusing because there's
just a lot going on. So if it helps you, you can always just put
in a light little tone just to make that separation
that much more distinct. And so if you decide
to go ahead and put in a light value
in your shadows, do it all over the
figure so that you have a uniformity
across the drawing. But really, at this stage, I would say, this is
our completed block in. And so where you decide to
go from here in terms of finishing the drawing
is another topic that we won't get into for
this particular class. But this would be sort of an
ideal scenario where we have the figure established
from head to toe portions are
feeling pretty good. We've separated light and
dark just a little bit. And then it's just again, a matter of A, how much time do we have to
spend on the drawing? Where do we want to take
this drawing in terms of a stylistic choice
or anything like that? So throughout the
rest of the course, we'll be going over
this process again, but just from different
poses and different angles.
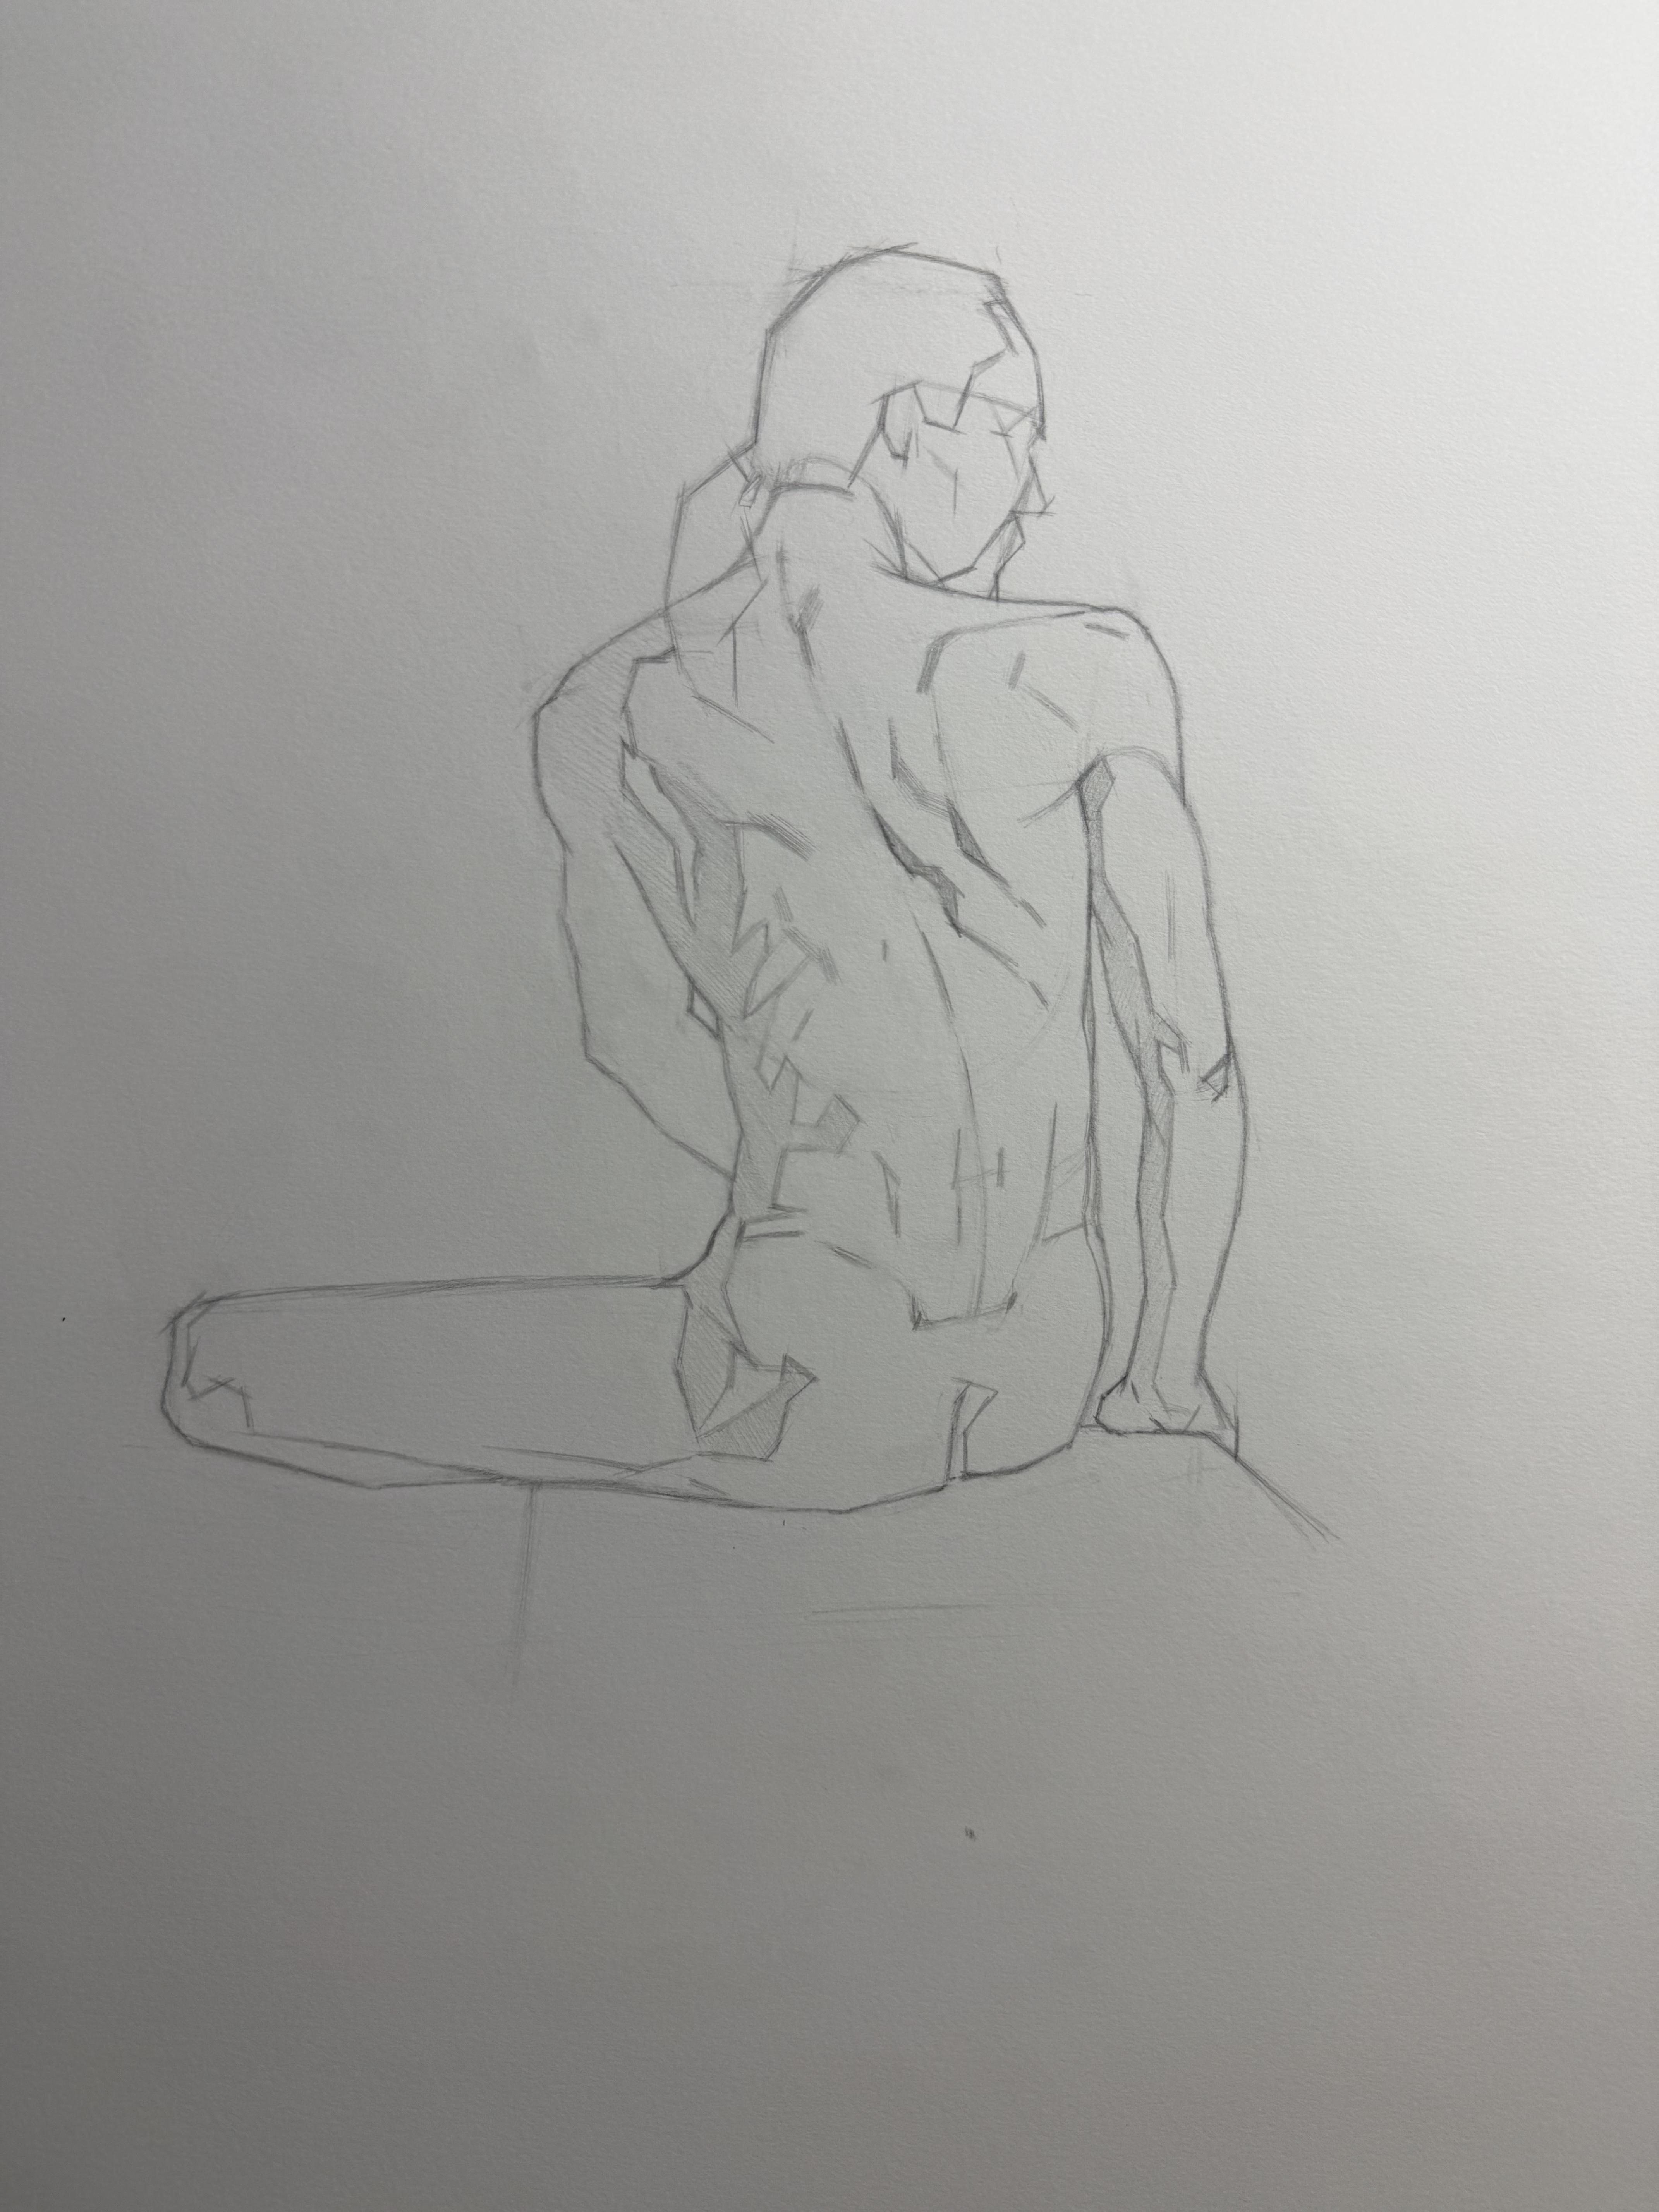
8. Marking the Page and Large Forms: So starting off, I'm
still going to mark the top and bottom about where
I want the figure to sit, and I'll find a halfway point as well so that I can build
my initial envelope. Now, a back pose is more or less similar to a
front facing pose. The only difference is
that maybe the head is a little bit obscured in
this particular instance, and I don't have some of the same landmarks that I do as I have on the
front of the body. So things will
change a little bit. But the overall approach
is fundamentally the same, especially when getting started. I want to just find those initial marks of top
and bottom and a middle, build out my envelope. And then, again,
it just gives me a rough guide and shape
to kind of build into. A lot of the times I'm going
to be adjusting from this, but I just need to
get something on the page so that I'm not staring at a
blank sheet of paper, and I'm just going to gradually
start carving into it. Now, you can see in my envelope, I've accounted for
the arm that's slightly extended
holding the pole. And realistically, if you have
any of the appendages like the arms or the
legs protruding in a sort of separate direction
away from the body, you want to include
that in the envelope. Again, it's really just about establishing the
large overall shape. And if you need to make
changes as you go, you have the
flexibility to do that, but I want to just think about the largest shape
possible that I can make and then
move on from there. Now, after establishing a
rough shape for the head, I want to go ahead and establish the axes for the
shoulders and the hips so that I can then
build a center line to establish the overall
flow of the body. Now, because I don't have a pit of the neck to connect to, I'm essentially
just building from the back of the head
and neck down to about where the glutes are in the lower half of the body to establish the
overall center line. And realistically, you
can kind of just follow what the spine is doing and build your center
line off of that. With those axes and
the spine established, we kind of have a rough sense
of what the torso is doing, and then we can start
building out from there. From roughly the
top of the head, I'm finding the angle
down to the shoulders, and I can still kind of see the outer edges
of the shoulders, which would kind of
be the achromium process of the scapula. And so I want to establish
those points so I can make sure that I'm
not getting too far spread out
with my shoulders. And what I'm thinking with
that is I want the head, neck and shoulders to be this really sort of
strong contained unit. And when I have
that established, then I can feel a
little bit more comfortable about establishing
the rest of the torso. Now, again, because
I don't have, like, the pit of the neck as a landmark and I'm not really seeing the front
part of the face, I don't have as much
information to use, but I can still use the sort of triangular shape of the
head neck shoulders to sort of lock into. And for now, that
will be enough. Now, with the head neck
and shoulders established, I can start to build out
the rest of the torso. And so what I'm looking for, for the most part, initially, is just finding these
sort of outer edges, and I'm following the flow of the spine for the most part. When I look a little bit deeper, I can see the overall shape of the rib cage and the
boxiness of the pelvis. So I want to keep those
in the back of my mind. But for just getting the
initial thing established, I can just focus on the
outer sort of silhouette of the torso itself and then start implementing some of those
shapes as I build out farther. Now, one thing I almost always
look for in a back pose is if we follow the spine all the way down to
the gluteal cleft, just above that, we see two little dimples
in the lower back, and that is the
sacrum of the pelvis. And the reason I like this
landmark is because it gives me the overall tilt and
orientation of the pelvis, but it also gives me a kind of central point to lock
in the torso itself. Because from there,
realistically, I know that there's
lower back muscles that are going to go
up into the spine. That's also going to help
me connect the rib cage. And by just having
that one element or landmark in the
drawing, in my opinion, it makes it a lot easier to create a better
sense of solidity overall in the torso itself before we start adding
some of the arms and legs. Now, for this front leg itself, I don't really have
to indicate too much. I just want to find the
general flow and get the feet placed so that I at least have everything
accounted for. Now, there's obviously a lot
more information going on, but in terms of the
gesture of the pose, I just want to get those quickly established so that I can build
out the rest of the arms. And then with
everything in place, I can start refining and making comparisons and if need be, make adjustments to the pose. Now, the arms in this pose are, you know, fairly
straightforward. I'm not going to
overcomplicate them with a lot of the curvature and the anatomy that I see at this point. I really just want to find
the sort of rough gesture. And so I'm just thinking
about the overall flow of that arm and kind of just the upper arm and lower arm being kind of
really simple cylinders. And the one thing I'll say about the arm that is on
the left hand side is that it's actually
not relaxed. He's sort of flaring out
his shoulder a little bit. So it's kind of there is
some tension in that arm, and it maybe looks a little
unnatural in the pose itself, but it is what it is. And so this other arm
has a lot more going on because it's kind of vent. There's a little bit
of foreshortening as the forearm and hand
are going away from us. But for the most part, again, we can just think about
the overlapping forms of cylinders kind of coming together and construct
the arm that way. And again, at this point, we don't want to be thinking
about anatomy or curvature. We just want to
be thinking along the lines of simple shapes, and that will do most of
the work to get us started. Now, with the arms and legs
sort of roughly filled in, I want to get back
into the torso and start flushing out more
information in there, and I want to lock in
this area because, again, with the standing pose, the torso is just going to
occupy so much space that I really want to
make sure that part is feeling as solid
as I can make it. And then if I need
to make adjustments in the arms or legs, there's just much less to do in terms of fixing
those at this point. But to me, the torso is kind of the focal point in this particular pose and kind of the gesture of
the pose is really nice. It's kind of a very sort
of powerful stance, but I really want to focus
in on that torso area and making sure that
the rib cage and pelvis feel very well connected. And the more solid I can
get that feeling like those two forms are interlocking
very well together. I think it's going to
strengthen the overall pose, and then building the arms
and legs off of that, in my opinion, is going
to be a lot easier. C. Now, again, with the back pose, we don't have the same kind of landmarks we do as a front pose. And I think there's maybe less landmarks to
sort of work off of. So things like the sacrum of the pelvis I mentioned
earlier, again, are huge for me because it
kind of really helps me lock in the pelvis and how
that connects to the rib cage. Now, the other thing I
can also think of is the shoulder blades
themselves can sometimes be a useful
landmark because, again, we have all of
those muscles that are attached and nearby the
scapula themselves. And so I don't necessarily want to
think about the anatomy, but if I think about
the general shape of the shoulder blades,
then, you know, I can really help align the rest of the shoulders because
I know that there has to be some degree of symmetry in the positions of the
shoulder blades themselves. Once I have a rough shape
for the shoulder blades, I can start to think about how the anatomy is connecting to it. But in this particular instance, just having the shoulder
blades and the spine and the sacrum in there
gives me enough to lock into that I can start
to then see how all of these things are coming together to help form the
rest of the torso. A. Building out more of the arms. I still don't want to get
caught up in anatomy, but I just want to reestablish that cylindrical shape
that I'm seeing, especially on this
arm because there is some degree of
foreshortening involved. I want to think
about how the elbow is kind of facing us more, and then I want to
attach the forearm as it's receding away from us. When I establish the forearm, I can find an endpoint at the wrist and then attach
the hand on top of it. Now, again, a lot of the times when
dealing with any pose, the arms and appendages, you might have to deal with
some sort of foreshortening depending on the pose and kind of the
position the models in. But again, if you
just think about the simple shapes
involved overall and just the overlapping forms
of the cylinders kind of connecting from the shoulder
to the elbow to the wrist, it's much easier to
construct the arms and then add anatomy afterwards
if necessary. Just as with any other
aspect of the drawing, I'd like to error on the side of keeping everything
simple at first. And then as I feel
comfortable about where the drawing is headed in
terms of just placement, proportion and
everything like that, then I can start adding
more information on top of what I've
already established.
9. Constructing the Legs and Back: Continuing down
through the leg here, I don't want to put in too
much of the contour just yet. I really just want to have
the overall gesture and kind of have that thrust
of the leg because this is the weight
bearing leg of the pose. The far leg, I don't
really see a whole lot. It's just, you know,
a very small amount as it's kind of
tucking in behind, and then I see a little bit of the foot in the background
that's in shadow. So I don't have a whole lot to necessarily solve in this
regard for the pose, but I do want to kind of account for some of the
information later on. But for the most part, I
really just want to find the overall silhouette
of this leg before I start flushing
out more information. S Now that I have the overall pose
pretty much established, I feel good about the gesture
and the proportions of it, so I can start getting back to just the torso and kind
of the main focus, but I want to just clean
up some of my lines. Any excess construction
lines that I still have in the drawing
from the beginning, I can take out and
try to just clean the drawing overall
so that I'm left with the final lines that
I want to stick with. Now, looking at
the torso itself, there is a lot of
information in the back, especially because of
how lean the model is. And well, I do want to get
that information in there. I want to sort of simplify
it as much as I can. And so I want to look at the sort of predominant
shapes that I see. So if I squint down
and look at the model, I want to just look at those shapes that
still stick out to me, and I don't want to
get caught up in the smaller details
that are less obvious. So, you know, because I have some landmarks in the upper back like the shoulder
blades and the spine, I kind of want to just look
at those in between spaces, and I want to focus on just
the large things that I see, and then anything
that is not that, I want to leave out for now because I still
want to maintain the overall simplicity of
the pose and then Again, as the drawing sort
of develops further, we can decide to add
in more information. But at this stage
of the drawing, because we're just starting, I still want to just think
about the big picture and try and capture the simplest
forms as I can. So a lot of really what I'm just doing now is just trying to clean up areas as I work my
way back down the figure. And, you know, there's some smaller little
plane changes that I see in the contour or there's some overlapping forms through
the rib cage oblique and the pelvis that I
see in this area that I want to try
and capture because, you know, I think it's
an important part for this particular pose, and it's very obvious on this
model because he's so lean that I want to try
and capture some of that information because I think it'll strengthen
the drawing. Now, again, this
will vary a lot from pose to pose, but, you know, it's something to
keep in the back to your mind is that once you get a certain level of
drawing established, a lot of it is just
going back and refining. And sometimes that could
be one pass, two passes, and it doesn't really matter how many times you
have to do it. So long as it strengthens the drawing and it
makes the blocking feel a little bit more solid to you and will help you
move the drawing forward, then I would say, go ahead
and take as much time as you need or as much
time as possible. Working down the arm, again, I'm just thinking about
simple cylinder shapes and sort of from the shoulder
down through the upper arm, down to the elbow and
then the forearm, just thinking about
how those areas connect as simple shapes. When I get to the
hand, like I said, in the previous drawing, is a lot of the
times I will keep the hands fairly sort
of simplified and like a block shape because if I were drawing
from life, again, it would be one of
those things where I would want to try and dial in the hand in one sitting
so that, you know, in case the model moves or
there's any adjustment, I don't have to be chasing a hand throughout the
course of the drawing. Now, in this particular
instance, again, working from
reference, you know, I don't have to
worry about that, but even in a block in stage, I still like to
simplify the hand into just a few simple shapes. And then as I work
further along, I will then slowly start to dial in some of the
details in the hand. But typically, that
won't happen until I get to the tonal
stage of the drawing. Getting back down
to the leg, again, I want to sort of
treat it the same way as I did the arm
just thinking about the cylinder shape of the upper quad as it kind
of connects to the calf. And there's really
not, you know, I think for the most
part, a lot of the limbs, you can sort of simplify
in that direction. The only thing I
have to consider in this particular instance is
I do see the knee as it's sort of coming from
behind the quad and then attaching to the shin
bone and the lower calf. So I have to make sure that I
have that overlap in there. But otherwise, for
the most part, I can keep this leg
in a fairly sort of simple state and as
long as it reads, there's no reason to
sort of over emphasize any information at this point because we're still in
the block in stage. So I think that
as long as it has the overall thrust of the leg and the
proportions look good, that's pretty much
as far as I want to get to in this stage
of the drawing. Now, the feet, I would treat exactly the same way
as I did the hand, and I would kind of
keep them in a very sort of simplified block shape. The foot being more
of like a wedge that is sort of attaching
from the ankle. And I want to just think
about that shape first. And then, you know,
there might be some small things that
if they jump out, like the ankle bone being
very prominent or, you know, the separation of
the big toe from the rest of the little toes would be something
I would look for. But otherwise, I would
keep the foot in a fairly simple state
for the block in, and then I would only start developing it further
if, you know, as we take the drawing to further stages of,
like, you know, shadow and, you
know, modeling form, then we can flush out
more information. But for the most part, at
this early on in the drawing, I want to just keep as simple and sort of large of
a shape as possible.
10. Refining and Shadow Mapping: So with the figure
pretty well established, I can start focusing in
on smaller sections of the figure and just start
to refine it overall. So again, this really
just entails, you know, cleaning up some of
my lines that are maybe leftover from
the original block in, start separating out some
of the smaller shapes, especially in the arms
and in the back area. There's a lot of
detail in there that while I don't want to get
caught up in too much of it, I do want to account for the larger shapes
that I'm seeing, and then from there, I can start mapping out some of the shadows. Using this arm as an
example, you know, I don't want to get caught
up in some of the form or, like, the anatomy
around the elbow. I really just want to make sure that the arm looks like it's foreshortened and that the necessary forms are
overlapping correctly. And this is what
I would say with any pose where you may have an arm or a leg that is foreshortened or
out in perspective. And as long as you can
get the forms to read in space correctly and they feel proportionate to the
rest of the model, that's about as much
as you'd want to do for the block in stage. And then later on,
we can always add more detail as necessary. Getting back up to the head, I'm going to keep this
relatively simple, but I want to just have some information in there so that I don't just stick
with the basic shape that I started with
from the beginning. Now, in this particular pose, the head is
predominantly in shadow, so I would err on the side
of keeping it fairly simple. And in the sort of overall context of
this drawing, again, I think that the
sort of focal point is pretty much the back and the rest of
the figure itself. So I would have a tendency to simplify a lot of the
shapes and information in the head in general because so much of it is
in shadow that I wouldn't want it to take
away from the back itself by trying to flush out
every little detail that I see that's happening, even though it is
buried in shadow. Now, decisions like that, I think, are artistic license, and they're ultimately
up to you in terms of how much information you want to flush out in a given area. I have a tendency
to want to keep my shadows fairly
simple and uniform, so I try not to flush
out too much detail, and maybe if I were to take
this drawing to the finish, I would maybe have a few
accents in the shadow. But beyond that, I wouldn't try and dig up too much information. Now, as I start mapping
the shadows of the back, I really want to just
squint down and look at the predominant shapes that I'm seeing and try to copy
those as best I can. There's a lot of
sort of middle value half tones that are happening
that are not quite shadows, but as the form is kind of gradually turning into
the light, you know, there's some kind of shapes
that are just a little bit darker than the
actual flesh tone or the most light facing areas. So I do want to have that
information in there, ultimately, but
for the most part, right now, I just want
to map out the shadows and try to account for some of the information
that I'm seeing. So there is a lot going on in
the back in terms of I see, you know, obviously, the lat, the trapezius, the
erector muscles coming from the lumbar area, and then down into the glutes. There's a lot of information
going on in there. But in order to help myself, I just want to squint down a really good
amount and just try and copy the shadow
shapes as best I can. And then, you know, as I kind of get
everything filled in, I can start looking for
more nuance later on. Working down the leg,
I want to just keep that shape fairly simple
down through the foot. I know there's a lot going
on in this calf muscle, and as it gets down to, like, the ankle and the lower foot, there's a lot of deviation
in the shadow shape, but I want to try and ignore a lot of that right now because, again, it's not really
going to help me. If I try to put in
all this information, it's going to
overcomplicate things. And I want to just keep
the readability of the shadows as good
and simple as I can. And that's the reason why squinting is so
important in this stage of the drawing is because it's very easy to
overcomplicate something. So by squinting down, we can eliminate a bunch of
details and just think about the overall
large effect of the light and dark the
shadow is creating. So just keep that in
mind as you're blocking in your drawing and establishing
the shadow patterns. This would apply to, you know, whether it's a figure, a
portrait or anything like that. The more you can
simplify things down, the overall legibility of your drawing is going to
look so much better and stronger of an impact
than if we try and capture all of these
details right from the jump. Working in this upper back area, there's a lot of
information to account for because of the amount of compression that's happening
within the shoulder, the scapular area in general, and then the trapezius and
the sort of upper back. And so I want to just try and, again, simplify that
out as best I can. But in this particular instance, even though it's not in shadow, some of the half tone
shapes that I'm seeing, they stand out pretty sort of, I think, obvious
because you know, because of how the muscles are sort of compressing
into each other, they're kind of creating these
more subtle shadow shapes. So in an instant like that, I would have a tendency to copy the half tones to try and flush out some information
because I think if I just left that area
blank and empty, it would get a little confusing, and there's so much
information that's happening in that area that
I need to account for it, because if I were to take
the drawing farther, it's something that I'm
going to have to resolve anyway as the drawing
sort of pushes forward. For where we're
at here right now in the block in, though, I think this is pretty
much a good place to say, like, this is
enough information. Now, certainly it could always
add more if I wanted to, but I think sometimes putting too much information
in the block in, especially on a
model of this type, can sometimes lead to just
too much sort of data, you know, and what
I mean by that? It could be very easy to get lost in a drawing if
there's too many lines every because we're
trying to account for every little nuance in
the figure that we're seeing. So a lot of that would
later on sort of resolve itself when we get to the modeling stage
of the drawing. But in terms of
the overall effect and the large effect
of this drawing, I would say that this is
probably enough of a block in for us to start maybe thinking about
filling in the shadows, getting a good
value established, and then gradually
starting to model form. So Again, a lot of this is
very situation specific. It's very specific to
the model, the lighting. But just kind of
keep that in mind as you're working on
your own drawings and error on the side of keeping the drawing
simplified first, and then you can always
add more detail as you go. So to kind of finish
up the block in, I will go ahead and just use a ruler to establish the
pole that he's holding. I'm not a huge fan of
objects, you know, or props in figure drawings, but it does happen
from time to time. So, you know, sometimes
it could be a chair, a platform, whatever, you know, depending on if you
are drawing from life, every setup will kind of be different so that's
something to keep in mind. But in this case, because I don't really
think I'm going to pull a perfectly straight
line, just free hand. So I will break out a ruler or some sort of straight
edge in these instances. So it's always handy
to have on hand. But otherwise, you know, this is pretty much
it for a back pose. As you can see, it
was a little bit different than the front pose because the anatomical landmarks are a little bit different. But realistically, the process is the same in terms of starting the drawing from
the beginning to where we are now with
the finished blocking.
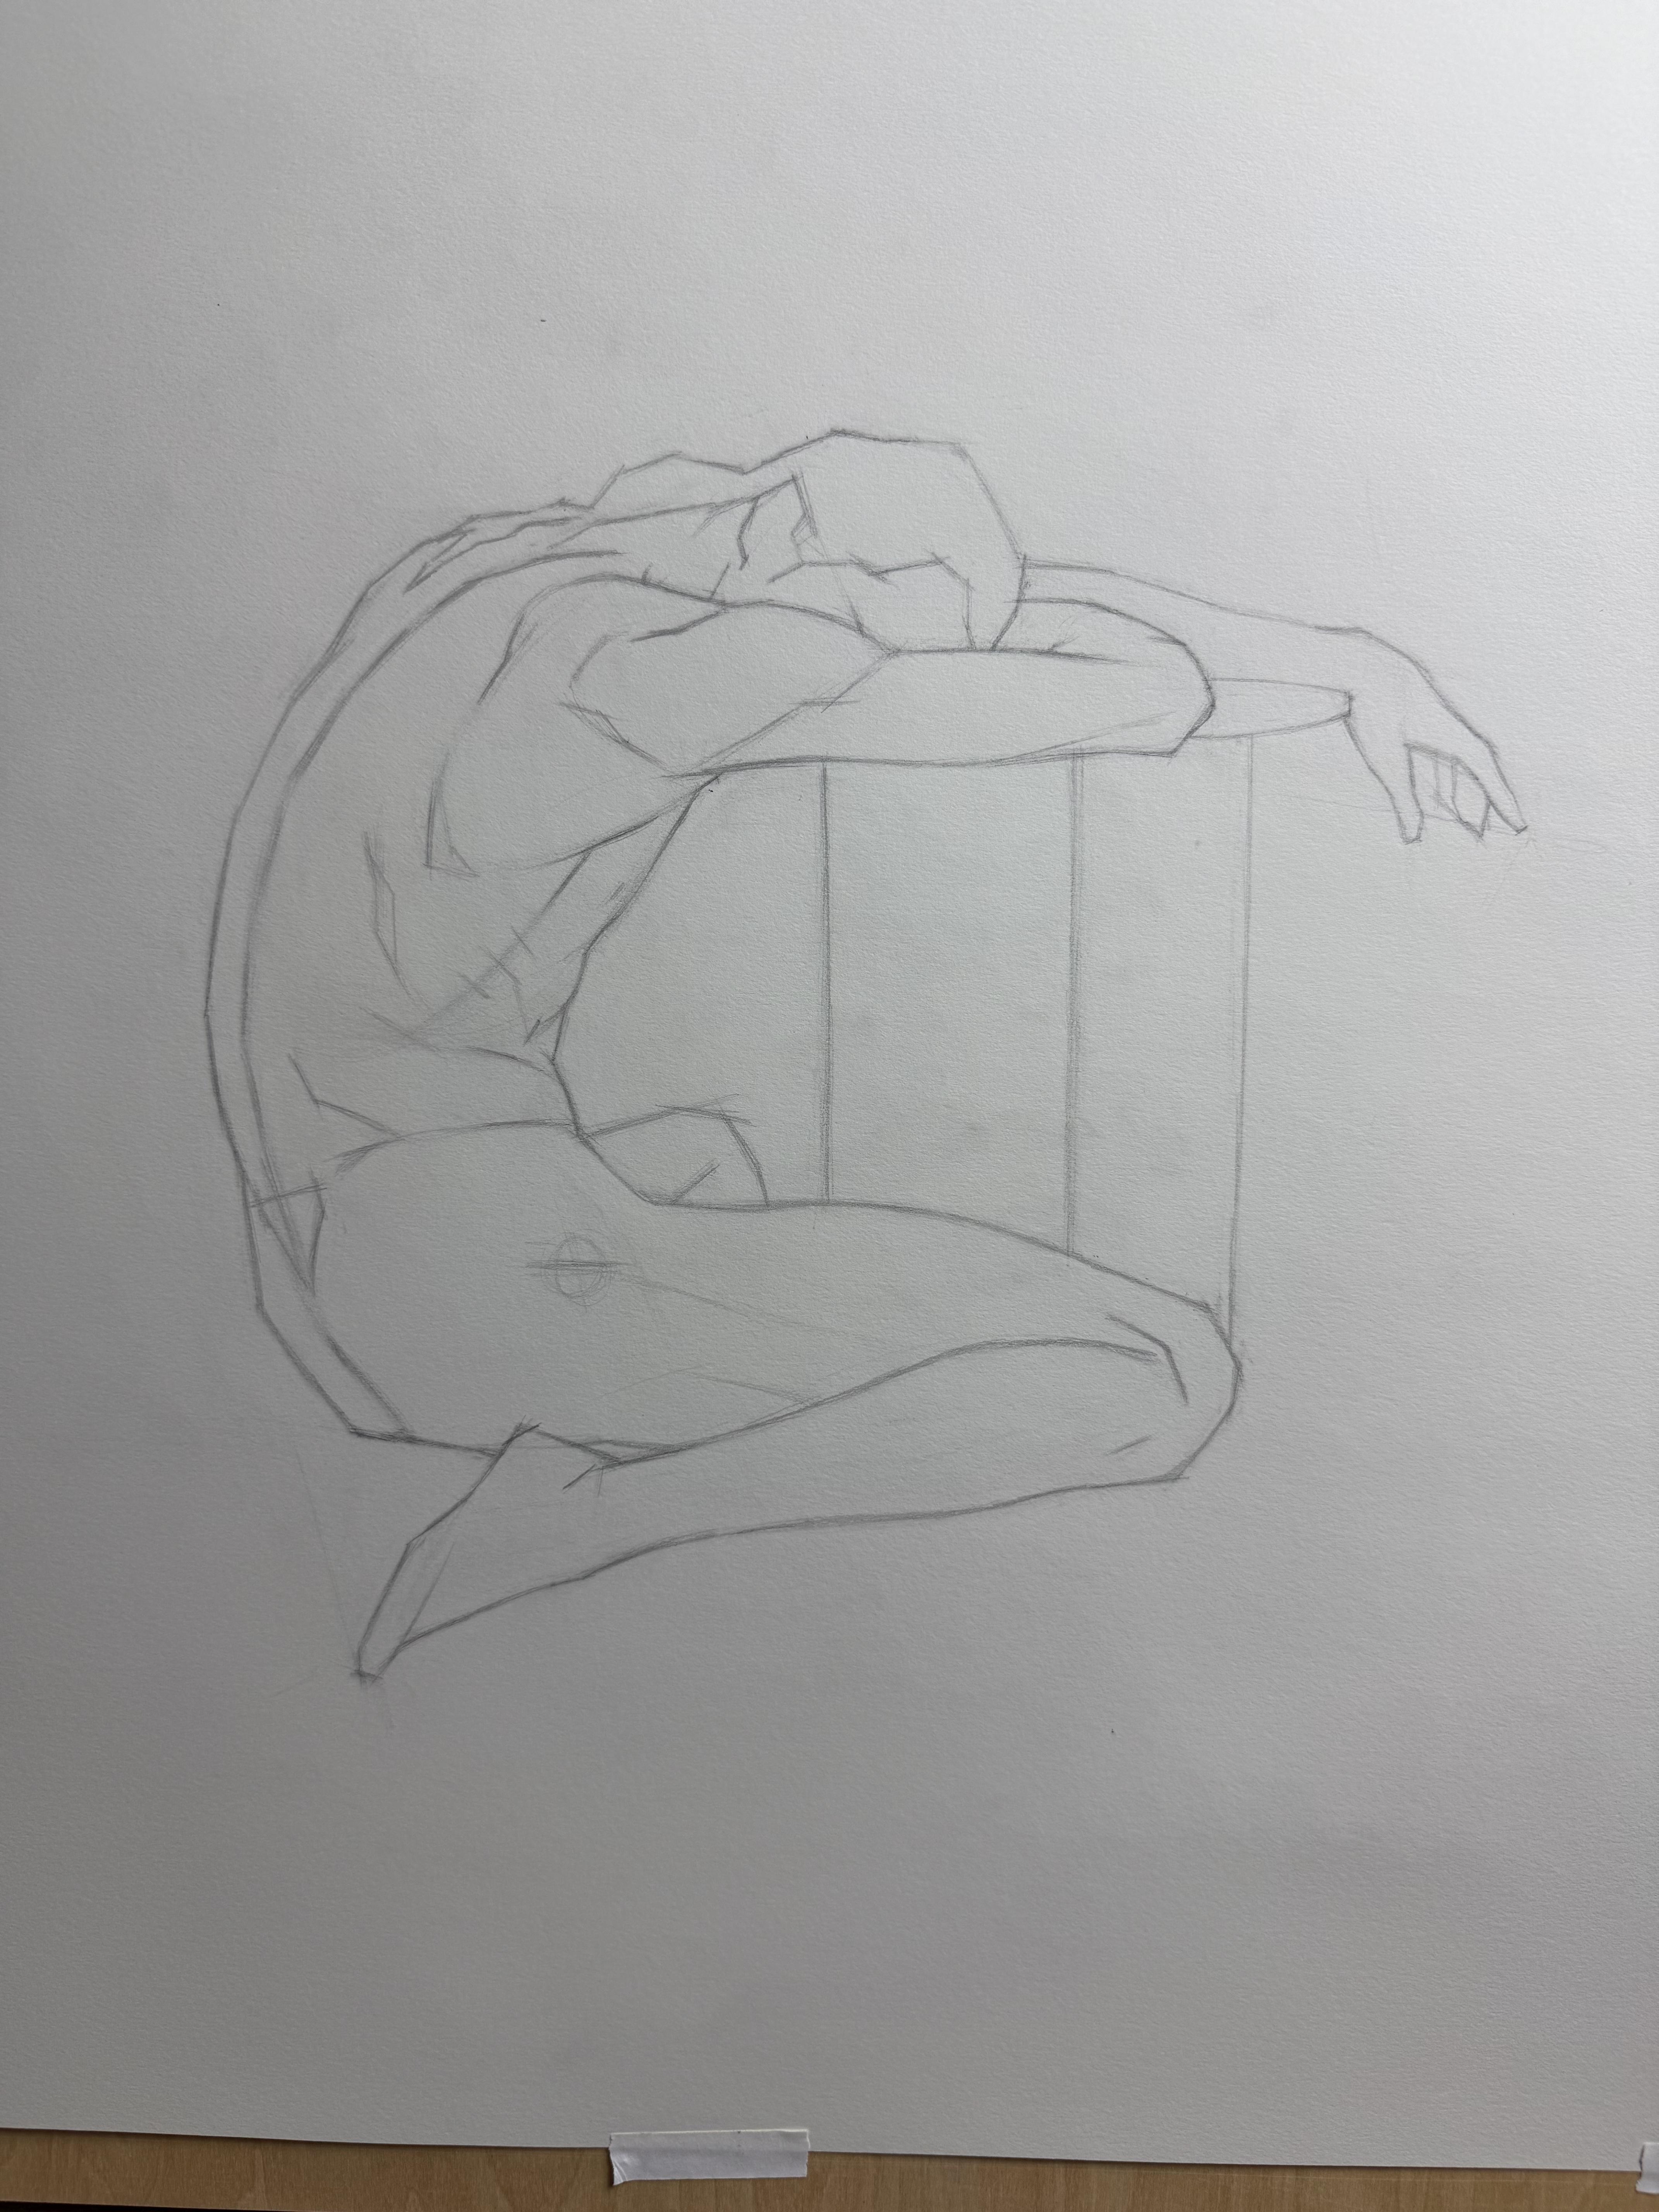
11. Evenlope and Large Forms: So when looking
at a seated pose, there's a couple
benefits, I think, doing a pose like this
and largely it has to do with everything
being a little bit more compressed because
the model is seated. And we don't have to worry about a standing figure and
measure long distances. In this particular instance, I can kind of draw the envelope of a pose in sort of
a triangle shape to try and contain
everything and then gradually build out within
that triangle shape. Now, obviously, there's a
variety of seated poses, so it's always going to
vary to some degree. But the nice part is that we have everything relatively
close together. So when I'm making
initial measurements and sort of flushing
out the figure, I just have a much shorter
range to deal with, and I find that helps move the pose along a little
bit faster than something like a standing pose
where we have to be really sort of a little bit more measured and accurate
with the proportions because we're dealing with
the figure in its entirety. When we have limbs
that are seated or legs that are
cross and compressed, we just don't have as
much to deal with. So we can kind of take those
measurements a bit faster. So as I build into
this envelope shape, I'm still starting with
a rough head shape. But one thing I'm
considering as I'm building it out
is I want to find the shoulder line and axes
as well as the bottom of where the figure is seated and then build
out from there. So the one other thing I have to consider is that
I don't necessarily have some of the
same landmarks that I have in the front
facing figure. So I don't have, like, a pit of the neck or the navel
or anything like that. So I have to use
other axis points to measure what I'm
trying to convey. Again, in this instance, I would be looking at the
pitch of the shoulder line, then I would use the spine as my center line down to
where the model is seated, and I would basically
use that to start to deconstruct
the rest of the figure. Now, in this
particular instance, I really going to
mostly focus on the torso itself because that's
the majority of the pose. And then from what I can see on the leg that is
sort of flaring out, there's not a whole
lot of information. And with the one arm that I see on the side that's
fully extended, you know, I won't
necessarily have to draw too much for that. So a lot of this pose is really just going
to be consisting of the torso and then building
off what appendages I do see. So building off
the shoulder line, I'm essentially creating
the neck from that. And then as I draw in the neck, I'm going to build down the
center line and use the spine and follow that all the way down to where the
model is seated. And that's going
to kind of give me that center line that
I would normally use from the pit of the
neck to the crotch if I were looking at
the front of the model. Then from that center line, I can kind of get a rough idea about where the rest of
the torso is going to go. And for this particular pose, I don't necessarily need to
draw a rib cage or a pelvis. I can kind of just
see this torso being a very sort of
simple block form, and I can connect that all
the way down to the shoulders to the pelvis and then start
breaking it down from there. If I can draw something with much larger and simpler shapes, I'll go ahead and do
that first before breaking it down into
smaller sections. So in this particular
instance, again, just wanting to find the
large mass of the torso so that I can build out the arm
and the leg that I do see. And then from there, we
can start looking for a little bit more smaller shapes to break down the
rest of the figure. You can see with just
a handful of lines, the pose really does come
together rather quickly. Now, it's not to say
that I don't have ways to go in terms of
putting in information, but the overall gesture
gets established fairly quickly because I don't have as many things to deal
with as compared to, like, a standing pose
or if I had, let's say, both legs to deal
with and they were crossed and there's a lot
of overlapping forms. But in this particular
instance, you know, it's a fairly straightforward
back pose that is seated. And so I can kind of get
things established fairly quickly and then start breaking it down into
smaller sections. Now, there's certainly
a lot going on in the back because of
the anatomy involved. But for now, I still want
to keep it simplified for the most part and think about just the overall roundness
of the rib cage. As it gets down to the pelvis, it looks a little bit more boxy, especially for his type. And so I want to think
about those two components coming together to form the
overall shape of the torso. M Now, with how he's seated and
kind of where I see the leg inserting into the hip area
where the pelvis would be, I kind of have this very
sort of boxy shape, and so I'm kind of just thinking about that in terms of
perspective as well, and how he's seated
on the block. I'm not going to
worry about the block so much for this
particular pose. I will indicate it at
some point so that he is seated and not
floating on the page. But for the most part, again, I really just want to
establish the pose and get the overall feeling
of what's going on, and then we can start putting in some of the
extra information. Now, establishing the arm, there's not a whole lot going
on in terms of activity, so I can just focus
on thinking about the cylinder shapes of
the upper arm as it connects to the lower
part of the forearm. From there, because the hand is actually on the
surface of the block, I don't have to think
about that too much and can simplify that
down into a simple shape. The far arm on the
left hand side, I don't even really
need to think about because it's mostly in shadow and I just have to
attach it from the shoulder. So realistically, again,
from this particular angle, the pose is fairly simplified in terms of
the basic construction, where I'm going to have
to spend more time later on is thinking
about some of the anatomy in the
upper back and making sure that works relative
to what I've established. Now, that's not to
say that I want to overly focus on the
anatomy per se, but I do need to think about what's happening
in the back. There's the position
of the scapulas in the shoulder areas that
I want to focus on. And then from there, I'm
really just thinking about some of the
major lines that I'm seeing happen as
the body's twisting and some of the muscles
are compressing. The left hand side of the
figure is mostly in shadow. So some of that area I can resolve when I get to the
mapping stage of the draw. But for the most part,
the overall construction is pretty much
established already. Now I just need to
refine it and make sure to check all my
measurements and then flush out more
information so that I can get this looking more
accurate to the reference. As I start putting some
information in the back, I don't want to get
caught up in some of the anatomical nuances
that I'm seeing. I really just want
to focus on shapes and try to accurately
portray them in my drawings. So even though I know there is a lot going on in
this particular area, a muscles are getting
compressed as he's twisting. And then, you know, on
the left hand side, there is a bit of information
that's in the shadow. You know, that's
all well and good, but I really just want to
focus on the shapes that I'm conveying and does
everything feel cohesive? Do the shapes feel like they
interlock with one another? You know, do they feel attached or they're inserting
into one another? That's all I really want
to focus on right now. And then as we start adding
information to the drawing, we can always complicate
things a little bit more, but realistically in
these early stages, just focus on shape and proportion and then
let the drawing sort of naturally evolve from there. A
12. Establishing the Head and Smaller Shapes: So at this point, we
really have most of the figure established in terms of a overall
general sense. Now, realistically what needs to happen at this point
is I need to go ahead and put a little bit
more information in the head and then start flushing out more of
the figure itself. But in terms of an overall shape and
the general placement, I feel pretty good
about this so far. So this drawing
might speed itself up a little bit faster than some of the
other demonstrations, simply because, again,
with a seated pose, I simply have less to
deal with in terms of an overall figure
because they're seated, things are compressed, and
I don't have to worry about measuring long distances like I would with a standing figure. So getting back up to the head, with the perspective
that I'm seeing, he's kind of in a
slightly profile but slightly turned away. So realistically,
what I'm going to be looking for is I'm
looking for the overlap in the neck and how that kind of connects to the rest of
the overall skull shape. Now, because it's closest to me, I can use the ear to
kind of give myself a little bit of a
guideline to place the rest of the
eye and the nose. And then some of
the chin is kind of tucked away behind the shoulder
so I can't see all of it. And so with a pose
like this, you know, the head is not really sort of the focal
point in my opinion. I think realistically speaking, if I were to complete
this drawing, a lot of the focus should
be on the back itself. That's kind of the
prominent sort of subject in my opinion
for this particular pose, but the head still
has to be there. So I do want to put
some information just so that it
is accounted for. Now, I'm still
going to keep it in a relatively sort
of simple state, so I'm just going to place
the features overall, but I'm not going to flush out too much information and
put in any sort of details. I really just want to
have that head locked in, and as long as I make it
feel like it has a sense of solidity in conjunction with the neck and the shoulders, that's going to be enough for me for the sake of the block in. A. With the head established and
all of the figure, more or less feeling
pretty good, I can start looking at some of the smaller plane changes in
the actual figure itself. And, you know, realistically, again, with certain areas
like this particular arm, I don't really see a whole lot going on because it's in shadow, but I want to try
and get some of that information out because
it's very obvious on him. When I start looking across at the other arm that's in the
light side of the figure, there's a lot more information for me to get involved with. So realistically, that whole
light side, in my opinion, is going to be more
of the area I spent a little bit more
time because there's a lot more information for
me to get involved with. Now, this arm is more
or less relaxed. He's not really extending
his arm out because I don't see any sort of flexion in the tricep area or
anything like that. So I know that
this arm is fairly relaxed because there's no
contraction in the muscles. But nonetheless, I'm
still thinking about the overall cylinder
shape and how that is sort of injecting itself
into the shoulder. And then as it connects to the
lower part of the forearm, I want to keep most of these shapes fairly
simple for now. And the contour on this
side is going to be, you know, kind of, you know, more or less even. It's not overly active, but it does need to be
in there to some extent. And I want to go
ahead and inject some of that in there,
but realistically, I think if you just stick with a simple cylinder shape to get started, it should be okay. As I start flushing
out some information in this back area, again, I want to try and just copy
what I see and not get overwhelmed by some of the anatomical nuances
that are happening there. I think for the most
part, just by focusing on the shapes and trying to
accurately represent those, you can really solve the
majority of the drawing. And, you know, while obviously anatomical knowledge does help, in this particular instance, I think there's
enough in there shape wise that I can wrap
my hand around that I don't need to overly inject information because I just feel like it would
be unnecessary. Now, there's a lot of grouping, especially in this
area where I see the scapula come in conjunction
with the trapezius. And it's not quite a super
deep shadow, but it's a very, very dark half tone that I'm going to
sort of try and make one larger shape so that there's a sense of cohesion
in that given area. And I feel like once I map out the other side of
the back and look for the sort of
relative symmetry in the scapular area down
through the rib cage, I think that's going to help the drawing and kind of
tie things together. Now, as I'm looking at this
shadow side of the back, a lot of this area is
grouped together in terms of the shoulder blade and the
rest of the arm itself. It's all kind of
grouped together. And so there's a lot going on in that shadow in terms of little pockets of
light here and there. So I just need to take
my time and slowly build out that area so that I can map
everything accordingly. I'm still squinting down, trying not to get caught
up in the details, but I do need to account
for a lot of these shapes. So by just slowing down and gradually working my
way down the shadow, I can just map that
out as best I can. And, you know, for
the most part, again, I think once this area is sort of figured
out and resolved, it's going to help the back make more sense relative
to the light side, as there's not as
much information on the light side
to really dig into outside of the shoulder
area where I'm seeing it's being compressed
and we're getting that compression in
the shoulder blade. But for the most part, a lot of what's going on in this particular pose is
happening in the back, so I do want to
take extra time to account for some of these
shapes and information because, in my opinion, again, this is the focal point of
this particular pose.
13. Mapping Shadows and Final Details: Okay Now, as I continue
along the back, when I get to the rib cage here, there's kind of a lot
of repeating shapes. So I'm trying to account for
some of that as best I can. And I think realistically, a lot of this area
would resolve itself a lot better once we start introducing tone
into the drawing. But regardless of that, again, because the back to me
is the focal point, I would spend more
time there really trying to articulate
some of those shapes. And then once we
get down to, like, the hip area and then
the rest of the leg, there's not a whole lot of information to
really latch onto. So that area could be a
little bit more simplified. Now, one thing I'll
mention again is that because we're dealing
with a seded pose, we were able to kind of move through the drawing a little bit faster than some of
the standing poses. And I would say, in general, there's a lot of variability with a seated pose, you know, whether the model is facing
us or turned away from us, or if we have to work with, you know, arms or legs that are maybe crossed over one another, some seated poses can be
more difficult than others, but the one thing I do
like is that because the body is compressed,
in my opinion, it's a lot easier to measure because the
distances we have to measure itself are much shorter versus a standing pose where
we have to measure from, you know, head all
the way down to the foot and then
everything in between. So it's a little bit of a trade off in terms
of complexity, but realistically, you know, we're kind of tackling
the problem the same way, but I find that seated
poses in general are a little bit
easier overall than a standing pose because
of that shorter distance that we can make those
relationships in proportions. And so with all the
shadows mapped out, you can kind of see that we
have the overall sort of gesture of the pose and all of the information
is accounted for. So a lot of what I'd end up doing at this
point is going over individual areas and just
trying to clean them up so that everything looks as readable as I can
possibly make it. Now, again, I didn't want to get too caught up in anatomy, even though in this
particular instance, it would be very easy to try and resolve as much information
as I see in there. But rather, I'd like
to focus more on just flushing out
shapes that I see. So again, kind of
the information in the back could be a
little bit overwhelming. But if I squint down and just look at the
large shadow shapes, look at areas that are kind of dissipating when I
squint my eyes down, I want to try and just get that overall large effect
that what I'm seeing. Then if we were to take this drawing further into
a modeling stage, that's where I would
spend more time trying to resolve things a little bit more accurately as
to what I'm seeing. But considering that this is
just the beginning stages, I want to think about just the overall large effect first, and then from there,
we can always add information and complexity. So at this point, I
can say that we have the information I feel is
necessary for a block in, and this is where
we would start to move forward in the drawing. And so if you decided it
was beneficial to you, you could at this point, maybe fill in a very
light shadow in the shadow areas
just so that you can see the shapes that
you have established. Again, it's really more
about just looking for any last minute changes that
might need to take place. And sometimes by putting
in a light shadow, things jump out a
little bit more just because of that light
degree of contrast. But overall, I think the pose is looking pretty
accurate to what I'm seeing. I like the gesture and the proportions feel
pretty good to me. So this would be
sort of the point where I would say the
block in is completed, and then if we were
to take it farther, we would start establishing a
shadow value range overall, and then that would
ultimately lead to modeling. But for the sake of this class, I would say, this is a
good practice drawing. It's a good block in, and I can be sort of content
with what I've built here. And so, again, the whole point is just getting comfortable with this process. And then as you get better, you can move faster
through these stages so that you can get to
other aspects of drawing. But none of that
can happen until the block in is sort
of as ideal as we can possibly make it in
terms of construction and proportion and having the
necessary information that will allow us
to move forward.
14. The Envelope and Gesture: So with this particular pose, I'm going to approach
it a little bit differently because there's
a lot of gesture involved. And so that's something that
I want to try and capture. Now, I'm still going
to be thinking about the overall large shape
and sort of build in an envelope because
I want to contain the figure in as simplified
a shape as possible. But from there, because there's kind of a very severe sort of
s curve in the pose itself, I really want to focus on
trying to capture that. So I'm going to focus
on building from, like, the shoulders and rib
cage down into the pelvis first because that's
the predominant shape that I'm seeing in this pose. And so because the head is really tucked
down into the arm, that's not something
I'm really going to account for at this point. I know it has to be there, but I really want to focus
in on the body and look at that really nice curve of the spine and how the body is
just sort of hunched over. And I think that's kind of
the focal point of this pose is really it's just
kind of that back and that kind of lean as
he's leaning on that block. And it has, like,
a cool look to it. And with him being
as lean as he is, there's a lot of cool
anatomy shapes involved. But really, I want to focus on just that
spine and pelvis, as they're kind of just
really hunched over, and then looking
for the sweep of the leg kind of has
a nice shape to it. And then, you know, the
other elements, like I said, like the head and then
the arm that is behind his head are kind of really not as important
for this particular pose, at least in regards
to establishing the overall proportions. And so with this
particular pose, I don't necessarily have the same landmarks
to work off of, like I did with
the standing poses or the previous seated pose, but I can still use the spine as a way to sort of
separate the sides of the body and start
thinking more about the shapes of the rib cage and the pelvis and how
they're coming together. I also look at this pose to the shoulder and scapular area, kind of create one large shape
as it flows into the arm, and then the lat would
flow into the rib cage. And then we would have the
rest of the abdominal wall in the oblique that kind of will tie itself to the
hips and the pelvis. So I start thinking about
the pose in sort of sections in this way so that I don't get overwhelmed
with all the information, but I'm just looking for
the next largest shapes after I've established the overall large shape of the pose. Getting down to the
leg and the pose, I want to keep it fairly simple. I mean, there's not a lot of
information in there per se. We're really just getting mostly that lower part of the calf
as it ties into the foot. And we are seeing a little
bit of the compression in the hamstring and
the hip flexor area. But, you know, for now,
I want to just keep that fairly simple
and just try to capture the overall flow of the leg because I think
between the upper arm and how the body
curves down into that leg and then flows down through the
calf and the foot, that's sort of the nice
appeal of this pose is we have these nice sort of curves that are happening
throughout the body. So I really want to make
sure I capture that first. And then, you know, later on, I can start adding information. But again, you know, in this
particular part of the body, I don't think it's going
to be any sort of area of emphasis compared to the
sort of upper body with, like, the back and
the scapula area and some of the information
we're seeing in the rib cage. Now, with the majority
of the pose established, I want to just start
breaking it down into smaller sections that are a
little bit more manageable. And I think by putting some
smaller shapes in there, it's going to allow
me to sort of remeasure areas that
I'm unsure about. Again, because of the
nature of the pose, I don't have as many
landmarks physically on the body for me to check and to kind of help me
construct the figure. So what I'm sort of
doing is I'm putting in information and kind of
eyeballing it to some degree. But then I'm following that up with measuring angles
and making sure that things are aligning in my drawing relative
to the reference. And so as I'm building out some of the information
in the torso, again, I'm not trying to
focus on anatomy per se, but I think on him in this particular pose
with the lighting, some of these shapes
are so obvious that I literally can just copy
them as best I can, and it's going to
look like the pose. So some of the information
I'm seeing in the lower body as the sort of external oblique is wrapping around the pelvis, and then we see a
little indication of the regular affront
abdominal wall, it's so obvious on him because he's so lean
and the shadows are sort of revealing
that information that I just have to
copy what I see. Now, ultimately, I still
need to go back in and just double check as
I add new information, I want to make comparisons to what I have established already. But for the most part, I'm
essentially just working shape to shape on my existing
block in that I have, and then I can start double
checking myself from there and making sure that things are aligning and sitting
where they need to be.
15. Smaller Shapes and Refining: So now that we have
the large sort of established figure there, I need to just start looking at smaller sections and just
start to refine the shapes, maybe resize some
proportional things, but very much like the
previous seated figure, because we don't
have to deal with the standing figure and we don't have to measure
long distances, oftentimes these
compressed poses can sort of resolve
fairly quickly. And once the large
shape is established, it's very easy to
just start working in smaller sections and just gradually build up
the figure that way. And so for this
particular figure, like I said, the focal
point, in my opinion, being the torso and kind of that really nice
hunched over look, I really just want to
make sure that I have that same sort of connectivity in the
pelvis and rib cage, especially as it's bending
there in the mid section, and I like the way
the shoulders and sort of some of the back muscles are
kind of coming together. And I just want to make sure
that those have a nice sense of being interlocked
and kind of connected. So that's kind of
where I would spend the majority of my time
in a pose like this. And again, it's very situational depending on other poses
you might work from. But in this particular
instance, again, because the head is
sort of tucked in, and then the arms are
kind of, you know, fairly straightforward
and the leg itself is very simple, too, I would spend more time
really working on that back and sort of pelvis area
for this particular pose. Now, working down
through the leg here, I would probably opt
to keep this fairly simplified because there's going to be more attention
on the torso. So I want to have sort
of an area of rest. So I would have a
tendency to sort of simplify the forms
through the legs. And realistically, I don't see a lot of information
there for me to latch onto except for the
foot as there's going to be a lot more
detail present in that area. But around sort of
knee and kind of where the calf is bunching up into the back
of the hamstring, there's not a lot of
information there. So I would have a tendency
to simplify the leg overall and just worry more about getting the foot in there eventually so that there could be more attention
paid to on the torso. And so, again, even down
through the calf through here, I want to keep the silhouette
overall fairly simplified. And, you know, when you
think about the leg as sort of working in
sort of two sections, we have the upper and lower leg. And realistically, all
I'm thinking about is the overall cylindrical shape of the calf is it kind of
tapers down toward the foot. And then when we get
to the foot, again, like in the previous
drawings where I talked about the foot
being more of like a wedge shape that is sort of sitting in between
the two ankle bones. And that's kind of the sort
of simplified effect that I want to go for for
this kind of pose. And again, I don't
want to get caught up drawing the details of the foot in a block in just yet because I want to just have
the large shape established. And if there was more
time down, you know, towards the end of the block in, we could establish
more information. But initially just
putting that shape in, we want to simplify it down. Now, as well as the head
being in this position, I don't have a whole
lot to work with, which is totally fine. So because I'm looking at
the relative distance of the head in relationship to where the shoulder
and the arm is sitting, I know that I can't
see any sort of information of the front
plane of the face, like, you know, any
of the features of the face, like
the eyes or nose. I just have the ear
on the side here, and then I can use
the hairline to sort of construct the
rest of the head. Now, sometimes when you have
a head obscure like this, it can be a little difficult. So if necessary,
sometimes it's helpful to just draw lines through
whatever's covering the head, as if you were
actually going to draw the head so that it helps
you with placement. Ultimately, you
would have to take out those construction lines, but sometimes just
visualizing them through another form that
is sort of coming in front of them can help you
construct the head so that it feels well connected to
the rest of the body. In this particular instance, so much is covered that it's easier for me to just
measure the distance of the back of the
head to everything else and then sort of build
the hairline around that. So that's kind of
what I'm going to do in this particular situation. And the other thing I'll do for this drawing is I'll add in some of the ponytail because
I feel like in this pose, because there's not a lot of
information for the head, it just kind of helps to maybe
have the ponytail in it's sort of like a graphic
element for the pose. And so I'd go ahead
and just add in a little bit more information in here than I did in some of the previous
block-ins we've done. But otherwise, you know, again, I would keep the head fairly
simplified because it's not really a very large area of importance for this
particular drawing, but it obviously has to be there because it's obviously
part of the body. But, you know, again, if I were to take
this drawing further, I would still probably keep
the head fairly simplified overall so that
more of the detail and finish could be pushed
throughout the torso. And now, lastly,
getting back over to this far hand in the background, I'll keep it in a fairly
simplified state, you know, because
it is a block in. So like I mentioned previously, I think a lot of the times with hands and feet
is you want to just try and establish
the large shapes as best you can early
on in the block in. And then, you know, I treat it like if I
was drawing it from life in a sense where
I wouldn't want to chase a hand or a
certain pose if I was drawing from life because odds
are it is going to change. Now, because this is referenced, we don't have to
worry about that. Even for the block in,
I would still keep the large shapes
established for the hand. So I'm going to indicate some of the thumb and
the forefinger and then keep some of the fingers that are in shadow
kind of simplified. And then that's pretty
much all I would do for a hand like this in this
particular drawing. And then, you know, later on, if we were to take
it to a finish, then we could
explore more detail.
16. Finishing Details: So basically, at this point, we have everything in
place for the block in. And so now I'm really
just going to go around the whole drawing and
more or less just clean up areas and
then maybe look for a few small little
shapes or details throughout the
figure that I feel like could benefit the blocking. But I would say, even if you got to this point where you have all of the
large shapes established, the pose is reading
like what you see in the reference or what you're looking
at at a model, then that's really what we want to establish
in the block in. And then everything
after that is going to basically help push the
drawing towards a finish. So again, in this instance, we could start mapping
out the shadows, and then from there,
we could start adding a slight value and then
gradually building up the forms. But in terms of starting from a blank page to the large shape to where we are now in the block in stage, this is really about the
kind of information I would expect in order to move on to the next
stage in the drawing. And hopefully, you can see
in my drawing compared to the references that I've
omitted a lot of details, and the pose still reads like
what the model is doing. And that's really all I want
to aim for at this stage. Now, I know sometimes
it's easy to get caught up in some of those smaller
shapes and details, and it's not that I don't
think that they're important. It's just that at this stage of the drawing,
they're not important. And so I wouldn't
want to necessarily add too much of that
information just yet. And it's something
that I would want to work towards as I put in more, let's say, again, value
and form into the drawing. And so although it is tempting to add some of that
stuff in there initially, I would recommend, you know, even if you're on a more
intermediate to advanced level, is to try and keep everything as simplified as possible for as long as you can until you move on to the tonal
stage of the drawing. And so you can see a
lot of what I'm doing is just adding a few
lines here and there, trying to think about how
things are interlocking, and then just
removing excess lines or any of the initial
construction lines that I started with or anything
that is unnecessary at this point in terms of
just lines in general, I want to go ahead and
just remove and get the drawing as clean as possible so that by the time
I get to adding, you know, like mapping the
shadows and start adding more information
is that I'm always working on top of
a clean drawing. And I think just in general, that is sort of a good sort of thought process as
you're working, is that you always
want to try and maintain a clean drawing,
a clean painting, and then make each stage of the drawing or whatever
you're working on as neat as you possibly can
so that it feels much easier to start adding
additional information, and you don't get
confused with what you've previously put down as
you were working earlier. And so I think for this drawing, I'm going to leave it at this particular stage and not map out any of the shadows
because I kind of like the way the drawing looks
as it is right now. More importantly, I hope that you saw how we approached the pose
from the beginning where we started with a large shape and then just looked for those sort of initial
gesture in the sort of the bending of
the torso and how we simplified that down first and then gradually broke it up into smaller shapes to reach
the pose that we are now. So, now there's
obviously a lot of variety of these types of poses. And now, we're not
tackling anything with extreme foreshortening
or anything like a lying down pose, but I would treat it the
same way we did this one. And regardless of how the
model is bending or twisting, when you have these sort
of compressed poses, just start with a
larger shape and gradually break it down into
smaller and smaller chunks, and then start to measure and
compare everything else in relationship from the appendages and however they're looking
in relationship to the torso, and then you'll gradually
arrive at your block in. But hopefully that
made sense and how we approach that and kind
of the other seded pose as well, because, again, we're kind of treating all
the drawings very similarly, but there's maybe
slight variances in how we deal with them because of what the model may
or may not do. But again, we're
kind of arriving at a nice simple block
in that pose reads, and, you know, that's
all we can really ask for in those initial few
hours in the drawing.
17. Closing: So I just wanted to
end this class with a few closing thoughts on the block in sort of process
that we've been going over. And more importantly,
again, this is, to me, sort of an overall
approach to drawing for me. And regardless of whether or not it's a figure or a portrait, still life, it
doesn't really matter because the approach for me
is fundamentally the same. Now, this is certainly not to say that this is
the only approach, as there's basically any number of approaches you can do
to create a piece of art. However, what I like about
this approach is that it's very sort of consistent in the results that I can
get because I'm following a very procedural sort
of method of drawing. So in terms of starting from
the largest possible shapes, working down to smaller shapes, comparative measurement, and plotting angles and
axes and things like that. To me, in the years that
I've been doing this, this is the most consistent
approach that I've done for doing these
kinds of drawings. Now, understandably,
everyone is going to have different goals that they
want with their art and their drawing and maybe
the different kinds of ways to finish a
drawing are basically, you know, it's kind of
up to the individual. But a lot of the times
where I think a lot of students struggle is
the beginning stages of the drawing
where they have to just place something on
the page and to try and figure out the
proportions and get everything working as a line drawing before
they can introduce any sort of shadows
or tone or form. And that's why I ultimately
put so much emphasis on the block in stage
because I just think it's so vitally important. And once you get a
good handle on that, you can really decide to choose any direction in
terms of finish, and that's something that
you can spend more time on. Now, I wanted to just
show you a couple of drawings that I
have finished here. And while, I understand that not everyone
is going to want to do this kind of form modeling
or this kind of a finish, I wanted to just say that these drawings also underwent
the exact same process that I went over
in the class from the initial block in stage
to mapping out shadows, to filling those in, and then
ultimately modeling form. And so the nice part is, is that once you get a handle on those initial
stages of drawing, you can freely
decide whatever you want to do and however
you want to finish. And, you know, if you only
have a certain amount of time to work on a
drawing or what have you, the choice is
ultimately up to you. But I hope that all of this helps so that you can
reach your own kind of potential finishes
with your drawing and that you have a good
understanding of the block in stages so that you never
feel lost or know where to go when you work on your own drawings.
Thanks for watching.
 Mark Hill, Fine Artist