Transcripts
1. Introduction: I'm ELISA with ancestral evolution. And today we're gonna be talking about the basics of fermented dairy. My husband I run a small farm and we're passionate about sharing traditional skills for the modern world. Today, we're gonna be talking about the basics of a couple of easy ferments. We're gonna be talking about Kiefer yogurt, butter, milk and creme fresh. This class is meant as a basic overview. No prerequisites are required. All you need are a couple of easy to find materials to get started. I've been making my own yogurt on a regular basis for over 10 years now. And while I'm newer to some of these other ferments, the basic principles still apply. First, we're going to decode some of the terms that are commonly used on theory packages. So you know what kind of milk to go for when you're getting ready for this class? Secondly, we're gonna talk about Kiefer what you need, how to do a primary and a secondary ferment that we're gonna talk about yogurt by milk and creme fresh and finally at the end, I have a bonus section just for you. So you want to stay tuned for that your project for this class is to create your own firm it. Pick one of these four ferments and make your own batch. Please take a picture of it and share in the project. Sexual below. I'm excited to see what you make and what you think of it. All right, so let's get started.
2. Decoding Dairy Labels: When you go to the store and you look at the labels on milk, you'll see some terms thrown around, which can be confusing if you don't know what they mean. The first is pasteurized, so pasteurization in general refers to the heating of a product in this case, milk to kill off pathogenic bacteria that could make you sick or someone else stick. Now the most common pasteurization process is called that pasteurization, and that's where the milk is heated to about 100 and 45 F, and it's held there for about 30 minutes. There are a couple of other types of pasteurization. Also, the next type is called high temperature. Short time pasteurization on. This is where the milk is heated to about 160 F, and it's held there for about 15 seconds. And this is abbreviated. H T S T. The next type of pasteurization is called high heat short time, and that's where the milk is heated to about 190 F and held there for about one second. That's abbreviated H h s t. Next, you'll see the term old for pasteurized and what that means is, the milk is heated up Teoh about 280 degrees Fahrenheit, and it's held there for about two seconds. Finally, you'll see the term ultra high temperature pasteurized. This is where the milk is heated to between 275 to about 302 degrees Fahrenheit, and it's held there for about 4 to 15 seconds. And that milk can then be packaged and put on the shelf. And that's shelf stable milk. So if you see milk that's on the shelf, it's not refrigerated. That's in kind of like juice box, like containers or something like that. You're looking at ultra high temperature pasteurized milk. Another thing you may see when you go to the grocery store and you look at milk labels is the term black toast free. Now this is milk that usually is treated with lack tastes, which is an enzyme that breaks down the lactose in the milk. You want to avoid this for what we're doing today. Last but not least, you're going to see the term homogenized, so if you mix water and oil together naturally, the oil is gonna float to the top. Similarly, if you have milk the fat and the cream. Part of the milk is naturally going to flow up to the top of the milk and create a layer of fat in homogenized milk. These back globular have been forced through a very small opening and high pressure, so it makes the globular much smaller and dispersed throughout the milk so you don't get that layer of cream on top of your milk. Then there is raw milk. Now raw milk has been the subject of quite a bit of controversy and hoopla. I'm not going to dive into that today, except to say that it's important to know the risks versus the benefits of using raw milk. If you choose to do that, it's also really important to know what the laws are in your state. Different states have different laws regarding the sale and consumption of raw dairy, so definitely be educated as to the risks and benefits and the laws in your area before you dive into that. For the purposes of this class, I recommend that you pick a whole fat milk, which is pasteurized but not ultra pasteurized. Homogenized milk is fine, Um, and you do not want to use the lactose free. If you can afford organic and you have access to it great. Sometimes it can be tricky to find organic milk that is not old for pasteurized. I have found that Trader Joe's carries an organic whole milk that is just pasteurized. It's not ultra pasteurized, so you may want to check that out. If you have one in your area or find the local farm, that would be the best. While you can use goats milk for many of these projects, you're gonna find that the consistency is a little bit different. It's going to be thinner, and for that reason I suggest that you use cow's milk to give you the greatest chance of success when you first try it and then feel free to branch out an experiment from there.
3. How to Make Kefir: Okay, So first, let's talk about Keefer. Keefer is a really great ferment. It makes kind of a liquidy sour yogurt. It's great in smoothies, and you can use it for a lot of other things, too. Originally from kind of Eastern Europe and Western Asia area in the Caucasus Mountains, the grains for Kiefer were handed down generations after generations after generations as a kind of family heirloom. The great thing about Kiefer is you can keep your grains going however long you want Teoh. And if you want to, you can pass them down to your own kids and grandkids. Unlike some other ferments, Kiefer grains have a combination of both bacteria and yeast, so that gives it a very unique flavor. It also has way more species of microbes than yogurt or any of these other ferments. I've seen numbers quoted between 50 and 70 different species, and I have seen numbers quoted about 100 different species. It depends on where you look and also probably the where you got your grains and what you've been culturing your grains in the number of probiotic species. Innkeeper are an order of magnitude higher then yogurt or pretty much any other dairy firm it you're gonna find. This is great news for your gets. So let's talk about what we're gonna need. First and foremost, we're going to need some keeper greens. These grains, contrary to what you might think, are not actual grains. They kind of looked like cauliflower, and they're a little bit gelatinous there. A couple of different places that you can find keeper grains first is the order them online . You can find them dehydrated, and then you'll have to reconstitute them and get them going. That process of kind of activating the grains can take up to eight weeks. To do so. Keep that in mind. The other thing you can dio, which is the best if you can, is to find a friend or someone in your area who makes Keeper on a regular basis and when they're grands, multiply, asked them if if they'll give you some grains or if you can purchase them from them. Many cities have meet up groups which are solely devoted to ferment, so that's a good place to look, and there are also some online forums where people share keeper grants as well. These are milk Kiefer grains, not Waterkeeper grains. There is a difference. The number of probiotic species are much higher in milk keeper as opposed to Waterkeeper. So make sure you get the milk keeper grains. Some places also sell milk keeper culture like a powder culture. And that can work too. If you are just wanting to make a limited number of batches, um, that will not go on indefinitely. The keeper grains will go on indefinitely. So that's why I like them. And when they multiply, you can give some to your friends and your family to and teach them how to make keeper. So we've got our grains. You're gonna need a mesh strainer of some kind Ideally made out of either plastic or out of stainless steel. You're gonna want a bowl. I like using one that has a spout on it so I can pour it easily. You're gonna need a jar, Alec, using KMI canning jars there really easy to sterilize and also they have the cup measurements on the side. So I can just eyeball kind of how much volume I have in my jar that supposed to measuring every time you're gonna want a spatula, You're gonna want a lid. I like using the plastic lives because they don't trust you in a pinch you could use a metal into, but I think the plastic lives are better if you're gonna make be making key for on a regular basis. And last but not least, we've got some milk. First, we're gonna take our keeper Greening's, and I've got about a tablespoon and 1/2 2 tablespoons of keeper grains in here, and I'm just going to transfer them into my jar. Should you get all the little ones in there and then I'm gonna cover it with milk. Gonna dio amount three cuts. That gives me some extra space. That gives me some extra space in the jar if some bubbles develop. The thing about Kiefer is that because it has a Houston it it creates some some bubbles in there. And actually, keeper does have a very small percentage of alcohol in it because of the east and because of the bubbles, sometimes your people will rise a little bit in your jar, so I would recommend not feeling your jar all the way. At least give yourself maybe a cup of wiggle room or so So we've got our milk in their and our keeper greens, and I've just put my lid on, and I'm just getting shake it back and forth generally a couple times, and I'm gonna set it on my counter. Then we're gonna let this set for between 18 and 48 hours. The way you're gonna know when it's done is it's consistency will have changed. It will have gotten thick, and you may see just some thin lines of kind of yellowish away running through the key for and that is a sign that it's done. All right, so we're just gonna let our key first it at room temperature somewhere between 68 80 F. Every so often, when I walk by, I'll just turn it upside down and set it back on the counter. No need to shake vigorously. I just like to do that, too, to get the bacteria to mix around a little bit. All right, so we will be back when our Kiefer is dense. Here's our keeper and it's been about 18 hours. As you can see, it started to the way has started to form a layer on the bottom so I could have pulled this maybe an hour or so before I did. But it's looking pretty good. And it's nice and thick on the top, you can see them. So what I'm gonna do is I'm just gonna take the lid off of my jar where we've got it fermented, and we're gonna pour it through our strainer. I've got my stringer just set over a bowl. Um, or you can use I like using kind of a measuring bowl cut thing that has a spout on it so you can pour it more easily. But I'm just gonna take it off and pour in here, and we're just going to filter out all the liquid here on you may need to give it some taps . Strange. Just give some firm taps to get the rest of the, um, Kiefer drained out of you can also use a spatula to kind of move the key for around and get it to drain out. Also right. And there are grains. So at this point, you can put these grains back in your jar and add more milk and just repeat the process and you've got some more, Keeper. If you're not ready for another batch of Kiefer yet, you could put your grains and a jar and cover them with about a cup of milk and put them in the fridge. And they can live in your fridge for up to about a week and then try to take them out and make a batch of keeper. That will help make sure that your grains stay healthy and robust and don't get wimpy on you. All right, So I'm just gonna take these grains and move them over here. And now this is our beautiful Kiefer. As you can see, it's slightly thick. It's kind of the consistency is sort of a drinkable yogurt here, and I am going to put it back in this jar. And at this point, you can go ahead and drink it just like this, um, or put it in a smoothie or what have you? Or put it in the fridge. But when I'm going to do today is I'm gonna show you how to do a second ferment. So the second fermentation further breaks down the proteins and the lack tose in the milk. It makes it a little bit more digestible For those people who are sensitive to dairy, it also makes the key for more effervescent and kind of bubble ease. So I'm just gonna pour this back in my jar. Here we go. So you can just let it sit like this with a lid on on your counter for another 24 hours or so, and that will give you a really nice secondary Furman and then stick it in your fridge. The other thing that I like to do is to add some flavorings to my secondary for men. So some really great suggestions would be Teoh use like some Citrus peel, especially orange or lemon peel. In here, you could use a chai tea bag. You could use some, like frozen fruit or really any kind of fruit you want. Today. I'm gonna be adding a little bit of ground cinnamon, just a couple cupper. Couple of generous Sprinkles in here, adding something to your secondary. Furman is a really great way to add flavor to your keeper without adding extra sugar to it . So I'm just gonna shake this up a little bit and just sit on my counter and we'll check back in about 24 hours and see what it looks like. So here's our keeper. We've had this keeper sitting out for an additional 24 hours after we filtered are grains out, and as you can see, it's pretty separated. Here. You can see the way and you can see the Kurds kind of separating in two spots here. And of course, we have kind of some of the cinnamon that we added to it. At this point, this is ready to drink. You can just drink it straight from the jar. I prefer Teoh, Shake it up vigorously, or you can use like an immersion blender or put it in an actual blender, and that will help kind of distribute some of these Kurds a little bit more. So it you have a more consistent texture. Um, and this will be nice and bubbly and effervescent, really refreshing, especially on a hot summer day. Now, if you're not ready to drink it yet, you can just stick this in the fridge but trying to drink it within about 2 to 3 weeks. If you can
4. How to Make Yogurt: All right, So let's talk about yogurt. This is the one ferment that probably everyone has heard of before. Today, I'm gonna show you how to make your own. The thing that says yogurt apart from some of the other ferments we're gonna be talking about today is that yogurt requires heat and it requires and more controlled temperature through its fermentation period. When we're making Kiefer buttermilk or cream fresh, we don't require any heat. We could just leave the ferment on the counter room temperature. But that's not the case with yogurt. When we make yogurt, we're going to heat our milk up to about 180 degrees. Then we're gonna let it cool back down to about 110 and then we add our culture and incubate our culture for about 8 to 12 hours. While you can still make yogurt without the heating step heating the milk up first day to 180 degrees will result in a thicker, creamier yogurt with more of the texture that you're familiar with. So what are we gonna need? First of all, we're gonna eat some milk again, whole milk, and we're gonna be using 1/2 a gallon. In this case, you're gonna need some commercial yogurt of some kind. You want the plain yogurt with nothing else added No sugars, No other additives. And you want like that has live cultures in it. So if you look at the back where under where it says ingredients, you should be able to tell if there are added ingredients sugar, etcetera. To take a look at that, before you buy some, you're gonna need a slow cooker of some kind. Today, I'm demonstrating with a crockpot brand crop on pretty much any slow cooker will do for this process. A thermometer is nice, but you don't have to have one, and then finally a ladle. And if you have some jars or some container, just store your yogurt. And after it's done, this is milk that just came straight out of the fridge. I'm putting it in a cold, slow cooker. Just get close that up and I'm gonna put this slow cooker on low, and we're going to set a timer for 2.5 hours, and then we'll come back. Now I've checked the temperature on my slow cooker at various time points, and I find that 2.5 hours is perfect to get 1/2 a gallon of milk up to 180 degrees. But if you have a different type of slow cooker or you're working with different volume of milk, you may want to double check your temperatures. One other no, I wanted to make is that when you're planning to make about yogurt, I recommend that you started at least six hours before your wine to go to bed. So you don't have to wake up in the middle of the night to do the next step. If you plan ahead and started at least six hours before your wanting to go to bed, then that will give you enough time to finish everything up and go to sleep. Wake up in the morning and then you'll have fresh younger. After we've heated, are milk and are slow cooker For 2.5 hours on low, I'm going to just turn it off. I'm just gonna leave it in the slow cooker with the lid on, and I'm gonna set a timer for three hours. We're just gonna let this sit and cool down for three hours, and by that time it should be approximately 110 degrees, which is what we're shooting for. So I'll see you back in three hours. So our milk has now cooled down to about 110 degrees, and now it's time to add our culture. So I've got some store bought plain yogurt here again. No sugar added nothing else with live cultures in it. And I'm just gonna take my lid off my slow cooker and I'm gonna add about 1/2 a cup of my commercial store bought yogurt to my warm. So we're adding the bacteria that we want to grow to a nice, nice, warm incubation. I'm just gonna start this up with the Wisc to get fully incorporated. We're just gonna put our top back on our slow cooker, and we're gonna insulated. Now. I like to use kind of an old back towel, and I just kind of cover it up and wrap it up with the bath towel. But like an old quilt, old comforter, anything like that. Towels are great. And I'm just going Teoh, put it aside and we're gonna let this sit for between eight and 12 hours. So I'll see you tomorrow morning. All right. So our yogurt has been incubating in Arsal Kerger for about 12 hours now, and we are going to unveil it from role. Take the lid off. You may have some condensation, and that's perfectly fine. Let off here. We've got a nice batch of yogurt here. You can see it's pretty thick. Who and a really nice consistency. So at this point, when I do is I just take kind of ladle and mix it up? You can see consistency here. Nice, thick, creamy yogurt. This is exactly what we're looking for. And if you remember, kind of the consistency of our key for this is a much thicker consistency. And that again is because we heated the milk first. That gives us this nice consistency. All right, so at this point, what I usually do is I take a canning jar. And if you have one of these canning funnels, they are They're great for this purpose. But you don't have to have one. Depends how good of a Laidler you are. And I just put some in the jars for storage. in the refrigerator. Now what? You can store this in pretty much whatever kind of container you want to store it in. I think glasses best just because yoga is slightly acidic. Better not to have it in plastic for a semi long period of time. Okay, you got your jar filled up here. You can just put a lid on and stick it in the fridge. Now, if you want sweetener or any flavorings in your yogurt, you can put them. And at this point, But if you do want Teoh, make another batch of yogurt in the future with some of the yogurt that you made, Remember to set aside some yogurt right now before you put any sweeteners or flavors or anything else like that, so you can make your next batch. But you can keep your yogurt going pretty much indefinitely. If you notice that your yogurt starts to change in its color texture some you may want to restart it with a commercial culture and then go from there. If you're someone who's sensitive toe lack toes, lactose intolerant or you're trying to avoid lack toes because you're on a low carbohydrate or ketogenic diet I recommend letting your yogurt incubate for about 24 hours instead of the typical 8 to 12. The 24 hour incubation period. Will we use up a lot more of the lack toes in the yogurt, and so you're gonna end up with the result, which is much lower in the natural sugars in the milk. If you do decide to let your yogurt go for a full 24 hours, so remember Teoh. Get some yogurt out at about 8 to 12 hours to use for your next batch. If you use the 24 hour yogurt for your next batch, it may not work as well for you because some of the bacteria may not be as healthy or robust. Another thing you can do at this point is to make some Greek yogurt, and that is also really good for reducing the lack toes in the yogurt. It gives you a much thicker yogurt and one that's higher in protein. So for that you just want your mess stringer again, and you can just put it over a bowl of some sort and cover it either with a woven kind of mesh cloth or you can use cheesecloth for this to that. This fine. Let's put it in there and you're just gonna put to me over in here? They do make strainers, especially for Greek yogurt. And if you're making a lot of it, you may want to invest in one, but it's not necessary. And you can just let this sit. I was stick it in the fridge, but you can let this sit for a couple hours to overnight, and at the end of that time you'll have some nice fake yogurt in the top of your container . So here we have our yogurt. That's been just draining for about four hours now. And if we look underneath here, we've got a pretty significant amount of liquid that's drained out of it. It's the way. And this yogurt is now. Ah, lot thicker than it. Waas concussed. You can kind of see how thick this is. If you let it go longer, it'll get even thicker so you can kind of see how thick that is compared with some of the yogurt that we did not strange. This is just you that just came straight out of the slow cooker that was pretty thin. This one is pretty thick. So there you go. If you want Greek yogurt, that's an easy way to make your own.
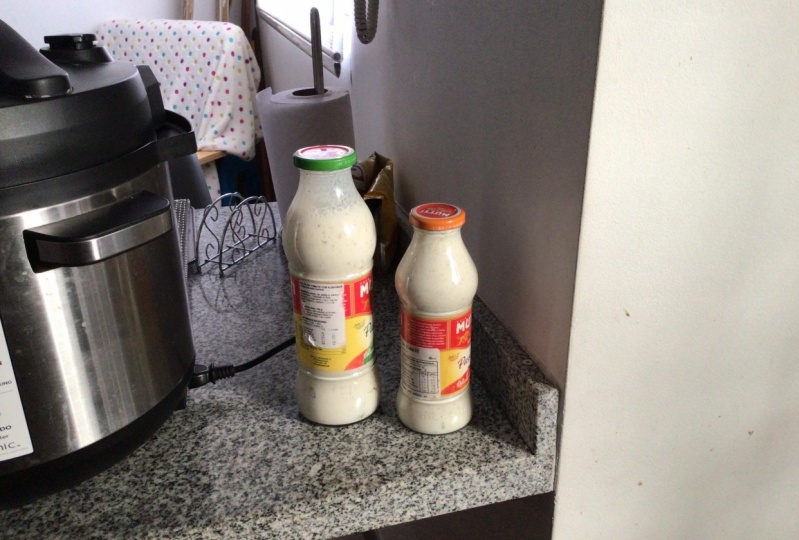
5. How to Make Buttermilk: next, let's talk about buttermilk. So buttermilk was traditionally made as the byproduct of making butter after they turned the butter, the resulting liquid after you got the butter out of there was left overnight this hour and that gave you buttermilk. Today, luckily, we don't have to make our own butter to get buttermilk. In fact, making your own government is very, very easy. What do we need? First, we need a glass jar. Today I'm using a court jar. You're gonna need some commercial buttermilk that doesn't have any additives or flavorings in it that has active cultures in it. That's what you're looking for. First, I'm gonna put about half a cup of matter milk into my jar, and then I'm gonna add about 3 to 4 cups of milk to the job. All right? Left. But at least we've got our plastic lid. These things are great again. We're just gonna put that put it on top. Just give it a gentle mix answered on the counter again between 68 80 F, and we're going to check back probably around 18 to 24 hours to see when it's picking up. When it's thickened up. We know that we're ready to go. All right, So here is our buttermilk again. It's been about 18 to 20 hours. Here. You can see it. That getting up here, take the lid off. Smells like better milk. You can see kind of the texture here also. Yeah, this buttermilk also is all done. Just gonna stick the top on, stick it in the fridge, and this should be used within two weeks of your making. It also ready for your buttermilk pancakes or even some homemade buttermilk ranch dressing .
6. How to Make Creme Fraiche: next, we're going to talk about creme freche. If you've never had creme fresh, you need to try it. It's really delicious. And it has kind of a a tangy zing to it, but it's also really rich. All right, so for this vermin, instead of using regular milk, we're gonna be using whipping cream. So you're gonna need a pint of whipping cream. You're gonna need a glass jar again. I recommend the canning jars there easy to deal with and easy to sterilize because we are culturing certain types of bacteria and yeast in these ferments, it is really important to use jars that have been sterilized. So I like to run mine through the sterilized cycle in the dishwasher before I use them for ferments. Next, we're going to need some commercial buttermilk and you're gonna wanna live. And the measuring this is a tablespoon next. So first, I'm just gonna put the whipping cream and the jar, fill it up most of the way here, and I'm just gonna add a tablespoon of the commercial buttermilk again. This is better milk that does not have the additives in it and also has live cultures, right? Just get a gently mix this and sit on the counter between 68 80 degrees and we're gonna check back on this in about 18 hours as well again, when it starts getting pretty nice and thick, that's when we know that we're done. All right, so here we have our creme fresh and we just have this sitting on the counter for about 18 20 hours now is gonna open it up and take a look. You can see this is super thick and creamy. Really nice texture here can see that. So at this point, this is all done. All I'm going to do is put the lid back on, stick it in the fridge. You want to let it stay in the fridge for about 24 hours before you use it. That will give it the best consistency. Um, and then just try to use it within two weeks. But they're Ugo very easy and delicious.
7. Dairy Sensitivity and Lactose Intollerance: I wanted to take just a minute to talk about lack toes and Casey, especially for those people who are sensitive toe lack toes or have a mild sensitivity to Casey. Whether you're sensitive to lack toes or you're just trying to minimize the lack toes in your diet because of being on a low carbohydrate or ketogenic diet, there's a couple of ways to do that. Now, when you're making Kiefer, I recommend that you do a secondary ferment, and that uses up almost all of the lack toes that's remaining in the milk when you're making yogurt. If you let your yogurt incubate for 24 hours instead of the usual 8 to 12 hours, that will also markedly reduce the actives in your final yogurt product. Fermenting your buttermilk for a longer period of time also can reduce the lactose. Now. Creme fresh because it is made with heavy cream, does not have very much like those in it. To begin with, let's try it and see how you do with it. If you have an allergy to dairy or any kind of moderate to severe reaction with theory, I recommend that you consult with a health care provider before you consume any of these products. But if you are just mildly sensitive to dairy proteins, especially K Scene, um, I would recommend you try doing a secondary firm it on your keeper. This has been shown to break down some of the casing proteins, so some people who are a little bit sensitive to Casey can handle the secondary ferment Kiefer, but not other dairy products. The other dairy ferment. That could be great if you are a little bit sensitive to Casey, used the creme fresh again because it's made with heavy whipping cream. It doesn't have the same amount of protein as, say, yogurt or milk does. If you're sensitive to K seen, I would stay away from the yogurt and buttermilk and just go for secondary for McKeever and creme fresh. So I hope that helps give it a try and let me know how it goes.
8. Troubleshooting: before I let you lose into the wide world of dairy fermentation, I wanted to talk about a couple of things that can go wrong sometimes and what you can do to fix it. So the first thing to keep in mind is that in all these ferments heat is gonna speed it up cold is going to slow it down. So for these Furman's, I've recommended to ambient temperature of between 68 80 degrees. If the temperature in your kitchen is around closer to the 80 degree side of things, these ferments may go faster. If you're closer to the 68 degrees side in that, they may go a little bit slower. If your kitchen is a little warmer, just know to check on your ferments a little sooner. Then you would have otherwise. And likewise, if your kitchen is a little colder, you may need to wait a little while longer. If you're getting your key for quicker than 18 hours, you may want to either remove some grains or add more milk to grains. If you find that it's taking close to 48 hours, Teoh get keeper. You may want to reduce the amount of milk that you're putting into your brains until it kind of catches up. So it's a little bit of a balancing act. You may need to kind of play around with it and see kind of how much milk you need for your grains. Also, over time, your grains will multiply, so the amount of milk you're gonna need is going to you go up somewhat, and then at some point, you're gonna need to split your brains. Now, you can give these two friends neighbors. You can grant them up in a smoothie. You can feed them to your chickens, or you can compost them whatever you like to do. But at some point you're gonna have too many grains per the milk that you're putting in. If you find that your Kiefer or your yogurt is a little bit too sour for your taste, you want to pull your fermentation a little bit sooner than you did. The longer you let them go, it's gonna have a little bit more of a sour taste to it. And it's perfectly fine. Teoh, either drink that, but it's just gonna have a little bit more using to it. All of these ferments are going to have a slightly sour smell to them. Keeper, because it has yeast in it is gonna have a little bit of a yeasty smell also. So when you're smelling your keeper, it should have sort of a smell of yeasty bread mixed with yogurt. If that makes sense, if you get a smell that is seems off to you, doesn't smell good. Discard your that batch of Kiefer. You can rinse your grains off with a little bit of distilled water and try again and see how you do. Never rinse your grains with tap water because the chlorine and the fluoride in the tap water can actually damage your grains and you don't want that so distilled or filtered water that's got the chlorine and the fluoride removed from it is best for wrenching your brains. Now, in general, you don't need to rinse your keeper grains. You can just keep them going, and you're gonna have a little bit of milk residue on them when you go to make your next batch. That's totally fine. The only time really you need to rinse them is if you feel like you're getting a, uh, you're getting a little bit of an unexpected result, or you got a little bit of a funky smell to it. If you were to develop mold in your key for batch, that would be something that you would want to discard and start over keeper grains and all . You don't want to get mold contamination in with your keeper because that is going Teoh perpetuate through further batches, and that can be a real problem. So if that happens, did you start over? Go from there. What happens if your yogurt doesn't set? It doesn't create that yogurt texture Well, there are a couple things that might have happened. One is that you didn't keep the temperature high enough for long enough for that process to take place. The second thing that can happen sometimes is that you didn't use enough starter culture to begin with. So if you peek at your yogurt the next morning and you find that it's still liquidy at a little bit more of your starter yogurt, mix it up and put it in a little bit of a warmer place for another eight hours or so and check it after that and in your future batches. Just make sure that you've got a nice insulated area. The slow cookers I've found to be pretty foolproof with this, especially with the town on top, but in other ways that you can incubate your yogurt. You can make your yogurt and makes in jars and put it in like a cooler with with warm water and that can hold the temperature. You can also put them in a warm oven now, when I mean by warm is about 110 degrees. So if you have one of the old school ovens that have a lit pilot light that keep ovens nice and warm, that is a perfect place for it. The other place you can stick them if you need a warm place is, for instance, on top of a fridge somewhere that's gonna have a little bit of heat generation and gonna keep that yogurt incubated and warm, and you should find that that work does the trick and it congeals. Write up and you'll have some yogurt. Now you may decide after experimenting with these ferments for a little bit that you want to try using something like goats milk. You can do that. It does work. However, be aware that with goats milk it a little bit different in terms of how the fat is distributed in the milk and a little bit different in terms of its protein content, you're gonna end up with a much more thin and watery result. We just find if that's what you're going for. But just be aware that that can happen also with Kiefer. I've had success with having a larger ratio of keeper grains to milk when I make goat milk , Kiefer versus cow's milk keeper. So that is something you can try also. So what happens if you accidentally bought ultra pasteurized milk instead of just the regular pasteurized milk? Well, I have actually made all of these ferments with old for pasteurized milk. They do work, and the reason for that is there is still Actos in the milk, and electives is the primary food source for the microbes that were culturing. However, you're gonna have a difference in consistency because the ultra pasteurized milk is heated to such a high temperature. You're gonna have proteins that are a little bit denatured, which means that you're not gonna have as kind of creamy as a texture in your finished product. So I I find that the regular pasteurized milk gives you the best texture in your end results. And for that reason, I would stick with that. Also, if you are culturing Kiefer grains over and over and over again, using ultra pasteurized milk can kind of It's not so good for the grains over time. So if you just picked up 1/2 gallon or gallon of older pasteurized milk by mistake one time , not a big deal. But if you're doing it over and over and over again with your keeper grains probably want to you find a different source for milk that is not ultra pasteurized. All right, if you come across a problem and I haven't covered it in this video to shoot me a question on, I'll do my best to answer it, and we'll go from there
9. Final Thoughts: you made it through congratulations. Now you know the basics of how to do four different dairy firm. It's a couple of reminders before you get started. Firstly, remember not to use ultra pasteurized milk if you can help it. Secondly, when you do your keeper and you do your primary fermentation, don't let those grains sit at room temperature in the milk for longer than 48 hours. After 48 hours, make sure you switch it out also, if you take a break for making keeper and you put your brains into the fridge, don't leave them in there for longer than one week without changing out milk. You have to keep them fed, after all, when you're making yogurt. If you're wanting to make another batch with the batch that you just made, remember to take out about half a cup to a cup and couldn't in a separate container at about 8 to 12 hours. And don't add any flavorings or sweetener to that container. That way, when you go to make your next batch, you've got your started culture all ready to go when you're making your creme fresh and your buttermilk. I do recommend you start with commercial buttermilk every time to make sure that you get consistent results. Last but not least, remember Teoh label your containers label what it ISS in the date on which it was made. In addition, if when I put my keeper grains in the fridge, I put a big blue X on the top of that container. So I know which container has my keeper grains in it. So having them labeled and dated just really helps keep things organized and helps you avoid ending up with a lot of really old jars of yogurt and stuff sitting in your fridge forever. So I hope this helps good luck making your own batch. Let me know how it goes and please post a picture in the project page. If you have any questions, feel free to ask, and I will do my best to answer them.
10. Bonus: Kefir Sourdough Bread and Buttermilk Ranch Dressing: as promised. Here's a bonus section, especially for you. I'm gonna teach you how to make your own a buttermilk ranch dressing with the buttermilk that you just made and also gonna teach you how to make sour dough bread with your Kiefer. If you like sour dough bread and you like Keeper, there's no need to maintain both a sour dough starter and keeper grains. Kiefer because it has yeast already in it, can be used as a sour dough starter. So that's why I'm going showing you how to do today to make your own Sarah dough bread out of Kiefer. What you're gonna need are about four cups of flour. You're gonna need about two cups of key. For now. This is key for that has just undergone a primary firm. It not a secondary ferment. So it's just sell on the counter for about 24 hours and has a nice, active yeast and bacteria going in there. You're gonna need just a little bit of sugar and a little bit of salt, but that's all. First I'm gonna take my four cups of flour and I'm gonna add about one teaspoon assaults. Next, I'm gonna add about one teaspoon of sugar. The sugar is there just to kind of jump start your fermentation process, especially if you're keeper has been sitting in the fridge for a little while. The sugar just gives the yeast a little bit of a boost to help it get growing again. I'm just gonna make sees that a little bit. Next, I'm gonna add about a cup and 1/2 of Kiefer. We're going to see how this dough looks and we'll add more as we need. Teoh. I like to kind of mix it up with the spoon first and then I'll stick it on the mixer needs more. So I'm gonna add a little bit more here, and I'm just going to stick it on the mixer. Once you fully incorporated your flower and your keep here, you're going to need your dough for about 5 to 10 minutes or until the gluten really starts to develop. Then you're gonna stick it in an oil bowl just down the bottom. You're gonna cover it and just stick it in a warm place for about 24 hours. So I'll see you back tomorrow. So we've had our dough in a warm place for 24 hours covered. I'm just smoosh it down here. Who? That's a nice air bubbles. Nice rise out of this. Can I kind of spit out here, then? I'm just gonna transfer this to a little Dutch oven. This could be any kind of a container that has a lid on it. That's oven safe, like a Pyrex container would work to. I'm just gonna put the lid on on. I'm gonna let this rise for another four hours, so we'll check back in four hours. We've had our dough doing its second rise here. You can see it's looking nice. So I'm just gonna put the lid back on the Dutch oven and I've got my oven preheated to 450 degrees. I'm gonna put this in the oven at 450 degrees for about 20 minutes with the lid on. And then after 20 minutes, I'm gonna take the lid off and cook it the rest of the way, which should be about 50 minutes or so, or when it's kind of golden brown on top. Keeping the land on allows the top part of the sour dough to sort of steam and also for it to rise to the maximum amount. So we'll see you back when it's done. So here's our beautiful loaf of sourdough. After it came out of the oven, this was in the oven for a total of about 50 minutes. So I'm just gonna cut it. Take a look. It's a nice crest. As you can see, you get some nice crumb in there, too, so this should be delicious. Can't wait to eat it. Have fun making your own sour dough and enjoy that. I'm gonna teach you how to make your very own buttermilk ranch dressing. So we're going to start with about 1/3 of a cup of are homemade buttermilk. To that, we're gonna add 1/3 of a cup of Manny's, ideally homemade, but doesn't have to be. We got 1/3 cup of sour cream for extra credit. You can use your homemade creme fresh you made earlier that also makes a great addition to this dressing. You've got two tablespoons of lime juice, one tablespoon of chives and a clove of fresh garlic. Just depressing. Last but not least, some salt and pepper. You can adjust this if we need Teoh. All right, let's mix it all up and take a taste. Looks pretty good. If I do say so myself. It's got a nice texture to it. Stick a taste. That's great, especially with the fresh, especially the fresh garlic. Definitely winner. If you're not a fan of fresh garlic, maybe use a little bit less poor. I use just a little bit of Dr instead of fresh, but I think it makes it gives it a great touch. So there you go. Homemade buttermilk ranch dressing, bona petite.
 Ancestral Evolution, Traditional skills for the modern world