Transcripts
1. #1 - Overall view of class content.: you want to learn how to sketch and be a great fashion designer, This course is for you. Hello. My name is Nina via and on your instructor. If you have watched my other two courses how to create a fashion collection or the other course on pattern making, you know that I was an instructor at Fit um, f i D M Fashion Institute of Design and Merchandising in Los Angeles. This course is on sketching, sketching ideas for fashion design. And even if you don't know how to draw and you know nothing about sketching, don't worry. I've been in your shoes. I learned sketching while attending F I t. In New York. In this course, we're going to cover new terminology when alert new words such as croak, ease and plum line and apex and silhouettes and quick sketches and someone. So let's get started first. We'll start by looking at the human body if you measure the size of your head in the average body. There are approximately eight heads in the human body. However, profession sketching, we like to extend and stretch it to nine heads. What does that mean? Let me show you so as I just mentioned in the average body. If you take one het space, there are eight het spaces. However, for fashion sketchy, we stretch that body into nine het spaces. This is known as a crow key, and we'll talk about that in the next class. We're going to learn how to sketch the basic croak e. And then we're gonna give it some shape. Something like this, for example, work like that. And then we're gonna put some clothes on. Okay, I'll see you in the next class.
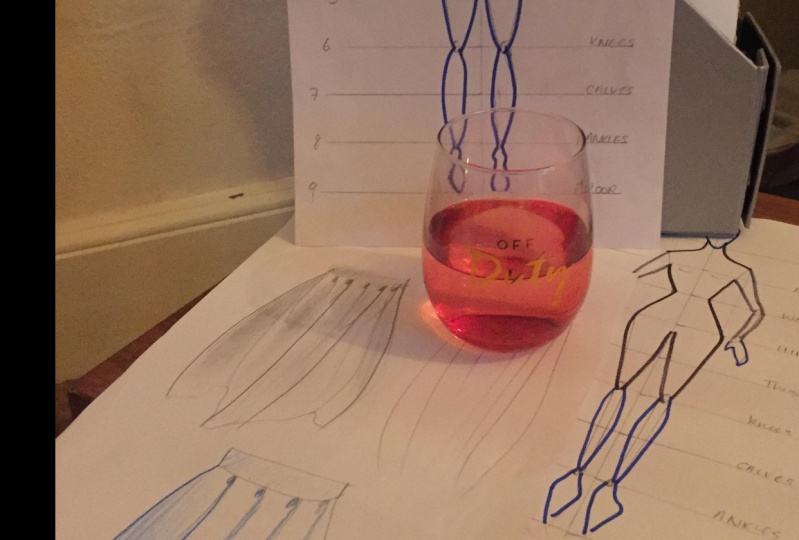
2. #2 - The Croquis. The "9-Head" Flat.: in this class, we're going to learn how to draw a crow key. What is it? Croquet. It's basically the human body dividing 29 head spaces. We're going to use it as a template to sketch our fashion ideas to sketch our fashion flats . What are flats? Well, think of it like a garment on a hanger. It's very flat, if you will. OK, so we're going to use this as a template to sketch our fashion ideas. Now some of you might think it's kind of boring. It's too easy. But this is the foundation of fashion sketching, so we've got to get it right. Okay, let's get to it. So you will need a piece of paper. 8.5 by 11 is fine. A ruler and a pencil. We're going to start by drawing a straight line right in the center of the page. Talk to bottom, and for the purpose of this exercise, we're gonna make our head. Space is about one inch in measurement, so go ahead and divide this line into nine heads spaces, and then we're going to draw a straight line across like this. This will help us and next we're going to mark 1234567 eight and nine. In this first head space, we're going to draw our head. And don't be afraid if you don't get it right the first time. It's not easy to draw a circular shape. This is fine. Next, we're going to draw the neckline and then we're going to draw the shoulders, which are slightly at an angle. And the width of the shoulder is about one head and 1/2 space wise. So it will be something like this. Next, we're going to mark the apex. What is the apex? It is the highest point of the bust, and that's a number two. We're going to write a pecs. Next is our waistline at number three. So we're going to write waste the number three level at the waist level. We're going to draw our waistline, which is about the size of your head, which is about an inch or so. In this case, something in a market like so. And that is your torso. You can also draw a bust line like so, if this is the apex level, this you'll be a bust level. Okay? at number four is your hips level, and the width of your hips is about the same measurement as your shoulder with. So one easy trick is watch this. If you George is a very slight line like this, I will give you an idea of the measurement of your hips. And then we're going to connect. You're waste to your hips. At number five level is your thighs. Six is your knees and at your knee level, we're going to draw these little circles to give us an idea of our knees. Our crotch level is right below number four for the hips somewhere around here, so now we're going to connect your hips to your knees. The's number seven level is your calves, and number eight is your ankles, and then we have the floor at the ankles level. We're going to draw these little circles like so, and then we're going to connect, and then we're going to create feet in the last space. So your waist level is also your elbow level, and your hips level is also your wrist. We're going to draw little circles at the elbows level next, so and we're going to connect on the shoulder and as well as your wrist level would be right here. We're going to connect and connect, and then your hand goes somewhere in this space right here, almost touching your thighs level. Okay, This is your basic skeleton for a croquet. You want to practice this over and over again until you get to the point where you can begin to soften some of the lines. Say, for example, your hips. And obviously, the night It's rigid as this administration, but rather have a bit of a curve to it. Your hips and your thighs and your calves and your shoulders of round and so on. So practice. Until you get to this point, the next class, we're gonna show you how to take this to this next level, which is really about body movement. How does the body move? I'll see you next class. Thanks.
3. #3 - The Plumb Line. Balance. Body movement.: okay in this class, we're going to go over how the body moves. How? When the torso section of the body moves in a certain direction. What happens to the lower hip section? How does one affect the other? Okay, so let's move that body. Okay, You might have seen one of these in one of your art classes. Maybe. And the reason I'm showing it to you is because, as you can see, the upper torso section and here we have the bottom hip section and the two are inter related. When one section of the torso moves, it affects the lower hip section. Okay, so I have outline the torso section and the hip section. Now, this is very important. This is a very important principle. So pay attention. Watch this. When one shoulder goes up, this hip goes down and when this shoulder goes down, this hip goes up. Same is true in the opposite direction. In other words, when this shoulder goes up, these Hape goes down. When this shoulder comes down, this hip goes up. This is very important principle in how the body moves. So make sure you really understand this clearly before we go any further. Another way of showing you see when this shoulder goes up, this it comes down. When this shoulder comes down, this hip goes up and true. The same is true in this side as well. So that's how the body moves. OK, I want to go over something called the plum line. If you are moving a house, you want to make sure that the walls are absolutely perfectly straight. Otherwise it would tip over. Same with the body. There's a plumb line inside our body that keeps us in balance, and if if it's not balanced, then we would fall over. So let's look at the plum line. The plum line is an imaginary line that goes through the body. It starts from the top from the neck area through the body down to the feet, and it is perpendicular to the floor. Perpendicular means this is a ride angle. This is a 90 degree angle, and that's what keeps the body in balance. To make sure you understand this, I do something and I drew it the wrong way again. I repeat, this is wrong just to show you what you should not do so here is my floor, and the plum line is perpendicular to my floor. Therefore, from the neck area, my plum line would look something like this. Okay, so I noticed that the plum line does not fall inside the feet. This is wrong. You can see that this figure would take over and fall this. If this was a real person, this person would just work full over. So this is the wrong way to do a sketching. Okay. In the next class, we're gonna go back to the original Croak E, and I'm gonna show you how to use it as a template to start sketching your ideas. OK, I'll see you in class.
4. #4 - Using the Croquis as a template.: in this class. We're gonna go back to our original croak e and use it as a template to start sketching some original ideas. Finally, Right. Let's do it. Okay, so I have taken my original croquet and with a Sharpie amusing blue. But it doesn't really matter what color. I'm going to accentuate some of the outer lines, shoulders, neck, so that when I use this underneath another piece of paper blank piece of paper, I will be able to see through. And it will help me in using this as a template. So when they place a blank piece of paper over it, I can see through it. And then you can start designing your ideas and you can start creating your original designs, as you can see. And you can use this over and over again to design anything that you like. So So you get the idea, right? You can really have fun designing your original ideas. Just having this simple little croak e to help you. I'm gonna show you other techniques How to really take this A whole new level in the next class. Teaching you sketching is easy. Meaning I can show you all the techniques and with practice and practice and practice, you'll get good at it. But will that make you a great great fashion designer? Hmm? I don't know. See, you have to start thinking about what inspires you. What are you passionate about? What do you like and what you don't like? If you watched my other video how to design a fashion collection and start your own brand? I talk about how one gets inspired and what motivates you to be a fashion designer. When you walk into a store, you don't like everything. There are some things you don't like. Start paying attention what you do like and when you don't like, maybe certain colors really inspire you or certain silhouettes. Some shapes, certain fabrics. Certain designers start paying attention. What inspires you? What motivates you to be a design that will generate ideas? And therefore I will take your sketching abilities to a whole new level. Now, we have a lot more to cover in this course, and I'm gonna teach you a whole bunch of other techniques and someone. But I want you to start paying attention about what inspires you. What do you like and don't like about fashion and stopping attention. Even walking down the street looking people start observing stock, observing people things. When you go to a museum into a movie theater, what movies do you like? What songs do you like? What inspires you? Start paying attention. Okay, I'll see you next class.
5. #5 - Pencil techniques. Rendering shirring and shading. : Okay, so now that we've covered the basics, some of the basics let's look at some details, for example, even a simple pencil the way that you can hold a pencil, I can give you a different line. On paper, I'll show you. Similarly, some cool tricks will cover how to sketch sharing or gathers as well as shading. So let's get to work. One technique that you should learn and practice is the amount of pressure that we can put onto the paper with our pencil. For example, we can be very gentle, very light or very heavy. See the difference. Same pencil, the amount of pressure. And in fact, you can go from very light to heavy back to light. Better heavy. So practice doing that. It sounds very simple, but it takes a little practice. So take a piece of blank paper and just practice a very simple exercise, starting with light, too heavy and light and heavy and light and heavy and light and heavy. And just keep doing it until you get used to the amount of pressure that you can put onto the paper with your pencil. It will help you also in the shading, which will come up next. Next, I'm going to show you how to do sure ing or gathers. So, for example, let's say that we had a skirt. So here is our waistband and we want to add fullness. Sharing gathers to the skirt so we'll start by doing these little tiny. They almost look like a number nine. See like a little nine and then also, uh, something like this where it's not really a closed nine, but it's select a little with little things, which, when extended to the waistline, I mean to the story to the headline will create what's known as Suri or Gathers, and it takes a little practice to get it right. But you will. We practice. And that's how you do sharing and gathers. Next, I'm gonna show you how to do shading using the flat side of the pencil. We're going to lightly shape our skirt now. We don't want to do all of it. We just want to do certain parts to give it a three dimensional effect, using the flat side of the pencil and also believe it or not, using your finger, you can smudge to give it a flat and smooth surface, and you can go back and keep doing it until you're satisfied with your work, and you can also do the waistband to give it a three dimensional shape will go dark on one side and light on the other, so it has a three dimensional effect. Now we're gonna go back to this exercise and apply it to our skirt using a skirt, and we'll start from the waist hand and going to start light and then go dark and light and dark in light and dark and maybe even the opposite. Meaning will go dark on top and line at the bottom. And you go to the same thing with the waistband, where it's heavy on one side and then life or light and heavy or heavy and light and heavy . So it'll give it some dynamic, and you can go back into your sharing and accentuate some of the folds to give it some really dynamic aesthetic to it. And it's a matter of going back and continuing. Teoh do our shading combination and pencil work until we get to our desired effect. OK, that's it for today. I will see you next class
6. #6 - Using a Fashion Journal as source of inspiration.: you are, as I mentioned before. This course is not just about sketching. I want to inspire you to find your driving passion in fashion, designing. Use your smartphone and start taking pictures off things that you like and create a little folder. This will become your diary, your fashion diary. Your fashion journal, if you will. So every day you accumulate images that inspire you. And so you create a pool of information off source ful inspiring information and images that will inspire to generate creative, new original ideas and designs. Okay, okay. Back to sketching. We'll cover a whole bunch of new techniques and information today. But before we get to that, one of the most important questions you As a designer, I have to ask yourself when you're sketchy, how does she or he get into the garment? Here's what I mean. A lot of students of mine would sketch this beautiful designs, and there was no buttons, no zippers, no snaps. And it was a woman fabric, so I wouldn't stretch like a knit fabric. So the question is, how does she get into it? All right. So as you're sketching your ideas in your designs, keep in mind that question. How is she going to get in and out of the dress or skirt or whatever it is you're deciding ? The next question is, Are you designing menswear or womens wear? And the reason I'm asking this question is the difference in the closure in the buttons in the front, for example, in women's wear, it is this side over this side. See that if you are wearing the jacket, it would be your right side over to the left side, whereas in menswear it is the opposite. It is. If you're wearing a jacket, it is. You're left side over to the right side, so the closure is different. So when you're sketching, be aware off these little details. That makes a difference. Okay, and now back to sketching. Once you get good at drawing the shape off the head, and you should practice many times, obviously, then you can take this line and create a neckline and then down center front and shoulders and put the buttons on this side. So then you will know that you're sketching a woman's jacket because the closure goes from this side onto the site. If you want to add some color to your designs. There's a couple of options if you're using markers. Uh, prison is a really good brand to use or colored pencils, which is what I'm using right now. And color pencils are a little more forgiving, and they're less expensive as well. And what you want to do with Theo. The pencil is too dark in certain areas, more than others to give it a three dimensional effect. So if the light is coming from this side, this side will be lighter, and this I will be darker. So I was dark in this side of my figure. Then I can also combine markers to give it a bit of an accent. And I can also use very fine point marker again to highlight certain details. And if you want to get dramatic, can you say heavier marker to highlight certain seven fairness and keep refining it? Julia. All right, then I'll see you the next class
7. #7 - Many different styles of sketching. Developing your own "voice".: All right, then. So we've learned about Crow Keys. We've learned how the body moves. We've learned balance and plumb lines, sketching techniques, pencil techniques, the fashion journal, how to create a fashion journal, which is really, really, really important. And I want to leave you with this final note, which is that ultimately you want to develop your own style, your own unique voice, what's gonna make you different than the next successful designer? Sketching is just one aspect of designing, and I really urge you to practice and practice and practice. If you get a chance to view some videos, old videos off current Lagerfeld, you can see that he would sketch all the time and have to stuff you would throw away. You know, that's part of the process. Sketch your butt off. Okay, Sketching is just one aspect of fashion designing, and here are some examples off different styles of sketchy See, this is very different than this one, and so on. There are many, many, many endless possibilities. Really, it's up to you to develop your own style, and it only comes about by doing it, doing it over and over and over again. Sketch every single day. That's having become great. If you haven't watched my other video on how to create a fashion collection and launch your own friend, I encourage you to do that. It's really an in depth, detailed step by step on how to create a collection and a swell as pattern making and did a great pattern making class if you want to learn pattern making, its really there's a lot of information in that 45 minute video, so it's a lot of material. So I hope you have enjoyed the course. If you have any questions, please email me. I answered all my emails and I will answer all your questions. Follow me on social media platforms, and I hope to see you on the runway, okay?
8. Bonus Lecture: FAQs, and other "goodies", etc.: Hello everyone. In
this bonus video, I'm going to answer the most frequently
asked questions that I get from you
guys, like supplies. When do I get my supplies
from whatever gets scissors and muslin
paper and so on. How do I get addressed for them when we get to dress form? And what's a good
textbook to use e.g. so I'm going to answer all
those questions for you. So when it comes to supplies, the company that I use, and it's a great, great, great company, is called French European Inc.
www.frencheuropeanink.com. They have every supply, every item you can imagine
for fashion designing, for draping, for
pattern-making and so on. So check them out. Including forums, yes,
including dress forums. When it comes to textbook, this is a great textbook
for pattern-making. It's called pattern-making
profession designed by Helen Joseph Armstrong. I highly recommend it. Okay. So that's that on supplies,
dress forms, textbook. So, okay, moving right along, what is the first course
that I should start with? What is the order that I
should take your courses in? Or another way of saying it is, I love fashion designing. How do I start?
Where do I start? Right? So I'm going to answer
your question like this. You could divide the industry, the fashion industry, into
two areas that co-exist. One is the creative
aspects of the industry, and another is the
business aspect. And the two have
to work together. If you're in the
creative aspect, meaning if you'd like to
sketch and paint and draw, I would say start
with sketching, sketching classes and
the draping classes and the pattern-making classes, which there are quite a few, as well as the fabric course, which is really quite
an intense course. But if you say,
well, you know what, I'm not really very artistic. I liked the business part. I like to buy and sell
fashion and social media. Then the course is to take would be the business of fashion. That's the title of
the course, which is, as the title says, it's about
the business side, right? The financial aspect,
buying and selling. Then there's also
marketing and branding. Have you ever wanted to draft? A basic bar is basic
pattern from scratch, using specific measurements
to fit your form, to fit yourself, to
fit a customer well. In this course, I'm going
to show you how to do that. I'm going to show you
how to measure a body so that you can create and
draft a basic bodice, front and back, and
a skirt as well. But there's one course
which is how to create a fashion collection
and launch your own brand. Which is really an
overall picture of the whole process
from beginning to end, meaning from the inception, from your ideas and mood
boards and sketching and some pattern-making and
draping onto production, manufacturing, some of
the business of fascism, branding and
marketing and so on. That will give you
an overall picture of the industry runs. It'll give you a good idea, maybe which way to go, which way to start, how to start the
process of taking these courses and learning about the fashion designing process. Okay. How did I get started
in fashion design? I get asked that
question many times. Well, let's start with
the fact that I was born and raised in Rome, Italy. So I was surrounded by art
and history and beauty. I mean, wherever
you turn in Rome, There's beauty like
fountains, e.g. such as the Trevi Fountain, where the famous movie
like Dolce Vita by Federico Fellini was shot
with Marcelo Master Yan. And the beautiful and either
Egbert and of course, architectural wonders like
the Colosseum and frescoes. Rama kept bell logic that
I was always good in. I was drawing and
sketching and painting. When I was 13 years old, my parents immigrated
to New York and I eventually attended one of the best fashion design
schools in the world, FIT Fashion Institute
of Technology, fashioned by day and
yes, music at night. I was in Iraq. After graduating from FIT, I worked at Ralph Lauren and we had the best Italian tailors in the world who share with me knowledge and skills and
wisdom from the old school, which I incorporate
in my classes. My mom was a seamstress. She was always working on
some project or another, either making something
for myself and my brother or working for
a factory sewing clothes. So I looked at her sewing machine as a toy and I started
playing around with it. When my mom passed away. She left me her fashion
design homework notebook from when she went
to school in Italy, something I will always
treasure because it's full of inspiring information
not available in any textbook or school. After working in
the industry for many years and
teaching at FID m, the Fashion Institute
in Los Angeles. I decided to start sharing my knowledge and
experience online, creating fashion
premier Academy, where I teach
courses on sketching and draping and pattern-making, branding and marketing,
textiles and board. I also have a YouTube channel where I answer all my
students questions. So I look forward to
answering more of your questions or
senior on Zoom. She been Yammer in classic Ciao. Fashion can be a form
of self-expression, of fun and creativity and can be a vehicle for you to make
a difference in the world. But what if you're lacking
the resources to grow? Did you know that Samsung
has a fashion division? Yep, they do. Their vision is to
support and empower new designers and companies
that want to grow and expand. As a consultant with Samsung, I am positioned to introduce new brands to
Samsung's resources. The possibility to elevate your brand to a whole new level. When I was working
at Ralph Lauren, we had weekly meetings
and fitting on a model. Model would come in, we would
try on the latest samples, jackets, dress. And so on. One day we had this new jacket
and the model puts it on. And Ralph says that lapel should be an eighth
of an inch smaller. I was so young and
naive. I didn't know. I'm thinking, well,
an eighth of an inch. Who's going to know
the difference? An eighth of an inch, right? Anyway. So took notes, went back to the sample
room till the tailors, seamstresses what to,
what to do and so on. Fast-forward. Many, many years later, I am teaching at the
Fashion Institute one day. In my classroom, I got my 17, 18 students around my, my table. I'm doing a demo and I'm
telling them this story. And I told him that sometimes
a little difference, like an eighth of an inch makes a difference between
good and great. Anyway, so I do my
demo, I tell the story, they go back to their desks and they continue
with their work. And I'm walking
around the classroom to see how they're doing. And one student, this one girl, was writing something
on her hand. So she is writing something. What are you doing? And she
showed it to me and it said, the difference between good and great is an
eighth of an inch. Pay attention to details. Sometimes the difference
between good and great, it's an eighth of an inch. And one more thing. For those of you who need one-on-one coaching and
tutoring, I am available. That service is available. We can zoom, we can FaceTime. Or if you prefer, just a simple phone call, that'll work just as well. I would love to take
you to the next level. So email me via admin.com and subscribe to my YouTube
channel, you know, V01.
9. What's NEXT?? Pattern Making 1 (Video Intro): All right, so you've
completed the course. What's next pattern making One. Why? Well, you see in
garment construction, you have to know how every
piece fits together, right? You have to know how a sleeve
goes into an arm hole, a collar into a neck
line, and so on. Look at it this way. If
you were building a house, you need a blueprint. You've got to know that the
electricity goes this way, the plumbing is this
way, and so on. I'm going to show you
briefly what pattern making one is all
about in this video. Chickens course is about
pattern making, some draping. I say some draping because
many times a pattern is first developed by
draping on a dress form. And then taking the drape
and transferring it to doted paper and manila and
making a pattern from it. In this course, you will learn basic principles
of pattern making such as dart manipulation and
added fullness and contour. You will learn techniques such as pivot and slash and spread new terminologies such
as slopers and blocks and darts and pleats
and tucks and yokes, and princess seams and
princess style lines. Apex notches, grain lines. How to label a pattern,
how to chew a dart. You will draft a
one dart sloper and a two dart sloper and an A line skirt and
a skirt with a yoke. And sharing princess seams and add grain lines
and label patterns. And so if you want to design
your own fashion ideas, you have to know pattern making. Pattern making is essential. And this is a great
beginner course that gives you a lot of great information and gets you off the ground.
I'll see you in class.
 Nino Via, Fashion Design, Instructor & Consultant