Transcripts
1. Excel 2016 Introduction - What You'll Learn: Hello and welcome to the Complete Excel 2016 course where I will take you from Excel beginner to excel pro in a single fun, Easy to follow course. My goal here is to get you feeling comfortable and confident using excel in the workplace so you can impress yourself, impress your boss, your coworkers and hopefully get the raise promotion or new job that you deserve. Hi, I'm Steve McDonald. I'm so excited that you're here, and I'm so grateful that you're checking out this course I love teaching. My talent is taking complex, intimidating subjects and making them simple and easy to learn and almost even fun. I'm very involved with my students. So any time you need any help, please just shoot me a message or asking the discussions, and I will be glad to help you out in any way that I can. So let's take a look at what you're gonna learn in this course. In this course, we're going to start at the very beginning with a blank Excel spreadsheet, and I'm going to give you a tour of all the tools on this ribbon. So you have an idea of what they all do and what the possibilities are in excel. Then I'm going to show you how to create your own spreadsheet. We're going to create this simple kitchen remodel cost worksheet so you can get some hands on practice with things like formatting headings entering data into cells, navigating around and formatting different cells for dollars, column headings and more. I'll show you how to save and name your file so you can find it and use it later. Then I'll show you how to create formulas. Here's an example of a formula. You can see the formula right there in the formula bar. I'm gonna show you how to do that so you can add up a column of numbers and then I will teach you over 20 of the most common functions that people use an excel, and I'll walk you through each one and how to do it effectively. I'm gonna show you how to create pivot tables so you can do analysis with lightning speed, and then we're gonna show you how to create charts from your pivot tables as well. So you could analyze your data and then put it into a nice, clean chart that you can share with coworkers or your boss or whoever needs to see the data . We're gonna create regular charts. We're gonna use our spreadsheet, and we're gonna create a pie chart which breaks down all of our building materials into costs. So you can, with just a glance at a chart, see that, for instance, your flooring takes up 41% of the cost of your kitchen. We're also gonna do line charts and bar charts as well. And I'm gonna walk you through each of these and I'm gonna go through it step by step to create it from scratch. So by the time you're done with this, you'll be able to do any of these on your own. We're gonna check out some of the new features for Excel 2016. I'm gonna show you how to take a table of information like this and create a three D map out of it. And here's just a example of what this three D map looks like. Just fun. New features for Excel 2016. I'm going to show you where to go to save and back up your work, how to save in different ways as different files, different file types and how to create backups to protect your work to prevent loss data. When mistakes are made, I'm gonna show you all about printing, show you how to do a print preview, had a format, your printing in a number of different ways to make your reports and charts and spreadsheets display well, when shared with others. I'll show you how to import data from other sources, including access databases, see SV files and other text files. And even from the Internet, I'm gonna show you the most important keyboard shortcuts so you can work quickly and effectively. And just to give you a quick example, here's one. If you hit controlled home, it's gonna bring your cursor up to the top the very first cell. If you had control shift arrow, you'll select a whole bunch of cells. And if you hit control and it'll take you to the last active cell in your workbook, those are just some really simple examples. But I'm gonna show you a Thanh of shortcut keys that you can use to work quickly and effectively. I'm also gonna teach you a number of different macros and macro zehr really intimidating to a lot of people, and they were to me as well. But I'm going to show you how you can learn how to do Mac Rose to automate a whole bunch of actions into one simple keystroke. And here's an example where we have a number of headings Sunday through Saturday and with the click of one shortcut key control shift F, we can instantly format all of those headings exactly how we want them to be, OK. And finally, I'm going to give you a step by step walk through of the ribbon here and all of these different tabs, and I'm going to cover almost every single one of these items. Within each tab, there will be a couple things I don't cover because they're just not that important. Or there things that you won't probably ever use that I'm gonna cover over 90% of all of the things in this toolbar all the way through formulas, data review view and the developer tab. I'm gonna walk you through all those things and my goal. The purpose of that is so that when you go to excel at your job, you'll feel confident and competent that you can understand what's happening in Excel. You can speak intelligently about excel, and most importantly, you can use Excel to make your life in your work easier. So that's just a highlight of some of the things that we're gonna learn. There's a ton more than I'm going to go through, and every bit of it is step by step. It's gonna go at a nice, comfortable pace for the beginning learner, and it's designed to take you from beginner to pro in the shortest possible amount of time . So thank you so much for joining the course and let's dive right in.
2. How to Get the Most Out of This Course: okay. And this lecture, I want to just give you some tips for how to get the most out of this course. And some of these tips will actually help you get the most out of you to me, in general as well. So the first thing I want to tell you is that because this is a hands on course with a practical application, I really encourage you to have excel open any time that you're watching a lecture and what you should do is go to a lecture, listen to a little bit and then pop back over to excel, practice it, go back to the lecture and watch a little bit more. And that will really help you to learn these skills the best that you possibly can and be able to put them into practice. The next thing I want to talk to you about is the you do mean dashboard itself. So here I am in a lecture. This is the count Count A and count blank function lecture. And there a couple of things that you can do to get a better experience out of you. To me, one of them is that you can go full screen now. I usually zoom a lot so that there's nothing that's going to be hard to see even if you're on a smaller screen. But full screen will still help you to really get the best visibility out of it, so you can ghost full screen. Or you can undo that and go back to the regular screen. Another important thing is that if you have a slower computer and things are bogging down a lot, you can change the quality to a lower quality, so that will play better than other than that. You want to have the best quality that you can, and this is already set on 7 20 p. And that's how I record these videos of the volume control here as far as volume. I try to record these so that there plenty loud so that you can even listen to them with background noise. But if you have the volume turned all the way up on your computer and it's not loud enough , check this volume control because you may be able to turn this one up a swell Okay. Another thing is that you can skip forward in the lecture 15 seconds. If I'm talking about something that you're already familiar with and you don't need to hear it, or you can jump back 15 seconds if you didn't understand something, and then my favorite feature is this one right here. So this is the speed control. Sometimes I talk a little fast when I'm excited, but sometimes I'll talk a little bit slower so that you could really get a clear understanding of what I'm trying to explain, especially if it's a more difficult subject. But for some people, you don't need it to go slower. In fact, most of the courses that I watch on you to me I watched at about 1.5 times the normal speed . Sometimes if it's a really slow lecture or something I'm already familiar with or just somebody talking really slow, I'll go at two times the speed. I have found that you can listen to me at about 1.25 to 1.5 times the speed, and you'll still get full comprehension, so that's worth trying out. But the beauty of this is that if you can, if you can still comprehend everything at 1.5 times the speed. Then you can get through this course in a lot less time and still get the value out of it. And that brings me to my third point. Repetition is very important in learning, and you're learning a lot of new concepts in this course, and a lot of them are actually fairly complex concepts do and challenging to put into practice. But I'm gonna make it very easy, very step by step that I'm gonna walk you through it. But the best favor that you could do yourself in trying to learn Excel is to go through these lectures, play around with it as you go jumping back and forth to excel and working with the worksheet and then back to the video. But then go through these videos a couple of times. You don't have to go through the whole course a couple of times, but if there's something you're struggling with, savy look up or pivot tables and you're having a little bit of trouble getting the concept perfect. Try and create the best one that you can create a chart creative. You look up function, create a pivot table, and then if it's not quite working out. Then you go back and watch the video, and I guarantee you're gonna pick up at least a couple of things that you didn't catch the first time around, and it will really help you to cement your learning. Another thing is that I tend to add little extras. And as I'm talking about something, little tips and tricks and things that you can use every day and excel and the first time through you won't catch most of those because you'll be focusing on the main subject. But the second time through, you'll pick up some of those subtle things you know. It might just be a little key stroke or a way to copy sells down or something like that. But it can really help you overall, and you can really get a lot out of it that way. But if you are a beginner, you want to follow through this course chronologically because it's designed to build on itself. So each lesson that you learn will apply to other lessons down the road and will make it much easier. Frito, learn all of the concepts in the course if you are not a beginner. If you use Excel in your work, and you really just need to learn some new functions, learn how to make charts or pivot tables or whatever. Then you can really skip down a ways even past the kitchen remodel worksheet section and go into the formulas and functions sections and into creating charts and pivot tables and pivot charts. So that's where you're gonna want to start if you already have a lot of experience. So those are some tips and tricks for how to get the most out of the U Timmy platform and also specifically this course. But I really enjoyed teaching, so I think we're gonna have a lot of fun with scores. So thanks for being part of the course and let's dive right in.
3. Take a Tour of the Excel Dashboard - How to Use the Tabs and Ribbon: okay, in this lecture, I'm just going to give you a tour of excel. We're gonna cover various dashboards, general navigation tips, including how to use the Excel Ribbon, how to use the various tabs in Excel and just where to find various things in Excel. So once you've opened, excel once and you've used it when you click on the Excel icon and open it, it will bring you to this screen. And this screen basically gives you the option to open up a recently used documents to open a blank workbook here to take one of the various educational tours of excels newer features like stock analysis, my cash flow or the overall Excel tour. Or you can go into any of these templates. And if you scroll down, you'll see a lot of templates. If you want to find other templates, you can go appear and you can search for a template or you could even go into different categories of template. In fact, I'll show you. If I click on that, it's gonna take me into all of the business category and even breaks the categories down to show you how maney templates There are four various sub categories, so I'm not going to open a template. So I'm gonna go ahead and just use this back arrow here, and I'm going to open up blank workbook now, once you've opened a blank workbook, if you click on the file tab, it's going to take you back to a navigational dashboard that allows you to a lot of things here on the left so you can click on info, and that will give you info about your specific workbook you could go to new. And that will take you back to this familiar place where you can open a new blank workbook or go into templates. You can click on open, and that's gonna bring you back into your recently opened Excel documents. Or it will also give you the options to find something on your computer or online. You have a save option, shows you the same places where you can save it and save, as is the same thing. First, you have to pick where you want to save it to. You have a print option where you can lay out your print settings. You have a share option where you can save your work to the cloud and share it with people . Email it to people and so on. We haven't export where you can save it as a PdF Foreign XPS document publish where you can send things to power. Bi I You can close your workbook or close Excel. You go to your account, which gives you just details on your specific products and what not. And then you have the options tab in the options tab is very important, and I hope you'll that you'll remember where it is. In fact, I'm gonna close this and I'm going to go back to where I just was and show you that again. So it's at the bottom of this list, its options, and when you click it, it's gonna go into your worksheet, and it's gonna bring up this dialog box, and you may never use this, but if you do want it or need it, this is where to find it. And it just has a ton of things. For all of your kind of customizing within excel so you could do general customizing. You can customize how formulas behave, proofing how it say's like how frequently auto recovery saves your work and things like that. Languages, all sorts of advanced options that you can customize. Here's a really important when you can customize the ribbon so you can basically change. I'm show you what I mean, this appears the ribbon, and so you can change what is up here so that it fits your needs and your working style specifically. And I will tell you, if you're new to excel, I recommend not doing any changes to this until you're more familiar with Excel, and you start to get a sense of kind of your work patterns and your work needs. And then at that point, you can come back in and customize it to really suit your needs and just make your work more efficient. But that's where that is. Basically, just click on things and add them to customize it. Your quick access to a bar, which you can also customize you confined and manage different Adan's for Excel, and then this is just a security center for except so those are the Excel options, and again that's at the bottom of this tab. But from this dash word, you can then just click the back arrow button and we'll take you back to your Excel worksheet. So that's kind of the one aspect. That's kind of how you get started opening and saving and managing yourself files. Now, let me give you a little tour of the actual Excel dashboard, and we'll just kind of show you where everything is. So we already discovered that file will take you back to that other dashboard where you manage your files. That's the only tab that will take you somewhere else like that. But all these other tabs will keep you right and excel. They'll just change this ribbon, and this is called the ribbon. This is where all of your tools are. I shouldn't say all of your tools, but many of your tools will be found here. So in your home screen you have a lot of formatting copy paste, a lot of texts and fought formatting and alignment. Here number formatting, some cool things like conditional formatting and tables, and so on and so forth. That's your home tab than your insert tab is where you can basically insert tables, pivot tables, pictures. Adan's This is where you do charts. This is where we'll create a three D map. Spark lines, which are many charts that go within a single cell and various filters and so on. Page layout is just how it sounds. You could change your themes. Your page set up the scale of your page. You can do things like take your headings away or bring them back. Get rid of your grid lines or bring them back, and so on and so forth formulas, which will be using in the formula sections of this course. You can insert a function here. You can choose from various drop downs for functions and a whole bunch of other things from managing your formulas. Data is where you can get external data to import into your spreadsheets. In these two areas can refresh tables and charts. Using this, you can sort and filter your data. And here's these air some or essentially sorting tools and then forecasting. And we'll get into how to create a forecast using the forecast sheet, which is a new feature, which is kind of fun. Reviewing just is a lot of things that you can do to prove your work at comments, and this is an important section. If you are working with worksheets with other people, and you need to be careful about them messing up your data or deleting or modifying your data in bad ways. You can protect your work this way. We have view, and this is just again, basically the layout. You can see excuses. The options here again to take away good lines, headings, etcetera and then developer is where you can go in and actually create macros and use visual basic Find Adan's and so on so forth. The last thing on the bar here is the Tell me what to do search function, and I'll go into that another lecture. But that's kind of like just the new Excel. Help. So that's a basic tour of your tabs and your ribbon. You can see there's a ton of information and tools available on that. Don't be overwhelmed. If none of that makes sense or very little, that makes sense. That's okay. I'd really just wanted to give you an overview of where everything is. We'll go into a number of those things so you'll have a much better familiarity with the tool bars on the ribbons. I'm just going to go back to the home tab because that's where you're going to spend a fair amount of time and then a couple of other quick things. If you need to have more space down here, you need to see more of your spreadsheet. You can actually close this ribbon by clicking on this arrow. But before you do that, make sure you remember how to open it back up, and the way to open it back up is right here. You would think it would give you a little drop down arrow, but it doesn't. This arrow is just to expand the formula bar. You would think it would give you a drop down arrow to bring the ribbon back, but it doesn't. So you have to go up to here, actually to your ribbon display options and click that and then go down to show tabs and commands and click that you can go to there and you can hide everything, and then you have to go back to it, sneaks over here a little bit, and you can show everything again. Then there are the obvious controls, like minimise, maximise, close. If you hit close, it'll prompt you to save your work. You could make a informed decision as to whether you need to save it before you close it. You have the save option here, which I like to use frequently, so I don't lose any data. Undo, redo. And this is a way you can customize your quick access toolbar so you can just click on any of these. For instance, if I click on new, it'll give me the option to start a new workbook right from here. And I can click that and it'll go away that you could add very sort of things quick print spelling, check sorting and stuff like that. But that's an overview of the basic layout and navigation of Excel to help you find your way around and find what you're looking for.
4. Using Excel Templates to Save Time and Effort: okay, And this lecture, we're going to be talking about Excel templates. And the reason I like to talk about Excel templates is because even if you don't get your own Excel skills up to a level where you can create complex spreadsheets that do everything that you want them to do, you can still use the pre formatted templates that Excel has created and provided for you to accomplish a lot of work, improve your efficiency and harness the incredible calculating power of Excel. So let's just take a peek some of the templates that are available in Excel and then I'm just going to give you a walk through of a couple of really nice, useful templates that are right here in Excel. So as you remember from the tour, this is where you start a blank workbook from scratch. These are various tours of Excel and other features in Excel, and then when we scroll down, we have a bunch of templates, and even on this first page you can see a few things that most people would be able to use , for instance, and academic calendar. When you click on it, it just brings up a kind of a little preview of it. And then if you want to go to that Excel document, you just click on the create button and it opens it up. But we're gonna take a look at this calendar in a minute. It's really simple, but it's really effective, and we're gonna take a look at this budget in a few minutes to, But you can see how they've really done a really sharp job and even made it pretty. With a little clip art inserted and a pivot chart right here, which I'll explain to you in a minute, these are all pre created by Excel and just ready for you to use. And if you're brand new to excel, trying to use even these pre formatted templates might be a little bit challenging. But once you've gone through this course, you'll recognize almost all of the different features and elements of these types of spreadsheets, and you'll be able to use them and modify them with your own data much more effectively. So we have budgets, calendars, inventory lists, but to do list, scroll down a bit profit and loss statement for a business, a wedding budget every wedding needs one of those attendance records, a simple monthly budget and so on so forth. You can also, as I've mentioned before, you can also go into these sub categories and find the whole time of additional templates in here. For instance, we could go to calculator. This gives you all kinds of different calculations. Sugar graham calculations, balloon payment, loan loan comparison calculators, refinance calculators, college loan calculators, and so on, so forth. We'll click back on home. That will take us back to the beginning. And, of course, you can also just do a search if there's something that you're looking for. Like if I want to do a budget, just type in budget hit, enter and it brings back a whole list of different budget templates right here. Okay, So while we're on the subject of budgets, let me just give you a closer look at this one just so I can show you how powerful this is . So the first thing I'm gonna do so I can explain this to you more clearly as I'm gonna delete some fields for the moment just to make it less confusing. And then I'll abdomen so you can see him later, So if you look at this, it's basically showing your income. So this particular person made $9600 this month, and then it shows your expenses. So they spent $7860 and these totals are calculated out of the data that they've put into their spreadsheet. That over here it gives a budget summary. So has all the different categories where they spent money. So entertainment, insurance, savings or investments, food, etcetera. And then those are all laid out in this nice table here. And by the way, this is called a pivot table, which is something that will be looking at later in this course. But this just shows each category. So the Children's category. They spent $140 this month, and this number, along with all these other numbers of expenses, goes into this calculation as we scroll down a little bit more. Over here, we have what's called a pivot chart, and the pivot chart takes all of this same information all of these numbers from the pivot table, and it just translates it into a visual representation of the numbers. So, for instance, If we look over on this side of the chart, we'll see under housing that the total expenses for housing is $2700. And then if we go over to this chart, we can see here that housing represents 34% of the total expenses for this household. And all of the information on these pages comes from another sheet in their workbook, where they've entered all of their information into this table. So you basically just go here and you enter in your costs. So if your extracurricular activities cost $40 you type in the number 40 hit enter, and it puts your costs in there. You put in all of your costs for this whole worksheet. Then you go back to your budget, you click on the table, you refresh the table, and it updates all of the numbers in here, and then it gives you your totals and tells you exactly what your budget is. Now the things that I went ahead and deleted, I'll show you that us because they're a little bit less critical to the equation. But they also include projected income, which means that they made a plan for how much they were going to make, and you can see that they actually want up making $100 more than they projected. And then they make a projection for how much they're going to spend in their budget, which is actually an important part of a budget because you're basically determining how much you want to spend. And then they actually spent $155 less than what they estimated. And then that's calculated right here. So it shows that they spend 100 and $55 less than what they projected. So that's one example of a really powerful but simple spreadsheet that you can use in Excel . Let's look at another one, and this one is even simpler. It's just a knackered emmick calendar. But what's cool about this calendar is that because it's in a spreadsheet that could be changed so we can change the year here, and it adjusts all the dates accordingly and go into the future. So this is a calendar template that is always valid. You can go into the month, and you can change your starting month. So if we were in March and we wanted to just start it. Right now, we just go here and click March, and it'll put your dates right in. And then, of course, it's scroll able to, so you can scroll through the different months. And then there's even one more feature here. If you click on the first day here, you can have a little drop down, and you can decide what day of the week you want to start on. So this is set for Monday through Sunday, but you could change that to more typical week. So it's Sunday through Saturday. And then, of course, all these air edible seeing just pop in here. And if you have ah, lunch meeting, you just type in lunch. Meeting 1 p.m. Enter in your calendar is ready to go, so my challenge to you is to go into this screen search for a template that you're interested in. Maybe it's a workout log, so you type in workout hit, enter and here's some really great ones. So you could go into this exercise planner, for instance, preview and see if it's something that would work for you. And then I want you to open this or create it, and I want you to play around with it. So I want you to go in, and I want you to kind of figure out what's going on here. For instance, this one has your name, your trainer, your start date exercises and all of your different information that you enter in here as we go and then check out the other tabs to and play around with this by entering in some pretend information and see what the spreadsheet does. And in doing so, you'll bring up some more questions in your mind for what the possibilities of an Excel spreadsheet are. So that's an introduction to how to use Excel templates to instantly help you become more efficient, organized and productive.
5. Saving Your Document Where You Can Find It: okay. And this lecture, we're going to just learn how to open a worksheet and save that worksheet to a place where you'll remember where it is. So if you're not already in a worksheet like this the first time you open up excel, it will probably look like this. It's giving you choices toe open various templates. Or if you go right here to the very first item, you can open a blank workbook. So if you click on that, it will bring up a brand new blank worksheet and you can go right in here and you can just type, huh? And there you have your first entry in your first cell of your first worksheet. And in the subsequent lectures, we're going to learn all about how to enter data into these cells, how toe create formulas to do calculations with it and how to create an entire spreadsheet . But first, what you want to do is make sure that you save your file somewhere where you'll be able to find it. So you want to go up to file and save as and to keep things really simple for this lesson. I just want to show you how to save it right onto your computer. And this is giving you two great options. You can go into your documents or you can save it right onto your desktop. And saving it into your documents is a great spot for it. And really, you'll find a place that you feel most comfortable keeping these. The important thing is that you know where that spot is and that you remember it. And so, for the ultimate ease of use, I'm gonna show you how to save it right onto your desktop. And from there you could move it into your documents. I actually have a file called my documents. It just makes it very clear to me who's documents they are. And it helps me to remember which folder I'm looking for. Okay, I'm gonna go into the desktop, and I'm going to go ahead and right click here, and I'm going to create a new folder. You'll see it pops up a new folder right here, and it's asking me to name it. So I'm gonna call this Excel files click Enter. So now I have this new folder on my desktop, and I'm gonna rename this my first spreadsheets and I'm gonna click. Enter, you'll see now appear. The title of this file is my first spreadsheet, and that's all that needs to be done. I've created my First Excel document, and I have saved it onto my desktop as my first spreadsheet, and now we're ready to get to work in Excel.
6. Entering Data and Navigating Cells: okay. And this lecture, Let's look at how to enter data into your cells and also how to navigate around your cells . So in the last lecture, we already figured out how to type hello into a field. Let's just change this, because ultimately we're going to create a kitchen remodeling worksheet. So let's type cabinets here. And once you've typed it in, you can either click the check mark button here that that's the same as enter where you can hit the enter key on your keyboard, and you now have an entry in yourself. Let's just fill out of couple more cells over here. Let's say we're putting prices on these type in 1000 and then you click tab, but it will send you over to the next cell, and you can keep doing that all the way across the spreadsheet until you're done. Another really neat trick as faras copying a bunch of information is if you click in one cell and you hover your cursor over this little square in the bottom right corner, notice your curse will turn into a thin cross rather than the thick cross. The left click on that and you can drag that down as many cells as you want and release it . It will copy that all the way down that column. Obviously, I don't want that there, so I'm gonna undo that. But that's a really quick and easy way to copy a lot of things. You can also click in one cell and right click and click Copy and see It will highlight it . Then you click on another cell and right click it and you can paste. It has all kinds of paste options. You can pace it simply. You can pace just the numbers you can paste formulas and so on and so forth. But I'm just gonna pace that number in there. And then you can click anywhere twice to get out of the copy and paste mode. And then, of course, I'm gonna undo that as well. And to move it through your spreadsheet from cell to cell, you can hit the up arrow key, the left arrow key, the down arrow key or the right arrow key where you can just move and click with your mouse toe Highlight cells you can left, click with your mouse and you condone drag. It drag it across or down or left, and it will highlight as many cells as you want. Toe highlight. When you release it, it will be highlighted. Teoh. Unhappily this. You just click anywhere on one cell. You can also click on a cell and then hit this shift Arrow keys. So if I hit shift and right arrow, it goes to the right. I hit shift and down arrow. It goes down and shifting left arrow because back in, shifting up, Pero it goes back up. So that's how you enter data into your cells and also how you navigate around cells quickly and easily.
7. Creating Simple Formulas to Do Powerful Calculations: okay, In this lecture, I'm gonna show you how to create a couple of simple formulas to do some basic math calculations that will really help you down the road to create spreadsheets that do powerful calculations. So I'm gonna just go ahead and clear out what we have here from before. Click Delete there. We're gonna enter him. Just a few numbers that we can do calculations on. I'm just gonna enter the number and then hit the enter key and you'll see it just drops it down to the next line. It's just a few here. Okay, So there are a number of ways that you can create formulas in excel, and I'm gonna show you a couple of them. One is not necessarily better than the other, but some you'll find to be more convenient or easier for you and others. You'll notice. Just take you more effort. So if we're going to add up this column of numbers, there are a couple of ways we can do it. One of the easiest ways is to use the auto Some button over here. If I click on this, you'll notice a couple of things just happened over in our spreadsheet. First, it highlighted all of the numbers that I just enter. Excel assumes that you want to add up all of the numbers that you just entered that are above the cell that you're working with, and in this case, it assumes correctly, because that's exactly what we want to dio. And then you'll notice it's entered This formula in here and you're formulas always start with an equal sign, and so it says, equals some. And some is actually a function in excel that allows you to do a mathematical equation quickly and easily. Rather than saying, for instance, two plus five plus eight plus one plus nine, it says, Give me back the sum of cell a one and then semicolon means through sell a five. So a five, which is this one and then it's enclosed in brackets, so we know what the cell ranges that it's referring to. Now all I have to do is hit, enter, and that formula takes action and starts to work. Now you'll notice in the cell here it brings back the actual number, the total of these cells. But if I click on this, you'll see up here in the formula bar that it shows the formula or function that we entered into that cell. So the formula sort of works behind the scenes. You won't see it show up right here in the cell. You'll just see the results of the calculation, but you'll see behind the scenes. This is like the Wizard of Oz back here, the man behind the curtain in the formula bar up here. Now you can double click on that, and it will show your formula right in the cell. But as soon as you hit enter, that's going to go behind the scenes up in your formula bar and you'll just see your actual results of your formula. So that's a simple addition. I'm gonna just actually delete this formula, and I'm gonna show you a couple of other ways that you could find that equation or create that equation so you can go appear to where it says formulas. And this is a great resource to be able to find any formula that you want and you click on that and it gives you all these different things. You'll see. There's our auto some again right there. You can go to recently used, which is gonna bring up things that I've used recently in Excel. There are a bunch of different options here, but we're gonna go to math and trigonometry. We're just going to scroll down to the S is And there's that same some formula you'll notice when you hover over something, it tells you exactly what it does. So this adds the numbers in a range of cells. So, for instance, if you hovered over sub total, it'll tell you what this formula does. It returns a sub total in a list or database, but we're going to use our some formulas. We're gonna click that it's asking which numbers which range of numbers you want to add, which is a one through a five. And if that's correct, then we just click. OK, now, let's say I only wanted to add the first to then I would select a one and a two, and it would fill those in for me, and then it would give me the total back for just these two. But in this case, right, I want a one to a five. So I'm gonna select all those where you can manually enter them in here like that either way, And then it will actually do the calculation right here for you. So you can double check to make sure you're doing the right calculation, and then you can click. OK, and there it is again. And then finally, I'm going to show you one more way to do this. I'm just gonna delete this formula out again, and I'm going to type it in manually. So you just say equals and that tells you that it's about to start a formula and you can either select a function from over here or you could just keep typing. And as I type, it's gonna bring up suggestions and I can click on that. And then it's gonna pre populate my parentheses, my bracket there, and I can either type in the numbers I'm trying to dio or I can manually select them. So I'm going to just highlight those hit enter and there we have our total. So let's go over here. We're gonna multiply. A couple of members were just going to go six times five to do that, we enter an equal sign and up here it's going to suggest some functions for us or if we like, we can just do the drop down and there is the product right there. So I could go use that. Or you can also search for a function by doing this and see, you can just type right in here. If we want to multiply these, this is gonna help us find one. You could just hit, multiply and go and see. It has recommended functions. It's recommending the product function, which is to multiply all the numbers given as arguments. So that's exactly want to do. You can either double click on that and click OK, and then it's gonna bring back our function argument box. The arguments are the cells involved with numbers involved in the formula. So again, excel a smart and it's saying, Oh, you probably want to multiply D one and D two, which is exactly right, so we don't even have to do anything. We can just click OK, and it returns our answer, and again, you can see there's our function up in the formula. Bar equals product of D one through D two. So now we've added a column of numbers for a total there, and we've multiplied a couple of members for a total there. And those are going to help us a lot down the road when we start building our kitchen remodeling spreadsheet.
8. Working with Workbooks and Worksheets: okay, And this lecture, we're going to be talking about how to work with worksheets and workbooks. I'm gonna explain to you what the difference is between a workbook and worksheet, and then I'm going to show you how to manage your sheets. Copy, rename, add delete and change the color of your tabs for your sheets. So what's the difference between a workbook and worksheet? This could get confusing sometimes when you're first starting with Excel. So let me give you an easy way to remember. A worksheet is a single Excel spreadsheet just like this, and each worksheet is defined by a tab down at the bottom here, and you can click back and forth between these two go from worksheet toe worksheet. Now both of these worksheets are contained within a workbook. If you think of a paperback book that you would get from the library, each page is a sheet of paper and all of the sheets of paper are combined into one book. It's the same with an Excel document. All of the worksheets are individual sheets that are combined into a complete workbook, and another really easy way to remember. This is when you click on one of these tabs. They're called sheets, and when you look at the default file name for your Excel workbook, they call it Book One. So that's an easy way to remember the difference between a workbook and worksheet. Now, let me show you how to kind of manage and navigate through your worksheets. Whenever you open a brand new workbook, it will start with just one sheet like this. We click on this to get a blank workbook. You notice it just has one sheet. If you want to add a new sheet, you hover over the plus sign and you left. Click it and it will create a new sheet to create 1/3 sheet. You do the same thing, so now we have three sheets and we can click between these three. So let's just put some text in here so you can tell the difference. Well, just type some days of the week in here so we can click to sheet one she to or sheet three and work with completely different sheets within the same workbook. We can also delete sheets and keep in mind that when you delete a sheet, you can't undo it. To delete a sheet, you right, click on it, go to delete, and then you have to confirm that you wanted to leave it and the sheet will disappear. You can also copy a sheet by left, clicking on it and dragging it over to the right, and you'll notice this little arrow moves. And if I click the control button, you'll notice a little plus sign appears on my little sheet icon. And then I release the mouse and it makes a copy of sheet, too. So now I have sheet to Version two. So if it clicked back on sheet one, you'll see it shows Sunday. She two shows Monday, and sheet to Version two is an exact copy of sheet, too. Now I could rename this street. Now, let's say if I wanted to call this one Monday afternoon and I want to call sheet to Monday morning. So now I have Sunday, Monday morning and Monday afternoon. Let's rename these sheets to match what the contents of the spreadsheet shows. So we're gonna rename this one to Sunday, so we go up to rename type Sunday and hit Enter. So now the sheet name reflects what's going on in the spreadsheet. You can also double click on this sheet to rename it. So call this one Monday morning and I'll double click on this one. Call it Monday afternoon. I can also color code these if I like, so I can right click on Sunday and change the tab color. Let's make Sunday a sunny yellow color and you'll notice it doesn't really show up much while I'm clicked on this tab. But when I click to the next tab that you'll see, the colors come through there nice and strong that I could go to Monday morning. Well, color this one a dark grey because Monday mornings are always a little rough, and then we'll go to Monday afternoon and will make this one kind of a dark blue. So now you can see of the yellow, the black and the dark blue. Let's say that I fill out the spreadsheet with a bunch of information is gonna put in some numbers here, cut him down, put some info here. So I already showed you how to copy this worksheet within this workbook, right by clicking, pressing control and dragging it to the next space like that. And so now you can see I have a perfect copy of this. That's one way to do that. Let me delete that. I can also right click on it and go to move or copy. So I'm going to copy this to another spot in Book four, and I can select where I wanted to appear. Let's say I want another copy of the Sunday sheet at the end. I select on that. I click create a copy and I click. OK, you could see it's now taking this Sunday sheet and created a copy of it down here at the end. Delete that I can also move it by either grabbing it and dragging it down to the end, and I'm gonna drag it back or I can right click and go move or copy and select moved to end and don't click on this button. Click OK and it moves it down to the end. I'll move that back once again using my mouse, but you can also move this worksheet to an entirely different workbook so we can go over here to book to, and this has some data in it and a couple of sheets, but I want to take our Sunday sheet and put it over here, so I'm gonna go back to Book four. I'm going to right click on Sunday and I'm going to say Move or copy. Of course, I have to click, create a copy and I click on this drop down and now I can go to book to and let's just put this at the beginning so we'll go before sheet one click OK, and now over a book to it's inserted Sunday in front of these other two sheets, so I have my original document there. But now Sunday has been added to it, and if I go back to Book four because I have made a copy of it, I still have my original copy here. So that's how you can copy and move different sheets within a workbook or between different workbooks. And on the same tab. You have a couple of other options, which I won't go into too much in depth. But you can go to insert the syllogism, insert various things from a new worksheet to a chart to various other pre formatted templates. You can also protect your worksheet, and you leave this click that you can either add a password that has to be entered in order to be ableto edit or modify this worksheet. And then you can select the things that you want people to be able to do or not do, and we'll go into protecting worksheets in another lecture. But that's one way you can protect your worksheets. And then finally, you have options to hide or run. Hide these tabs. So if I want to keep this Sunday tab, but I want to hide it from view, I'll click on hide and you see it disappears to bring it back. I have to hover over one of the existing tabs, right click it, and now it will give me the option of unhygienic. I can hide the existing tab that I'm on, or I can go toe unhygienic, and it will bring up a list of hidden sheets. In this case, we only have one, and it's selected. So we click OK, and it unhygienic that. So that's how you work with worksheets and workbooks. And remember, just like a traditional paperback book. All of the work sheets are contained within a workbook, so take a little bit of time to move. Copy, rename, add colors to your tabs and get comfortable working with your worksheets.
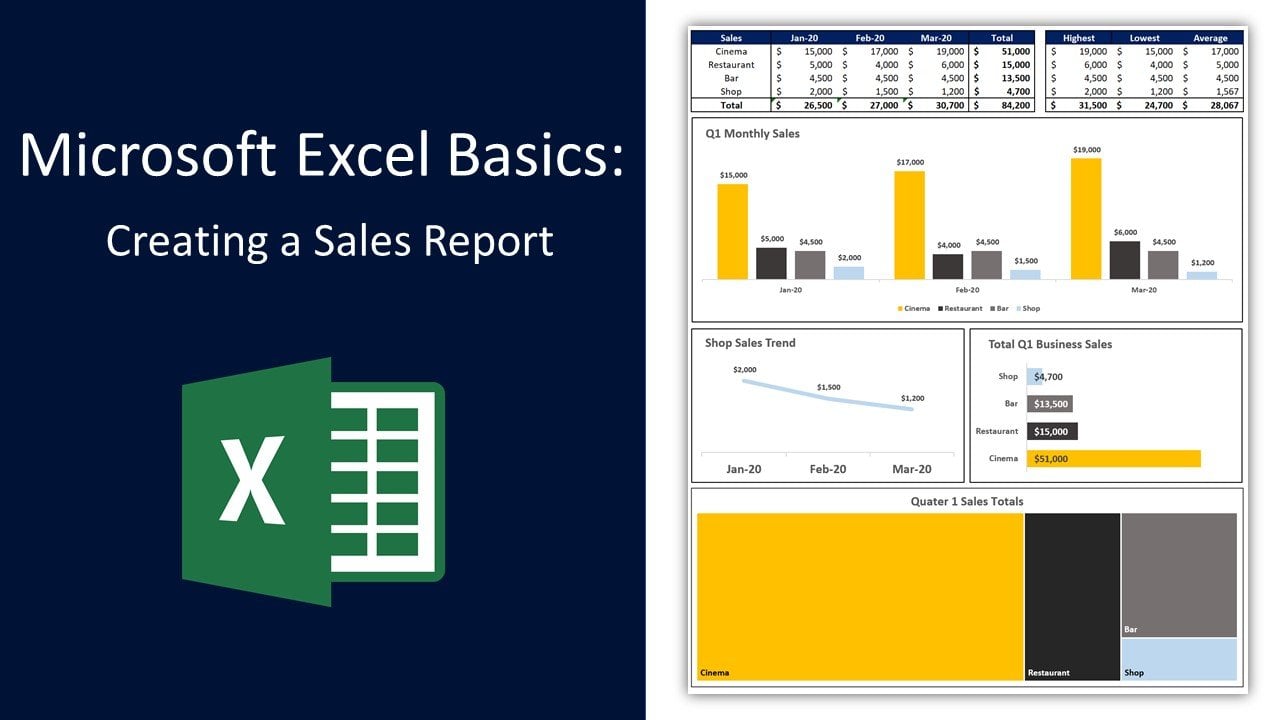
9. Introduction - Creating and Formatting Your Heading: okay. This is where things start to get fun in this section. We're going to create this kitchen remodel costs worksheet, and this is a fairly basic spreadsheet, but it does a couple of really powerful calculations that become more and more valuable as the volume of your data increases. But even in a small spreadsheet like this, it can save you a lot of time. So what we have in this spreadsheet is column A, which is our materials. You can see cabinet handles cabinets and you'll notice that it specifies, for instance, with the Cabinet handles says per unit. So that would be per handle because obviously you're going to have a lot of handles, and then flooring is per square foot and so on and so forth. And column B. Here we have the quantity of each item. So again, with Cabinet handles, we have 24 Cabinet handles in column. See, we have the cost of each item, which is pretty self explanatory, and then call him D. We have the total of the cost of each item, plus the grand total for the entire project at the bottom. So we have to calculations or formulas in this spreadsheet, the 1st 1 is in the Total column. It's a simple product of the quantity times the cost. So when you take 24 handles times $5 each, you get $120. And then we have a calculation that adds all of these totals for each different material. Using a basic some formula. I'm also going to show you a little bit of formatting, just some really basic formatting, so you can put these grid lines in and these colors and different sizes for the headings and stuff like that. So to get started, the first thing we would need to do is start a new sheet or a completely New Excel document to create a new one. We go to file click New and double click on Blank Workbook, and that brings us to a new blank workbook. So let's create are heading for our spreadsheet and then, in the subsequent lectures, will go into every detail of creating this spreadsheet step by step. So first, of course, will type in kitchen remodel costs, and the first thing you'll notice is that as I'm typing into that cell, it bleeds into the other cells in a simple way to fix that is to click off of the cell click back in the cell. So we're working with the cell and not the tax itself. And then we're gonna left, click and drag over and highlight all four of these cells here. And then we're going to go up to here where it says, merge and center. This is just a quick way to format the text right where we want it. So click on that and you'll see now if I click off of this, it's blended those four cells together, and it's centered the heading right in the middle of the cells. Now we can click on that cell and will change the font to a bigger font. I'm gonna make it bold, and I'm also gonna add some color into the background. There we go. Now it's starting to take shape, and finally, I'm going to make it a little bit taller just to give it a little more space. So that's how you create a little heading and format it in the first step to creating your kitchen remodel cost worksheet
10. Formatting Subheadings and Columns and Alphabetizings Lists: okay. And this lecture, we're going to learn how to create our subheadings and then create our list of materials and sorted alphabetically using a quick sort feature in Excel. So first, we're going to go to our second row here and entering our subheading. So we have materials, quantity, costs and the total. And to move across the page like this. I just hit the tab after each word that I enter when I can hit, enter and it'll drop me back down to the next line, and I'm going to start entering in my list of materials. So it'll type Cabinet handles per unit and to save time so you don't get bored during this lecture. I'm just gonna go ahead and copy and paste thes so you don't have to watch me type them all in. Okay, so there we have our list and you can see it's all kind of blending together now. So what we'll do is we'll go and format are subheadings a little bit here, and I'm gonna make these bold gonna increase the fart attorney Bert. And I'm gonna put a subtle color behind them just to make them stand out and then I'm going to give them some more room. If you hover your cursor on the line between two columns and double click on it, it will automatically expand that column to fit the largest block of text. So if I click on these, it's just going to fit it right to these headlines. OK, but I wouldn't really want that because I want Thies to have a little more space. Another way that you can adjust Call him with quickly is by highlighting all of the columns you want to adjust, and then you congrats on one and stretch it, and it will adjust the width of all the columns at the same time. That doesn't always work exactly how you want it to. The more common way for me is to just highlight one column, double click on it and have it auto adjust. And, of course, if you want more space or less space, and you could just manually adjust, um, part of it's visual. What looks good in your spreadsheet and part of it is functional. You just have to have all the information fitting in there. But once we've got our subheadings formatted here, we can go down and we're gonna highlight this list and you'll notice these air not in alphabetical order. So just to make it easier to read, we're gonna alphabetize these And the way we do that as we go up here to sort and filter and we just click on that and it gives us some pretty straightforward options, and the 1st 1 here is sort A to Z. So we just click on that and it says it found additional data next to our section, and it's asking if we want to alphabetize the surrounding data, but we just want to go with what we've selected. So I'm gonna click, continue with current selection and click Sort, and then when you take a look at it, you'll see Now it is alphabetized from A to Z. So that's how you create subheadings and adjust your column with. And that's also how you enter a list of materials and sort it alphabetically. So it's easy to read
11. Entering and Formatting Numbers: okay. And this lecture, we're going to be entering our quantities and costs into these columns, and then we're going to format those numbers just to make them look good in our spreadsheet . So first, you just click on the cell that you want to enter your first number in and you type in your number, hit the enter key type in your next number, hit the enter key, and I'm gonna go ahead and copy and paste thes. Then we can go up to our costs and do the same thing. Start entering our costs and hit. Enter Anil Copy and paste these to make it quick as well. And there we have all of our values. But as you can see, these don't really look that great in our spreadsheet. So we're gonna do a little bit of for Matic just to make them look better. So first will highlight all of the quantity numbers, and we'll be using this number formatting section up here to do some simple formatting for them. So right now it's formatted as a regular number, which is actually what we want, and we can go in here to the alignment. You could see that we have a lot of options in here for formatting our numbers. We're just gonna change this to aligning our text to the right and click OK, now, we could also do that by going up here and clicking centre left or right. That just lines up our numbers and makes him a little bit easier to read. And then we'll go over to our costs and we need to change these $2 rather than just regular numbers. And there are a couple of ways to do this. We can either go right here to this quick formatting tab and just click dollars and that's going to automatically insert are dollar signs and put the sense in there and for this one to keep it clean. Since we don't have, we only have dollars. We don't have any sense. We're going to go ahead and get rid of the sense. Just shows the dollar amounts, keeps it a little cleaner, but you'll notice there are tons of different ways that you conform at things. You can do just numbers with decimals, currency accounting, you could do dates, times, percentages and they're even mawr formatting options. If you click here, but in this case we're just doing our numbers, and that's really all we need. And then at this point we can change. These column size is a little bit to make them a little bit more relevant. On second thought, I don't really like that without the decimal, so I'm going to go ahead and add our destinies back in there. It just looks a little bit more like the dollar amounts that we're looking for. So that's how you enter and format numbers into your columns. And next we'll go ahead and create some formulas to create our total for our quantity, times or costs and then a total down at the bottom.
12. Create Formulas to Calculate Total Costs: okay. And this lecture, we're going to create a couple of formulas to calculate our quantity Times are costs and create a total over in this column D. And then we're going to add all of those totals into a grand total down here at the bottom . So to create our formula, the first thing you always do is start with an equal sign. And in this case, we are multiplying the quantity times the cost. So we have 24 cabinet handles times $5 each. So we can just click in this cell and that will enter B three into our formula. And then we can click shift and the eight key, which is the ass tricks, which is the time symbol for multiplication. Then we click in our other cell, which is the cell that we want to multiply it by, which is C three. And then we click enter. And if I click on this cell, you can see up in our formula bar. It shows our formula equals B three times C three, so be three times C three equals that. So that's how you enter a formula to do your calculation. I want to quickly show you how to use a function to do the same thing. So I'm gonna delete this formula, and I'm going to start again with my equal sign and you can see over here next to the Formula bar. It actually has suggested functions, and right at the top here it has the product. So I could just click on that and it will enter product, which is the function for multiplication. Or I could also start typing product in here, and it will suggest it. And then I can click on that. Then it starts with our bracket, so we're going to go ahead and click on ourselves again, and you'll see that automatically highlights it and enter it into our function. So there a couple of ways that we can enter the range of numbers that we're trying to multiply. You can click here comma and then click on the next one that you want to include in the formula and then hit. Enter and it will show are correct. Answer and you'll see it says product of B three. And when you have a common essentially means and so B three and C three, so it's B three and C three or Weaken Go product and you can click on this cell and then drag over to this one, and it will say product of B three and the semicolon means through C three. But we click enter and again there. We have our formula and r correct answer. Now here's an awesome trick, which is one of the many magical things about Excel. We've entered our formula into this cell, but we basically need to do the same formula for all of these lines. And imagine if we had hundreds or thousands of items in this list, how tedious that would be to go here and enter that same formula and over and over and over to save ourselves all of that trouble. We could just take our cursor here and hover over this little box down in the right hand corner of our cell and notice how the cursor changed to a skinny cross. Now I left click on that and I'm going to drag this box all the way down to the bottom of my list and I'm gonna release it. And it has copied that formula all the way down. See and you can double check all the math. One times 500 is 500 four times 30 is 120 one times 800 is 800 four times $6 is $2400 if you click in each cell, you'll see this one is how I put it in equals product of B three through C three. But notice as I go down now it says product of B four through C four and be five to C five . Excel understands that we want the formula on this line to reflect the costs or the numbers in these cells, and so it automatically changes the numbers to make them relevant to that line. So that's pretty awesome and very quick and easy way to add that up. Now we're going to create a grand total of the bottom. So I'm gonna click total here and tab to get to the next cell. And now we want to add all of these numbers here. And as you recall from before, we can go and use the auto, some which just simply adds up all of these selected cells or we can simply enter our formula in here selected from here or typing it in manually s you click on it and select the cells we want to add together and noticed that I don't enter the final bracket. I could actually go shift and parentheses and then hit Enter. But big sell will automatically do that when you've highlighted them by hand with the mouse . So any way you can enter and that shows your total and you can double check your formula to make sure that it's right. Or rather, I should say that we'll check your function because this sum is actually a function which is basically just a pre formatted formula. So it says equals some of D three through D tents of D three through de 10 and that's perfect. Now I put this down here just because it seemed nice to have a little bit of space between these, but we could do some formatting to make this total stand out a little bit later, and if we don't want this extra space, you can just left click on that row there and then right click and delete, and it'll shift our road right up. So that's how you create a multiplication formula to multiple your quantity, times your costs and also how to create an addition formula or some formula to add a column of numbers to get a grand total.
13. Final Formatting Grids and Spacing: okay. And this lecture, we're just going to look at some final formatting, put some grid lines in here and a little more color, and that our kitchen remodel cost worksheet will be complete. So the first thing I'm going to do is just put some color in here to make this stand out a little bit. And we're already going with a pretty settle color theme. I'm just gonna add a little subtle kind of pink or salmon there is to make that total stand out, and we're gonna put some grids in here, and I'll just show you a couple of things like the way that grids work is that if you were a highlight this whole section and go in here to your borders and say all borders and then I'll click off of that, you can see it just lays in an outline for each cell. These little gray grids that you see are really just guides. Those would not show up on paper if you were to print this. So this formatting partly does depend on whether you're printing it or whether you're just using it online or on your desktop. But let's undo that I'll just make a little bit of formatting that will just look a little cleaner. So what I'd want to do is just highlight all of this. I wanna put grids in there. I'm going to just highlight this. And I'm going to do an outside border for this whole area just right here. We're gonna do the same. This area, it's already selected there. So I could just click it this and the same for this. And then this one, I'm gonna add a grid to as well, all borders, so that just to find things a little bit more and one of the thing that will show you real quickly and this is something that will go into more later in the course. But I want to show you how to do a table. So I'm just gonna undo all this formatting that I just did. And I'm gonna highlight this. I'm gonna format as a table. And when you do that and again, I'll go into this more later in the course. It provides a little additional functionality to your spreadsheet, but it also allows you to use these really simple and kind of clean color formats So if we did this one, just show you what that looks like A real quick. It's gonna ask, Where is the data for your table? It's right thing, or it's already highlighted it, and it also has Super Table has headers, and it does. So I'm just gonna leave that clicked and click, OK, and then when I click off of it, you can see it's put these little drop downs here where I can sort things. But it's also formatted the lines with some horizontal bands just to make it a little bit easier to see. And, of course, you can change that formatting to something with some or possess if you want. But we'll just go back to this 1st 1 that we did, which was pretty simple and clean looking. And that's another way to just get some quick formatting into your table. In fact, I'll go back to my original formatting just to keep things simple, But that is how you create a kitchen remodel cost worksheet, and our worksheet is complete. So now what you want to do is follow through these lectures and actually create one of these yourself, or you can download the Excel document for the kitchen remodel cost worksheet, and you can play around with it and just make sure that you understand how the formulas work in the formatting so that you have this down so that you can then go and create your own worksheets to more efficiently and effectively perform the tasks that you need to perform.
14. Intro to Formulas and Functions: okay, In this section, we're going to be learning all about functions and formulas. We're going to learn about their basic anatomy. What? The difference is between a function and a formula, some shortcuts for inserting them in excel. And we're going to create some or detailed spreadsheets that use multiple functions to do a number of calculations. So far, in the course, we've learned how to enter data into cells, had a select and highlight cells, had to navigate back and forth through the cells and even how to create a couple of basic functions. We learned how to create simple formulas using the some function, and we remember that it always starts with the equal sign. We're gonna look at this formula in more detail, and we're gonna look at all the pieces and parts and exactly what each part means in the equation and what its uses and how you can use the different parts of the formula to aid you in your calculations. Then we're going to create an entire spreadsheet like this, which calculates the monthly commissions and bonuses and total monthly pay for this group of sales reps here. We're going to use a some formula to get the total of all of their monthly commissions were going to use an if formula to decide whether or not they have met there. Monthly Target and whether or not they get their monthly bonus based on their commissions were going to use another, if formula, to add in their bonus. If they have met there, Monthly commission, their monthly target, Then we're going to use a some F formula to figure out the total monthly pay for two different regions east and west for all of the sales reps in those regions. And then we're going to use a some ifs function to calculate the total monthly pay just for the sales reps who have hit their monthly targets. And if these functions sound foreign to you or this seems a little bit overwhelming at the moment, that's totally okay and understandable. We're going to break this whole spreadsheet down piece by piece and created step by step, and I'm gonna walk you through creating these functions so that you'll have a firsthand view of how they come together and you'll be able to recreate them in your own spreadsheets . And then finally we're going to use a count if function to calculate the number of employees in each region. An account ifs function to calculate the number of employees per region who have hit their monthly target. Then we're going to learn how to create a table and use a V look up function, which is a very widely used function. So we'll be using our same group of sales rep plus a few others. We're going to put it into a table that has drop downs that you can use to sort the data and, more importantly, will have a V look up section here so that when you enter in a sales reps number, for instance, cells up number two and it enter, it goes and looks up the REPS name and their total monthly pay from column E, and it inserts it into our little table here. And you can imagine the value of this. If you had thousands of lists and you just needed to find a bunch of information about a sales rap or an auto part in a huge catalogue, you can just type in the product code or the name of the item and bring back all kinds of information like size, barcode numbers, prices, etcetera. So we'll learn how to do that. And then finally will learn how to use the left mid and write functions to sort data and make it easier to view and to use. So we'll sort out these I D codes, taking pieces of the code and putting him into these other columns. So you get your rep i D Number, Region and your sales group all sorted and easy to view. At the end of this section, you'll know how to use seven of the most popular and useful functions in Excel and in the next lecture will dive right in and get started looking at the difference between formulas and functions.
15. What is a Formula: Okay, so let's talk for a minute about what a formula is we've already experimented with. Formula is a little bit to do calculations in our kitchen remodeling costs worksheet. But let's really get down to the nitty gritty about formless so you really understand what it is, what it does and what it can do for you. So what is a formula? There are a number of ways you could define a formula, but the most basic definition is that a formula is an expression used to calculate the value of a cell. We've looked at this a little bit, but let's really break it down. So let's say what we have a couple of members in a couple of cells. We have five. And if I if we want to create a formula to do a calculation with these numbers, as you remember, we start with the equal sign and we could simply select cell a one plus sell a to and hit enter, and it'll create a formula that says equals a one plus a two, and it will do the math for us that we can easily go in and modify this to say, a one divided by a two. Click enter and you'll see five divided by five equals one. We can change this to subtraction. Five minus five equals zero or we continue to multiplication using the Asterix, as you've seen from before five times five equals 25. So that is the most basic use of a formula. But even with those basic uses, you can create some really powerful calculations as the volume of your data in your spreadsheet increases. So throughout this section we're going to look at how to use formulas like this. And more importantly, we're going to learn how to take them to the next step, using functions such a some product and more advanced functions such as left right, mid V, look up count ifs and so on and so forth. So in the next lecture, I'm gonna explain to you what a function is, how it works within a formula, and we'll start to see that rial power of Excel for doing amazing calculations
16. What is a Function: okay, And this lecture, we're going to learn what is a function and what can it do for you now? We were just talking about formulas and how they create calculations in Excel and a function is basically a formula on steroids. A function is a piece of code that makes your formulas more powerful, And I'm going to show you a really simple example of how this works in just a minute. But you can also think of a function as a piece of a formula that Excel has pre defined to make it easier for you to use. So let me show you really quick and simple example of the power of functions. As you recall from our previous lecture, When we're talking about formulas, we have a very simple formula. Here we have five plus five equals 10 but let's say that you had a lot more data in this situation. Let's say you have a whole big long list of numbers, and this is actually still a small example compared to many Excel situations. Now, if we wanted to create a formula for this, we start with our equal sign and we would have to go five Shift plus five Shift plus five Shift Plus I have shift plus and so on and so forth until we get all the way down this list just to add up these numbers talk about tedious. So instead, we're going to use a function. We're gonna start with their equal sign. We're gonna go up to our function bar here, click on some our function arguments box pops up, and it's already asking us, Do we want to do one through 11? We click OK, and presto, there's our answer, or you can click on the equals type. In the word. Some click it click and drag to highlight the numbers that we want to add up and click Enter and once again, presto, there's our answer. So comparing to going through manually and adding all these numbers into a formula versus using a function within the formula to quickly calculate a lot of cells, you can see the power that a function will have. And this is just the tip of the iceberg. So real quickly let me show you a couple of ways to find functions, and then through the rest of this section, we're gonna look at the seven most popular and widely used functions. We'll teach you exactly how to use them so that you can really start to put some power into your Excel calculations. So if you go appear to the Formulas Bar, it has a hole list of drop downs here with all kinds of functions. And before you get overwhelmed by this, I want you to know that most Excel users, even experienced Excel users do not know how to use every function that's available in Excel. There are tons and tons of them. And the beauty is you can just find the functions that you need to do what you need to get accomplished and not really worry about the rest of them. And then as you go, you're gonna add some new functions to your bag of tricks so that you can do the calculations and do the analysis that you need to do on your spreadsheets. So first I'm gonna delete my function here and there a couple of ways you can do this, you can go to the insert function. This is one of my favorite ways to do it, because if you can't figure out what you're trying to accomplish, you could type it in here, and it's pretty smart about helping you find it. So if I want to add something up and I don't even know that it's called the some function that I could just click, add and click Go. And it will recommend a number of functions here, and I can click on these and it will give me little definitions of what they are down below here. And so when I click on some, it's going to say ads, all the numbers in a range of cells. So I know that that's the one that I need. It also has different categories here. So this is the recommended, because I've done a search for addition. But you can also go to most recently used. So you congrats, your favorites, and it will use the ones that you've used recently, and you can see these are all the ones that I'm gonna teach you. In this course that I've been using recently, you can click on all, which will give you a complete A to Z list, and you can either scroll through this or you can use your mouse or you could even type in the letter that you're looking for. So if you're looking for some thank you type s you, um and it brings you right to it. And then finally you can. It breaks it down by categories like financial date and time, Matthew Drake etcetera. And you can use those categories all the way down to the bottom to search for a more targeted function. But in this case, we were using some function, so we'll just click on that. It's also very handy that it brings up this function arguments box, and I'll get into more of the definition of what a function argument is in the next lecture when we're talking about the anatomy of a formula. But this box just makes it really easy to enter in the cells that you are wanting to do. Your calculation on usually anticipates it quite well. And if it doesn't, then you could easily just select them or you can type them in manually. So that's really nice. It also does your calculation and gives you a an answer here so you can double check to make sure that your clicked on the right cells and that you have the right formula working before you go ahead and do it so you can click. OK, then. And you have your function completed. There are a couple of other ways you can do this to auto. Some gives you a few options here of very popular functions. Just for really quick reference, you can get right into them again. This is similar to the the insert function box that we're just looking at. It has your recently used so again you recognize these. These are the ones that I'm gonna teach on this course. And they're ones that I've used recently. And then you can go into all of your specific categories. And again, you can see that there are tons and tons of functions in here, many of which you will probably never use. And that's okay, but you can see scattered through here. There are some very commonly used ones like the If function that I'm going to teach you in this course, you can actually create functions that work with text, which is cool, because Excel not only works with numbers, but it also works with text, and I'm gonna show you a couple of these, like left mid and right. You can work with dates and times by sorting dates, months, minutes, even down to seconds. Look up in reference is a powerful way to find things out of huge lists, and we're going to use an example of that in V Look up, which is a very popular look up tool for pulling information out of giant lists, math and trigonometry. This is where you'll find some of the ones that we've already used here, such as product, which is multiplication. Some, which is addition and a couple other was that we'll look at leader like some if and some ifs. And then there's a whole bunch of other functions here. Statistical engineering, cube, etcetera, etcetera. So that's where you confined your functions. Either there or the insert function. Or, of course you can. If I delete this out, you conduce the equal sign and you can just start to type your function. And of course, it brings it up right there. And then finally, you can go up here and you can grab a recently used function from right from the Formula bar. So that is what a function is and what it can do for you as you're working with Excel. And in the next lecture, we're going to look at all these different little pieces in parts from the equal sign to the function, the brackets or parentheses, the semicolons and the numbers. And we're gonna look at the whole anatomy of a formula, including the functions. We're gonna break it down, not only so you can understand it, but so you can modify it and manipulated to create the calculations that you want to do.
17. The Anatomy of a Formula: in this lecture, we're going to be talking about the anatomy of a formula, and this is important because there are a number of different parts to each formula, which you can add or remove from a formula to change the calculation that it will do. So in this lecture, we're going to talk about six main pieces that you will find in formulas, plus a couple of other common elements that you'll find on a regular basis. So let's just take a look at a completed formula so we can see what it looks like. If we click on that cell, you'll see this basic, some formula and the first part of our formula is Theo equal sign. You always start any formula with unequal sign. The equals essentially just tells Excel that you were about to enter a formula. The second part of this formula is the function, and in this case, we're using the some function, which we already learned about. And as you recall, a function is just a little piece of code that adds steroids two year formula and allows you to do much more powerful calculations. Next up In this formula, we have the parentheses. Parentheses Do two things in this formula, their defining the cell reference. So these parentheses are defining. Sells a one through a two in this formula. Another thing that parentheses, conduce is define your order of operations. So, for example, if I have a some formula here and I want to say two plus two times five if you recall from math class, putting those parentheses in there makes a difference in your equation by defining your order of operations. So if we have it written like this two plus two in parentheses, times five, you have to do what's in the prince. He's first, so you'll do two plus two and get four, and they'll take four times five and you'll get 20. So if we go back into this equation and we move this parentheses over to hear it now changes the order of operations because you have to do the multiplication before you do the addition, unless parentheses to find it differently. So you have to do in this equation. You do two times five and get 10. Then you have the two and you get 12 and you'll see if I hit Enter. That's what we have. So in this above equation, we have two plus two is four, then times five is 20. And in this equation, because we've moved the parentheses over to the outside, we have two times five is 10 plus two is 12. So that's what parentheses do. They modify your order of operations back to this equation. The more common use of parentheses is that they define cell references. So in this case, it's defining our cell reference to sells a one and a two. If you didn't have these parentheses here, you would get a air. In fact, I could show you what that looks like. See, it gives you a name air because it doesn't understand what you're referring to without the parentheses. So undo that to fix it. So those that's what the parentheses do. And speaking of cell references, that brings me to the next one number four, which we've basically already talked about. But this inside your parentheses. Here is your cell reference, and your cell reference essentially supplies the data for your calculations. Another name for a cell reference is a function argument, and I'll show you what I mean by that. If we go back here and we click on the some function from here, it's going to bring up our function arguments. Your function argument is the data that you're referring to that you want excel to use in your formula. And you always define your function arguments with parentheses and in fact, you can see Excel is doing it automatically for me here. So that's your function argument the fifth part of our equation here and let me go back to our original formula. The fifth part of our equation is an operator, and you might remember operators from math as well. Operators are plus minus divide and multiply. Those are the most common operators there. Also greater than less than you can use, the greater than and less than Cymbals together, which means does not equal or you can use the equal sign. So those air operators, which you probably recall from math as well and then the next one is Number six is Constance and Constance is a number or text in your formula That does not change. So that's our number two in this equation, as opposed to a cell reference where I could go into this cell and I could change the number and it would change the answer. But a constant will always stay the same so that number two is the number two, and it will always be that way in the formula. So those are the six parts of our formula. There are a few other elements that you will use from time to time. The most common ones are probably quotation marks, which defines text within your formula commas, which would be used in your cell references. And we've talked about this, but the difference is when you do a one Colin A to it means a one through a two. So you're picking out an entire range of cells. When you use a comma, you are referring to a one and a two. So you're really just defining two cells, and you can create lists of cells like this. You could say a one, a two and D one. So that's what used the calm before. And then, of course, the colon used for the range. So if you wanted to do a one through E one, we can select it like that. Excel will automatically enter in the colon to give us the full range of these numbers. So that's the anatomy of a formula. We learned about the equal sign the function, the parentheses to define your range and your order of operations, the cell reference or the cell argument, the use of operators, the addition of a constant, which is a number or text in your formula that doesn't change, and then quotations, commas and Coghlan's, which are some other common elements that are used. So that should help you to not only understand formulas better but to be able to troubleshoot them, modify them and create formulas to do the calculations that you want to do in your spreadsheets.
18. Quickly Select Cells to Use in Your Formula: okay, in this lecture, we're going to talk about how to easily select cells when you are entering a formula. Now we've already looked at how to select cells. Just in a spreadsheet. You can use the right arrows, the down arrow, the left arrow, the up arrow. You can use shift and arrow to select the whole block up arrow and left out to go back. You can use your mouse left, click and drag and hold it and then release it when you're ready. Or you can even select a column, click control and select another column while holding down the control button. But those airways to select cells just in general. We want to learn how to select cells when we're entering a formula. So let's go back to our kitchen remodel, cost worksheet and go back to our total column, where we're going to use the some formula toe, add up all the total costs. And, of course, we enter equal sign to start our formula. And then we can type in some and we enter the parentheses and you've probably figured out a few of these ways from watching previous lectures. But the first way is to just enter manually the cells that we want to use. So d three colon, which means through do you turn and you can see that Excel highlights those cells with the blue border to give us a real good visual indicator that we've got the right cells. And, of course, you close out your parentheses and hit enter and you have your total. Let's start this over again. Another way right is to click the equal sign and use your drop down click on the some. And of course, it brings up your function arguments, and it automatically pre populates the logical cells above the cell that you're working with and in this case, those air. Correct. So we would click OK, and we have our correct answer again. And then finally, as we're entering our formula, if we click on it right here, we can manually select. So you just left click on that dragged down and again, it gives you the D three through de 10 and you don't even have to close the parentheses. With that, you can just hit and turn. It will automatically do it for you. Now the other thing, we could do is we can select just a couple of cells by clicking and dragging, or you can click press control. Let's say, for instance, that we just wanted to select the items under $1000. We click on the 1st 1 we hold down the control button, and then we select the rest of them, and you'll notice that Excel does some things to define this in the formula. So it says D three, which their 1st 1 comma, which essentially means and de six through D 10. So it has a single cell and a range of cells, all in the same formula. And then finally, we could define it like this. If we wanted, we could select this range and then say, for instance, we had another set of data over here that we want to include. We could use the control key and select all that. And then a final way to select cells, especially if you have a gigantic list, is you can click on your first cell in click control shift in the Arrow key, and it will select all the way to the bottom. The column. But we'll actually need to go shift up one cell so that it doesn't include the cell where we are entering our formula. But that works great if you have a ton of data. So those are some quick and easy ways to select cells when you're entering your formula to make you just a little bit more efficient when using Excel.
19. Absolute vs. Relative Cell References: okay. And this lecture, we're going to be talking about absolute versus relative cell references. And you may be wondering, what does that even mean? And why is that important to me? And I'm really excited to show you, because this is not only a very cool trick to understand in excel, it's also very important when it comes to trying to do certain calculations on certain spreadsheets to save yourself a lot of headache. So let me just demonstrate for you quickly what absolute versus relative cell referencing is. So I'm gonna put in a formula right here, and we're just going to go with our good old some formula. And I'm gonna reference a couple of cells over here. We got C one and I'm gonna hold the control key and click D one. So there we go. So you want anyone click enter. If a double click back in the cell, you can see our formula. So the sum of C one and the one pretty simple. Okay, I'm gonna click off that. I'm gonna highlight that cell again. And I showed you this before, but it's good to see again. I'm going to now hover my cursor over this little green box in the lower right hand corner of the cell and you'll see my cursor becomes a skinny cross now and I'm gonna left. Click it and drag it down a few rows, and I'm going to copy that formula down those rose. Now let's see what happens when I click on these. The 1st 1 is just just how I set it up. The 2nd 1 has copied the formula, but it's changed the row to row to. So instead of being C one and D one appear, it's copied the Formula two, C two and de two and so on and so forth that continue to go down here. You'll see that it's copied it for each row to match the cell that I've entered the formula into. Now this is known as relative cell referencing, and it's very valuable of Excel for the purposes of copying formulas exactly like we've done here. But what if I wanted to have a relative cell reference in column C so that it did continue to move down each row matching the row that the formula is in? But what if I on Lee wanted to reference cell D one as the other number that it's adding to . How would I do that without manually entering all these formulas? Well, let me show you. I'm gonna go ahead and delete thes go back to our original formula. So I want the c calm to change, and I want the d calm toe. Always stay in row one. So here's an awesome trick. Click on De Juan and I pushed the F four key on my keyboard. Watch what happens. You see those two little dollar signs that appeared next to the D and next to the one Those are the magic symbols that make this cell reference on absolute cell reference rather than a relative cell reference. Now watch what happens when a copy this formula down the rows. Okay, this 1st 1 is the same as our original version. When we go to the 2nd 1 look what happens. The sea reference is relative. It's moving with the formula, but the D reference is staying exactly where I told it to go. Now watch as we continue to move down, see how the Sea reference continues to move relative to our formula and the D reference stays absolutely where we told to stay. Now you might be following along and thinking, OK, well, that's neat. But what's that going to do for me? When can I use that? And I'm so glad you're thinking that because I have a perfect example for you. So in this very simple spreadsheet, which we're going to be using quite a bit and building out throughout subsequent sections of this course, we have some sales reps. We have their monthly commissions, some dollar figures. In here. We have a formula at the bottom here, a some formula that just calculates their totals. No big deal. We have their total monthly pay, which we have not calculated yet, and then we have a holiday bonus over here of $500. Now what we want to do is create a formula in here that will calculate all of their monthly commissions and include their holiday bonus in it. So we get their total monthly pay. And if we were to create a formula here, a simple some formula saying $2000 from beats L B two plus $500 from cell D to and then try and copy that down what we'd wind up with his $2000 plus nothing and $2100 plus nothing and $2300 plus nothing because that relative cell reference would move down with our formula. But by using our absolute cell reference, we'll put in our some formula again. We'll reference our monthly commission and our holiday bonus using the control click, and then we'll hit the F four key lips. Time out. I just put in absolute cell reference on both of our references, and we don't want to do that. So I'm gonna undo that. I'm gonna click on the D to hit a four, and now we have a relative cell reference over here, and because of these dollar signs, we have an absolute cell reference here. So I will hit enter to complete my formula, and you can see it's taking the 2000 plus the 500 added them together for our total. Now let's click in hair and copy are formula down, and as you can see, it's working. So we have 2000 plus. The 500 up here at D two is 2500 $2100 plus the 500 appear D two to a 600 so on and so forth. And we can double check our for Miller's to see that this is still doing an absolute cell reference to this one cell appear and only that cell. And this is doing a relative cell reference to the cell one to the left of the formula and will take this one down here and the same thing. So that's the difference between absolute and relative cell referencing. And that's how you create an absolute cell reference so you can copy formulas down large columns in your spreadsheets but still being able to refer back to one specific cell or a number of specific absolute cells.
20. AVERAGE and AVERAGEA: okay in this lecture, I'm going to show you how to use the average and the average A functions, and they're only slightly different. But I'll show you when you'll use the average and when you use the average a function. But basically the average function adds up all of the numbers in a list and then divides them by the number of members In that list, the average A function comes into play. If you have a non numerical entry in one of your cells and you want to actually include that essentially as a zero in your calculation, the regular average function will not include it. It will just skip that one and take an average of the rest of the cells. So let's go ahead and look at an example here using our list of sales reps and their monthly commissions. So if we want to take the average of the sales reps monthly commissions, we would, of course, start with an equal sign and we can start typing an average and double click it select ourselves hit, enter and it shows us that the average monthly commission for all five of our reps is $2180 So that's pretty simple. Now let's look at a scenario where we would use the average A function. Instead, let's say that for this month Bob was not in the office. He was actually on loan to the accounting department. Notice that when we change this from a numerical entry to a text entry, it changes the average blow. See before. If we undo this, the average of all five is $2180. When we put the word accounting in there, instead, it drops the average to 2150. So if we wanted to change this to average A so that it treats this more like a zero, then we would just add on a to the formula here. Click, enter and you'll see that now the number is significantly lower because it's counting all five of these, and it's treating this text entry as a zero. So now averages $1720 you might be wondering what the purpose of this would be. Well, good example would be if Bob is still being paid out of the sales department, but he's not bringing in any revenue than the average. A function would allow a manager to see how much money the department is earning per rep, including Bob who's missing. And of course, if we undo this and go back to just the average, then that would be appropriate if Bob was being paid from the accounting department this month and they only wanted to see what the commission's were for the sales reps that were being paid out of the sales department. So that's how you use the average and average a functions to find averages, including or not, including cells that have text.
21. COUNT COUNTA and COUNTBLANK: okay. And this lecture, we're going to be talking about the count and count a functions and will actually also look at the count blank function. And basically, what these functions do is they just count up the number of entries in a range of cells and return back a total. So let's take a look at an example. And of course, I've cleaned up our spreadsheet again here so that it basically just includes the monthly commissions. And I've added a couple of totals here that we want the number of active reps. So, for instance, if Bob is out of accounting, who on account just the reps that are actively selling and then we want to just count the total reps so that it will count all the reps that are actively selling as well as anyone who's not. So the first thing we're gonna dio is going toe active reps, and we're going to use our count function, so we start with their equal side. We go up and find our count function, and you could see it's automatically selecting all the cells above the cell were looking for. But we don't want the total cell so we're going to actually change this to these cells, right? Just with our sales reps. And they're also going to highlight that and press F four to make those an absolute cell reference so that when I copy this formula down, it's going to stay attached to cells B two through B six and I click OK, and it brings us back a number of four, which is 1234 active reps. And the reason it does that is because the count function is only counting the cells that have numbers in them. It doesn't count the cells that have text values, so we'll copy this formula down and then we'll go into it and we're gonna change it to be account A. So we'll add in a it will hit, enter and you can see the difference here. Well, first of all, because we used our absolute cell references, it kept the same cell references rather than dropping it down one level. But the difference that count a makes is that it's going to count all of the cells that have an entry at all. So it counts five, and that gives us our total reps, including Bob, who is in accounting now, If we were to delete this, you'll notice that it changes to our total refugees before because we don't have any entries in here at all. And again, count A will count any cell within our range that has any sort of text or number in it. But if it doesn't have anything, that's not gonna count it. So it's important to know what sort of data or how you need to have your data formatted within your spreadsheet so that it gives you the desired outcome in your spreadsheets. You know, let me show you one mawr, which is count blank. And I'm just gonna call this one blanks and we're gonna go equal side. Of course. Start typing it in and it brings up Count blank, double click that, of course. And we're gonna highlight all of the same range. The purpose of Count Blank is that it's actually gonna count the number of blank cells in a given range. So if you have a huge list of sales reps and for instance, they are responsible for entering their own commission members on a shared spreadsheet. But someone or many people are not doing what they're supposed to be doing, and they're leaving it blank. You could use this function to do a search to find out how many people are not entering their data into the spreadsheet. So this counts our range of cells, and it sees that there's one blank cell and it returns this of value of one. Now, if we go back, we have the accounting word back in here again. You'll see that everything changes again. So we have four active reps. Those the ones with numerical entries. 1234 We have five total reps that includes all entries, numerical or text. 12345 and we have zero blanks. Obviously, there are no planes, so that's how you use the count. Count a and count blank functions to account various items and given ranger cells
22. IF Function: okay, in this lecture, we're going to be talking about the if function, if functions are very simple, yet very powerful to use. Essentially, what an it function does is, it says, if this factor or number of factors are true, then calculate this. If this factor or a number of factors are false, then calculate this and let's look at an example from our regular spreadsheet. So once again we're looking at our spreadsheet with our sales reps and their monthly commissions. And in our previous lectures, we've added in our monthly bonus and before we're treating it as a holiday bonus so that everyone got the bonus. But in this case, we want to change this moments a little bit, so it is a commission based bonus. So we have another column here that have added, called our monthly target, and you can see I've defined the monthly target is $2100 you can see from our list that we have a couple of people who have not met the monthly target of $2100 one person who has met it and to people who have gone over the monthly target. So what we want to do is create a new function that will allow us to add the monthly bonus to the people who have reached their targets and not add the monthly bonus to the people have not reached their targets. So the first thing we're going to do is just put out a qualifier here saying yes, they have met their target or no, they have not met their target. So we're going to create a new function here. Of course, we start with their equals that, of course, we can go to you formulas and the if function is in logical. You can see it right there. You can also go to insert function, of course, and I'm under a logical again and it will be right there so we can double click that and it will bring up our function arguments box. Bring that up closer so we can see and you'll notice this function. Arguments Box has a couple of more fields than our regular simple some formula, for example. So the first thing is the logical test, and you can see here it says it checks whether condition is met and returns one value of true and another value, if false. So as you may recall, from back in one of our previous lectures, we were talking about operators. And in this if function we're going to use, some operators were going to use greater than equal to or less than so. First, we're going to select the cell that we're doing, the calculation on which is B two. And so it basically says, If B two is and then we'll say greater than or equal to their magic number is 2100 so put in 2100. So that's her formula. And then we're putting in what we want in our cell, if it is true. And in this case, what I wanted to say is, if it's true that this is over greater than or equal to $2100 or 2100 that I want this to give us a result of yes, so we're just gonna type in the word yes, and then if it is less than $2100 I wanted to say no. So in this list, if they have met there, monthly commission, this column is going to say yes and if they have not met there Monthly commission that is going to say no. So we entered all that in and we click OK, and you can see this is not greater than or equal to $2100. So it gives us back a result of milk and I'll go ahead and copier formula down and it completes it accurately. So you can see referring back to our formula before is greater than or equal to $2100 so you can see that it is. It's equal to $2100. And if that is true, then it's going to give us a yes. And it did gave us a yes. So that gives us the data in this column, essentially the answer to our question about their monthly commissions meeting the target or not. Now let's go and create another if statement to add in their bonus. If the answer here is yes case, we're gonna go click over here and do another if statement. So we start with the equals sign. And of course, it's pretty populating if here, because that's a functional we've used recently. Or we can go to our logical again or we can go to insert function. And if we go to most recently used, it's gonna put it right up at the top. Or you noticed if we're a logical, it'll show up there as well. Whichever way is quick is for you to find it. You click on this statement and then we're going to put in our test. So our test is if this cell for a monthly target equals and you have to put quotes around the words, no. And then you say here. If the answer is true, then we just wanted to enter the Total monthly commission and not add the bonus. So we'll just click on B two and you can see it's give us the answer of $2000 and then if it's false. In other words, if the answer is not know, but it's yes, then we want to have the total monthly commission plus the bonus, and you can see that it's already doing the calculation and giving us $2000 plus the voters to be $2500. So we click. OK, copy our formula down. And if you look closely and this is why you always check your formulas because you'll notice this isn't working. Ah, these people here have met there. Monthly Target. So says yes. But it's only taking their regular monthly commission. It's not adding in their bonus. And the reason for that is because when I created this formula, take a close look. I did not put an anchor on this first cell to make it stay at E, too, so it is automatically moved down t four. So what I'm just gonna do is I'm gonna go back here and I'm gonna delete thes go back into my original formula, and I'm just going to go up two e two and I'm going to click F four. And as you recall from our absolute versus relative cell references lecture, it puts the dollar signs next to the E, which is the column, and the two which is the row toe anchor. Our reference to this exact cell, and then I'll click enter to put in my formula. Now I'll copy it down one more time and we'll double check it again. And you'll see now where Jane has yes met her monthly target of $2100. It's taking the 21 plus the 500 giving us the correct value now of 2600. And we can click on one of these to double check and you'll see that it is indeed referring to this cell, which is be five plus are anchored cell of you too. Perfect. So that's a simple example of using if formulas. And I know that at this point things are starting to get a little bit complex. So let me just go through the formula one more time. T make sure it's really clear to you how this comes together and how it all works. And this will be helpful, kind of referring back to our anatomy of a formula lecture because I'll just show you the anatomy of what we have here. So, of course, we start with our equal sign and we're looking at this cell right here. The formula in this cell with starts, 30 call sign. Then we add the if function. We use our parentheses to define our range of cells that were doing the calculation on. So if I double click on this, it will make it easier for us to see so you can see that first, We're referring to Cell C six and we're saying that which is right here. We're saying if C six equals no, which this one in this case equals, Yes. So it's gonna come back false if C six equals no. Then just enter the results from Selby six. So then if if this did say no, it would just enter $2500 here in this cell as the after and then where we have the other comma essentially says for all other scenarios, calculate B six plus cell e to. So if it doesn't say no says anything else in here, then it's going to do this calculation. So in this case, it does take this cell B six plus e to the bonus, and it gives us back our total of $3000 a hit. Enter. You can see the total there again and will quickly look at one of the ones that says no. It's the same formula for both cells, but this one meets the criteria of the formula, and the other one didn't. So, again, it's equals. If cell C three, which is right here is no which in this case it is no. Then just give us back the number from B three, which is the commission without the bonus. If it doesn't equal now, then give us the commission, plus the bonus number. And as you can see in this case, it does actually equal no. So it gives us our first result, which is just be three. And there's be three right there, and it essentially just copies over B three into our total monthly pay. So hopefully that makes it a little bit more clear how the breakdown of the function works . But that's how you use an if function to essentially bring back one calculation if the value is true and another calculation if the value is false.
23. SUMIF and SUMIFS Functions: okay. And this lecture, we're going to be talking about this some if and some ifs functions. We've already learned about the some function and the summit and some s functions air just a little bit different in that some if function adds a range of cells, if one or more conditions are met in another selected range of cells, and the summits function does the same thing as the summit function with multiple conditions and multiple ranges of cells. So let's take a look at an example using our sales reps red sheet, and you can see that I've added a couple of more items to the spreadsheet. Now I've added column me here, which is the region, and it's basically just broken into two regions east and west, so each sales rep is designated as being the East or west region. And then I've added this new section down here which calculates total monthly pay by region , east or west, and the total monthly pay if that monthly target is hit. And I just noticed that my Texas a little cramped here, so I'm just gonna double click on this column and open that up. But our summit function is going to do a calculation here, and it's going to sort all of our people from the East region and do a total of their monthly pay. And then it's going to sort all of our people by the West region and calculate the sum of their monthly pay. So let's start with the East Region. And of course, we put in our equal sign and we go to our formulas tab. We're looking at math and trigonometry Scroll all the way down to the summit. Click it and it brings up our function arguments here. And first it's going to ask us for a range, which, of course, are range are the cells that we want to evaluate based on the east region. So we're going to highlight thes. They're also gonna highlight these numbers and press F four to create an absolute cell reference here so that when we copy this down, it's not gonna shift down and have the wrong cell ring. Then we go to our criteria, which is east because we're searching just for the East region and then, of course, are some range is the numbers that we want to add up So that's our total monthly pay. And then we wanted to do the same thing with this. I let it press that four to make it an absolute cell reference. So the formula copies down correctly. We'll click OK and it'll entering our number. Then we'll copy or formula down and we'll double check our west region. And we have 123 west regions 4600 and $3000 for a total of $7600. So perfect. So we really did was do a some of the numbers in this range, but with the if criteria, if it is east or if it is west and that's what the sum if formula does. So now let's go to this next column and figure out our total monthly pay if they hit their monthly target and will use the some ifs formula, which does the same thing as the summit formula, adding arrange yourselves if one or more conditions are met. But we can also use multiple conditions and multiple ranges of cell for some ifs, so we'll start with our equal sign and let's go to our drop down and see if it's in here. There it is Click that brings up our function arguments. You'll notice the some ifs, is in a little bit different order. First, us for our some range and are some range is our total monthly pay. And then it's going to start giving us a number of different criteria to work. So our first criteria, of course, is the range of cells that we want evaluate. And that's our region. Oh, I almost forgot. We need to highlight thes and press F four again to make them an absolute cell reference so we can copy our formula down later and have it refer to the same cells. Still, and our criteria again is east, and then our criteria range Number two is our monthly target whether it's been hit. So we'll highlight that and press that for in the criteria for that is yes, we'll click. OK, copy our formula down and then we can double check the 2nd 1 as well. So here we're looking for the West region. We have three reps in the west region and we have to who have met there. Monthly Target $2600.3000 dollars for a total of $5600. So we also see that this summits formula is correct. So to summarize what we've done here again, we used of some if formula, to determine the some of this column based on one criteria, whether they're in the East region or the West region. And so this roe calculated the east region, and this road calculated the west regions total monthly pay. Then we got a little more complicated with a some ifs formula where we first said, We're going to take the people in this top row from the East region as our first criteria. Then we're on Lee going to take the people who have hit their monthly target as our second criteria, and we're going to bring back their total monthly pay of $2800 for this one person. Then, of course, that was for the East region. We calculated the same thing for the West region, so it takes all three of our West region people as our first criteria looks for yes, is as our second criteria, and we see that we have two of them here, $2600.3000 dollars so it does have some of those from that range and comes back with their total of $5600. So that's how you use the sum if formula to add a range of cells if one or more conditions are met in another selected range of cells and for the some ifs to do that same thing with multiple conditions and multiple ranges of cells.
24. COUNIF and COUNTIFS Functions: okay, In this lecture, we're going to be talking about the count If and Countess functions and the count. If and Countess functions are very similar to the summit and some s functions except the instead of adding a range of cells were counting a range of cells based on one or more criteria. So let's look at an example from our sales rep sheet, and you can see that I've added another section down the bottom here with our regions eastern west and then our number of employees per region. So we're basically just going to do a simple count of our number of employees per region, based on the criteria east or west. And then in this section column we're going to counter number of employees per region based on Eastern West and based on the additional criteria of whether or not they've hit their target. So yes or no, and they were just going to count them. And obviously, in a small spreadsheet like this, this would be pretty simple to just look at and doing your own. But if you had hundreds or thousands of entries or employees, then this would be a really valuable calculation to bring back those numbers. So again, this is similar to the summit and some ifs, so this should be fairly straightforward. And it should also help you to clarify a little bit how to do this some if in some ETFs. So, of course, we start with our equal side and we can go to our drop down and there's my count. If become that, we'll bring up our function arguments. Put that somewhere where it's not going to get in the way of our calculation. And, of course, our range is the entire list of cells that we want to count. So that's our region. When we click on criteria and criteria, in this case is going to be the East region. Pretty simple so that we click OK and you can see that in the East region we have to employees, so it's carried to. So that's correct. Copy are for going down, okay, and one thing you'll notice is that when I copied that down, it kept the relative cell placement so it actually shifted it down one level. So we need to correct that by deleting this and re selecting that to make sure that it's on the right region. Another way we could have done that is by using absolute cell references, using their dollar signs as anchors like I showed you in the previous lecture. But it's really important to make sure that you do that so that you're on the right cells. So we'll click enter and in our west region with 123 So that's also correct. Pretty simple, that will do. Our count ifs and basically, when you haven't s added to the end of a function name, it usually just means that you are doing the same function, but with multiple criteria. So in this case, we go to our count ifs, We'll select our region and our criteria. One is still going to be east and then our second criteria ranges whether or not they've hit their monthly target. And then we're looking for people who have hit their monthly target. So we're gonna put it in yes, here and we'll click OK, and we can see that in the East region we have two employees, but only one of them has hit their monthly target. So that's correct. Copy our formula down okay. And we have the same issue with this one. So I'm gonna double click on that and you can see both of my cells have shifted down so I can take these. I like them and shift them back up to where they belong. So we're in the right regions and then hit. Enter again and double check it and you can see now it's on the right regions and again, if you want to not have to do the correction on that, you could either create the formula here from scratch. Or you could just go up here and put in anchors. And if you recall, you do anchors by highlighting this hitting F four like that and it anchors to that and we have the number two for the West region. So we have in our West region. We have three employees, and two of them have hit their monthly target. So that's also correct. So that's how you use the count. If and Countess functions to count the number of employees per region and using multiple criteria to count the number of employees per region who have hit their monthly sales goals
25. VLOOKUP Function: okay. And this lecture, we're going to be talking about thievy Look up function and the view Look up Function basically looks up a given value in a list, and specifically it looks for data or a value in a vertical list as opposed to a horizontal list, in which case you would use H Look up. But because of the way that we generally create lists using columns, the V look up function is generally a lot more valuable than the H. Look up. In fact, a lot of people tell me that V look up is their number one favorite function in Excel. It's useful for looking up part numbers, prices or inventory codes in any large list of numbers or coated info. And a great example would be if you have ah, 100 page catalog of some obscure part numbers auto parts, for example, and each one has an inventory code. You can put that in a vertical list, and you can use V look up to find the descriptions that prices or any other information that you have in your chart simply by finding that inventory coat. So before we dive right into learning how to use the B look up function. Let's talk about a couple of the basic rules that you need to keep in mind while you're setting up this function. Number one. The look of value must be in the furthest left hand column of the table that you're working with or it won't work, so to keep it simple, the easiest way to do this is to put all of your inventory codes or product members for this example in the A column. Then you won't have to worry about it. Number two Formatting and spacing in your look up cells must be exact and must be correct. For example, there can't be extra spaces blank spaces in front of the number or behind the number third in your table array reference. You want to use absolute cell values or even better, create a table with your entire look up array and name it. Then use the name as theory reference. And the reason for this is again that you can refer to the table as your search range. But a table is dynamic, so if you want to add or delete rose from the table later, you'll still be able to find those rows using V. Look up, and if this doesn't make sense to you right now, that's fine. I will go into this as we go. So now that we have some general rules it in line, let's go take a look at our sheet. And I have, of course, made a few modifications to it again. So you can see here we have our good old sales rep spreadsheet, but you can also see that I've added a few things to it again. The first thing I've added is this column a where we have a sales rep number and you'll notice this is in the far left hand column. And if you remember, one of the rules for creating a Villa Cup function is that the look up value must be in the far left column of the table that you're working with. Okay, so I've added that have also, as you can see, have added a number of new sales reps, and that's just to make this a little bit more dynamic. So we have MAWR options to search in RV, look up function, and then I've added this section down here and this is where we're going to actually create our Villa Cup function and be able to enter different sales reps. I DS and come back with their rep name and their total monthly pay using a couple of different V look up functions. So the first thing we need to do before we enter R V look up function is we need to create a table out of this chart, and this is actually relatively simple. We just need to highlight the entire section. I'm gonna go ahead and leave off that bonus because it's really not relevant to what we're searching for in here. And then we're gonna go over here to format as table, click this drop down and you could see it's just giving us aton of different table styles that we can choose from. And I'm just gonna pick the simplest one right here because it actually happens to match the formatting I already have going. Just click that and then we get this important pop up that's asking us Where is the data for your table? We'll have already selected it here, and it's already populated it in this field, so I don't need to do anything more with that. And then this is an important question to my table has headers. And as you can see, my table does have these headers, the sales rep number sales, rep. Month of commissions, etcetera. And I don't want it to include those as part of the search data, but it is going to use those as you'll see in a second as part of the table. So I'm gonna leave that checked. If I didn't have headers, that I would just uncheck this, but I'm gonna leave it checked. I'm gonna click, OK, and it creates my table and I'll click off of this so you could see So it's done to really cool things first, it's formatted my data, just a simple formatting right with these nice bars. But this makes it easy to track across Rose. And so if I want to see where Casey's numbers are, it's easy to distract across this blue grey here to see what's going on. But also it's created these awesome little sore double drop downs, and if I click this, you'll see it has some really great options. Sort smallest to largest, largest to smallest sort by color has a bunch of filters and we're not going to go into tables in this lecture, but just know that tables could be very powerful for sorting your information. Okay, so I'm gonna close out of that. And then one last very important thing we need to do with our table is we need to name it to name it. All you do is click inside the table anywhere, go up to table tools here and you click on design and you'll see over here there's a table name. So I'm gonna highlight this and I'm gonna rename this from table to to sales are just short for sales rep and then be sure to enter to save that. Then if I click off of this, you'll see it just goes back to the home tab. But if I click back in my table, it goes back to the design and it shows my table name in here. That's important because we're going to use that later in RV lika function to refer to this entire table as their data. So let's go ahead and created the look of function. This first column is where we're going to be entering our sales rep I d to bring up the results in these two cells. So we're going to go straight to this cell, which is where we're gonna actually enter every look up function. And of course, we start with our equal sign And I was playing with me. Look up before us was sitting right here. So just to use it right out of the drop down and there's a function arguments box and you can see we have four function arguments for the V Look up function. So obviously it's a little more complex than our good old some formula. But by now you've created enough formulas, and we'll go through this nice and slowly so this will be totally achievable for you. So the first argument here is our look up value. And again, the look of value is gonna be a value that were pulling from the first column of the table , which is our sales rep. I d number. You could see I just titled this one sales rep ideas Well, and so this is where we're going to be entering one of these numbers to bring back these results. So I'm just going to click on that and we're done with that one. Then we go to our table array and our table array again is our table. So we could either select a whole group of cells here if we hadn't already created table or weaken. Type in sales are, which is the name of our title. Or you can just click and drag and select our table and notice. It's just identifying it as the name of the table. Then we have a column index number, and this can sometimes be a little bit confusing the first couple of times you look at it, but once you get used to it, it's no problem. And I'll explain it. We're just entering the number of the column that we want to get the data back from. So if you look at thes instead of being a B, C D E F G, we just changes to a number. So this would be calm. One column to column three column, four column five and column six In this particular table So in this case, we're looking to get the rep name. We're entering the sales rep I d number and in this V look up function. We want to bring back the rep name. So we're gonna look for column B. And the number for that is to because we have 12 So we're just gonna type into and that's all we need for that and the range. Look up. You just have two choices here, true or false, and you're almost always going to use false. So I'm just going to type that in here. Basically what range look up is asking is do you want excel to find the closest match to what you've entered and if we type true in here than excel will find the closest match. And sometimes it's not really what we're looking for. And sometimes if you type true in Excel will bring back some kind of screwy results. And there are of a few rare instances where you would want to use this. But for the most part, you want excel to bring back an exact match for what you're looking for. So you don't get any of those security results, so we put in false, and it's gonna bring back only exact matches for our inquiry. So we click OK, and then you'll see it says N a here, and that's okay because we haven't entered anything in here yet for it to do a V look up function. So let's go to this section and will type in the number two hit Enter and you'll see we type in number two. It goes and searches in this column and finds Carol so that you look up has been successful . Now let's create one for a total monthly pay, because what we'd want to do now is when we type in two, we want to bring back Carol and her total monthly pay little type or equal sign again. Good of you. Look up Goto our look up value, which again? It's gonna be right here. Our table array just type in sales are You can always check over here to make sure that it's correct. You'll notice it's starting to list everything in the table. So one Joe $2000 No etcetera. So that's how I know that I've typed this incorrectly. I don't type it incorrectly. If I just have to sales, then it wouldn't be pulling from my table, so they have to make sure that I get it typed in correctly and there we go. Then we have our column index number. And again it's 123456 is the numbers of our columns and working looking for their monthly pay here. So we need 123 or five column number five and then our range. Look up again. We don't want to need screwy answers or we're guessing answers from Excel. So we're gonna say false when we click. OK, and there we go. So for sales rep Number two, it's Carol and her monthly pay is $2000. Let's go ahead and put it in a couple other ones and make sure it's working, says Report. And says Air Force Bob and he made $2800. It's put in. So there are eight. Sales are up. Eight is Robert, and he made $2600. So if you look up is working. So I know we've covered a lot in this lecture, but the important things to remember are number one. Always put your look up value in the farthest left hand column in order to make me look up work. Highlight your entire spreadsheet that you want to use in your view, look up function and formatted as a table that clicking up here. Remember to click in your table and click design and name your table so that you can enter that into your function. Arguments for you if you look up and then finally remember that your column index number is just counting the columns from left to right. So calm a is one B is two. See his three and so on. So that's how you use the look up to pull data out of a vertical list.
26. LEFT RIGHT MID Functions: okay. And this lecture, we're going to use the left right and mid functions to sort of fixed with string of data into separate columns to make that data easier to read and easier to use for other calculations. Let's look at an example, and I'll explain MAWR what fixed with string means because that's an important phrase to make these functions work correctly. So here we have our good old sales rep spreadsheet. And, of course, I've done some changes to it again. What we've done is added over in the a calm here, a rep i d code and this is our fixed with string. So as you can see, these all follow the same format, and they all have the same number of characters. And what we're going to do is we're gonna take these red by decodes, and we're going to sort them separating them out into these different columns, so out of definition in here and then I'll explain how this works. So you can see here the first number in each of these rep I d codes is the reps i d number . So you can see Janet is rep number one carols to Joe's three Bulbs four. Marcy's five. The second number is the reps initial So J for Janet C. For Carroll J for Joe and so on. The third number is the Wraps region, so we hav e for East and W for West all through the list and then the fourth character is their sales group, So we have A, A, C, B and C. So basically all of the reps are sorted into the sales Group A, B or C. But the important thing about this fixed with string is that each of these codes have the same number of characters, and each character is in the same spot in each string. So they're rep. I decode is the far left. Their initial is the second to the left. Their region is third to the left, and their sales Group A, B or C, is the last one or the furthest one to the right. And that's really critical. You have to have these formatted correctly. If I add a space in here, or if I add another random character, then it's going to throw off the calculation for this particular cell, and it's gonna mess up our sorting with our left right in mid functions. So basically, the moral of the story is look through your data. Make sure that it qualifies as a fixed with string. Typically, these are gonna be like rep I d numbers or inventory codes from a catalogue. But make sure that all of your data is consistent in every cell and that will make your left right and mid functions work better. So let's start by creating a left function to pull our rep I d number from the left side of this reply. Deco. So the first thing we're going to do, of course, is push are equal key. And then I don't think it's showing up right here that I haven't used left for a while. So I'm gonna go ahead and go to our formulas tab, go to text and go to left and click it. That brings up our function arguments box, and you can see this is quite a bit simpler than RV. Look up. So it's just asking for the text that we are referring to, which, of course, is our rep I d code. So we just click on that, and then the number of characters. And again, this is why the fixed with string is so important. The number of characters from the left is just one character. If you wanted to take the one and J, then you would say to characters. But because this is our left function, it's going to find the left most character. And then we're going to tell how many characters from the left it wants to grab. In this case, we just want the rep i d number. So we're just gonna click one and click, OK, and then I'll show you one other trick. You remember how we normally grab this and to rag it down? Well, you could also copy this to the bottom of your list here just by using your skinny plus sign and then double clicking it, and it automatically cops it to the bottom of the calm. And you can see that this left function is working perfectly. It's grabbed all of the ref I d numbers off with left side of our rep Eddie code. All right, so let's go ahead and do a mid function to grab the region code out of the middle here. The east and West out of the middle of this rapid ICO. So again we'll click are equal sign and I'll go to my drop down and look for the mid. It's not in there either. Haven't used it for a while, so I'll just type in mid. I'm just showing you various ways to do these so you can kind of see what the options are and use the one that works the best for you. So type in mid, and then I can either click on it here, or I can just type in the left bracket or parentheses or just sit the tab key and then see normally it would bring up my function argument box. But where I've just typed this end, it's giving me hints here so I could just follow along the hints here to you, and I can get away with not even using that function argument box. So for Mitt, it's looking for the text that I'm looking for, which, of course, is the same cell here. So I'll click that and it's looking for the start number because with mid, you have to designate where in the middle you want to start and we don't want the first digit because that's their rap i. D number. We don't want the second digit because that's the sales reps initial. We want the third digit. So I'm gonna hit a comma and the number three, then calm again. And then it's asking for the number of characters that I want. Well, I really only want that one character. Otherwise it will bring me back the E and the A. So I'm just gonna say one character again. And then you can either manually close the brackets by putting a bracket, or Excel is smart enough to know that it has to add that. So you just hit enter and you could see it brings back the E for Region East. Then, of course, we'll copy this down by double clicking it, and it's doing everything correctly West, last East and West. So that's our mid function. And just in case that was confusing at all, let me go back and show you how to do it with the function arguments box. Just so we're not losing anybody. The equal sign we can go to text or we can go to insert function and we're undertaxed already. So we'll sort down for mid double click mid and it brings up her function Arguments box. And these are the same fields that we were seeing underneath their formula as we're typing it in. The text that we're gonna sort from is right here. The starting numbers is gonna be 123 in from the left. So put in the three the number of characters We just want the one character. So type in one and you can see that it's created the formula exactly how we typed it in before when we weren't using the function arguments box. But this just makes it a little more straightforward. And then we click OK, and it brings back r E. Copy it down by double clicking on the corner. And there's our function copied down, working perfectly. And finally, let's go do a right sort function. It will sort out our sales group, which is a B or C from the right hand column. So again we type equals will do insert function. It's already on text, so I'm going to sort down too, right? There's our function arguments box. Our text, of course, is the same first column fixed with string entry over here and the number of characters noticed. We don't have to designate how far over it is like we did in the mid, because it's just going to start from the very right. If we put two characters than it would bring back E a w A to B. C. But we just want the very far right. So we're just going to say one character and click OK, and you can see it brings back sales Group a double, click it to bring it down and double check everything. And we have a A C B C. So that's how you use left, right and mid functions to sort of fix string of data into separate columns to make this data easier to view and easier to use in other calculations.
27. Concatenate: okay. And this lecture, I'm going to show you how to can captain eight that can. Katyn eight function provides an amazing way to save yourself tons of monotonous data entry . And many Excel users have told me that this is their number one favorite function. So it's taken a cow. It works. So, as you can see, we basically have are same list of sales reps with their monthly commissions. But what I've added in here is their last names. So we have to separate columns of first names and last names. And this is where the concoct innate function becomes awesome. So if you had a list of these names, that was 1000 people long for an entire nation wide or global company. And suddenly your boss came to you and said, Hey, you know what? This spreadsheet is not set up right? We actually need all of these names put together first and last name in the same column. You basically have two choices. You can go in and do it all by hand and spend three full business days doing that, or you can use the concoct innate function. So to use contaminate, we're going to need a new column. So we're gonna left Click here, then we're going to right Click, go to insert And it will add a new column one to the left of the column were clicked on. So we click the equal side and we can just start typing Con Captain eight. And this little pop up just reminded me of something. See what says joined several text strings into one text string. Concoct, innate, basically just means to combine or join. So we double click on concoct innate. And now we're ready to enter formula Click on our first name could control and our second name and then enter and you can see it's taken Joe and Russo and put them together. Now we have one problem here. Don't leave. Our boss is probably going to want a space between these. So what we need to do is double click back in here and go back in between our two cells and we're going to add a space on the way. You out of spaces, you do quotation, mark space and quotation Mark. And then we have to have a comment to separate it from the B two. Any time that you're using text, you contain it within quotation marks so that Excel knows that it's text. In this case, the text that were containing is just one little space. So have our first sell A two, which is Joe Comma two. Separate it, which basically means and right we have our second entry, which is a space which is contained by quotation marks. Comma two, separate it. And then we have our 3rd 1 which is B two, which is Russo. So now when we hit enter, we get Joe Space Russo. Then we click on that, grab the corner and copy it down, and we successfully have all of our names can. Captain ate it so you can see how quick that would be. And if you have a huge list, it would be just lightning fast. You know, let me show you another way to do this. Actually, let me show you two more ways. One way is you can click equals, and you can either go to your drop down here and grab can Captain eight. If you've used it recently, we can go to your formulas bar, go to insert function and find concoct innate, which, by the way, will be under text right here because we are doing a function with text. Do you click on that? Select your first throw, add your space, select your second word and you can see that has the same formula right there. And it even gives you feedback. Here. It tells you how it's going to read when it's finished, click OK and we get the same result. And then finally, one mawr. I'll show you how to do this by hand, using the ampersand. So we type in, concoct innate started with parentheses, type A to, and then we can use an ampersand, which is the and sign or the shift seven key like that. So ampersand. Then you enter your quote space quote and then another ampersand. The ampersand just means can count me and then be to closer parentheses and hit. Enter and you get the same results. And, of course, grab your feel handle. Copy it down, and then you could take your next three days off and go to the beach. So those air three quick ways to use concoct innate to save you aton of time. Grabbing information from different cells and combining them are joining them into one cell in a nice, clean way
28. LEN: okay, And this lecture, we're going to learn how to use the land function. And Len basically just stands for length of text. So the land function just counts the number of characters in a string of text and used by itself. It's not super useful, but used in conjunction with other functions. It could be really helpful. So let's take a look at how to do that. So here we have a very simple rep I d code and the I. D code basically consists of a number in the last name, and what we need to do is separate the last name out so we can just have the rap name in the second column. So first, let me show you how to use the land function. Just account all the characters in each of these cells, and then we'll use it in combination with the right function, which we've looked at before to pull out just the reps name. So over here, if we're going to use the land function, we click equals Elian, and you can either double click on that or you could just click tab, and then we click on the cell, were looking for and hit Enter and you'll see that it just gives us the number seven. So it's just counting that they're seven characters in the string of text. So let's get rid of that and we'll go in here and now we're going to use it in conjunction with the right function. And let's do a quick review on the right function. So you remember how that works. And let's just do this straight from our formula bar Goto formulas insert function. Double click on right, and it's looking for a text. So we click here and then remember, it looks for the number of characters. So if he's rep names were all the same number of characters we could easily just count. 12345 We get hit five hit, enter and it would bring back the name. But you'll see when we copy this function down that is taking the five right hand letters from all of these, and it doesn't work at all. So that's why we're going to use the land function in conjunction with it to sort it out so we'll go back. We'll do right function again, and we still want a two and a common to separate it. And then we're gonna type in the land in a parentheses and a two and Prince sees. So now we're calculating the length of these characters, but we don't want the 1st 2 right. So then we're going to say, minus two. And where we've entered this formula by hand, we need to close our parentheses. We had enter, and it brings back Russo and we copy it down. You can see it's getting it correctly now. So to briefly review that again, we've used the right function to pull the furthest right characters in the string. And then we're taking the length of the entire string, minus the 1st 2 characters to bring back our rep name. So that's how you use the land function in conjunction with the right function to pull out a specific string of characters
29. FIND and SEARCH: okay. And this lecture, we're going to learn about thesis er church and find functions. These two are very similar and can almost be used interchangeably, with a couple of minor exceptions in The main difference between the two is that find is case sensitive and search is not. So Let's dive right in and I'll show you some examples of how to use them and where each one of them work. So you can see we have are same sales rep list. Here we have first names, last names, and I've added back in the region because we're going to use that for our search. So first, let's look at how you use search. Of course, you do your equal sign and to find search, you only have to tape an s. And it's the 1st 1 that pops up. They had a tab and you'll see our parameters. Here are first find text. So what are we looking for? And we're gonna be searching for the word West. So we want to put that in quotes because it's text, and then we enter a comma. And then now it's asking for within which text. So that's where we want to search, which is right here. It's like that. And then you have the option of doing a start number. So if this was a long string of text and we wanted to start at the 10th character, then we would put Tan in here and it would start searching at the 10th. But here we wanted to search the whole string of text. So we're just gonna hit, enter. And so it's giving. It's bringing back the value of one. And what that means is it It found the word West, starting with the first character. If this said Northwest that you would see that it says seven because it's 1234567 characters in is where the word West starts. We'll just put that back to how it was, and we will copy our formula down, and I'm just gonna double click the fill handle and it goes all the way down and let's take a look at what we've got here. So obviously it's saying it found west at position number one in these three cells, and then it gives us a value air in the ones that have east and search will always give you a value error as the result if it doesn't find what you're looking for. So we know for sure that these two cells don't have the word west. Now let's look what happens if we do this with a find function. Just gonna delete thes double click here so I can get into this and I'm gonna delete the search and shaded to find and we'll hit Enter again, Copy it down. And now you see, we get a value error for all of them. And the reason for that is because find is case sensitive and that's really important to remember. In fact, most people prefer using search for most things because find is case sensitive. So if we were to change this to a capital W and copy it down, then we'd get the same results as search because find is looking for that exact match. Has to be capital w lower case E S t. So let me just give you one more quick example of how you can use, find or search. Let's say we're searching for the letter o in these names, so type equals. Find a tab. We want to find. Oh, so we put that in quotes comma within this cell groups within this cell and we hit Enter copier formula down and you can see that in this 1st 1 it found the O at the fifth position in this one. It found the at the second position. This one there are no owes this one. It found the, uh with the second position and this one There are nose, so it brings back a value air. So those are the basics of how you use search and find to find a character or a string of characters from another cell and then bring back of value, indicating what position in the string it's located.
30. MIN and MAX: okay. And this lecture, we're going to look at the men and Max functions and these air Really simple. They just give you the minimum number in a given range or the maximum number and given range. So let's take a quick look how they work. And you could see here we have our sales reps listed and their monthly commissions, and we're just going to do a function to figure out the lowest number in this list of commissions and the highest number. So to do the men function, you just go equals am I am Tab. Select your range. It's basically like doing a some function. Enter and you see it went to our range and brought back the lowest of 2000. And actually, what we would want to do is highlight this f for it to make it absolute value, since we're going to be copying this down below the cells that were referencing course hit , enter and we'll copy it down and then I'll double click on this one and just change this to Max and hit Enter. And now this one is doing the max of the same cells and you can see it's brought back 2500 which is the highest number in the list. And that's really all there is to doing Min and Max Now, the men and the max were very valuable when used in conjunction with other functions. So let me show you an example of how that would work. So here we have a slightly different spreadsheet. What we have is the sales reps and we have various sales reps. But you can see that they repeat through the list and then we have their individual sales numbers, so these would be specific items that they've sold. So Bob sold something for $20. Bob sold something for $100 so on. Now what we want to do is we want to find the minimum and maximum sales numbers for Bob. So we're gonna use the men function, and then we're gonna put a if statement in there so we can sort this whole list just for Bob and leave out Jane and Carol, and we're gonna be creating what's called an array formula. And an array formula is basically a formula in excel that performs multiple calculations, and it always has to be enclosed in brackets like this. Okay, so first we have to set up a cell containing our search text, and that's gonna be the word, Bob. And then we can go ahead and put in our formula, and we're going, of course, start with equals and men, and then tab. And then if so, we're looking for are logical test, which is this whole range? We're gonna click F four toe, anchor it as a absolute cell reference. So if that whole range equals this cell, which is Bob than the value we want to be this cell, we're gonna anchor that text and then enter false and we closed both sets of parentheses. And then we can indicate that this is an array formula By clicking, shift control, enter and you'll see that it's gone ahead and it's searched first. It searched for the If statement so says if the sales rep name over here is Bob, So it's found four occurrences, and then it goes to the men function minimum function. It says, What's the minimum function of the four Bobs? And it finds are 20. So that's our men. Let's find our Max. And I just realized I didn't anchor this text, so I'm gonna anchor that so I don't have to copy the word Bob down. Then we could just copy or formula down. It's gonna flow correctly as men that now we're going to click on it and change it to Max. You could see it does the same thing, so it searches through the range of sales rep names. And it says, if those air equal to D five right here so the sales rep name range. If those were equal to D five, which is Bob, then bring back the this range of numbers. So it's bringing back 2100 2 33 50 And then the Max function brings back the max of those results, which is 3 50 So we hit, enter and we have our 3 50 So that's how you create an array formula to combine multiple calculations in one formula and in this case, using the men and Max combined with an if statement to bring back the minimum or maximum from multiple different sales reps.
31. AND and OR: okay, in this lecture, I'm going to show you how to use the and and the or functions. I'm going to show you the difference between the two, which is fairly subtle. And then I'm also going to show you how to put a little extra power into them by combining them with an if function. So let's take a look at the example were using. We have our good old sales rep spreadsheet here where we have our sales reps, and then we have their monthly commissions. We haven't if function here that determines whether they've met there monthly target of $2100 just comes back with no or yes and then we have their total monthly pay, which just takes their commission. And if they've hit their target than ads in their bonus, and then we have their region and what we're doing now is we're trying to determine whether the sales rep needs additional sales training, and we're first going to use the and function to determine the answer to this just for the east region. And then at the end, we'll add in an if function and nest the and function within the if function to create a more user friendly text answer in this cell. So let's start with the and function we're going to say equals a nd tab, and we're gonna take our total monthly pay. And we're going to say if this is greater than their monthly commission. So that's our first logical test, and the region cell equals East the word East. We're putting it in quotes, so it knows that it's a word that it's going to come back with the answer of True. If both of these logic tests are false, that's going to come back with an answer of false, so hit enter and you can see that it is thestreet gin. But the total monthly pay is not greater than the month of commission, so it's come back with an answer of false. So we'll copy that down and see what we get. And then, of course, we have to double check our answers, and you can see that this is actually not working correctly because the only person that says that's attending the training is the person in the East region who has met there monthly targets, and that's not what we want So I'm going to go back in here rather than saying this being greater than this. I actually need to say if their total monthly pay is less than or equal to their month of commission, let's try that and then we'll copy that down. That looks better. Now, the only person that needs to attend the East Region training is the one person in the East region who has not met. They're totally monthly target. But if this is ah spreadsheet, that's going out to a bunch of employees and they need to be able to see whether or not they are supposed to go to this training. This isn't the best terminology for that. So what we're going to do is we're going to add an if function to this formula so we can add some much more logical, much more user friendly text in here so that people can clearly see whether they need to go to the training or not. So I'm gonna go back into this function, and I'm gonna add an if function that's going to be combined with the and function, so we type in if and tab then we have the same logical argument with the and but then we Atacama here we're just gonna put in our text the value. If true, we're gonna say quote, attend Wednesday training end quote And then he said, Comma, you'll see Now it's asking for the value of false and we're just going to say quote, no training needed End quote. We'll close our parentheses and will hit. Enter, then we'll double click to copy that down, and now you can see it very clearly. Obviously, the West Region reps don't need to do the training, but also the East Region rap that has met there. Monthly Target. They don't need to go to the training either, so there's also is no training needed. Whereas the one East Region rep who did not meet their monthly target it will say clearly, attend Wednesday training. Okay, so that's how to use the and function. And then also, how did nest it within the if function, Let's go real quickly. Look at the or function, and I'll just show you how that works so we'll just go down here, click equals, then type who are tab to open up our parentheses. And if we wanted to do a similar function. We would say if our total monthly pay is less than or equal to our commission or were in the East region so the region equals quote east, then we'll bring back a result of truth toe hit. Enter and we'll copy this town. And this is just to give you an example of how the or function would returned different values than the and function, so the or function will return a value of true if either of the criteria are correct, so you can see that it first brought back our two reps that have not hit their monthly targets and brought those back is true. But it also went to this rap who has met there monthly target and because they're in the East region and that's one of our criteria. It also gave us a true so it was a quick comparison. I'll put our and function right here the same criteria less than or equal to the monthly commission. The region equals east. Copy that down and so you can just compare the difference between the results that you would get from the or function and the results that would get from the and function. But the real power of this comes in when you do it like this and you take it and function, you nest it within the if function so that you can get these really specific and relevant results back to make the function more useful.
32. ROUND: okay, And this lecture, we're going to talk about rounding functions, and I'm going to show you a number of different functions that can be used for rounding. And I'm going to show you one really important thing that rounding does to correct math. There's in your Excel formulas that could otherwise potentially get you into a lot of trouble. So let's take a look at our example sheet here so you'll see I have this broken down into five different rounding functions. We have the basic round function we have round up, round down, ceiling and floor and round up and sealing are very similar and round down and floor very similar. But I'm going to show you some subtle differences between them, so that if you want to use it, you know how to use it. But let's start with the basics of the round function, and my favorite use for the round function is to keep you out of trouble. With math, there's in Excel, and the best way to show you this is just to dive right into an example of this. So let's say that we have two numbers here, so we have 2.9999 and 2.9999 So if we add these two cells together and I'm just going to Goto had and use the auto some and you can either go click on the auto, some on the home tab or you can just click Ault Plus and it will drop the auto some formula right in there. You can see it's highlighted. The two cells were looking for Click Enter. It comes back with a result of 5.9998 But here's the problem. If we click on these two cells and we reduce the formatting to get rid of some decimal places, look what happens to those numbers. When you reduce decimal places, it automatically rounds it so you can see that in the cell. Here it's showing 3.0 but the actual number in this cell is still 2.9999 So when we add this cell plus this cell, the actual answer is 5.9998 So this is where the round function comes in handy. First, we're going to delete this formula. We're going to use our round function equals round and they will tab, and we're going to say this cell plus this cell. So those are the numbers in our equation. Now you notice it's asking for the number of digits. So what it's asking is how many digits do we want it to round two If we're working in dollars and cents that we want to hit comma and we want to hit two because this is the number of digits after the decimal, and any time you're working with dollars and cents, you need this to say two digits because you have the 10th place and your hundreds place for your sense, so you'll notice. Now if I click on this and I changed the decimal places and add decimal places, it still comes out a 6.0 because I've rounded it to the two decimal place. But you will notice if I go over here and I create an equation that says equals this. Plus this and hit Enter that it comes back his 599980 because it's taking 2.9999 plus 2.9999 changing the formatting up here doesn't change the actual number. That is the result it on Lee changes what's displayed in your cell, so you'll notice if I reduce the number of decimals on this. Excel automatically rounds it to the sixth, but the actual number in that cell is not actually six. When I get it out to the full number of decimal places, that shows the true number, which is 5.99980 So this rounding function actually brings us back a solid six. It's still essentially $6. So when working with dollar amounts using the round function conceive you some serious critical math, there's because where we're talking about a percentage of a sent here. If we were to take this amount and multiply it by 100 watts, what would happen now we're off by two cents, whereas if we take this amount and multiply it by 100 where we've rounded it, it's going to give us the correct answer. So six times $6 times 100 is $600 of course we'll change the decimals to make it match. But it without the rounding. We get errors in our math when it comes to dollars. So that's an example of how to use rounding to fix your math. There's now let's look at another example where we're using a percentage, and this is basically the same issue. We'll go with our equal sign and we say Sell a three times Selby three, which is 29% and it comes up with 0.8671 Now again, if we change the decimals and reduce down the number of decimals to to, I noticed that it rounded it up 2.87 or 87 cents, because it's taking 870.8671 and it's rounding it 0.87 So what we need to do to fix it again to see is the round function and C equals round. And then we can take the product of $2.99 times 29% rounded to two decimal places. Hit, enter and it gives us the correct amount of 87 cents. And then one more thing, I'll point out to you. As far as the round function goes, you'll notice that I've been using the regular number, which is our math equation, and then the number of digits and I've been putting 22 is the number that you always use when you're using dollars and cents. But if I change this 20 I could go with whole dollars when I hit enter rather than being 87 cents, it rounds it up to a dollar so you can enter in whatever decimal place you want to go to. If I wanted to just go to the tens of sense that I can hit the one and it'll round it to 90 cents and of course I could make this look more like 90 cents by extending the decimal over and then it looks like 90 cents, and it works better when you have larger numbers. But if I have, for instance, $245.565 dollars, but if I'm adding these two numbers hit enter, then I get $810. But if I want around this to the hundreds that I can actually do around function, then I add the two numbers. Then I go to my number of digits, and if I say minus two and enter, you'll see it rounds it to 800 because it's rounding it to two places to the left of the decimal. And again, if I I'm do that with just the regular Matthew, see that it comes out to 8 10 And if I redo it with the rounding to minus two decimal places, you can see it rounds it to minus two. I could even if I wanted to round this to minus three, and you'll see that. Then it rounds it all the way up to 1000 because it's rounding to the third place to the left of the decimal. So those are the two essential parts of the rounding function. You have your number, which in this case, we're entering as a mathematical equation. But you could just be putting on a regular single number and then the number of digits that you're rounding to, which is a positive number, a negative number or zero. Okay, so let's get into the roundup function. The difference between the round up and the round is that rounding will naturally round up or down according to the standard mathematical rules. So if we do a rounding function on this and we around it to zero digits. You'll see that it naturally rounds that down. Let me copy that formula down and you'll see that it naturally rounds this one up cause $2.15 is less than $2.49 and $2.75 is more than $2.50. And that's the normal rounding rules in math. So watch what happens when we change the use to round up, copy the formula. And now you see that it's taken the $2.15 and forced it to round up to $3. Of course, will change this formatting so it looks like dollar signs. Then there we go and round down does exactly the opposite. So we already cools around down Tab. Take your number and a number of digits. We're going to zero round it to the whole dollar hit, enter, and then if we copy it down, you'll see that it forced the rounding of both of these down to $2. Now let's take a look at what ceiling and floor ceiling is basically the same as round up with one subtle difference. So let's do our ceiling on this is it to have go to her cell at the comma and you'll notice now, instead of saying number of digits, it's asking for the significance, and the significance is what number increments you want to round two. So if we want around to the fives will hit. Enter, you'll see that it takes us $2.15 and it rounds it all the way up to five. Now we could change that toe ones and you'll see that it takes the $2.15 and rounds it up $1.23 or we could change it 2.5. You'll see that it takes the $2.15 and rounded up to 2.5. So that's really helpful if you need to do your rounding in increments other than hold numbers and you'll notice for copy this down. So where this rounds up to the half dollar, essentially to the to the 0.5, the 2 75 rounds up 750.5 as well. 23 and then the floor works in the same way that the ceiling does, but it's going to round down instead, but using increments, so we get a floor tab. We choose our number and then we pick our increments or are significance. Let's say we want to go to the $1 increments. Then you can see it rounds down to $2 and same with the 2.75 It's going around down to $2. Let me reform at these, so it doesn't bother me. There we go, and the ceiling and floor can be pretty much as extreme as you want them. So if I want the ceiling to go to the to the twenties, then it's going around to the nearest $20 increment. Or, if I wanted to go to the nearest hundreds, that's going around to the nearest $100 income it. But more typically you would probably be in the range of the single digits or the percentages of a number like 50 cents, and I'll show you one more example of how the ceiling and floor could be effective. You could use round up round down for this is well, but if we're doing, say, retail dollars, if these air wholesale prices in a retail store and you want to double the price and then change the ending to, ah, 99 cents, for instance. Then we would take equals ceiling. You take our $2.15 times two, we got around it to the whole dollar closer brackets. And then we're gonna add one more math equation and say, minus 0.1 which is basically minus one cent copy this time for the number below. And so it's gonna take our $2.75. Multiply attempts to and give us $5.50. Then it's gonna round it up and take one penny away. So that would be a really quick way to create a bunch of retail prices out of a huge list of wholesale prices. And I'll just let you take a look at that formula again. So has our original number times two the significance. It means the number that we're rounding to us. We're just net rounding to one whole number and they were subtracting one penny and we could actually change this to 50 cents if we wanted to buy having 500.5 hit enter and then it would round it up to 5 49 and we could do the same thing with the one above. So that's how you can use five different rounding functions and also a couple of ways that you can use those functions to fix errors and also save a lot of time doing calculations.
33. Conditional Formatting: okay. And this lecture we're going to be talking about conditional formatting and conditional formatting is really cool because you can basically apply a format to a bunch of data, and it will either color code it or put little icons on it. And it will give you a really strong visual indicator of the values in your spreadsheet. So let's take a look at an example here and you'll recognize our good old familiar sales rep spreadsheet. And what we're going to do is apply some conditional formatting to their monthly pay here just to make these numbers stand out. So we can really see whose numbers are high, whose numbers are low and so on. So first we're gonna highlight this data, and we're gonna go appear to conditional formatting. You see, we have a number of options. First, we have the ability to set some rules, and I'll show you how to do greater than or less than rules using this feature. We have top to bottom rules so you can do like top 10 items, bottom 10 items and so on in a larger list. And then we have these three presets, and these basically just allow you to apply either data bars, color scales or icons to your data. So we're going to start at the top here and go create a cell rule we're going to go to greater than. And it brings up this nice little dialog box, and you can see that Excel has already sort of analyze the information in here and made some assumptions about it. So it's assuming that we probably want to see all of the cells that are greater than $2500 you can see that includes three of these, and the other two are not included, and then it also just has a default color. So it's gonna add a light red fill with dark red text. But we can change this number if we wanted to. We could say anything higher than, say, $2700 which would rule out this middle one. But that's actually a pretty good number. So we'll leave that there and then you'll see that there are other options for this as well , so we could go with the yellow go just read text. We'll just go with the default for now and I'll click OK, And then when I click off of it, you see that the conditional formatting has been applied and you can see that it makes these numbers that are over $2500 really stand out. So let's undo are highlighting rule here, and we'll go back into our conditional formatting and check out a top and bottom rule. So let's go ahead and go with the top 10 item, and obviously we only have five items here, so we're gonna change this. We're just going to go to the top two, but we'll do the same thing. Same color. Do the light red filled with dark red text click. OK, and now you'll see it's done essentially the same formatting, but using a different rule. It's just picked out the top two in our list. So let's select this again will add some more formatting. Now, the cool thing is, you can add multiple conditions to your formatting. Let's go into our presets here will go into our data bars, and the nice thing about these is you can hover over them and it will preview it for you. So these are all just different colors that it applies These are all Grady int, and these are all solid, so you can see what those look like. I don't need to click on them, but while we have this top two formatting in the red laid on their let Me jump to the icon sets and show you what we can do with that. Because this is a case where we can apply multiple formatting without too much overlapping , basically muddying things up so you can see you have arrows, shapes, indicators and ratings. Let's just go with a simple example of directional arrows so you can see when I hover over this. In fact, I'm going to click on this. You can see that now. What it's doing is it's taking the top two and doing up Green Arrow taking the middle and doing a sideways yellow arrow. It was taking the bottom two and doing a downward facing red arrow so you can see how this gives you a really strong indication of the different values in this range, and it compliments fairly well with our top two in red here. So now, to get rid of some of this formatting instead of just clicking the undo button, which doesnt work to go all the way back to something that we did a long time ago. We'll go back into our conditional formatting, will say, manage rules or you can say just clear rules if you want to just get rid of them. But we're going to go to manage rules because we're just gonna get rid of one of them. And so you can see our two rules that we have set up here and all we have to do is pick one and elite rule. And okay, so now it's taken away our top two red ones, and it's just left our icons. So let's go back in to do some or formatting. We looked at data bars. Color scales are similar to data bars, but they just add, Ah, full color. You can see they basically sort according to value so that so color scales work. Now let's go look at a new rule, and we can actually create a formula to make a determination about what sort of formatting we're going to have in ourselves. And the style Lockbox gives us a number of ways to modify the rules, but we're gonna look at this one at the bottom use of formula to determine which sells to format. And then we're going to go in here and we're gonna add a formula that's going to determine how these air formatted. So we start with our equals and we're going to use the function of, and parentheses were going to say E to equals Quote. West Comma and D two is greater than 2500 close parentheses, and you can see it's showing that there's no format set, so we have to go into our format now. We could form according to number fault, border or fill. It's good with a bright yellow just so it stands out and we'll click. OK, and you could see the preview here and we'll click. OK, and now you can see that what it's done is it's used our formula to pick out on Lee the West region and on Lee the sales numbers that are over 2500 in the west region. And if you want to look at that again, we can go to our conditional formatting back to her, manage rules and you'll see our rule is right here. We click on that and go to edit rule takes us right back in here where we can change this to less than 2500. Click. OK, and now it's only applying the conditional formatting to the west region that is under 2500 . So that's how you apply conditional formatting to cells and where conditional formatting becomes really valuable is your ability to apply it to the cells to make it visual, but also to sort your data according to that conditional formatting. So, for example, I'm gonna take this range here, and I'm going to turn it into a table. Okay, I'm going. Apply some basic formatting to it. Click OK, you can see that it's added these drop down arrows. Now, if I go to this, I can now go to sort by color, and I could sort by any of the conditional formatting that I have on here. So if I want to sort my red arrows, I could do that and it brings my red arrows to the top. I want to sort by green arrows. I can do that and it brings the green arrows to the top. So when you think about this when applied to a gigantic spreadsheet with thousands of entries. For instance, thousands of sales reps from the East and West regions. If I wanted to find on Lee the sales reps that are in the West region and have sold under $2500 for this month, that I could just go to sort by color go to my conditional formatting that applies to those sales reps. Click on it, and all of those that are highlighted in yellow are gonna jump to the top, and I instantly have my results. So that's how you use conditional formatting, not only to apply strong visual formatting to yourselves, but also to use that formatting to quickly and easily sort through your data.
34. Intro to Charts and Graphs: okay, In this section, we're gonna be talking about how to create charts and graphs in Excel. In this first lecture, I'm just going to show you some of the possibilities with charts and graphs and give you an introduction to the ones that we're going to create in the next few lectures and I'll walk you step by step through creating your first shirt. So if you look up here in the left hand corner of this spreadsheet, you'll probably recognize our kitchen remodel cost worksheet. The only difference is that have taken the grid lines out of our worksheet just to make our spreadsheet and our charts easier to look at. And by the way, the way that you do that is just by going to view and clicking grid lines and C, they pop back up or I can click good lines and they go away. So what I've done is created these three charts based on our spreadsheet, so you can see this 1st 1 here is basically just the cost of different materials. So we have the materials across the bottom, just like we have in our first column, and then we have our total costs laid out into columns. The awesome thing about charts is that it makes all of your data very visual so we can look down this column and kind of pick out some things and see that flooring is our most expensive. Cost cabinets are next. If we look around some more, we'll see that the fridge is the next expensive thing. Or we can create a chart like this, and we can really easily see that are flooring. It's the most expensive thing that our cabinets or the second a matter of fridges the third . And so this is a column chart which will show you how to dio. And then next year is a pie chart. It's just a circle that's divided into segments representing each of the materials in her chart. So all of our materials here are represented around the outside, and in this case, instead of having the cost of different ones listed in the chart, we have the percentages of the total cost for each one. So again we can see that are flooring is 41% of the entire cost of the remodel, and then when we go over to paint, we can see that it's only 2% so this gives you a really great visual breakdown of your costs. Finally, we have essentially the same chart as this 1st 1 over here, but this one is set up as a bar chart. So where data is represented horizontally and the nice thing about a bar chart is, it makes it even more clear the differences in any value so you can see how flooring really stands out because this bar extends so far across the page, whereas this one does still stand out. But it's not quite as dramatic as this, and you can see all the way down to, like the Cabinet handles and the paint would each one costs and how each item relates to the rest of the items in the list. So let's just start from scratch with our kitchen remodel costs worksheet, and I'll show you how to create your first shirt. And probably one of the hardest things about creating charts is deciding how you want to represent your data. For instance, if we were to have a chart that listed are materials and then the quantity of each material that might not really be that beneficial to us because it's not necessarily going to help you in any way to see a chart that shows you that you're going to have 24 Cabinet handles and 400 square feet of flooring. On the other hand, if you want to compare costs of each material to each other to see which parts of your projects are going to be the most expensive, then comparing your total cost for each material makes a little bit more sense. So before you go to create a chart, look at your data and really think for a minute about what you want to represent. So in this case, we're just gonna work with materials and our total, and there are a couple of ways that you can use the data like this. You conform at it as a table, which will talk about another part of this course, or you can name it as a range, and the way you do that is you select the entire range that you want to work with. Click up here in the name bar, Name your range, Coz Kitchen are for kitchen remodel and hit. Enter. Then, if you click off of this and selected again, you'll see that the name of your range pops up there, where you can just select your range, go to insert and click on charts. Now you can either pick from one of the drop downs here, which will give you a little preview each chart type. Or you can click on this era, which will bring up a dialog box where you can go to the recommended charts tool. I like the recommended charts tool because it will give you ideas for what it thinks will work best for you. And in some cases it's not very helpful because, like in this instance, I have the quantity and cost included in this range. And so it's trying to figure out how to calculate the quantity and cost along with the total. And some of these charts don't really make that much sense. But typically, if you if you have a kind of tight range that is relevant only to the chart information that you're going to present than the recommended charts, tool is generally pretty accurate and helpful. I'm gonna go to all charts. I'm just gonna choose a column chart and even though this looks kind of funny right now. We're gonna change it so that it's representing the information that we wanted to represent and I'm gonna show you how to do that. So I'm gonna just click on that and you notice when you hover over it, it gives you a really nice close up of it so you can see what you're getting into. But if selected, that one and I'm gonna click, OK? And that's just gonna automatically create a chart. Now, you can see once this chart is created, it is showing which sells its using out of my range for the different things in this chart . So I'm gonna show you how to change that. So first I'm gonna shrink this chart down a little bit so we can kind of fit everything in here where we want it, and then I'm going to right click on my chart and I'm going to go to select data. We'll just pull this up here a little so you can see first we have a chart data range, and that's referring to my whole range, which is just what I want where I don't need to calculate the quantity and the individual cost of each item. I just want to do a chart with the entire totals of each item that I'm gonna go ahead and go in here. I'm gonna take the quantity and the cost, and I'm going to remove those. And then the other thing I'm going to do is I'm going to switch the rows and columns, so actually want the total cost of my materials to be in the vertical column. And I want all of these items to be in the horizontal calm so each of them will be represented differently. So I just click this and it will switch those back and forth and you can see how that's changed things. So I'm gonna go ahead and click, OK, now I can expand this a bit to make it look a little better. And now you can see we have a really clear representation of our flooring costs or cabinet costs, cabinet handles and all of the different materials that we have in our spreadsheet, and that gives you a basic chart representing the differences of the costs of each of your materials. And the next lecture will look at some tools for formatting this so we can change the colors and different elements of it to make it look exactly like we wanted to look.
35. Formatting Charts: Okay, So in the last lecture, we learned how to create a chart, and we used our kitchen remodeling costs worksheet to create a chart in this lecture, we're going to learn how to format that chart, working with colors and the various elements of the chart to make it look great. So let's jump right into where we were in the last lecture. We took our kitchen remodeling costs worksheet, and we just created this very basic chart that has all of our different materials here and there. Total costs. And now we're just going to clean this up a little bit and make it look a lot better. So the first thing I want to do is I want to make all of these bars different colors because I want to make this chart look a lot more like this one. But before I start actually making any changes, let me give you a quick tour of this interface here. So if you click on the chart itself, you get this little four way arrow, and that allows you to grab the chart and move it around. If you click on any of the elements within the chart, you could edit them within that area. Same with all of these other areas, even the grid lines. You can click on them and it highlights, um and allows you to edit it. You can also go to these three items here and click on them to do modifications there. And if you hover over them, it will show you exactly what that aspect does. And then they all have dropped down arrows to which give you more options. So this is your title, which is right here. And if you uncheck this, the title will just go away. And if you re check it, it'll come back and then you have options. And you could just play with these. See, that makes it overlay the chart that makes it above the chart. And then you can even click on the more options for a lot of different options. So those are some things you can play with, but what I'm gonna do is turn this off and start doing some modifications to these things. So I was talking about first changing these columns to make them color just to make them look better. So we go into this paintbrush here, and it gives us styles and colors. So you'll see. Here you have different options that you can use for styles you can scroll down and they're a bunch of different options, and then you can go to the colors, and this gives you different options for colors. So these are all based on the Excel theme that I have set up for my page right now, so those are a few different options, but you'll notice that every color I'd choose it just keeps all of the columns the same color. And that doesn't have so much to do with my color scheme as it does to do with this particular field. So I'm gonna go out of here, actually, so I'm going to click on this, and this is called a data Siri's. Make sure it's highlighted, and then I'm going to right click it, and I'm going to go down here to where it's this format data Siri's and that's gonna bring up a formatting pane and you'll see these a lot when you click on various elements throughout the chart. And while we're in here, I'll show you a couple of cool things. This is called gap with, and that's going to change the spacing between my columns and it will actually do it right after I release it. So I'm just making my columns wider just to make give them some more bulk and then I'm gonna go appear to the fill color. So we have Phil with effects and we have serious option. I'm going to go to the Phil and if I go down here Oh, it's not there. I have to do one more thing before I do this after, right click on my chart, go to select data. And if you remember, before I unclipped the quantity and the cost because we only wanted to create a chart based on the total. But I left the quantity and cost entries in this legend entry Siri's area, and that's not allowing me to change the color of the data. So what I'm gonna do is just click on these and click remove, and now I only have one entry in here, and it's gonna work a lot better. So I click OK and I could go back and select my data. Siri's again right click format data Siri's and it brings up this panel. Now I can click on Phil and you'll see it says very colors by point. And if I click on very colors by point, do you see that it makes he's all different. You can also see that it inadvertently added the legend back in there. But that's OK. We'll take care of that. But now, if I close out of this and go to my colors, I can play with these color schemes and get some different colors. And this 1st 1 is the one that I'm looking for. So I'll just click on that, and I can close that out. Then I'll go in and just click on the legend toe, highlight it and click Delete. Or I can always go to this chart elements pop up, go to the legend and uncheck it and you'll see it disappears. The next thing I'm going to do is rename my chart, but I also quickly want to show you another tip. I showed you how to grab and move the chart, but you can also grab these buttons in the corners or on the side, and you can stretch the chart to resize it. And that makes it really handy to fit it wherever you want in your worksheet. So let's go in and change the title on this and you click it once and then you double click it and that will put your cursor in there. And I want to make this called cost of different materials, and then I can double click on it again, triple click on it to highlight everything, and you can change too bold, any other kind of text formatting, or you can change the size of it and you'll notice when I do this drop down and I hover over these different sizes. It gives you a little preview of what it's gonna look like. So I'm gonna go with 16 and just click off and you're done. Now. There are a couple of other things I'm gonna clean up on this just to make this a really clean, sharp looking chart. The 1st 1 is these grid lines in here, and if you hover over them and click on them, you'll notice that highlights some with these little beads. So from there I could just hit the delete button, or it could always go into my chart elements as before, and I can either check it or uncheck it. I'm also going to get rid of this. This is my vertical value access and I just go to here and I could go to the drop down and this is my vertical and I could just uncheck that box and that will get rid of it. Now I just need one more thing, and that is my data labels, and you can see when I hover over this it already pops up a really nice version of the data labels. But I'll just show you real quickly that they're different options you can use, like centering it, putting it inside the end of the column inside the base of the column outside the end of the calm, which is the one I like for this particular chart. So we'll go ahead and just click on that, and thats done. So now we have a nice, crisp, clean, bright formatted chart that creates a nice visual representation of the total cost of different materials, so that's how you form out a chart. Next, we'll look at how to create a couple of different kinds of charts
36. Create a Bar Chart: okay, And this lecture, we're going to create a bar chart, and we've already created a column chart. And then we've spent a little time for Madigan and cleaning it up. So we're going to use those skills that we just learned to create a bar chart. So we're going to make a chart that looks something like this, and you can see it's basically has the same data as our column chart, except that it's horizontal. And the good thing about a bar chart is that it makes the differences in the values more pronounced so you can see that the flooring really stands out as being the most expensive thing, whereas the Cabinet handles are very short. So they stand out along with the paint as being the least expensive. So let's go ahead and dive in and create one of these. Of course, we start with our basic kitchen remodeling costs worksheet, and we're gonna highlight the data that we want in our chart and remember how we had highlighted this whole range and then I had to go into the select data and delete the quantity and the cost. Another thing you could do to avoid having to do that. It's just select the exact data that you want by selecting the first column and then holding down the control button and selecting the second column that we were just getting the data that we want and not getting the data that we don't want. Then, of course, we go to insert and charts, and we'll just use our recommended chart two again and you'll see it's going to recommend a bar chart. Because our data was a lot simpler for Excel to interpret, it was more easily able to come up with a relevant chart. So it's got this clustered bar chart, which is exactly what I wanted to show you. We'll click OK, and there's a chart and we'll just go in and modify. This is that. Call this cost of route materials. Make that a little bigger going and take out these grids but hitting delete. Take out this bottom access and we'll just go with a green. And remember, if we wanted to change this so that these were all different colors, we'd have to go in select on these right click go to format data. Siri's good to fill and very colors by point. So now it's created Grady it based on the color scheme that I selected right here. If I went with one of these multicolored ones than it would be all different, we're going to stick with the green. And in fact, we're going to get rid of the Grady int. So we're gonna keep all the colors the same. But we are going to go to the gap with, and we're gonna increase the gap with the bit to make him a little thicker. There we go. So now we have our chart pretty well cleaned up. We need to add in our data labels. Perfect. Okay, so we have a pretty good looking chart now, But the one thing I would like to fix, which I don't love, is that these numbers are all sort of out of sequence. So we have a small one down here, a small and appear big one in the middle. What I want to do is make these nice and orderly, so they follow a nice trend. So what I'm gonna do is I'm going to sort my spreadsheet over here. We could have put this into a table which we'll talk about later in the course. But in this case, we're just going to use a simple sort tool. So you can see I've selected all of my data, including my headings all the way down, not including my total and notice. Right now these numbers are all out of order. So I'm gonna click on sort, and this says our columns sort on and our order and notice. Also, this says my data has headers. I leave that checked because you can see it's recognizing that the headers are not part of the data that's to be sorted. So first I go by the sort by value, and that's giving me my header titles, and I pick which one I want. So I want to sort by total Click that and then I say, sort on and you have various options. Here. You can go buy, sell color font color, but we're just going by values, right, because those are the numbers in the cells. And then, in what order do you want to sort your data and I'll give you one tip here. If I sort this by largest to smallest, that's typically how you would want to look because you want your biggest number on the top of your smallest number on the bottom. If I do that, the chart is actually going to invert that. So if I go in here and I click smallest to largest and here, then it's gonna look exactly how I want it to look in my chart. So I'll do that and I'll click. OK, and then you'll see that my chart has responded to the sorting, and now we have a nice, clean visual of our lowest cost toe highest cost items from our spreadsheet, and one last thing we could do to add even more emphasis to this trend here is we could go back into this status Siri's click format data. Siri's go back to our fill and go back to very colors by point like we were doing before with our other chart and click that notice. That doesn't look awesome, because the largest bar is the lightest, which is not what we want. So we get out of that and we'll go back to our colors. You can see right now I'm selected on this Grady int from darkest to lightest. But if I scroll down a little bit more has the same colors, but with ingredient from lightest to darkest, so we can select that one. And now we haven't even stronger emphasis toward the most expensive material from our chart . So you could do that, or you could just leave it as a simple, clean bar chart. So that's how you create and form out of bar chart.
37. Create a Pie Chart: Okay, So in this lecture, we're going to learn how to create a pie chart. We've been working on creating column charts and bar charts and formatting our charts to make them look a little sharper and cleaner. And now we're going to use those skills to create a pie chart that looks, that looks pretty much like this. So let's go ahead and get started making this chart. So here we have our kitchen remodel cost worksheet and the bar chart that we created. And I'm gonna actually show you two ways that you can take this same data, the same chart and turn it into a pie chart. One way would be to create it from scratch, and I'll show you how to do that. Another way is to use an existing chart and turn it into the chart that you're looking for . And one awesome trick is that you can actually copy this whole sheet here onto another sheet and then just use that as the basis for building your new chart So we can just go down here to the tabs for the sheets and I'm gonna left Click this and I'm going to drag it over here and then I'm gonna push control. And then when I release it, it just copies it over. And now it names that bar chart version two so you can see there's the original one there. So when I'm on and they're exactly the same, so now I can go in here and I'll change the name on this. The pie chart hit Enter and its copy doesn't other sheet. Now I can go into this and I'm going to right click on it and I'm gonna say, Change chart type. I'll go to pie chart. Excuse me, that one option and I'll click. OK, and presto, it's a pie chart Now. Granted, this needs a little bit of formatting to make it look good, but the title has already formatted, and a lot of the details, like the legend being taken out in the color scheme, is all the same, as well as the data that it's drawing from. So that's a great way to short cut a lot of effort, and then we'll just do a little bit of formatting and clean this up and we'll be set. So that's kind of the shortcut. Now let me show you how to create a pie chart from scratch. So I'm just gonna click on this and delete it and we'll go back and will select our data and we'll go to insert. And in this case, we just want a pie chart. So we're just going to go straight to pie chart and we'll move this up here to make it easier to work with. We're going to get rid of our legend. We're going to rename this to the cost of different materials changed too bold. Increase the fault. You remember all this, right? There's that. Actually, this is a pretty clean, sharp looking chart already. So all I really need to do is go to my chart elements. And of course, I want my data labels and I'm gonna go to the drop down. There are a couple of options again. Center inside and outside, and best fit data call out. Well, we go without with outside and again. It's just the cleanest in this situation. Close about. We can go to our colors and I do like this color scheme, so I'm gonna go with that, and I actually like that this has the white borders in between each one. But that's something we could modify as well if we wanted to. We could highlight this data Siri's and go to the border and say, No line, solid line ingredient line and we can play with these a little bit sewage radiant line does . We can do solid line, which is fills it with color. It's also kind of nice or weaken. Do never line, which is sort of the simplest. So we'll stick with that for now, because simple is usually better. So one thing you'll notice with a pie chart is that the smallest slice starts right here at Vertical, and then as the slices grow, they move around the chart until you get back to the full 3 60 And there's something about that that makes it readable and kind of easy on the eye. But I want you to know that you do have the option of rotating at us well, and the key would be, if you do rotate it, you want to make sure that you find a logical reason for that, or that the visual results are somehow better than this default setting and one example of a reason might be, and this is a mite because it's not always gonna improve your situation. But where we have all of this data up here and it's kind of clustered in here, we may want to rotate this chart to pull all this over to one side to make it easier to sort and easier to separate out. The other option would be to consider moving the title to a different spot. So let me just show you what it's like if you rotate this. What we do is a click on the data Siris in here we right click go format data, Siri's And in the Siri's Options here, which is under this bar chart icon, you have the angle of your first slice so we can take this and we can rotate it. And whenever I release the mouse, you'll see that it moves it. And so you'll notice by looking at this that having the logic of the charts start way over here, it looks a little off centered or lopsided. It looks a little off balance, so that's the drawback of rotating it. The benefit is that you can see that already without any formatting these numbers are lining up better, so it could be possible to find a place where you could line this up. That would work. We'll just kind of rotated around a bit to see if there is one, like maybe right there. And in fact, if we look back at my example, it didn't take into account very well the angles and the layout of the chart. But it did take into account where all of these labels belonged and where they would be most comfortable. So that's a decision you just have to make as you're creating your chart. So for now, let's just put this back at Vertical. So we're starting with our smallest piece and working around to the largest, and we'll go from there while we're in here that I'll just show you another thing called pie explosion. So if we move this little bar a little bit, you can see that it actually breaks the pie part and spreads it out, and in some cases this can help you to really differentiate the different pieces that it just depends on what kind of data you're trying to represent. So we'll put that back to normal and then I'll go ahead and manually move these to give them some more space. So what you do is you click on them and then I'm just gonna drag this out of the way. You see that the little line follows it out. Now click on the next one and do the same thing, moving into more of a comfortable space, and then I'll move this one. And then finally, this one is to give all little space and we'll click off and you could see. Actually, that's not too bad that that does not feel super cramped, so we'll just move these a little away, too. So they have the same kind of spacing, the same feel, and so they have the line to make them consistent. And there we go Now. One other thing you could do is we could take this chart title and we could just grab it and drag it down over here. And I could even put a carriage return or hit the enter key here that I could highlight this and left justify it to drop it over into the corner, that I can take this part of my chart and I could either. Just I could expand it to make it bigger and or I congrats, the whole thing and just move it up so something like that, and then probably take this and move it into the chart just a little bit. So it's more comfortable, so it's not cramped on the edge and click off. And there you go. So now we have a pretty clean looking chart. Our title is in a nice open space over here so that all of these little guys have room to breathe, So you can really see the numbers, Okay. And one final thought is that the purpose of a pie chart is to show you how all of the pieces of the whole come together. So you have 360 degrees starting from here all the way around to create a whole The numbers air. Fine, because they do tell us, you know, that these air inexpensive materials and these are expensive materials. But it would be even nicer to have either the material name labels or the material name labels and percentages. So we're going to click on the data format data labels, and then we're going to go over here to this, the label options click on that and we have label options here, which is a drop down, and this gives us all of the options for where we want this information come from. So what we actually want here is the category name. We want to get rid of the value. So instead of having the values, we're gonna have a percentage to show the percentage of the whole click on that and they will click back into our chart. And now you can see it's giving us even more detail here now, because it is giving us more detail. We are now running into the issue of needing more space. So we are gonna have to move some of these out a bit more to give them a little more room. More like that. Now, the pluses and minuses to this arrangement is that we have the percentages, which is nice to be able to see because those values are very relevant to the information that the pie chart is trying to tell us. But we also have the issue of it becoming a bit muddy now and almost having too much data in the labels. One solution to that would be to simplify our material labels France with paint per gallon . We could, either at another row that indicates that it's per gallon or we could leave that off. But if we went in here and we took away some of these labels some of the complexities of the labels, then you can see that really cleans up our chart and simplifies things a lot. So that's how you create a pie chart from scratch. And those are some options and ideas for formatting. Not only your labels, but the arrangement and colors of your chart. And remember, you have some options. You can either taken existing chart like this bar chart, and you can click on it and then right, click and go change chart type and then select your pie chart and you can go like that or you can create it from scratch. I'm gonna undo this. You need to remember to go down here to your sheet, and you need to click it and drag and control and then release your mouse to copy that sheet so that we could change this to a pie chart. You can still go back to your bar chart without destroying it or basically overriding it. That's how you create a nice, sharp clean pie chart, which shows the percentages of the costs of your different materials.
38. Create a Line Chart: okay, And this lecture, we're going to learn how to create a line chart. So far, we've learned how to create a column chart, a bar chart and a pie chart. And we've learned some tricks and strategies for formatting and making our charts look nice and sharp and clean. And now we're going to create a line chart. So I'm going to go ahead and create a line chart out of our existing spreadsheet, and then we're gonna create one from scratch from a different spreadsheet that includes dates. And the reason for that is because line charts are really best suited to demonstrate or represent data that is spread over time because it shows the progression or the change in that data over time. So let's go ahead, and I'll convert this into a line chart and show you what that looks like. And then we'll go ahead and dive into this other spreadsheet and I'll show you how to make a line chart from scratch. So we right click on this and we go to change chart type. And of course, that brings us to our chart. Pop up and we'll go to line chart and there are a number of choices here, but the only one that really is going to apply is gonna be a basic line chart. Because we only really have one set of data. We're going to go with that click, OK? And it's changed it Teoh a line chart so you can see that basically, this is showing the progression of costs from the lowest to the highest, and we'll go ahead and change our colors, give it a little more juice, and then we're gonna also change the elements here. We're gonna put a vertical axis in here, and we're gonna take off our data labels just so we have a cleaner line here, and then we're going to go into the spreadsheet and we're gonna take out all of those little descriptors in parentheses. So it just makes a nice, clean chart at the bottom there. So that creates a pretty clean, simple, sharp chart. One more thing, we're gonna do those. We're gonna go in here and we're gonna format this axis. See how this line starts way in here. And this one stops way in from the edge. We're gonna expand that out a little bit. Just to make it. Philip the space a little better, and that's in the format. Axis tab. I brought that up by clicking on this bottom axis, the horizontal axis. And if we click on the Axis options, which is thes little bars, then we go to this axis position on tick marks versus between. Tick marks will click on on tick marks, and that gives us a pretty clean chart. And that's how you create a simple, clean lines are in excel. Okay, now let's take a quick look at an example of a chart that has dates and monthly sales and will create a line chart based on that. So here is just a really simple chart. It basically has monthly sales and in the first calm as the month with January through December, so every month of the year and then in the right column. It has the sales data for that month. So this could be for any business or individual sales rep. But you'll see how nice this is when we charted on a line graph, because the dates and the sales are represented by one line. So of course, the first thing we do is we highlight our range that we want to use for a chart, and we can go to the recommended charts and you'll notice the first thing that brings up is a line graph because its just logical Justus aside, another cool version of this is a stacked area chart because it gives you a kind of strong graphic visualization by filling in the line graph, We're going to select our line chart. Click OK, and there's our chart so you can just see how clearly this represents each month and the progress in sales. So this big peak month here in March, you can really see a strong peak there, and then you can actually also see sort of the trend here from August, September, October, November and how that ramps up. So this is a pretty clean, simple chart. There's not a ton that needs to be done with it, but we could get rid of these grid lines to make it a little cleaner if we wanted Teoh. Although in honesty, this is one situation where I kind of like the grids, we could also do a little formatting to this. We could change the color of our line to make it stand out more. And then I would like to go in here to the horizontal axis, goto access options and where it says access position instead of having it between tick marks. I'm going to say on tick marks, and you'll notice that when I click that it basically just expands it out to fill the space a little bit more. That's just a matter of personal preference there. But that's what that looks like. So that's how you create a line chart using a regular date or time interval and a value.
39. Introduction to Pivot Tables - Preparing Your Data: okay. And this lecture, we're going to be talking about pivot tables. Pivot tables are an amazing tool or doing really powerful calculations. You could do a lot of different quick calculations with the same data set or the same table , and they're also really great. If you have a lot of data that's changing frequently, and you need to continually run reports on that changing data. And for some reason, pivot tables and pivot charts seem to be very intimidating to a lot of people. And I can understand why, because there are a number of moving parts and there are a couple of things that you have to do right to get them to work. Well, we're gonna cover all of that in this section so that by the end of the next few lectures you will be able to create a pivot table from scratch or from excels recommended pivot tables feature so you can do powerful calculations on your data. So the first thing we have to look at when we're thinking about creating a pivot chart is the data itself. What we're looking at here is just some sample data for a fictitious home store and you can see that we have headings across the top here with sales rep region items sold the price of the item sold category that the item is sold in within the store and the day that it was sold. And this data is basically for one week worth of sales. So we have our sales rep names, which you recognise, probably from our previous spreadsheets. We have the region Leicester East because they're two separate stores. So each sales rep is designated to one store either the West Store or the East store. Then we have the items with the prices of each item. We have the category, so we have, like living room, patio, etcetera and, of course, the days of the week. So first, let's talk about a couple of rules kind of basic guidelines to set yourself up for success when creating a pivot table. But before we get into the rules, let me just show you an example of a very simple pivot table so you can kind of have a vision of what we're going to be doing. So based on this table, let's say that we wanted to find out which sales rep sold the most in this week. A simple way to do that with a pivot chart would look like this. So what it does is it pulls out our rose, which in this case happens to be our sales reps names. And then it takes a some of the price of all of the items that they sold, and it sums them up next to their name. You can see that these air sorted from highest to smallest, and the way we do that, we just click anywhere in the field, right click and click sort, smallest to largest or largest to smallest. Goethe largest smallest, and we can quickly and easily see that Jane is number one for sales and that Bob and Robert are battling it out for second place. So that's what a pivot table looks like. Now, let's go back to our rules for setting up our data so that when we create this table, everything work smoothly like this. So the first rule is that you always want to use a table for your data and not a simple range for a couple of our charts and things. In the past, we've just selected ranges for our source data. But tables are more dynamic and you can add and change data within your table, and it will update into your pivot tables and your pivot charts much better. So if we click on any cell in here, we're going to see up above the ribbon that it says table tools design. When it says table tools like that, that tells us that we already have a table. Sometimes these drop down arrows or a helpful indicator. But there are other types of formatting and excel that shows thes drop downs, so it's not a sure indicator. When we click on the design tab, we can see that this has been named sales reps, and just so I can back up for a second and show you how to do that, I'm gonna convert this back to arrange. It's gonna ask me if I want to convert it and I'm going to say yes. And so now when I click on any cell in here, you'll notice that it's not bringing up this additional tab that has table tools and design . That's how I know that this is now a range, so I'm gonna keep my cell within my range selected. And I'm gonna go to insert and table and you can see it's asking Where is the data for your table? It's already selected it and we can see it. Selected my data all the way down. Leave this checked because my table does have headers, which are these category lists across the top and then look like Okay, it is now formatted it as a table, and I'm gonna go in here and we're gonna go to table styles and I'm just going to click on none. And the reason for that is I can convert this back to arrange it any time. And the formatting won't cause me any problems down the road. Once I'm sure that I'm going to keep this as a table, I can go ahead and format it. However, I want to make it look good or be more presentable. But in the meantime, it's easiest, and it avoids potential issues by keeping the form Atticus None. So that's rule number one formatted as a table, and we now have it format as a table. But since I changed it to arrange and changed it back Now I have to name it again, and you aren't able to put spaces in these, so it's all continuous characters. Then press enter. Be sure to make your table name descriptive, because if you have a number of tables and you call them all data or table 1234 and five, then it's gonna be really hard to go back in and find them and refer to them and other tables and charts and things. So do yourself the favor of making it descriptive to save yourself trouble down the road. Rule number two, which technically you would want toe address before you create a table, is that you want all of your data to be organized into columns with headings. And we've already looked at this before. We have our headings, which is perfect. And then all of the data in the columns specifically relates to that column heading. And that's very important. For instance, are categories are listed in a column, so every sale that's in the living room category or the patio category or the kitchen category is all listed vertically in the calm and the wrong way. To do this would to be to do it like this. If I had column headings of bathroom, kitchen, living room and patio across the top here and these were my headings, then these are not going to sort correctly in my pivot table, and essentially it defeats the purpose of creating a pivot table. So this is wrong. Having them listed under category is right, so that's rule number two. Rule number three is that you don't have any empty columns or rows, so let me show you why. This is important If I have an extra row here, an extra blank row, and I select on this cell and I go to insert my pivot table, Excel is going to read all of this connected data around this cell and assume that the table ends here because it's really smart about picking up on divisions of Rose like this. So we want to help excel out and keep it from getting confused by keeping those extra blank rows out of there. The same applies to columns. If I have ah extra column here that's cutting the day column off from the rest of the table . There's a good chance that Excel is not going to recognize that this is part of the table, so that's Rule number three. Make sure there are no empty columns or rows in your table, and then Rule number four is that your data should be consistent in all of your columns. In other words, I wouldn't want this to say Monday, Saturday, Saturday, and then have a date, you know, like March 3rd and then go back to Sunday and Tuesday and Tuesday. These are all days of the week so that they can all be sorted using a text value and they're consistent. Same with the price. Of course, we wouldn't want to have 303 100 then a word like sold or free or something like that, to confuse excel and so on and so forth. So good, consistent formatting down. All of your columns will make your data really work well when you go to create your table. And finally, if you're going to format of value, for instance, I want to change the number formatting here. Don't just format one cell. You want to format the whole column here, so if I want to form at this cell to change it to a different type of number formatting. I want to format this entire column or field together so I can select the whole calm. They clicking control, shift down, Arrow and Excel will search all the way to the bottom of my field. And then I could go into my formatting and changes to whatever I want. I want to say currency, take off the decimal places to clean it up. I could do that. That will also prevent you from confusing Excel, especially if you start adding data into this. For instance, if I add a section here and I want to say that something is $200 and I hit enter, you noticed that formats it the same as the entire field. So So that's Rule number five formatting the entire field rather than just one cell. So now that we have our data all cleaned up, we can click in any cell within our table. We can go to insert and we can create a pivot table, and I'll show you a quick one just so you can see how it's gonna look. And then in the next, lectures were going to get into detail about these. So here we are in our recommended pivot tables, and Excel is just going to analyze our data or our table and tell us some relevant pivot tables that would work using that data. So I'm just gonna pick us really simple on here. So this is a sum of price by category, and it has. The rows are bath, kitchen, living room, luggage and patio. So it's essentially taking our categories. And then it's summing up the price from each of those categories. So really simple. I'm gonna click OK, and it see it's just opened up a new worksheet, and it's dropped my pivot table right in there, and I would want to go in and sort this from largest to smallest and now, with just a couple of clicks, were able to take that whole list of data, and we can see that sales in the living room category are $2560 sales from the patio category or $1250 that the bath department has only sold $290. So we're able to really quickly analyze some of this information to make decisions about this particular store. So that's how you get your data organized, cleaned up and set up correctly so that you can create a pivot table. And in the next couple of lectures, we're gonna look into a lot more detail of how toe create and use pivot tables to really sort your information and have it make pivot charts out of those.
40. How to Create a Pivot Table: OK in this video, we're going to talk about how to create pivot tables. And I'm really excited about this video because you could do a lot with pivot tables and they're really easy to change. And they just make it so easy to do so much analysis and sorting on your data that it's almost unfair. So at this point, we have all of our data sorted and organized and cleaned up. So it's ready to go and ready to create awesome pivot tables. And we've formatted it into a table so that its dynamic so that it's easy to update our pivot tables if we add information in here. So the first thing you want to do is sort of check your data in a pivot table to make sure that it's reading everything correctly. So what I want to show you is if I scroll down, you'll see that I have 63 rows here and one is the header at the top. So that means we have 62 rows of data in this table, so we're going to create a little pivot table that just counts those rose to make sure that everything's working so go to our insert, go to pivot table and this gives us a pivot table Pop up and it says, Choose the day, Do you want to analyze? And you can see that this is selecting our full table here according to its name, which is perfect, and then choose where you want the pivot table report to be placed. You could do it on this existing worksheet, but things tend to get a little muddy. So we're gonna go with the default of new worksheet and we just click, OK, and then you'll see it brings up a brand new worksheet here with a couple of new fields. One of them is this box right here. And this is actually your pivot table. It just doesn't have anything in it yet. Which is why it says to build a report, choose fields from the pivot table field list. So as long as we're clicked in here, you'll see that this pivot table fields pop up comes up. Now, if I click out of that, you'll notice it disappears because I'm just working in a blank cell. But as long as I'm working inside this pivot table, it's going to give me these fields over here, and this is where all the magic happens. Now, this is also where things tend to start getting confusing and it becomes a little intimidating for most people. So I'm gonna go do this part kind of slow, and we're just going to start really simply but understand that even going slow, it might be a little confusing at first, So this would be a great part of the video to maybe watch a couple of times if it doesn't make perfect sense to you. But believe me when I say once you get this figured out, you're just gonna be dragging and dropping these things in two different places and you're gonna be creating these pivot tables that are that are just doing all kinds of cool calculations in a snap. And you'll have a lot of fun with this. It's once you figure this out, it's easy to kill an hour, just playing with things and seeing what you can come up with. But as I said, we're going to start out by just doing a simple count to make sure that our pivot table is working correctly. So you'll notice that all of these items, right? Here are headers in my table. Remember, we have the sales rep names. We had the region Easter West, the item like a rug or fireplace, the price of the item, the category to him like kitchen bath, living room, etcetera and then the day of the week. So the way that you create a pivot chart is you basically take these different headings and you grab them with your mouse and you dragged them into one of these boxes, and these boxes are what create your pivot table over here. So I'm going to drop the days of the week into values right now, and you'll notice that it changed it and says, Count of day and what that's doing right here. So it's created a tiny little pivot table, and all it's doing is saying the count of days in the charts. What's counting all of the rows that have a day in my chart? And it's come back with 62. And remember that when we're looking at a sheet that if I scroll down, we have not, including our headers at the top. We have 62 entries, so that means that this is counting all the rows and are pivot Table is working perfectly. So here's where pivot tables are cool, because I could easily modify this, change it or get rid of it by simply grabbing this heading here, dragging it out of one of these four boxes so I can go toe up here or I can go onto the sheet and see how there's an X there. That means that if I let go of the mouse, it's gonna take it out of this box When I let go the mouse see it removed it from the values area, and it cleared my table back to being blank. So now let's get into this and really learn what these areas do. So this first box here is called the Filters and what that's going to do If I drop something in there, let's drop the region in there. It's going to put a little bar up at the top here, and I can click on this and I can sort by region. So right now it's set on all. So that means that any data in a table down below here is gonna include all the regions But if I just wanted the data in the table down here to include the East region, I could just click on East and click OK, and now it's going to sort all of this by east. So for now, we leave this on all so that's filters. The next one is columns and columns is gonna be just like it sounds. Columns that extend out horizontally in your chart with lists of data underneath them. So let's take the day over here and put it in columns, and you can see how quickly that just pops all these different days of the week right into the pivot chart. Now real quickly. Notice how this says column labels. What Excel does is it basically adds his new names to your fields. But this can sometimes be confusing if you're not used to using Excel. So one way to kind of clean up these headers here is to go to your pivot table tools, click on design and go over here to report layout and click the drop down. Right now it's showing it in compact form. If you go down here to tabular form and click that, notice how that changes from column labels today. So now it's using the actual field header, and it makes a lot more sense. So because clearly these air the days of the week, so now we have the region appear in our filters in the days in our columns. Now, let's get some of the big ones in there so we can actually start doing some calculations. Now we're gonna take the sales reps. We're gonna drop them down into the rose. And of course, the rose also lines up just like you would imagine. Each sales rep name is listed in its own row, so you can see how we have a table starting to come together. Here we have our columns with the days of the week and our rose with our reps. And so pretty much the next logical thing here would be to grab the price and drop that into the values section. And so now we have all four parts of a pivot table working and active right now. So we have a filter. We have column set up. We have Rose set up, and we have values in the middle. So those are the four parts that will make up any pivot table, and some will have only one or two of those parts, and others will have all four. But those are the four parts that you'll see in any given pivot table. So what this table is doing is it's taking all of our sales reps and all of their sales for the whole week, and it's telling us how much they sold each day. And it's totaling all of the reps sales down at the bottom. And what we want to do is sort this to make it a little cleaner. So we right click go to sort, so largest to smallest. So that's going to sort our totals. So already this table is telling us a ton of information. First, it's songs that Jane is. Our top sales are up for the week by a landslide. It's also telling us that Mac, Helen and Marcy are kind of struggling. Or maybe it's telling us that they were on vacation where you see these gaps in the sales. It's also giving us a grand total of all of the sales for the week and a total of all the sales for each day and by the way, we can also sort this row largest to smallest. So it goes sort largest to smallest. And we can easily see now that Sunday's our biggest day, followed by Saturday, followed by Tuesday and all the way down to Thursday and Friday, which was where our smallest sales days. So that's the basics of a simple pivot table and some examples of how powerful it is to quickly analyze your data real quick. I want to go over the sort of layout of a pivot table one more time to make it really clear , and then in the next lecture will go into some other versions of pivot tables so you can see kind of the possibilities and the potential of the analyzing power of it. So the one thing that gives most people confusion at the beginning is you start grabbing these things and dropping them into these boxes. And then all these things just start popping up here, and sometimes it's hard to know why that's there and where it's coming from. Let me just go over the layout of this because these four boxes will always go to the same place on this pivot table, and once you're familiar with that, it becomes a lot less confusing. Why things are popping up where so the first part is the filters and the filters always show up up here at the top outside of the main table, and it always has a little drop down, and you can click on it to sort it by the elements in that filter. So we can click East here and click OK, and you'll notice that our table shrunk. Now it only has four reps. Bob, Robert, Joe and Helen, because those are the people who work at the East store. We can also go back and click West, and now it has five Reps. Jane Carroll, Casey, Mac and Marcy. Because those are the people who work at the West store so you can see it's completely changing our table. Based on these filters, the 2nd 1 is the rose, and the rows are always going to be right down this left column lined out in rows. So by dropping my sales reps into the Rose area, I know that it's gonna show up down this left hand column. Okay, the next one is columns. The columns are always going to go across the top here. So by dropping my days of the week into the columns area, I know that the days of the week we're gonna extend across the top of my table in the last area is the values area, and the values area is always going to be what shows up inside of your table. And so, by dropping the price into the values area, the price is what's going to show up in here and you'll notice that this says some of price . And you can change that by clicking on this, drop down and go to value field settings and see it brings up this pop up. You can rename this, give it a custom name, or you can change what it's doing here. So, for instance, we could change this to the average sales per rep per day. Click OK, and instead of totals, it's going to calculate averages. Of course, that's not a very useful calculation in this situation, so we're going to go back to value field settings and go back to some. But those four areas are always going to show up in the same area on your pivot table, and that's just really important to keep in mind, because as we start dragging these around, it's gonna help you a lot. So that's how you create pivot tables and also how to do some simple formatting and sorting of your data.
41. Put Your Pivot Table to Work: OK in this video, we're going to talk about how to create pivot tables. Previously, we were working on creating a pivot table, and we created one with all four different parts of a pivot table included. Now we're going to get right into the nitty gritty of pivot tables, and we're going to start moving things around and sorting data quickly so we can really start to make some valuable calculations using what we've learned. Okay, so let's just start out with a really simple cheat and will quickly build it up from there . We have our sales reps in our rose, and we have our price in our values, So that's just right here in the value area. Now let's say that we wanted to know how many of each item our sales rep sold. What we would do is take our items and we drag it into the columns area, resize that a little bit so it's easier to see. And now you can see that has the same sales numbers, which is the sum of all of our individual prices. But now, as it all laid out in columns, according to each item, so now it makes it easy to see that Jane sold $1500 in rugs and $75 in small suitcases, and that could be telling because she didn't sell much of anything else. And yet she's the top sales person. So as a manager in the store, this might make you think that it's time to start selling more rugs or maybe to train your other reps on how to sell rugs so that they can make more money for your store as well. So that's if we drag our items into the columns. Let's get rid of that one. Now go back to our simple Rose and values table and let's take our category and put it into the columns. Now you can see which category each sales were up sells the most in. So Marcie has Onley sold in the bath, and Helen has only sold in kitchen, whereas Jane has only sold in living room and luggage. And then finally, let's get rid of that. Let's put our region in the columns, and now we have a solid breakdown of the two stores so we can see these are all our sales at the East Store and These are all our sales at the West store. So that's pretty simple, but helpful If you're trying to break down your sales like that. Now let's do one other interesting thing. Get rid of the region again, go back to our basic table. The cool thing is that you can actually take the same field and put it into the same area twice. So I've already got the price in here. I'm gonna put it in here again and notice it gives me the same thing. However, I can change this to give me more meaningful information. So the way I do that is I click on this and I right click, and I'm gonna go to show values as and look at all these options for how it could represent these values. And a really good one is percentage of grand total. So I'm gonna click on that and look at what we've got now. We now have the price, the total sales for each rep, and then we also have a total percentage of their sales compared to the whole. So now we can see that Jane has done almost 25% of the entire sales for these two stores, which is pretty remarkable. In fact, that might prompt us to want to say, Well, what percentage has she sold just at her store? Because this is for two stores. So then we'd grab the region, put it into the filters, filter it by filtered by the West store, click OK, and now we see that Jane did 43% of the total sales in her store. So see the power of pivot tables to really bring back a lot of valuable calculations. Okay, let's keep digging here. I'm going to take that back out of there to kind of simplify it back down. I'm gonna get rid of our filter. So back to our discussion about Jane and selling these rugs. Let's say I want to know where this number comes from. $1575. To find that out, I can double click on this and look what happens. It brings up a whole new worksheet with a whole new table just representing the calculations that went into coming up with that one number of $1575. Now it's listing all of the sales by Jane, and it shows all of our individual sales here. So this is another good way to be able to look into where her sales are coming from and say , Oh, wow, she sold 5 $300 rugs and one suitcase so clearly she's doing something right in the rug department. I'm gonna go ahead and delete that. You could do that with any of the values that you create in a pivot table so I can click on Bob's as well, and I'm going to get the same thing. It's gonna bring up all of Bob Sayles and Weaken, see easily all of the categories that he sold in and all the items that he sold. So very powerful stuff. Get rid of that one, too. Let's talk quickly about some formatting stuff in your pivot tables. If you want to form out of cell, you actually want to form at the entire field. So I'm gonna highlight this entire field. I want to change this to a currency format. I can click currency. It will form up the entire field so it makes more sense to read, and then you can also format your entire table to make it look sharp. So let's fill this out a little bit more again. I'm gonna put my days back into the columns, so we have, ah, kind of more full table and then we're going to go into the design under pivot table tools and you can see it gives us some formatting options so we can add a pivot table style, and there are lots to choose from exceed. They go from kind of clean and simple, all the way up to a little more rich all the way up to kind of intense for Matic. But I'll just pick something kind of clean and simple, like this one. I like that one, and that just gives a little bit of color. We can also format this row but going home and go into currency. Of course, you can see our numbers don't fit now. So we just have to double click all the all the columns to size all the columns to fit. Okay. Again, I'm going to go back to our simpler version here. Now, let's take note of one thing right now, it says our grand total of $6320. Let me show you what happens if we add data to our original table. So here we are, back in our original table. Now let's say we just take a bunch of the interests on the bottom here and we copy him and paste him down below. We're just adding about 10 rows to our data Now. If we go back to our pivot table, you'll notice that nothing has changed here. Assists. It still says $6320. What we have to do is go to our analyze button and click Refresh, and now you'll notice it has updated the pivot table with the new data to $6425. And the nice thing about that is that because we have this format as a table, when we inserted all those news New rose, it recognizes it as part of the same table so that when we go to this and just simply refresh it, it calls from that same table, and it includes the new data. If we had this set up as a range than we wouldn't be able to just quick refresh and update , this data would have to click in here, and we have to go to change data source, and we have to re select our range to make sure that the new information down here was included. So that's how you refresh your data. Okay, Now, let me show you a great way to find typos in your data. So let's say that we have this century and his name is spelled Bob with two B's on accident . First, let me go. Refresh my data and you'll notice that what we have now is we have Bob and we have Bob with two B's. Actually, to make this even easier, I'm gonna go ahead and sort a to Z. They're now. It becomes very clear we now have an extra entry in our rose because whenever you put something into the Rose area, it's going to look for each individual occurrence of a value. So even though Bob is in this spreadsheet a dozen times or more, it's only gonna bring back one entry for Bob and put all the totals here. But this B O B B version of Bob is a unique entry, so it thinks it's another person. So by sorting this way, we can see that this is a typo. We can go back, We could fix it. Refresher data and bam! It's changed back to Bob and everything is fixed. So that's a really cool way to find typos in a huge table. You could also rename your heading. So let's say I want to call this sales totals. I could just go in here type sales totals, click, OK, and now the information in our pivot table starts to make a little more sense because that is a much clear representation of what's being shown in the table. And then let me show you one more thing. I'm just gonna delete this whole thing, and I'm going to go back to our original table here and I'm gonna click in it and I'm gonna go to insert and remember before we went to insert pivot table and we created a pivot table from scratch. You can also go to the recommended pivot tables button. Click that, and it will bring up recommendations from Excel. And this is kind of a handy way to learn about pivot tables because you can let excels logic sort of teach you So, for instance, what it's come up with is a sum of price by category and region, and not all of these will be intuitive, but most of them will make a lot of sense. So what it has for a rose is are different departments or categories, and then it shows our sales by east region or east store and west store, and then it has a grand total. And if you clicked, okay, then it would create this pivot table for you, and you could sort of go on to sort these totals or manipulated to make it even more valuable to you. Let's look at the next one. Okay, this is a pretty straightforward one. It's just taking our categories and giving us a total from each category. So just by doing this you could see that living room, probably because of all of Jan. It's rug sales is our highest category. Pretty simple. So the next one is a sum of price by sales rep. And so it actually puts our regions in here into our rose, and it also puts our sales reps into our Rose column, which is a nice way of divided into region, gives us a sub total of both of the regions and then a total of the individual sales rep sales. Here's another really simple one. Just showing us our rows of the east and last and the some of the sales in Eastern last. This one is the count of the items by category and region. So we have our different categories or store departments, and then it just tells us how many things have been sold in each of those departments, so you can see it in our bath department. 26 items were so total in both regions and in our patio department, only five items were sold in both regions. And that's a really good example of the power of pivot tables to count things. And I feel like whenever you say the word count, it sounds simple because you're just basically adding things up. But the power to count in complicated ways is one of the places where pivot tables really excels. No pun intended. This one is the sum of price by day and category. So instead of putting our sales reps over here in the rose area, we have our days of the week so you can see what things sell in different categories. On what days? So, for instance, you can see a lot of kitchen items are sold on Saturdays. So that sort of feedback er information might help you to understand that a kitchen promo on a Saturday would be beneficial, where you can see that a lot of patio items were sold on Sunday. So again, that might make Sunday an important day to focus on sales for patty items. So that's how you use the recommended pivot tables chart. And again, if you click on one of these, it's just gonna go ahead and automatically create it for you. It drops all of your categories and prices and days of the week into the areas where they belong and automatically creates your table for you. So that's how you create pivot tables and modify them and manipulate them to really dig into your data and do some quick analysis, and also how to do some simple formatting and sorting within your pivot tables.
42. Pivot Charts: okay. And this lecture, we're gonna be talking about how to create pivot charts out of your pivot tables. And the advantage of pivot charts over regular charts is similar to the difference between regular tables and pivot tables. Once you've created a pivot chart, any changes that you make to the pivot table will immediately show up in the chart. Let me show you what I mean by this. It's pretty cool. So we're going back to our very basic pivot table here in our row labels, we have our sales reps, and then in our value field, we just have the prices, which is the totals of what they've sold. So the first thing I'm gonna do is I'm just going to sort this. So I'm gonna right click on this cell, go to sort and largest to smallest. So that'll put Jane upon top so we can see who's selling the most. And then I'm going to create a pivot chart out of this. And you remember, the value of the pivot table is that we can change these values or these rose really quickly. For instance, weaken drag sales reps out of there. Drop item in the Rose, and now we have the price by item rather than by sales rep. Or we can take the items out and we could put the categories in there. So now we have the total sales for each category, So those are all the quick things. Weaken Dio. Now let's see what happens when we do this in conjunction with a pivot chart, and I can either go to analyze and pivot chart, or I can go to insert and pivot chart. Now you'll notice we still have a regular charts here and are recommended charts, which we've worked with before. But we're going to go to pivot chart over here. So you click on that, and by default, it just goes to the column, and you can hover over the image with your mouse and it will get bigger. So it just shows a really basic column chart of our categories Sorted by price. You could also do a pie chart with this where it'll just show you, for instance, that living room is the majority of the sales, whereas bath is the smallest section. So let's just go with a pie chart so I can show you some more details of how quickly you can change this with a pivot chart. So a quick Okay, that pops up or chart. Now, I'm gonna go in here and I'm just going to go to the axis or category, gonna pull that out of there, and I'm gonna drag the items and instead, So now you see a pie chart divided up by each item. And if we expand that out, you can see the whole list and you can see that rug is the biggest one. Fireplaces, a big one and so on. So let's drink that back down. I'm gonna change it again. We'll pull the items now out of the rose. I will put the sales rep soon. Now I can see all of the sales sorted visually. And of course, you see Jane, who is the light blue here taking up the whole quarter of the pie. But it's really that easy and quick to just drag these out of here and drag something else in there. So by putting the region in there, I can quickly see the division between the West Region sales and the East Region sales, and you can see that the West region is dominated. Let me show you one other kind of chart real quick. We'll just do a column chart so we go to analyze and pivot chart. That's the other way to insert it. We'll go to the column chart so you can see this is a real simple breakdown of East versus West sales similar to that pie chart. And again we can get rid of the region and we can put the item in here. So now our columns are broken down by item. And of course, we can sort this list to make it make the chart make more sense. So we right click sort, largest to smallest, and then this makes a lot more sense. So now it's really easy to see that rugs are our top seller fireplaces, air next coffee tables and so on, all the way down to the poor little toaster so we could drag that out. Now with the category of again, we'll sort this. And so here you can see Living Room is the top seller patio, kitchen, luggage and bath. And let's see what happens when we do the day. Once again, I'm gonna sort it It's just very quickly returning some valuable information. You can see with just a glance that Sunday is the top sales and Friday is by far the worst sales. A lot of the formatting on pivot charts is similar, So if we want to go in and select on our grid lines and delete those we can. If we want to go and edit our title bar, we can edit that and we can remove the legend. You know, things like that to clean it up and make it better. We could widen up these, basically any of that formatting that you could do with the regular chart. You can also do with a pivot chart. So you also the notice these two buttons here on the chart which are representing our rose and our values. The cool figures with the days This is actually sore doble. So you can go in here and you can Onley select, say, the weekend click OK, and it will instantly change your chart to reflect that sorted where we could put him Friday through Sunday and it will show that and then you just go to select all to bring it back to normal. But if you want to get rid of those buttons, then you click on your chart. Go to analyze and you have this section here called Show or Hide, and you can go to the field. Buttons dropped down here, and it will give you options so you can get rid of the value field buttons that clicking that and you'll see that some of price button is gone. And then we can go to our access field buttons. Click on that, and the day drop down button is gone. So now it looks pretty much like a normal chart. The only difference being when I go in and grab these I could drag the days out of there. You could drop the sales right back in and presto! Now the chart is representing my sales reps. So that's how you quickly and easily create pivot charts from your pivot tables so that you can have a nice visual representation of your pivot tables that will instantly change an update as you change your pivot table
43. What's New for 2016: okay. And this lecture, we're gonna be talking about new features for Excel 2016. There's quite a handful of them, and some of them are really fun. So I want to show you briefly how a couple of them work, and then I'm going to go into more depth with a few of them in other parts of this course. So the first thing I'll show you is what's called smart. Look up. If we take a simple word like the word world and we right click on it, we get this option called smart. Look up. If we left click on smart, look up over to the right here. It will actually open up new pain, and it will search the Internet and bring you back results from the Internet so you can see we have a simple map. We have a definition of it. We have a Wikipedia entry, mawr images and so on. And it's always been my opinion that this is much more valuable inward, where you're actually doing more research based things. But it's still awesome to have it here and excel where you could just explore right here within the Excel window, another new feature is the get and transform tab here in this section here allows you to manage how you bring information such as spreadsheets or databases into your excel to work on them. So the way you use that as you just go to new query and then, for example, you can go to from file. And I'm just going to go grab some data from this workbook so I can just select the document I want, and I just want to grab this sheet one. So this shows the documents available, and in this case there's only one, and then it gives you the option to select individual sheets. So I'm gonna click sheet one. It shows me a preview of what's on that worksheet, and then I can click load, and you can see that it pops it into my workbook under a new worksheet and applies some basic formatting to it. And you also have another pain here that shows your recent queries and some details about that query so we could go back to the data tab. We can turn the queries paying off, or we can turn it back on, or you can see your recent sources, which just shows where you've done a recent query. So that's the get and transformed feature, and then we have ink equation. And if you go to the insert tab and then way down to the right here we have equation. You click the drop down. It gives you the options to insert popular equations, but you can also go down here where it says inky equation at the bottom. Click that, and you can write in your own equation. So if I want to do the area of a circle, I'd say a equals. And I'm doing this with the mouse, by the way. Oops, I was gonna say pi squared. They need to change that suit, go back to erase rewrite so a equals pi oh are squared and then you can see it translates it into text for you. You click insert, and it will allow you to drop it right into your page. So that's a cool one. Inc equations. We also have a share button, which is right here in the upper right hand corner, and you just click on that and it brings up a share pain and you can save your file to an online location on the cloud, and then you can include people who you want to share the document with, and you can even change whether they can editor view the document and then you click share . Now we're gonna look at a couple of new features, which I've created entire lectures about, so I'm going to cover these really briefly. But one of them is to tell me what you want to do. Button. It's basically the new help function for Excel 2016 but it also does have some fun options where it will just give you suggestions of how to get things done. So we'll look into that one in some more detail later. There are six new chart types. If we go to recommended charts Goto all charts, we can see these new charts. Here we have a tree map, a sunburst, a history Graham hiding back in behind the history. Graham is a Peredo chart, a box and whisker chart and a water filter, and we'll go into the uses of those a bit more. In a separate lecture, we have a really neat one called one click forecasting, which is just a button on the data sheet where you click forecast sheet, and it will create a forecast of your existing time related data. So this will be the existing data, and this is the forecast of data. So that's a really fun one to use, and I'll go into more detail on how to do that in another lecture. And then finally, we have the three D Maps feature, which will also go into in more detail in another lecture. But that's a really fun feature found right here on the insert tab. You just click on that button and it gives you these tours that you can create, and I'll show you how to create one of these three D tours that maps out data on an actual map. A movable, clickable, movable map. So those are some of the exciting new features for Excel 2016
44. 6 New Chart Types for 2016: Okay, This lecture is going to be about all the new chart types in Excel 2016. And I'm gonna show you six new chart types and basically just kind of show you an example of them and how you use them or kind of what you use them for. First, let me just drop it really simple chart in here. It's a really basic chart. It just says the days of the week, Monday through Sunday and then some numbers 10 through 70. I need to have a chart selected in order to go into the charts, feature here on the ribbon and look at charts. I also want to show you another really cool feature, which is the recommended charts. And if I click on this, you'll see that it's already taken my data from my table and it's come up with excels. Best recommendations for charts based on the arrangement of my data. So it's pretty cool. I mean, you can see it's basically said, Hey, you should use a clustered column and it shows me an example of exactly what it's gonna look like. So you don't even have to create your chart using trial and error. Before you figure it out, you can just click on these examples and see how they're gonna look. So I mean, for having no formatting or any modifications done to it. That's pretty sharp looking pie chart, to be honest, So those are the ones that it recommends, and then you can also, if you don't see when you like on here, you can click all charts and it brings you into the whole list here. And this is the same thing that you'll get if you click. Well, let me just show you. If you click this little drop down arrow, it brings you right into the same pop up and again you go to all charts and then it shows you the whole list. And so, in column charts. You have all these different choices, and you can just click through him to try, um, and then if you hover over it, it will give you a really big version of it. So it really makes it easy to find the chart that you need. And then you could see all of these pretty much have different versions along the top to select from will cover charts in a different section, of course, but this lecture is really about the new charts for Excel 2016. So let's take a look at those and there are some really cool ones. We've got the tree map, which looks like that, and I'm gonna show you examples of all of these in a minute. We've got the sunburst. We've got the history, Graham at the Box and whisker and actually within the history. Graham Tab. There's also the Peredo chart here. So if you're looking for that, it's hidden under the hissed a gram We've got the box and whisker And then we've got the waterfall, which is a cool chart So those are the new chart types and we're gonna talk about each one in this lecture. So I just pre created a few of these using some of the example data from Excel just so you can get a good idea of what these look like. I'll give you an idea of what they do and how they work. So first we'll take a look at the history. Graham. So what a history Graham does is it puts data into ranges or bins, so these would be considered the bands to visually show you frequency distribution. An example of the range is a simple example would be like one range of 0 to 10. The next range would be 11 to 20. The next train to be 21 to 30. Next train to be 31 to 40 and so on so forth. You can see from this as some dollar ranges and these air for different book prices from one distributor, one publisher. And it's similar to a bar chart where you just have a bar for each number. Except that each bar is is wider and has a full range of numbers. And the purpose of a hist a gram is to show you again the frequency of distribution. And what I mean by that is, for instance, if you look at these prices. So if this is a chart for book prices and you have these books $13.76 to $22.13 you can see that there are very few of these fact. It says there's only one. But then when you go over to the books ranging between 55 63 $64.1. You have 48 of them. So if you're trying to get a nice distribution of prices, then by looking at this chart, you get a pretty good visual understanding that you would need to come in with some or lower priced books and some more books priced in this range, and probably some more books priced in these upper ranges to to really fill things out. But again, of course, it depends on what your goals are with the pricing. But this hissed a gram, and these ranges just gives you a really solid visual idea of where your pricing is that. Okay, so that's a history. And let's look at a Peredo chart. Peredo chart is basically a history Graham with a line chart built into it so you can see we have the same Ben's here, and these are for categories. So in this case, these bends represent issues that caused returns or losses in profit, and so it starts from highest, the smallest, so you can see that the defects are the biggest issue, the biggest cause of loss incorrect prices. The next wrong product is the next and so on down the line. And then what this line chart does is it starts with the full value of this. So this defect Ben represents if you trace it over 40% of the losses and then when you go to the next item, when you add this been plus this been it equals 65% of the losses. And when you go to this next, been the three of these combined. So this is a running total of these values. The three of these combined equals over 80% of the losses. So what this Peredo chart does is this line graph tells you basically the distribution of these different categories. In other words, what we see here is we have 123 of these categories or issues representing over 80% of all the loss in this company. So the value of that is it helps you because you can look at these larger issues and work on solving them, and maybe not focused so much on, say, like poor quality content, which only accounts for a very tiny percentage of the loss. So that's what a Peredo chart does. Next One is a waterfall chart and a waterfall chart basically has a staircase pattern that represents gains and losses or ups and downs. And a waterfall short clearly shows your starting number your changes up or down throughout the process, and then you're ending number, and so you can see these two orange bars. This is your starting number 245,000. This is your ending number 24,000 and then all the yellows represent decreases. So you have your gross revenue. That's all of your income, and then you have some revenue adjustments and then these air sub totals along the way. So this yellow shows a decrease, and they have your sub total in this gray bar, and they have more decreases. You have the cost of inventory, and they have see out stair step, saying of your merchandising costs and your other sales costs, and that brings you down to this sub total, and then you continue to have your losses. You have staff costs, marketing costs, facilities and insurance costs, and then another sub total here and then your taxes, and then it show it represents your final value at the end. So again, the value of a waterfall is to just show you the losses or gains. This one doesn't really have any games except for this first value, but losses or gains or decreases and increases from Category two category. So that's a waterfall. The next one is a box and whisker a box and whisker is a relatively sophisticated chart, and if you're a statistics person, you've probably seen these before. But basically it shows the mean, which is the centre value. Here. There's actually an ex. It's kind of hidden, and it shows a range of the values in your data. And the other value that the box and whisker chart shows is that it can show extremes or outliers such as, like this value out here or this value out here. And so this is another chart that was taken from data representing different books published books. So you have your Children's category romance in your mystery and these air the prices that have their plotted on this chart so you can see like the Children's books are all price in a very tight range, whereas the romance is priced in a very broad range and the meanness here. But you can see that the mean is probably offset toward the high end because of all of this wide range of prices all the way up here to this one outlier, that's $300. That's a very visual representation of the diversity of the prices of these books. And then you see, mystery is sort of like a combination of the two not really extreme, like romance, but not super tight, like Children's that has a little bit more variety. So that's what a box and whisker does, and we have a sunburst. A sunburst shows a hierarchy of data, and it shows categories in visual block sections, so you can easily see which categories air the largest, in which categories that the smallest or this could be values. But it's generally broken into categories. So again, this is from a book company, and so you can see if you actually click on this, it actually highlights this and dims the rest out So you can really see these Air Children's books. And it gives you an idea that there's a really large percentage of Children's books coming from this company where you can click over here and you see romance here and the breakdown of that, we can go to mystery, you know, all the way down to like your science books, which is a very small slice of the pie, literally. And then finally we have tree maps and a tree map is similar to a sunburst. It's just laid out differently, so you can see we have the same categories here from the publisher. We have Children's books, which takes up a very large portion of the chart and then romance, which takes up a sizable portion and then all the way down to our science or even computers . So those are the six new types of charts for Excel, a 2016 to help you visually organize and display your data.
45. "Tell Me What You Want To Do" - The New Help Feature: okay, And this lecture, we're going to talk about the tell me what you want to do feature and basically the tell me what you want to do. Feature in Excel 2016 is kind of like the new help feature, but it has a few extra bonuses that make it actually work pretty well. So let's just dive right in and take a look at what this does. It's located alongside the tabs at the top of the ribbon here, and you can also jump right to it, even from your worksheet, by hitting old Q. And it'll put your cursor right in there and has a couple of parts to it as the recently used part, which allows you to access things that you've done recently, has this try section where it just basically gives you suggestions on things to try out. But most importantly as this search feature, so let me give you an idea of the benefits and drawbacks of this. The thing that I don't love about it is that I would like to be able to type in addition and have it come up with a some function, for instance, right. But instead it comes up with Adan's prepare for distribution. Get help on addition, which, if I go to the get help on addition, it will bring me to a essentially an Excel help page and give me some options for how to learn how to use a some formula. So see, if I scroll down, it gives me a HelpAge on how to use the some function. But it doesn't intuitively take me to the some function, which is sort of what it's supposed to do. But if I type in some, then it will take me at least two math and trig where I could men scroll down and use the some function here you do. You also have this smart look up, which I'll click up, which brings you Web results in your right hand column here, which typically will be like Wikipedia articles and things like that. This is also featured in the new word 2016 and in my opinion it's more valuable inward because that's where you'd probably do more research like this. But there are some things that it does well. Eso first, some examples. Let's look at some of the things we're learning in this course, like I type in three D, It immediately goes to three D map, and these are the same buttons that you'll see in the ribbon tab, which is kind of nice, so you don't have to go find it in the ribbon tab. You can just type in three D and help operate appear at the top, another example of what we've been working on this charts. So you type in charge and I'll give you the option to create chart. Or you can go straight to like a two D column. 32 column BAR chart. Statistical chart history Graham Line chart. Another option is, for instance, list type in V. Look up and again. It doesn't bring a straight TV look up, which is kind of unfortunate, but it does bring us to look up in reference, which we can then activate the drop down and go to be looking there, type in table. You could just go straight to inserting a table, or you can go to the drop down for my at us table. So that's pretty useful as well. So to kind of summarize that in some ways to tell me what you want to do. Feature is useful if you're trying to find something quickly or you don't know where to look for it or you do need help, just like the old days when you just click on help. But it could be a little bit more intuitive as faras interpreting your input and translated it into, for instance, a easy to use formula or that kind of thing. But tell me what you want to do. A feature is new for 2016 and that's how you use it.
46. 1-Click Forecasting: okay. And this lecture, we're going to be talking about one klick forecasting for Excel 2016. In the past, you were able to do forecasting by various methods. But now forecasting is a one click button on the Excel ribbon. And in this lecture I'm going to show you a simple example of how to do that and a couple of the features that are built into it. So what we're going to do is we're going to take a basic list of data like this, and I'll break this data down just a little bit for you. Basically, we have January 1st 2010 through December 1st 2011 so it's basically two full years of data monthly, and then we have just some very simple sales figures, and you'll notice that the sales figures tend to trend upward. So from January to October, we have some basic lower numbers that kind of move up over time. Then, in November and December, we have some higher figures, which is going to indicate a seasonal trend for holiday sales. Then we kind of go back down to our average numbers, but you'll see they start to move up over the year through October again and then you'll see again. We have some significantly higher November in December numbers. So we're going to essentially create a trend forecasting a year into the future with a chart, and it's going to look something like this, and you can essentially do this with one click. But then we will go in and tweak some options to make it more relevant to our data. So let's just jump right into it. The first thing that you have to do with your data is basically just click inside your range, and then you go over here and then on your ribbon, you click on the data tab and then to the far right. You have a forecast section and you have forecast sheet right here, and we clicked the forecast sheet and it's gonna bring up this dialog window, and it already, as you can see, is putting our historical data in here, and then it has generated a forecast. You can see that forecast doesn't is pretty flat. It doesn't really have a lot of detail, and it doesn't really seem to relate a lot to what's going on. So we're going to change a couple of things here. The first thing is the forecast end date. So it's only going six months into the future. And what I want to do is be able to see this. The seasonal trend here that's happening. So I'm going to extend this to December so it goes that far into the future, and you'll notice it doesn't automatically update. But I've discovered that if you click on this button and change it to a column chart temporarily on, that's, that's another option for your forecast. But then you change it back to a line chart that will update the chart. But as you can see, it's still showing a pretty flat trend. And part of that is because if we go into our options here, you have the seasonality feature, and in here it has two choices. Detect automatically or set manually, and currently it seems to be detecting zero, meaning they're zero intervals in. What Excel is seeing is our seasonality. So we want to change this to 12 because we have 12 intervals in our season and you'll notice what it does here. Since we have these November December increases, November December increase. Now it's following our trend, and it's interpreting the data a little more actively month to month. And then it is showing our future trend of November December increased there. So that's one option. You can leave it on, detect automatically, or you can adjust these intervals here. You also have this confidence interval, which shows you like a low confidence forecast on a higher confidence forecast. You can take those out if you want to clean it up just with the click there, and that just shows you the one forecast. And then you have a few other options here that you can play with but that basically cleans it up and and kind of gets it reflecting our existing data. So go ahead and click create, and then you'll see what it does. This was our data sheet here that created another sheet, and I'm just gonna grab this and move it over to make it a little easier to see. But what it did was it created this new sheet in a table and noticed that has our timeline and as our values, and that has a forecast. And this is our existing data that we entered up here. But if I scroll down, you'll notice that it's actually added to my data here, and it's included the forecast numbers in here. And actually let's line that up so you can see everything. But it's done specific calculations for the forecast, which are reflected, of course, in this line. And, of course, as with all charts, you can go in and change chart elements. You can add access titles, chart titles labels for the data and get rid of the grid lines to make it really clean. You can add a trend line that you could do it based on your values. This is your existing values or based on the forecast value. You can take the legend out if you want to clean it up a little bit, and you can add up and down bars, which doesn't really have a lot to add to this jerk. So then we'll get out of that and you have different styles. You can do different color schemes that you can create, and then finally you have some filters so you can actually take out bits of data like months out of here, and you can see it highlights Simas. I hover of them, or you can even filter by the values of the forecast. So those are some options with this chart as well as with most charts. And finally, you can go in to the individual elements of it, and you can edit them right inside the charts so I can go in, highlight thes grid lines and just delete them right there. So that's the one. Click forecasting. That's how you create a forecast chart, and you can use that to quickly chart out your trends.
47. 3D Maps: okay. And this lecture, we're going to be talking about three D maps in the New Excel 2016. This is a really cool feature. It's not entirely different than the previous power maps, but now it's integrated right into the ribbon. You can just go to the insert feature, and you can create a three D map pretty quickly. But it could be very practical for a very rich three D visualization of something like product distribution, income per city or per state or per country, any sort of data visualization that relates specifically to geography on any scale, really. But for the purposes of this course, and as a demonstration for you have come up with kind of a fun little three D map based on places in Europe that I'd like to go on vacation. So let me just show you the chart that I've started with to create a three D map. You need to have some sort of quantity or value you need to have, and you need to have locations so you can use addresses or you can use city names. You can use it codes, but it has to be formulated into a range or a table that the map can pull from. And it has to be specific, accurate and clear enough that it can calculate all your data. So I just created this very basic range here for places where I'd like to go on vacation and the importance of each of those places on my list. And this is certainly not all inclusive. It's just kind of a random list that I came up with. But you can see the city here in the first column, and then I have the country listed in the second column, and then I have a ranking by priority. So the top ranked city here in Crete is number 15. So that's the highest priority, and the lowest ranking priority would be in Italy here. And that's just going to allow my three D map to show some more interesting visualizations for each of these cities. Another interesting thing to note is that this three D maps function in Excel 2016 is going to use being maps and being maps doesn't recognize every city name particular with some smaller, more obscure cities, and it also is fairly particular on how things air worded in order for it to recognize them . So, for instance, this little town of San Guar, Germany Hopefully I said that at least close to write is actually spelled like this in Germany. And if I don't spell it like that, it won't plotted on the map. And the other interesting thing is I put in London, England, here. But being actually wants to see it called United Kingdom, so we'll modify our data to make it work. And sometimes you just have to check your results to make sure that whatever you put in is recognized by being, and then you just click anywhere in the range, or you can highlight the whole range if you want. Then you go to three D maps. Here, click the drop down click open three D maps, and the first time that you do this, it's going to essentially ask you if it can add three D maps as an ad in, and it's basically already incorporated into Excel. But in my case, it did take a few minutes and Excel sort of locked up for a little bit while it was getting it all figured out. Which is fairly understandable because I'm sure it's a pretty large bit of software. So anyway, you click open three D maps, and it basically is talking about tours, so you can see that I've already created one here. But I could also go to create a new tour, and what I'll do is I'll show you the one I've already created. And then I'll create a new tour to show you essentially some of the ways that you can create one. So this just brings you right to my plotted cities. On the map, you can see that they're all plotted on the map, and the height of each bar is based on how I ranked each city for my priority to visit there. So you can see over here that the city of Enna in Sicily I've already been there. So it was sort of low on my priority list to go back. And so the bar is small. On the other hand, the city of Capri, Italy, I've never been to, and it was high on my priority list, so it's created a high bar. Same with chin. Quit Terra more than you have somewhere like Shahm anywhere I've been, but would love to go back, and it's a little bit lower on the priority list, so you can just see how it's really created a rich visual representation of the list of data that I created. So a couple of things we can do with this is there different themes. For instance, you can go to the simpler theme here. I was just in the aerial color, which is more of a satellite type image. There's another one more of a grayscale. There's a subdued one. If you really want to see your data points standing out of the map and there are several others, I'll just show you one really funky one, which is like a glow. It looks like a night scene, but those are your options for themes. I'll just go back to the original one that I have, and then you have some options up here. In your view, pain you can do. The tour editor, which brings up these basically aerial views. It's essentially a video representation of your data. You have your layer pain, and this is where you actually enter in your data for the maps to interpret it, and I'll show you a little more on this later. And then you have your field list, which shows in this case I'm looking at Range three as my city, country and vacation priority, and you use these to drop into your layers to get the data that you're looking for. Like I say, I'll go into that in just a minute. But let's look at one of the tourists real quick here. I'm going to start playing this one, and it's just going to go through these different short tours and do a basically a fly by. So here's the 1st 1 that's it's basically just circling around the area, and you could see all the plots. That's a transition into another flyover. You can see it slowly flying over the region. And then that's another transition, and the globe starts to rotate as you kind of fly by. And then it stops and you just click the back button and it brings you back. So let's go back to our Excel spreadsheet and let's create one of these sort of from scratch. I won't go into all the details, but I'll show you the important parts. So again I just click in my range, Go to three D map, open three D maps and let's do a new tour. So it's just gonna be blank. Now. The important part here is this field list, and you can if you close this, you can find it right up here. In your view. So you click on that, and this has some old ranges in there from various other things that I've been messing with . But what we want to do is go to the range that is appropriate to the data that we're using , and I want to take my city and put it into the location field, and then you'll see it's immediately plotted. All of these cities on the math and the height is how tall those columns are gonna be in my ranking of vacation. Priority is going to be the relevant data to make those heights taller or shorter. So I'm gonna drop that into the hype field, and then you can see those grew right out according to the rankings that I gave to their priority. Now it always puts these layer summaries in here, which, if you have a lot of data, you could use Thies to visualize things, but I find it generally is just getting in the way. So I'm just going to right click that and remove it. And so if you have more data points in in here, you could use those. The only other thing I'm going to do is you can see that these are all the same color, and that's a little boring. So I'm going to actually take the vacation priority again and put it into the category field. And then it's going to just sort these into different categories, so it's a little bit more visually appealing. Obviously, there's a ton that you can do with this, but this is kind of a basic tour of it, just so you can kind of see how cool it is. So close that out. A couple other things. You can change your data. So we're in column stacked columns, which doesn't apply because I just have very simple data here. You can do regular columns, which also is the same as what I already have, because this debt is really simple. You can do bubbles, and again that gives you a real visual of the priorities. Obviously, this city in Crete is very high priority, whereas Anna is low priority. So you can just kind of see how that's ranked. You can go to a heat map, so it just shows the intensity of the priority. And then this one goes by region, which wouldn't apply here because I just have cities. But if you had a lot of data in different regions than it would chart and basically show you the priority of each entire region and then of course we can change the theme. So I want to go toe like more of a global theme. I'll go back to my bars at my vacation priority into the category. Then, of course, you can move this around. You can come in at a lower angle by clicking that coming at a, you know, almost vertical or like top view almost. But I kind of like this lower angle, and then you can kind of shift around by clicking that one, and then you can either grab it and pull it like this, and then you can. I'm scrolling with my mouse to go in or out, but you can also use this to zoom and our seem out and Of course, it's already created one tour here, and I can click play, and it will show me what it's going to show me. But it doesn't really have any animation attached to that yet. And the animation takes a little bit of playing with to get it right. But I'm gonna change the settings on this and I'll do a circle which basically makes it fly around in a circle. Gonna make it go is fast. That can, because it's usually pretty slow. And I'm just going to make this six seconds long, you can name it and they will close that and I'll click play again and you can see it's just kind of doing a circle fly around of my data. You can create more of these, of course, which is what I did before. You can basically say new seen here. You say copy scene, or you can go like with a new scene. And then it's having me kind of start all over. So, um, easier way to do that is just to go copy scene. Looks like this happy scene. And then I could go into this and I can modify what I'm gonna do with it going to my settings again. Change it like if I want to do a flyover. I couldn't do that. This is your transition between scenes. So if you set this too low, it'll transition really fast. Three seconds. You'll see. It's about right. So now if I click play on my 1st 1 do my little fly around that it's gonna do three seconds of transition into the other one. And now it's gonna do a flyover. That's it. So that's how you use three D maps in Excel 2016 to create a really rich visual image or display of your geographical data.
48. Saving as CSV, Text and PDF: okay. And this lecture, we're gonna talk all about saving your work. And here we are in our good old kitchen remodeling costs, work, sheep, and we're gonna save this. And we've already talked about the basics of saving to a specific location on your computer , and I'll go through that again real quickly. But we're also going to get into saving as a CS V file or a comma separated values file saving as a text file and saving as a pdf. So first, let's just go over the basics of saving again. This has already been saved, so you can see that whenever whenever you can see a title up here that doesn't say like book Warner book to, then you know it's been named and saved. But if we were to go in and do a little change, we'll just put some text right here that you noticed that changes from saved to now saying excel. And if we want to save it, then we can just go click the save button notice. Now it's has saved again where you can also click control s and that'll save it. And thirdly, you can go to the file menu and click save right here that just saved it and brought it back to the main screen. OK, so that's the basics of saving. If I wanted to say this as another workbook, for instance, let's say I wanted to have one version of this that was nice and clean like this, and I wanted to have another version down here. They had a bunch of notes and we could just type whatever we wanted in there. I've already got this version saved as the kitchen remodel worksheet download, but I could take this version and I could save it, as so I'd go file conceived as. And now I can rename this or I can say, you know, kitchen remodel worksheet download with notes, and we want to save this as an excel workbook with E x l s X file extension. So it's like that we can click save. So now this is saved as a new file, you know? So I got a file and open. When I go to my recent tab, you'll see that I now have the version with notes. This one's a text file that you could ignore. And then this is the original Excel file there, so they're saved is two different things. OK, so let's get a little further into this. I'm gonna close this Excel file. I'm going to go back in to file and open. You'll notice that if I go back into the original document here, it's not going to show those notes on there. I see. So now I have to completely separate Excel workbooks, one with the notes and one without. Of course, you have to be careful doing that because if I wanted and made changes to any of my numbers here, they're not going to automatically update on the other version with notes. But I just wanted you to know how to save something as a separate file. If you need to separate it out, we're going a different direction with your document case. Let's talk more about saving as let's turn this into a C S V. File, a comma separated values file and the purpose of C S V files is to be able to share or export your data in your table with other programs. For instance, if you want to bring it into a database software like access a CSP file would be a good way to do it. So the way you say this of the CSB files, you go file, go to, say vows, and then we go to our drop down here. These air file types, we click dropped out. You'll notice all kinds of things in here. And I'm gonna talk about a couple of these so you can see there several that six CSB. This one says CSP utf eight. This one says CSP comma delimited. And by the way, this is the one we're going to use this one's CSP Macintosh in this one C S V m s dos. So this is if you're saving specifically for Mac system and this one is used mostly if you are saving a document that as international characters on it, because it will do a better job of preserving that. But generally speaking, for most uses, you're going to use the CSB comma delimited file. So you go ahead and select that and then I'm just gonna add an extension on this. This is one, so I don't confuse it with my other documents and then I'm gonna click, save, and now we have it saved as a CS V file and I'll show you what that looks like. It was navigate to that and open up, and there it is. So you can see our headers here are all separated by one comma, and that's why they're broken up into separate columns. You can see our materials is all here, and then there's a comma. And then there's the quantity and then a comma, and then the price and then a comma and then the total. And that breaks that up into columns as well. You see, we have a couple of extra comments here at the end, which means that I have a couple of active columns here, which you could get rid of, that we could delete those columns or we could delete the comments out of here. But that's not a big deal. But you can see all of these rows are separated into columns by the comments, and then we could use this file to import into, like I say, different Excel spreadsheet on access database or all kinds of other software. OK, so I'm going to get rid of that. That's a C S V file. Now let's create a text file. Go to save as again, click on our file extensions again. And here's a text file and you notice it's his tab Delimited. So a C S V is comma delimited text files tab delimited. So we'll go ahead and save one of these will call it the same thing. And then I'm gonna open that one. Oppa's well, so you can see what it looks like. You see, this shows text document. Okay, now we have the same information, but it's formatted differently. You can see there's a tab between each of the columns, so as cabinet annals per unit and then a tab and then the quantity and then a tab, and then the cost of the tab and then the total and they're all broken up like that. And each of those tabs is the separator or the limiter to tell the software where to put a column break. So we'll close that again, and I'll even show you If I was to import that into this new sheet here, got a data go from text or see SV, we navigate to it, there's our text document and you could do the same thing with our comma separated one, but you'll notice on our delimit er, Excel has recognized that their tabs between all of the items between all the columns and it's gone ahead and put that in there. If this was a comma separated file, it would have recognized that as well. And it would have selected comma. But you'll notice we picked the wrong thing. Like, for instance, if we click on space, then it makes a real mess of things and it organizes it really strange or flee click on equal sign, which there probably aren't any of. Then it just mashes everything together. So those two limiters air really important for helping your worksheets to transfer over in the format that you want them to. Okay, And if we were to load this, we could just click load, and it'll pop it in there, and it's gonna form at it as a table. But you'll see how it brought it in and put our main title up top, and it put our subtitles here and that put all of our other information right into ah table . Just how we like it now typically wouldn't bring a text or a CSP file that was created an excel into Excel. This would be used for bringing this file into access or another database software or another program because you'll notice if you do this with Excel, we're going to hear you see appear. All of our formulas have been erased because the text file on Lee recognizes the text. And whereas on original click on these, these are all formulas, right? So that's something to just keep in mind. And then, finally, I want to show you how to save it. As a PdF, we goto file again and an older versions you could go to save us and click the drop down and it would say, Save as pdf somewhere in here, similar to with Microsoft Word. But now you have to go to export and create pdf slash XPS document so you go ahead and click there. Now it brings up your save as well. Technically, it's called published as, but this is basically your save as dialog box, and you can see that it's selected. Pdf as your file type and there are a couple of things to look at. You can open the file after publishing if you don't want to, that you could just de select that. And then you can optimize it for either standard publishing, online and printing or a smaller size, which is just for publishing online. If you were using this, like on a website that people are downloading and you wanted to download faster or take up less space than you would select that. Generally speaking, though, you can go with standard. And they do have some options. Here you can publish all the pages, or you could do a range of pages. You can do the entire workbook or just the active sheets. That's basically all there is to that click OK and Go Click publish. And now that's going to go ahead and pop it open in pdf viewer. And that automatically opened it up in chrome for me because that's how I view pdf's and you could see Now we have a nice PdF image of our spreadsheet. And, as you probably know, with a pdf, you cant modify anything on here. I couldn't highlight thes, but if I try and type of red or anything, it's all locked. But the beauty of pdf's is that even if someone that you're sending this information to does not have excel. They can still open your table. They could still access the information that you want to send them so you could send them charts or spreadsheets or whatever. They're free. Pdf viewers. As I just mentioned, I used the regular Chrome browser. You can open PDS right in chrome, so saving your document as a PdF is a little more accessible way to share your data. Okay, so in this lecture, we've covered basic saving of your document how to do a save as to create a duplicate of your document, how to save it as a CS V or a comma separated value file. How to save it as a text file with a tab delimited er, and finally had a publisher work sheet as a Pdf
49. Backing Up Your Excel Files: okay. And this lecture, we're gonna talk about backing up your Excel files. Backing up your files essentially just means creating copies of your Excel workbooks in separate places so that if one gets lost or computer crashes or a hard drive dies, you have another copy somewhere else that's still safe, so there are a lot of ways to back up your data. But one popular method is called the 3 to 1 backup strategy, and the idea behind this strategy is that first you save three copies of any given file. Second, you save it on two different local devices, so that could be your computer's hard drive, plus a USB drive or an external hard drive, but something that is local and accessible but different from your primary computer, and finally, that you save at least one copy off site. So this could be on a hard drive that stored in a different building. Or it could be stored on the cloud using something like one drive or one of the many options you have out there for online storage. But as you can probably see, having to local files and one offsite file ensures that even If you have to disasters and a computer and a hard drive goes down, then you can still go online and get the copy. Or if your computer and your online storage system fail, then you'll still have that external hard drive or USB drive available to you to get those copies and using our kitchen remodeling costs. Worksheet will just take a look at how this is done. I'll just give you a quick walk through. So obviously we already have this saved as kitchen remodel worksheet download, and it saved onto my computer's hard drive. But I want to make another copy of it, and I could just go save and go save as. And then I can browse to a place and I'm gonna put it on a thumb drive. So I have a little scan disk drive. I have my file name put in here, Save Us Excel, Workbook, Click, Save and Simple is that I've backed it up on a second local location. Okay, and now for the third thing to put it somewhere online or off site, we go to file and save as, and I could just go to my one drive put in my documents look, save, and now I should be able to go into a blank Excel document and go to file and open. And I find one of these kitchen remodel worksheets. Save to my one drive. I have one save to a removable USB drive, and I have one save to my computer, and that is fact up. So that's just one way to effectively back up your documents. There are other methods out there that you're free to explore and experiment with to see which works for you. But at the very bare minimum, this is a basic program for keeping Your Excel backed up so that when disaster strikes, you'll still have access to all of your Excel files.
50. Using the AutoRecover Feature: OK, in this video, we're gonna be talking about the auto recovery feature in Excel. How to recover is cool, because if you close a workbook and accidentally don't save it, Excel will automatically save a copy of it. For you shouldn't be confused with backing up your files, which is an entirely different subject and a very important one. But back up is not what we're talking about here. We're talking about the auto recover feature, So let me just show you how to recover works. So if we're here working in our kitchen remodel cost worksheet and let's just say we add a note to it, this is a small example, but it'll give you an idea of how the feature works. Let's just say that I added that note for my contractor. And then I ran out the door in a hurry and I closed Excel, and instead of clicking save, I accidentally hit don't save, and then my contractor goes to open up that file, goes to that file, opens it and doesn't see the notes. But I told him that I left him a note. So he says, Hey, where are those notes that you left me, but I don't remember what those notes were because I was in a hurry. And now everything is messed up, right? Well, not entirely, because what we can do is we could go back up to our file menu. If you look right here where it says manage workbook, you'll see it says today at 11 48 AM, when I closed without saving. And this is Ah, auto recovered copy of the worksheet so I can click on that and you'll notice. Now my note is showing up, and there's a new little tab up here that says Recover Unsafe file. This is a recovered file that is temporarily stored on your computer, and then it gives you the option to restore it and to restore it, you just click restore. And then it's going to make sure that you're okay with overriding the last saved version because the last saved version did not have this note. If I click OK, then it will save that version. So you can imagine if you had been working for four hours and doing all kinds of calculations and entering formalism doing data entry, and you went ahead and click close and don't save how frustrating that could be. Well, now you know how to recover that file and get all of your work back. Now, let me go ahead and show you some of the options that you have. If you go down to the options menu and under the save tab here, you can customize how this auto recover feature works so you can see you can change how often it happens. And right now I have it set for one minute, just so that I didn't have to sit here and wait for my example. But you can see you can enter a whole number from 1 to 120 so that's one minute to 120 minutes. And that's how frequently it will update. So if you're doing really critical work, you can have a update every one minute or five minutes. If it's less critical, you can have it do it every 10 minutes or even every half an hour. The more often you have it, do the auto save the higher chances of it, sort of slowing down your work. But if it is slowing down your work, you can just increase the minutes a bit and take care of that. Then you also have the option of keeping the last other recovered version if you close without saving, which is a nice feature, so you can leave that on. You have your file location where it saved, and the rest of these options are not as critical. But these are the basics for just getting it set up the way you want. So you go ahead and click OK, and you're set. Now, when you do a bunch of work and you accidentally close your worksheet, you'll have an auto recovered file. One other thing to note is that the auto recovery is for saved files, So that's if you have done a save as and already have a file. There's another feature where if you're in an unsaved file like this one, this is just a bunch of random texts I put in here and see it, says Book one, which means I have not saved and named this. Now if I go ahead and close this and I say don't save them, Excel will still save a copy of it, but it's found in a different place so you have to go to file. And when you say open, it's gonna have this option down here at the bottom for recover unsaved workbooks. So you click on that, and then it will bring up a list of all the unsaved workbooks. And in this case, that was just called Book one. But I'll show you the date it was done and everything. And if you click that, open it, then it will bring back up that unsaved file. And again, you could restore this if you like. And you do that by clicking, save as and then name it. Select a file location and you've successfully recovered your workbook. And one final note about the auto recovery is that when you're in your options and you're save options and when it says save auto recovery information every one minute, that means that if you're working for one minute and you close the workbook without saving it, that it will recover that work. There is one caveat, though it does have a 32nd idle time, the Excel program has to be idle for 30 seconds, meaning that you aren't doing any active work in there for 30 seconds in order for the auto recovery to kick in. So every once in a while, if you don't have that idle time and you close a workbook and then try to recover certain changes that you did, they won't show up because it wasn't idle for 30 seconds. So that's just something to keep in mind if you get surprised by that. But the honor recovery features just one Maura Little way to sort of bail yourself out when you accidentally close something and don't save it.
51. Import from Web, Copy/Paste, and Cleaning Up Data: in this video, we're going to talk about how to import from outside of Excel into excel so you can use it for your analysis or whatever else you need to do with it. The easiest way to get data when you have it outside of an Excel spreadsheet is to navigate to where you have it. Copy and paste. I have pre selected a website here that just lists U. S states and their capitals. You can see it's already in a table format, so I'm just gonna put my mouse right here and you can see it turns into the text cursor. This is the select text cursor click and drag all the way down. You see as its elects all the data I let go and I'll hit control and see on my keyboard to copy the data. Or you could also click right click and click Copy there and you can see that it shows control, see as the shortcut. So I have the data copied and I'm going to navigate back to my excel sheet. I have my cell selected here in a one, and I'm going to click control V for Paste or you can just click paste. And there's that data. There are other things that you can do at this point to format it. For instance, each of these still has a hyperlink attached to it, and normally it one of remove these hyperlinks from your data to clean it up. You don't wanna have hyperlinks in your text, or you might accidentally click on one when you're trying to click in a cell. That would take you to that website, but another way of getting data If you don't have the ability to copy it like that, or if you have another data source that you want to look at, let me open up a new sheet here and I'll explain. How do you do that? Under the data tab, you'll see external data. Click there and let's look at from Web. This is a good one, and I have a website that I've pre selected with some data right here. Top 1000 baby girl names. I'm going to copy the Web address here. I'm gonna go back to my Excel and say, Get external data from Web. Then you go here and paste the website in it and hit go. So now what's happening is Excel is looking at this website, and it's searching for any data that Excel can use and grab an import into excel. There's gonna be a few pictures and things that it's gonna have a hard time to grab, but let's see how it works here. So it's asking for import data what cell I want to start in. And I want to start on existing worksheet and hit OK, and then it will start to search that website and grab that information, and sometimes it will take a little while. But you can see it's grabbing the very first word babble, and it's just going down the entire Web page and looking for all the text. Then, if we scroll through here, then we get to the actual data were looking for. And here are those lists of names from the website, and a little bit later, I'll show you how to separate out the one and the Emma because we probably wouldn't want those in the same cell when we go to do analysis. But here we are. You can see we have all 1000 baby names if I hit control home. It takes me back to the very top corner, so that's a couple of different ways to import data. If you have it in a word document or a PDF or some other source, you can follow the same method that we used here. Simply select all the data copy move to Excel. I usually start in cell a one and then click based. Let's go back to the baby names sheet and do some cleaning up on that. So if we click on the A, we can select the entire column and then we'll go to the data tab and click on text to columns. And this delimited function here allows us to separate the text based on different factors and in this case will look at spaces so we'll go next. And then for the delimit er will use space. No, we select treat consecutive spaces has one. So if we have two or three spaces, it will treat it all as one space, and this shows an example of what's gonna happen here. The first section we don't even care about. We're gonna delete that later. Then we hit next, and for now we're just gonna leave this as general because you can always change the formatting leader. And then will it finish? So now every word that had a space following it Excel has taken that data and moved it to the next column over. So now, since we don't really care about the top information here, we can just select that. So we're just gonna delete all this section So to delete a row, you can just right click on a row and click Delete and then I console ect all of these again I can click control home takes me to a one I can hold the shift button and go all the way down with my arrow key all the way down here to roll 44 and then go to home and elite she rose. And I'll show you how to do that with a keyboard shortcut us Well, gonna click Control Z to undo it. I can use Ault h and then D for delete and then our that would do the same thing. So now we have the baby name separated with the numbers in one calm and the names and another. However, if I remember right as you go through your data, you will have grabbed a few other things that you also don't want to have in there. But we don't need these two rows will delete those, and we'll use our keyboard shortcut cult H d r after I select both rose and we'll just scroll through real fast just to make sure all of our names air there and that we don't have any other data that we don't want in there. And we're just cleaning the data and getting rid of what we don't need. It looks like we're good with that. But we don't need the rest of these and will select all those rows. And I've selected more rows that I need to. That doesn't matter. Weaken. Just delete them all. I will select Ault H D R. Control home will take me back up to the top and then the next thing we do is click save. That way you can save the data you've just imported. So you hit the save button here, or ult F s and save is right here, and that takes care of importing your data. So that's how you import from a web address and how you copy and paste information from another source as well as how you clean up your data.
52. Import from CSV file and Excel Workbook: OK, in this video, we're gonna talk about how to import data into excel from other sources. And when you're talking about importing data, the first thing you want to do is go to your data tab here and you're gonna be in this section to get and transform data section, and you have a lot of options. But we're going to cover two of the most common ones, and the 1st 1 is right here from text or comma Separated Values file. And a comma separated values file is gonna look like this. This is just a note pad file, and you can see that we have all this information in here, and it looks like it's just jammed in there. But if you look closely, you'll see that each of the text strings are identified by quotes on either side. And then there's a comma separating each piece of text. So it bob in quotes comma Blake and quotes comma his phone number and quotes because that counts is text comma, then the number one, which is his office number, and you could see it continues down the list. But it's all organized by these commas separating each value or each cell, and that's called a delimit. Er, the comma is a delimit er and a limiters could be other things like spaces, too. But in this case, we're using the comma as the delimit er. So when we go ahead and minimize this and we'll go back to our data tab and we'll go ahead and click on from text or CSP file, I'm gonna go find that document. It's right here, and it brings up a dialog box for us. You can see it's giving us a preview of the information. Remember how we had the first name Bob? And then there's a comma. And then Blake and then a comma will see how Excel has read each of those commas as a break between columns. So all of our information is now nicely arranged in a table. They're a couple of choices here along the top, the file origin. We just leave. This section gives us a choice of the delimit ER, and in this case they were separated by commas. So we'll leave that. But there are other options. You can see colon equal sides, semicolon space tab, etcetera, and you'll notice if I select one of these colon, for example. Now it's clumping all of our information into one column because it doesn't find any Coghlan's in there. If these were separated by Coghlan's instead of Commons, then it would break it up nicely into columns like it did. But since it's not finding any of those, it's just clumping it all together. And when we go back to defining the comma as the delimit er, you can see it breaks up nicely. We can also leave this based on the 1st 200 rose. It just wants to know which data we should use for it to determine the layout. And if we wanted to, we could say, based on entire data set, But in this case, it doesn't really matter. And then we have some options. We could cancel at it or load, and we want to load it into our worksheet. Here. We could just click load, and it will just load it, or we can do the drop down and say, Load to that's gonna bring up another dialog box and give us some more options. So you see, the default settings are for to create a table out of our data and put it into a new worksheet. So that would create a worksheet number two and place it into a new blank worksheet. Now, if we wanted to put it into this worksheet, then we could just change this to existing worksheet. You'll notice now it's giving us a location where it's gonna put it, and it's highlighting that there. Now. If I wanted to change this location, we bring it down a little bit. That could go ahead, minimize this, and then I can use the arrow keys to move it. Or I could just select a spot with my mouse and my cursor that will select a new spot, and you can see it's now identifying that cell phone. Maximize this again and double check everything. Then when I'm ready, I just click OK, and it's dropped it into our existing worksheet at the spot where we chose to put it, and it's formatted it as a table. You'll also notice that the queries and connections pain comes up over here, and it gives us a little preview and some options to modify this connection. Okay, so that's importing from a text were see SV file. Let's go ahead and go to the get data. Drop down and click on that. You'll see. We can also do a texture CSP file here. But let's do this import from another Excel workbook. So we click on that, gonna do a search to find my file, and there it is, a click on that. And now you see, we have a slightly different dialogue box here because in this Excel file we have several different tables that we can choose from. And if we click out on some of these, you'll see. For instance, if we click on the offices table, you'll see it gives us a preview. And what that table contains is office I. D. Number, City State phone number. We also have our employees table here, which has some employees information. And then we have this employees import table, which, if you look at this one, it's cleaned up a little bit, so we set this one up to import. This one has some blank sections here on an extra column, whereas this one's been cleaned up, so this is the one would want to use. But the important thing to remember from this dialog box is that you need to navigate to the specific worksheet that you want to import. You can preview it and then, of course, we'll go to load again and load, too. And in this case, we're going to go to a new worksheet and click OK, and it brought the data and as a new worksheet and again it's formatted it as a table. And if we didn't want it to be formatted as a table, then we could go up to our table styles here and we'll go to the design. This is under the design, the table tools designed, and we'll go to the nun formatting, change it to none, and then we can convert it back to arrange. It's important to reformat. This is none before you convert it to arrange to get rid of any unwanted formatting, and we just click convert to range and you can see this saying this will permanently remove the query definition from sheet and convert the table to a normal range. Continue. This is basically just going to reset this as a normal range, but we already have our data pulled in, so that's fine. Click OK and Now we just have a normal range with our imported data. So those are two ways to import data again, we looked at bring it in from a text or C S V, which is a comma separated values file. And then we also looked at going to the from file and from an existing Microsoft Excel workbook.
53. Importing Data from Access Database: okay. And this lecture, we're going Teoh import data from an access database and bring it into excel. And I'll just give you Ah, look at the data base that will be bringing it from Here's our access database and we're just working with this employees table here. We're gonna pull this into excel. So first we're gonna close this database, and then we're gonna go to our data tab, and we're gonna say get data and go to from database and from Microsoft Access database. Click there and we click on the database that we're looking for. And that brings up the Navigator pane here. And you can see this is the main file folder for our employees Contexts Access database. And then these are the different objects within that database for us to choose from, and we want to use the employees table here. So go ahead and click on that and you could see it gives us a preview of it, and we can scroll to the rights, the whole thing, and it looks good. We're gonna go ahead and click on the drop down on load and go to load, too. And then we get this little import data dialogue box asking how we want to view the data. And we could go table. We could open in a pivot table. We could open in a pivot chart or we could just create the connection and not open anything . But in this case, we want to open it as a table and we can choose the existing worksheet or a new worksheet. We're gonna bring it into the existing worksheet. You can select an area where you'd like to put it. You can either go in here and manually adjust this chairs. That to be we could change this to to and then it will drop it here. Or we can get rid of that and click this arrow. And then I could select B two and then maximize it again. And now it's going to that cell when we click. OK, and there's are complete table imported from our access database. Okay, Now let's open up our access database again and go back in there and make a change to it. Then I'll show you how the link or the connection works. So we're gonna change something, so it's kind of obvious we have all these three of seven phone numbers. Let's change one of these 2703 just so it stands out when we had enter its updated in our access table and we can save it and closer access database. That brings us back to our Excel. If we click into our table and then go to refresh all and we go find Bob Blake, you can see there's are 703 So we now have a link from this Excel spreadsheet to our access database. So any changes that happen in the access database will be able to be updated in here. And you can go here to the properties, and you have some options for modifying that data formatting and layout. And then you also have choices on what to do with the rows and cells when you refresh the data so it's automatically set to insert sells for new data and delete unused cells, which means that your table here will automatically expand and contract to fit the data that's coming over from access. Okay, and then if we go to this button here when get into more properties and you can set how often it refreshes so you could set it to refresh every 60 minutes or every five minutes or whatever you want to set for frequency there. Or you can also set it to refresh when you open the file, which is a good idea. And then this sets it so that when we click refresh all which is what we did a moment ago, it will refresh the connection as well. Oh, and also, you have the option here to change your query name. So if there's a more meaningful name for this, like maybe we'd want to call this Weekly Employees Employees update, you could write a description as well. And having a descriptive name and a helpful description makes it easier for you to manage your connections when you're working with your workbook and managing the data that you're bringing into the workbook so you could add a description there and then you go ahead and click, OK, and then okay again. And now we have the property set for this import connection. So that's how you connect to Excel worksheet to an access database to bring in data from access
54. Printing Your Excel Document: in this video, we're going to cover how to print and excel document. We're gonna talk about some of the print basics such as print preview page orientation, layout in margins, paper size page breaks, headers and footers and some other basics like that. Like most Microsoft products, Excel allows you to go straight to file and print and print preview. And there's the print button, and it shows you that if you have a sheet loaded and I hit the escape, he to get out of the print preview and back into the main scream. Now, if you have this chart and several other charts on the same worksheet and you only want to print this chart, what you need to do is set the print area the way we do that. As we go to page layout print titles click in their slide this off to the side, and then you can just select this field. So now that's the only area that will print. So here's our print preview, but what happens if we want to add a comment down here? Below are spreadsheet. I'm just gonna pace the comment in here real quick. I will go back to print titles, print preview and see that comment doesn't show up in our preview because it's outside the print area. So let's go back in and look at that Under view and page break preview, I'm gonna hold the control, but now and scroll my mouse to change the zoom. You could do this in the lower right hand corner of the screen as well. And if you see this blue border here, this is showing the print area that we've selected and our text comment is outside of that print area, so nothing out there will print. So we're gonna move the cursor to the blue border, where you see the up and down arrows well left. Click with your mouse and drag it down, and now this area will print. Now let's go back to their view. Normal. Go back to our page layout, print titles, print preview and there it ISS. Let's see what else we can do with the print titles menu because there are a lot of options . Another way to open it is to hit the old key type P for page layout and then I for titles, and you'll see these little letters show up in the ribbon. Okay, let's go to headers and footers. Now there's all kinds of things that you can add to a header or footer, and one of the really common basic ones is page numbers. So we'll put a custom foot or here, and we'll do it in the right section in the bottom of the footer, multi page and space. And then you click this button and that gives you a page number were basically putting a little bit of code that we type space of space. And then we hit this button and it puts code in for the number of pages in your document. These are some other things you can click to put data in your footers and headers, but we're not gonna mess with that. And you can see that Page one of one shows up in the footer here. Okay, let's do a print preview so you can see it. And there it is. And if we use all and hit P than I will bring up the page, set up again. So let's talk about margins. This is where you change the spacing around your data when it's printed. We can change it from 0.752 point five or whatever spacing you want. We can change the space for the headers and footers to show up. And what's most useful about this particular section are these buttons. Center on page, horizontally and vertically. So we'll look at that print preview again and we get all of the data center to the page and you can see it looks a little bit prettier. So let's hit the escape button again. Well, O p. I again and we go to page and change the orientation to landscape hit print preview. And look at that. Looks even a little bit better will hit escape again to get out of that. Okay, now one of the other parts you should be aware of on the print preview button, and we'll get into that by hitting the all key again and then w I that gets into the page break and you can lay this out any number of ways you can lay it out however you like. And once you've changed it, we're gonna back out of this by hitting Ault W l where you can just click up here to normal . Notice this darker grey line here and here. That's showing you where the print areas set in normal view. So those are the basics of printing and Excel document and how to change your margins, your page orientation and your centering within a page.
55. Excel Keyboard Shortcuts: in this lecture, we're gonna be talking about excel shortcuts and I'm just going to use this spreadsheet here. Just has a list of sales reps, their total monthly commissions, whether they hit their monthly sales target and their total monthly pay in the sales region that they're in. I'm just going to use this spreadsheet as an easy way to show you a bunch of these shortcut keystrokes and how they work. So the 1st 1 is a shortcut for the auto some and the way you do a quick auto summons. You hit Ault and equals. And just like that, it inserts your auto some formula. If you hit, enter there it is that leads me right into my next one, which is Control Z. If you want to undo something that you've just done, you hold down control and it Z and it does. It controls. He is a favorite of a lot of people who use excel because most of the time, if you make a mistake, you can fix it by clicking Control Z. You can also read Do it by pressing control. Why? And that will redo what you've just done. Done. If you want to delete a column, you can select the column and click control minus, and it will take it away. And again, I'll click Control Z to undo that. If you want to add a column you press control plus on your keyboard, or if you don't have a number pad, you press control shift plus and that adds a calm will control Z to take that back. If you want to make something bold, you press control be and it makes it bold. You can press control, be again toe. Unmold it When you're working with a formula, you could make absolute cell reference by selecting the cells that you're referring to and clicking f four. And it will add these little dollar signs, and you can see that this one has already been done. But if I hit F four again, it will make just the row absolute. I hit it again. It will make just the column absolute. See how it says dollar sign F. So it's referring to the F calm as an absolute cell reference, and then if you hit it again, it will make it a relative cell reference. And then I hit a final time, and it brings it back to an absolute reference like I had it. But you could just hit the F four button and toggle through the different cell references. That way, if you select a range of data and you hit F 11 it'll automatically create a new sheet with a chart based on the date of you've selected. So you can see here it's taken our sales reps and charted them. According to their monthly commission. If you hit the F one key, it'll bring up the help feature. If you select a cell and press control shift one, you'll format it as a number you can see. Right now. This is formatted as accounting, but if we hit control shift one, it changes it just a normal number, of course, all control Z to undo that. To insert a hyperlink, you press control K. It brings up an insert hyperlink box, and you can enter the address of the hyperlink you want there. Another useful shortcut is if you click into a formula, so a double click on this. I can evaluate a part of the formula so I can look at this first section of this formula. And when I press F nine on that section, it analyzes the formula and tells me what that part of the formula is calculating. So when you have longer, more complex formulas, this is a really great way to look at pieces and parts of the formula so you can analyze it and troubleshooting. And again you can see that that was C six equals no and see six equals. Yes, which is why it when I hit f nine, it came back. It's false. Another really useful shortcut as I can open the create table dialog box by just being clicked anywhere in this range. And then I press control t and it immediately brings up the create table box. If I wanted to create a table out of that or so, just click OK, and there I have a table control Z to undo it. If you want to quickly move between worksheets, you can just press control and page up. That will take you one worksheet to the left so you can see this is the chart we created a few minutes ago or you compress control page down and that will take you one tab to the right on your worksheets. And if I continue to do that, that will take me to a blank sheet that I have shed three and then page down again will bring me to another worksheet where I was playing with some conditional formatting and to get back to where I won't want it to be, I press control page up twice, and that will bring me right back to where we were. If you press control one, it will bring up a dialog box to format cells. And, of course, you can do your number alignment for border Phil and protection formatting. If you press control A, it will select your whole active worksheet. So Control A is basically a select all click on any cell to UNSA licked the entire worksheet. You can press control F that will bring up the find and replace dialogue. So if I wanted to find all of the entries where Bob existed and replace it with Robert, I could just say, Replace typing Bob, Change to Robert. Look, replace all says, All done. We made one replacement, okay, and you can see it's now changed to Robert Control Z undo that if you want to close your entire workbook, you press control W. Of course, it will ask you if you want to save it. If you want to save your changes, click save. If you don't click, don't save in this case, I'll click. Cancel because I don't want to close it. One of my favorite keystrokes isn't necessarily a shortcut, but if you're entering a formula, for instance, you're entering a some formula down here, you type in equals s, um Instead of entering your parentheses manually, you can just press the tab button, and it will automatically enter the parentheses and put the cursor there so you're ready to select yourselves. If you want to copy a lot of information from certain cells, you highlight whatever you want to copy. Press control. See, see highlights it and then you click wherever you want to paste it and press control V that'll paste it. Undo these for a moment and highlight these again. Press control X two cuts. Select where you want to go and control V and you'll cut it and paste it. So see how, in this case, when we're cutting it actually cuts it out and puts it in the new spot controls. Eat on, Do it. When entering a formula, you'll notice that I select my formula, and when I hit enter it drops me down to the next line. If I wanted to stay there in that same cell, Aiken type s, um, select my cells and then press control. Enter and you noticed that now I'm still selected in the same box without moving down to the next line. So if you want to do edits in there or do formatting on that box without having to grab this and re select it than control interests, way to get a fairly obvious one. But a simple way to select cells is to press the shift in arrow keys. Right Arrow keys takes you one column to the right down Arrow key, takes you one road down and the up and left. Syracuse discussed the opposite direction That's up, and that's left. You can also press control and right arrow keys, and that will take you to the furthest right cell in your range. So I press right goes to their breast down. It'll be the furthest down cell press down again. I'll take me all the way. The bottom press up again. Press left and it will take me all the way over. Press down and so if you press control s, it will automatically save your document Press F 12. It'll open the save as dialog box if you're in a cell and you want to edit it rather than double clicking, you compress the F two button and it will drop your cursor into the cell, seek and then start editing. And then finally, if you're selected inside a region or range, you press control Asterix. Or, if you don't have a number pad, you press control shift. Eight. It will select the current region or range that your cell is within. So those are some shortcuts and keystrokes to help you navigate Excel more quickly and to be more efficient and effective while you're using Excel, when you're spending a lot of time working in excel and doing some of these things over and over again, these keystrokes can save you a whole lot of time.
56. ALT Key Shortcuts: okay. In the next few sections, we're gonna look at a whole bunch of additional functions that are just going to round out your Excel skills. But in this lecture, I want to introduce you to the altar shortcuts because I use them a lot, and that way you'll have a solid understanding of what I'm doing now. When you're using Excel, a lot of people will take the mouse and go to wherever they want to click, and they'll go to menus like these and click insert and then click again. Insert column or insert rose or insert sheet, and they will go back to your sheet and continue typing. But the thing is, your fingers are already on the keyboard, typing numbers or typing data into your spreadsheet. So it's much easier to use keyboard shortcuts to do the same things. So let me give you a few examples. Let's just type the word data into a cell and will use a keyboard shortcut to insert rows and columns. So one way to do this is to take my hands off the keyboard, grabbed the mouse, find, insert and navigate through the dropped out menus, or after I've taped in my data. I could just sit the all key we had all it brings up all these little black squares with letters in them showing you where the shortcuts are. So H is for home and for insert p for layout and all of these shortcuts bring up the tab that you're looking for. So if I had Ault and then I want to see the data tab, I just hit a and that brings up all the data tools. So I'm gonna have escaped to get out of that. And let's insert some rose. I had Ault h for home I for insert, see its way over here and then our for row. And actually, you can't really see that there's next to row. So let me put in some more data, so it makes it more obvious again. I had all to each, I are all one at a time. I don't have to hold them down and you could see a new room and see how fast that could be . I noticed that in our second cell in column B, it's much narrower. Then I should be. And one way to fix that is to grab your mouse and go to format and auto fit column with which works. But let's it controls and undo that. Another way to do it with the malice is to double click right here that also works all controls, the again to undo that. But if only is a keyboard shortcut. You had Ault h Oh, the letter. I, if you have it, memorized it super fast. But even if you don't, it's still faster just because you already have your hands on the keyboard. So that's how to use the Ault shortcuts. But let's look at another favorite shortcut, and that's the control one shortcut and yet control and the number one. It brings up the format cells. Dial it box, and you could even navigate through this without the mouse by hitting the tab to go to the list of things. Or you can just hit the arrow keys on your keyboard to navigate through the different taps . So that's a really good one. You can hit tab and change which type of formatting you want. Todo You can also get to it by hitting Ault h oh de or simply hit control one, which is much faster. Okay, so let's change this column back using Ault H o W c the w there with that, and we'll change it back to eight. Now, let's say instead of widening the column, we want to just wrapped the text and you hit Ault age. And then there's the W up there that wraps the text, and if I do it again, it turns it off. Now, the cool thing is, if you know where things are with your mouse, all you have to do is hit the all key and then look at the key strokes. Essentially, Excel is teaching you how to use the shortcuts. So it shows you f for file H for home and so forth. For example, if a f i s or a and I couldn't save my project using the old keystrokes, it's a lot faster than using the mouse and to clear the shortcuts just hit the escape key. And the coolest thing about the old shortcuts is that they could be type with one finger on one hand. You don't have to hold down the old key while you're hitting the H key. You just hit Ault and then release and then hit H and then release. So it's easier than doing like a Control Z where you have to hold down the control and the Z together. So that's just a little introduction. Teoh how to use the all shortcut keys to work more quickly in Excel.
57. TEXT: in this video, we're gonna learn about the text function in Excel. Now. This is a very versatile function. It's used mainly for writing lines of text where you want some of the numbers or some of the other inputs. Two. Very. Based on what you've put into other cells, you can have the text function, format things in a couple of different ways, and I'll show a couple of them here. Now let me give you the basics of using the text function. You start out by typing your equal sign. You type in the word text and hit the tab key. Then that starts you with your open parentheses and you're ready to put in your formula. And I'll hit the escape key a couple times to get out of that. Another way you can go to it is to go to the insert function and scroll through all the options here to find it, and you find the text function. So that's another way of bringing up the text function. To us. It's another way I like to start with equals type the word text and the bold text here says . What is the value or the number that you want to show or whatever else you want in there. If I say 0.25 that moves the bold section from value to format text. So now the function is asking, How do you want this formatted? And I want to show it as a percentage. So to format this, you'll start by putting an open quote. And that's how you tell Excel that whatever you're putting here is not gonna be showing in the formula. It's gonna be explaining to excel how you want things to be formatted. So I'm gonna take a 0.0 that will give me one digit before the decimal place and one digit after that I put the parentheses in here, and that's exactly how everything is going to show up. So hit the close quote, close parentheses and enter now shows 25.0%. Let's delete that and try again in a different way. Type equals text 0.25 comma open quote. Now I could just use the pound sign and then the decimal place and the pound sign and the percentage close quote, close parentheses. And now, because there is no number after the decimal place. The pound science says Okay, there's no number there in your value, so we're not going to show anything. So you can use that pound sign as kind of a wild card. Now the reason this is useful is let's say that I wanna have a line of text talking about a percentage say 25%. Same way we do a formula because I want the text on the text to reflect a number that's gonna change. So the equals sign, open quotes and then we're gonna type. Here is the 25% of the total number. Doesn't really matter what the sentence says. We're just using this as an example. So that's just a sentence. But I don't have 25% showing, so I'll just put 0.25 there. I'll go back to this particular formula, and if I had F to open up the formula again, scroll back here to where the 25% shows up. I hit the close quote Emperor Sand Side. Now that tells Excel that were no longer playing with text. What? We're gonna put a formula in here, so I start with text open parentheses. What's the value that I want. I want whatever happens to be in this cell. So click on that and you see a one is selected. I'll hit the F four key, which locks both the column and the row. So it doesn't matter where I moved the sentence. It's gonna make an absolute cell reference to a one that hit Comma. And then I'll delete the 0.25% because that's not gonna be important anymore. Format text. I want to be a percentage open quote 0.0. I like that zero behind the decimal, but you don't have to have it. The percentage sign is very important. You want a percentage to show close quote, close parentheses, ampersand and the open quote sign. So now you've got two phrases of text. The formula in the middle that another phrase of text hit Enter and the sentence says exactly the same thing is, it used to say, but say this now needs to be 20.35% notice the sentence changes, so I could say 0.7895 rounds it to the first digit because I have only one desperate place showing, So it's going around it to that last one instead of saying 78.95% it says 7 86 If I wanted more decimal places to show that I could go in here and put more of those in their or I could just put a pound sign there, only one of them. Let's do another one. Every time I get into the cell, I head off to, and that opens up the formula without having to click up in here or anywhere else. So that's how that text function works there. You can do this not just for percentages. You can also do this for other kinds of numbers. For example, let's say I have the number 1000 here and I want a sentence with the number of 1000 in it equals open quote There are, so we'll just make this one sentence. There are 1000 close quote ampersand sign. Get that one hit a four. So I lock it. So it's an absolute cell reference, and I'm going to hit the ampersand sign. Open quote, period. Close quote notice. I did not put the text formula in there because I want to show you something doing it this way. It shows you exactly how you have it formatted in the first cell. If you change the format of this number, we click up here. It's not gonna change it in the sentence. You have to actually use the text formula for that formatting to take. So you come in here. Text. There's my reference using the arrow keys on the keyboard comma formats open quote. We'll do the pound sign, then comma three spaces because I want three spaces after the comma close quote and the close parentheses hit, Enter and now I've got There are 1000 of these with the comma, but I don't have anything showing after the decimal place because in this format, I don't have anything in there saying that I want something after the decimal place to show . So if this number were, say, 1000.25 it's not going to show up in my sentence. If you were to say 1000.95 a round up as you see toe one, but it's not going to show the decimal place unless you tell it to. We're going back into the formatting section and decimal place and put something after it. And if you use the zeros, it's much more specific on two zeros. I wanna show, too. And that shows 1000 point, maybe five. Seeing comeback this number and say, now this could be a 1,000,000 of them. And however the number changes the text function, update your sentence for you. So those are just a couple of ways that you can use the text function.
58. REPT - Repeat: OK in this video, we're going to talk about the repeat function. And if I go like I'm entering a formula, we enter the equal sign and then our e p t. That I had tab and then asks for the text that you want and how many times you want to repeat it. So let me hit the escape key to clear that, and I'll show you another way to get to this one. Go to the insert function button and it's under the text menu, and you can go through here and go down to repeat. And you can do it through this wizard just by filling out these fields. Normally, it's quicker and easier to just do it within the cell. That way, it makes it easier to just reference cells within the sheet. So hit equals R E P T. Whoops got out of myself. You have to hit the tab button to get the open parentheses, and then we can type in the text that we want to repeat. So let's say that we want to type in the text, quote the quick brown fox comma, and I see the bold ID section goes to a number of times and let's do it 25 times close parentheses had enter. And there we go. We now have the same text 25 times. Now that could be useful if you're looking to have the same thing typed many times in one direction. So that's what the repeat function does. But let me show you another strategy that I really like. That's related, but I could just move out 25 times if I wanted to repeat something 25 times. And I'm just gonna type of filler text in this column and hit a one, for example, and I had control left Arrow, and that takes me right back to the very first column, and now I can type the quick brown fox, and if it copy control, see, you can also hit the copy button there, but then we'll have it copied. I can also hold control shift and the right arrow down, and now everything to where I put that filler text is selected. Then I can hit the paste button up here on the ribbon, or it can hit Control V. Now I have the quick brown fox copied and pasted into every single column, so you might use this strategy if you needed to repeat a header 25 times. Of course, you can't see all of them because the columns are too narrow, so you are a fit. The width we use are all key H oh, I and that makes every call in the exact same with another way to do that, I'll hit Control Z to undo it. Weaken Goto format, auto fits and column with right there, and that does the same thing. So the repeat function can be useful if you want the same thing repeated many times where we can use this strategy to copy data across columns. And if you want the same thing, repeated down a column in different rows. One way you could do that is to copy this whole selection, and we already have a copy. But if you didn't, you hit the escape key, so everything's un selected. So you make sure sell a wanna selected and you hold down the shift and control keys and then tap the right arrow key. It will take you all the way to the far side of that data, and we'll copy it that's control, See? And then I'll hit control home, which will bring our cursor back to calm a and let's put the cursor on, say, sell a three and we want to do a paste special. You could go through here and go to this paste special and then hit transpose. See what that does. All that data is now pasted, and each item is in its own rope, so that's one way of doing it. Let's sit control Z to undo, and I'll show you another way to do it is press Ault each V. Yes, because it's the same menu you see the E down here has that underlined. You hit the E on your keyboard and it'll automatically check that box for you. You hit okay with your mouse or hit enter, and that's another way to do it. So it's a few different ways to repeat text over sells horizontally or vertically down the rows
59. UPPER, LOWER, and PROPER: in this lecture, we're going to talk about three very similar functions and excel. Or at least they're used in a very similar fashion to give us different results. We're looking at the upper, the lower and the proper functions. What these functions do is modify the text that you have in your spreadsheet to show it either upper case, lower case or every word capitalized. So I have some text already pre typed out, and I'm just gonna paste it here. I hit the F two button to open up the cell I had paste and enter. So move the mouse out of the way. So notice with Peter Pumpkin eater. The first word is all caps. The second word has the first letter capitalized, and the third word is all lower case. Now I'm just going to auto fit this column so that we can have everything in one cell and be able to see it correctly. That's Ault H O I, or you could go to the format and click the auto fit with button if you like. So with Peter Pumpkin eater, let's do upper first but equals and then upper a start typing it and you could see a seal nuan left in the list so I can hit the tab key to select it. You can see the bold section is for the text. So I'm just going to click this cell here, and then I'm getting hit comma. Sorry, you don't need a comma because there's only one frame of reference in this formula. So delete that comma and then close parentheses. And now Peter Pumpkin eater is all capitalized. Let's auto fit that cone for whip this. Well, okay, let's do lower. So I start with equal sign. Start typing lower, select and hit tab to make sure that's the function I'm going to use. Click on the text that I want to change Close parentheses. Hit. Enter now everything is lower case. Same thing with proper equals p r o. Its third on the list tab. Now all of these functions I'm gonna hit escape again. Here you can find all these same functions, but inserting the function from here on the list you confined it under text, you confined lower signs proper. And then here is upper. So they're all in there as well. If you needed to do it that way, but to type out proper, we just start typing it. Then we hit tab, select close parentheses, and there's the text. So depending on what text you have typed or pre selected, you can change the form out of the capitalization to whatever you like using these three functions. So it's a summary of the upper lower and proper functions.
60. TRIM - Remove Extra Spaces: okay, in this lecture, I'm gonna talk to you about the trim function in Excel. This one's especially useful, especially when you're importing data that's not quite as cleans that needs to be. Or if you have cell references that have extra spaces added, which happens when it comes from outside. Excel in your importing data from other sources. So the way the trim function works, you start writing the function by hitting equals and you notice, it says it removes all spaces except that spaces between words. So, for example, if you have some data that comes in and it has multiple spaces in front and then say it says just something simple, like, this is data, period, and then you have more space is at the end, and just so you can see it better let me out ofit. This and once again, auto fit is Ault h o I. You can see this gets kind of messy, especially if you have more data that comes in without the extra spaces. Might be somebody's name, for example, and it's a line to the left. The problem is when you use other functions that look at the data in the cells. You need to sell data to be consistent. So in order to get the data so it's cleaned up a little bit, use the trim function. So we hit equals. Start typing. Trim out, hit the tab button for the open parentheses, then select this data. It closed parentheses. Auto. Fit it with Ault H O I. Now the extra spaces air gone. No spaces before or after. Let me show you a way to test it. Now, if you go back to the original want, you could see if we have F to where the cursor is. There's all this space all over the place, and I just hit the home button to get to the front of it really fast. And I'm typing the arrow keys so you can see the movement of the cursor in this space for him. The N key. You can see these extra spaces. We hit the escape key and go down to Fred where there's no space is at all for Head F two and move the Aero Key. You can see there are no extra spaces at all if I go back to this one and I copy it hit control C and then I do a paste special. So if you paste it has a value, you will be able to do the same thing and see where the extra spaces have been removed. So you go to paste special values, OK, that I had have to You can see there no spaces. So this trim function is very, very handy for helping you trim the data that you have for analysis and getting your data ready for further usage. Okay, Now, let me give you a specific example of how to put this trim function into practice. So I have some data that I've put together that is not clean. I set it up so that it will have some issues so that I can show you how to use the trim function. So I'm just gonna pace it in here using control V. So you can see we have a list of names and year. So we're gonna use the trim function to remove the spaces and clean all the state up. You can see this one has a couple of extra spaces in the end, some of them have extra spaces in the middle and those spaces will get in the way if you're trying to do certain analysis on your data. So let's say we want to clean all these extra spaces out of these names. What will dio is it equals and type the function trim Hit the tab key. So we're ready to select our text. Gonna arrow over left on the keyboard to Janet Smith. Close parentheses, using the shortcut shift zero and then hit. Enter. So the formula basically just says trim, Sell A to see your says it right here. So I'm going to copy that formula. Then hold the shift button down and down arrow. So I match with the last name in my spreadsheet this and control of you to pay set formula down that all the names have all the extra space is removed. The only thing we have to do is to delete out that trim formula so I can analyst the data, so I'm gonna have escaped to clear out everything we have previously copied. I'm gonna copy everything that we have selected and now well paced, just the values over the top of the same data, and that will remove the trim function from the data. So we used the shortcut Ault H V V. So now the trim for Mills gone and all we have left are the names we had escaped to clear up what we've copied and lets it control plus space bar, just like the whole column. So I can auto fit the wit to match the data that we have there. And if you remember, the shortcut is Ault h o. I see the eye under the format here. That's for auto Fit column with. So now we have this cleaned out of here and I can copy it and it paste over the old stuff. And when I paste over the old stuff, it gets rid of all the formulas that we put it in there. See how the lines went away? See, this has the lines that are darker around each cell, and this one no longer does. But we don't want to ruin all the formatting in there. That's it. The undo button controls the and let's instead based on Lee values again. Holt each vv. And that leaves the formatting alone. So we don't overwrite any of the formatting that we used to have their. So that's how to use the trim function to clean up your data, to make it easier to work with and do more analysis on.
61. Combining LEFT, MID, FIND and TRIM: OK in this video, we're going to use the left in mid functions to separate our names into different columns. So we've already cleaned up our data and taken out all the extra spaces so that this will work better. So if we really want to separate our data, let's start with their table here that says First name. And then we'll have middle initial. And then we'll put in our last name. And we'll also include the year because it's there and we want to include that control shift left Arrow starting from the last cell, select everything we have in the header. That's why I left column C blank so that we would have a space between our original data and the new data that we're working with. Then we hit control. Be as in boy too bold. The headers. Okay, so let's start with the first name. I hit the aerial keys to get into cell D to, and I only want the word Janet to show, and the way to do that is to use the left function. So we started function with the equal sign, then left, and you'll notice it says returns a specified number of characters from the start of a text string. So we're gonna combine left and find functions. So hit the tab key to get the parentheses in there. And this is the data they want. And I'm gonna hit the F four key three times. 123 and see how it added the dollar signs into the cell reference. The dollar sign next to the A means the column is locked, but not the row. So once I'm finished with this formula, I can copy it all the way down and it won't move. It'll stay in the same column. That's our absolute cell reference, and you'll see how that works in a minute that we enter the comma. Well, you could just count the word. Janet has 12345 characters. The problem is, Gary has four. The name George. It has a whole bunch. So if we enter the number five here, it's not gonna work for each name. So instead, we're going to use the find function you'd see. It says returns the starting position of one text ring with another texture. Find this case sensitive. In this case, we're not gonna worry about the case so much. Hit tab. What text do we want to find? We wanted to find the space after the name. So we'll hit Quote Space bar and then end quote. They'll hit the comma, and we want to find it within this text, and we hit the F four button three times. 123 in this section with the brackets means that it's optional, so you don't actually have to put anything in there to make the formula. Work will do close parentheses twice once for the find function and wants for the left function hit enter. And now Janet shows up. We hit control C to copy it, Shift arrow all the way down and paste so it grabs everything up to the first space and enters it in here. The next step is to copy and paste those values, because occasionally you might still have a space in there. So let's clear this copy from Janet Copy Don't H V V. And when we look at Janet yep, we have that extra space. We don't wanna have extra spaces in there. So how do we get rid of those extra spaces in the first formula. We could have done a minus one and the find, which would make it a little more complicated. But instead we can use the trim function. So let's do that. We'll go equals trim. Grab that close. Parentheses copy. Peace it down. Escape so I can copy the whole field. Copy it back to here and Ault H V V again and I can hit the shift control down Arrow to select it and then hit the delete key. And now my data here will have no extra spaces. So let's go ahead and do the middle initial, and then we'll get to the last name. So, like this text at 43 times toe lock the column comma for our start number. Well defined function. Quote space quote comma where we want to find the space in this cell. 43 times close parentheses, close parentheses. Hopes. Forgot one thing. The number of characters in mid is not an optional section. You actually have to tell the number of characters because it's in the middle of the text string. So let's try if a huge number to make sure that it accommodates all of the letters because we're going to get the middle initial and the last name in the same cell, and that will make it work. So we're going to copy this, paste it all the way down. So now I have everything after the middle initial, and then we can use these results to get our last name to get the last name out of the middle initial section. We need to get rid of the formula and trim it because we have an extra space in there. So first we have to get rid of the foreign was by selecting them all. Shift control down arrow control. See, to copy it all Holt H V V to paste the values without the formulas. And let's trim it will come over here to a new section equals trim Tab hit control. Left arrow takes me right to that sell because that's where all the data is. And Aiken, skip over the blank columns in the middle. Close parentheses hit. Enter. Copy that. All the way down. Control V to paste over it now, Control, See to copy that whole section and come back over here Ault h v v to paste the values. Now we have it cleaned up and have just the values We don't need this anymore. Control, Shift down Arrow and elite. Now let's do the mid function equals mid tab this text comma find left Arrow to select that text I want to find and we want Actually, we want to find the space So put a space comma We want to find it within so you to close the parentheses for the find function at 100 for the number of characters close prince sees and enter and it brings back Smith Now what we could do to simplify this just f to toe go back into this formula Hit the home key brings me to the left side of the equal sign right there. Oh, and we could put the trim formula right in there and hit tab and hit the end key to add the extra close parentheses for the trim function now hit enter and that gives you the same results with it trimmed up without those extra steps of copying and pasting to clean it up . So now we can copy it. Shift there all the way down, paced with control V. And there we have all the last names course. We have a couple that are too big for the column here, so we'll auto fit the width of the column. Halt H O I to make the column bigger. It escaped to clear everything else we've copied. And I would just want the middle initial here. So let's just select this and move it out of the way. Using shift control down arrow Control, see a copy. Go over here, paste it back over here to delete it. Shift control down Arrow. Oops. I made a mistake. I didn't get the formula off the other one. So it's undo and come over here. Couple this first, then Ault H V V to paste the values only it's now weaken. Delete this stuff and our data will stay as it is. So in this case, we can use the left function again because all the data that we want is the middle initial here. So we can just go ahead and enter. The formula equals left Tab over. Here is the data we want to pull from comma two for two characters. Close parentheses after copy that formula down. Using shift down Arrow Control V to paste it. There are all our middle initials. So let's copy the whole thing and get rid of the formulas beheading cult H V V and pacing in his values. We'll delete this using shift control down arrow, then delete. Okay, now, let's do the year. Well, we could just do this equals that Copy it all the way down using shifting down arrow Control V. So that's how you use the left and mid functions to separate your data. But now you've got a nice set of data, all separated out and ready to do analysis on.
62. HYPERLINK - Create a Table of Contents for Your Worksheets: okay. And this lecture, I want to show you how to use the hyperlink function. First, I'm gonna show you how to insert a hyperlink into a cell, and then I'm gonna show you a cool trick for using the hyperlink function to create a table of contents for all of the sheets in your workbook. So to enter a hyperlink in a cell, you just click into the cell and start typing your link. So if I'm doing google dot com, I type that in, and when I had enter, you can see it recognizes that as Google, because it's recognizing this has a Web address. The other way to do it is to go to the insert tab, go all the way over here. Toe links. Click the drop down click Insert link. You'll see it brings up this dialog box. The two important things are the text to display. So we want to just say google all right, a little cleaner looking. And then we put in the web address www dot already popped it up. Auto populated it. We click. OK, and now you can see we have the link, but it has some friendly texts in it. So those are two ways to put a hyperlink into cells in your spreadsheet. Now, let me show you a really cool way to create a table of contents that will allow you to navigate from sheet to sheet within a workbook. The hyperlink function in Excel is just not as intuitive as the other functions. And let me show you what I mean by that. So we start typing it in like any other function equals hyper it tab to go to the function . And it asked for link location and then friendly name. So a great use of the hyperlink function is to create a list of all the sheets names in a workbook, and you can create a table of contents so you can click the link, and it will take you to the sheet that you're looking for instead of having to navigate by scrolling through all say, 20 or 30 sheets to find the sheet that you want. So to show you how that works, let me escape out of this and insert a new sheet. Ault H I s is the keyboard shortcut for inserting a new worksheet. You see, we now have sheet one and sheet to, and we'll go back to sheet one here in column C will hit equals hyper link tab to open the function it asks for link location say sheet to H nine is where I want it to go than comma . Friendly name quote she to, and the friendly name doesn't have to match. Exactly. You could make it a little more reader friendly, so we put a space in there, close that hit, enter and now and she want. I have a link. See, it's formatted as a hyper link and clicking. It should take me to sell H nine on sheet, too, except it doesn't work. So the way to make this work is to do some extra code inside the formula. And once you add this extra code, this table of contents is very useful. So let me show you how to do it. So first, let's create a listing of the sheet names, so we say sheet, too, She three. We don't currently have a sheet three or sheet for, but we'll make those later so that's OK. So let's start typing out. The high polling function again equals hyperlink and there it is. In the list will hit tab. And instead of just going straight to the link location, I'm going to type a quote sign than a pound sign than an apostrophe on end quote. And I'm gonna get the ampersand sign that I'm gonna click on this cell here before she to then another ampersand, another quote, an apostrophe and an exclamation point. I'm gonna say I want to go to a cell h nine. That's what I want a reference. And then close the quote. And for a friendly name, let's just say sheet to because that's what I want to name it and then close parentheses and had enter. So now I've got this same formula, and it looks just like it used to. But now when I click it and that takes me to sell H nine inch eat, too, and it works exactly how we wanted to. So going back to sheet one. Let's copy this formula using control, See then shifting down arrow. A couple of times use control V to paste it had escape. And if I have to, here you can see it's exactly the same formula that we were using before but now were rough seeing sheet. Three. So let's escape again. Now we don't have a sheet. Three. So what happens if I click here? We got an air references invalid because I don't have a sheet. Three. So let's insert a sheet. Three. Instead of using the keyboard shortcuts, let's do it this way. Go insert and sheet and now I have a sheet. Three. You'll notice they're out of order, but that doesn't matter. We go back to sheet one and click our link again for sheet three, and now we're on sheet three. Cell H nine Correct sheet. Juan we could click sheet to. It works, so if you have 30 or 40 sheets, it gets difficult trying to scroll all the way back to the first sheet. So one way you could do that is to organize this right click on sheet one and move or copy and have this before sheet, too. If you do that, no matter how many sheets you have afterwards, you could insert a bunch of them. Just hit this, plus a lot of times to get a lot of sheets. That way. Whatever sheet you're in, you can always just have your table of contents in the very first sheet that you work with . If you hit control down and tapped the arrow button, that brings you to where you can click sheet one instantly. So let me show you another modification that you can do to the hyperlink formula. First, let's navigate to sheet four. I'm just gonna click a cell here and start the function equals hyperlink. Hit Tab Link location. Again, It's quote the pound sign. Now I'm gonna do the apostrophe and write the name of the sheet where all my links are. She want the apostrophe? The exclamation point, Let's say Sell a one close quote and for the friendly name I wanna have quote, table of contents and quote parenthesis. E hit. Enter it says table of contents. Let's click on it. Thank you. See, now we have a link that takes you right back to sell a one on sheet one. Now let's go to sheet for and navigate up to this formula here. We're going to cop it with control, see, and then use control page down to move to the next sheet. I'll go Teoh, so each one click control shift and page down a bunch of times and notice below. I'm selecting all of the sheets right now, and I'm gonna paste this link onto all of those sheets in one shot. So we hit control the We'll go back to sheet one and check it sheet for sheet to she. Three. She five, she 67 And I could just click with the mouse to instead of using the shortcut, you'll see the hyperlink for table of contents is on all of them, and when we test it, we can see that it works. So that's just one really cool trick for using the hyperlink to create a table of contents of all the sheets that you have in a workbook. So that's I use the hyperlink function and excel.
63. RAND and RANDBETWEEN - Random Numbers: in this video, let's talk about using the rand and rand between functions to use the rand function you start protecting equals R A n. There it is. Rand hit the top button and then you just hit the closed parentheses and you don't have anything to input into the function at all. This is how it works. You hit enter, and it gives you a random number. And most of the time the random number is a decimal, because there are a lot more decimals than there are whole numbers. So there's your random number, and you copy this by just sitting control. See and hold, shift down and hit the arrow keys right and down a bunch of times, then hit enter, and now you have a lot of random numbers. Now, for most situations, a random, desperate like this isn't very useful. More often, you would want a random number within a particular range. For example, if you're drawing a number out of a hat, it would probably be like the numbers one through 10. So let's it delete and create a range equals rand between Down Arrow than tab, and now it's asking for a bottom number. So for our lowest number, let's go ahead and just use one, then comma. Now it's asking for the top number, and the highest number we want is 10. Shift zero will close your parentheses than hit. Enter, and it brings back and nine. Now it's a copy and then hold down the shift key and use the arrow keys and then let go of shift and hit Enter. And now we have a bunch of random numbers between one and 10. So that's how you use the rand and the ran between functions to generate one or more random numbers.
64. ROUND: OK, in this video, we're gonna talk about the round function, and the round function is not particularly useful by itself. It's used in connection with other mathematical operations where you've come up with some numbers and you have many decimal places and you wanna limit it to a specific number of decimals, or you can go in the other direction. And if you have a member in the millions or more and you want around that down to the nearest thousands or hundreds, for example, and you can also specifically round up or round down and their functions for those that will explore as well. So here we've started with the basic mathematical representation for pie. And, as you may know, if you add more numbers after the decimal place, pie just keeps going indefinitely. But for most purposes, you just use the basic 3.14 Now, if you want to use this number as it stands in your mathematical operation, if you do your math with all of the decimal places, you'll come up with a slightly different number than if you just use 3.14 So that's what round is for. We start by typing equals and see you have round, round down and round up round down will round your number down to zero round up well around you, never up. So let's look at round first. So for mathematical operations that use pi, usually you want 3.14 and that's pretty much it. So we'll select it by hitting Tab on the keyboard. The number I want to round is selected right here, and so a one that I had the comma. Now it's asking for the number of digits, shift zero to close the parentheses and enter, and we get 3.14 and the restaurant zeros. So if we want to get rid of all those zeros, we could just get rid of those. Since they're not useful and we rounded that down to two digits, let's try showing another number. I'll just type in a bunch of digits here, and we'll show all those put the comma and get rid of zeros. Let's say we want around this big number to the nearest 1,000,000 equals round. Oops, missed. Typed it back space. There we go. Hit tab. That's the number I want around. So if we wanted to deal like we did above and showed two places after the decimal would hit a positive, too. But in this case, we want to show places before the decimal. So we hit. Let's do a negative seven and we'll around it to the nearest 10 millions close that parentheses hit, enter, and there it is, rounded to the nearest 10 millions. Let's go back into that by hitting F two. We're gonna move the cursor to delete that and put six, and now it's rounded to the nearest 1,000,000. So let's create another number and I'll show you how to do round up and round down. Okay, so here's a number and let's start with round up and it asks how many digits we want around up. And let's go ahead and put in negative three and we'll do the thousands. And there it is. We could do the same thing with round down equals round down. We picked that number, hit a comma negative three, and it rounds it down to the nearest thousands. So that's how you use the round the round up and the round down functions
65. INT - Integer: okay, In this lecture, we're gonna talk about the inter function into short for integer and an integers just a whole number. So when you use the integer function, it brings back on Lee the whole number portion of a divided number. So our example here is like something you might see in a payroll department. You have a list of hours worked in these air total hours, and then we're going to try and break it down into days and hours, and we're going to use the in function to break down the total days, and then we use the mod function leader to break down the hours. So to use the in function, we, of course, select our cell and we start with equals. I m t tap to select it, and all its asking for is a number. But what we wanted to do is bring back the number of days. So we're going to select the number of hours worked, which is 36 in this case divided by using a slash and then the number of hours in the day close the parentheses and hit enter and you see it's bringing back on Lee, the whole portion of the answer, which is the one now. One thing you'll note. I'll go over here and do this. If I say equals and 36 hours divided by 24 hit Enter, it's gonna bring us 1.5, right, because 36 hours is 1.5 days, 1.5 days. But by using the in function in here, all that it's returning is the whole number portion of this equation. Okay, so we'll copy will. First don't delete this, and we'll copy this down and you can see on our answers. This one is 55 hours. So that's two full days, plus a partial day. And then this one is 12 hours, which is not on entire full day. So it brings back to zero and one thing to notice that the aunt function will always round down to the nearest whole number. So, for instance, if we take 22.5 and we create a formal for that and we just select that number, it's going to bring us back 22 so it's rounded down to the nearest whole number. But if we were to change this to a minus 22.5, and we update the formula. It notice it now has rounded down again, which brings it to the hole number minus 23. So that's just something to keep in mind when using the inter function and then in the next lecture will look at the mod function and we will fill in the remainder of the number of hours in this equation.
66. MOD - Remainder: okay. And this lecture, we're gonna look at the mod function. What the mod function does is it returns the remainder after division. So in our previous example, we used the interviewer function here to bring back the whole number or the Inter Jer to tell us the number of whole days in this number of hours worked. Now we're going to use the mod function to bring back the number of hours left over so very similar to our interview function. We're going to just do equals and then m o d for mod tab. First it asked for the number we want to divide, which is this and then just to the comma here. And we're dividing by 24 hours. We hit Enter, he could see the answer is 12. So when we divide 36 by 24 were left with 12 remaining hours. And so by using our inter function and our mod function together, we could break 36 hours into one day and 12 hours. So now let's copy our formula down and you'll see that it's working. So 55 hours Brexit into two days and seven hours, right? Because 48 hours is two days, and the remainder is seven hours. 12 hours breaks down into zero days and 12 hours. And to show the mod function on a much simpler scale, we'll just give you another number. Last time we used the example of 22.5, and if we do equals M o d tab to select it, this is the number we're using. If we divide it by one, then the remainder is 0.5. Change that to three. It becomes 1.5 because three goes into 22.57 times, right, three times seven is 21 and the remaining portion of that is 1.5. So that's how you use the mod function to bring back the remainder after dividing two numbers.
67. DATE and DATEVALUE: in this video, we're gonna look at the date function, and the way you put in the date function is equals on D A t E. And there's two options here. The date returns a number that represents the date in Microsoft's date time code, and we'll talk more about that in a little bit, and the other one is date value. And this is where you take a text string and you turn it into the number that represents the date in Microsoft State time code. So we'll take a look at both of those and talk about the date time code. But first, let's look at date. So let me hit the tab here, and the date function asks for a year, month and day, and if I put a couple comments in here, you can see it highlight each of those things so had escaped to get out of that. Now, if you just want to type in the date that you just type in the date and you don't need to use the date function for that. But if you have multiple options that a date could possibly be, then the date function becomes useful or If you've imported data from someone else and it's all represented as just a bunch of numbers, then you could use the date function to sort that or make that more presentable. So let me go ahead and bring up the worksheet that is available to download with this lecture, and you can do that and follow along. And what we have in this worksheet is the years, the month with the month name and the month number and the days of the month. Okay, so let's start putting in our date function. We start with equals D E a T E hit tab and will just select a year from our list will choose a month number, and then we'll select a day, do close parentheses and had enter. Now if, instead of using the number for the month, were to click and drag it over to the month name and enter that formula, you'll see that Excel doesn't like it. You'll see it returns a value error. If you click it and hover over that button there, it'll tell you the value entered is the wrong data type. So again we can go back and pick another number and put that in our formula and you'll see that it works. I need to see if we copy this formula and paste it up a couple of cells. It will change because we have relative cell references. So if we head off to, you'll see it's referring to different cells now. So if we wanted to get the date formats for all of these, we could just copy this formula down the column, and it would represent all those numbers as dates. Now, once you have the date displayed, you can change the format on it. You just hit control one. To bring up the format box. You got a date. You have all kinds of options for how to make your date appear, depending on what you're using it for, so we can select a different one of these and hit OK, and there we've changed the formatting. One thing you want to be careful of is, if you copy the formula down, paste it down here, you'll notice the years off because our formula isn't referencing a year. We could copy and paste this down, and then we have a year in there and I could double click here to widen up the calm so that we can see our values. Okay, so that's the date function. Let's look at the date value function, so we start with equals and date value and select it on a tab. And let's select this particular date close parentheses and hit Enter. You can see that our function came back with an air. It's saying that the value have used in the formula is the wrong data type. So if we re enter our formula to take a look at that again, notice that it says it's looking for the date text. Well, this is a number, but it wants the text. So in order to do that, let me just finish out this formula and we'll get that value air again. And let's just turn this into a text string. So I'm going to copy it control, see, and then we'll do paste as values and see now it's not a formula anymore. It's actually just the numbers of the date. If you hit the home button to go to the beginning of the text string and hit on apostrophe , that's another way to format things as a text string. And if we hit, enter now, our date value function works. This number here is the Microsoft Excel daytime coat that we were talking about earlier. So the number of 43,419 represents the date november 15th 2018 in Microsoft's time value code. If we change the year to 2017 you'll see the number changes. It gets smaller. So to demonstrate how this works, we could take a date and just add a one to it. So we say equals select this state Timecode, Adwan and hit Enter and it adds a number to it, and we'll copy that down a few times. You'll see. It's just added one day to each of these numbers because each one represents a day. And now, if we go back and we select these date time values and reformat them as a date, you'll see that they're all one day apart. So first we choose date for the category, and we'll just pick this format and click OK, so now you can see each date is one day later than the next, exactly like it was with our date time formula. So let's undo that for a second when you have a bunch of members like this, these daytime formulas work for the math behind the dates, and the reason that's useful is that you can use it in your Excel formulas to calculate future dates, historical dates, etcetera and one just interesting side note is that if you convert January 1st 1900 to the date value, you'll find that it's number one. So the serial numbers that Excel keeps track of for the use of the date value starts on January 1st 1900. Then, if you look back at our example, November 15th 2017 is number 43,054 because it's 43,054 days after January 1st 1900. So that's just to help you understand what those numbers mean exactly. They just represent a date in time. So that's the date function and the date value function and how to use them in Excel
68. TIME: okay. And this lecture, we're gonna talk about the time function. Excel reads time differently than what you might be used to seeing. It has what's called a date time code, which is just a number that represents hours, minutes and seconds. And the reason for that is that you can then use that number to do mathematical equations with times in excel. So to do the time function, we start with equals and then type in time and the time function converts hours, minutes and seconds, giving us numbers to an Excel serial number formatted with a time format. So in the background, you have the serial number that represents the time so you can see it asks with our will, hit the comma in the minutes, another comma and then the second. So if you just have a time that you want to enter, you can just type it hours, minutes, seconds and then we don't. But the function becomes beneficial when you want to pull hours, minutes and seconds from different places and have multiple options for your time entry. So let me bring up the download that I've included for you with this lecture, and we'll have some numbers that we can play with. Okay, so now we have calmed with hours, minutes and seconds. So now let's use the time function equals time tab Key. Pick an hour. Will do 16. Pick a minute will take 10 and for seconds will pick 50 close parentheses and had enter, and it displays a time of 4 10 PM And, of course, this function works like other functions where you can copy it control, see and then hit shifting down arrow and paste it. And it will copy your formula down, pulling from relative cell references. So if we select the last 1.5 2 and scroll down, we can see all of our cell references have moved down with the formula. So if we want one that represents an AM time weaken, just select the cell F two to open the formula, and we can pick on earlier time. We'll just grab the our drag it up to the AM section hit, enter and now showing am now when you're formatting time, let's just click control shift and down Arrow to select it all, and we can use control one to bring up the format cells option, and you could see right now it's formatted under custom. But you can also go to the time category and use these options as well, so you can see you can get military time. You could show the time and date which we don't have the date, but I'll show you what it looks like when you do that click OK, you'll notice it shows the date format in here, but we don't have an existing date. So shows up his ones and zeros. So that's how you use the time function in Excel.
69. TODAY and NOW: OK in this video. Let's look at the today and the now functions, and these are a little different than most of their functions in Excel because they don't really ask for any data. They just use the date and time that your computer has set, and then it displays it to you. So if we put in the Today function, we start with equals and start typing. Today, you'll see it says Returns, the current date formatted as a date. So we hit the tab to select that function, and you don't even put any info in there. You just close the parentheses and hit Enter. And the day of this recording is July 10th 2017. So let's take a look at the malfunction. You start with equals. Start typing and ow! You see, it says it returns the current date and time formatted as a date and time. So it had tab to selected, close the parentheses and hit enter. And now we have today's date and the exact time that I'm recording this. Now. If I were to save this workbook and open it up a week from now, then when I open it the time and dates will change to the current time and date, so these formulas will automatically update every time you open the workbook. And it will recalculate to the current time or date so that today function, for instance, is very useful. When you're working on analysis, that is date specific, and you want today's state to up to hit. Every time you open the workbook, it just makes it a lot easier. And, of course, don't use this. If you want to just show a specific date, a static date In that case, you just type in 7 10 2017 And when you open your workbook again, it'll still say 7 10 2017 But if I open this workbook tomorrow, then this highlighted cell will say 7 11 2017 where he could use this formula and then copy the tax here and paste it as a value using Ault H V V. And once you pesetas value, the formal has got to see this one shows that now formula, and then this one just shows the date. Now, if you're close and then reopen this file a day later, this one will still say July 10th and this one with the formula will say July 11th 2017. So that's how you use that today and the now functions to create a continually updating date entry in a cell.
70. YEAR, MONTH, DAY, HOUR, MINUTE and SECOND: OK, in this video, we're going to talk about the year, month, day, hour minute and second functions these air valuable for taking an existing date entry and separating it out into its individual parts. So we're gonna use are now function to enter a date and time in here and then we'll break it up with the year, month, day, hour, minute and second functions. So we'll do equals. And now and that will give us today's date along with the time and it doesn't show the seconds, but the seconds are there in the data. Okay, so we're just gonna put in interest for the year, the month, the day, the hour, the minutes and the seconds. So that will use each of these functions to bring back this data. So for a year, with you equals and y e a r it tab, go grab this date, close the parentheses and hit enter and it brings back our year 2017 from that text ring above. Now, if this reference were to change that our function will update, I'll show you an example of this will copy this, paste it as a value using Ault H v V and then I'll just go into the text and change the date to 2012. And when I hit the enter key and it updates, the year function also updates it in our cell right here. Let's do the month equals month tab. Select our reference, close parentheses and enter and see. It returns the number of the month the seventh month for day with equals Day tab. Select our data, close parentheses and enter, and it shows the 10th day. He also knows that are other versions of the day function. There's days and days 3 60 days returns the number of days between two dates and days. 3 60 returns the number of days between two dates based on a 360 day year. So that's 12. 30 day months. Oops. Gotta go delete that next one is our equals. Our returns the hour from the referred cell and the hour is nine for a minute. With you equals minute. Select our reference and it shows 39 finally we'll do second equal second, same thing. Pick a reference. So and to show you again how things update. If we put the now function back in here, you can see the second shows. Four. The year has gone back to 2017. How many time I update any of these functions in here? Everything else will update. So, for example, a hit off to to bring up the formula again and hit Enter again. Watch what happens to the seconds. Say it changed to 24. And what that means is every time you save a workbook with a live formula in here in your polling year, month, day, etcetera. It will update when you reopen that workbook or when you make any updates to the formulas. And if you want to lock any of these cells to show these values permanently thing enough to copy it and replace it just a za value and get rid of the formula. So that's how you use the year, month, day, hour, minute and second functions to pull different parts out of, ah, date and time
71. WEEKDAY and WEEKNUM: Okay, This lecture, we're gonna look at two functions the week day function and the week numb function. And when we start typing these, you can see them right here in the week. Day returns a number from 1 to 7, identifying the day of the week of a date so it doesn't work by itself. You have to have a date to work with. And then week Numb is similar, but it gives you a number from 1 to 52 for the week number in the year. So let's hit escape. A couple of times, we'll put in a date to work with it. We'll just put in January 1st 2070. Now we put in our formula for a week. Day equals weekday tab. Select that date close parentheses hit, enter. And that was the first day of the week. And for excels purposes, the first day of the week is Sunday. And then if we create a little formula, say this plus one, add a day to it and then we copy this down and we'll copy are weekday formula down here a swell see 1234567 and then back to one. So it's reflecting our seven days of the week and again, one being Sunday to being Monday, three Wednesday on through to seven, which is Saturday. And then it starts over again at one for Sunday. Now let's check out week numb, and we'll grab our date over here again. Close parentheses. Enter will copy it and paste all the way down. So you see, these 1st 7 days in January were in the first week of the year, and this eighth day of January was in the second week of the year. So let's go ahead and put in today's date and see what results that comes back with. We'll use the Today function. We're gonna copy these, and we can do that by doing shift control and right arrow to grab both of them. Control, See to copy Arrow Down and Control V to Paste. It's now we can see that July 10th 2017 is the second day of the week, which is a Monday, and it falls in the 28th week. So that's our weak, numb or week number, so you can use these functions to do calculations and pull information out of calendar events so you can figure out how much time has passed between two dates or how many weeks have passed etcetera. These functions would be commonly used in payroll situations, for instance, calculating what day is payday? We're calculating things like pay periods in the year, so those are the week, day and week non functions.
72. IFERROR: OK in this video, we're gonna talk about the if error function. The fair is a very useful function, but not by itself. And the function works pretty much how it sounds. If there's an error in your formula, then it will return a different value. So let's get right into it will start by typing equals and if and you see it's the 2nd 1 down, so it returns a value if error, and that's where you select the value that you want to return. If the function or formula that you put in returns an error and if it's not an error than the function, will just go ahead as normal. So we'll hit tab and take a look at the parts. The value will be any sort of function or mathematical equation that you want to use in your formula that will return some sort of an answer. So it could be a huge, long formula with nested if statements and all kinds of things, and then if that function returns an error instead of saying n a or divide by zero or some error message, you can have it returned something that you would prefer so let me demonstrate by having a comma and then two pairs of quotes next to each other and that will enter a blanket. What you do with those is you have a set of formulas doing an analysis for your calculation . You have an error returned. For example, if you're bringing in data that has numbers and text values in the same column and you're doing a formula on the whole column than the formulas that airing out we'll just show up is blank instead of with an error message. So let me escape out of here and show you what I mean. So just put it a list of members here and then in the second cell here, I'm gonna put a text value. So just do a simple mathematical calculation on this. I will just say this cell plus five. So you see 23 plus 5 28 will copy this down to all four of these and paste are formula in here. You see, the cell where I had the text is coming back with a value air because this is not a number . So to fix that and make it look pretty, here's what we would do well, go appear hit F two to open the function up hit the home key to go to the left side of the equation That right era start writing if air down arrow and tab to select it at the end key and this value is going to still be our calculation than comma And then our value If air is quote, quote and in excel language that means a blank so it won't put anything in that cell. So this is gonna make things look so much better. In our finished spreadsheet, we hit the close parentheses and enter. They will copy our formula from the top using control. See will use shift control down Arrow to select all of ourselves and then control V to paste the formula in there. And now we have a blank. You can see if we go into this. The formula is still there doing the calculation, but we've basically overridden the error message. And where this is particularly useful is when you're turning in a analysis or a report to 1/3 party, it's not professional toe. Have your analysis filled with a bunch of errors. So this is a way to just clean up your report or your analysis to make it more presentable for 1/3 party. Okay, now something else to be aware of if you're using an if air function like this is that it can slow down your system because the formulas being calculated twice by excel. So first it does this formula, and then, if there's a comma than it's gonna calculated again to check if there's the air. So if you have a lot of big formulas with if air functions in them, it's possible that it could take some time to do the calculations when you refresh it or are working in it. So in our example, instead of doing four math problems, Excel will be doing eight math problems. But that's the affair and one example of how to use it to clean up data that you're presenting to someone else.
73. LARGE and SMALL: OK, in this video, we're gonna talk about the functions large and small. These two functions do the same thing just on the opposite ends of the number line. So let's take a look at large. First, we type equals and start typing large, and you'll see it says it returns the ke ith largest value in a data set. And the K basically is just your variable. So, like in algebra, it would be the X in your equation. So whatever number you tell it to do, for example, if you put five in there, we'll bring you back the fifth largest number. Small does the exact same thing except at the other end of the number spectrum. If we type in equals and small see, it shows the fifth smallest number. So let me just load a list of random numbers in here, and we will use these functions to find the largest and smallest of the list. So here's just a random data set, and let's say that I want to find out what the fifth largest number in this set is. I equals and large tab to select it. So the array, I'm gonna go select over here. Control Shift down Arrow to select all that data. Hit that four. That Locke set a race when a copy this formula down, it's not going to move the cell references. It's going to stay right where I want it hit comma and then are variable. Let's do five. So we want the fifth largest close the parentheses and hit enter and our function tells us that the fifth largest number is 84. Okay, now let's do the small function equals small tab. Picked the same array. Use control shift down Arrow to select the whole thing f four to make it absolute comma five close parentheses and enter. And 21 is the fifth smallest number. Now, a strategy I find very useful is if I'm entering my data, I don't wanna have to type in which largest or smallest number I want every time. So let's delete thes, and I'll show you a cool way to do it. That makes it easier. So first we're gonna create a little number list here that we can use for our formula. So we just put a number one here and then we do a little formula that one plus one that's gonna go to then we just copy that and shift down arrow a bunch and match it up with our other list and control V to paste that formula in there. So here all my numbers and I can pull from these to go 1st 2nd 3rd etcetera. So we'll put some titles here large and small is a heading over here. And then we'll do. Our formula equals large tab, an arrow over to select G three shift control down arrow to select the entire array F four toe, lock it so it stays when I copy it down my number column, comma. And instead of typing a number like five, I'm gonna click the one over here. Now I'm gonna lock it by hitting F for once, twice, three times. So now the dollar sign is on Lee next to the column J So the column is locked, but the row is not so. That means I can copy this formula down and over, and it will stay locked on the J column rather than moving over one to the right and I'll show you why I did that in just a second close friend sees and hit enter and 93 is my largest number. Can I'm gonna control see to copy it Use shift and down arrow to go all the way to the bottom and then holding the shift in a right arrow. I'm gonna put this formula into all these cells and control V to paste. So now I have the large formula. Correct 93 87 85 etcetera. Now I'll just go back in and fix the small formula. It says large now, but I'm just gonna change it. It's referencing all the right data. I just need to change this to the small function. Change that hit. Enter It controls C for copy, shift control Down Arrow and control Vita paste. So now my small function is working as well. So now we have a ranking from largest to smallest and smallest to largest. You'll notice down here, 41 is repeated twice, and it's also repeated twice over here. But that makes sense because 41 is in our list twice. So it's the 12th and the 13th largest, and it's the 11th and the 12th. Smallest. You noticed these columns or just the inverse of each other. The biggest numbers 93 the smallest number. The last entry is 93 and you can use this for all kinds of different calculations. You can use it for fractions and decimals as well. Asshole numbers. So that's a use the large and small functions to pull out a specific number in a list by its rank like fifth or eighth or 20th.
74. INDEX and MATCH: OK, in this video, we're going to talk about the index and match functions. An index and match are used similarly to be Look up and h look up. But you don't have to worry about the data being right next to each other. So in that sense, it makes it superior, more effective and easier to use. Okay, so we're gonna be using this table, which is included in the downloads for the lecture. And these are just random numbers. And most times, when you want to analyze data from something like this, you'd go to a new sheet and then you type equals and at the control page up key to grab the data. And by the way, I know bananas is spelt wrong and I'll show you why in just a minute he and grab, say, the topic that you want to look at and the year that you want to look at just by selecting these here and then Okay, you grab that and there it is. And then it makes it easier to do whatever analysis you want to dio. However, occasionally you might end up moving data around. So let's say we want events in bananas to change places. So we're gonna insert a row above events and hit Ault H i R. And I used shift space bar to select the whole row. When we go up here and shift space bar to select the whole roll up here control V to Paste and Ault H d r deletes the empty row. So now you go back to your sheet. Were you doing calculations? And all of your references are messed up. So if you use index Match to do this, then you wouldn't run into this problem. So let's delete thes and start over with index match. So Index Match incorporates the labels in your cells into those values. So let's just clear the rest of this out and let's get right into the function equals index . So the way Index works is it asked for an array and then your phone number and then your column number. And that's how you find the number you're looking for, and an array is just a collection of data. So in this case, we're going to navigate back to sheet one using control page up, and we're going to select the whole row of data next to apples. So we click here and say, shift control right to select the entire row than shift control down Arrow to select the entire array. No, I have everything selected. I'm gonna hit F four to make these absolute. So let's call this area The pond and our data is the fish. So all of our fisher in the pond So any fish that we want to find us right here and we can editor function right here in the function bar without having to go back to sheet too. So we hit comma, and you could just put in a road number six or seven or eight. But matches gonna help make this a lot easier. The match function is gonna help us find our fishermen. And these labels here and here are fishermen that are gonna help us to find our fish or our data. So we type in match and then tab and our look up value. It's gonna be back on sheet, too. It's gonna be in column D right next to our information, and we'll enter in a label there later, and we'll have f 43 times to lock just the column. Not the row, because we're going to copy this down and over. And we want to still reference the labels and column D or are fishermen. So that's our look up value. Next, we need to look up a race with a comma. Our look up array is gonna be all of the labels in all of the rows where data is. So we're going to select the labels for the rose five through 12 and hit F four toe lock those references and then comma and then the match type. In 99% of the time, you'll use zero for exact match. There are rare instances where you'll use long or minus one, but we're not going to get into that for this purpose. Most of the time you'll do it exact match because you want the exact spelling of that label . So that means you have to get all the spelling exactly right in sheet, too, for this to work. So that's important. Okay, so that match function identifies the rose close parentheses to finish the match function. So now we're back to our index function, So we just did our row number and now we're gonna do our column number now call a member has these brackets, which means it's optional. Well, let's just hit a comma so we could just put one. And you just have one column selected in your ray, and that would be just fine. But in this case, we have five columns, so that wouldn't work. We have to identify which column we're going to use. So we're gonna use the match function again, hit Tab Goto our look up value. And we're going to create a spot up here. And this time will hit F 42 times to lock the row number. But not the column, because we're gonna copy this across the columns. Okay, So where is our array for the fishermen across the columns? Let's go back to sheet one click on 2012 and then control shift right arrow to select the whole array and hit four to lock the array. The arrays should always be locked, comma zero for exact match. Closed the parentheses for the match formula, and then we close the princes for the index formula. So now we've nested to match functions into one index function. Now, when I enter you'll see I haven't error because it doesn't have any results yet because it's referencing blank cells when I want this match to be referencing E six rather than F six. But that's simple. You just grab it and move it over. Okay, so now we can put in our references. Let's start with the year we have equals and then we'll come over to sheet one, because this that's exact spelling. So we just click on this and it brings in 2014. And to show you how important matching up your spelling is, even if I type bananas wrong like it is in the spreadsheet. If I add a space behind it and hit Enter, it still is going to give us an error because even that space is enough to throw it off. So that's why I want to use equals and then select that cell and grab it exactly how it's spelled. So even though it's spelled wrong, it's still gonna reference correctly and see. Now it's grabbing the number that we want 66207 here and 66 to 7 over here. So now to show you the magic, let's see what happens when this reference moves. So let's go down here and select two cells and hit Ault H i R to insert two rows, shift space parts select this whole row and control. See to copy it control V to paste it in here. All to h d r to delete throw all hdr to delete this other row. Oh, and I forgot to delete the equals to find the bananas. I didn't take the foreign lot, So let's go back here and grab bananas again. And this time we'll take that formula out of it and then Ault h v v to paste it just a za value. No formula. Now let's move everything around again to see if our reference still works. So go appeared they ault h i r to insert a row shift space far to select the whole row control See to copy it Troll V to paste it and ultra HD are to delete Throw. Okay, now let's take a look at our reference. So bananas a 66207 And when we look at sheet 26 16 07 Okay, there it worked. No errors. So even though we moved our data around in the array. We didn't lose our reference because Index match doesn't care where in that selected array . The data is it just cares what the fishermen are or those two reference points or labels along the side and the top are so as long as you have the references along the side in the top, correct it confined it anywhere in that array. The only time you will have a problem if is if you take bananas here and copy it and paste it outside of the array that we're referencing and then go cult H d r to delete this row, and now you'll notice that it's not finding it. But that's because it's outside of our array, because our references only D five through age 11 and our references all the way down here on Rose 17. But you can even fix that scenario. And the way you do that is when you write your array, just select the whole column. So instead of having this limited to de five, we just have column D. And rather than having it be age 11 we just have it be calling H. But if you do that with your index array, then you have to do it with your match a raise as well, because they do have to line up. So we'll take out the rose on our match as well for our labels. And then we can leave the columns as they are. So now we enter and you can see that they're references working again. Now it doesn't care how far down the spreadsheet bananas is because our array includes the entire column. So that's how you use index and match together as a nested function to essentially do the same thing that you would with be, look up except you're not limited to just the left column, and you confined your references even if they move.
75. Nested INDEX, MATCH, IF and IFERROR: okay. And this video, we're continuing to look at nested functions and you'll recognize this spreadsheet from our index match lecture. But now we're gonna add to it a bit. They were gonna add an if statement and and if error statement as well. So let's say we're doing an analysis of these three categories, and we only want to show the numbers that are higher than 100,000 will hit off, too, and go into our formula and we're going to add an it function. So type if and tab. And I'm gonna copy this whole function because we'll be able to use this later. And this is our logical test. And if it's greater than 100,000 comma control V to paste that function, which will bring back the same number comma and their value, if false, two sets of quotes. So it'll do blank. Then we close that, and we'll copy this formula, paste it over, and here's what it does. So now this one and that one are showing up his blank because they're under 100,000. So let's undo that for a second. Go back to our 1st 1 So this one if we didn't ask it to display a blank, we just left it like this. Here's what happens. Copy this over. Paste it and it shows the dash, which is zero, which is wrong. His numbers are not zero. We just wanted to display a blank. So let's f two back into this and lie back those quotes so it displays a blank and they will go ahead and copy and paste this all the way down. The reason we want a blank cell here is that it's text, not a number, and you can't do math with it. I'll give you an example here. If I do a some of this range of banana numbers and then we copy that down to these, you can see that these calculations work. Okay. Say we needed just the some of the bananas for 2013. We put that in. When you do, the sum of a blanket comes back zero. Okay, so anyway, that's an example of ah message if function using the index and match now, another thing you can dio in conjunction with index and matches if you're changing labels. Okay. So what I'll do is I'll go back in here where it says living space and will put an extra space so that it doesn't match and you'll see it comes back with an air. What you can do is create a if error, go to the end of it and put in a blank, using our quotes, copy and paste this across. That way, if you see blanks all the way across in a row, that's a good indicator that there's something wrong. So that's how you nast, your index and match functions with your if statement and how you can even include an affair in the mix as well.
76. Nested IF, AND and OR Functions: OK in this video, I'm going to show you how to nest multiple functions within on if function, and we're going to use and and or in conjunction with the Net function to do that so they would just have some numerical data associated with different fruits. So I've just colored this upper section orange, and I've also created a drop down menu so you can select different terms oranges, apples, bananas and grapes. So to create a nested if function, we start by typing equals If and we hit tab to start it, and it's looking for a logical test. So if something is true, then do one action otherwise do another action. So let's say we want to find numbers in this list that are located between these two numbers. So we start by nesting and and four go in here and we hit Tab to select it. And let's just select this number and will hit F 43 times to lock the column, just in case I want a copy. This formula over to the right that little still reference the D column. So if that is greater than this cell, well hit F or wants to lock both columns and rows on that cell that we had a comma slick. This number again hit F 43 times again and less than that. We select this number and hit F four to lock it as well when we closed the parentheses for the and function, which brings us back to our if function. So we hit comma. Now it wants the value. If true and we can return anything we want. We could put a one, or if we want to have a text string, we could do quote in between end quote and it will bring back that text. And then we hit a comma and her value. If false, I will just say blank. So that's just two quotes. Then we close the if statement function and hit. Enter and you see that it's blank because 112 is greater than 82. So let's just copy this control, see, then shift down arrow to the bottom of the column and hit Control V to pace that formula down. They will hit all to H O I to widen the columns a little bit, and we have four items that are in between 50 and 82. And the cool thing is, we can change these variables and our results will change. So if we change this 1 to 100 you see, we have mawr that fall in that range now And if we increase this to 75 I think you see, we now have fewer within the range for increased this toe 1 50 then we have quite a few within that range. So they nesting the and statement inside the if statement, we're referring to two different variables, and we can change those variables and get different results. So let's increase the strange even mawr and go to 45. And then let's add another element into our nested statement. So let's select our oranges and we'll have f 43 times again toe lock. That column just in case we copy it over to the right and then we say, is equal to and we select this one up here, hit at four, wants to lock it and then we'll go clicking door function here and we'll say in between comma and the right fruit we had enter and then we copy this formula all the way down. And now on Lee, the ones that are labelled oranges are displaying our text and will do all to H O I again to auto fit the width of the column. And now we can use our drop down and change us from oranges to apples and you see it changes. We can change it to grapes you see. Now it's just giving us data back on the ones that have grapes. So that's how the nest and inside an if statement, let's use, or so we'll just go ahead and delete this. Start over, we start with equals if tap to select it, we type in or instead of and and or checks whether any of the arguments are true and returns true or false. So we hit Tab to start the function. We'll select the cell F 43 times to lock. The column is greater than it will select. This number hit a four once toe locket comma or this. Select that again at 43 times to lock. It is less than this top member of four once. Then we entered closing parentheses. We're back to our if statement, say comma, and then our value of true, we could just show the name of the fruit. So click there and F 43 times. In this particular example, you don't need to lock the column, but it's a habit that you tend to get into because if you were copying these across columns thing, you'd want it to be locked and then you wouldn't have to go back and change it so comma and then we'll do this blank again. So to quotation marks right next to each other, close the parentheses and hit Enter and they will copy the formula and drag it down. And let me just change a couple of these numbers to make this work, and you'll notice that we have an answer on every one of these. The reason is, if you look at this formal the way I wrote it, the answer is true for any of these numbers. So let's just change these numbers up here to make some of these false. Let's change this to 300 so now you can see this one where the number is 1 85 It's not greater than 300 or less than 140 so that's essentially doing the same calculation as our and function, but just using the logic of the or function you can use the and and the or functions within these F statements. And you could even use several of them within the same statement to just add in different criteria that you want excel to look for and then bring back whatever response you want. Okay, so that's how you nest. And in an or statement within an if statement.
77. Record Your First Macro: Okay, let's talk about Mac Rose. A macro is a feature in Excel that allows you to record an action and then replay that action over and over just with the click of a button or a keystroke. So Macron's air really useful when there's a task that you do over and over, that would be easy to replicate if you recorded it with the macro. And I'll tell you. When I first became aware of Mac Rose, I was really intimidated. It seemed like it was one of those things that's in the realm of developers and coding, and I just imagined that it was going to be really overwhelming and difficult. So if you're feeling that way, I want to set your mind at ease because you might find that macros are a lot more simple than you thought. OK, and I'm gonna walk you through it in this lecture, just the basics of how to create a really simple macro. And then I'm gonna show you a couple of other kind of commonly used macros that you can dio and I'll walk you through each one so you can use a couple of these in your own day today Excel work, and that will give you the foundation as well to be able to go on and record your own unique macros for tasks that you do over and over. So the first thing we need to do is go to our developer tab here. And by the way, if you don't have this developer tab, we can add it just by going to file and options. And in your customized ribbon tab customers a lot of things here, but you'll see that we have the developer right here, and if this is unchecked, then it won't show up in your ribbon. So make sure that that's checked and then click OK, and you'll have the developer tab ready to go and you'll see this section over here. This is code, and this is where you create and manage your macros. Now, as I've said, a macro is basically just a recording of a serious of actions that you do in Excel that you can then replay. It's an easy version of visual basic, which you may or may not have heard of, and visual Basic, also known as Vehbi eh or visual basic for applications, is actually coating So with B B A. You are actually writing code or adding code to excel, to make it do even mawr advance and sophisticated actions. Okay, Now let me just give you a really simple demonstration of how a macro works, and then I'll get into some more useful applications of it. So to create a macro or to record a macro, you just go up here and you click record macro, and you're gonna get this little dialog box that's first going to ask for your macron name . And so we'll name it. Let's just call this macro demo and notice how it didn't put spaces in there. You cannot use spaces in macro names. Okay, The second thing that offers is a opportunity to use a shortcut key. And you don't have to do this. You can run a macro just by going up to the macron's button up here. But if you want to be able to just run it with a quick shortcut key, then you could just assign one here. So let's just call this one control A. And one thing to keep in mind is that when you create a shortcut, key for a macro. It will override the existing shortcut for that letter. So, for instance, if I use control, be well, that normally will bold text when you use that shortcut key. But if you if you assign control, be to a macro than instead of bolding, your text is gonna run the mackerel. So that's an important thing to keep in mind. If you don't use the shortcut key again, you could just run it by clicking up here. But we'll do control s. We just have a one quick button to click and then you have a choice of where you want to store your macro. Okay, you have three choices here. The one you'll probably use the most is this workbook. What that does is it assigns the macro to this particular workbook Onley. So whenever you or someone else is working with this workbook, this macro will be here, stored here and available to use. You can also select a new workbook which would just basically open a new workbook and then that macro will be associated with that new workbook or you can do a personal macro workbook and a personal macro workbook will basically store this macro on your copy of Excel. So if you're creating a macro that you use in all kinds of different situations and scenarios, you would then want to use a personal macro workbook so that that way, if I'm in a completely different workbook or a new workbook that I just created, or an old workbook that I created a year ago, then that macro will be available to use it all of those workbooks. Anytime you're using your copy of Excel, you can call on a personal macro workbook. OK, But for the purposes of this one, we're just going to say this workbook. And then, of course, you can do a description, and that's really helpful of people. Or even you are looking through a list of 10 or 20 arm or macros trying to find the one you're looking for. If you describe it well, that's gonna help you, especially others who may be using or trying to use your macros. So this one, we're just gonna call basic micro double. Okay, then we click. OK, you'll notice up here. Now it says stop recording. Okay. The reasons to stop recording is because it is now recording my actions on this workbook. When I'm finished with my macro and doing my steps, I'll go in and I'll click. Stop recording, and it will complete my macro. Okay, So were selected over here. I'm just going to do a couple of really simple things, and then I will create the macro, and then I'll be able to go back in and run that macro later, okay? And we're just gonna do five random numbers and then we're going to add them up, and then we'll be able to run that macro and Excel will do all of that for us, including the formulas and everything. So just gonna hit equals are on D tub, Actually, let's do ran between then. We could be whole numbers tab. And let's just do numbers between one and 10. Hit, enter, and it gave us number time. Now we're gonna click on that, and we're gonna copy that down five places. We're copying the formula down. So now we have five random numbers. I'm gonna click down here. We're going to go home, and we're just gonna go click auto. Some it pre populates are formula. We hit enter. So Now we have these five numbers being added up, and then we have our total right here. Okay? And then I'm gonna click back up in the top and leave the cursor there. Okay, so now we go back to our developer time and we click. Stop recording. And we have successfully recorded a macro. It's now let's go to a new sheet, a new blank sheet. And we have actually, let's just put a cursor right here and let's hit control A to run the macro and notice what it did. It took the cursor. It jumped up to a one. It put in these random members and put a sub total. Let's run it again, drool A So what did I just overrode the one that we had it put in five round of numbers and create a subtitle just like that, just with one click of a button? Okay. And Francis, we could delete all these. We could click back in here and I'll show you another way to run it. Go to Micro's and you see it's got a list of macro names. We only have one Mac er called Macro Demo, and that's the one we want. And you see, we have some options over here. We can run it, We can step into it. Which basically just means to view it in the editor. We can edit it, weaken, delete it if you click delete. It's gone forever. And they have other options here. Okay, But we're gonna run it. So we just click Ron and presto, it just ran our macro. So I realize that's a really simple example of the macro, but did you see how easy it is to just record the steps that we're doing and then hit the run button or hit control A. In this case, which is our shortcut key for this macro, and presto, it ran the macro just like we wanted executed beautifully. And we don't have to do all those steps again. So you just go in here and select it all and click delete. Okay? I also want to show you how to create a macro button so we can go to our developer tab and we can go to insert. We go to form control. Do you see? It says button form control just left. Click on that. Come down here and drag and drop. You can see our macro name is right there. I'm going to click on that. We'll say OK, and now it pops up. Just calls it button one. Let's just rename this. We'll just call this random numbers and then to finalize that renaming. You just click on a cell outside of the button. And now when we go back in and we click on this, it just runs our macro for us. And I couldn't click on this as many times they want. They will just keep running the macro. Delete all of this. Click over here and I could click on it again. It's just gonna run it. Run, run, run! Okay, so that's just a cool button to help you run your macro. Of course, you can always go to here, view your macro and run it from here. You can click the button or something. Else I should show you is that if you want to record your macro, you can go down here, click this button here and it's gonna bring up a new dialog box to record your okay. So to run your macro, you can click the button here. You can go up here and run it here. You can use your shortcut, which was control a click control a few times that I'm running the macro. Those are your ways to run it to record it. You can click here to record. Or you could go down here and click here to record. Okay, Okay. I'm gonna go ahead and delete this for now. I'm gonna right click on it and then left click to select it rather than click on it. Hit the delete button and that's gone. So I'm sure at this point you can imagine all the different things that you can use this for to automate tasks, repetitive tasks that you do all day, every day. And in the next couple of lectures, I'm going to get into some examples of pretty common things that people use macros for to make life easier.
78. Saving Your Macro and Security: Okay. In the last video, we talked about what a macro is and how to create a really basic macro. And as you recall, we created this macro with five random numbers created with Iran between formula and then we just did a sum total of the bottom. Okay, so that's really basic macro. In this video, we're gonna talk about how to save your Excel workbook with your macro in it and also some security things if you download macros from other sources. So first, let's talk about saving. It's pretty much the same is normal. You just go to file, you go to save ours, and everything else will probably look pretty similar. But here's the thing that's different right here on the drop down, you'll notice I've already saved this and you'll notice it says Excel. Macro enabled Workbook x l s m. Okay, so that's the file extension that you have to use in order to save it with the macro enabled in the workbook. OK, on your drop down menu, you'll notice your normal excel workbook. Looks like this right? But if I go click save on that, it's going to give me this error was going to say the following features cannot be saved in a macro free workbook and says your VB project, which is a visual basics. And by the way, the reason this says BB visual basic is because when you create a macro, you are actually creating visual basic. It's just that Excel is writing the code for you. How did you go? Okay, but a way to save a file with these features, click no. And then choose a macro enabled file type in the file type list. So to continue saving as a macro free workbook, click. Yes. Okay. So if I don't want the macros in it and I will lose my macros double click. Yes. If I do. You want to get those? Macro is in there, and I want to save this the right way. You have to be sure to click. No. Here, go back up to here, change it to macro enabled workbook, and then you can click Save. So that's the first important thing about saving your macro enabled workbooks. The next thing that I want to show you has to do with security when you're downloading a macron able workbook and I'm gonna flip over to another tab here. So this workbook is one that I downloaded from the Internet, saved onto my computer, and I'm now trying to open it in Excel and you'll notice this yellow bar up here that's giving me a warning message and it says Protected view. Be careful. Files from the Internet can contain viruses. Unless you need to edit. It's safer to stay in protective you. So if I want to use this, you know, I could go in here and I could delete this. No, I can't because it's in protective you. So if it's pretty protective, you you're not gonna be able to enter anything in the cells. I'm typing. See? Nothing's being entered. If I try to run the macro, it's not gonna run the macro. I just hit control be or control A was our macro, right? See, all that does is select all which is what control they normally does. But it's not running our macro because it hasn't been enabled. Okay, now, here's the thing you need to know about files from the Internet. They can contain viruses. So if someone builds an Excel workbook with some sort of V B, a code that contains a virus or is designed to cause problems on your computer thing that can cause you problems. So that's why my accepted saying, Hey, before you open this, make sure that you know it's a trusted source and if it's not, then don't enable OK, but if you have ah, reliable source, you know where it's coming from. You know it doesn't have any problems. It's not gonna have viruses or cause your computer issues. You go ahead and click here to enable editing, so that enables me to go in and edit. So now I could put things into the spreadsheet, but it still has disabled the macros. So if I wanted to enable the Mac Rose, I still have to go here and click enable. Okay, now we're ready to go. So if I go and I clear all these cells, I'm gonna go here and I click control a. Now it's gonna run my macro. Now everything's enabled, and it looks just like you're used to seeing, but that's what you have to do to enable a worksheet that has macros in it.
79. Use a Macro to Create a Kitchen Remodel Costs Template: okay. And this video, we're gonna look at it really simple, but practical use of a macro. We've already talked about the basics of water. Macro is what it does and how you create one. And we've talked about how to save your Mac Rose. Now we're going to just create one, and we'll go back to our regular kitchen remodel cost worksheet for this. And let's say that this was a contractor and the accounting department used this worksheet over and over every time they worked on a kitchen and remodeled it. The accounting department needed to put new quantities in for these and maybe even new costs. But for the purpose of this, let's just say new quantities. They didn't want to have to recreate this worksheet all the time, and they could just copy it and then delete these out every time. But that takes 20 or 30 seconds, depending on how fast the person is. And if they could do it in one simple click of a button, then they've just saved that time every time they have to create this worksheet. So let me walk you through creating a macro that will recreate this sort of in a template form. So you start on your developer tab and you go to record Macron. Look on that. We're gonna name it. Just call this kitchen remodel looks, room model costs worksheet. You want your names and your descriptions to be descriptive so that you and other people confined your Mac rose and know what Therefore? Okay, so we're going to a shortcut key. Let's go. This control are for remodel. We'll save it in this workbook, and then we'll describe it. We'll just say kitchen cost temple. Okay. Kitchen remodel. Cost template. Click. OK, so that says stop recording up here. That's how we know that the macro is recording and now it couldn't go through our steps. So the first thing we would do, of course, if we want a new copy of this would be to go down to the tab, right click, select, move or copy. It's gonna give us a little drop dialog box. We'll just say, move to the ants. We're gonna make a copy of this at the end of these lists of tabs, and we're gonna click create a copy, Otherwise it will just move it. So this is going to create another copy of it. Click OK, and now we're on additional copy of it. Now we can go in and remove our quantities. Highlight those and click delete and you'll notice that our totals still have the formulas in them and seeing the formula bar. But because they don't have quantities to multiply by the cost there just showing up blank , which is perfect. And we'll just leave our cursor right here in the quantity column so that it's ready to take entries and we're finished. Go stop recording. And now if I'm in a blank work, look and I couldn't control are it's going to create a new workbook for me. It's gonna bring this whole worksheet in there. It's gonna delete out all the qualities, is gonna drop my cursor right into quantities so I can just start putting in quantities. Okay, so if you do 20 of these a day, every time you start a new one, all you do is sit control, are another one control are for or stroller and see. Now I have now my number eight. So I create a whole bunch of these just with one quick click of a button, Okay? And I realize that's a simple procedure and a simple example, but I just wanted to give you a really accessible example so that you could see how that works, using an everyday type of a situation.
80. How to Use Relative Cell References: okay. And this video, we're going to learn how to use relative references and to demonstrate how to use relative references. When recording macros, I'm going to show you how to just do a list of days of the week across the top of your spreadsheet, and we'll do it one way, using relative references, and we'll do it one way without so you can see the difference. Okay. And when we're talking about relative references, were talking about this little button right up here under your coding section. And you could see if I don't click on that, it's normal. But if I click on it now, it's highlighted and gray, and that means it's activated. Okay, so we're gonna start with it off, and we're gonna first record a macro that has absolute references so you can see how that behaves. And then we're going to record a macro using relative references to see how that behaves. When you're recording a macro with absolute references with this not selected, it doesn't matter where you start when you're recording, but it does matter where you first click after you start recording. Okay, so I'm gonna go ahead and click record and name. This was gonna name this is of week. The absolute Okay, Was it enter? And now we're recording. So if we want to start our list or are headlines of days of the week in cell B three, we're gonna click into that cell that's gonna tell the macro that we want to start absolutely in cell B three. And now we can put in our steps. So we're just going to say Sunday hit tab Monday. Highlight those two, and we're going to use auto fill to drag them across through Saturday. Okay, Then we can do some quick formatting. We're gonna auto fit. The width of the columns were going to say Ault h o I see how that art if it the width of the columns and then we're gonna say control be to make them all bold. Good. And that's it for our absolute cell reference. Macro, go to developer click stop recording. And now if we go to a new sheet, we can select any cell and we can go run our macro, select our days of the week absolute and click run, and it's going to drop it in B three and it's going to stay there. Okay, let's just clear all of that. And let's select right in the same cell, get a developer macro, run our macro and you see no matter whether were selected down here or were selected right here, it's always going to jump right to that absolute cell reference of B three and put your list right in there. Good. So that's the one way to do it. Now let's talk about what it looks like if we use a relative reference, okay, just gonna delete this. I'll go ahead and delete these columns just to clean this up and we'll start from scratch. Okay? With a relative reference, you want to be specific about where you're starting, because wherever you go from there, your macro is going to move that number of cells, so we're going to click in the upper left hand corner. But ultimately, we want to put our days of the week starting in B three. Again, we're gonna start here. We're going to select use relative cell references. Were gonna say record macro and we're gonna say days of the week relative. Okay, Hit. Enter. Now we're recording and we're going to use the arrow keys to go one to the right and one to down. So what we've just told Excel to do is from wherever our cursor starts or wherever a selected cell is at the beginning of the macro. Move one to the right and to down. So you'll notice if we start our selection when we run our macro g eight and it's still gonna move one to the right and two down. Okay. Whereas our absolute cell reference always jumped back up here. Okay, so let's try it. Were selected in the cell. Gonna do the same thing. Touch Sunday tab Monday. It's like both of them. Drag them over and used auto fill and then we'll adjust her calm with again. Ault h o I. And then do bold control be and we're finished good or developer Tab. So stop recording and I'm gonna turn this off just so I don't forget later and they'll go to a new sheet. And first, let's start with the cursor right here in a one, and we'll go to Micro's. We'll go to your days of the week relative and run it. And you see, since we're started there. It went one to the right and two down. Let's go ahead and clear all that. Actually, let's just delete these cells to clear all the formatting and everything. There we go. Okay, Now, let's start with your cursor. Here at E Lost two E one. Go to developer. Go two days of the week, relative and run. So, you know, as we started in E one and it went one to the right and to down. So now our list is over here. So can you see how this one little toggle button will make a difference in how your macro performs, whether you're gonna have it locked into one spot or kind of respond to wherever you initially place the cursor. So let me show you a more robust example of that. Let's actually let's just delete this and we're gonna see delete this one. Just clean this up a little bit. Okay? Now, let's go to sheet one here. You probably recognize this fairly well. This is our sales rep spreadsheet, and it has the months January through December has spark lines, has our sales reps and all their sales for each month. OK, so what I've done in this other sheet over here is I've just expanded this out a bit. So what we're gonna do is we're gonna use the macro recorder, and we're going to use relative references and absolute references to create a formula to do totals all the way down the side over here. Yeah. And the cool thing about this is that if we were just to record a macro, that said total over here. And then we put a formula for the sum of these numbers and put it in here. And then we tried to copy it down and paste it. When we tried to run that macro somewhere else. For instance, we ran that macro on this spreadsheet, even though as the same number of columns as different number of rows. So if we tried to run that macro, what it would do then is it would pace that formula all the way down to let's see, how many rows do we have here? Real 14. It would go all the way down to row 14 and you have formulas in here and it would cause a mess or if we had a similar table like this That had, ah 100 sales reps. When we went to runner macro, it would Onley calculate the totals for those 1st 14 because it's not connected to the size of the table or range. It's just using absolute references to go down 14 spaces and paste the formulas. So let's go ahead and get into this and I'll show you how it works. Now the first thing I'm gonna do with this is change it from a table to arrange, because the way that it references cells in a table makes this macro not work. But if we have it in a range than it will work just fine. OK, so I'm gonna go ahead and select on that. I'm going to go to home. I'm going to actually, I'm gonna go to design first, and we're gonna change the formatting back to none so that it doesn't get stuck with any of that formatting, and then we're gonna go convert to range. They asked if we want to convert it to a normal range. Quincey. Yes. Okay. This is just a simplify. It sort of macro doesn't get messed up. Okay, so we're gonna go back to our developer Tab, and it doesn't really matter where I'm clicked initially, but I'm gonna go to record Macro, Let's call this sales rep Total's click. OK, then we're gonna go click up into cell 01 So that's now in absolute reference, we've told Excel to go exactly the cell 01 And we can start, you know, type total. Then we're gonna hit control, enter. So we stay in the same cell and I were going to say control, be too bold that you can do any kind of formatting. This is just as an example. I'm gonna go over the home and I'm gonna center it, and that's fine for the formatting. Then we're gonna hit Enter. That's also going to select absolutely sell 02 Now we're gonna put in our formula. I'm gonna say, equal some tab to select it. I'm going to select this range where you could type in the numbers. Of course. Just enter your formula normally, but we're going to say control, enter again. So we select the same cell or so we stay selected within cell 02 and then we're gonna copier formula. You say control, see? And we're gonna use the arrow key to travel over to our range. And then the sneaky part here is we're gonna say control and down Arrow. So instead of telling Excel to go to M 10 we've just told Excel to go to the end of the range. So if we have 24 entries, it's going to go all the way down to M 24. If we have 100 entries, it's going to go all the way down to M 100 so on. But we've basically tricked the recorder into going to the bottom, sell in the range rather than a specific cell number. Okay, now we're going to go to the developer tab. We're going to say, use relative references. And now, instead of telling it to go exactly to sell 0 10 we're just going to tell it to go to a relative reference, which is one two spots to the right of the bottom of the range. Okay, so that allows it to be flexible. Now we're gonna press control, shift up arrow to go select all the way to the top and control V to paste are formula in there, and we can just hit Enter to finish it up and our macro is ready. Now we can go stop recording and we can go ahead and delete this here and then we'll run it here and then we'll run it over on the other one as well. Okay, so let's select just anywhere. We'll go to Micro's and we'll go to sales. Rep totals. Well, hit, run and I should have probably had it. Adjust the column widths, but that's easy enough to do. But you can see it's plopped in the word total, and it's copied this formula. It's what's created this formula, some formula, and it's copied it all the way down to the bottom of a range. So let's go try it on our bigger range and see if it works. We go to here, this one still formatted as a table, but it's not going to make any difference If you run it on a table, that's fine. You just can't record it on a table. That's just where the issue comes from. So we'll just click anywhere Good or Micro's goto sales rep totals and click, run and again I have toe open that up, but you can see it adjusted the height. This one's shorter. This one's longer. But our macro work just fine to go down to the bottom of the range, go over and paste our formulas for are some function through all of our sales reps. Okay, so that's the basics of using relative references versus absolute references and kind of how to combine them to get the macro recorder to do what you want to do. And we demonstrated that first by looking at our days of the week macro, where we just put in the headlines for Sunday through Saturday. And then we finished up by creating some formulas, total formulas for some sales reps.
81. An Easy Cell-Formatting Macro: okay, In this lecture, we're gonna look at how to create a macro that just automatically does a bunch of formatting to a cell. So let's just say that you have a situation where you have a headline that is always supposed to have the same formatting. So, for instance, it says name and we hit, shift, enter and we go to our home tab and we want it to be bold, and we wanted to have a border on the bottom. We want the text to be a dark blue and a larger size. We want centered, and we want the column with to be a specific with, let's say, 12. That's a lot of formatting to have to do every time you want to do a cell like this. So instead of doing it like that, we can create a macro for it. So let's go ahead and go over here and we'll recreate this, but we'll do it as a macro so we can just start with some text in here again, Control answer to stay in the same cell. Then we go to developer Click on Record Micro, and we'll call this headline formatting and let's create a shortcut key for it. We'll call it Control Shift F, which, as you can see, is an upper case f And then let's describe it. Actually, I'm sorry. Let's call this heading, not headline, and I will just say it formats headings in Bold blue and centered Okay, we had okay to start recording and now we're recording go up to her hometown. The important thing is that we stay within the cell that we started with So we go bold. We increase the size with you are underlying We do our blue we go change our column width 2 12 Enter Oh on we center it. OK, so that's our macro. Staying in the same cell. Go back to developer and says Stop recording. And now if we have a bunch of headings and we want to form at all of them, we could either highlight one of them and say control shift f or let's say we have a few of these and then we have Bob over here. We could go select this one and press control. Select this one and this one. So he selected all the cells that we want format. We say control shift f and you see, we've got all of them formatted just with that click of a button so you could do this with a whole bunch of cells. Let's say we just had couple cells like this. Well, auto, fill these across and we also have themselves over here. We can select all of these. We can hold control and select all these. So all the cells selected that we want a format control shift f and presto, they're all for my just how we want. No, no, no, said Wednesday. It's cut off because we only made these the width of 12 or 89 pixels. But that was the formatting that we chose. We need to adjust it to, say toe automatically, do 15. Then we would just record a new macro that made it whatever we wanted. But you can see how handy that would come in to just form out a whole bunch things with one click of a button. Important thing to remember is when you're recording your macro, you started one cell and you stay in that cell. If you start moving around to different cells than your macro is gonna also move from cell to cell and it's gonna get really confused. OK, and then one other thing to keep in mind is that when you've done formatting with a macro, you cannot click the control Z button toe. Undo it. If I do that, well, I can undo the cell with a column. With that, I just did manually. But if I had controls the again, it gives me that error chime because I can't undo for my God have done with the macro. Okay, so that's one thing to keep in mind in order to undo this format and you'd have to manually go in, select it, you know, and change it to no border, no gold, smaller funked, etcetera. OK, but you can create a mackerel like this to do all kinds of different formatting to save yourself time with repetitive formatting that you have to do over and over
82. Find and Delete Empty Cells from Located Outside Your Data: okay. And this lecture we're gonna talk about how to find and elite empty cells that are outside of your range. Have you ever gone to print a simple spreadsheet and wound up having eight pages come out of your printer for one little spreadsheet? This is why that happens. Many beginning Excel users think that if these are the only cells that have something in them, that they're the only active cells in their workbook. But that's actually not the case. If you've typed around here at all, they very well could be active cells they might be asking. Well, why does that matter? Well, if you go to print this page, for instance, and you have active cells that go all the way down the page to say, sell 100 or row 100 that you're gonna wind up printing several pages on accident just to get this one a little spreadsheet printed there are other instances. For instance, when you're doing mail, merge If you're taking a list of addresses to make envelopes rather than printing off your list of 100 people, you might accidentally print off another 100 blank envelopes that only have a return. Address it. Waste your time. Your resource is and one final reason is that when you have active cells outside of your data, Excel requires more memory, too. Keep track of those cells even though they're technically empty. Okay, so I'm gonna show you how you do this. If you're selected up here in the upper left hand corner and you click control and end, it's gonna bring you to the last active cell in your workbook, the furthest down and the furthest to the right. So in this workbook, F 18 is the last act of cell in the workbook. And this can change based on your behavior. If I go over here to call him I 19 and I select that cell and I type some numbers into their and I hit enter, it activates that sell Now, even if I go back and I that backspace delete that now remember, I 19 should now be the last active cell in the workbook. And we contest that by going back up here. Hitting control and and you see now before was G 18. It's now I 19 because I activated the cell. And even though I deleted the values out of the cell. I didn't deactivate the cell. OK, so there are several ways you can get rid of these active cells, but the best one is just to highlight all these rows and columns and delete them. Okay, So, keeping in mind that were I 19 you can highlight them however you want. I'm gonna go control shift left arrow, and then shift up arrow to highlight those that I'm going to go over to eat. I'm gonna hit control. So I'm still selecting, and I'm going to select these with the mouse. So if selected all of those cells plus them, which is fine, okay? And then we can go appear and hit clear and clear. All and that should take everything out of those cells. Now, if I go here, you're gonna notice it hasn't changed. Gonna hit control and now still goes to that same spot. What you have to do is save your workbook, close it and then reopen it So we'll do that really quick. Save it. Could a file on clothes and then file and open. Now, when I go back to my sell a one and I hit control and end notice. Now it jumps to the last cell that actually contains data in my spreadsheet. Okay, now, if I go to print this, it's only going to print to here, and I'm not gonna get extra pages printing off. And when I do other calculations or exporting, its not going to even look at any of these other cells because none of them are active. Okay, so just to wreak out that if I have an active cell over here, I put some data into it and enter that data into the cell. Even if I going to leave it when I go back here and say control And that's the last active cell in my workbook. We wanted to lead all that. I could do it like I showed you using keystrokes. Or I could just select that cell and drag up and select all the cells here, hit control and slipped the rest of these cells clear. Clear All. Sometimes you can right click and also hit. Delete. You know, it'll ask you to shift sales up or left as long as you don't have a date out here. Doesn't matter. Click. OK, they're gone. And Then when we save it and restart the workbook, we can go to hear it control. And and instead of going here to our last cell, it's going to go to our last bit of data that isn't an active cell. And I guarantee you, if you use Excel very often, you can go find worksheets or spreadsheets at your job or that you've used personally. And you could find a lot of blank cells that are active below your sheets so you can go in and practices and clean those up and you'll just get one step further toward having cleaner . Easier to manage, easier to use worksheets. Thanks for watching.
83. Flash Fill and Auto Fill for Fast Data Entry: OK, in this video, we're gonna be talking about Flash Phil and auto fill how they both work and what the differences. So let's start out with flash fill. Flash fillers just excels way of helping you to fill out cells using some basic intuition. And let me give you an example here. So we have this first name column, last name column, and then we have a mailing label name. Where we gonna combine the first and last names? And you could use a formula Lykken Captain Eight or something to put this together as well . But Flash Phil makes it super fast and easy. And what we do is we just click into ourselves. We start typing. So obviously the name is gonna be Steve's. No. When we hit, enter and we start typing. Sam, George is you can see what it does. It basically uses its intuition to say, obviously, just put a first name and a last name together, and you're starting to do it again. So you're probably going to do this for the whole list, okay. And if we want to keep that, that would just hit, enter, and it populates everything. If you don't want to keep it, and you just keep typing And it will essentially stop bugging you about filling out all these things. And you can do it manually. But that you'll notice do that. We have a flash feel dropped down here. We can see some options. We could undo that. We could accept it, but it's already accepted where you can select all five of the cells. Okay, so that's one way to do Flash Phil. Let me just delete these and I'll show you another way. You can also click on this cell and we're gonna go ahead and right click on this and drag it down, release it and that you'll notice it has different Phil options over here and we can go to Flash Phil. And again it will predict what we wanted to do. And flash Philip. Okay, we'll go control Z. Undo that. There's one last option where you just go to Philip here and hit Flash Phil. And once again it's gonna populate that. Oh, and there's one more. Let's do controls the one last time we just hit control E. That's the shortcut. In fact, if you look up here, you'll see that it shows control E right there as a shortcut. Okay, so those are a couple of ways to use Flash Ville to just make data entry a lot quicker and easier. Okay, let's talk about auto fill. I don't feel a similar, but a little bit different, and we'll go to a new sheet here for auto fill. I'm gonna widen up these columns just a little bit. Auto feels great when you want to enter data. That is a repeating pattern. So a really good example is a type Monday, and then you grab on the selector handle, you start to drag down. You'll notice that it says Tuesday, Wednesday, Thursday. In other words, Excel is predicting what you wanted to dio, and it automatically populates it for you. You can do the same thing with numbers if you type one to and then select them and start going down 345 You know, etcetera. You could do the same thing with dates I put in a random date. February 3rd, 2001. I let it drag it down. See, I go 6th 7th 8th 9th all the way, and it just fill in the States. And then finally, you can do this. Just if you want to repeat the same thing over and over, like just the word name, for instance, select it and drag it down, and it's gonna auto. Fill that name over and over and over. You do have some options with the auto Fila's Well, you can do the formatting Onley. You could do it without any formatting where you can skill regular flash ville. But if we wanted to, we could put name and date, and then we could auto fill these and watch what happens now say name, date, name, date. So I could fill this all and with alternating things. And that is a recognisable pattern for Excel. So little follow that. So that's a used auto fill. And one thing to notice. If you don't have flash Phil activated or it doesn't seem to be working, you can go double check that it's work and go to file Good options advanced and under editing options, it's going to say enable auto complete for cell values and automatically flash Phil, so make sure those were checked. Click OK and then you should be able to go back I light it and do your dragging, and it will continue to auto fill for you. Okay, so that's how to use Flash Phil and auto fill to make your data entry quicker and easier.
84. Freezing the Top Row of Your Spreadsheet: Okay, let's take a look at how to freeze the top row and or the left column of your spreadsheet. This is great for saving a lot of time and hassle. And if you're going to be sending a spreadsheet to a co worker or sharing a spreadsheet, it's good to enable this to make it easier for them to work on it as well. Okay, freeze panes is great when you have headers and a column down the left that you want to always be able to see. So, for instance, these sales rep names over here. As I scroll to the right, they disappear. So what? I'm getting into data that's over this way. I lose the view of that, and that's a problem. The same thing happens with a range we have scrolled down. Then those wouldn't stick to the top. So the way to fix that is to go to freeze panes, Frieze bans, and we couldn't freeze all of them based on where were selected. We can freeze just the top row or just the first column. So first, let me show you how to freeze the top. Just click on that. You don't see any difference yet. But as I scroll down, see how they're locked to the top, Which makes it really handy when you have huge, long lists of data. Because I just scroll down, you're not gonna lose track of which month you're looking at. To get rid of that, you just go in and say Unfreeze panes. And now it's back to normal. Okay, Now, if I want a freeze, just the sales rep names. I gotta freeze pans and I say freeze, First column. See, that little line appeared Now, as I scroll to the right, the stay right there. So as I'm looking at the month of August, I could go down, say 7 25 Ok, that's Jane. Okay, so that's really helpful. Let's go and select. Actually, let me show you a different example real quick on the swan. Let's go ahead and put our cursor right here, and we're going to do freeze panes, and we're gonna say Freeze all pains, actually. Sorry. Let's put our cursor right here. We're gonna freeze all pains. The top button that freezes it right where your cursor is. See the line going this way and longer in this way. This is a small example. So it doesn't really matter, but you'll see as we scroll, see how material the materials list stays locked and the rest of the range scrolls when we go to the side, same with the top. It's going to stay locked right where this line is. So we're headers. Stay locked, and as we scroll, it just rolls right up into it. Okay? And then again, to get rid of that, you just say unfreeze panes and it will behave normally as you scroll. Okay. Okay. So that's how you use freeze panes. Toe lock the top row or the left column of your spreadsheet to make it easier to keep track of what you're looking at when you're way down your spreadsheet.
85. Hide and Unhide Rows, Columns and Entire Sheets: okay. And this lecture, we're gonna talk about how to hide and unhygienic rose and columns as well as entire worksheets. This is a quick lecture, but this is really important and very useful. This can help you to visualize your data, but it can also help you to hide unwanted data when you are printing. Okay, so first of all to hide, Rose, you simply go in and highlight the rose You want to hide. So let's say we want to get all the Cabinet information hidden, and then you right, click and you just go to hide. You notice it's going to get rid of it, and you can see it goes 12 and the jumps to five. But it puts this little bar here and you'll notice when you hover over your normal dividers between the road numbers, you get a dark black line. You get that same dark black line here. But if you go down a little further, you get a double line. And if I double click on that, it on heights, everything okay? So again, I can right click and go hide, and that I could double click toe on hide it or I can also select these two rose on either side of where my Rose Air Hidden. I can right click and say Unhygienic, and they'll reappear. Same thing with columns. Um, let's say I just want the materials and the total costs I go hide simplifies my spreadsheet , but you can go select the columns again and go unhygienic. Or you could just get the two double lives and double click toe in Hide it. Okay, so that's how you hide and un hide rows and columns. And then, if you want to hide an entire sheet like, let's say, on sheet to here we had a bunch of calculations behind the scenes calculations that applied to this sheet, which is more of a user interface or a presentation piece for, say, your board members. Right. But we want to hide sheet to then we just right click on it and say hide, and that brings us back to sheet want and sheet to is hidden. But the question is, what's it's God? How did we get it back? Well, it's just a simple is I'm hiding rows and columns. You right click on it, click on Unhygienic. It's gonna give you a list of sheets that are hidden. If you want sheet to unhitch hidden, you make sure it's highlighted. Click OK, and she too is back. Okay, so that's how to hide and unhygienic rows, columns and entire sheets in your workbook.
86. Insert Multiple Rows and Columns Easily: okay. And this lecture, we're gonna talk about how to insert rows and columns into your spreadsheets quickly and easily, and I'm going to show you some shortcuts and tricks, ways that you can insert multiple rows and columns. And how to, for instance, insert every other blank row just to make your work a lot easier. So we'll die right in first. I'm going to show you a little cheat sheet here. These were just some keystrokes that are gonna help you. But before we get into these shortcuts will use just our mouse to get some rose in here kind of the old fashioned way. And then we'll build on that to show you some cold tips and tricks. So the first way to insert a row is just to click on that row. You click on the road number, it'll highlight the entire row, and they're gonna right, click and click Insert and bam! You have a row. Pretty basic, pre straightforward. What's controls either get rid of that. You could do the same thing with a column left. Click on the column number right click and click insert. You have a new column. You'll notice that When you insert a column within a formatted range, it will keep that same formatting, which is really cool. Let's say we're just clicked in a cell here and we want to select the whole row. This is where this shortcut right here is gonna be you hit shift space bar, and that selects the whole row. Then you can use this shortcut. Ault. I are. So when we had Ault, it's gonna bring up all of these shortcut keys. We're not going to use any of the ones up here. We're going to use I for insert, but I and then it's still waiting for another command. You can see from the notes that says, up here we had our our and inserts of wine grow. You'll also notice this little drop down here. It gives you some insert options. And if we click on that, it'll give you some formatting options. So you conform at the same as the cells above or the row above. You conform at the same as the rows below, where you can clear the formatting entirely so it does its own thing. And that could be really helpful, depending on where you've inserted your row. If you don't want to use that, just you click there. Click off of it, and when you click back into this space, it'll go away. So let's undo our insert row. And this is where the fun begins, because you probably already knew that. But the fun begins when you go ahead and select, say, 123456 rows and you go to your insert row. Now it's gonna insert multiple rows, so this could be very helpful when you need to insert more than one row when you're doing a lot of work. Are you doing this every hour at your job? And that's what a lot of people don't know. You could do the same thing with columns If we select all three of these columns and insert , that's gonna give us three new columns. Okay, Control Z to get out of that and then finally, And this is kind of my favorite little trick is if you select this row and then you press the control key and click on each of these rows individually, gotta make sure you actually click on it like that, and then we do Altai are again or right click and click insert row, but we're going to Ault. Ah are now see what happens. It does a row every other row. So each row that I individually selected it adds a row. And actually, I missed one down here, but you get the idea, but you can see the point of how efficient that could be if we needed to say, Put sub totals or or some other information in between each of these rows that's gonna help you a lot. And you could do the same thing with columns like Into Control Z. Select that press control Bam, bam! Let's go all the way and then you could do your fault. I see or right click and hit insert. You see that through a column in between each one, and you'll notice some of the formatting on. This one is weird with the columns, so you're just gonna have to be aware of your formatting if you're doing that. But that's a quick and easy way to do that. Okay, so that's how you insert rows and columns, multiple rows and columns and every other line rows and columns. Thanks for watching
87. Mail Merge with Microsoft Excel and Word: OK, in this video, we're going to talk about mail merge and specifically, we're gonna talk about how to take an Excel list like we have here on sheet, too. A mailing address list and merge it into Microsoft Word to create a mailing and whether you're pulling these first names into the greeting field of a letter or you're pulling these entire addresses with the mailing label name to create envelopes, pre printed envelopes, mail merges a really amazing and useful tool. And I realized that technically, it is a Microsoft Word feature. But I think that because of the way that relates to excel, it's worth showing you. And it's just one of those things that so many people need to be able to know how to do So taking a look at our list here we have our mailing address, and you can divide these up in various ways. But one of the better ways is to do first name, separate last name in a separate column. I like to do the mailing label name, which has the first and last name together, because sometimes this is gonna be different. Sometimes you're going to use a shortened name or a nickname here for first name. It just gives you an option to have more information here. And then you do your address, your street address, your city, your state in your zip in separate columns. And then we're gonna merge those altogether inward. Okay? And normally wouldn't do this. But I just listed are return address over here so I can copy and paste that where it needs to go. Okay, so we're gonna jump into a word I'm playing for document. And I'm going to assume that if you're an intermediate to Advanced Excel user that you're probably pretty familiar with word as well. If not, just follow along and you'll see how we make this work. So first, let's create an envelope. So if we go toe mailings and we go to select recipients, this is where we're going to find our list of mailing addresses, go to use an existing list. I'm just gonna navigate to that excel document, and it's our kitchen remodel cost worksheet. It's got a couple of sheets on here and we're on sheet tubes. We need to select that. Then click. Ok, so this now has our recipient list in the background. If we want to do envelopes, we can either just click on envelopes or we can say start mail, merge and we can go toe envelopes. That gives you some options here. Like you can choose the envelope size you can choose where your delivery and return address goes. These are both set toe Otto, which is fine. Gives you a little preview of what it's gonna look like. Then you click, OK, and then it creates a little envelope for you. If I shrink this down so you can kind of see that envelope on the screen Better First, we can just go to our Excel document and copy this return. Address it. Control will see to copy. Then we go back to our word document and we could just pace it. And here, control V. Oops. I accidentally hit a regular be to delete that, and then we're gonna go down here. So that's a return address. Field this start to address field and then we're going to go poll fields Or I should say columns from our Excel spreadsheet to insert into here. So we go to insert merged field and see these are column names first name, last name mailing label, name address. City State, etcetera So we can go mailing label name and then you'll see our cursors here we just hit Enter to go to the next line. There's a cursor there now Goto another field it address hit after again City And now we're gonna go comma Space State, Two spaces and zip So these little brackets show you which column it's gonna pull a front and it's gonna pull this list of addresses from our Excel spreadsheets. Now we can go to preview results and there's our first envelope. We can cruise through the previews toe. Look at all the records. This will take us to the next record. Now we see Sam Margot, Claire be back and given and that's our whole list could weaken, jump all the way back to the beginning, and then you can click preview off, and that will show you your field names again that you've inserted in there. Then we got to go to finish emerge, and then you can either just print it, send emails, or you can edit the individual documents. Mostly, you would just print it, but if you want to kind of preview each one individually or do some kind of changes to it. Each one you can say headed individual documents. We're gonna merge all of them because we want all of them. And now it's created an individual envelope for each one of these, and we can scroll down through them and see all of our envelopes and, you know, for six centuries, obviously, this isn't saving us a lot of time. But if you have 6000 entries, you're putting 6000 envelopes. This is really, really worth your while and pretty much any office job that you have. You're gonna run across this at one point or another, so really important to know. Okay, so that is our envelopes. Oh, and one more thing I want to show you. If you get to your preview here and you see, there's one kind of fought here and a different type of thought here, rather than go through here and change each and every one of these and scroll down and change it and scroll down to change it. You can just close out of this or just minimize it. Go back to your original document where you're doing the mail. Merge. Do your edits. So what I'm gonna do is just use the format painter. Highlight a little bit of this. Not the whole thing. Just text click on the format painter. Look over here. I needed toe klik. It better try that again. Form a painter, all the There we go. So we've changed the return address to the same fault, and then we could go back to our preview results. And as we go through, they're gonna be the same now. And we could go to finish emerge. And now we have a finished document with matching fonts. And then if you go ahead and print this Okay, so that's how you create an envelope using mail. Merge. Next, we'll look at how to add a custom greeting to a letter. Yes. I'm gonna jump into a different word document. Here. Here we have just a really generic form letter and said blah, blah, blah for placeholder texts and then a signature at the bottom. And we want to put in a custom greeting right here with their first name. So the first thing we're gonna do is go to select recipients using existing list. Same thing. I'm gonna navigate to that same excel worksheet. Go sheet to again. And I meant to tell you this last time You want to make sure this is checked. That shows first row of data. Contains column headers because it does have headers. That's our first name. Last name address, etcetera. Click. OK, we now have it loaded and we can go to insert merge field and we have our cursor selected there. And we clicked first name. So it inserts the field they're gonna enter to put our text starting on the next line and then we can preview are results of this. So we have a preview and you'll notice I don't have a common there, so we want to change that. Turn the preview off. Go back here and Atacama. Now we can preview. So there's a Steve when we can cruise through these Sam Margo Claire defect jibali. Okay. And then the same with this, you finish emerge. You can either just print it or you can go open up each of these in their own page and you can edit them individually, if you like, or you considered as an email. But that's how to use your excel spreadsheets along with word to do a mail. Merge. Thanks for watching
88. Paste Special: OK, in this video, we're going to talk about Paste special. And if this is something you're familiar with, you know that it is very powerful for a lot of different reasons beyond just your simple copy Exactly what you see and paste exactly what you see. And I'm gonna give you a whole bunch of examples and kind of different scenarios where pays special could be really valuable to save you a ton of time. Okay, so let's just take our kitchen remodel costs worksheet here, and I'm gonna highlight the whole thing and going to copy it. Okay, We've got the little dotted lines around the outside showing that it's copied to the clipboard. And if I wanted to just do a simple pace, I could just go over here and click here and click Control V, and that's going to paste it right into these cells. Now you'll notice the formatting Well, the formatting is the same, but the column width is a little bit different because these columns are different. But for the most part, it's carried over everything. If you cook into this, you'll see it still has the formulas. You can see that these cells still have the dollar formatting and things like that, right? So let's go ahead and done deal using controls the and we'll look at paste special, which gives us a whole ton of different options. So you find pay special by either going up here doing this drop down, and it gives you all of these different options, which will go through where you can also click the pay special button down here. It's gonna bring up the pace Special Dialog box. You can also right click, and it's going to bring you up these options here, and it's also going to give you an additional drop down here with a bunch of options. Or again, you can go down to here and open up the dialogue box. And then finally, if you press control Ault and V, it'll bring you straight to the paste Special Dialog box again. That's control Ault V, or you could think of it as a cult and then your regular paste control the right all to control the okay, and that brings up to the style Ugg box, which gives you all of these options. But before we look at this, we're going to go back to this version will right click, and then you can actually preview a lot of the different options with space special, which is really cool. So, for instance, this is your normal paste that's just gonna bring values formatting. Basically, everything across you can paste on Leah's values so you can see here. We don't have any of the coloring, the formatting, the grid, the dollar signs. It's just giving us the numbers and text. In other words, the values right. And we'll talk a little bit more about why that's valuable in a second. But I just want to show you these previews first. Okay, here's another one where paste the formulas and it doesn't look any different. But you'll notice that in these number columns, under the totals and costs where those air formulas it will maintain the formulas here and then transpose is a really cool one, so you'll notice what transposed does is it takes the kitchen remodel costs title and it puts it to the left. And then it puts all of column A. In fact, there. I'll just finish this so I can show you with my arrow, basically takes all our first column and lays it across the top. So we have all of our materials now listed across the top and let me highlight thes and double click here. Even a model of that secrecy cabinet handles cabinets, flooring, fridge, just like we have down the left side. And then, instead of going across and rose, it goes down in columns. And that could be very handy if you need to just change the orientation of arrange so that you could view it vertically. Instead, let's go back to our pace special. So that was that was transposed. And then we can just paste the formatting, which is also kind of cool. So if I wanted to create, say, a bathroom remodel cost worksheet, and I wanted to keep this same formatting or style that I could just paste all the formatting and then fill in the blanks with the bathroom remodel costs. And then finally you can pesetas a link, and this one's pretty wild because, for instance, you can see right here. This is $120 if I go over here and I change this to $300 when I had enter, watch what happens right here. It updates. So this is linked to this. And in fact, in the formula bar, you can see it says equals D three. And this is cell D three. So any time you make changes to this one, it's gonna make change to this one. So I could use this scenario on a different sheet. And whenever I update this sheet, the other sheet will update as well. So that's a pretty valuable use of it. Okay, I'm gonna controls the again to get rid of those cam. Make sure I covered him all. Yep. Okay, so we have paced regular paste formulas. We have paced formulas and number formatting. So this you'll notice the dollar signs air still in there and the formulas air still in there. So if you want, if you want to keep those, you can keep those without all the cell formatting, but just keeping the number formatting. That's kind of cool. We have keep source formatting, which is basically going to keep all of the formatting from the original source. We can do it without borders. You can see the grid line is gone. This one's really cool. Keep source column with. So remember how, when we do just the normal paste, it just messes up the column widths. So when you do this one keep source column widths, it actually adjusts your column widths automatically to make it look just like it was before. So that's pretty valuable transpose we already looked at paced values is important because again, if we just want these numbers, we don't want the formulas or anything like that. We can do that. This one will keep the values and the number formatting, but not the formula. So remember, this one keeps the formulas and number formatting. This one is going to keep the values and the number formatting. So you basically just get the numbers formatted, how they are but no foremost come with you. And then we have paced values and source formatting. And this one isn't gonna work because my columns in this area of the spreadsheet aren't the same size. But, for instance, where we could use this is if I wanted to replace the spreadsheet with the same spreadsheet , but without the formulas in here, Then I could just click here, go to the swan click paste, and now I'm gonna escape out of it. And I'm gonna show you when I go to these areas where they used to be formulas, right? $2400. That's 400 times six in the formula where it just has the number. So it just has the value, not the formula originally. And you'll see if I go control Z to undo that paste and click back into that cell, you'll see that it has a formula in there. Okay, so once again, the this place, special values and source format and keeps all the source formatting and the values, but leaves the formulas behind. Okay, so that's that one. We have a couple more here, and we've seen these before. Formatting We could show just the formatting do the links. We could pace a picture which basically just paste an image of what we're looking at. And then a linked picture, which is a picture that is linked to the original spreadsheet. Okay, let's go to the dialogue box real quick and talk about some of those things. Now, a lot of these we've looked at already. You can paste everything you can pace just the formulas you can paste just the values. Just the formats. We won't go into comments, invalidation. Some of these things are not. Something will use very often. But you can do column widths, which is kind of what we looked at before, where you get these columns all the same size. Basically, most of these are the same as the right click dialog box, but it's just a different format for selecting them. Okay, so let's talk about how to paste using skip blanks. I'm just going to give you a couple of numbers. Little range hero. Quick. Okay. So you can see that we have two columns of numbers. We have the tens column and the twos called, and we have a couple of blanks throughout this little range we have in the first row. We have the 10 and the two in the second row. We have two blanks in the third row. We have the 10 on the left side and a blank on the right and the fourth row. We have a blank on the left and two on the right. Now what I'm gonna do is I'm gonna copy this. I'm gonna pace it right over here as well. so we can keep track of what happens when we change this. Now I'm gonna take this left column, and I'm gonna copy this left calm. And then I'm going to pace it over this column using peace Special skip blanks so you can see what happens. Okay, lets escape out so we can compare. So in our original, when we had the tens and the twos. Now, when we've pasted the tens over what happens is we have where the 10 finds another value, the to it replaces it with the 10. These air blanks of nothing happens where the 10 finds another blank. It also fills in the space. And where we have a blank on this side and a value on this side, it does not replace the value with the blank. And that's what it means by skip blanks. Okay, It means that the values that you copied from this side will Onley populate over here if they're not blanks. So where you have a blank here and a value there, it does not replace it. It skips the blank. Okay, So that skip blank those I mentioned that I was gonna talk about paste as values because that's one of the most valuable uses of paste Special one of the ones you'll use the most. So we'll just talk about that for a minute, and then we'll be finished on. I want to start with this hyperlink down here, and I didn't mean to have to I need one. So this is a hyperlink, right? And if I take this and I highlight this carefully and copy it a copy and I pasted over here , right click and just paste it, then I'm still gonna have the hyperlink. Okay, so I'm gonna controls you to get rid of that. Now, if I don't want to have the hyperlink, though, I could go to my pace special, and I could go to paste values, paste it. And now the hyperlink is gone. So I've removed that and simplified the text, and that's gonna work for you in so many different scenarios. And I'll give you another example. So off controls that you just to get rid of that escape. Now, let's say we were dealing with these values over here, right? We have these formulas in here so that whenever we change these numbers, these numbers are going to change. But let's say I just wanted to do a calculation with these numbers. Without the formulas in there, I can actually copy these. And I can either pace them right into here using paste values, right, and that will. Basically, it's a basically a simple way to delete out the formulas. See how now when I click on these, they're just numbers. No more formulas, so it can clean up your data to make it easier to do calculations. And, of course, if I had another spreadsheet over here where I was doing calculations like raw calculations just with these numbers, I could go over here and I could paste just the values like that. And then I don't have the formatting from my range anymore. I just have the numbers. And when I want Teoh say, I want to do a calculation where I'm just picking out various things like these, like I want just want to add a few of the numbers or something. I could do some formula, uh, grab a couple of these numbers and get some results without having these numbers. For instance, this member of change this number it's not gonna affect my calculations because it's not going affect these numbers that I pulled out of it. Okay, so that's the one who use the most, and that's paste special. And just to go back into a copy again and go back to our paste options, make sure you missed anything with last one, which I don't use very often is. You can add an operation and actually let me go like this. We grab these numbers and copied them, and we're gonna put him right here. And let's say we wanted to, um, make these negative numbers. We can actually put a minus one in all of these cells. Just copy it down, and then we gotta pay special. Oops. Have to copy this again. Could have pay special. There are dialogue box. We're gonna, uh, multiply. So we're multiplying all of these numbers by the numbers in these cells, which is minus one right and 120 times negative one is negative. 120. So when we do this, we're using this operation here. We're using a multiply click. OK, we've now converted all those numbers to negative numbers and I mean, that's like a intro to the things that you can do with Paste Special as you continue working in Excel and you have these pay special options in your head, whether it's this dialog box or the drop downs, particularly these simple ones, like the formulas and values and four Months and also transposed, these are going to pop up in your mind as opportunities to simplify your data, to make it easier to work with an easier to do more calculations with. Okay, so grab one of your spreadsheets and do some copying and paste special and practice using these to get a sense of how they'll help you in your work in the future. And thanks for watching.
89. Sort and Filter: in this video, we're gonna be looking at the sort and filter. So let's go get some data in a worksheet Here, Here we have, ah, table with our employees. Their first name, last name, area code, phone number, offside. The date of birth, Employment status, higher date sorting and filtering is a really quick way to get to the data that you're looking for. And when you have a table set up, you have these little drop down filters. But even if you just have a range here, you can use these tools up here. So the quickest way to do it is to just select into a cell in a column within the cell or in the heading. And you just go up to here and you consort ese or lowest to highest, which is how it's already sorted and noticed. There's a little arrow now that appears, that shows that this is being sorted where we consort Zito A or highest to lowest. And when we do that, you'll see that all of our listings flip upside down, starting with the highest employee number and going down. Okay, if you're finished with that and you want to go back to normal. We get rid of those filters, you can go clear and that will clear. But you notice it didn't reset it, so that one is at the top. OK, so if we want to reset it and we have to re sort it a dizzy and then clear the filter So that's a simple way. You can also sort here, and this allows us to put in multiple criteria for multiple different columns. So, for example, let's say first, we want to sort people by their office i d number. So we put all the offices together, we go sort by, we click on office, I d number. We're gonna sort by values. You also have some other choices here, but we're gonna sort by values. And they were going to go smallest to largest. And first let's just click, OK, so you can see what that looks like. Okay, so you see, now there's a little up arrow in the office. I d dropped out because it's sorting from lowest to highest in the offices there. Okay, Now we could go back into our sort and we could add a level we could go by last name do my values and a dizzy again and click OK, and actually, you'll see that nothing changed. So let's go ahead and do a different sort. We'll go ahead, remove this level at a new level. Let's sort them according to whether they're part time or full time. So in our office, I d three will put the full time people first and the part time people second. Okay, so go to employee status, sort my values So dizzy because gonna put the f before the tea click. OK, and now you'll see we have some more organization over here. So in the threes here you have all the full time people first and then the part time and in the full wars, same thing, full time, full time, part time, part two. So that's what you can sort using multiple criteria in a table. Arrange like this. Let's look at filters. With this button, you can toggle the filters on her off. And, of course, when you click on the drop down here, you have options to filter here. Now, the cool thing about filters is that you can actually remove things from the list, depending on what you remove. So let's take another quick look at our list. So let's say let's stick with their part time full time here. Let's say we only want to see the people who are part time in our table. So we go to the drop down on the employee status. You can see we have the choice of select all which is selected right now where we can de select all we can just select part time, which is what we want. Just part time people. Go ahead and click. OK, you see, that removes all the full time people. Okay, You know, it's now it has this little funnel up here which is showing that it's being filtered. Okay, we could go to change that to full time. People only look OK. And now it's filtering out all the part time people. Okay, If you want to get rid of those filters and sorts, you just go clear, and that's gonna clear all your filters and sorts and put you back to normal. But you'll notice it's still left it sorted in chronological order. According to the office, I d. Because that's the last sort that we did and they also have the option of advanced sorting , which we're not going to get into for this lecture. That advanced sorting allows you to just basically Adan MAWR criteria you can filter with and and or criteria and just dig even deeper into your data.
90. Quick Calculatilons with the Status Bar: okay. And this lecture, we're gonna talk about the status bar, and the status far is a really simple and quick tool that can give you a ton of information without really doing anything. And the status bar is this guy down here and way over to the left. Here, it just shows your ready message what mode you're in. It shows your macro button that you can click to begin recording a macro. And over here it has your different page layout. So here's your normal view. Here's your like print page layout, and then this one shows your page break previews, all of which are very helpful when you're printing or laying out your page and then you have the zoom over here and this is just a slider that you can zoom back and forth. Okay, let's go back to normal view, though What I really want to show you is in this blank section right here where it's gonna show you formulas. And first you have to have some data selected. So I'm gonna go and just select this row right here with this call I'm rather And now look down here and see what we have happening here, so you can see right here we have the average of the selected cells, so it's actually adding up all of the cells in that we've selected, and it's taking the average of them. Over here we have the count, which is basically the number of selected cells that contain data, and it shows eight of them eight cells. And then finally, we have the some of the selected cells and you can see it's $5790 just like in our total here. And this is really useful because if you just want to do some quick calculations in your data, you can do that without having to create a formula anything. So you know, the real simple is like if I want to know the total of these two cells, I do that. And bam, I have a sum of two. You know, if I want to know a total of my entire spreadsheet, I could just click on the select all button. It's going to select my entire worksheet, and it's going to give me all the totals of everything in the worksheet, but you can do one cell. You can do a whole variety of cells. You can press control and select a number of different cells up. Cited me to click off it, control and click these cells, and it will give you the some an average of just those selected cells. Okay. And then finally, to go back to here so you can see some numbers. If I go down to my status part I right click. You can see all of these options for the status bar, which I think most people are not aware of so I can get rid of the zoom. I could get rid of the slider. I can get rid of the some function I can add in other functions. I can put in the men or the max, and you have a whole bunch of other options that you can put here to customize your status bar. But just to give you an example, I could add the men in there. So now it's giving me the minimum number or the smallest number in this list, right? And if I want to get rid of that again, I could just uncheck that, and now it's gone. So that's just a really quick tip that will help you to do lightning fast calculations in your spreadsheets, using any selection of cells, the entire sheet, a couple of cells, a column, whatever. Thanks for watching.
91. Intro to the Complete Walk-Through of Excel Tools and Ribbons: okay, In this section, we're going to be doing a complete tour of the Excel Tabs and Ribbon. And I'm really excited about this section because I've never seen it done before. In a course in my goal with this section is to give you a really broad understanding of all of the tools and tabs that are available to you and excel, and to expand your Excel vocabulary immensely so that when you talk about Excel or when you're working with excel, when you come across new things while you're in excel or through a conversation with a colleague, you're going to have a better understanding of what they're talking about or what you're looking at in itself. So what do I mean by a tour of the tab and ribbons? Well, across the top here we have all of these tabs and these air, all for different excel ribbons. And as you've probably noticed, as you're going through excel, it can be kind of overwhelming just on the home tab alone, you have dozens and dozens of tools and features, many of which you may not even know what they are. And as we've gone through the course, We've covered a lot of different things, but we haven't gotten in depth into each and every one of these things. So in this section, I'm going to cover about 90 to 95% of all of the tools in here. And I'm going to give you examples as often as I can so that you don't just have a theoretical understanding of these things. You actually have some hands on practice seeing how they work and being able to do something with these tools yourself. Okay, so in this section, each lecture is broken down into its own tab and some tabs air gonna take two or even three lectures to cover the entire thing. But that's how in depth we're going to go into the ribbon. And I'm also going to try and cover each tab chronologically from left to right, so that if you need to find a certain tool group later, you can kind of scam or fast forward through the lecture for that tab to find that specific tool. So we're gonna cover to the home tab with all of its formatting and sell styles. We're gonna cover the insert tab, which covers pivot tables, illustrations like shapes and pictures, spark lines, Filters, charts and MAWR. We're gonna cover the page layout time, which is all about how you set up your page, particularly for printing, and we'll talk about a lot about themes and colors. We'll go into the formulas tab, which you've already learned a lot about formulas by now. But we'll get a little more in depth into some of these and, more importantly, will get into the how to use to find names for cells and ranges and how audit your formulas , which just kind of helps you manage and correct your formulas. We'll get into the data tab, which is all about getting data from outside sources, setting up queries and connections to outside sources using sorts and filters and other things like Flash Phil, removing duplicates from a range or list of numbers and so on. Get into the review tab. This or you can do things like proofing. We'll look at how to add comments and navigate. Do comments, delete comments, have show them and then we'll get into protecting your workbook so you can actually lock cells. You can lock ranges of cells into a whole bunch of things with the protect section. We get into the View Tab will cover all of these tools and primarily what will look at, which is new. Something that hasn't been covered in the course is the Windows Group of tools. So how to arrange multiple windows within one screen and a whole bunch of things to go with that and will even touch on Mac Rose. But really, Mac Rose will be talking about in the developer tab, where we go into visual basic recording. Macros. Security. Talk about Adan's a little bit. Talk about adding controls like buttons to run your Mac rose and so forth. Oh, and I didn't mention will also be covering the file tab, which has its whole list of tools here, including your options printing, saving and so forth. Okay, so buckle your seat belts because there's gonna be aton of new information coming to you as well. A some good review of some of the things you've already learned. But by the time you're done with this section, I promise you that you are going to have a much more solid understanding of the entire tool set in Excel. So that when you look at this dashboard, when you look at these different tabs in these different ribbons and tools, you no longer gonna just look at him with a blank stare, wondering what the heck all these things do because you're gonna know what they do and even have some experience using all of them.
92. File Menu - The Complete Walk-Through: okay. And this lecture we're going, Teoh, do a complete tour of the file tap. And the file tab is located right up here, next to home. And when you click on it, it actually takes you out of this screen and takes you into the file menu. We're just gonna go right through these, and I'm gonna really get into some detail with most of this stuff. There are few things l skipped that just aren't important. Irrelevant. But most of it I'm gonna cover. So the first thing is that info tab and the info tab first has the information about your actual file over here. So it gives you the size categories. You can add title tags categories here. It gives you dates When it was modified when it was created, tells you when it was lost, printed, tells you who the author is, who it was last modified by. And then you can even go here to show more properties. And what that did actually is gave us mawr options, toe add subjects, hyperlinks, things like that. Okay, so close out of that. And then over here we have four major options here. 1st 1 is protect workbook, and this controls what types of changes people could make to your workbook. And there are other places in Excel where you will be able to add protections to your workbook. But for now, let's click here he exceed this. Gives you some options. You can market this final, let people know that it's finished, and it's not to be edited. You can put a password on it. You can protect just the current sheet that you're working on, where you can protect the entire workbook structure meeting. Like, for instance, people can't add additional sheets or you can add a digital signature but just give you some examples of what these look like. Let's look it encrypt with password and see that just brings up a dialog box and allows you to enter a password. Okay, so pretty straightforward. We can go to Marcus Final and you'll see it gives you pop up to make sure that you want to say OK, and I'm gonna cancel that, because I don't want that. But if you want to, you say OK, and then let's also look at the protections here. If you go to current sheet, it brings us back to our excel worksheet, and first you put a password on there. Can you check this to protect it Now? Protect this sheet and the contents of any cells that you lock, and you have all kinds of choices here for how you want to protect that. You can prevent people from inserting columns, inserting rose four Matic cells and so on and so forth. Okay, so that's the protective sheet option. Let's go back in here. So that's our protect workbook. Those air some options. Now let's go to inspect workbook, and when you click on this just gives you three options, you can expect the document for hidden properties or personal information. This is if you're sending this out or sharing it, you can check it to make sure it doesn't have, say, liqueur any private information that you want. I'll click on that to show you says to make sure you save your changes, and that's fine was click yes, and that's gonna bring up all these options for things we can check and you can. I d select these if you don't want to check them, but assuming that we just want to check everything on here. For instance, document properties and personal information. Just click, inspect, and it goes through and checks everything. And you can see all these say, check Mark. That means they found that it was there was nothing to share. Okay, But this one has a little exclamation mark because it did find document properties and author name and an absolute path to the workbook so I could go ahead if I didn't want, for instance, my author name on there. I could just click remove all, and it would get rid of that. And then when I share it, my personal information won't be shared, but we'll click close. To get out of that, we have to go back into our file menu back into info. So that's inspect. That's inspect document check accessibility. We'll look for things like merged cells, which are difficult for people with disabilities to read on certain devices. So that's pretty cool. And then check compatibility will compare different features from earlier versions of, except so this just will be become some notes on problems that you might have safe from like in this case, there's formatting that's not supported by XL 97 through 2003 and weaken Select which versions we want to show. So friendship were just sharing with people who have excelled. 2010 2013 and 2016. Then we can get rid of these two previous versions and you'll see now it's saying that there are no compatibility problems, so that's if we dislike those. Okay, so that's the compatibility checker. Go back to your file. And that was compatibility. So we're good for the issues and then the manage workbook button. So first you have your version history. You can go here, and it will show you a recent versions of it in this tab will come out of that and go to back into here. And then you can manage your workbook here and do recover unsaved workbooks. And this is gonna bring up workbooks in your entire Excel program that you have not named and saved. So you'll see these air named Book One because they haven't been saved. That shows you the date and time. So if you accidentally close something without saving it, you can go back in and reopen it and recover that. Okay, back to file. So that's managing your workbooks, and then the final one is browser view options. And this is how you modify what other people conceive e when they're viewing this on the Web. So if you're sharing this via, say, one drive or SharePoint and you're sharing it to a browser and with other people so they can all work on it together, then you just click on this to modify your browser options. So, for instance, if I want them to see the entire workbook, I can do that. If I want them to see certain sheets, I can click on sheets and I could de select sheet to If I don't want them to see that and finally go to specific items in the workbook so we can pick named Ranges or this is a name cell and we can modify which of those are displayed, okay, and then the parameters. You can put in specific creditable cells that people can then enter parameters in, like for calculations. If you want to do percentages of discounts off a list of sales prices or whatever that you can put those in here, and you can either click on these and add them or you can click on them and delete them, says to You sure will say Sure, we're sure. And then if I go to add it, it'll bring me up a dialog box again, and I can select it and click. OK, okay, so that's your browser view options and that takes care of the info tab under the file menu . Now let's take a look at some others. By the way, that's probably the most complex one. There's the new tab, which we've seen before. You can open a blank workbook or a template. The open tab is where you navigate to your documents to open them. This gives you a recent things. These are things that have been shared with you. You can go to your one drive specifically and find files. There you can go to your computer, or you can browse to your computer or wherever to find files. OK, so it's open. Save you. Just click save, and it will save your document and then save as will bring you into a option here to rename it, you can rename it. You can also save as a CS V right there, or as a template or a text file or various other things, and then you just click. Save printing options. You can do a quick print by hitting print right there. Select how many copies you want quickly. This gives you a nice preview of it. You can click here to choose your printer. There are different options that you can send to and select different printers or add a printer. Here, modify your print properties here, your settings. You can print just active sheets. You can print the entire workbook, or you can print just a selection. A current selection of cells that you've selected. You can select your number of pages like one through three or three through 10. You can do collating. Here you can change your orientation. You could do portrait or landscape. See that changes to the landscape. You can change your paper size. Pretty straightforward. You can change your margins. Also pretty straightforward. If I go to a wide margin, hopes were already at wide margin. Probably narrow margin. You'll see it move. See it just moves closer to the edge, so that just effects the amount of space you have around what you're printing its margins and then scaling and you can shrink these to fit. Leave it with no scaling fit All columns that shrinks your columns, squeezes them inward so they'll all fit on a page. Or you can squeeze all your rose. This one obviously doesn't take up the whole page, so wouldn't be relevant. But if you need to get a lot of columns into one piece of paper that you can use this Okay , so that's your scaling. And you can go to your page set up here that says everything that you can imagine your page , your margins. You can add a header. This is kind of cool, actually. So if I wanted to call this kitchen remodel worksheet download demo, I just select that where you can create a custom header. And then I could do a foot or a swell. Do the drop down. Let's just call this page one, and you go ahead and click, OK, and now those headers and footers are going to be printed, which is cool. So that was the header and footer and then the sheet. Basically, this is like if you want to show grid lines or print only in black and white how you want it to move through the sheets etcetera, and then your options is just your portrait versus landscape. Uh, it close out of all these and then we have share shares Pretty cool. If you haven't saved this to a one drive, then what it will say here is saved and got to save it first to an online place where it can be shared. But then, once you've done that, it will give you this share option. When I click here, it's gonna bring me back into here. It's gonna open up the share tab. You can enter an email addresses here to invite through your outlook email where you can click here to open up your address book and grab contacts out of there. These are people that have already entered. So I put myself in here, and then I've also added some links, and the way you get links is you go to here and get a sharing link when you click there. That gives you two types of links that you can just email the people and then they can go in and get into your excel workbook. So if you want someone to be ableto edit it. You would grab this link, just hit coffee, and then you can send this to if you want someone to build on, leave you it. You have a copy, Same thing, and you can send this to him and I'll show you how this works because it's really cool. So you go into your browser. And so if you emailed this to someone, they take this link and either just click on or copy and paste it into their browser. And what happens here is it brings up a fully functional online excel so you can go in here and you can edit the workbook and add it in browser. And then it's going to allow you. Oh, it's giving this error because I have this open on my desktop, you know, says that everyone has to be online in order, work on it at the same time. In effect, I'm gonna close out of mine so that I can show you this because it's pretty cool. We'll get out of that. We're gonna say, Don't save. We'll close that we'll try this again there. Now it's gonna open it up and notice. Now it gives us the full ribbon, all the tools we can even to save as and print. And so we have all the options here to edit this. And if I were to open this up in a second browser window and go into edit this, then watch what happens here. If I select a whole bunch things scoot this over. If I select this area right here. So that's one person working there, right? And then another person goes in and select. Sit here, notice this blue line. So this person who's working right here can see that someone else has that area selected and is working there. And right, So I have this green area selected. Watch what happens when you go to the other person. That one's highlighted and red so you can actually see where other people are working while you're working on this and multiple people can work together or simultaneously on the same document. Okay, so that's how to share, and we'll go back to our file again. We've got share export. That's pretty simple. You could just create a PdF or an XPS document, which is basically Microsoft's version of a Pdf publish. This is power bi I, which is kind of asshole own thing. Power bi eyes like a dashboard where you create reports and you can, you know, share your workbooks or your data from your workbooks and use that feature through the publish button. Close is pretty obvious. It just closes Excel. Your account gives you specific details of your account. This is your Microsoft account feedback. You can give feedback to Microsoft and then the options button. We won't get into entirely in this lecture because it's a whole thing in of itself. But you have all of your options for modifying your data, your proofing, how you save your documents, which we'll talk about an auto recovery lecture and change your languages. You can customize your ribbon, all kinds of things in there, but that is a tour of the file menu and all that's involved on the back end of Excel
93. Home Tab (part 1) - The Complete Walk-Through: okay. And this video, we're gonna be doing a complete tour of the home tab in the home tab is located right here in the home tab is a place where you will spend a lot of time doing your work. Almost all of these tools are things that you'll use at one time or another. So our ribbon for the tab is broken up into the clipboard, our faults, alignment of cells and text number, formatting styles, cells and editing. And you'll notice that many of these have these little drop down arrows here. And a lot of these will take you to the same place, but I'll go through each one of those as we go. So let's start with the clipboard with the clipboard, we have the features of cut copy and format painter. Let's start with Cup. We take a selection like this and select our whole range here. When we click cup, you'll notice that highlights that entire area. That means that it's been cut and copied to the clipboard, and then we can go select a spot to paste it. Now we could go here and click either paste here or right click and paste that gives us a preview. I haven't even clicked on it yet, but it's just for giving us a preview. Or we could use control V and paste it. So now it's cut it from where it was before and pasted it here. You could see the columns are not the right with, but all of our information is pasted right there. Okay, let's go ahead and undo that. So we still have it selected here. We could also go to another sheet and we could pace it there. And of course, we could resized these columns really easily to make it work, to make everything fit. I just do that by double clicking on those and you can see it was basically transferred our entire range over here. Okay, so that's cut. Let's do undo to get it back to where it is now. When you have it selected for cut, it's still waiting for you to pace it somewhere. If you decide, you don't want to paste it, just hit escape and see that cancels it. Okay, you can click into any cell toe de select that, but if you haven't selected to cut like this and cut and it selected and change your mind just had escaped. Okay, so copy works the same way you can just copy it, and then when you paste it, it will keep the original where it belongs. Okay, well, undo that. We have some other options for pasting. You'll notice that you have a time of different options. So we have just the basic paste you can paste as values and see that's just bringing the values, which is the text and the members, not any of the formatting. You can paste formulas, and this will include the formulas. In fact, I'll show you that. So it's based on our values but also has our formulas here. Okay, undo. Whereas if I paste as values, which is this one, you'll notice that these are just the numbers. The formulas are gone from our original, which has the formulas okay. Again, let's undo that. And so that's values. Formulas that keeps the formulas transpose will convert rose two columns so you can see what happens here if I open up these a little bit so you can see it. It's gone and taken our rose and turn them into columns and So are headers will across the top. It's now put along the left side our materials list. It's put it across the top our quantity cost totals. So it just converts rose to combs. And that could be a really useful thing. If you're copying, say this list here and you want these to be headers across the top, you just copy that. First waiting to escape. Copy it and let's go right here and paste transpose and see that it lays them out across the top. Okay, we're gonna undo all these. Get rid of this, Okay? We'll go ahead and do one more paste option. You can pace just the formatting, so see how that's just the formatting. It's just doing the colors and grids, but none of the text you can pay still link. And if you do that, then if I change this, let's change this to $3. They noticed it updates, so this range is actually linked to this. Okay, escape and controls eat. I'm do all that and then escape for more time. So we get rid of our range copied to the clipboard. We got a case that's cut, copy paste and Finally, the format painter is a really cool. If I want to take just the format from say, well, let's say I have some text over here that just says Steve and I want to get this format and put it here. I just select the format that I want. I click the format painter and see how it has a little brush Now. Next to my plus side, I left click here and it just copies all that formatting right over to my text. You can also select What time Do that. Okay, so let's say I want to do another header here that says Bob. So again, I click on the formatting that I want. Now I can double click on the format painter and I go to Steve, and I click there noticed that brushes. Still, they're not good on the bottom and click that one as well and see it formatted that as well . And you can go around and format as many things as you want that way, and when you're done, you just hit escape to cancel. Okay, so let's control the or control Z undo all that Well, just delete that okay and then had escaped to get out of the format. Painter. Yes. So that's the tools in the clipboard. One last thing. If I click this drop down arrow, it's actually gonna bring up the clipboard. So these are all the items that I've copy. So if I wanted to add things to the clipboard, I got control, see? And it puts the word fridge on the clipboard. I can escape out of that and notice it stays. I can go to let's say I want a copy. This whole list, I can click control, See? Or you can copyright here, that cook that puts this whole list. So now if I want to put this list over here, it's like they're go to here and just click on it. Or you can go here and click paste, and it's copy that whole list over there. Okay, go ahead and do that Rid of it. In fact, for one of our later demonstrations, when I get to fill, I want to use this particular information to demonstrate it. So what I'm gonna do is click here and I just go hover over that and click it and paste it right in there. So it's ready. Okay, so that's the clipboard. You can also select here and go paste all. It's gonna put everything that I have in the clipboard over there, okay? Or control Z to undo that. And then if you want to clear the clipboard, you just click clear. Ole and the clipboard can also be moved. You can grab it, you click. Move and see. Now I have ah, moving arrow left. Click it to select it, and if you drag, it will pop out of there, and you can put this wherever you want. If it's more convenient for you to have it right here, you could even click into cells, click into the clipboard and use it more conveniently to close that You close it out, but you'll notice when you open it again. It's gonna pop up right there. If you want to nest it back over to the left here, you grab it again. Drag until you're all the way off the screen and it will automatically nest in there. And then when we close, it could go. Yes, that's the clipboard. Let's talk about thoughts already. Have some fonts up here. You'll notice If I click on here, it shows the calibri thought. This is your font size 11 and there's no other formatting highlighted here. If I go to this header here, you'll notice that it's caliber, a size 18 and it's bold. And then if we go into our fill, you'll notice that this green color is selected. These are all background colors you can see. If I hover over them. It gives you a preview of what they would look like. You can change any of these where you can go to know fill that will just make it clear in the background. And by the way, white is different than no. Phil White will cover up things that are behind it. And no, Phil, just be transparent. You can find more colors here, and you could pick out any little piece of the rainbow. But in all you do is select, and it will show you the new color you've selected. If I go for red or orange, actually read would be about there. This one gives you the Grady in from white to black, and this is where you actually pick the colors and their intensity. But it shows you your new color that you're selected and then the current color, Which is that green. Okay, so we'll close out of that. That's your fill. This is the font color basically works the same way. But for the actual text in your cell, and if you click on the one that's displayed here, this is like your auto color. So if I click on this, it'll change it to the yellow that's displayed there. Okay? And if I went in and changed it to that color, they will show the most recent color that I've used. So if I wanted to go change this cell to that green color, I just instead of using the drop down and going and finding it, all I have to do is click the little paint bucket, and it will automatically do it. Same with this. Normally, your thought will be black. And then if you have text in here that you just go click that and it will change it to block. Okay, so controls you don't do OK. These will make things just bigger or smaller. Candle slept in our header and just click that to make it bigger click that up to make it smaller. Okay, um, bold. You can bold or unmold the Tallix or in italics, underline or no underline or double underline. And then you're grids. Let's just use an example out here in the white space. If I select that whole blank area, you have these gray light gray grid lines on the background. But those are just to show you where the cells are. These black grids are a result of this feature here for use the drop down. You can create a bottom border, which is just a black line on the bottom top border, which is just a block line on the top, and so on. All borders will fill in everything. So if I click off this you see, it feels in the entire grid. Re select that on. You could do a thick border just outside border, which is what this is. I just selected that area and then did the outside of it double borders and so on and so forth. And then this one, you can draw borders. Can you just go wherever you want to go and then release? Okay, we'll do a couple of those so that is the font section. Oh, and you also have the funds that you can choose from here. And this will change your fonts. And then finally, you have a drop down with this one as well, and you'll notice this has some of the same things that are appear. So we have our number, which the same is this. We have our alignment as well. And then we have our front section, which is here. But this gives you just another way to select your fonts, your font styles, which is italic or bold your phone size. All of this is up here, but this is another way to select those things. And the other thing that you can do here is like to strike through, which will show you what it looks like. Superscript, which makes a law should actually I'll show you what superscript looks like. Let's deal with this superscript and we click OK and see it makes it the small, raised up script. Okay, so that's your font. Area alignment is pretty straightforward. Let's just use this 24 as an example. You can ally it at the top of the cell, the middle of the cell or the bottom cell, you can write a line it, center it or left alone it. This allows you to angle it, which isn't something of your too often, but you can put on angle like that. Click it again to undo. This is an in debt, so I can let's see, increase the in debt from the left, and you can do that as many times you want. Or you can decrease the in depth until it's gone. You can wrap the text, and a good example of this is if, let's go ahead and choose this example. I will crunch this down so this doesn't fit you wrap text. Then what it will dio is it will continue to use more lines to fit it into those columns, and you can see if I expand this, it will use less space. And if I crunch it down, whereas these cells just bleed into the next cells and go behind them hidden behind them, this one will continue to go line after line so that everything is displayed within that column. So we have this. Well, let's just do you can either hit this to unwrap it or you could do on do controls the to get everything back to the way you want And let me show you how emerge and center works if I have Ah, just a title here that says Steve McDonald and I want to have that text cover all four of these cells. Then I just highlight the cells I want and hit Emergence center and see now those air, all one cell. If I select on the cell blow, it selects this individual cell. If I select up here, it selects all four of those rose as one cell. Okay, they've quick murdered center again. It will emerge it like that. Go ahead. Delete that. If you click the alignment, drop down. You'll see it automatically brings you to the alignment tab you can do left in the center, Right, etcetera. Same with vertical bottom Top center. You change indents. Here's your wrapped text and you can change your text directions to flow right to left or left to right. And then you can change the angle of your text just like you did with this. Okay, you'll also notice that in this drop down you have your number, which we'll get to in a minute your fault. You can select, which we've already covered supporters, which we've also already covered. But here, more options for the borders, Phil, which is your colors and protection, which we'll talk about in another section. So that's a tour of the clipboard, the thought section and the alignment section of the home tab. And that's it for this video. In the next video, we'll keep going with number section styles, cells and editing.
94. Home Tab (part 2) - The Complete Walk-Through: OK, in this video, we're going to keep going with the home tab, and we're gonna talk about numbers, styles, cells and editing. So let's talk about numbers in numbers you can just for mature numbers. This way. So you pick on a number of this 24 we can do the drop down here. You can do it as general, you can click a number and it will give it decimals. You could do currency. It will give it a dollar sign. Accounting is similar, but we'll format it a little differently over to the right and so on and so forth. There are dates, different types of dates, percentages, fractions, and select here for more. But we'll go back to general for that. You can also use these drop downs, and you can put different currencies in there just by selecting that you can do percentages . This is to modify the common style and then actually, let's go back to that. And then here you can, uh, increase the decimal places where you can decrease the desolate places. And again you have the drop down here that just brings you into this. But this is basically the same thing as what? You can do it there. Okay, well, pop that factor, General. And then styles styles were pretty cool. There's some really cool tools in here. Let's highlight this whole row of members here, and we're gonna go to conditional formatting. So I have a whole section on conditional formatting, so I won't get too far into it. But basically what it does is adds colors to your cells to display different types of information. So, for instance, we can make the largest numbers, have more blue, and the lowest numbers have less blue. Or we can have arrows that mean higher or lower and so forth. But let's just show you these radiant data bars. So So if I hover over that, see how the 2400 has a lot of blue because the biggest number and then 120 has just a tiny little blue bar showing That's the smallest. So it's just a visual representation of your data, different colors, and that there are color skills, so warmer colors are lower numbers and the green is the higher number, and you can reverse it if you want. Great to Steve Grady um of one color Icahn. Sets are arrows and stuff. So, for instance, this one lower numbers air red, higher numbers of green. And the reason that's got these is because with these arrows it doesn't fit. So I would have to just double click there to show that you can see the middle number is 1200. It's got a sideways aero. The biggest number is up arrow and then the rest of down arrows okay, controls. You don't do that. So that's conditional. Formatting format is the tables another cool, and this is just turns this whole thing into a table. Right now, it's just a range of data. But if we go here and just pick on one of these, we just click it and it's gonna ask us where our data is, where arranges and you can just click and select. It asks you if it has headers and it does have headers here and then you just click OK and click off of that. You can see this is now formatted as a table, and you have drop downs with sorting features and all kinds of things that go with tables. We'll get more on the tables as well, because tables or something, you use a lot of itself. So control Z to undo that, um, and then sell styles. So let's just click on a bunch of these here, and you can just pick different cell styles. Good, bad neutral. You can have miscreant colors. You can use these for headings pretty easily you can do currency with. Well, I wouldn't work for currency on that here. Better to select on these to show the cell styles for currency you can do at the Kama Styles. You can do commas without decimals, currency with decimals, currency without decibels and percentages. So those are all your cell styles. And then in yourselves group here, you could insert, delete or format groups of cells. So if I'm selected right in the middle here, I could insert just a space l You can see that just inserted a cell there, control Z. We can answer the whole row so they just put a row right in the middle. Rosie, we can insert a column, just plops a column in there, and we can answer sheet. So that just added a new third sheet. Okay, so that's insert delete is basically the same, but it takes him away instead of inserting himself. I want to delete a row. Just a leader role. It's gone. Controls you to get it back and so on and so forth. Okay, format. This is a good one. You can change the row height. You can auto fit the row height. If you click that. Well, it's already been out if it But let's say this row is really tall for some reason. Okay, when were selected on that, we could go format and auto fit row height and it shrinks it down to just the right size. Okay, um, we can also same with columns. If this is a really wide column, we got a format and auto fit calling with Oh, and I actually fit it to the cell I had selected. So it wants like that. What if it calm with now if it's to the widest text in the cell, and then you can just click on the regular column with and it will give you measurements and you can enter whatever measurement so you can see this column is now 10.57 could change this to quick answer drops it down to two trolls again. So that's your format. You could rename a sheet if you click here, notice little highlight your cursor here. And I could call this kitchen hit, enter and now ever renamed that sheet? You can also just do that by right clicking into it and saying rename Okay, that's formatting. No, you can change your tab Colors too, if you want to make him fancier. Well, that wasn't very, uh let's do a brighter color so you can see Steve read their see now that Tavis Red, don't you clicked on it. It kind of fades it out a little bit. So that's your tab Colors. And then you can protect your sheets as well. Put a password on it and lock various things which we talked about actually in the file tab section. Okay, Cancel out of that. And then finally you're editing group. How about some of the cool one and easy to use? If we didn't have this in here, we could just highlight that cell and click auto. Some and Excel will just automatically put in a some function and it knows that you want to add up everything above you. So it just goes, selects all that grits formula hit, enter and it doesn't automatically for you. Cool thing is have used the drop down. You could also do that Count numbers, and I'll just give you a count of how many things you have. 12345678 You can do the average of all the numbers should enter to put the former one. So 723 is the average of all these different things and so on and so forth. You have other options, Max, man, and more functions that you can use the auto some just to quickly put in a formula. So I better change that back to this. So let's talk about Phil. So now it's time for us to use these little things that I copy and paste it down here. I'm just gonna select all the cells next to these days of the week. I'm gonna go fell on. You say Phil, right? He knows just crabs everything to the left of these cells and fills. It's pretty cool. We can also do the same thing. If we selected here and went Phil down. So I selected this cell and it grabbed the information from the cell above it and filled it down. And finally, we have Siri's, which I won't get into Justify which I also won't get into, and Flash fills the really cool Let's talk about Flash Bill So they go over here and I click on this cell and I want these formatted differently. So I do cap lock and I want these in caps because Sunday I started type Monday and you'll notice that it just automatically filled in the rest of the word and then put all the rest of the words down here in caps. That's flash. Phil Excel is anticipating what you wanted to do. It anticipates that you want to change everything in this two caps, and then if you just hit enter, it'll put it on. You could also go like this. Delete. If I have already typed in Sunday, I could just highlight all of this. I don't even have to start typing Monday, Phil Flash Phil, and it just knows based on the pattern over here. Yes, that's flash, Phil. Clear is a cool and you can just clear everything out of a selected range of cells. Control z Undo that you can clear just the formats, and I should let me move up to show you a better example of that. To go to this whole range here and I go clear formats. It just gets rid of all the four Matic Bolds colors, dollar signs, everything. No, Let's undo that. First, we can clear just the contest and it leaves all the formatting. Okay, Rosie. And then we can clear comments or High Plains. This is a good one. If you have, for instance, have a bunch of Web addresses, see how that automatically makes that a Web address. It's difficult to click into these cells because it's you often get ahold of the hyperlink . So let's say we have a bunch of these. If you go and try and click into the cell, it's easy to just accidentally click the hyperlink. So an easy way to fix that is toe gently highlight them all just like that, and then we go clear and we can say clear hyperlinks. So those are now no longer clickable. See, it doesn't get that little pointer, and then we can also clear the formats and now we just have text. So that's a good way to convert hyperlinks away from, um being hyperlinks and just create text out of them. Delete to get rid of all that. Okay, that's it for clear, sort and filter. Let's look at this range here. Actually, let's look at this whole range here like that and we go sort and filter you consort A to Z . Okay, so that actually sort of these alphabetically. Everything else follows with it because it's sorting by the first thing to the left. And if we want to sort by this totals road that we can go, sort, we can go to custom sort and we can sort by total. I was sort on values and we want to go largest to smallest. That's going to sort it. Click OK, you can see now it moved all of our materials to stay in line with our numbers, but it put our highest value at the top, although a doctor lowest. So that's sorting and filtering controls. Either do that and then finally find and select. So if you go to find it's like you want to find, say, say this is a huge spreadsheet. We want to find the oven cost. There's gonna find any type of in and we find and highlights it for us. So it's quick and then replace same thing. Let's say we want toe replace oven with stove. Who knows? Stove, we say replace all. This is all done. We made one replacement. Okay, See, now it replaced that with stove. Okay, Control Z close out of that control Z and so that's fine. And that's finding replace. It takes you the same place we have go to you could go toe certain cells just by clicking on. So if I wanted to go to so be 13 b 13 I said, OK, and it just drops me right there. They didn't go. Go to special. Let's say I just want to find a formula that has numbers in it. So I d select all of these and I click OK, and that goes ahead. And it's elects all of our places that have members with formulas, which is all of these. Let me show you one other thing. I'm gonna grab image here. This is the cover photo for this course, and it's in excel as an image. But let's say I'm selected over here, and but I want to find this image somewhere buried in my spreadsheet. So I gotta find and select again. I go to go to special and I click on objects, and I say, OK, see it highlighted and selected that object because that's the only object in the entire spreadsheet. Okay, um, again, you can go to Formulas, You just click on that and it will select formulas and all kinds of things if we still have the conditional formatting we could. I like that. Um, and you could just select all these different variables and then finally also have this selection pain, which is this thing, and it allows you to select different objects and things like that. Okay, so that's the editing group. And that wraps up our complete tour of the home tab and all of the tools on the home tab ribbon
95. Insert Tab (part 1) - The Complete Walk-Through: okay. And this lecture, we're going to be talking about the insert tab and all of the tools that go with it. So the insert tab is the one next to the home tab, and it consists of tables, illustrations, Adams, charts, tours, spark lines, filters, links, text and symbols. So we're just gonna start over here at the left side and go all the way through. So the 1st 1 is pivot tables. You'll notice. Here I have our spreadsheet. That's probably familiar to you of our sales reps as the reps, the region, the item that they sold, the price that it sold out the category, that it's in the day that it was sold. And I also added, in some dates, these aren't necessarily accurate, but I just put him in there for one of the examples that will be using further on in this section. But let's make a pivot table out of this, using the pivot table button, so the first thing you do is you make sure your selected anywhere within this range of cells, and then you go just click the pivot table button and it's gonna bring up this dialog box and it automatically select your area where your data is. You can scroll down to make sure that it's going all the way to the bottom. And if you need to change anything, you can use your arrow keys. For instance, if I use shift an up arrow, I can move the bottom of the range up or down, using the down arrow. But Excel has selected it perfectly for us this time, so we'll leave. That, as is, will put it in a new worksheet and we'll go ahead and click, OK, and it instantly pops up our pivot table page. So this is a separate sheet and you'll notice it now that we've put in a pivot table. It brings up this new ribbon under pivot table tools up here, and there are a lot of important tools in these ribbons. So as I'm going through the insert menu and adding things like pivot tables or pictures or tables, they're all gonna have these special tool tabs. So as we go, I'm gonna walk you through these as well. So, for pivot tables we have analyzed and design and the 1st 1 is analyzed, and the very first option is just to name your pivot table, and I recommend doing that. We'll just call this sales reps and hit Enter Now that's named. He also has some options here. Click here to go to options, and this just gives you options for customizing the way your pivot tables look and behave. So this is your layout and format. You can show totals or hide totals. You can change the way it's displayed. You can customize the printing style. For instance, repeat row labels on each printed page will show the labels. If you unsa like that, then it will just show your data data tab some options to customize that and then all text . You can add this to help describe it for people who are visually impaired, who used different types of readers to use their computers. So those are the options. And before we get too far into this, let's go ahead and add some data into our pivot table. So we're gonna take our sales reps and we're gonna put it in the rose. You see. Now we have all our sales reps represented here, and then we're gonna take the date that they sold it put it into the columns, and then we're gonna take the price of the items and put it in the values. So this just gives us a nice table of our sales reps, their sales dates and the amounts that they sold in those days. So in the active field, you can see it's telling us we're in the sum of price, field or area. So if we click over here, that's not anything. If we click here, you almost shows the date for Click Into Here. It's the some of the prices we click over into the sales reps. It shows sales reps. So that's just telling you where you are. And you also have a settings area here so you can rename your fields. So if we didn't want this to be called sales reps, we could call it something else. We just call it wraps or whatever. You can use different functions instead of some, and this is your layout. You can adjust that using this tap. Okay, The drill down and drill up fields are for if we had, for instance, months or quarters or years to go along with these dates than those would be It's basically a hierarchy, right? You'd have years above the dates and the dates would be a child to the parent, which is be the year. And then you can drill down into the data to get deeper toward the child data. So that's what those are. These pluses and minuses here will expand your data. So right now I'm selecting on Jane. Expand it and I pick a category. Let's just go with Price and say, OK, let's scroll down. So we're still looking at James. You can see it's broken down the prices vertically. Okay, we can un expand. So that's your active field. And now it could just use this to select okay, this next one group selection. So if I have, say, this group here, these three people and I click on group selection, you'll notice that just clumps them into a group together. And they're like, part of a subgroup. And if I want to get rid of that, I just click on group. Okay, you can also group number or date fields, so if I click on this, I can click group and it'll picked dates for you, or you can add indeed, click OK, And it creates a group kind of grouped Undo that. Next one is filter so you can do a slicer slicers air Really cool. You just click that slicers air just really user friendly ways to sort the data so we can put a sales rep slicer in there. And so this allows us to filter this whole pivot table by just clicking a button. So if we want to just show Bob, we just click Bob and there he is. We could expand him out. So you all you can see is Bob. We're going to show Bob and Helen we click here and click Helen. So now we've got the data for both of them. We could do more people if we wanted. We could click toe, get them to go away. And if you want to clear the filters, he just go like that. Of course, if we minimize this and this looks like our normal pivot table, that's a slicer. Select on it and delete it and you'll notice that brought us back to our home taps so that we just have to go back to your analyzed tab. See which did slicer, uh, timeline the reason I put these dates in here so I could show you a timeline. So you click on the date, it's gonna create a timeline. Based on those dates. This is similar to a slicer, so it's just giving you different dates to select by So right now it's going by month. So if I wanted to get just the month of January, just click on that and it's January. Of course, all these air January, so better demonstration will be days. So if I just wanted to get January 4th, that just brings back to January 4th. They can expand this to select, like, four or five days, and then it just sort it by those days, you could do it by clicking or by clicking and dragging and got a slider here to bring you to different areas. We don't have any days there. There we go. So that is a timeline, this button to clear the filters and get back to our normal pivot table and then make sure your selected on this and hit delete to get rid of it. Hey, go actor analyzed Tab. That was our timeline, these air connections so we don't have a connections, but you could manage which filters or pivot tables connected twos in that tab. Refresh just refreshes your table. So if you're in your sales rep data here and something changes like we add some data in there, then we'd go back to our pivot table, go to analyze click Refresh, and that will update this. So it's current changing your data source. If you click on this, it is going to take you right back to your dinosaurs and give you the chance to modify. So say, we didn't want these dates in here. We can just go shift left arrow notice that just moved our selection to the left. And now that's outside of the range. If we clicked, okay, then the dates would no longer be part of our pivot table. We're not gonna do that. Brussels could cancel. And again, that was the changed at source. And we have some actions here. You can clear you're familiar with this. If you click, clear all, it's gonna clear all of your selections over here in your pivot table fields, and it'll basically just take you back to square one, and you can't undo that so I recommend being careful with that one. But if you wanted, if you had a really complicated set up over here that you just didn't want anymore, you could click clear all and just start fresh and drag new things in select just allows you to go to specific sections so you can select the entire pivot table. For example, you could pick just the values you wanted. So you're selected on those things. You can select just the labels. If you want just a quicker selection tool, just click here to get out of that could move your pivot table. So it's gonna ask you where you want to put it so you can move to a new worksheet or you could move it to a different location here. So So you have got it right here. If we change this to sheet six a two, then it would drop it in right up here. Okay, We're not gonna move it, though, so we'll just click. Cancel. So their actions calculations. We won't get into calculations, tools. You can create a pivot chart based on this. So you just click there and it brings up charts that you might want to use, and you can go through the different ones and select them. So show you who did the most sales on a particular date. But you have all kinds of choices for charts. Cancel that recommended pivot tables is where you click on this, and it's going to suggest different ways of organising your data. So expand that out a little bit. You see, this one is suggesting that we go by categories bath, kitchen, living room, etcetera and then we sort by east and west and then have a grand total. So this is a good one. Actually, you could see which region is selling the most in which category. So really effective use of pivot table there. But you have all kinds of recommended tables that you can pick from here, and then this just determines what you're showing. So your field list is this right here? If you click that, that's just gonna disappear. Click it to bring it back. Show I'd buttons is if, for instance, when were selected into here, and we go like this and we want to show the detail of the price breakdown free trip. Click OK and see Now it's got these plus minus buttons here, and we can hide them or show them and they're all expanded now. We could shrink them all down. Makes a little easier. See, now you can see the plus minus buttons, and this just allows you to hide them or show them Yeah, and finally field headers. We dislike this. It removes these different headers, and when we click it again, it brings the back so it shows your role labels your column labels so that your analyzed tab and your designed to have is a lot more simple. You can add in sub totals within your table. You could do grand totals, just turning them on or off. You could change the layout of your report. You can choose to have, like blank rows or no black rose. This is simple. Just your headers column Headers do banded rose more like a traditional table. You could do bandit columns, just all visual design elements, and then this just allows you to kind of put a different design or style on your pivot table. Okay, so that is your insert tab and pivot tables, and then the analyze and designed tabs to go with it
96. Insert Tab (part 2) - The Complete Walk-Through: okay. And this lecture, we're gonna be continuing our tour of the insert tab. And as you recall, last video we were working on pivot tables under the table stab. And in fact, if I switch over to that screen this was the pivot table that we're working with. And remember, we used to analyze and design tools. Now, we're working on our kitchen remodel costs worksheet, and we're going to keep going with the insert tab and create a table. And by the way, you probably know this trick. But if you have all tab, it will take you to the most recent other window screen that you've been using. So I just hit ball tab to cycle back and forth between those. So this is our kitchen remodel cost worksheet, and we're gonna make a table out of it using our next button on the insert tab. It's the first real quick. I'm just gonna go ahead and get rid of these. And if you remember using the home tab weaken, go clear. I was just gonna say, clear all so that just gets rid of those and then back to insert tab. So we've already looked at pivot tables. And by the way, the next one over has recommended pivot tables. But you already know how to use that. That just recommends a pivot table for your data. And now we have just a traditional table. We go and click that and it's gonna ask you where is the data? And I had my cursor over here, so it thinks we're looking over there. It's not. So we're looking over here. We're just selecting that and that shows us where our table will be. And we want to say yes, my table has headers and then we click, OK, and it's created a table out of our data and you'll notice. Now we have another new tab called Table Tools Design, and this is gonna look fairly similar to our pivot table design tool. We have an opportunity to name it so we could just call this kitchen costs and you can't put spaces in table names. Okay, so now we have a named table, and then we can look at some of these design tools so we can resize the table clicking here , and this just allows us to select a new area, and you can do that by using the arrow keys, the shift arrow keys or you could just grab and drag. But in any case, we already have that selected. So we're not gonna resize it, so we'll just click cancel case. That's re sizing. Then we have your tools here. You could summarize this with a pivot table. We're not going to do that because that's basically just turning this into a pivot table. You can remove duplicates. This is an interesting and important one. I don't have a great example for, but I'll explain it real quickly if we had, if this was a contact list with a bunch of employees and different people were entering the data from different sources or different places. If we got, for instance, are good old buddy Bob, If Bob got entered in there, say three times with all the same information, his phone address and everything, then we could just go to this, remove duplicates and click it, and it will search for duplicates. So it's asking which columns who want to search in. If he was under this first tab, we would just click that first tab and we'd click OK and see In this case, it found no duplicates. But if it did find duplicates, then we just click another button to make the duplicate Bob's go away. And then there would only be one. Okay, so that's how duplicates works. Convert to a range. So if we wanted to put this back to arrange, we could do that now. One kind of word of warning. If you convert it to arrange with all this formatting on here, then it's going to keep that for Matic as a range, and it can just get a little tricky. So what I recommend doing is going up here to the very top of your table styles. Click on No formatting or it's cold, none right there and then click Convert to Range. It will ask you if you want to, you say yes and now it's converted back to our original formatting. Okay, I'm gonna control Z because I don't want to do all those changes, but that is under your design tab. That's how you convert it back to arrange. Okay, we can insert a slicer. We looked at thes when we're talking about pivot tables weaken, Just sort our table. Based on some of these criteria. So let's just sort by materials and click, OK, and here's our slicer. And so with this, we can just quickly say, Well, we want to see how much the oven costs. We click oven and it gets rid of everything or filters everything out except for oven. If we want to select multiple criteria, we can click here and click, say, just oven the fridge, the cabinets and the cabinet handles. Okay, and that will sort it for us. Okay, click this to undo all your sorts. And then, by the way, one thing I didn't mention When we're talking about pivot tables when you put a slicer in it also brings up an additional option menu. So you have formatting here that you can change to get a different style. You can put a caption on it that's different. If you want, you can change the settings and so on. Most of this is just simple stuff. But I want to let you know there is that additional option tab there. Okay? Any way to get rid of the slicer? Just select on click Delete. Now we're back to a regular table will go back to our insert tab in our design to have under table tools. We can export this. Send it to SharePoint. If you are using SharePoint, you can refresh the data. Normally, if you're pulling data from another workbook or table or source, these were some opportunities. If you have this linked online, then you can open up in a browser and so forth. We don't have a set up that way. These air your table style options so you can get rid of your header row. You can create a total row, which is why I got rid of the total before because this will create one for you. You can get rid of the banded rose. You could do special formatting for the first column, which is bold in this case with Last column. If you want your totals to stand out, you can do bandit columns, and you would usually get rid of the banded Rose to deal like that. Or you can get rid of the filter button, which is that little drop down right there. Okay, And then, of course, you have your styles here. Okay, so that's tables. Let's go back to our insert tab and real quick and gonna convert this back to arrange just to get it back to what it used to be. And there we go. So now we're back to normal and back to our insert tab. So that was Tables. Let's talk about pictures. We're gonna put a picture. Do you remember how I had that image of the course right over here? I'll show you how I did that. So you just click on pictures, navigate to where you want to go, those and then it pops up the picture. You can resize this by grabbing the corner hair and dragging to make it about how big you want. And then when you have the four arrows, you congrats it and move it. So let's just put it right here. You can also Oh, it could also grabbed this piece here and rotated if you want. Or if you grab one of the horizontal or vertical bars, you can stretch it, but you'll notice that changes of proportions of it. So it controls the to get rid of that. And then again, with their picture, we have this formatting tab so you can remove the background and you can see that Excel just basically guessed at what the background waas. It didn't do too bad and got the hand on the computer in there anyway, we can discard those changes, but that's how you remove the background. You can do basically adjustments to the image. Here. You can do light corrections. So if I wanted to be lighter, darker, this is just like where you edit your pictures, either in your phone or using photo shop or whatever you can do adjustments to the color. So if I want this to be, you know, more purple, I could do that. I want to be orange. I could do that. Artistic effects. This is just all kinds of kind of crazy looking stuff. You can compress the picture that basically just save storage space. You can change the picture. Basically, replace it with a different picture where you can reset the picture. This is after you've done some changes. For instance, if I go to the brightness and I've brighten it up too much, didn't like that click reset, it puts it back. One thing I didn't mention it, you'll notice that pictures just float and they can you know, so they'll cover over other things. So that's good thing to keep in mind. You have borders, so if you just hover over these will preview for you. You can change the color of the border. You can do effects with the border, so you can be like a drop shadow and see where it moves. There's an inner shadow, those kinds of things. It's a picture effects. You can change the picture layout. Okay, And then with these, if you have, let's just see if I can copy and paste this. Okay, there. Now I have two of the same image, right? So when we're in the formatting, you'll notice that says, Bring forward or send back. So if I say bring forward, then this one is gonna lay over this one, see how it's laying on top of it. And if I say send back that, it's gonna drop it behind, and this one will be in front. Okay, your selection. Pain. It's just like what would seem. You can use it. Teoh quickly select things. Alignment and rotation are pretty straightforward. This is kind of cool. Takes a snap to grid, and when you're moving it. It's going to find the closest script edge, Caesar. If I make a smaller and see how it snaps to the lines there, that's better. So if I go like this, I see it snaps toe that snaps to that edge. Anyway, you can see it kind of moved to the grid. That just makes it easier to line up. Sometimes do, uh, and then you can crop and the way use these, just grab them and slide them. So say, I just want the crop all the way down like that. Just do that and then click off of it and you've cropped. The photo course will undo that, and then you can adjust the height and width. Okay, so those are your formatting tools for your picture. Go back to insert, so we're making some progress. Now let's go ahead and delete these pictures. You can do online pictures. It's pretty straightforward. You just select a photo from online click insert. It's down here so we shrink down. It's to award more big shrink. Okay, so the thing to remember about these is you have to understand their licensing before you use them, but this one has the Creative Commons license attached to it. So you can you have proper attribution. But you need to know what the licensing is on any photo that use online. But that's how you get a picture online. Just click delete to get rid of that back to insert. That's online pictures. We have shapes, icons and three D models and shapes, or just what they sound like. You can just crab whatever you grab a smiley face, and then you draw it in here. Buy less clicking and dragging, and you notice this is snapping to the grip. So there's your picture, and then you can move it. You can stretch it, whatever you need to do. If they didn't want that to snap to the grid, I could just go to a line and see how it's It's gray. There's a great box around it, so if I click it again and look at it, there's no great box. So now it was just drag fluidly. I can put it wherever I want, and then you have all kinds of editing tools here, these air pretty obvious. You can change text. That's if you're using text you can do styles and colors. You can grab another shape like say, you want an arrow and see I have the low plus sign you left Click drag on. You could move it until you get the right shape and then released to drop it. Okay, so those your shapes that your formatting tab. When I click off of this, you'll notice the formatting tab goes away. But I could go back to an insert tab. Can I have my options here again? So those air shapes let's delete those. It will goto icons. So if we just wanted to have a person we just selected and go insert it just pops it in there. We could put it wherever we want. Same thing appear. You can change the design of it and so forth. Okay, don't delete that back to insert. That's icons three D models. This is kinda cool. You could do a file if you have one created, or you can go to an online source. Just go to classroom and we'll get this Earth click insert and their groups. You have to click right on it to get it so you can move that and then see this you can rotate it. So if we want to look at Africa, we want to look at South America, North America. Whatever you want to look at North Pole, you can rotate it the way you want to, and when you're in the format tools, you can adjust the default view. Here you can get more three D models. You can reset it to the original. So if I click this, it will snap back to how it was originally. Same thing with this. You Kenbrell forwards and backwards selection, pain and sizing. Okay, so that's three D models. Let's get that back to insert, and then you have two more options. You can insert smart art graphics. I'm not going to go into that, and then you can take a screenshot. So the way you do that is, you just go like that will take a picture of our pivot table window. Click on that, and it actually inserts a screenshot. Let me resize it so it's a little easier to see, so it actually takes a screenshot of our other Excel screen and plops it right in as an image. You have all your editing options there as Well, okay, Going to leave that back to insert case that takes care of the illustrations group in the insert tab, you've got the Adan's Adams air basically just additional tools to use an excel. Um, if you go to this one, it will give you a list of Adam's that you've already added or downloaded. Or you can go to the store, and it's gonna bring up some options that you can go to click on the store. These are just different. Add ins that you can use for excel, and you can just add these or try him out. Most of them have a cost associated with them. So anyway, that's your out ends. Okay, so that finishes up the tables Group, the illustrations group and the evidence in the insert tab in the next lecture will go on to work on charts, tours and more.
97. Insert Tab (part 3) - The Complete Walk-Through: Okay, This is part three of our complete tour of the insert tab in Excel, and we've already looked at all of these sections. But now we're going to get into charts. We're gonna look at tours, spark lines, filters, links, text and symbols. So let's jump right in the charts and get started, and we can do recommended charts, and this is just going to give you ideas for how do you could potentially chart out your information? You can also go to all charts, and you can look for different styles of charts, depending on how you have your information set up. Excel may or may not find a good or useful chart that it recommends. Okay, that's recommended charts. And then, of course, you can go and pick from your own charts. And let's just take a look at a pie chart so this pie chart is pulling from the quantity of each material. So obviously, this big yellow on is our flooring because there are 400 pieces of flooring or 400 square feet of floor in, so it's not a very relevant chart, but you could go to the filters here and say that you want to go by the total instead, quick, apply. Close that, and now you can see it's a little bit more relevant. So it's looking at our flooring and saying, While our flooring is $2400 it's the most expensive item. So is the biggest piece of the pie. The next expensive items cabinets and the orange one hears cabinets, and you can change the way these were labeled everything. But that's just a quick way to create charts. You can change the styles over here, just clicking on buttons, just whatever suits your preferences. You can change colors. You can add elements to it. Modify the layout. You could swap the axis to put the rose where the columns are in. The columns with Rose are that doesn't apply toe pie chart, but that works with bar charts and things. Change your chart type or move your chart. Okay, so that's your design tohave under charts, and then you have your format tab. All this looks familiar. You could just change colors, change thoughts and so on. Okay, let's get out of the charts. Just wait believing that and go back to insert okay, that takes care of charts, maps. We're actually going to use a different example for this, and I'll just tab over this one. Yeah, there it is. This is just a list of places that I'd like to visit the city, the country and the priority of which one's the most important. And you could map this out just by going to the maps. Click on that. And it's just a version of a chart, really, But it just gives you a visual of those areas, so they're all in Europe. So it shows you that, for instance, the Czech Republic is high on the list should that Portugal is high on the list just by a visual representation of the death. Okay, we'll delete out of that. Go back to insert. So that's maps pivot chart. We already know how to do pivot charts, but you can use this button here to insert one, and this will give you the option of a chart or a chart and a table at the same time. And then three D maps have a section on how to do three D maps, so we won't go into that. But you can create a three d map of the world. That's well, three dimensional. And it works really well when you use things that have, like, cities or countries and some sort of data to be represented by the map. Okay, next, let's talk about spark lines. We're gonna jump over into a different workbook for that. In this workbook I have are familiar sales reps and I have the months of the year, January through December and then I have their sales numbers for each month, and we're just going to use this data to create a spark line. The thing about spark lines is you place them at the end of a row of data and has to be some sort of data that shows a trend over time. So the way we do it, we select the data. Then we click on spark Line. It asks us to choose the data we want. We've already selected that, and then we choose where we want to put the spark line. Please click there, click OK, and it creates this little many chart with a line graph. We can click on that and drag it down, and that will create a little line chart for each of our sales reps. We can expand this out a little bit if we want. And you can see that once we've created these spark lines, we have a new design tab here that has a bunch of more options. So here we can edit the data. This would be editing where your data is located. You could change it between a line a column or a win lost chart so we could go to columns. You see, it represents it similarly, but just using columns go back to our lines. For now, you could have little markers on the high point. See, that puts little red markers on the high points for each rap and that you could do low points as well. So that shows you their basically their worst sales month in their best sales month. You can show negative points, but we don't have any negative numbers here, although if we did, we could just change one of these to a negative and then go back to our list. Click on her spark charts again, go back to design. Now we can show negative points. You could mark the first point in the last point, and then you can do markers for every change for every data point which in this case is our months, we'll take off the markets for every one of them, cause that gets a little busy. And then we can go to our styles. And you could do different colors for the high points, low points beginning and end so we could do something like this. So now you're beginning and and are marked in yellow. Your hypo is marked in green and your low point is marked in red. You can change your marker colors. You can change the high point color, low point color, etcetera. So these were basically just overall styles in these airways to change individual elements of that style, you can change your access, and down here, this is an important point when it comes to columns. Let me show you this. If you have column selected here, let's go ahead and make these a little bit bigger so we can see him. There we go. Okay. You'll notice that the high points on these are all at the top of the screen or this I should say the cell, but they're not really relative to each other, which is a problem because it's a little bit misleading. So what we want to do is good or design tap, goto access and say our minimum and maximum value. We want to be the same for all smart lines instead of automatic for each spark line. So if you click on that and for the then you can see that their relative to each other. Now I can give you an even better example. If we take this data, copy it, put it into the higher range. Here, you'll see that now, this one, none of the values actually hit the top. You'll also notice that these are all raised up because of this one negative value. So let's also go in and change that. Take away that negative to make it a little more clear, and now you can see it better. So some of these values this value is reaching the top of the cell, and these values are only coming about halfway up the cell. So all of these charts are now relative to each other rather than being this relative to themselves. And the cool thing about spark lines is they just allow you to visually represent the data that you have in a spreadsheet, and you can just pick out trends for individual sales reps rather than having to look at all of this. Put in the one big chart, and a good example would be this one right here. If you look at all of these, you can see a general upward trend going through the end of the year. So it's safe to assume that September, October, November December have strong sales months and most of the reps air following that trend. But then you look at this guy right here and you can see that has just drops off here. So that's a good visual indicator of something maybe being wrong. And so you can then go in and look at some of the data and see that thes months are critically low compared to these other reps. And that's the kind of data that can give you valuable insight, which is one of the main purposes of using Excel. For instance, maybe this company started a training program somewhere in July or August that boosted the sales of most of these raps. But maybe Marcie didn't get in on that training, which is why hers dropped off because she wasn't trained up on new market trends or sales techniques that were necessary in the market. So then that would be a good indicator that you need to go back and get Marcy some training . So that's kind of a long winded explanation about spark charts. But they are cool, and they are useful for representing data and trends along a row of data. OK, so let's spark charts or spark lines. We could do a slicer. If we turn this into a table, go back to our insert tub do slicer. We could do a slicer based on our sales reps. Look, OK, we just want to see Bob Sayles click there on. There we go. Okay, clear that out and delete the slicer. Go back to insert. We've already looked at a time line that's similar to a slicer but allows you to sort the doubt of based on dates specifically. Okay, let's talk about links for a minute. There basically two types of weeks that I want to show you. The first type is if you just had a cell selected that linked out to a website. It's a hyperlink. The 2nd 1 is that if you had a cell selected that you can click on, it would take you to another sheet in Excel. So, for instance, what's good or kitchen remodel worksheet real quick? Let's say that we wanted to have a link right there that takes us to Bob's sales on our other sheet. We just go ahead and do the drop down on Link Click Insert link. So this is showing the text that we want to display, and we're just gonna have this say, Bob's sales. And then we referenced the cell reference and he happens to be a six, I believe, and then you can select a place in this Excel workbook. So we're gonna go to sheet one, which is where Bob Sayles are, and that's really it. We can also add a screen tip. I just typing whatever you want in there. So let's say click here to see Bob Sayles actually, sales numbers, uh, look OK. And then we click OK here, and it created a link for us. Now, when I hover over this, it gives us the little screen. Dempsey, click here to see Bob sales numbers and if I click on it that it takes us over to the chart . And I made a mistake and I thought that Bob was on number six, but he's on number two, So let's fix that real quick. We just go in here, right click click on Edit Hyperlink, And he was on a two, right? So it took a two click OK, and notice how there's a little hand pointing out that means it's awake. Click on the link and now our cell selection jumped to sell a to Okay, so that's how to do a link within a document. You can also just do a link outward go to insert link. So that's the place in this document. You can do existing file or what page for a new document or to an email address, But we're gonna dio what page and let's say we just want to go to Google. Put that there. Type the address www dot google dot com, and it pretty populated it because it recognizes it. Look OK, and now when you click on this, it'll just take you to Google and noticed this little screen tip here where it says Click wants to follow, click and hold to select the South. So that's a little one of the things that's a little tricky about cells with hyperlinks. Is there hard to select on? But so if you click this once, it'll go to Google. If you click and hold it, then we'll put you into the cell. We should build do the same with Bob, see if I hold it, and then when I release it doesn't take me where the hyperlink wants to go. But if I just click it once that it takes me where the hyperlink wants to go, okay, drop back to our kitchen remodel cost worksheet, and I'll go ahead and delete those. So those air links you can also insert taxed into your document have quite a few options. You can do a text box. You can create headers and footers for each page. You put word art in there, and I'll just give an example that's basically just fancy lettering. You can put a signature line into your documents, or you can add objects, and this is all kinds of different things. You could put Power point presentations in there you can put word documents embedded right into your cell spreadsheets and so forth. OK, but going back Teoh apps going back to that. The more simple versions of the text is a text box, and when you click that you left click and drag and it puts a text box in there and you can just say hello world and they have a text box. Okay. And to delete that, you have toe, get your four point arrow and click right on the whole box to select it and then click Delete. Okay, back to insert. So that's a text box Word. Are you congest? Click on and pick a fancy were style and same thing for type Hello World and click out of it. There it ISS. And of course, you can get back into there and you have a format tools so you can change the text lettering. Those have to select the whole thing to do that, like so you can change the colors and there you go. Okay, again, we click on the edge of that. We can delete it. Go back to insert that's text, and let's insert some symbols. We have two options you can go to the regular symbols. This is just a bunch of options for symbols that you can put into your excel file. So if we want a copyright symbol in a cell, we click insert. Close this and there it ISS If I want to say copyright Steve McDonald, There we go. Got a symbol in there? Okay. Coming back to symbols. We have equations as well. And if we use our drop down, there are some pretty to find equations that you can use. You can scroll down to doom or where you can go to ink equations to right here, which is kind of cool. So you can actually write with your mouse in this area. So if I want to write E, he cools. Um, so you squared. Oops. I didn't do a very good job so you can go the single selecting, correct slick that area. And I wanted this version. So go ahead. And actually one of lower case sees click that, and it fixes it for me because it didn't read it quite right. Recon going race, and you can erase those, go back to writing and write it more clearly. And I understood better that so then that's our equation. You just click, insert and see it popped our equation into excel. Okay. And with your equations, you also have a format tab. Excuse you. All of these options, and you have a design tab. So you have all kinds of options for putting symbols and and different structures of equations. Over here, you can go to your ink equation tool there, and so Okay, so that wraps it up for our insert tab. We've covered tables, have covered illustrations. Where to find your Adan's charts, tours, spark lines, filters, links, text and symbols.
98. Page Layout Tab (part 1) - The Complete Walk-Through: OK, in this video, we're gonna be talking about the page layout tab in the ribbon, and it's located right up here, right next to the insert tab. And essentially, the page layout tab is going to affect two major things. One is the look and feel colors and fonts of your worksheets, and the other is how it behaves when it prints. Okay, so the page layout tab includes themes, page, set up scale to fit sheet options and arrange. Okay, so let's jump over to our kitchen remodel worksheet and we'll get started. Okay, so this is our familiar kitchen remodel costs worksheet. And he added, in a couple of elements here, which I'm going to use in some examples, we just haven't Era, which is one of the objects from the insert menu to shape. And then these are pictures also from the insert mint. Okay, so on our page layout menu, and we'll get through these in just a minute. But first, let's talk about themes, themes, a really great way to control the colors and fonts of your workbooks, and you can use a theme just to create one kind of look and feel for one worksheet where you can even use an Excel theme across several workbooks. Or you could even use it in other office products like Microsoft work to create a professional and consistent look and feel across platforms so you can see we've got in our kitchen remodel cost worksheet. We have this kind of sage green colors and will jump over to another sheet that will be familiar to you. This is our sales reps, which we use to demonstrate inserting slicers, and this has the same color scheme. Okay, so if you go to our home tab and you look at the background colors, you'll see that these greens are this far right column on the theme colors. You also notice there's another set of colors called standard colors, and I'll get to that and explain that in just a minute. But the important thing to note right now is that the colors in this spreadsheet are this far right color. And when we look at our kitchen remodel costs worksheet, they're the same right these far right green colors. Okay, now watch what happens when I go to our page layout and we go to themes and by the way. Right now we have the default office view, but you'll notice that if I cover over these other themes, it changes. So this one's called facet and you'll see that our kitchen remodel costs work. She changes. Just watch right here. When I hover over that, it turns. Can't pray. We gotta gallery. It turns blue. You could see the thoughts or changing sizes and styles as well. Inter goal. We have another blue organic turns to a brown. He could see our arrow are object over to the right changing colors as well. I on board turns purple. Okay, so this was a stark contrast. So let me just use this. If I click on that, then I actually select that theme and notice how everything has changed now to match that theme, including our object. And if I go to our home tab and go to our colors, you'll notice that this purple is the far right column. And before, in the theme that we have going, that was the green that we do this right. And the importance of that is that if you're using colors from the same column than when you change your theme, then it will change consistently toe whatever color is in that column, and to show you what I mean, we're going to go back to our other spreadsheet and see the screens all changed to that wild purple color because we change the theme or this workbook, so it automatically changed everything. So now we have a consistent look and feel between our sheets. Okay, of course, if I undo that, take that away. Then it puts us back to our regular kind of sage green colors, which is part of the original office theme. Okay, so the important thing to remember is that your theme colors will change together. Oh, and even though I undid that I need to go back and I need to change the theme back to office and then that's going to change our colors scheme back to the original office colors case. We talked about theme colors and how If you use thes consistently throughout different pieces, it'll change consistently. Now. Where it doesn't change is with standard colors with standard colors. If you add these to your spreadsheet and then you change your theme, it will not change these colors, so I'll give you an example. Let's just make this still a bright yellow spot right down here. Okay? Bright yellow. Go in and go to page layout and goto themes, and we're going to change it to the eye on board room again. I'll click that. So you notice everything here again? Changed too. Like these purple tones. But our standard color this yellow stayed yellow. No change at all. Okay. And our sheet one over here changed. Okay, So, again, that's on your home tab. When you're in your colors, thes theme colors will change when you change your theme. The standard colors will not. Okay, so let me go ahead and do this, OK? So first I'll go change my theme back to office, and then we'll just go ahead and delete this. It doesn't really matter. Okay, Now we're back to our original. So that is themes and how to use them. Colors are similar here. You can select a color scheme, but just the colors notice how the thoughts are changing, but the colors are okay. So if you just want change colors, you could do that. Or you could just change funds and you'll notice as I go through these quite a bit of change in some of those phones, OK, so you can just change colors on Lee or fonts on Lee. Or you can change the whole theme here and then effects is something you probably won't use very often. But if you will keep an eye on the arrow over to the right as I hover over these, you'll just see a subtle change to the way that that object behaves. Okay, so not really much going on with that. But when you have objects in your spreadsheets than you can play with those effects, okay, so that's it for themes. Now let's look at your page set up, and most of this is related to printing. Thank you. Notice This one does have, ah, pop up window that you can open and you can do page orientation. You could do margins, which we have appear. We have headers and footers, which probably will look familiar from the file menu because a lot of this is similar to what you can do in the file menu when you're printing and then we have this sheet set up and we'll get into this in a minute. Okay, But let's start with margins. Pretty straightforward. And we've talked about this in our file menu lectures as well. But you can do your most recent custom settings. You could be normal, wide narrow or do custom margins, and you'll notice. So if I click on narrow and then I go to my file and print, it will give us a print preview. You can see this narrow window over here, or narrow margin. Okay, to go back and we changed too wide. Good file and print. You'll notice of wide margin. And of course, you can change these here too. Right? So that's just your margins. Same is what you do here on your file. Menu orientation is the same as what we're familiar with. You need portraiture, landscape change it, toe landscape. You'll notice. See these dotted lines here that is showing you where your current page ends? Okay. And any time you've been messing with the brakes or the margins, those little lines will show up if you haven't been than those won't appear. Okay, so right now our page break on the right is between I and J columns. Okay, Watch when I change this to portrait. Now, the line is right here between the E and the F because now we're in a vertical orientation . Okay, so you can use those when you're printing. But most people, when they're printing, will use the page breaks, preview pain. So I'll show you this real quick. This is the normal view where you're just usually in putting data are doing calculations and things. Do an analysis in your worksheet. But if you go to the page layout page, this gives you more of a page look, and it gives you measurements across the top and down the sides. It breaks your pages up into how they will look on the pages and so you can see that this would be cut off. The way we haven't set up right now gives you opportunities to add headers and all kinds of things like that. So that's one other view, and then you can go to the 3rd 1 which is your page break preview, and this shows you where your page breaks are. So this is the end of my page one, and this is page two, and my page breaks right here. You can't really see the blue line behind these two. But if I move it so I can grab it, grab it and drag it. So let's say I just wanted those photos and my spreadsheet on one page dragged that to their Let it go. Now you can see that this whole area showing Page One okay and how if I go back to my normal view now, you'll see it's put a solid line in here showing where the page break is okay. And if they go to file and print in my preview, you can see it's now fit those photographs onto the page. Okay, so that's your page break. And if I click undo, let's do it. Do twice. It'll put it back to where it waas, and when I go back to file and print, it's see it's back to cutting it off again. Okay, so that's how you do the patriot that way, and you can drag the bottom margins as well like that. Okay, so you control your page breaks either way. That way. Okay, so let's go back to our normal view. So that's margins and orientation. Size is pretty straightforward. You just choose the size of paper that you want to print on. But you know his face like tabloid that changes. It pulls the page line all the way over here. So it's between the I and J. If I go back to size and change back to letter, I noticed the small, dotted lines drop back to where they originally were. Is that size front area? You can select what you want to print, so So I want to print all of this right there, and I say Print area and I say Set print area. Okay, now we can go to our file print and you'll notice it's still coming it off. But it's got page to now because it wants to include all of that and what we're printing. Uh, and you can also see when I click off of this, we have the same black lines showing where our print area is defined. Okay, we want to get rid of that print area again, and I say clear print area. Now that's gone. I can also make multiple selections if I select this and say set print area and then I come over here and select this you can add it to the print area. You'll see. Now there's a box around both of these sections. I gotta file and print preview. You'll notice it's doing that in one page and the arrow on our next page. Okay, so we've manually selected these print areas, Okay, And then again, clear print area to get rid of that. And now we're just back to like our normal orientation. And if you don't have anything selected that it will just cut your print areas where the dotted lines are, where a normal sheet of paper would be oriented. Okay, so print area and then breaks. You can add a page break. So first, before you click anything here, you have to select where you want the page break to be. So if we wanted to put a page break, well, let's make it interesting. We want to cut the bottom of this off. I'm just doing that to show you right there. Page breaks and they say, Insert page Rick. Okay, when I click off it, you'll see right above the road that I was selected on. It's got that hard line. They're so I mean, that's gonna do it it's gonna break the page here, so it's gonna print this top part, and then it's going to print this bottom part. Okay, so go to file print and see it cut right across the top, and we got a pitch to You'll see it. Put the bottom part in there. Okay, go back. Okay, so that's page breaks. We can say Remove page, break or reset. All page. Ricks. Let's just reset. All Okay, that's page breaks. Let's talk but background. Now, this doesn't affect your printing. It will not print a background, but it'll affect the way that your thing looks and it's a little bit odd. I don't use it, but I want to show you because it is kind of interesting. So you just click on background, browse to your source, and I just have an example Here. Click on that. And there you go. So this is just a basically a wood paneling image, and it just repeats it over and over and fills in your background. But, you know, you could suit this up to make it look sharp. You could, you know, highlight this. Go to your home tab, change your color toe white. You could put some rows and columns in around this to create a little margin for it. And, you know, it's kind of an interesting look, Teoh. So that's just more to make it fun looking. But we're gonna undo the white and undo the background, and you can either click, undo or you go back to page layout se, and then it changes to delete background. So we click that on background. This guy Finally, the print titles. This one's kind of cool. I'm gonna use this other example for it, though, So let's say that we want to have all of our sales rep names on every page. When we print this because you can see we have a natural page break right here. So it's gonna print all of this stuff on the one page and then all this stuff onto another page. But it's not gonna have their rap names. So we go to the print titles button and we condemn Zig Nate. What's going to print where okay. And the first thing we do so knows we're under the page set up, which is you can also get to by just clicking this button and expanding this out. But we're under sheets, and first we select our print area. And you can if you click this little up arrow, then you can go in and just select your printer. So what we want to print is all of this data right here. Right? Okay, so we've selected that, and then we want the columns at the left to repeat. So we click there and then we can select these. I don't actually, you just have to click out. Okay? It's now it's saying Column A to column A. Basically, you could do the same with Rose at the top. But for this example, we're just doing it for the names on the left. Okay, All of this is if you just want to change the way things look, you can show your grid lines sprint blocking light, that kind of thing. So we don't need to worry about that. And then you can just go straight to print preview here if you want. Okay. So now it shows our spreadsheet here, and it's got all of our names of our people, and then we go to the next page with the additional information. See it's inserted the names of them again here. And one thing I did is I accidentally left off the titles. So let's go back and we'll do that. Gap. Let's go ahead and repeat the rose at the top as well. We can do that. I'm gonna change my print area as well. To include the sparkling is why not? Good. There we go. Print preview. Okay, now we have our titles up there. We have our rep names. Go to pitch to titles and by titles. I mean, our dates are the months we have a rep names inserted there again. And then we go to the last one and it's got her spark charts as well. Of course, we could adjust this last page to fit on one page, or we could adjust the margins to make it all fit on two pages or whatever we want to do. Or we could even just change the orientation, make it landscape that just self. It's on two pages, you know, it could go make these wide margins to make it a little more even a lot of things you can do to play with that to make it fit So that's your print titles, not takes care of the page set up, and we're out of time for this video. But in the next video, we'll look at scale to fit your sheet options and the arrange group.
99. Page Layout Tab (part 2) - The Complete Walk-Through: okay. And this video, we're going to continue to look at the page layout tab in the ribbon, and we were just looking at our sales rep spreadsheet, and we're finishing up with the page set up. Now we'll be working on scale to fit sheet options and the arranged group and the rest of these air. Pretty simple. Let's go back to our kitchen remodel cost worksheet. And so this is just your scaling, which we've looked at over in our file menu under print. The scaling is also right here, so justice how you want things to fit. So if you say no scaling, you just print everything normal size. You can fit the sheet on one page, so that will shrink it all down. You could fit all the columns on one page are all rose on one page. It'll shrink it horizontally or vertically, but that's basically the same thing here, so you can change your wit. You can change your height, you can scale it and a good example. It's good on this one, for instance, where we're having trouble fitting all this on the one page right, we can go to this drop down or pop up when no, and we can go landscapes. Good. And then we can say fit to one page. Uh, then we got a print preview or we could click OK, and go to file with this is just quicker. Get a print preview and see it shrunk everything down to fit on one page. Okay, Another way to do that would be to go saying no scaling and say, Shrink all columns onto one page and see it does the same thing. It shrinks it up, so that all fits on one page. Okay, so that's scale to fit sheet options is pretty simple. Will jump back to our kitchen costs worksheet to show you this easier. Your grid lines just help you to know where the cells are, but they don't print unless you ask them to. If you say print here, that will actually print on the paper, and you can actually hide them, too. So if you click on that, that takes some way and you saw a blank page and same with your headings, these letters across the top and these numbers down the side. You can hide those or bring him back and You can also choose to print them when you print. So that's that arrangement we've talked about. But we'll just go over this one more time real quickly. If I take this object this photo and I slide it like this, you can see it's sitting behind this other photograph. But if I select it and say bring forward stepping forward, then it brings it forward. If I say send back, then it drops it back. Okay, you can add your selection pain over here to the side so you can grab things more easily. Select things more easily, and you can change the way things move when you align them. So if I say snap to shape, that's a good thing for objects. I click on this, and when I move this, it's gonna automatically try toe alignment with this other objects CEO. It snaps to it. Okay, if I say take that off and I say snap to grid, then it's going to let's go over here a little bit. That's gonna snap it to the grid, and it's hard to tell a little bit here because it has a border around it, but it's popping to the grid. Okay? And they will notice if I take all those off than when I grab it. Just moves fluidly, and I just kind of arrange it by hand. Okay, But you can see how the snap to shape works great for objects like this, because gonna line these objects up better. Probably easier if I had this out of the way like that. Okay, so that's the alignment where she can take grid lines off using that one, too. Look with that back on. And that sums it up for the page layout tab. So we learned a whole bunch about themes and how to kind of create consistent themes and the importance of using theme colors versus standard colors if you want them to be able to change when you change your theme. We talked about the page, set up all kinds of things related to page breaks and margins and things when you're printing or getting ready to print. And then we looked at scaling some simple sheet options and your arrangement
100. Formulas Tab (part 1) - The Complete Walk-Through: okay. And this lecture, we're gonna be talking about the formulas tab in the Excel ribbon, and the form of this tab is right up here. Next to page layout was Click on that and it's broken up into your function library to find names, formula, auditing and calculation. And we're also going to look at the formula bar, which is right here. So let's first talk about the function library. The first button over hair is the insert function button. When we click on this brings up a dialog box that helps us to insert a function. If you already know what the function is, do you want to use, it's easier just to start typing it. But if you need to find a function, then this could be helpful. So you can either type of function in that you want to use, for instance, to be typing and s. Um, and it go. So if we were looking for some or somethin, they're right here. You can also search by category. So right now we're in recommended. We can go to most recently used, and you can go to the different categories. You can goto all, which is just gonna have everything alphabetically. You can go to financial date in time and so forth. You know, if you click on text, it's gonna bring back text related things good. And then when you're ready to use a function from here, you just click on it and click OK, and you'll see it enters it into your formula bar and into yourself, and then it allows you to do the function arguments specifically here in the function arguments box. So I'm gonna cancel out of that, not tell you use the insert function, and all of the rest of these are just drop downs with the same categories that we were just looking at. So, for instance, will except for this one, this is the auto. Some are awesome, allows you to. For instance, if you have a list of members and you want to do an instant formula for these, you have to be selected in the cell directly beneath the numbers. You go click on auto, so and then you just pick whatever you want. There's some average count numbers. Men, Max, or you could do more options. But if we want to do this, some of those numbers, it was Click some, and it just puts the formula right in there. And it makes assumptions that we want the cells directly above the cell with the formula, so that if it selected where you want, you just hit enter. And there you're there. You're some formula is. And like I say, if you wanted to do a different formula, you can say count numbers and it will just do a count formula and so forth. Okay, had escaped to get out of that. And I was, Go ahead and delete these for now. So that's our auto. Some recently is just shows you things that you've used recently. Financial is all things related to financial calculations and so on and so forth. Financial is gonna be your biggest category, but you've got logical text date and time has days, dates, time, seconds. Look up in reference. That's where you find things like each look up index, match and V look up math and trigonometry and then mawr functions. And these all have their own dropped endless Okay, so lots to choose from there. Most people don't use even attempt of the functions in here. But if you need them, That's where they are. Okay, While we're on the subject of functions, let's also talk about the function bar. So one thing is, if Ugo and click in a cell and put your equal sign and you'll notice that when my equal sign isn't there, I'm gonna delete that first notice up here it says a one. This is your name box. It's telling you what the name of this cell is. Okay, But if I had the equal sign, this changes to the function box and it has a drop down now. And it's gonna bring up your most recently used functions, and you can just select from some of those. If you want to do the product, just select. It brings up your function argument box, and you're right into creating your formula. Okay, cancel out of that. So that has two functions. And we'll talk more about the name box when we get to define names in a minute, because that's actually a really cool thing to use. But moving over to the right here again. If we are selected in here and we hit the equal sign, you'll notice the it populates the equal sign up in the function bar here. And as we start putting in our formula or our function, you notice that it's populating it in here. And the nice thing about that is, if you don't want to edit your formula right in here, you can just go here and click, and you can edit right here. So, you see, we go ahead and be that hit the comma. It was looked another so, But it's all creditable up in here. And if you have huge formulas, you need to build a see the whole formula. You can go over to the right here and click this drop down, and it allows you to just expand the formula bar so you can see the whole thing. Okay, To minimize that, you just click that again. And then here you have some options as well. From here, you can insert a function. So let's back up a little bit back the equals. I had insert function again. It's gonna bring me to that insert function dialog box. Okay, And then also when we're here and we do our equals and are so if you want toe enter your formula, you just click here and it'll hit after now. Obviously, I haven't completed the formula, so it probably won't go back and and a shit. Let's just do a couple of members. And if I go here, it's just like hitting the enter key. So go enter. You see, it's completed our formula for us. Okay. Also from in the middle of the formula. As you know, you can hit the escape key to just get out of what you're doing. We'll hear better example. Let me let me delete this and start over if you're just in and sell, equals and start typing in your formula. But then you decide you don't want to enter your formally. You could just hit escape and that will let you out of it. You might have t escape twice to get out of the function selector and then out of the function manager taping it in. But if Europe here and you're typing in your formula and you decide to change your mind, you can hit escape. But you can also just go here and at the cancel button, and that will just cancel out your formula. Okay, so that's how that formula bar works, and that's how the function library works. Let's talk about defined names. Let's look back over into a wand. Here. You'll notice that her name box says a one. If I want to name this, sell something else like Steve Cell. I just type it in right there and I had enter. Now you'll notice if I click over here, it calls it see to. But if I click back here because it's Steve sell, the reason that's important is because you can use that name to refer to that cell. So, for example, let's call this one Bob so type of him hit. Enter. So now we have Steve Cell and Bob. So now what? A Steve Cell has a value of two and Bob Cell has a value of five. I go over here and I create a Formula A some formal I can start to type in Steve's cell and look what pops up right here. Excel is now recognizing that sell name as a valid argument. So if I select on that, we're highlighting Tab. It's now used that as our first cell reference benefit comma and I started taking Bob Cell again. There it is. I can hit tab to select it, or I can double click on. And now when I hit Enter, you'll notice that it's doing the math. It's doing the some of Steve Cell and Bob Cell. And if I click into this, you'll notice. It says that and the formula bar. And this is important for two reasons. The first reason is that it gives the Excel use, ERM or information about this formula than if it just said a one in A. To If this cell was called January sales and this cell is called February sales, then I would know that this was a some of the January sales in the February sales, so it's more descriptive. The other reason is that you can create entire named ranges of cells and refer to them in for Melis so it makes your work go more quickly. For instance, let's get rid of these names, Okay? Now they're named back to a one and a two those of their default names. Let's name this entire range. Well, first, let's put some numbers in here, okay? We're gonna select this whole range, and we're gonna call it number list. hit Enter. Okay, now it's name number list. This is still the one that's still a two, but this whole range is called member list. Now, if we want to enter a formal over here, we hit equals some tab. Then we could start taping in number list. And there it is. It's like that it have to select it. And now I see it's selecting that whole range hit enter, and it does a total of all those numbers. Okay, so that's how you name ranges using the name box up here. Let's go back to our formulas tab, and this is where you manage those names. So first we have the name manager. Let's click on that. So this is our name manager dialogue box, and you can see there are a number of different named cells and ranges. But if you look right here, there is our number list, and you could see it shows that it refers to sheet to which is the sheet were on and it's a one through a five, and that was the range of cells that I defined. You'll notice also here it shows the values and the cells shows what it refers to. It shows the scope or, in other words, what that name applies to, whether it's a workbook or a worksheet. Okay, we go up here and we can create a new name by clicking there. So you define the name. You say what scope you want to apply to the whole workbook. She wants she two or sheet three. You could put a comment in there. You can define what that name refers to and then click OK to create it. Okay, that's to create a new name, cellar range you can edit so we could go into our number, the list. We can edit it. We changed the name. We could change what it refers to you click here and we can go in and just select cells when you finished. Click OK where you can delete one so we can go pick on one of these and delete it. And in fact, I'm gonna do that because I'm gonna use thes names, for example, in just a minute, so I'm gonna click on that one click control and select the rest of these and click delinked. Are you sure you want to delete them? Yes, Okay, so that just leaves us with our number list. So that's the name manager. It's close out of that. Let me show you this example Here. So this is a little spreadsheet that I created so I can show you why these named ranges or cells are important. First, I need to get rid of this formal here. Okay, So what I've got here isn't is the item couch, table TV and bookshelf and the press $1000.500 dollars, $700.600 dollars. And I'm gonna use this little spreadsheet to show you how to use to create from selection button in just a minute. And that's a really important one. But before we get to that, let me talk about the defined name button to click on that. It allows you to create a new name, just like we were looking at before and to your name. The skill comment where refers to look, canceled. And remember, you can always create a new name just by selecting cell or a range of cells and then typing in your name right here and hitting. Enter. Yes. That's defined. Name using a formula Once you have a name to find, like back on this sheet. We have this range to find his number list. So if we want to use it in a formula that would sit equals. And let's say we want to do an average tab, and then when we're ready to select our number or number range, we say using formula and it's got the name of a number list right there. This will have the names of all the named ranges and cells in your workbook. So if I hadn't deleted bookshelf TV Couch and those other ones, those of being here as well. But I could just click number list, see it drops that right in there, then it just hit Enter and I've got the average of my number list. Okay, back seat one. Let's use this to create names from a selection. This is really cool. First we select our range. Okay, that's a range. We have our item names in ourselves, with the prices in the then we say create from selection, and this is the important part. Says create names from values in the top row. Left column, bottom row or right column. So we're going to create names. These are gonna be the names, couch, table, TV and bookshelf. Those are gonna be the names for these cells because these are the prices of those items. Okay, so we go ahead and say, Left column. That's where we're taking the names from. And we say, Okay, now watch what happens when I click into this cell. It's called Couch This. So table, this cell TV, this so bookshelf. So you could do that with a whole giant list of items like this, name all these ranges and then use them in calculations. Okay, so then if I want to do a calculation over here and I want to do the some of the couch price and the table price, I just say equals some tab. Start taking couch. There it is. Tab, Comma, start typing table. There it is, right at my drop down tohave and then enter you notice. It says $1500. 1000 plus 500 is 1500. I click into this. You can see up here Says equals some couch and table case. And they were referring to named cells in our formula. How cool is that? And doesn't that mean a lot more to you when you look at it when it's this some of the couch in the table that if it said some of B two and B three Cool, huh? OK, so that's the defined name section. So that's it for this video, but we've covered the function library section. We talked about the formula bar, that name box and then the defined names section, and in the next video, we'll get into Formula Oddity.
101. Formulas Tab (part 2) - The Complete Walk-Through: Okay. This video is part two of the formulas. Tap. Now let's look at formula auditing. This is a pretty cool, too, because it could just help you to find formulas, to understand what they're doing, how they're behaving, what they're referring to. And so and I'll show you exactly how so It clicked into this cell here with this formula, I say trace precedence. Click that. Look at that. It's got Blue Arrow showing which cells are being used in this formula. See that? Okay. And then I can go click here to remove the arrows. Now, if I go to this cell, which is being used in that formula, I can say trace dependence, and I'll see that same era. It's saying that this formula depends on that precedent. Okay, go ahead and click. Remove arrows again, and you can also use this Drop down and just use Remove president arrows, or just use remove dependent arrows. Okay. And if you click on this and there's nothing it'll say, remove arrows. Command found no trace of a stream of Okay, so that's how you trace your formulas. This is your show. Formless when I click on that notice that all of these expanded. And instead of showing the total of $1500 this is actually showing the formula in the cell , so that could be helpful. If you're trying to figure out which sells our numbers that are based on a formula like this one and which ones are actually pure data where we've just entered a number in here, so you to get rid of that, you just click show formal again and that will go away and then error checking is a great one. Air checking helps you to check errors to figure out what's going wrong with your formulas . So to do this when I'm gonna jump over to a different workbook real quick, I'm gonna go back here to our index match. I remember this one where we created these kind of complex index match functions so that we could use multiple criteria to search for numbers in a range. Okay, let's go to air checking, and in the drop down you can click on error checking or trace air. Let's go to error checking, and this is gonna bring up a dialog box, and it says error and sell D 13 which is right here and also notice there's that little green marker up in the left hand corner. That's a good indicator that you haven't Oeiras well, and then it shows what the formula is. And it says the formula omits adjacent cells. And what that saying is that this formula was not including this cell, and I actually just entered this number in there for the purposes of this demonstration, because that's not being included. In fact, all of these are the same. This cell right above them. It's not being included in this total calculation. Okay, and excels doesn't like that. Okay, so what you can do is you could say, ignore this error, in which case it will just ignore it. You can edit it in the formula bar. You can get help on it, or you can update the four go to include cells. So if I want Excel to basically try and fix this for me and include this cell here, then I can just click. Update says the air check is complete and you'll notice now it updated the formula to include that $1,000,000,000 sell and updated the results as well. Obviously, I don't want that. So we're gonna just click, OK? And they don't get click controls the and go back to the original air. Okay, let's go back up to error checking, though. And I could say ignore this air now it says the error check is complete for the entire sheet. Look, okay? And noticed that my error message just gone now. Okay, so now when I go to check errors that won't find any and then under the air checking, you also have the trace error which just draws arrows to the cells that are causing the errors. Okay, And then finally, we have the evaluate formula. This is a really cool, um as well. Let's go ahead and click that what it's gonna do is bring up our formula, and it's gonna help us to dig into the formula and break it down into what it really is. So this is simple. For most, it's pretty easy to evaluate, but when we click evaluate, it shows you basically the steps of the form of steps that it's taking to come to this answer. And in this case, there are only two steps. There's really just the formula itself and what? It's referring to you. And then there's theano, sir. Okay, so that's a simple example. But if I close out of this and go into one of these more complex ones, our index match nested functions and say Evaluate formula. Then when we say evaluate, we're going to see the results of the underlying sections. So this is showing that it's referring to bananas in our spreadsheet. Click the Value. It again shows us the next section here shows us that that's referring to 2015. Click value it again. It's going to the index section, and then it shows what the answer is. Now we can restart that, too, and we can also say, Step in. You can see that here in the match. It's referring to Cell C 17 because that's where bananas is right, because our formula references bananas. Now we can step in some more, and then it shows that the word in the cell has been else. Okay, step back out of that. We'll continue to evaluate, and again we can step into it. And it shows that in this case, the match part is referring to the sale that says 2015. Okay, so that's about as far as I'm gonna get into. Evaluating for him was just wanted you to know that that was there. So if you do need to get deeper into a complicated formula, you can use those tools. Okay, So close out of that, this one's called the watch window. This just brings up this window and you can add certain cells from your spreadsheet into this window and it will stay in front of your spreadsheet, and it will tell you what's in those cells. So if you're making changes, it will let you know. So, for instance, let's add a cell. Let's just add this cell that we've been working with that we have the error issue, right? Had that in there. Okay, so now that's in there. It's referring to that, and this is just sitting here, and this could be free floating, or we can take it and messed it over here. We'll slide that over this way a little bit now if I go back in here and I'm evaluating my formula or checking my heirs and I decide to update this to include the cell with the $1,000,000,000 in it, I go ahead and say update. That's all fixed. And now it's is a $1,000,000,000 in there and noticed that over here I'm getting the same updated thing. So in my watch window, I could just be aware of what's going on in that particular cell, Whether it's a problem cell or whether it's just an important total line or whatever, You can keep it out that way. Okay, then if I want to get rid of that, I just selected and say Delete. Okay, so that's the watch window and they just click there to get rid of it. Click there to get back. We have our calculation section calculation options. This is how your formulas are calculated. Okay, so by default, Excel is set to automatically calculate formulas whenever a change is made. So in other words, if I go and click this number and I delete it, it instantly updates the total in this cell. In other words, this formula updates itself. Okay, but let's go on do control Z, and let's change the calculation options to manual. Now it's manual. I'm in this cell and I click delete notice. Nothing changed, actually have to go into this cell. Select the formula hit, enter and now it's up to you. Okay, so that's the mystery manual and automatic I recommend leaving it on automatic unless you have a really good reason to change it to manual. And then this third option is automatic except for data tables. So, in other words, if you've created a data table, then it will allow you to update those manually. We're gonna put it back on automatic because that's where we want it to be and then calculate now and calculate sheet are just buttons. You can click if you have it set on manual so you don't need this if you're set on automatic, which you probably should be. But if you're on manual and you want to calculate a cell that you click, calculate now you want to calculate the whole sheet. In other words, update all the formulas they click calculate sheet. Okay, so that's calculation, and that's it for this lecture. We've talked about the function library. We talked about the formula bar, how to name cells and ranges, how to work with your define names, how to create them from a selection and manage them. We learned how toe look at Formula Harding, including tracing your formulas, checking your errors and evaluating your formula. We learned what the watch window does, and we learned how to change the way that Excel calculates our formulas by default, and that is the formula stab.
102. Data Tab (part 1) - The Complete Walk-Through: OK, in this video, we're gonna be talking about the data tab, and the data tab is a really important one because it's where you get data from other sources. It's also where you do queries to connect to data and a whole bunch of other things. And the data tab is right over here to the right of formulas. We'll click on that and you can see we have our section of get and transformed data. We have queries and connections. We have sort and filter. We have data tools that forecast, and we have outlined. So let's dive right in to get in transformed data. In previous versions of Excel, this section would be found in an ad in called Power Query. But in 2016 it's integrated right into the main software and even within Excel 2016 versions, the data tab on some versions will look different than others. For instance, you can see mine has that get data drop down over here, but many will have a new query button somewhere in here instead, and in fact I'll show you an example of what that might look like. This is just a screenshot of what yours might look like you can see it's got to get external data tab. And then it has a new query button here, which is where you would go to create a new query or get new data. You can see it has different options, like from a file from a database like an access database from Missouri and so on. But if yours looks more like this than just know, that years will be in a little different place. But it's still basically the same tools. Okay, so the way that my version and a lot of other versions will look is that you'll have the get and transform data group here on the left, and you'll primarily get your data or import your data using this button here. So let's just dive in and I'll walk you through how to use this. So when you click, it gives you a drop down and you have quite a few options. You could do it from a file, and you can see you have the options of From Workbook from Tax or see SV file from XML from a Jason file or as thief founder of Jason likes to pronounce it jokingly just song or from a folder, and we'll look at one or two of these in just a minute. But let me go through the rest of the drop down here after file we have from database, so we have from sequel server. Some people say SQL Server from Microsoft Access Database from Analysis Services or from Sequel Server Analysis Services Data Base. We'll look at how to do a Microsoft access database into just a little bit as well, then from online services. Again, some versions will be a little different. Yours might have a zur or from SharePoint. In this case, it just lists Facebook, okay, And we won't go into that because basically just logging into Facebook to create a connection and import data and then from other sources So you can go from a table or range . You do a query from the Web. So if you have data that's arranged in a table format, or even if it's not, for that matter but on a website you can do this using just the girl. You could do a Microsoft query do o data O D B C oh led be or a blank query where you write one from scratch. We won't get into these, but this is so you know where they are. Should you need them. Okay, you can combine queries by merging or pending queries. You can launch the query editor. That's a really important one. So remember, if you need to get into the query editor something you get data tab or it may be under your new query tab, depending on your version, but it's the launch query editor. We'll get into this tool quite a bit in this lecture because it's really important to be able to edit your queries as you create them, because that's part of the power of the get and transform feature In Excel. You could modify your data source settings, basically changing the location of the source of your data where you can modify your query options. So let's just go up to the top here and go from file. We're gonna go ahead and go to from text or CSP. So what we're doing when we use the get and transform feature and Excel is we're creating a connection to a data source. Well, technically, we're creating a query, so we're setting up some criteria so that when we connect to that data, we can have it behave the way that we want to every time it comes in and weaken. Refresh the data so that it stays current in our Excel workbook. So if you're downloading or importing data from another source frequently, this could be a huge time saver. So let's go ahead and click on from Tax or CSP, and I'm just gonna import this employees table. You'll see that it brings up a little dialogue box with a preview here. It's just got some options for a file origin. We're just gonna leave that on the windows default. It lays out a delimit er where this is a text file and it's a C S V. That means comma separated values file. That means that our Info est invited by commas, and if we tell Excel that it's divided by comments, then it will break those pieces of information into columns. But you can choose different delimit er's. If that's appropriate and then data type detection, you can say based on 1st 200 rose or on entire data set, or tell it to do not detect data types, but you usually want to do 1st 200 rose or entire data set. Okay, we'll leave it at that. And then this is your preview and you have a couple of options here. You can just click the load button, in which case it will drop it right into my spread sheet. You can use the little drop down here and say load to, and it will give you all kinds of options. You can load it to a table of pivot table, report a pivot chart, or you could just create the connection to this data but not actually loaded into your worksheet. You put it in the existing worksheet and choose a location, or you can create a new worksheet. You can also select Add this data to the data model. Data model is basically when you create a relational data set in Excel. It's sort of like an access database, but it allows you to connect and relate multiple tables and data sources to each other. OK, so we could just set it up like this and then click OK, and in fact, I'll show you what that looks like. The first single notices this query zin connections Window pops up and it has our employees table in there under the one query shows him a rose we have loaded. And if we click on this, it'll give us a preview and some options weaken viewed in a worksheet, edit it or delete it. And they also noticed that loaded our information into a worksheet and it formatted as a table. So if I were to go to this original file and I were to delete out these lost three names here and save it within excel here, I could go and click refresh. And it would recognize that the original file was missing these three and it would delete them because we now have a query that is going to that original source that text file or CSP file and pulling fresh data from that source. Okay, so that's part of the importance of having these connections. So let's jump back into the data tab, and I'm gonna go ahead and delete this connection so I can show you some other ways to do it, and I'm gonna delete this sheet. Okay, so that was if you just load it straight in, let's try a different way. So we're going to go from file from tax or see SV Employees Table. Here we have a preview were again that was our load and our load. Two options. Now let's try the edit option. When we click on that, it's gonna bring us to the query editor. The query editor is really cool, and it's really important to know a few things about it. You can see it looks like its own piece of software. Really, it has its own ribbon. It has four different tabs, all with their own tools, and it even has the file tab. Sorry, five tabs, but it's pretty involved and sophisticated editor so that we can modify the way these behave when we import them. So if you're completely happy with this, exactly how it ISS, you could go ahead and say, close and low, do the drop down and see their clothes and load. It will load it right into your current worksheet. Where are you going to stay close and load, too, just like we did before, and it will give you some options for where you want to put it. But let's go back into that? Because we're not going to do it that way. This time we're gonna go about kendo at it. Open up our query editor, and we're gonna look at some of these other options here so you can rename it in the properties. If I just want to call this employees still eat that. You can do a description. You'll notice that changes the name over here. You can also get to the properties by clicking on that one. You can refresh the preview where you can refresh all the data. There's nothing to refresh here, so we won't do that. We won't get into the advanced editor with the managed tab. You have the options of deleting and duplicating it through here. But let's get into some of these cool tools over here. Well, actually, first, let's look at this table right here. This is just basically your Excel spreadsheet. You can see your row numbers down here. We have our columns across the top. Notice. It's just giving these default names of calm. 123 and four. And we have these little symbols long here. This is ABC. If I click on that, you'll notice that these are all different format types, so ABC stands for text, so it recognises that these are text. This was the same. It recognizes that there text. This one sees the phone numbers and calls them text, and it's up to you whether you want to consider phone numbers, text or numbers. And then this one has office numbers, and those air form A does numbers. So you want to three. We go there to see that the 123 stands for a whole number, so it automatically formatted them out We want. If you want to change them, you can just go on and click and change however you want. You can click into these and rename them, so we'll call this first look into this one. Felt lost. Look into this. Wanna call it phone? There we go and let's say we don't want going for We can just click on it and we can either right click and say, Remove or we can click on it and just go up to remove columns. He almost gives you two choices on the drop down. You can either remove the columns that are selected recon room move the other comes. So if we wanted to delete all three of these, we would select on this one and then click remove other columns. We just want to delete the one that we have highlighted here because thes air office numbers that don't really apply to this say, phone number lists that we're trying to create so we can just click remove columns, and that one went away. If you have tons and tons and tons of columns, say, 20 or 30 or whatever you go this option and you can go to choose columns, it's gonna bring up another drop down. You see, it's got a list of our columns there so you can select columns using this, which is sometimes quicker. If you have a ton of columns and you can also search by name or whatever, the column name is okay. Cancel out of that. You can choose option with Rose. Let's say you wanted to get rid of these last three entries. 13 14 and 15. We can say remove rose. Go to remove bottom Row's. It's going to say, How many rows do you want to remove? Well, we want to remove the bottom three so we had a number of rose. Three look. Okay. And watch. 13 14 and 15 down there to spear. Okay, so it took care of us. You go to keep Rose. Same thing you just choose. If you only want to keep the top rose, you could just keep the top rose bottom rose a range of rose. Whatever you want to keep, we consort here, so let's go. Last name. We can click here to sort sort by sending knows that these air not in alphabetical order. Click Sort of sending now their mouth political order. You can also click here to do the same thing we can sort of backwards put it back to ascending. So what we're doing here is we're creating these actions that every time that we import this or every time we were fresh this data and excel, it's gonna go through this query. So, in other words, this query editor is going to make these changes to it. It's gonna delete the last column. It's going to lead the last three rows. It's gonna alphabetize everything by last name is going to do all of this before it drops it in to accept so that we don't have to do it every time. So we don't have to do all this formatting basically, in arranging and deleting and adding as we're importing this data, OK, so that's what's really cool about it. SPLIT COLUMN So this is pretty cool. Let's say that the Joe Barnett all these names were in one column. So said Joe Barnett, stew Bishop Bob, like etcetera. We could simply select on this. Go to split column and you can choose by the limiter or by number of characters. So if there was a space between Joe and Barnett, we could go by a delimit ER and we could choose space and you say the left most limiter. So it's looking for the first space, and then when we click okay, it'll divide it up into two separate columns with the first name and want in the last name on the other. This is already divided, so it wouldn't do anything, so I'm gonna click cancel, But that's how you use the split column. You can group them based on certain values that doesn't really apply to this table. Okay, you can change the data type again. All these air text. But if I selected on that and I want to change the data type two number currency, whole member, dating time, whatever, I can change that here. And then it will be reflected in that little icon there. You can use the first Rose Headers. This one doesn't have headers. But if the information that I brought in from the Sea SV file had said first last and phone on the first row, then I could just click on this and it would promote them to header See? And I didn't actually mean to click on that button. But when I did see it promoted the first Roto Headers it now is this Joe Barnett and his phone number. Why don't want that so I can fix that. You can't control Z in the query editor toe. Undo things. There's no undo button up here either, But you can change the steps over here. So you see all of our steps air here. We found our source would change the type of information we're getting. We re named our columns. We removed the bottom rose. We sorted the rose alphabetically by last name. And then we promoted Joe Barnett to the headers. Well, we don't want that to happen, So we're going to go ahead and click on the Red X and delete that notice. It puts Joe back into the table and puts our headers back. Okay, so this important now you can change the steps that you've applied over in here. If we don't want to remove that last column with their office numbers, I can just click the Red X here and we'll go ahead and click Delete. He noticed it gave me that warning, saying, You know, if you delete this step, it might mess up what you've done after that. So make sure that you're not gonna mess up other actions, but in this case, it was fine. So that's used first Rose headers. You can replace values. So let's say that these phone numbers Aaron correct. Let's say this 555 prefix was supposed to be 395 all the way down here. Okay, Then we go ahead and go to replace values so it we don't want to get down there. We want to do it at the end. Make sure select on the end. Now let's try replaced values says Replace one value with another in this look to come so value to find Let me move this kiss. We're gonna take 555 and we're gonna replace it with three 95 Click OK, and presto changed it to 395 OK, and then you'll see. It also added that step. So that's how you replace a value we can do combine so we can merge multiple queries or a pen queries If you merge queries, you'll go and bring in another query. We don't have another query in here, but if I did, then it was show a preview of the second query as well. This is our first query would show a preview of our second query, and then we could go and select how we want to join them or join kind. And these are different options for how you want those two queries to relate to each other and match up, uh, cancel out of that manage parameters. We won't go into that, but you can view and modify your parameters there data source settings so you can manage your permissions at it. Permissions, change your data sources and so on. In this pop up, you can get new sources. You could go to recent sources. That's just to create a new query. And then, as we said, over here, you can modify the name. You can modify the properties or modify the steps. Okay, so that's all the time we have for this video. In the next video, we'll look at these other tabs in the ribbon of the query editor, and we'll continue looking at the other elements of the data tab in the Excel River.
103. Data Tab (part 2) - The Complete Walk-Through: Okay, This is part two of the data tab, and we're just finishing up looking at the query editor. And in our transform tab, you could see some of these air similar. You got group by values. Use the first Rose headers. You can use transpose, which is basically where you reverse from columns to rose or rose two columns. So if your data comes in oriented incorrectly, then use the transposed to shift it. You can reverse Rose. Just click on that show. It looks like I just flipped the whole table upside down. So bottom ones now show up on the top. We'll reverse that back. Actually, we'll delete both of those, so it's just normal. You can count. Rose is just going to give you account. That's how many rules you have. But you can also look down here in the lower corner and shows you four columns, 12 rows. You can do more with data type here. We won't get to into that and some of these other tools, like replace values which we already looked at. All right, here you can split columns like when you separate first and last names like I showed you we won't get in too much of this stuff. You, uh, modify your date in time? Yes. That's your transform at columns. You know, this is just ways to work with the comb so you can put additional columns in here, but we won't get into too much of that. But just know that this where you'd go to create additional columns in your spreadsheet and they got a view so you can put in a formula bar, and so we'll go back to home, Actually, let me get rid of that formula. Borrow quick, go back to home. And now that we've finished setting up things, arranging things the way that we want it, then go ahead and go too close and love closed load to We're gonna say table new worksheet , and we're gonna add this data to the data model. Look, Look, OK, now it's creating our query and you'll see now it's populated it in here. We have first name, last name, phone number. I never did change this toe office number. We could go back into our query editor data. Don't get Dana. Go to launch Query Editor Kulik in here. Change this to office number closed load and you see it updated. It's better to change it in your query editor so that every time this comes in, it has the correct column heading. If you just went in here and changed it right here, it's not gonna always update. OK, so that's our query. Now, whenever we have changes to the state on the original source, we can refresh our data. It's gonna refresh it. So that's the get data drop down and how to look at the Query editor. And we went into file into the CSP. You could go from another Excel workbook. You go from a database, you could go into an access database if you want this employee contacts list. So this is a cell database. This file contains a number of things from queries, some tables. But if you go into our employees table, it's gonna build up a preview. You see, this one's a little more extensive. It's got office I ds. We scroll the rights, got date of birth employment status. This one is blank, but we could do the same thing. We can pop this into our query editor, and we could modify these for So, for instance, our data birth showing the time of day which we don't need, so we could go at that right now it's on date. In time, we'll just change it to date. That cleans it up a little bit. If for some reason we wanted our area code to be separate from the whole phone number would go Split column go by number of characters. Take the 1st 3 Once this far, left as possible. Click OK, you know, sit. Separates it now into the area code and the numbers. Then if we wanted to use this query, would just go to close and load load to new workbook. You can select this if you want to use it in the data model or not. We'll say, Well, just got and select it. Click OK, you see, it's creating that connection again, and there it is. So again, data tab, get data from database Microsoft access. You can go again from Facebook. We're not gonna do that. You can do it from table arranged so you can go to a named table or a named range in your worksheet and pull from that created query. They have all these other options. And we already looked at how Tow Launch the query editor, which is really important to know change data source settings and query options won't go too far into that stuff. Okay, now, when you go back up here, you can also go from Taxi SV right here. You're going to get data and do it here. Texas V. This is the same one. This web option is also said the same table range. This is the same recent sources just allows you bring up places that you've imported or created queries from before recently. And then existing connections shows you things that you're connected to right now in the workbook. Ok, okay. So that's how you use the getting transformed data you can refresh here. You can modify, acquires in connections by opening this window. Ifwe click that, it just goes away. It clicked that it brings it up. You can also modified here. You can close it there, or you can even grab this. See the four sided air. I can pull it out of here, and I could plop it somewhere within the window. I wanna put back and just drag it back over plop it. Okay, we could go with properties of this Queary so you can choose whether or not you want to adjust your column. Widths include road numbers. Preserve your column, sort, filter and layout, or preserve yourself one running just by clicking on these boxes. You can also affect how your table responds when you have more or less rose. By selecting one of these options, it gets a lot of that. And then the Edit Links button just allows you to view the other files this spreadsheet is linked to so you can modify them. How you wish. So that's the Queers in Connections Group and that will conclude this video. And in the next video, we'll get into the sort and filter data tools, forecasts and outline.
106. View Tab (part 1) - The Complete Walk-Through: okay. And this lecture, we're gonna be talking about the view tab, and the view tab allows you to change the way your windows are oriented. Zoom, split screens and a couple of other cool things. And this view tab is located down the road here, right there, and you'll see it's divided up into work with views show, Zoom Window and Mac Rose. I sort of feel like a game show host when I'm laying out the categories like that. So let's do workbook views for 200 these air different ways that you can view your workbook and you're probably accustomed to seeing in normal, which is what this is. Let's get some data in here, so we have a better example. So here we have our table of our sales reps, and this is normal view. Well, let's go check out page, break, preview and page break Preview basically just shows you where the edges of each page are, so you can see it's got laid out Page one page two and you can see these blue dividers that show you where that's happening. So the dark blue line is outlining your entire print area and the dotted lines are showing you the edges of each page so you can see all of this information fits on the page one. You can see all of this information fits on the page to, and you can see there's just not quite enough room to fit the spark charts on here. So they got stuck onto Page three. Now we could change that. I, for instance, taking some of these. Actually, let's take all of these and we're just going to shrink the column so tiny, but huh? Now you'll notice that the spark charts fit onto Page two because there's enough room, okay, but for the moment, let's undo that, and I'll show you a couple other things, which I might have shown you already. But let's say we don't want these sparked arts on here. We could just grab the entire print area, see the double arrow, slide it into the edge of that you Almost now, our print area ends here and those air outside of the print area, so those will not print same with the bottom. If you want toe, include information that's down here or you want to exclude information like that just move it like that. Okay, do both those. So that's the page. Break preview. And they have the page layout. What? Slide over the page one. Okay, so here's our same thing. Actually. Let me go ahead and zoom a little bit to make this easier to see. Okay, so now this is showing it as a printed page. It's showing your margins. It's showing the whole length of the page actually consume out a lot to secrecy, the whole thing. So you can see all three pages that way. Sit back and so I can show you some of the details here. So we have our regular column headers, our letters. We have our rose. We also now have a ruler which is showing us measurements in inches. And there is one at the top. Oh, there we go. You have to be selected on that page for to show up. We have a ruler stop ruler along the side, and we also have headers and footers, which is cool. So saying we wanted to call this monthly sales, and then we wanna say, Bye, Steve. And you could put something over here like date or whatever to but you get the point. We also have a footer. Let's just put this in the footer. There we go. So we've got something in the footer and header. Now you noticed that when you do that, it goes on to all the different pages, which is the whole point of a header and a footer and adjustments that you make to the page layout. Apps page layout like, If you change your margins, we gotta narrow margins. Those show up here in page layout view, so if we added a page break right here, you'll see it's breaking the page there. And the rest of our information is now outside the print area. Okay, we could go to wide margins. For example, let's go back to our normal margins. Or actually, we had on Wide Martin's. Let's go back to that and we'll remove the page break. Really, It's not your page layout view to go back to normal. Okay, so let's talk about custom views, and I'm going to jump into a different workbook to show you the custom views because you can see it's great out right here. The reason for that is that I have tables in this workbook and it won't work with tables. Okay, so I'm just gonna jump over to another one. Can you see this workbook just has this range, and it allows us to do custom views. So before you get into custom views, you have to do some rearranging to your page lab. So what we'll do is we'll go to our page layout button and first, let's add a header. So we'll just call this Steve's Construction, okay? Click. Anywhere to get out of that will go down at a footer looking to get out of that. So now we have a header and a footer in our page layout. Let's go ahead and do a couple more. Changes will go to the page. Layout itself will take the grid lines out. It will change the margins too wide. And let's even go into the set up and we'll go to Central. Okay, let's hop over to our print preview road quick. I just want to show you what that's gonna look like. OK, so you could see our headers in there, our footer and centered. So if we go back and in our regular layout, normal view, we go to custom views. We click. Add now we can name this. It's called this kitchen costs and it says, Do you want to include that print settings in the view? Yes. You want to include any hidden rows columns or filter settings? Yes. So those are all things that you can program into your custom view. Click. OK, and now when we go to custom views, you'll see this is programmed in there. Okay? Actually, I'm just gonna delete all of what we just did. Clear those all out and jump forward. And I'll pace another example in here so I can show you how the custom view works. Pay some values. This is just our sales rep info. And we go to our age layout. You you'll notice it doesn't have any of the headers, doesn't have the footers. It doesn't have the wide margins. We go to page layout, it's got narrow margins. Okay, so none of that stuff is there. But all we have to do is go to view and custom views, go to a kitchen cost view and says show and it jumped us back to our normal, but we'll go back to page layout you'll see it. Put our headers back in there. It put our footers back in there. It got rid of our grid lines that put in our wide margins. See if we go to page layout margins wide, so it basically customized our layout to look like that pre programmed view. Okay, so that's custom views how you do that. And then we'll talk about one more for this lecture, which is show because pretty straightforward. Let's go back to normal view just to make it easier so you can show good lines or hide grid lines. Here you can show or hide the formula bar. You can show or hide the heading. That's the letter column headings, and the numbers alongside Sofiane click that it will hide those or bring reason doesn't show rulers because you have to be in page layout view. That's this ruler across Stop. You can hide that or show that case those with show tools and the workbook views under the view tab. And then we'll get into Zoom Window and Mac Rose in the next lecture
107. View Tab (part 2) - The Complete Walk-Through: OK, in this video, we're gonna be continuing our exploration of the View tab right over here. We've already looked at workbook views and show. Now we're gonna check out Zoom Windows and Mac Rose, and I'm not going to go too far into Macron's because we have a whole section on that, but I'll touch on a little bit. So let's start with Zoom and let me jump into a sheet with some data in it. So we're back in our sales rep. Sheet zoom is pretty straightforward. You click on the zoom button and you can pick your level of magnification. So if you have 200 it will double in size. Bring away in there or you can go all the way down To say 25. Makes it easier to see the big picture. You could do fit selection. I'll show you that in just second, or you can go custom and you can pick your percentage. So if we want 65% look OK now the fit selection, you just select an area. Let's say we want to look at Bob, Carol and Casey for the months of January, February, March and April. Go to zoom, Click fit selection. Okay, and it fills the entire screen with what we've selected. Okay, if you want to restore it to 100% you just click the 100% button. That makes it basically what I would call normal the menu. Also zoom to selection here without clicking into that there. Just click to that, and it will drop you in there. You also have a zoom control down in the lower right hand corner of the screen. Down here, you can just grab it and slide it back and forth where you can click the minus button or the plus button and do that, and I'll share with you a little piece of humor from the Microsoft Corporation. When you hover over the zoom, it says, zoom to the level That's right for you for zooming. Resuming, Use the controls in the status bar. I love that zoom your resuming. So this is how you get Zamir zooming more storm. Okay, Before I make you dizzy, I'll stop and let's talk about the window view. Well, first, let's go back to 100% and talk about window view. The window view allows you actually some really useful working options. The 1st 1 was New Window. You just click on New window brings up an entirely new window. So now I have to windows of the same sheet open. You can see that when I minimize this, I'm still in it. Watch if I click into the middle of this one or better yet, so you can see it. Well, I'll select the middle here, and I could go to the other one and going that and I'm still selected up here. Okay, so that's the same workbook in two different windows. Go back to view and I'll show you what you can do with that so you can go to arrange all and you have some choices here. You could tile the windmills, you gun range of horizontally, vertically cascade. And you can also select this box to do only the windows of the active workbook. So let's go ahead and do that, and we'll tile them and click. OK, so now we have that same window open and two side by side workbooks. But it is the same workbook, and you'll notice if I go in and change this number right now. Bob's February sells for 508. Let's just change them, too. 2000 notice as I type it in this window. It also changes in the workbook in this one because they're the same workbook. Where this could be useful is if you want to look at different things at the same time. So, for instance, if I want to go over here and look at the spark charts at the same time that I'm looking at the names and the numbers from January, I can't came. You'll notice to like all of our tools are all shrunken down because we just have half size one knows. But that's OK. Most of the tools air still there. Brick and I was just maximize one of the windows and get to your full range of tools. So that was our new window tab. Select back into that. Let's talk more about the arrange. All you can do tiled, you canoe horizontal. Sure what that looks like. So that was one workbook on top of the other. So again, on this one, I could be looking at, say, like the top rose. And on this one, I could be down here looking at the bottom row's and you could do some other things like you could minimize the ribbons that doing that button there to give you more space to work . If you need to bring the ribbon back, then you go back in here and say un collapsed the rhythm ribbon on, right click, right click and I'm collapse the ribbon. So you bring that back. Let's look at some different arrangements. So that's horizontal Weaken do vertical. So it's going to him side by side. Okay, let me show you another thing with the arrange all button. Okay. First, I'm gonna close down their second coffee of the same workbook, and I'm gonna maximize this one and go back to our normal view here. I'm gonna open up a couple of other windows that I have. Okay, now, I've got three windows open right now, all different workbooks I'm gonna go to arrange all and I'm gonna take off the windows of active workbook. So now it's gonna arrange all of the workbooks that I have open whether they're related or not, and it's gonna arrange them vertically, so click. OK, so this is great. If you have information in different workbooks that you need to compare. And this isn't obviously good example, cause these a related. But if this one was on the kitchen remodel cost. This one is on our employees phone list, and this one is our sales reps. If there was data from those things that we needed to visually compare or to see side by side, this would be the way to do it. We could also go into one of these. Go back to a range and we could do it tiled and click. OK, now it's gonna take those three windows. It's gonna fit them all in as tiles. So these are just different ways of working with your windows to make it easier to work. Now, one thing to keep in mind, which a lot of people will struggle with is if, for instance, let's go ahead and maximize this one. Then we're gonna minimize this one. Okay, so it's now minimize down on the bar below. So now I only have two that are up and showing if I go to arrange all and I go to tiled and I click OK, only the two that are active or maximized are gonna show. Okay, So if I want to show all three tiles and I have to go into the one that I'm missing, open it up. Go back into a range. All go to tile. Click. OK. And now it includes all three. Okay, in the last one that you have, the last option is Cascade. Click on that and click. OK, and now it layers some on top of each other. So you so they're all layered. Okay, so let's go back to our view tab that takes care of the new window. That's where you create a new window from the same workbook. We looked at a range all, which is where you can arrange the workbooks to make them easier to use. And look out. Let's talk about freeze panes. This is a really cool on. And for this one, I'm gonna go to a different tab. This one freeze panes is great when you have headers and a column down the left that you want to always be able to see. So for instance, these sales rep names over here As I scroll to the right, they disappear. So what? I'm getting into data that's over this way, I lose the view of that. And that's a problem. The same thing happens with a range we have scrolled down, but in the case of a table, when you scroll down, if you're selected in the table, they'll scroll with you in a table C. As I go down, they scroll with me so they stick to the top. But if this was just a range, then those wouldn't stick to the top. So the way to fix that is to go to freeze panes. It's a free spans, and we couldn't freeze all of them based on where were selected. We can freeze just the top row or just the first column. So first, let me show you how to freeze the top. Just click on that. You don't see any difference yet, but as I scroll down, see how they're locked to the top, Which makes it really handy when you have huge, long lists of data because I just scroll down. You're not gonna lose track of which month you're looking at. To get rid of that, you just go in and say unfreeze panes. And now it's back to normal. Okay, Now, if I want to freeze just the sales rep names. I gotta freeze pans and I say freeze! First column. See, that little line appeared Now as I scroll to the right, the stay right there. So as I'm looking at the month of August, I could go down, say 7 25 OK, that's Jane. Okay, so that's really helpful. And then finally, let's go and select. Actually, let me show you a different example real quick on the swan. Let's go ahead and put our cursor right here. And we're going to do freeze panes and we're gonna say Freeze all pains, actually, Sorry. Let's put our cursor right here. We're gonna freeze all pains. The top button that freezes it right where your cursor is. See the line going this way and longer. In this way, this is a small example. So it doesn't really matter, but you'll see as we scroll, see how material the materials list stays locked and the rest of the range scrolls when we go to the side, same with the top. It's going to stay locked right where this line is. So we're headers. Stay locked, and as we scroll, it just rolls right up into it. Okay. And then again, to get rid of that, you just say unfreeze panes and it will behave normally as you scroll. Okay, Another thing that we can do is we can split the whole window into multiple windows within one window. So let's go to this example. It's gonna show up better if I select right here. And I got a split. It splits the window right there. So now you see, I have the same information, the same workbook in both of these pains special. If I scroll up here, you'll be able to see it Better. See, we've got Bob. Caroline Casey. We've got Bob. Caroline, Casey. Same windows. But we can scroll them separately and look at them right within the same window. So that's similar to when you arrange them horizontally. But this is the same workbook within the same window. Okay, so you just click this toe, unspool it it You can also split it like four ways. If you click right in the middle here and say split. So now we have it split vertically. But we also have another scroll bar here and split horizontally. I see So if I scroll both sides of this, I've got both of the things here. So those were just different ways to look at it so you can get to your data and see your data more easily and again to undo it. You just hit split again. Okay, Next ones hide. If I click hide, it just hides the window that I was just own. It just disappears which could be helpful if you have a workbook, lots of calculations or behind the scenes data that you don't want someone seeing and then another one that is more of like a user interface. Okay, And then if you want unhygienic, you just goto unhygienic. It's going to give you the style of box toe, let you choose which one you want. Unhygienic. You select on it and click. OK. They also noticed that the personal workbook is here. This is where, for instance, all of your macros that you store into the personal workbook will be stored and you can go in and open that that way to access it. But we're gonna reopen this worksheet that we just hit I select to get and clicking. OK, And there it is back in view ago. If you want a view to windows together and be able to scroll through them at the same rate , you can go to view side by side. Select the other workbook that you want to compare it to and click OK and then you'll get him compared to each other. And you would think that when it says side by side, that would be to the left into the right. But a lot of times it ends up being horizontal. But the cool part is when you have synchronous scrolling selected here. If you scroll through one of them, you'll see that automatically scrolls through the other one. So it's just another way. It's kind of work with your data together, one attending different workbooks and then if you hit on reset window position, it'll flip him. So now the one that was on the bottom is on top in the one that was on top above. Okay, then you can also turn off synchronous scrolling if you want. There we go, so it's not highlighted. And as you scroll now, the scroll independently and you can also turn off the view side by sides by clicking that that'll bring it back to your normal window. Yes, that's the window. And then the switch windows is pretty straightforward. You just select that and you can pick which window you want to look at so far to go to that all. I could do that, and good, uh, this one. We're gonna go that good. So that's the window group and then Macron's. We're not going to get into Makahs in this video because the developer tab has all the stuff for Mac Rose. But just know that in the view tab, you can go here and you can get into your macaroons. You can view your Mac Rose. You can record a macro, and you can switch to relative references, which will talk more about in the macro section because we also have a dedicated macro section for the scores, and we'll also talk about it when we explore the developer tab. So those are the workbook views with show zoom window and macros buttons on the view tab
108. Developer Tab (part 1) - The Complete Walk-Through: OK, in this video, we're gonna be talking about the developer tab and the developer Tavis found right over here to the right of the View tab. And it includes the code section, Adan's Controls and XML. And we're going to go into controls quite a bit and code quite a bit. Well, just briefly touch on Adan's and XML, just so you know what they are about. Now, if you don't have the developer tab and I'll show you what I mean, your system might look more like this, right? No developer tab showing up there. That's okay. I'm gonna show you how to do it. So what you do is you go to file, you go to options, you go to customize ribbon, and then over here, in your tabs, that should be under main tabs, and you'll see the developer tab here is not checked. So you want out a check into the check box and click OK, and it'll just appear so. Then you select on that and you're right in there. So one of my favorite parts of the developer tab is the code section, because this is where you work with visual basic and Mac Rose, I'm gonna show you this stuff in just a second. But first, let's just record a macro and I'll show you how that works, and then I'll show you where it stores it. So if you want to record a macro, macro is basically a little program that you can create the automates tasks for you that you do in excel. So let's just say that we want to make a smiley face in Excel and be able to push one button and have excel completely recreated. What we would do is we would go up to record Macro. That gives us a little macro dialog box here, and we'll name it. We'll just call it Smiley, and it allows us to assign a shortcut key to it. So we'll click on that and we'll say, shift s so it's an uppercase s. So to run this, you'd quick control shift s. We're going to store it in this workbook because this is the only place we're going to use this, and we'll just leave off the description because we know what this does. We'll say, OK, we're gonna go down here and we're gonna click this cell we're going to. Right click. We're going to fill it with yellow. We're gonna go over here, click this cell right click, fill it with yellow. I'm just gonna do this for a couple cells so that it looks like a smiley face. Actually, I was gonna click and suppress control and slicked thes make them all y'all to you, and then we'll click back up into the top. Actually, I better make those eyes better. Okay, so we have a little cheesy, a little smiley face. Now we click. Stop recording, and we just created a macro. Now, if we go home and I select the entire sheet, I say clear. Ole. So have a nice blank page again. And I press control shift s it just did all that formatting for me and created a little smiley face. So in its simplest form, that's how you record a macro. Okay, let's go back to our developer Tab. We just recorded a macro right there. Okay, now we can go look at that macro by going into the Visual Basics editor, and this is the visual basics editor, and we're not going to go too deep in this lecture. because, as you can see, it's like its own program. It has its whole own menu bar in its own toolbar and a number of different windows that you can work with. But I'll give you a quick little tour and I'll show you the code that we just created when we create our smiling face. So over here in this pain we have what's called the Project Explorer, and this is where you keep track of and find your different macro and PB A Projects. So the workbook that we're in right now is the macros demo workbook. And if we go down to the modules, here we go Toe module to you can see there's a whole bunch of code here. And if you look up at the tops of sub smiley smiley macro keyboard shortcut control shift s that sound familiar? That's what we just created. When we typed that into the little dialog box, it was recording our actions the whole time. And then all of this code here is basically VB, a code for us navigating around excel and coloring all of those different cells yellow. You can see it goes all the way down here to the bottom, and that ends down here. And like I say, we won't get too deep into this. But just know that this is where you go toe edit your Mac Rose when you start getting into VB a programming, Okay, I'm gonna go ahead and minimize that and go back to our main page where we have our macro here. Now, we looked at how to record a macro, and we looked at the visual basics editor whether you're macros were stored. So let me go ahead and delete all this again, Get rid of our macro that we just ran. And so we saw that you can press the shortcut key control shift s which we assigned to that macro to run it. But you can also run it right here from the Mac Rose window. And the Mac Rose window will give you a list of your Mac Rose. So we have one called macro demo, which we've done in a separate part of this course. And then we have our smiley face macro that we just created and those air n the workbook that we're currently looking at. You can choose other workbooks all open workbooks. Just this workbook, where your personal workbook, which is where you can store Macron's that you want to use all across excel. But for now, we're gonna go to our smiley and we can run it. We can step into it, which means basically run it step by step to troubleshoot it. We can edit it. Which brings up the visual basic editor where we were just looking where your code is, weaken, delete it. We can go into the options here and we can change the shortcut key or out of description. We're like I say we can run it. So let's go ahead and run it from here. You'll see it ran in the same way. Okay, let's go ahead and clear all those cells again. I'm gonna show you one other way to record a macro, and that's using the relative references on One thing you'll notice is that even if I have my cell selected all the way over here, if I hit control shift s to run that macro, it always is just gonna jump back to the exact same spot and dropped the final cursor in a one. That's because it's using absolute references. So it's actually referring to B two and B three and B four to place these colors. Okay, that I'm gonna show you a way to do it differently so that you can place it wherever you want to place it. And that's by using relative references. So we select that. Just see, it's highlighted and gray, and we're going to start here in F one. Then we're gonna go record. Macro, we'll call this smiley relative and we'll give it a shortcut. Give control shift our for relative. Look. OK, then. We're going to use the arrow keys this time. So we're gonna go shift down, down, go to our home to have and make it yellow. We're gonna narrow down like yellow. Hello. We're just selecting cells using our arrow keys, which makes this a relative reference. Okay, so we have our smiley face. Go back to the developer tab and it stop recording Now. Watch what happens when we delete this out and I go over here and hit control shift our see how Now it's creating my smiley face over here, whereas if I'm over here and I hit control shift s our original one was over here and it will build it over there. But if I'm click down here, I clicked. Control shift s It's gonna build that same one up in the corner, always in the same place. But from down here and a click control shift, our it's gonna build that little smiley face right where my cursor started. Okay? So that's the primary difference between relative references and absolute references and a little demonstration of how that actually shows up. But when you start recording macros, that's a really important concept to grasp, because it makes a big difference in how your mackerels will behave. Relative to your data case, we've looked at recording macros using relative references. Our macro dialog box, the visual basic editor. Let's take a look at macro security. We're not going to get too deep into a lot of this, but just know that this is where you go to modify your macro security. You'll notice it by default, one into macro settings. And one of the most important things to be aware of is that you have four choices here with how your macros will behave. You can have all Macron's disabled and it won't notify you that they're being disabled. The default settings to disable all macros and give you a notification. So what this basically means is that when you download a macro or imported macro into excel , it's going to automatically disable it. But it will tell you Hey, we've disabled this macro because it could be dangerous and it's going to give you the option to enable it. Okay, that's what that little yellow bar up here is that you have to click enable, okay, and that's usually what you want to have a set on. You can disable all macros except for ones with digital signatures, and you can enable all macros and you can see right here not recommended, because basically dangerous code could just automatically run on your computer when you download it without you having a chance to look through it and make sure that it's friendly . Okay, there are a lot of other options here that you could do with your settings and macro security that we're not going to get into. But definitely remember this that you should have it set up so that it will give you a notification so you can enable friendly macros. Okay, when you know they're from a trusted source. Okay, so that's the code group Adan's Air. Pretty straightforward. There are three different types here. You can go and get Adan. It's here. There are a handful of Adan's that are already available with this file, and they're calm. Adan's or component object model Adan's Those air basically custom Adan's that you can either build or have built and then bring in to excel. But if you want Tokyo and just get Adan's or manager existing at and you just click here and this is where you can deal with your personal Adams that you already have added where you can go to the store and it's gonna bring up just a ton of options and you can just choose from these and select add to bring those into excel, and then you go to my Adan's and you could use them case. That's the ad in store, and then this is the ones that are already available. So, like the analysis tool pack, house analysis tool Pact BV, a euro currency tools in the solar, Adam Okay, and we're going to stop there for this video, and in the next video, we're gonna jump into controls and XML
109. Developer Tab (part 2) - The Complete Walk-Through: OK in this video, we're gonna look at the control group and the XML group Controls are pretty interesting. This is where you can add things like buttons that a user can just click on to run a macro or drop down boxes and things like that. Okay, so, for example, let's go to the insert button here and you'll see this drop down. And it has two options here. Form controls and Activex controls, and you'll notice a lot of the same options are available in both of these. And the reason is they're fairly similar. The main difference is that form controls is kind of the older version. So this is where you put buttons and drop downs and things like that into your forms. You can assign macros to these, and you can put the's right into your Excel spreadsheets. Active X controls are basically Mawr dynamic and Mawr customizable, and I'll create a couple of them just to give you an example. So first, let's to a regular form control, and this is just a button. It's immediately going to ask me if I want to assign a macro. For now, I'm just going to say cancel. So right now it's just a button. If I click off of it and then go click on it, it doesn't do anything. All it does is select it, and I could modify it. I can stretch it or whatever I can right click on it. And I could edit the text and call it something else. But let's do that. Let's go this smiley quick off of it. Now it's renamed. Now let's do a sign. A macro total right Click on it and I'll say a sign of macro and let's put smiley and click . OK, I always get this out of the way. Go ahead and click off it. Now you notice when I hover over it, there's a little finger, and if I click on it, it's gonna actually run our macro. So this button is running our macro. That's delete that real quick and try that again. Okay, click on it. Runs our macro just like that. Okay, let's look at an Activex. Control will do a button from there as well. And I'm not gonna sign anything to this. But I'll just show you the difference between active X and form controls. I guess this was going to say Command button. We could do the same thing with this. We can resize it. We could move it, but you'll notice a couple things that are different. First of all, when we created it, it didn't ask us to assign a macro to it. Second of all, if we right click on it, you'll see it doesn't have that option. There are a lot of things we can do with it, like we can go view the code. This is going to actually take us into the visual basic editor. In fact, I'll click on that and I'll show you what that does. You can see it's actually has code written to create this command button. And we could put code in here like Let's do that will create a little program that makes this create a message box was, say, message box. I will say hello. Okay, close out of that, but you'll notice now if I click off and hover over. It doesn't give me the same option like this one to run it. It still is like a move button, and the reason is because we're in design mode, So Activex controls will have designed mode. You can toggle this honor off. You see, when I turn that off now I have a little arrow button and I can click out and run it and see what it did. It popped up a message box that says Hello. Okay. And that's because in our visual basic editor, we added that little code in there so that our command but number one, which is what that button is called, created that message box. Okay, and I can even do this and say Designed mode is turned. Oh, if I go back in, you'll notice. If I turn on design mode again, I can't click on it. I could just go in. I can edit it, change it, stretch it, whatever. But if I take it off design mood that it's clickable and it'll run and it brings up our message boxes. His design motors turned off, and that's how we were able to run it. Okay, so those are just some really simple examples of how to use some form controls and Activex controls to work with your macros and run some vb a code. Okay. And let's see the next thing is properties. You'll notice properties is toggled off because I'm selected on this right now. But if I click over here, properties becomes available. If I actually, if I go into design when I select this I can go into this properties window. It's gonna bring up all these different things which are properties of this specific control. And you can see we've got texts and fought color and all kinds of different things on here . Let's see if we can go in and change the button text. Let's just give it like a blue highlight. You gotta see we just changed the button text. There are all kinds of things that you can do in here to modify. The way that this button behaves OK, three properties goes out of that view code is pretty straightforward. That's just gonna bring us into the visual basic editor. It's going to show us the code behind that button. So that's properties and view code run dialogue. I'm not going to go into that because it's kind of an older way to create forms. You can create a form dialog box, and then you just click this button to run it. Um, actually, you know, I can show you real quick. Why not? So you go right Click. Can you say insert? Give you all these different options of things that you can insert types of sheets, charts And what not? If you go to this M s XL five point of dialogue and select that and click OK, it's gonna create this weird looking sheet and it's got this dialog box here. You see, it's got some controls on already and you can modify it. You can add things to it. I could take a form control and had another button to it And what not and then if you want to run it, you just click run dialogue. You can see it just created this dialog box with these buttons. So you click OK, and it goes away. So we're gonna delete that because, like I say, that's an older style or way of building forms. Okay? And then finally we got XML, and like I say, I'm not gonna go into this much, but I'm just gonna kind of touch on it. But XML is basically just a way to move data back and forth and process data between databases on do. You could do it using Excel so you can import XML data files into excel from other sources . You can export them out of excel. This allows you just to manage the sources that you already have connected for your XML, and then you can map the properties of it. You can get expansion packs for your XML, and then this is just a refresh button. But we're not gonna go too much deeper into XML. But that's the developer tab. You've got your code group where you can record Mac Rose and get into your visual basic editor. You've got your ad ends where you can add an additional functionality to excel. You've got your controls, which is where he can at buttons and drop downs and things, either right into your excel spreadsheets or into user forms and things like that. And they've got your XML, where you can connect to other databases using the X amount, and that also does it for the entire ribbon and all the tabs on the ribbon. So at this point, we have covered every single tab on the ribbon, and we've looked at almost every single little tool that you could possibly use on every tab in the ribbon. So by this point you have a very solid vocabulary. So now when somebody talks about Excel themes or colors or margins, or in your data tab, when somebody talks about how to sort or filter or how to do data validation, you now have a reference for some base knowledge about all of these things that you can take forward. And obviously it's impossible to learn everything that there is to know about Excel. But now you know what each of these tools are, and you can pick and choose which ones are going to be the most important for you and dive a little bit deeper. But the cool thing is, now you know more about all of these tools than your average Excel user ever. Well,
110. Conclusion: Sadly, this is the end of the Excel 2016 course. I just wanted to take a moment, though, to say I'm so grateful to you for joining the course and for taking the entire thing and coming all the way to the end. I hope that you've learned a lot, and I want to emphasize that this is just the beginning of your journey. You've learned a lot of skills and strategies in theory, in the scores, but what you really need to do now is take everything that you've learned and start to put it into practice. So let's just take a minute to review what we have learned in this course. We started out with the basic tour of Excel. We went through all the ribbons. We went through all of these different tabs just to get a really basic overview of all the features and options that you have an excel. Then we created our first document, our first worksheet. We learned how to save it to a place where you can find it. We learned how to navigate through the cells, add data into the cells and use simple formulas from the auto some and We created a kitchen remodel cost worksheet so we could practice formatting and doing simple formulas like addition and multiplication. Then we learned about the seven most popular functions, and we learned how to find functions up here, and we learned how to insert functions. We learned about V. Look up right mid left. Some if in some ifs, count and Countess. And we also learned about average and regular if functions. Then we took our kitchen remodeling costs worksheet, and we created charts out of it. So we made a column chart. We made a bar chart. We made a pie chart and we made a line chart. We learned how to format those charts, clean them up and make him nice and sharp and professional. Then we learned how to make pivot tables, and we learned how you can quickly change and sort your data just by dragging and dropping different pivot table fields in your table. And then we create a pivot chart, which instantly changes and updates as you change your pivot table. Finally, we explored the new features for Excel 2016 such as the six different new chart types like Sunbursts and History Grams we looked at the new help feature, and of course we looked at one click forecasting, and we played around with three D maps quite a bit. Then we went into a whole bunch of additional formulas. We learned logic formulas with text formulas, date and time formulas and math formulas. And then we did our entire tour of the entire Microsoft Excel ribbon. We started with our file menu went into saving, printing, exporting our work. We went through the entire home tab and learned all about formatting and styles. We went through the insert tab where we learned how to do tables, learn how to do charts, spark lines and do filters. We worked with page layouts that you can set things up just right. Get your margins and spacing right and layout so that you can print. We did some additional foreign lows, and we learned how to even, like, trace your dependence and show formulas and evaluate formulas. We spent a lot of time on the day of the tab doing getting transformed data, which is where you import data and create connections to other outside sources. And remember, we went and did data validation where we set up rules for how you can enter things into cells. I went through the review tab, learn how to protect our sheets, add comments and view comments, looked at the View tab, which is all about laying out the page, how you want it to be being able to split pains and things like that. And then, finally, we learned about macros on the developer tab. We learned how to record our own macros to automate our work, so you've really learned a lot in this course. Now it's time to take what you've learned and put it into practice in a riel environment. The first thing you need to do is make sure you use the downloads that are included in many of the lectures and just go through them. Click on, um, manipulate them, change the formulas, play with the tables, play with the formatting and the charts and really get some hands on experience with what you've learned. And if you get hung up on anything, you can review the lecture that relates to that download. Or you can shoot me a question, the discussions or even a personal message, and I'll be happy to help you out in any way that I can. And then the next step is to take what you've learned and practiced that's specific to the course and then apply it to something personal. So whether it's a work project, a spreadsheet for your boss, a pivot table for your boss, a personal budget or a three D map of your favorite places to go on vacation, put this stuff into practice so you could really start to ingrained these skills into your brain. And then, finally, I would challenge you to pick your favorite type of chart, whether it's a bar chart or ah pie chart or or pivot chart and create one from scratch using some of your own data. So again, I just want to thank you sincerely for joining this course and learning with me. I'm so honored that you did, and I'm always here in the discussions if I could help you in any way, and I wish you the best of luck in your personal life and your career, and I'll see you in the discussions
 Steve McDonald, Excel and Photoshop Geek