Transcripts
1. Intro: Lighting is one of the most important parts when creating digital videos as it can guide and dictate the mood of your image and ultimately how your audience connects with it. Today, we'll be learning how to identify lighting nuances and techniques by putting them into practice. Hi, my name is Lucas Gonzalez. I'm a New York City-based artist and cinematographer. I've shot for brands such as Vice, Spotify, Tidal, TinyGiant, Verizon, and even some of your favorite classes here on Skillshare. I've shot documentaries and short films, which are my personal favorite just because of the amount of creative freedom it allows you. In today's class, we're going to be talking about lighting fundamentals and I'm going to be helping you create your own visual style for your videos. This class is intended for anyone who is currently making online content and wants to improve the lighting or just overall enhance the visual style of their image, making it more cinematic. All the techniques that I'm going to be sharing with you today can be easily applicable to many different spaces, so if you're working from a small bedroom to even if you have access to a larger studio space. You'll be learning how to use natural, beauty, three-point, RGB, and practical lighting as well as I'm going to be showing you some of my favorite tools and applications and hope that I can support you with developing your own visual style. By the end of this class, you'll have multiple reference points that you can keep coming back to as you continue to develop your own unique visual style. Hope you walk away with fresh ideas and new tools that can take your lighting to the next level. Let's get started.
2. Shaping Natural Light: The good news is that the most powerful light source is actually free, it's the sun. If you're someone that's shooting throughout the day, this is very helpful because you can really utilize the sun in order to create bright and clean images. In this lesson, we're really going to be breaking down how to maximize the sun and how to shape the sun to be able to create contrast and balance within our images. If you're someone who's just using a window as a way to light yourself, you want to make sure that you set yourself up so you can get that soft and consistent lighting throughout the day. Now when you're working with the sun, on a lucky day, it might get cloudy and so this means that the light's just going to be even, soft, and constant throughout the day. But on a not so lucky day, you might get a super bright sunny day. Let's say you have south-facing windows, you're going to get a lot of fluctuation in the light and it's going to go from soft to hard and if you're recording yourself at home, for instance, this means that you're going to constantly have to re-expose in your camera. We're going to be looking at some easy ways that you can just modify so you don't have to worry about this throughout the day. Whenever you're utilizing light and light is going through any surface area, whenever you're using an LED or you're using the sun that's going through something, whatever it's going through, in our case, the window and depending on your window size, that is what's going to dictate the spread of the light in an area. We're going to be talking about how to control this. When using a window, use what you have. If you have a see through curtains at home that can help soften and diffuse the light, make sure those are installed. If you have something like blinds, that could also be very helpful. This isn't going to be always the case, sometimes the sun is just going to be way too harsh and your kerning just may not be enough or you might want the window in the shop because you're limited on the space or it's just a very nice aesthetic to have. A tool and a tip that I can suggest to you is to get something called an ND gel. Now an ND gel, it's literally just a filter that's just cutting off certain stops from the light. They come in different variations, they come in 0.3, 0.6, 0.9 and all of these numbers really just mean a stop two or three of light that it is cutting. It's a really easy way to just reduce lighting in a window. Let's say you're utilizing your window, you have your see through curtains, everything's soft, and it's really even across your face, but you're missing a little contrast or you would like to introduce something. The very easiest way you can do this is by, on the opposite side of wherever your key light, so wherever the sun's coming in from, you want to introduce like a black fabric or you can even use the backside of a reflector like the black side, anything dark that you can just hang up on that other side. What this creates is something in film that we call negative fill and really what you're creating is a two to one ratio contrast on your face, meaning that you want the key lights to be twice as bright as your fill. If you're someone who's interested in even taking it a notch further, what you can do is just introduce a backlight. A backlight, basically it's just going to aim at your back and what that does is it's going to separate you from the background and it gives you a really nice edge, usually around the rim of your hair and a little bit of your shoulder. At this point, what you should have is a very nice soft key light, you may have that contrast two to one ratio on your face giving you that extra definition and you might even have that backlight to separate you from the background. This is honestly one of my favorite setups and the reason is because it's fast, it's versatile, and effective. You don't need much equipment for this. I can go anywhere and as long as they have a window, I can implement this setup and it just provides me some awesome soft, easy, bright images.
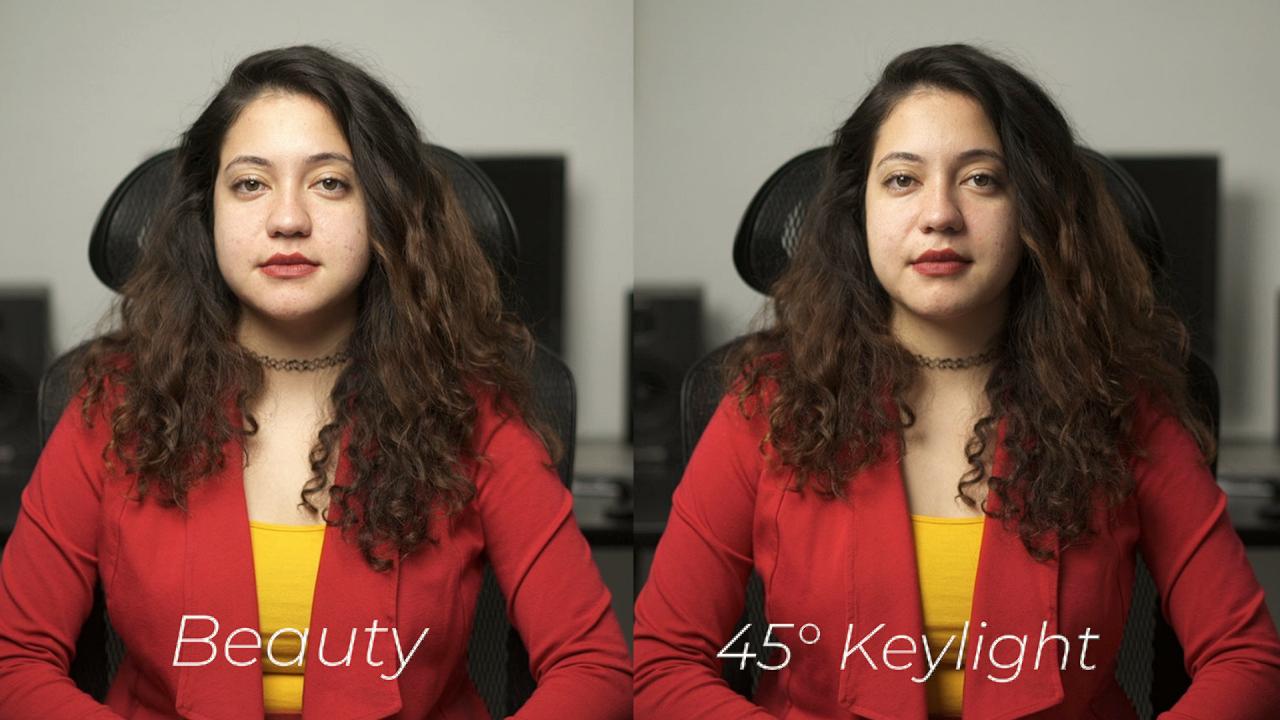
3. Three Setups using one Light: In this lesson, we're going to be exploring how to get different high-quality looks by only using one light. Now, this is very helpful obviously if you're constrained on things like time, space, and budget. When working with one light, It's all about light control. We're going to be talking about how to modify and shape a light. In this case, I'm going to be using an LED for now called the aputure 300D. This is a little bit more on the expensive side, but it doesn't matter because you can use whatever light you already have. I just happened to have a huge soft box on it that you're going to see. But again, use whatever you already have or look for some cheaper alternatives if you need it. To show you the angling and the positioning of the light, I have my friend here, Melissa, who is going to model for us. But you can do this at home by yourself or if you want to include someone else. The three setups that I'm going to be running you through are a beauty light, a 45-degree angle key light, and something a little bit more dramatic and fun which is the three-quarter back-light. Let's go ahead and get into it. Today I'm working with the aputure 300D. It's an extremely portable and versatile light, I currently have it on a soft box, but you can use any light that you have in order to follow along. It's really important that when you work with one light, you take the time to shape and modify the light because it's really your only source that you're going to be working with. The first thing we're going to do is go ahead and move this key light. The first setup that we're going to be talking about is, how to create a beauty light, and what I just did there by moving the light is centered it, frontal, and high up. This is going to create a beauty light and you can replicate this with any soft box you may have, or even one of those ring lights. By doing this, you can see that it's very soft, it's very pleasing to the face you can even see it fills in, or rather it creates some really nice shadows in the neck area. Everything is super smooth, super soft, and it's just pleasing overall to the eye. Now, by putting this right above the camera, it helps create those really nice ring circles in the iris. If you want to get rid of some of those shadows, what you can easily do is you can just grab basically any kind of white card or a reflector and you bring it underneath the face and you can see how nice that looks, and it fills everything in. Also going to show you what it looks like with a reflector, because it's just a little bit stronger on this silver side here, but it does the same effect and you can see how much it actually fills in. We're going to move back the light to the 45-degree angles that we originally started with, and I'm going to show you what kind of look you can get with that. Let's go ahead and do that. You can see here what I just did, even by just shifting that back to 45 degrees, you no longer have this bright frontal beauty light, but instead, you're getting a lot more contrast on the face and you're getting those shadows on the opposite side, depending on the situation and the circumstance, this is a look that you may want, and it's really nice. However, you're not stuck with this permanent two-to-one contrast ratio, simply what you can do and what we talked about is modifying light. In this circumstance, what you can do is bring in a reflector as such, and if you bring it to the opposite side, you can see how it fills in the shadows really nicely, but it still retains some contrast. As you can tell, just by positioning and modifying the light, you can get a little bit more of a dynamic image. The last setup that we are going to be taking a look at is called three-quarter back-light. Now, you can see I've changed the light unit here. I have a different kind of source, but you can use a soft box. The idea is that you place a unit in the back of your subject on camera's left side, and if you place it close enough, it gives you a very dramatic look. Now, what I have here going on is that once you place in the back, it's going to give you a nice rim hair light. It's going to create a lot of shadows in the front side of your subject. In order to retain and bring back some details in the front of your subject again, you bring in your trusty reflector. What this does is as soon as I bring it in, It's going to reflect that light right back into the shadow parts. By doing that, I can also choose to come a little bit back and maybe get a little bit less reflection or coming close right outside of camera frame. This is an extremely versatile and edgy look. All of the three setups that I've shown you today are simply just made with one light and using just some easy modifiers. I hope you can save all of these tips and experiment a little bit with your current setup.
4. Three Point Lighting: In this lesson, we're going to be talking about three-point lighting. Three-point lighting is just a simple guide that you can use while you're using three different light fixtures to illuminate a scene or a subject. In this case, we're going to be taking a look at the key light, the fill light, and the back light. Like I mentioned, this is a guide, and in no way is a set rule, but you can use this setup to basically work out from as a formula, and then once you get really comfortable with it, you can start experimenting and tweaking it to your own needs. Depending on where you position your lights, you're going to be able to create different moods. Your key light is usually your main source of light. It also tends to be the brightest light within all your other lights, and you can think of it as your main light. With this, it's very important where you set your key light and the amount of output because that really dictates the mood that you want to create. For example, you guys saw me push this light a little bit more to the side. Now, what that does is create a little bit more contrast and depth in the face as you can see. By moving even just a slight this light a few degrees over to my subject's left, I was able to change the mood. If I wanted it to be a little bit more frontal and slide that over to my right, what that would create is just an overall brighter and more ambient light that may be used for something else. Remember, where and how you place your key light is extremely important because that ultimately sets up the mood for your scene. Now we're going to take a look at the fill light. Now, the fill light is really going to be your second source of light in this scene, and it's really used just to compensate for the shadows that are created by your key light. The way you do that is by placing it on the opposite side of your key light, and it tends to be usually softer and a little bit dimmer, and the reason for that is just because it's really just used to fill in a little bit of those details that are otherwise lost in the shadow areas, again created by your key. Now, I'm using an LED here, but you can use anything like a large white card, a reflector, anything that's going to bring light to those shadows, you are able to use as a fill. Your third light is your back light. A quick tip for you is when setting up the back light or your hair light, you want to turn off your other sources of light. What this allows you to do is just really appreciate what the back light is doing and how it's hitting your subject. Really what a back light is used for is to create some sort of separation between your subject and the background so they don't really disappear into it. It does this by creating a highlight rim around the edges of their hair and a little bit of their shoulder. Another note is, a back light is different from a background light. A background light is really used to emphasize your background. Contrary, it's your back light, which is still maintaining that light on your subject to distinguish them from the background. Three-point lighting is not a fixed standard or set of rules. I hope you're able to use this lesson as a guide in order to really appreciate and implement these lighting positioning and techniques on your scene.
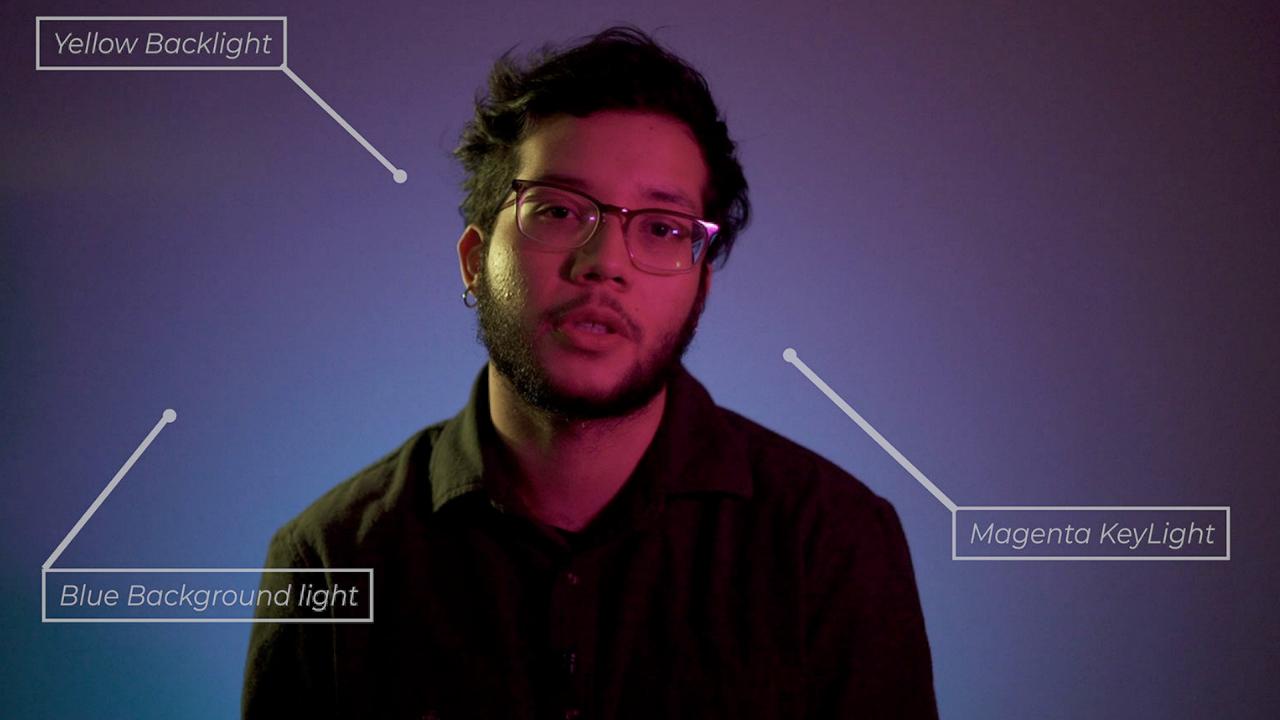
5. Working with RGB Lights: We're going to be jumping into stylized lighting, aka, just mixing RGB colors. This is one of my favorite ways to just get creative and add dimension to my images. Think of the mood and feel that you want to give to your audience. Is it comic? Is it energetic? Is it sexy? Colors are really important tool in evoking emotions out of people. You want to be very intentional with what mood and tone you want to say in your image. The important part is that you're just choosing colors that are aligning with whatever style it is that you're going for. In color theory, there are basic complimentary colors such as green and magenta, blue and orange. But you can really explore with something like a color wheel to see the endless possibilities. We can honestly dedicate an entire course just on color theory. But for our purposes here, I'm just going to be showing you some simple, easy ways to implement color into your current lighting setup. There are multiple ways you can introduce color into your images. You can buy an RGB light, something like this. It's a very small Aputure MC but this offers you a lot of versatility because it lets you control the hue which is color itself, saturation which is the intensity of the color and the brightness which is how light or dark the color is. You don't need to go out there and buy an RGB light to get color into your image, you can easily just get some gels and now this is exactly similar to the idea of an ND filter. It's just going to change the color and these come in like endless amount of colors and intensities. You can pick some gels and use them with occurring lighting units that you own. If this isn't accessible to you, if you're using an LED and only if you're using an LED, you might be able to get a wave like this using some color paper from Michaels or some crafty paper like that. Let's go ahead and get started. The first thing that you want to do is just completely black out your room. You want to start in the dark for this and that way you can really see what each light is going to be doing. For our purposes, I just have my main key light here lighting my face on just so you could see me. For this we're going to be working with the background and we're going to try to add some color to the background to just make it a little bit more fun and energetic. We're going to start adding some color to the background. I have two lights here facing the back wall, one is on the left and one is on the right and they're both the same Aputure MCs that I showed you earlier. With the app, I'm actually going to turn on both units. I really love the contrast of pink and purple and so that's where we're going to be adding. That's one light on and now with the same app, I can go ahead and turn on the other one. As you can see, just by having these two lights pointed on the back wall and adding some complimentary colors to each other, I just added a really fun, exciting, and energetic background to my shop. When you're lighting any background, so it could be just a standard wall like I had, you could use like paper seamlesses or even fabric. There's a few ways you can do it. You can do it by when I'm doing right where it's like you're just grabbing two different lights and then pointing them at the wall. You can even do this with one light and they just have one color just separate the background from you. The point is that you just want to have a light that is just dedicated to the background so that can separate. You can use any light for the background. However, with these two units or any RGB units again, the benefit is that they're very quick and versatile. Right now for instance, I linked up to this application on my phone. If I wasn't feeling this color and I wanted to try something else, I can do that in an instant. Let's go ahead and look at that, and done. You can see that even with just a quick few taps, I was able to completely change the color in the background and feel of my video. I have this warm tungsten, orange and like this blue behind me and that's just a very comic energy in comparison to what we had before. Really I just wanted to show you how effective just adding a color to the background can be. Right now we're going to look into adding color to your face and seeing what that does. Basically what we're going to do is I'm just going to turn this around. This is going to light me from the back, like this dramatic. For this look what I really did was I just moved the units around. To my front here and my key light, I have this bright magenta that's really just filling the left side of my face and I really wanted to just complement that so I added this yellow to my shoulder and to my back of the hair that's really edgy and bright, but I think it works. I saw the background was looking a little bit dull and I wanted to spice it up so I added this blue gel to this light that I have here in the background. That's actually not RGB light but with the gel, it can complement and I made it work to make this really dynamic and fun image. In actuality, we could have lit the scene in many different ways. I think each of them would have served their own purpose. But it's important to again make sure that you're consistently tuning into what colors, what feels right for the content that you're producing. If you're interested in learning about color theory I'm going to have some resources in the description below so you can check out what are complimentary colors, how they work, and how you could even continue to implement them in your videos in the future. There's no right or wrong way to light a scene and what colors you choose really depend on the moodiness that you want to go, how intense? How dramatic? Definitely experiment and play around and see what style works for you. Up next, we're going to be looking at some practicals and learning how to add even more depth to your image.
6. Practicals in the Frame: One of the most effective ways to enhance the look of any video is to introduce practicals. In cinematography, practicals are usually defined as light fixtures within the frame. This really means any ceiling fixers, lamps, Christmas lights, computer screens, you name it. If it's in the frame, it's a practical. Practicals are such a powerful tool in video, primarily because there's such a simple and effective way to help create depth in a scene. You can light an entire scene just off practicals. However, this is a bit difficult because usually candles and lamps are not strong enough to light up a subject. For the purpose of this video, we're going to be using them in the background to create depth and enhance the overall look of our image. I'm going to be sharing with you two different setups. The first one just using a regular lamp with a tungsten bulb. Tungsten bulbs are awesome because they're warm, they give you a very cozy feeling. This is going to give you a really nice atmosphere in the background. You probably have one of these lying around your house. Once you have your lamp set to the side, you want to make sure it's not blown out and you do this by factoring in a dimmer. A dimmer is going to make sure that you get the exposure right so it's not the brightest thing in your image and it's not going to take away from you as the subject. Tungsten practicals always give you that warm and cozy feel. But if you're looking to change things up, you may want to look at some LED strips. For instance, these lights are so common nowadays just for the flexibility they offer you in changing color. Changing color is huge if you want to just switch up the mood or the tone in your video at a very effective way. Another option that you have for RGB. In case you don't want to use the strips because they're causing a little flicker, this is another option that you have. This is an aperture bulb. There's many different types of RGB bulbs in the market, like a Philips one. This one's cool because it's intended for video, so you're going to avoid the flickers. Now, the cool part like I said, it's RGB. As you can see, I can go around the wheel, I can control the intensity, I can switch it up, I can use to light my background, I can use it as a key light. They're very flexible lights, and I really like this bulb and it's definitely something that you may want to look into as an option. As you can tell, practicals are not only such a great way to add depth to your scene, but they just offer you so much to experiment, the possibilities are endless with, and they're very affordable.
7. Tips & Tricks: In this bonus lesson, I'm going to be again just emphasizing some key points and giving you a few tricks to again develop your own lighting process. The first thing is you want to make sure that you again establish that set tone of your content. Is it going to be that high key bright even look or are you going for something a little bit more moody, contrasty and you want to do something with low key lighting? Whichever way you decide to go is fine. You just want to make sure that you're developing a process that's just simple and easy for you to recreate each time. Two apps that can help you with your lighting process are Sun Surveyor and light metering app. Sun Surveyor is an application that, essentially, just allows you to see where the sun is rising and where it's setting. You can see at what points during the day is the sun going to be the highest and at what point is it going to start coming down. This is helpful again when you're shooting with windows, if you're shooting with a window in your scene, just so you can see what the sun is going to be doing while you're shooting. The second application is a light meter app on the iPhone and Android. Now, this essentially just does what it sounds like. It's a light meter. Wherever you point your phone's camera to, it's going to tell you the best settings and what you should have your camera at. If you use both of these apps, they're really just going to make it so much easier and simpler for you to make sure that you're getting the lighting in the room correct. Another tool that you can use is something called BlackWrap. Now, what BlackWrap is exactly like aluminum foil, but it's black, so what you can do is just wrap it around the edges of any light that you have and really use it to cut and modify and just point and direct the beam of the light anywhere you need to. This is very helpful when you have things that are spilling or that you really just need one specific area to be focused. Some tips that I have just for reflections. If you're someone like me, for instance, who wears glasses and you find that sometimes while you're recording, you're seeing the reflection of the light in your glasses, a quick solution to this is just raise the light and then aim it down. This is going to help get the reflection out, and if that's not enough, I would just say be hyper-conscious, like make sure that you're eye level to the camera so you're essentially looking up and revealing the reflection but rather keep your chin down so you can avoid those reflections. Another tip that I have for reflections is if you're someone who's getting a lot of glare into your lens, maybe off some of the light that's spilling off your LED or even from the sun, what you can easily do is use some of that BlackWrap I showed you earlier, or a black tape if you have, and stick that on to the barrel of your lens in front. You're going to see that's going to cut some of the light that's just directly coming into the lens. If you're someone who currently wants to upgrade or just get some brand new lights, some companies that you may want to look into are Aperture, Quasar, Nanlite. The reason is because I think all of these companies offer very versatile lights at a very budget-friendly pricing. Remember that even if you just have one decent light, just by using reflectors and soft boxes and modifiers, you can really start to get a beautiful image. Go ahead and try different lighting setups, combinations, angles, and lighting units. Essentially, you just want to experiment until you achieve something that you're happy with. This is really the best way that you're going to learn.
8. Class Project: For this class project, it's really all about developing your own process. How are we going to do that is, I want you to go back to the lessons, pick a look, pick a setup that you like, and we want to recreate that at home. I don't want you to overthink it. I don't want you to go out and buy anything that I showed you. Just simply, use what you already have and have been using and let's get the most out of that. What I want you to do is upload a screengrab or still of the image, and if you even want, this is optional, but you can also upload a behind-the-scenes of how you're setting up your lights and the positioning. That way, I can give you maybe a little bit of advice if I see something that's worth changing or we can all just learn from each other in the Project Gallery. Feel free to use the Discussions tab as another resource where you can just post questions and I'll be going through those and answering them. Again, I want you to have fun and I want you to experiment with this and remember that this is your own unique lighting process so you don't have to recreate what I had, but rather just take the techniques, take the fundamentals, and apply them to your own.
9. Outro: Awesome. Thank you so much for joining me today. We took a look at a lot of different basic lighting setups that I really hope just gets you thinking about your own lighting style and developing that. If you're an online creator currently making videos on any platform, right now, we have the Project Gallery down below. I'd love to see your before and after setups, and I'll be checking those out. If at any point you are confused or need a little bit of a reminder, feel free to check back on the lessons and make sure that you're following the in-process series here on Skillshare. I'll be seeing you soon. Take care.
 In-Process, Storytelling + Media