Transcripts
1. 01 Introduction: Hello and welcome to my class. My name is Tyler. I'm on interactive media designer and digital illustration is one of the discipline, and I'm very passionate about in this class. We're going to let out of applied for the gentiles of light and shadows to paint on me. Texture brushes, inaudible a street. In addition, you will have free access to a collection off over 60 100 extra brushes, which I've created, converted to illustrate pressures. Made his classes table for big unanswered Adam Illustrator for level so as to take this class. Just feel free to post the process and final outputs of your class. Working the project gallery our but lots of review and make recommendations.
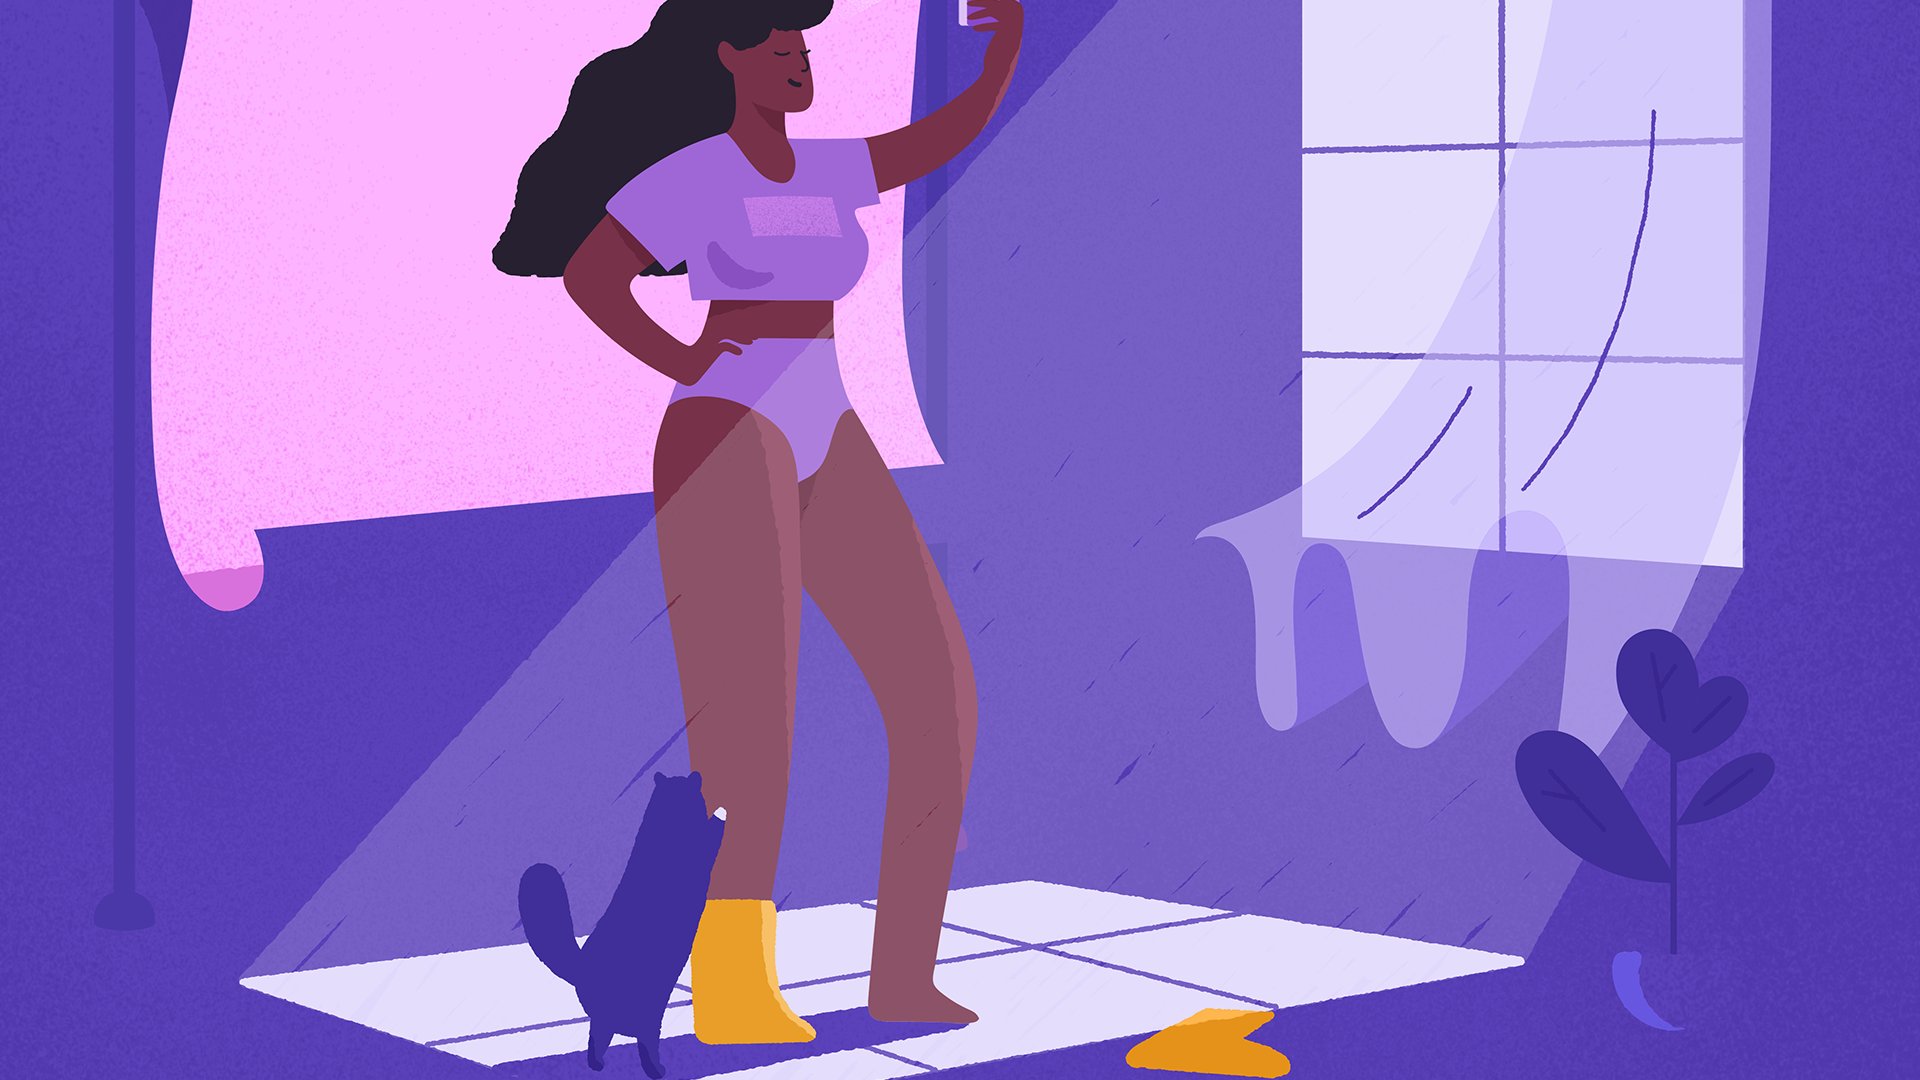
2. 02 Fundamentals of light & shadow: hello and welcome in this section, we're going to let out The fundamentals of light and shadow was used to create this illustration For this class I recommend in the Russian off Adebola Streeto from CS five airports. Now, for this illustration, you notice that the light is coming from the top right, and as it heats the hope, yet the object reflects on obscures the light being now, the obscure light beam is known as the form shadow, which creates the cost shadow on the ground plane. In other words, on object, reflecting lights can be divided into form lights from shadow and cast shadows. Now you'll notice that in my layers panel have placed the textures for the form lights, the form shadow and acosta into separately us, not a form light come before the divided into I light, which is the reflection of the light source on the brightest port. On the objects. The source light, which is the area of face and the lights us on the afternoon, which is really so slight begins to talking off, fade gradually into the form shadow last for the form shadow. It's coming divided into course shadow, which is the plane that turns away from the light source on the reflected light, which is the diffused light, the bounces off the objects. And finally the cast shadow coming, divided in so number, which is the darkest parts off the shadow, completely obscured by the objects and P number, which is the area we're the light especially obscured or the fall off. Here it goes from Pasha shadows, no shadow. So by turning off each layer, I wanted you to see the breakdown off this illustration. I was able to paint this illustration from my imagination based on the understanding and knowledge off the fundamentals of light and shadows in the next class, we're going to create the line out of the illustration. So thanks for watching issued a
3. 03 Creating the Line Art: Hello and welcome to class tree In the last class, we explore the fundamentals of light and shadows in this section. We're going to force the four creator liner toe illustration before we start a plant concept that we are lanes in the last loss, not to create the line out. First ofall select the secretary from the toolbox and old shift as you click and drag to create a profit cycle. Then, after I used the return go toe to create the bottleneck and for the cover off the bottle, not the kids the same return go by person country air from your keyboard and then, after recited to create the bottle cover as shown Subsequently, select the circle and rectangle for the Bortnick. Go to the park to find a partner and click on the United Icons and match them together. Now, once that is done, use the deregulation. So to select the uncle points at the point of intersection and drag those indicators to create around corn effects that after we're going to do the same thing for the bottle car. So first the fall select the uncle points at the top, using the direct selection to and drug Doesn't Iquitos to create the wrong corner subsequently are going to create another tango to complete the line out illustration in the next class? We're going to create the best color for illustration. So thanks for watching and see you there.
4. 04 Creating the base color: hello and welcome to class for in the previous class, we created lineup for illustration using illustrator's basic shapes and this section we're going to create the base qualify illustration before moved to the next step off. Painting light and shadows without texture brushes, so forced the four. Select the bottle shape, swept the fuel for the stroke and apply a pink color. For the bottle core. Apply a blue collar now using the HSB, which you cannot says from the color swatches panel. Manu create dark shades of blue for the shapes off the photo cover as shown. Then after we're going to convert this flat colors to grid in colors, using the grid and panel and the interactive good into. So starting with the body good to the good and panel dragon drop its collar to the guidance later toe added to the grid and color. Then, after old orders, you click and drag to stop onto, duplicated and removed to stop with black culo by clicking and dragging it down. Now for the region's Coehlo wanted transition from doctor light such that light is coming from the top right corner. So it's created doctor double kick to stop on the left toe. Open up the call apono. Then after click on the panel menu, select it. Just be and choose a proportionate for the meat on. We're not going to change the pink color for color. Stuff are meeting for the light on double. Click the color stop on the right to open up the call apono. Switch to the HSB slider and select a brighter pink. Then, after I create another stop off for the shadow and apply a deeper shade of purple. Subsequently president on your keyboard to assess the interactive good gentle, move your mosque close to it and wants changes to the rotates symbol. Click and drag to rotate the angle of your credit column as shown. Then after began, click and drag the damn owned indicator to review more off the bright tone and the second indicator to reposition the good and color has shown. Now feel free to experiment with the Gruden Kahlan to you arrive at something that fuse right. However, if you want to understand some of the guiding principles for playing colors more effectively, check out my course on creative texture and with Adebola Strettle So the next thing is that we're going to apply greedy in closer to cover all of the border for these. What going to create a greedy in transition from dark blue light blue using the HSB Slater So which agreed and panel created dark blue for the doctor on a lighter blue for the light on on a blue collar for the Mito. Finally, we're also going to change the angle and the position of the questions color has shown. Then, after we're going to create the base color for the Castro before the fall, select the Ellipse tool from the toolbox, click and drag to create the Ellipse has shown and apply a deduction of popular to its. Subsequently, we're going to use the master to create the fall off error off the cycle. To achieve. These press you to activate the match to and click on the Ellipse to create the horizontal and the vertical mission has shown. Then off the admin messaged both ends of the vata commissioning on both ends of the recent Amish line. Then, after select the uncle points created by Michelin at the ends of the shape, reduces a positive zero and changes color to a bright pink. We're going to change the color off the measure and close to the edges of the shape to Poppel to apply the same purport. So another article points on the mentioning Select the uncle points First I on your keyboard to activate the eyedropper True and click on the public color that was applied to the previous uncle points. Then after reduces a positive to a viral that create a smooth transition and apply the same process so other uncle points in the measuring close to the edges of the Ellipse. However, as you move towards the mention is close to the edges of the boto, we're going to use a darker shade of you. So once you're done by going to apply textures in the next section. So thanks for watching See you day.
5. 05 Applying the texture brushes: Hello and welcome to class fight. It's nice to have you again. In the previous class, we created the base color for illustration using the ingredients on the master. Finally, we have come to the most fun part off the illustration. Where will be applying the UNMIK texture Pro? She's toe illustration. For this class, you will only have access to the brush that I use for the illustration. Downloaded Good interest. So secession and click on cut texture brush. It's to get the full collection off over 60 special brushes, which are already converted to illustrate a brushes. Check out my class on creative texture with Adebola. Streeto were You can also lend out to create your own texture. Brushes other methods of using texture in Adebola, Streeto and many more. So once you don't download in it, open it up. Go to the brush Ponyo. Click on the brush library menu and select save brushes. Once you've saved it, go back to your illustration. Open up the brush Panamint waking. Click on the brush library menu. Click on user defined brushes and select the brush that received. Now before we start painting, select the bottle illustration or alters your click and drugged illustrations of duplicated . Then, after select the main body of the bottle, go to the swatches panel, click on the panel menu and select new switches. Now from the new switches option sets the name for the switch and click on the or keyboards , and when you're done, then after do the same thing to save the good and colors on the bottle. Cover social quaintly we're going to apply the texture proceeds to the edges of the shape. To do these applied his Mkapa Tonbridge to the bottle shapes. Then, after select the body off the bottle goods of the appearance, Pano select boats the stroke on the few prayers controversy to group them, click on the add new few icon and select the good and color that's just saved from the searches. Panyu, however, you will need to adjust angle and the position of the good and color has shown. Then, after we're going to do the same thing for the shapes of the bottle. Car subsequently used the painters that creates a stroke on the cover, as shown, give it a light blue strip color, applying one off the pattern. Brushy Street, an old orders, it clicked. Drug. You know that's a created to be kids at the other end of the shape. Then, after select the blend so from the toolbox users to click on board strokes to create the wickets between them. However, to achieve the illusion off, caught out on the cover ships were going to change the blend mode to multiply, reduces apostasy and give it a deep blue color. Then, after press contributes, created duplicates off the strop, and it's offsets its to the left. Change its blending motor screen, change its color to a brighter blue and reduce it's opacity. So before was that painting some textures? We're going to organize Palios to create a new layer for the form, shadow and for the form light inside the board earlier subsequently. But the form lightly are selected. Create nearly has incited for highlights. The source late on after then, after creating your layers inside the shadow layer for the co shadow and the reflected lights. So starting with your after select the brush to set the blend mode to multiply shoes, it's likely depreciate of pink Increases truck wait to two points, paint some textures and reduces a positive now for the course shadow and sure it's layer is selected. Just a deep purple sit is blending mode to multiply. Set is true. Equates to two points and paints and textures, and shown I wanted you have to be very mindful about is that when you reduce the opacity off layer, any texture you create inside that layer will inherit the value off that a positive. So if you want to control the opacity off the textures, individually selected texture inside layer and change. It's a positive now for the source. Light changes blending moto overly. Choose a bright pink and paint some textures. Subsequently, you can reduce the positive reduces stroke waiters, the paint muscles, light and others. The beauty up a gradual transition. Now for the reflected light, you can use the same invited that you used for your source lights to paint in some reflected light. However, it should be conscious of the fact that you reflected light should be Doc Watson you're after. If we have to be careful not to make it to breaks. Then after who painting more often to make the edges of the caution is after. I will also paint in morsels light very in its capacity. Now for the I light using off whites set its blending motor screen and paints on my life. However, feel free to various capacity and stroke. Quit. I don't see you arrive at something that fuse rights. Social quaintly feel free to go over each of the layers toe add most was light more after one more course shadows these and other types of cutout brushes very in its capacity and wait notes that when you select a brushstroke but nothing else selected the next brushstroke that you paint with up its attributes. Now the goal is to ensure a nice transition that fuse natural. Just be bored to put down your brush strokes and trust your instincts as it paints. If it fuels off the hook, adjust it accordingly, not try to ensure that you're not selecting the wrong Blair Asa pains. Once you're satisfied with your textures, who needs a marks them to the border shape. To do this, select the body of the bottle. The placated group, the car shadow move the duplicate above the group. Selected duplicates give it a black few Select boot. The group on the duplicates, go to the transparent panel, click on make mosque and check, Invite, mask option. Then, after we're also going to mask the reflected light. So applying the same technique to placate the body of the boat, so group textures off the reflected lights. Moved. Duplicates Abovitz. Give the duplicate a black feel. Select boarded duplicates on the reflected lights. Go to the transparent Panyu, click or make mosque and check on that mask option. Subsequently, we're going to apply the same technique to mask the textures. For after him, the source lights on the highlights. Now, at this point, we're going to change the stroke off the main body. But due to a more organic texture stroke, so achieve these. Select the shape. Go to the appearance Pano Double kick on the group. Select the stroke on from day, you can apply texture that suits your taste. Then off. Give me after increases waits to treat point in order to make it more views. However, once you make this change, you will have to apply the same changes to the duplicates that was used to mark the painted textures. To achieve these, select one of the mosque painted textures go to the transparent when you click on the mosque in off the goods of the appearance. Pano increases stroke weights of three points and applied textures that you used for the body shape subsequently do the same thing to the other duplicates that was used to mosque for the textures. Once you're done, recite your at bodies in the at bat, so you know that's accommodates the background that we are going to create. Then, after create a new layer for the background, select one of the creators. Cutout brushes used a bright yellow increases stroke weight to five points and click to apply the texture. For now, I'm going to start creating the texture for constructed. So in your caste strata layer, you should have a layer for the ambro and the number not remember that the umbra is the darkest part of the shadow, completely obscured by light. Why the pin number is the full of area that goes from pasha shadows and no shadow. So get started. Fourth of four reduced capacity off the shadow based shape and with the umbrella selected, select one of the market scattered brushes. Choose a deep blue ish pop Okelo sets his blending mode, so multiply. Set a stroke. Weights toe 1.5, depending on the size of your illustration. Reduce it's opacity and start painting. Now we're going to beat up the shadow, gradually varying in size on apostasy, and as we get closer to the bottle, you will adjust the values of your brushes to make the shadows deeper. Then, after select the pin number, Leah sets blending modes overly on painting some textures. Variant is cut brush type. It's a paucity on a stroke. Quit. Subsequently. We're going to start adding more textures to the background, making use of limited value off color. If you want to know more on the guiding principles of using colors more creatively, check out my core spawned created texture, which Adebola streeto. However, if you need to change the colors that you've applied, select the textures. Click on the edit menu, select edit colors and choose your color at work. Not for the color. At Rock Option selects the edit. Stop click on the link. I can't affect all the calls that once. Then, after you can increase its brightness, produce a saturation and change its Huebel Now feel free to experience major something that fuels good to you and when you don't click on the OK button. Finally, we're going to create cast writers for the bottle car tow. Achieve these. Create a new layer for it places below the cover shapes. Select one of the Marcus Qatar brushes. Choose a deep purple set is blending much to multiply. Reduces apostasy. Set a stroke. Weights 0.5, depending on the size of your illustration and start painting. Asked will continue to paint or very, it's stroke weights, its capacity and cola volume. Now the goal is to Butte. A gradual movement from the darkest parts completely obscured my light. So the full of tears that moves on pressure shot. It's no shadow. Now. The next step is for us to mask the shadows to the border shape. So applying the same mosque in taking that we use for the bottle textures duplicate the base shape of the body. Place it above your cast shadows group. The cast shadows change the color of the duplicates. To block, select both the duplicates and the group. Open up the transparent Pano, click on Make mosque and check the invite. My description
6. 06 Conclusion: now, finally, we're going to be adding some finishing touches to the illustration, improving its looking feel, increasing its visual depth and contrasts. But this is what my finished illustration looks like. I did more textures to the boto. The cast, shadows and the background, once lost, satisfied would look fuel. Now, when trying to add more textures to the mass group, the challenges that the textures would not stay inside the group. So you love to drug and drop the newly painted textures into the mask. Congratulations. If we're able to follow True and create something like this place, feel for it supposed to find out walking a project salary so that I can review and make recommendations were necessary. Our recommended to check out my class on creative test turning with Adebola straighter. Give loan to learn how to create your own texture. Brushes. Autumn enters of great and thanks just techniques for using Callisto paint textures and so much more. It's a great pleasure toe our view in disclose Thanks for watching and see you in future classes
 Damilola Kajopelaye-ola, Digital Product Designer