Transcripts
1. Introduction: [MUSIC] Hi. My name is [inaudible] and I'm a Creative based in
the South of France. My work combines block printing with calligraphy
or hand lettering. Creating beautiful stem made is one of my very
favorite thing to do. Block printing
makes it very easy. During this class, I will
teach you how to carve a rubber stamp and how to create several different
greeting cards with it. We will cover Japanese
wave stem from the template provided and print three different
cards with it. The scale shape is
easy to curve and yet offers many
printing possibilities. This class is designed
to all beginners and there is no previous
carving experience needed. All you need to complete the class is a
lino cutting tool, some soft rubber block, an ink-pad, and some
paper to print on. I love block printing for its
versatility and playfulness and the fact that you
can use again and again those stamps
you've carved. It really is a
medium that led me to regular creative practice
despite being short on time. The materials needed are not expensive and I find these
very freeing as well. Carving in a soft block
and printing with ink pads makes a whole process
very easy and mess free. Block printing is
a perfect fit for creatives short on time and wanting to expand them by zone as it offers so
many possibilities. You can implement the
techniques learned in class in all your future creative or
do-it-yourself projects, whether it is sketch
booking, scrap-booking, creating greeting cards, gift wrap, and so much more. By the end of the class, you will be able to
cover rubber stamp from a template or
from your own design, and use it to create very different patterns to
create cards and so much more. Almost one years
old that curving is highly addictive and
before you know it, you'll have a wall
stamp collection. I hope you'll join
me in the class. [MUSIC]
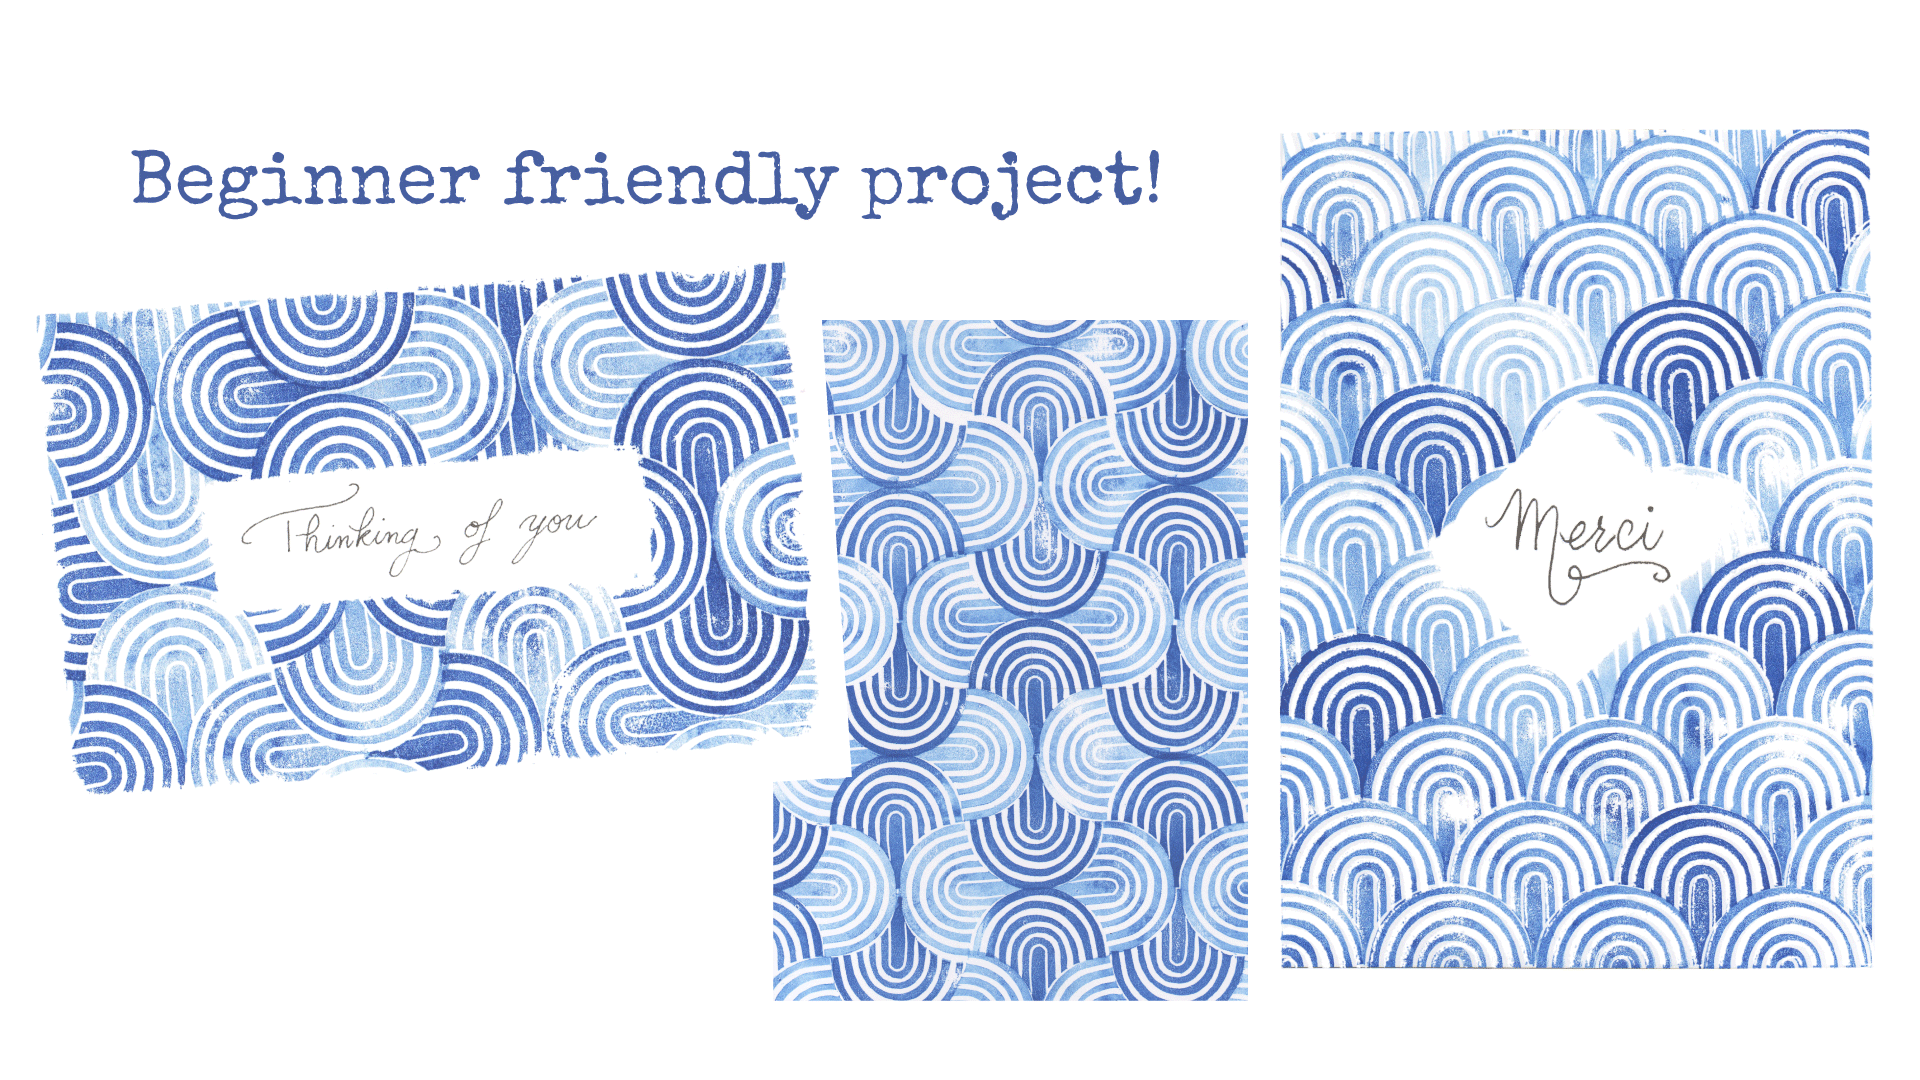
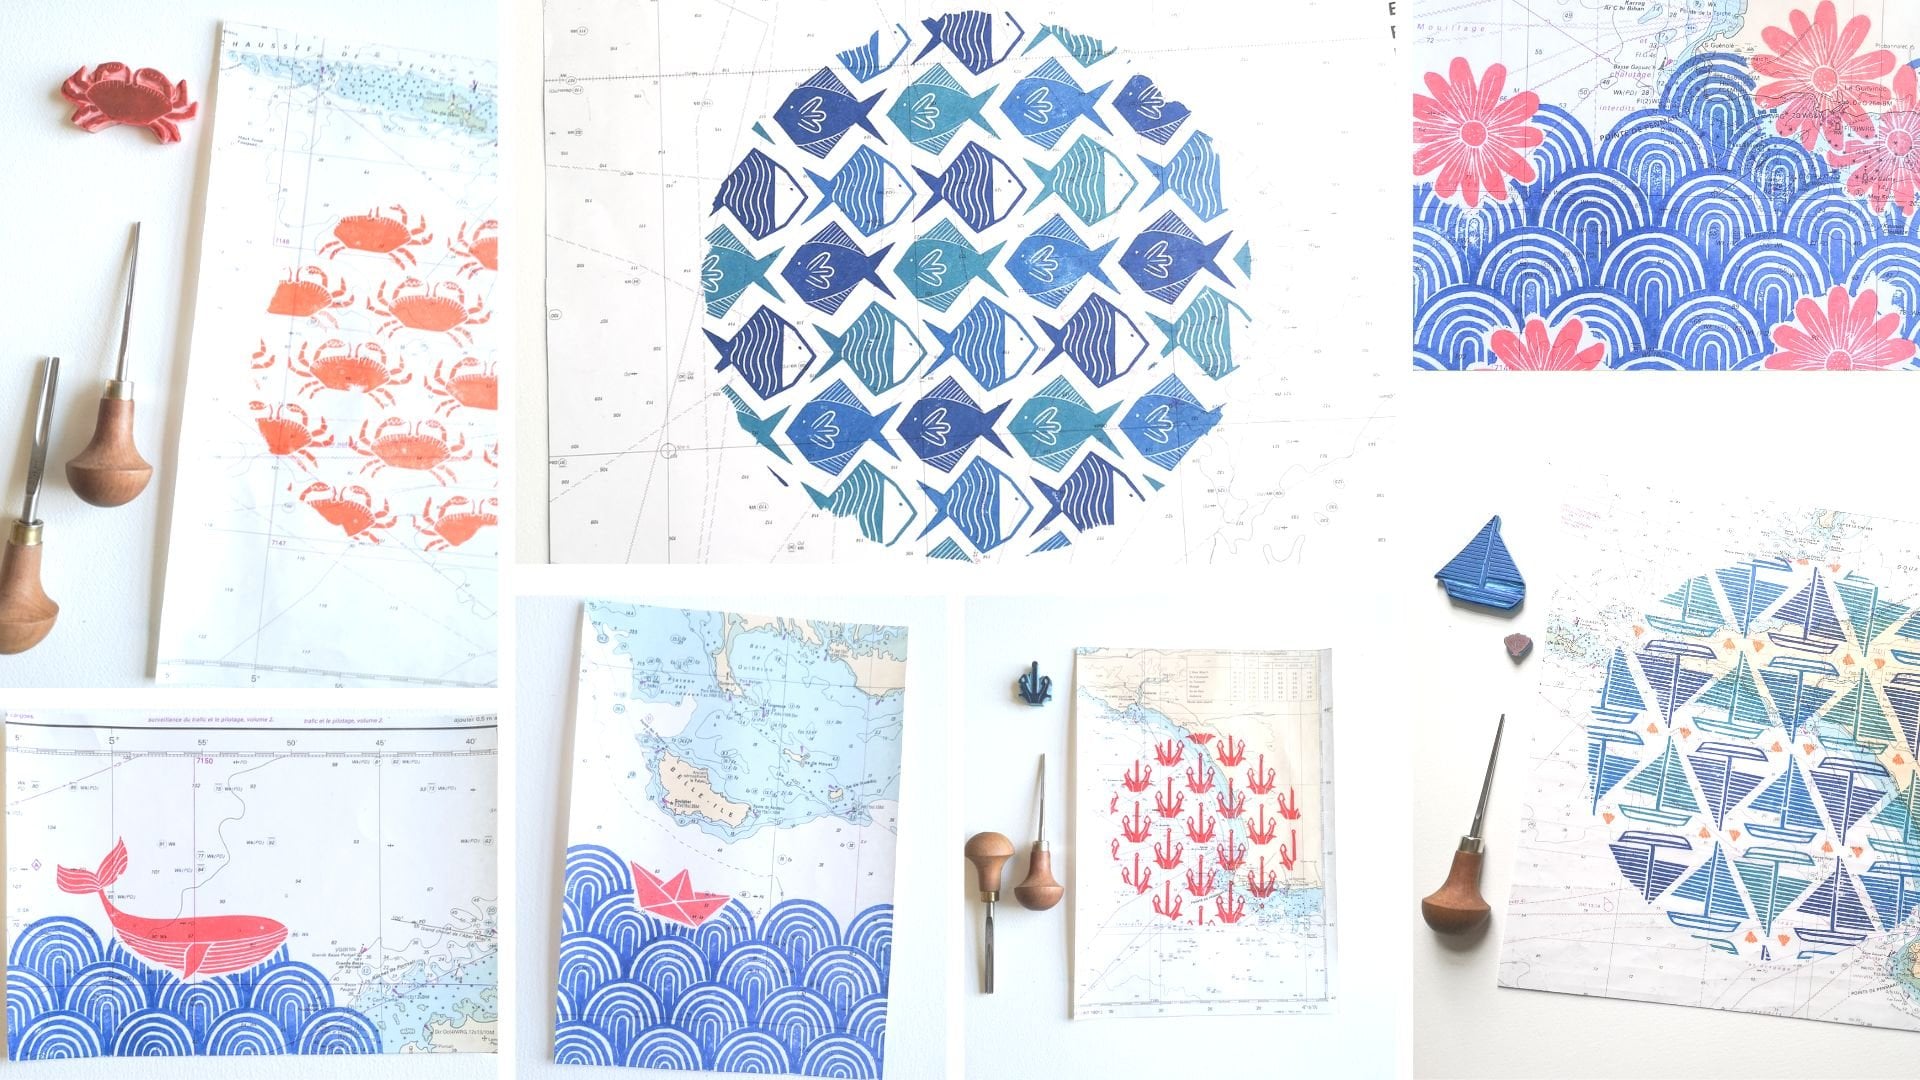
2. Your Project: [MUSIC] Class project is a Japanese wave print
or greeting count. You recreate this
print with a stamp, we will curve in a
soft rubber block. Depending on your
personal preference, you can also have a hand-written message to
complement your greeting card. You will learn how to transfer the Japanese wave design from the template provided
to the rubber block, and how to curve actual stamp or block we will use to
prints the greeting cards. Then we will see how to create at least two different
patterns arrangements with different code of shades using only warning pad and the
stamp curved in the glass. First, you will print two different patterns
arrangements, and then you will create a
greeting card with a message complementing your card by preserving some whitespace
when you print. To add a warmer effect and make your greeting card
even more spatial, there is always bonus lesson
so that you can learn how to quickly create a
matching envelope as well. To complete the project, you would need a
lino cutting tool, a soft rubber block, an ink pad, some tracing paper, as well as cards or
paper to print on. Upload your project in
the project gallery, whether it is a picture of your stamp or work
in progress seen, or once you've
completed your project. Once you're familiar with the
skills teaching of class, you will be able to create
one of a kind paper goods such as greeting cards
or gift wrap in no time. You can use again and again
the stamps you curve, and you can start combining them when you got your
own collection. If you've got any questions, feel free to reach out in
the discussion section. To get started, you need
to follow the link in the project and resources section to download
this template. [MUSIC]
3. Materials: Here is what you need
to complete your class. First, align your
cutting tool such as the Essdee beginner
set, for instance. Beginner sets are
budget-friendly options. They come with several
blades and one handle. You will also need
a soft hover block. The most common ones are
Speedy carve by Speedball or the Factis artist carving
block by the Factis brand. They both are very similar
and of great quality. Depending on where you live, you can find some
other brands as well. You will also need an ink
pad of your favorite color. My favorite ink pads are
VersaFine Clair and VersaFine, by the brand Tsukineko, which is widely distributed. They are offered on
many vibrant colors. Today, I will be using the blue belle color
by VersaFine Clair. But of course, you can pick
any color you would like. Don't feel like you have to
use that particular brand. Any ink pad from the craft department or
store will do just as good. Of course, you'll also need
some paper to print on. I like using the
Clairefontaine paper paint on, which is both very
thick and quite cheap, and is available in
many different formats. But today, I will be using the A5 smooth surface paint
on paper by Clairefontaine. You can print on any
paper that you've got at home as long
as it's not too thin. That said, I always
run test prints on printer paper and I get decent
results with it as well. The texture of the paper
you will use will affect the stamp prints and it's really a matter of personal preference, whether you'd like to work with a smooth or textured surface. Feel free to test
different paper options so that you can pick
the one you prefer. You will also need
a pencil, a pen, a ruler, and one eraser
to complete the project. While you can complete your
class with only these items, I would really recommend having some washi
tape or painter tape, as well as some tracing
paper as it would make the wall
project much easier. You would also need
envelopes matching the size of the paper
you're using if you want to complement
your greeting cards with an eye-catching
and printed envelope. If you have a cutting
mat to protect your desk or table when carving, go ahead and grab it. But don't worry if you don't, any piece of cardboard will do. Gather your materials and I'll
see you in the next video.
4. Process Overview: In this lesson, I will detail the process step by
step from scratch to finish so that you can
visualize it before starting. It's really helpful to know
the different steps we will be taking before even
starting the project. First, you will need to print the class resource documents
that features the template. To do so, just click on the link of the project
in resources tab. You will immediately
receive an email with document you
can then print. Once you've got the
document printed, you can use some tracing paper to trace over the template. We will then use our
designs sketch on the tracing paper to transfer
it onto the rubber block. Why you can't sketch directly
on the rubber block? It is much easier to have
a sketch beforehand. By then, your stamp would
be ready to be curved. There will be a lesson
focusing on how to easily curve your stamp and make sure you are happy
with your result. Once you've got your stamp, we can start having
fun testing out different printing layouts to create prints and
greeting cards. To test and combine different printing
techniques, first, we will print a classic
monochrome layout arrangement of our Japanese waves. Then, we will print an
upside down overall pattern with two shades of
blue using only one ink pad. We can then move on to
create greeting cards. To do so, we will
use paper masks to preserve white space where
we can add a message in. In this example, we
will print a pattern on the wall card accepted in
the central circle part. There are also in-written
messages included in the class households document that you can trace
if you'd like to. There is a bonus lesson where
we will see how to create a matching envelope
if you want to send beautiful snail mail
to friends or family. If you haven't downloaded
the template yet, follow the link in the
project and resources section and print
the stamp template so that we can get started.
5. Japanese Waves: Trace the Template: [MUSIC] Now that you've
got your template printed, it's time to trace over it. The easiest would be
to cut a piece of tracing paper slightly
bigger than the design. Place the tracing
paper on top of the design and make sure
to hold it properly. You can even add a
piece of washing tape to maintain it in position
when you're tracing, if you find it helpful. I recommend filling in with pencil all the areas that
are black on the template. By doing so, carving will
be much more easier. Indeed, you won't have any
doubt regarding which areas of the design needs to be carved away and which we need to stay. In short, all the black
and colored lines of your sketch will stay and will carve everything that
is of the block coral. [MUSIC] Trace the template and you're ready to move on to
the next lesson.
6. Transfer the Sketch to the Block: [MUSIC] Once you have
the template twist, it's time to actually
transfer it onto the block so that we
can start carving. Flip the tracing paper
onto the block so that the pencil sketch is in
contact with a block. At this point, it really
doesn't matter if the design is not
aligned or anything. The only key thing is to hold it firmly so that it wants more. You can add a piece
of washing tape to help you keep it in position. While holding the tracing paper, you can start verbing
with your firm the tracing paper to transfer
the sketch on the block. Make sure you verb the
entire scale shape before we moving the tracing
paper forms a block. You can lift a corner
of the tracing paper to check that you wrote
over the wall design. If for some reason, the design has not
transferred properly, I would recommend you to
just start over again. Having a neat and
clean transfer is essential to cover stamp
that you will be happy with. We are now ready to carve. Join me in the next lesson so
that we can start carving.
7. Stamp Carving: [MUSIC] For this lesson, you will need your
liner cutting tool. So design you have just
transferred to the block and a cutting mat or piece of
cardboard to protect your desk. First, there's a couple
of safety rules to follow to make sure curving remains
an enjoyable moment. The end of the blade of the
cutting tool is very sharp, so make sure not to touch it. The most important safety rule is to always carve
away from you. Cutting tool to never be pointed towards you no matter
what position you're in. As a matter of fact, holding the block
instead of your hand is both safer and
easier when carving. The hand holding the
block must be kept away from the cutting
tool trajectory as well. So that you don't injure
yourself in case of slip. To make your curving easier, use Exacto knife or
pair of scissors to cut a piece of rubber block that is slightly bigger
than your design. It will allow you to rotate the block freely when carving. To carve the stamp, we will first choose the
smallest blade size of the kit. So number of the blade
is carved on its back. First, screw the fair
hole of the handle, but don't tight it completely. Then insert your blade and
tighten the fair hole. Your tool is now ready. Before jumping into
curving your stamp, it's worth taking
a few minutes to test your tool on these
copies of soft block. Place the one hand of the handle in your palm
and your index on the [inaudible] It is important to have deep enough for the designed to show on the print, but not too deep either. The line width depends on the pressure you exert
on the cutting tool. So more pressure you exert
the wider the line will be. It's important to keep the angle between the cutting
tool and the table as steady as possible and the
angle would be 130 degrees. By doing so, the width of
your line won't change. Try carving a straight line
as well as some curves. Notice, Oh, I not only
adjust my hand but also the block position so
that I always feel comfortable and not end up
in an awkward position. You can see here how much of pressure affects the line width. The first one is much wider, while I use here is
the exact same blade. Once you feel ready, grab your Japanese Wave Design. We will carve everything that
is of with the block color. So in my case, all blue will go away and we'll keep
the dark pencil lines. Start carving the outer
edge of the scale shape. I'm left-handed and I find it easier to rotate my
block clockwise. If you're right-handed,
you may feel more comfortable to rotate
it counterclockwise. You can notice my snail pace. I think it's really worth taking your time and at
patience of process. Not only it's really relaxing, but it will also
allow your lines to be really smooth
and consistent. You can carry on by carving
the interior lines. If you start feeling any
tension on your hand or waist, just take your break. Don't fully issue, don't carve
perfectly along the lines. [MUSIC] Once you're done carvings into your lines carve along
those K borders. Now it's time to carve a wider area along
the scale shape. To do so, insert a larger blade and go
along the lines of code. You can then use the Exacto
knife to trim the block. Try to trim as closer the design as possible
without damaging it. It will make printing and
aligning the stamps easier. [inaudible] our stamp is ready, and I can't wait to test it. I hope you're happy with your stamp and are
ready to test. Don't worry if you think that your stamp is a
way too imperfect or that you've messed
up some of the areas because it's the
next lesson we will look at how we can fix that.
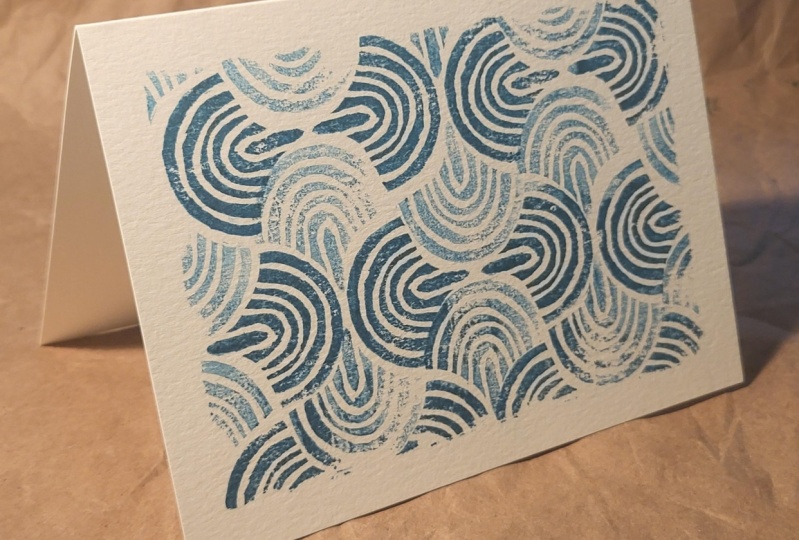
8. Test Print - Let Go of Perfectionism: [MUSIC] You can now grab an
inkpad and some draft paper. We will test our stack. Let's see how it turns out. Don't feel like you
can't adjust anything. Of course, there's
no way to bring back any excess materials that you've carved away accidentally. But you can refine your
carving again and again until you are happy
with all it prints. For instance, you
may want to keep or note any bad pronouns
that prints out. Tabs, a stamp pad until
it's fully covered with. Top you stamp with
confidence on the paper. It's important not to move it
once it does touch a paper, if you don't want the ink to smudge or hand up
with a double print. Here, for instance, I'm not really happy about this wonky line which
gets senior here, and I will try to improve it. Test print once again and repeat the process until you are
happy with the result. I'd like now to show
you some close-ups of my prints and stand so that you can see all
imperfect they are. I'm pretty happy about OSes thinking of your
card turned out. But if you look closely there
just so many imperfections. Here, for instance, I didn't her lines
systems properly and he handed up with a gap between
the two elements printed. On the top here that's
the opposite and there is an overlap between
two elements printed. There you can see some
inconsistency in zinc in column. I actually really like it, but I think it's just a matter
of personal preference. I use masking tape to
preserve the white border, and you can see that some of the edges are not very crisp. In that corner here, the print fades away before the border
and I'll stop here. But I really could go on and on regarding how many
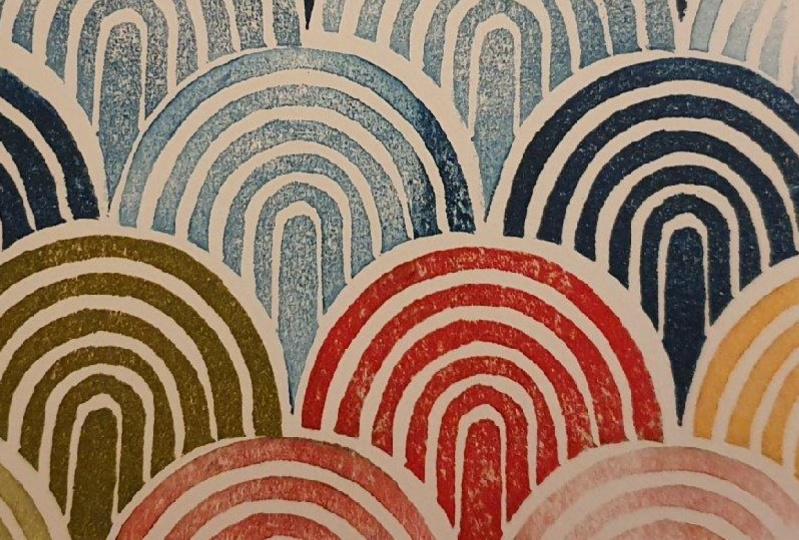
imperfections I could spot. Let's have a look
at this one now. I can't see any big gaps or overlaps as I showed you
on the previous piece. But if you look closely, the alignment is just
really far from perfect. You can especially see that's
the bottom, for instance, there's also quite
a lot of texture, and here for some reason
some parts didn't really print and I've got
some white how we apps. I like this look with
a lot of texture. But if you prefer a cleaner, neater print, it's also something
you can easily achieve. Small size of paper, so less texture you'd get. It's also important to make sure that your inkpad has enough ink, and here I think mine, I would have needed beefy. These two example and are
really far from perfect. But I don't think it makes
them less beautiful. They've gotten and
made feeling of similar designs that
would be drawn digitally, will lose and actually think it makes them
even more special. I really hope this close-up
will make you relax, let go of perfectionism, and just have fun when printing.
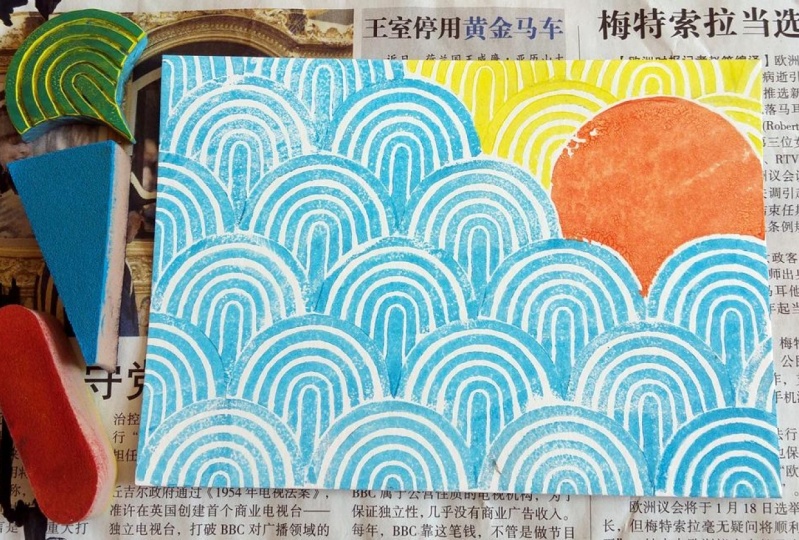
9. Print 1: Classic Monochrome: [MUSIC] I hope you're
ready to print. For this first pattern, we'll go for a classic
monochrome layout. I've chosen to print it
on a portrait format, but really it would work just as good on a
landscape format. Choose whichever you prefer. Here is our first pattern
that we'll print. There's only one card
on and the stamp will be printed in only
one direction; the tip pointing
towards the bottom. We'll start by printing the bottom rows and the
second one and so on. In terms of composition, you could go for an
overhaul pattern that fills the card or keep
some white space. If you do so, I think the
best would be to print either 2/3 of the
card like me or 1/3, but I don't recommend
to print half the card. I've got a piece of paper I'll print on already in position. Below, I've taped this
card piece of paper that is larger than my card
to protect my desk. Let's ink our stamp and print
the bottom-left corner. To make the alignment easier, I've aligned the
left and right edges of the stamp with the
bottom of the paper. Carry on, placing next to
the first print the second. Try to stay as
horizontal as possible. If you find it easier, you can also trace a guideline with pencils that
you'd erase later. For the second row, place your stamp as close to
the first one as possible. Don't worry too
much if there are some tiny overlaps of
gaps between two prints. Beware of inky fingers that
could ruin your print. Having baby wipes close
by comes in very handy. [MUSIC]. There we have our first
Japanese waves print. Now that you have printed
the first pattern, we will explore how we
can arrange the stamps differently to obtain a very
different look in the print. We'll also see how to
create different shades of the same code on only
using one ink pad.
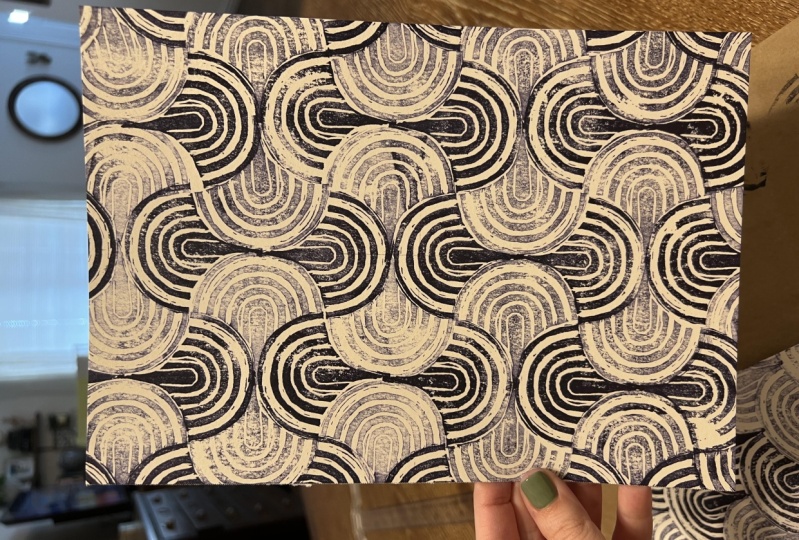
10. Print 2: Upside Down Two Colors: [MUSIC] We're going to print another whole patterns
with two tones of blue. To do so, we will print two
times without re-inking. By doing this, the
second stamp will be of a lighter blue color
than the first one. I think it add depth
and interest to your print without
needing to use several ink pads
and have to clean the stamps in between
using different colors. Here is what we'll
print in this lesson, an upside down overhaul pattern
with two shades of blue. To achieve this with
a single ink pad, we'll print try stamps
without re-inking. First, we'll ink the stamp
as in the previous video, print and get the
darker blue shade. Then we'll put a second
time to get a lighter blue. Let's have a look at
the composition now. The dark blue waves are
printed vertically. Once, the pointed tip
points towards the top, and once it points
towards the bottom. The row just above our stamps
have the light blue color, and they are printed
always entirely. Once the tip is on the left, and once it is on the right. It's important to remember
this when printing, and the easiest is to keep your reference picture to prevent from messing
up the pattern. Let's get started. First, I'll do guidelines
with a pencil to make sure that my first
stamp is properly aligned. As long as your lines are perpendicular to the
edges of the card, it doesn't matter where
you start printing. Grab a piece of draft paper as well because we'll
need it when printing. I'll keep this one
close-by for reference. I think I'm all set up, and I will start by printing
the first dark blue stamp using my guideline to make
sure it is well in position. If we don't re-ink this one, we'll have a light blue color. Hence, it has to be horizontal. Now I'm re-inking, and then we'll print a
second dark blue stamp. If you're not sure what color is left on you ink pad,
just re-ink it. You can use a scrap paper to
remove the first layer of color if you need to print
a lighter blue shade. You can keep going, keeping in mind which
color goes where. [MUSIC] I hope you've enjoyed the second way of
printing Japanese waves. I think the two patterns
we've printed are very different and yet they use the same single stamp and color. It really gives you
a taste of what is possible when you start
combining stamps and colors. Block printing is very
versatile and playful, and I know I completely
lose sense of time when I start exploring other
printing possibilities. In the next lesson, we'll talk about how to easily preserve
some white space so that you can add a
hand-written message to your greeting cards.
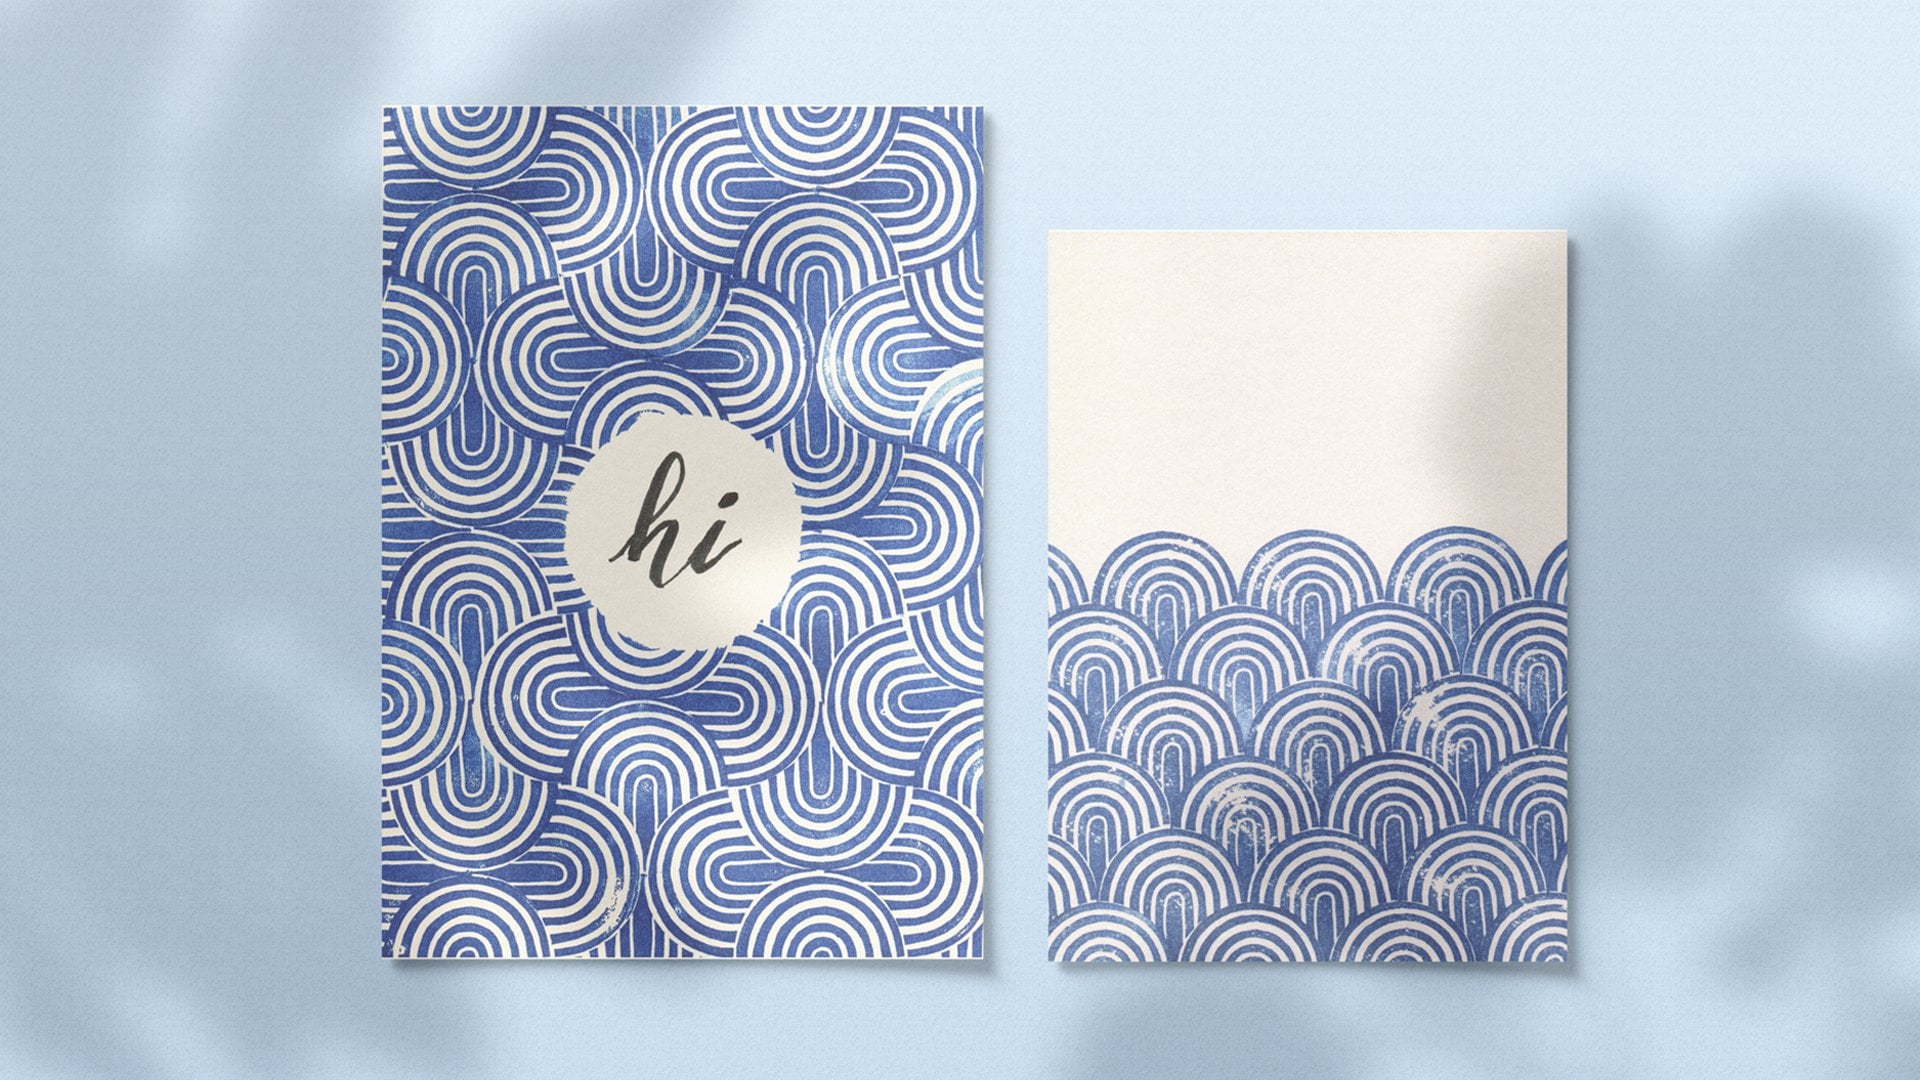
11. Print 3: Greeting card with Hand Lettered Message: In this lesson, we
are going to print a wave pattern using
the techniques seen in your previous videos and
use speaker masks to create whites pace where you can then
had unwritten message in. I've included in the class
resource several hand made written messages that you can trace over if you'd like to. I love this simple technique to mask some of your print
because you can easily create one of a kind cards or post-sales featuring your
favorite quotes or messages. To complete a project, you need to get in a
draft piece of paper a circle of diameter
5.5 centimeters. First, I'll taste the diagonals to mark the center of my paper. Plus wash your
tape on the circle cut-out and stick it in
the center of your card. It is the same pattern that so one we've printed
in the last video, but in a monochrome version. I will start by printing
the bottom hole. Once again, I use a card edge as a reference
to allowing in my block. Here, I have moved a
little bit at standpoint. It was already on the paper, so the ink I've smudged. I hope it will be okay, and I'll just carry on. [MUSIC] When you get to the holes
that will be printed both on the card and
on the paper mask, make sure to apply enough pressure on
the stamp so that it prints properly on the
edges of the mask. [MUSIC] Now that we've got the overall pattern printed, let's remove the paper mask. Here is a blank circles where
we can have the message. I would recommend to trace
guidelines to make sure your text is centered
and always on top. You can write your
own message or use a template provided if you feel more comfortable doing so. I always write it first in
pencil to make sure I'm happy with how it looks
before moving on to inking. Let it dry for a few minutes. You obey your guidelines
and your card is ready. Feel free to experiment
with different shapes and sizes of the paper mask
to create various cards. If you'd like to
make just name made look even more special, you can apply the
same techniques to create a matching envelope. So jumping in the next video for some beautiful name
made inspiration.
12. Bonus: Matching Enveloppe: [MUSIC] Here are some matching
envelopes I have printed. For the first one, I've printed an eight centimeters wide stripe of the monochrome
classic layout pattern. Here is the same, but
with two shades of blue. This one is more busy, and I don't like it as much. It features an overhaul
pattern with only white rectangular preserved for
writing down the address. For this lesson,
I have decided to go for stripe on the left on the envelope with
the same patterns and we've printed as
a previous lesson. What I'll do first is
trace a vertical line eight centimeters
from the left edge of the envelope. All done. My line isn't straight.
That's better. Place a piece of scrap paper
along the line you've just traced to make sure not to print to rest
of your envelope. You can tape it down with some washing tape to
maintain it in position. I'll just keep our card
close by for reference, and start printing [MUSIC]. Here is our beautiful
snail mail set friends and family will
be free to receive.
13. Final Thoughts: [MUSIC] I hope you've enjoyed the class and are proud of your greeting
cards and prints. Please show a picture
of what you have created in the project section. I would love to see
your cards and prints. I have included in the class resource
document a blank template of the same scale
shape we used to carve Japanese wave
stamp of the class. If you'd like to get started with your own stamp collection, it is an easy way to do so. I very much like to record in this class to share
about what I love. If you've enjoyed it, I would love if you could leave me a review in the
review section. It is my first Skillshare class, but I will be creating new ones related to block printings, snail mail, and hand lettering. Follow me if you'd like
to hear about them. We can also connect
on Instagram. My handle is @marie.mindthegap. Thank you so much for
sharing your time with me and happy
block printing. [MUSIC]
 Marie Le Moal