Transcripts
1. Introduction and Supplies You Will Need: Hi friends. How are you? I hope you're
having a great day today. I'm excited about sharing
this project with you. This is a drawing and
watercolor painting project that I designed,
especially for Kids. Students do not need to have any drawing or painting
experience at all. To be successful
with this project. I will guide students
step-by-step through all the steps
that they need to take. Today, we're going
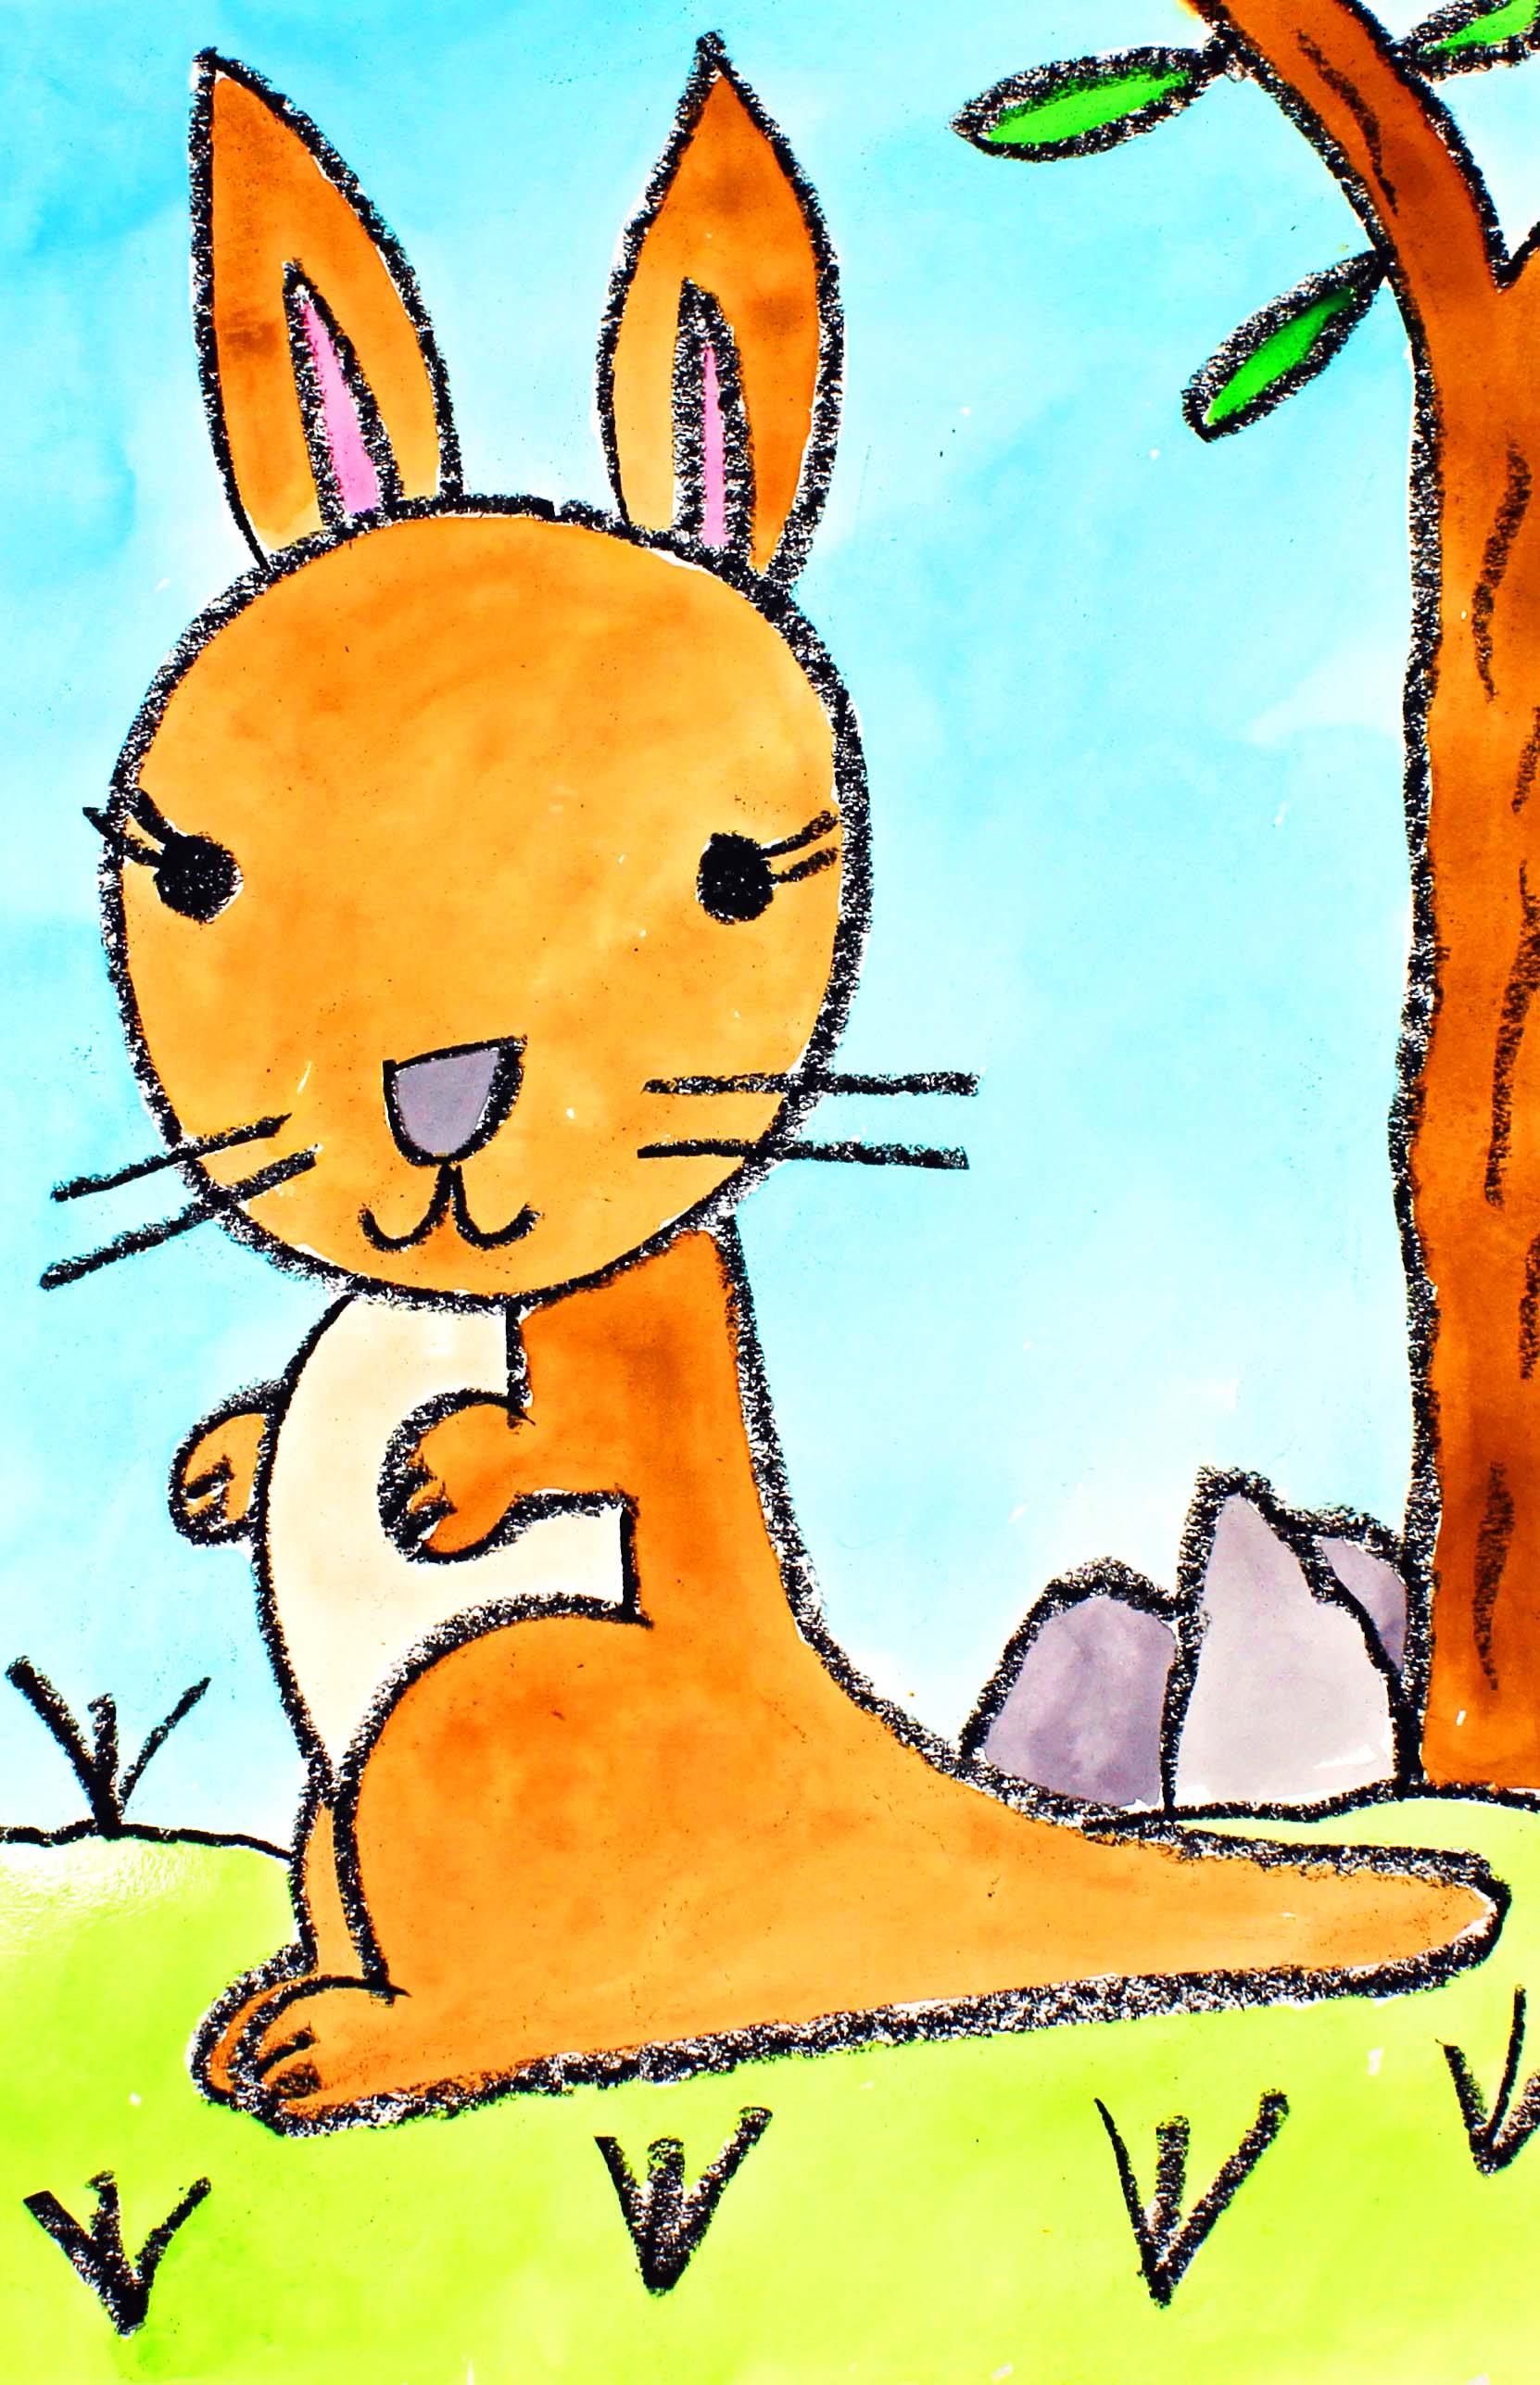
to be creating this cute little Kangaroo. Let's talk about
the supplies and the materials that you will
need for this project. The first thing
that you'll need is a sheet of watercolor paper. You will need a set of watercolor paints
and a paintbrush. You will also need
a cup horrible with clean water and a
set of crayons. You'll need a black crayon
or a black Oil Pastel. Either one will work just fine. And the last thing that
you'll need is a paper towel. So go ahead and gather all of those supplies and materials. And I'll see you back
here in the next video.
2. Step 1: Draw a Kangaroo Design: In this step we're going
to draw our design. So let's get started. The first thing that we're
going to do is pick up our black Oil Pastel
or are black crayon? I'm going to use an Oil Pastel. My Oil Pastel broke,
but that's okay. I understand that oil
pastels are really soft and sometimes
they break in. If they break, I
just say, Oh, well, I put the broken part back into my tray and
then I continue on. So I'm going to be using
my black Oil Pastel. So what we're going to do
first, those over here. What we're going to do first is we're going to draw a circle. The circle is going to
be about right here. It's going to be a
little bit to the left on our sheet of paper and it's
going to be fairly large. So I'm going to do that first. I'm going to Draw a
fairly large circle closer to the left edge
of my piece of paper. There we go. Now, remember when you're
drawing your circle, we don't want your circle
super small or super giant. We're just going to want our
circle to be pretty big. Okay? This is going to be the
head for our Kangaroo. Now let's go to the top of our circle and let's
make some ears. They're a little bit point T, curve lineup in
curved line down, curve, line up, and
then curved line down. Remember, if your
drawing does not look exactly the same
as mine, that's okay. We want your artwork to
look like your artwork. That's what makes
things interesting. Let's add a little bit of
detail inside of those ears. Then. Now let's move onto
the facial features. So I'm going to make some eyes, I'm just going to make
some circle eyes. And they're going to be pretty
far apart on my circle. I'm going to try to make
them roughly the same size. So it might take a
little bit of back and forth so I can make
them the same size. If there's a different
type of an eye that you'd like to make
for your Kangaroo. Go ahead and do that. Now I'm going to
make a little nose. So that's just a straight line
with a U-shape underneath. And then a little smile. There we go. You may
or may not know this, but kangaroos have eyelashes, pretty long eyelashes sewing, going to make some eyelashes
here coming out of the eyes. And they do have whiskers, so I'm going to
make some whiskers. There we go. Alright, now what
we're going to do is come down here and we're going to create a body
for our Kangaroo. So what I'm going to do
first is come out from the chin area and make
a slightly curved line. Then what I'm going
to do is I'm going to move over just a little bit. I'm going to make very
small straight line. And then I'm going to make
a curved line like this. It's almost like a letter C. Then I'm going to come over a little bit with
a straight line, a short straight line, a short line coming down. Then what I'm going to do
is I'm going to attach this line to this line
with a curved line. Let me show you what I mean. This is going to be the
knee for our Kangaroo. So I'm going to
make a curve line that comes down like this, goes past that line. And this is going to be
the knee for our Kangaroo. Alright, we're going
to stop right there. And then we're going to come
to the back of the Kangaroo. And this is where the back of
the Kangaroo is going to be and the tail is going to
come out over on this side. So we're going to come down. And then we're going to make
a curved line like this. Then we're going to
stop about right there. Now we're going to
come back over on this side and we're going to make up foot for our Kangaroo. So I'm going to
make a curve line. Then I'm going to
make a straight line coming all the way to the tail and then curve
around like this. So this is going to be the
tail for our Kangaroo. So now you can see we
have a hand and an arm. We have a knee, we have a foot. And we can make
some little fingers and toes if you can fit them. Then what we're going to
do is we're going to make another knee and foot
but on the other side. So it's going to follow along with that
first knee and foot. And then we need to make another hand over
here on this side. And that's just a
curved line with some little lines
in-between for the fingers Okay, so there's our Kangaroo. Now let's add a background
for our Kangaroo. So what we're going
to do is we're going to make some graphs. And that's just going
to come out from anywhere that you want from
the Kangaroo, his body. Then maybe I'll make some
grass over here on this side. And let's make a tree up here on this side of our artwork because we do have a little
bit of space. So I'm going to come up and I'm not going to make
a super straight line, but I'm going to make
a line that looks like a tree and then come out with
a little branch like that. Alright, now I'm going
to start at the top, come down and make a, it's kinda like a V-shape. So I come down and then I
go back up a little bit. If you have room,
you can do that. We're going to just
make some really long leaves on our tree wherever
you can fit them in, wherever you want to. I'm just going to make a few. Then if you'd like to add a little bit of
detail to the tree, you can go ahead and do that. So it looks like bark. Now, I still have
a little bit of space right here that
I'd like to fill in. So I'm going to make some rocks. So I'm going to just make some jaggedy lines
coming and maybe touching the tree and then some more jaggedy lines
to touch this rock. Then maybe a little bit more of a jaggedy
line right here. So we have our Kangaroo, we have our graphs, we have our rocks, and we have our tree. If there's anything
else that you'd like to add to your design, you can do that right now. For example, I think
I'm going to add a little bit of grass here. Those are just going
to be some V's with some lines coming out
of the middle of the V. That just adds a little bit
more detail to the Design. If you'd like to add some flowers onto
there, that's fine. If you'd like to add
anything in the sky, you can go ahead and
do that as well. I think I'm happy
with my design, so I'm going to
stop drawing there. And I'm going to show you
something on my hands. So you might have this
as well where you have some oil pastels
on your hands. That's why you have your
handy-dandy paper towel so you can get that Oil
Pastel off of your fingers. Not all of it will come off, most likely, but the majority
of it probably will. Alright? Alrighty. So
there's our design. When we come back, we will start
painting our Design
3. Step 2: Paint the Kangaroo Design: In this step we are going
to paint our design. So let's get started. The first thing that
we're going to do is we're going to add a drop or two of water into each
of our pans of Paint. And what this will do is it will soften up
our Paints a little bit so they are
easier for us to use. So I really do encourage
my students to take the time to take this step
because it really does help. Now that are Paints
or softening up, Let's turn our attention
to our design. So here we have our
cute little Kangaroo. And the Kangaroo is
sitting on some grass. We have a tree and
we have some rocks. Okay? So what we're going to focus
on painting right now is the Kangaroo and the
tree and the rocks. Alright, we're going to
start with a Kangaroo, which I am going to Paint brown. You get two, Paint Your Kangaroo any color
that you'd like. But I am going to paint
my Kangaroo brown. And this part of the
Kangaroo, the tummy. I'm going to paint
that a little bit of a lighter brown
and I'll show you how to make a lighter brown. Okay, the tree I'm going
to Paint brown as well. Green leaves and
some green grass. And I'm also going to
paint these rocks, and I'm going to paint them a light gray that I'm going
to make with my black paint. I'll show you how
to do that as well. So let's start by making
some brown paint. If you choose to use
your brown as well. I'm going to put some water into one of my wells. Here we go. Quite a bit of water and then a little bit
of brown Paint. Then I'm going to
test out that color, see if I like it. Oh, perfect. Actually maybe a
little bit darker. There we go. Sometimes
it takes a little bit of experimentation when
you're creating Art. And just keep creating, keep experimenting until you're happy with your pink color. Here we go. So like
I said before, I'm going to paint my
entire Kangaroo brown. And then the tummy
of my Kangaroo. I'm going to paint a little
bit of a lighter brown. And to do that, I'm just going
to add some more water to my brown paint in
that will create a lighter shade of brown. Alrighty friends. So now I
have my Kangaroo painting. I'm going to add a
little bit more water into my brown Paint and that
will create a lighter brown. And that's what I'm going
to use for my tummy. So it might look
really light to you. I can see that it's a
light brown or tan. I hope that you can
see that as well. There we go. Now what I'm going to do is I'm
going to paint this tree, and I'm going to paint
the tree a darker brown. So I'm going to add
some water back into my well with my brown and then I'm going to add
some more paint. And remember, if you would like a darker shade of a color, then you just add more
paint and you just keep experimenting until you get
the color that you want. Alrighty, there we go. So now we have our Kangaroo
and our tree painted. Now I'm going to paint my nose. Let's see. I'm going to
paint my nose probably gray like the rocks and
the inside of the ears. I'm going to paint a light pink. Alright, so now I
have my pink ears, inner part of my ears. Now I'm going to paint
these leaves green. Now I'm going to paint the nose and the rocks a gray color. So I'm going to add
a little bit of water into one of my wells. And then I'm going to
take a tiny bit of black. Just a tiny bit and
create a gray color. Yes, that's nice. Alrighty friends. So I
have painted the nose gray and the rocks gray as well. In our next step, we will be painting the
background and the grass. So I will see you back
here in the next video.
4. Step 3: Paint the Background: In this step, we are going
to Paint the Background, we're going to paint the sky, and we're going to
Paint the grass. I'm going to choose
to paint the sky blue and the grass green. But you get to choose
the colors that you would like to
paint your painting. So I am going to prepare a
little bit of blue paint. I am going to add some
water into one of my wells that you can see that. Then I'm going to
add some blue paint. I like this light blue
color for the sky. And then I'm just going
to start painting. I'm going to try to
stay inside the lines. I'm going to know and understand
that if my paint starts running around with the
other colors, That's okay. That always happens with
Watercolor Paints because that's just the nature of this type of pain and
that's what it loves to do. So it might do that with me, and it might do that with you. Alrighty friends. I'm finished painting my Kangaroo Design. I had a lot of PFK-1
teaching you this project. I hope that you had FUN as well. I will see you next time.
 Em Winn, Teacher, Art Instructor, Artist