Transcripts
1. Introduction: Acrylic paints are
water-based paints, which use acrylic polymer
to bind pigments. They are faster to dry than oil paints and don't
require solvent, which makes them convenient, quick to setup,
and easy to grip. Also good results on
variety of surface. Advantage of acrylic
paints are water-based, which means they can be
thinner with just water. No toxic spirit are required. In addition, wet
paint brushes can be easily wash with
soap and water. Many people love to paint
with acrylic paints because its durability,
adhesive quality, and low toxic acrylic is a great for craft classes
and mixed media work. Acrylics or not, a high
maintenance medium, need only for supplies. Start your acrylic paintings. Paint itself, a brush, a cup of water, and a common surface
like Canvas, wood or paper that you
desire to work on it, you can control its
consistency and texture. One of the most
significant aspects of acrylic is how
malleable they are. Acrylics allows you to maintain anywhere you can take
outside to paint, or you can also paint indoor. Even in your kitchen. They are very fast drying, so you can do layers
of colors quickly. Colors and texture is built
up over subsequently, lives can get the
effect of something like an old master painting
in the fraction of time. Hi, my name is showing up. In this class we
will be playing with acrylic paints
that some brushes, some things and come
and play along with me.
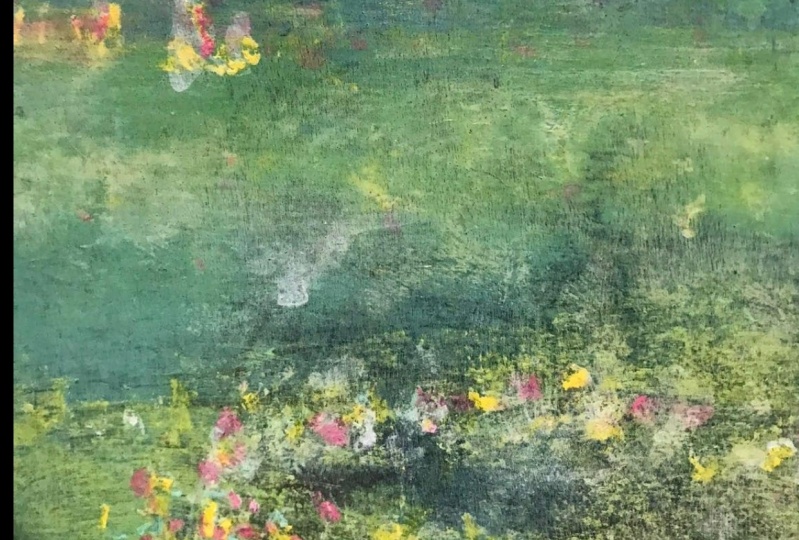
2. Lighthouse: In this painting, we are
using all these colors. This is acrylic colors and we
are doing acrylic painting. Our base is with wood. Wood and it's round shape. It's a seven inch one. So here I'm using heavy body, white, brown, burnt
umber disease. And this is brown, yellow. Here we are using
some craft paints. Apple Barry reading,
read, navy blue, and bright blue, and of
course black as well. Using some different brushes. Palette knife will be using palette knife and flat
brush, some fan brush. To blend. You can use a
bigger brush as well. You can use for texture,
some texture brushes. And of course we will be needing one regular brush to do all
small stones and some trees, some grasses here as you see. So let's start with that. I'm just applying the
paint directly on my wood and blending it
with the palette knife. No, blending it with the rough
soft brush, sponge brush. I use my paint on the side and not using any
palette right now I'm making some water with a palette knife and also adding the
same white for clouds. Adding some stones
with the brown, adding more white for
making lighter brown, adding black to make
a darker brown. Some yellow ocher added as well. And this is the rock, so there are different
shades of brown. So it's very easy when you have all the colors down there
and you can mix it, make it lighter or darker, add some yellow and
maker Sandy effect. And I'm using comb here, but you can also use fork. I'm drawing lighthouse as you are seeing this with
a very rough pencil. And I'm going to paint
with my pencil as well to give some depth. And I'm also using
a very small brush. It's easy to make outlines, adding some colors to it, making more whiter that, and keep on adding more colors. So enjoy the whole process. Well, I'm adding some
green colors to give small tree and small
bushes or lower. I'm adding with the fan brush
some detail grass effect. So it's very easy when you use your fan brush just
to be the tip of the brush and it will give you such a beautiful
effect of some grass. Was not satisfied
with the lighthouse, so I added more
white color and as I go I'll make more
detailed outlines. And I will keep on
adding the colors. Because all done, this
beautiful painting is ready.
3. Hot and cold: This painting is
called hot and cold. We're going to use
acrylic paint. You use some warm colors here. In colors here, we
have white, black, and as you'll see, we're going to use
different brushes that we already used in. You're going to use almost
similar in all our paintings. Around grows flat brush, fences, big flat brush and a
texture brush of course, to make some dots and
some lever effect. I do also do it with the tip of my pencil as you see
a lot of paint here. And I also use my
back of my brush to make some dots as
visa scene painting. Let's start. As you see, I have
started drawing just very random abstract face, not doing any details. So there is a color
that I've chose, one with the warm color
and one with a cool color. So I just wanted
to depict a day, night probably and give
the water effect and sunset effect by the sky that I made background
as dark black. So come along and see, let's think now adding black color and started
from the center. But I would like to do it
the bigger part first. So I'm doing the background. Background is full black. I'm just spreading my
paint on the wood. So as you'll see now I'm
adding more colors to it. And slowly I'm going to blend it and make a beautiful effect. Home color is almost done. Now I'm going to start
doing cool colors. But before you add
blue, wash your brush. Because a red or yellow goes
into blue becomes pale, purple, red and blue
becomes purple, and yellow and blue
becomes green. So we don't want those colors. So make sure you wash the
brush or change the brush to make blue water. Let's add some blue and
white to create water. Like a beach look different shades of water
you can create very easily just by
blending fellow blue, red, blue, and white. Now we will also add towards like water
is spreading over. As you see the beach, how the waves comes. I just wanted to create
very light kind of scene. So the family is going to walk. You can see we
will start drawing some just very
simple stick figure. Kind of a man, woman and a child
walking through with the liner brush, making some brunch
with black color. And we will add pink
and white flowers. This is what I'm drawing
here, the stick figure, as I told you, the whole
family, I created men. And then there will be a good
close by with a long dress. It's very simple,
very, very simple. There is no details.
You can create. Anything. You don't like. This. You don't have to, but it's all imagination. And there is no limit
for imagination. So be creative and
add as you like. It's some routes
toward the men's side, the warm color and trying to make it not
very much visible, but a blend them. Now we'll add some flowers. As you see. I'm adding orange, some pink, some white
with the texture brush. Just a flat, rough brush. It's dry brush, don't
take too much color, less will be more. Here I'm adding moon
and sun effect. As you see at some half towards
the head kind of branch. And add some yellow
flowers tools that you can just add some black to depict. It's a shadow. And
some nighttime. Blending with the dry
brush is no much color. And trying to fix
the face. Alden.
4. Pink Rose: Let's create beautiful
sky and rose flowers field that's bunch
of rows flowers with the different shades of
red, yellow and pink. To make pink color. Sometimes I blend red and
white to make a pink color. For you don't need
all the shades. You can make lights colors, blue with the navy blue
and white at purple with white to make all these
shades as you will go and you will see
it in my video, how I added different shades and created this beautiful sky. Look. As you see here, all the small, small
leaves you see, there's a blue underneath. There's a darker green. There's a lighter green for the new leaves that
is coming here. You will see much
varieties of the shades, which I have not got all the
sheets by taking from here. I created a few shades
by blending them. Green and yellow mix. Nice, lighter, green shade,
that looks beautiful. So as we go, you will see that there will be more shades appearing
as we mix the colors. So these are the brushes
we're going to use it. And it's not about
what I'm using. It's all about what you have. Pull out your colors, pull out your brushes, and see what do you,
what is available. You don't have to do
exactly same color rows. If you don't have red and white, you can use some other colors and just create a beautiful
scene, what you like. So let's start
making our painting. Let's add blue color for
shadows as a leaf shape. And then I'm going to add green color on the
top of blue color. Mix. Green color with a yellow
and make a lighter green. Add red flowers just
like a opposite leaves, like two leaves together. As us to show the flower effect. Now take white and
make us water on the top with the pencil or with the liner
brush you can do, I'm using pencil tip to make
a swallow with white color. So it's becoming pink. As you see how beautiful
this is looking. You can see the several sheets. Now add some red
to green and make dark green and reddish
shade of leaves. Add some small dots and dashes to show the new
flowers on the top. And add a stem to it. Add some leaves as well. New and bright leaves. Adding some small leaves. The more bright color, and yellow and blue
and yellow and green, and yellow and green and white. To make lighter shade of
leaves, fresh leaves. On the top. It is important to put
darker underneath so you can see more dimension of
your lives as you go. Then.
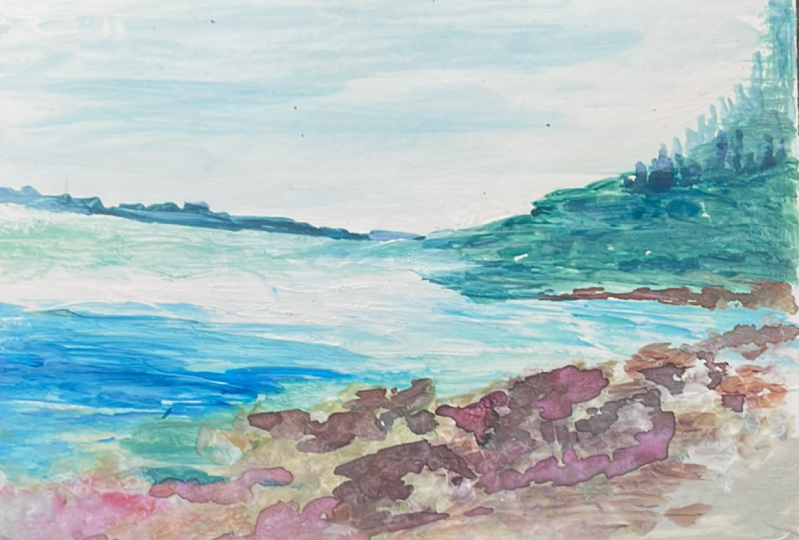
5. River and Mountains: Let's make some
mountains sky in a field of flowers with very
limited palette. Yellow, I love teal color, navy blue, white, and black. We have used a similar brushes. We're going to use the
similar brushes again. And let's begin. Here we are adding some
white, yellow, blue, and teal color, spreading
slowly with the palette knife. With the lighter color first, slowly spread. As you go down. Blending and spreading
is very important. Blend it very gently. As you see, blue is
mixed with the yellow. How nice the green
color is appearing. This is dry brush technique to there's no color on my brush. I'm just blending the colors
what I have put it before. And darker blue and
make Mountain add white to give the tip and
the shadow of the mountains. Gradually add all the
colors green, yellow, and blue, to show different leaves and
highlights on the leaves. Now I enjoyed the whole process. With the sponge brush. I'm adding some leaves and with the different colors in
between to give the dimension. Add some yellow to give some dimension to
show the flowers. Now adding more green
and blues to show like there's a small trees and the leaves on the mountains. And by the water. Now add a small drop to
show the small flowers.
6. Mermaid & Ariel: This is mermaid and
a real painting with the bag around the galaxy look. And my roommate is water
and Ariel is purple. So if you have used flat
brushes, pencil, Sponge brush, and white gel pen, here I have used
neon acrylic paints. Pink, neon purple, pink, blue, teal white, and pink. Let's start with work. Here you see I'm
drawing outline. I put straight my
paint on the canvas. This is canvas
board eight by ten. And I'm going to
do all my outlines for this is Mermaid
and areas together. I want to create one
picture with water. Inside the water. They release floating or
swimming, you can say. So after I do my outline, I'm going to apply
the paint all over. This time. I'm going
to take more water on my brush and spread
the blue color all over. I added more water
because I wanted a water effect and I diluted
my paint with lots of water. So it looks like a watercolor. More water this time, even we are using acrylic paint. You can add lots of water to it. So this is a
different technique. I'm going to pull out my paint after I spread
all over blue color. And I'm going to take a napkin, dab it on the top of it, and it will come out. What is dry? Will not
come out. What is red? It's going to just see how
the color came out and gave the napkin effect
on it. A little design. You can pull out some more
paint if you'd like to. If you I think this
is fine for me, but if you want to take it out, take a wet cloth and rub this acrylic
paint will come out. But after if you do too much
dry, it won't come out. So now I'm taking
a palette knife and taking my paint straight. I'm adding some blue towards it. And it will give you
the cracking effect. So you see the green, blue, white, and teal color together. And I'm just spreading
out with balanced life. As you see, I have put it blue color that act on my canvas. And I'm going to spread it
out and make a background. While you are doing. The front face. Scores slow so you don't mess up all the features of the mermaid. Neon or people with dry brush
and blending with the blue. I want my background
as in Galaxy. I'm going to add some
white and yellow dots. I'm trying to blend the
neon with white and yellow to given
effect of galaxy. Just blending when it
is a little bit dry. I'm using my dry
brush to blend it, not adding any color, just rubbing the paint,
whatever was there. Add some neon pink
and neon purples. Just a few drops. And we have to have a
dark blue underneath. I'm spreading,
adding some dots to create a beautiful galaxy
look. So follow along. Add white and a dry brush. I'm very little to
give some stars. That barbel to area blended with pink and purple. And I'm also adding
some white bubbles. Just do the dry brush
technique. Very simple. And white dots all
over the areas, but all the details of Ariel and Mermaid with water and Galaxy. Beautiful background with pink, purple and blue,
but lots of stars. So as you see how
colorful it is.
7. Green and Blue Northern Light : Let's make beautiful
northern lights very famous. There's a girl on the scooter, the top of the mountain,
watching the star. Some more mountains here. And beautiful northern light. To create all this not
enlight, we used blue. This is the brilliant
blue, yellow, navy blue, neon green,
white, and black. Few brushes, flat
brushes we will be needing and some brown brush, pencil to draw this plot, whatever you have, I have used these brushes and these bits. So let's begin at blue, green, white, yellow, and blue. Spread with the lighter
shade will go towards up and blend the colors slowly, adding green and yellow
and blending with white. As you see. Now we have blue upwards in a slanting with and if you have some extra, pull it out and blend it slowly. Going to add one more
line of blue in between. To give some dimension. Slowly blend it out. Take some blue and blend. Blend with the yellow and see how many
different shades you got. That's the whole beauty
of adding darker shades. And these are the
heavy body paint. Few bluer. Now I'm making a
lighter shade of mountain, just making under painting right now we are not
doing the final, It's an ugly stage. But slowly and gradually we will build the mountains.
Follow along. Add white to give
some dimension. Again. Like a mountain. I'm trying to create mountains. Add some dark and light
shade in-between. To create the Northern
Lights, adding some white. And I already have
blue in my brush. So there isn't a
mountain effect. And slowly blend. Add more blue, some white and black. Trying to make small triangle
shape for mountains. And blending them. Right now it's an ugly stage and slowly you will see how
I've built up mountains. So just play with the paint and slowly and gradually
you'll get it. At some stars. Spread the paint or debit. With a texture brush, gentle hands and white on
the tip of the mountains.
8. Light Scene - Rapunzel: Let's create beautiful scene
from a movie Robinson. There is lot of
lengthens, lights, trees, and lake,
the proper color. So we're going to use the same acrylic Apple Barrel paints and yellow, navy blue, neon, purple,
pink, white, black. For this, we will be using
several different brushes, palette knife, flat brush, texture, brush, of
course, pencil to draw. And yeah, that's it. Let's start. We have blue, pink, white, and lending as with the
palette knife burst and with the sponge brush, now we have pink
and white making this circle in the center. And adding some yellow and pink. I'm going to make like a water just putting some shades
of blue, yellow, white. And we have already
purple there. So we're going to blend it out. Add more white. Metallic life. That's some yellow as well. Adding yellow for
lengthens with valid type, just putting like a long dash. That's all. It adds some
yellow and pink to make a corner and keep
adding more shade. What we did was underpainting. And now we are doing our background with blending
with the same sheets and added more water and lengthen
and then differentiate. But it's the same method. Draw a book and the pencil
with the long hair. And also draw friends
sitting close to some light in your
Lenton and pink and purple. To make water. I added few
trees in the background. That's some more purple. This is, this painting
is more neon purple. That's how the effect
of shows in the movie. So we are trying to depict that. And we need lots
and lots of light. The trees are having lights. And we're going to
add more white and yellow to make detail
for our lengthens. Add some dots to show
star in the sky. Yellow color, the pencil
to make long hair. No. Spread it out and do
some details and the bulk. Add some blue in
between the trees. Make gasoline. Just a rough drawing. And add some darker shade
and added lots and lots of dots to show the light, the reflection in the water. Now add more stars. Small lots with the
back of the brush. In this painting, I have done
several layers, background, foreground, and lots
of details as you see. By adding small dots with the tip of the
pencil with yellow, white color to show more, more and more light and some
more details on the castle. And I really liked this effect. Almost done. Then.
9. Under the Sea: Let's make underwater scene. As you see lots of fish, looks like a whole fish
school is going here. There's lot of different colors. Very seaweed and water
and dry brush technique. You can see here
the same colors. We're going to use. Yellow, red, orange,
and black, white, neon green, and a blue to
create this beautiful scene. And it is more of a
dry brush techniques. So let's learn how to do it. Let's start painting
under the sea. We have blue color, white and yellow,
neon green as well. I'm blending with the
night first and then I'm spreading slowly with
the sponge brush. I have one small brush and
one Ben, white gel pen. I'm going to do outline and
make to school but drives. Let's fill the color dark blue. Now, I'm adding
some water florals, making very gentle
hand water swirls to show that water bubbles are
coming from scuba divers. As you see, I'm only taking
very little paint and slowly, slowly, I'm going
to do some swirls, which is going towards the gentle hands
to show that there is some water running
by or some bubbles. Now I'm adding a few
lines from the center, which is going towards
down to indicate some light is popping from the top and gently
spreading down. I'm going to add some
more paint from the side, from the tough coming to
us down to show light. And now I'm doing
with the tapping with the soft sponge brush and
making some lines. For light. Now, add lots of fish and some bubbles to
show under the sea. Like a whole school of fish. I'm going to make some
more dry brush effect with the water for water. And as you see, there's lots of
lots of fish there. And I'm adding some
small dots and bubbles to heal under water affect all the fish is
done with a white color. I'm also going to add some
Ctrl C Ctrl seaweeds, green, red, yellow, and blue. I'm just going to add some more depth for
the scuba drivers. As you see, there's lots
of small dots there. The red, yellow, and orange. Also white. Now let's make some
seaweed with neon green. Just making some grassy effect. It looks like seaweeds. Very simple method just starts and dabs with the colors we are doing to undersea some codons and leaves and lots of fishes. Also added some more
dry white color to give an effect. All done.
10. Flower Girl: Last but not least, we are making acrylic
paint painting on canvas, eight by ten. Here I'm using acrylic paints. This is equal green, white, rose pink,
and dark green. You're going to draw and paint in a very
simple technique. We have pencil and
few brushes here. And see it is very
easy technique. Let's start. I'm just making a flower and a U-shape metaphase when shoulders again making
a flower some leaves. In a very abstract
and freehand drawing, it's very easy to
make some flowers and leaves around the body. So we're going to use
all these colors. Just put renin white and I'm blending
with the soft brush. I don't want it to
be just plain white. I'm adding a rose pink color, making outlined what
we drew just now. And just filling up the colors in a very
simple technique. Anybody can do this,
it's very easy. Now I'm using small
brush to make leaps and some outline of the face and adding some color on the side
of the cheek bones. And now I'm continuing with my flower and
filling the pallor. As you see, cheekbones are dark. I'm adding some white
color to blend with it. The sides and under the chin. Getting some shapes
for the flowers. Adding some white
inside the flower. Only putting some dots and apps. That's all I'm making
anything details? Making outline of my shoulders, outline of the stems
and leaves and flowers. And as you see,
it's very simple. Just doing over my drawing. What I did just
now add some white to the pink and made a few
shade of lighter pink. And let's do the leaves with the dark green
or queen we have. The way to make
leaves is very easy. If you have a flat brush, do it slant and just
drag the brush. And you'll be able to make
a different shape of leaf, press it and pull legs down. Connecting the dots and lines, the flowers to give
some dimension. And this very easy to
have a liner brush, even marker can work for that. You just have to connect. Adding, reshape the flowers. One more flower, few more here and there,
wherever you like. It's easy to make leaves. Just press and pull
towards down and connect. One more. We'll make it here. We lose some details on flowers, white color and making lines to show the, whose lot of petals. All done. I hope you like it. There's so many
different techniques. Try which one,
whichever you like, and create your imagination.
 Shalina Chranya