Transcripts
1. Introduction to this Class: Hello, everyone. My name is Robert Marcelo and welcomes my class Dynamic anatomy for artists. Muscles of the legs in the first few lessons will take the time to illustrate the leg from the front. Back inside positions in these lessons, jeweler in the terminology of the muscles as well as the major forms and landmarks you should try to commit to memory. Remember, you also get copies. All the art files to study and follow along with in the next few lessons will utilize what we've learned thus far creates more dynamically poses. Then in the next few lessons will illustrate and talk about the differences from male to female legs and will also create examples of the front and back pelvis and talk about that as well. I hope you find these lessons to be informative. And I'm here if you have any questions, so don't hesitate to reach out. I can't wait to see what you come up with. Thank you very much for considering this class and more contents on the way. As always. Keep drawn. Keep em fun and I will talk to you soon.
2. Various Drawing Methods: all right. So before we start drawing a leg in the different views on been talking more about the anatomy of the terminology, I want to first explain to you that there is really a couple different ways. I would say three major ways that I look at drawing parts of the body and so probably the first, the first that most artists are gonna be taught and, you know, start to adapt his the sterile metric approach. So a sterile metric approach is basically just a very structured approach. It could be blocks. It could be cylinders. The beauty of this is allows you to quickly map out perspective proportions on make changes quicker. So, for instance, if I was to take the foot here and attach it with a wedge like shape and really would require a couple because it comes out at one angle and it comes out of another angle And so if I'm gonna make changes to this, it's a lot easier to make changes right now. Based upon what I have here in front of me, it still has a look and feeling of dimension, but I can easily edit this where, after apply all the anatomy. It becomes a little bit more difficult for quite a bit more difficult to make the change of something like orientation of the foot. So we have to remember as we rotate the foot towards the viewer or way at a different angle . The knee goes with that for the most part, and then obviously wants the knee rotates outward or inward. The anatomy follows, so it's all you know. It's all connected, so we have to be aware of that S O. That's where maneuvering things in this blocky, basic, primitive way could be a real time saver. I also find it to be easier if I'm having a difficult time trying to figure out a perspective or even a piece of the puzzle. I find it a little bit easier to draw things like this to the side and then adapt that information. No, I can see that applies to everything, really. But it really applies to basic perspective and shapes on then. Likewise, you can learn to train yourself to do that with more advance anatomy and any number of things. So this would be the idea of the sterile metric approach. Again, it's very good for getting that comfort level of those most perimeter shapes and initial forms. Now the next one is really just kind of silhouette drawing or perimeter shape drawing. So it's it. This comes a little bit more with practice, but you really want to try coupling these together. So I don't really think it's one of the other ones. The right way one's the wrong way. I think it's combining all of this. Eso this. This could be good if your you know a little bit better and noticing certain parts of the body and their relationship to one another. So, for instance, one that really stands out for me on we'll talk more about. This is the relationship that you get from the sartorius. It comes down in the tibia right here, and you see this kind of elongated kind of s hook eso perimeter shape Drawing can be a little bit easier, and you see it's more in the interior of the late, but it it's a reference point that makes the perimeter shape drawing a little bit more effective. But if you're good at really spotting silhouettes or spotting the flaws in the silhouette, then you might want to, uh, utilize this one as well. So it's It's kind of just drawing that primitive shape and then making adjustments askew. Go again. I feel like this is something that does require a little bit more practice. Um, but throughout these lessons, we're gonna be using a little bit of each. So just like that, we've got more of a silhouette. You can practice painting these in as well. Some people do really well with a nice big salad brush and then drawing in the civil wet and then working into the interior details. Now the last one is kind of starting from one area and then working out okay in the body can can actually be pretty effective to do this at times because everything is connected and everything has a relationship to its neighboring muscle or bony landmark. Whatever. So So, for instance, it may seem like this would be pretty difficult to do, but it's it's helpful in certain parts of the body. So one that comes to mind is the quadriceps. They look like this big upside down or not upside down, but it just like a big teardrop. Okay, so if you take that big teardrop, and then you cut into this. You have the fastest media, Alice, the latter, Alice. And then the rectus femoris is kind of another upside down teardrop right there. So really can pictures all three of these. His two drops into that one larger teardrop and then the inner leg. Same thing. It can kind of be perceived as a teardrop. You can really attach all these in that way. So you got the outer portion of leg like that, and then at the lower portion of the knee, it comes in. Remember what I just said about that sartorius coming down? We can use that. This is the tibia here. You got the gas track name IUs, which looks like a bit of a diamond like shape. Or maybe like a football or something like that. And you have the soldiers, and you could really just keep piecing this together. So this is another way to kind of think about this, and some people get really good at just this method. Here, Uh, you get the patella, the tibia, Allison, tear that comes over like this. And obviously we'll cover all this terminology and the next lessons. But I just want to give you some food for thought as we get to those inside ankles higher on the outside and again, just kind of piecing together the puzzle. All right. And there we go. So there's again. This is more of a, you know, piece by piece. Uh, construction of it still relatively the same night. Not identically. Uh, and again, I don't want you to think of this is 11 way over the other. It's it's kind of a collective way of thinking. I think that there's times where it's very effective to use each one of these. And also, you gotta remember that some days you're you know, you're gonna have this event flow going on and you're just gonna be drawing better. Other times you're gonna struggle a little more, and I always feel that that's when you jump back to your fundamentals or you change the way that you're doing something. So, for instance, you start to struggle because you're in this kind of rod or something like that. And sometimes the best way to fix that is to, you know, break that run in that mentality by doing something new and inventive. So maybe just switching up the method in which you create now one last thing and then we'll jump into the actual lesson, started doing these breakdowns and talk about the muscles and the terminology, not fun stuff. The other thing I wanted to think about is that the leg isn't so up and down. So as I studied these, I want to adjust them. But I have to fight that urge. But I just want to explain this initial process to you. You know, the upper leg needs to be larger and taller on this example of the right, and I want to get in there and edit things. The main thing is, if you do adopt the sterile metric approach to the left here, remember that the body is not stacked. It's not a bunch of stacked blocks. So always, ah, feel a bit apprehensive to teach the blocky process a sterile metric approach because I know what it does to people's thought process. When they go to illustrate the human figure, they get a very stiff happens of myself. I fight this all time. You don't want to get overly stiff feeling now, the beauty off. What? I would consider this one on the right to be more of rope drawing. You know where you find an area and you kind of flow through it. You kind of connected all with these flowing lines. You're going to see a lot more of this and, you know, figure drawing, you're gonna get something, looks and feels more organic and has a more fluidity to it again, their strengths and weaknesses of each. But the main thing is that you think about the body, especially the legs is not being stacked components and you think about the rhythm and the balance. So So let me show you if we have we illustrate this to the side. We draw the pelvis, The pelvis has a bit of an angle. It's not. It's not simple is drawing it straight up and down like this. And actually, we'll do that. We'll just do the comparison. So if you were to draw the pelvis with a square like this versus una tilt and then you draw the upper leg, you draw this very, very blocky, very basic, and you just get these initial forms in place and oven attaching the foot. You probably wouldn't even know this is a lake, right? By the time I had the foot, maybe you get a better understanding. That's a leg. But up until then, it was pretty hard to read, right? So now watch the difference. I'm pretty much utilizing the same shapes, but I'm gonna bring this back but of a tilt. Bring this one straighter. I'm actually gonna need to add a little bit more than just that. But it's already It looks more natural. Looks more like, you know, posture. But also, what I would do is is that something like this. So I really wanted to be evident that there is a back and forth rhythm that you get. And even though I'm using these very blocky stare a metric shapes, I still want to think about this rhythm because a Zion illustrate the leg, especially on afford facing shot. I need to remember these things, and that needs to be evident in my work. So obviously not something that straight up and down and stacked, but rather a bit of a back and forth rhythm. Okay, so this is you know, this is how we distribute the weight in the balance, through the through, the legs, from the pelvis to the the ground plane here. So again, it's kind of paying attention to all of us. So I just wanted to give you this initial warm up really practices. Another great practice activity To get you started is trying to draw as many late poses you can just with these basic building blocks, even study figure drawing and a photo from life and then converted to just ah, very sterile metric and building block approach in them. Practice overlaying the anatomy on top of that. But you should be able to construct lots of different poses in this very simplified way, which will help you out a great deal. So with that, let's stop right here, head over to our next lesson and continue on.
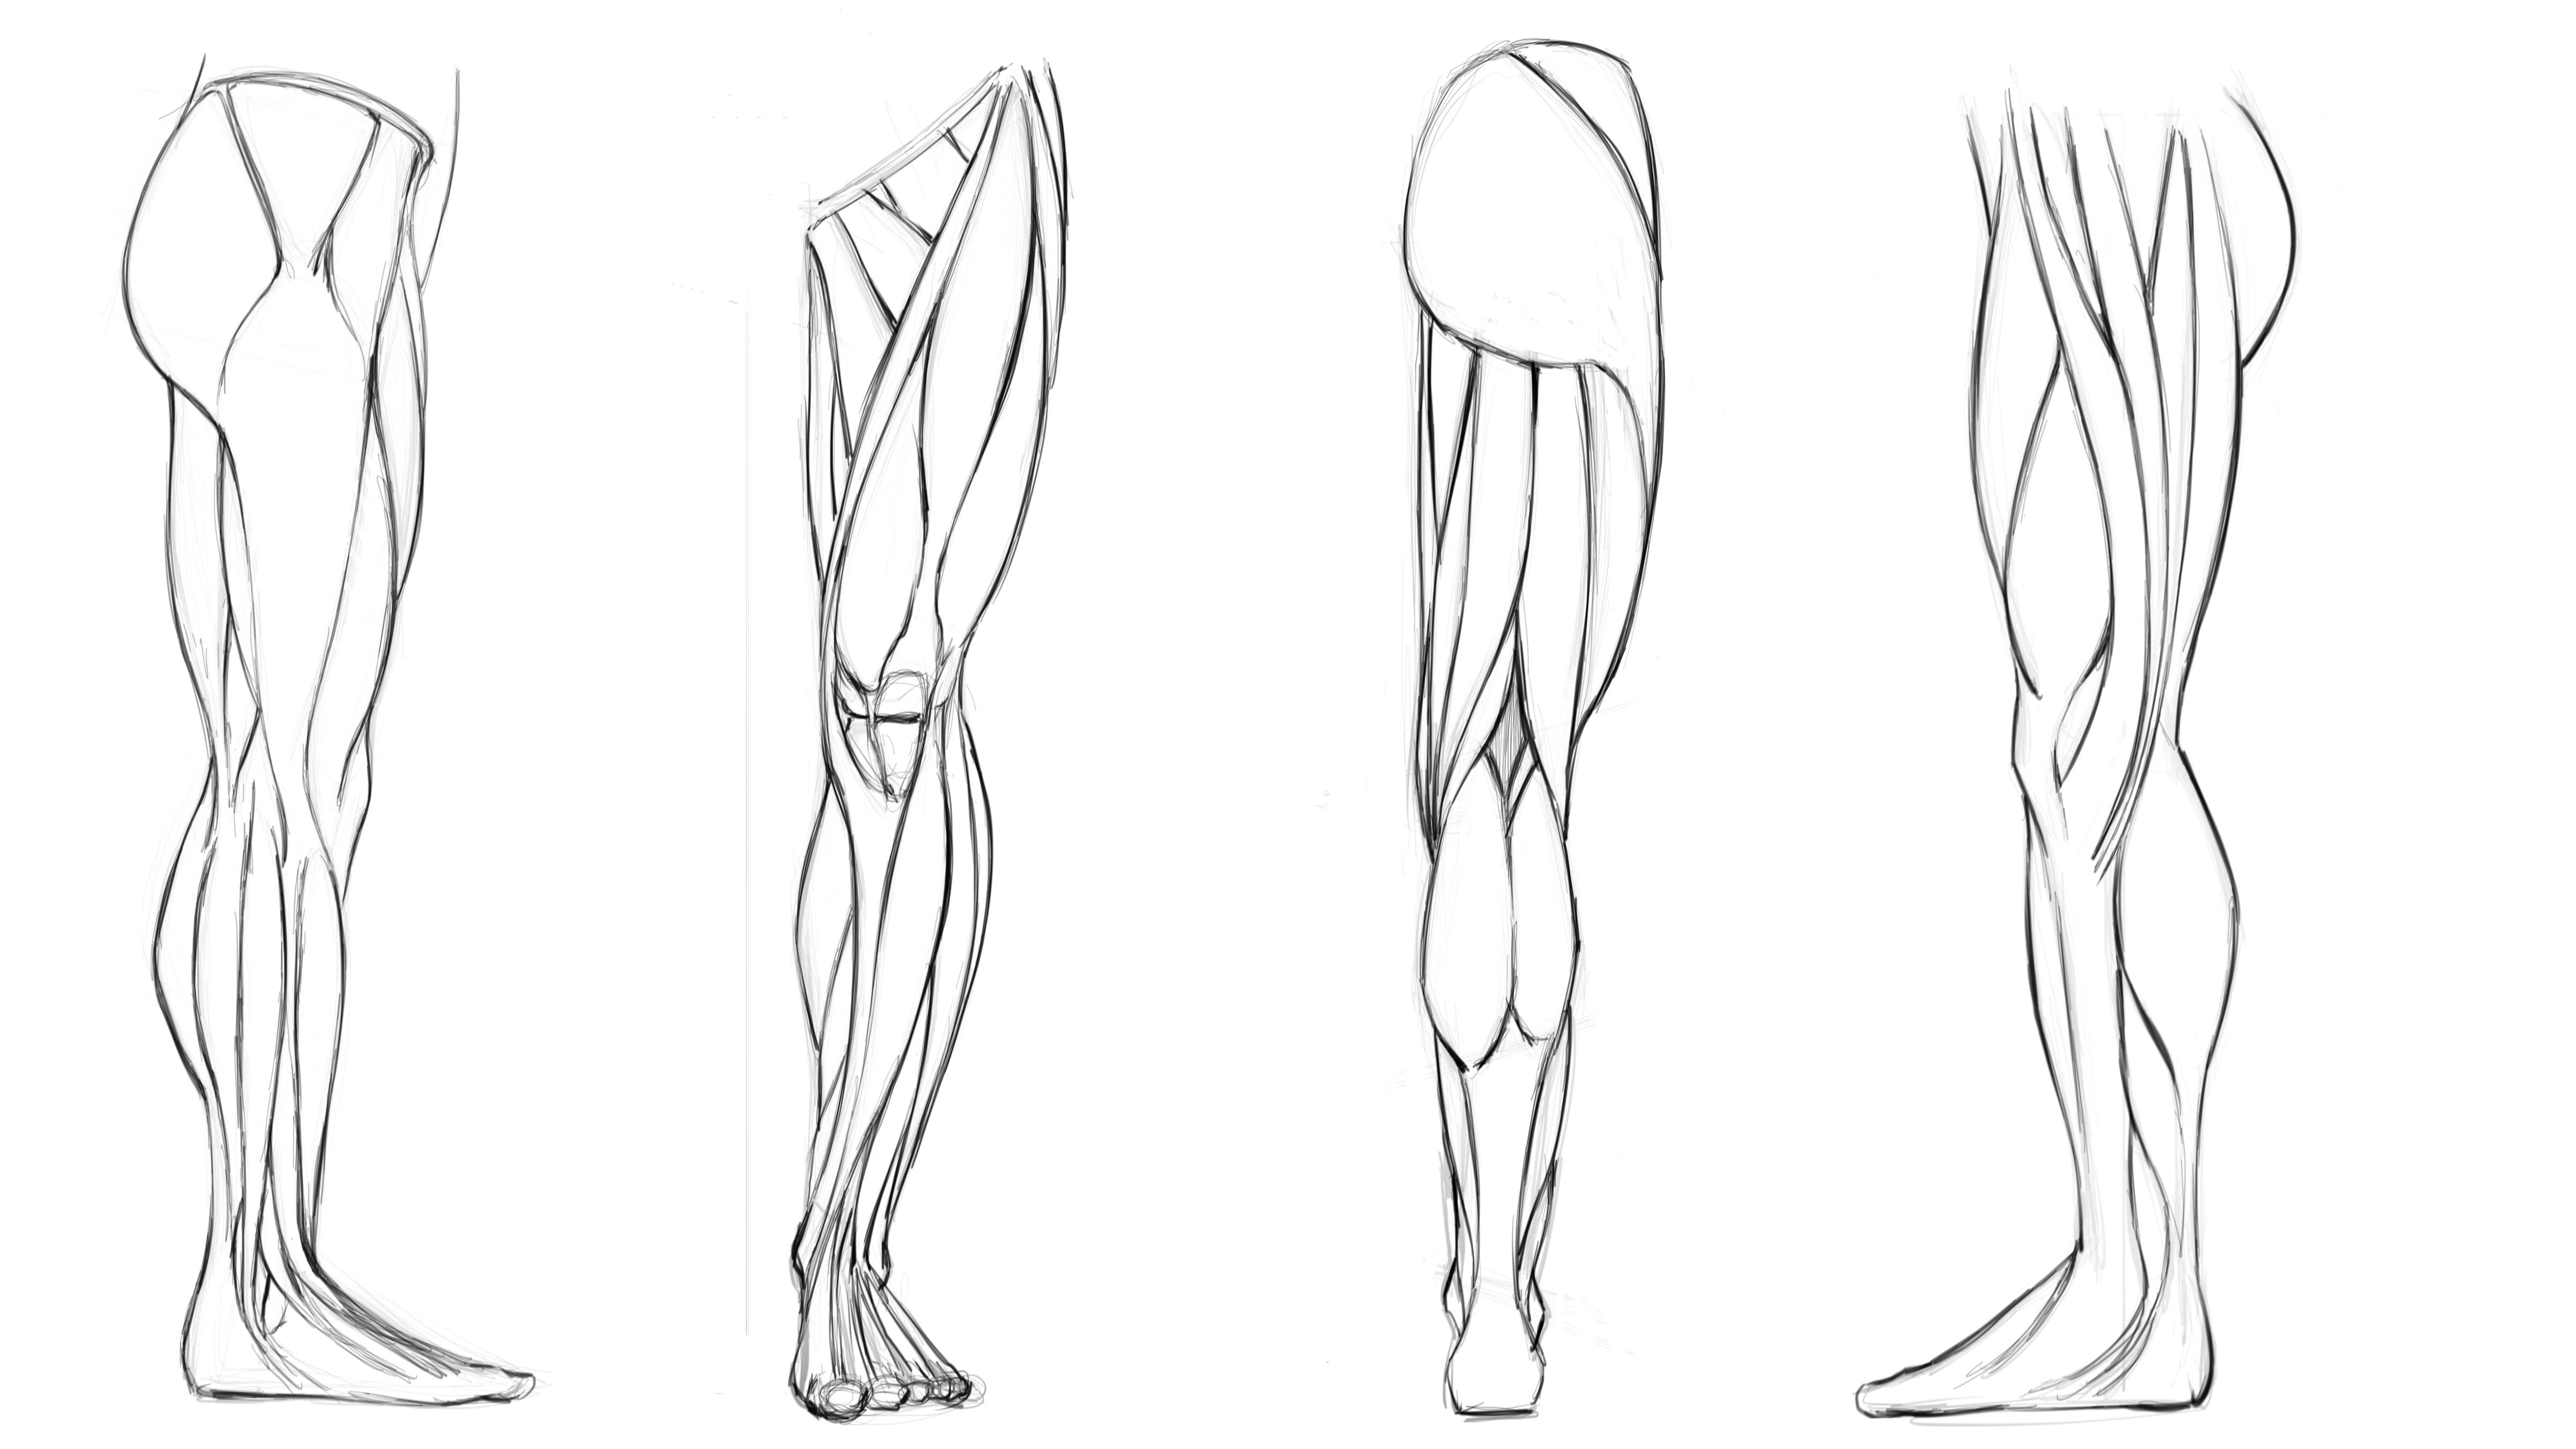
3. Leg Anatomy Anterior View: Okay, so now let's go and get into drawing the legs from the front view or a leg. And let's start by just defining a straight line down the center of the canvas just so it gives us some basis to work from. But one of the things I noticed often with the lake is that people will forget to kind of bring it in on an angle from the starts. We're not going to get into the bones a whole lot, but something you can think about is that the femur comes in word like this. Um, you often see me work on stuff like this by using a lightning bolt method again. This doesn't reflect the way the bones actually are, but it will reflect on help you with the anatomy in the foot, depending on if you're doing something a little bit more animated or hero esque, or even a lady in high heels. And you're gonna have this foot higher like this but generally comes pretty flat to the ground when you're trying to get something more realistic. So I'll just generally draw an angle and then another small angle for just to kind of remember the direction of toes, you know, happened. Our current and then so for the pelvis will bring that over here, and we'll get, um you know, we're just getting a representation of it like that. So, again, this is more representational of the anatomy than it is. It's kind of a mix between the bone structure and anatomy. So if we work from this part down, I think the most important part is that the inside of the leg is relatively straight by comparison to the outside of the lake, which actually has a lot more curvature. So it goes like this, and then it comes back out, and then right about here would meet thesis ID of the lower leg, something like this. Eso I don't really like using cylinders for legs a whole lot. Um, even this right here. This is kind of a, you know, shape first method after getting obviously that directional line of the lightning bolt there. But even this I really jumped passes and want to start using what I would call more like rope drawing or just, you know, different understandings of the anatomy. So, for instance, right up here you have the ASIS point of the hip and the sartorius starts here it comes all the way down and it connects the side of the leg right here. And so you can really kind of draw this elongated s shape. Okay, so let me just get that in there and show you what I'm talking about. So what happens here? I see that s shape. It gives me a little bit of a starting point or whatever, and I start to get rid of some of this lightning bolt now, because it's gonna be obstructive for the part that I'm thinking about now. So I liked almost immediately get this s curve s hook in there and then with the gastric name IUs or calf muscle, it kind of slopes out, and it looks like a a bit of a diamond shape. Now, there's actually a couple things going on here, but I think about this overall, get get rid of this line. I think about the overall shape for so these larger volumes, larger forms. I get those in place first and then work into the smaller ones. I just find it easier to do that. So right here The quadriceps quads of legs. I was just gonna be the fastest media analyst ladder Alice and the breakfast for Morris. All kind of looked like this large, basically upside down horror teardrop early. So if you were toe, think about it like this. First, get this major volume of the quads in place, it looks like a large teardrop. And then what happens? That actually looks like smaller teardrops breaking into this and subdividing it. So if you were to go like this, like best like this, you see that all kind of look like a teardrop center opposite one another s? Oh, yeah. I tend to think that whenever I can picture the simplified forms like that in volumes of something else that just kind of commit it to memory. Um, So then you have the patella. It's the kneecap you have. The again is the gas, Jack. Mimi is. But then you have the sole e ists right under that. So that's one. That's that line. You start to see me draw where I was already subdividing this era. And then at the very bottom of that, you have the flexor digital him longest, which is right down here So you see these kind of all kind of flow in the same direction. Really? Bring this line back further now. So that initial s shape that I had rs hook as curved. I'm certainly to push that back. This is actually, you know, the bone here. So the tibia push that bag and so now wants to get to the other side here. Ah, the leg rounds out. Now, obviously, the more defined and athletic the individual, the more this is probably gonna be noticeable. But the main thing is, by the timing of the vast ists latter Alice in place and the curve, the outside of this leg. And we're going to see the soul liest. The pro pro Gnaeus longest label. All these for you. But again, you're going to see this more distinct curvature here, here, in a relative straightness on the inside like no, obviously nothing on the human body, straight but relative to the other side. It does appear to be straight. And remember, the sartorius comes right up here and connects to this. ASIS on Aces stands for anterior superior iliac spine. So, yeah, I could definitely see why they went with the abbreviation of bases. So, yeah, I'll make sure to again label this for you so that you can reference this and learn as much as you wish. But for me personally, it's more about learning the drawing of the forms and how to construct this from memory. And then here, the inner thigh muscles, all kind of point back towards EEA pelvic area. So the pelvic bone, lower public region. There's a lot more advanced terminology. I won't get into all that. I will label the muscles for you in the diagram, though. But essentially what I like to think about here is this crisscrossing V pattern or, um, triangular shapes that air. They're staggering back and forth. So the the one right here is the packed a gnaeus muscle. And then on the lower inside region about here, um, right through here is going to be the abductor longest muscle, and then the one that spans down the inner ridge of the leg. Um, is the Chris Ellis so again, I'll make sure the label these they do get a bit confusing. But the main thing is that you just have these lions kind of point towards the lower pelvic bone. Eso again. Just remember a sort of staggering of triangular shapes. And it'll be more clear as we were fined this as we get down into here, one little trick I want to show you about the lower part of the leg are I don't know if it's a trick, but it's something I like to do is first get the Tibby Alice muscle in place because it's the most predominant. So if you if you watch the lessons on the form I talked about getting the okay, lets extensive digital him in place first. I'm working from that. This is kind of ah, similar spot in the leg that I think about. So I get this to be Alice in place. I know that it comes down and it curves around to the side of the foot. And then from here, Aiken, go to the next one, which is the extensive digital longest and its lower right here. But it spans out, and it goes to ah, each one of the toes, except for the main totes, like the four toes at the big toe. Uh, and again, little things like that little reference points. Allow me to remember this and then the soldiers to be on the back. But then we have the Peroni ous longest, and that comes all the way from appear on the side to see a lot of these kind of Ah, you know, again coincide in the shape they're not roll complex. I think the harder point to the leg of the inside and outside referred to as the medial and lateral side. So, person, I think the you know, the anterior and posterior views on the front or back are easier. And so what? I believe the reasoning for that is we get so used to looking at the front of the leg, the back leg or we go right for that when we go to do our studies. But then as we go to study the inside and the subtleties of the you know, the outside, I would say the inside is probably the last one. The medial side is probably the last one that we really start. Teoh learn because we don't need to learn it as much we don't see. It is frequently eso That's just my own personal view on that. But again, I'm gonna show you how to draw these things. We're gonna talk about placement, the muscles and refinement and things like that. But you're really gonna also pull way back from this for your character creation. So you're just gonna house what you know about the body, what you learn from these lessons. But then you're also gonna learn to do away with some of that and just utilize what you need at the moment for your character designs. Okay. And then remember what the ankle, the inside of the ankle is higher outside is lower. So that's Ah, constant. You would always look for these constants that apply to every individual. And then again, with the foot will draw this very basic. We're gonna be doing some separate lessons on hands and feet. That'll get us majority of the way there. And then we will find this further. And like I said, I'll label it out for you and give you that reference. So, just like that, we have the front view of the leg and ah, good starting point will now carry it over to our next angle of the leg and continue on. So with that, let's move on to our next lesson.
4. Anterior View Refinement: Okay, so now we're gonna go and clean this up, make a little bit more sense out of this. So it will soft to racist first and one also just point out again certain areas that I feel really helped me to start drawing this from memory on. Keep in mind too. I still draw from reference whenever possible. But the whole point here is that you study enough about anatomy where you can construct this from memory and premier imagination. So one of the big things like I've already mentioned is finding the aces up here. Okay, So and the ASIS then giving you a starting point for the sartorius which wraps around down to here. Now I kind of over exaggerated this part of the U. S. So when I When I picture the s, it's right through here. It's a very stretched out elongated s on again. I tend to sometimes over exaggerate this now for stylized anatomy and representations. That's not a big deal, but I want to at least be aware of it that, you know, in reality, this comes down a bit straighter. So and then for the calf muscle or the cast right knee Mia's again. It's a bit of a diamond shape. Then we have the soldiers right below that also kind of a diamond shape. But these air really kind of stretched out. Um, almost pyramid er, but again, kind of stretched out diamond shapes, but with a little bit more of around in this, they really kind of tucked to the side more than when I'm illustrating here. And then the flexor digital, um, longest right down here. And and it's just kind of like a step and repeat pattern. You know, I would really say it. This needs to be but shorter. We can nudge those around as we go. And the other thing is that, you know, paying attention to these angles. So again, the inside ankle is higher, the vast this latter Alice is hired in the media. Alice, eso All these things kind of couple together really start to make it easier to draw these poses from imagination in. Even if you're drawn him in a front view like this, it still helps you to do the more dynamic views later. So we'll get into that as well again. All these muscles go up to that that interior superior iliac spine. The acronym is ASIS, and then the rectus femoris comes down. It points right down to the patella. So the kneecap. So it's pretty easy to go from this point to this point, see where it belongs. And then the vast Tous media Alice is lower in the vastness ladder. Alice is higher, obviously. And then you kind of this this bump to the side of legs again. It's really apparent in a muscular individual somebody, it does a lot of squats or running back for football. They have is really defined, bumped to the outside of the latter Alice. And then over here you've got the tensor past a lot. I'm saying that right? And then you also see some of the gloomiest medias right to the very side here. So again, remember how this point right here is so imperative so that you can work down into the quadriceps and really get all that aligned pretty easily on. Then, if we work down to the side here again, I really like to get the front muscle right here in place. S So this is the Tibby Alice and it comes down. It's very predominant on the front of the leg. On as it comes down, it sways around to the side of the foot, right under, uh, the inside ankle like that, and then the next one over, which comes up a bit higher, like this is the proneness longest and then actually comes all the way down to the other side and behind the ankle. I see how you can get, uh, you know, both of these in place and again using the ankle as a landmark Teoh figure out where they go now, once he's air in place, the one that comes in the middle here, it's really kind of the most important, I guess. I guess they're all important, right? They'll have their functions, but these But this one right here is the extensive digital, um, longest. And this goes to each one of the four toes eso all the toes except for the big toe. So we can just divide this up, get that to go to each one of the toes from the pinky to the long tome and basically all of makes up for the big toe, also known as the Alex. I'm not gonna get into drawing the toes a lot. But just start with kind of overlapping ovals, and then you can chisel back, backing up to get some of the definition of toes will be addressing hands and feet and upcoming lesson. And then on the very side here, you get the soul Leah's again. So, like this, it gives you that nice Ben that you see on the upper calf, upper outside of calf muscle like that. And just remember, as you draw the quadriceps downward towards the knee or patella, uh, the area that connects that is actually the quadriceps tendon. And then you come down to the patella and then below the patella or the kneecap, you have the patella ligament. So again, these are things that you're just gonna think about when drawing this. All right, then, right here we have the sartorius wrapping around. Looks like it's coming from behind the fastest media Alice. And then attach is right here to the ah to barasa t of tibia. So just kind of wise out or fans out and attach is there, and you can notice behind there that you see a little bit of the femur and then the tibia bone just like that. All right. So as we work on the inner thigh here, the most we're going to see stranding up the medial inside of the leg is gonna be the Priscilla's. And then I like to think about these these inner thigh muscles as, ah v shaped or triangular shapes and even why shapes eso, you know, just to get those in rather quickly. That 1st 1 is the part of the adductor group and that attaches to the pubic bone. Ah, the next one is going to be the pectin AEA's And then this last one up top eyes going to be the Elio So is it's actually written really up, so it's of a piece of silent, but I'll make sure again to label these s so that you can pay closer attention to him. And just remember, if you are trying to commit more of the terminology to memory, always try to hand right as much as possible. It just seems to really help that process. Eso This next one is the looses longest. So the extent, sir looses longest, very thin muscle that comes down from behind these other muscles and goes down to the Hal ICS or the big Toe. And then once you've got all this in place, you can start to beef up the line way. I think this is important, because what you really want to do is get the feeling of which muscles are in front. So, friends, that's the rectus for Morris. Put a nice, heavy line right here on each side. It really makes that that muscle stand out on top of the bestest media. Alison Best the slider Alice, and that's what you want. You really want these diagrams to help you feel more confident and in the arrangement of these muscles again, you're very rarely ever gonna draw these in this way except for studies. But the more you do it, the Morial committed to memory and the better you feel, and your illustrations will just start to look way more impressive because it's housed upon some actual studies. Sexual knowledge. Can we be sure you could see that little pinky toe? It looks like I missed the toe there. Okay, so that's it will go ahead and wrap up right here. We'll head over to the next lesson and continue on. So with that, let's move on
5. Leg Anatomy Posterior View: All right, So I was talk about the back of the lakes or get him to start the street line just to, you know, I've got some kind of reference point there on this canvas, and, um, I'm gonna guess a little bit about the upper leg distance. So what I tend to do is just, you know, you could mark roughly the halfway mark, but then bring the upper leg femur down lower, and you also get a, um, a bit of that outward bend to the side. I'm going to start with basic forms first, but proportions. We're gonna very based fund, you know, lots of different things, like male female, more masculine, more of a bodybuilder. Something like that. You know, lots of different variables there. So play around that. And then again, I want to get this Boeing effect. You gets this outward curve here and here, and the gas track name ius has a bit of tilt going up this way. And we know the inside ankle is higher going this way so you can do this kind of back and forth tilting of the anatomy. So as you work down to the ankle again, you'll see the inside. It's higher outside his lower on. Just these sort of patterns to the forms will help out of mentally. So calf muscles like this and you get a divide there comes up the back like that. The other thing they tend to see the most distinctly in the leg is really this diamond like shape right here. So as the gas truck name ius comes up, they've been outward curve outward. And then the semi membrane this comes across like this does this kind of thing. But you get a very distinct kind of opening and diamond shape to the back of the lake with another little muscle right there. And then, you know, you always see this band the side of a me or it looks like, you know, very noticeable. Bend on the inside of the leg right there and all those muscles kind of scroll or, you know, wrap right through this area. So the the most distinct one is the semi tender Nanosys from Tina Rate. And so that's like this big one right up the back. Here. This is one. Well, basically, both your your hamstrings, your biceps for Morris and uh, the semi tender know sis is basically where you get the a lot of pain. Like if you're suffering from leg pain cramps, you know, you dig kind of right back here in the middle of these two muscles. This is a common problem for athletes and, you know, people that, you know, use a lot of leg muscles there, So yeah, split right up the middle. And let's see, we've got the semi membrane. It's again. So it occurs here and then also over here and just keep in mind, you could be referencing the pdf so that you can see this more clearly in case you're not able to follow along as well. And then also along the side here you have the doctor group. So it's kind of like this V shape and you're gonna get some of the Priscilla's on the side on these all kind of need to be moved around, so it'll look like I'm adding another muscle. But I'm really just kind of nudging lines around trying to fill up those forms. And then as you bring this out, your most predominant curve in the side of the leg is the fastest ladder, Alice. And of course, appear we've got the bloodiest Maximus. Everyone knows what that one is. It's probably one of the most popular ones. And so I showed me to scale this down so we can get that in there. And obviously the shape is more distinctly different from male to female. But in this case, we're just gonna talk about the muscles themselves were getting into some examples later. So bloodiest medias is on the side. Secluded Maximus, the big one right back here comes down. And then along the side here, the low to build track goes down. I see a little bit of that from the side here by the vast ISS ladder, Alice and again, Gladys Medias up here. Let's work down here into the got struck me, Meus and you also get I'm asides here you get the soloists and this occurs on both sides. So again, that kind of makes it simple. I feel like the back of the leg is a lot more simple to kind of process than you know, the sides and in the front, and things like that. Eso down at the bottom, You've got the flexor digital him longest, so it kind of resembles the same shape. Is the soldiers right there? And then on the other side? You have the Polonius. It was like this. And then you have the Achilles tendon that comes right down here off the calf muscles. And this is a pretty popular one, right? A lot of injuries there. A lot of people talk about their Achilles tendon and played sports you probably had heard of or dealt with injuries in that area. That's pretty pretty common and again, really pay attention to the fact that the ankle is higher on the inside. So cleanup work I need to do in here. But essentially, that's how I would get the bulk of these muscles in place. And then Ivory says, I clean up and refine it. I'll take back some of these rough sketch lines and really make this more clearly discernible. Yeah, that's that's really it's so the same thing with the outward Ben. Just remember, you get the two curves here relatively straight on inside of the leg. You have the relationship difference and tilt of the calf muscle. The ankle. You can even see the tilt difference when you can't really notice it much here. But you see it from the fastest media, Alice to the inside of leg. Now you're not going to see the I'm sorry. The fastest ladder, Alice to the inside of leg where you're not going to see the fastest media, Alice. But you're gonna see all those other Mosul's converge and kind of swirl around this area. And it again, it will be more clearly readable. Once I refined this a bit more. So with that, let's head over to our next lesson.
6. Posterior View Refinement: Okay, so now let's go and clean this up and make it read more clearly. So soft. Tories all this information back something to about there. Okay, so start with the Claudius Maximus right here. And here's the gloomiest medias. It really looks like these two are, Ah, more unified. So I don't need that little divot there, even though their name differently. Generally they're going appear to be pretty, uh, pretty unified. So, again, this larger muscle right here is the fastest letter. Alice Hand. If we start in the back of the leg, we got the semi tender noses here. Remember, these are all going to kind of swirl and converge. We're on the side of a calf muscle. And then we got the semi membrane. This membrane ius. Yeah, because the terminology is but confusing to pronounce for me at times. And next to this we have the semi 10 Nanosys or I'm sorry. Here we have the bicep for Morris, my hero, My pap In the latter, Alice right there and on this side we have the semi membrane us again. So remember, it's here. And then here. So here and here. Bring that all the way down again, kind of have more converge in this one spot, and then we have the adopter group here. It looks like a V shape. And then the Priscilla's is on the very side. And then right here we get a little bit of this Sartorius sartorius wraps around and connects here, so this is more visible in the front. But you see a little bit of it right about there. Remember that there's a bit of an opening right here, this diamond like shape. And if you start to memorize that, you just have this divide and the calf muscles, and it just looks like they're pretty even. Just remember that on the outside of the leg beside with the fastest ladder, Alice, you have a small little divide right there. A little muscle right there. And that is called the plant terrorists or plan terrorist muscle. But a lot of times it's just gonna look like it blends, and obviously to the calf muscles there, The major, The definition you're going to see is sometimes this little one, you know, triangular shape here. So again, remember that the inner calf muscle against right naming this is lower So this is the medial head. So just remember medial metal metal being to the inside of the leg and then Achilles tendon coming right off the back of that sloping inward and then coming out of the hell I'm like this. And then again, solely asses right here on both sides pulls out and swoops in the very bottom you get. And you got another little slant here so hopefully can see that it's not very evident, but it's it's ah, you know, it's not very symmetrical as faras, the next to get the flexor digital him longest on this side, the medial side like this. And then on the lateral side or outside of the leg, you have the Peroni, its muscle. That's what's gonna be a little bit higher, kind of similar shapes, but they're just and there's that little bit of a slant there, and then opposite of that really would be the inside of ankle is higher. Males have ankle is lower, and at this point I would just really refine this a bit more So to me, the fastest lateral, it seems a bit too bowed out. Kind of push that line back of it more and then I would just developed the line. Wait. So I want to try to make it look like certain muscle groups are in front of other muscle groups, and you can generally do that with introducing a little bit more line. Wait a little bit more line clarity, and that's really it. So hopefully this portion of the lesson has shown you how to draw the post a review of leg with a little bit more confidence. I just really want to do the turnarounds, and you're able to study all the PDFs that again are associated with this lesson. It all start to make more and more sense on. Then we'll get into some more actionable examples where the bodies actually in motion. Eso what? That Let's move on to our next lesson.
7. Leg Anatomy Lateral View: Okay, welcome back. So now we're gonna work on a lateral view of the leg, Remember? Lateral means side, or in this case, I would consider it to me outside of the leg, cause media would mean inside of the later middle of the lake. So from the lateral side, first thing I want to do is establish a straight line down the page. Uh, obviously, the anatomy is not perfectly straight or anything like that, but again, always gives us that basis off a starting point. So what I want to do here is first established the overall lengths. So the upper leg is obviously larger by comparison. The lower leg. So the femur. And then as you come back again, you can use this little lightning bolt kind of method to figure out the the transition of the anatomy. So the Ben they have in the upper leg here back bend to the lower leg, and then we just attach the foot down here, a bit of a diamond shape. And I think it's really helpful to pay attention to this back and forth that you're going to see in the leg. It's evident all throughout the body and it's really how we balance ourselves. So once you get Thea, you know the bloodiest Maximus Media's all that in here. I guess we'll just start with, Ah, representation of the pelvis area like that, and keep in mind it does slam back. It's It's never a straight up and down thing. So if you look at this in like a stereo metric approach, you can really think about a box shape on an angle here. Ah, a cylinder or box like shape like this and then another angle a cylinder bislett shape. But they need to kind of teeter totter back and forth, because again, that's how we create balance in the body. And that's how you know we push and pull against our bones or whatever. So I guess we pull their muscles don't actually push. They pull against the bones, but then their gravity. Obviously we fight against gravity with our muscles and way push away. So essentially you want to see a push and pull or a balance of you know, anatomy. This is evident in the way the torso sits with the against the lower the lower portion of the body of the legs So here you want to see it as well. So we're gonna go back and forth, get that in there, and there's our basic representational forms off the leg at a side view. Eso now to, you know, to address the anatomy. What's soft to raise this back? Oh, you know, just push this information back as far as you need Teoh to really get in here and illustrate the anatomy in more detail. So what I'm gonna start with is we'll start from the top down and we'll go with the Glutinous Maximus. Probably one of the most popular muscles, right? Very powerful muscle, very well known. And then what it does, it comes down in it. It just kind of comes down like this. And this is the I t. Track or the you Leo tibial track. And this comes down kind of angles out. This will stop right there for now, but when it comes up, it's separate. So you get this divide of it kind of looks like a V shape here, and this is the bloodiest medias. And then you get the other one that comes out like a another tapered triangle. And this is the tensor fash a lot. It looks like a lot to me. Or maybe I just wanted coffee, But But then what happens? You get this little series of shapes like this, these coincide with the iliac crest, and then right here you have this sort of a bump on the front of the crest there or from this side angle, it looks like it's on the front. And this is the oasis. Okay, so the anterior superior iliac spine, and it's ah, it's a really popular landmarks or one that you want to commit to memory because it will make placing these a lot easier. But really, this iliac spine is the most important for, you know, getting these muscles in place right there. So again, remember this Ah, long stretched out piece here is the I T track or the Ilia Tibial track. And then from here, we've got the fastest latter, Alice. Now, this is such a big muscle that it goes on both sides of this. I t track like this. Um, no. Obviously, when you're drawn a character with skin and things like that, you're not going to see the divide here. Okay, so this thes lines. I almost want to race him back because these lines here for the I t track are so defined where you're going to see segmentation there. I don't think I've ever noticed. Anybody have extreme segmentation there. Um, but you will, obviously from the muscle. So, for instance, for the rectus femoris, you know, somebody's very defined. You're definitely going to see that segmentation that divide there, Miss Sartorius, That comes up right about there. And then here you're gonna really just get the lower abdomen gonna come down right there in a bit of a slant. So in the back here again, we see some of this vast, this latter, Alice. And then back here, we're going to see the biceps for Morris. Long head, that's gonna come down like this. It's gonna cut in this way. And actually, what you're seeing here will be the short head. So this is the bicep femoris, shore head, something like that. And then as it come down here, you get a little bit of the you know, the tendons that connect them together, and then you get thesis ID of the patellas of the me cap for me and Then, beneath that patella, you get the ligament of patella. And then this big Boeing area right here, where bows out is the gas Jugni, Meus or calf muscles. So generally, when you think of the leg and you do a side view like this, it becomes very easy to say. I'm just gonna draw the rectus femoris, fastest ladder, Alice, the calf muscle. You know, you don't think a whole lot about all these other strands that we're getting ready to illustrate. But they're there. And you know, obviously, if you want to get more confident drawn the body ultra defined, you really need to know about it. So the soul ius is right here that comes down now on the bottom of the gastric name IUs it comes down and you get the Achilles tendon. So it's gonna appear white in illustrations and it comes right down to the hell like this. But then the solely ists passes right alongside that parallel to that, and then the next one in is going to be the Peroni iss longest, And these all kind of shoot just straight down the leg. So when you're drawing like a runner or somebody has very defined legs. You're just gonna have a little bit of hints to these muscle groups, you know, they don't need to be ultra. I mean, you'll see some people have very defined segmentation here, but again, it's It's more rare than an often. And so let's see then you here gonna have the extent, sir, Digit or, um, longest. Now, this one gets covered up a lot as it moves up the leg. But as it comes down here becomes very parent, and this one goes to the toes. Eso it's gonna go to all the toes except for the big toe. Now, from a lateral view like this, we're not really going to see that. But I just want to reiterate it. And then on the front, this big guy is the Tibby Alice. Okay, so this is very this makes up like that other front shape of the leg. It's very pronounced muscle. We're gonna see that right there. And the other thing is, when the Peronist longest comes down like this comes down and then it curves over. I was right to the side of the foot there, and we'll just to a basic foot for now. As I've mentioned before, we're gonna be doing hands and feet as their own lessons because there's just so much to that. But there you go. So there's our side view or lateral view of the leg will go and refine. This now will make it easier toe label and point out a little bit more of the, you know, the muscle groups of definitions in greater detail. So with that, let's move on to our next lesson.
8. Lateral View Refinement: Okay, so let's go in soft. Two races back. Redraw through it one more time. I think this one's pretty visible, but it's always good. Teoh sculpt the sent a bit more, Make your final decisions. And you know, when it comes to anatomy, really redrawing every pose a tely east twice is probably a good idea. Okay, so we'll start up here. So again, we notice are we know this is the most predominant muscle in this area. Glutinous Maximus Sounds pretty strong. Pretty pretty dominant, right? And so it kind of shaped something like this. Now, it really comes down through here like this, but I'm gonna illustrate it where I showed the shape or form a bit more clearly. Andi, it's still I feel a bit strange explaining the track just because, uh, a lot of this is to teach you how to draw the body on. You're never really gonna draw this, but it's good to know it's there for ah, for the purpose of studying. So it comes down like this kind of separates, Um, that it comes up here, something like this. And then here you get the bloodiest medias somewhere bad. And this one is important to remember. Regardless, if you're doing an anatomical illustration or not eyes the iliac crest because and very defined, skinny people, you will see this. And and I think it's important. At least I find it to be important my own illustration to pay attention to that shape. It becomes pretty difficult for a lot of people to draw the pelvis properly. Eso paying attention to these defining to find bony landmarks is important. So as we come down here, we're going to see a little bit of the sartorius right here. The rectus femoris right here. This is obviously very important for drawing cause you do see this a lot. Oh, you know, every time, really. And then the bass, this latter, Alice right here and again That's gonna go all the way over here. It's very large. Muscle makes up the predominant volume of the leg and you'll see it on both sides of the I t. Track from this perspective, and then notice that in the perimeter shape you get the right pissed for Morris in the vastness Latour, Alice that come down to the patella. The patellar ligament here to the kneecap and then on the back of the leg here, we're going to get the biceps for Morris Long head. So that makes up the rest of the silhouette of the upper leg, and that comes down. And it was a little bend like that. And then as it separates right here, you get the biceps for Mora's shore head, which kind of comes in from the side and behind. Like that, it starts to connect with the tendons from roughly up here through here. I'm Meghan illustrate that again. I want you to really pay attention to the the separation and forms and volume more than the actual tendons. So down here we start to get the divides will start on the back of leg with the gas, tracking the mia's or calf muscle. And forgive me if my pronunciation is off on any of these. I do recommend that you, ah, utilize other tools for checking pronunciation and forgive me if this is a little redundant , but I do want to continue to make this point throughout the course. I really feel it's important to check multiple sources, so I definitely want my content to be very informative for you. and I want you to feel like maybe you don't need to check as many. Resource is after taking my glasses bought in the pursuit of knowledge and something that's so detailed and so in depth is anatomy. I just recommend that you do check. Multiple resource is we all should just always found inconsistencies with different instructions. So I don't want you to think that my instruction is the end all you have to check it and pronunciations a good example. We all pronounced things a bit differently. Some people are more correct than others, obviously. And but there's great resource is online for checking pronunciation. So just type P two muscle group that you're wanting. Teoh get mawr familiar with online, and you'll find different pronunciation videos on YouTube and elsewhere and just, you know, really take the time to study those and write it down the way it sounds. Stuff like that. Okay, so here we have again on the back of Ah, the lower leg, the gas truck. Namie is this one right? Here is the sole liest. Okay. And then as we move further end, um, we get the, um, Polonius longest. Okay, so that's this one's gonna kind of but a lot a little bit and then taper down. And then as it comes down, it's going to curve and go to the side of the foot here does okay, and then the next one gets kind of hidden a bit. So what I'll do is I'll start on the front of late. I'll get the Tibby Alice and first that bows out, gives us the other perimeter of silhouette shape of the lower leg. Bring that down. It's kind of shaped like a bit of, ah, elongated chicken leg. And then it gets it goes to the front of the foot. Here are curves down to the front of the foot. I believe outside. Maybe. And then from this perspective, it gets covered by the extensive digital longest, which we know that goes to the toes, right, digits to torm. Ah, as we, uh we illustrate the foot more detail label, you know, more clearly the toes that each one goes to those little confusing. But for now, we just want to focus on this profile view like that. And then also, you've got the no, probably really gonna slaughter than this one It's the Polonius. Courteous Curtis. I believe you, Sam. Together, it looks like courteous. But again, I'll show you the diagram with names terminology so you can look it up. But it's Ah, I believe it's Proteus. Charity is which is tough for me to say. And then you see a little bit of the the tendons and go to the digital form or the digits like that. And then also behind the Polonius longest. You have the ponies. Breathe this. Okay, so that comes down each side of that. It's covered up, Oppa until probably about here and then those. It just comes down the side there and we got the bottom of the foot. It's gonna pretty flat aside from, you know, the toe on the pads with pads wrecked to the ground plane just like that. Okay, so there we Oh, so that's that's a refined version of it. And again, I'm going, Teoh, think I forgot to mention this one. This is the tensor fash a lot. And also remember, you got this bump here, which is the ASIS, and that's going to give you a loan landmark for a lot of the way these muscles connect on Aces stands for anterior superior iliac spine. Okay, so there we go. So now we will head over to our next lesson and continue on. So with that, let's move on.
9. Leg Anatomy Medial View: All right, so now we're gonna draw the medial view of the leg. So remember, medial is Ah, middle. So inside of the leg will start with a line down the middle of canvas. Just Teoh get some idea of lengths. And so we could really use our other view of the leg. But I'm just gonna go ahead and go for it. So you've got the upper part of the leg. Get the glue, Deace Maximus. Like this. So it's kind of a oval or circle to the back, and then the upper portion leg is going to be a little bit longer than lower portion. Um, I would say maybe like a 60 40 split. Something like that. Maybe a little bit less dramatic. But just play around this concept and and we'll see what works best for what you're after For your visualization. There's a lot of variations. I'm not going to. We're too much about an accurate description of workplace that, but a little bit lower than the halfway mark anyways. And then again, this back and forth posturing of the forms. So if you picture the abdomen or lower portion of the torso comes down at an angle than the legs come out, you know, with the Ford Bend to where the rectus femoris is gonna be. And ah, then a back bend more significant bend to where the calf muscles are. So again, that kind of teeter tottering effect that you get. Remember, you can really initiate this with the, you know, cylinders and squares and really get a little bit more of that angular representation going on, if that helps you. But I think since we've already warmed up to this was just go for the volumes and then obviously the foot being a bit of a triangular shape and just attach the toes. So something like that. So there there's our basic forms and I will cut into that and start to define the anatomy. So obviously the bastards media Alice, right here on the inside. And this is very much like a teardrop shape, especially because we're gonna draw on the sartorius which comes down like this. And it perhaps around this and comes up points towards that that ASIS an interior superior iliac spine. Okay. And then along the upper medial side right here, we would get the Adopter group what kind of visa out from this point and then alongside that again more towards the medial inner thigh. We get the Priscilla's and it's actually the most superficial muscle on this side of the leg and that comes down right along the side of the sartorius that actually it's pretty thick right here and Ben's out and then attach is right down here. Let's raise some of that banks. We could see a bit more clearly and then we see the adductor group again right here. And that's very much like a piece of pie or V shape right there and then the semi member Gnosis, which I hope I'm saying that right? I always want to see a semi membrane ISS, but I know that's not true. So are not correct. So I think it's a semi member Gnosis and just remember, you can check pronunciation through a variety of videos you find online that will help you out. So something like this it comes down. It's wider up here and then from this back area which shows us our perimeter or silhouette of the back leg would be the semi tender noses that comes right here. So we can erase back some of these initial volumes and see this a bit more clearly and from the ah vastness media. Alice, you're going Teoh, come right down over the patella and that's gonna wrap down to the patella ligament her patella tendon. But it's all kind of, you know, from this kind of illustrations, all kind of one shape. And then But obviously when you're drawing a character that's more defined with skin, you're generally gonna shop, show more segmentation to some of these areas A little more definition. Okay, so now let's get back to here on the back of the leg, we're gonna go from the the calf muscle, the gas truck, me, Meus, and we're gonna bring that end to about here, curve that back. This is like he a bit of a football shape and then come right down to the back of a hell. And this is the Achilles tendon, right to the hill of foot. Obviously we all know about this. A lot of injuries there. So you probably heard of your favorite athlete or friend that's at issue in that part opening that, but it does happen a lot, so it's pretty well known. And I was Achilles and Greek mythology. And then over here, we're going to get the solely ists. So it's gonna come right alongside their and kind of spiral towards the base here. And then right below that, we're gonna get the flex her digital him longest so even smaller, similar shape, and that's gonna come down. And the tendons of that are going to go to the inside of the foot. Bit of a curve there. There's a few more that kind of poke from around the sides there as well. And then this represents the bone. So the the tibia, and then on the front of this, we get the Tibby Alice. So that's going to give us the other again perimeter shape to the leg and these back and forth kind of bends that we see now. Forgive me if I've already said this, but I may reiterate, you know, just just to really kind of hit home. So really, the thing that I tried to commit to memory right here, you know, obviously isn't all the exact connection points of every muscle. I mean, you definitely want to pay attention and study as much as possible. But when I think of this in terms of figure, drawing and character design, the thing the thing that I remember most is quite simply, the bend here, the bend here. Okay, The relative straightness here in here now they're obviously not straight. They're still bent, but the relative differences from side to side, Um, and again, that's a back and forth. I mean, even as little as it is. But even to the hell you see it there so back and forth A zigzag pattern. Right? So again, when you when you do that, when you start to pay attention that it makes it a bit easier to draw this from memory and think a little bit more about the silhouette in the perimeter shapes up the forms to the volumes become easier to construct quicker to construct. You also want to really think about the apex. You know where the highest point is to certain parts of the anatomy. I think that helps helps out as well. It also helps out when you start to style eyes this more because, you know, again, that's kind of what we're all after us. Faras character design and you know, you may have a little bit more realism to your concepts, but a lot of us artists are seeking to style eyes and develop what we know about the body and make it look even a bit more. I don't want to say interesting, because the body is definitely interesting enough, but it a bit more inventive will say that. So let's go and wrap up here. We'll head over to the next lesson, will find this. And so with that, let's move forward.
10. Medial View Refinement: rights and I will clean this one up is well, so soft Races back. I think for the most part, this one's pretty easy to read. But there is just confusing. I always find the leg to be the most confusing parts the body as far as the anatomy goes. When I'm trying to define the anatomy in this way, when I go to drop with again more skin on it, it's not nearly as bad. But, um, you know, we need to know what it looks like without skin so that we can draw better with skin. I guess so. So again, semi. Ah, what does this one semi 10 diagnosis I always have toe We look at the word on these ones semi tender know, sis. And right next to that, the semi member No sis. And these are all gonna scroll down or swirled down and connect here on the bone. Eso It's good to get these in as faras. You know, the kind of correlation that they have to one another get really thin and you've got let's see, 123 and then you've got the sartorius so really four that come down collide in this area So semi, uh, tender noses, the semi membrane IHS or I'm sorry, semi member noses and it passes beneath the doctor group right here than the Priscilla's. I'm saying that one right, Chris still is comes down like this all these again kind of spin and sprawl together into this area and then the Sartorius sartorius is the one that allows us to rotate our leg from the hip. So pretty important muscle there gives us that range of movement. Eso is when you draw them together like that. It's not as bad, I think, because again you kind of look for these rhythms in the body that you can, you know, commit to memory that you can ah line basically. Now remember right up here you also have this divide right here for the adductor group. So I look at both of these like I look for the V pattern that you see there and really this one's lower. So as faras relationship going like this, but they're both pretty distinctive V patterns be shapes, but you can get in there like that and then the vast this media Alice which you need to know introduction because It's a pretty popular muscle, writes one that a lot of people work on when they're strengthening their quadriceps and they're trying to get very powerful legs. They go right for the quads. That's gonna be the rectus femoris in the front there, vast media Alice, which you know to me, it just looks like a really big teardrop shape. So that's pretty easy to commit to memory than the patella tell a ligament or patella tendon and then the gas truck name IUs in this one, to me looks like a football, and then you just kind of smooth out the edges that goes down to that Achilles tendon in the back of a heel. Andy to be Alice. This is the bone there and solely ists and the flexor digital room longest. Remember when you draw on the bottom of the foot, you want to show some of those pads you do want to compress against a ground plane? Our look nearly is accurate, but, uh, but it's better than just drawn on. You know, you just don't want to draw a straight line. Doesn't need to have a nice mix off in a straight line, so it shows that there's some weight against those pads. Okay, so now what? I'll do. Like I've said in other lessons, I'll make sure that we, uh, have this in a diagram version. Uh, and then that will help you commit more of this to memory. But again, it's really important that you just look for the relationships in this that resonate with you. Okay, so for me, like I've already kind of mentioned the back and forth Brigham of the Anatomy, just like the lightning bolt method rates here. The lightning bolt to me looks a bit like this, minus that foot attachment, but something like that. So if we were to go across the front of it, kind of talk back, shoot down the back of it. So that's kind of how I see it. So it's probably a little bit more in the end, set up like this. Eso that's like a simplified skeleton if you want to call it that. But again, it's looking for these different rhythms and, you know, trying to memorize what works for you. So if you look at it and you go, I see something different, Rabbi. See? You know when I pay attention to this. I really noticed this. You know this This y pattern right there. Okay, so if you look, this looks like a kind of a bent. Why? And that might be your I don't know if it's called a pneumonic device, but a device nonetheless is something that you used to commit to memory That makes it easier for you to reconstruct this. That's what you gotta find. So hopefully the ones I show you help. But then maybe you see something different, and that becomes your again your device for memorization. Um, but again, a lot of times you're going to forego a bunch of this detail a bunch of the segmentation, and you're just going to get something that looks more, um, realistic to you, whatever that might mean. So, again, these curves relative straightness from side to side. Two relative straightness here, curve here, curve here and a bit of an angle, but still relative straightness even right there, saying, see, it's a back and forth. So there we go. So now what we're gonna do you know, we've kind of approached an illustrated the leg from these different viewpoints, right? So now we want to do is we want to put it in action. We want to draw some that are more dynamic, More expressive may seem trickier. You know, at first like how do we make this actually work and function? But at the same time, since we've taken the time to study the body and break it down in these different main viewpoints, it's now going to be easier to draw it more dynamically because we have reference points we have. We put some, some working right. So let's proceed on to the next lesson and start to do that, and with that, let's move on.
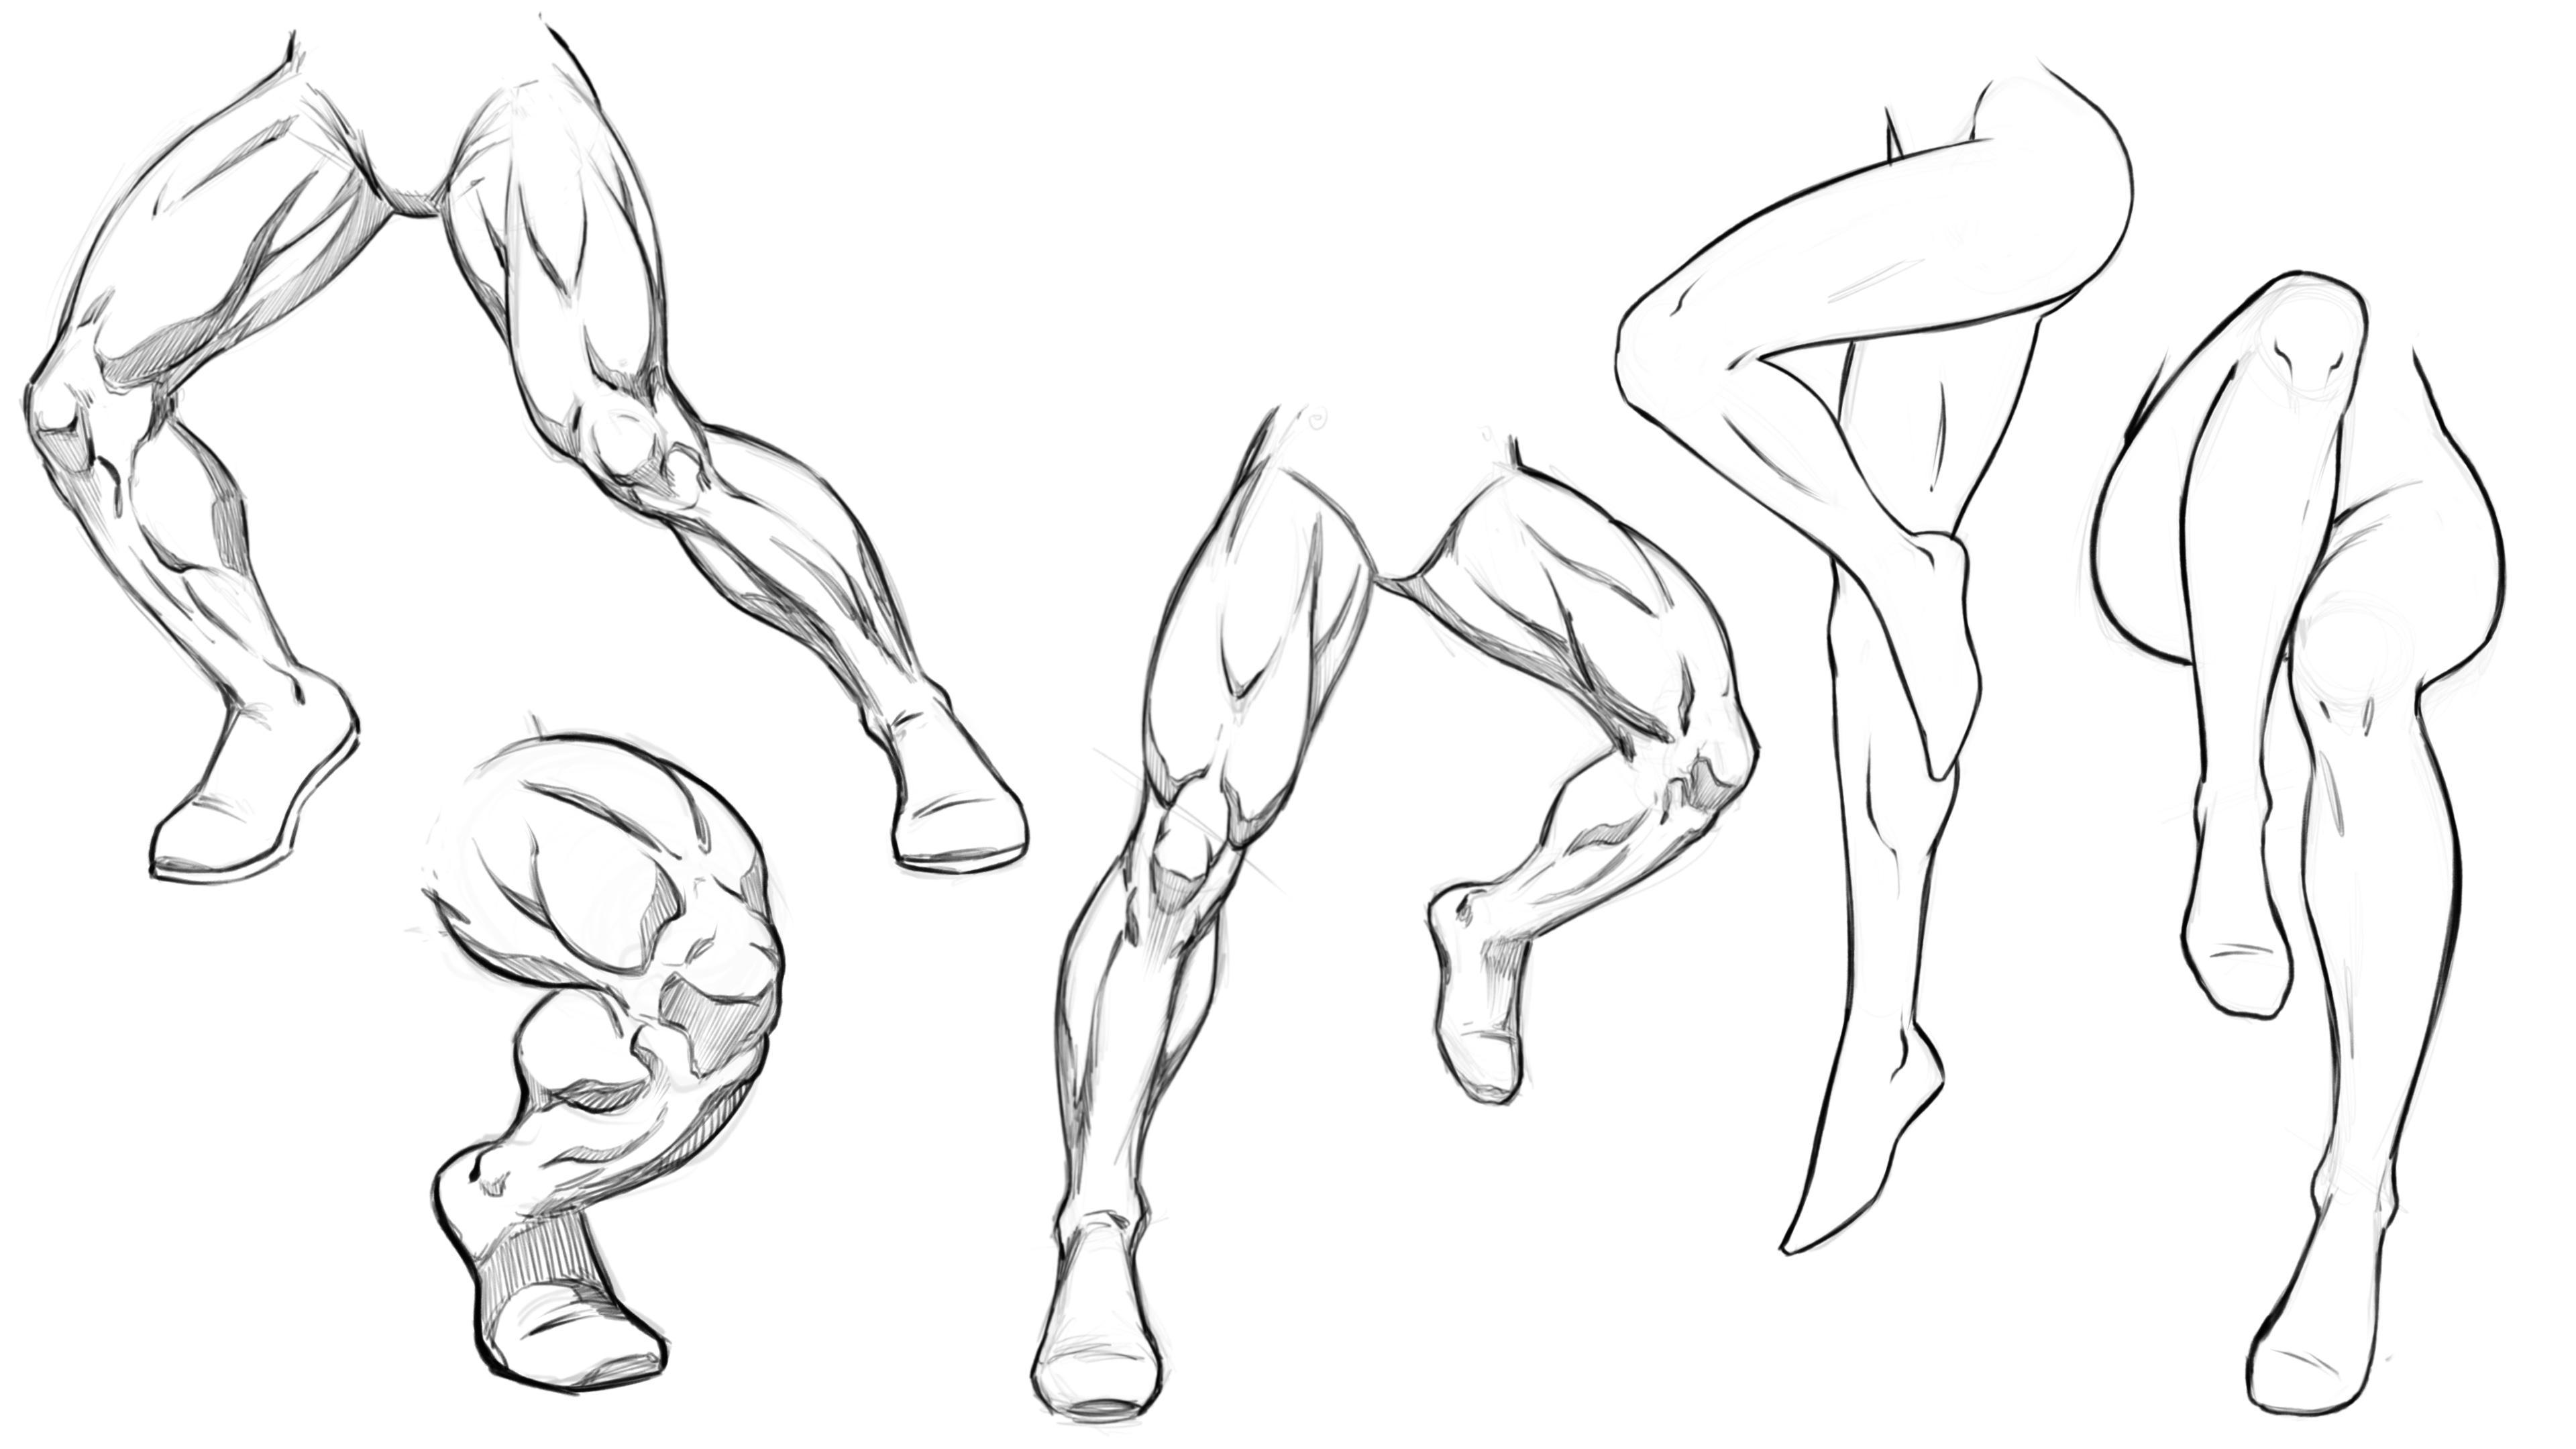
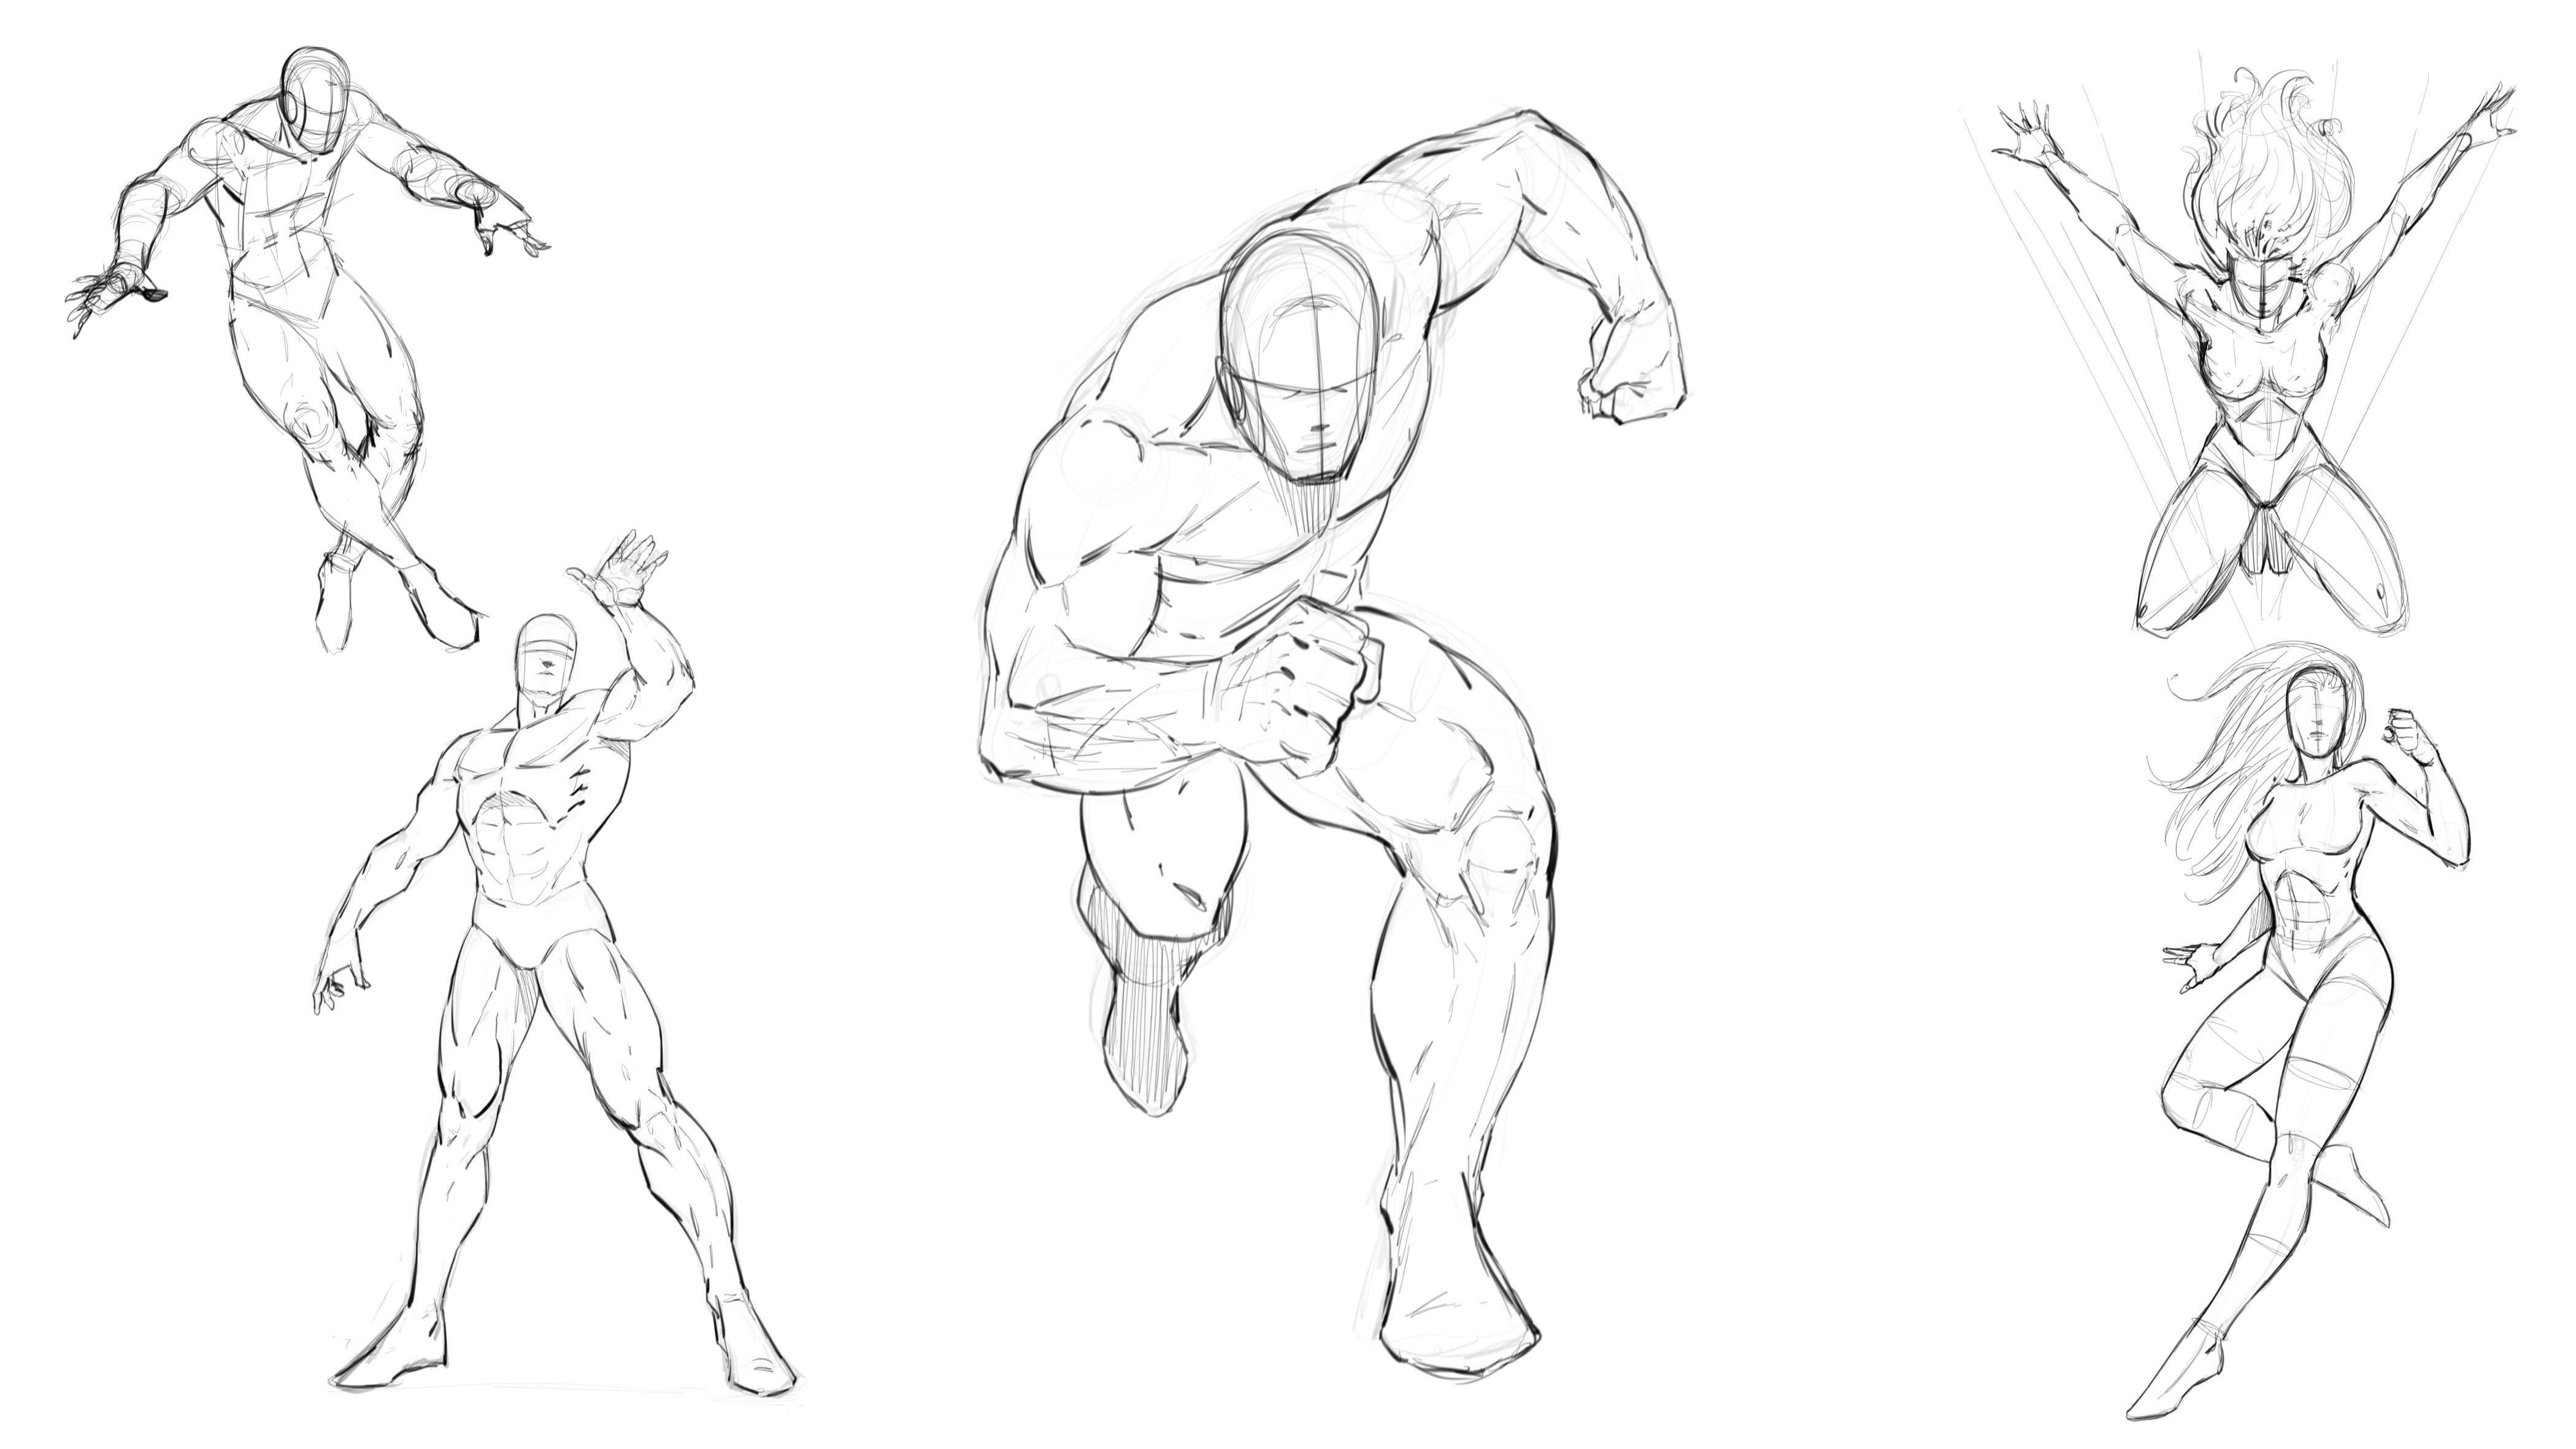
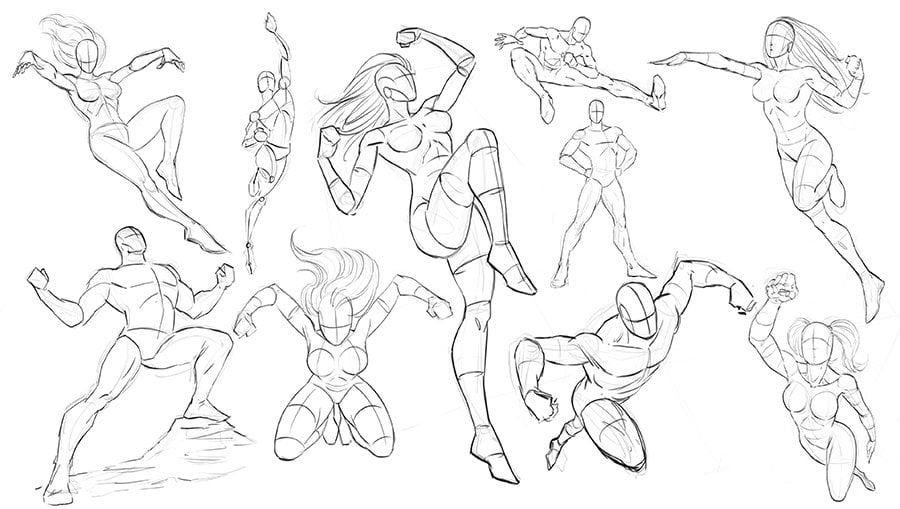
11. Side Lunge Pose: Now let's go and implement some of this. We'll start with oppose. That's still relatively basic. Eso is gonna be a profile, polls somebody kind of lunging forward and we'll just kind of go from there. So essentially, let's start with the pelvis area will just throw that in with a circular shape. We're gonna use this lightning bolt kind of method to push back the leg and then connected to the ground plane. So something like this. So you could use a couple ways, really? Just roughly the knee here, remember, the upper leg femur area is gonna be longer than the period from the need to the ankle and then from the ankle, pivot down to the toes, the ball of the foot and then against the ground plane. So whatever you gotta do, Teoh, establish your lengths. But that's kind of the method I take right there on the other leg. We're gonna bring that for like this. I find this a little bit more difficult to do the lightning bolt because of the way it needs to come down from here. But just put a bit of the arch to the the upper leg. Well, position me here and then bring that back notice It's a an outward bend that a back bend. Okay, so it's just kind of the representation of the primitive skeleton. Also, when we drop the foot down, the foot's gonna be flat here. But when we drop this down, it needs to be higher than it is back here. OK, so that's just going to give us that feeling of perspective. So a lot of times in the beginning, when we go to illustrate something like this, we might put both feet on the same ground playing something like this, and it just kind of kills, um the illusion of death. So are the, you know, the idea of perspective. So now, now we've got these established links in place. Um, and, you know, keep in mind if you want, you could get both Just like this case, just a Ford Ben back bend. Same concept, really. But I like showing the lightning bolt when I can, because it just helps me think about the next stage of anatomy. Or really, what we'll do is we'll move to ah, sterile metric approach. So first, just to show the the angle's off these masses. So, for instance, the pelvis can be tilted back like this. The upper leg drop us off. A cylinder like shape can be oriented. Something like this. A lower leg actually need to bring that down more. We need a little bit of separation for the neither can be illustrated. Like this upper part of the foot Could be a bit of Ah, a wedge like shape like this. And then attach the toes. My bad. Same thing over here. Bit of a rounded cylinder, the upper leg or leg. Um then attach hate diamond like shape of the foot. Okay, so something like that and that gets us started. Okay, so now let's go ahead and softer races bag and dropping some anatomy. And I'm gonna I kind of wanted to do this in a way. Why? I show you more relationships than anatomy so we can draw, inasmuch as little of the anatomy is, we need Teoh. So remember, what we're trying to do now is take what we've studied and implement it into more of our figure. Drawing or more off. Something is a little bit more like a, you know, real world study or something we would actually use in our work. So So what I'll do here is first put in the, you know, the glutes like this. And then we know that back here we have the biceps for Morris, and we know it's relatively straight by comparison to the front of leg. So here, we're gonna get in the rectus femoris and then the fastest ladder. Alice like this When I gonna worry about the i t. Track, we know that it comes down like this attach is to the front of it. We can kind of hint towards it, but I want to kind of forget about that now, a little bit, because again, a lot of time, majority of time, we're not gonna draw that. It is helpful to know so that when you get over here, you can say OK, well, I know the media. Alice is here. Claudius, Maximus include AEA glitters. Max's best for you, me and then appear we know we have another muscle. Forgive me. I'm drawing a blank right now. Um, but there's ah, there's that segmentation that you get that divide. We know that we have the, um the iliac crest, right? here now that we have the and he says right there, somewhere around about there. But again, we're not going to get to detailed with this. I feel like I'm adding too much detail, but I do like to reconfirm some of this so that I can, you know, make some good decisions about the parts that I do want to be defined. S I'm gonna bring this down. We get to the patella. Some, like, bad back here. We've got the gas truck, name IUs. We'll bring that down to the Achilles tendon into the heel of the foot, show the pad of the foot. And, you know, the angle here is to represent the smaller toes going to the big toe here like that. And then down here, we know that the bonus relatively straight. But then the front band here, you get from the not the Tibby. Alice. Okay, so then you get the gas, right? Name is here. Get the soldiers here, and you've got a few of the muscles here that divide. But again, I'm going to avoid illustrating every single one of those. I don't want this to be, um, redundant. From what we've already done. Like I said, we're trying to take. We've learned here and implement it. And to you know, what we'd use for maybe a character resign or something like that. Character polls anyways. So to the other side of the leg again, Rectus femoris, That one's pretty pronounce and a lot of very defined individuals. So I don't feel strange over illustrating that same thing with the vast this media Alice on this side. And then you've got the sartorius. It comes up like this. Now it actually wraps around more like this. But again, you don't see it. This, uh, this evidence, right, so sometimes I'll draw it in first, but then I'll make sure Teoh, pull that information back and then you've got your divides here, which remember these air triangular, or be like, in shape. And this is the abductor group and the Priscilla's and all that. Um, and then back here, the biceps for Morris. So that gives us our perimeter shape to the leg. There's are near patella, and then these kind of curl end, and from an angle like this, these we're gonna curl and then you're going to see that calf muscle pop out from here, that comes down and you get this bend to the hell. It was kind of swooping line. I did it flow and again the tippy Alice here and attached the foot with a basic triangular shaped a little bit more hint to the anatomy. Now ankle here again, gas Charney MIAs. So is because we know it's on both sides. And then down here we have the flex er, digital room longest. Just like that, we can work up into here. Touched the lower torso. Okay, so just like that, we have our polls broth 10 now, um, again, it's It's a lot more segmented that I would use for a majority of my character concepts, but it gives me lots of reference points so that I can now go through and refine this and really pick and choose what I want to see. What I want to be evident in this character, I could tone this way back. It could make the character a lot more, you know, obese and unless chiseled, if I wanted to. But I think it's important to to practice implementing these shapes and forms and mainly these directions. You know, you know where to point these muscle groups. And then again, as we solved to race and refine this, we'll take it down a notch. So let's head over to the next lesson and continue on cleaning up this work.
12. Side Lunge Pose - Refinement: all right, so now it's going softer races back and redraw it. And that one thing I'm noticing, that kind of flew through this a little bit and through the purpose, because I don't want to keep re labeling and drawing every single muscle. But what I want you to dio is look past it now, right? That's really the exercise here. So But one thing I did notice is over here on this side. I kind of did a carbon copy from one side of the other, and I think I mentioned this before in the lessons. But I'll say it again if you see something to even from inside to outside. So, like, medial to lateral side of, you know, some anatomy, then you know there's probably a problem. Okay, that's kind of what tipped me off them looking at. Why does that look the same? Because, you know the body just not like that At the latter, Alice is positioned and sized differently than the media. Alice. Well, same thing here. The soul liest. That I basically kind of place in the same area on the outside of the leg is a lot higher. Does it's more like this. So the gas track name ius is more positioned. Most of the you know where it looks like. It's behind it. Please, just keep that in mind so that its lower on the medial side of leg on the interior side or initial to the lateral side. This part, the outside of the leg. It is taller and takes up more of this space right here. Okay, So now, texture, Probably not that wide, but But now we throw that right out the window. I just want to point out that mistake there. And we started drawing through this and we start to think a bit more about the form, the volume, the perimeter of the silhouette, things like that. So I do want also fix this foot. It's really oddly shaped in place. I need to be a lot flatter on the bottom there. And also I think it the toes air too long from the bend. I think if I pulled that back look better potentially, hopefully and probably gonna bring up the rounded portion of the heel, some constantly nudging these lines around, trying to sculpt it, trying to get the best version of what I could get for today and then move on from there. So that's, uh, something I always say about drawing the human body. Just get it done. Make it look as good as you can port today and then move on and then study and revisit your You're never going to stop improving. But the main thing is that you keep producing the work, so we know that we have a few muscles on the side here. I'm not gonna relabel him again. I'm gonna share the diagram so that you can look at those and study along. But as I get to this part, I just think about what kind of segmentation do I want to see in this character? You know, how defined is this character? Uh, and chances are just going to see a couple of these divides. Not not all of the segmentation is from the muscles there, but they are pushing against this foot. So there is some flex their, uh you know, So you're probably going to see a little bit more separation there. But again, I really want to fight the urge to draw every permanent shaped every muscle group. It just looks bit silly, and that's what we're going for. So again, I want the the shape of the leg itself, the perimeter shape to the most bold content kind of work into the interior forms. And then, you know, like, right here at the I t track, I'm not going to show that because again, this is more of a character of skin on them. So you're not going to see that? Probably not gonna even see. The divide is much with any of this one, Sam. Hardly anybody. You tend to notice any of US definition. You will see the the bump here on the on the pelvis, A little bit of separation here from the rectus femoris. I think that's ah gonna be noticeable a little the side definition leg right there. And that's probably about it. And that's probably even a bit much tie the truth. I mean, that's that's a pretty defined character. Um, go ahead and draw the bottom of the pelvis right there and then with the other leg, This might be a little bit low, but I'm just gonna fill it in again. I'm going to jump past all of these different divides of the muscle really just go right for the silhouette. I feel like the shape itself is pretty pretty accurate for what I want to see for the leg. The position, Maybe a little bit low. I feel like I need to raise it up. Let's do that. Let's see, Just feels a little low on this character and sprays it up to about here and then possibly extend the lower portion. Leg her like that. Okay, so now Gangel for the the silhouette, Get that band on the front of the leg from the tippy Alice. I feel like I'm drawing a bit crooked, and I am so destroyed. Line in there for reference like that. Like the area of the leg right here. Could get a lot thinner or a bit thinner anyways, and again, I'm not gonna show nearly all this divide in this segmentation. So you see here I'm still trying to pinpoint landmarks and define certain parts. The anatomy. One thing I will say that you have to be aware of when you move into this area of the work . So we've again. We established our anatomy illustrations. Talked a lot about you know where the superficial muscles kind of reside. How they overlap things like that starting and ending points. But then, when you get to this stage of the work, you really have to let go of all that, and you have to focus upon conveying the forms and the major masses of the muscles some definition but not tracing every muscle group. I really want to stress that, because I think in the beginning, as illustrators, we tend to trace every muscle group in our final illustrations and our realism, in a sense, because we're trying to implement what we think we know about the muscles on again. I think that's better for your anatomy studies to do things like that. But then when you go to draw figure, drawing example ah, character design, whatever it might be, you have to again let you gotta pull back. You gotta let a lot of that go. You really want to imply a lot of the forms, and even though we're not adding value yet, we'll get into some examples where we do that. We just want to apply these forms, and that means using line breaks and again not tracing the muscles. I think that a lot of times when you see a character that's traced and all the muscles are traced out, you know to evenly it really flattens out the illustration. It makes it more boring on it makes it look more amateurish. So again, just be careful of that. Allow the viewer to kind of connect the dots. There's lots of artists it will tell you that, and that's very important to imply forms and again not trace everything out. So studies like this can be very impactful, very helpful. I suggest you do this as many times as needed to feel comfortable with this sort of pose and then move on to the next. So what we'll do, we'll conclude here. We'll head over to the next lesson and work on some more studies. So with that, let's move on
13. Drawing the Second Leg Pose: Okay, so now we're gonna work on a little bit more dynamic pose. We'll start with something that's a little bit of a Segway from what we've already studied . Nothing to advance. But you want to take your studies that are from the various angles from back side. And then you want to try to relate that information to again dynamic poses or something with more gesture, more character. So in this case, what we're gonna do is start with defining just a box for the basic position of the pelvis and then attach of the limbs from there. Just establish the lengths. First, eso won the like to come out towards camera just a little bit and then, ah, bit of a back bend right here and then position the foot. And I really fight the urge to make any of these established lengths to straight. So put a little bit of bend, even Teoh what you perceive as being relatively straight. Ah, straight leg. But again, you know, flight, there's to draw anything straight on the body. Now, for perspective purposes, the legs gonna be lower. Eso When things were closer to the viewer from ah perspective like this. Where are high level is somewhere will say in here, Wolf. We're to draw Perspectively. You know, something like that we could, you know, make the argument that no picture of sidewalk coming out towards the viewer that one leg is gonna be further back, not always off their standing straight and forward to camera. Then you're not going to do something like this. But just remember little things like adjusting the way that the foot is reacting to the ground plane can have a significant difference on the way that you're drawing comes out. So we'll start with something like that. You see, it's very basic, but it gets us Ah, you know, kind of a skeletal structure of basic skeletal structure to start with. So as I work into this, if you want to stay with the stereo metric approach, remember, that's gonna be really blocking things out. You can go a Sfar as's to develop cylinders or cubes, rectangular cubes, particular prisons, I should say, and you know, you can really work out the depth perception on something like this. If you feel that that's not something you need, then you can jump two cylinders. That's still kind of allows you to do that. And if you're even more events in that, you might jump into just drawing anatomy. But a Zyl say over and over again. And these lessons, I feel like if there's anything you tend to struggle with, you might want to get back to the fundamentals. And for me, this is one that always helps me get more perspective in place. So this is the, you know, the work up, the under drawing and the fleshing out of the forms and the masses. And for me, perspective can be tricky. So I'll often times revert back to so wonders and cube like shapes or prisons. So again, this is coming out towards camera bit more. And we've got the knee area in the lower leg. I don't come down. I kind of picture that this is more parallel to the viewer now. So in that case, I won't put as much depth and dimension on the still under like shape there like this find center on these when you can. So this like is gonna be off, you know, not pointing towards the viewers much. So the center line is gonna be right to the edge. But we can still try to find center this way. So with these dis shapes in a line right through the middle, But the missed this, uh, this shape or oval is going to be a lot more, Uh, you know, it's gonna be wider or taller. I guess it we should take, um, something like that. And we scale this down just a little bit. So what? The foot? Remember the inside ankles higher. So we can also start to think about some of these relationships of the anatomy like that Foot's gonna come out towards the viewer like that. Okay, so now we've got our basic structure in place and we could start the land some anatomy, So let's go ahead and a racist back. I'm just gonna softer races, and I feel like the front leg is a bit too large by comparison, but that might work while for trying to really push that feeling up for shortening and death perception. So can I go with it for now and see if I need to adjust that along the way. So some of the things I like to think about right here really the the muscles that kind of encapsulate other areas of the body. So for me, it's finding the ASIS up here like that and then using the sartorius, it comes down and around. Remember, it gives us this elongated s like shape. So even in a foreshortened pose like this, that's still gonna be evident. And then along here, it's gonna come down, attach the side here. So just keep in mind this line down here is not the sartorius it attach is down here to the tibia. But then we continue on with the tibia. It has this very distinct curve, and it really looks like it all kind of connects. That's ways to be drawn. That big s there. We can get in the knee is a placeholder so kind of guessing at its position right here. But we'll just draw that in again as a placeholder. And then on the other side of the this area with ASIS is the, uh, tensor fascia, Lottie. So those two kind of again encapsulate this area. So when you use those as a reference point to get the quadriceps in, so you've got quieter steps that looked like a kind of a heart like shape when they're all combined for an upside down heart. And then just point those right to that ASIS get in the rectus femoris right here than you know, getting kind of subdivide these muscles as you go. But again, it's a It's a good place holder. They're gonna have that over here is much think of is visible. But we could start cutting into this. We still have that sartorius to guide us. And then, you know, we know we get the media. Alice. Bestest media. Alice. Right there. Here. You see, I keep nudging these things around some kind of guessing the position at this moment, and then I'll just slowly start to you, uh, divide into it and adjust. So get the lower pelvis in there. Get some of the gloomiest medias over here. Yeah, and so now let's work down into here. We've got the Castro acne Meus, the Solis, and then here you have the flexor digital. Um, longest. It looks a bit weird. Let's do that again when we get that curve of the tibia and all these muscles just reside and you know, kind of bump up against there so again, you can use that for a landmark. And as I mentioned before, another one that I like to get in on the front of the way is the Tibby Ellis interiors that starts on, uh, the side of the knee. And then it extends over inside of the foot. Something like that. Okay. And then as we work down to the side over here, we've got the next one in line is the pro gnaeus longest comes all the way Appear Oh, down! This is going to split off. And we're going to get the extent, sir. Digital him longest through here. That comes over this way. You got the soldiers over here? Look for that peak of the late here. So you kind of have this apex here and here. And then the medial millio ISS merely owe us. I'm saying that right. It was just called the ankle. So you got the medial side, the lateral side. So inside, outside, middle on outside, I guess. And then you've got the extent, sir, How loosest Longest that comes from behind here. And that points down to the big toe since looses means larger toe. That's the muscle that goes down there. And the extent sir, digital arm longest divides out. So that's this one. Here is a little messy. Will clean that up that divides out to the for other toes something like that. And then on the inside of the leg, the leg just keep in mind it comes out and it kind of bends back inward. So now this is more significant as you're taking pressure off the upper leg. Uh, so, you know, as you sit down, you'll see this part of the leg really start to bow out. Eso be careful with that The way that you show that whether you show the flex with attention there because that is going to affect how the leg looks like it's it's bearing weight. I think I need to widen up this rectus for Morris. Some like that. And then you have these muscles that point towards the Fehlberg lower pelvis and kind of something like that, just, you know, keep it easy. It's just kind of point inward. Uh, and so now same thing over here. He's kind of pointing inward, like there's a little bit of a bow outward like this, and that it flattens out right about there. You might get a little bit of that Fastest ladder, Alice. So this is ah, one of those tricky poses. You know, when the legs starts to turn away, you start to see less of the other muscle group. Naturally. So, uh, playing around with you know, how much of that you might see on the very edge becomes tricky. So you just have to, you know, men over these lines around and make the best judgment call. We do know that we would see from an angle like this. Where does definitely see the rectus femoris bear? Predominantly, I think we would see just a little bit of the fastest lateral ous like that as we bring the knee down. So the patella back this way Gas truck medias this way. And then we can obviously reference what we did over here already. And we know we got the soulless. Actually, I think that would bend. I would go back this way, been like this, and then we've got that flex for digital. Him longest. We've got the medial now, Melillo sis or ankle. I hope I'm saying that, right? And no ankle sounds right. So we'll go with that and then for here would get the tibia or shinbone. But then you're gonna get a little bit of that to be Ellis Interior kind of poking around. It's a pretty strong muscle. So when the legs were fined, you you see it even from a perspective like this, where Tung, obviously on the other side of the bone, for the most part. But it does change that profile, so we'll get that in there. Obviously, the foot comes down, you've got the the end of the foot there. Okay, so just like that, we have the rough layout of the pose and you see, it's it's pretty crude, but we're gonna clean it up in the next lesson and talk a little bit more about that. So with that, let's move on.
14. Second Pose Refinement: Okay, so now we're gonna software a system we draw through it and I will time lapse this one a little bit speeding this up about 2.5 times. Mainly just because, you know, we've put in all the anatomy. We've got a lot of the muscle orientation in place. But now the main goal is to just use line, wait to clean it up and to pick apart areas that we want to be more defined in the illustration. Eso I still want to go for a pretty muscular superhero kind of form, but at the same time, I don't need all that divide of every single muscle. Just, you know, it would become distracting for any kind of real world life illustration or figure drawing or anything like that. But I do want to bring out some of those muscles that are evident in a character that's very well defined and especially in this kind of stance, where the character is squatting a little bit. So there is some, you know, some pressure or some, you know, flexing going out of the muscles. Eso You could bring some of that out. Now, one thing I will say about this type of study is it's really a good idea to do this a couple times, and you see it doesn't take very long, and obviously this is sped up just a little bit. But it still didn't take very long to Dio. But when you can create a few different versions of this area of the work or any state to the work, really, But you really take the time to isolate a certain part of your study in this case, the line Wait and you do a few different variations and you look at them comparatively. It teaches you so much about your art. It's why I always recommend lots of sketchbooks, lots of, ah, various studies that you can look back on, make sure always date your work, and it teaches you so much about certain things. Maybe just a certain element that you're getting right. Anatomy is so tricky. And so, um, you know, complex, really that it's good to pay attention when you did figure a certain thing out, and sometimes you'll even go back and realize that you were doing better at maybe legs or arms or portion of the anatomy and then you kind of got away from that. For whatever reason. Um, I really couldn't tell you why that happens. I've seen it in my own work. I've heard others talk about it, but those studies and that comparative thinking in your studies can really help. You kind of hone in on that and be really just a little bit more specific about the way that you are learning not just getting in the habit of drawing for the sake of drawing, because, you know, you always hear practice makes perfect, right. More practice makes you a better artist, and that's true. But then we also have to be aware of what we're practicing. And And I really think that when you separate portions of your work, whether it be the line way, whether it be, you know, placement of anatomy, whether it be just your shapes of shadows creating volume in the illustration, whatever you're looking to dio and really hone in on that and again comparative studies where you make ah few of the same study but maybe rotate it. Maybe just try it. Maybe take the same polls like this one and draw a couple times and you just kind of get that information really pushed in the brain box. You know, you really take the time to focus upon it. And then I think that when you do that mawr often than not, you start to commit that specific thing to memory and you don't struggle with that as much anymore. It's why you know you can draw certain poses with a lot more ease than other poses, and you know that about your own work. I definitely know that about my own work. You know, there's certain poses I still to this day struggle with, but I need That just tells me I need to sit down and really focus on that specific pose and give it lots of attention. Lots of studies and, you know, ultimately level up in that area of my work. So we're going conclude here. We'll head over to the next lesson and continue on. So with that, let's move forward
15. Second Pose - Value Study: All right. So what I wanted to know is establish some light and shadow and you could do this with a marker if you're not working digitally more of a gray scale. So I'm just gonna use a layer and push this back with the capacity setting. And what I want to do is just think more broadly about the way that this is being let. So, for instance, if the light is on, we'll see the forward facing of the lake here. Then we're going to get, ah, shadow to the side of the fastest media. Alice, We can kind of grab the whole side of the lake here, So I think that what's important first is instead of working into the smaller muscle groups , eyes just too broadly light the whole lake. So, for instance, something like this you can even do some on the ground plane if that helps you toe think more visually about it more dimensionally about it. But again, try to fight the urge to cut into these two awfully soon and get the whole side of legs out of the foot and then work into the smaller forms. So I really want this to be. We'll say about a 40% shadow. Something like that. You're 35. Uh, and then once I've got that larger shadow in place, I can again work off into the smaller forms. Think about the way the shadow, my cast, you know, things like drop shadows, cash, shadows like that. Again, I feel like that Sartorius is, um, a little too defined. So I'm probably gonna get that out of there. Still trying to figure out if I want to keep that until sometimes introducing too much segmentation, too many details again just makes it look on natural. And I feel like that's an area that doesn't look as good as it could. We also want to chisel these shadows a bit. You don't just want around everything over. So it's real easy. Toe. Get in the habit of just rounding around each muscle, and sometimes it looks a lot more natural if you just put a weird little kind of bumper and consistency into something like this. So even this area right here is that right? In the Sara, it's a little too evenly lit, so I might come back in a race. Parts of it and play around different shapes. So I have, you know, have a curve here. That angle here curved back up here. So basically just kind of shifting something is to clean. So to me, to clean is like that. That's actually not too bad, But let me make something overly rounded, like to clean is something like that. So I want to fight that urge and just play around with, you know, shifting the way that it's let it makes sense here, Uh, a bit of a shadow on the bottom of this same thing here with the foot. I might get a little bit of shadow on the very front of the foot that makes it look like it's not so flat. So you really want to think about playing changes when doing this? Try to think like a sculptor, like if you were sculpting this out of a piece of clay, you know, where would the shadows go, where with the changes in the major planes be so you can actually start very almost like how we started with a stereo metric approach to draw the anatomy. You can also shade in that same idea and also just remember that light is kind of like perspective. So use perspective lines and picture where that would hit and where it would stop to, you know, stop reaching that other side of whatever it is you're shading. And ultimately, when all those feels relying your reference, look at photos, convert photos, Teoh very vivid gray skills up the levels or the intensity of the gray scale so that you basically see more of the shadows. Eso Now we've got this kind of reference layer and this bit of value to give us an idea of you know what? What might need to be edited? What looks right, What could be better things like that. So I like to do this a lot. It's you see, it didn't take a lot of time, but it can aid us in the process moving forward, whether it be to to shade the work with cross hatching or to just, you know, sort coloring it, whatever it even going back and editing our previous line work. So, like I've mentioned already, I feel like the sartorius is just too well defined and it looks almost a bit silly, so I'm gonna get that out of there. But again, this value study can help me even gauge the existing line work. Have you heard of some of these little lines again? Play around with the concept of line breaks you don't always need, uh, every line to be connected to convey, uh, these forms. In fact, the land breaks will generally make it look a lot more confident. Some like that. And then I might go back again and, uh, you know, at a little bit more line weight based upon the shadow, Especially if this is going to be of value that I might just utilize with color that I might want to still go back and beef up these lines. Eso that they read independently from one another. Number line. Wait. Works best when he put a heavier curve on the outside, or I'm sorry. Heavier line. Wait, honey on the curve. So as the anatomy curves out, you can make that Ah, that line thicker. And then also, you can put a heavier line, the thicker line to the shadow side of anything that you're trying to make more pronounce on. Then we're all spells. The main thing is just that There is a back and forth from your line weight that it goes from thick, that then s so that it doesn't appear to overly repetitive and flat prettiness. Everyone over here. There we go. So it's starting to Ah, look and feel more dimensional. And that's what we're after. So for that, show me a thing or two about how you can developed the lay further and given a bit more volume on. Obviously, you could go back through here and you could redraw over top of all this and you could shade it with cross hatching like we didn't previous examples with the arms and things like that. So you can, ah, into all sorts of neat things with this. Ah, this value study. I just feel like it always helps you to think more three dimensionally about what you're drawing. So even if you don't plan on being a painter or digital painter, this stuff can still be very helpful for your on air lineup. Eso we're going conclude here, head over to the next lesson and continue on
16. Male Vs Female Leg Poses: All right, So in this video, I want to draw some examples of male versus female and draw the legs in a more dynamic way . More action or ended way. Eso. The main thing here is that we're not going to use as much segmentation and divide for the muscles. We've already kind of covered all the muscle groups and where they start where they end up general and things like that. So we want to do here is implement with alarm. But again, in a more dynamic approach, more poses a little more foreshortening. Um, now you can still rely on the previous diagrams to age in this process, but you're gonna want to pull away from all the segmentation, all the divides, all the definition. And obviously you're gonna play around this concept for a multitude of characters. You've got the major differences, obviously male to female. But then you have lots of variation. You have, you know, overweight characters. You have characters that have shorter legs versus a long, longer legs and, you know, proportion differences, things like that. But I do like to practice with the overly defined characters first because it allows me to think more about the volumes of the muscles. See the definition, and then it's a little bit easier for me to pull back and away from that. Now, as we get into the female representation here, I am going for a little bit softer. Feel not, doesn't mean that you can't see women that are very defined, very muscular, obviously. But in this case, I want to think a little bit more about the line language in the shape language I want there to be. You know, I want the lines toe flow through one another. I want there to be more sweeping Kercher's and generally that will give the appearance of a more feminine character. And that's what I'm going for. Eso again. It's not that you can't have. Obviously, females that are very, you know, have very dense muscle structure and that kind of thing. But in this case, I wanted there to be a little bit more of a, um, softer feel to the anatomy. So generally the legs will be longer also, you know, we obviously know that the hips air a little bit wider and most instances and some showcasing that Aziz, we go up the upper portion of the leg. The anatomy widens out a bit mawr and again, just a little bit wider bit of the framework on the pelvis area. Now, another thing I want to make sure to mention when you go to pull your reference and study from it, you know, things like picks obey. They've got a great amount of images, obviously, can just google images. But if you're gonna use it in your work, you gotta be a little bit more careful about that. But one of the things I did here is actually studied from certain parts of various images. And this one here, I'm actually adding a leg. And this leg is not part of the reference. This is from my own imagination. And I want to stress that because sometimes I will draw purely from imagination. If I find myself struggling that I'll go back to some reference and but I'll still make sure to kind of run it through my own creative filter. OK, so I like I like a little bit more of a dynamic feel to the work. And again, I'll challenge myself to take a component of the reference maybe one leg maybe a portion of the leg. Like if I'm struggling with the upper leg anatomy, I might just utilize that. And then I will go from there and construct my own version or add on pieces. And I think that's a really important exercise that we should all practice because if you're always studying from reference, if you're always trying to recreate what you see, they become a little bit more of just portrait's. In a sense, you know, you just you're just trying to create what's visually in front of you. For imaginative works, of our for character designs for storytelling, I feel like you need to stretch your imagination a little bit more. You need to practice developing with not there in a good way. To do that again is to take a component a piece and then add to it Eso, for instance, with this leg pose at the top left. I changed it from the original reference. That's why I'm not showing the reference. And then I also added feet. There was no feet in the reference, So just things like that were you again challenge yourself to add to it and develop it further. This last one. There was absolutely no reference whatsoever, and it probably shows in the stylization of the line working the way that I create the anatomy. But again, it's that kind of practice activity that I recommend we all dio so that we can develop imaginative characters a little bit easier and not always feel like we're so compelled to find just the right reference. Mainly because that could really be just a horrendous task if you're always trying to find just the right pose or even trying to create the right pose with the tripod, the camera, which I find to be more suitable but it's still a lot of work, you can develop your own imagination and get past that. So let's conclude here had over to our next lesson and continue on
17. Male Vs Female Hips: so in this lesson will draw the male and female pelvis and talk about the differences that you see there and what to look for. So what? The middle pelvis. I tend to draw it more angular, more boxy. And although if you study the bone structure, it said that the male pelvis is actually taller. I don't see that, especially as it relates to the rest of the anatomy. So by the time you fill the rest of the sin, I feel like the female pelvis looks considerably taller. Now the few mill pelvis is actually overall larger. It's definitely wider. And so what happens here is that by the time you draw out the width of the hips and you start to work into the upper legs, you're going to really see this Boeing effect. You know, just think of the lower portion of an hourglass, and the other noticeable difference is really the V shape that you get. Ah, and the connection points of the legs to the pelvis area, and you're going to see more of that V shape and the female character. So what? The male character. It's still there, but the angle isn't as dramatic eso again these air just the preliminary ideas in these shapes that I like to introduce a zai get ready to draw the rest of lakes. So try to keep in mind that finding landmarks and relationships really helps out and complex areas of the body. And I feel that it wasn't until I started to find more of these ideas and commit them to memory that I was able to draw legs from my imagination a bit more clearly. So the other thing to pay attention to here is the difference of the angle that you get from the femur as it attaches to the pelvis and comes down to our center of balance. So the reason these angle and obviously is so that we can stand in balance and the angle is different. This is referred to as a cue angle, by the way, Bengal is different from male to female and again, another very helpful thing to remember, so that you're not drawing the characters with the exact same posture or alignment of the femur in relationship to the pelvis. Eso again very quick and easy thing to kind of guide you and then as we work into the wrestle leg. Another thing to keep in mind is it. The legs for the female are actually spaced out a little bit more so in this very relaxed standing position, or maybe a little bit more of a soldier kind of stance, the feet closer together. In this instance, you're still going to get a little bit more of a gap. Now, this isn't always, obviously, because there's lots of different characters with different anatomy and different posture and, you know, fat deposits on the body, things like that. But generally you're gonna get a little bit more of a gap in between. The legs of a female with legs on the mail are actually going to meet closer together and oftentimes not have a gap there. So the, uh, proportional legs of the mail generally are thick enough where they come together more again, variations in all sorts of people. Obviously eso. Now, as we work through this, we've got more this information house. Another thing to pay attention to is it on the top of the hips for the mail. You typically will see a little bit more of the fat deposit in the oblique area that kind of passes over the ASIS or the area of the aces on the top of the hip bones right about there. So this is something again that's usually a little bit more noticeable in Mel characters. Doesn't mean that females can't have the same fat deposit. It just generally, males have it more noticeably in this area, even if they're at a low fat Um, Index. You're still going to see a little bit of that on, and it kind of shapes right down into a V into the crowd. So now, again with the aces, Aces is such an important landmark, and I use this a lot to really sculpt the rest of legs because you can use this to pinpoint where the quadriceps come up and point to that area, right? So it's a great landmark. It's It's really one of the most help helpful areas for me in drawing legs confidently. So I know that if I bring all these quadriceps up to that point and remember, it's the sartorius that kind of encapsulates the quadriceps is it points up that area, so you have on one side the sartorius and on the other side, the tensor fascia, Ayla T. And I'm probably seeing that Rome, but it's it's a pretty complex pronunciation for me, but those to encapsulate the quadriceps and point that ASIS area again. It just makes it a lot easier to draw that very complex Siris of shapes and forms. When you have these things that you can rely on that you can again commit to memory. Hopefully now, the other thing that I think is very important for getting the silhouette of the legs right is thinking about the you know, the inner thigh muscles. In this case, we're drawing these as, ah, one large kind of form and then the relationship from that to the vastness media Alice. And this applies to both male and female. Now, if you're going forward, very defined male, very sculpted anatomy, then you're going to really show the segmentation these muscles. But I feel like if you don't at least pay attention to the relationship of again those inner thigh muscles to the fastest media Alice, you won't get that shape right that you need for the inside perimeter or silhouette of the leg, for instance. I think that when I would draw female legs before paying attention to this area. I would just draw like a larger curve and I would try toe, get that curve right. And what I mean by that is tracing that inner thigh and trying to get that compound in curve of those areas I'm describing. Well, it's a lot easier when you get the landmarks in place and you draw them is individual forms and this could be my opinion. But I want to share with you and then go back softer race and redraw the silhouette of the inner area of the leg. I feel like once I start to do that, I start to get a little bit more confident at drawing that part of the leg. I always seem to get that wrong until I adopted that, so just remember here would draw the forms of the and her thigh. In this case, all all of those is one kind of collective Ah, volume and then the vastness, media Alice and relationship to the sartorius, pointing up to the aces. And then you had softer race that back and then go for the silhouette shape. It's almost like a connecting of the dots, in a sense, you know, rope drawing around all these volumes. So I hope that makes sense. And if it doesn't feel free to question, and I will try to elaborate on that further. But I do feel that that's one of the things. And you could see me do it here where I start to draw through this now. And I could just go around that together. I might cut into it a little bit to show a little bit of definition there. But even if I don't show the definition, I still need those two component curves to make that inter rids with leg look and feel more organic, more natural. Andi again, that's kind of how I was able to do it. Now, if I cut into it, I'm gonna get a more rigid feeling. You're going to see me do that on the mail like I'm going to cut into it. I'm going to show more definition more. You know of the segmentation of the muscle groups. Andi, again, this is one of those things where you have to do this multiple times. You have to try a variety of these characters where some of them. You practice softening up the forms and adding more of the fat deposits. And, you know, you making this wider and, you know, making the limbs thinner for certain care. You know all variations of these proportions. There's so many different character types in so many different proportional types for the human body. But hopefully this will get you understanding again the relationships, the starting and ending points, and at least how I tend to work through it so that you can, ah, you know, better gauge your own work. You know, develop your own workflow. Eso again kind of drawing through here and sculpting. I'm going to also leave Ah, a few of the landmark areas in place, like the lines for the connection of the legs to the hips. I want to show that a little bit more, Uh, you know, pay attention to the the angles that you see on again. I'm gonna use a little bit more angular representation of the male anatomy. It's just something I tend to do in my work, not necessarily something you have to do because obviously you can have characters that are a lot less angular. It's really dependent upon your own style and again showing more of the separation orchestration of the muscles here. And the another good thing for turning the leg is paying attention to the vast is I'm sorry , the rectus femoris. So the big muscle right up the front center of the leg again that in conjunction with that , pointing up to the aces is a great way to figure out where the rest of the anatomy goes. It's a very helpful landmark so that once you get that right, remember, that's gonna come right down and point to the patella or the knee. So if you turn that you want to turn the knees of the, the knee can rotate outward. Just pay attention to your own leg. Obviously, watch your foot as you rotate the leg outward. See the range of movement that you have from your knee and how much it can rotate outward. But again, when you draw that on paper, you're going to want to have that coincide in that relationship, from the need to the rectus femoris in that obviously going back and those muscles pointing to the aces so again I can't stress it enough. How much those landmarks and, you know, kind of memorizing that will make all this much, much easier for you. But regardless, don't expect it toe happen overnight. Don't think that you're going to draw long in this lesson. And at the end of this lesson, you're gonna have legs mastered. Even at the end of this course, you might need to watch it twice. You're gonna need to do as many studies as it takes. And if you're ready to do that, then you ready to be proficient artist, A talented artist. But you have to be ready to do lots and lots of studies, especially as it pertains to the legs. So we're going and wrap up here and head over to our next lesson.
18. Hips - Refinement: all right, So now we're gonna softer Racists and redraw through it, and I'll speed this up a little bit because it's been It's a bit redundant now, but again, Also really looking to do here is clean up. The work makes the final decisions about the anatomy. One thing I did find myself doing here as well is actually checking the symmetry or the proportions from one side of the other. So now, looking at it, in retrospect, I can really see that the leg on the left on the male character is much wider than the one on the right. So I think that initially I was paying attention more to the connection points of the anatomy where they parts of the muscle start where the end and I was kind of missing the proportional elements. So you know that's bound to happen. You know, if you're focusing on one thing, I do think that it's beneficial to focus on a specific thing in the work and then really work through that as much as possible. So when you work on proportions, work on proportions when you work on lie in wait work online weight volume of the muscle time of the muscle. Carry that through through the entire illustration versus, you know, maybe rendering one leg in its entirety and then trying to render the other leg. I always feel that when I break things down in that way, I tend to get the most out of the work. So here you see me checking the cemetery to the leg, and that's when I really notice it. Wow, that curve goes way outside. So that perimeter shape of the bastards latter Alice was just way too far out. Um so correcting that and again, I'm making the male character a lot more segmented. So showing a lot more definition in the anatomy, I kind of wanted there to be this variation anyway, so that I could show how I try to get a little bit more of a softer representation to the female characters anatomy and then, um, or Bridget and defined representation to the male anatomy. But again, remember that obviously, that doesn't apply to every male and every female. I'm just trying to give you, hopefully the basis of information that you can you the lives to develop your own characters and see through this a bit more clearly now. Another thing I want to talk to you about is when you create these studies being ready to create lots of them. And I probably have already said that in the course. But I want to make sure to keep hitting this home. That one of the things I've struggled most with besides drawing hands and on faces at different angles, had two different angles. Would be lakes, leg anatomy and just legs in general are so vast, so so many different ranges of movement and then also the way that they are shaped, obviously from male to female, and then the complexity of the definition versus people that are not defined. When you start adding in all these variables, they're just tricky. And I can't say that I have had to work harder any part of the body mawr of than probably hands than than legs. I've probably spent more time on faces and head drawing because, you know, we focused on that area, the work of our characters so much but legs have been just the hardest thing to get right. But what I want to share with you is that if I look at my work from 10 years ago, the way I can draw lakes today, it's much, much better. I have a lot greater understanding of it. And the reason why I want to share that with you is that you just need to take that, uh, take, you know, a little bit of comfort in that idea that as long as you keep drawing them and developed lots of studies, even if you don't get him right the first couple of times, you know, So you're drawn him today. You're not happy with him. Just keep at it. You're gonna develop lots of studies. You're gonna have to draw many, many representations of the legs from different angles. But it starts here where you first think about the basic shapes where the anatomy originates and you know how it looks and things like that. And again, comparison male to female. But then you're going to have to develop lots and lots of practice studies. But remember, in retrospect, after you put in the hard work, you're gonna look back and you're gonna think yourself you're gonna be so happy that you did it. But in the day in the moment of creating. Sometimes we can get very frustrated and see the slow crawl off a progress in our work. And just remember that that is just something that happens to every artist. But you will get better. A za long as you finishes on should keep going and you know the to the victor go the spoils , whatever that means. But just keep at it and you'll be glad that you did. So let's move over to our next lesson and continue on.
19. Male Vs Female Gluteus: All right, So now we're gonna take this, and just to speed things up, I'm just gonna race the interior information, so waste not, want not. It's pretty easy to just take the silhouette of what we've already done. If you're drawn on paper because flip the paper over and hopefully with a little bit of luck, you can see through the paper or a little bit of light you can definitely see through the paper. You know, just use a window if you don't have a light table, something like that. But you see that just by erasing the interior information, we can save ourselves a step. And so now trading all this race bag basically flipping these characters around. Okay, so now let's Ah, let's just point out the major differences from drawing like the glutes. So with the male character, probably the first thing that's noticeable is the glutes are a little more squared off quite a bit more squared off. Actually, eso I start off very boxy when drawing the male glutes like this. So very, you know, sterile, metric boxy approach, angular things like that. Like I probably mentioned multitude of times throughout these lessons the mail. Anatomy generally is more angular anyways, um, I always feel it's a good way to kind of convey that through the illustration is angles for the mail on more Kercher's, uh, subtle curves for the the female. So for the glutes, just like that kind of boxy information, then for the female, I'm just going to extend this down further. So again amuse more curves. How many is a bit more, Um, but more height as well. Filic eight still needed to bring this line out further, even though I shouldn't really change the silhouette, but it just appears a little bit uneven for some reason, as I start to illustrate glutes here, but and then you get a bit of a V shape, and that's evident both, but I think it's a little bit more significant in the female form, so a little bit more of a V shaped there where comes and meets the small, lower small of the back. Remember that the arch that we get here is from the ah iliac crest. So something like that, then, if we were to segment this more and think more about the anatomy, you've got the gloomiest Maximus here. But then you have the gloomiest media's that comes over like this. So you're not going to see this as much. In most people, you do tend to see it a little bit more on a very muscular male, where they'll get Ah, a bit of a dimple right there that comes up on die. I want to say that's because you're seeing the segmentation of castration from the media's a little bit, Um, not exactly sure on that because, like I said, you don't generally see the divide there, but it's good to be aware of it. So again the medias comes through here. The bloodiest Maxima's like this. And then as we work down into the back of the leg, obviously you can reference Thea. Studies already did. But the big thing is that you just have this divide right down the back. It's pretty much center, and you have the, um uh the because it would be the lateral side, the biceps for Morris and then on the inside or medial side of these two major muscles of the hamstrings, you're going to get the semi tender know, sis, and I'm not gonna re illustrate these guys. I want to show this more with the the way that I would draw, you know, the legs of characters. And like I said, you're generally not going to see this divide. Hardly ever. Um, especially in a relaxed pose or something like that. But again, it's good to know it's there. It's good to pay attention, that diamond shape that you get to the back of like now you will see that more so even though you said you typically won't see these lines right up the middle like that, I think they look strange when every tryto implement them. You do often see the shape here on both male and female where you see this, you know, the it looks more like the you're just seeing the gas truck. Neemia sore calf muscles come up to a point. So you see, a lot of artists illustrated like this, so a bit of ah pyramid like shape up the back of the leg. So, like I said, it looks like if you if you didn't know the underlying anatomy, it looks like the calf muscle just kind of come up and protrude up or insert up into the back of, ah leg there. But once we look at our illustrations without the skin, basically, we know that there's actually on opening there, that there's a lack of Muslim. That's that diamond like shape that you get. So again, it's funny how, when you start to draw this stuff, you have to, uh, well, you start to get a better understanding of what's really there and what's not So things that you drew before that you know, previously made sense. You start to refigure, rethink about what you're doing. Oh, I've kind of been misinterpreting that information, and that's just natural. It's something that's just gonna happen. Uh, really you need actually be glad when you find those specific areas in your work where you're forced to rethink it, because you, uh, again you were kind of misinterpreting what was really there or not there. So again, the major things with the glutes is just more angular for the male more squared off. Obviously, it's the same anatomy, and, um, you're just gonna play around with the, you know, the orientation. Obviously, somebody, it's less muscular. They're not gonna have as much definition ah, of a straight across the line or something like that. So you're gonna play around variations to that. You're probably going to see a very big, um, definition line right here. I was kind of throwing that in there for now and then if they're good shape, you'll see more of the center line of the back. We'll get into the torso in some lessons real soon here. But the you know again, you're not going to see that everybody. Um But if they're more defined and in better shape than you will see a little bit of a line there, you'll see those muscles and the lower back again. You're going to see more of a V like shape right here. And that's really it. I think that if I did any definition, it would be more to the side to the leg a little bit on the sides again. You get the fastest ladder, Alice. Over here, you see a little bit of the media, Alice and the Sartorius kind of wraps round and attaches to the medial side of the leg here . But again, unless you're doing the full on breakdown, which we've already covered, then you're not going to really show all that. It's gonna be a little bit more of a representation like this. Something softer, racist, quick, and just clean these lines up a little bit more. I will show the major differences a t least the way you know, envision it from male to female again. Sometimes less is more when you go to illustrate these these divides these segmentation is to the anatomy and you don't want to connect every line. Sometimes you just want to hint to certain areas so that the line comes down here. We're not gonna draw the way down to the calf muscles, but they'll get more defined as it come down into the character. Just remember, you get this sort of rounded nous. This is really the ah, you know, the the side viewer perimeter shape of the best this media Alice. There's actually again if you reference the illustrations from before, there's a few muscles that coincide in this area, but obviously want Teoh draw the characters with skin. You're going to just get the single perimeter like shape and not an area that you typically see definition visible definition. So just have that line kind of fade off as it gets to the outside Now, Typically, another thing that you do seem to notice is ah, for the female characters, there's gonna be a little bit more gap in between the legs, especially if they're thinner versus the male, where the legs are generally wider. So they tend to converge up kind of, you know, connect together a little bit more like that again, that's gonna very greatly based upon character types. And if it's somebody that's, ah, you know, in great shape versus a little bit heavier. These are all you know. This is gonna kind of very you're kind of playing around with where I might connect the lines. Obviously, once I introduced value into something like this, it becomes a lot easier to read. Makes more sense. Calf muscles kind of coming up. And then I don't think I would connect this line back here. You'll see some artists will do a little broken up line like this, and it really depends on your style and what you're trying to make a focal point in each area, something like that. More small of the back. And just remember, on the sides here as you go up past the iliac crest, You're gonna get the external obliques again. I'm gonna cover those in the future lessons here. So we're just going to stop right here. Ah, and allow you to kind of practice this. But again, this is ah, subject to change based upon the character types and lots of different variables. But hopefully, this gives you a better idea. Some of the major things to look for as you're trying to illustrate, you know, the glutes in the back of the legs here. Eso that'll wrap this one up, we'll head over to the next lesson and continue on eso with that. Let's move forward.
20. Gluteus Muscles Rendering: Okay, so let's draw over this and incorporate some volume study to it. So basically, let's first to find the light source. Well, say, with light if we were to do an orbital kind of affect light sources over here somewhere. Okay, So that means that it's on this side of the body versus over here. If we thought again, like in orbit, it be on the other side of the body. So you get more edge lightings. We wanted to be again, kind of on this side of the body. It's going to cast a bit of shadow, and it's going to make these forms appear more dimensional. So that's the purpose of this study. Now we have to think about the side of leg here, catching some shadow. You can draw these shadows in. You can sketch him in like I'm doing here. What have you feel most comfortable with? But the main thing is that we try to round over, uh, some of this information, um, probably gonna get a bit of shading on the inside of the leg. Obviously, this side of the leg is gonna catch a larger shadow. You might get a little bit of definition just to the inside. I'm gonna kind of reframe from adding too much definition on the back of the leg. Like I talked about what? The hamstrings. I don't really want there to be this visible separation on the back. You might see that. And you know, we have a body builder somebody. It's really ultra defined. But generally, for most people, it's just not going to be evident. If I was going to do it, I might still do it. But I might add it in with lines kind of cross hatching like this. So typically, when you do something like that, it doesn't look so rigid or it's traded or whatever, like there's not this defined line that you're going to see. So sometimes you just have to be careful with the way that you utilize your lines. You know, obviously, in the human body, there's no actual lines were just trying to convey a sense of, ah, against separation definition, things like that. But you can also get that with your cross hatching. So you just got to play around with these concepts. So this is all meant to resemble kind of solid shadow up until this point, but I will also play around with ideas were break up. You know this shadow with some cross hatching kind of soften that transition eso that's not so solid all throughout because we can really make something like this appear too rigid and too almost like a stone statue. Action figure. Something like that where there's not enough mixture of soft edges and transitions on. Even though this is supposed to be a male character, that would maybe be a little bit more rigid. We still have to have some softness to the anatomy, you know, there's still fat on the body, right? There's It's not all just, you know, strong muscle. There's there's a mix of the other anatomy and things. So we have to have toe make sure that we kind of implement some of that as we do this. So back here, I really want to fight the urge to shade too much into that segmentation or that ah dipped that we get in the back of the legs in a shoot around it, and I could use some line breaks through here. So again, I don't want to draw connected line right through there. I just think that it ah wouldn't explain that area of the anatomy bear. Well, some like this and then we can break off some of this with some no cross hatching. Just remember, cross hatching is going to give you that great Asian and that transition from light to dark . You can play around with all sorts of methods for this different angles that you crosshatch different lion thicknesses, all sorts of neat ways to kind of incorporate your style into the way that you crosshatch. I'm just kind of tapering these lines will think that thin there. Actually, I don't even like that way of cross hatching when we try that again. Bring that back. Okay, so now a little bit of the side here. Okay. And again for the back legs, the hamstrings. Just maybe a couple of law. Little bits of cross hatching on an angle, but no defined lines. A little bit more shadow to the inside of the lake. Here, remember, the obliques will be more noticeable on the mail. Usually kind of sit like this. You don't really see that iliac crest there, but you can kind of again hint to that I don't know about drawn an actual line there, but you can head to it. Lots of little line breaks, especially if you're are you feel like it's, you know, it's becoming, ah, more of a distraction. Just tests, um, line breaks in that area. Okay, there we go. So now the same thing on the female glutes, So I might try to make the shadow proportionately larger just because it's, um, you know, I've drawn the but larger on the female anyway, so I might continue on that with the way that I shaved it. Um, and I might avoid the angular kind of transition. So hopefully you can tell by the male glute that I've kind of drawn the shape more like this, like a line coming down or curve coming down more of an angle, then another curve. It's just the way to kind of chisel out the curb. But in this this case over here, I'm gonna allow the shadows to b'more overall, more curved. I could still play around with the way that I shift the curve as it goes around the forms, but I'm purposely going to allow it to be more of a smooth curve and bend just so that it again kind of conveys to me anyways, a little bit more of a feminine quality. No kind of do that same concept all throughout the illustration here. Yeah, My allow. These all be a little bit more smooth and the way they're curved. It doesn't mean that I can't introduce some angles to the shadows. You really want to play around that concept? You really want to try Teoh mix up angles and curves all throw different parts of your illustrations and, uh, ultimately find your style over like that. There again, I don't want a connected line right through here, so I'm just gonna use a little bit of shading like that. This is all meant to be. Ah, A solid filled in area, her shadow. And then again, with the rendering Aiken cross hatchet, I can use some tapered lines to explain the gradation from light to dark. It's often up that hard edge shadow And just like that, I've got a little bit more of a rounded kind of feeling to the work. So I think these types of studies could be very important to go along with you know your interpretation of the body and trying to really make it look and feel more three dimensional on the page. Eso cross hatching could be a great way to do that. And it's, um it's kind of fun, actually. Like across. Actually, it seems to be for me, it seems to be soothing more so, I guess it all is. But more so than the rest of the art process kind of get lost in the effect of just trying to really see how I can round out this these shapes a little shed on this side. Remember to you, you can shade even the opposite side where you might perceive they're being a little bit more light. But it doesn't mean you can't have some very thin lines too still round over this, this edge of the work. So a lot of times, when I put the light source on this side, I kind of forget to do that and again, you don't really have to think of it that way. You can think of it as the hottest point of the light is here and here and then, in that case, you might get or you would get a little bit of shading on the very edge. So just think of it like if you were doing a a value study with gray scale, how you would shade it and then try to convert that to your line work and off. Sometimes I will actually do both. I feel like this area doesn't need to be as defined. So you want to kind of again hen to these areas, in which case you might just want to use some broken up lines, some softer lines, and you want to try to create as much variety and variation as you can. So that's not too repetitive not to ah overly, Cem simplified. Sometimes us simplifications air, great thing. In our other times you want some range and some subtle variations. So there you go. Just like that, we've incorporated some more shading to this hope. It's giving you a better idea how you can make this look more dimensional, and you can really continue on and do this as much or as little as needed, and ultimately figure out your style with that. All right, so that'll conclude this section on legs. I hope you've enjoyed this content and more lessons are on the way, so good luck with their studies and I'll talk to you soon
 Robert Marzullo, Online instructor of Figure Drawing and Comic Art