Transcripts
1. Introduction: Hello there. My name is Bex, and welcome to my very
first Skillshare class. First, in this class, we're going to do a full anatomical breakdown
of each part of the eye, we'll talk about how
these parts fit together, a little bit about
their function, and cover a few details
that are really key to observe if you want your eye
drawings to be realistic. Once we have covered
all the anatomy, we'll then get into the
nitty-gritty of drawing eyes. I will show you some
tips and techniques. We'll talk about how to
nail your proportions and make sure that
your eyes are level. We'll also chat about
how to give your eyes a convincing structure and form. We'll talk about how the
shape of the eye is changed depending on the direction
they are looking in. Finally, we'll tackle
drawing eyes at 3/4 angle. In this section, we'll
discuss the effects of foreshortening and
perspective on their shape and the
distance between them. At the end, we'll have a
look at the class project, which is drawing a full page of eyes in any medium you like. Just apply what you've
learned in the class, challenge yourself to
draw eyes at angles that are unusual or that you
maybe haven't tried before, and most importantly,
have fun with it. Let's get started.
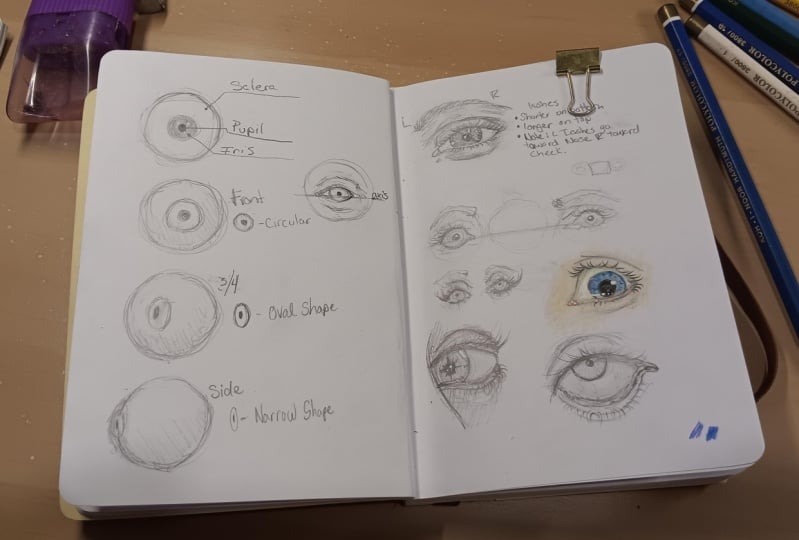
2. Anatomy Overview - Parts of the Eye: Anatomy Overview.
In this section, we're going to take
a very quick look at all the different parts of
the eye and their labels. The eye is made up
of three parts. We have the sclera, which is the white
part of the eye, we have the iris, which is the colored
portion of the eye, and in the middle of the iris, we have the pupil. Next of course we have the upper eyelid and
the lower eyelid. The eyelids follow
the spherical form of the eyeball and
wrap around there. Next up we have the
lacrimal caruncle, this is the little pink
fleshy triangle shape on the inner corner of the eye. Between the lacrimal
caruncle and the eyeball, you will find the puncta, which are tiny
little openings that produce tears and help
keep our eyes moisturized. This area is also commonly
referred to as the tear duct. Later in the lesson, we'll
also talk about the cornea, which sits over the top of
the iris and the pupil, this, in my opinion, is the most important
form on the eyeball, and of course, we'll take a look at the
eyelashes and the eyebrows. In this class, we'll refer to the end sides corner
of the eye or the corner closest
to the middle of the face as the medial
angle of the eye. The other corner of the eye is known as the lateral angle. I always just think of the word medial sounding like
the words middle, and that helps me remember
which side is which. I hope that helps you too. That briefly does it
for a quick anatomy. In the following
anatomy sections, we'll take a look
much more in-depth at each individual
part of the eye.
3. Anatomy - The Eyeball: In this section, we're going
to talk about the eyeball. But first, let us talk a little bit about where it lives. The bones of the skull determine the overall shape of
the orbits of the eyes, otherwise known as the eye
sockets or the eye cavities. The main purpose of
the eye socket is, of course, to protect the
eyeballs from damage. The shape of an
individual's skull and the shape of the
eye sockets determines a lot about how the outside
structure of the eyelid. Next, let's talk
about the eyeballs. Eyeballs are roughly an
inch in diameter and are held in place by muscles
called extraocular muscles. These are the muscles
that are responsible for moving the eye
around and the socket. When you look up,
down, left, or right, that is the extraocular
muscles at work. Now it's time to talk a
little more about the sclera, also known as the
white of the eye. This part of the eye
is completely opaque, but it's really
important to notice that it's not actually white. The color of the
sclera is off-white. It usually has a grayish
tone or a bluish tone, maybe even a slightly
yellowish tone. The color of the sclera will often be very close to white, but it will never
actually be stark white. You want to save your brightest
whites for eyelids only. The color as the sclera
appears will be largely determined by the environment
that the person is in. The iris is the colored
part of the eye, and Here you see
a huge variation and different colors and
tones between individuals. For instance, my eyes are blue, my mom's eyes are hazel. Some people have olive
green-colored eyes. There's lots of variations of grays and different
shades of browns, and even of the same individual depending on what lighting
situation they're in, you may actually see
different tones in their eyes from one
angle to another. One of the most
important things to remember about the iris is that when somebody
rotates their heads or moves their eye
and the socket, the shape of the iris changes. This is due to a
shift in perspective. From the front view, the iris appears as a circle. When the iris is viewed
from a three-quarter view, so if the head is turned to a three-quarter angle or the eye is rotated
in the socket, instead of appearing
as a circle, the iris will change to
more of an oval shape. When you look at the
eyeball from this side, you will see that the
iris is very narrow. It appears as an
extremely narrow oval and at just
the right angle, it almost begins to look flat. We'll talk a lot more
of it very soon. The center of the
iris is the pupil. The pupil changes size in
different lighting situations. When it's dark,
the pupil opens up very wide to let in more light. In very bright light, its shrinks all the way
down to a tiny dot. Basically, the pupil works much like the aperture of a camera. Another interesting thing about the pupil is that
it's actually a hole. Basically, what it
does is it lets light through which hits the retina at the back of your eyeball. The reason the pupil as black is because once the light rays pass through the light
is mostly absorbed by the tissues inside the eye. Because the pupil is in
the center of the iris, that behaves in the exact
same way when the head is turned to different views
where the eye is rotated. Again, that will appear as
a circle from the front, an oval from a
three-quarter angle, and a very narrow
oval from the sides. Now let's talk about the cornea. The cornea is a
transparent covering which sets over the
iris and the pupil. It has a convex shape, which means that
it curves outward, and it basically bends the light before it enters the pupil. It also serves as a
protective layer or barrier. The cornea sets on top of
the iris and the pupil, which adds an extra layer
of thickness to the iris. Because the cornea
protrudes from the eyeball, it affects the shape
of the upper eyelids. Usually, the best way
to see this is by taking a photograph when
you are looking up. Because the upper eyelid
wraps around the eyeball, you can see where it's slightly raises up over the cornea. As an artist, it's important to remember that best part
of the form exists. It is particularly important
when you're drawing eyes at certain angles to create an accurate sense of
form and structure. This is essential to remember if you want your drawings
to be realistic. Lastly, let's talk about
the lacrimal caruncle. This is the
triangular-shaped area at the medial angle of the eye. In other words, at the
inner corner of the eye. This area is also commonly
referred to as the tear duct. The punk tar is also
found in this area and is responsible for
keeping the eyes moist. Because of this, the
eyeballs always have a very glossy and
reflective appearance. This means that any
direct light source will reflect off of the
iris and the cornea, creating bright
white highlights. These highlights are
commonly seen in the tear ducts and along
the lower lids of the eye.
4. Anatomy - The Eyelids: Next, let's talk
about the eyelids. The eyelids are controlled by the orbicularis oculi muscles. The orbicularis oculi muscle
is a sphincter muscle, which is arranged
in concentric bands around the upper
eyelids and lower lids. The main function of this
muscle is to close the eyelids. This muscle is covered by a
very thin layer of skin and is essential for conveying
different expressions. Because the cornea
protrudes from the eyeball that affects the
shape of the upper eyelids. The shape of the
upper lead changes depending on the direction
the eye is looking at. The raised area will always follow the iris and the pupil. Because of that
the upper lid has a more distinctive curved
shape than the lower lid. It's also larger and has a
greater range of movement. The lower lid
follows the form of the eyeball unless the head is tilted back or
viewed from below, you can usually see the rim of the lower lids and
most scenarios, the lower lid catches the light. This means you can see how thick it is and building this into your drawings will
really help give your eyes a sense of depth, structure, and solid form. When the face is relaxed, the top lid usually covers
the top of the iris and the lower-left sets on the
very edge of the iris. Although this can vary
from person to person, this also varies quite
drastically when you start getting into
definite expression. For example, when someone
is shocked that they will raise their eyebrows
eyes and open their eyes up fully
so that you can see the entire iris and the pupil. Another good example of
this is when someone smiles and pushes the lower
eyelid up and curves it, best brings the lower lids up on the eyeball so that it
partially covers the iris. As an artist, you're going
to want to pay attention to the unique features all of the individual that
you're drawing. The drawing portion of
this class we'll cover in more detail tips and
techniques to help gauge you. But the key to capturing
someone's true likeness, lies in good observation. Let's talk about some common
variables and eyelids shape. Some people have a
very obvious crease in the upper eyelid that clearly follows the shape of the
eyeball that's going to make the eyes look larger and the
[inaudible] more prominent. Some people have an [inaudible]
This is a skin-fold of the upper eyelid that covers the inner
corner of the eye. Best fold rates across
the upper eyelid, therefore a strong crease at the back portion of the
eye is not visible. As people age, their muscles and skin starts to lose elasticity. As we age the forms of the upper lids begin
to fall downwards, creating wrinkles
and you'll often see soft tissue around
the eyes as well. These unique features that
are going to help you capture somebody's likeness and give your drawings, character
and interests. There are many other eye shapes and variations out there, that was just a few examples, but the main thing to
take away from this is that observation is key. That being said, it is valuable to learn these
fundamental principles because when you're working
with an understanding of anatomy and general proportions, then you'll be able to
more easily identify the unique features of
whoever you are drawing.
5. Anatomy - Eyelashes and Eyebrows: In this section,
we're going to talk about eyelashes and eyebrows. Let's start with the lower lid. You'll have noticed that the eyelashes on
the lower lid tend to be quite a lot shorter than the eyelashes on the top lid. They grow on the outer rim of the lower lid and the hairs fall downwards
away from the eye. The upper eyelashes are
longer and more curved. The eyelashes on the lateral
angle of the eye tend to be longer and tend to grow
in an upward direction, pointing away from the eye. Heading to the medial
angle of the eye, the eyelashes start to
point in the direction of the nose and start to
become a little shorter. Don't take these rules
to literally though, because if you want your
eyelashes to look realistic, you're going to have
to vary their lengths, the density of them,
and their direction. Ideally, you'll
want the eyelashes crossing over each other. You want some stray
ones going in the opposite direction
to other ones. These variations are going to apply to both the
upper and lower lid. So if you want your
lashes to look natural, make sure you're
intentionally breaking these rules and try to keep
them looking really organic. Next, let's chat about eyebrows. The eyebrows are made up of lots of little, short hairs, which fall in an arch shape
across the brow ridge. Usually the eyebrows are separated in the middle
by the glabella. This is a
keystone-shaped area of the forehead between the
eyebrows and above the nose. Here is an example
of the keystone on a stone arch so you can see
what I'm talking about. Where the eyebrow
tends to start, the hair tends to be
messier and sticks out, and almost like a star shape. These short hairs eventually become a little bit
more organized and start to travel at an upwards angle towards
the peak of the eyebrow. The peak of the
eyebrow often lines up with the temple
line on the forehead. At this point, the hairs
start to cross over each other and begin falling
at a downward angle, eventually thinning out and
ending in a narrower point. Obviously there is a ton of
variation in eyebrow shape. Some people have very
dense and thick eyebrows, other people have very
thin and narrow eyebrows. Again, just pay really
close attention to the person that
you are drawing. If you're drawing
from imagination, getting a perfect likeness
isn't going to be a concern. So just have fun, try out different
shapes and sizes, and see what you
can come up with. If you are a beginner
at drawing eyes, I would 100 percent recommend
drawing from reference until you really have a good
grasp of the fundamentals, then move on to drawing from
imagination because you will be armed with all the
tools you need to experiment. Use what you've
learned to construct awesome eyes that look
solid and have a good form. That's it for the
anatomy section. Let's get on to drawing.
6. Drawing - Spacing and Axis: In this section, we're
going to talk about the axis of the eyes and
the spacing between them. The axis is a horizontal line that runs through the
middle of the eye. You can also use the inner corner of
the eye if you prefer. The axis determines at
what angle the eye is tilted and is especially important when you are
drawing a pair of eyes. Eyes will always be
on the same level. Because the axis runs through the middle
of both of them, it enables us to check that
they are in the right place. If an eye is too high or too low is going to look
really strange. When drawing a pair of eyes, this is always one of
the first lines that I put down because it establishes both the tilt of the
head and enables me to check that my eyes
are on the same level. The next thing
that's important to consider is the distance
between the eyes. When you're looking at
the face straight on, the eyes are roughly
one eye's width apart. This rule will apply
to the average person. Some people may
have wide set eyes, so slightly wider than
one eye's width apart. Some people have close set eyes, so the distance will
be slightly narrower, but this is a really
handy general rule to check your proportions. I thought it'd be
useful to demonstrate this against a
photograph of a model. Here you can see that by
marking the distances between the eyes and then
moving them around, we can see that the spacing is pretty much equal
between the eyes. Knowing this is invaluable for
checking your proportions, but that rule only applies to drawing the head straight on. We'll revisit the topic
of spacing when we talk about drawing eyes at a three-quarter view
later in the course.
7. Drawing - Eyelids and Planes: Next, let's talk about the
eyelids and the planes. If we look at the eyes
from a bird's-eye view, you can see that the front
plane of the face is curved. This is important because it has an effect on the eyelids. Due to this curvature, the inner corners of the eye set further forward than
the outer corner. In other words, the medial
angle of the eye set is further forward than the
face then the lateral angle. Because of this, the cornea does not set in the middle
of the eyelids. When someone is
looking forwards, more of the sclera or the
white of the eye is seen on the lateral angle of the eye or the outer side of the eye. In other words, if somebody
is looking straight on, more of the white
of the eye will be visible on the outside of the iris than on the side that is closest to the
middle of the face. Here's a little illustration to show you how this
looks from the front. Also notice that the top
lid partially covers the top of the iris and
the bottom lid rides across the bottom of the iris. Next, let's look at the
planes of the eyelids. Planes are used to indicate a change in the
direction of the form. In other words, they
happen when a form turns. Planes that face in a similar direction will
share similar values. A plane that is directly
facing or directly opposite a light source
will be the lightest value. A plane that faces away from the light source
will be a shadow, and a plane that
is slightly angled away from the light will
be more of a mid-tone. Planes can be a whole
topic in themselves. For the purpose of this class, I just want to focus on
the planes of the eyelids. The top eyelid has
three distinct planes, and the bottom eyelid
has two planes. Planes on the upper lid tend
to have steeper angles, whereas the lower lid is shallower and the planes
are flatter in appearance. Now, drawing an eye with geometric lanes doesn't
look very natural, so all you really need to
do is bend out the corners slightly and you'll be left with a very organic and
accurate eye shape.
8. Drawing - Direction and Shape: Next, let's talk about
how the cornea affects the shape of the
eye when the eye is looking in
different directions. Borrowing your eye
from the last section, let us give this a more of an eyelid and color
looking forward. This is the eye in a very
neutral expression with the top three planes
and bottom two planes. In our next illustration, we're going to look at
the cornea or the iris, facing towards the
medial of the face or towards the medial
angle of the eye. You can see in this illustration
we are still working with our three planes on the
top and two on the bottom. The cornea pulls the
top eye lid along with it and changes the shape
of the top lid slightly. You can also see the shape of the iris and pupil are more of an oval because we are looking
at them from an angle. But really, the most
important things to remember is that there
are still three planes. A very common mistake people
make is forgetting to split the eye into three
planes and treating the top eyelid like
the bottom lid. Drawing it with only
two planes and almost treating it like when the
cornea is turned away, the upper lid collapses
in on itself. That is not the case. Although the upper lid
changes shape slightly, that plane change still remains distinct and relatively high. Next, let us have a look at the eye looking in the
opposite direction. We've got the cornea facing towards the lateral
angle of the eye. You can see here we still have our top three planes and
our bottom two planes. At this angle, you can see quite a change in the
shape of the upper lid. The angles are less steep
towards the middle of the face. Again, the shape of the
lids followed the cornea, so the outer edge of the eye, the planes become
a little steeper. Again, quite often
you'll see people losing that plane change when they draw the eye facing in
this direction. To avoid this mistake, it's helpful to remember
that those three planes exist no matter what direction
your eye is looking in. Onto the next couple
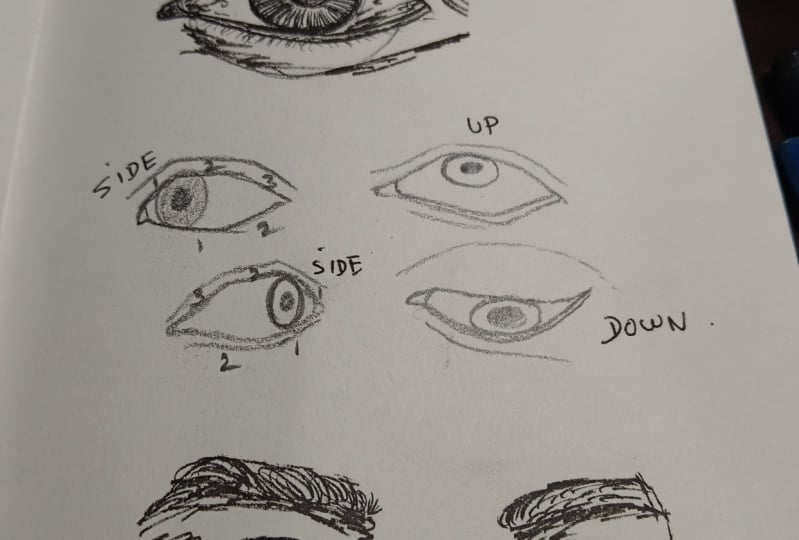
of directions. First, let's look at
the eye looking up. When the eye looks up or down, what you'll see is
that the upper lid follows the direction of
the iris and the pupil. When we look up, the lid opens right up. You can see a lot
more of the sclera underneath the iris
and the pupil. You'll see less of
the top eyelid. At this angle, you can also observe the
thickness of the upper eyelid. This is really important
to remember if you want your drawings to
have realistic form. In addition to that, at this angle, you can see how the eyelid
wraps around the cornea. Don't forget to maybe slightly exaggerate that shape across
the iris and the pupil. It really helps to
convey a realistic form. Next, let us look
at the eye when somebody is looking down
towards the ground. At this view, you can see a
lot more of the top eyelid. You can still see those
three distinct planes. You'll maybe see less of
the iris and the pupil. A lot of the time the eyelashes will get in the way
a little as well. But you will be able to
observe very clearly the rem of the bottom eyelid. Again, this is
really important to show depth and a sense of form. Most importantly, the eyelid
closes as we look downwards. In other words, the top eyelid follows the direction
of our gaze. When we look up, the top eyelid comes
up with our eyeball, and when we look down, the top lead follows
our gaze downwards. Now that we've looked
at the eye from straight on and
different directions, let us have another look at
the eye from a side profile. The first thing that's
important here is to recognize that the upper lid sits on top of the lower lid. Often you will see the upper lid overlap where
it meets the lower lid. This isn't always
completely obvious, but this is because the upper lid is thicker
than the lower lid. This angle is really useful for looking at where the
eyelashes grow from. They come from the
edges of the lens. When we look at the eye in side profile
when it is closed, the upper lid comes down
over the lower lid. Again, the lower lid doesn't have as much of a range of
movement as the upper lid. We'll see that it doesn't
really move at all. You'll also be able to
observe the thickness of the upper lid in comparison to the lower lid at this angle.
9. Drawing - The 3/4 View: In this section we're
going to talk about drawing eyes at 3/4 view. Earlier in the course, we established the rule of
the eyes being one eyes width apart when we're looking
at them or drawing them from a straight on view. This rule is really
straightforward. However, when you're drawing
the eyes as 3/4 angle, things do become a
little more difficult. This is due to perspective
and foreshortening. We also talked a little about the front plane of the face
having a curved shape so this also has an effect
when we are drawing the eye at a 3/4 perspective. When we're drawing the
eyes at a 3/4 angle, the real about them being
one eye width apart changes. Again, this is due to
perspective foreshortening and the curvature of the face. The axis of the eyes,
stays the same. The eyes might be
tilted at an angle, but we'll still be
leveled with each other. This is really
important because if one eye is too high
or too low is going to look really odd so
take plenty of time to make sure that you've
established your axis first. After establishing the axis, take time to measure
the distance between the eyes very carefully. The eye closest
will be the widest. Depending on how far the
head is turned around, will alter the spacing between the eyes and the
furthest away eye. The perspective of the eyes follows the perspective
of the head. You can use lanes or ovals
to establish your distances. As we move towards the
furthest away eye, the points will become
closer together. I find it helpful to start with the eye that is closest to us. We know that the space
between the eyes is not going to be less than
an eye's width apart. We know that the distance
between the n site and a site of the furthest away eye is going to be even
shorter than that. You'll usually find that the eye furthest away tends to be about 2/3 or 1/2 the size of the eye that
is closest to us, depending on how far
around the head is turned. The eye furthest away
will also have a straighter or it can have
steeper, faraway edge. This is because
the lateral angle of the eye on this side
is no longer visible. The shape will follow the
curve of the eyeball. The other eye should be the same height as the
eye that is closest, but it will be
substantially narrower. As the head turns away, the shape of the either
eye will change, showing the curve of
the eyeball more. After sketching it, nice
and coping reference, I'm just going to quickly show you the measurements against the reference to give you an idea of the spacing
that we're looking at. I would highly recommend looking at lots of
different references, maybe taking some of your
own and just studying them. Do these measurements
yourself until you get comfortable
where the changes and distance between them as they turn away from the
viewer along with the changing shape
of the contour of the furthest eye until you're really comfortable
drawing them. By practicing all of the different angles the
eyes can be viewed at, you'll become very comfortable with drawing them and once you are able to draw realistic
eyes at any angle, then you can go on and you can start playing around
and stylizing eyes in any way you want really playing with the
shapes because you'll understand exactly how the eye is structured how it behaves, depending on the
direction that is looking in and the angle that
is possessions at. These sketches won't have
to take a long time, really just trying to
end that basic stroke. Generally when I'm drawing eyes, I like to start with the pupil. I don't always draw the
eyeball bought beating my end the overall form of the eye
ball as you're drawing. At this point, you should have developed a good
understanding of the anatomy of the eye and a bunch of helpful
drawing techniques. In summary, in the
drawing section we have covered the
axis of the eye. So that's making sure
that your eyes are on the same level and of course, the direction of the access will determine the tilt of the head. The top of the eyelid
has the planes, the bottom lid has two planes. The upper lid is responsible
for most of the movement. The way that the shape of
the eye changes depending on which way the model is
looking, and finally, the way that the curve of
the face for shortening and perspective effect
drawing eyes at 3/4 view. The three-quarter view is
the most difficult view to master so make sure you
gather a bunch of references. I always find that
very helpful to take my own references and used my face to get specific angles that I want
to practice. You can do that. Or there are plenty of
websites like Unsplash, pixels and Pexa bits name
a few where you can find really good stock photographs
by always taking your own as the most useful for practicing this
kind of technique. Obviously, if you
wanted to practice different eye shapes and
different eye types, then that is where the stock
photos come in really handy. But lots of practice, take your time to measure
your proportions. Remember that the
farthest of the eye will be not more than the closest eye but will be
roughly the same height. With close observation
and lots of practice, in no time you become really confident with drawing
eyes at any angle.
10. Class Project - Let's Draw!: Now it's time to take a look at the class project and I am so excited to share
this with you guys. I want this project to be as fun and stress-free as possible. So pack your favorite medium for painting or drawing
wherever you want, pencils, charcoal,
oil paints, gouache, or digital art wherever you like and try to draw
a full page of eyes, lots of eyes looking in different directions from different angles
and perspectives, triangles that you've
maybe never drawn before. Of course, I know not everybody is going to
have the time to do that. So if you are short on time, feel free to just
draw a pair of eyes. But wherever you do, just try to have fun with it. Don't worry about
making mistakes, that is the best way to learn. My weapon of choice for
the class project is my favorite painting
medium, watercolor. I predominantly work with
watercolor and oil paints, although I do dabble
other mediums as well. Let's talk a little bit about
how I tackle this project. First, I had to gather some
references so I set up my camera and took lots
of pictures of my face. I am not a fan of selfies so it's a bit out of
character for me, but that's really
is the best way to get unique references. It's also really
useful to see how the same set of eyes change depending on the
way that they are turned, the direction that
we're looking in. I honestly think
it would be more beneficial to take
your own references so that there is the consistency over the
eyes that you're drawing. Then you can really see
how some clear change in the direction of the gaze
or angle of the heads changes completely the
shape of the eyelids and particularly the three-quarter
view and the side view, how completely different
the drawing approach is. If that's not what
you want to do, there are loads of great stock images
online that you can use. I'll leave some websites and
the project description. Once you have your
references together, and I do recommend using
references for this class, start by establishing
the access of the eyes. Take your time and think about the placement and
the spacing of them. Start with a large shape like
the shape of the eyeball, establish the shape and
angle of the pupil. Pay attention to whether
the pupil is rounded or whether it is an oval shape
depending on the direction. Don't forget about the
cornea, of course. Remember your planes
of the eyelids. So you've got the three
planes on the top lid, two planes on the bottom. The bottom lid is
shallower than the top. Think of it, the shape of
the eye that you're drawing, and how the cornea may
influence the upper-left. Remember your eyelashes
are coming from the outer rim of your
upper and lower eyelid, try to pay attention
to their direction. The same goes for the eyebrow. It's worth taking some time
before you even put pen to paper to just set and
look at your references. See if you can maybe
describe the type of eyes that you
are about to draw, their shape if they
are close set, wide set, or average. Maybe try to describe the
shape over the eyelids. Are the eyebrows thick or thin? Are they tidy? Are the messy? I would say that my own eyes are pretty large and protruding. [LAUGHTER] I don't know
if it's the right words. From my side view, I feel it's like they
bulge quite a lot. I also would say that I have
a partially hooded eyelid. The crease of my eyelid
isn't always that visible depending on how
far open my eyes are. I have really thin
and skinny eyebrows which I've never
grown back since I over plucked them
as a teenager. [LAUGHTER] That's just
a few observations I made heavily for
your own eyes. See what you can come up with and just try to implement
it in your drawing. You're probably set to date
of less than three minutes, but thank you so much for making it through my
first Skillshare class. I would love some
feedback from you guys. I cannot wait to see
what you come up with. If you've enjoyed this
class and there are any topics that you
would like me to cover, please feel free to
leave me a suggestion. If you're interested
in connecting with me or finding out more
about what I do, you can find links to
my website and all of my social medias on my
Skillshare profile. I post videos over on
YouTube and TikTok as well. Anyway, thank you ever so
much for watching the class. I really hope that you learned something
valuable from it. If you have any feedback, constructive criticism
is much appreciated. I'll see you in the
next class. Bye.
 Rebecca Cameron, @sketchwithbex