Transcripts
1. Introduction to Drawing Wands: Hey everyone, welcome to drawing your own personal wand class. We're going to go over some of your characteristics
are things that you like, your hobbies. And we're going to create
a short prompt list where you're going to take
that prompt list and draw your own won. We're going to just pick out some basic things like
are you a reader? Do you like to go hiking? Those are gonna be things
that you're going to use to create your own
personal magic wand. It's great to have you here. I'm Tammy king, a
self-taught and digital mixed media artist. I create things with pens, paint, go digitally
when I want to. I use a whole realm of different products to create
beautiful and creative art. For this course,
you're going to need some basic supplies
like your pencils, your pens, your sharpeners, your tape, a ruler and eraser, that's gonna get you to a black
and white image that I do encourage you to get out
any watercolors you have, or colored pencils or pens. And we're going to add in some beautiful color if you want to stick with black
and white, That's great. 23 of this course, you're going to
learn how to draw your own personal wand and then dress it up your homework. It was going to be
to pick that one up on the website and the
projects and resources area. And if you want to do
a little extra credit, think about doing a personal one for a friend or family member. A few of the things that
you're going to learn in this course are symmetry, making one side of an object
look the same as the other. How to personalize something, giving it extra value, as well as making things
look professional. Those three things I believe are three concepts that will give
your work additional value. My goal is by the
end of this course, you'll be able to make
your own personal wand, as well as other items
that personalized. And you'll be able to
bring joy to the world by creating things
that people love. So let's get started on making
your own personal wand.
2. Your Wand Project: Hi friends, thanks
for joining me for this one's class
today I'm going to discuss what your overall
project is going to be. I want you to go through all the steps of creating
your own personal wand. All be here to take you
through those steps. From picking reference, getting a prompt list, making
your sketches, and doing your research
in getting into doing some reference photos
and how to get good reference photos
that are free to you. I want you to be able to
come out of this class, being able to post
your own personal one to the class resources
and projects area. It's up here on the screen. I'll show you where
you can find that. And I want you to
be able to share that completed wand
with everyone. If you want to do
some extra credit, you can do that. I'm going to give you some reference on how to
create a prompt list for say, a friend or family member, or just someone from the
general public or a theme and being able to create more
ones and more items. I want you to feel
like you've learned something and that you're comfortable posting
that to the class. And for everyone
just to get a look and see it all your creativity and a little bit into your
own personality here online. Thanks so much and
I'll see you in the next lesson as we go over some supplies that
you'll need for this class.
3. Supplies: Hello, Thanks for
joining me today, I'm going to be discussing
the different worksheets and supplies that you're
going to need for this class doing your wand. Before going deeper
into this course, please download and print off all the sheets in the
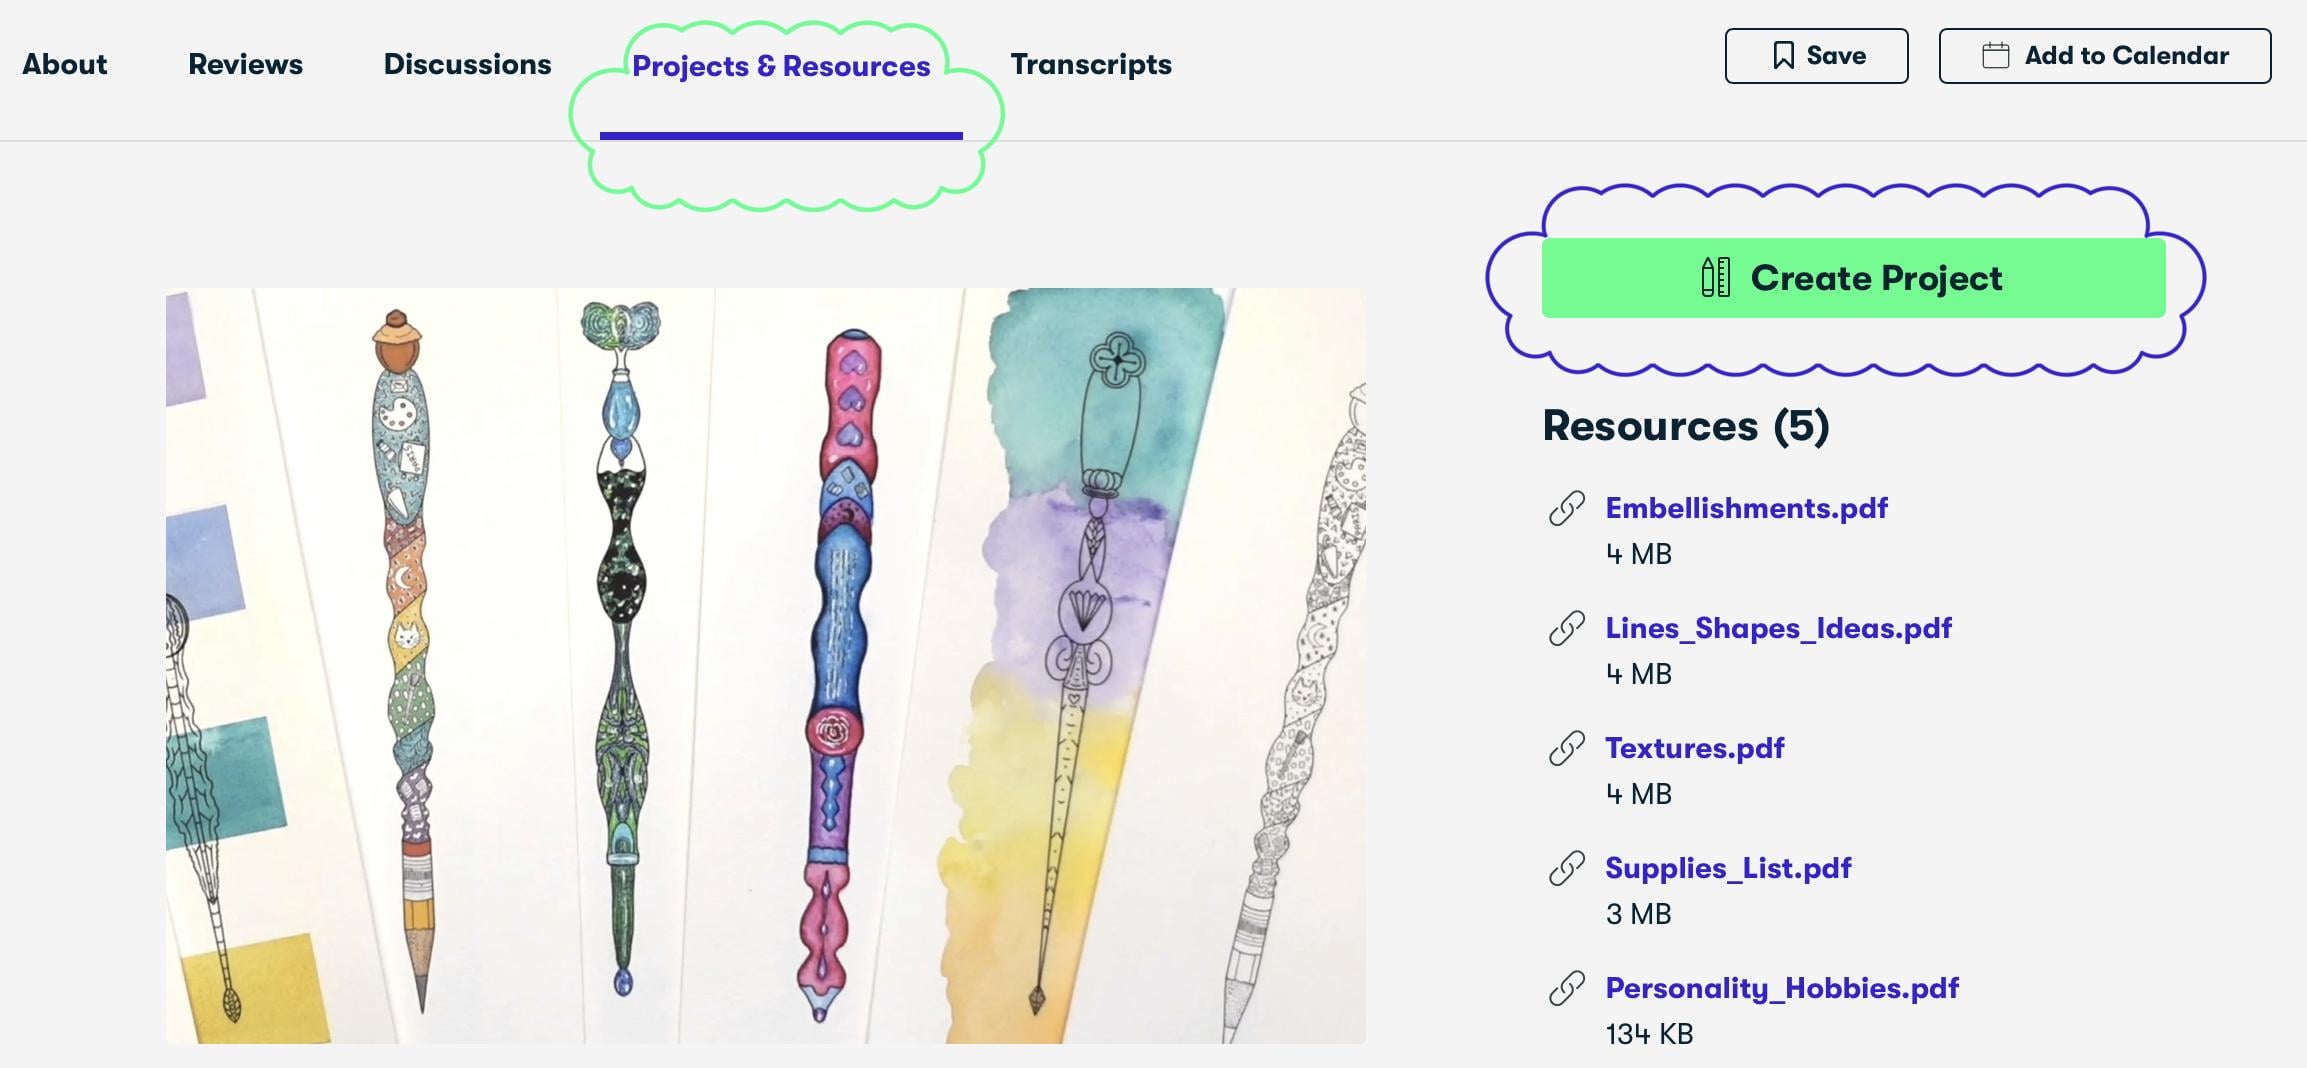
projects and resources area. First off, I've got
this wand base for you. I've got a line and
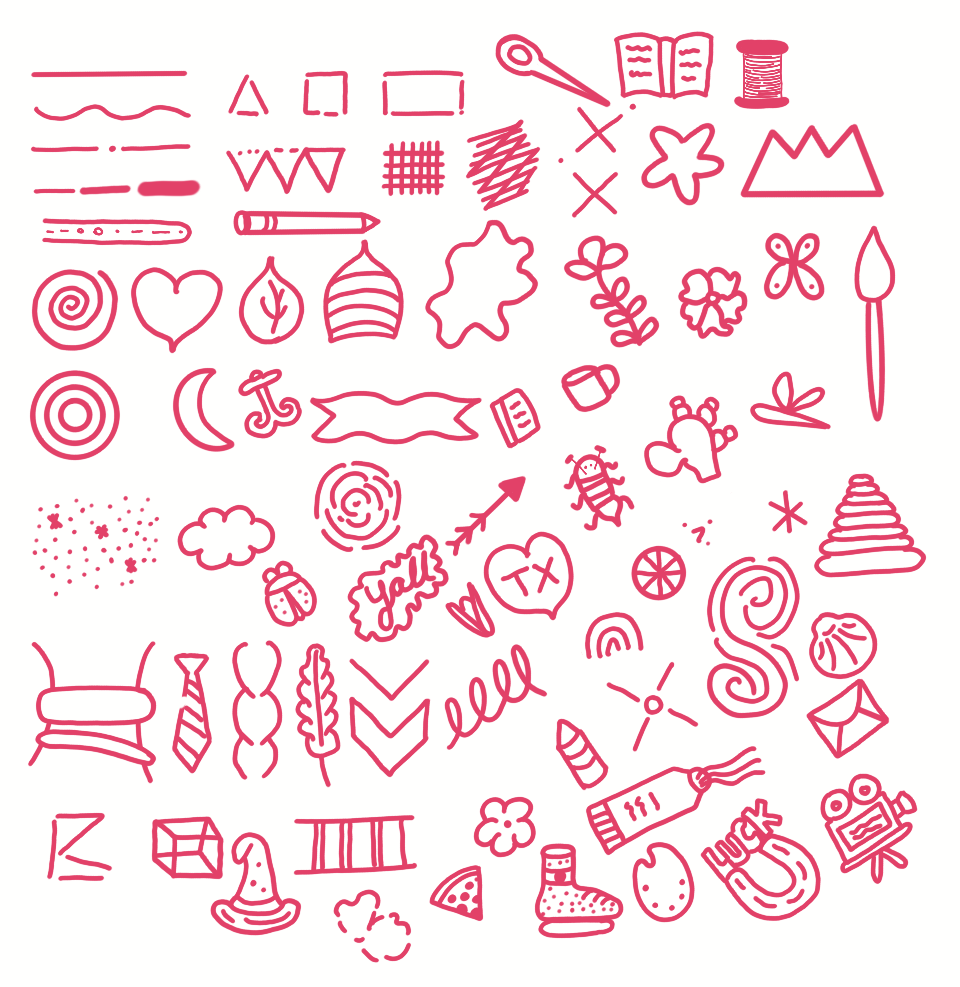
shape piece here. I've got some textures. I've also got some
embellishments. I've got a personality and
traits sheet as well as a Hobbes unlike section on
this Hobbes and lakes sheet, you can see like space
travel or botany, farming. And you're going to take
those different terms and apply them to your wand
based on your likes. When it comes to your supplies, I have what I call your basic supplies and your
optional supplies. So let's go over
both of those now. When it comes to
your basic supplies, you'll need a
pencil, a black pen, and eraser, sharpener, a ruler, some paper and tape, as well as a window
or a lightbox, or some transfer paper
that's gonna get your black and white wand onto a grand new piece of paper. If you want to add color, I'm going to encourage you
to use some watercolors. You'll need some brushes and some watercolor paper for that, and I'll discuss
that in a moment. You can also use some colored
pencils or some pens. Or you can use a
variety of all three. If you decide to go
the watercolor root, I'm going to have three
small classes for you. Later on in this workshop, I'm going to be having what I call painting within the lines. Horizontal lines, as well as what I'm calling
a watercolor burst. All three of these
are just gonna be short workshops later
on in the course. For watercolor,
you're going to need a pen that does not bleed. I recommend the fabric
Castell Pitt Artist Pen. This one is a fine
point as well as the archival ink microns, as you can see in
this little image. I've used both of those
and they do not bleed. But when you use say something
like a Tombow marker, it bleeds all over. If you decide to
watercolor you want, you're going to need
some basic supplies. You'll need some
watercolor brushes. These are two great sizes. This one's a small and
this one is a medium. I'm not gonna give you
out specific numbers because brushes come in different numbers
depending on the brand. But here's a good indication of two sizes that would
be great for a wand. You also need some
water in a jar, and you'll need some
watercolor paints. I have this little set. It's fairly cheap. I believe it comes for sale
at both Amazon and Michael's. And the brand on this one
is Prima Marketing inc. You can use any watercolor, so use whatever watercolors
you already have on hand. If you're not
looking to buy any. You can also get
watercolors in tubes. And this is one brand
that I really like. It's called Sennelier. Along with your watercolors, you're going to need
some watercolor paper. When you're using water, you'll need watercolor
paper because that water is going to get
into the grain of paper. And if you use just
regular printer paper, It's just going to warp. These are three
brands that I love. All three of these are 300 GSM, 140 pound, and that means it's going to hold up to
using your water. An additional supplies
that you'll need for making watercolors
is a paper towel, just your basic
kitchen paper towel. If you want to learn
more about watercolors, I do encourage you to take a Skillshare class
on watercolors. I've been enjoying
many of them myself. If you don't have watercolors or you don't want to
use watercolors, I'm going to have some
other options for you. You can also use
colored pencils at any brand will do just the colored pencils
that you have on hand. Also, you can use some markers. And just like the
colored pencils, just use whatever you
already have on hand. I forgot a variety
of things here, from Posca markers to just
some basic Pentel markers. And I'll be using all
these different items to dress up ones. Three additional items on
my list are transfer paper, a light box, and your standard
window during the daytime. All three of these things
can be used for transferring your drawings and creating
symmetry in your drawings. You're gonna put your drawing on your item and then copy it. And I'll be showing
you how to accomplish that in a further lesson. Now that you have all your
worksheets and your supplies, we're going to move
on to reference. We're also going to create
that prompt list where you put down your themes like
the things that you like, your hobbies, your personality, and we're gonna get to find out a little bit more about you. From there we're going to
research some reference photos, and then we'll be moving on
to doing some sketching. I'll see you in the next lesson. Bye.
4. Reference: Hi everyone, welcome back. In this section, we're
going to be creating your prompt list and
finding some reference. Your prompt list is
going to include three to five things
about yourself. We're going to find out about your personality and your
likes and your hobbies. Okay, now it's time to get out your personality traits
and Hobbes sheets. I've got mine here when
it come down here. And you're going to
create your hobbies and likes and personality sheet
and I'm going to do the same. So mark down your hobbies. I like nature and botany, painting, travel, reading, cats, the sun, moon and stars. Those are some items that I just love and I'm going to be
adding them to my wand. So make sure you check which
ones are yours if you like. You can also go off, you have your
personality trait sheet. I'm going to show
you three main sites where I get my reference photos. Go to Pinterest,
Pixabay, Pexels. So I'm going to show
you how to go to those websites and find
reference photos for your wand. Let me tell you a little bit about Pinterest,
that's pinterest.com. They also have an app and botanical board here
I found lots of cool images that I really enjoy
from the botanical world. One of them is this
particular one here. I'm really loving these
nuts and I'm going to use this nut here in my one. So I'm going to take
a quick snapshot of that and save it to my gallery. I'm just going to go down
here and save that photo. There's loads of pictures
here on Pinterest, and I'm just going to use
these as reference photos. I'm not going to be
copying anything exactly. I also like this little pepper here because I live
in San Antonio, Texas and I love
me some peppers. So I'm going to get that image. And I'm just going
to take one of those little peppers
as reference. You're gonna do the same. You're gonna go through and find your own little
reference photos from Pinterest, Pixabay or Pexels. Now let's check out Pexels. I'm going to search for travel on here because
I'm a huge traveler. I like to travel
internationally. I've been doing
that quite awhile. So I'm looking for
say, a passport, maybe some luggage,
something like that, like this passport here. That'll be an easy image
to add to a one because it's just a rectangle with
some interesting information. So I'm going to take a
little snapshot of that. Next up, I'm going to
go over to pixabay. And I've already searched for some moon and star
type images because that's one of those
things I love gazing at the moon and stars. So I'm going to check out
this little image here. I'm really liking this
crescent moon and the stars. Now that you have some
of your own reference, I want you to print those out. And in the next lesson, we're going to be doing some sketching of those
reference images. So I'll see you there soon.
5. Reference Sketching: Hi everyone. I'm so glad to have you
today for our sketch class. It's awesome having you get
to this point in the class where we actually get to
start working on that one. We're going to be doing some
of those sketches based on your research into
your own personality, where you got your own
little like images and that type thing to
sketch into your wand. For this section, you'll want to get out a piece of paper, your pencil and your eraser, and maybe even a sharpener
depending on your pencil tip. I've got my sharpener here. We're gonna be doing
just some really quick, rough little sketches of the
items found on your sheet. My sheet has a cat, the moon, the stars
and so forth. As I discussed in
the last lesson. So let's get into doing some
rough sketches for the cat. I'm just gonna do a
round face, some ears. And you're basically going to look at your drawings
and do the same. In this case, the cat has
more of a round face. Added in this section here. It's very hard to
make exact circles, and I just want this
to be a rough sketch. These are items I only be
adding to the wand later on. And I want to know where to start when everything's ready. So I'm just going to
bring these ears in. I'm going to give the
cat some eyes, nose, mouth, Some whiskers,
little acorn. And under these drawings are exactly like the ones
in the pictures. I'm just using that
as a reference point. I can see how an acorn
is put together. And then I'm going
to do a pepper. And then you can
see on a pepper, it's got a very
triangular coming down. So I'm just going to give it
some character there with some different line length. So I'm just going
to make my moon. I like this crescent moon. Then I want to add some stars, but they're not gonna be
like stars from up here. I'm just going to do my
own version of stars. I do these little
diamonds and give them each a little line on the
edge, then they get filled in. Then some books in a passport
is like a book as well. So I'm just going to do a
quick book sketch here. And then my passport, I'm going to bring
that down here. It's a basic rectangle, right? Passport. Maybe give it the new little
card on the bottom here. So I've got some drawings here. And now I'm going to move onto
my bass line for my wand.
6. Wand Base Sketch: Okay, For this section,
we're going to take everything we've learned and all our drawings and put
them into the base wand. You're gonna get out
your sheet here. Your base one sheet. You're gonna have your
little doodles over here. You're a little items. And I want you to also get out your line and shape ideas sheet. You can see here, I'm going
to be going over some of the base items and
then different items that you can pit into
the upper areas. If you'd like nature, maybe you go with
the tree type idea. Maybe you like these
lines where they go in or like little ripples, those are fun to or circles. Then these are just ideas. You're going to take. Anything
that you've come across, different concepts, different
lines, different squiggles. And you're going to put
your own personality into your wand. So let's come down here to the one sheet and you
can see this middle line. That's gonna be the line where you're going
to work off of. I encourage you to
potentially use the whole thing
and do your items, but in the end you're only
going to copy from one side. And we're going to make
a symmetrical wand, or one side is the
same as the other. And then we're going
to dress it up with additional embellishments and
images and also textures. It's all going to come
together here in the end. But this is where we start. I'm going to show
where my one starts. And then we're going to be choosing three to
five sections here. So I'm gonna come down
and I want my first part. I'm going to go with
that little nut. So I'm going to pick my net
between here and there. And then I want a handle, so
I'm gonna come down here, but you choose
your own sections, how long you want them to be. You can choose now
from your bottom, How big do you want your
base section to be? These are some of
those different ideas for your base section. I want mine to be pretty long, so I'm going to
come way up here. So I've got 123.4 sections now. And then I want to
pick my cat head in as well as one of my main items. So I'm going to have my net
here and my cat head here. And then I'm going to
incorporate the rest of my items into intersections. So I'm going to pick my
top of my little nut here. And then I'm going to create
little piece along here. This is where I want
my base nut to be. Pet my cat head in here. I'm going with that round. Okay, she's gonna
get hurt your ears. I say xi because this
is my cat katana. Then I put in those little
whiskers like I did before. And that little pause. And I'm going to
come down and I'm going to pick my base
reference sheet. I'm gonna go round. I've decided that I want
it to be fairly thin. So I'm going to
come to the sides. And I'm going to use a
ruler to just connect that. Next step. Amanda, take my shape in lines sheet and I'm going to select an option to connect
the different sections. I'm going to connect the nut to katana with these little
ones that come into the, at this angle gives me a handle. And I started to think
of those upper sections as the one handle. Then when I come down
to this section, I'm going to create a little crescent because
this is around one. And then I'm gonna come in
and do this shape here. I'm going to come out. That's the base wand. In the next lesson, I'm going
to be introducing you to embellishments and doing
textures on your won. So this is going to bring
everything to life. It's going to finish it off. And once you're finished
with this sketch, you're going to be
transferring your drawings to a new piece of paper where everything is fresh
and new and crisp. And then once that's done, we'll get into
coloring your wand.
7. Embellishments: Thanks for joining me. Next
up we're gonna be doing some embellishments and adding
some texture to your won. So let's get started
on the fun part. We're going to be also
adding in some of those little
drawings that you've created from your own reference, I'm going to be adding in a little pepper that I
came up with over here. I'm going to add
in my passport and my book and my sun,
moon and stars, as well as adding in some embellishments that I
have over on my own sheet. I've got a really cute
little heart with TX in it because I moved
to Texas a few years ago. I've got fun little things
like little curlicues, little bugs, butterflies,
different things like that. So you'll want to choose
things based on your own life. So let's come down here to this deeper level,
right in here. I'm going to be adding
in my little pepper, that triangular little body. It's got the little top. I'm just adding in these
fun little charms. Change that up a little bit, give it some more personality. It's not just a triangle. It's a hot spicy pepper. Add in some sun, moon and stars. Maybe some stars in here. Maybe the moon. My passport can go up in
here because it's so small. I'm just going to give
some a little squigglies. I'm not trying to reproduce
the passport and all. I'm just trying to
give a view that I like some books and
that type thing, maybe a pit, something
in here like a little suitcase to
also represent travel. Then I want to add in
some books down here. I'm going to come over here
to The embellishment sheet. Come back up here. And I'm going to
put in my Texas. I'm going to add in
a little cactus. We have loads of
cactuses around here. I like tea, so let's
add a tea cup. How about also adding
in a little butterfly? Then I'm going to bring over the texture sheet and see all
these different textures. How about I add in some circles, I'm gonna go with these
cute little ones here where it's the dots
within circles. Just to give this some texture. How about we add in some
of this texture as well, but up here, it gives
some lines and dots. So we're just going
to add in some additional dots in here. Dress it up. Then how about some texture in this
center section as well? I think I just want to go lines, maybe do some
different line shape. Case. I think my
wand is completed. I've given it lots of fun. And now I'm going to
be taking this wand and copying it over
to a new sheet. And I'm going to use
some symmetry as well. So I'm gonna be
copying just half of it of the main images, the sides, the cat and
the side down here. When it comes to the extra
little embellishments, I'm going to leave
those where they are. And I'm going to show you how to do that in the next lesson. We're gonna be using
light boxes or windows or transfer film to
make that happen. And I'll show you all
the different options for you to be able to do that. So let's move on to the next
lesson. I'll see you there.
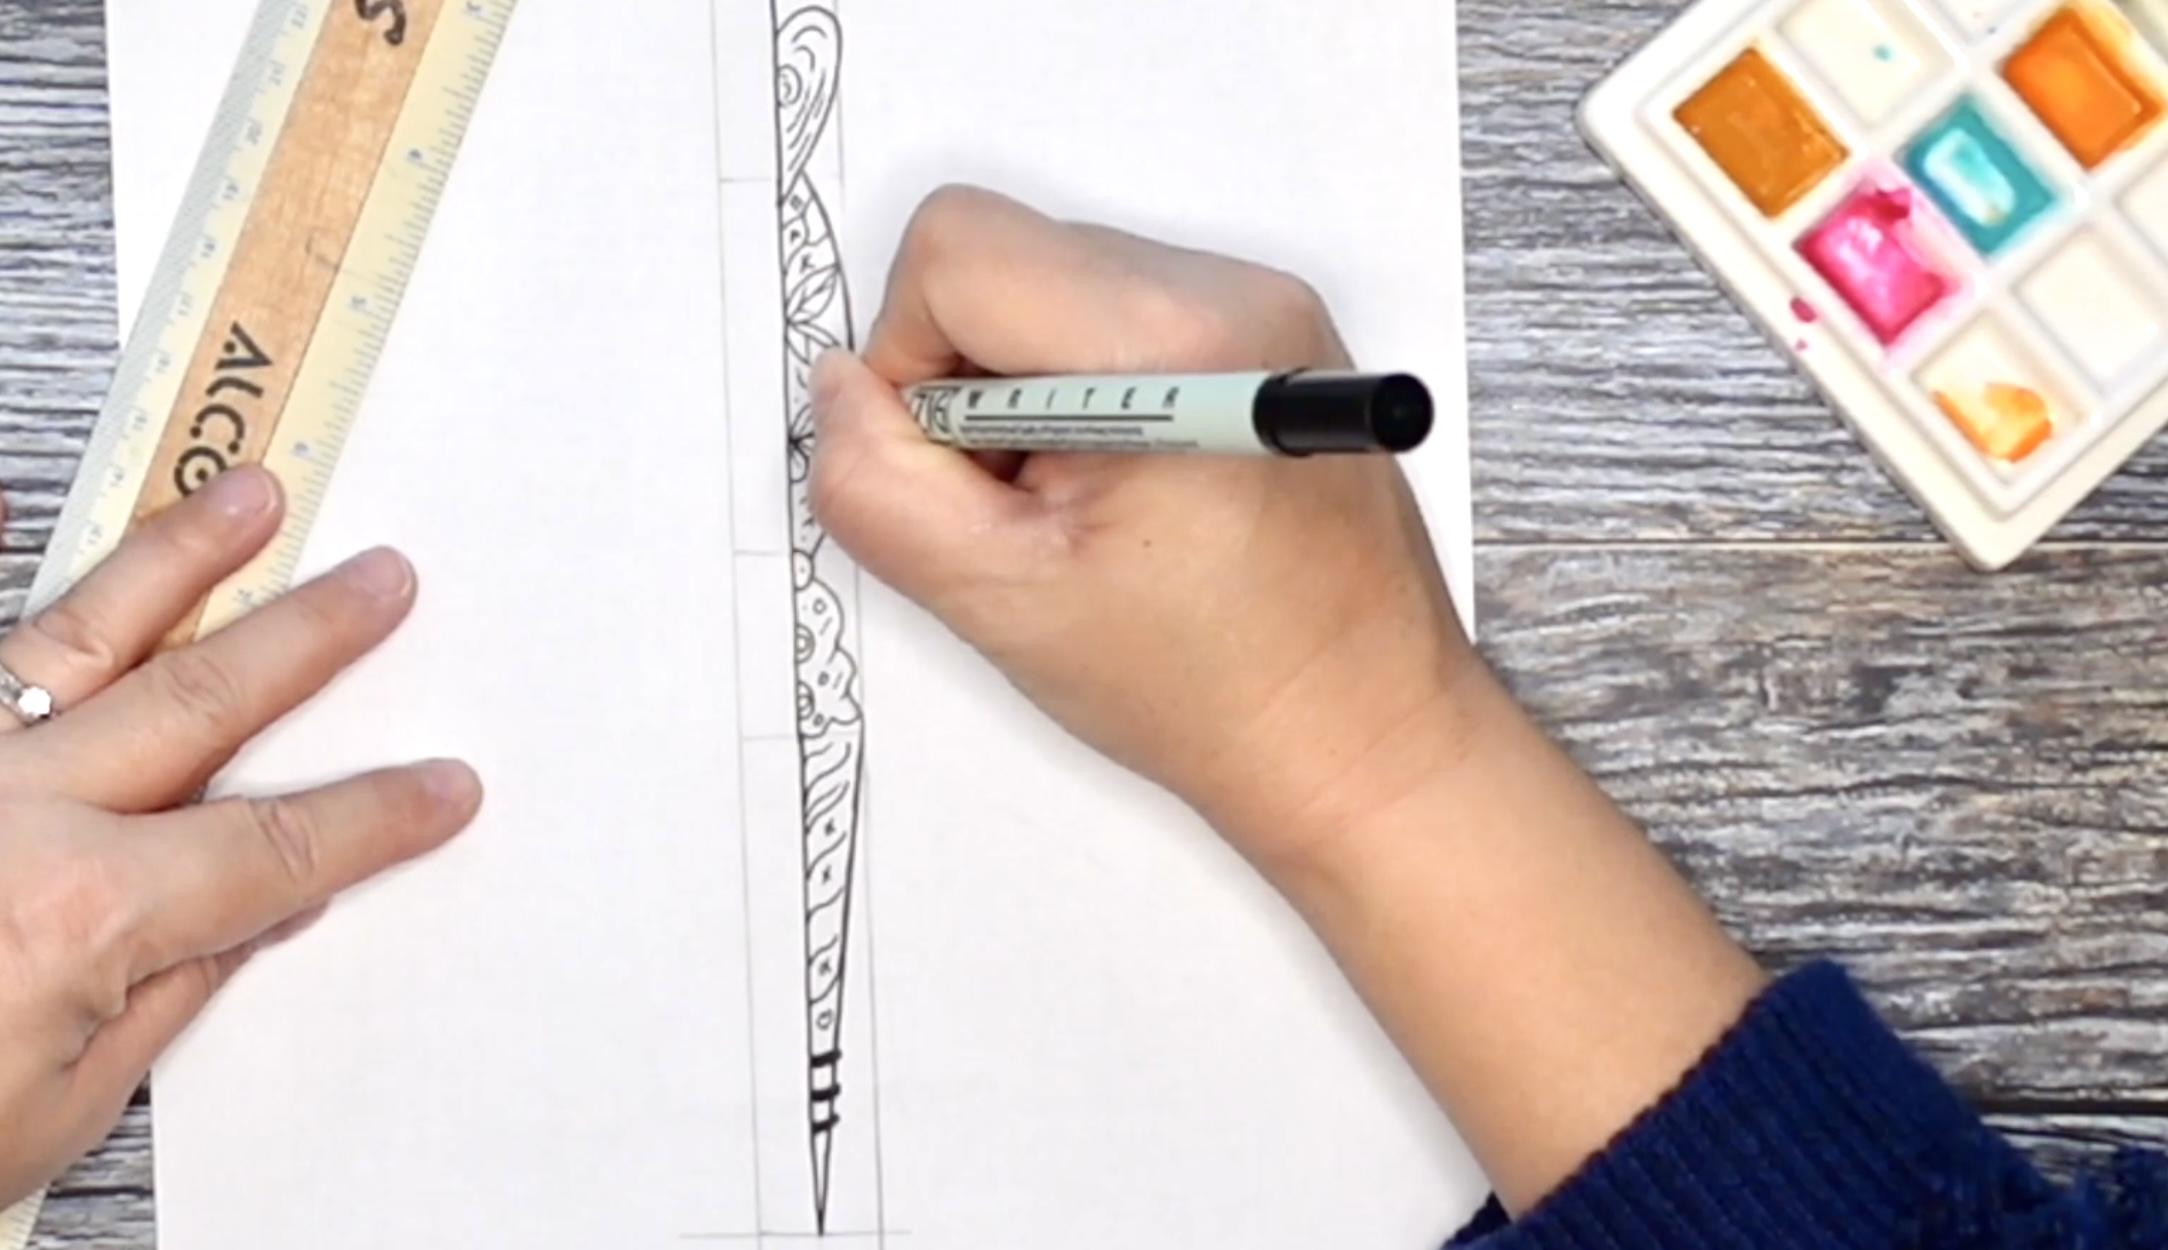
8. Transferring: Hello friends, so
great to have you here for your next lesson. In this lesson,
we're going to be learning how to transfer your sketch over to a new piece of paper so
you can decorate it. If you're gonna be using
pens or colored pencils, you can put that onto
just a regular piece of paper or a thicker card stock. If you're gonna be
water coloring, you'll want to be transferring your image over to a piece
of watercolor paper. So let's get into
the first steps. If you don't want to
tape down your image, then you're gonna
take your ruler and you're gonna go right
down the center. You'll want to make sure this
is exactly on the center. And remember typically
your pen tip is going to have a little
bit of a thickness. You'll want to get that
set on both sides. And then you're
going to want to go straight down the
center this way, you know where the center is so that you can make
that symmetrical one. So both sides are
going to be the same. Now we're going to want
to go over everything on this side and make sure you give it any little like
curves and that type thing. So I want my little on
that to come up here. Let me speed this up for you and make sure to
double-check everything. Make sure it's filled in. Okay, So now we're gonna take our eraser and we're just
going to erase that one side. Now that I've had you
erase over those lines, I'm going to have
you come back in and make them deeper
with your pen again. That way anytime we're wanting to go over them as we transfer, they're gonna be
nice, thick and dark. Next you're going to come in here and slice it
down the center. If you have a pair
of scissors, shoes, a pair of scissors to do this. Now the ear drawing
is in two-halves. It's time to transfer it
to a new piece of paper. You're going to either
use a light box or a window or that transfer paper. If you don't have a light box, you can use a window. And you're gonna
be using a window just as you do a lightbox. It's just you're
gonna be taping to a window and doing
all the steps, just like I'm going to
do on the light box. So that's a free way to
transfer your image. In this section, you're
going to learn how to use the light box. You're gonna be
turning the light box on and you're going to take half-year drying and
you're going to tape it to a piece of paper. The one great tip is to turn
off the lights when you do this so that you have gesture light box and you're having
all that light come through. So I've got my image, it's taped, it's lined
up in the center. Then I'm going to be taking
a pen and I'm gonna go over, let me speed this up for you. Make sure you got
everything copied by holding down the paper
just a little bit deeper. I'm releasing the tape. I'm lifting up and I'm
just pulling this over. So now my wand is coming
together on the other side. And we're going to come
down and we're going to go over all
those lines again, making sure that we attach
everything in the center. This time we're just
doing the outline, just the outer sections. And for me I'm doing the cat. I'll speed this up
for you as well. I'm going to flip this over. We're going to flip the
original drawing over. And then we're going to come
in with our extra piece. We're going to put this
all right back together, making sure that
everything matches up. If you're using a clear tape. You can also put some
in the center here. If you're using that white tape, you'll want to just
do it to the side. Now we're going to
flip this back over. We're going to finish all
those little embellishments that you added. Like, I've got a little
butterfly up here. And I'll speed this
up for you as well. If you find that some
items like better, moved, feel free to move them. This is a great time to do that. So there's my wand. And this is all
using the lightbox. Your next option is
using transfer paper. This is my least
favorite option, but it is one that you can do, say at night if you're at home and you happen to have some. So let's get started
on showing you how to use transfer paper. Next up we have your
transfer paper option. First off, you'll
want to put down your piece of paper that
you want to transfer to. And then you're gonna get
out your half sketch. You're going to place
your half sketch directly in the
center of your paper. And I've actually
created a very, very faint line
down here so that I can make sure I'm
in the right spot. Then I'm going to pull that up and I'm gonna get my
transfer paper out here. Now that I have a piece of
transfer paper available, I'm going to wash my
hands as you can see, it Verde gotten
some of it on me. Make sure your transfer paper is long enough to
cover your one, but not too much more. You're gonna have this section
right on top of your line. And I'm going to just
put a little bit of tape on it to keep it down. Now I'm going to take my drawing and I'm just gonna go
right on top of it. So now we're just going to
copy everything we see. I'll speed this up here so that you don't have to
see me do it all. This is my third option because it's the hardest option as well because you can't see
what you've already done. So you have to make
sure that you've done all those lines just for memory. And we're gonna make sure
that we're coming right back onto that line. This can be a little bit more challenging and
that's another reason why this is my least
favorite option. It can be a little hard to see. And we're going to be adding
in the other drawing. I'll speed this up for you. Okay, now we're going
to take everything up. Next up we're gonna go
over our drawing with a black pen and make sure
all the marks are correct. I'm just going to erase
anything that's left on there, making sure that it's nice
and white and bright. Now that you've
transfer your wand onto the paper that
you're going to decorate, you can either keep it
black and white as it is, or add watercolor,
pens, pencils. It's all up to you. I'm going to have
several little courses next to show you how
to decorate your wand.
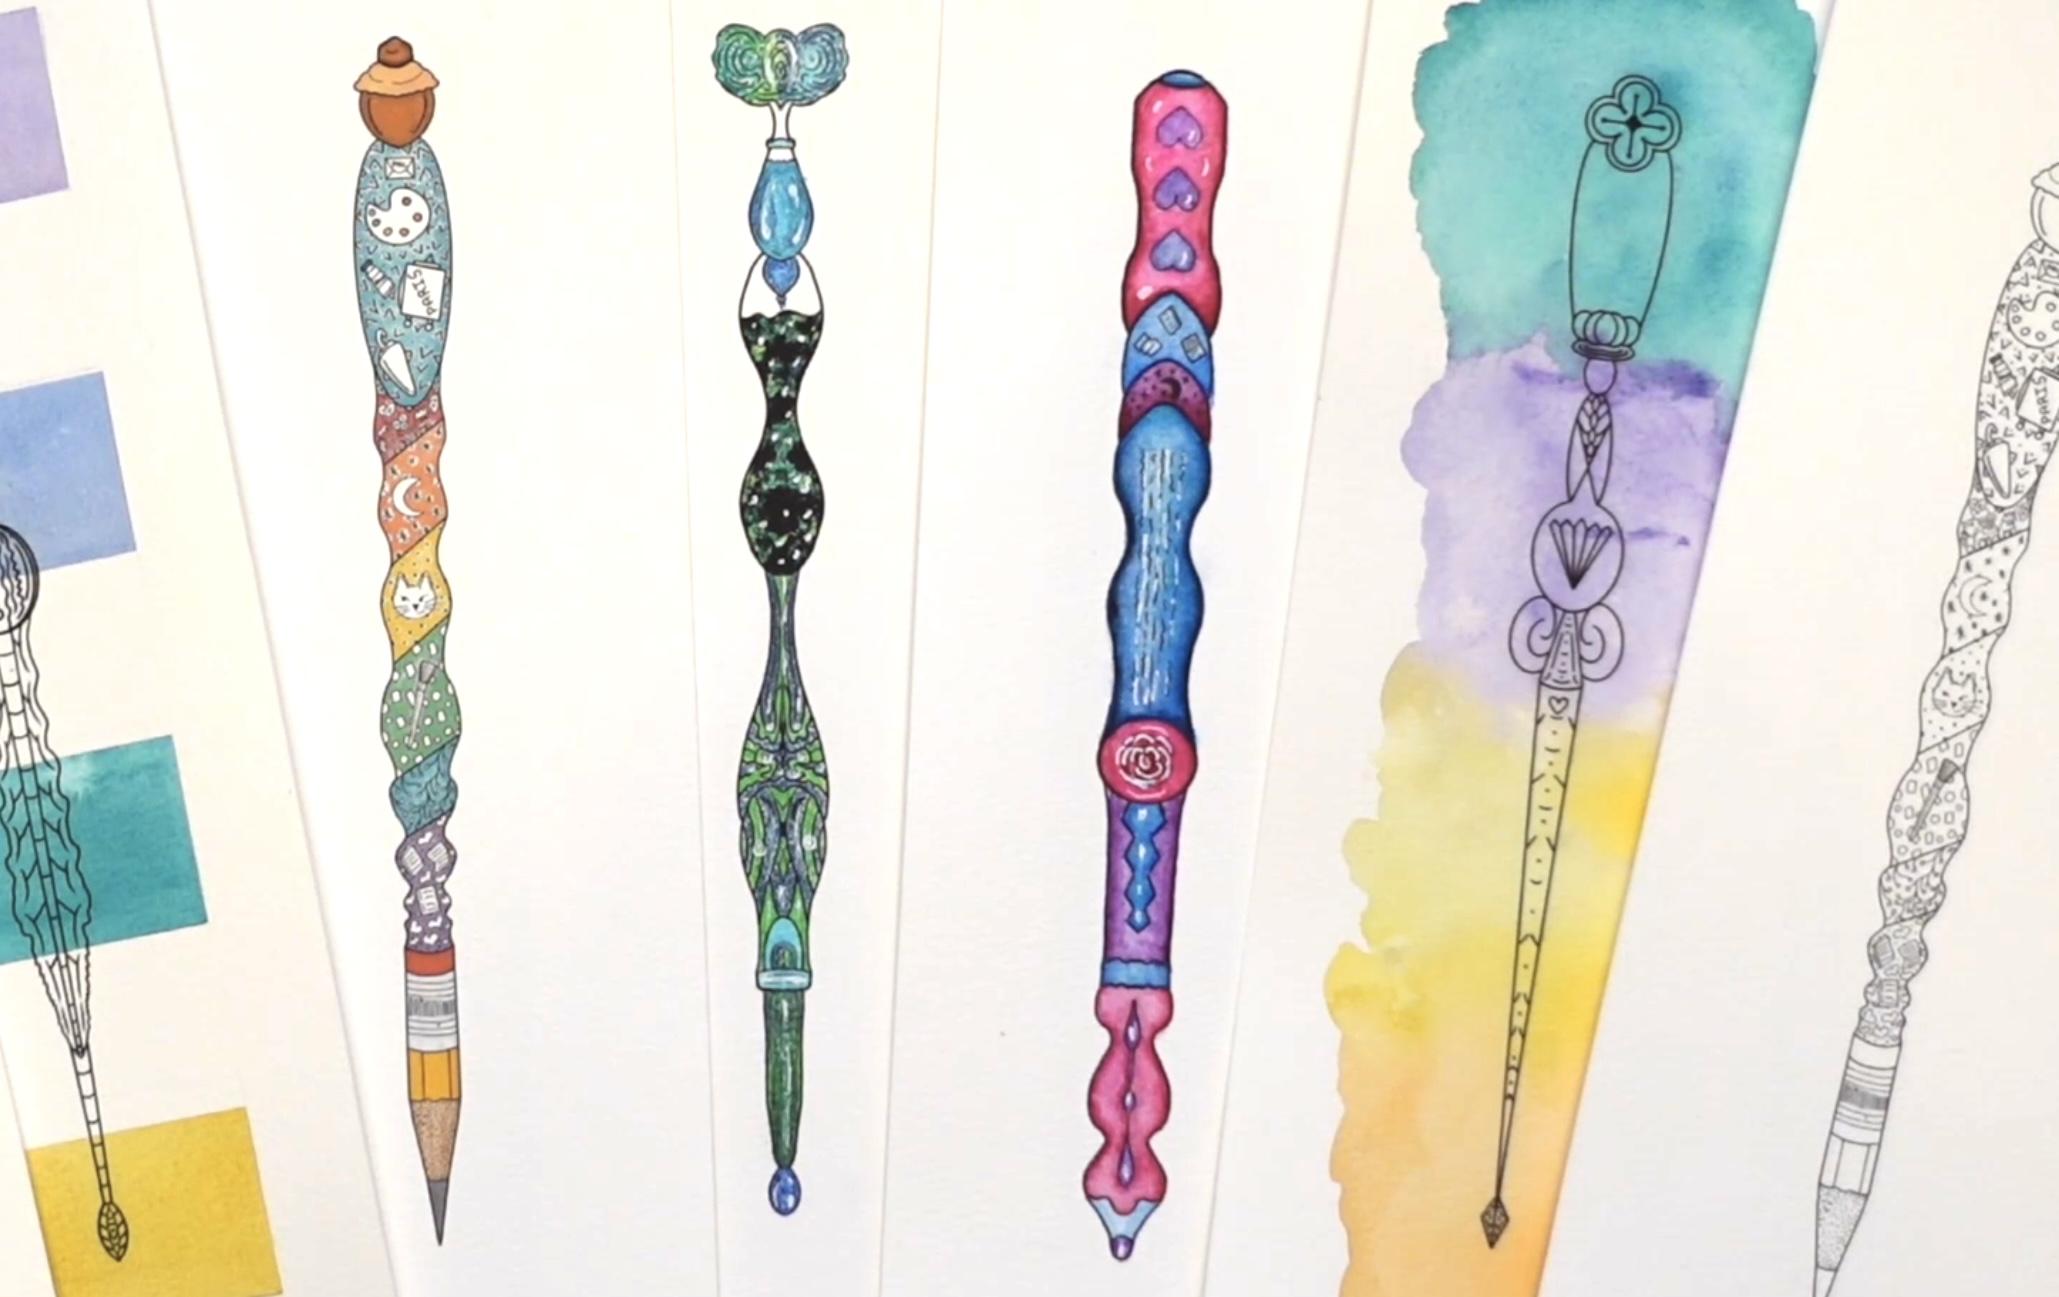
9. Color Options: My overall favorite part of doing these ones is
adding the color. I'm going to have three
little workshops on adding different types
of watercolor elements. And then I'm going
to do a class on colored pencils and a
class on using your pens. You're going to use
whatever you have at home. And these three courses
on watercolor and the two on other versions
of supplies, you're just going to
pick which one you want to go with and
decorate your wand. You can use them all
and do your wand with different
varieties of supplies. The first watercolor workshop is going to be called
inside the lines. And that's where you're
going to watercolor just within the one area. The second one I have is
doing these horizontal lines. So you're just going to make
these cute little boxes and dress your wand up
there and it's very easy. Then your third option is to do what I'm calling
bursts of color. And that's where you're creating different versions of
colored down your wand. All three of these
are fairly simple. If you don't have watercolors and you wanted to
use something else, colored pencils
are great option. I've got this wand here done
in some colored pencils, and I've just created a
little set here of colors, I think work really
well together. Then I've used some
different techniques and showcased this one more is
like almost a perfume bottle. I'm really loving that. If you don't want to use any of those supplies and you just
have some markers at home. I'll be doing a little
workshop here on this one, showing how to make some areas look a little
bit more like metals. And just creating a
really nice palette and using your colors that
you already have at home. Let's get onto
decorating your wand.
10. Watercolor #1: In The Lines: In this lesson, you're gonna do the wand called
inside the lines, and that's where
you're going to do all the watercolor within
the form of your wand. So let's get down
and get it with some color to this
beautiful one. For this lesson, you'll need to have your watercolor paper
with your wand on it, making sure that your wand
is done in a waterproof pen. You'll need your brushes, your watercolor
paints, some water. And then for highlights, you can use a Posca pen, a unit boss techno, or any opaque white
pen or gouache. I choose a palette by selecting something like
these analogous colors. I like these blues and
these purples in there, all right, next to each
other on the color wheel. So those are great options. If you'd like to do
like red and oranges, those are great options as well. You can do like yellow, orange, red, maybe even pink. And just use the color wheel to select some great color
combination studies. Take three or four colors
next to each other. I'm really loving these
blues and this purple here. So I'm going to select
those and I might even add in a bit of
this green over here. Let me pull this
over. So those are really pretty green here. So first off, I'm going to get my brush wet and add some
color to my palette. So I'm gonna go here
with this blue. We're going to transfer
some of it down here. And I'm gonna do that with
each of the different colors, trying to wash out my
brush between each color. So let's go in here. I'm gonna go with this green, right? In this section. I'm just keeping
this really simple. And going with a
color per section. Like I said earlier, if you want deeper watercolor lessons, please take a class
that will teach you all the ins and outs
here on Skillshare. We're just keeping
this very loose. And going in-between
all the lines. I'll speed up some of the
sections in here for you. If you find that you've
gone outside the lines, you can use a little
piece of paper towel and try to mop up any of that color. I'm gonna come down here
and I'm going to bring some more of that medium,
turquoise blue. Make sure you wash
out your brush between changing to
any other color. So that's it. That's called water coloring within the lines. Next up, I'll be showing you
another watercolor option. I hope you enjoyed water
coloring within the lines. I've got some more
watercolors and other options coming
up for you next, I'll see you in the next lesson.
11. Watercolor #2: Bursts of Color: Next up we have what I'm
calling bursts of color. This is a really simple
way to watercolor one, but it's also beautiful. So let's get down and color
this one. It's really simple. What you're gonna do
is you're going to get your brush wet
and you're just going to drop a little bit of water in here
and not too much, but enough to get
it nice and wet. You're gonna go all the way
down to your first section. You're going to
choose four colors. And I'm gonna go with this pink and then the red and then the
orange and yellow. Try to go with colors that are right next to each other on the color wheel for a
really pretty palette. So I'm just adding
in loads of color. They're trying to keep
it within the area, but not too much the sides. So I'm just adding in
this really pretty color. A little bit more bright. But I have a lot of
lights on it here for the, for the image. Make sure you're cleaning your
brush between each color. Make sure to space
these out so each color has about the same
amount of area. If you're happy with your color, this is where you stop. If you want to add in
any additional color, this would be the time
before it's too dry. Thanks so much for
joining me for this bursts of color
watercolor wand. I'll be moving on to show you another one that you can
make in watercolor as well. I'll see you there.
12. Watercolor #3: Horizontal Lines: Your third and last
watercolor one is this beautiful
horizontal line one. You'll need your ruler
to put out some lines. And I'm going to show you
how to do that right now. So let's get into adding some beautiful
watercolor to this one. For this watercolor, want young age, your
medium-sized brush. Watercolors, some water
as well as a ruler. So you're going to mark
out on each side of your wand and equal distance. And then as well on the
top and the bottom. So I put in some tape already as I figured out where
that distance is. And then I also went up and
I made those little boxes. I'm going to speed this
up so you don't have to watch me make
all these lines, but you get the gist. You're just going
to go up and make these lines that you
have rectangles as well. You can figure out what
your equal distances. And you're just going to dip
your brush into the water. And then we're going to choose four colors that are
right next to each other, making sure to get right up to the tape and blend
all that together. I'm just going to repeat
this all the way down. So let me speed this up for you to very simple way
to make your wand. If you find that any color has gotten out of the
area that you want it in, you can use a paper
towel to block that up. I hope you enjoyed
working with watercolor. Next up, I'm going
to be doing a class on using some colored
pencils to color your won. So I'll see you there.
13. Add Color: Colored Pencils: Welcome back for another
wand coloring session. Today we're gonna be focusing on colored pencils and
making your wand very beautiful with this
very simple supply that most people have at home. So let's get into
decorating your wand. For this watercolor lesson, I'm gonna be picking out some really pretty colored pencils. I've got some greens and blues, and I'm actually basing that
off of the color wheel. I'm taking some colors that
are right next to each other, like this, solid green in
this really pretty blue set. And I'm putting them together and creating a color palette. I base this off of the idea of doing a wand that's a bottle. Sort of thinking spells magic and putting that altogether
with maybe perfume. So I'm gonna put a little
bit of blue up here. And I'm just going around
in little circles. Then I'm going to blend some other colors in some greens and maybe
some of that darker blue. For this one, I'm trying to do a little bit on each
side That's the same. So you get a little bit of
that symmetry idea going up. So just use all your
different colors and blend them together to get a
really pretty palette. I'll speed this up for you. I'm just using all
these different colors in keeping with the idea of the outer sections are a little darker
than the intersections. And a rule of thumb
is if it's round, it's going to be darker on
the edges because you're not gonna be able to see them
as much as say the front. You're going to
decorate your wand in any way that you want. These are just some ideas. If you want something to appear behind something, make
it a little darker. If you have a white pen, you can use that. You can also use a
white posca pen. So that's the finished
colored pencil one. It looks a little bit
like a perfume bottle, I think, and I'm
loving it very much. So I'll be adding this
to my collection. Thanks so much for
joining me for a quick colored pencil course. Next i'm, I'm gonna
be showing you how to use some pens to create like metal textures and just having fun with your overall markers
that you have at home. So I'll see you there.
14. Add Color: Markers and Pens: Thanks so much for joining
me for the next course. This is going to be on using some pens to decorate
a beautiful wand. I look at this one and I think botanical medieval
jesting stick. And that's where I went
with this concept. For this one, we're gonna be
tackling this upper half, this lower half in this little
bloom appear at the top. So I'm going to take
each section by itself. For this one, I'm gonna be
using some orangey yellows, reds, a little bit of brown, pink and red and a white. To bring this one to life. It's a really nice
little palette to make something that's
like botanical. And you're going with
the fall type idea and also making say, a metal or wood section
down at the base. I encourage you to
put all your colors down on a piece of paper so you know what
color you're going to get. So let's get to
decorating this one. I'm going to start out
with this pink color. And I'm just coming down and filling in these
little sections. I'm leaving some white gaps. For some highlights. You can also come in with a white pen and add in some highlights
here at the end as well. But if you don't
have a white pen, leaving some little
white gaps is a great way to show reflection. I'll speed up the
process for you. This is a delicate but
deadly jousting wand. These Posca markers
work really well. I have a set of
the basic colors, but I think I'll be getting
some additional ones in the future because
they work really well. So let's work on
making this look a little bit more
like a metal base. I'm going to come in with
that darker color on the edge because it's going to be the furthest
away from our eyes. So it's going to get
less sun hitting it. You can also make this
look like a tree by doing a very simple technique of using the same colors and just
dabbing them around. Just decorate your wand as
you feel you want it to look. This is all about you. This is your personal wand. What colors do you like? Now I'm going to come in
with a lighter yellow. I'm going to blend those
together a little bit. I'm gonna come in
with a third yellow. I've got this Posca pen. And I'm going to
create some lines on top blending these altogether. They're normally
Brown in nature, but this is my
wand and I'm going to decorate it fun
and whimsical, even like science
fiction in some cases. So I'm going to add in
a little bit of white. It's mostly dry now, giving it that specular look. So I'm going to start
off with some pink. I'm going to leave some a
little white specular areas. I'm going to use
some yellow now. Come in and do this
little area here, taking a little
bit of red up here and making it look
like it's on fire. Now I'm going to add some
red into the darkest areas. Thanks so much for
joining me for decorating the wand
with some markers. Next step, I'm going to discuss a little bit about
your homework. So I'll see you there.
15. Homework: Congratulations, You made it
to the end of the course. For this section, I just have a little bit of
homework for you. I want you to flush
out your wand, add any additional
lines or colors, and just make it look its best. Next step, I want you
to take a photo of your wand and post it to the Projects and
Resources areas, though everyone in the course can see what you've
come up with. Once you're ready to
upload your project, you're going to click that
create project button. And it's going to take you
to a page where you're going to upload your image. You're gonna get a project title and a project description. You can also add in some
additional images or video. You can also add in some tags. Once you're ready, click
the Publish button up at the top and
you're all set. I'm personally very
excited to see your wand. And if you did a one for your
friend or family member, I would love to see that too.
16. Bonus Lesson: Procreate Symmetry Tool: Thanks so much for joining
me for this bonus lesson. In this lesson,
I'm going to show those who have an
iPad and procreate how to create symmetry
very easily and quickly. This is a great way
to do digital ones, and I just loved this. Oftentimes I'll start my Juan's with this concept as I love digital art and I
like blending both digital and on paper, watercolors and that type thing. So let's get started. You're just going to come
down here to your iPad and you'll need to already
have procreate installed. First off, you'll need to click procreate emblem down here. It looks like a little
light colored brush. And you're going to
come into the program. It's going to say
procreate up here. And I've got loads of
different pieces of art. I've got a stack called won, so I'm gonna go in there. You're going to
create a new canvas by clicking the little plus up here and then clicking the little file cabinet below that has another plus. I work in inches and I do
eight-and-a-half by 11, the standard US piece of paper. I do 300 DPI and
then I click Create. I'm gonna come down
here and I'm going to have a blank piece of paper. I'm going to create a symmetrical system by clicking
the little wrench there, click drawing guide,
edit drawing guide, and then pick symmetry. Then you're going
to click options. Right now, vertical is selected, that's the one we're
gonna be using, but you will have
other options like Horizontal, Quadrant and Radial. So you might want to use those in the future, but for now, you just want vertical
selected and go done. That's going to
bring you out here. And you'll be able to see a straight line down the center. If you click up here, you're going to see
your layers and your first one's already now going
to be selected as assisted. That means that those
assisted symmetrical options are now applied to that layer. If you click an
additional layer, you'll see that that layer does not have Assisted Drawing on it. If you want that layer
to also be assisted, use click it and you
click Drawing Assist. Now both of those layers
have assisted drawing. If you click the plus, now you have one that does
not have assisted drying. So say you're doing a
wand and you want to put something on one side, you congest pit what
things on one side, and it will apply to both. So let's get in and I'll
show you what I mean. So I'm going to pick my
layer one that's assisted. I'm going to choose
my micro pen. I really liked that one for
just basic drawing and that's under the inking section of
procreate brush library. So I'm gonna come up
here with my brush and I'm going to go
right on the line. And you'll see I'm
doing a heart and it's doing it exactly on one
side as it is on the other. I'm going to choose the base of my wand all the way
down here and say, I don't want that little
dot on that layer. I'm just going to erase that. I'm gonna come up here and
I'm going to go to layer two. And I'm going to go back to
my brush and I'm gonna make my little dots on where I
want my subsections to be, just like we did in the class. So that layer I can
turn on and off. So it won't be part of my end drying if I don't
like I just toggle. I'm going to come back to my
first layer and I'm going to do a little base for my wand and I'm
going to come down here. I'm going to hold my pencil
as they call it in iPad. And I'm going to hold down, and as you see, I've got these
straight lines now. I can go right down here. If I want to do a
squiggly line saying, come up here and do these little squiggly
lines and release. Anytime you put your pencil down and you draw a
line and you hold, procreate is going
to help you out. And it's going to give
you these little lines. If you want to delete something, you just hit two little fingers. And you go back and you go back. I'm going to connect
my heart now to this center section like that. If you don't like something, you can take your eraser and erase and then come
back and reconnect. You can also use two
fingers to pull it up. And this is all
based on what you selected in your settings, so different gestures
can be changed. So now I'm gonna
come in here and I'm just going to create
some little v's. Holding my pen is creating that perfect v
right from the start. So this is a quick
way to make a wand. In this case, it's almost
like a little pick. Because of how I did it. I'm going to click my eraser
and I'm going to erase just a little bit in here and make it a little
more perfect. But I think you've got
the gist of how to create your own personal wand using the symmetry tool in Procreate. It's all a lot of fun and some much can be done with
this simple tool. I'm gonna come up
here and I'm gonna go to my layer three
that does not have drawing assist and
show you what happens when you just want to make
something on one side. I'm creating some
little dots and I'm going all different places. That's how you can get some
variety of say your dots. Thanks so much for
joining me for this bonus Procreate lesson. I hope you enjoyed it and
I'll see you again soon. Take care. Bye.
17. Thanks: Thanks so much for
taking my course. If you enjoyed this course, I would love for you
to leave me a review. Reviews go a long way to
letting other people know about courses that you enjoyed and that they might
enjoy as well. And it just helps my course get more visibility
here on Skillshare. So thank you so much. I hope from this course
you are able to learn many things that you'll be
able to apply to your art. And no matter if you're an advanced artist or at
the beginning artist, I hope there is something
in here for you. Please stay in touch. I'm on the internet in
many different places. You can find me on Instagram and YouTube under a
Tammy on creative. I'm also on Twitter
under Tammy a creative. They just don't allow for as many characters on Twitter
as some of the other sites. So I'll see you on the internet
and thank you so much.
 Tammie Ann Creative, Artist & Crafter