Transcripts
1. Introduction: Hello, my name is Michelle [inaudible] I'm a cartoonist, illustrator and traveler based here in Sunny Tampa, Florida. As an artist, probably my favorite thing to draw is the human body. Like many other artists, I've at times struggled with creating a figure that looks dynamic, which is a big problem because as human beings, we constantly move and interact with our world, so it's really crucial as an artist to be able to portray that movement in a realistic and believable way. Overtime though, and after lots of careful observation, I've been able to narrow down some key tips and rules to help make my human figures look more realistic and dynamic. The most important thing to keep in mind when drawing a figure that looks dynamic is to make sure that you are evoking a sense of movement. In this lesson, we go over some practical exercises that you can use that will not only help improve your observation skills, to help you identify when a figure looks as though it's engaged in dynamic movement, but also how you can take those observations and employ them into your work. Throughout this lesson, we'll talk about how you can use things like angles and asymmetry to place the body in a way that looks although it's moving, even when those movements are subtle and small. We'll also go over something called the black silhouette test, which will help you ensure that all the body parts are reading clearly to your viewer. This lesson is specially designed to help make the process of making your figure drawing more dynamic using just simple concepts that you can employ in all kinds of different ways whether your character is simply shifting their weight suddenly, or if they're making big gestures. This is the perfect class for you if you're someone who wants to draw more dynamic characters and evoke a sense of movement in your action scenes. I'll be here every step of the way to show you how you can accomplish this heightened sense of movement with your figures. If this class appeals to you, why don't we head on over to the next lesson so we can start figuring how we can create more dynamic characters and mimicking a sense of movement in your drawings. Thanks for watching, and I'll see you in the next video.
2. Gesture Drawing: Let's spend a little bit of time talking about the importance of gesture drawing. So what is a gesture drawing? A gesture drawing is a fast, rough drawing up the human figure and usually conveys some type of movement. In this video, we're going to be focusing more on the movement aspect of gesture drawing and how it can be used to make your poses more dynamic. But it can also be used to help better convey and understand the form of a figure. You can use any tool that you feel comfortable with. But I personally prefer using a brush pen or even ink and a brush since those tools allow me to make older marks with fewer strokes. Anytime you're going to draw figures and movement, it's really important to do gesture drawing warm ups and try to prioritize quantity over quality. Since the more gestures you do, the looser and looser your lines should become, which will give your line quality more of a sense of movement, and the nice thing about gesture drawings is that you don't have to get hung up on small details since they're supposed to be fast and rough. Making your gesture drawings try to move your arm and shoulders rather than your hand and wrist. Hand and wrist movements are great for smaller details. But when it comes to big, bold movements that you often see in dynamic drawings where there's lots of action. Those sorts of marks often look most fluid when they're made by moving your arm and shoulder. Even just a few seconds is enough time to explore a particular pose. Since these drawings are meant to be quick and rough, it's very easy to move on to the next pose or make variations if you don't like one for whatever reason. If you're working with reference, this is another great way to make small changes to a particular pose that may not be exactly what you need. While gesture drawings can be any size, I would recommend making them large at first, this particular sheet of paper that I'm working on is an 11 by 17 sheet. Although you could go bigger if you wanted to. So allow yourself to really get into them. As you're creating your gesture drawings, try to channel energy into your arm as you're making marks. Don't be afraid if your gestures come out anatomically incorrect or a little bit lopsided. That's part of the process here. After you've done gesture drawings that or a few seconds long, you can move on to gesture drawings that are maybe 30 seconds long instead. If you end up making a gesture drawing that you really like, you can either use tracing paper or scan it in and draw on top of it to create a drawing that is more refined. So get into the habit of doing gesture drawings whenever you're about to be in a drawing session and you'll start to notice that your lines will be more dynamic and will evoke more of a sense of movement. Thanks for watching. Now whenever you're ready, let's continue on to the next lesson.
3. Drawing From Life: Now let's talk about the importance of drawing from life and how it can not only improve the realism in your drawing, but how you can also take actions and movements seen from real people and incorporate it into your figure drawing to make your figure drawing look more dynamic. While using things like wooden mannequins, and photo reference can be helpful. Often times, being able to draw a live human body is going to be the most beneficial way to be able to interpret dynamic movement in your drawings, even if you position a wooden mannequin in the correct pose, the mannequin won't be able to show strain and various muscle groups or shift their weight in an appropriate or believable way. So it's fine to use these kinds of tools, but don't become overly reliant on them. One option available to you is to attend figure drawing classes that feature a live model. This is a good way to buffer your anatomy skills, and so wildlife figure drawing lessons can be helpful. There are certainly not your only option. Here's a helpful drawn from life exercise that you can take advantage of in your own time. That will help you improve your ability to draw realistic movements from real people. Grab a sketch book and your favorite Drawing Tools, and go to a public place where you can draw without being disturbed. Good places to go would include cafes, museums, parks, and libraries. Once you find a place to sit, keep an eye out for anyone making any interesting poses or movements. So this could be maybe somebody walking in an interesting way or running, or maybe they're just gesticulating to make a point while talking to a friend. Remain at a comfortable distance so you don't bother your drawing subjects. It's best that you capture these figures relatively quickly to get a rough gesture and pose it. Don't spend too much time on extraneous details because those can always be added later. Remember the focus here is the movement. So even though taking life drawing classes, and going out into the world and drawing real people that you see is going to be your two best options in terms of buffing up your life drawing skills. There is another option for you, and that is drawing from video reference. Videos of people dancing, running, playing sports. All of these are great options to learn how to draw different poses. The nice thing about video is that if you find a pose that you really like, you can pause the video so that you can draw just that pose. Another nice thing about video is that you can also watch videos in slow motion. That way you can watch the pose change more gradually. The downside to video though, is that the figures have a flatter, more two-dimensional look to them. That's why drawing bodies live and in person is better since you'll get a better sense of the mentioned and mass. But even still, video reference does have its purposes, and can be pretty helpful in the right context. Thanks for watching and now, whenever you're ready, let's head on over to the next video.
4. Drawing the Figure at an Angle: Welcome back. Now let's take some time to talk about how drawing the figure at an angle can help make it look more dynamic. Drawing at an angle or at an X shape is going to be a really good way to ensure that you're mimicking movement within the human body. Drawing the body upright, vertically and horizontally can appear stiff and static, while drawing the body at an angle, or ideally at several angles, can mimic the appearance of movement. So if you're trying to draw a figure more dynamically, it helps to imagine the body's movements in an X-formation rather than a cross formation and this is because when the body is standing or walking at a leisurely pace, a line of action tends to be more straight up and down rather than at a angle. So here on this image on the right hand side, we can see three women standing and even though each of these women are distributing their weight differently and have different stances, you can more or less reduce their figures to a straight up and down line. Of course, there's nothing wrong with drawing a figure straight up and down like this but do keep in mind that it will make your figure appear more as though it is at rest rather than in movement. Let's take a closer look by comparing these two figures that are running. The first image on the left hand side shows a figure running and the body positioning is at a 45 degree angle, while the second image shows the man running at more of a 10 degree angle. In the first image, because the man is at a greater angle, this evokes more of a sense of movement as though the man is taking off at sprint and even appears as though he's running as fast as he can, where as the image on the right-hand side seems almost as though it's more of a leisurely jog because the man's body is positioned at a greater angle, this makes the first image appear much more dynamic. So in summary, sometimes even just making a simple change like rotating the angle of the body when drawing a figure can help make an image look much more dynamic and can visually raise the stakes of your image. Thanks for watching, and whenever you're ready, let's move on to the next video.
5. Multiple Angles and Asymmetry: Welcome back. Now that we've spent some time talking about drawing the figure at an angle, let's now go over some of the advantages of using multiple angles and asymmetry to make your figure look more dynamic in a subtler way. On this slide, I've drawn up two simple figures. Figure on the left looks as though he's standing perfectly still, and it doesn't really make use of any interesting angles. While, of course, there'll be situations where maybe you will want to draw a figure that's standing perfectly still, in most cases, you're probably going to want to evoke some kind of dynamicism or movement in your figure drawing. The figure on the right-hand side though looks as though it's still standing, but by utilizing multiple angles, where the arms folded cross and where the shoulders tilt, we get a lot more visual interest here. Even though this figure is not exerting a lot of energy and it doesn't seem to be running or doing any other exaggerated movements, we still get a sense of dynamicism simply because the body has various angles, points of interest, and there's a certain level of asymmetry between both sides of the body. If we were to break down the lines of action between both of the figures, you can see on the figure on the left-hand side that the lines are very straight, and pretty much all of the lines function at a 90-degree angle, from the shoulders, spine, and arms. Since the arms are positioned straight up and down, there's no movement in the elbows either. The figure on the right-hand side though has no 90-degree angle whatsoever, and there's even a curve in the spine. We can also see that the elbows are bent, and they're bent at different angles too, which is not only visually more interesting, but more natural since humans typically stand and position their bodies in ways that are asymmetrical. As you can see, you don't necessarily have to position the entire body at an angle or create big expressive gestures or movements to portray a figure in a dynamic way, even just making small simple changes, like the way they bend their joints, position their shoulders or neck, or the curve of their spine or stance, can add more of a sense of subtle movement to your figure drawing. Just remember that human beings rarely ever stand completely straight up and down. If you're able to capture the fact that humans oftentimes shift their weight, hold their bodies in various positions, lean forward, backwards, side-to-side, bend their elbows and knees, etc, then you'll do a better job of expressing more nuanced dynamicism and movement even when a character is at rest or simply standing. Hope this helps, and if you're ready, let's continue onto the next video.
6. Playing with Perspective: Now, let's talk about how you can use perspective to heighten the action in your dynamic figure drawings. Let's start by taking a look at the photo on the left. If you look carefully at this photo, the man's left leg appears larger than the right leg since it's closer to the camera and it's highlighted by the natural lighting of the Sun. The reason why the right leg appears smaller is because it's further away and also darkened by the shadow that the body is casting and to a lesser extent, you can also see this with the arms as the right arm is jutting outwards towards the camera and as highlighted by the Sun, while the left arm looks slightly smaller as it's moving further away from the camera and is also slightly darker since it's in shadow. This is a great example of how highlights can be used to make things appear more prominent and shadows can be used to make things less prominent. Now, let's try looking at an illustrated example of this. On this slide, we have two figures that are engaging in the same stretching pose but drawn from different angles and each figure has a different perspective. Even though these two poses are the same, because they employ different types of perspective, the figure on the right looks more dynamic than the figure on the left and this is for a couple of different reasons. First, if we take a look at the positioning of the feet and each of the figures, we can see that the right and left foot on the left figure has a much straighter positioning and this has a sort of flattening effect to the figure. Whereas, if we take a look at the figure on the right hand side, there is a much more extreme angle between the right and the left foot. Not only that, we can also see that the left foot and leg is proportionally much smaller than the rest of the body, which makes it look as though it is further away from the viewer and as a result, the front part of the body that's closer to the viewer gives more of a sense as though it is popping out of the picture, which overall makes this figure field more dynamic, even though the pose is more or less the same to the picture on the left. Even though there's not much shading in either of these pictures, another thing that helps make the picture on the right look more dynamic is the variation in line width. If you look at the lines in this back leg, you can see that they're much thinner compared to the lines on the front hand side, while the thickest lines in this image can be found here at this front foot. So much like highlights and shadows, if you want an image to appear closer, you can use thicker lines to make that possible and thinner lines to make something appear further away. The image on the left. However, doesn't really have much variation in line thickness, which also has a sort of flattening effect to the figure. In summary, by playing around with the perspective using things like shadow, highlights, and variation in line width and making some body parts closer to the viewer, while other body parts are further away, can help make your figure look more dynamic. Thanks for watching and now, whenever you're ready let's move on to the next video.
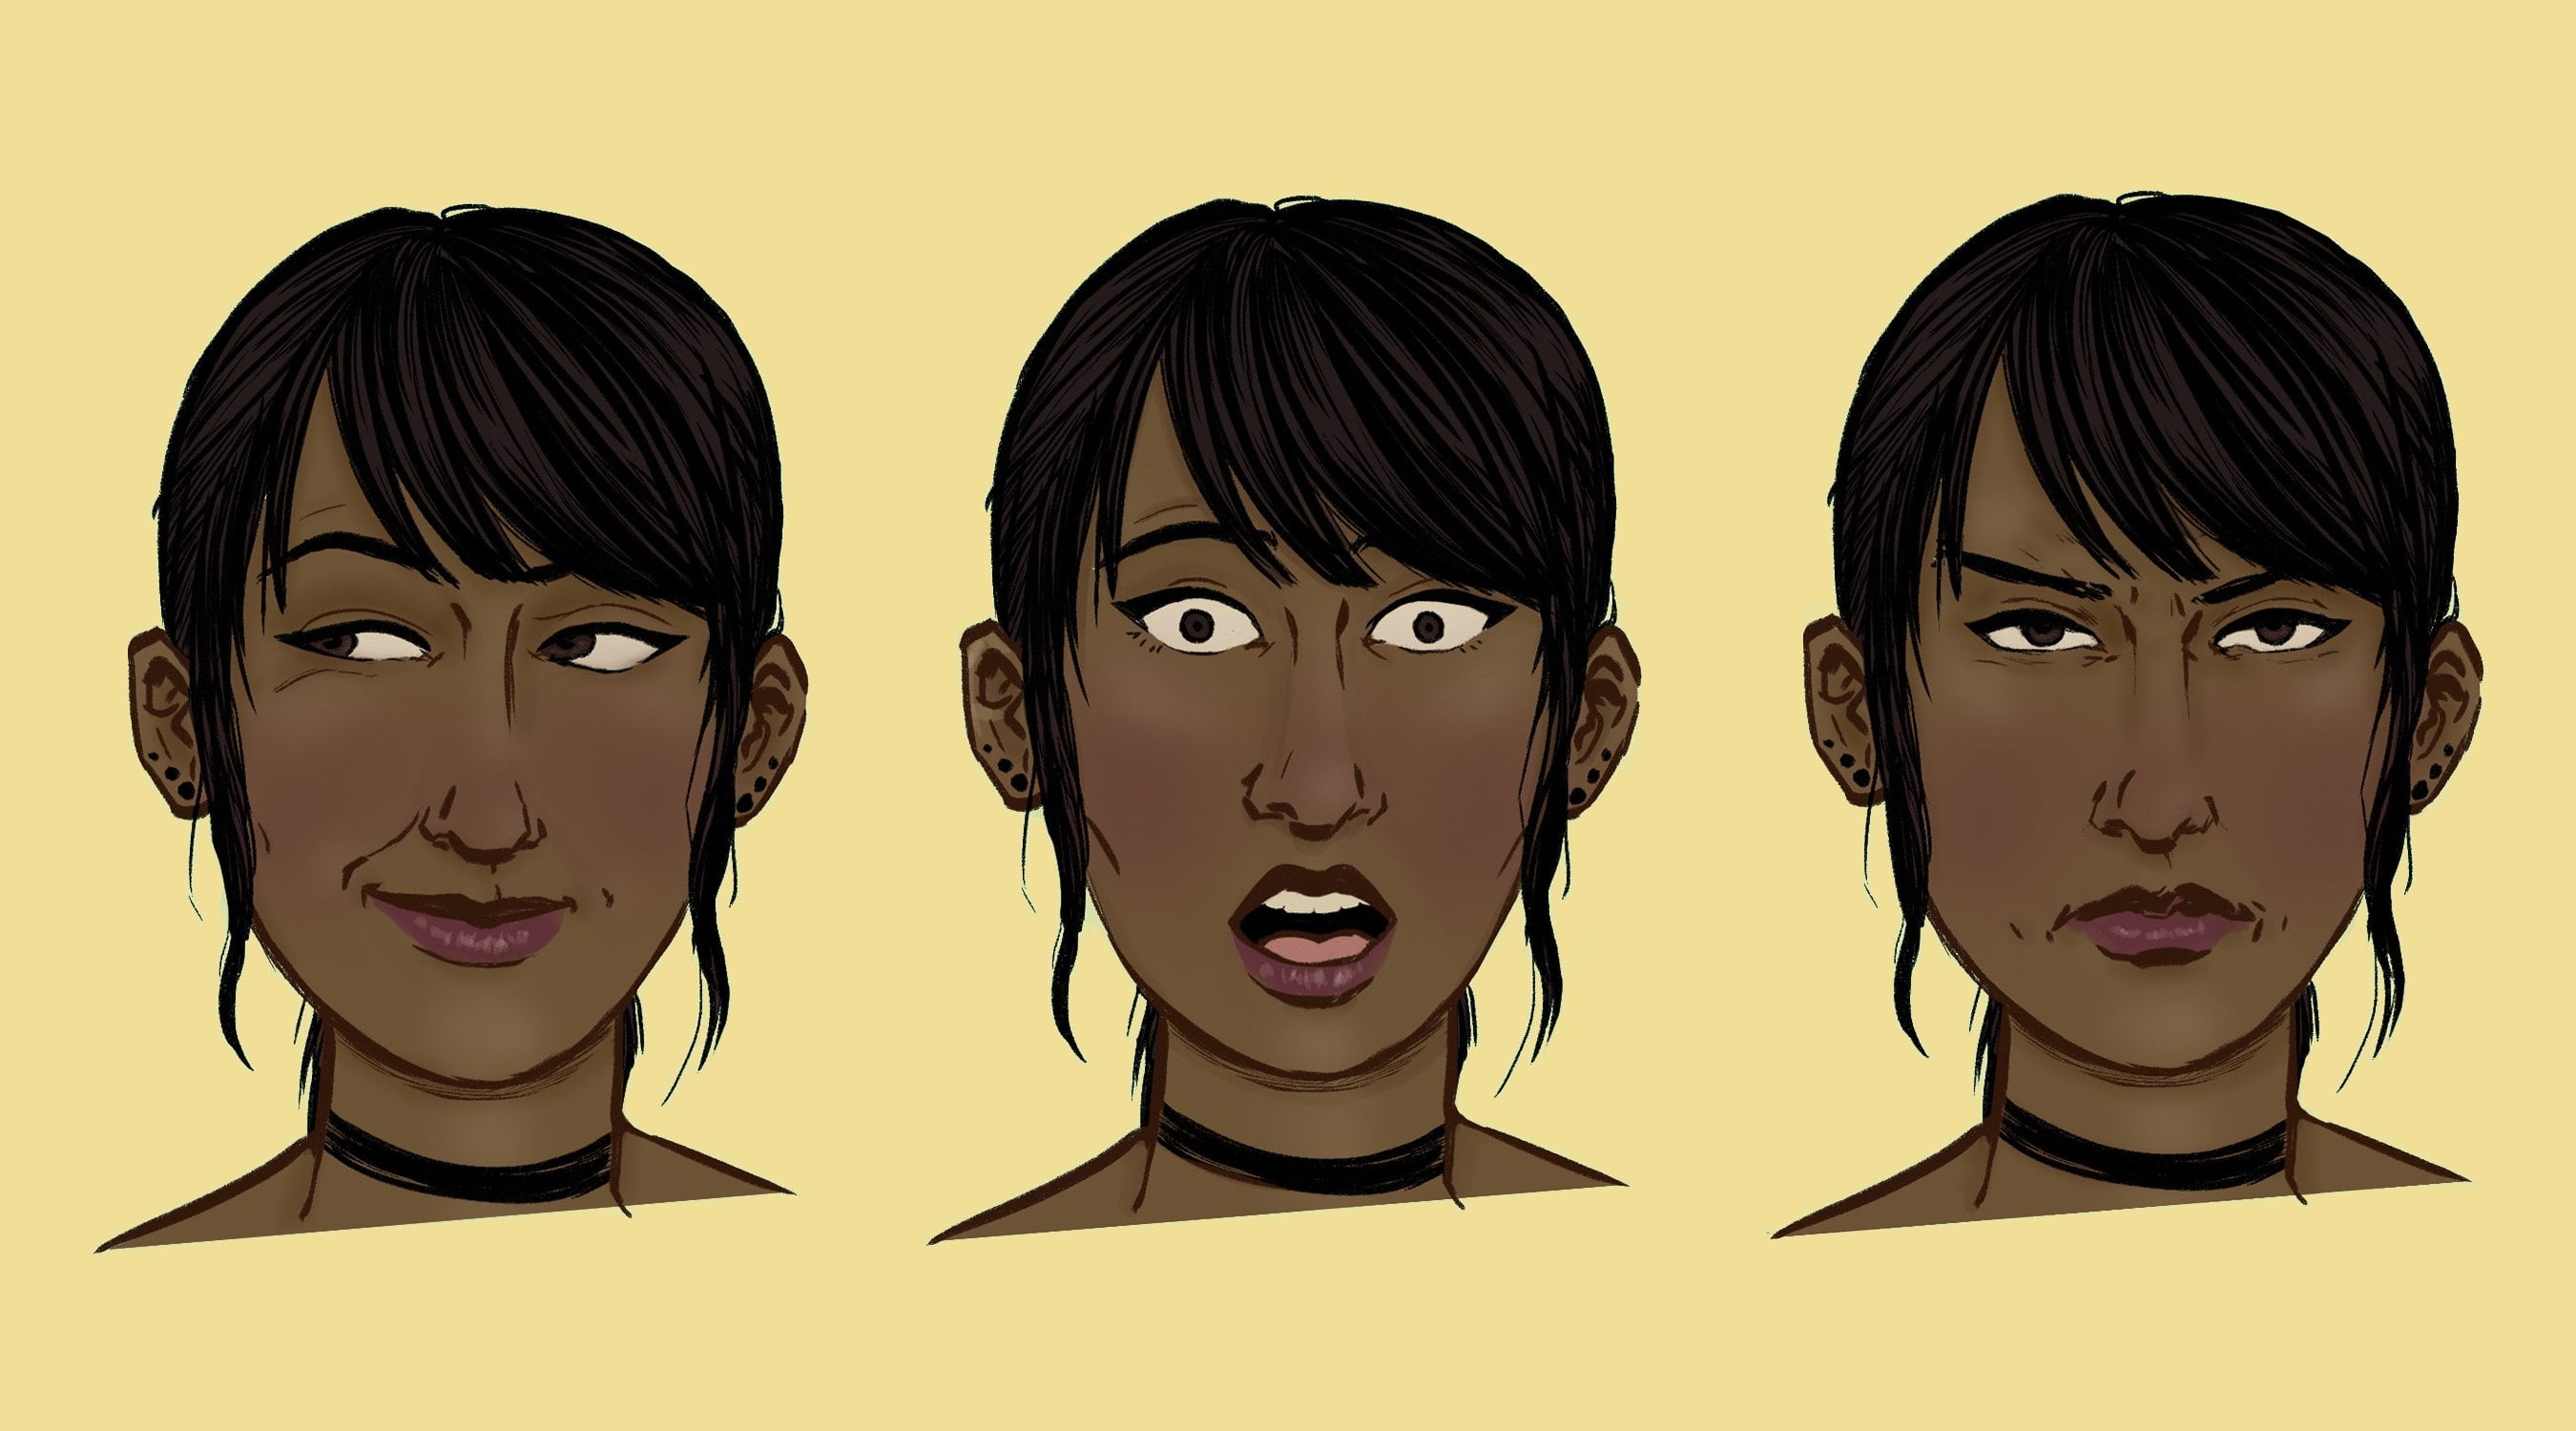
7. Strain and Tension: Now let's spend some time talking about how you can draw strain and tension in your figures muscles to convey a sense of movement. It's important to remember that the same body part can look different depending on the movement. To illustrate this, I have three photos of three different necks. The first photo is a neck at rest. This is a neck that is in a relatively relaxed state so there's not a lot of strain or tension going on here. The photo in the middle, however, shows the neck being stretched outwards and if you look closely, you can see that there are more tendons that are visible, particularly around the base of the neck near the collarbone as the neck stretches outward and the final photo shows a neck with the most possible strain. As the man in the photo struggles to open a jar, not only are there many more tendons stretching and flexing towards the base of the neck, because the jaw is also being strained, this is causing some wrinkles around the top of the neck as well. If you want to convey movement accurately in your figure drawing, it's really important to consider what type of movement your figure is engaging in. If you want to draw a figure involved in an extremely strenuous activity then the image on the right would be appropriate, but it wouldn't be as appropriate if you wanted to draw a figure, say lounging casually, where there would be most likely no tension or strain in the neck or very little tension. Keep that in mind as you're trying to portray a movement in your figures. Now let's take a look at an illustrated example of this. On the left we can see a simple drawing of an arm flexing out because they're actually doesn't seem to be much strain or tension been conveyed in this first drawing, this image doesn't seem so much like it's flexing, but more just casually posing. However, if we take a look at the arm on the right, this particular image seems to convey a lot more tension. This is particularly noticeable around the wrist, biceps, the elbow area, and the base of the arm. Even though these two images are very similar, the right benefits a lot by adding just a few carefully placed lines to convey muscle strain and as a result it looks not only more realistic, but much more dynamic. It definitely pays off to take the time to study anatomy and learn how muscle groups move depending on the way they're being flexed or posed. Here's an exercise that you can use to practice sharpening your observation skills when it comes to muscle strain and movement. If you'd like to pause this video to try this at home, feel free to do so. Try curling your hand into a tight fist and then take a moment to closely observe the various tendons, veins, and shadows that appear. Now loosen up your hands so the fingers are only slightly curled into your palm. Notice how the strain in your hand and wrist visually disappears, the more you relax your hand. I would recommend paying special attention to the wrist area where you might notice tendons or veins bulging out. Notice how the shape of the hand is also smaller and more compact the more it is curled inward and you might also notice that there are more visible lines within the palm of the hand. With the help of a mirror or a camera, you can also perform this tests with other body parts. Learning to pay more attention to your own body and how it moves can help you relay these movements in your artwork. Thanks for watching, and whenever you're ready, let's continue on to the next video.
8. Dynamic Details: Now that we are approaching the end of this lesson, I think this is a good time to talk about how you can add some finishing touches and final details that can help further the action in your figure drawing just a little bit more. Let's start off by talking about fabric and clothing. It's a good idea to pay attention to how clothes move with the body. Let's take a look at the first image. In the first image, we can see that this woman's shirt has billowed up as her body is moving down from a jump and this is slightly exposing her stomach. We can also see that as one of her legs kicks outwards, there's a distinctive rippling around the upper leg, pelvic region here, and this wrinkling that we see here, extends downward to the other pant leg and because pants are typically made of heavier material, this wrinkling it seems much darker compared to the wrinkles in the shirt which is made from a lighter material and as a result, doesn't cast as many shadows. In the next two photos, we can see that the figures have larger swaths of fabric draped over their bodies. In this first photo, we see this boy simply walking, which is a pretty subtle movement but we can still see the fabric in the back billowing outward as his leg and foot jets out whereas the fabric on the other side of his body looks a little bit more still as this leg is planted firmly onto the ground. In the next photo, we see that the fabric of this woman's outfit is billowing out quite a lot, much more than in the second photo and this is because the twirling action that this woman is engaging in, is making the fabric move from all sides. Definitely pay attention to how fabric moves in correlation to the movements of the human body when in action since that will help heighten the action in your moving figure. Now let's talk about hair. Hair can seem tricky but it helps to imagine longer hair as a mass or a curtain of fabric similar to what we just talked about in the previous slide. You should also keep in mind that shorter hair or hair that is heavily weighed down by a hat or by gel, will move less than the long flowing hair. In this first photo, we can actually see the hair from this running woman mimicking a shape very similar to the piece of fabric behind her. Hair moves because the head or the neck or some other human body part moves. If the body is in a particular pose like the woman in this particular picture here, the hair follow the rules of gravity and that's why even though in this photo we can see a sense of action and movement, the hair falls downward since this woman's head is relatively still. Although, if you wanted to exaggerate the movement, you could probably draw this woman's ponytail coming outward slightly. Remember that hair obeys the rules of gravity and if the body is not in movement or has just finished a movement, the hair will naturally fall towards the ground and to close, remember that it's easy to get caught up in the details. Remember to draw the figure first and the clothes, hair, and various accessories last. The movement of the figure will inform you on how the various details will look and what direction they should be moving in. Since this particular figure is running towards the right, this means that the hair, necklace, the back of her tank top, and the back of her shorts should be billowing behind her from the left-hand side. Her arm on the other hand though is moving in an upwards direction which means that her bracelets will jet out from the bottom through the force of her arm moving up. Remember to draw the figure first and save if these details for last since it'll be much easier for you to figure out what direction they should be moving in once you have your figure down and now whenever you're ready, let's continue on to the next lesson.
9. The Black Silhouette Test: Now let us spend a little bit of time talking about the black silhouette test. So what is the black silhouette test? The black silhouette test is a test that you can perform to ensure that your figure is clear and easy to understand to audiences and viewers. You can perform this test on any figure. You can do this by asking yourself if you were to take a black marker and completely cover over your figure drawing with it, with the figures movements still be clear and distinguishable. The key here is to use negative space to make the body parts more distinctive and easy to see. What you want to avoid is making this silhouette look like a blog or having body parts get lost in the black mass. Now this is a test that is best seen visually. So let us start by comparing these two images of women doing yoga. In the next slide, we will remove the background and replace the figures with the black silhouettes. Can you guess which figure will work better as a black silhouette? So now we have to replaced the two images with black silhouettes. Hopefully you can tell right away which of the two figures is most successful, the image on the left hand side is very clear. We can easily make out all of the major body parts and movements. We can even see small details like the woman's pony tail, her nose, and even the outline of her fingers. The black silhouette on the right-hand side though, is less successful, although we can make out the arms and the general shape of the hands, the head, torso and legs. It clump together and lost. Not only is the image on the right hand side visually more confusing, but it also appears more static and does not flow very well. It almost appears more like a rock or a boulder rather than a human body in movement. That is why the black silhouette test is so important. Anytime you are feeling uncertain about how well your image is reading and whether or not the actions are clear to the viewer, you can perform this test on your figures to ensure that all the body parts are clear and distinguishable. I certainly hope that helps. Now, whenever you are ready, let's move on to the next lesson.
10. Assignment: Welcome to your assignment video. Your assignment has two parts and involves two drawings. For the first drawing, what I'd like you to do, is draw a figure standing still. This figure can be whoever you want. It can be an original character that you might have, It could be a drawing of yourself. But the important thing for the first drawing is that they are as stiff and rigid as possible. While that seems maybe counterintuitive since this is a class on making your figures look dynamic, that's because for the second drawing, you'll be drawing the same figure in some kind of dynamic movement using the tips that we have talked about throughout the lesson. The reason why I want you to do both of these drawings, is so that you can compare and contrast and see the differences between the two. Creating these two separate drawings and then putting them side by side, will help you get a better understanding of really why things like using different angles and asymmetry and the black silhouette test and drawing from life can help you with evoking movement and a sense of dynamism in your drawings. Be sure to remember to use all of the things that we've talked about, like warming up with gesture drawings, practicing by drawing from life, using different angles and asymmetry and so on. You can keep your drawings sketchy and loose if you'd like, or you can take it a step further and clean your lines up, make them more refined, and feel free to work in whatever medium you choose, whether that is traditionally or digitally. The details here are less important. What's really key here is nailing down the movement, the sense of action and the angles in which you show that your character is moving. Don't forget, if you get stuck or have any questions whatsoever, feel free to leave a comment, and I'll help you out as best as I can. Good luck with your drawings and have fun.
11. Closing Thoughts: Congratulations on completing this lesson. Just remember that by using some of the tips and strategies that we thought over, you can make your figure look more dynamic. Just like anything in life, the more you practice, the better you'll get at creating figures that are realistically moving within the picture plane. Also keep in mind that when it comes to evoking a sense of movement in your figures, doing as many drawings as possible is going to be the thing that helps you the most. When it comes to improving your figures to make them look more dynamic, prioritize quantity over quality, draw as much as you can, as quickly as you can, and be sure to keep your lyons rough and loose, at least in the preliminary stages. You can always focus on refinement later. Don't forget to warm up with gesture drawings, to draw from life and to draw from your shoulder and arm rather than from your wrist and hand. Thanks so much for taking this lesson. I really enjoyed making it for you and I hope to see you soon. Bye.
 Michelle Tabares, Cartoonist, Designer and Illustrator